
The form is a basic component responsible for performing CRUD operations on an entity. The listingElements group referenced under vendor/magento/module-ui/etc/ui_configuration.xsd file provides a nice list of both primary and secondary form components:
| bookmark | dataProvider | fileUploader | massaction | range |
| boolean | date | form | modal | radioset |
| button | dynamicRows | hidden | multiline | select |
| checkbox | htmlContent | multiselect | tab | |
| checkboxset | exportButton | input | nav | text |
| component | field | insertForm | number | textarea |
| container | fieldset | insertListing | paging | wysiwyg |
| dataSource | file | listing | price |
Moving forward, we will use the form component, and a few of its secondary components to create the Stock Resupply screen as shown:
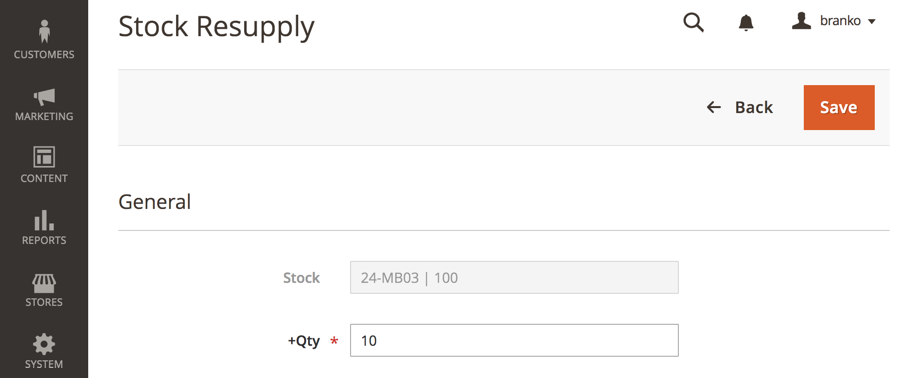
The form itself is to consist of Stock and +Qty fields. The Stock field will be a read-only field consisting of an SKU + current qty string. The Back button will take us back to the Micro Inventory listing, whereas the Save button will post the form to a special Resupply controller action, which will then increase the stock by a given +Qty amount. The Actions selector in the upper left corner is to consist of two custom actions, allowing for fixed product stock increases.
We start off by defining the <MODULE_DIR>/Controller/Adminhtml/Product/Resupply.php as follows:
use \Magento\Framework\Controller\ResultFactory;
class Resupply extends \Magelicious\Minventory\Controller\Adminhtml\Product {
  protected $stockRegistry;
  protected $productRepository;
  protected $resupply;

  public function __construct(
    \Magento\Backend\App\Action\Context $context,
    \Magento\Catalog\Api\ProductRepositoryInterface $productRepository,
    \Magento\CatalogInventory\Api\StockRegistryInterface $stockRegistry,
    \Magelicious\Minventory\Model\Resupply $resupply
  ) {
    parent::__construct($context);
    $this->productRepository = $productRepository;
    $this->stockRegistry = $stockRegistry;
    $this->resupply = $resupply;
  }

  public function execute() {
    if ($this->getRequest()->isPost()) {
      $this->resupply->resupply(
        $this->getRequest()->getParam('id'),
        $_POST['minventory_product']['qty']
      );
      $this->messageManager->addSuccessMessage(__('Successfully resupplied'));
      $redirectResult = $this->resultFactory->create(ResultFactory::TYPE_REDIRECT);
      return $redirectResult->setPath('minventory/product/index');
    } else {
      $resultPage = $this->resultFactory->create(ResultFactory::TYPE_PAGE);
      $resultPage->getConfig()->getTitle()->prepend((__('Stock Resupply')));
      return $resultPage;
    }
  }
}
Given the simplicity of our form, using the isPost() check on the request object, we allow ourselves to use the same controller action for rendering the Stock Resupply screen, as well as submitting the save action to it.
With controller action in place, we then define the <MODULE_DIR>/view/adminhtml/layout/minventory_product_resupply.xml as follows:
<page>
  <update handle="styles"/>
  <body>
    <referenceContainer name="content">
      <uiComponent name="minventory_resupply_form"/>
    </referenceContainer>
  </body>
</page>
Much like with the form listing, this layout file merely calls the minventory_resupply_form component, which is where all our visual elements of the Stock Resupply screen reside.
We then define the <MODULE_DIR>/view/adminhtml/ui_component/minventory_resupply_form.xml as follows:
<form>
  <argument name="data" xsi:type="array">
    <item name="js_config" xsi:type="array">
      <item name="provider" xsi:type="string">minventory_resupply_form.minventory_resupply_form_data_source</item>
      <item name="deps" xsi:type="string">minventory_resupply_form.minventory_resupply_form_data_source</item>
    </item>
    <item name="layout" xsi:type="array">
      <item name="type" xsi:type="string">tabs</item>
    </item>
  </argument>
  <settings>
    <buttons>
      <button name="save" class="Magelicious\Minventory\Block\Adminhtml\Product\Edit\Button\Save"/>
      <button name="back" class="Magelicious\Minventory\Block\Adminhtml\Product\Edit\Button\Back"/>
    </buttons>
  </settings>
  <!-- dataSource -->
  <!-- fieldset -->
</form>
Much like the listing component, the form component also requires a data provider.
We then modify the minventory_resupply_form.xml by replacing the <!-- dataSource --> with following:
<dataSource name="minventory_resupply_form_data_source">
  <argument name="data" xsi:type="array">
    <item name="js_config" xsi:type="array">
      <item name="component" xsi:type="string">Magento_Ui/js/form/provider</item>
    </item>
  </argument>
  <dataProvider class="Magelicious\Minventory\Ui\DataProvider\Product\Form\ProductDataProvider" name="minventory_resupply_form_data_source">
    <settings>
      <requestFieldName>id</requestFieldName>
      <primaryFieldName>entity_id</primaryFieldName>
    </settings>
  </dataProvider>
</dataSource>
Here we set the data provider, which points to our custom class, Magelicious\Minventory\Ui\DataProvider\Product\Form\ProductDataProvider.
We further modify the minventory_resupply_form.xml by replacing the <!-- fieldset --> with the following:
<fieldset name="minventory_product">
  <argument name="data" xsi:type="array">
    <item name="config" xsi:type="array">
      <item name="label" xsi:type="string" translate="true">General</item>
    </item>
  </argument>
  <field name="stock">
    <argument name="data" xsi:type="array">
      <item name="config" xsi:type="array">
        <item name="label" xsi:type="string">Stock</item>
        <item name="visible" xsi:type="boolean">true</item>
        <item name="dataType" xsi:type="string">text</item>
        <item name="formElement" xsi:type="string">input</item>
        <item name="disabled" xsi:type="string">true</item>
      </item>
    </argument>
  </field>
  <field name="qty">
    <argument name="data" xsi:type="array">
      <item name="config" xsi:type="array">
        <item name="label" xsi:type="string">+Qty</item>
        <item name="visible" xsi:type="boolean">true</item>
        <item name="dataType" xsi:type="string">text</item>
        <item name="formElement" xsi:type="string">input</item>
        <item name="focused" xsi:type="string">true</item>
        <item name="validation" xsi:type="array">
          <item name="required-entry" xsi:type="boolean">true</item>
          <item name="validate-zero-or-greater" xsi:type="boolean">true</item>
        </item>
      </item>
    </argument>
  </field>
</fieldset>
Here we defined fieldset with a General title, and two fields: stock and qty. The stock field was defined as disabled, as its purpose will be merely to merge the <SKU> | <qty> values for informational purposes. The structure of the individual field definition might seem overwhelming at first, but we can easily determine available arguments by observing the <component name="column" definition under the <MAGENTO_DIR>/module-ui/view/base/ui_component/etc/definition.map.xml.
We then define <MODULE_DIR>/Ui/DataProvider/Product/Form/ProductDataProvider.php as follows:
class ProductDataProvider extends \Magento\Ui\DataProvider\AbstractDataProvider {
  protected $loadedData;
  protected $productRepository;
  protected $stockRegistry;
  protected $request;

  public function __construct(
    string $name,
    string $primaryFieldName,
    string $requestFieldName,
    \Magento\Catalog\Model\ResourceModel\Product\CollectionFactory $collectionFactory,
    \Magento\Catalog\Api\ProductRepositoryInterface $productRepository,
    \Magento\CatalogInventory\Api\StockRegistryInterface $stockRegistry,
    \Magento\Framework\App\RequestInterface $request,
    array $meta = [], array $data = []
  ) {
    parent::__construct($name, $primaryFieldName, $requestFieldName, $meta, $data);
    $this->collection = $collectionFactory->create();
    $this->productRepository = $productRepository;
    $this->stockRegistry = $stockRegistry;
    $this->request = $request;
  }

  public function getData() {
    if (isset($this->loadedData)) {
      return $this->loadedData;
    }
    $id = $this->request->getParam('id');
    $product = $this->productRepository->getById($id);
    $stockItem = $this->stockRegistry->getStockItemBySku($product->getSku());
    $this->loadedData[$product->getId()]['minventory_product'] = [
      'stock' => __('%1 | %2', $product->getSku(), $stockItem->getQty()),
      'qty' => 10
    ];
    return $this->loadedData;
  }
}
Our data provider is expected to implement the getData method. This returns an array of data that feeds the form with proper values. The structure of the array might be difficult to grasp at first, so it helps to gloss over some of Magento's data providers. The stock and qty entries here will provide values for the fields defined via minventory_resupply_form.xml.
We then define <MODULE_DIR>/Block/Adminhtml/Product/Edit/Button/Back.php as follows:
class Back extends \Magento\Backend\Block\Template implements \Magento\Framework\View\Element\UiComponent\Control\ButtonProviderInterface
{
  public function getButtonData() {
    return [
      'label' => __('Back'),
      'on_click' => sprintf("location.href = '%s';", $this->getBackUrl()),
      'class' => 'back',
      'sort_order' => 10
    ];
  }

  public function getBackUrl() {
    return $this->getUrl('*/*/');
  }
}
The ButtonProviderInterface requires the getButtonData method implementation. The structure of the return array is somewhat blurry until we gloss over some of the other buttons that are defined across Magento. This renders our Back button as follows:
<button id="back" title="Back" type="button" class="action- scalable back" onclick="location.href = '... stripped away ...';" data-ui-id="back-button">
    <span>Back</span>
</button>
The Back button provides a go back to previous page functionality, which in our case is determined by the value of the getBackUrl method response.
We then define <MODULE_DIR>/Block/Adminhtml/Product/Edit/Button/Save.php as follows:
class Save extends \Magento\Backend\Block\Template implements \Magento\Framework\View\Element\UiComponent\Control\ButtonProviderInterface
{
  public function getButtonData() {
    return [
      'label' => __('Save'),
      'class' => 'save primary',
      'data_attribute' => [
        'mage-init' => ['button' => ['event' => 'save']],
        'form-role' => 'save',
      ],
      'sort_order' => 20,
    ];
  }
}
Much like with the previous button, we use a similar array structure for our button here. The difference is that this time we are passing the data_attribute as well. This renders our Save button as follows:
<button id="save" title="Save" type="button" class="action- scalable save primary ui-button ui-widget ui-state-default ui-corner-all ui-button-text-only" onclick="location.href = '... stripped away ...';" data-form-role="save" data-ui-id="save-button" role="button" aria-disabled="false"><span class="ui-button-text">
    <span>Save</span>
</span></button>
The mage-init part might seem confusing at the moment. Suffice it to say that it's a way of initializing a JS component, which is something we will address in more detail in the next chapter. Our Save essentially triggers the form's submission.
With this we have finished our form component definition, making the whole Stock Resupply screen functional.