
We have been asked to add a functionality that shows an active countdown with a You have %h %min %sec to catch our same day delivery offer message on a product view page, whereas the countdown is based on an optionally assigned daily cutoffAt time, set for every product individually, for every day of a week independently.
Let's take a moment to think about our approach here:
- Every product and every day of a week imply Monday to Sunday _[Cutoff_At] product attributes
- Product attributes imply setup script
- Active countdown implies JS components
We start by bumping up the setup_version value of our <MODULE_DIR>/etc/module.xml file from 1.0.0 to 1.0.1. This allows us to introduce the <MODULE_DIR>/Setup/UpgradeData.php file with an upgrade, as follows:
protected function upgradeToVersionOneZeroOne(
  \Magento\Framework\Setup\ModuleDataSetupInterface $setup
) {
  $eavSetup = $this->eavSetupFactory->create(['setup' => $setup]);

  $days = [
    'monday', 'tuesday', 'wednesday', 'thursday',
    'friday', 'saturday', 'sunday'
  ];

  $sortOrder = 100;

  foreach ($days as $day) {
    $eavSetup->addAttribute(
      \Magento\Catalog\Model\Product::ENTITY,
      $day . '_cutoff_at',
      [
        'type' => 'varchar',
        'label' => ucfirst($day) . ' Cutoff At',
        'input' => 'text',
        'required' => false,
        'sort_order' => $sortOrder++,
        'global' => \Magento\Eav\Model\Entity\Attribute\ScopedAttributeInterface::SCOPE_STORE,
        'group' => 'Cutoff',
      ]
    );
  }
}
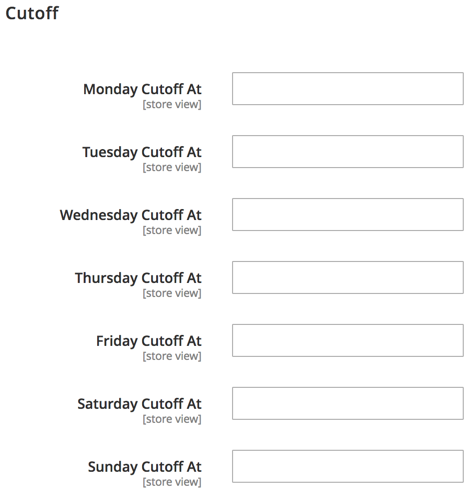
The addAttribute method here is run for each day of the week, thus creating monday_cutoff_at to sunday_cutoff_at product attributes. If, at this point, we were to run the Magento's setup:upgrade command, our UpgradeData script would get executed and schema_version and data_version numbers from within the setup_module table would get bumped to the 1.0.1 version. Likewise, going into the Magento admin area and editing or creating a new product, would show the following screen. This is where we enable the user to enter the time of the day in an <hour>:<minute> format, such as 15:30. This time, if entered, will later be used by the JS component to render the countdown functionality on the storefront product view page:
We then create <MODULE_DIR>/Block/Product/View/Cutoff.php, as follows:
namespace Magelicious\Catalog\Block\Product\View;

class Cutoff extends \Magento\Framework\View\Element\Template implements \Magento\Framework\DataObject\IdentityInterface
{
    private $product;
    protected $coreRegistry;
    protected $localeDate;

    public function __construct(
        \Magento\Framework\View\Element\Template\Context $context,
        \Magento\Framework\Registry $coreRegistry,
        \Magento\Framework\Stdlib\DateTime\TimezoneInterface $localeDate,
        array $data = []
    ) {
        $this->coreRegistry = $coreRegistry;
        $this->localeDate = $localeDate;
        parent::__construct($context, $data);
    }

    public function getProduct() { /* ... */ }
    public function getCutoffAt() { /* ... */ }
    public function getIdentities() { /* ... */ }
}
We will use this class when we reach our layout update.
The getProduct method is further implemented, as follows:
public function getProduct()
{
  if (!$this->product) {
    $this->product = $this->coreRegistry->registry('product');
  }
  return $this->product;
}
As mentioned previously, the registry's product key is already set by the parent class up the layout tree, so we exploit that fact to fetch the current product.
The getCutoffAt method is further implemented, as follows:
public function getCutoffAt()
{
  $timezone = new \DateTimeZone($this->localeDate->getConfigTimezone());
  $now = new \DateTime('now', $timezone);
  $day = strtolower($now->format('l'));
  $cutoffAt = $this->getProduct()->getData($day . '_cutoff_at');
  if ($cutoffAt) {
    $timeForDay = \DateTime::createFromFormat(
      'Y-m-d H:i',
      $now->format('Y-m-d') . ' ' . $cutoffAt,
      $timezone
    );

    if ($timeForDay instanceof \DateTime) {
      return $timeForDay->format(DATE_ISO8601);
    }
  }
  return 0;
}
This is the gist of our same day delivery functionality from the PHP side of things. We ensure we properly return the full date and time based on the product's $day . '_cutoff_at' attribute value; this will later be passed onto the JS component.
Finally, the getIdentities method is further implemented, as follows:
public function getIdentities()
{
  $identities = $this->getProduct()->getIdentities();
  $timezone = new \DateTimeZone($this->localeDate->getConfigTimezone());
  $now = new \DateTime('now', $timezone);
  $day = strtolower($now->format('l'));
  return array_push($identities, $day);
}
The getIdentities method has been implemented in a way to ensure caching of this block is considered in a relation to product identity as well as the day of the week.
We then create the <MODULE_DIR>/view/frontend/requirejs-config.js file, as follows:
var config = {
  map: {
    '*': {
      cutoffAt: 'Magelicious_Catalog/js/cutoff'
    }
  }
};
This registers the cutoffAt component with Magento, which points to our module's cutoff.js file.
We then create the <MODULE_DIR>/view/frontend/web/js/cutoff.js file, as follows:
define([
    'jquery',
    'uiComponent',
    'ko',
    'moment'
  ], function ($, Component, ko, moment) {
    'use strict';
    return Component.extend({
      defaults: {
        template: 'Magelicious_Catalog/cutoff',
        expiresAt: null,
        timerHide: false,
        timerHours: null,
        timerMinutes: null,
        timerSeconds: null,
      },
      initialize: function () {
        this._super();
        this.countdown(this);
        return this;
      },
      initObservable: function () {
        this._super()
          .observe('timerHide timerHours timerMinutes timerSeconds');
        return this;
      },
      countdown: function (self) { /* ... */ }
    });
  }
);
Our JS component template value points to <MODULE_DIR>/view/frontend/web/template/cutoff.html, which we will soon address. expiresAt is the only real option that is expected to be passed on when the component is initialized. The observable timer* options will be used internally to control the functionality of our component.
The countdown function is further implemented, as follows:
countdown: function (self) {
  var today = moment(new Date());
  setInterval(function () {
    self.expiresAt = moment(self.expiresAt).subtract(1, 'seconds');
    var milliseconds = moment(self.expiresAt, 'DD/MM/YYYY HH:mm:ss').diff(moment(today, 'DD/MM/YYYY HH:mm:ss'));
    var duration = moment.duration(milliseconds);
    self.timerHours(duration.hours() >= 0 ? duration.hours() : 0);
    self.timerMinutes(duration.minutes() >= 0 ? duration.minutes() : 0);
    self.timerSeconds(duration.seconds() >= 0 ? duration.seconds() : 0);
    if (self.timerHours() == 0
      && self.timerMinutes() == 0
      && self.timerSeconds() == 0
    ) {
      self.timerHide(true);
    }
  }, 1000);
}
This here is the gist of our same day delivery functionality. Using the core JS setInterval method, we set up a simple per-second counter. With the few lines of code wrapped within setInterval, we control our observable timer* options bound to our cutoff.html template. This, in turn, results in the visual countdown effect.
We then create the <MODULE_DIR>/view/frontend/web/template/cutoff.html file, as follows:
<span class="cutoff-component" data-bind="ifnot: timerHide">
  <span translate="'You have'"></span>
  <span class="timer">
    <span class="timer-part timer-part-hours">
      <span class="numeric" data-bind="text: timerHours"></span>
      <span class="label" data-bind="i18n: 'hours'"></span>
    </span>
    <span class="timer-part timer-part-minutes">
      <span class="numeric" data-bind="text: timerMinutes"></span>
      <span class="label" data-bind="i18n: 'minutes'"></span>
    </span>
    <span class="timer-part timer-part-seconds">
      <span class="numeric" data-bind="text: timerSeconds"></span>
      <span class="label" data-bind="i18n: 'seconds'"></span>
    </span>
  </span>
  <span translate="'to catch our same day delivery offer.'"></span>
</span>
This is the template file behind our JS component. We see all those timer* options being bounded to proper span elements. Wrapping every timer* option in its own span allows for potential flexibility around styling later on.
We then create the <MODULE_DIR>/view/frontend/templates/product/view/cutoff.phtml file, as follows:
<?php /* @var \Magelicious\Catalog\Block\Product\View\Cutoff $block */ ?>
<?php $jsonHelper = $this->helper('Magento\Framework\Json\Helper\Data'); ?>

<div class="cutoff" data-bind="scope:'cutoff-scope'">
  <!-- ko template: getTemplate() --><!-- /ko -->
</div>

<script type="text/x-magento-init">
  {
    ".cutoff": {
      "Magento_Ui/js/core/app": {
        "components": {
          "cutoff-scope": {
            "component": "cutoffAt",
            "expiresAt": <?= /* @escapeNotVerified */ $jsonHelper->jsonEncode($block->getCutoffAt()) ?>
          }
        }
      }
    }
  }
</script>
This is the template file that initializes our JS component. With this file in place, we can finally glue things together by amending the body element of the <MODULE_DIR>/view/frontend/layout/catalog_product_view.xml file, as follows:
<referenceBlock name="product.info.extrahint">
  <block name="cutoff"
      class="Magelicious\Catalog\Block\Product\View\Cutoff"
      template="Magelicious_Catalog::product/view/cutoff.phtml">
  </block>
</referenceBlock>
The final product view page result should look like this:
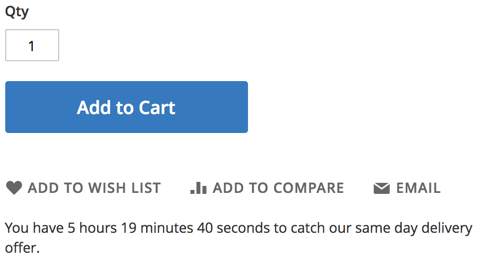
Once the timer reaches 0 hours 0 minutes 0 seconds, it should disappear.