The Magento web API framework differentiates three fundamental types of users:
- Guest: Authorized against an anonymous resource:
<resources>
  <resource ref="anonymous" />
</resources>
- Customer: Authorized against a self resource:
<resources>
  <resource ref="self"/>
</resources>
- Integrator: Authorized against a specific resource defined in acl.xml:
<resources>
  <resource ref="Magento_Cms::save"" />
</resources>
To further understand what this means, we need to understand the link between <VendorName>/<ModuleName>/acl.xml and <VendorName>/<ModuleName>/webapi.xml.
The acl.xml is where we define our access resources. Let's take a closer look at the partial extract of one such resource, defined in the <MAGENTO_DIR>/module-cms/etc/acl.xml file:
<config>
  <acl>
    <resources>
      <resource id="Magento_Backend::admin">
        <resource id="Magento_Backend::content">
          <resource id="Magento_Backend::content_elements">
            <resource id="Magento_Cms::page" title="Pages">
              <resource id="Magento_Cms::save" title="Save Page"/>
            </resource>
          </resource>
        </resource>
      </resource>
    </resources>
  </acl>
</config>
Our focus here is on the Magento_Cms::save resource. Magento merges all of these individual acl.xml files into one big ACL tree. We can see this tree in two places in the Magento admin area:
- The Role Resource tab of the System | Permissions | User Roles | Edit | Add New Role screen
- The API tab of the System | Extensions | Integrations | Edit | Add New Integration screen:
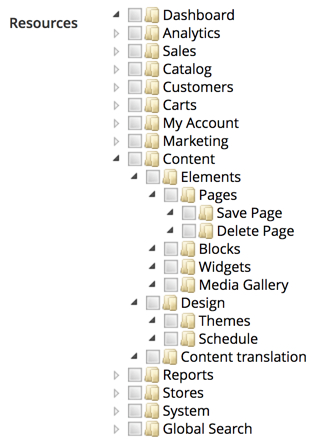
These are the two screens where we define access permissions for a standard admin user and a special web API integrator user. This is not to say that a standard admin user cannot execute web API calls. The difference will become more obvious when we get to the Types of authentication section.
To this point, these resources don't really do anything on their own. Simply defining them within acl.xml won't magically make a CMS page in this case access-protected, or anything like that. This is where controllers come into the mix, as one example of an access-controlling mechanism. A quick lookup against Magento_Cms::save string usage, reveals a Magento\Cms\Controller\Adminhtml\Page\Edit class using it as part of its const ADMIN_RESOURCE = 'Magento_Cms::save' definition.
The ADMIN_RESOURCE constant is defined further down the inheritance chain, on the \Magento\Backend\App\AbstractAction as const ADMIN_RESOURCE = 'Magento_Backend::admin'. This is further used by the _isAllowed method implementation as follows:
protected function _isAllowed()
{
  return $this->_authorization->isAllowed(static::ADMIN_RESOURCE);
}
The AbstractAction class here is the basis for pretty much any Magento admin controller. This means that the controller is the one that utilizes the resource defined in acl.xml, whereas definitions in acl.xml serve the purpose of building the ACL tree, which we can manage from the Magento admin interface. This means that anyone trying to access the cms/page/edit URL in admin must have a Magento_Cms::save resource permission to do so. Otherwise, the _isAllowed method, reading the ADMIN_RESOURCE value, will return false and forbid access to the page.
Web APIs, on the other hand, don't use controllers, so there is no access to the ADMIN_RESOURCE constant and the _isAllowed method. APIs use webapi.xml to define routes. Let's follow up with the CMS page save analogue, as per the <MAGENTO_DIR>/module-cms/etc/webapi.xml file:
<routes>
  <route url="/V1/cmsPage" method="POST">
    <service class="Magento\Cms\Api\PageRepositoryInterface" method="save"/>
    <resources>
      <resource ref="Magento_Cms::page"/>
    </resources>
  </route>
  <route url="/V1/cmsPage/:id" method="PUT">
    <service class="Magento\Cms\Api\PageRepositoryInterface" method="save"/>
    <resources>
      <resource ref="Magento_Cms::page"/>
    </resources>
  </route>
</routes>
The individual route definition binds together a few things. The url and method argument of a route element specify what URL will trigger this route. The class and method arguments of a service element specify which interface and method on that interface will execute once the route is triggered. Finally, the ref argument of a resource element specifies the security check to be executed. If a user executing a web API call is unauthenticated or authenticated with a role that does not have Magento_Cms::page, the request won't execute the service method specified.
The customer type of user is the most convenient for working with widgets. The Magento checkout is an excellent example of that. The whole checkout is a fully AJAX-enabled app on its own, separate from the usual Magento storefront, such as its CMS, category, and product pages.