
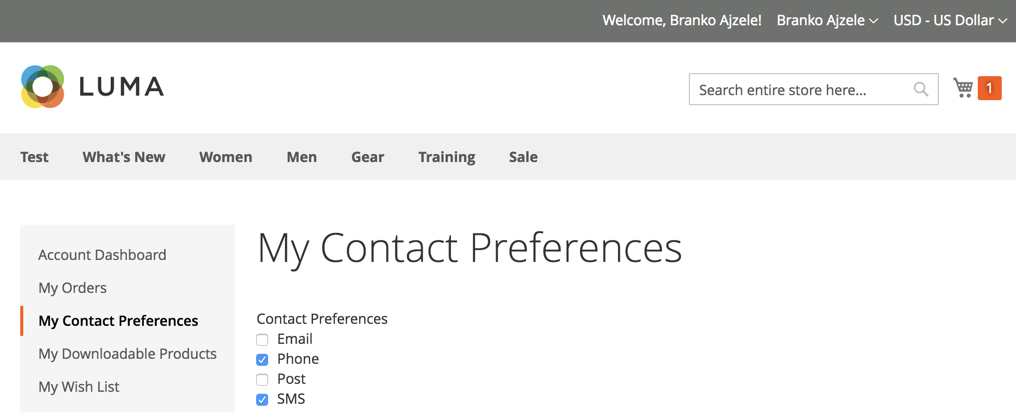
Now that we understand the mechanism behind the customerData object and the section load, let's put it to use by creating a small module that adds contact preferences functionality under the customer's My Account area, as well as under the checkout. Our work is to be done as part of the Magelicious_ContactPreferences module, with the final visual outcome as follows:
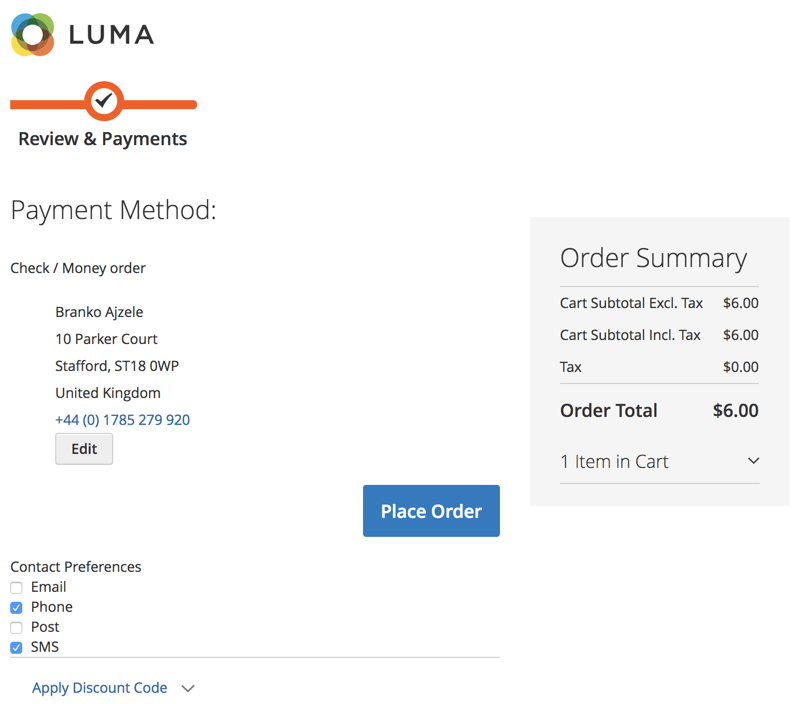
By contrast, the customer's checkout area would show contact preferences, as follows:
The idea behind the module is to provide a customer with an option of choosing preferred contact preferences, so that a merchant may follow up with the delivery process accordingly.
Assuming we have defined registration.php, composer.json, and etc/module.xml as basic module files, we can deal with the more specific details of our Magelicious_ContactPreferences module.
We start by defining the <MODULE_DIR>/Setup/InstallData.php, as follows:
$customerSetup = $this->customerSetupFactory->create(['setup' => $setup]);

$customerSetup->addAttribute(
  \Magento\Customer\Model\Customer::ENTITY,
  'contact_preferences',
  [
    'type' => 'varchar',
    'label' => 'Contact Preferences',
    'input' => 'multiselect',
    'source' => \Magelicious\ContactPreferences\Model\Entity\Attribute\Source\Contact\Preferences::class,
    'required' => 0,
    'sort_order' => 99,
    'position' => 99,
    'system' => 0,
    'visible' => 1,
    'global' => \Magento\Catalog\Model\ResourceModel\Eav\Attribute::SCOPE_GLOBAL,
  ]
);

$contactPreferencesAttr = $customerSetup
  ->getEavConfig()
  ->getAttribute(
    \Magento\Customer\Model\Customer::ENTITY,
    'contact_preferences'
  );

$contactPreferencesAttr->setData('used_in_forms', ['adminhtml_customer']);
$contactPreferencesAttr->save();
We are instructing Magento to create a multiselect type of attribute. The attribute becomes visible under the Magento admin area, with a customer editing screen as follows:

We then define the <MODULE_DIR>/Model/Entity/Attribute/Source/Contact/Preferences.php, as follows:
namespace Magelicious\ContactPreferences\Model\Entity\Attribute\Source\Contact;

class Preferences extends \Magento\Eav\Model\Entity\Attribute\Source\AbstractSource
{
  const VALUE_EMAIL = 'email';
  const VALUE_PHONE = 'phone';
  const VALUE_POST = 'post';
  const VALUE_SMS = 'sms';

  public function getAllOptions()
  {
    return [
      ['label' => __('Email'), 'value' => self::VALUE_EMAIL],
      ['label' => __('Phone'), 'value' => self::VALUE_PHONE],
      ['label' => __('Post'), 'value' => self::VALUE_POST],
      ['label' => __('SMS'), 'value' => self::VALUE_SMS],
    ];
  }
}
These are the contact preference options we want to provide as our attribute source. We will use this class not just for installation, but later on as well.
We then define the <MODULE_DIR>/etc/frontend/routes.xml, as follows:
<config>
  <router id="standard">
    <route id="customer" frontName="customer">
      <module name="Magelicious_ContactPreferences" before="Magento_Customer"/>
    </route>
  </router>
</config>
Unlike our route definitions in previous chapters, here we are using an already existing route name customer. The attribute before it allows us to insert our module before the Magento_Customer module, allowing us to respond to the same customer/* routes. We should be very careful with this approach, not to detach some of the existing controller actions. In our case, we are only doing this so that we might use the customer/contact/preferences URL later on.
We then define the <MODULE_DIR>/Controller/Contact/Preferences.php, as follows:
namespace Magelicious\ContactPreferences\Controller\Contact;

class Preferences extends \Magento\Customer\Controller\AbstractAccount
{
  public function execute()
  {
    if ($this->getRequest()->isPost()) {
      $resultJson = $this->resultFactory->create(\Magento\Framework\Controller\ResultFactory::TYPE_JSON);
      if ($this->getRequest()->getParam('load')) {
        // Merely for triggering "contact_preferences" section
      } else {
          // SAVE PREFERENCES
      }
      return $resultJson;
    } else {
      $resultPage = $this->resultFactory->create(\Magento\Framework\Controller\ResultFactory::TYPE_PAGE);
      $resultPage->getConfig()->getTitle()->set(__('My Contact Preferences'));
      return $resultPage;
    }
  }
}
This is the only controller action we will have. We will use the same action for handling three different intents. This is not an ideal example of how one should write code in this scenario, but it is a compact one. The first intent we will handle is the section load trigger, the second is the actual preference save, and the third is the page load. These will become clear as we move forward.
We then replace the SAVE PREFERENCES comment with the following:
// \Magento\Framework\App\Action\Context $context
// \Magento\Customer\Model\Session $customerSession
// \Magento\Customer\Api\CustomerRepositoryInterface $customerRepository
// \Psr\Log\LoggerInterface $logger

try {
  $preferences = implode(',',
    array_keys(
      array_filter($this->getRequest()->getParams(), function ($_checked, $_preference) {
        return filter_var($_checked, FILTER_VALIDATE_BOOLEAN);
      }, ARRAY_FILTER_USE_BOTH)
    )
  );
  $customer = $this->customerRepository->getById($this->customerSession->getCustomerId());
  $customer->setCustomAttribute('contact_preferences', $preferences);
  $this->customerRepository->save($customer);
  $this->messageManager->addSuccessMessage(__('Successfully saved contact preferences.'));
} catch (\Exception $e) {
  $this->logger->critical($e);
  $this->messageManager->addErrorMessage(__('Error saving contact preferences.'));
}
Here we are handling the actual saving of the chosen contact preferences. The request parameters are expected to be in the <preference_name>=<true|false> format. We use the implode to turn the incoming request and pass it onto the repository's setCustomAttribute method. This is because, by default, Magento stores the multiselect attribute as a comma-separated string in the database. The addSuccessMessage and addErrorMessage calls are interesting here. One might expect that we would return these messages as part of a JSON response. But, we don't really need a JSON response body here. This is because Magento has the messages section defined under <MAGENTO_DIR>/module-theme/etc/frontend/sections.xml as <action name="*">. What this means is that messages get refreshed upon every section load and, since our controller action is mapped in our own sections.xml, the load of our section will also load messages.
We then define the <MODULE_DIR>/view/frontend/layout/customer_account.xml, as follows:
<page>
  <body>
    <referenceBlock name="customer_account_navigation">
      <block class="Magento\Customer\Block\Account\SortLinkInterface" name="customer-account-navigation-contact-preferences-link">
        <arguments>
          <argument name="path" xsi:type="string">customer/contact/preferences</argument>
          <argument name="label" xsi:type="string" translate="true">My Contact Preferences</argument>
          <argument name="sortOrder" xsi:type="number">230</argument>
        </arguments>
      </block>
    </referenceBlock>
  </body>
</page>
The definitions here inject a new menu item under the customer's My Account screen. The customer_account_navigation block, originally defined under <MAGENTO_DIR>/module-customer/view/frontend/layout/customer_account.xml, is in charge of rendering the sidebar menu. By injecting the new block of Magento\Customer\Block\Account\SortLinkInterface type, we can easily add new menu items.
We then define the <MODULE_DIR>/view/frontend/layout/customer_contact_preferences.xml, as follows:
<page>
  <update handle="customer_account"/>
  <body>
    <referenceContainer name="content">
      <block name="contact_preferences"
template="Magelicious_ContactPreferences::customer/contact/preferences.phtml" cacheable="false"/>
    </referenceContainer>
  </body>
</page>
This is the block that will get loaded into the content area of a page, once we click on our newly added My Contact Preferences link. Since the only role of the contact_preferences block will be to load the JS component, we omit the class definition that we would normally have on custom blocks.
We then define the <MODULE_DIR>/view/frontend/templates/customer/contact/preferences.phtml, as follows:
<div class="contact-preferences" data-bind="scope:'contact-preferences-scope'">
  <!-- ko template: getTemplate() --><!-- /ko -->
</div>

<script type="text/x-magento-init">
  {
    ".contact-preferences": {
      "Magento_Ui/js/core/app": {
        "components": {
          "contact-preferences-scope": {
            "component": "contactPreferences"
          }
        }
      }
    }
  }
</script>
The only purpose of the template here is to load the JS contactPreferences component. We can see that no data is passed from the server-side .phtml template to the JS component. We will use the section and customerData mechanisms later on for that.
We then define the <MODULE_DIR>/view/frontend/requirejs-config.js, as follows:
var config = {
  map: {
    '*': {
      contactPreferences: 'Magelicious_ContactPreferences/js/view/contact-preferences'
    }
  }
};
Here we map the component name, contactPreferences, to its physical location in our module directory.
We then define the <MODULE_DIR>/view/frontend/web/js/view/contact-preferences.js, as follows:
define([
  'uiComponent',
  'jquery',
  'mage/url',
  'Magento_Customer/js/customer-data'
], function (Component, $, url, customerData) {
  'use strict';
  let contactPreferences = customerData.get('contact_preferences');
  return Component.extend({
    defaults: {
      template: 'Magelicious_ContactPreferences/contact-preferences'
    },
    initialize: function () { /* ... */ },

    isCustomerLoggedIn: function () {
      return contactPreferences().isCustomerLoggedIn;
    },
    getSelectOptions: function () {
      return contactPreferences().selectOptions;
    },
    saveContactPreferences: function () { /* ... */ }
  });
});
This is our JS component, the core of our client-side functionality. We inject the Magento_Customer/js/customer-data component as a customerData object. This gives us access to data we are pushing from the server side via the getSectionData method of the Magelicious\ContactPreferences\CustomerData\Preferences class. The string value contact_preferences passed to the get method of the customerData object must match the item name under the sectionSourceMap of our di.xml definition.
Let's extend the initialize function further, as follows:
initialize: function () {
  this._super();
  $.ajax({
    type: 'POST',
    url: url.build('customer/contact/preferences'),
    data: {'load': true},
    showLoader: true
  });
}
The addition of an AJAX request call within the component's initialize method is more of a trick to trigger the contact_preferences section load in our case. We are doing it simply because sections do not load on HTTP GET requests, as that might load the same customer/contact/preferences page. Rather, they load on HTTP POST events. This way we ensure that the contact_preferences section will load when our component is initialized, thus providing it with the necessary data. We are far from saying that this is a recommended approach for general JS component development, though.
Let's extend the saveContactPreferences function further, as follows:
saveContactPreferences: function () {
  let preferences = {};

  $('.contact_preference').children(':checkbox').each(function () {
    preferences[$(this).attr('name')] = $(this).attr('checked') ? true : false;
  });

  $.ajax({
    type: 'POST',
    url: url.build('customer/contact/preferences'),
    data: preferences,
    showLoader: true,
    complete: function (response) {
      // some actions...
    }
  });

  return true;
}
The saveContactPreferences method will be triggered every time a customer clicks on the contact preference on the storefront, whether it is an act of checking or unchecking individual contact preferences.
We then define the <MODULE_DIR>/view/frontend/web/template/contact-preferences.html, as follows:
<div data-bind="if: isCustomerLoggedIn()">
  <div data-role="title" data-bind="i18n: 'Contact Preferences'"></div>
  <div data-role="content">
    <div class="contact_preference" repeat="foreach: getSelectOptions(), item: '$option'">
      <input type="checkbox"
           click="saveContactPreferences"
           ko-checked="$option().checked"
           attr="name: $option().value"/>
      <label text="$option().label" attr="for: $option().value"/>
    </div>
  </div>
</div>
The HTML defined here visually sets our component. A basic knowledge of Knockout JS is required in order to utilize the repeat directive, fed with the array of data coming from the getSelectOptions method, which by now we know originates from the server side.
We then define the <MODULE_DIR>/etc/frontend/sections.xml, as follows:
<config>
  <action name="customer/contact/preferences">
    <section name="contact_preferences"/>
  </action>
</config>
With this, we make the necessary mapping between HTTP POST customer/contact/preferences requests and the contact_preferences section we expect to load.
We then define the <MODULE_DIR>/etc/frontend/di.xml, as follows:
<config>
  <type name="Magento\Customer\CustomerData\SectionPoolInterface">
    <arguments>
      <argument name="sectionSourceMap" xsi:type="array">
        <item name="contact_preferences" xsi:type="string">Magelicious\ContactPreferences\CustomerData\Preferences</item>
      </argument>
    </arguments>
  </type>
</config>
Here we inject our contact_preferences section, instructing Magento where to read its data from. With this in place, any HTTP POST customer/contact/preferences request is expected to trigger a follow-up AJAX POST customer/section/load/?sections=contact_preferences%2Cmessages&update_section_id=true&_=1533887023603 request that, in turn, returns data much like the following:
{
  "contact_preferences": {
  "selectOptions": [
    {
    "label": "Email",
    "value": "email",
    "checked": true
    },
    { ... }
  ],
  "isCustomerLoggedIn": true,
  "data_id": 1533875246
  },
  "messages": {
  "messages": [
    {
    "type": "success",
    "text": "Successfully saved contact preferences."
    }
  ],
  "data_id": 1533875246
  }
}
If we were to enable our module at this point, we should be able to see it working under the customer's My Account screen. Though simple, the steps of getting everything linked were somewhat involved. The benefit of this approach, where data is sent via the sections mechanism, is that our component plays nicely with full-page caching. The needed customer-related data is simply fetched by additional AJAX calls, instead of caching it on a per-customer basis, and thus this bypasses the purpose of full-page caching.