Table of Contents for
JSON at Work
 JSON at Work
Published by
O'Reilly Media, Inc., 2017
JSON at Work
Published by
O'Reilly Media, Inc., 2017
- nav
- Cover
- JSON at Work
- JSON at Work
- Dedication
- Preface
- I. JSON Overview and Platforms
- 1. JSON Overview
- 2. JSON in JavaScript
- 3. JSON in Ruby on Rails
- 4. JSON in Java
- II. The JSON Ecosystem
- 5. JSON Schema
- 6. JSON Search
- 7. JSON Transform
- III. JSON in the Enterprise
- 8. JSON and Hypermedia
- 9. JSON and MongoDB
- 10. JSON Messaging with Kafka
- A. Installation Guides
- B. JSON Community
- Index
- About the Author
- Colophon
Chapter 10. JSON Messaging with Kafka
Apache Kafka is a popular distributed scalable messaging system that enables heterogenous applications (those that run on multiple platforms) to communicate asynchronously by passing messages. Kafka was originally developed by the LinkedIn engineering team as part of a major rearchitecture effort. After the company moved from monolithic applications to Microservices, they created Kafka to fill the need for a universal data pipeline capable of processing large message volumes in order to integrate the services and applications across their enterprise. In 2011, LinkedIn open sourced Kafka to the Apache Foundation. Today, many companies successfully leverage Kafka as the central messaging platform in their enterprise architecture strategy. You can find more information about Kafka on the Apache Kafka main page.
Kafka differs from other messaging systems (e.g., Java Message Service, or JMS) in that it is not tied to a particular platform. Although Kafka was written in Java, Producers and Consumers can be written in different languages. To demonstrate this, we’ll have a Node.js-based Consumer and a Consumer written in Bourne Shell in our end-to-end example.
Kafka supports both binary and text messages. The most popular text formats are plain/flat text, JSON, and Apache Avro. The Kafka APIs (used by Producers and Consumers) communicate over TCP. In this chapter, we’ll use Kafka as a traditional messaging system with JSON-based messages, and show how to do the following:
-
Produce/consume JSON messages with Kafka from the command line
-
Design and implement a small end-to-end example that leverages Kafka with JSON
Kafka Use Cases
Typical Kafka use cases include the following:
- Traditional messaging
-
Applications publish messages that are consumed by other applications. Kafka uses an asynchronous (i.e., the sender doesn’t wait for a response) publish/subscribe (or pub/sub) messaging model that decouples Producers from Consumers.
- Analytics and stream processing
-
Applications publish real-time usage information (e.g., clicks, visitors, sessions, page views, and purchases) to Kafka Topics. Then a streaming application such as Apache Spark/Spark Streaming reads messages from the various topics, transforms the data (e.g., map/reduce), and sends it to a data store such as Hadoop (via Flume). You can add analytics tools (e.g., data visualization) on top of the target data store.
- Operational and application performance netrics
-
Applications can publish statistics (e.g., message counts, number of transactions, response time, HTTP status codes, and counts) for review by operations personnel to monitor and track performance, usage, and potential issues.
- Log aggregation
-
Applications across an enterprise can publish their log messages to a Kafka Topic, which makes them available to log management applications—e.g., the ELK (ElasticSearch, Logstash, Kibana) stack. Kafka could be used in front of Logstash to receive large data volumes and allow Logstash to perform more-expensive operations at its own pace without losing messages.
Kafka Concepts and Terminology
Here are some of the key concepts in Kafka’s architecture:
- Producer
- Consumer
-
Registers for or Subscribes to a Topic and reads messages as they become available.
- Topic
-
A named channel, a message feed/stream for a category of messages. In our example,
new-proposals-recvdcontains messages that represent new speaker session proposals at MyConference. You can also think of a Topic as a stream of business events, including orders and product returns. A Topic is divided into one or more Partitions. - Broker
- Cluster
- Partition
-
In a distributed environment, a Topic is replicated across multiple Partitions (each of which is managed by a separate Broker).
- Offset
-
A unique ID for a message within a Partition. This is how Kafka maintains the ordering and sequencing of messages.
This is all you need to know in order to produce/consume JSON messages for this chapter. Many other important areas are not covered in this book in order to maintain brevity and focus, including Durability, Consumer Groups, Delivery Guarantees, and Replication. Kafka is a big topic that warrants its own book, and you can find more information in Kafka: The Definitive Guide, by Neha Narkhede et al. (O’Reilly).
For our example, we will have a single Broker (Kafka server), and each Topic will have a single Partition.
The Kafka Ecosystem—Related Projects
Kafka is a general-purpose messaging system that integrates with other message-processing systems to build larger, more powerful messaging applications. Kafka’s ecosystem includes, but is not limited to the following:
- Apache Spark/Spark Streaming
-
Used for stream processing (see “Kafka Use Cases”).
- HiveKa
-
Provides integration with Hive to create a SQL-like interface to Kafka Topics.
- ElasticSearch
-
The standalone Consumer pulls data from Kafka Topics and loads it into ElasticSearch.
- Kafka Manager
-
A management console for Kafka that enables administrators to work with Kafka Clusters, Topics, Consumers, and so forth.
- Flume
-
Moves large amounts of data from a channel (e.g., a Kafka topic) to the Hadoop Distributed File System (HDFS).
- Avro
-
A data serialization alternative to pure JSON that provides richer data structures. Avro is not a standard, but has its own Schemas (which have no relationship to JSON Schema) that are written in JSON. Avro is an alternative to JSON that provides richer data structures and a more compact data format. Avro started as part of Hadoop, and eventually became its own project.
This list is just a small sample of other systems that work with Kafka. See the Kafka Ecosystem page for a full description of the Kafka Ecosystem.
Kafka Environment Setup
Before we look at the command-line interface, let’s install Kafka and Apache ZooKeeper to run and build all the examples in this chapter. Refer to “Install Apache Kafka” in Appendix A, and install Kafka and ZooKeeper.
Now it’s time to configure Kafka so that it allows us to delete Topics (this setting is turned off by default). Edit the KAFKA-INSTALL-DIR/KAFKA_VERSION/libexec/config/server.properties file (where KAFKA-INSTALL-DIR is the directory where your installation procedure installed Kafka, and KAFKA_VERSION is the installed Kafka version) as follows:
# Switch to enable topic deletion or not, default value is false
delete.topic.enable=true
Why Do I Need ZooKeeper?
At this point, you may be wondering why you need ZooKeeper in addition to Kafka. The short answer is that ZooKeeper is required in order to run Kafka. In other words, Kafka (as a distributed application) is designed to run within the ZooKeeper environment. ZooKeeper is a server that coordinates distributed processes by managing the following: naming, status information, configuration, location information, synchronization, failover, etc. The naming registry uses a hierarchical namespace that is similar to a filesystem.
ZooKeeper is used by several well-known projects, including Kafka, Storm, Hadoop MapReduce, HBase, and Solr (Cloud Edition), and so forth. To learn more, visit the ZooKeeper main page.
Kafka Command-Line Interface (CLI)
Kafka comes with a built-in CLI that enables developers to experiment with Kafka without leaving the command line. We’ll demonstrate how to start Kafka, publish JSON messages, and then shutdown the Kafka infrastructure.
To use the convenience scripts and avoid lots of typing, please be sure to visit the chapter-10/scripts directory (from the code examples) and change the file permissions so that all scripts will be executable:
chmod +x *.sh
How to Publish a JSON Message with the CLI
Here are the steps (in the required order) to start Kafka and then publish/consume messages:
-
Start ZooKeeper.
-
Start the Kafka server.
-
Create a Topic.
-
Start a Consumer.
-
Publish a message to a Topic.
-
Consume a message.
-
Clean up and shut down Kafka:
-
Stop the Consumer.
-
Delete a Topic.
-
Shutdown Kafka.
-
Stop ZooKeeper.
-
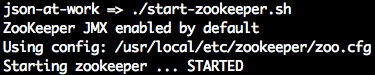
Start ZooKeeper
As mentioned earlier, Kafka requires ZooKeeper. To start ZooKeeper, run the following command in a new terminal:
./start-zookeeper.sh
Example 10-1 shows the script.
Example 10-1. scripts/start-zookeeper.sh
zkServer start
You should see the following:
Start Kafka
Now it’s time to start a Kafka server (from a new terminal):
./start-kafka.sh
The script looks like Example 10-2
Example 10-2. scripts/start-kafka.sh
kafka-server-start /usr/local/etc/kafka/server.properties
In this script, the server.properties file has configuration settings for Kafka. We edited this file earlier to enable the ability to delete topics.
The Kafka server should now be running. This command prints a lot of logging messages, and you should see the following when the server reaches the steady state:

Create a Topic
Next, let’s create the test-proposals-recvd Topic to receive new speaker session proposals.
To create the Topic, run the script as follows (from a new terminal):
./create-topic.sh test-proposals-recvd
The script runs the kafka-topics command as shown in Example 10-3.
Example 10-3. scripts/create-topic.sh
...

kafka-topics --zookeeper localhost:2181 --create \
             --topic $1 --partitions 1 \
             --replication-factor 1
This script works as follows:
-
$1is the command-line variable that has the Topic name (in this case,test-proposals-recvd). -
We kept things simple by using only a single partition (an ordered sequence of records) and one replica for the Topic. A Partition can be replicated across multiple servers for fault tolerance and load balancing. In a production configuration, you would have multiple replicas to support large message volumes.
When you run the preceding script, you should see this:

List Topics
Let’s make sure that the new Topic was created properly by running the following script:
./list-topics.sh
The script uses the kafka-topics command as shown in Example 10-4.
Example 10-4. scripts/list-topics.sh
kafka-topics --zookeeper localhost:2181 --list
You should see that the test-proposals-recvd Topic was created:
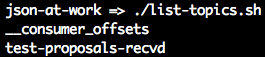
The __consumer_offsets is a low-level, internal Kafka implementation detail—pay no attention to it.
We’re concerned only with the Topic that we created.
Start a Consumer
Now that we have a Topic, it’s time to produce and consume messages. First, we’ll create a Consumer
that subscribes to the test-proposals-recvd topic with the following script:
./start-consumer.sh test-proposals-recvd
This script uses the kafka-console-consumer command as shown in Example 10-5.
Example 10-5. scripts/start-consumer.sh
...

kafka-console-consumer --bootstrap-server localhost:9092 \
                       --topic $1
In this script, $1 is the command-line variable that has the Topic name
(in this case, test-proposals-recvd) that the Consumer is listening on.
You should see that the Consumer is now polling/waiting for a new message, so there’s no output yet:

Publish a JSON Message
It’s now time to publish a JSON message to our topic with the following script (in a new terminal):
./publish-message.sh '{ "message": "This is a test proposal." }' test-proposals-recvd
Example 10-6 provides the script.
Example 10-6. scripts/publish-message.sh
...

echo $MESSAGE_FROM_CLI | kafka-console-producer \
          --broker-list localhost:9092 \
          --topic $TOPIC_NAME_FROM_CLI

...
Note the following in this script:
-
We use
echoto print the JSON message to Standard Output and pipe it to thekafka-console-producercommand. -
$MESSAGE_FROM_CLIis the command-line variable that has the JSON message to publish. -
$TOPIC_NAME_FROM_CLIis the command-line variable that has the Topic name (in this case,test-proposals-recvd).
When you publish the message, you should see the following:

The message doesn’t show in this terminal window.
Consume a JSON Message
When you revisit the terminal window where you started the Consumer, you should see that the Consumer
has read and printed the message from the test-proposals-recvd Topic:

We now have a simple CLI-based example with Kafka that produces and consumes JSON messages. Now let’s clean up.
Clean Up and Shut Down Kafka
Here are the steps to clean up and shut down Kafka:
-
Stop the Consumer.
-
Delete a Topic (optional).
-
Stop Kafka.
-
Stop ZooKeeper.

Delete a Topic
We’ll now delete the test-proposals-recvd Topic with the following script (this is optional):
./delete-topic.sh test-proposals-recvd
Example 10-7 shows the script.
Example 10-7. scripts/delete-topic.sh
...

kafka-topics --zookeeper localhost:2181 --delete --topic $1
In this script, $1 is the command-line variable that has the Topic name
(in this case, test-proposals-recvd).
You should see the following on your screen:

Stop Kafka
To stop Kafka, just press Ctrl-C in the terminal window where you started Kafka or you can do a graceful shutdown as follows:
./stop-kafka.sh
Example 10-8 shows the script.
Example 10-8. scripts/stop-kafka.sh
kafka-server-stop
This script uses the kafka-server-stop command to stop the Kafka server. The controlled/graceful
shutdown takes a while and produces a lot of log messages. If you return to the terminal window where you
started the Kafka server, you should see the following message at the end:

If you deleted the test-proposals-recvd Topic in the previous section, it won’t exist when you restart
Kafka. If you did not delete this Topic, it will be there upon a Kafka restart.
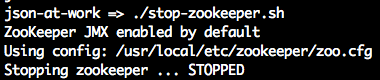
Stop ZooKeeper
Let’s finish up by stopping ZooKeeper. Type the following from the command line:
./stop-zookeeper.sh
Example 10-9 shows the script.
Example 10-9. scripts/stop-zookeeper.sh
zkServer stop
At this point, all the Kafka-related infrastructure should be stopped, and you should see the following:
Kafka Libraries
Kafka enjoys wide support across the major application development platforms, including the following libraries:
- Java
-
Spring is widely used for integration within the Java community, and provides support through the Spring Kafka library.
- Ruby
-
Karafkais a gem you can find on GitHub. - JS
-
kafka-nodeis a module we’ll use for the end-to-end example in the next section. You can find more information onkafka-nodeon npm and GitHub.
End-to-End Example—Speaker Proposals at MyConference
We’ve shown how to use Kafka at the command line, and we’ll now combine that with Node.js-based applications that consume and produce messages. For our final example, we’re going to create an application that enables speakers to submit proposals to speak at MyConference (a fictitious company). Each speaker will submit a proposal, which is reviewed by a member of the MyConference proposal team. The speaker is then notified by email on the MyConference reviewer’s decision.
Test Data
We’ll continue to use the Speaker data that we’ve used in previous chapters, but we need to add a few more elements to make this a fully dressed proposal. Example 10-10 shows the upgraded speaker session proposal.
Example 10-10. data/speakerProposal.json
{"speaker":{"firstName":"Larson","lastName":"Richard","email":"larson.richard@ecratic.com","bio":"Larson Richard is the CTO of ... and he founded a JavaScript meetup ..."},"session":{"title":"Enterprise Node","abstract":"Many developers just see Node as a way to build web APIs or ...","type":"How-To","length":"3 hours"},"conference":{"name":"Ultimate JavaScript Conference by MyConference","beginDate":"2017-11-06","endDate":"2017-11-10"},"topic":{"primary":"Node.js","secondary":["REST","Architecture","JavaScript"]},"audience":{"takeaway":"Audience members will learn how to ...","jobTitles":["Architects","Developers"],"level":"Intermediate"},"installation":["Git","Laptop","Node.js"]}
In this example, we have the following Objects:
speaker-
The speaker’s contact information.
session-
A description of the session, including title and length.
conference-
Tells which conference the speaker is applying for. MyConference runs multiple events, so this is important.
topic-
Primary and secondary topics covered in the talk.
audience-
The audience level (beginner, intermediate, or advanced).
installation-
Installation instructions (if any) that the audience should follow before attending the session.
Architecture Components
Here are the components needed for the MyConference application:
- Speaker Proposal Producer
-
Uses the publish-message.sh script to send the JSON-based speaker session proposal on the speaker’s behalf to the
new-proposals-recvdTopic. In the real world, this would be a nice AngularJS application with a solid UX design that invokes a RESTful API, but we’ll stick with an extremely simple shell script interface to keep the focus on JSON. - Proposal Reviewer (i.e., Consumer)
-
Listens on the
new-proposals-recvdTopic, accepts/rejects a proposal, and sends a corresponding message to theproposals-reviewedTopic for further processing. In an enterprise-level architecture, we would put a RESTful API in front to receive the speaker proposal and then publish the message to thenew-proposals-recvdTopic. But again, we’re not showing an API here to simplify the example. - Speaker Notifier (i.e., Consumer)
-
Listens on the
proposals-reviewedTopic, generates an acceptance/rejection email (based on the reviewer’s decision), and sends a notification email to the speaker. - Email Server (emulated)
-
Acts as MyConference’s Email Server to send notification emails.
- Email Client (emulated)
-
Serves as the speaker’s Email Client to receive notification emails.
For the Email Client and Server, we’ll use MailCatcher, a simple email emulator to simplify infrastructure setup.
Figure 10-1 shows the overall flow and the way the components interact.
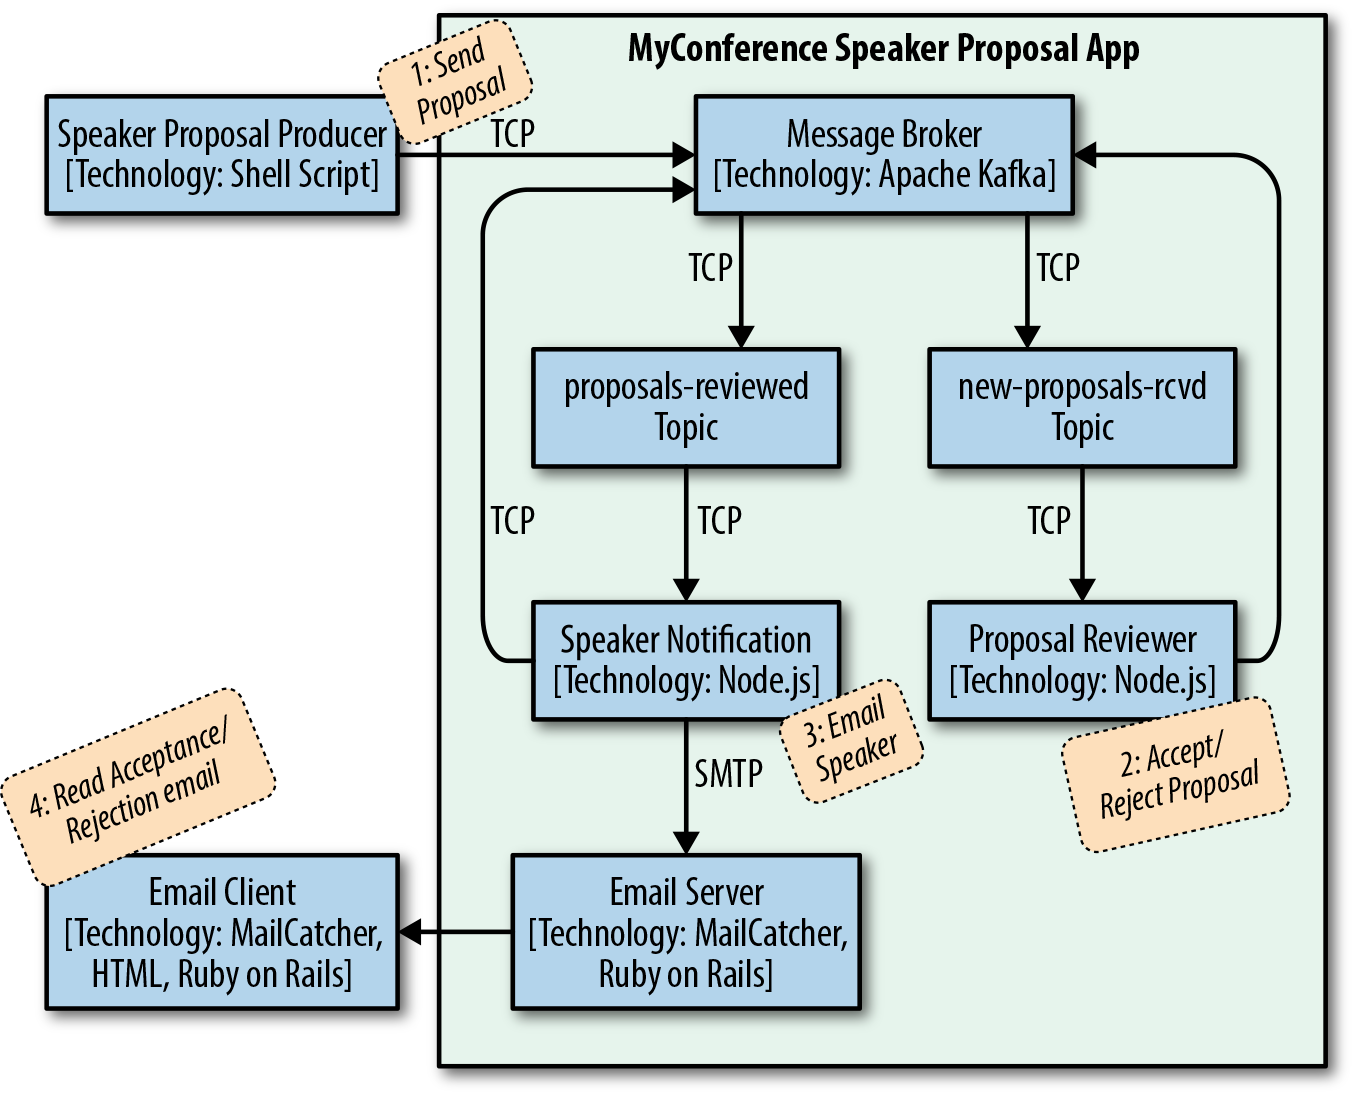
Figure 10-1. MyConference Speaker Proposal architecture—components
The flow of this diagram is as follows:
-
The Speaker uses the Speaker Proposal Producer to send a proposal to the
new-proposals-recvdTopic within the MyConference application. -
The Proposal Reviewer receives a proposal message on
new-proposals-recvdTopic, makes a decision, and sends the acceptance/rejection message to theproposals-reviewedTopic. -
The Speaker Notifier receives an acceptance/rejection message on the
proposals-reviewedTopic, creates a notification email message, and sends it. -
The Speaker reviews the notification email message(s).
It’s now time to walk through some code and run the example.
Set Up the Kafka Environment
If you ran through the CLI example, the steps should look familiar (refer to that section if you need to refresh your memory). We’ll need four terminal sessions to run the example. Do the following to get started:
-
Create terminal session 1.
-
Start ZooKeeper.
-
Start Kafka.
-
-
Create terminal session 2.
-
Create the
proposals-reviewedTopic. -
Create the
new-proposals-recvdTopic.
-
With the core Kafka components in place, let’s set up an Email Server to receive acceptance/rejection notification email messages.
Set Up Fake Email Server and Client—MailCatcher
We’ll use MailCatcher. A Simple Mail (SMTP) server is a great tool for testing emails without forcing you to send a real email. MailCatcher has the characteristics we need for this example:
-
Follows standards—MailCatcher is based on the Simple Mail Transfer Protocol (SMTP).
-
Easy installation.
-
Simple startup/shutdown.
-
Security is optional. I know this sounds scary, but we don’t want to go through the hassle of setting up the user ID/password for an email server. For simple examples and prototyping as we’re doing here, this is OK. Of course, for bigger prototypes and real-world situations, you definitely want to secure access to your email server. MailCatcher will work well for bigger examples because it can also accept user credentials.
-
Nice web UI that shows email messages sent to the server.
For more information on MailCatcher, visit its website.
If you haven’t installed Ruby on Rails yet, refer to “Install Ruby on Rails” in
Appendix A, and install it. Install the mailcatcher gem on the command line
(staying in terminal session 2) as follows (also see “Install Ruby Gems” in Appendix A):
gem install mailcatcher
Start the MailCatcher server as follows, and you should see the following on your screen:
json-at-work => mailcatcher
Starting MailCatcher
==> smtp://127.0.0.1:1025
==> http://127.0.0.1:1080
*** MailCatcher runs as a daemon by default. Go to the web interface to quit.
MailCatcher runs as a daemon in the background, which enables you to do other things in the current terminal session. We’ll visit the MailCatcher web UI after we have some emails to review (see “Review Notification Email Messages with MailCatcher” later in this chapter).
Set Up Node.js Project Environment
The Proposal Reviewer and Speaker Notifier are both written in Node.js. If you haven’t installed Node.js
yet, refer to Appendix A, and install Node.js (see “Install Node.js”
and “Install npm Modules”). If you want to follow along with the Node.js project provided in
the code examples, cd to chapter-10/myconference and do the following to install all dependencies
for the project:
npm install
If you’d like to set up the Node.js project yourself, follow the instructions in the book’s GitHub repository.
Speaker Proposal Producer (Send Speaker Proposals)
We’ll use the publish-message.sh script (that you saw earlier) to send the contents of
the speakerProposal.json file to the new-proposals-recvd Topic.
In the same terminal session (2), run the following command from the scripts directory:
./publish-message.sh -f ../data/speakerProposal.json new-proposals-recvd
The Proposal Reviewer accepts/rejects proposals randomly (see the next section for details), so you’ll need to run this script three to five times (or more) to get acceptance and rejection and notification messages for the Speaker.
Proposal Reviewer (Consumer/Producer)
The Proposal Reviewer does the following:
-
Listens on the
new-proposals-recvdTopic to receive Speaker session proposals -
Validates the proposal and decides to accept or reject it
-
Sends the decision on the proposal to the
proposals-reviewedTopic for further processing
myconference/proposalReviewer.js includes the full Proposal Reviewer application. Example 10-11 shows the portion of the code (along with setup) that receives the Speaker session proposals on
the new-proposals-recvd Topic.
Example 10-11. myconference/proposalReviewer.js
varkafka=require('kafka-node');...constNEW_PROPOSALS_RECEIVED_TOPIC='new-proposals-recvd';...varconsumer=newkafka.ConsumerGroup({fromOffset:'latest',autoCommit:true},NEW_PROPOSALS_RECEIVED_TOPIC);// Use incoming JSON message.// Use JSON.parse() and JSON.stringify() to process JSON.consumer.on('message',function(message){// console.log('received kafka message', message);processProposal(message);});consumer.on('error',function(err){console.log(err);});process.on('SIGINT',function(){console.log('SIGINT received - Proposal Reviewer closing. '+'Committing current offset on Topic: '+NEW_PROPOSALS_RECEIVED_TOPIC+' ...');consumer.close(true,function(){console.log('Finished committing current offset. Exiting with graceful shutdown ...');process.exit();});});
Note the following in this example:
-
Use the
kafka-nodenpm module to consume/produce Kafka messages. You can find more information onkafka-nodeon the npm site and on GitHub. -
Listen on and consume messages from the
new-proposals-recvdTopic as follows:-
Instantiate and use the
ConsumerGroupObject to consume Kafka messages on thenew-proposals-recvdTopic. ThefromOffset: 'latest'parameter indicates that we want to receive the latest message on the Topic, andautoCommit: truetells the consumer to commit each message automatically after it is consumed (this marks the message as processed). -
consumer.on('message' …)listens for a message and invokesprocessProposal()(more on this later) to process the incoming Speaker proposal that was just received. -
consumer.on('error' …)prints an error message for any errors encountered when processing the message. -
process.on('SIGINT' …)listens for aSIGINT(process shutdown), commits the current offset, and does a graceful exit:-
consumer.close(…)commits the current offset. This ensures that the current message is marked as read, and that the Consumer on this Topic will receive the next message on the topic upon restart.
-
-
Example 10-12 shows how to validate the Speaker proposal and make a decision.
Example 10-12. myconference/proposalReviewer.js
...varfs=require('fs');varAjv=require('ajv');...constSPEAKER_PROPOSAL_SCHEMA_FILE_NAME='./schemas/speakerProposalSchema.json';...functionprocessProposal(proposal){varproposalAccepted=decideOnProposal();varproposalMessage=proposal.value;varproposalMessageObj=JSON.parse(proposalMessage);console.log('\n\n');console.log('proposalMessage = '+proposalMessage);console.log('proposalMessageObj = '+proposalMessageObj);console.log('Decision - proposal has been ['+(proposalAccepted?'Accepted':'Rejected')+']');if(isSpeakerProposalValid(proposalMessageObj)&&proposalAccepted){acceptProposal(proposalMessageObj);}else{rejectProposal(proposalMessageObj);}}functionisSpeakerProposalValid(proposalMessage){varajv=Ajv({allErrors:true});varspeakerProposalSchemaContent=fs.readFileSync(SPEAKER_PROPOSAL_SCHEMA_FILE_NAME);varvalid=ajv.validate(speakerProposalSchemaContent,proposalMessage);if(valid){console.log('\n\nJSON Validation: Speaker proposal is valid');}else{console.log('\n\nJSON Validation: Error - Speaker proposal is invalid');console.log(ajv.errors+'\n');}returnvalid;}functiondecideOnProposal(){returnMath.random()>=0.5;}functionacceptProposal(proposalMessage){varacceptedProposal={decision:{accepted:true,timeSlot:{date:"2017-11-06",time:"10:00"}},proposal:proposalMessage};varacceptedProposalMessage=JSON.stringify(acceptedProposal);console.log('Accepted Proposal = '+acceptedProposalMessage);publishMessage(acceptedProposalMessage);}functionrejectProposal(proposalMessage){varrejectedProposal={decision:{accepted:false},proposal:proposalMessage};varrejectedProposalMessage=JSON.stringify(rejectedProposal);console.log('Rejected Proposal = '+rejectedProposalMessage);publishMessage(rejectedProposalMessage);}...
After the Proposal Reviewer receives a Speaker proposal message, processProposal() does the following:
-
decideOnProposal()randomly chooses to accept or reject the proposal to keep things simple. In a real system, an application would put the proposal into someone’s work inbox, and a human would review and make a decision. -
JSON.parse()parses the proposal message to ensure that it is syntactically correct (it follows basic JSON formatting rules). -
isSpeakerProposalValid()uses theajvnpm module to validate against a JSON Schema (schemas/speakerProposalSchema.json): -
If the Speaker proposal was accepted,
acceptProposal()does the following:-
Creates an acceptance object with fields to indicate that the proposal was accepted, and the time slot when the speaker will deliver the presentation at the conference
-
Uses
JSON.stringify()to convert the acceptance object to JSON -
Invokes
publishMessage()to send the acceptance message to theproposals-reviewedTopic
-
-
If the Speaker proposal was rejected (or its format was invalid),
rejectProposal()does the following:-
Creates a rejection Object with fields to indicate that the proposal was rejected
-
Uses
JSON.stringify()to convert the rejection Object to JSON -
Invokes
publishMessage()to send the rejection message to theproposals-reviewedTopic
-
Example 10-13 shows how to send an acceptance/rejection message on to the proposals-reviewed Topic.
Example 10-13. myconference/proposalReviewer.js
...constPROPOSALS_REVIEWED_TOPIC='proposals-reviewed';...varproducerClient=newkafka.Client(),producer=newkafka.HighLevelProducer(producerClient);...functionpublishMessage(message){varpayloads=[{topic:PROPOSALS_REVIEWED_TOPIC,messages:message}];producer.send(payloads,function(err,data){console.log(data);});}producer.on('error',function(err){console.log(err);});
This code publishes messages to the proposals-reviewed Topic as follows:
-
Instantiates and uses the
HighLevelProducerObject to publish messages to theproposals-reviewedTopic. The instantiation forHighLevelProduceractually happens toward the beginning of the file, but we show it here for convenience. -
publishMessage()invokesproducer.send()to send the message.producer.on('message' …)listens for a message and invokesprocessProposal()(more on this later) to process the incoming Speaker proposal that was just received.
We’ve only touched on the kafka-node Objects used by Producers and Consumers. For further details, visit the kafka-node module documentation to learn more about the following:
-
HighLevelProducer -
ConsumerGroup -
Client
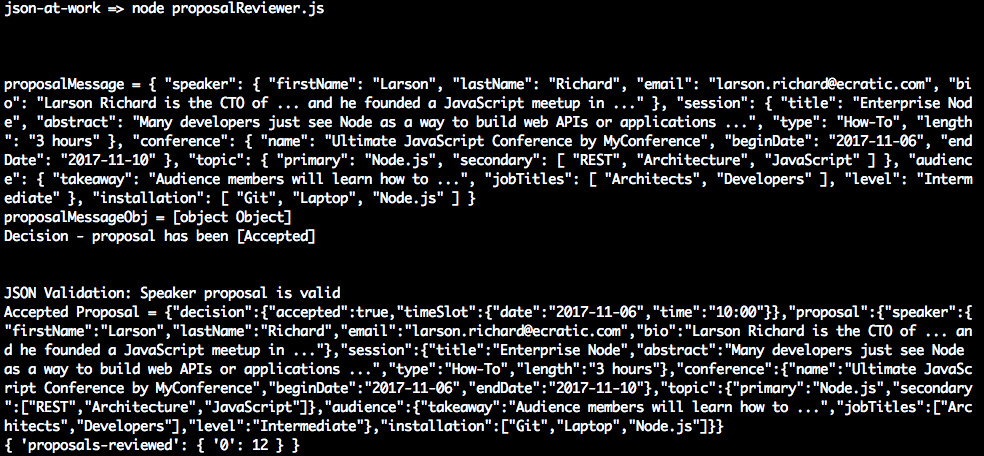
Now that we’ve looked at Proposal Reviewer code, create a new terminal session (3) and run the following command (from the myconference directory) to start the Proposal Reviewer:
node proposalReviewer.js
When Speaker proposal messages arrive on the new-proposals-recvd Topic, you should see that
the Proposal Reviewer logs the proposals it receives and the decisions it makes (on the
proposals-reviewed Topic):
Speaker Notifier (Consumer)
After the decision has been made to accept/reject a proposal, the Speaker Notifier:
-
Listens on the
proposals-reviewedTopic for accepted/rejected proposals -
Formats an acceptance/rejection email
-
Sends the acceptance/rejection email
myconference/speakerNotifier.js includes the full Speaker Notifier application. Example 10-14 shows the portion of the code (along with setup) that receives the accepted/rejected proposals on
the proposals-reviewed Topic.
Example 10-14. myconference/speakerNotifier.js
varkafka=require('kafka-node');...constPROPOSALS_REVIEWED_TOPIC='proposals-reviewed';...varconsumer=newkafka.ConsumerGroup({fromOffset:'latest',autoCommit:true},PROPOSALS_REVIEWED_TOPIC);...consumer.on('message',function(message){// console.log('received message', message);notifySpeaker(message.value);});consumer.on('error',function(err){console.log(err);});process.on('SIGINT',function(){console.log('SIGINT received - Proposal Reviewer closing. '+'Committing current offset on Topic: '+PROPOSALS_REVIEWED_TOPIC+' ...');consumer.close(true,function(){console.log('Finished committing current offset. Exiting with graceful shutdown ...');process.exit();});});...
The Speaker Notifier listens on and consumes messages from the proposals-reviewed Topic as follows:
-
Instantiates and uses the
ConsumerGroupObject to consume Kafka messages on theproposals-reviewedTopic. The setup for this consumer is similar to the code in the Proposal Reviewer. -
consumer.on('message' …)listens for a message and invokesnotifySpeaker()(more on this later) to process the incoming acceptance/rejection message that was just received. -
consumer.on('error' …)andprocess.on('SIGINT' …)function in the same manner as the Proposal Reviewer example.
Example 10-15 shows how to process the accepted/rejected proposals and formats a corresponding acceptance/rejection email using Handlebars (which was covered in Chapter 7).
Example 10-15. myconference/speakerNotifier.js
...varhandlebars=require('handlebars');varfs=require('fs');...constEMAIL_FROM='proposals@myconference.com';constACCEPTED_PROPOSAL_HB_TEMPLATE_FILE_NAME='./templates/acceptedProposal.hbs';constREJECTED_PROPOSAL_HB_TEMPLATE_FILE_NAME='./templates/rejectedProposal.hbs';constUTF_8='utf8';...functionnotifySpeaker(notification){varnotificationMessage=createNotificationMessage(notification);sendEmail(notificationMessage);}functioncreateNotificationMessage(notification){varnotificationAsObj=JSON.parse(notification);varproposal=notificationAsObj.proposal;console.log('Notification Message = '+notification);varmailOptions={from:EMAIL_FROM,// sender addressto:proposal.speaker.,// list of receiverssubject:proposal.conference.name+' - '+proposal.session.title,// Subjecthtml:createEmailBody(notificationAsObj)};returnmailOptions;}functioncreateEmailBody(notification){// Read Handlebars Template file.varhbTemplateContent=fs.readFileSync(((notification.decision.accepted)?ACCEPTED_PROPOSAL_HB_TEMPLATE_FILE_NAME:REJECTED_PROPOSAL_HB_TEMPLATE_FILE_NAME),UTF_8);// Compile the template into a function.vartemplate=handlebars.compile(hbTemplateContent);varbody=template(notification);// Render the template.console.log('Email body = '+body);returnbody;}...
After the Speaker Notifier receives an acceptance/rejection message, notifySpeaker() does the following:
-
Invokes
createNotificationMessage()to create the notification email to send to the Speaker:-
Uses
JSON.parse()to parse the acceptance/rejection message into an Object -
Invokes
createEmailBody():
-
-
Invokes
sendEmail()to send the notification email to the Speaker (see the next example)
Example 10-16 shows how to send an acceptance/rejection email.
Example 10-16. myconference/speakerNotifier.js
...varnodeMailer=require('nodemailer');...constMAILCATCHER_SMTP_HOST='localhost';constMAILCATCHER_SMTP_PORT=1025;vartransporter=nodeMailer.createTransport(mailCatcherSmtpConfig);...functionsendEmail(mailOptions){// send mail with defined transport objecttransporter.sendMail(mailOptions,function(error,info){if(error){console.log(error);}else{console.log('Email Message sent: '+info.response);}});}
The Speaker Notifier sends email messages to the MailCatcher server as follows:
-
Instantiates and uses the
nodemailertransporter Object to send email. TheMAILCATCHER_SMTP_…constants indicate the host and port used by the MailCatcher on your local machine. The instantiation for thenodemailertransporter Object actually happens toward the beginning the file, but we show it here for convenience. -
sendEmail()invokestransporter.sendMail()to send the email message. -
nodemaileris a generic npm module that sends email messages by using SMTP. You can find more information onajvon the npm site and on thenodemailerCommunity Page.
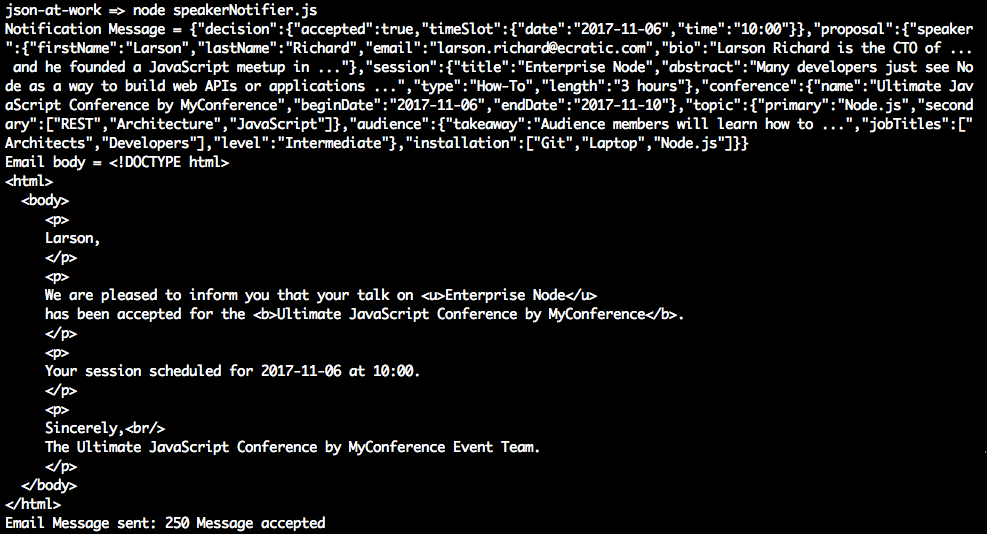
Now, create a new terminal session (4) and run the following command (from the myconference directory) to start the Speaker Notifier:
node speakerNotifier.js
When accepted/rejected proposal messages arrive on the proposals-reviewed Topic, you should see
that the Speaker Notifier logs the accepted/rejected proposals it receives and the email
notifications it sends:
Review Notification Email Messages with MailCatcher
To wrap up our example, let’s look at the notification messages (generated by the Speaker Notifier) sent to the prospective MyConference speakers.
Visit http://localhost:1080 on your machine and you’ll see the MailCatcher user interface. Figure 10-2 shows the summary page that lists the email messages generated by the MyConference application (using Handlebars).
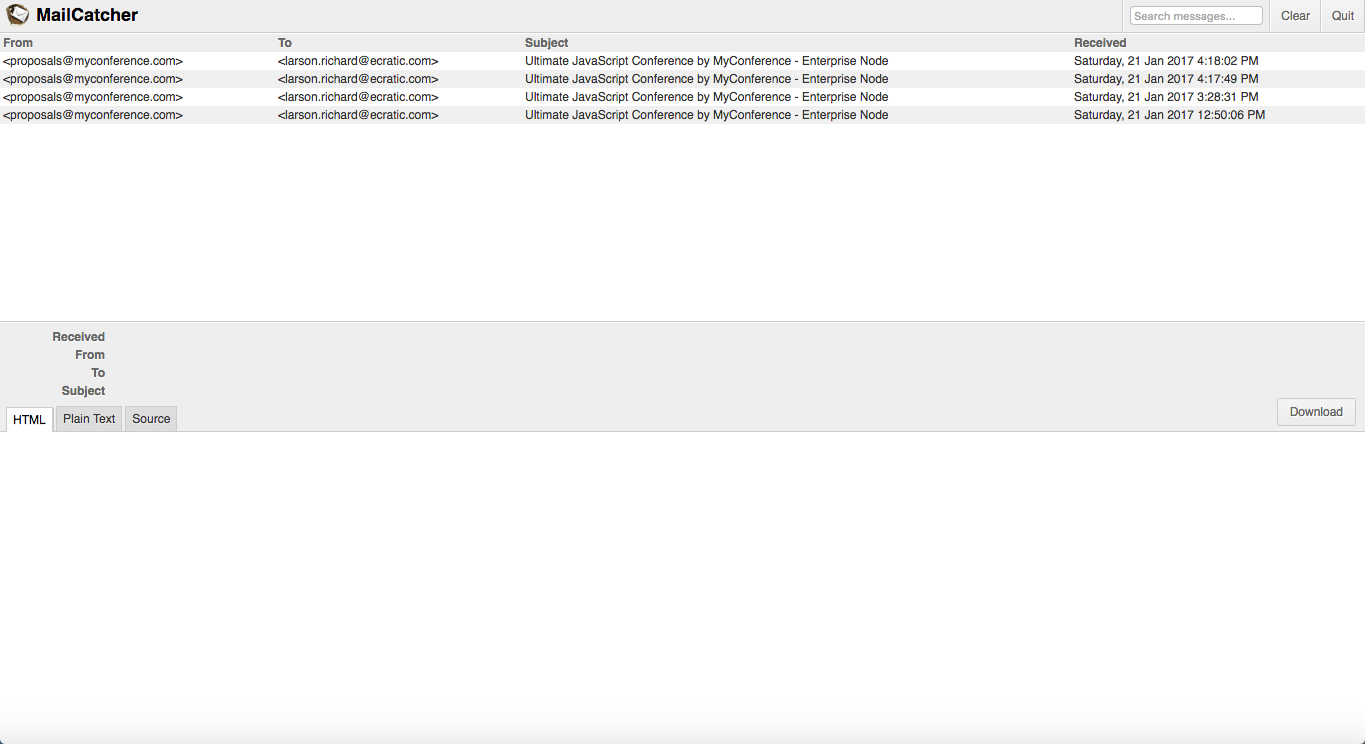
Figure 10-2. Speaker Notification messages on MailCatcher
Click some of the messages until you see an Acceptance message indicating that the session proposal was accepted, as shown in Figure 10-3.
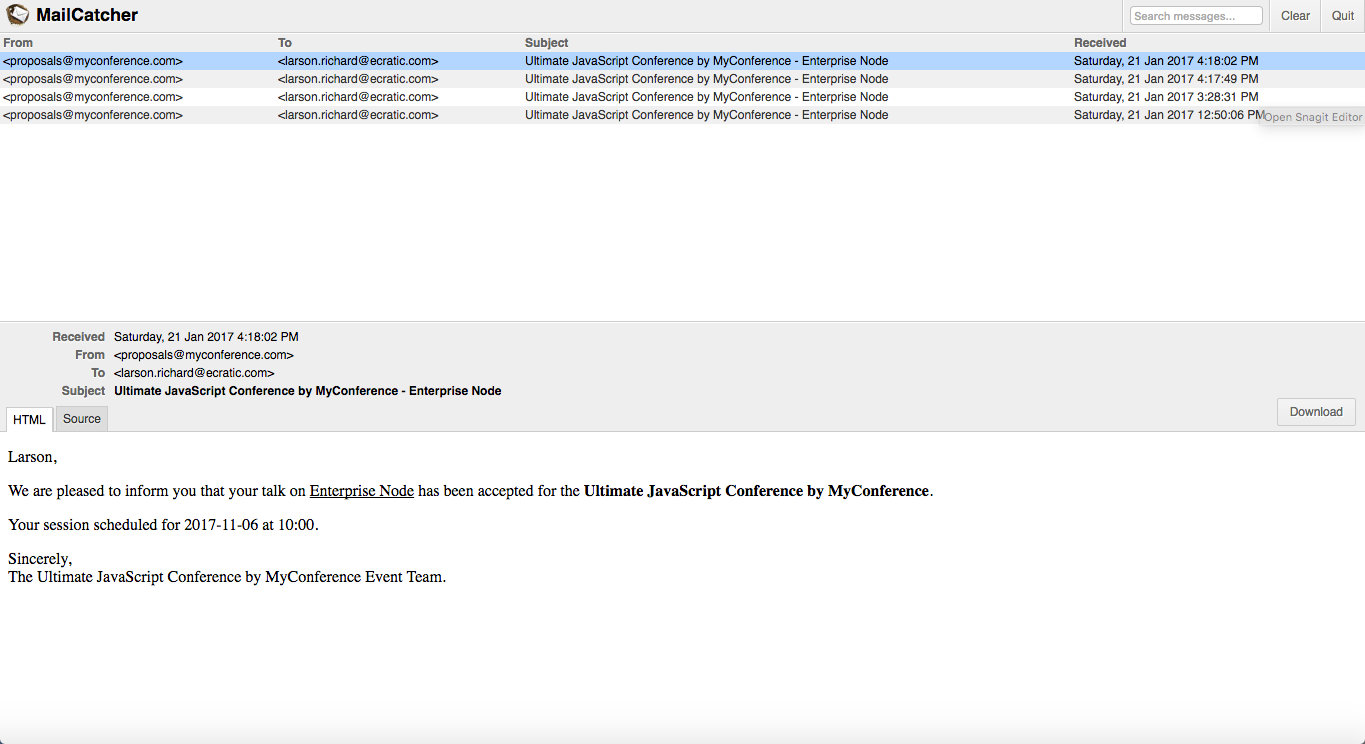
Figure 10-3. Speaker Proposal Acceptance message on MailCatcher
Figure 10-4 shows a sample rejection message.
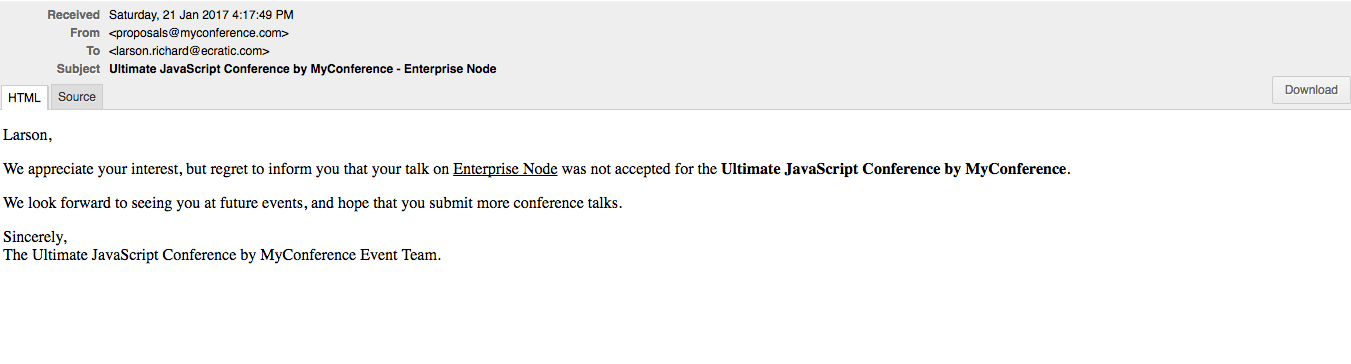
Figure 10-4. Speaker Proposal Rejection message on MailCatcher
The MailCatcher web UI controls work as follows:
-
Download the current email message by clicking the Download button. This saves the message as a file (with the extension .eml) in EML format, which
-
Follows the MIME 822 standard
-
Is compatible with MS Outlook and Outlook Express, Apple Mail, Mozilla Thunderbird, and other email clients
-
Preserves the original HTML format and headers
-
-
Shut down the MailCatcher background process by clicking on the Quit button on the upper-right side of the page
What We Covered
In this chapter, we’ve shown how to do the following: