Table of Contents for
JSON at Work
 JSON at Work
Published by
O'Reilly Media, Inc., 2017
JSON at Work
Published by
O'Reilly Media, Inc., 2017
- nav
- Cover
- JSON at Work
- JSON at Work
- Dedication
- Preface
- I. JSON Overview and Platforms
- 1. JSON Overview
- 2. JSON in JavaScript
- 3. JSON in Ruby on Rails
- 4. JSON in Java
- II. The JSON Ecosystem
- 5. JSON Schema
- 6. JSON Search
- 7. JSON Transform
- III. JSON in the Enterprise
- 8. JSON and Hypermedia
- 9. JSON and MongoDB
- 10. JSON Messaging with Kafka
- A. Installation Guides
- B. JSON Community
- Index
- About the Author
- Colophon
Chapter 7. JSON Transform
Your application(s) may take in data from multiple APIs, and you’ll often need to convert their JSON response data to a format that integrates with your application architecture.
Many JSON Transform technologies enable you to convert between a JSON document and other data formats (e.g., HTML or XML) or a different JSON structure. Many developers will be familiar with some of these libraries (e.g., Mustache and Handlebars), but we’ll show how to use them in nontraditional ways (more on that later). We’ll also cover libraries (e.g., JSON-T) that are not well-known to the community at large, but are commonly used by members of the JSON community.
Types of JSON Transformation
Typical types of transformations include the following:
- JSON-to-HTML
-
Many web and mobile applications have to handle JSON data from APIs, and this is the most common type of JSON transformation.
- JSON-to-JSON
-
Sometimes the JSON response from a Web API isn’t quite what you’re looking for, and you’d like to change the format of the data to make it easier to work with. In this case, you can alter the structure by modifying values and/or removing, adding, and deleting fields. Some of the libraries are analogous to eXtensible Stylesheet Language Transformations (XSLT) for XML (which is used to transform XML documents) in that they use a separate template to describe the transformation.
- JSON-XML
-
SOAP/XML-based Web Services still exist, and sometimes you need to consume XML and convert it to JSON for compatibility with newer applications in the enterprise that are based on REST and JSON. Conversely, your applications may need to send XML payloads to SOAP/XML-based Web Services. In this case, you’ll need to convert from JSON to XML.
In this chapter, we’ll show how to do the following:
-
Convert JSON to HTML
-
Convert a JSON document to a new (JSON) structure
-
Convert between XML and JSON
-
Use JSON Transform libraries
-
Write Unit Tests that transform the content of JSON documents returned by a Web API
What to Look For in a JSON Transform Library
Just as you saw with JSON Search, several libraries are available for each type of transformation, and it’s hard to choose which one(s) to use. We’ll use the same criteria we did in Chapter 6:
- Mindshare
-
Does it appear to be widely used? How many hits do you see when you do an internet search?
- Developer community
-
Is the code on GitHub? Is it well maintained?
- Platforms
-
Does it run on multiple platforms? Do multiple providers support the specification or library interfaces?
- Intuitive
-
Is it well-documented? How easy is it to install? How intuitive is the interface? How easy is it to use? How much code do I need to write?
- Standards
-
Is the library associated with an official standard (e.g., IETF, WC3, or Ecma)?
Test Input Data
We’ll use the same OpenWeatherMap API data that we used in previous chapters for our examples. The original OpenWeatherMap API data was captured in chapter-7/data/cities-weather.json. For the sake of brevity, Example 7-1 provides a shortened version of the data.
Example 7-1. data/cities-weather-short.json
{"cities":[{"id":5386035,"name":"Rancho Palos Verdes","coord":{"lon":-118.387016,"lat":33.744461},"main":{"temp":84.34,"pressure":1012,"humidity":58,"temp_min":78.8,"temp_max":93},"dt":1442171078,"wind":{"speed":4.1,"deg":300},"clouds":{"all":5},"weather":[{"id":800,"main":"Clear","description":"Sky is Clear","icon":"02d"}]},{"id":5392528,"name":"San Pedro","coord":{"lon":-118.29229,"lat":33.735851},"main":{"temp":84.02,"pressure":1012,"humidity":58,"temp_min":78.8,"temp_max":91},"dt":1442171080,"wind":{"speed":4.1,"deg":300},"clouds":{"all":5},"weather":[{"id":800,"main":"Clear","description":"Sky is Clear","icon":"02d"}]},{"id":3988392,"name":"Rosarito","coord":{"lon":-117.033333,"lat":32.333328},"main":{"temp":82.47,"pressure":1012,"humidity":61,"temp_min":78.8,"temp_max":86},"dt":1442170905,"wind":{"speed":4.6,"deg":240},"clouds":{"all":32},"weather":[{"id":802,"main":"Clouds","description":"scattered clouds","icon":"03d"}]}]}
Let’s start with a JSON-to-HTML transformation.
JSON-to-HTML Transformation
Most developers should be familiar with converting JSON from an API response to HTML. For this type of conversion, we’ll look at the following libraries:
-
Mustache
-
Handlebars
Target HTML Document
Refer to “Test Input Data”. We want to simplify the Cities data and display it in an HTML table as shown in Example 7-2.
Example 7-2. data/weather.html
<!DOCTYPE html><html><head><metacharset="UTF-8"/><title>OpenWeather - California Cities</title><linkrel="stylesheet"href="weather.css"></head><body><h1>OpenWeather - California Cities</h1><tableclass="weatherTable"><thead><tr><th>City</th><th>ID</th><th>Current Temp</th></tr></thead><tr><td>Santa Rosa</td><td>5201</td><td>75</td></tr></table></body></html>
We’ll compare how each library converts the sample JSON input data to the target HTML document.
Mustache
Mustache uses templates that provide a declarative (codeless) way to convert data into other formats. In this case, we’ll use it to convert JSON data to an HTML document. The Mustache team uses the term logicless to describe their library because templates contain only simple tags without if/then/else clauses or looping constructs. Based on the specification, Mustache expands the tags in a template file with values from a hash or an object that is populated by an application. The beauty of templates (regardless of whether you use Mustache or Handlebars, which reintroduces some conditional logic) is that this approach provides a separation of concerns by factoring out the transformation from application code to external files. External templates enable you to easily add/remove data formats or change how you do the data formatting without modifying application code.
For more information, see the following sites:
Mustache template syntax
The Mustache template in Example 7-3 converts the OpenWeatherMap JSON data to HTML.
Example 7-3. templates/transform-html.mustache
<!DOCTYPE html><html><head><metacharset="UTF-8"/><title>OpenWeather - California Cities</title><linkrel="stylesheet"href="weather.css"></head><body><h1>OpenWeather - California Cities</h1><tableclass="weatherTable"><thead><tr><th>City</th><th>ID</th><th>Current Temp</th><th>Low Temp</th><th>High Temp</th><th>Humidity</th><th>Wind Speed</th><th>Summary</th><th>Description</th></tr></thead>{{#cities}}<tr><td>{{name}}</td><td>{{id}}</td>{{#main}}<td>{{temp}}</td><td>{{temp_min}}</td><td>{{temp_max}}</td><td>{{humidity}}</td>{{/main}}<td>{{wind.speed}}</td>{{#weather.0}}<td>{{main}}</td><td>{{description}}</td>{{/weather.0}}</tr>{{/cities}}</table></body></html>
This template works as follows:
-
The template is based on an HTML document, and Mustache expands each tag with data from the
citiesArray. -
A tag can represent a single field, such as:
{{temp}}. -
Sections are enclosed within begin (for example,
{{#cities}}) and end (for example,{{/cities}}) tags.-
A section can correspond to an Array (e.g.,
cities) or an object (e.g.,main). -
A section sets the context for the other tags within that section. For example, the
{{temp}}tag inside the{{main}}section could be expressed as{{main.temp}}, and corresponds to main.temp in the original JSON input document.
-
-
The field syntax in a tag can refer to an Array index. For example,
{{#weather.0}}refers toweather[0]from the input JSON document.
Next, we’ll now show a Unit Test that renders the template with Cities data.
Mustache Unit Test
All tests in this chapter will continue to leverage Mocha/Chai, just as we saw in previous chapters. Before
going further, be sure to set up your test environment. If you haven’t installed Node yet,
visit Appendix A, and install Node.js (see “Install Node.js” and “Install npm Modules”). If you want to follow along with the Node.js project provided in the code examples, cd to chapter-7/cities-weather-transform-test and do the following to install all dependencies
for the project:
npm install
If you’d like to set up the Node.js project yourself, follow the instructions in the book’s GitHub repository.
Example 7-4 uses the following Node.js modules:
- Mustache
-
This is available at https://www.npmjs.com/package/mustache. The corresponding GitHub repository can be found at https://github.com/janl/mustache.js.
jsonfile-
We’ll use this module to read the OpenWeatherMap JSON data from a file and parse it.
jsonfileis available at https://www.npmjs.com/package/jsonfile. Here’s thejsonfileGitHub repository: https://github.com/jprichardson/node-jsonfile.
The Unit Test in Example 7-4 shows the example Mustache transformations in action.
Example 7-4. cities-weather-transform-test/test/mustache-spec.js
'use strict';/* Attribution: Cities Weather data provided by OpenWeatherMap API([http://openweathermap.org]) under Creative Commons Share A LikeLicense (https://creativecommons.org/licenses/by-sa/4.0).Changes were made to the data to work with json-server.This does not imply an endorsement by the licensor.This code is distributed under Creative Commons Share A Like License.*/varexpect=require('chai').expect;varjsonfile=require('jsonfile');varfs=require('fs');varmustache=require('mustache');describe('cities-mustache',function(){varjsonCitiesFileName=null;varhtmlTemplateFileName=null;beforeEach(function(){varbaseDir=__dirname+'/../..';jsonCitiesFileName=baseDir+'/data/cities-weather-short.json';htmlTemplateFileName=baseDir+'/templates/transform-html.mustache';});it('should transform cities JSON data to HTML',function(done){jsonfile.readFile(jsonCitiesFileName,function(readJsonFileError,jsonObj){if(!readJsonFileError){fs.readFile(htmlTemplateFileName,'utf8',function(readTemplateFileError,templateFileData){if(!readTemplateFileError){vartemplate=templateFileData.toString();varhtml=mustache.render(template,jsonObj);console.log('\n\n\nHTML Output:\n'+html);done();}else{done(readTemplateFileError);}});}else{done(readJsonFileError);}});});});
This code works as follows:
-
beforeEach()runs before any Unit Test and does setup. In this case, it builds the filenames for the input JSON file and the Mustache template. -
In the
'should transform cities JSON data to HTML'Unit Test:-
jsonfile.readFile()reads and parses the input JSON file into a JavaScript Object (jsonObj). -
fs.readFile()reads the Mustache template into a JavaScript Object. -
We then convert the Mustache template to a String.
-
mustache.render()renders the Mustache template into an HTML document using the values provided byjsonObj(which was read in earlier).
-
Before you run the Unit Test, open a terminal session and run json-server on port 5000 from your command
line:
cd chapter-7/data

json-server -p 5000 ./cities-weather-short.json
Next, run the preceding test from a second terminal session as follows:
cd chapter-7/cities-weather-transform-test

npm test
You’ll see an HTML document that looks like our HTML target document.
Mustache online tester
The Architect template editor is an excellent online tester that makes it easy to iteratively test and develop a Mustache template. This tool is great, because it shows how the result changes as you modify the template. This WYSIWIG (What-You-See-Is-What-You-Get) output enables rapid development and debugging.
In the Architect online tool, select Mustache.js in the Engine drop-down, paste the Mustache template, and input JSON into the Template and View text boxes (respectively). You should see the screen in Figure 7-1.
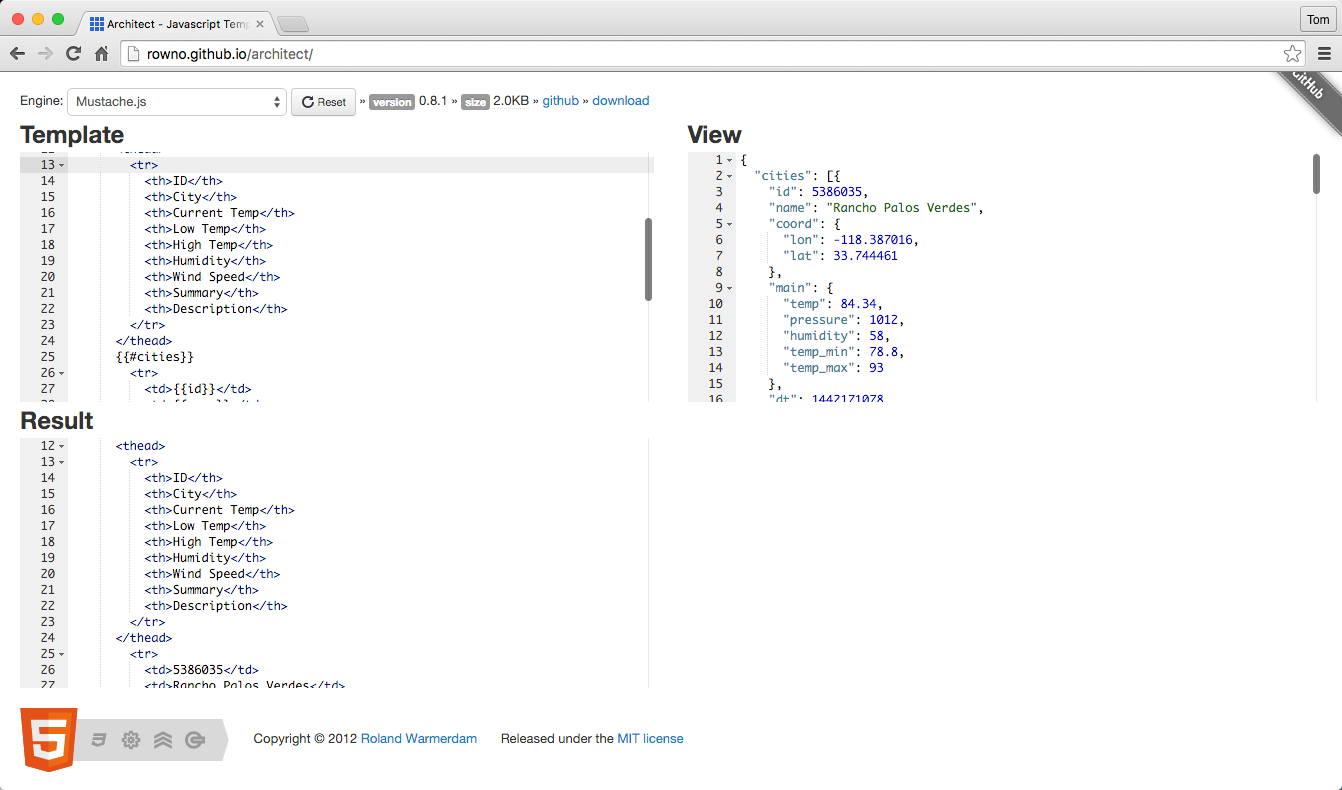
Figure 7-1. Architect: JSON-to-HTML transformation with Mustache
The Architect template editor also works with several other templating engines, including Handlebars (which is covered in the next section), so this is my favorite online template editor.
Remember that this web application is publicly available:
-
Any data you paste into this app is visible to others. So don’t use this tool with sensitive information (personal, proprietary, and so forth).
-
A large amount of data will flood your browser. I’ve been successful with up to about 10,000 lines of JSON, but after that this application begins to freeze up.
Mustache on the command line
Mustache also works directly from the command line. If you have installed Node.js, do a global installation of the Mustache Node.js module and run it from the command line (within the book example code directory) as follows:
npm install -g mustache

cd chapter-7

mustache ./data/cities-weather-short.json \
  ./templates/transform-html.mustache > output.html
Mustache on other platforms
A quick glance at the Mustache site will show that Mustache enjoys wide cross-platform support, including the following:
Mustache scorecard
Table 7-1 shows a scorecard for Mustache based on the evaluation criteria from the beginning of this chapter.
| Mindshare | Y |
|---|---|
Dev community |
Y |
Platforms |
JavaScript, Node.js, Java, Ruby on Rails |
Intuitive |
Y |
Standard |
N |
Overall, Mustache is a powerful and flexible template engine used by many web developers. Although it’s not a standard, Mustache has a solid specification.
Handlebars
Handlebars is an extension of Mustache, and it also expands the tags in a template file with values from a hash or an object. Handlebars and Mustache are highly compatible, and Mustache templates will usually work with the Handlebars engine. HTML conversion is pretty simple, and we won’t see any major differences between Mustache and Handlebars for now. Handlebars adds a few more features to enhance transformation, and we’ll cover them in “JSON-to-JSON Transform”. For more information on Handlebars, see the following:
-
Handlebars main site (click the Learn More buttons for further details)
Differences between Handlebars and Mustache
Handlebars extends Mustache by providing additional capabilities, which include the following:
- Conditional logic
-
Handlebars has built-in helpers such as
ifandunless. We’ll show how to leverageunlessin “JSON-to-JSON Transform”. - Helpers
-
Handlebars allows a developer to register custom helpers to extend Handlebars. Each custom helper provides an additional directive that can be used in a template. For example, you could add a
{{fullName}}helper that would combine thefirstNameandlastNameelements for aspeaker. Helpers are powerful, but we don’t cover them further in this book. See the Handlebars website and Jasko Koyn’s Custom Helpers Handlebars.js Tutorial for more information on Handlebars helpers.
The Handlebars GitHub site has a full description of the differences between Handlebars and Mustache.
Handlebars template syntax
Let’s use the Handlebars template in Example 7-5 to transform the input JSON to an HTML document.
Example 7-5. templates/transform-html.hbs
<!DOCTYPE html><html><head><metacharset="UTF-8"/><title>OpenWeather - California Cities</title><linkrel="stylesheet"href="weather.css"></head><body><h1>OpenWeather - California Cities</h1><tableclass="weatherTable"><thead><tr><th>ID</th><th>City</th><th>Current Temp</th><th>Low Temp</th><th>High Temp</th><th>Humidity</th><th>Wind Speed</th><th>Summary</th><th>Description</th></tr></thead>{{#eachcities}}<tr><td>{{id}}</td><td>{{name}}</td>{{#main}}<td>{{temp}}</td><td>{{temp_min}}</td><td>{{temp_max}}</td><td>{{humidity}}</td>{{/main}}<td>{{wind.speed}}</td>{{#eachweather}}<td>{{main}}</td><td>{{description}}</td>{{/each}}</tr>{{/each}}</table></body></html>
This template works as follows:
-
Handlebars expands each tag with data from the
citiesArray. -
A tag can represent a single field, such as
{{temp}}. -
Sections are enclosed within begin (e.g.,
{{#each cities}}) and end (e.g.,{{/cities}}) tags.-
A section can correspond to an Array (e.g.,
cities) or an object (e.g.,main). -
The
eachtag (e.g.,{{#each cities}}) is used for arrays (in this case,cities). -
A section sets the context for the other tags within that section. For example, the
{{temp}}tag inside the{{main}}section could be expressed as{{main.temp}}, and corresponds to main.temp in the original JSON input document.
-
Handlebars Unit Test
The Unit Test in Example 7-6 uses a Handlebars template to render HTML with the Cities data.
Example 7-6. cities-weather-transform-test/test/handlebars-spec.js
'use strict';/* Attribution: Cities Weather data provided by OpenWeatherMap API([http://openweathermap.org]) under Creative Commons Share A LikeLicense (https://creativecommons.org/licenses/by-sa/4.0).Changes were made to the data to work with json-server.This does not imply an endorsement by the licensor.This code is distributed under Creative Commons Share A Like License.*/varexpect=require('chai').expect;varjsonfile=require('jsonfile');varfs=require('fs');varhandlebars=require('handlebars');describe('cities-handlebars',function(){varjsonCitiesFileName=null;varhtmlTemplateFileName=null;beforeEach(function(){varbaseDir=__dirname+'/../..';jsonCitiesFileName=baseDir+'/data/cities-weather-short.json';htmlTemplateFileName=baseDir+'/templates/transform-html.hbs';});it('should transform cities JSON data to HTML',function(done){jsonfile.readFile(jsonCitiesFileName,function(readJsonFileError,jsonObj){if(!readJsonFileError){fs.readFile(htmlTemplateFileName,'utf8',function(readTemplateFileError,templateFileData){if(!readTemplateFileError){vartemplate=handlebars.compile(templateFileData);varhtml=template(jsonObj);console.log('\n\n\nHTML Output:\n'+html);done();}else{done(readTemplateFileError);}});}else{done(readJsonFileError);}});});});
This Handlebars Unit Test is practically identical to its Mustache counterpart, with the following differences:
-
We don’t need to convert the Handlebars template (that is, read from
fs.readFile()) to a String. -
It takes two steps to render the template:
-
handlebars.compile()compiles the template into thetemplatevariable. -
template()(from the compile) then renders thejsonObj(input JSON) into HTML.
-
When you run the preceding test with npm test, you’ll see a second HTML document that looks like our HTML
target document.
Handlebars online testers
Two excellent online testers make it easy to iteratively test and develop a Handlebars template: TryHandlebars and Architect.
To use TryHandlebars, copy the Handlebars template and JSON into the Handlebars Template and Context text boxes. The result is shown in Figure 7-2.
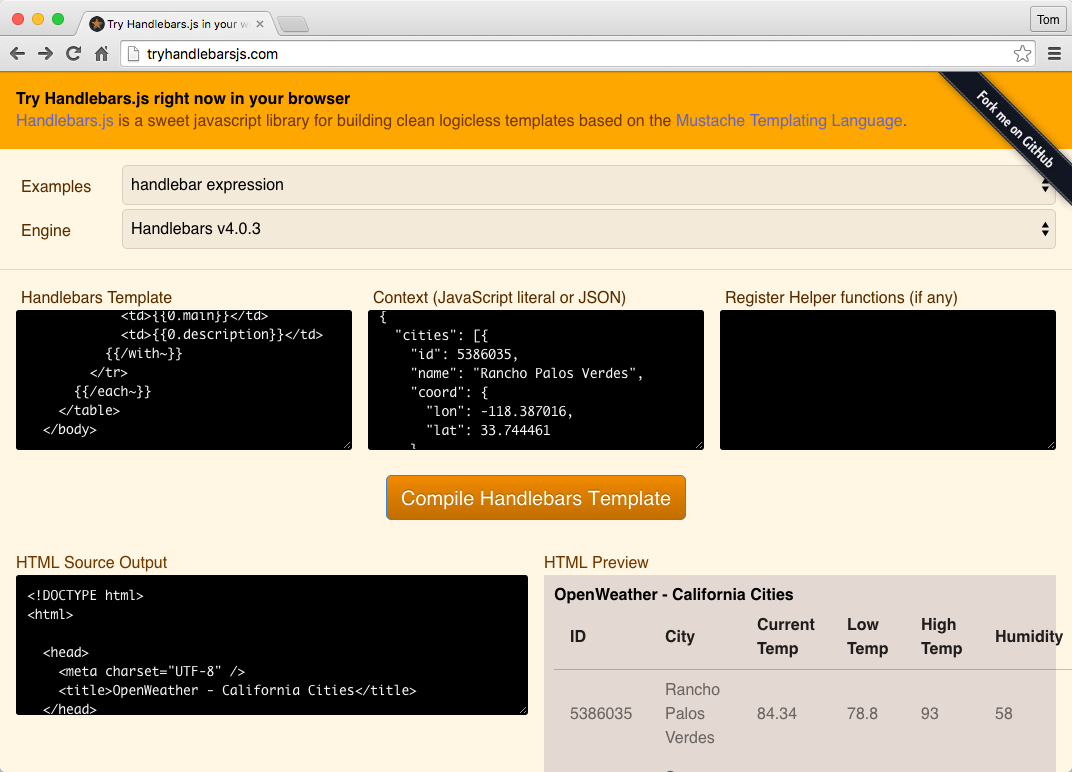
Figure 7-2. Try Handlebars.js: JSON-to-HTML transformation with Handlebars
You can also use the Architect template editor. Select Handlebars.js in the Engine drop-down, paste the Handlebars template, and input JSON into the Template and View text boxes (respectively). Click the Compile Handlebars Template button, and you should see the result shown in Figure 7-3.
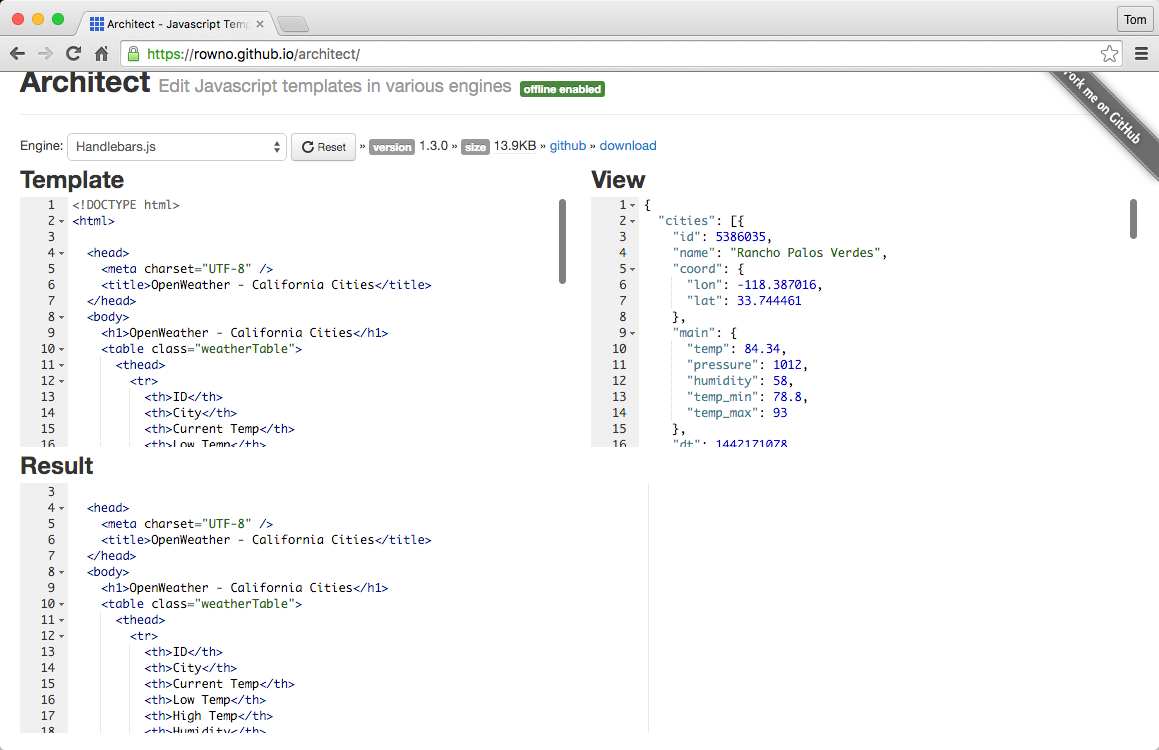
Figure 7-3. Architect: JSON-to-HTML transformation with Handlebars
Handlebars on the command line
Handlebars also works directly from the command line. If you have installed Node.js, do a global installation of
the hb-interpolate module, which is also available on GitHub:
npm install -g hb-interpolate

cd chapter-7

hb-interpolate -j ./data/cities-weather-short.json \
   -t ./templates/transform-html.hbs > output.html
Handlebars scorecard
Table 7-2 provides a scorecard for Handlebars based on the evaluation criteria from the beginning of this chapter.
| Mindshare | Y |
|---|---|
Dev community |
Y |
Platforms |
JavaScript, Node.js, Java, Ruby on Rails |
Intuitive |
Y |
Standard |
N |
Handlebars is another excellent engine that is used by many web developers. Just like Mustache, Handlebars isn’t a standard, and it too has a solid specification and works across multiple platforms.
JSON-to-JSON Transform
If you’ve worked with APIs for any length of time in a professional setting, you’ve come to realize that APIs don’t always work the way you want them to. The JSON response from an API is often the most overlooked part of an API’s design, and the data provided by an API is often difficult to use. Even if the data is well-designed, you may not want to use all of it or you may want to convert it to another JSON structure that is better suited to the consuming application (or other applications in your system).
Similar to the discussion in Chapter 6, you could do the following:
-
Parse the JSON data from an API and manipulate the resulting hash structure programmatically
-
Write custom code to convert between an input JSON document and another JSON structure
But these approaches are tedious and difficult. There’s no need to write this type of utility code, because libraries are available to do most of the work for you.
The Issues
The biggest issue I’ve seen in the area of JSON-to-JSON transformation is the lack of standards (official or de facto). In the previous chapter, for example, even though JSONPath is not an official standard, it is a de facto standard. JSONPath is a concept and query language with wide acceptance and implementations on multiple platforms. But with the JSON Transform libraries, it was difficult to find something that was more than just a single-language/platform implementation. I was looking for products that could transcend individual platforms and serve a larger, more universal purpose in the community. It was a journey to find the best solutions, but a few JSON Transform libraries are better than a one-off solution, and I hope you find them useful for your projects.
JSON-to-JSON Transform Libraries
Several libraries (callable from an application) can transform JSON documents. We’ll look into the following libraries:
-
JSON Patch
-
JSON-T
-
Mustache
-
Handlebars
If you’re in a hurry, Handlebars is the best choice for JSON-to-JSON transformation (see “Handlebars” and “JSON-to-JSON Transformation Evaluations—The Bottom Line”). Otherwise, let’s walk through the various JSON-to-JSON transformation techniques so you can see why.
Honorable Mention
Several JSON Transform libraries are available, but we can’t cover all of them. Here are three additional libraries that are worth a look:
- Jolt
- Json2Json
jsonapter-
jsonaptertransforms JSON data in a declarative manner that leverages an external template with transformation rules. The template is analogous to XSL, but that’s where the similarities stop.jsonapterand its template rules are in pure JavaScript, but XSL had its own separate templating language. Unfortunately,jsonapterworks only with JavaScript and Node.js.
Target JSON Output
Refer to “Test Input Data” earlier in this chapter. Even though there
are only three elements in the cities array, the data is overly complex for our use.
We don’t want to use all of these fields, so let’s simplify the structure as follows:
-
Keep the
citiesarray along withidandname. -
Make a completely new, flattened
weatherobject. -
Add other weather-related fields from other structures to
weather:-
main.temp,main.humidity,main.temp_min,main.temp_max -
wind.speed -
weather.0.mainandweather.0.description
-
-
Rename fields for the sake of clarity.
Given these transformation rules, the output should look like Example 7-7.
Example 7-7. data/cities-weather-short-transformed.json
{"cities":[{"id":"5386035","name":"Rancho Palos Verdes","weather":{"currentTemp":84.34,"lowTemp":78.8,"hiTemp":93,"humidity":58,"windSpeed":4.1,"summary":"Clear""description":"Sky is Clear"}},{"id":"5392528","name":"San Pedro","weather":{"currentTemp":84.02,"lowTemp":78.8,"hiTemp":91,"humidity":58,"windSpeed":4.1,"summary":"Clear""description":"Sky is Clear"}},{"id":"3988392","name":"Rosarito","weather":{"currentTemp":82.47,"lowTemp":78.8,"hiTemp":86,"humidity":61,"windSpeed":4.6,"summary":"Clouds""description":"scattered clouds"}}]}
We’ll evaluate each of the JSON Transform libraries based on how easy it is to convert the sample JSON input data to the target JSON output.
JSON Patch
JSON Patch is an IETF standard that specifies a data format for operations that transform a single resource. JSON Patch works in conjunction with the HTTP PATCH standard. The purpose of HTTP PATCH is to modify a resource produced by an API. In short, HTTP PATCH changes a portion of a resource, whereas HTTP PUT replaces the resource entirely.
JSON Patch is supposed to be used as part of an HTTP Request, and not the Response. JSON Patch is really meant for an API Producer, and not the Consumer. But the context of this chapter is from the API Consumer’s point of view, and we’ll see how far we can go with JSON Patch to transform the data in an HTTP Response.
JSON Patch syntax
Table 7-3 shows the main JSON Patch operations that could be used with the OpenWeatherMap data.
| JSON Patch operation | Description |
|---|---|
Add - |
Adds a value to either an existing Object or an Array. It can’t create a completely new Object in a document. |
Remove - |
Removes the |
Replace - |
Replaces a value in the document. This is the same as doing a |
Copy - |
Copies a value from one field to another. |
Move - |
Moves the |
For a full description of JSON Patch, visit the main Patch site.
Each value for path and from is a JSON Pointer, which was covered in Chapter 6.
JSON Patch Unit Test
The Unit Test in Example 7-8 shows the example transformations in action. This code uses the JSON Patch Node.js module. Patch has a corresponding GitHub repository.
The Unit Test in Example 7-8 shows how to use JSON Patch to transform the Cities weather data to the target JSON data structure.
Example 7-8. cities-weather-transform-test/test/json-patch-spec.json
'use strict';/* Attribution: Cities Weather data provided by OpenWeatherMap API([http://openweathermap.org]) under Creative Commons Share A LikeLicense (https://creativecommons.org/licenses/by-sa/4.0).Changes were made to the data to work with json-server.This does not imply an endorsement by the licensor.This code is distributed under Creative Commons Share A Like License.*/varexpect=require('chai').expect;varjsonfile=require('jsonfile');varjsonpatch=require('json-patch');varcitiesTemplate=[{op:'remove',path:'/coord'},{op:'remove',path:'/dt'},{op:'remove',path:'/clouds'},{op:'remove',path:'/weather/0/id'},{op:'remove',path:'/weather/0/icon'},{op:'move',from:'/main/temp',path:'/weather/0/currentTemp'},{op:'move',from:'/main/temp_min',path:'/weather/0/lowTemp'},{op:'move',from:'/main/temp_max',path:'/weather/0/hiTemp'},{op:'move',from:'/main/humidity',path:'/weather/0/humidity'},{op:'move',from:'/weather/0/main',path:'/weather/0/summary'},{op:'move',from:'/wind/speed',path:'/weather/0/windSpeed'},{op:'remove',path:'/main'},{op:'remove',path:'/wind'}];describe('cities-json-patch',function(){varjsonFileName=null;varjsonCitiesFileName=null;beforeEach(function(){varbaseDir=__dirname+'/../../data';jsonCitiesFileName=baseDir+'/cities-weather-short.json';});it('should patch all cities - fail',function(done){jsonfile.readFile(jsonCitiesFileName,function(fileReadError,jsonObj){if(!fileReadError){try{varoutput=jsonpatch.apply(jsonObj,citiesTemplate);console.log('\n\n\n\Original JSON');console.log(jsonObj);console.log('\n\n\n\Patched JSON');console.log(JSON.stringify(output,null,2));done();}catch(transformError){console.error(transformError);done(transformError);}}else{console.error(fileReadError);done(fileReadError);}});});...});
In the example code, the test runs an example JSON Patch transformation. To run this test from the command line, do the following:
cd cities-weather-transform-test

npm test
As you’ll notice, the should patch all cities - fail test fails as follows:
cities-json-patch
{ [PatchConflictError: Value at coord does not exist]
message: 'Value at coord does not exist',
name: 'PatchConflictError' }
  1) should patch all cities - fail
In this example, JSON Patch can’t find the following path to /coord because the underlying JSON Pointer works only with individual objects, and not collections.
Example 7-9 is a second test that almost works.
Example 7-9. cities-weather-transform-test/test/json-patch-spec.json
...describe('cities-json-patch',function(){varjsonFileName=null;varjsonCitiesFileName=null;beforeEach(function(){varbaseDir=__dirname+'/../../data';jsonCitiesFileName=baseDir+'/cities-weather-short.json';});...it('should patch all cities - success (kind of)',function(done){jsonfile.readFile(jsonCitiesFileName,function(fileReadError,jsonObj){if(!fileReadError){try{console.log('\n\n\n\Original JSON');console.log(jsonObj);varoutput=[];for(variinjsonObj['cities']){output.push(jsonpatch.apply(jsonObj['cities'][i],citiesTemplate));}console.log('\n\n\n\Patched JSON');console.log(JSON.stringify(output,null,2));done();}catch(transformError){console.error(transformError);done(transformError);}}else{console.error(fileReadError);done(fileReadError);}});});});
Although the should patch all cities - success (kind of) test runs, it doesn’t quite work for the following reasons:
-
We want to create a new
weatherObject rather than use the existing Array, but JSON Patch doesn’t allow for that. -
The test code iterates over the input JSON and transforms each element in the
citiesarray, and then collects the results in theoutputArray. This is needed because JSON Patch can work only on a single resource (an Object) rather than a collection (an Array).
JSON Patch on other platforms
Because JSON Patch is a standard, it enjoys cross-platform support (besides just Node.js), including the following:
See http://jsonpatch.com/#libraries for more platform and library support.
JSON Patch scorecard
Table 7-4 shows a scorecard for JSON Patch based on the evaluation criteria from the beginning of this chapter.
| Mindshare | Y |
|---|---|
Dev community |
Y |
Platforms |
JavaScript, Node.js, Java, Ruby on Rails |
Intuitive |
N |
Standard |
Y - RFC 6902 |
JSON Patch limitations
JSON Patch has the following limitations:
-
JSON Patch doesn’t allow you to add completely new data structures. It can only modify existing structures and their data.
-
JSON Patch is designed only to change a single Object, and isn’t designed to work with Arrays. This is because JSON Patch uses JSON Pointer to search for data, where each query returns only a single field from a JSON document.
JSON Patch is not meant to transform the JSON data from an API’s HTTP Response, but it was worth a try. JSON Patch is really designed to work with HTTP PATCH, which specifies how to use JSON to patch portions of a resource’s data through an HTTP Request. JSON Patch is a great fit when you need to implement HTTP PATCH for an API.
But better libraries are available to transform JSON to other JSON data structures, so let’s move on and try JSON-T.
JSON-T
JSON-T was one of the early JSON transform libraries, and it was developed in 2006 by Stefan Goessner (who also created JSONPath). JSON-T is similar to XSLT for XML, and uses a template that contains transformation rules.
JSON-T syntax
JSON-T uses transformation rules defined in a JavaScript Object Literal, where each rule is a key/value pair. Rules are in the following form:
vartransformRules={'ruleName':'transformationRule','ruleName':function...};
Note the following in the preceding form:
-
Each
ruleNameortransformationRulemust be enclosed by single ('') or double ("") quotes. -
Each
transformationRulehas one or more conversion expressions surrounded by curly braces, like this:{cities}. -
A conversion expression can evaluate to another
ruleNameor to a field in the document—an Array, Object, or key/value pair.
The following example shows the JSON-T transformation rules that could be used to transform the OpenWeatherMap data:
vartransformRules={'self':'{"cities":[{cities}]}','cities[*]':'{"id":"{$.id}","name":"{$.name}",'+'"weather":{"currentTemp":{$.main.temp},"lowTemp":{$.main.temp_min},'+'"hiTemp":{$.main.temp_max},"humidity":{$.main.humidity},'+'"windSpeed":{$.wind.speed},"summary":"{$.weather[0].main}",'+'"description":"{$.weather[0].description}"}},'};
This example works as follows:
-
selfis the top-level rule that specifies how to format the new JSON document, and{cities}refers to thecities[*]rule. -
cities[*]specifies how to format thecitiesArray:-
The star syntax in the
cities[*]rule indicates that the rule applies to thecitiesArray elements. -
The
*resolves to each Array index. -
{$.}is shorthand notation. The{$.name}rule tells JSON-T to pull data from thenamefield of eachcitiesArray element. Here’s the longer notation:cities[*].name.
-
For complete documentation on transformation rules, see “Basic Rules” on the main JSON-T site.
JSON-T Unit Test
The Unit Test in Example 7-10 shows how to use JSON-T, and leverages the jsont Node.js module.
Example 7-10. cities-weather-transform-test/test/jsont-spec.js
'use strict';/* Attribution: Cities Weather data provided by OpenWeatherMap API([http://openweathermap.org]) under Creative Commons Share A LikeLicense (https://creativecommons.org/licenses/by-sa/4.0).Changes were made to the data to work with json-server.This does not imply an endorsement by the licensor.This code is distributed under Creative Commons Share A Like License.*/varexpect=require('chai').expect;varjsonfile=require('jsonfile');varjsonT=require('../lib/jsont').jsonT;describe('cities-jsont',function(){varjsonCitiesFileName=null;vartransformRules={'self':'{ "cities": [{cities}] }','cities[*]':'{ "id": "{$.id}", "name": "{$.name}", '+'"weather": { "currentTemp": {$.main.temp}, "lowTemp": {$.main.temp_min}, '+'"hiTemp": {$.main.temp_max}, "humidity": {$.main.humidity}, '+'"windSpeed": {$.wind.speed}, "summary": "{$.weather[0].main}", '+'"description": "{$.weather[0].description}" } },'};...beforeEach(function(){varbaseDir=__dirname+'/../../data';jsonCitiesFileName=baseDir+'/cities-weather-short.json';});it('should transform cities JSON data',function(done){jsonfile.readFile(jsonCitiesFileName,function(readFileError,jsonObj){if(!readFileError){varjsonStr=jsonT(jsonObj,transformRules);jsonStr=repairJson(jsonStr);console.log(JSON.stringify(JSON.parse(jsonStr),null,2));done();}else{done(readFileError);}});});});
Notice that the preceding test invokes the repairJson() function in order to produce valid JSON:
functionrepairJson(jsonStr){varrepairedJsonStr=jsonStr;varrepairs=[[/,\s*}/gi,' }'],[/,\s*\]/gi,' ]']];for(vari=0,len=repairs.length;i<len;++i){repairedJsonStr=repairedJsonStr.replace(repairs[i][0],repairs[i][1]);}returnrepairedJsonStr;}// Modify the spec as follows:...jsonStr=repairJson(jsonStr);console.log(JSON.stringify(JSON.parse(jsonStr),null,2));...
Without any modification, JSON-T produces a trailing comma after the last element of the cities
Array, so the transformed JSON would be invalid “as is.” To fix this, the repairJson() function in the
preceding example uses a Regular Expression (Regex) to eliminate the final comma before the closing curly
object bracket (}) or Array brace (]). Although most languages have Regex functionality, this is bad
because you have to add custom code to correct the output. You shouldn’t have to write your own
infrastructure.
JSON-T on other platforms
In addition to Node.js, JSON-T runs on the following platforms:
- In the browser
-
JSON-T runs as a JavaScript file, jsont.js.
- Ruby
-
JSON-T can run as a pure Ruby implementation.
I haven’t been able to find a pure Java implementation of JSON-T.
JSON-T scorecard
Table 7-5 shows a scorecard for JSON-T based on the evaluation criteria from the beginning of this chapter.
| Mindshare | Y |
|---|---|
Dev community |
Y |
Platforms |
JavaScript, Node.js, Ruby on Rails |
Intuitive |
N |
Standard |
N |
JSON-T limitations
JSON-T has the following limitations:
-
Overly complex syntax.
-
No Java implementation.
-
Can’t handle an escaped String within a String. For example, JSON-T takes the String,
"escapedString": "I have a \"string within\" a string"and converts it to the following invalid String:"escapedString": "I have a "string within " a string". Again, this requires a Regular Expression to fix the problem. -
Can’t handle the last element in an Array or Object.
JSON-T is a small improvement over JSON Patch because JSON-T can process an entire document. But JSON-T still requires a developer to write additional code to make it work. JSON-T is a step in the right direction, but it still won’t work in a real development environment. JSON-T is good at converting JSON to HTML, but it’s not designed to convert from one JSON document to another JSON structure.
Mustache
In the previous section, we saw how Mustache can easily convert from JSON to HTML. We’ll now see how well it can convert the Cities data to the target JSON output document.
Example 7-11 is a Mustache template to do the conversion (template details were described in the JSON-to-HTML section on Mustache).
Example 7-11. templates/transform-json.mustache
{"cities":[{{#cities}}{"id":"{{id}}","name":"{{name}}","weather":{{{#main}}"currentTemp":{{temp}},"lowTemp":{{temp_min}},"hiTemp":{{temp_max}},"humidity":{{humidity}},{{/main}}"windSpeed":{{wind.speed}},{{#weather.0}}"summary":"{{main}}""description":"{{description}}"{{/weather.0}}}},{{/cities}}]}
Let’s run this template in the Architect template editor. Select Mustache.js in the Engine drop-down, paste the Mustache template, and input JSON into the Template and View text boxes (respectively). You should see the result in Figure 7-4.
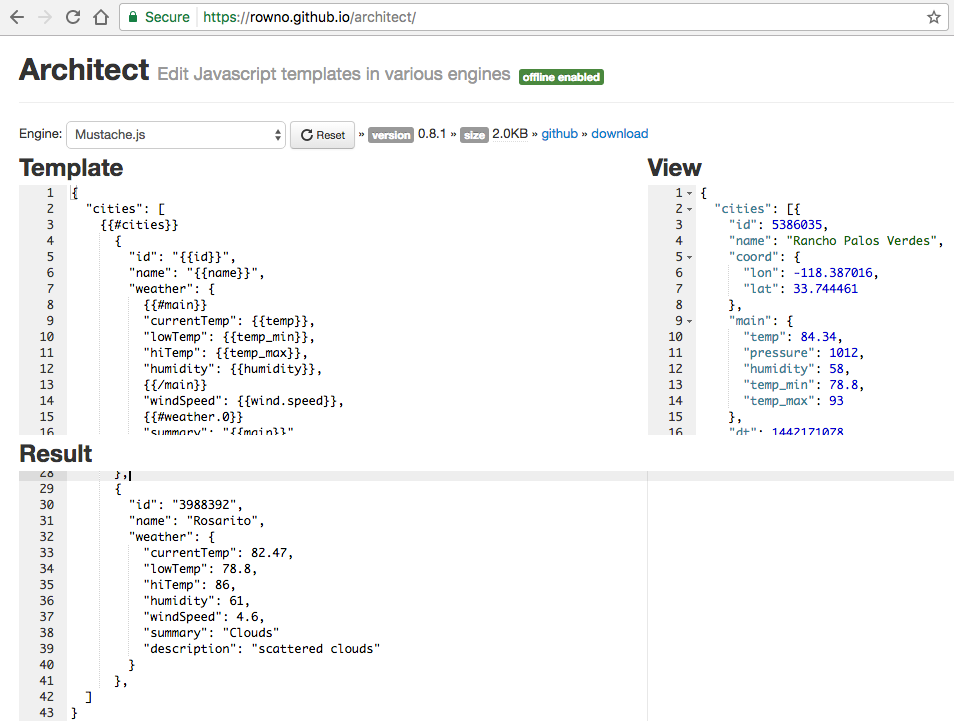
Figure 7-4. Architect: JSON-to-JSON transformation with Mustache
Take a look at line 41 of the resulting JSON (in the Result text box) and you’ll see the trailing comma, which is invalid JSON. You can confirm that the resulting JSON is invalid by pasting it into JSONLint:

Handlebars
As we saw previously, Handlebars does a good job of converting JSON to HTML, and the template in Example 7-12 shows how to convert the Cities JSON data into the target JSON output.
Example 7-12. templates/transform-json.hbs
{"cities": [{{#eachcities}}{"id": "{{id}}", "name": "{{name}}", "weather":{{{#main}}"currentTemp":{{temp}}, "lowTemp":{{temp_min}}, "hiTemp":{{temp_max}}, "humidity":{{humidity}},{{/main}}"windSpeed":{{wind.speed}},{{#eachweather}}"summary": "{{main}}", "description": "{{description}}"{{/each}}} }{{#unless@last}},{{/unless}}{{/each}}] }
This template is similar to the one shown in the JSON-to-HTML section on Handlebars, but with one notable difference. The following line does exactly what we need: it emits a comma after each element unless it’s the last element:
{{#unless@last}},{{/unless}}
Here’s how it works:
-
{{#unless}}is a built-in Handlebars helper that renders the enclosing block only if the condition returnsfalse. -
@last@is a built-in Handlebars variable that returnsfalseif an element is the last in an Array, andtrueif the current element is at the end of the Array.
For more information on {{#unless}} and @last@, visit the Handlebars website.
Let’s run the template in the Architect template editor. Select Handlebars.js in the Engine drop-down, paste the Handlebars template, and input JSON into the Template and View text boxes (respectively). You should see the result shown in Figure 7-5.
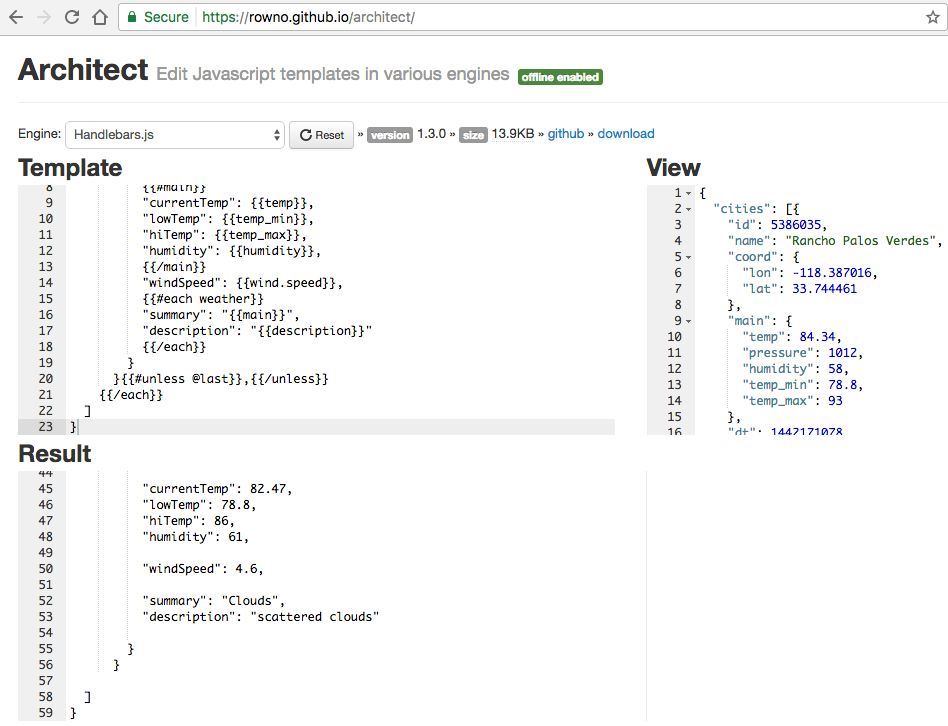
Figure 7-5. Architect: JSON-to-JSON transformation with Handlebars
Take a look at line 56 of the resulting JSON (in the Result text box) and you’ll see that there is no trailing comma so this should be valid. You can confirm that the resulting JSON is valid by pasting it into JSONLint, as shown in Figure 7-6.
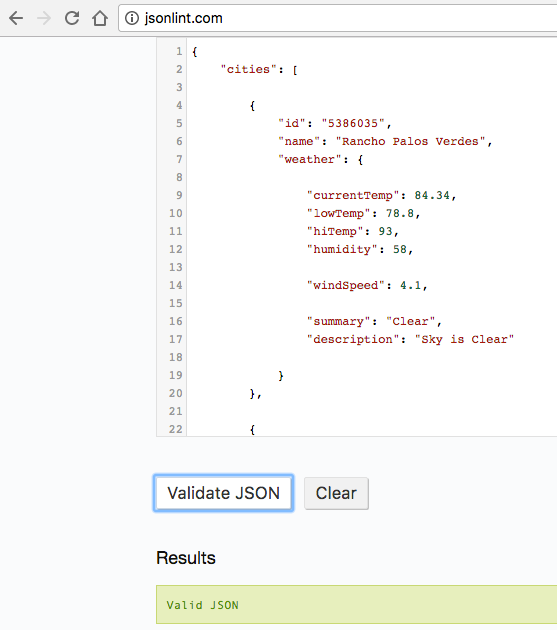
Figure 7-6. JSONLint validation of JSON transformed with Handlebars
This is exactly what we’re looking for. As noted earlier, Handlebars differs from Mustache in that Handlebars has just enough conditional logic to make the JSON-to-JSON transformation work properly.
JSON-to-JSON Transformation Evaluations—The Bottom Line
Based on the evaluation criteria and overall usability, Handlebars is my overwhelming choice for JSON-to-JSON transformation for the following reasons:
-
It’s the only library that works “as is.” The conditional logic makes it possible.
-
It has solid cross-platform support.
-
The template language is rich enough to meet most transformation needs.
-
It’s declarative, yet allows for custom logic with custom helpers.
-
Excellent online tools facilitate development.
We’ve covered JSON-to-JSON conversion, and now it’s time to cover JSON-XML transformation.
JSON-XML Transformation
Often, developers and architects need to integrate with legacy systems that still use XML. To have a clean separation of concerns, it’s important to add a thin adapter at the boundaries of your system that encapsulates the translation between XML and JSON.
JSON-XML Transformation Conventions
It’s easy to convert XML elements (e.g., <weather>) to/from JSON, but it’s difficult to convert XML
attributes to/from JSON. This is a lossy conversion, which means that you can’t convert the JSON back
to the original XML, and vice versa because JSON doesn’t have a standard way to represent attributes.
Remember that JSON’s core constructs are Objects, Arrays, and key/value pairs.
For example, an XML attribute provides metadata that describes an element, and looks like this:
<weathertemp="84.34"pressure="1012"humidity="58"temp_min="78.8"temp_max="93"/>
In this XML snippet, the temp, pressure, humidity, temp_min, and temp_max attributes describe
the weather element. Back in the days when XML was in vogue (roughly 1998–2008), many XML Schema
designers leveraged XML attributes to:
-
Reduce the overall payload of messages going over the wire
-
Simplify the conversion between XML and their native platform (e.g., Java, JS, Ruby, or C#)
We’d like to see how to directly convert between XML and JSON, and several well-known conventions (specifications) describe how to do this:
-
Badgerfish
-
Parker
-
JsonML
-
Spark
-
GData
-
Abdera
This chapter focuses on Badgerfish and Parker because they’re well-known. A full discussion and in-depth comparison of these XML-JSON conversion convention is beyond the scope of this book, but you can find further details at the Open311 wiki.
To compare the Badgerfish and Parker conventions, we’ll start by showing a sample input XML document based on the OpenWeatherMap data. Then, we’ll compare how both conventions would convert from XML to JSON. Example 7-13 provides the input XML.
Example 7-13. data/cities-weather-short.xml
<?xml version="1.0" encoding="UTF-8" ?><cities><city><id>5386035</id><name>Rancho Palos Verdes</name><coord><lon>-118.387016</lon><lat>33.744461</lat></coord><maintemp="84.34"pressure="1012"humidity="58"temp_min="78.8"temp_max="93"/><dt>1442171078</dt><wind><speed>4.1</speed><deg>300</deg></wind><clouds><all>5</all></clouds><weather><id>800</id><main>Clear</main><description>Sky is Clear</description><icon>02d</icon></weather></city><city><id>5392528</id><name>San Pedro</name><coord><lon>-118.29229</lon><lat>33.735851</lat></coord><maintemp="84.02"pressure="1012"humidity="58"temp_min="78.8"temp_max="91"/><dt>1442171080</dt><wind><speed>4.1</speed><deg>300</deg></wind><clouds><all>5</all></clouds><weather><id>800</id><main>Clear</main><description>Sky is Clear</description><icon>02d</icon></weather></city><city><id>3988392</id><name>Rosarito</name><coord><lon>-117.033333</lon><lat>32.333328</lat></coord><maintemp="82.47"pressure="1012"humidity="61"temp_min="78.8"temp_max="86"/><dt>1442170905</dt><wind><speed>4.6</speed><deg>240</deg></wind><clouds><all>32</all></clouds><weather><id>802</id><main>Clouds</main><description>scattered clouds</description><icon>03d</icon></weather></city></cities>
Badgerfish
Badgerfish has an excellent online tester that makes it easy to convert from the input XML to JSON (per the Badgerfish convention). The Badgerfish Online Tester is shown in Figure 7-7.
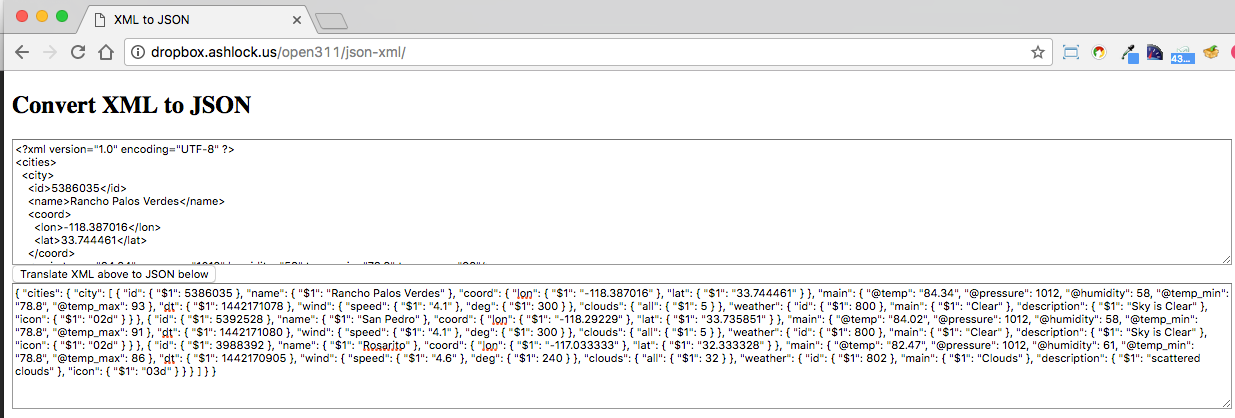
Figure 7-7. Badgerfish online tester—convert XML to JSON
Paste the input XML into the text box just below the Convert XML to JSON label, click the “Translate XML above to JSON below button” and you’ll see very compact JSON in the resulting text box. You can use JSONLint or your favorite text editor (which includes a JSON beautifier plug-in), and you’ll see the (more readable) JSON output shown in Example 7-14.
Example 7-14. data/cities-weather-short-badgerfish.json
{"cities":{"city":[{"id":{"$1":5386035},"name":{"$1":"Rancho Palos Verdes"},"coord":{"lon":{"$1":"-118.387016"},"lat":{"$1":"33.744461"}},"main":{"@temp":"84.34","@pressure":1012,"@humidity":58,"@temp_min":"78.8","@temp_max":93},"dt":{"$1":1442171078},"wind":{"speed":{"$1":"4.1"},"deg":{"$1":300}},"clouds":{"all":{"$1":5}},"weather":{"id":{"$1":800},"main":{"$1":"Clear"},"description":{"$1":"Sky is Clear"},"icon":{"$1":"02d"}}},{"id":{"$1":5392528},"name":{"$1":"San Pedro"},"coord":{"lon":{"$1":"-118.29229"},"lat":{"$1":"33.735851"}},"main":{"@temp":"84.02","@pressure":1012,"@humidity":58,"@temp_min":"78.8","@temp_max":91},"dt":{"$1":1442171080},"wind":{"speed":{"$1":"4.1"},"deg":{"$1":300}},"clouds":{"all":{"$1":5}},"weather":{"id":{"$1":800},"main":{"$1":"Clear"},"description":{"$1":"Sky is Clear"},"icon":{"$1":"02d"}}},{"id":{"$1":3988392},"name":{"$1":"Rosarito"},"coord":{"lon":{"$1":"-117.033333"},"lat":{"$1":"32.333328"}},"main":{"@temp":"82.47","@pressure":1012,"@humidity":61,"@temp_min":"78.8","@temp_max":86},"dt":{"$1":1442170905},"wind":{"speed":{"$1":"4.6"},"deg":{"$1":240}},"clouds":{"all":{"$1":32}},"weather":{"id":{"$1":802},"main":{"$1":"Clouds"},"description":{"$1":"scattered clouds"},"icon":{"$1":"03d"}}}]}}
The core rules of the Badgerfish convention include the following:
-
Element names become Object properties.
-
The textual content of an element goes into the
$property of an Object with the same name. For example,<name>Rancho Palos Verdes</name>becomes"name": { "$1": "Rancho Palos Verdes" }. -
Nested elements become nested properties. For example, the following XML
<wind><speed>4.1</speed><deg>300</deg></wind>becomes
"wind":{"speed":{"$1":"4.1"},"deg":{"$1":300}} -
Multiple elements with the same name at the same level become Array elements. The following XML
<city></city><city></city>becomes
"city":[{...}] -
Attributes go in properties whose names begin with
@. For example, the following XML<maintemp="84.02"pressure="1012"humidity="58"temp_min="78.8"temp_max="91"/>becomes
"main":{"@temp":"84.34","@pressure":1012,"@humidity":58,"@temp_min":"78.8","@temp_max":93}
We’ve glossed over a lot of details, but Badgerfish has excellent documentation and resources. For further information, see the following:
Parker
Parker provides a simple conversion, but it ignores XML attributes, so you will lose the attribute data when converting to JSON. Following the Parker convention yields the JSON document in Example 7-15 (based on the input XML).
Example 7-15. data/cities-weather-short-parker.json
{"cities":[{"id":5386035,"name":"Rancho Palos Verdes","coord":{"lon":-118.387016,"lat":33.744461},"main":null,"dt":1442171078,"wind":{"speed":4.1,"deg":300},"clouds":{"all":5},"weather":[{"id":800,"main":"Clear","description":"Sky is Clear","icon":"02d"}]},{"id":5392528,"name":"San Pedro","coord":{"lon":-118.29229,"lat":33.735851},"main":null,"dt":1442171080,"wind":{"speed":4.1,"deg":300},"clouds":{"all":5},"weather":[{"id":800,"main":"Clear","description":"Sky is Clear","icon":"02d"}]},{"id":3988392,"name":"Rosarito","coord":{"lon":-117.033333,"lat":32.333328},"main":null,"dt":1442170905,"wind":{"speed":4.6,"deg":240},"clouds":{"all":32},"weather":[{"id":802,"main":"Clouds","description":"scattered clouds","icon":"03d"}]}]}
The core rules of the Parker convention include the following:
-
Element names become Object properties.
-
Attributes are ignored.
-
Nested elements become nested properties.
The Parker convention is simple, but has the following issues:
XML-JSON Transform—The Bottom Line
With these shortcomings in mind, I suggest No Convention (none of the above) to convert the following:
- XML-to-JSON
-
Parse (unmarshal) the XML into Objects/Hashes on your current platform by using a well-known library (we’ll use
xml2jsfor our Node.js-based examples). Then, convert the Objects/Hashes from your platform into JSON withJSON.stringify()if you’re using JavaScript. Chapters 3 and 4 show how to convert Ruby and Java, respectively, to JSON. - JSON-to-XML
-
Parse the JSON into data structures on your platform using a common library.
JSON.parse()works great for JavaScript. Chapters 3 and 4 show to parse JSON into Ruby and Java. Then, generate an XML document from your data structure (this is also known as marshaling). Again, we’ll leveragexml2jsfrom a Node.js-based Mocha/Chai test.
Rather than being concerned with a particular convention/style of conversion, focus on the following:
-
Do what works best for you.
-
Use the libraries you already know and have on hand.
-
Test the conversion results to make sure that you’re not losing any data.
-
Keep it simple.
-
Encapsulate everything and make sure that it fits well with the rest of your enterprise application architecture.
In short, choose the best library that you can find on your platform and work with or around the limitations.
Parsing/generating XML libraries
XML has been around for a long time, and each major platform has a solid implementation, including the following:
- Node.js
-
We’ll use
xml2js. - Ruby
-
There are several good libraries, and two of the best are LibXml and Nokogiri.
- Java
-
Java Architecture for XML Binding (JAXB) has been a mainstay for years in the Java community.
JSON-XML Transformation Unit Test
The Unit Test suite in Example 7-16 has methods to test JSON-to-XML and XML-to-JSON conversion, and uses the following technologies:
xml2js-
To convert XML to/from JavaScript data structures, you can use
xml2js, which is also available on GitHub. JSON.parse()/JSON.stringify()-
To convert JSON to/from JavaScript structures. You can find more information about
JSON.parse()/JSON.stringify()at MDN and in Chapter 3.
Example 7-16. cities-weather-transform-test/test/json-xml-spec.js
'use strict';/* Attribution: Cities Weather data provided by OpenWeatherMap API([http://openweathermap.org]) under Creative Commons Share A LikeLicense (https://creativecommons.org/licenses/by-sa/4.0).Changes were made to the data to work with json-server.This does not imply an endorsement by the licensor.This code is distributed under Creative Commons Share A Like License.*/varexpect=require('chai').expect;varjsonfile=require('jsonfile');varfs=require('fs');varxml2js=require('xml2js');describe('json-xml',function(){varjsonCitiesFileName=null;varxmlCitiesFileName=null;beforeEach(function(){varbaseDir=__dirname+'/../..';jsonCitiesFileName=baseDir+'/data/cities-weather-short.json';xmlCitiesFileName=baseDir+'/data/cities-weather-short.xml';});it('should transform cities JSON data to XML',function(done){jsonfile.readFile(jsonCitiesFileName,function(readJsonFileError,jsonObj){if(!readJsonFileError){varbuilder=newxml2js.Builder();varxml=builder.buildObject(jsonObj);console.log('\n\n\nXML Output:\n'+xml);done();}else{done(readJsonFileError);}});});it('should transform cities XML data to JSON',function(done){fs.readFile(xmlCitiesFileName,'utf8',function(readXmlFileError,xmlData){if(!readXmlFileError){varparser=newxml2js.Parser();parser.parseString(xmlData,function(error,xmlObj){if(!error){console.log('\n\n\nJSON Output:\n'+JSON.stringify(xmlObj,null,2));done();}else{done(error);}});}else{done(readXmlFileError);}});});});
The preceding code works as follows:
-
beforeEach()runs before any Unit Test and does setup. In this case, it builds the filenames for the input JSON file and the output XML file. -
In the
'should transform cities JSON data to XML'Unit Test:-
jsonfile.readFile()reads and parses the input JSON file into a JavaScript Object (jsonObj). -
xml2js.Builder()creates an Object that can convert from JSON to XML. -
builder.buildObject(jsonObj)converts the JavaScript Object (from the input JSON file) into an XML String.
-
-
In the
'should transform cities XML data to JSON'Unit Test:
What We Covered
We’ve shown several JSON Transform libraries to do the following:
-
Convert JSON to HTML
-
Either Mustache or JSON will work just fine.
-
-
Transform JSON to other, cleaner JSON structures
-
Choose Handlebars.
-
-
Convert between XML and JSON
-
Don’t worry about the XML/JSON conventions.
-
Use an XML library that works well on your platform.
-
-
Write Unit Tests that transform the content of JSON documents returned by a Web API
Use these JSON Transform techniques to convert JSON data from external APIs into data formats that are compatible with your applications.
What’s Next?
Now that we’ve covered the JSON Ecosystem (Schema, Search, and Transform), we’ll move to the final section on JSON in the enterprise; this part of the book covers the following topics:
-
Hypermedia
-
MongoDB (NoSQL)
-
Messaging with Kafka
In Chapter 8, we’ll discuss Hypermedia with JSON in order to show how to interact with an API.