Table of Contents for
JSON at Work
 JSON at Work
Published by
O'Reilly Media, Inc., 2017
JSON at Work
Published by
O'Reilly Media, Inc., 2017
- nav
- Cover
- JSON at Work
- JSON at Work
- Dedication
- Preface
- I. JSON Overview and Platforms
- 1. JSON Overview
- 2. JSON in JavaScript
- 3. JSON in Ruby on Rails
- 4. JSON in Java
- II. The JSON Ecosystem
- 5. JSON Schema
- 6. JSON Search
- 7. JSON Transform
- III. JSON in the Enterprise
- 8. JSON and Hypermedia
- 9. JSON and MongoDB
- 10. JSON Messaging with Kafka
- A. Installation Guides
- B. JSON Community
- Index
- About the Author
- Colophon
Chapter 3. JSON in Ruby on Rails
We’ve shown how to use JSON in JavaScript, and in this chapter we’ll show how to use JSON with our second platform—Ruby on Rails (RoR).
We’ll cover the following:
-
Performing Ruby/JSON serialization/deserialization with
MultiJson -
Working with Ruby Objects and JSON
-
Understanding the importance of JSON camel casing
-
Using JSON with Minitest
-
Making RESTful API calls and testing the results with Minitest and
jq -
Building a simple JSON-based API with Rails 5
In our examples, we’ll make RESTful API calls to work with the data we deployed on json-server in
Chapter 1. We’ll then create a more realistic JSON-based Web API. But before we develop a
RESTful API, let’s start with the fundamentals of converting between Ruby and JSON.
Ruby on Rails Setup
Before we go any further, let’s start building our development environment by installing RoR. Please go to Appendix A, and follow the instructions in “Install Ruby on Rails”.
Ruby JSON Gems
Several good JSON gems provide Ruby/JSON serialization/deserialization functionality, including these:
JSON-
The default JSON gem provided in Ruby.
oj-
Optimized JSON, considered by many to be the fastest Ruby-based JSON processor available.
yajl-
Yet Another JSON Library.
There are many other JSON gems in addition to this list, and it’s hard to choose.
Rather than forcing a developer to know how to use each JSON gem,
MultiJson encapsulates this choice by providing a wrapper
that invokes the most common JSON gems on behalf of the caller by choosing the fastest JSON gem that has
been loaded in an application’s environment. Encapsulating JSON gems like this decouples an application
from a particular JSON implementation. For further information on how MultiJson chooses a JSON
implementation, see its GitHub repository. For detailed documentation, visit the MultiJson documentation on RubyDoc.
Since MultiJson defaults to the standard JSON gem, let’s install the oj gem to optimize performance.
gem install multi_json
gem install oj
Now that we’ve installed the oj gem, MultiJson will default to oj rather than the standard JSON
gem.
JSON Serialization/Deserialization with MultiJson
Applications need to convert a Ruby Data Type to JSON (serialize) and vice versa (deserialize) to exchange JSON data with other applications.
The MultiJson Object
The MultiJson Object provides the following methods:
-
MultiJson.dump()serializes Ruby to JSON. -
MultiJson.load()deserializes from JSON to Ruby.
Note that MultiJson.dump() does the following:
-
Uses traditional Ruby snake case (
first_name) rather than the recommended cross-platform camel case (firstName) when serializing thespeakerObject withoj. -
Doesn’t generate a JSON String when serializing the
speakerObject with theJSONengine. This is because theJSONgem doesn’t serialize a class unless it implements ato_json()method. -
Uses snake case (
first_name) rather than camel case (firstName) for key names.
According to the RubyDoc MultiJson documentation, here is the method signature for MultiJson.dump():
#dump(object, options = {})The options provided depend on the underlying JSON implementation (in this case oj) because
MultiJson is a wrapper.
JSON Serialization/Deserialization with Simple Ruby Data Types
We’ll start by serializing some basic Ruby Data Types:
-
Integer
-
String
-
Boolean
-
Array
-
Hash
-
Object
Example 3-1 shows how to serialize/deserialize simple Ruby data types with MultiJson and oj.
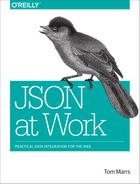
Example 3-1. ruby/basic_data_types_serialize.rb
require'multi_json'puts"Current JSON Engine =#{MultiJson.current_adapter()}"putsage=39# Integerputs"age =#{MultiJson.dump(age)}"putsfull_name='Larson Richard'# Stringputs"full_name =#{MultiJson.dump(full_name)}"putsreqistered=true# Booleanputs"reqistered =#{MultiJson.dump(reqistered)}"putstags=%w(JavaScript, AngularJS, Yeoman)# Array of Stringsputs"tags =#{MultiJson.dump(tags)}"puts={:'larsonrichard@ecratic.com'}# Hashputs"email =#{MultiJson.dump()}"putsclassSpeakerdefinitialize(first_name,last_name,,about,company,tags,registered)@first_name=first_name@last_name=last_name=@about=about@company=company@tags=tags@registered=registeredendendspeaker=Speaker.new('Larson','Richard','larsonrichard@ecratic.com','Incididunt mollit cupidatat magna excepteur do tempor ex non ...','Ecratic',%w(JavaScript, AngularJS, Yeoman),true)puts"speaker (using oj gem) =#{MultiJson.dump(speaker)}"puts
When you run ruby basic_data_types_serialize.rb from the command line, you should get the following:
MultiJson.dump() doesn’t do much with the scalar types (Integer, String, and Boolean). Things begin to
get interesting with the speaker Object because here MultiJson.dump() initially generates a valid, yet
unattractive, JSON String. As you’ll soon see, MultiJson.dump() has other parameters that enhance
serialization.
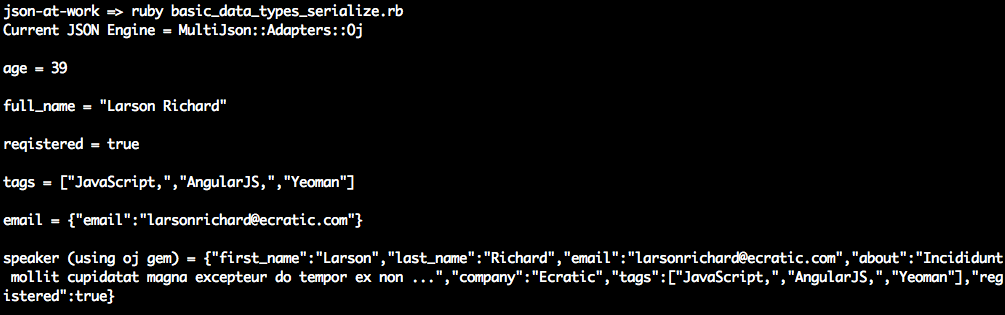
To make things more readable, we’ll leverage the :pretty ⇒ true option to pretty-print the JSON output
from the speaker Object, as shown in Example 3-2. Although pretty-printing is more attractive to look at, it is inefficient, and
should be used only for debugging purposes.
Example 3-2. ruby/obj_serialize_pretty.rb
require'multi_json'...speaker=Speaker.new('Larson','Richard','larsonrichard@ecratic.com','Incididunt mollit cupidatat magna excepteur do tempor ex non ...','Ecratic',%w(JavaScript, AngularJS, Yeoman),true)puts"speaker (using oj gem) =#{MultiJson.dump(speaker,pretty:true)}"puts
Running the preceding code yields the following pretty-printed speaker Object:
JSON Deserialization with Objects and MultiJson
MultiJson can also deserialize JSON. Let’s use the MultiJson.load() method to deserialize JSON into a
Ruby Hash. But this causes an impedance mismatch because the speaker Object’s initialize() method
takes Strings (which match the speaker Object’s attributes) as parameters. We’ll need to convert Hash to
a set of attributes to instantiate a speaker Object. Fortunately, it’s unnecessary to write any code to
convert the Hash because the well-known OpenStruct makes the Hash (from decoding JSON) look like an
object.
Example 3-3 shows the use of OpenStruct.
Example 3-3. ruby/ostruct_example.rb
require'ostruct'h={first_name:'Fred'}m=OpenStruct.new(h)putsm# prints: #<OpenStruct first_name="Fred">putsm.first_name# prints: Fred
OpenStruct is a data structure that is similar to a Hash, and it allows you define key/value pairs of
attributes and their values. OpenStruct is part of Ruby Core and provides the ability to access keys as
attributes. For more information about OpenStruct, see the Ruby Core documentation.
When we instantiate a new speaker Object, it would be great to print out the new object in a readable
manner for debugging purposes. With puts, you’d normally see something like this:
puts speaker # #<Speaker:0x007f84412e0e38>
With the awesome_print gem, the output is much more attractive. For more information, see the
awesome_print GitHub repository.
Before running the code in Example 3-4, install the awesome_print gem from the command line:
gem install awesome_print
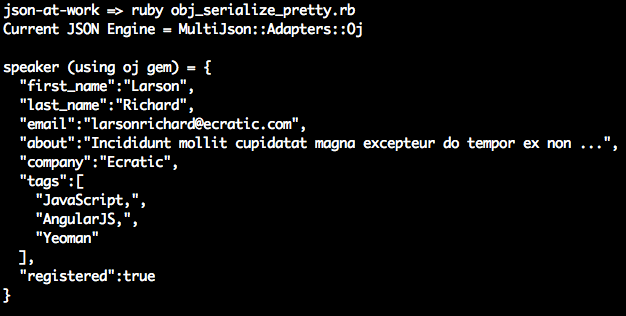
Example 3-4. ruby/obj_deserialize.rb
require'multi_json'require'ostruct'require'awesome_print'puts"Current JSON Engine =#{MultiJson.current_adapter()}"putsclassSpeakerdefinitialize(first_name,last_name,,about,company,tags,registered)@first_name=first_name@last_name=last_name=@about=about@company=company@tags=tags@registered=registeredendendspeaker=Speaker.new('Larson','Richard','larsonrichard@ecratic.com','Incididunt mollit cupidatat magna excepteur do tempor ex non ...','Ecratic',%w(JavaScript, AngularJS, Yeoman),true)json_speaker=MultiJson.dump(speaker,pretty:true)puts"speaker (using oj gem) =#{MultiJson.dump(speaker)}"putsostruct_spkr=OpenStruct.new(MultiJson.load(json_speaker))speaker2=Speaker.new(ostruct_spkr.first_name,ostruct_spkr.last_name,ostruct_spkr.,ostruct_spkr.about,ostruct_spkr.company,ostruct_spkr.tags,ostruct_spkr.registered)puts"speaker 2 after MultiJson.load()"apspeaker2puts
Run this example, and we’ll see that the preceding code successfully deserialized the JSON String stored
in json_speaker into an OpenStruct Object and finally into another speaker instance—speaker2. Note
the use of awesome_print’s ap method rather than the built-in puts to pretty-print the Object.
Although multi_json and oj efficiently process JSON, sometimes developers need more control over the
data to be serialized.
A Word on Camel Casing and JSON
If you haven’t noticed, JSON Keys/Property Names are usually in camel case form. For example, a Key that
represents someone’s first name would normally be expressed as firstName. But up to this point, we’ve
seen that Ruby’s JSON libraries natively express Keys in snake case (first_name). While this
may be OK for small code examples and Unit Tests that no one else will use, snake case is incompatible
with the rest of the world. Here’s why:
-
JSON must be interoperable. Although my stance on this will probably offend many ardent Rubyists, and others may call this bike shedding, the whole point of JSON and REST is interoperability across heterogeneous applications. There are other programming languages than Ruby, and the rest of the world is expecting camel case (
firstName). If your API works in a way that is unexpected, people won’t want to use it. -
The major players use camel-cased JSON:
-
Google has standardized on camel case in their Google JSON Style Guide.
-
The majority of JSON-based public APIs (e.g., Amazon AWS, Facebook, and LinkedIn) use camel-cased JSON.
-
-
Avoid platform bleed-through. JSON should look the same regardless of the platform/programming language that generates or consumes it. The Ruby on Rails community prefers snake case, which is just fine within that platform, but this local programming language idiom shouldn’t be reflected in an API.
JSON Serialization with Objects and ActiveSupport
The ActiveSupport gem provides functionality that has been extracted from Rails, including time zones, internationalization, and JSON encoding/decoding. ActiveSupport’s JSON module provides the ability to do the following:
-
Convert between camel case and snake case
-
Choose which portions of an Object to serialize
You can install ActiveSupport from the command line as follows:
gem install activesupport
We’ll use ActiveSupport::JSON.encode() to serialize a speaker Object into JSON, as shown in Example 3-5.
Example 3-5. ruby/obj_serialize_active_support.rb
require'active_support/json'require'active_support/core_ext/string'...speaker=Speaker.new('Larson','Richard','larsonrichard@ecratic.com','Incididunt mollit cupidatat magna excepteur do tempor ex non ...','Ecratic',%w(JavaScript, AngularJS, Yeoman),true)json=ActiveSupport::JSON.encode(speaker).camelize(first_letter=:lower)puts"Speaker as camel-cased JSON\n#{json}"putsjson=ActiveSupport::JSON.encode(speaker,only:['first_name','last_name']).camelize(first_letter=:lower)puts"Speaker as camel-cased JSON with only firstName and lastName\n#{json}"puts
In the code example, you’ll notice that ActiveSupport::JSON.encode() provides the following
options:
-
Camel case (
firstName) Key names by chaining with thecamelize()method. Note that the first letter of each Key is capitalized by default, so you’ll need to use thefirst_letter = :lowerparameter to get lower camel case format. -
Limit the portions of the
speakerObject to serialize by using theonly:parameter.
When you run the code, you should see the following:

But if you only want to convert from snake case to camel case, the awrence gem is a simple alternative. awrence
converts snake-cased Hash keys to camel case, which you can then convert to camel-cased JSON. I haven’t
tried this gem yet, so this is left as an exercise for you.
JSON Deserialization with Objects and ActiveSupport
ActiveSupport also has the ability to deserialize JSON. We’ll now use the decode() method to
deserialize JSON into a Ruby Hash. Just as before, we’ll leverage OpenStruct and awesome_print to
help with instantiation and printing, as shown in Example 3-6.
Example 3-6. ruby/obj_deserialize_active_support.rb
require'multi_json'require'active_support/json'require'active_support/core_ext/string'require'ostruct'require'awesome_print'...speaker=Speaker.new('Larson','Richard','larsonrichard@ecratic.com','Incididunt mollit cupidatat magna excepteur do tempor ex non ...','Ecratic',%w(JavaScript, AngularJS, Yeoman),true)json_speaker=ActiveSupport::JSON.encode(speaker)puts"speaker (using oj gem) =#{ActiveSupport::JSON.encode(speaker)}"putsostruct_spkr=OpenStruct.new(ActiveSupport::JSON.decode(json_speaker))speaker2=Speaker.new(ostruct_spkr.first_name,ostruct_spkr.last_name,ostruct_spkr.,ostruct_spkr.about,ostruct_spkr.company,ostruct_spkr.tags,ostruct_spkr.registered)puts"speaker 2 after ActiveSupport::JSON.decode()"apspeaker2puts
You’ll see the following result when you run the preceding code from the command line:

The plissken gem is an alternative that converts from camel-cased Hash keys (that originated from JSON) to snake case. We’ll use plissken in our upcoming Unit Tests.
Unit Testing with a Stub API
Now that you know how to serialize/deserialize JSON to/from a speaker Object, we’re ready to run a simple
server-side Unit Test against a Stub API provided by json-server (which we used in previous chapters).
Just Enough Unit Testing with Minitest
The two most common Ruby testing frameworks are Minitest, which is part of Ruby Core and RSpec. Both Minitest and RSpec are excellent, but we can use only one of them in this chapter to keep the focus on JSON.
On one hand, Minitest
-
Is part of the Ruby Standard Library, so there’s nothing else to install.
-
Is lightweight and simple.
-
Has most of the functionality that RSpec provides.
On the other hand, RSpec
-
Requires you to install a separate
rspecgem, but enjoys wide acceptance in the Ruby and Rails communities. -
Is large and complex. The RSpec code base is about eight times larger than Minitest.
-
Has a richer set of matchers than Minitest.
For me, it’s really a matter of taste, and you’ll be fine with either framework. I chose Minitest because it comes standard with Ruby.
Minitest lets you choose between BDD (Minitest::Spec) and TDD (Minitest::Test) style testing. Let’s go
with Minitest::Spec for the following reasons:
-
I prefer BDD’s simple English-style sentences that describe each test.
-
It looks similar to RSpec, so the tests will look familiar to those developers who use RSpec.
-
It’s consistent with the JavaScript-base Mocha/Chai testing in the rest of this book.
This chapter covers only the basics of Minitest. To learn more, see Chris Kottom’s excellent book, The Minitest Cookbook.
Setting Up the Unit Test
Before going further, be sure to set up your test environment. If you haven’t installed Ruby on Rails
yet, refer to Appendix A, and install Ruby on Rails (see “Install Ruby on Rails” and “Install Ruby Gems”). If you want to follow along with the Ruby project provided in
the code examples, cd to chapter-3/speakers-test and do the following to install all dependencies
for the project:
bundle install
Bundler provides dependency management for Ruby projects.
If you’d like to set up the speakers-test Ruby project yourself, follow the instructions in the book’s GitHub
repository.
Test Data
We’ll use the Speaker data from earlier chapters as our test data and deploy it as a RESTful API. Again,
we’ll leverage the json-server Node.js module to serve up the data/speakers.json file as a Web API. If
you need to install json-server, refer to “Install npm Modules” in Appendix A.
Here’s how to run json-server on port 5000 from your local machine:
cd chapter-3/data

json-server -p 5000 ./speakers.json
You can also get a single speaker by adding the id to the URI as follows: http://localhost:5000/speakers/1.
With the Stub API in place, it’s time to write some Unit Tests.
JSON and Minitest Testing with APIs
Our Unit Test will do the following:
-
Make HTTP calls to the Stub Speakers API
-
Check the values from the HTTP Response Body against expected values
As in previous chapters, we’ll continue to leverage the open source Unirest API wrapper,
but this time we’ll use the Ruby implementation.
Please note that the Unirest gem takes the JSON in the HTTP Response Body, parses it into a Ruby
Hash, and returns it to the caller (inside the HTTP Response Body). This means that the Unit Test
won’t be testing directly against JSON data, but rather it will test against the Hash that was populated
by the JSON response from the API.
Speakers Unit Test
The Unit Test in Example 3-7 shows how to use Unirest to invoke the Speaker Stub API provided by json-server
and test the response.
Example 3-7. speakers-test/test/speakers_spec.rb
require'minitest_helper'require'unirest'require'awesome_print'require'ostruct'require'plissken'require'jq/extend'require_relative'../models/speaker'describe'Speakers API'doSPEAKERS_ALL_URI='http://localhost:5000/speakers'beforedo@res=Unirest.getSPEAKERS_ALL_URI,headers:{'Accept'=>"application/json"}endit'should return a 200 response'doexpect(@res.code).must_equal200expect(@res.headers[:content_type]).must_equal'application/json; charset=utf-8'endit'should return all speakers'dospeakers=@res.bodyexpect(speakers).wont_be_nilexpect(speakers).wont_be_emptyexpect(speakers.length).must_equal3endit'should validate the 3rd speaker as an Object'dospeakers=@res.bodyostruct_spkr3=OpenStruct.new(speakers[2].to_snake_keys())expect(ostruct_spkr3.company).must_equal'Talkola'expect(ostruct_spkr3.first_name).must_equal'Christensen'expect(ostruct_spkr3.last_name).must_equal'Fisher'expect(ostruct_spkr3.tags).must_equal['Java','Spring','Maven','REST']speaker3=Speaker.new(ostruct_spkr3.first_name,ostruct_spkr3.last_name,ostruct_spkr3.,ostruct_spkr3.about,ostruct_spkr3.company,ostruct_spkr3.tags,ostruct_spkr3.registered)expect(speaker3.company).must_equal'Talkola'expect(speaker3.first_name).must_equal'Christensen'expect(speaker3.last_name).must_equal'Fisher'expect(speaker3.tags).must_equal['Java','Spring','Maven','REST']endit'should validate the 3rd speaker with jq'dospeakers=@res.bodyspeaker3=speakers[2]speaker3.jq('.company'){|value|expect(value).must_equal'Talkola'}speaker3.jq('.tags'){|value|expect(value).must_equal['Java','Spring','Maven','REST']}speaker3.jq('.email'){|value|expect(value).must_equal'christensenfisher@talkola.com'}speaker3.jq('. | "\(.firstName) \(.lastName)"'){|value|expect(value).must_equal'Christensen Fisher'}endend
Note the following in this Unit Test:
-
The
minitest_helperconsolidates configuration and setup and factors it out of this test. We’ll cover Minitest Helpers later in this chapter. -
The test executes the Unirest
GETrequest synchronously (and gets a response) with Minitest’sbeforemethod, so that setup occurs in only one place in the code. Minitest executesbeforebefore running each test (i.e.,it) within the context of thedescribe. -
The
should return all speakerstest does the following:-
Ensures that the HTTP Response Body is not empty
-
Checks whether the Speakers API returns three
speakers
-
-
The
should validate the 3rd speaker as an Objecttest works as follows:-
Populate the
speakersHashfrom the HTTP Response Body (@res.body). At this point, the JSON from the API has already been parsed by Unirest and converted to a RubyHash. -
Use
OpenStruct.new()to convert theHashfor the thirdspeakerinto anOpenStruct, an Object-like structure. Theto_snake_keys()method (from theplisskengem) converts the camel-cased (firstName)Hashkeys to snake case (first_name) for compatibility with Ruby. -
Use Minitest BDD-style
expectassertions to check for expected results:-
The third
speaker’scompany,first_name,last_name, andtagsmatch the values in the speakers.json file.
-
-
-
The
should validate the 3rd speaker with jqtest works as follows:-
Use
jqqueries (e.g.,.company) to check the same fields as in the previous test.jqsimplifies Unit Testing by enabling a developer to query the JSON-basedHashes without the need to convert to an object.jqis a powerful JSON search tool, and Chapter 6 covers it in greater detail. -
The
. | "\(.firstName) \(.lastName)"query does a String interpolation to combine thefirsNameandlastNamefields into thespeaker’s full name for testing purposes. -
The
ruby-jqgem provides a solid Ruby-basedjqimplementation.
-
To run this test, use bundle exec rake from the command line, and you should see the following:

rake is a commonly used build utility
for Ruby projects. In the bundle exec rake command, the following occurs:
-
rakeuses the gems that Bundler listed in this project’sGemfile. -
rakehas been configured to usetestas the default task.
The Rakefile defines the build tasks, and looks like Example 3-8.
Example 3-8. speakers-test/Rakefile
require'rake/testtask'Rake::TestTask.new(:test)do|t|t.libs=%w(lib test)t.pattern='test/**/*_spec.rb't.warning=falseendtask:default=>:test
By default, Minitest is silent and doesn’t indicate that tests are passing. In the preceding Unit Test run,
notice that passing tests show in the output. The speakers-test project leverages the minitest-reporters
gem to make
the output more readable.
The Minitest Helper in Example 3-9 configures the minitest and minitest-reporters gems for use by the
speakers_spec.
Example 3-9. speakers-test/test/minitest_helper.rb
require'minitest/spec'require'minitest/autorun'require"minitest/reporters"Minitest::Reporters.use!Minitest::Reporters::SpecReporter.new
For the sake of completeness, Example 3-10 shows the Speaker Plain Old Ruby Object (PORO)
that holds the Speaker data.
Example 3-10. speakers-test/models/speaker.rb
classSpeakerattr_accessor:first_name,:last_name,,:about,:company,:tags,:registereddefinitialize(first_name,last_name,,about,company,tags,registered)@first_name=first_name@last_name=last_name=@about=about@company=company@tags=tags@registered=registeredendend
The preceding code is plain and simple:
-
speaker.rb resides in the models directory to follow commonly accepted Ruby project conventions.
-
attr_accessordefines theSpeaker’s data members (e.g.,first_name) and accessor methods (getters/readers and setters/writers) for the data members. -
initialize()initializes the data members whenSpeaker.new()is called.
Before moving on, you can stop json-server by pressing Ctrl-C at the command line.
What Is Missing in the Unit Tests?
So far, the Unit Tests have done a decent job of testing JSON data, but something is missing. The code had to check for the existence of all the expected fields, which is clumsy and cumbersome. Imagine how arduous this would be for larger, deeper, more complex JSON documents. There’s a solution for this problem: JSON Schema (this is covered in Chapter 5).
We’ve shown how to deploy and interact with a Stub API, and now it’s time to build a small RESTful API with Ruby on Rails.
Build a Small Web API with Ruby on Rails
Now that you know how to serialize/deserialize JSON to/from a speaker Object and how to do a Unit Test
with the Speaker Stub API (from json-server), we’re ready to build a simple web application that
leverages the API data and presents it to a user.
We’ll continue to use the Speaker data to create an API with Rails 5. This version of Rails includes
rails-api, which provides the ability to create an API-only Rails application. rails-api began as a
separate gem,
but it has been merged into Rails.
We’ll build two Rails-based API applications to demonstrate some of the features of AMS:
speakers-api-1-
Create an API with camel-cased JSON.
speakers-api-2-
Create an API that customizes the JSON representation.
Before we create anything, let’s determine how the APIs will render JSON.
Choose a JSON Serializer
There are several options for rendering JSON in Ruby on Rails. Here’s a list of the most widely used techniques:
- ActiveModel::Serializers (AMS)
-
AMS provides functionality to objects that need some ActiveRecord features, such as serialization and validation. AMS is part of the Rails API, and you can find documentation on GitHub.
- Jbuilder
-
A Domain-Specific Language (DSL) builder that uses a separate template (i.e., outside the controller) that controls the output. For further details, please see Jbuilder on GitHub.
- RABL
-
Ruby API Builder Language (RABL) generates JSON, XML, PList, MessagePack, and BSON. This gem also uses a template file. The RABL GitHub repository has details.
Evaluation criteria
Here are a few considerations to help choose a JSON serialization approach:
-
JSON generation should be done outside application objects because an object should have no knowledge of external representations. This means that you shouldn’t have code in your object that renders JSON. According to Uncle Bob Martin, a class should have only one reason to change; this is known as the Single Responsibility Principle (the first of the five SOLID principles of OO Design). For further details, see his The Principles of OOD site. When you introduce JSON formatting to an Object, that Object now has a second reason to change, because it has two responsibilities (making it more difficult to change the code in the future):
-
The original functionality of the object
-
JSON encoding
-
-
Don’t clutter Controllers or Models with JSON generation. This also violates Single Responsibility and makes the Controller/Model code less flexible. Use external templates to clean up Controllers and Models and factor out messy, complex formatting logic.
-
Control which attributes of an object to serialize and which ones to omit.
Although these guidelines may sound a bit strict, the whole point here is interoperability and consistency. But there are no silver bullets, and it’s perfectly acceptable to have different opinions. In which case, do the following:
-
Know why you believe what you believe. Back up your position with sound software engineering and architectural principles.
-
Work and play well with others. Determine whether your approach fits with the overall community rather than just a single language, platform, or segment within a particular technical community.
Now that we’ve established some evaluation criteria, let’s review the options.
AMS, RABL, or Jbuilder?
Based on the preceding considerations and a review of all the options, it’s a tough decision because AMS, RABL,
and Jbuilder each provide most (if not all) of what we’re looking for. AMS factors out serialization into
a Serializer Object, and RABL and Jbuilder both use external templates. Because RABL can’t emit lower camel
case,
it’s out of the running, which reduces our options to AMS and Jbuilder.
Choosing between AMS and Jbuilder is difficult:
-
Each provides the same quality of JSON representation.
-
Their performance is similar when you configure Rails to use
oj.
It comes down to which approach you prefer:
-
Programmatic JSON serialization with
SerializerObjects (AMS) or with templates (Jbuilder) -
JSON serialization in the Controller (AMS) or in the View (Jbuilder)
There are great arguments on both sides:
- Pro AMS
-
Using AMS is a good approach because everything is Ruby-based. Jbuilder templates introduce the need for developers to learn a new DSL.
- Pro Jbuilder
-
Jbuilder forces you to think about the JSON representation first, and pushes you to decouple from the underlying database.
As many people in the Rails community would say, “it’s a wash.” In other words, it’s a toss-up between AMS and Jbuilder; either approach produces great JSON responses for an API. I chose AMS because it’s part of Rails and there’s no need to learn a new DSL for templating.
speakers-api-1—Create an API with Camel-Cased JSON
We’ll take the following steps to create and deploy the speakers-api-1 API with Rails 5:
-
Set up the project.
-
Write source code:
-
Model
-
Serializer
-
Controller
-
-
Deploy the API.
-
Test with Postman.
Set up the speakers-api-1 project
The speakers-api-1 project already exists in the Chapter 3 code examples under the chapter-3/speakers-api-1 directory, so you don’t need to create this project. But for the sake of completeness, the following sidebar explains how the project was created.
Even though the project is already set up, you will need to install the gems to run the project. Do the following:
cd speakers-api-1

bundle exec spring binstub --all
In this command, Bundler installs the gems specified in the project’s Gemfile.
Create the Model
The Speaker class in Example 3-11 is a PORO that represents the Speaker data that
the API will render as JSON.
Example 3-11. speakers-api-1/app/models/speaker.rb
classSpeaker<ActiveModelSerializers::Modelattr_accessor:first_name,:last_name,,:about,:company,:tags,:registereddefinitialize(first_name,last_name,,about,company,tags,registered)@first_name=first_name@last_name=last_name=@about=about@company=company@tags=tags@registered=registeredendend
This code doesn’t do much; it just provides the data members, constructors, and
accessor methods (getters and setters) for a speaker. This code doesn’t know anything about
JSON formatting. The Speaker class inherits from ActiveModel::Serializer so that AMS will convert
it to JSON.
Create the Serializer
AMS provides Serializers (separate from Controllers and Models) that serialize Objects into JSON.
The SpeakerSerializer already exists, but the following sidebar explains how it was created.
Example 3-12 shows the SpeakerSerializer that AMS uses to render speaker Objects as JSON.
Example 3-12. speakers-api-1/app/models/speaker_serializer.rb
classSpeakerSerializer<ActiveModel::Serializerattributes:first_name,:last_name,,:about,:company,:tags,:registeredend
In this code, attributes lists all fields to be serialized into JSON.
Create the Controller
In a Rails application, a Controller handles HTTP Requests and returns HTTP Responses. In our case, the
Speaker JSON data is returned in the Response Body. The SpeakersController already exists, but the following sidebar explains how it was created.
Example 3-13 provides the full SpeakersController that implements the index and show methods.
Example 3-13. speakers-api-1/app/controllers/speakers_controller.rb
require'speaker'classSpeakersController<ApplicationControllerbefore_action:set_speakers,only:[:index,:show]# GET /speakersdefindexrenderjson:@speakersend# GET /speakers/:iddefshowid=params[:id].to_i-1ifid>=0&&id<@speakers.lengthrenderjson:@speakers[id]elserenderplain:'404 Not found',status:404endendprivatedefset_speakers@speakers=[]@speakers<<Speaker.new('Larson','Richard','larsonrichard@ecratic.com','Incididunt mollit cupidatat magna ...','Ecratic',['JavaScript','AngularJS','Yeoman'],true)@speakers<<Speaker.new('Ester','Clements','esterclements@acusage.com','Labore tempor irure adipisicing consectetur ...','Acusage',['REST','Ruby on Rails','APIs'],true)@speakers<<Speaker.new('Christensen','Fisher','christensenfisher@talkola.com','Proident ex Lorem et Lorem ad ...','Talkola',['Java','Spring','Maven','REST'],true)endend
Note the following in this code:
-
The
speakersArray is hardcoded, but it’s for test purposes only. In a real application, a separate Data Layer would populate thespeakersfrom a database or an external API call. -
The
indexmethod does the following:-
Responds to HTTP
GETrequests on the /speakers URI. -
Retrieves the entire
speakersArray and renders it as a JSON Array in an HTTP Response Body.
-
-
The
showmethod does the following:-
Responds to HTTP
GETrequests on the /speakers/{id} URI (whereidrepresents a speaker ID). -
Retrieves a
speaker(based on the speaker ID) and renders it as a JSON object in an HTTP Response Body. -
If
idin the HTTP Request is out-of-bounds, the Controller renders a 404 (Not Found) HTTP Status Code with a plain-text message in the HTTP Response withrender plain.
-
-
When the Controller invokes the
rendermethod, Rails looks for a matching Serializer to serialize thespeakerObject, and invokes theSpeakerSerializerby default.
The Controller and Serializer are decoupled and know nothing about each other. The serialization code exists only in the Serializer and does not reside in the Controller or the Model. The Controller, Model, and Serializer each do one thing.
In a Rails application, the Routes file maps URLs to Controller methods that execute when the URL is
invoked. The rails generate controller command that was shown earlier created the routes shown in Example 3-14.
Example 3-14. speakers-api-1/app/config/routes.rb
Rails.application.routes.drawdoget'speakers/index'get'speakers/show'# For details on the DSL available within this file,# see http://guides.rubyonrails.org/routing.htmlend
You can shorten the Routes file with Resource-based routing as shown in Example 3-15.
Example 3-15. speakers-api-1/app/config/routes.rb
Rails.application.routes.drawdoresources:speakers,:only=>[:show,:index]# For details on the DSL available within this file,# see http://guides.rubyonrails.org/routing.htmlend
Instead of separate routes for the index and show methods, this resourceful route defines them
with a single line of code.
Camel-casing AMS JSON output
By default, AMS renders JSON keys with snake case (first_name and last_name). Out of the box, the
serialized JSON (when the user invokes http://localhost:3000/speakers/1 with an HTTP GET) looks like this:
{"first_name":"Larson","last_name":"Richard","email":"larsonrichard@ecratic.com","about":"Incididunt mollit cupidatat magna ...","company":"Ecratic","tags":["JavaScript","AngularJS","Yeoman"],"registered":true}
To make our JSON output compatible with non-Ruby clients, let’s add camel casing by adding the global initializer file shown in Example 3-16.
Example 3-16. speakers-api-1/config/initializers/active_model_serializers.rb
ActiveModelSerializers.config.key_transform=:camel_lower
Test the API with Postman
Now that the Speakers API is up and running, let’s test with Postman (as we did in Chapter 1) to get the
first speaker. In the Postman GUI, do the following:
-
Enter the http://localhost:3000/speakers/1 URL.
-
Choose
GETas the HTTP verb. -
Click the Send button.
You should see that the GET ran properly in Postman with the speaker JSON data in the HTTP Response Body
text area and a 200 (OK) HTTP Status, as shown in Figure 3-1.
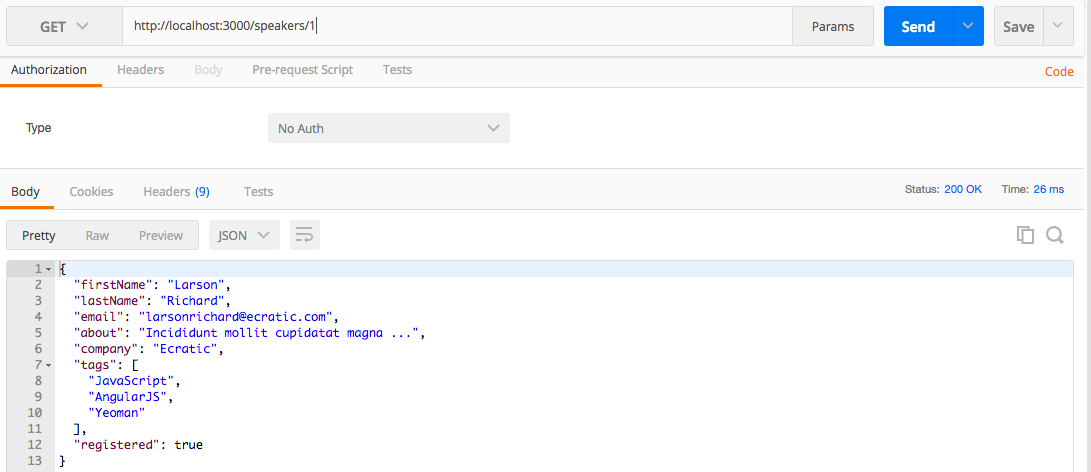
Figure 3-1. Speaker JSON data with Postman
You can stop speakers-api-1 by pressing Ctrl-C at the command line.
speakers-api-2—Create an API that Customizes the JSON Representation
AMS’s JSON customization functionality goes beyond camel-casing. The second API application will show how
AMS can customize (alter) the JSON representation of each speaker. Except for the new
SpeakerSerializer, speakers-api-2 has all the same code as the original speakers-api-1 project,
so we’ll just focus on serialization.
Before going further, please install the gems to run the speakers-api-2 project. Do the following:
cd speakers-api-2

bundle exec spring binstub --all
Change the JSON representation with AMS
This new version of the SpeakerSerializer provides a new name field (which combines the first_name
and last_name) without changing the original speaker Object, as shown in Example 3-17.
Example 3-17. speakers-api-2/app/serializers/speaker_serializer.rb
classSpeakerSerializer<ActiveModel::Serializerattributes:name,,:about,:company,:tags,:registereddefname"#{object.first_name}#{object.last_name}"endend
Note the following in this example:
-
attributesreferencesnameinstead offirst_nameandlast_name. -
In the
namemethod:-
The
objectrefers to thespeakerObject being rendered. -
Combine the
first_nameandlast_namefields by using String interpolation to render a singlenamefield. The originalSpeakermodel knows nothing about thenameattribute created by the Serializer.
-
The ability to customize the JSON representation with attributes is powerful because it decouples
the Model from the JSON output.
Deploy the API
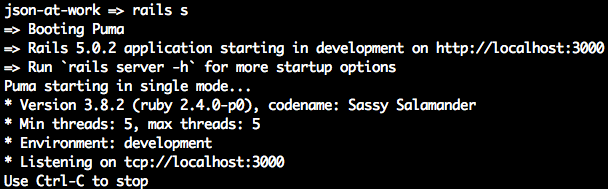
In the speakers-api-2 directory, run rails s to deploy the API at
http://localhost:3000/speakers.
Test the API with Postman
In the Postman GUI, invoke HTTP GET on http://localhost:3000/speakers/1
and you should see the screen in Figure 3-2.

Figure 3-2. Customized Speaker JSON data with Postman
Don’t forget to stop the speakers-api-2 application by pressing Ctrl-C at the command line.
What We Covered
We started with simple conversions between Ruby and JSON, discussed the importance of JSON camel casing, and then demonstrated how to call a (Stub) JSON-based Web API (and tested its contents with Minitest). We then finished by creating a RESTful API with Rails 5 and tested it with Postman.
What’s Next?
Now that we’ve developed a JSON-based application with Ruby on Rails, we’ll move on to use JSON with Java (and Spring Boot) in Chapter 4.