Table of Contents for
JSON at Work
 JSON at Work
Published by
O'Reilly Media, Inc., 2017
JSON at Work
Published by
O'Reilly Media, Inc., 2017
- nav
- Cover
- JSON at Work
- JSON at Work
- Dedication
- Preface
- I. JSON Overview and Platforms
- 1. JSON Overview
- 2. JSON in JavaScript
- 3. JSON in Ruby on Rails
- 4. JSON in Java
- II. The JSON Ecosystem
- 5. JSON Schema
- 6. JSON Search
- 7. JSON Transform
- III. JSON in the Enterprise
- 8. JSON and Hypermedia
- 9. JSON and MongoDB
- 10. JSON Messaging with Kafka
- A. Installation Guides
- B. JSON Community
- Index
- About the Author
- Colophon
Chapter 2. JSON in JavaScript
We’ve covered the basics of the JSON data interchange format, and in this chapter we’ll begin to develop applications with JSON. JSON began as a subset of the JavaScript definition for Objects and Arrays, but rest assured that JSON is now decoupled from JavaScript. JSON is language-agnostic and works across multiple platforms. Because JSON has its roots in JavaScript, this is where we begin our journey.
Here’s what we’ll cover:
-
Using JavaScript serialization/deserialization with
JSON.stringify()andJSON.parse() -
Working with JavaScript Objects and JSON
-
Making RESTful API calls and testing the results with Mocha/Chai Unit Tests
-
Building a small JSON-based web application
In our examples, we’ll leverage Node.js, scaffold a web application with Yeoman, and make RESTful API calls
to pull in the data we created on json-server in the previous chapter. That’s a lot of moving pieces and
parts, so we’ll iteratively build on each concept. But before we develop our web app, we need to start
with the basics of JavaScript serialization/deserialization and Objects.
Node.js Setup
Before we go any further, let’s start building our development environment by installing Node.js. Please go to Appendix A, and follow the instructions in “Install Node.js”.
JSON Serialization/Deserialization with JSON.stringify() and JSON.parse()
Applications need to serialize (or flatten) their information into JSON in order to produce data for other applications in a platform-neutral manner. An application must also be able to deserialize (or unflatten) JSON data consumed from external sources into data structures for use by that application.
The JSON Stringifier/Parser Object
The JSON stringifier/parser Object was originally developed by Douglas Crockford, has been part of the
JavaScript library as of ECMAScript 5 in 2009,
and provides the following methods:
-
JSON.stringify()serializes to JSON -
JSON.parse()deserializes from JSON
Additionally, the JSON Object
-
Was originally developed by Crockford
-
Can’t be instantiated
-
Has no other functionality
JSON Serialization with Simple JavaScript Data Types
We’ll start by serializing some basic JavaScript Data Types:
-
Number
-
String
-
Array
-
Boolean
-
Object (Literal)
Example 2-1 shows how to use JSON.stringify() to serialize simple Data Types.
Example 2-1. js/basic-data-types-stringify.js
varage=39;// Integerconsole.log('age = '+JSON.stringify(age)+'\n');varfullName='Larson Richard';// Stringconsole.log('fullName = '+JSON.stringify(fullName)+'\n');vartags=['json','rest','api','oauth'];// Arrayconsole.log('tags = '+JSON.stringify(tags)+'\n');varreqistered=true;// Booleanconsole.log('registered = '+JSON.stringify(reqistered)+'\n');varspeaker={firstName:'Larson',lastName:'Richard',:'larsonrichard@ecratic.com',about:'Incididunt mollit cupidatat magna excepteur do tempor ex non ...',company:'Ecratic',tags:['json','rest','api','oauth'],registered:true};console.log('speaker = '+JSON.stringify(speaker));
When you run the preceding file with node from the command line, you should get the following:
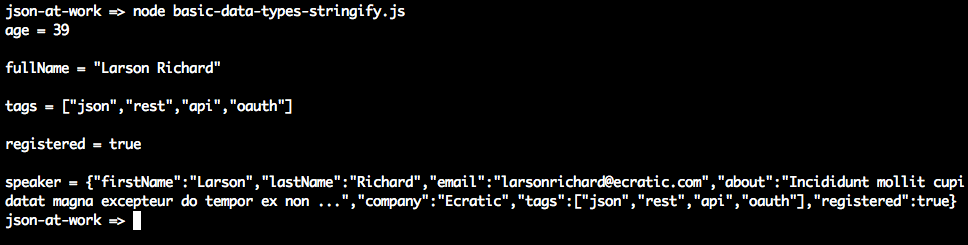
JSON.stringify() doesn’t do anything too interesting with the scalar types (Number, String, Boolean).
Things begin to get interesting with the speaker Object Literal because here JSON.stringify() initially
generates a valid, yet unattractive, JSON String. JSON.stringify() has other parameters that enhance
serialization. According to the Mozilla Developer Network (MDN) JavaScript Guide,
here is the method signature:
JSON.stringify(value[,replacer[,space]])
The parameter list is as follows:
value(required)-
The JavaScript value to serialize.
replacer(optional)-
Either a function or an array. If a function is provided, the
stringify()method invokes thereplacerfunction for each key/value pair in an Object. space(optional)-
Indentation—either a Number or String. If a Number is used, this value specifies the number of spaces used for each indentation level.
Let’s leverage the replacer and space parameters to pretty-print the speaker Object and filter out
some data elements, as shown in Example 2-2.
Example 2-2. js/obj-literal-stringify-params.js
varspeaker={firstName:'Larson',lastName:'Richard',:'larsonrichard@ecratic.com',about:'Incididunt mollit cupidatat magna excepteur do tempor ex non ...',company:'Ecratic',tags:['json','rest','api','oauth'],registered:true};functionserializeSpeaker(key,value){return(typeofvalue==='string'||Array.isArray(value))?undefined:value;}// Pretty Print.console.log('Speaker (pretty print):\n'+JSON.stringify(speaker,null,2)+'\n');// Pretty print and filter out Strings and Arrays.console.log('Speaker without Strings and Arrays:\n'+JSON.stringify(speaker,serializeSpeaker,2));
Running the preceding file yields the following:
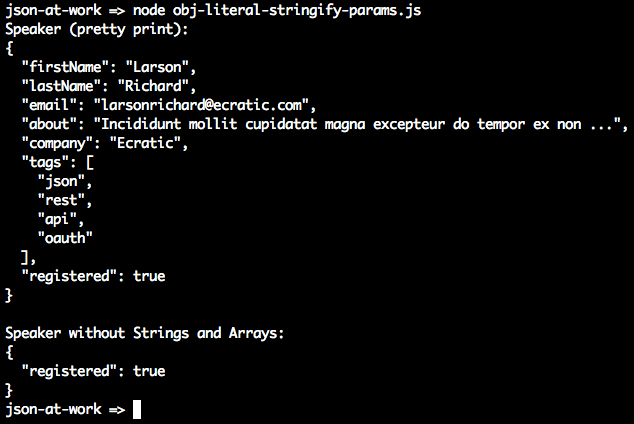
The first JSON.stringify() call pretty-prints the JSON output with an indentation level of 2. The second
call uses the serializeSpeaker() function as a replacer (JavaScript functions are treated as expressions
and can be passed as parameters). serializeSpeaker() checks the type of each value and returns undefined
for Strings and Arrays. Otherwise, this function returns the value “as is.”
JSON.stringify() does one of the following with an undefined value:
-
Omits the value if it’s part of an Object
-
Converts the value to
nullif that value belongs to an Array
JSON Serialization with an Object and toJSON()
As you’ve seen, JSON serialization makes the most sense with Objects. Let’s customize
JSON.stringify()’s output by adding a toJSON() method to our speaker Object, as shown in Example 2-3.
Example 2-3. js/obj-literal-stringify-tojson.js
varspeaker={firstName:'Larson',lastName:'Richard',:'larsonrichard@ecratic.com',about:'Incididunt mollit cupidatat magna excepteur do tempor ex non ...',company:'Ecratic',tags:['json','rest','api','oauth'],registered:true};speaker.toJSON=function(){return"Hi there!";}console.log('speaker.toJSON(): '+JSON.stringify(speaker,null,2));
Serialization works as follows:

If an Object has a toJSON() method, JSON.stringify() outputs the value returned by the Object’s
toJSON() method rather than stringifying the Object. Although the use of toJSON() is legal, it’s probably
a bad idea. toJSON() defeats the whole purpose of JSON.stringify(), because the developer is now
responsible for serializing the entire Object structure. This could work with simple Objects such as speaker
(as currently defined), but you’ll end up writing lots of code to serialize more complex Objects that
contain other Objects.
JSON Deserialization Using eval()
Originally, JavaScript developers used the eval() function to parse JSON.
eval() takes a String parameter that could be a JavaScript expression, a statement, or a sequence of
statements. Consider Example 2-4.
Example 2-4. js/eval-parse.js
varx='{ "sessionDate": "2014-10-06T13:30:00.000Z" }';console.log('Parse with eval(): '+eval('('+x+')').sessionDate+'\n');console.log('Parse with JSON.parse(): '+JSON.parse(x).sessionDate);
Running the preceding file yields the following:
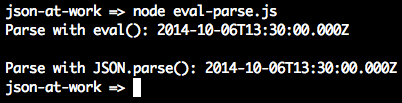
In this case, both eval() and JSON.parse() work the same and parse the date properly. So what’s the
problem? Let’s look at another example with a JavaScript statement embedded in the String; see Example 2-5.
Example 2-5. js/eval-parse-2.js
varx='{ "sessionDate": new Date() }';console.log('Parse with eval(): '+eval('('+x+')').sessionDate+'\n');console.log('Parse with JSON.parse(): '+JSON.parse(x).sessionDate);
When we run this, we now see the following:
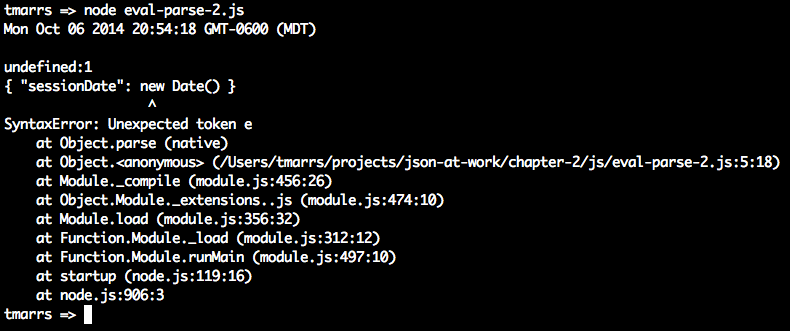
We passed in text that contains a JavaScript statement, new Date(), and eval() executes that statement.
Meanwhile, JSON.parse() correctly rejects the text as invalid JSON. Although we passed in only a fairly
innocuous statement to create a Date, someone else could pass in malicious code and eval() would still
execute it. Even though eval() can be used to parse JSON, it is considered a bad/unsafe practice because
it opens the door to any valid JavaScript expression, leaving your application vulnerable to attacks. Because of this security issue, the eval() function has been deprecated (for parsing JSON) in favor of JSON.parse().
JSON Deserialization with an Object and JSON.parse()
Let’s return to our Speaker example, and use JSON.parse() to deserialize a JSON String into a speaker
Object, as shown in Example 2-6.
Example 2-6. js/obj-literal-parse.js
varjson='{'+// Multi-line JSON string.'"firstName": "Larson",'+'"lastName": "Richard",'+'"email": "larsonrichard@ecratic.com",'+'"about": "Incididunt mollit cupidatat magna excepteur do tempor ex non ...",'+'"company": "Ecratic",'+'"tags": ['+'"json",'+'"rest",'+'"api",'+'"oauth"'+'],'+'"registered": true'+'}';// Deserialize JSON string into speaker object.varspeaker=JSON.parse(json);// Print 2nd speaker object.console.log('speaker.firstName = '+speaker.firstName);
When we run this file, we get the following:

JSON.parse() takes a JSON String as input and parses it into a fully functional JavaScript Object. We’re
now able to access the speaker Object’s data members.
JavaScript Objects and JSON
So far, we’ve shown how core JavaScript Data Types and simple Object Literal–style JavaScript Objects interact with JSON. But we’ve glossed over some details, and now it’s time to go a bit deeper. There are several ways to create (or instantiate) JavaScript Objects, and we’ll focus on Object Literal form because this type of Object is the one that is the closest match to a JSON Object.
We’ve already shown the speaker Object in Object Literal form, but we’ll show it again
in Example 2-7 for reference.
Example 2-7. js/obj-literal.js
varspeaker={firstName:'Larson',lastName:'Richard',:'larsonrichard@ecratic.com',about:'Incididunt mollit cupidatat magna excepteur do tempor ex non ...',company:'Ecratic',tags:['json','rest','api','oauth'],registered:true,name:function(){return(this.firstName+' '+this.lastName);}};
With Object Literal syntax, you define an Object’s properties (both data and functions) inside the curly
braces. In the preceding example, the speaker Object is instantiated and populated with data. If you never
need to create another instance of the speaker Object in your application, Object Literal is a good
approach because it provides a simple yet modular way to group an Object’s data and functionality. The real
drawback to the Object Literal approach is that you can create only one instance of speaker, and you can’t
reuse the name() method.
Node REPL
So far we’ve been using Node.js from the command line to execute JavaScript files. Let’s change things up a bit and start using Node.js’s interpreter, the Request-Eval-Print-Loop (REPL), instead. The REPL is really great because it provides instant feedback on your code, and enables you to iteratively debug and improve your application. You can find in-depth coverage of the REPL in the Node.js documentation. But nothing is perfect, and neither is the REPL. One of my pet annoyances is the following:

For each statement that doesn’t produce output, the interpreter outputs undefined. Many people find this distracting, and there’s a way to turn it off. See Appendix A (“Taming the REPL—mynode”) to configure a command alias I affectionately call mynode that I
find easier to work with than the standard Node.js REPL.
Without further ado, let’s work with our speaker Object by using the mynode REPL:
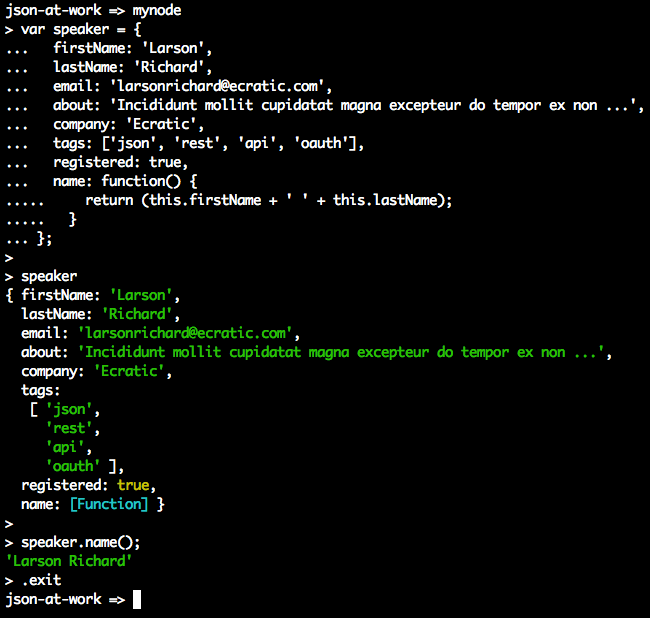
In this run, you’ll notice that we can interact with the speaker Object by calling its methods and
viewing the results in the interpreter.
Here are some of the commands you’ll need to use the REPL:
.clear-
Clear the context of the REPL session.
.break-
Go back to the REPL prompt. Use this to break out of a multiline statement.
.exit-
Exit the REPL session.
.save-
Save the REPL session to a file.
Where to Learn More About JavaScript Objects
We’ve glossed over many details of Object-Oriented JavaScript, and there are several other ways to interact with objects. We’ve shown just enough OO here so that we can work with JavaScript Objects and JSON in a meaningful way within an application. Complete, in-depth coverage of JavaScript Objects is far beyond the scope of this book. To gain a deeper understanding, here are a few excellent resources:
Unit Testing with a Stub API
Now that you know how to serialize/deserialize JSON to/from a speaker Object, we’re ready to run a simple
server-side Unit Test against a Stub API provided by json-server. We’ll also use this Stub API when we later
create a small web application.
Unit Test Style—TDD and BDD
Test-Driven Development (TDD) is an approach that uses Unit Testing to drive development. Here’s a typical flow:
-
Write some tests.
-
Run the tests, which fail because there isn’t any code.
-
Write just enough code to make the tests pass.
-
Refactor the code to improve design and flexibility.
-
Rerun tests and fix code until all tests pass.
TDD-style Unit Tests tend to be procedural.
Behavior-Driven Development (BDD) is an approach that tests a User Story based on acceptance criteria and expected outcomes. BDD-style tests read like English sentences; for example: “Speakers should receive their payment from the Conference within 30 days.” For more information on BDD, please see Dan North’s excellent article, “Introducing BDD”. Some people see BDD as a refinement to TDD, and I tend to agree because a developer would follow the same workflow as TDD.
Both BDD and TDD are solid approaches, and can be combined to form a robust test suite for an application. The Unit Tests in this chapter use a BDD-style approach for assertions.
Just Enough Unit Testing with Mocha and Chai
Here are the tools for our server-side Unit Test:
- Mocha
-
Mocha is a JavaScript Unit Test framework that runs in both Node.js and a browser. We’ll leverage Mocha from the command line within a Node.js project, and add a few features to support JSON-based API testing. You can find more details at the Mocha website.
- Chai
-
Chai is an assertion library that complements JavaScript testing frameworks and adds a richer set of assertions, in this case to Mocha. Chai enables developers to write TDD or BDD style tests. The tests in this chapter use the
expect(BDD) assertion style, but you’re free to experiment with theshould(BDD) orassert(TDD) assertion styles. Use the approach that makes you comfortable. For more details on Chai, visit the Chai Asssertion Library website.
Setting Up the Unit Test
Before going further, please be sure to set up your test environment. If you haven’t installed Node.js yet, see Appendix A, and install Node.js (see “Install Node.js” and
“Install npm Modules”). If you want to follow along with the Node.js project provided in the code
examples, cd to chapter-2/speakers-test and do the following to install all dependencies for the
project:
npm install
If you’d like to set up the Node.js project yourself, follow the instructions in the book’s GitHub repository.
Unirest
Our Unit Test will invoke an API with HTTP, so we’ll include Unirest in our testing repertoire. Unirest is an open source cross-platform REST client provided by the Mashape team. There are implementations in JS, Node.js, Ruby on Rails (RoR) and Java. Unirest is simple and works well in any client code that makes HTTP calls to REST APIs, but it’s also great for Unit Testing. Unirest enables cleaner Unit Tests because you can do a one-time setup (e.g., URI, Headers) and then make multiple HTTP calls throughout the test suite. For detailed documentation, visit the Unirest website.
Unirest is great because it’s cross-platform, and the concepts and method signatures are similar regardless of the language implementation. There are other excellent Java-based HTTP libraries (e.g., Apache Commons HTTPComponents HttpClient, but as a polyglot (multilanguage) developer, I prefer Unirest. Please note that Unirest is not just for Unit Tests. It’s widely used as an HTTP client wrapper by APIs (which invoke other APIs), and by web and mobile client applications.
Test Data
We’ll use the Speaker data from Chapter 1 as our test data and deploy it as a RESTful API. Again, we’ll
leverage the json-server Node.js module to serve up the data/speakers.json file as a Web API. If you need
to install json-server, please refer to “Install npm Modules” section of Appendix A.
Here’s how to run json-server on port 5000 from your local machine:
cd chapter-2/data

json-server -p 5000 ./speakers.json
Speakers Unit Test
The Unit Test in Example 2-8 shows how to use Unirest to make an API call to the Speaker Stub API provided by
json-server.
Example 2-8. speakers-test/speakers-spec.js
'use strict';varexpect=require('chai').expect;varunirest=require('unirest');varSPEAKERS_ALL_URI='http://localhost:5000/speakers';describe('speakers',function(){varreq;beforeEach(function(){req=unirest.get(SPEAKERS_ALL_URI).header('Accept','application/json');});it('should return a 200 response',function(done){req.end(function(res){expect(res.statusCode).to.eql(200);expect(res.headers['content-type']).to.eql('application/json; charset=utf-8');done();});});it('should return all speakers',function(done){req.end(function(res){varspeakers=res.body;varspeaker3=speakers[2];expect(speakers.length).to.eql(3);expect(speaker3.company).to.eql('Talkola');expect(speaker3.firstName).to.eql('Christensen');expect(speaker3.lastName).to.eql('Fisher');expect(speaker3.tags).to.eql(['Java','Spring','Maven','REST']);done();});});});
In this Unit Test, the following occurs:
-
The test sets up the URI and
AcceptHeader forunirestby using Mocha’sbeforeEach()method, so that setup occurs in only one place in the code. Mocha executesbeforeEach()before running each test (i.e.,it) within the context of thedescribe. -
The
should return all speakerstest is the most interesting, and it works as follows:-
req.end()executes the UnirestGETrequest asynchronously, and the anonymous (unnamed) function processes the HTTP response (res) from the API call. -
We populate the
speakersobject with the HTTP Response Body (res.body). At this point, the JSON from the API has already been parsed by Unirest and converted to a corresponding JavaScript Object (in Object Literal form). -
We use Chai’s BDD-style
expectassertions to check for expected results:-
We have three
speakers. -
The third
speaker’scompany,firstName,lastName, andtagsmatch the values in the speakers.json file.
-
-
To run this test from the command line (in a second terminal session), do the following:
cd chapter-2/speakers-test

npm test
You should see the following results:
json-at-work => npm test

...

> mocha test

...

  speakers
    ✓ should return a 200 response
    ✓ should return all speakers


  2 passing
Building a Small Web Application
Now that you know how to serialize/deserialize JSON to/from a speaker Object and how to do a Unit Test
with the Speaker Stub API (on json-server), we’re ready to build a simple web application that
leverages the API data and presents it to a user.
We’ll develop the web application in three iterations:
-
Iteration 1—generate a basic web application with Yeoman.
-
Iteration 2—make an HTTP call with jQuery.
-
Iteration 3—consume Speaker data from a Stub API (with
json-server) and use a template.
Yeoman
Yeoman provides an easy way to create (i.e., scaffold) a web application and simplify developer workflow, and is similar to Gradle and Maven (from the Java community), and Ruby on Rails. We’ll use Yeoman to set up, develop, and run the example application. To install Yeoman (which depends on Node.js), refer to Appendix A, and follow the instructions in “Install Yeoman”.
Yeoman provides the following functionality:
-
Creates the development environment
-
Runs the application
-
Automatically reloads the browser when changes are saved
-
Manages package dependencies
-
Minifies the application’s code and packages it for deployment
Yeoman follows the philosophy of convention over configuration:
-
Automates setup
-
Just works
-
Uses standardized directory structures
-
Provides Dependency Management
-
Assumes reasonable defaults
-
Encourages best practices
-
Enables tool-based developer workflow (e.g., test, lint, run, and package)
Please review the following Yeoman tutorials for more information:
The Yeoman toolset
Yeoman consists of the following tools:
- Scaffolding
-
Yo generates the directory structure and Grunt/Gulp/Bower configuration files for an application.
- Build
-
You can use either Gulp or Grunt to build, run, test, and package an application.
- Package Management
-
Either Bower or npm can be used to manage and download package dependencies.
Although Grunt is a solid build tool, and npm is an excellent package manager, we’ll use Gulp and Bower for our examples because the Yeoman generator for the web application uses these tools.
Yeoman generators
Yeoman leverages generators to build and scaffold a project. Each generator creates a default preconfigured boilerplate application. There are over 1,000 generators, and Yeoman provides a complete official list.
Iteration 1—Generate a Web Application with Yeoman
Let’s start with a simple application that has no real functionality, and hardcode the Speaker data into
a table. We’ll add the speaker functionality in Iterations 2 and 3. With Yeoman installed, we’ll use the
generator-webapp generator to create our application that comes out-of-the-box with web pages, CSS
stylesheets, Bootstrap 4, jQuery, Mocha, and Chai.
If you’d like to set up the Yeoman project yourself, follow the instructions in the book’s GitHub
repository.
If you want to follow along with the Yeoman project provided in the code examples, cd to
chapter-2/speakers-web-1. In either case, do the following to start the application from the command line:
gulp serve
This command starts a local web server and shows the main page (index.html) in your default browser. You should see the page in Figure 2-1 at http://localhost:9000.
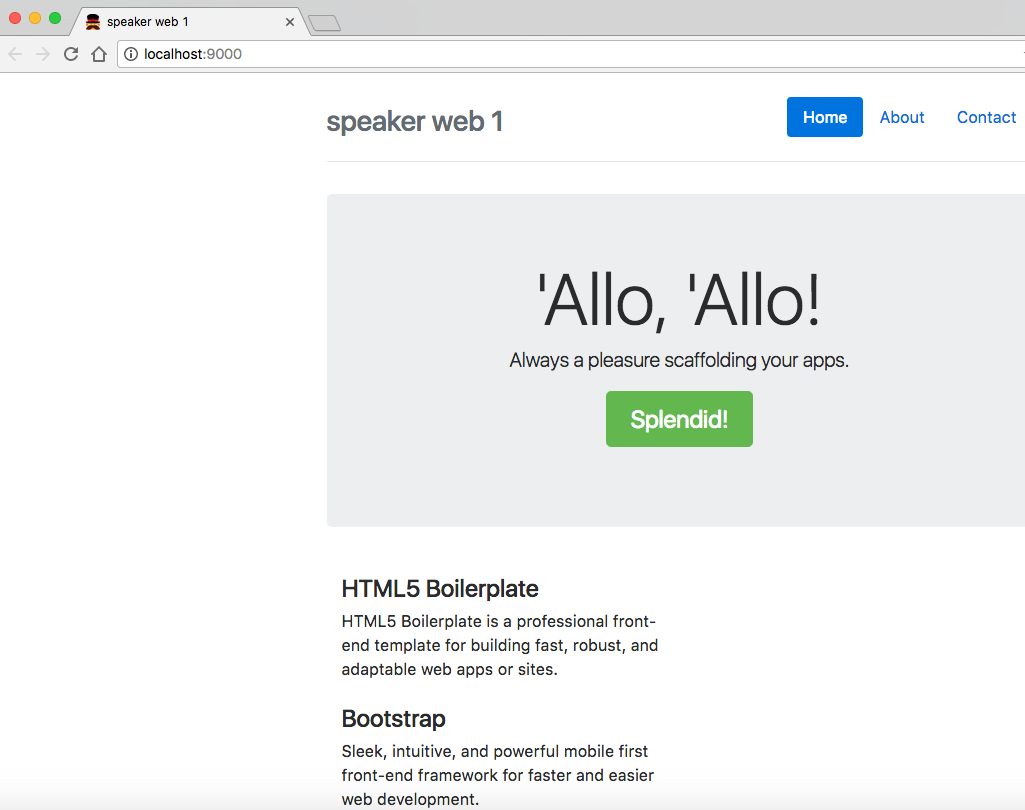
Figure 2-1. Basic web app with Yeoman generator
Note that if you keep the application running, you can see changes take effect as you save them because this application automatically refreshes with LiveReload.
The generator-webapp Yeoman generator creates a nice starter application, and it’s time to customize
it. First, let’s change the title, Header, and jumbotron (i.e., remove the Splendid! button) in
index.html as shown in Example 2-9.
Example 2-9. speakers-web-1/app/index.html
<!doctype html><htmllang=""><head>...<title>JSON at Work - MyConference</title>...</head><body>...<divclass="header">...<h3class="text-muted">JSON at Work - Speakers</h3></div>...<divclass="jumbotron"><h1class="display-3">Speakers</h1><pclass="lead">Your conference lineup.</p></div>...</body></html>
Let’s add a table with some hardcoded Speaker data in the index.html file, as shown in Example 2-10.
Example 2-10. speakers-web-1/app/index.html
<!doctype html><htmllang="">...<body>...<tableclass="table table-striped"><thead><tr><th>Name</th><th>About</th><th>Topics</th></tr></thead><tbodyid="speakers-tbody"><tr><td>Larson Richard</td><td>Incididunt mollit cupidatat magna excepteur do tempor ...</td><td>JavaScript, AngularJS, Yeoman</td></tr><tr><td>Ester Clements</td><td>Labore tempor irure adipisicing consectetur velit. ...</td><td>REST, Ruby on Rails, APIs</td></tr><tr><td>Christensen Fisher</td><td>Proident ex Lorem et Lorem ad. Do voluptate officia ...</td><td>Java, Spring, Maven, REST</td></tr></tbody></table>...</body></html>
We now have a web application that displays the sample Speaker data, as shown in Figure 2-2.
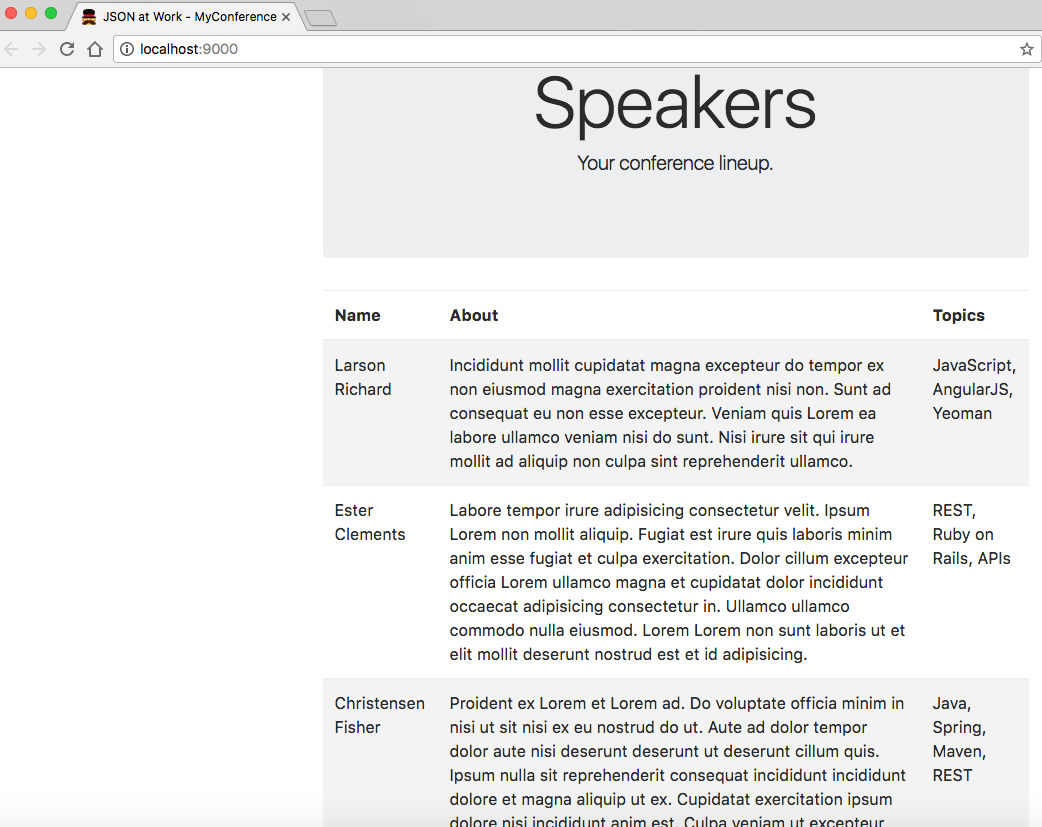
Figure 2-2. Sample Speaker data in index.html
Here are the key application files and directories generated by generator-webapp:
-
app/ contains the application’s code (for example, HTML, JavaScript, and CSS).
-
index.html is the application’s main page.
-
images/ holds the application’s images.
-
scripts/ is a directory that has the application’s JavaScript (and other scripting language) files.
-
main.js is the application’s main JavaScript file. We’ll work with this more in Iteration 2.
-
-
styles/ is the folder that holds CSS and related styling files.
-
-
bower_components/ contains the project dependencies installed by Bower: Bootstrap, jQuery, Mocha, and Chai.
-
node_modules/ contains the project dependencies required by Node.js, including Gulp.
-
test/ holds test specs used by the chosen testing framework(s). In this case, we’re using Mocha and Chai.
-
gulpfile.js is the Gulp build script used to build and run the application.
-
package.json is used by Node.js to manage dependencies that Gulp needs to execute the project scripts.
-
dist/ contains build-related artifacts created by
gulp build.
To wrap up our discussion on generator-webapp, here are the other important commands you’ll need to know:
- Ctrl-C
-
Stop the application (the web server).
gulp lint-
Use
lintto validate the JavaScript files in the application. gulp +serve:test-
Test the web application. In this case, it runs PhantomJS with Mocha and Chai.
gulp build-
Build and package the application for deployment.
gulp clean-
Clean the artifacts generated when testing and building the application.
You can get the full list of commands by typing gulp --tasks at the command line.
Please shut down the web application before moving to Iteration 2.
Iteration 2—Make an HTTP Call with jQuery
In Iteration 1, we developed a web application with Speaker data hardcoded in the main page, and now it’s time to add “live” content and functionality.
We’ll take the following steps:
-
Factor the hardcoded Speaker data out of the main page.
-
Add a separate JSON file to hold the Speaker data.
-
Use jQuery to populate the main page with Speaker data from the JSON file.
If you’d like to set up the Yeoman project for Iteration 2 by yourself, do the following:
-
Follow the instructions in the book’s GitHub repository.
-
Don’t forget to copy the app/index.html file from Iteration 1.
Or if you want to follow along with the Yeoman project provided in the code examples, cd to
chapter-2/speakers-web-2. In either case, do the following to start the application from the command line:
gulp serve
This command starts the local web server as shown in Iteration 1. You should see the page in Figure 2-3 at http://localhost:9000.
Figure 2-3. Sample Speaker data
This has the hardcoded Speaker data table in the main page (in index.html) that you saw earlier. Please keep the web application running so you can see changes take effect as you save them.
Now, let’s remove the rows from the table body. The HTML for the speakers table now looks like Example 2-11.
Example 2-11. speakers-web-2/app/index.html
<!doctype html><htmllang="">...<body>...<tableclass="table table-striped"><thead><tr><th>Name</th><th>About</th><th>Topics</th></tr></thead><tbodyid="speakers-tbody"></tbody></table>...</body></html>
In this example, we now have an empty table that has only a header row. We use Bootstrap’s
table-striped CSS class so that we’ll have zebra-striped rows. Notice the speakers-tbody ID on the
<tbody> element that holds the table’s content. Later, jQuery will use this ID to populate the table
rows.
We now need a separate JSON file to hold the Speaker data. Please see the new /speakers-web-2/app/data/speakers.json file that has the Speaker data for the application (this was copied from /chapter-2/data/speakers.json).
To complete Iteration 2, the upgraded app/scripts/main.js file now uses jQuery to populate the speakers table with the data from the app/data/speakers.json file, as shown in Example 2-12.
Example 2-12. speakers-web-2/app/scripts/main.js
'use strict';console.log('Hello JSON at Work!');$(document).ready(function(){functionaddSpeakersjQuery(speakers){$.each(speakers,function(index,speaker){vartbody=$('#speakers-tbody');vartr=$('<tr></tr>');varnameCol=$('<td></td>');varaboutCol=$('<td></td>');vartopicsCol=$('<td></td>');nameCol.text(speaker.firstName+' '+speaker.lastName);aboutCol.text(speaker.about);topicsCol.text(speaker.tags.join(', '));tr.append(nameCol);tr.append(aboutCol);tr.append(topicsCol);tbody.append(tr);});}$.getJSON('data/speakers.json',function(data){addSpeakersjQuery(data.speakers);});});
In this example, we put the code inside jQuery’s $(document).ready() so that the entire page
(including the DOM) is “ready” (fully loaded). $.getJSON() is a jQuery method that makes an
HTTP GET request on a URL and converts the JSON response to a JavaScript object. In this case, the
app/data/speakers.json file is addressable as a URL through HTTP because it is deployed as a part of the
web application. The $.getJSON() callback method then delegates the job of populating the speakers table
to the addSpeakersjQuery() function.
The addSpeakersjQuery() method loops through the speakers array by using the jQuery .each() method. The
.each() function does the following:
-
Finds the
<tbody>element in the speakers table by using thespeakers-tbodyID we showed in the index.html file -
Creates a row and its columns by filling in the
<tr>and<td>elements with the data from thespeakerobject -
Appends the new row to the
<tbody>element
For more information on jQuery’s getJSON() function, see the jQuery Foundation website.
If you kept the web application running, you should now see the screen in Figure 2-4.
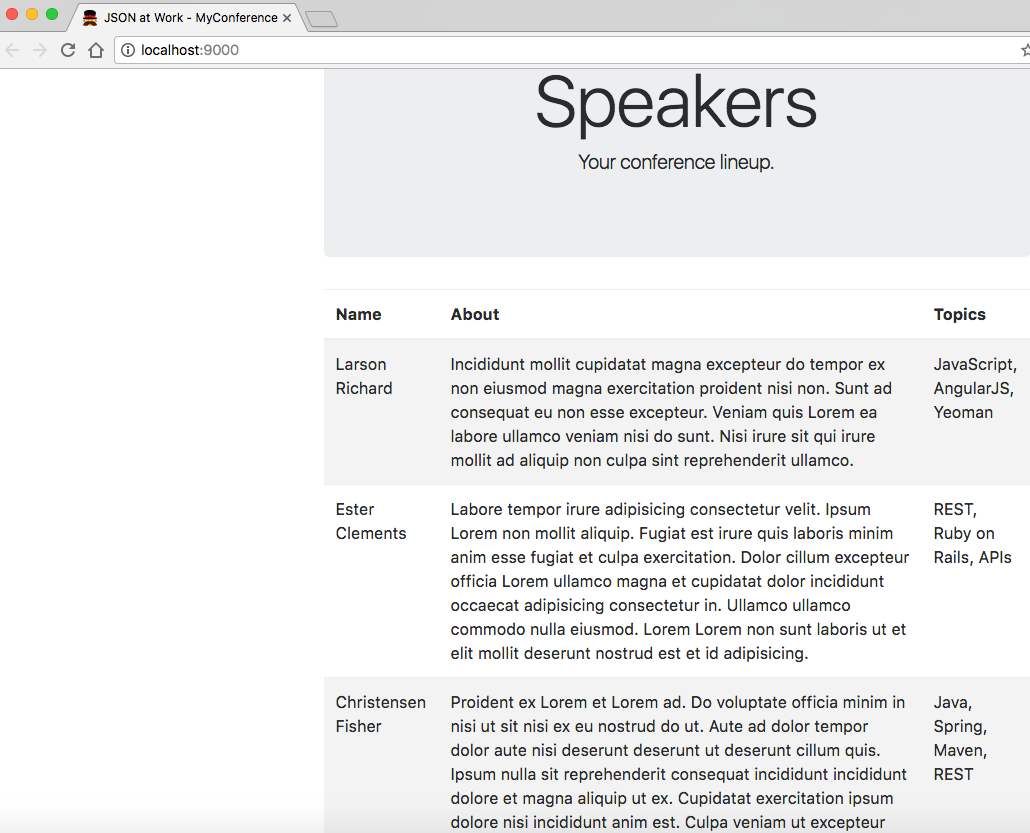
Figure 2-4. Sample Speaker data with JSON file and jQuery
The main page looks the same, but we were expecting that. We’ve improved the application by factoring out the hardcoded Speaker data from the main page, and we’re now making an HTTP call. At this point, we have some of the elements of a real web application that populates its pages dynamically, but here are the drawbacks:
-
The JSON data comes from a file within the web application, and we want it to come from a RESTful API.
-
The JavaScript code knows about HTML elements on the main page. We would like to reduce the amount of HTML and DOM manipulation.
Please shut down the web application before moving to Iteration 3.
Iteration 3—Consume Speaker Data from a Stub API and Use a Template
In Iteration 2, we made an HTTP call to populate the main page with Speaker data from a JSON file, and we’re
now going to get the data from the Stub API provided by json-server that was used in Chapter 1. We’re also going to factor the HTML and DOM manipulation out of the JavaScript into an external Mustache
template.
We’ll take the following steps:
-
Modify the HTTP call to point to the
json-serverURI. -
Use a Mustache template to remove the HTML and DOM manipulation from JavaScript.
If you’d like to set up the Yeoman project for Iteration 2 by yourself, do the following:
-
Follow the instructions in the book’s GitHub Repository.
-
Don’t forget to copy the following files from Iteration 2:
-
app/index.html
-
app/scripts/main.js
-
Or if you want to follow along with the Yeoman project provided in the code examples, cd to
chapter-2/speakers-web-3.
Next, let’s modify the HTTP call in main.js to point to the Speaker Stub API (provided by
json-server), as shown in Example 2-13.
Example 2-13. speakers-web-3/app/scripts/main.js
...$.getJSON('http://localhost:5000/speakers',function(data){addSpeakersjQuery(data);});...
The code now invokes the Speaker Stub API provided by json-server. Note that data is passed
to addSpeakersjQuery() because json-server doesn’t emit the named speakers Array.
First, open a new terminal session and run json-server on port 5000 from your command line:
cd chapter-2/data

json-server -p 5000 ./speakers.json
Start the web application (in another terminal session) from the command line:
gulp serve
This command starts the local web server as shown in Iterations 1 and 2. You should see the same Speaker data when you visit http://localhost:9000 in your browser. But the web application is in better shape because it’s using data from an API rather than a file. Please keep the web application running so you can see changes take effect as you save them.
To complete Iteration 3, let’s factor out the HTML/DOM manipulation from our JavaScript code into a
Mustache template. Mustache bills itself as providing logic-less templates, which means that there are no
control statements (e.g., for or if) needed to generate HTML from JavaScript and other languages.
Mustache works with multiple languages.
Example 2-14 is our Mustache template that generates HTML content based on Speaker data.
Example 2-14. /app/templates/speakers-mustache-template.html
<!--[speakers-mustache-template.html]This is the template for items in the speakers array when the app first loads--><scriptid="speakerTemplate"type="text/html">{{#.}}<tr><td>{{firstName}}{{lastName}}</td><td>{{about}}</td><td>{{tags}}</td></tr>{{/.}}</script>
Note the following about this example:
-
The template is an external file to keep the HTML out of our JavaScript code.
-
The template code resides within a
<script>element. -
The HTML is structured just as it would be in a regular web page.
-
Mustache fills in the data by using variables enclosed in double parentheses.
-
The context enables Mustache to loop through the Array of Speaker data. We have an anonymous (nameless) collection that we received from the HTTP call, so we enclose all our elements within a beginning
{{#.}}and closing{{/.}}to set the context. Note that if we had a named Array (e.g.,speakers), the context would begin with{{#speakers}}and end with{{/speakers}}. -
Each variable represents a field name within the specified context. For example, the
{{firstName}}variable gets data from thefirstNamefield for the current element in the Speaker data Array.
Please review Wern Ancheta’s excellent article, “Easy Templating with Mustache.js” for a deeper discussion on Mustache.
Besides Mustache, a couple of other solid templating libraries are frequently used by the JavaScript community:
- Handlebars.js
- Underscore.js
-
This is a general utility library, but it includes some templating functionality.
In addition, most MVC frameworks (AngularJS, Ember, and Backbone) have some form of templating. We’ll cover Mustache and Handlebars more thoroughly in Chapter 7.
Example 2-15 shows our refactored app/scripts/main.js file that now uses Mustache.
Example 2-15. speakers-web-3/app/scripts/main.js
'use strict';console.log('Hello JSON at Work!');$(document).ready(function(){functionaddSpeakersMustache(speakers){vartbody=$('#speakers-tbody');$.get('templates/speakers-mustache-template.html',function(templatePartial){vartemplate=$(templatePartial).filter('#speakerTemplate').html();tbody.append(Mustache.render(template,speakers));}).fail(function(){alert("Error loading Speakers mustache template");});}$.getJSON('http://localhost:5000/speakers',function(data){addSpeakersMustache(data);});});
In this example, the addSpeakerMustache() function converts the Speaker data (that we received from
json-server) into HTML by using our Mustache template. We use the jQuery’s $.get() method to pull in the external
Mustache template. When the $.get() call completes, we then find the main page’s <tbody> element (just
as before) and then use the append() method to append the HTML content that was created by
Mustache.render() (based on the template and Speaker data).
But we’re not quite done, because we need to add Mustache to the web application:
-
Use Bower to install Mustache into the web application. From the command line in the speakers-web-3 directory, type
bower install mustache. -
Add Mustache to app/index.html (right after main.js) as shown in Example 2-16.
Example 2-16. speakers-web-3/app/index.html
<!doctype html><htmllang="">...<body>...<scriptsrc="bower_components/mustache.js/mustache.js"></script>...</body></html>
If you kept the web application running, you should now see the screen in Figure 2-5.
Notice that Mustache formats the Speaker data a little differently, but we improved the web application
by making an API call to the Stub API (provided by json-server) and by templating the HTML with Mustache.
Of course, you can go further by using AngularJS or React, but this is left as an exercise for you.
Please don’t forget to shut down both the web application and json-server with a Ctrl-C in each
terminal session.
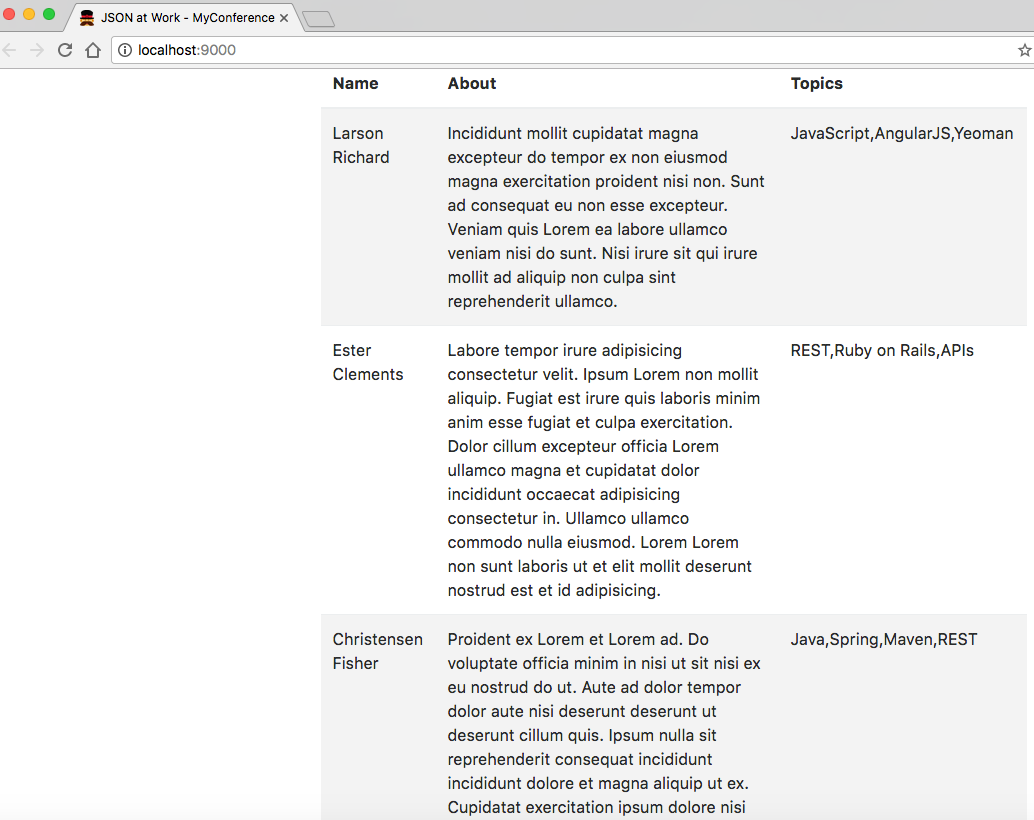
Figure 2-5. Speaker data using Mustache
How to Go Deeper with JavaScript
A deeper, more thorough knowledge of JavaScript is needed to truly understand Node.js and other JavaScript frameworks (e.g., Angular, React, Ember, Backbone, etc.), and package/build management tools such as Yeoman. If JavaScript Objects are new to you, and all the curly braces, parentheses, and semicolons are a boiling sea of syntax, then take heart because you are not alone. Every JavaScript developer encounters these issues along their path.
Here are a few websites where you can go to deepen and broaden your skills:
-
JavaScriptIsSexy provides excellent, freely available tutorials to help you reach an intermediate or advanced level. The main tutorials include these three:
As you work through these (and similar) resources, Objects and Functional Expressions will become commonplace as you reach the intermediate-to-advanced level of JavaScript. At that point, you will have a much more enjoyable and productive experience when developing with current JavaScript tools and frameworks.
What We Covered
We started with simple conversion between JavaScript and JSON and went all the way to develop a working web
application and a Unit Test that makes a RESTful API call to json-server. For the sake of brevity and
clarity, we’ve covered “just enough” of several technologies for you to understand core concepts and build simple
applications. But we’ve just scratched the surface of JavaScript, Node.js, and Yeoman.
What’s Next?
Now that we’ve developed a web application with JavaScript and JSON, we’ll move on to use JSON with Ruby on Rails in Chapter 3.