Practical Data Integration for the Web
Copyright © 2017 Vertical Slice, Inc. All rights reserved.
Printed in the United States of America.
Published by O’Reilly Media, Inc., 1005 Gravenstein Highway North, Sebastopol, CA 95472.
O’Reilly books may be purchased for educational, business, or sales promotional use. Online editions are also available for most titles (http://oreilly.com/safari). For more information, contact our corporate/institutional sales department: 800-998-9938 or corporate@oreilly.com.
See http://oreilly.com/catalog/errata.csp?isbn=9781449358327 for release details.
The O’Reilly logo is a registered trademark of O’Reilly Media, Inc. JSON at Work, the cover image, and related trade dress are trademarks of O’Reilly Media, Inc.
While the publisher and the author have used good faith efforts to ensure that the information and instructions contained in this work are accurate, the publisher and the author disclaim all responsibility for errors or omissions, including without limitation responsibility for damages resulting from the use of or reliance on this work. Use of the information and instructions contained in this work is at your own risk. If any code samples or other technology this work contains or describes is subject to open source licenses or the intellectual property rights of others, it is your responsibility to ensure that your use thereof complies with such licenses and/or rights.
978-1-449-35832-7
[LSI]
To everyone who produces or consumes JSON data with web/mobile applications, REST APIs, and messaging systems—I hope this makes your job easier.
To the unsung JSON community that produces JSON-based tools and libraries for the rest of us—thank you for all your hard work to make JSON useful and meaningful.
JavaScript Object Notation (JSON) has become the de facto standard for RESTful interfaces, but an ecosystem of little-known standards, tools, and technologies is available that architects and developers can start using today to build well-designed applications. JSON is more than just a simple replacement for XML when you make an AJAX call. It is becoming the backbone of any serious data interchange over the internet. Solid standards and best practices can be used to harness the energy and enthusiasm around JSON to build truly elegant, useful, and efficient applications.
The only thing missing is a book to pull everything together. This book aims to help developers leverage JSON so that they can build enterprise-class applications and services. My goals are to promote the use of JSON tooling and the concept of message/document design as a first-class citizen in the fast-growing API community.
My journey into JSON began in 2007 when I was leading a large web portal project, and we had to populate a drop-down list with several thousand entries. At that time, I was reading Head First AJAX by Rebecca Riordan (O’Reilly), so I had a decent architectural approach. AJAX would solve overall latency and page load issues, but what about the data? I had been using XML successfully for several years, but it seemed like overkill for the task at hand—moving data from the backend of a web application to the View. Head First AJAX mentioned a new data format called JSON, and it looked like the way to go. My team began looking into APIs that would convert our Java objects into JSON, and chose the one that had the simplest and shortest JUnit tests—the goal was to do the simplest thing that could possibly work. We put the application under rigorous load testing, and the Java-to-JSON conversion was never a performance issue. The application scaled up in production, and the users saw their drop-down list in a timely manner.
Along my journey, I considered the use of JSON with web applications, RESTful APIs, and messaging. As of 2009, I was still working with XML because XML Schema provided the semantic validation needed for meaningful data interchange. So, my position at that time was to use JSON for web user interfaces, or UIs (for speed), and XML for Web Services and Messaging (for integration). But then I heard about JSON Schema in 2010, and found that I had no further need for XML. The JSON Schema specification is still under development, but it’s sufficiently mature enough now to use for enterprise-class integration.
At this point, I was hooked on or, more accurately, obsessed with JSON. I began looking around the internet to see what else JSON could do, and I found copious APIs, online tools, search capabilities, and more. In short, anything that has been done with XML can (and should) now be done with JSON.
I then began to look for JSON in books, and was disappointed when I could find only a chapter or two on the topic in a JavaScript or RESTful Web Services book. I saw a growing JSON community along with lots of tool support and articles and blogs, but there was no single place—other than Douglas Crockford’s JSON site—that pulled everything together.
This book is for architects and developers who design/implement web and mobile applications, RESTful APIs, and messaging applications. Code examples are in JavaScript, Node.js, Ruby on Rails, and Java. If you’re a Groovy, Go, Scala, Perl, Python, Clojure, or C# developer, you’ll need to follow along with the code examples provided. But rest assured that most major/modern languages provide excellent JSON support. For the architect, I’ve provided guidelines, best practices, and architecture and design diagrams where appropriate. But in addition to providing visionary leadership, real architects prove their ideas with working code. While I love working with JSON and writing code, it’s entirely meaningless without use cases, and a business and technical context. For developers, this book is packed with code examples, tooling, and Unit Tests, along with a GitHub repository (see “Code Examples”).
Chapters 5–10 only have code examples only in Node.js to keep things simple and focused. But it’s not hard to translate these examples into your platform of choice.
When I wrote JBoss at Work with Scott Davis back in the mid-2000s, our vision was to write a book that developers could use at work on their daily jobs. In the same manner, the purpose of JSON at Work is to provide practical examples to developers based on my real-world integration experience with JSON. To that end, I’ve baked Unit Testing (wherever feasible) into every chapter. It’s simple: if there’s no test for a piece of code, then that code doesn’t exist. Period.
Expect to roll up your sleeves and look at code. Whether you’re an architect or developer, you’ll find something here to help you on your job.
By reading and following this book’s examples, you’ll learn how to do the following:
JSON basics and how to model JSON data
Use JSON with Node.js, Ruby on Rails, and Java
Structure JSON documents with JSON Schema to design and test APIs
Search the contents of JSON documents with JSON Search tools
Convert JSON documents to other data formats with JSON Transform tools
Use JSON as part of an enterprise architecture
Compare JSON-based Hypermedia formats, including HAL and json:api
Leverage MongoDB to store and access JSON documents
Use Apache Kafka to exchange JSON-based messages between services
Use freely available JSON tools and utilities to simplify testing
Invoke APIs in your favorite programming language with simple utilities and libraries
Here’s a sample of the JSON tooling you’ll use in this book:
JSON editors/modelers
Unit-Testing tools (e.g., Mocha/Chai, Minitest, JUnit)
JSON Validators
A JSON Schema Generator
JSON Search tools
JSON Transform (templating) tools
This book is not for you if your only interest in JSON is to make AJAX calls from JavaScript. Although I cover this topic, it’s just the tip of the iceberg. Plenty of JavaScript books have the chapter you’re looking for.
Developers looking for a deep reference on REST, Ruby on Rails, Java, JavaScript, etc. won’t find it here. This book relies on these technologies, but focuses on how to use JSON with these languages and technologies.
This book consists of the following parts:
Appendices
Chapter 1, JSON Overview, starts with an overview of the JSON data format, describes best practices in JSON usage, and introduces the tools used throughout the book.
Chapter 2, JSON in JavaScript, shows how to use JSON with JavaScript, Node.js, and Mocha/Chai Unit Tests.
Chapter 3, JSON in Ruby on Rails, describes how to convert between Ruby objects and JSON, and integrate with Rails.
Chapter 4, JSON in Java, tells you how to use JSON with Java and Sprint Boot.
Chapter 5, JSON Schema, helps you structure JSON documents with JSON Schema. Along the way, you’ll generate a JSON Schema and design an API with it.
Chapter 6, JSON Search, shows how to search JSON documents with jq and JSONPath.
Chapter 7, JSON Transform, provides the tools you’ll need transform a poorly designed JSON document to a better designed/more useful JSON document. Plus, it shows how to convert between JSON and other formats such as XML and HTML.
Chapter 8, JSON and Hypermedia, looks at how to use JSON with several well-known Hypermedia formats (e.g.,
HAL and jsonapi).
Chapter 9, JSON and MongoDB, shows how to leverage MongoDB to store and access JSON documents.
Chapter 10, JSON Messaging with Kafka, describes how to use Apache Kafka to exchange JSON-based messages between services.
Appendix A, Installation Guides, shows how to install the applications you’ll need to run the code examples in this book.
Appendix B, JSON Community, provides further information and links to connect you to the JSON community (e.g., standards and tutorials) and to help you go further with JSON.
All code examples for this book are freely available from the JSON at Work examples GitHub repository.
This book is here to help you get your job done. In general, if example code is offered with this book, you may use it in your programs and documentation. You do not need to contact us for permission unless you’re reproducing a significant portion of the code. For example, writing a program that uses several chunks of code from this book does not require permission. Selling or distributing a CD-ROM of examples from O’Reilly books does require permission. Answering a question by citing this book and quoting example code does not require permission. Incorporating a significant amount of example code from this book into your product’s documentation does require permission.
We appreciate, but do not require, attribution. An attribution usually includes the title, author, publisher, and ISBN. For example: “JSON at Work by Tom Marrs (O’Reilly). Copyright 2017 Vertical Slice, Inc., 978-1-449-35832-7.”
If you feel your use of code examples falls outside fair use or the permission given above, feel free to contact us at permissions@oreilly.com.
Safari (formerly Safari Books Online) is a membership-based training and reference platform for enterprise, government, educators, and individuals.
Members have access to thousands of books, training videos, Learning Paths, interactive tutorials, and curated playlists from over 250 publishers, including O’Reilly Media, Harvard Business Review, Prentice Hall Professional, Addison-Wesley Professional, Microsoft Press, Sams, Que, Peachpit Press, Adobe, Focal Press, Cisco Press, John Wiley & Sons, Syngress, Morgan Kaufmann, IBM Redbooks, Packt, Adobe Press, FT Press, Apress, Manning, New Riders, McGraw-Hill, Jones & Bartlett, and Course Technology, among others.
For more information, please visit http://oreilly.com/safari.
Please address comments and questions concerning this book to the publisher:
We have a web page for this book, where we list errata, examples, and any additional information. You can access this page at http://bit.ly/json-at-work.
To comment or ask technical questions about this book, send email to bookquestions@oreilly.com.
For more information about our books, courses, conferences, and news, see our website at http://www.oreilly.com.
Find us on Facebook: http://facebook.com/oreilly
Follow us on Twitter: http://twitter.com/oreillymedia
Watch us on YouTube: http://www.youtube.com/oreillymedia
First of all, I’d like to acknowledge Douglas Crockford for creating and standardizing the JSON data format. JSON is the data language of REST and Microservices, and the overall community is indebted to his vision and efforts.
I appreciate my O’Reilly editor, Megan Foley, and my former editor, Simon St. Laurent, for believing in this book and for their patience and guidance on the project. Thanks for sticking with me and helping me throughout the project. I would also like to thank my O’Reilly copy edit team, Nick Adams and Sharon Wilkey, whose diligent work improved the quality of this manuscript.
Thanks to Matthew McCullough and Rachel Roumeliotis from the O’Reilly Open Source Convention (OSCON), Jay Zimmerman from No Fluff Just Stuff (NFJS), and Dilip Thomas from the Great Indian Developer Summit (GIDS) for giving me the chance to speak about JSON and REST at your conferences. It’s always fun to speak at conferences, and I hope to continue doing this well into the future.
I’m grateful to my technical reviewers who provided valuable feedback on this book: Joe McIntyre, David Bock, Greg Ostravich, and Zettie Chinfong. I would also like to thank the following people who helped shape and mold my ideas on how to talk about JSON: Matthew McCullough, Scott Davis, Cristian Vyhmeister, Senthil Kumar, Sean Pettersen, John Gray, Doug Clark, Will Daniels, Dan Carda, and Peter Piper.
The Colorado Front Range technical community is world class, and I’ve had fun presenting at the following user groups to help refine my material:
HTML5 Denver
Denver Open Source User Group (DOSUG)
Colorado Springs Open Source User Group (CS OSUG)
Denver Java User Group (DJUG)
Boulder Java User Group (BJUG)
BoulderJS Meetup
Thanks to my friends in the Toastmasters community who encouraged me, believed in me, and pushed me to finish the book: Darryle Brown, Deborah Frauenfelder, Elinora Reynolds, Betty Funderburke, Tom Hobbs, Marcy Brock, and many, many others. You have inspired me to communicate clearly, to “Lift as You Climb,” and to “Travel Beyond.”
There is an amazing JSON community on the internet. Much of this book is based on the great work that you’ve done and continue to do. You’ve inspired me to tell your story and to connect the dots.
To my late parents, Al and Dorene Marrs, who loved me and always believed in me and supported me—I know you’re in a better place. You inspired me to be adaptable, to innovate, and to work hard. You always encouraged me to do my very best. Thank you for everything you did for me.
Finally, to my beautiful wife, Linda, and my daughter, Abby—I love you. Thanks for your patience with me while I spent my evenings and weekends on the manuscript and code.
The JavaScript Object Notation (JSON) data format enables applications to communicate over a network, typically through RESTful APIs. JSON is technology-agnostic, nonproprietary, and portable. All modern languages (e.g., Java, JavaScript, Ruby, C#, PHP, Python, and Groovy) and platforms provide excellent support for producing (serializing) and consuming (deserializing) JSON data. JSON is simple: it consists of developer-friendly constructs such as Objects, Arrays, and name/value pairs. JSON is not limited to Representational State Transfer (REST); it also works with the following:
Node.js (which stores project metadata in package.json)
NoSQL databases such as MongoDB (see Chapter 9)
Messaging platforms such as Kafka (see Chapter 10)
In the early days, REST’s detractors derided RESTful Web Services as being non-standard, but (just like HTTP) JSON is in fact a standard. Both the Internet Engineering Task Force (IETF) and Ecma International (formerly the European Computer Manufacturers Association, or ECMA) have recognized JSON as a standard. Douglas Crockford originally created JSON in 2001, and initially standardized it in 2006 under RFC 4627 through the IETF; see the JSON specification. In the fall of 2013, Ecma International also standardized JSON under ECMA 404; see their JSON specification. With Ecma recognition (per Douglas Crockford; see his Google+ page), JSON is now considered a formal international data processing standard.
In March 2014, Tim Bray published an updated version of Douglas Crockford’s original standard as IETF RFC 7158 and RFC 7159 to correct errata with the original IETF 4627 standard (thus rendering it obsolete).
Before we go further, let’s look at a small JSON sample. Example 1-1 shows a simple JSON document.
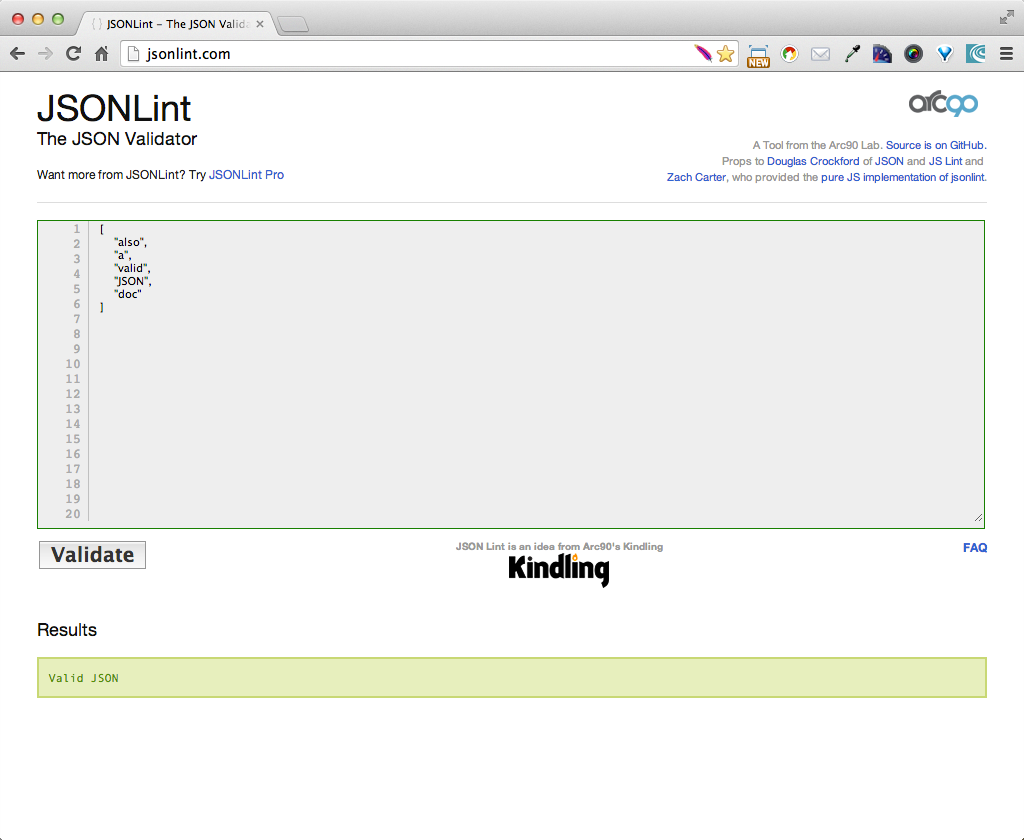
{"thisIs":"My first JSON document"}
A valid JSON document can be either of the following:
An Object surrounded by curly braces, { and }
An Array enclosed by brackets, [ and ]
The preceding example shows an Object that contains a single key/value pair, where the key,
"thisIs", has a value of "My first JSON document".
Just to keep us honest, let’s validate this document by using JSONLint. Just paste the text into the text area, click the Validate button, and you should see the page in Figure 1-1.

Example 1-2 presents a simple JSON Array.
["also","a","valid","JSON","doc"]
In JSONLint, paste the JSON Array into the text area, and click the Validate button, and you should get the result shown in Figure 1-2.
But we’re getting ahead of ourselves. We’ll cover JSON syntax more thoroughly in “Core JSON”.
Although standardization through Ecma International and the IETF has helped JSON gain industry acceptance, other factors have popularized JSON:
The explosive growth of RESTful APIs based on JSON
The simplicity of JSON’s basic data structures
The increasing popularity of JavaScript
JavaScript’s resurgence is boosting JSON’s popularity. Over the past several years, we have seen the rise of JavaScript as a first-class development language and environment. This ecosystem includes platforms such as Node.js, and Mode/View/Controller (MVC) frameworks such as AngularJS, React, Backbone, and Ember. There has also been a tremendous increase in the number of books and websites showing best practices in JavaScript Objects and Patterns. According to Douglas Crockford, JSON is a subset of JavaScript’s Object Literal notation, and fits seamlessly into JavaScript development.
Thousands of RESTful APIs leverage JSON. A sample list of popular JSON-based RESTful APIs includes the following:
Salesforce
GitHub
DropBox
Tumblr
Amazon Web Services (AWS)
To see the thousands of available JSON-based REST APIs available, visit ProgrammableWeb, and do a search on REST and JSON. Then, take several weeks to review the results.
JSON is simple and is gradually replacing XML as the primary data interchange format on the internet. JSON is easy to read, and its structures easily translate to concepts well understood by software developers—Arrays, Objects, and name/value pairs. We don’t have to scratch our heads or argue anymore about what should be an Element or an Attribute. Objects and their data members are a much better fit for Object-Oriented (OO) design and development. A document formatted in JSON is usually smaller than its XML equivalent, because JSON has less overhead and is more compact. This is due to the lack of begin and end tags surrounding each data element. So, at an enterprise level, JSON is more efficient to process than XML, because JSON documents can be transmitted over a network and processed faster than their XML counterparts.
Although Douglas Crockford initially intended JSON to be a data interchange format (typically with REST), JSON is now finding a home in configuration files for widely used products such as Node.js and Sublime Text. Node.js has a package.json file that it uses to define its standard npm package structure; we’ll cover this in Chapter 2. Sublime Text, a popular IDE in the web development community, uses JSON to configure its appearance along with its package managers.
The Core JSON data format includes JSON Data and Value Types. We’ll also cover versions, comments, and File/MIME Types.
JSON has the following core Data Types:
Consists of a key (a data attribute) and a value.
Now that we’ve covered basic definitions, let’s dig deeper into each Data Type.
Example 1-3 shows some sample name/value pairs.
{"conference":"OSCON","speechTitle":"JSON at Work","track":"Web APIs"}
Name/value pairs have the following characteristics:
Each name (e.g., "conference")
Is on the left side of the colon (:)
Is a String, and must be surrounded by double quotes
The value (e.g., "OSCON") is to the right of the colon. In the preceding example, the value type is a String, but there are several other Value Types.
We’ll cover Strings and other valid Value Types further in “JSON Value Types”.
Objects consist of name/value pairs. Example 1-4 shows a sample Object that represents an address.
{"address":{"line1":"555 Any Street","city":"Denver","stateOrProvince":"CO","zipOrPostalCode":"80202","country":"USA"}}
Example 1-5 shows an Object with a nested Array.
{"speaker":{"firstName":"Larson","lastName":"Richard","topics":["JSON","REST","SOA"]}}
Example 1-6 shows an Object that contains another Object.
{"speaker":{"firstName":"Larson","lastName":"Richard","topics":["JSON","REST","SOA"],"address":{"line1":"555 Any Street","city":"Denver","stateOrProvince":"CO","zipOrPostalCode":"80202","country":"USA"}}}
Objects have the following characteristics:
Are enclosed within a beginning left curly brace ({) and an ending right curly brace (})
Consist of comma-separated, unordered, name/value pairs
Can be empty, { }
Can be nested within other Objects or Arrays
Example 1-7 shows an Array (containing nested Objects and Arrays) that describes conference presentations, including title, length, and abstract.
{"presentations":[{"title":"JSON at Work: Overview and Ecosystem","length":"90 minutes","abstract":["JSON is more than just a simple replacement for XML when","you make an AJAX call."],"track":"Web APIs"},{"title":"RESTful Security at Work","length":"90 minutes","abstract":["You’ve been working with RESTful Web Services for a few years","now, and you’d like to know if your services are secure."],"track":"Web APIs"}]}
Arrays have the following characteristics:
Are enclosed within a beginning left brace ([) and an ending right brace (])
Consist of comma-separated, ordered values (see the next section)
Can be empty, [ ]
Can be nested within other Arrays or Objects
Have indexing that begins at 0 or 1
JSON Value Types represent the Data Types that occur on the righthand side of the colon (:) of
a Name/Value Pair. JSON Value Types include the following:
object
array
string
number
boolean
null
We’ve already covered Objects and Arrays; now let’s focus on the remaining Value Types:
string, number, boolean, and null.
Example 1-8 shows valid JSON Strings.
["fred","fred\t","\b","","\t","\u004A"]
Strings have the following properties:
Strings consist of zero or more Unicode characters enclosed in quotation marks (""). Please see the
following list for additional valid characters.
Strings wrapped in single quotes (') are not valid.
Additionally, JSON Strings can contain the following backslash-escaped characters:
\" Double quote
\\ Backslash
\/ Forward slash
\b Backspace
\f Form feed
\n Newline
\r Carriage return
\t Tab
\u Trailed by four hex digits
Example 1-9 shows valid numbers in JSON.
{"age":29,"cost":299.99,"temperature":-10.5,"unitCost":0.2,"speedOfLight":1.23e11,"speedOfLight2":1.23e+11,"avogadro":6.023E23,"avogadro2":6.023E+23,"oneHundredth":10e-3,"oneTenth":10E-2}
Numbers follow JavaScript’s double-precision floating-point format and have the following properties:
Numbers are always in base 10 (only digits 0–9 are allowed) with no leading zeros.
Numbers can have a fractional part that starts with a decimal pont (.).
Numbers can have an exponent of 10, which is represented with the e or E notation with a plus or
minus sign to indicate positive or negative exponentiation.
Octal and hexadecimal formats are not supported.
Unlike JavaScript, numbers can’t have a value of NaN (not a number for invalid numbers) or Infinity.
Example 1-10 shows a Boolean value in JSON.
{"isRegistered":true,"emailValidated":false}
Booleans have the following properties:
Booleans can have a value of only true or false.
The true or false value on the righthand side of the colon(:) is not surrounded by quotes.
Although technically not a Value Type, null is a special value in JSON. Example 1-11 shows a
null value for the line2 key/property.
{"address":{"line1":"555 Any Street","line2":null,"city":"Denver","stateOrProvince":"CO","zipOrPostalCode":"80202","country":"USA"}}
null values have the following characteristics:
Are not not surrounded by quotes
Indicate that a key/property has no value
Act as a placeholder
According to Douglas Crockford, there will never be another version of the core JSON standard. This isn’t because JSON is perfect; nothing is perfect. The purpose of a sole JSON version is to avoid the pitfalls of having to support backward compatibility with previous versions. Crockford believes that a new data format should replace JSON when the need arises within the development community.
But as you’ll see in subsequent chapters, this “no versions” philosophy applies only to the core JSON data format. For example, in Chapter 5, that specification is currently at version 0.5 as of this writing. Please note that these JSON-related specifications were created by others in the JSON community.
There are no comments in a JSON document. Period.
According to his postings on the Yahoo! JSON group and Google+, Crockford initially allowed comments, but removed them early on for the following reasons:
He believed that comments weren’t useful.
JSON parsers had difficulties supporting comments.
People were abusing comments. For example, he noticed that comments were being used for parsing directives, which would have destroyed interoperability.
Removing comments simplified and enabled cross-platform JSON support.
According to the core JSON specification, .json is the standard JSON file type when storing JSON
data on filesystems. JSON’s Internet Assigned Numbers Authority (IANA) media (or MIME) type is
application/json, which can be found at the IANA Media Types site. RESTful Web Service Producers and Consumers use a technique known as content negotiation (which leverages the JSON MIME type in HTTP Headers) to indicate that they are exchanging JSON data.
JSON is all about interoperability, and it’s important to provide JSON data feeds in a way that Consumers expect. Google has published a JSON Style Guide to support maintainability and best practices.
The Google JSON Style Guide is extensive, and here are the most important things for an API designer and developer:
Property Names
Date Property Values
Enum Values
Property Names (in Google parlance) are on the left side of the colon in a name/value pair (and Property Values are on the righthand side of the hyphen). Two main styles can be used to format a JSON Property Name:
lowerCamelCase
snake_case
With lowerCamelCase, a name is created by joining one or more words to look like a single word, and the
first letter in each word is capitalized (except for the first word). Both the Java and JavaScript
communities use lowerCamelCase in their coding guides. With snake_case, all letters are lowercase,
and words are separated with an underscore (_). But the Ruby on Rails community prefers snake_case.
Google, along with the majority of RESTful APIs, uses lowerCamelCase for its Property Names, as shown in Example 1-12.
{"firstName":"John Smith"}
You may think that Date formats aren’t that important, but they are. Imagine exchanging date information between a Producer and Consumer who come from different countries or continents. Even within a single enterprise, two development groups will likely use different date formatting conventions. It is important to consider the semantics of how to interpret timestamps so that we have consistent date/time processing and interoperability across all time zones. The Google JSON Style Guide prefers that dates follow the RFC 3339 format, as shown in Example 1-13.
{"dateRegistered":"2014-03-01T23:46:11-05:00"}
The preceding date provides a Coordinated Universal Time (UTC) offset (from UTC/GMT—Greenwich Mean Time) of
-5 hours, which is US Eastern Standard Time. Note that RFC 3339 is a profile of ISO 8601. The main
difference is notably that the International Standards Organization’s ISO 8601 allows
the replacement of the T (which separates the date and time) with a space, and RFC 3339 does not allow
this.
Geographical APIs (e.g., Google Maps) and APIs related to a geographical information system (GIS) use latitude/longitude data. To support consistency, the Google JSON Style Guide recommends that latitude/longitude data follows the ISO 6709 standard. According to Google Maps, the coordinates for the Empire State Building in New York City are 40.748747° N, 73.985547° W, and would be represented in JSON as shown in Example 1-14.
{"empireStateBuilding":"40.748747-73.985547"}
This example follows the ±DD.DDDD±DDD.DDDD format, with the following conventions:
Latitude comes first.
North (of the equator) latitude is positive.
East (of the prime meridian) longitude is positive.
The latitude/longitude is represented as a String. It can’t be a Number because of the minus sign.
Although the Google JSON Style Guide is silent on this topic, here are a few rules of thumb:
JSON is a serialization format, not a presentation format. So, indentation is meaningless to an API Producer or Consumer.
Many JSON Formatters let the user choose between two, three, or four spaces when beautifying a JSON document.
JSON originated from JavaScript (as part of the ECMA 262 standard), but unfortunately there is no single consensus throughout the JavaScript community. Many people and coding style guides prefer two spaces, so this is the convention used in this book for consistency. It’s OK if you prefer another style here, but be consistent.
Our examples throughout this book cover conference-related data, including the following:
Speakers
Sessions
We’ll start by creating a simple JSON data store for speakers and publishing it to a Stub RESTful API by taking the following steps:
Model JSON data with JSON Editor Online
Generate sample JSON data with JSON Generator
Create and deploy a Stub API (for future testing)
Our architectural style is based on the concept of noBackend. With noBackend, the developer doesn’t have to worry about the nuts and bolts of application servers or databases at the early stages of application development.
The first seven chapters of this book use noBackEnd architecture to maintain focus on our application
from a business perspective (services and data first) so that we can support not only UI-based
(e.g., mobile, tablet, and web) clients, but APIs and non-web-based client applications as well. We’ll deploy
JSON data with simple tools such as json-server to emulate a RESTful API.
By using this approach, we take an interface-first approach to designing and building an API, which provides the following:
More Agile, rapid, iterative frontend development due to the decoupling from the backend.
Faster feedback on the API itself. Get the data and URI out there quickly for rapid review.
A cleaner interface between the API and its Consumers.
A separation of concerns between the Resource (e.g., speakers as JSON data) exposed by the API and its (eventual) internal implementation (e.g., application server, business logic, and data store). This makes it easier to change implementation in the future. If you create and deploy a real API with Node.js/Rails/Java (or other framework) too early, you’ve already made design decisions at a very early stage that will make it difficult to change after you start working with API Consumers.
A Stub API does the following:
Eliminates the initial need to work with servers and databases
Allows API Producers (those developers who write the API) to focus on API Design, how best to present the data to the Consumers, and initial testing
Enables API Consumers (e.g., UI developers) to work with the API at an early stage and provide feedback to the API development team
By using the lightweight tools in this book, you’ll see that you can go a long way before writing code and deploying it on a server. Of course, you’ll eventually need to implement an API, and we’ll show how to do that when we cover JavaScript, Ruby on Rails, and Java in Chapters 2–4.
Creating a valid JSON document of any real size or complexity is tedious and error-prone. JSON Editor Online is a great web-based tool that does the following:
Enables you to model your JSON document as Objects, Arrays, and name/value pairs
Makes it easier to rapidly generate the text for a JSON document in an iterative manner
JSONmate is another solid editor on the web, but we don’t cover it further in this book.
In addition to JSON modeling and text generation, JSON Editor Online provides the following features:
Validation occurs as you type JSON data in the JSON text area on the left side of the page. If you forget a closing double quote for a value (e.g., "firstName": "Ester,), an X will show next to the following line of JSON text along with hover text that explains the validation error.
Click the Indent button at the upper-left corner of the JSON text area.
After creating some Objects and key/value pairs (with the Append (+) button) in the JSON model on the right side of the page, generate JSON text by clicking the left-arrow button (in the upper-middle portion of the page). You should see the changes reflected in the JSON text area on the left side of the page.
Modify some data in the JSON text area and click the right-arrow button, and you should see the changes in the JSON model on the righthand side of the page.
You can save a JSON document to your local machine by selecting the Save to Disk option under the Save menu.
You can import a JSON document from your computer by choosing the Open from Disk option from the Open menu.
Please remember that JSON Editor Online is publicly available, which means that any data you paste into this app is visible to others. So don’t use this tool with sensitive information (personal, proprietary, and so forth).
After you’re finished modeling Speaker data, click the right-arrow button to generate a pretty-printed (indented) JSON document that represents the model. Figure 1-3 shows JSON Editor Online with our initial Speakers model.
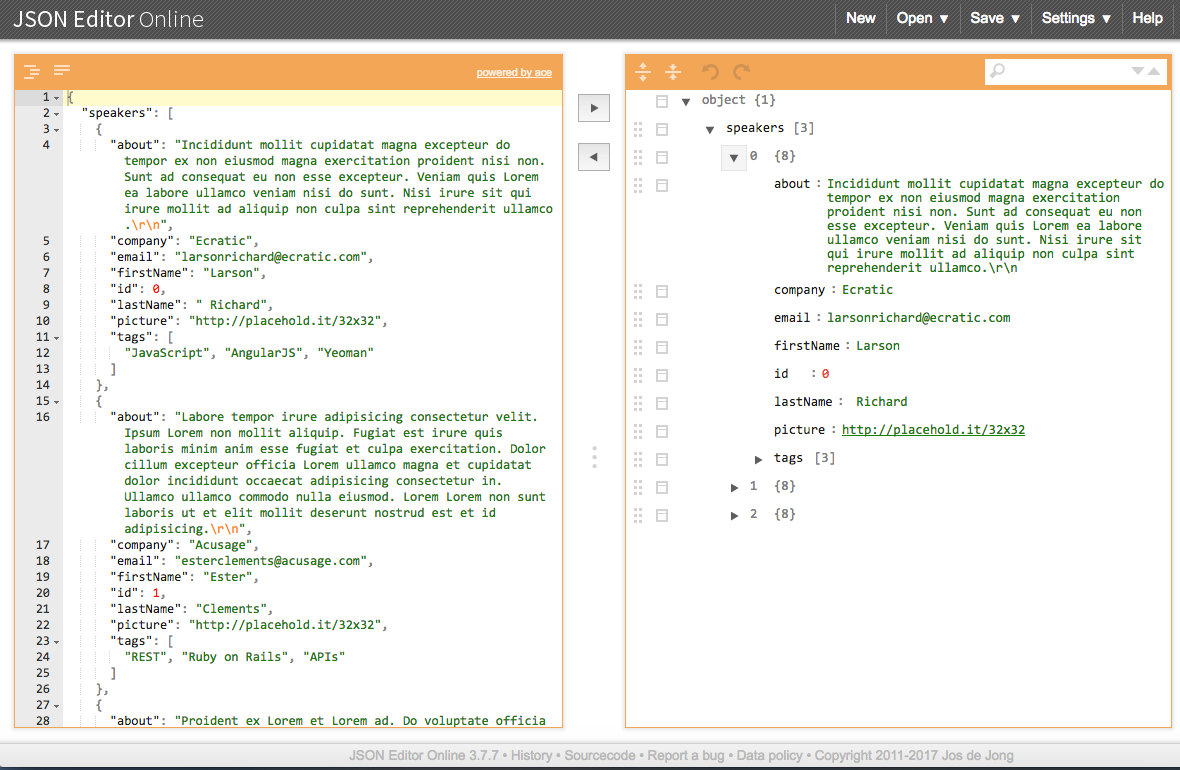
This is just a rough model, but this initial sketch is a decent starting point. Use the initial model to visualize JSON data, get early feedback, and iterate quickly on the design. This approach enables you to refine the JSON data structure throughout the development life cycle without investing heavily in implementation and infrastructure.
JSON Editor Online provides a decent start, but we want to generate lots of test data quickly. Test data can be problematic because of the sensitivity of the data, and the data volume needed to do any meaningful testing. Even with JSON Editor Online, it will take a great deal of effort to create the volume of test data we’re looking for. We need another tool to help create the data we need to create our first version of the API, and that’s where JSON Generator comes in. This excellent tool was used to create our speakers.json test data file. The template used to generate the speakers.json file is available on GitHub. Chapter 5 covers JSON Generator in more detail.
To create the Stub API, we’ll use the Speaker data we just created and deploy it as a RESTful API. We’ll
leverage the json-server Node.js module to serve up the speakers.json file as a Web API; this enables us
to prototype quickly. You can find more information on the json-server GitHub page.
Before going further, please set up your development environment. Refer to Appendix A to do the following:
Install Node.js. json-server is a Node.js module, so you need to install Node.js first. Refer to “Install Node.js”.
Install json-server. See “Install npm Modules”.
Install JSONView and Postman. See “Install JSON Tools in the Browser”. JSONView pretty-prints JSON in Chrome and Firefox. Postman can also run as a standalone GUI application on most major operating systems.
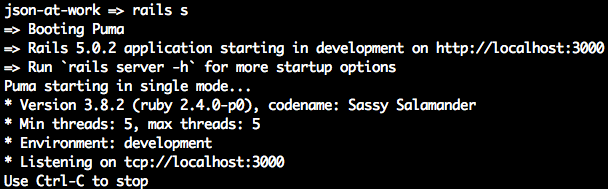
Open a terminal session and run json-server on port 5000 from your command line:
cd chapter-1

json-server -p 5000 ./speakers.json
You should see the following:
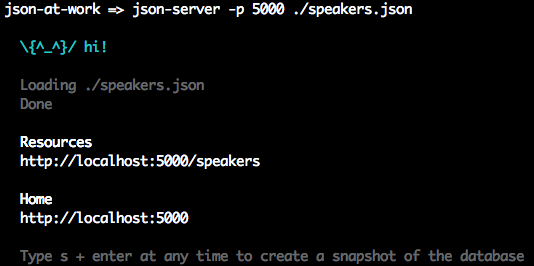
Visit http://localhost:5000/speakers in your browser, and (with JSON pretty-printing provided by JSONView) you should see all the speakers from our Stub API as shown in Figure 1-4.

You can also get a single speaker by adding the id to the URI as follows:
http://localhost:5000/speakers/0.
This is a good start, but a web browser has limited testing functionality; it can only send HTTP GET
requests. Postman provides the ability to fully test a RESTful API. It can send HTTP GET, POST, PUT,
and DELETE requests and set HTTP Headers.
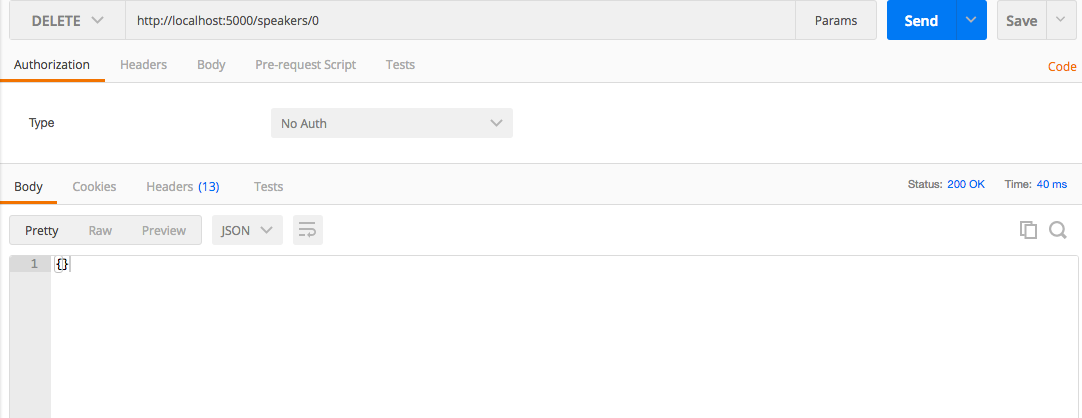
Let’s use Postman to delete the first speaker in the API as follows:
Enter the http://localhost:5000/speakers/0 URL.
Choose DELETE as the HTTP verb.
Click the Send button.
You should see that the DELETE ran properly in Postman with a 200 (OK) HTTP Status, as shown in Figure 1-5.
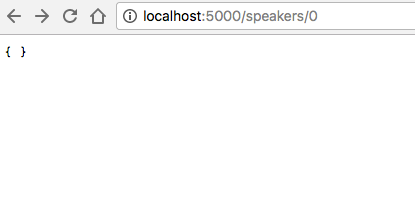
Now, ensure that the first speaker has truly been deleted by revisiting http://localhost:5000/speakers/0 in your browser. You should now see the empty response shown in Figure 1-6.
You can stop json-server by pressing Ctrl-C at the command line.
With the Stub API in place, we can now invoke it from any HTTP client (e.g., JavaScript, Ruby, or Java) to consume the data from an external application. Although most of our examples in subsequent chapters use an HTTP GET, rest assured that json-server can handle all the core HTTP verbs (GET,
POST, PUT, DELETE). Although not covered in this book, Mountebank
is an alternative server that provides more robust functionality for stubbing and mocking APIs and protocols.
The main point here is that an API Producer can use JSON-based tools to prototype a testable RESTful API without having to write any code. This technique is powerful because it enables the API Consumer to test without having to wait for the API to be 100 percent complete. At the same time, the API development team can iteratively upgrade the design and prototype.
We started by covering the basics of JSON. We modeled JSON data with JSON Editor Online, and deployed it with a Stub API.
The next three chapters show how to use JSON with the following core platforms:
JavaScript
Ruby on Rails
Java
In Chapter 2, you’ll learn how to use JSON in JavaScript with the Stub API we just created with json-server.
We’ve covered the basics of the JSON data interchange format, and in this chapter we’ll begin to develop applications with JSON. JSON began as a subset of the JavaScript definition for Objects and Arrays, but rest assured that JSON is now decoupled from JavaScript. JSON is language-agnostic and works across multiple platforms. Because JSON has its roots in JavaScript, this is where we begin our journey.
Here’s what we’ll cover:
Using JavaScript serialization/deserialization with JSON.stringify() and JSON.parse()
Working with JavaScript Objects and JSON
Making RESTful API calls and testing the results with Mocha/Chai Unit Tests
Building a small JSON-based web application
In our examples, we’ll leverage Node.js, scaffold a web application with Yeoman, and make RESTful API calls
to pull in the data we created on json-server in the previous chapter. That’s a lot of moving pieces and
parts, so we’ll iteratively build on each concept. But before we develop our web app, we need to start
with the basics of JavaScript serialization/deserialization and Objects.
Before we go any further, let’s start building our development environment by installing Node.js. Please go to Appendix A, and follow the instructions in “Install Node.js”.
Applications need to serialize (or flatten) their information into JSON in order to produce data for other applications in a platform-neutral manner. An application must also be able to deserialize (or unflatten) JSON data consumed from external sources into data structures for use by that application.
The JSON stringifier/parser Object was originally developed by Douglas Crockford, has been part of the
JavaScript library as of ECMAScript 5 in 2009,
and provides the following methods:
JSON.stringify() serializes to JSON
JSON.parse() deserializes from JSON
Additionally, the JSON Object
Was originally developed by Crockford
Can’t be instantiated
Has no other functionality
We’ll start by serializing some basic JavaScript Data Types:
Number
String
Array
Boolean
Object (Literal)
Example 2-1 shows how to use JSON.stringify() to serialize simple Data Types.
varage=39;// Integerconsole.log('age = '+JSON.stringify(age)+'\n');varfullName='Larson Richard';// Stringconsole.log('fullName = '+JSON.stringify(fullName)+'\n');vartags=['json','rest','api','oauth'];// Arrayconsole.log('tags = '+JSON.stringify(tags)+'\n');varreqistered=true;// Booleanconsole.log('registered = '+JSON.stringify(reqistered)+'\n');varspeaker={firstName:'Larson',lastName:'Richard',:'larsonrichard@ecratic.com',about:'Incididunt mollit cupidatat magna excepteur do tempor ex non ...',company:'Ecratic',tags:['json','rest','api','oauth'],registered:true};console.log('speaker = '+JSON.stringify(speaker));
When you run the preceding file with node from the command line, you should get the following:
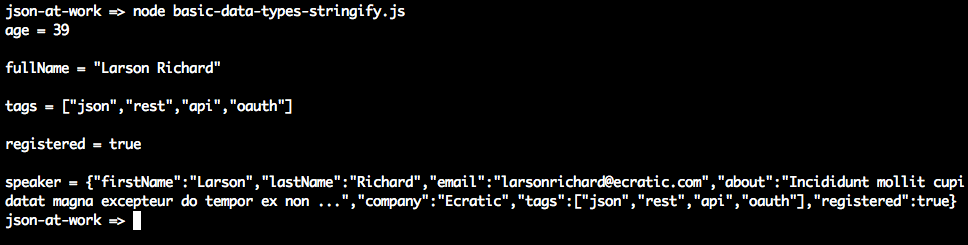
JSON.stringify() doesn’t do anything too interesting with the scalar types (Number, String, Boolean).
Things begin to get interesting with the speaker Object Literal because here JSON.stringify() initially
generates a valid, yet unattractive, JSON String. JSON.stringify() has other parameters that enhance
serialization. According to the Mozilla Developer Network (MDN) JavaScript Guide,
here is the method signature:
JSON.stringify(value[,replacer[,space]])
The parameter list is as follows:
value (required) The JavaScript value to serialize.
replacer (optional) Either a function or an array. If a function is provided, the stringify() method
invokes the replacer function for each key/value pair in an Object.
space (optional) Indentation—either a Number or String. If a Number is used, this value specifies the number of spaces used for each indentation level.
Let’s leverage the replacer and space parameters to pretty-print the speaker Object and filter out
some data elements, as shown in Example 2-2.
varspeaker={firstName:'Larson',lastName:'Richard',:'larsonrichard@ecratic.com',about:'Incididunt mollit cupidatat magna excepteur do tempor ex non ...',company:'Ecratic',tags:['json','rest','api','oauth'],registered:true};functionserializeSpeaker(key,value){return(typeofvalue==='string'||Array.isArray(value))?undefined:value;}// Pretty Print.console.log('Speaker (pretty print):\n'+JSON.stringify(speaker,null,2)+'\n');// Pretty print and filter out Strings and Arrays.console.log('Speaker without Strings and Arrays:\n'+JSON.stringify(speaker,serializeSpeaker,2));
Running the preceding file yields the following:
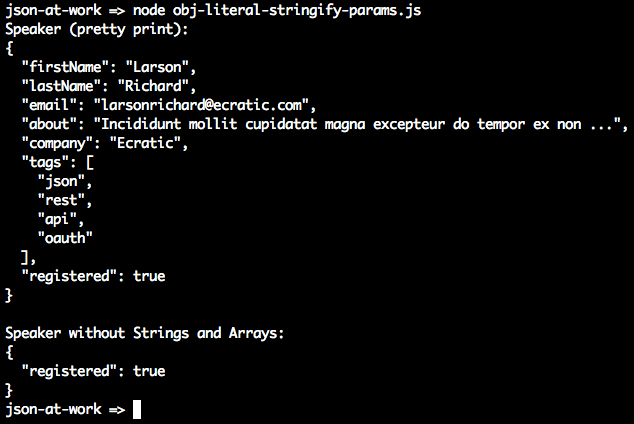
The first JSON.stringify() call pretty-prints the JSON output with an indentation level of 2. The second
call uses the serializeSpeaker() function as a replacer (JavaScript functions are treated as expressions
and can be passed as parameters). serializeSpeaker() checks the type of each value and returns undefined
for Strings and Arrays. Otherwise, this function returns the value “as is.”
JSON.stringify() does one of the following with an undefined value:
Omits the value if it’s part of an Object
Converts the value to null if that value belongs to an Array
As you’ve seen, JSON serialization makes the most sense with Objects. Let’s customize
JSON.stringify()’s output by adding a toJSON() method to our speaker Object, as shown in Example 2-3.
varspeaker={firstName:'Larson',lastName:'Richard',:'larsonrichard@ecratic.com',about:'Incididunt mollit cupidatat magna excepteur do tempor ex non ...',company:'Ecratic',tags:['json','rest','api','oauth'],registered:true};speaker.toJSON=function(){return"Hi there!";}console.log('speaker.toJSON(): '+JSON.stringify(speaker,null,2));
Serialization works as follows:

If an Object has a toJSON() method, JSON.stringify() outputs the value returned by the Object’s
toJSON() method rather than stringifying the Object. Although the use of toJSON() is legal, it’s probably
a bad idea. toJSON() defeats the whole purpose of JSON.stringify(), because the developer is now
responsible for serializing the entire Object structure. This could work with simple Objects such as speaker
(as currently defined), but you’ll end up writing lots of code to serialize more complex Objects that
contain other Objects.
Originally, JavaScript developers used the eval() function to parse JSON.
eval() takes a String parameter that could be a JavaScript expression, a statement, or a sequence of
statements. Consider Example 2-4.
varx='{ "sessionDate": "2014-10-06T13:30:00.000Z" }';console.log('Parse with eval(): '+eval('('+x+')').sessionDate+'\n');console.log('Parse with JSON.parse(): '+JSON.parse(x).sessionDate);
Running the preceding file yields the following:
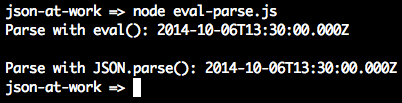
In this case, both eval() and JSON.parse() work the same and parse the date properly. So what’s the
problem? Let’s look at another example with a JavaScript statement embedded in the String; see Example 2-5.
varx='{ "sessionDate": new Date() }';console.log('Parse with eval(): '+eval('('+x+')').sessionDate+'\n');console.log('Parse with JSON.parse(): '+JSON.parse(x).sessionDate);
When we run this, we now see the following:
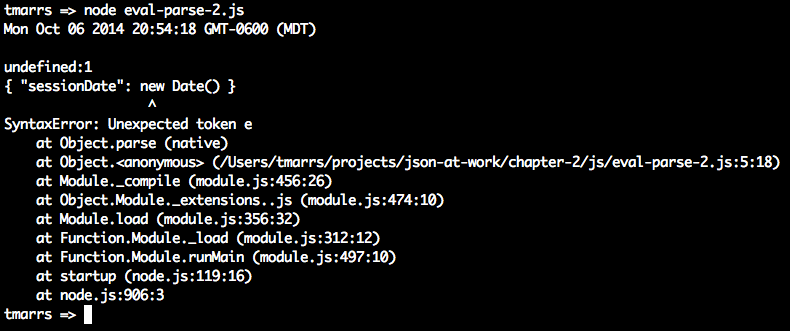
We passed in text that contains a JavaScript statement, new Date(), and eval() executes that statement.
Meanwhile, JSON.parse() correctly rejects the text as invalid JSON. Although we passed in only a fairly
innocuous statement to create a Date, someone else could pass in malicious code and eval() would still
execute it. Even though eval() can be used to parse JSON, it is considered a bad/unsafe practice because
it opens the door to any valid JavaScript expression, leaving your application vulnerable to attacks. Because of this security issue, the eval() function has been deprecated (for parsing JSON) in favor of JSON.parse().
Let’s return to our Speaker example, and use JSON.parse() to deserialize a JSON String into a speaker
Object, as shown in Example 2-6.
varjson='{'+// Multi-line JSON string.'"firstName": "Larson",'+'"lastName": "Richard",'+'"email": "larsonrichard@ecratic.com",'+'"about": "Incididunt mollit cupidatat magna excepteur do tempor ex non ...",'+'"company": "Ecratic",'+'"tags": ['+'"json",'+'"rest",'+'"api",'+'"oauth"'+'],'+'"registered": true'+'}';// Deserialize JSON string into speaker object.varspeaker=JSON.parse(json);// Print 2nd speaker object.console.log('speaker.firstName = '+speaker.firstName);
When we run this file, we get the following:

JSON.parse() takes a JSON String as input and parses it into a fully functional JavaScript Object. We’re
now able to access the speaker Object’s data members.
So far, we’ve shown how core JavaScript Data Types and simple Object Literal–style JavaScript Objects interact with JSON. But we’ve glossed over some details, and now it’s time to go a bit deeper. There are several ways to create (or instantiate) JavaScript Objects, and we’ll focus on Object Literal form because this type of Object is the one that is the closest match to a JSON Object.
We’ve already shown the speaker Object in Object Literal form, but we’ll show it again
in Example 2-7 for reference.
varspeaker={firstName:'Larson',lastName:'Richard',:'larsonrichard@ecratic.com',about:'Incididunt mollit cupidatat magna excepteur do tempor ex non ...',company:'Ecratic',tags:['json','rest','api','oauth'],registered:true,name:function(){return(this.firstName+' '+this.lastName);}};
With Object Literal syntax, you define an Object’s properties (both data and functions) inside the curly
braces. In the preceding example, the speaker Object is instantiated and populated with data. If you never
need to create another instance of the speaker Object in your application, Object Literal is a good
approach because it provides a simple yet modular way to group an Object’s data and functionality. The real
drawback to the Object Literal approach is that you can create only one instance of speaker, and you can’t
reuse the name() method.
So far we’ve been using Node.js from the command line to execute JavaScript files. Let’s change things up a bit and start using Node.js’s interpreter, the Request-Eval-Print-Loop (REPL), instead. The REPL is really great because it provides instant feedback on your code, and enables you to iteratively debug and improve your application. You can find in-depth coverage of the REPL in the Node.js documentation. But nothing is perfect, and neither is the REPL. One of my pet annoyances is the following:

For each statement that doesn’t produce output, the interpreter outputs undefined. Many people find this distracting, and there’s a way to turn it off. See Appendix A (“Taming the REPL—mynode”) to configure a command alias I affectionately call mynode that I
find easier to work with than the standard Node.js REPL.
Without further ado, let’s work with our speaker Object by using the mynode REPL:
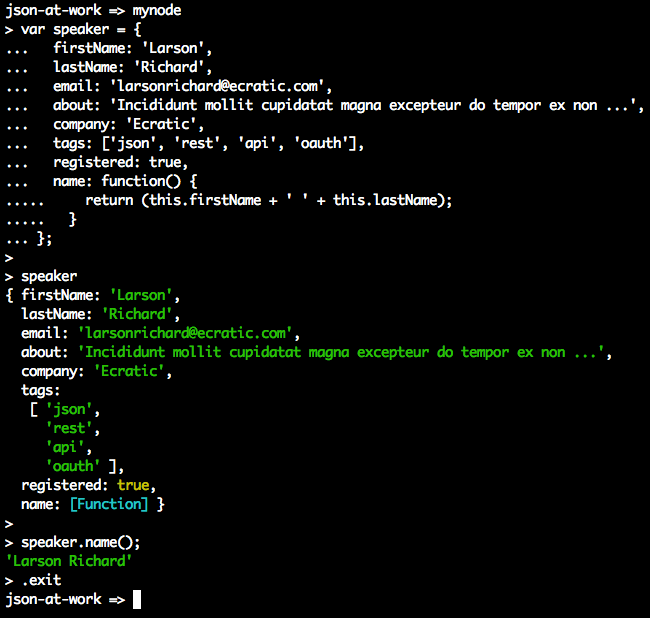
In this run, you’ll notice that we can interact with the speaker Object by calling its methods and
viewing the results in the interpreter.
Here are some of the commands you’ll need to use the REPL:
.clear Clear the context of the REPL session.
.breakGo back to the REPL prompt. Use this to break out of a multiline statement.
.exit Exit the REPL session.
.save Save the REPL session to a file.
We’ve glossed over many details of Object-Oriented JavaScript, and there are several other ways to interact with objects. We’ve shown just enough OO here so that we can work with JavaScript Objects and JSON in a meaningful way within an application. Complete, in-depth coverage of JavaScript Objects is far beyond the scope of this book. To gain a deeper understanding, here are a few excellent resources:
Now that you know how to serialize/deserialize JSON to/from a speaker Object, we’re ready to run a simple
server-side Unit Test against a Stub API provided by json-server. We’ll also use this Stub API when we later
create a small web application.
Test-Driven Development (TDD) is an approach that uses Unit Testing to drive development. Here’s a typical flow:
Write some tests.
Run the tests, which fail because there isn’t any code.
Write just enough code to make the tests pass.
Refactor the code to improve design and flexibility.
Rerun tests and fix code until all tests pass.
TDD-style Unit Tests tend to be procedural.
Behavior-Driven Development (BDD) is an approach that tests a User Story based on acceptance criteria and expected outcomes. BDD-style tests read like English sentences; for example: “Speakers should receive their payment from the Conference within 30 days.” For more information on BDD, please see Dan North’s excellent article, “Introducing BDD”. Some people see BDD as a refinement to TDD, and I tend to agree because a developer would follow the same workflow as TDD.
Both BDD and TDD are solid approaches, and can be combined to form a robust test suite for an application. The Unit Tests in this chapter use a BDD-style approach for assertions.
Here are the tools for our server-side Unit Test:
Mocha is a JavaScript Unit Test framework that runs in both Node.js and a browser. We’ll leverage Mocha from the command line within a Node.js project, and add a few features to support JSON-based API testing. You can find more details at the Mocha website.
Chai is an assertion library that complements JavaScript testing frameworks and adds a richer set
of assertions, in this case to Mocha. Chai enables developers to write TDD or BDD style tests. The tests in this chapter use the expect (BDD) assertion
style, but you’re free to experiment with the should (BDD) or assert (TDD) assertion styles. Use the
approach that makes you comfortable. For more details on Chai, visit the Chai Asssertion Library website.
Before going further, please be sure to set up your test environment. If you haven’t installed Node.js yet, see Appendix A, and install Node.js (see “Install Node.js” and
“Install npm Modules”). If you want to follow along with the Node.js project provided in the code
examples, cd to chapter-2/speakers-test and do the following to install all dependencies for the
project:
npm install
If you’d like to set up the Node.js project yourself, follow the instructions in the book’s GitHub repository.
Our Unit Test will invoke an API with HTTP, so we’ll include Unirest in our testing repertoire. Unirest is an open source cross-platform REST client provided by the Mashape team. There are implementations in JS, Node.js, Ruby on Rails (RoR) and Java. Unirest is simple and works well in any client code that makes HTTP calls to REST APIs, but it’s also great for Unit Testing. Unirest enables cleaner Unit Tests because you can do a one-time setup (e.g., URI, Headers) and then make multiple HTTP calls throughout the test suite. For detailed documentation, visit the Unirest website.
Unirest is great because it’s cross-platform, and the concepts and method signatures are similar regardless of the language implementation. There are other excellent Java-based HTTP libraries (e.g., Apache Commons HTTPComponents HttpClient, but as a polyglot (multilanguage) developer, I prefer Unirest. Please note that Unirest is not just for Unit Tests. It’s widely used as an HTTP client wrapper by APIs (which invoke other APIs), and by web and mobile client applications.
We’ll use the Speaker data from Chapter 1 as our test data and deploy it as a RESTful API. Again, we’ll
leverage the json-server Node.js module to serve up the data/speakers.json file as a Web API. If you need
to install json-server, please refer to “Install npm Modules” section of Appendix A.
Here’s how to run json-server on port 5000 from your local machine:
cd chapter-2/data

json-server -p 5000 ./speakers.json
The Unit Test in Example 2-8 shows how to use Unirest to make an API call to the Speaker Stub API provided by
json-server.
'use strict';varexpect=require('chai').expect;varunirest=require('unirest');varSPEAKERS_ALL_URI='http://localhost:5000/speakers';describe('speakers',function(){varreq;beforeEach(function(){req=unirest.get(SPEAKERS_ALL_URI).header('Accept','application/json');});it('should return a 200 response',function(done){req.end(function(res){expect(res.statusCode).to.eql(200);expect(res.headers['content-type']).to.eql('application/json; charset=utf-8');done();});});it('should return all speakers',function(done){req.end(function(res){varspeakers=res.body;varspeaker3=speakers[2];expect(speakers.length).to.eql(3);expect(speaker3.company).to.eql('Talkola');expect(speaker3.firstName).to.eql('Christensen');expect(speaker3.lastName).to.eql('Fisher');expect(speaker3.tags).to.eql(['Java','Spring','Maven','REST']);done();});});});
In this Unit Test, the following occurs:
The test sets up the URI and Accept Header for unirest by using Mocha’s beforeEach() method,
so that setup occurs in only one place in the code. Mocha executes beforeEach() before running
each test (i.e., it) within the context of the describe.
The should return all speakers test is the most interesting, and it works as follows:
req.end() executes the Unirest GET request asynchronously, and the anonymous (unnamed)
function processes the HTTP response (res) from the API call.
We populate the speakers object with the HTTP Response Body (res.body). At this point, the JSON
from the API has already been parsed by Unirest and converted to a corresponding JavaScript Object (in
Object Literal form).
We use Chai’s BDD-style expect assertions to check for expected results:
We have three speakers.
The third speaker’s company, firstName, lastName, and tags match the values in the speakers.json
file.
To run this test from the command line (in a second terminal session), do the following:
cd chapter-2/speakers-test

npm test
You should see the following results:
json-at-work => npm test

...

> mocha test

...

  speakers
    ✓ should return a 200 response
    ✓ should return all speakers


  2 passing
Now that you know how to serialize/deserialize JSON to/from a speaker Object and how to do a Unit Test
with the Speaker Stub API (on json-server), we’re ready to build a simple web application that
leverages the API data and presents it to a user.
We’ll develop the web application in three iterations:
Iteration 1—generate a basic web application with Yeoman.
Iteration 2—make an HTTP call with jQuery.
Iteration 3—consume Speaker data from a Stub API (with json-server) and use a template.
Yeoman provides an easy way to create (i.e., scaffold) a web application and simplify developer workflow, and is similar to Gradle and Maven (from the Java community), and Ruby on Rails. We’ll use Yeoman to set up, develop, and run the example application. To install Yeoman (which depends on Node.js), refer to Appendix A, and follow the instructions in “Install Yeoman”.
Yeoman provides the following functionality:
Creates the development environment
Runs the application
Automatically reloads the browser when changes are saved
Manages package dependencies
Minifies the application’s code and packages it for deployment
Yeoman follows the philosophy of convention over configuration:
Automates setup
Just works
Uses standardized directory structures
Provides Dependency Management
Assumes reasonable defaults
Encourages best practices
Enables tool-based developer workflow (e.g., test, lint, run, and package)
Please review the following Yeoman tutorials for more information:
Yeoman consists of the following tools:
Yo generates the directory structure and Grunt/Gulp/Bower configuration files for an application.
You can use either Gulp or Grunt to build, run, test, and package an application.
Either Bower or npm can be used to manage and download package dependencies.
Although Grunt is a solid build tool, and npm is an excellent package manager, we’ll use Gulp and Bower for our examples because the Yeoman generator for the web application uses these tools.
Yeoman leverages generators to build and scaffold a project. Each generator creates a default preconfigured boilerplate application. There are over 1,000 generators, and Yeoman provides a complete official list.
Let’s start with a simple application that has no real functionality, and hardcode the Speaker data into
a table. We’ll add the speaker functionality in Iterations 2 and 3. With Yeoman installed, we’ll use the
generator-webapp generator to create our application that comes out-of-the-box with web pages, CSS
stylesheets, Bootstrap 4, jQuery, Mocha, and Chai.
If you’d like to set up the Yeoman project yourself, follow the instructions in the book’s GitHub
repository.
If you want to follow along with the Yeoman project provided in the code examples, cd to
chapter-2/speakers-web-1. In either case, do the following to start the application from the command line:
gulp serve
This command starts a local web server and shows the main page (index.html) in your default browser. You should see the page in Figure 2-1 at http://localhost:9000.
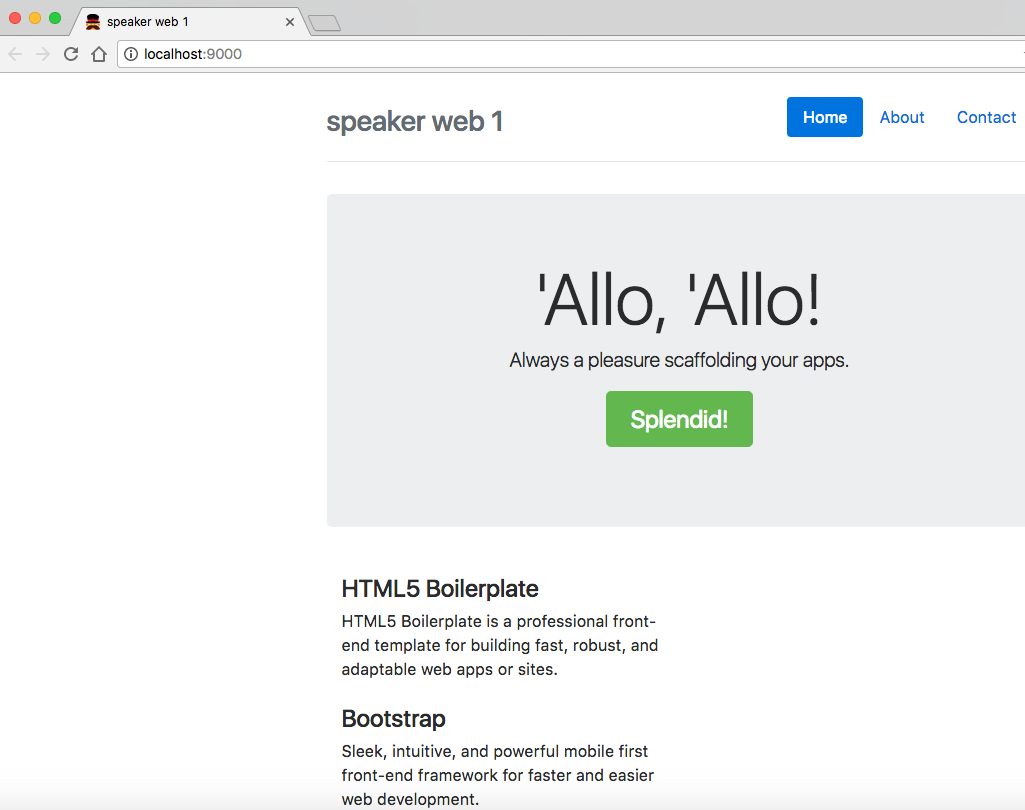
Note that if you keep the application running, you can see changes take effect as you save them because this application automatically refreshes with LiveReload.
The generator-webapp Yeoman generator creates a nice starter application, and it’s time to customize
it. First, let’s change the title, Header, and jumbotron (i.e., remove the Splendid! button) in
index.html as shown in Example 2-9.
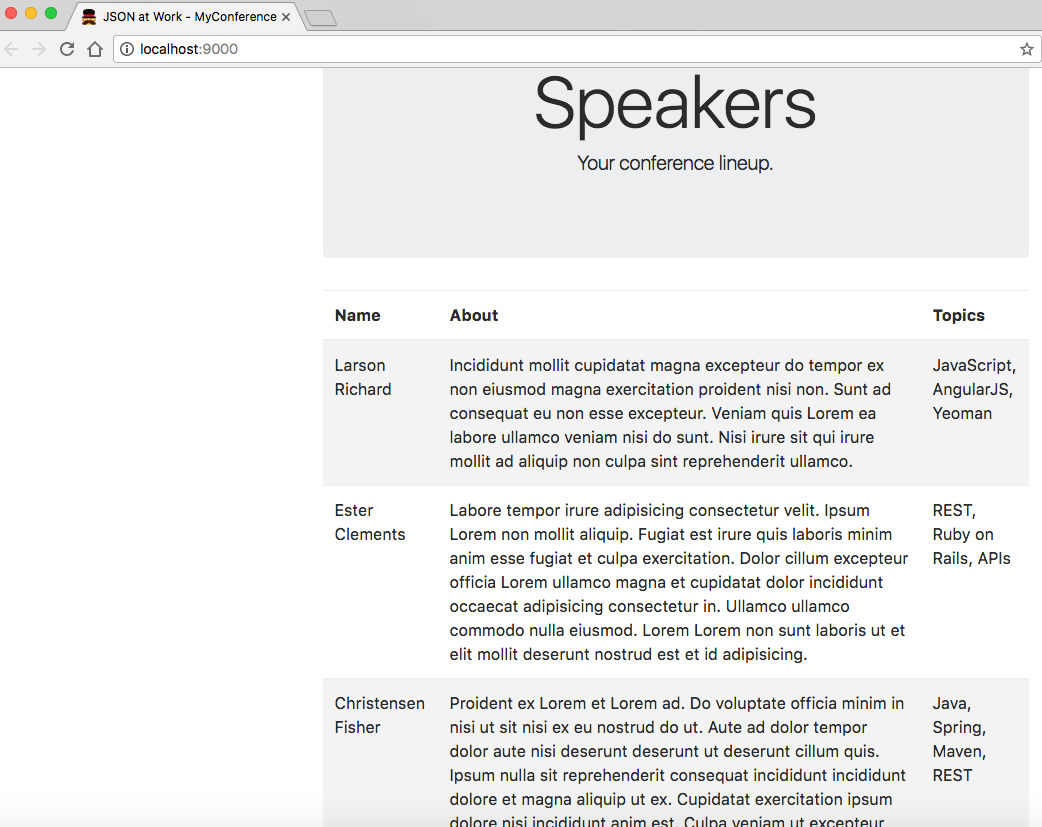
<!doctype html><htmllang=""><head>...<title>JSON at Work - MyConference</title>...</head><body>...<divclass="header">...<h3class="text-muted">JSON at Work - Speakers</h3></div>...<divclass="jumbotron"><h1class="display-3">Speakers</h1><pclass="lead">Your conference lineup.</p></div>...</body></html>
Let’s add a table with some hardcoded Speaker data in the index.html file, as shown in Example 2-10.
<!doctype html><htmllang="">...<body>...<tableclass="table table-striped"><thead><tr><th>Name</th><th>About</th><th>Topics</th></tr></thead><tbodyid="speakers-tbody"><tr><td>Larson Richard</td><td>Incididunt mollit cupidatat magna excepteur do tempor ...</td><td>JavaScript, AngularJS, Yeoman</td></tr><tr><td>Ester Clements</td><td>Labore tempor irure adipisicing consectetur velit. ...</td><td>REST, Ruby on Rails, APIs</td></tr><tr><td>Christensen Fisher</td><td>Proident ex Lorem et Lorem ad. Do voluptate officia ...</td><td>Java, Spring, Maven, REST</td></tr></tbody></table>...</body></html>
We now have a web application that displays the sample Speaker data, as shown in Figure 2-2.
Here are the key application files and directories generated by generator-webapp:
app/ contains the application’s code (for example, HTML, JavaScript, and CSS).
index.html is the application’s main page.
images/ holds the application’s images.
scripts/ is a directory that has the application’s JavaScript (and other scripting language) files.
main.js is the application’s main JavaScript file. We’ll work with this more in Iteration 2.
styles/ is the folder that holds CSS and related styling files.
bower_components/ contains the project dependencies installed by Bower: Bootstrap, jQuery, Mocha, and Chai.
node_modules/ contains the project dependencies required by Node.js, including Gulp.
test/ holds test specs used by the chosen testing framework(s). In this case, we’re using Mocha and Chai.
gulpfile.js is the Gulp build script used to build and run the application.
package.json is used by Node.js to manage dependencies that Gulp needs to execute the project scripts.
dist/ contains build-related artifacts created by gulp build.
To wrap up our discussion on generator-webapp, here are the other important commands you’ll need to know:
Stop the application (the web server).
gulp lint Use lint to validate the JavaScript files in the application.
gulp +serve:test Test the web application. In this case, it runs PhantomJS with Mocha and Chai.
gulp build Build and package the application for deployment.
gulp clean Clean the artifacts generated when testing and building the application.
You can get the full list of commands by typing gulp --tasks at the command line.
Please shut down the web application before moving to Iteration 2.
In Iteration 1, we developed a web application with Speaker data hardcoded in the main page, and now it’s time to add “live” content and functionality.
We’ll take the following steps:
Factor the hardcoded Speaker data out of the main page.
Add a separate JSON file to hold the Speaker data.
Use jQuery to populate the main page with Speaker data from the JSON file.
If you’d like to set up the Yeoman project for Iteration 2 by yourself, do the following:
Follow the instructions in the book’s GitHub repository.
Don’t forget to copy the app/index.html file from Iteration 1.
Or if you want to follow along with the Yeoman project provided in the code examples, cd to
chapter-2/speakers-web-2. In either case, do the following to start the application from the command line:
gulp serve
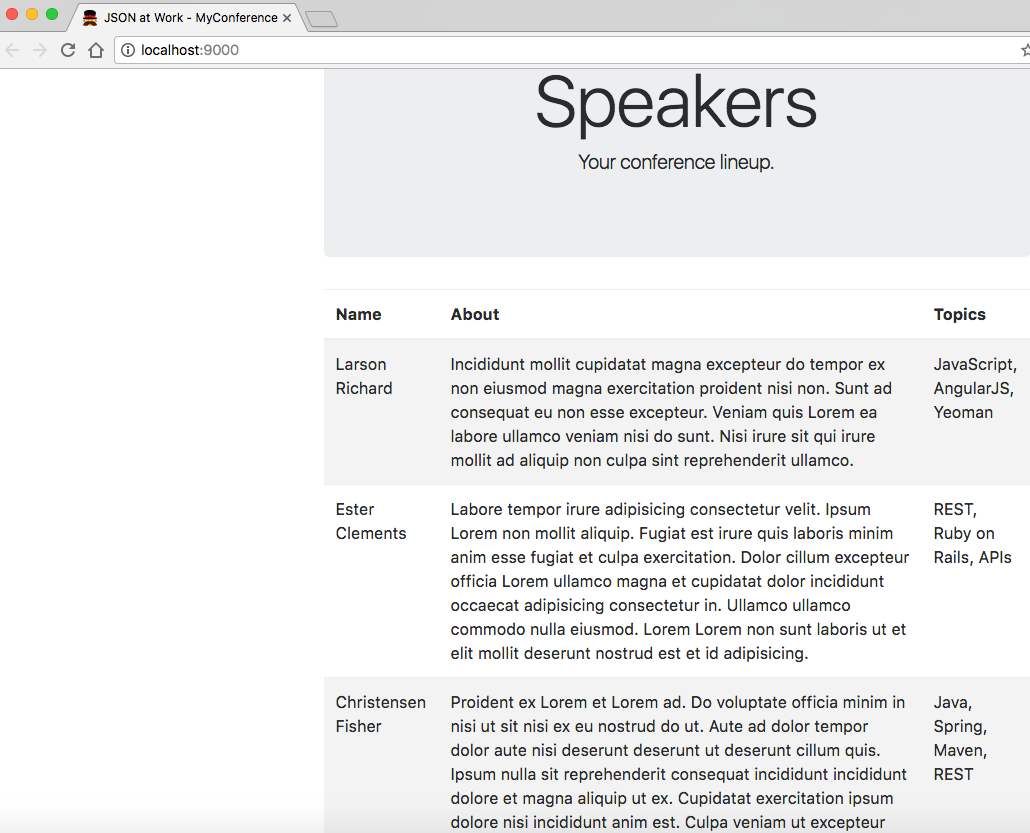
This command starts the local web server as shown in Iteration 1. You should see the page in Figure 2-3 at http://localhost:9000.
This has the hardcoded Speaker data table in the main page (in index.html) that you saw earlier. Please keep the web application running so you can see changes take effect as you save them.
Now, let’s remove the rows from the table body. The HTML for the speakers table now looks like Example 2-11.
<!doctype html><htmllang="">...<body>...<tableclass="table table-striped"><thead><tr><th>Name</th><th>About</th><th>Topics</th></tr></thead><tbodyid="speakers-tbody"></tbody></table>...</body></html>
In this example, we now have an empty table that has only a header row. We use Bootstrap’s
table-striped CSS class so that we’ll have zebra-striped rows. Notice the speakers-tbody ID on the
<tbody> element that holds the table’s content. Later, jQuery will use this ID to populate the table
rows.
We now need a separate JSON file to hold the Speaker data. Please see the new /speakers-web-2/app/data/speakers.json file that has the Speaker data for the application (this was copied from /chapter-2/data/speakers.json).
To complete Iteration 2, the upgraded app/scripts/main.js file now uses jQuery to populate the speakers table with the data from the app/data/speakers.json file, as shown in Example 2-12.
'use strict';console.log('Hello JSON at Work!');$(document).ready(function(){functionaddSpeakersjQuery(speakers){$.each(speakers,function(index,speaker){vartbody=$('#speakers-tbody');vartr=$('<tr></tr>');varnameCol=$('<td></td>');varaboutCol=$('<td></td>');vartopicsCol=$('<td></td>');nameCol.text(speaker.firstName+' '+speaker.lastName);aboutCol.text(speaker.about);topicsCol.text(speaker.tags.join(', '));tr.append(nameCol);tr.append(aboutCol);tr.append(topicsCol);tbody.append(tr);});}$.getJSON('data/speakers.json',function(data){addSpeakersjQuery(data.speakers);});});
In this example, we put the code inside jQuery’s $(document).ready() so that the entire page
(including the DOM) is “ready” (fully loaded). $.getJSON() is a jQuery method that makes an
HTTP GET request on a URL and converts the JSON response to a JavaScript object. In this case, the
app/data/speakers.json file is addressable as a URL through HTTP because it is deployed as a part of the
web application. The $.getJSON() callback method then delegates the job of populating the speakers table
to the addSpeakersjQuery() function.
The addSpeakersjQuery() method loops through the speakers array by using the jQuery .each() method. The
.each() function does the following:
Finds the <tbody> element in the speakers table by using the speakers-tbody ID we showed in the
index.html file
Creates a row and its columns by filling in the <tr> and <td> elements with the data from the
speaker object
Appends the new row to the <tbody> element
For more information on jQuery’s getJSON() function, see the jQuery Foundation website.
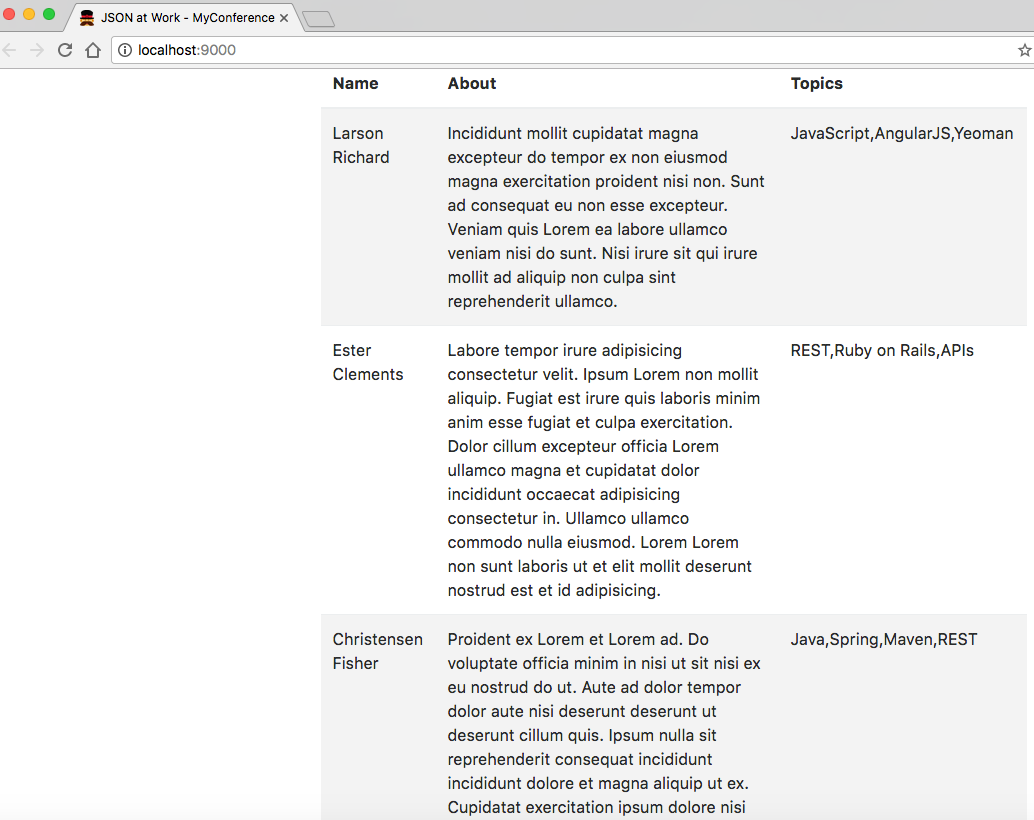
If you kept the web application running, you should now see the screen in Figure 2-4.
The main page looks the same, but we were expecting that. We’ve improved the application by factoring out the hardcoded Speaker data from the main page, and we’re now making an HTTP call. At this point, we have some of the elements of a real web application that populates its pages dynamically, but here are the drawbacks:
The JSON data comes from a file within the web application, and we want it to come from a RESTful API.
The JavaScript code knows about HTML elements on the main page. We would like to reduce the amount of HTML and DOM manipulation.
Please shut down the web application before moving to Iteration 3.
In Iteration 2, we made an HTTP call to populate the main page with Speaker data from a JSON file, and we’re
now going to get the data from the Stub API provided by json-server that was used in Chapter 1. We’re also going to factor the HTML and DOM manipulation out of the JavaScript into an external Mustache
template.
We’ll take the following steps:
Modify the HTTP call to point to the json-server URI.
Use a Mustache template to remove the HTML and DOM manipulation from JavaScript.
If you’d like to set up the Yeoman project for Iteration 2 by yourself, do the following:
Follow the instructions in the book’s GitHub Repository.
Don’t forget to copy the following files from Iteration 2:
app/index.html
app/scripts/main.js
Or if you want to follow along with the Yeoman project provided in the code examples, cd to
chapter-2/speakers-web-3.
Next, let’s modify the HTTP call in main.js to point to the Speaker Stub API (provided by
json-server), as shown in Example 2-13.
...$.getJSON('http://localhost:5000/speakers',function(data){addSpeakersjQuery(data);});...
The code now invokes the Speaker Stub API provided by json-server. Note that data is passed
to addSpeakersjQuery() because json-server doesn’t emit the named speakers Array.
First, open a new terminal session and run json-server on port 5000 from your command line:
cd chapter-2/data

json-server -p 5000 ./speakers.json
Start the web application (in another terminal session) from the command line:
gulp serve
This command starts the local web server as shown in Iterations 1 and 2. You should see the same Speaker data when you visit http://localhost:9000 in your browser. But the web application is in better shape because it’s using data from an API rather than a file. Please keep the web application running so you can see changes take effect as you save them.
To complete Iteration 3, let’s factor out the HTML/DOM manipulation from our JavaScript code into a
Mustache template. Mustache bills itself as providing logic-less templates, which means that there are no
control statements (e.g., for or if) needed to generate HTML from JavaScript and other languages.
Mustache works with multiple languages.
Example 2-14 is our Mustache template that generates HTML content based on Speaker data.
<!--[speakers-mustache-template.html]This is the template for items in the speakers array when the app first loads--><scriptid="speakerTemplate"type="text/html">{{#.}}<tr><td>{{firstName}}{{lastName}}</td><td>{{about}}</td><td>{{tags}}</td></tr>{{/.}}</script>
Note the following about this example:
The template is an external file to keep the HTML out of our JavaScript code.
The template code resides within a <script> element.
The HTML is structured just as it would be in a regular web page.
Mustache fills in the data by using variables enclosed in double parentheses.
The context enables Mustache to loop through the Array of Speaker data. We have an anonymous (nameless) collection that we received from the HTTP call, so we enclose all our elements within a
beginning {{#.}} and closing {{/.}} to set the context. Note that if we had a named Array
(e.g., speakers), the context would begin with {{#speakers}} and end with {{/speakers}}.
Each variable represents a field name within the specified context. For example, the {{firstName}}
variable gets data from the firstName field for the current element in the Speaker data Array.
Please review Wern Ancheta’s excellent article, “Easy Templating with Mustache.js” for a deeper discussion on Mustache.
Besides Mustache, a couple of other solid templating libraries are frequently used by the JavaScript community:
This is a general utility library, but it includes some templating functionality.
In addition, most MVC frameworks (AngularJS, Ember, and Backbone) have some form of templating. We’ll cover Mustache and Handlebars more thoroughly in Chapter 7.
Example 2-15 shows our refactored app/scripts/main.js file that now uses Mustache.
'use strict';console.log('Hello JSON at Work!');$(document).ready(function(){functionaddSpeakersMustache(speakers){vartbody=$('#speakers-tbody');$.get('templates/speakers-mustache-template.html',function(templatePartial){vartemplate=$(templatePartial).filter('#speakerTemplate').html();tbody.append(Mustache.render(template,speakers));}).fail(function(){alert("Error loading Speakers mustache template");});}$.getJSON('http://localhost:5000/speakers',function(data){addSpeakersMustache(data);});});
In this example, the addSpeakerMustache() function converts the Speaker data (that we received from
json-server) into HTML by using our Mustache template. We use the jQuery’s $.get() method to pull in the external
Mustache template. When the $.get() call completes, we then find the main page’s <tbody> element (just
as before) and then use the append() method to append the HTML content that was created by
Mustache.render() (based on the template and Speaker data).
But we’re not quite done, because we need to add Mustache to the web application:
Use Bower to install Mustache into the web application. From the command line in the
speakers-web-3 directory, type bower install mustache.
Add Mustache to app/index.html (right after main.js) as shown in Example 2-16.
<!doctype html><htmllang="">...<body>...<scriptsrc="bower_components/mustache.js/mustache.js"></script>...</body></html>
If you kept the web application running, you should now see the screen in Figure 2-5.
Notice that Mustache formats the Speaker data a little differently, but we improved the web application
by making an API call to the Stub API (provided by json-server) and by templating the HTML with Mustache.
Of course, you can go further by using AngularJS or React, but this is left as an exercise for you.
Please don’t forget to shut down both the web application and json-server with a Ctrl-C in each
terminal session.
A deeper, more thorough knowledge of JavaScript is needed to truly understand Node.js and other JavaScript frameworks (e.g., Angular, React, Ember, Backbone, etc.), and package/build management tools such as Yeoman. If JavaScript Objects are new to you, and all the curly braces, parentheses, and semicolons are a boiling sea of syntax, then take heart because you are not alone. Every JavaScript developer encounters these issues along their path.
Here are a few websites where you can go to deepen and broaden your skills:
JavaScriptIsSexy provides excellent, freely available tutorials to help you reach an intermediate or advanced level. The main tutorials include these three:
As you work through these (and similar) resources, Objects and Functional Expressions will become commonplace as you reach the intermediate-to-advanced level of JavaScript. At that point, you will have a much more enjoyable and productive experience when developing with current JavaScript tools and frameworks.
We started with simple conversion between JavaScript and JSON and went all the way to develop a working web
application and a Unit Test that makes a RESTful API call to json-server. For the sake of brevity and
clarity, we’ve covered “just enough” of several technologies for you to understand core concepts and build simple
applications. But we’ve just scratched the surface of JavaScript, Node.js, and Yeoman.
Now that we’ve developed a web application with JavaScript and JSON, we’ll move on to use JSON with Ruby on Rails in Chapter 3.
We’ve shown how to use JSON in JavaScript, and in this chapter we’ll show how to use JSON with our second platform—Ruby on Rails (RoR).
We’ll cover the following:
Performing Ruby/JSON serialization/deserialization with MultiJson
Working with Ruby Objects and JSON
Understanding the importance of JSON camel casing
Using JSON with Minitest
Making RESTful API calls and testing the results with Minitest and jq
Building a simple JSON-based API with Rails 5
In our examples, we’ll make RESTful API calls to work with the data we deployed on json-server in
Chapter 1. We’ll then create a more realistic JSON-based Web API. But before we develop a
RESTful API, let’s start with the fundamentals of converting between Ruby and JSON.
Before we go any further, let’s start building our development environment by installing RoR. Please go to Appendix A, and follow the instructions in “Install Ruby on Rails”.
Several good JSON gems provide Ruby/JSON serialization/deserialization functionality, including these:
JSON The default JSON gem provided in Ruby.
oj Optimized JSON, considered by many to be the fastest Ruby-based JSON processor available.
yajl Yet Another JSON Library.
There are many other JSON gems in addition to this list, and it’s hard to choose.
Rather than forcing a developer to know how to use each JSON gem,
MultiJson encapsulates this choice by providing a wrapper
that invokes the most common JSON gems on behalf of the caller by choosing the fastest JSON gem that has
been loaded in an application’s environment. Encapsulating JSON gems like this decouples an application
from a particular JSON implementation. For further information on how MultiJson chooses a JSON
implementation, see its GitHub repository. For detailed documentation, visit the MultiJson documentation on RubyDoc.
Since MultiJson defaults to the standard JSON gem, let’s install the oj gem to optimize performance.
gem install multi_json
gem install oj
Now that we’ve installed the oj gem, MultiJson will default to oj rather than the standard JSON
gem.
Applications need to convert a Ruby Data Type to JSON (serialize) and vice versa (deserialize) to exchange JSON data with other applications.
The MultiJson Object provides the following methods:
MultiJson.dump() serializes Ruby to JSON.
MultiJson.load() deserializes from JSON to Ruby.
Note that MultiJson.dump() does the following:
Uses traditional Ruby snake case (first_name) rather than the recommended cross-platform camel
case (firstName) when serializing the speaker Object with oj.
Doesn’t generate a JSON String when serializing the speaker Object with the JSON engine. This is because the JSON gem doesn’t serialize a class unless it implements a to_json() method.
Uses snake case (first_name) rather than camel case (firstName) for key names.
According to the RubyDoc MultiJson documentation, here is the method signature for MultiJson.dump():
#dump(object, options = {})The options provided depend on the underlying JSON implementation (in this case oj) because
MultiJson is a wrapper.
We’ll start by serializing some basic Ruby Data Types:
Integer
String
Boolean
Array
Hash
Object
Example 3-1 shows how to serialize/deserialize simple Ruby data types with MultiJson and oj.
require'multi_json'puts"Current JSON Engine =#{MultiJson.current_adapter()}"putsage=39# Integerputs"age =#{MultiJson.dump(age)}"putsfull_name='Larson Richard'# Stringputs"full_name =#{MultiJson.dump(full_name)}"putsreqistered=true# Booleanputs"reqistered =#{MultiJson.dump(reqistered)}"putstags=%w(JavaScript, AngularJS, Yeoman)# Array of Stringsputs"tags =#{MultiJson.dump(tags)}"puts={:'larsonrichard@ecratic.com'}# Hashputs"email =#{MultiJson.dump()}"putsclassSpeakerdefinitialize(first_name,last_name,,about,company,tags,registered)@first_name=first_name@last_name=last_name=@about=about@company=company@tags=tags@registered=registeredendendspeaker=Speaker.new('Larson','Richard','larsonrichard@ecratic.com','Incididunt mollit cupidatat magna excepteur do tempor ex non ...','Ecratic',%w(JavaScript, AngularJS, Yeoman),true)puts"speaker (using oj gem) =#{MultiJson.dump(speaker)}"puts
When you run ruby basic_data_types_serialize.rb from the command line, you should get the following:
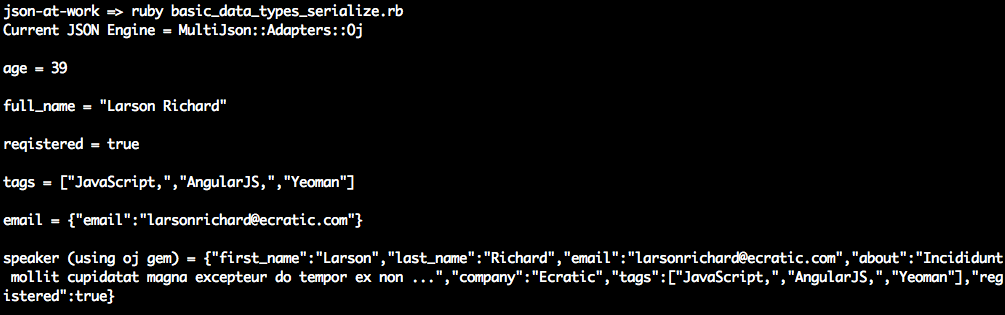
MultiJson.dump() doesn’t do much with the scalar types (Integer, String, and Boolean). Things begin to
get interesting with the speaker Object because here MultiJson.dump() initially generates a valid, yet
unattractive, JSON String. As you’ll soon see, MultiJson.dump() has other parameters that enhance
serialization.
To make things more readable, we’ll leverage the :pretty ⇒ true option to pretty-print the JSON output
from the speaker Object, as shown in Example 3-2. Although pretty-printing is more attractive to look at, it is inefficient, and
should be used only for debugging purposes.
require'multi_json'...speaker=Speaker.new('Larson','Richard','larsonrichard@ecratic.com','Incididunt mollit cupidatat magna excepteur do tempor ex non ...','Ecratic',%w(JavaScript, AngularJS, Yeoman),true)puts"speaker (using oj gem) =#{MultiJson.dump(speaker,pretty:true)}"puts
Running the preceding code yields the following pretty-printed speaker Object:
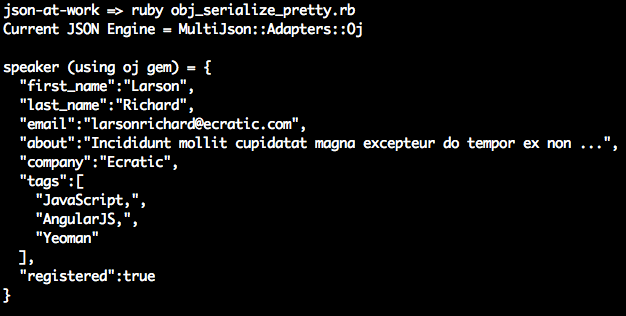
MultiJson can also deserialize JSON. Let’s use the MultiJson.load() method to deserialize JSON into a
Ruby Hash. But this causes an impedance mismatch because the speaker Object’s initialize() method
takes Strings (which match the speaker Object’s attributes) as parameters. We’ll need to convert Hash to
a set of attributes to instantiate a speaker Object. Fortunately, it’s unnecessary to write any code to
convert the Hash because the well-known OpenStruct makes the Hash (from decoding JSON) look like an
object.
Example 3-3 shows the use of OpenStruct.
require'ostruct'h={first_name:'Fred'}m=OpenStruct.new(h)putsm# prints: #<OpenStruct first_name="Fred">putsm.first_name# prints: Fred
OpenStruct is a data structure that is similar to a Hash, and it allows you define key/value pairs of
attributes and their values. OpenStruct is part of Ruby Core and provides the ability to access keys as
attributes. For more information about OpenStruct, see the Ruby Core documentation.
When we instantiate a new speaker Object, it would be great to print out the new object in a readable
manner for debugging purposes. With puts, you’d normally see something like this:
puts speaker # #<Speaker:0x007f84412e0e38>
With the awesome_print gem, the output is much more attractive. For more information, see the
awesome_print GitHub repository.
Before running the code in Example 3-4, install the awesome_print gem from the command line:
gem install awesome_print
require'multi_json'require'ostruct'require'awesome_print'puts"Current JSON Engine =#{MultiJson.current_adapter()}"putsclassSpeakerdefinitialize(first_name,last_name,,about,company,tags,registered)@first_name=first_name@last_name=last_name=@about=about@company=company@tags=tags@registered=registeredendendspeaker=Speaker.new('Larson','Richard','larsonrichard@ecratic.com','Incididunt mollit cupidatat magna excepteur do tempor ex non ...','Ecratic',%w(JavaScript, AngularJS, Yeoman),true)json_speaker=MultiJson.dump(speaker,pretty:true)puts"speaker (using oj gem) =#{MultiJson.dump(speaker)}"putsostruct_spkr=OpenStruct.new(MultiJson.load(json_speaker))speaker2=Speaker.new(ostruct_spkr.first_name,ostruct_spkr.last_name,ostruct_spkr.,ostruct_spkr.about,ostruct_spkr.company,ostruct_spkr.tags,ostruct_spkr.registered)puts"speaker 2 after MultiJson.load()"apspeaker2puts
Run this example, and we’ll see that the preceding code successfully deserialized the JSON String stored
in json_speaker into an OpenStruct Object and finally into another speaker instance—speaker2. Note
the use of awesome_print’s ap method rather than the built-in puts to pretty-print the Object.
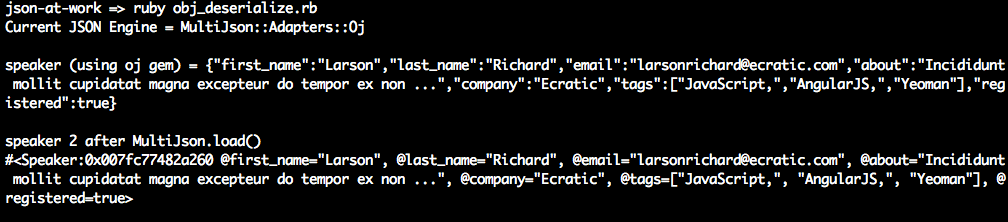
Although multi_json and oj efficiently process JSON, sometimes developers need more control over the
data to be serialized.
If you haven’t noticed, JSON Keys/Property Names are usually in camel case form. For example, a Key that
represents someone’s first name would normally be expressed as firstName. But up to this point, we’ve
seen that Ruby’s JSON libraries natively express Keys in snake case (first_name). While this
may be OK for small code examples and Unit Tests that no one else will use, snake case is incompatible
with the rest of the world. Here’s why:
JSON must be interoperable. Although my stance on this will probably offend many ardent Rubyists, and
others may call this bike shedding, the whole point of JSON and REST is interoperability across
heterogeneous applications. There are other programming languages than Ruby, and the rest of the world is
expecting camel case (firstName). If your API works in a way that is unexpected, people won’t
want to use it.
The major players use camel-cased JSON:
Google has standardized on camel case in their Google JSON Style Guide.
The majority of JSON-based public APIs (e.g., Amazon AWS, Facebook, and LinkedIn) use camel-cased JSON.
Avoid platform bleed-through. JSON should look the same regardless of the platform/programming language that generates or consumes it. The Ruby on Rails community prefers snake case, which is just fine within that platform, but this local programming language idiom shouldn’t be reflected in an API.
The ActiveSupport gem provides functionality that has been extracted from Rails, including time zones, internationalization, and JSON encoding/decoding. ActiveSupport’s JSON module provides the ability to do the following:
Convert between camel case and snake case
Choose which portions of an Object to serialize
You can install ActiveSupport from the command line as follows:
gem install activesupport
We’ll use ActiveSupport::JSON.encode() to serialize a speaker Object into JSON, as shown in Example 3-5.
require'active_support/json'require'active_support/core_ext/string'...speaker=Speaker.new('Larson','Richard','larsonrichard@ecratic.com','Incididunt mollit cupidatat magna excepteur do tempor ex non ...','Ecratic',%w(JavaScript, AngularJS, Yeoman),true)json=ActiveSupport::JSON.encode(speaker).camelize(first_letter=:lower)puts"Speaker as camel-cased JSON\n#{json}"putsjson=ActiveSupport::JSON.encode(speaker,only:['first_name','last_name']).camelize(first_letter=:lower)puts"Speaker as camel-cased JSON with only firstName and lastName\n#{json}"puts
In the code example, you’ll notice that ActiveSupport::JSON.encode() provides the following
options:
Camel case (firstName) Key names by chaining with the camelize() method. Note that
the first letter of each Key is capitalized by default, so you’ll need to use the first_letter = :lower
parameter to get lower camel case format.
Limit the portions of the speaker Object to serialize by using the only: parameter.
When you run the code, you should see the following:

But if you only want to convert from snake case to camel case, the awrence gem is a simple alternative. awrence
converts snake-cased Hash keys to camel case, which you can then convert to camel-cased JSON. I haven’t
tried this gem yet, so this is left as an exercise for you.
ActiveSupport also has the ability to deserialize JSON. We’ll now use the decode() method to
deserialize JSON into a Ruby Hash. Just as before, we’ll leverage OpenStruct and awesome_print to
help with instantiation and printing, as shown in Example 3-6.
require'multi_json'require'active_support/json'require'active_support/core_ext/string'require'ostruct'require'awesome_print'...speaker=Speaker.new('Larson','Richard','larsonrichard@ecratic.com','Incididunt mollit cupidatat magna excepteur do tempor ex non ...','Ecratic',%w(JavaScript, AngularJS, Yeoman),true)json_speaker=ActiveSupport::JSON.encode(speaker)puts"speaker (using oj gem) =#{ActiveSupport::JSON.encode(speaker)}"putsostruct_spkr=OpenStruct.new(ActiveSupport::JSON.decode(json_speaker))speaker2=Speaker.new(ostruct_spkr.first_name,ostruct_spkr.last_name,ostruct_spkr.,ostruct_spkr.about,ostruct_spkr.company,ostruct_spkr.tags,ostruct_spkr.registered)puts"speaker 2 after ActiveSupport::JSON.decode()"apspeaker2puts
You’ll see the following result when you run the preceding code from the command line:

The plissken gem is an alternative that converts from camel-cased Hash keys (that originated from JSON) to snake case. We’ll use plissken in our upcoming Unit Tests.
Now that you know how to serialize/deserialize JSON to/from a speaker Object, we’re ready to run a simple
server-side Unit Test against a Stub API provided by json-server (which we used in previous chapters).
The two most common Ruby testing frameworks are Minitest, which is part of Ruby Core and RSpec. Both Minitest and RSpec are excellent, but we can use only one of them in this chapter to keep the focus on JSON.
On one hand, Minitest
Is part of the Ruby Standard Library, so there’s nothing else to install.
Is lightweight and simple.
Has most of the functionality that RSpec provides.
On the other hand, RSpec
Requires you to install a separate rspec gem, but enjoys wide acceptance in the Ruby and Rails communities.
Is large and complex. The RSpec code base is about eight times larger than Minitest.
Has a richer set of matchers than Minitest.
For me, it’s really a matter of taste, and you’ll be fine with either framework. I chose Minitest because it comes standard with Ruby.
Minitest lets you choose between BDD (Minitest::Spec) and TDD (Minitest::Test) style testing. Let’s go
with Minitest::Spec for the following reasons:
I prefer BDD’s simple English-style sentences that describe each test.
It looks similar to RSpec, so the tests will look familiar to those developers who use RSpec.
It’s consistent with the JavaScript-base Mocha/Chai testing in the rest of this book.
This chapter covers only the basics of Minitest. To learn more, see Chris Kottom’s excellent book, The Minitest Cookbook.
Before going further, be sure to set up your test environment. If you haven’t installed Ruby on Rails
yet, refer to Appendix A, and install Ruby on Rails (see “Install Ruby on Rails” and “Install Ruby Gems”). If you want to follow along with the Ruby project provided in
the code examples, cd to chapter-3/speakers-test and do the following to install all dependencies
for the project:
bundle install
Bundler provides dependency management for Ruby projects.
If you’d like to set up the speakers-test Ruby project yourself, follow the instructions in the book’s GitHub
repository.
We’ll use the Speaker data from earlier chapters as our test data and deploy it as a RESTful API. Again,
we’ll leverage the json-server Node.js module to serve up the data/speakers.json file as a Web API. If
you need to install json-server, refer to “Install npm Modules” in Appendix A.
Here’s how to run json-server on port 5000 from your local machine:
cd chapter-3/data

json-server -p 5000 ./speakers.json
You can also get a single speaker by adding the id to the URI as follows: http://localhost:5000/speakers/1.
With the Stub API in place, it’s time to write some Unit Tests.
Our Unit Test will do the following:
Make HTTP calls to the Stub Speakers API
Check the values from the HTTP Response Body against expected values
As in previous chapters, we’ll continue to leverage the open source Unirest API wrapper,
but this time we’ll use the Ruby implementation.
Please note that the Unirest gem takes the JSON in the HTTP Response Body, parses it into a Ruby
Hash, and returns it to the caller (inside the HTTP Response Body). This means that the Unit Test
won’t be testing directly against JSON data, but rather it will test against the Hash that was populated
by the JSON response from the API.
The Unit Test in Example 3-7 shows how to use Unirest to invoke the Speaker Stub API provided by json-server
and test the response.
require'minitest_helper'require'unirest'require'awesome_print'require'ostruct'require'plissken'require'jq/extend'require_relative'../models/speaker'describe'Speakers API'doSPEAKERS_ALL_URI='http://localhost:5000/speakers'beforedo@res=Unirest.getSPEAKERS_ALL_URI,headers:{'Accept'=>"application/json"}endit'should return a 200 response'doexpect(@res.code).must_equal200expect(@res.headers[:content_type]).must_equal'application/json; charset=utf-8'endit'should return all speakers'dospeakers=@res.bodyexpect(speakers).wont_be_nilexpect(speakers).wont_be_emptyexpect(speakers.length).must_equal3endit'should validate the 3rd speaker as an Object'dospeakers=@res.bodyostruct_spkr3=OpenStruct.new(speakers[2].to_snake_keys())expect(ostruct_spkr3.company).must_equal'Talkola'expect(ostruct_spkr3.first_name).must_equal'Christensen'expect(ostruct_spkr3.last_name).must_equal'Fisher'expect(ostruct_spkr3.tags).must_equal['Java','Spring','Maven','REST']speaker3=Speaker.new(ostruct_spkr3.first_name,ostruct_spkr3.last_name,ostruct_spkr3.,ostruct_spkr3.about,ostruct_spkr3.company,ostruct_spkr3.tags,ostruct_spkr3.registered)expect(speaker3.company).must_equal'Talkola'expect(speaker3.first_name).must_equal'Christensen'expect(speaker3.last_name).must_equal'Fisher'expect(speaker3.tags).must_equal['Java','Spring','Maven','REST']endit'should validate the 3rd speaker with jq'dospeakers=@res.bodyspeaker3=speakers[2]speaker3.jq('.company'){|value|expect(value).must_equal'Talkola'}speaker3.jq('.tags'){|value|expect(value).must_equal['Java','Spring','Maven','REST']}speaker3.jq('.email'){|value|expect(value).must_equal'christensenfisher@talkola.com'}speaker3.jq('. | "\(.firstName) \(.lastName)"'){|value|expect(value).must_equal'Christensen Fisher'}endend
Note the following in this Unit Test:
The minitest_helper consolidates configuration and setup and factors it out of this test. We’ll cover
Minitest Helpers later in this chapter.
The test executes the Unirest GET request synchronously (and gets a response) with Minitest’s before
method, so that setup occurs in only one place in the code. Minitest executes before before running
each test (i.e., it) within the context of the describe.
The should return all speakers test does the following:
Ensures that the HTTP Response Body is not empty
Checks whether the Speakers API returns three speakers
The should validate the 3rd speaker as an Object test works as follows:
Populate the speakers Hash from the HTTP Response Body (@res.body). At this point, the JSON
from the API has already been parsed by Unirest and converted to a Ruby Hash.
Use OpenStruct.new() to convert the Hash for the third speaker into an OpenStruct, an Object-like
structure. The to_snake_keys() method (from the plissken gem) converts the camel-cased (firstName) Hash keys to snake case (first_name) for compatibility with Ruby.
Use Minitest BDD-style expect assertions to check for expected results:
The third speaker’s company, first_name, last_name, and tags match the values in the
speakers.json file.
The should validate the 3rd speaker with jq test works as follows:
Use jq queries (e.g.,
.company) to check the same fields as in the previous test. jq simplifies Unit Testing by
enabling a developer to query the JSON-based Hashes without the need to convert to an object. jq is a
powerful JSON search tool, and Chapter 6 covers it in greater detail.
The . | "\(.firstName) \(.lastName)" query does a String interpolation to combine the firsName and
lastName fields into the speaker’s full name for testing purposes.
The ruby-jq gem provides a solid Ruby-based jq implementation.
To run this test, use bundle exec rake from the command line, and you should see the following:

rake is a commonly used build utility
for Ruby projects. In the bundle exec rake command, the following occurs:
rake uses the gems that Bundler listed in this project’s Gemfile.
rake has been configured to use test as the default task.
The Rakefile defines the build tasks, and looks like Example 3-8.
require'rake/testtask'Rake::TestTask.new(:test)do|t|t.libs=%w(lib test)t.pattern='test/**/*_spec.rb't.warning=falseendtask:default=>:test
By default, Minitest is silent and doesn’t indicate that tests are passing. In the preceding Unit Test run,
notice that passing tests show in the output. The speakers-test project leverages the minitest-reporters
gem to make
the output more readable.
The Minitest Helper in Example 3-9 configures the minitest and minitest-reporters gems for use by the
speakers_spec.
require'minitest/spec'require'minitest/autorun'require"minitest/reporters"Minitest::Reporters.use!Minitest::Reporters::SpecReporter.new
For the sake of completeness, Example 3-10 shows the Speaker Plain Old Ruby Object (PORO)
that holds the Speaker data.
classSpeakerattr_accessor:first_name,:last_name,,:about,:company,:tags,:registereddefinitialize(first_name,last_name,,about,company,tags,registered)@first_name=first_name@last_name=last_name=@about=about@company=company@tags=tags@registered=registeredendend
The preceding code is plain and simple:
speaker.rb resides in the models directory to follow commonly accepted Ruby project conventions.
attr_accessor defines the Speaker’s data members (e.g., first_name) and accessor methods
(getters/readers and setters/writers) for the data members.
initialize() initializes the data members when Speaker.new() is called.
Before moving on, you can stop json-server by pressing Ctrl-C at the command line.
So far, the Unit Tests have done a decent job of testing JSON data, but something is missing. The code had to check for the existence of all the expected fields, which is clumsy and cumbersome. Imagine how arduous this would be for larger, deeper, more complex JSON documents. There’s a solution for this problem: JSON Schema (this is covered in Chapter 5).
We’ve shown how to deploy and interact with a Stub API, and now it’s time to build a small RESTful API with Ruby on Rails.
Now that you know how to serialize/deserialize JSON to/from a speaker Object and how to do a Unit Test
with the Speaker Stub API (from json-server), we’re ready to build a simple web application that
leverages the API data and presents it to a user.
We’ll continue to use the Speaker data to create an API with Rails 5. This version of Rails includes
rails-api, which provides the ability to create an API-only Rails application. rails-api began as a
separate gem,
but it has been merged into Rails.
We’ll build two Rails-based API applications to demonstrate some of the features of AMS:
speakers-api-1 Create an API with camel-cased JSON.
speakers-api-2 Create an API that customizes the JSON representation.
Before we create anything, let’s determine how the APIs will render JSON.
There are several options for rendering JSON in Ruby on Rails. Here’s a list of the most widely used techniques:
AMS provides functionality to objects that need some ActiveRecord features, such as serialization and validation. AMS is part of the Rails API, and you can find documentation on GitHub.
A Domain-Specific Language (DSL) builder that uses a separate template (i.e., outside the controller) that controls the output. For further details, please see Jbuilder on GitHub.
Ruby API Builder Language (RABL) generates JSON, XML, PList, MessagePack, and BSON. This gem also uses a template file. The RABL GitHub repository has details.
Here are a few considerations to help choose a JSON serialization approach:
JSON generation should be done outside application objects because an object should have no knowledge of external representations. This means that you shouldn’t have code in your object that renders JSON. According to Uncle Bob Martin, a class should have only one reason to change; this is known as the Single Responsibility Principle (the first of the five SOLID principles of OO Design). For further details, see his The Principles of OOD site. When you introduce JSON formatting to an Object, that Object now has a second reason to change, because it has two responsibilities (making it more difficult to change the code in the future):
The original functionality of the object
JSON encoding
Don’t clutter Controllers or Models with JSON generation. This also violates Single Responsibility and makes the Controller/Model code less flexible. Use external templates to clean up Controllers and Models and factor out messy, complex formatting logic.
Control which attributes of an object to serialize and which ones to omit.
Although these guidelines may sound a bit strict, the whole point here is interoperability and consistency. But there are no silver bullets, and it’s perfectly acceptable to have different opinions. In which case, do the following:
Know why you believe what you believe. Back up your position with sound software engineering and architectural principles.
Work and play well with others. Determine whether your approach fits with the overall community rather than just a single language, platform, or segment within a particular technical community.
Now that we’ve established some evaluation criteria, let’s review the options.
Based on the preceding considerations and a review of all the options, it’s a tough decision because AMS, RABL,
and Jbuilder each provide most (if not all) of what we’re looking for. AMS factors out serialization into
a Serializer Object, and RABL and Jbuilder both use external templates. Because RABL can’t emit lower camel
case,
it’s out of the running, which reduces our options to AMS and Jbuilder.
Choosing between AMS and Jbuilder is difficult:
Each provides the same quality of JSON representation.
Their performance is similar when you configure Rails to use oj.
It comes down to which approach you prefer:
Programmatic JSON serialization with Serializer Objects (AMS) or with templates (Jbuilder)
JSON serialization in the Controller (AMS) or in the View (Jbuilder)
There are great arguments on both sides:
Using AMS is a good approach because everything is Ruby-based. Jbuilder templates introduce the need for developers to learn a new DSL.
Jbuilder forces you to think about the JSON representation first, and pushes you to decouple from the underlying database.
As many people in the Rails community would say, “it’s a wash.” In other words, it’s a toss-up between AMS and Jbuilder; either approach produces great JSON responses for an API. I chose AMS because it’s part of Rails and there’s no need to learn a new DSL for templating.
We’ll take the following steps to create and deploy the speakers-api-1 API with Rails 5:
Set up the project.
Write source code:
Model
Serializer
Controller
Deploy the API.
Test with Postman.
The speakers-api-1 project already exists in the Chapter 3 code examples under the chapter-3/speakers-api-1 directory, so you don’t need to create this project. But for the sake of completeness, the following sidebar explains how the project was created.
Even though the project is already set up, you will need to install the gems to run the project. Do the following:
cd speakers-api-1

bundle exec spring binstub --all
In this command, Bundler installs the gems specified in the project’s Gemfile.
The Speaker class in Example 3-11 is a PORO that represents the Speaker data that
the API will render as JSON.
classSpeaker<ActiveModelSerializers::Modelattr_accessor:first_name,:last_name,,:about,:company,:tags,:registereddefinitialize(first_name,last_name,,about,company,tags,registered)@first_name=first_name@last_name=last_name=@about=about@company=company@tags=tags@registered=registeredendend
This code doesn’t do much; it just provides the data members, constructors, and
accessor methods (getters and setters) for a speaker. This code doesn’t know anything about
JSON formatting. The Speaker class inherits from ActiveModel::Serializer so that AMS will convert
it to JSON.
AMS provides Serializers (separate from Controllers and Models) that serialize Objects into JSON.
The SpeakerSerializer already exists, but the following sidebar explains how it was created.
Example 3-12 shows the SpeakerSerializer that AMS uses to render speaker Objects as JSON.
classSpeakerSerializer<ActiveModel::Serializerattributes:first_name,:last_name,,:about,:company,:tags,:registeredend
In this code, attributes lists all fields to be serialized into JSON.
In a Rails application, a Controller handles HTTP Requests and returns HTTP Responses. In our case, the
Speaker JSON data is returned in the Response Body. The SpeakersController already exists, but the following sidebar explains how it was created.
Example 3-13 provides the full SpeakersController that implements the index and show methods.
require'speaker'classSpeakersController<ApplicationControllerbefore_action:set_speakers,only:[:index,:show]# GET /speakersdefindexrenderjson:@speakersend# GET /speakers/:iddefshowid=params[:id].to_i-1ifid>=0&&id<@speakers.lengthrenderjson:@speakers[id]elserenderplain:'404 Not found',status:404endendprivatedefset_speakers@speakers=[]@speakers<<Speaker.new('Larson','Richard','larsonrichard@ecratic.com','Incididunt mollit cupidatat magna ...','Ecratic',['JavaScript','AngularJS','Yeoman'],true)@speakers<<Speaker.new('Ester','Clements','esterclements@acusage.com','Labore tempor irure adipisicing consectetur ...','Acusage',['REST','Ruby on Rails','APIs'],true)@speakers<<Speaker.new('Christensen','Fisher','christensenfisher@talkola.com','Proident ex Lorem et Lorem ad ...','Talkola',['Java','Spring','Maven','REST'],true)endend
Note the following in this code:
The speakers Array is hardcoded, but it’s for test purposes only. In a real application, a separate Data Layer would populate the speakers from a database or an external API call.
The index method does the following:
Responds to HTTP GET requests on the /speakers URI.
Retrieves the entire speakers Array and renders it as a JSON Array in an HTTP Response Body.
The show method does the following:
Responds to HTTP GET requests on the /speakers/{id} URI (where id represents a speaker ID).
Retrieves a speaker (based on the speaker ID) and renders it as a JSON object in an HTTP Response Body.
If id in the HTTP Request is out-of-bounds, the Controller renders a 404 (Not Found) HTTP
Status Code with a plain-text message in the HTTP Response with render plain.
When the Controller invokes the render method, Rails looks for a matching Serializer to serialize the
speaker Object, and invokes the SpeakerSerializer by default.
The Controller and Serializer are decoupled and know nothing about each other. The serialization code exists only in the Serializer and does not reside in the Controller or the Model. The Controller, Model, and Serializer each do one thing.
In a Rails application, the Routes file maps URLs to Controller methods that execute when the URL is
invoked. The rails generate controller command that was shown earlier created the routes shown in Example 3-14.
Rails.application.routes.drawdoget'speakers/index'get'speakers/show'# For details on the DSL available within this file,# see http://guides.rubyonrails.org/routing.htmlend
You can shorten the Routes file with Resource-based routing as shown in Example 3-15.
Rails.application.routes.drawdoresources:speakers,:only=>[:show,:index]# For details on the DSL available within this file,# see http://guides.rubyonrails.org/routing.htmlend
Instead of separate routes for the index and show methods, this resourceful route defines them
with a single line of code.
By default, AMS renders JSON keys with snake case (first_name and last_name). Out of the box, the
serialized JSON (when the user invokes http://localhost:3000/speakers/1 with an HTTP GET) looks like this:
{"first_name":"Larson","last_name":"Richard","email":"larsonrichard@ecratic.com","about":"Incididunt mollit cupidatat magna ...","company":"Ecratic","tags":["JavaScript","AngularJS","Yeoman"],"registered":true}
To make our JSON output compatible with non-Ruby clients, let’s add camel casing by adding the global initializer file shown in Example 3-16.
ActiveModelSerializers.config.key_transform=:camel_lower
Now that the Speakers API is up and running, let’s test with Postman (as we did in Chapter 1) to get the
first speaker. In the Postman GUI, do the following:
Enter the http://localhost:3000/speakers/1 URL.
Choose GET as the HTTP verb.
Click the Send button.
You should see that the GET ran properly in Postman with the speaker JSON data in the HTTP Response Body
text area and a 200 (OK) HTTP Status, as shown in Figure 3-1.
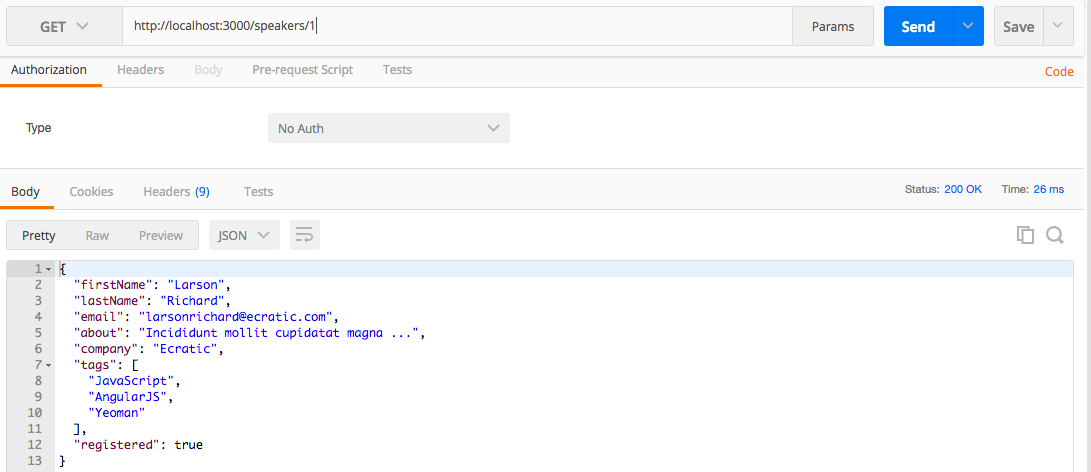
You can stop speakers-api-1 by pressing Ctrl-C at the command line.
AMS’s JSON customization functionality goes beyond camel-casing. The second API application will show how
AMS can customize (alter) the JSON representation of each speaker. Except for the new
SpeakerSerializer, speakers-api-2 has all the same code as the original speakers-api-1 project,
so we’ll just focus on serialization.
Before going further, please install the gems to run the speakers-api-2 project. Do the following:
cd speakers-api-2

bundle exec spring binstub --all
This new version of the SpeakerSerializer provides a new name field (which combines the first_name
and last_name) without changing the original speaker Object, as shown in Example 3-17.
classSpeakerSerializer<ActiveModel::Serializerattributes:name,,:about,:company,:tags,:registereddefname"#{object.first_name}#{object.last_name}"endend
Note the following in this example:
attributes references name instead of first_name and last_name.
In the name method:
The object refers to the speaker Object being rendered.
Combine the first_name and last_name fields by using String interpolation to render a single name
field. The original Speaker model knows nothing about the name attribute created by the Serializer.
The ability to customize the JSON representation with attributes is powerful because it decouples
the Model from the JSON output.
In the speakers-api-2 directory, run rails s to deploy the API at
http://localhost:3000/speakers.
In the Postman GUI, invoke HTTP GET on http://localhost:3000/speakers/1
and you should see the screen in Figure 3-2.

Don’t forget to stop the speakers-api-2 application by pressing Ctrl-C at the command line.
We started with simple conversions between Ruby and JSON, discussed the importance of JSON camel casing, and then demonstrated how to call a (Stub) JSON-based Web API (and tested its contents with Minitest). We then finished by creating a RESTful API with Rails 5 and tested it with Postman.
Now that we’ve developed a JSON-based application with Ruby on Rails, we’ll move on to use JSON with Java (and Spring Boot) in Chapter 4.
We’ve shown how to use JSON with JavaScript and Ruby on Rails, and we’ll now move to Java, our third and final platform for this book. Here’s what we’ll cover:
Performing Java/JSON serialization/deserialization with Jackson
Working with Java Objects and JSON
Using JSON with JUnit
Making RESTful API calls and testing the results with JUnit and JsonUnit
Building a small JSON-based API with Spring Boot
In our examples, we’ll make RESTful API calls to work with the data we deployed on json-server in the
previous chapter. We’ll then move to create a more realistic JSON-based Web API. Before we develop a
RESTful API, we need to start with the basics of Java serialization/deserialization with JSON, and
then add more complexity.
This chapter uses Gradle for building source and test code. If you haven’t installed Java and Gradle, go to Appendix A and see “Install the Java Environment” and “Install Gradle”. After that, you will have a basic environment that enables you to run the examples.
Gradle leverages the concepts from earlier Java-based build systems—Apache Ant and Maven. Gradle is widely used and provides the following functionality for Java projects:
Project structure (a common/standard project directory structure)
Dependency Management (for JAR files)
A common build process
The gradle init utility initializes a project by creating a core directory structure and some
initial implementations for the build script, along with simple Java source and test code. Here are the
key directories and files in a Gradle project:
src/main/ contains source code and resources.
java/ is the Java source code.
resources/ contains the resources (e.g., properties, data files—JSON in our case) used by the source code.
test/main/ contains source code and resources.
java/ is the Java source code.
resources/ contains the resources (e.g., properties, data files—JSON in our case) used by the source code.
build/ contains the .class files generated by compiling the source and test code.
libs/ contains the JAR or WAR files that result from building the project.
gradlew is the Gradle wrapper that enables you to run a project as an executable JAR. We’ll cover this in more detail in the Spring Boot section later.
build.gradle is initiated for you by gradle init, but you need to fill it in with project-specific
dependencies. Gradle uses a Groovy-based DSL for its build scripts (rather than
XML).
build/ contains build-related artifacts created by gradle build or gradle test.
Here are the most important Gradle tasks you’ll need to know in order to work with Gradle.
You can see these tasks when you type gradle tasks on the command line:
gradle build Build the project.
gradle classes Compile Java source code.
gradle clean Delete the build directory.
gradle jar Compile Java source code and package it (along with Resources) into a JAR.
gradle javadoc Generate JavaDoc documentation from the Java source code.
gradle test Run Unit Tests (includes Java source and test code compile).
gradle testClasses Compile Java test code.
Here’s how the example projects were created:
gradle init --type java-application was used to create the initial speakers-test and speakers-web
applications.
The generated build.gradle file and the Java application and test files are stubs. They have been replaced with actual code for the examples in this chapter.
Gradle is well-documented, and here are some tutorials and references to help you go deeper:
Gradle Beyond the Basics, by Tim Berglund (O’Reilly)
Now that we’ve covered the basics of Gradle, it’s time to look at Java-based JSON libraries, and then move on to coding examples.
JUnit is a widely used Unit-Testing framework. The tests in this chapter use JUnit because of its common acceptance in the Java community. JUnit tests are procedural, so the Unit Tests are TDD-style. If you’d like to combine JUnit with BDD, Cucumber is a solid choice. To learn more about BDD and Cucumber in Java, see Micha Kops’ excellent article on “BDD Testing with Cucumber, Java and JUnit”.
There are several solid JSON libraries for Java/JSON serialization/deserialization, including these:
You can find details about Jackson in the GitHub repository.
Gson is provided by Google.
This library is provided by Doug Crockford.
JSON support was introduced into the Java platform in JavaEE 7 as part of the Java Specification Request (JSR) 353 initiative. JSR-353 is a standalone implementation, and you can integrate it with your Java SE applications as of Java SE 8. Java SE 9 will provide native JSON support as part of the Java Enhancement Proposal (JEP) 198 initiative.
All examples in this chapter use Jackson because it
Is widely used (especially by the Spring community)
Provides excellent functionality
Has worked well for a long time
Is well maintained with an active development community
Has good documentation
Additionally, we’ll maintain focus by sticking with one Java/JSON library. As mentioned, the other libraries work well, so feel free to try them on your own.
Let’s start with the basics of Java serialization/deserialization.
Java applications need to convert from Java data structures to JSON (serialize) and convert from JSON to Java (deserialize).
As in previous chapters, we’ll start by serializing some basic Java data types:
integer
string
array
boolean
Example 4-1 shows a simple Unit Test that uses Jackson and JUnit 4 to serialize/deserialize simple Java data types.
packageorg.jsonatwork.ch4;importstaticorg.junit.Assert.*;importjava.io.*;importjava.util.*;importorg.junit.Test;importcom.fasterxml.jackson.core.*;importcom.fasterxml.jackson.core.type.*;importcom.fasterxml.jackson.databind.*;publicclassBasicJsonTypesTest{privatestaticfinalStringTEST_SPEAKER="age = 39\n"+"fullName = \"Larson Richard\"\n"+"tags = [\"JavaScript\",\"AngularJS\",\"Yeoman\"]\n"+"registered = true";@TestpublicvoidserializeBasicTypes(){try{ObjectMappermapper=newObjectMapper();Writerwriter=newStringWriter();intage=39;StringfullName=newString("Larson Richard");List<String>tags=newArrayList<String>(Arrays.asList("JavaScript","AngularJS","Yeoman"));booleanregistered=true;Stringspeaker=null;writer.write("age = ");mapper.writeValue(writer,age);writer.write("\nfullName = ");mapper.writeValue(writer,fullName);writer.write("\ntags = ");mapper.writeValue(writer,tags);writer.write("\nregistered = ");mapper.configure(SerializationFeature.INDENT_OUTPUT,true);mapper.writeValue(writer,registered);speaker=writer.toString();System.out.println(speaker);assertTrue(TEST_SPEAKER.equals(speaker));assertTrue(true);}catch(JsonGenerationExceptionjge){jge.printStackTrace();fail(jge.getMessage());}catch(JsonMappingExceptionjme){jme.printStackTrace();fail(jme.getMessage());}catch(IOExceptionioe){ioe.printStackTrace();fail(ioe.getMessage());}}@TestpublicvoiddeSerializeBasicTypes(){try{StringageJson="{ \"age\": 39 }";ObjectMappermapper=newObjectMapper();Map<String,Integer>ageMap=mapper.readValue(ageJson,newTypeReference<HashMap<String,Integer>>(){});Integerage=ageMap.get("age");System.out.println("age = "+age+"\n\n\n");assertEquals(39,age.intValue());assertTrue(true);}catch(JsonMappingExceptionjme){jme.printStackTrace();fail(jme.getMessage());}catch(IOExceptionioe){ioe.printStackTrace();fail(ioe.getMessage());}}}
In this example, the @Test annotation tells JUnit to run the serializeBasicTypes() and
deSerializeBasicTypes() methods as part of the test. These Unit Tests don’t do many assertions on the JSON
data itself. We’ll cover assertions in more detail later when we test against a Web API.
Here are the most important Jackson classes and methods that serialize/deserialize to/from JSON:
ObjectMapper.writeValue() converts a Java data type to JSON (and in this case, outputs to a Writer).
ObjectMapper.readValue() converts JSON to a Java data type.
Run a single Unit Test from the command line as follows:
cd chapter-4/speakers-test

+gradle test --tests org.jsonatwork.ch4.BasicJsonTypesTest+
You should see these results:
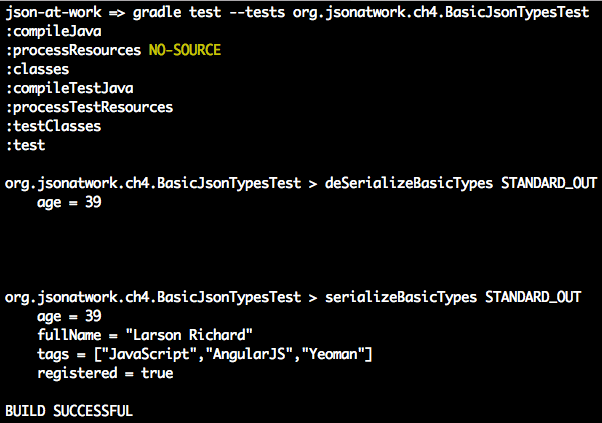
This example isn’t too exciting right now because it serializes/deserializes only simple data types to/from JSON. Serialization/deserialization gets more interesting when Objects are involved.
Now that we have a decent grasp of Jackson and how to work with simple Java data types, let’s wade in
deeper with Objects. Example 4-2 shows how to use Jackson to serialize/deserialize a
single speaker Object, and then how to deserialize a JSON file into multiple speaker Objects.
packageorg.jsonatwork.ch4;importstaticorg.junit.Assert.*;importjava.io.*;importjava.net.*;importjava.util.*;importorg.junit.Test;importcom.fasterxml.jackson.core.*;importcom.fasterxml.jackson.databind.*;importcom.fasterxml.jackson.databind.type.*;publicclassSpeakerJsonFlatFileTest{privatestaticfinalStringSPEAKER_JSON_FILE_NAME="speaker.json";privatestaticfinalStringSPEAKERS_JSON_FILE_NAME="speakers.json";privatestaticfinalStringTEST_SPEAKER_JSON="{\n"+" \"id\" : 1,\n"+" \"age\" : 39,\n"+" \"fullName\" : \"Larson Richard\",\n"+" \"tags\" : [ \"JavaScript\", \"AngularJS\", \"Yeoman\" ],\n"+" \"registered\" : true\n"+"}";@TestpublicvoidserializeObject(){try{ObjectMappermapper=newObjectMapper();Writerwriter=newStringWriter();String[]tags={"JavaScript","AngularJS","Yeoman"};Speakerspeaker=newSpeaker(1,39,"Larson Richard",tags,true);StringspeakerStr=null;mapper.configure(SerializationFeature.INDENT_OUTPUT,true);speakerStr=mapper.writeValueAsString(speaker);System.out.println(speakerStr);assertTrue(TEST_SPEAKER_JSON.equals(speakerStr));assertTrue(true);}catch(JsonGenerationExceptionjge){jge.printStackTrace();fail(jge.getMessage());}catch(JsonMappingExceptionjme){jme.printStackTrace();fail(jme.getMessage());}catch(IOExceptionioe){ioe.printStackTrace();fail(ioe.getMessage());}}privateFilegetSpeakerFile(StringspeakerFileName)throwsURISyntaxException{ClassLoaderclassLoader=Thread.currentThread().getContextClassLoader();URLfileUrl=classLoader.getResource(speakerFileName);URIfileUri=newURI(fileUrl.toString());FilespeakerFile=newFile(fileUri);returnspeakerFile;}@TestpublicvoiddeSerializeObject(){try{ObjectMappermapper=newObjectMapper();FilespeakerFile=getSpeakerFile(SpeakerJsonFlatFileTest.SPEAKER_JSON_FILE_NAME);Speakerspeaker=mapper.readValue(speakerFile,Speaker.class);System.out.println("\n"+speaker+"\n");assertEquals("Larson Richard",speaker.getFullName());assertEquals(39,speaker.getAge());assertTrue(true);}catch(URISyntaxExceptionuse){use.printStackTrace();fail(use.getMessage());}catch(JsonParseExceptionjpe){jpe.printStackTrace();fail(jpe.getMessage());}catch(JsonMappingExceptionjme){jme.printStackTrace();fail(jme.getMessage());}catch(IOExceptionioe){ioe.printStackTrace();fail(ioe.getMessage());}}@TestpublicvoiddeSerializeMultipleObjects(){try{ObjectMappermapper=newObjectMapper();FilespeakersFile=getSpeakerFile(SpeakerJsonFlatFileTest.SPEAKERS_JSON_FILE_NAME);JsonNodearrNode=mapper.readTree(speakersFile).get("speakers");List<Speaker>speakers=newArrayList<Speaker>();if(arrNode.isArray()){for(JsonNodeobjNode:arrNode){System.out.println(objNode);speakers.add(mapper.convertValue(objNode,Speaker.class));}}assertEquals(3,speakers.size());System.out.println("\n\n\nAll Speakers\n");for(Speakerspeaker:speakers){System.out.println(speaker);}System.out.println("\n");Speakerspeaker3=speakers.get(2);assertEquals("Christensen Fisher",speaker3.getFullName());assertEquals(45,speaker3.getAge());assertTrue(true);}catch(URISyntaxExceptionuse){use.printStackTrace();fail(use.getMessage());}catch(JsonParseExceptionjpe){jpe.printStackTrace();fail(jpe.getMessage());}catch(JsonMappingExceptionjme){jme.printStackTrace();fail(jme.getMessage());}catch(IOExceptionioe){ioe.printStackTrace();fail(ioe.getMessage());}}}
Note the following in this JUnit test:
serializeObject() creates a Speaker Object and serializes it to Standard Output by using the
ObjectMapper.writeValueAsString() method and System.out.println(). The test sets the
SerializationFeature.INDENT_OUTPUT to true to indent/pretty-print the JSON output.
deSerializeObject() calls getSpeakerFile() to read a JSON input file (which contains a single
speaker JSON Object), and uses the ObjectMapper.readValue() method to deserialize it into a
Speaker Java Object.
deSerializeMultipleObjects() does the following:
Calls getSpeakerFile() to read a JSON input file, which contains an array of JSON speaker Objects.
Invokes the ObjectMapper.readTree() method to get a JsonNode Object, which is a pointer to the
root node of the JSON document that was in the file.
Visits each node in the JSON tree and uses the ObjectMapper.convertValue() method to deserialize each
speaker JSON object into a Speaker Java Object.
Prints out each Speaker Object in the list.
getSpeakerFile() finds a file on the classpath and does the following:
Gets the ContextClassLoader from the current Thread of execution.
Uses the ClassLoader.getResource() method to find the filename as a resource within the
current classpath.
Constructs a File Object based on the URI of the filename.
Each of the preceding tests uses JUnit’s assertion methods to test the results of JSON serialization/deserialization.
You’ll see the following when you run the test from the command line using
gradle test --tests org.jsonatwork.ch4.SpeakerJsonFlatFileTest:
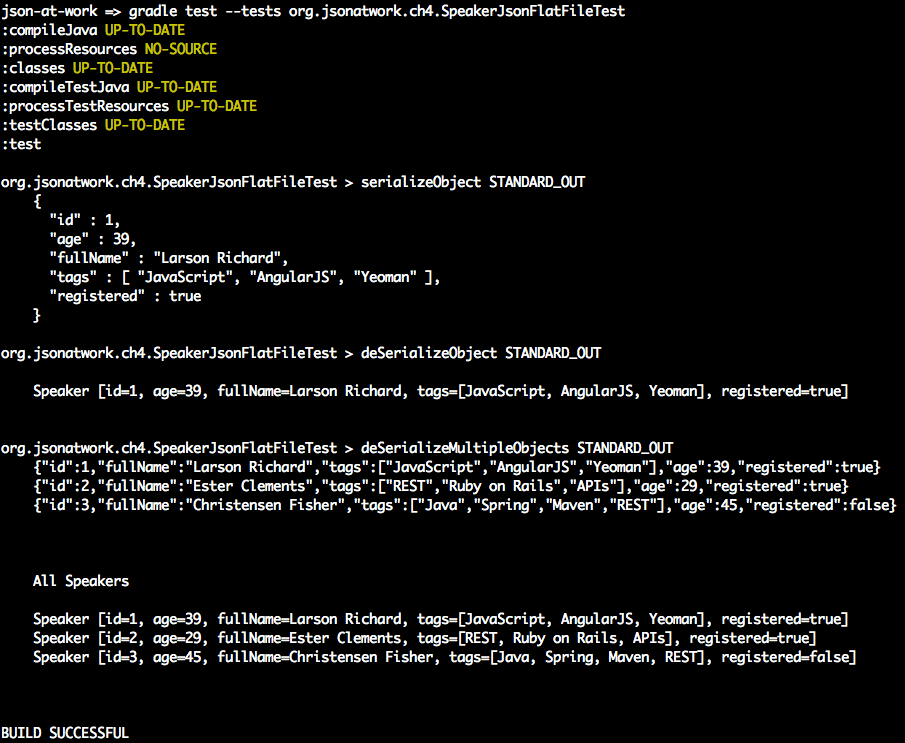
Jackson offers much more functionality than can be shown in this chapter. Refer to the following resources for some great tutorials:
Java Jackson Tutorial, by Eugen Paraschiv
Jackson Tutorial, Tutorials Point
Jackson JSON Java Parser API Example Tutorial, by Pankaj (JournalDev)
Java JSON Jackson Introduction, by Mithil Shah
Until now, we’ve been using JUnit to test against the data from JSON flat files. We’ll now do a more realistic test against an API. But we need an API to test against without writing a lot of code or creating lots of infrastructure. We’ll show how to create a simple Stub API (which produces a JSON response) without writing a single line of code.
To create the Stub, we’ll use the Speaker data from earlier chapters as our test data, which is available at GitHub
and deploy it as a RESTful API. We’ll leverage the json-server Node.js module to serve up the speakers.json
file as a Web API. If you need to install json-server, refer to “Install npm Modules”
in Appendix A. Here’s how to run json-server on port 5000 from your local machine (using
a second terminal session):
cd chapter-4/speakers-test/src/test/resources

json-server -p 5000 ./speakers.json
You can also get a single speaker by adding the id to the URI as follows: http://localhost:5000/speakers/1.
With the Stub API in place, it’s time to write some Unit Tests.
Our Unit Test will do the following:
Make HTTP calls to the Stub Speakers API
Check the JSON (from the HTTP Response) against expected values
As in earlier chapters, we’ll continue to leverage the open source Unirest API wrapper, but this time we’ll use the Java version.
In the previous JUnit tests in the chapter, we ensured that only bare minimum functionality was working (no exceptions were thrown), and it’s now time to make our tests a bit more sophisticated. The remaining Unit Tests will look at the JSON content returned from an HTTP Response, and verify that it matches the expected output. We could search through the data and do a comparison with custom code, or we could use a library to reduce the amount of work. JsonUnit has many helpful matchers to simplify JSON comparison in JUnit tests. We’ll cover the basics of JsonUnit in these Unit Tests, but it provides much deeper functionality than we can cover here, including the following:
Regular Expressions
More matchers
The ability to ignore specific fields and values
The Unit Test in Example 4-3 pulls everything together by invoking the Stub API and comparing the JSON response with expected values.
packageorg.jsonatwork.ch4;importstaticorg.junit.Assert.*;importjava.io.*;importjava.net.*;importjava.util.*;importorg.apache.http.*;importorg.junit.Test;importcom.fasterxml.jackson.core.*;importcom.fasterxml.jackson.databind.*;importcom.mashape.unirest.http.HttpResponse;importcom.mashape.unirest.http.Unirest;importcom.mashape.unirest.http.exceptions.*;importcom.mashape.unirest.request.*;importstaticnet.javacrumbs.jsonunit.fluent.JsonFluentAssert.assertThatJson;publicclassSpeakersApiJsonTest{privatestaticfinalStringSPEAKERS_ALL_URI="http://localhost:5000/speakers";privatestaticfinalStringSPEAKER_3_URI=SPEAKERS_ALL_URI+"/3";@TestpublicvoidtestApiAllSpeakersJson(){try{Stringjson=null;HttpResponse<String>resp=Unirest.get(SpeakersApiJsonTest.SPEAKERS_ALL_URI).asString();assertEquals(HttpStatus.SC_OK,resp.getStatus());json=resp.getBody();System.out.println(json);assertThatJson(json).node("").isArray();assertThatJson(json).node("").isArray().ofLength(3);assertThatJson(json).node("[0]").isObject();assertThatJson(json).node("[0].fullName").isStringEqualTo("Larson Richard");assertThatJson(json).node("[0].tags").isArray();assertThatJson(json).node("[0].tags").isArray().ofLength(3);assertThatJson(json).node("[0].tags[1]").isStringEqualTo("AngularJS");assertThatJson(json).node("[0].registered").isEqualTo(true);assertTrue(true);}catch(UnirestExceptionue){ue.printStackTrace();}}@TestpublicvoidtestApiSpeaker3Json(){try{Stringjson=null;HttpResponse<String>resp=Unirest.get(SpeakersApiJsonTest.SPEAKER_3_URI).asString();assertEquals(HttpStatus.SC_OK,resp.getStatus());json=resp.getBody();System.out.println(json);assertThatJson(json).node("").isObject();assertThatJson(json).node("fullName").isStringEqualTo("Christensen Fisher");assertThatJson(json).node("tags").isArray();assertThatJson(json).node("tags").isArray().ofLength(4);assertThatJson(json).node("tags[2]").isStringEqualTo("Maven");assertTrue(true);}catch(UnirestExceptionue){ue.printStackTrace();}}}
Note the following in this JUnit test:
testApiAllSpeakersJson():
Gets a list of all speakers from the Speakers API by calling Unirest.get() with http://localhost:5000/speakers
Verifies that the HTTP Status Code is OK (200).
Gets the JSON document (which contains an array of speaker Objects) from the HTTP Response Body.
Makes a series of assertions on the JSON document with JSONUnit’s assertThatJson() to verify that
We have an array of three speaker objects.
Each field (for example, fullName, tags, and registered) in each speaker object matches the
expected values.
When you run gradle test, you should see the following as part of the output:
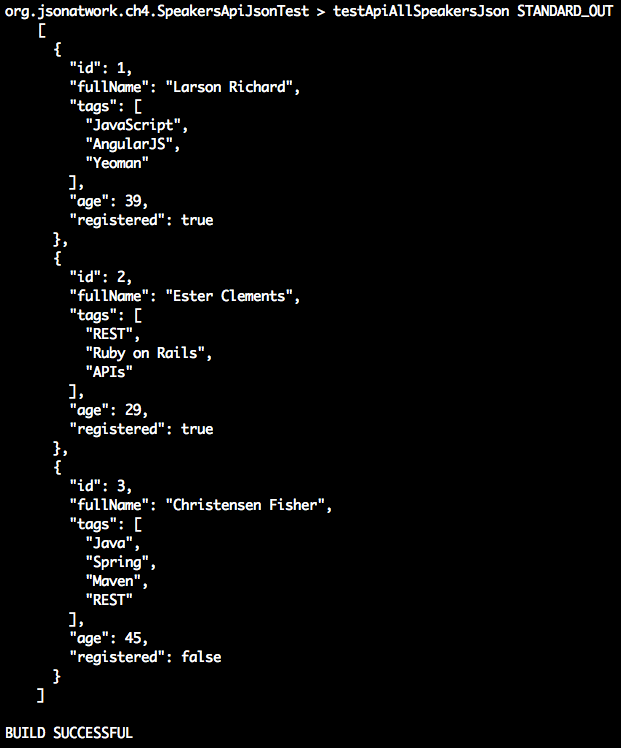
testApiSpeaker3Json():
Gets speaker 3 from the Speakers API by calling Unirest.get() with http://localhost:5000/speakers/3
Verifies that the HTTP Response Code is OK (200)
Gets the JSON document (which contains a single speaker Object) from the HTTP Response Body.
Makes a series of assertions on the JSON document with JSONUnit’s assertThatJson() to verify that
We have a single speaker Object.
Each field in the speaker Object has the expected values.
When you run gradle test, you should see the following as part of the output:
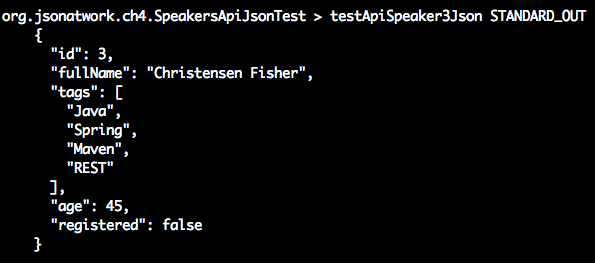
This Unit Test only touches upon the basics of the Unirest Java library, which also provides the following:
Full HTTP verb coverage (GET, POST, PUT, DELETE, PATCH)
The ability to do custom mappings from an HTTP Response Body to a Java Object
Asynchronous (i.e., nonblocking) requests
Timeouts
File uploads
And much more
Visit the Unirest website for further information on the Unirest Java library.
Before moving on, you can stop json-server by pressing Ctrl-C at the command line.
We’ve shown how to deploy and interact with a Stub API, and now it’s time to build a small RESTful API.
We’ll continue to use the Speaker data to create an API (chapter-4/speakers-api in the examples) with Spring Boot. The Spring Framework makes it easier to develop and deploy Java-based Web applications and RESTful APIs. Spring Boot makes it easier to create Spring-based applications by providing defaults. With Spring Boot:
There are no tedious, error-prone XML-based configuration files.
Tomcat and/or Jetty can be embedded, so there is no need to deploy a WAR (Web application ARchive) separately. You still could use Spring Boot and Gradle to build and deploy a WAR file to Tomcat. But as you’ll see, an executable JAR simplifies a developer’s environment because it reduces the amount of setup and installations, which enables iterative application development.
We’ll take the following steps to create and deploy the Speakers API with Spring Boot:
Write source code:
Model
Controller
Application
Create a build script (build.gradle).
Deploy an embedded JAR with gradlew.
Test with Postman.
The Speaker class in Example 4-4 is a Plain Old Java Object (POJO) that represents the Speaker
data that the API will render as JSON.
packageorg.jsonatwork.ch4;importjava.util.ArrayList;importjava.util.Arrays;importjava.util.List;publicclassSpeaker{privateintid;privateintage;privateStringfullName;privateList<String>tags=newArrayList<String>();privatebooleanregistered;publicSpeaker(){super();}publicSpeaker(intid,intage,StringfullName,List<String>tags,booleanregistered){super();this.id=id;this.age=age;this.fullName=fullName;this.tags=tags;this.registered=registered;}publicSpeaker(intid,intage,StringfullName,String[]tags,booleanregistered){this(id,age,fullName,Arrays.asList(tags),registered);}publicintgetId(){returnid;}publicvoidsetId(intid){this.id=id;}publicintgetAge(){returnage;}publicvoidsetAge(intage){this.age=age;}publicStringgetFullName(){returnfullName;}publicvoidsetFullName(StringfullName){this.fullName=fullName;}publicList<String>getTags(){returntags;}publicvoidsetTags(List<String>tags){this.tags=tags;}publicbooleanisRegistered(){returnregistered;}publicvoidsetRegistered(booleanregistered){this.registered=registered;}@OverridepublicStringtoString(){returnString.format("Speaker [id=%s, age=%s, fullName=%s, tags=%s, registered=%s]",id,age,fullName,tags,registered);}}
There’s nothing exciting in this code. It just provides the data members, constructors, and
accessor methods (getters and setters) for a speaker. This code doesn’t know anything about
JSON because (as you’ll soon see) Spring automatically converts this object to JSON.
In a Spring application, the Controller handles the HTTP Requests and returns HTTP Responses. In our
case, the speaker JSON data is returned in the response body. Example 4-5 shows the SpeakerController.
packageorg.jsonatwork.ch4;importjava.util.*;importorg.springframework.web.bind.annotation.*;importorg.springframework.http.*;@RestControllerpublicclassSpeakerController{privatestaticSpeakerspeakers[]={newSpeaker(1,39,"Larson Richard",newString[]{"JavaScript","AngularJS","Yeoman"},true),newSpeaker(2,29,"Ester Clements",newString[]{"REST","Ruby on Rails","APIs"},true),newSpeaker(3,45,"Christensen Fisher",newString[]{"Java","Spring","Maven","REST"},false)};@RequestMapping(value="/speakers",method=RequestMethod.GET)publicList<Speaker>getAllSpeakers(){returnArrays.asList(speakers);}@RequestMapping(value="/speakers/{id}",method=RequestMethod.GET)publicResponseEntity<?>getSpeakerById(@PathVariablelongid){inttempId=((newLong(id)).intValue()-1);if(tempId>=0&&tempId<speakers.length){returnnewResponseEntity<Speaker>(speakers[tempId],HttpStatus.OK);}else{returnnewResponseEntity(HttpStatus.NOT_FOUND);}}}
Note the following in this code:
The @RestController annotation identifies the SpeakerController class as a Spring MVC Controller that
processes HTTP Requests.
The speakers array is hardcoded, but it’s for test purposes only. In a real application, a separate Data Layer would populate the speakers from a database or an external API call.
The getAllSpeakers() method does the following:
Responds to HTTP GET requests on the /speakers URI.
Retrieves the entire speakers Array as an ArrayList and returns it as a JSON Array in an HTTP Response
Body.
The @RequestMapping annotation binds the /speakers URI to the getAllSpeakers() method for an HTTP
GET Request.
The getSpeakerById() method does the following:
Responds to HTTP GET requests on the /speakers/{id} URI (where id represents a speaker ID).
Retrieves a speaker (based on the speaker ID) and returns it as a JSON Object in an HTTP Response Body.
The @PathVariable annotation binds the speaker ID from the HTTP Request path to the id parameter
for lookup.
The ResponseEntity return value type enables you to set the HTTP Status Code and/or the speakers
in the HTTP Response.
In both of the preceding methods, the Speaker Object is automatically converted to JSON without any extra
work. By default, Spring is configured to use Jackson behind the scenes to do the Java-to-JSON conversion.
As mentioned earlier, we could package the Speakers API as a WAR file and deploy it on an application server such as Tomcat. But it’s easier to run our API as a standalone application from the command line. To do this we need to do the following:
Add a Java main() method
Package the application as an executable JAR
The Application class in Example 4-6 provides the main() method that we need.
packageorg.jsonatwork.ch4;importorg.springframework.boot.SpringApplication;importorg.springframework.boot.autoconfigure.SpringBootApplication;@SpringBootApplicationpublicclassApplication{publicstaticvoidmain(String[]args){SpringApplication.run(Application.class,args);}}
In this example, the @SpringBootApplication annotation registers our application with Spring and wires up
the SpeakerController and Speaker.
That’s all the code that we need. Now, let’s look at the build.gradle script to build the application.
Gradle uses a script called build.gradle to build an application. Example 4-7 shows the build script for the speakers-api project.
buildscript{repositories{mavenCentral()}dependencies{classpath("org.springframework.boot:spring-boot-gradle-plugin:1.5.2.RELEASE")}}applyplugin:'java'applyplugin:'org.springframework.boot'ext{jdkVersion="1.8"}sourceCompatibility=jdkVersiontargetCompatibility=jdkVersiontasks.withType(JavaCompile){options.encoding='UTF-8'}jar{baseName='speakers-api'version='0.0.1'}repositories{mavenCentral()}test{testLogging{showStandardStreams=true// Show standard output & standard error.}ignoreFailures=false}dependencies{compile([group:'org.springframework.boot',name:'spring-boot-starter-web'])}
Note the following in this build.gradle script:
The jar block defines the name of the application’s JAR file
repositories tells Gradle to pull application dependencies from the Maven Central Repository.
testLogging tells Gradle to show Standard Output and Standard Error when running tests.
dependencies defines the JARs that the speakers-api depends on.
This is a simple build, but Gradle has far more powerful build functionality. Visit the “Wiring Gradle Build Scripts” section of the Gradle User Guide to learn more.
We’ve covered the build script, and now it’s time to deploy the Speakers API.
The gradlew script was generated by the gradle init command that was used to create the speakers-api project.
To learn more about how to create a Gradle project, see “Creating New Gradle Builds”
from the Gradle User Guide.
gradlew pulls everything together and simplifies deployment by taking the following steps:
Invokes the build.gradle script to build the application and uses the Spring Boot plug-in to build the executable JAR
Deploys the Speakers API (as an executable JAR) to http://localhost:8080/speakers on an embedded (bundled) Tomcat server
In the speakers-api directory, run ./gradlew bootRun to deploy the application, and you’ll see the following (at the
end of all the log messages):
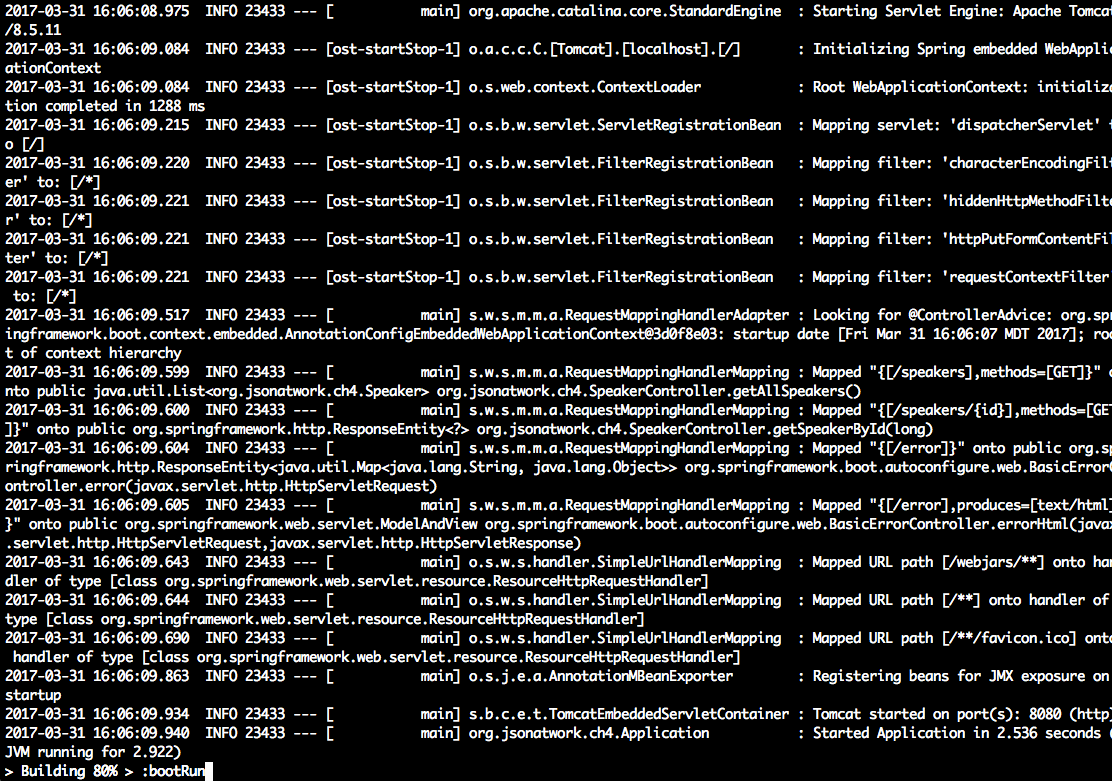
Now that the Speakers API is up and running, let’s test with Postman (as we did in Chapter 1) to get the
first speaker. In the Postman GUI, do the following:
Enter the http://localhost:8080/speakers/1 URL.
Choose GET as the HTTP verb.
Click the Send button.
You should see that the GET ran properly in Postman with the speaker JSON data in the HTTP Response Body
text area and a 200 (OK) HTTP Status, as shown in Figure 4-1.
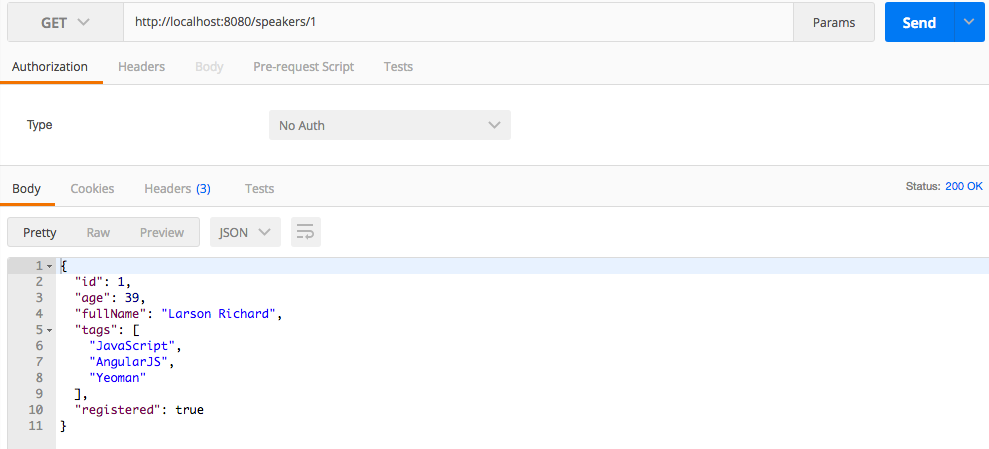
You can stop gradlew by pressing Ctrl-C at the command line.
As promised, development and deployment is simpler because we didn’t do any of the following:
Create or modify XML-based configuration metadata for Spring or Java EE (i.e., web.xml)
Deploy a WAR file
Install Tomcat
Note that we took these deployment steps to show how to set up a simple development environment for a Web API. You still need to deploy a WAR file to an application server when you move into shared (e.g., Staging, User Acceptance Testing, Production) environments so that you have the ability to tune and load-test the application.
With the basics of JSON usage on several core platforms (JavaScript, Ruby on Rails, and Java) behind us, we’ll move deeper into the JSON ecosystem in the next three chapters:
JSON Schema
JSON Search
JSON Transform
In Chapter 5, we’ll show how to structure and validate JSON documents with JSON Schema.
We’ve covered the basics of JSON using our core platforms (JavaScript, Ruby on Rails, and Java), and now it’s time to wade in deeper. In this chapter, we’ll show how to leverage JSON Schema to define the structure and format of JSON documents exchanged between applications:
JSON Schema overview
Core JSON Schema—basics and tooling
How to design and test an API with JSON Schema
In our examples, we’ll design an API with JSON Schema after we progressively walk through the concepts of JSON Schema. As noted in the preface, from now on we will write all our examples in Node.js to keep the size of the chapters to a minimum. But know that the other platforms work well with JSON Schema. If you haven’t installed Node.js already, now would be a great time. Follow the instructions in Appendix A.
Many architects and developers are unfamiliar with JSON Schemas. Before going into details, it’s important to know what a JSON Schema is, how it helps, and why/when to use it. Along the way, we’ll look at the JSON Schema Specification and show a simple example.
The difference is in the type of validation. When you validate a JSON document without a Schema, you’re validating only the syntax of the document. This type of validation guarantees only that the document is well-formed (i.e., matching braces, double quotes for keys, and so forth). This type of validation is known as syntactic validation, and we’ve done this before with tools such as JSONLint, and the JSON parsers for each platform.
Syntactic validation is a good start, but at times you need to validate at a deeper level by using semantic validation. What if you have the following situations:
You (as an API Consumer) need to ensure that a JSON response from an API contains a valid Speaker, or
a list of Orders?
You (as an API Producer) need to check incoming JSON to make sure that the Consumer can send you only the fields you’re expecting?
You need to check the format of a phone number, a date/time, a postal code, an email address, or a credit card number?
This is where JSON Schema shines, and this type of validation is known as semantic validation. In this case, you’re validating the meaning of the data, not just the syntax. JSON Schema is also great for API Design because it helps define the interface, and we’ll cover that later in this chapter.
Before talking too much more about JSON Schema, let’s look at Example 5-1 to get a feel for the syntax.
{"$schema":"http://json-schema.org/draft-04/schema#","type":"object","properties":{"email":{"type":"string"},"firstName":{"type":"string"},"lastName":{"type":"string"}}}
This Schema specifies that a document can have three fields (email, firstName, and lastName), where
each one is a string. We’ll gloss over Schema syntax for now, but don’t worry—we’ll cover it soon.
Example 5-2 shows a sample JSON instance document that corresponds to the preceding Schema.
{"email":"larsonrichard@ecratic.com","firstName":"Larson","lastName":"Richard"}
The json-schema.org site, shown in Figure 5-1, is the starting place to go for all things related to JSON Schema, including copious documentation and examples.
From here, you can find example Schemas, great validation libraries for most major platforms, along with the JSON Schema Standard GitHub repository (where the standard is maintained). The GitHub repository is shown in Figure 5-2.
Here you can track updates, issues, and progress with the JSON Schema standard (more on that later in “The Current State of the JSON Schema Standard”).
JSON Schema provides the ability to validate the content and semantics of a document, and here are some real-world use cases:
The Open Web Application Project (OWASP) Web Service Security Cheat Sheet recommends that Web Services should validate their payloads by using a Schema. Granted, they still talk about XML Schema, but their concern is still applicable to JSON. OWASP calls for validation of field lengths (min/max) and fixed format fields (e.g., phone number or postal code) to help secure a service.
JSON isn’t just for APIs anymore. Many enterprises use JSON as the preferred format to send payloads over messaging systems such as Apache Kafka (we’ll cover this in more detail in Chapter 10). The message Producer and Consumer are completely decoupled in this style of architecture, and JSON Schema can help ensure that the reader receives messages in a format that it’s expecting.
JSON is a first-class citizen in API Design. JSON Schema helps define an API’s contract by specifying the format, content, and structure of a document.
With the structure and rigor of JSON Schema, this may seem counterintuitive. We’ll show a streamlined prototyping workflow with JSON Schema and related tooling when we design an API later in this chapter.
As mentioned in the Preface, as of 2009 I wasn’t sure that JSON was ready for the enterprise. I loved its speed and simplicity, but I didn’t see a way to guarantee the structure and content of JSON documents between applications. But when I learned about JSON Schema in 2010, I changed my position and came to accept JSON as a viable enterprise-class data format.
The JSON Schema Specification is at implementation draft 4 (v0.4), and the next implementation draft 6 (v0.6) is on the way. Draft 5 (v0.5) was published late last year as a working draft to capture work in progress and was not an implementation draft. But don’t let the 0.x version number concern you. As you’ll see in our examples, JSON Schema is robust, provides solid validation capabilities today, and there is a wide variety of working JSON Schema libraries for every major programming platform. You can find more details in the JSON Schema draft 4 spec.
JSON Schema fills the same role with JSON as XML Schema did with XML documents, but with the following differences:
A JSON document does not reference a JSON Schema. It’s up to an application to validate a JSON document against a Schema.
JSON Schemas have no namespace.
JSON Schema files have a .json extension.
Now that you have an overview of JSON Schema, it’s time to go deeper. JSON Schema is powerful, but it can be tedious, and we’ll show some tools to make it easier. We’ll then cover basic data types and core keywords that provide a foundation for working with JSON Schema on real-world projects.
JSON Schema syntax can be a bit daunting, but developers don’t have to code everything by hand. Several excellent tools can make life much easier.
We’ve already covered JSON Editor Online in Chapter 1, but it’s worth another brief mention. Start modeling a JSON document with this tool to get a feel for the data. Use this tool to generate the JSON document and avoid all the typing. When you’re finished, save the JSON document to the clipboard.
Once you have your core concept, the JSONSchema.net application generates a JSON Schema based on the JSON document that was created earlier with JSON Editor Online (see Figure 5-3). The JSONSchema.net application alone will save you 80 percent of the typing required to create a Schema. I always start my Schema work with this application and then make incremental upgrades.
Here are the steps to generate the initial Schema with JSONSchema.net:
Paste in a JSON document on the left side.
Start with the default settings, and make the following changes:
Turn off “Use absolute IDs.”
Turn off “Allow additional properties.”
Turn off “Allow additional items.”
Click the Generate Schema button.
Copy the generated Schema to your clipboard.
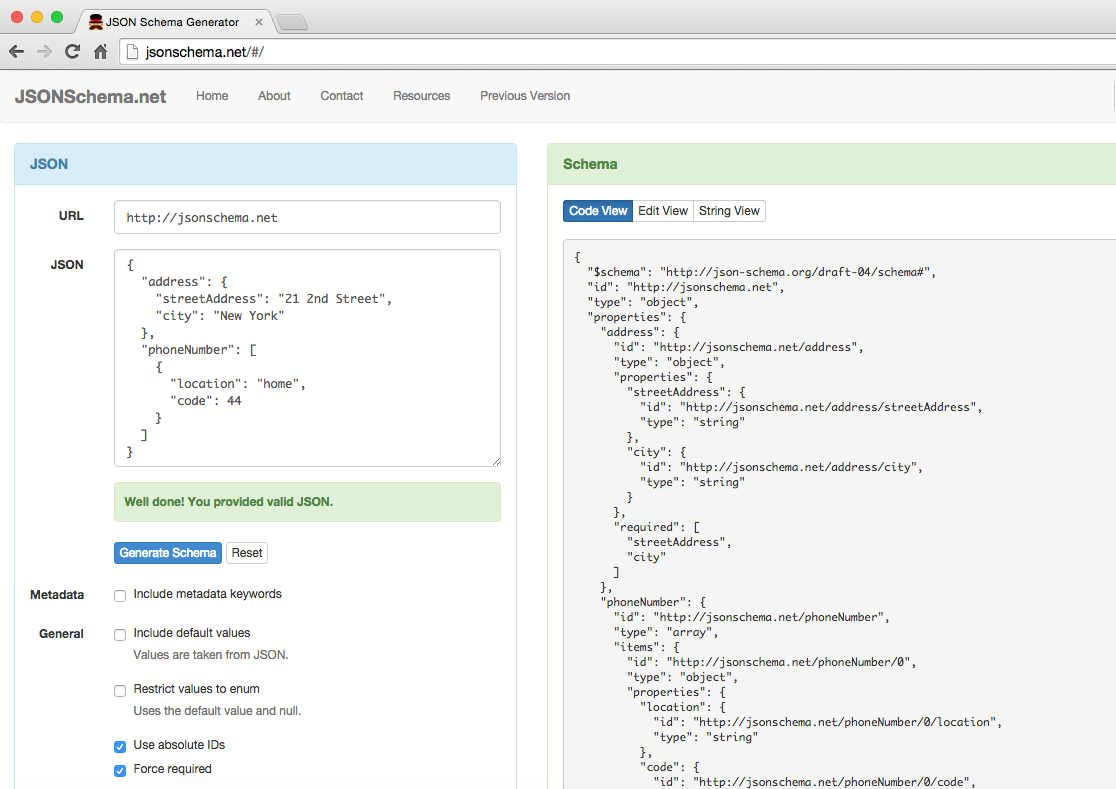
After you’ve created a JSON Schema, the JSON Validate application validates a JSON document against that Schema, as shown in Figure 5-4.
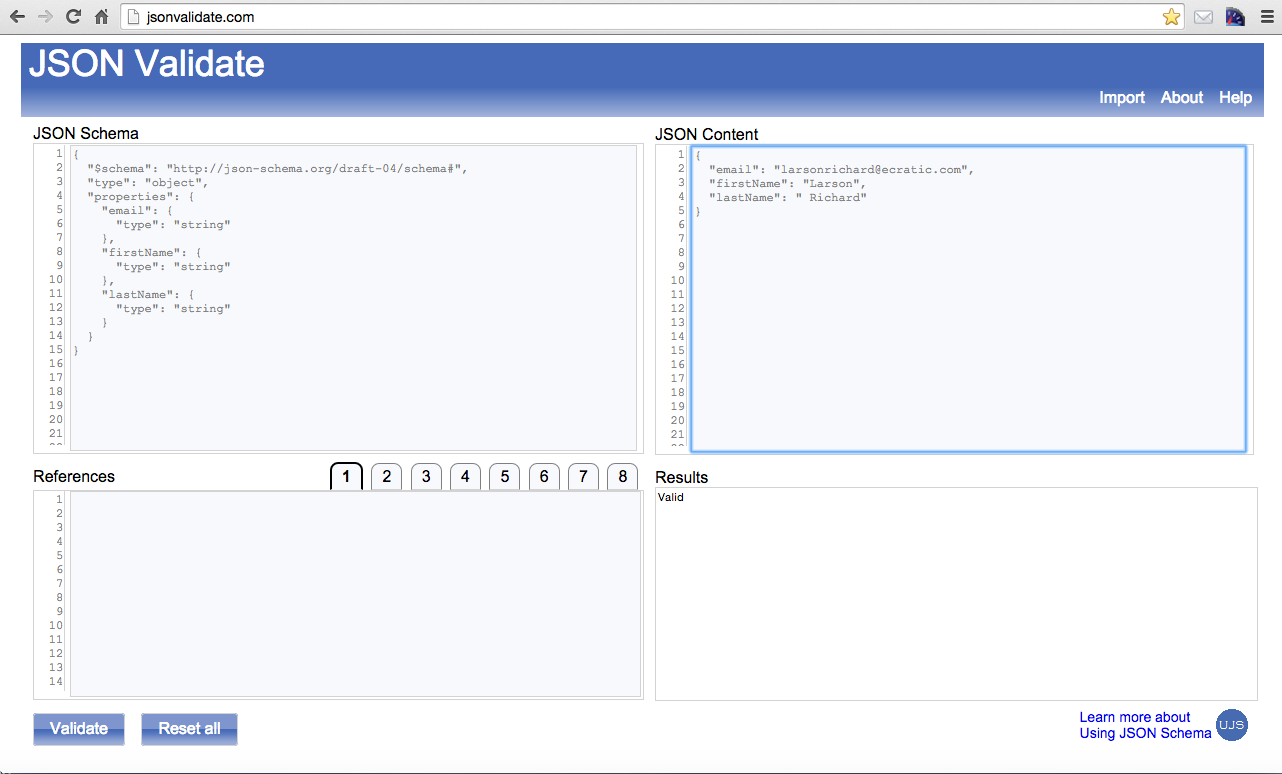
To validate the JSON document against the Schema, do the following:
Paste the JSON document and Schema into the JSON Validate application.
Remove all id fields from the Schema because they’re not needed.
Click the Validate button to validate the document.
But sometimes you don’t have good internet connectivity, so it’s great to have tools that run
locally. Plus, if you have sensitive data, it’s safer to run examples on your machine from the command-line interface (CLI). The validate module is the Node.js equivalent of the jsonvalidate.com site. To install and
run it, follow the instructions in Appendix A (see “Install npm Modules”).
Both jsonvalidate.com and validate are part of the Using JSON Schema site (a great Schema resource),
which can be found on GitHub.
You’ve already seen the JSONLint site in Chapter 1, but you can also use JSONLint from the command line by
using the jsonlint Node.js module. To install and run it, follow the instructions in Appendix A (see “Install npm Modules”).
I’ve used jsonlint only for syntactic validation, but if you run jsonlint --help from the command line,
you’ll notice that it can also do semantic validation with a Schema. For more information, see
the jsonlint documentation on GitHub.
We’ll leverage validate from the command line to work through the examples.
Here are the core keywords in any JSON Schema:
$schema Specifies the JSON Schema (spec) version. For example,
“$schema": "http://json-schema.org/draft-04/schema#" specifies that the schema conforms to version 0.4,
while http://json-schema.org/schema# tells a JSON Validator to use the current/latest version of the
specification (which is 0.4 as of this writing). Using the latter of these two options is risky because
some JSON Validators default to a previous version, so an earlier version (and not the current/latest)
version will be used. To play it safe, always specify the version so that you (and the JSON Validator)
are sure about the version you’re using.
type Specifies the data type for a field. For example: "type": "string".
properties Specifies the fields for an object. It contains type information.
The document in Example 5-3 contains the basic JSON types (for example, string, number, boolean) that you’ve
seen before.
{"email":"larsonrichard@ecratic.com","firstName":"Larson","lastName":"Richard","age":39,"postedSlides":true,"rating":4.1}
JSON Schema uses the same basic data types as the Core JSON data types from Chapter 1 (string,
number, array, object, boolean, null), but adds an integer type that specifies whole numbers.
The number type still allows both whole and floating-point numbers.
The JSON Schema in Example 5-4 describes the structure of the preceding document.
{"$schema":"http://json-schema.org/draft-04/schema#","type":"object","properties":{"email":{"type":"string"},"firstName":{"type":"string"},"lastName":{"type":"string"},"age":{"type":"integer"},"postedSlides":{"type":"boolean"},"rating":{"type":"number"}}}
In this example, note the following:
The $schema field indicates that JSON Schema v0.4 rules will be used for validating the document.
The first type field mentioned indicates that there is an Object at the root level of the JSON
document that contains all the fields in the document.
email, firstName, lastName are of type string
age is an integer. Although JSON itself has only a number type, JSON Schema provides the
finer-grained integer type.
postedSlides is a boolean.
rating is a number, which allows for floating-point values.
Run the preceding example using validate, and you’ll see that the document is valid for this Schema.

Although the preceding Schema is a decent start, it doesn’t go far enough. Let’s try the following changes to the JSON document that we want to validate:
Add an extra field (e.g., company).
Remove one of the expected fields (e.g., postedSlides).
Example 5-5 shows our modified JSON document.
{"email":"larsonrichard@ecratic.com","firstName":"Larson","lastName":"Richard","age":39,"rating":4.1,"company":"None"}
Right now there’s nothing to prevent you from invalidating the document, as you’ll see in the following run:

At this point, you might be thinking that JSON Schema isn’t useful because it’s not validating as expected. But we can make the validation process function as expected by adding simple constraints. First, to prevent extra fields, use the code in Example 5-6.
{"$schema":"http://json-schema.org/draft-04/schema#","type":"object","properties":{"email":{"type":"string"},"firstName":{"type":"string"},"lastName":{"type":"string"},"postedSlides":{"type":"boolean"},"rating":{"type":"number"}},"additionalProperties":false}
In this example, setting additionalProperties to false disallows any extra fields in the document root Object. Copy the previous JSON document (ex-2-basic-types-invalid.json) to a new version
(ex-3-basic-types-no-addl-props-invalid.json) and try validating against the preceding Schema. You should now
see the following:

This is getting better, but it still isn’t what we want because there’s no guarantee that all the expected fields will be in the document. To reach a core level of semantic validation, we need to ensure that all required fields are present, as shown in Example 5-7.
{"$schema":"http://json-schema.org/draft-04/schema#","type":"object","properties":{"email":{"type":"string"},"firstName":{"type":"string"},"lastName":{"type":"string"},"postedSlides":{"type":"boolean"},"rating":{"type":"number"}},"additionalProperties":false,"required":["email","firstName","lastName","postedSlides","rating"]}
In this example, the required Array specifies the fields that are required, so these fields must
be present for a document to be considered valid. Note that a field is considered optional if not
mentioned in the required Array.
Example 5-8 shows the modified JSON document (without the required rating field, plus an unexpected age field) to validate.
{"email":"larsonrichard@ecratic.com","firstName":"Larson","lastName":"Richard","postedSlides":true,"age":39}
When running this example from the command line, the document is now considered invalid:

We finally have what we want:
No extra fields are allowed.
All fields are required.
Now that we have basic semantic validation in place, let’s move on to validating number fields in JSON documents.
As you’ll recall, a JSON Schema number type can be a floating-point or whole number. The Schema in Example 5-9
validates the average rating for a speaker’s conference presentation, where the range varies from 1.0
(poor) to 5.0 (excellent).
{"$schema":"http://json-schema.org/draft-04/schema#","type":"object","properties":{"rating":{"type":"number","minimum":1.0,"maximum":5.0}},"additionalProperties":false,"required":["rating"]}
Example 5-10 is a valid JSON document because the rating is within the 1.0–5.0 range.
{"rating":4.99}
Example 5-11 is an invalid document, where the rating is greater than 5.0.
{"rating":6.2}
Run this from the command line, and you’ll see that the preceding document is invalid:

JSON Schema provides the ability to validate Arrays. Arrays can hold any of the JSON Schema basic types
(string, number, array, object, boolean, null). The Schema in Example 5-12 validates the
tags field, which is an Array of type string.
{"$schema":"http://json-schema.org/draft-04/schema#","type":"object","properties":{"tags":{"type":"array","items":{"type":"string"}}},"additionalProperties":false,"required":["tags"]}
Example 5-13 is a valid JSON document for the preceding Schema.
{"tags":["fred"]}
The document in Example 5-14 is not valid because we’ve added an integer to the tags Array.
{"tags":["fred",1]}
Run the preceding example to verify that the document is invalid:

JSON Schema provides the ability to specify the minimum (minItems) and maximum (maxItems) number of items
in an Array. The Schema in Example 5-15 allows for two to four items in the tags Array.
{"$schema":"http://json-schema.org/draft-04/schema#","type":"object","properties":{"tags":{"type":"array","minItems":2,"maxItems":4,"items":{"type":"string"}}},"additionalProperties":false,"required":["tags"]}
The JSON document conforms in Example 5-16 to the preceding Schema.
{"tags":["fred","a"]}
The document in Example 5-17 is invalid because the tags Array has five items.
{"tags":["fred","a","x","betty","alpha"]}
Run the preceding example to verify:

The enum keyword constrains a field’s value to a fixed set of unique values, specified in an Array.
The Schema in Example 5-18 limits the set of allowable values in the tags Array to one of "Open Source",
"Java", "JavaScript", "JSON", or "REST".
{"$schema":"http://json-schema.org/draft-04/schema#","type":"object","properties":{"tags":{"type":"array","minItems":2,"maxItems":4,"items":{"enum":["Open Source","Java","JavaScript","JSON","REST"]}}},"additionalProperties":false,"required":["tags"]}
The document in Example 5-19 is valid based on the preceding Schema.
{"tags":["Java","REST"]}
This document in Example 5-20 is not valid because the value "JS" is not one of the values in the Schema’s enum.
{"tags":["Java","REST","JS"]}
Run this example to show that the document is invalid:

JSON Schema enables you to specify an object. This is the heart of semantic validation because it
enables you to validate Objects exchanged between applications. With this capability, both an API’s
Consumer and Producer can agree on the structure and content of important business concepts such as a
person or order. The Schema in Example 5-21 specifies the content of a speaker Object.
{"$schema":"http://json-schema.org/draft-04/schema#","type":"object","properties":{"speaker":{"type":"object","properties":{"firstName":{"type":"string"},"lastName":{"type":"string"},"email":{"type":"string"},"postedSlides":{"type":"boolean"},"rating":{"type":"number"},"tags":{"type":"array","items":{"type":"string"}}},"additionalProperties":false,"required":["firstName","lastName","email","postedSlides","rating","tags"]}},"additionalProperties":false,"required":["speaker"]}
This Schema is similar to previous examples, with the addition of a top-level speaker object nested
inside the root object.
The JSON document in Example 5-22 is valid against the preceding Schema.
{"speaker":{"firstName":"Larson","lastName":"Richard","email":"larsonrichard@ecratic.com","postedSlides":true,"rating":4.1,"tags":["JavaScript","AngularJS","Yeoman"]}}
The document in Example 5-23 is invalid because the speaker Object is missing the required rating field.
{"speaker":{"firstName":"Larson","lastName":"Richard","email":"larsonrichard@ecratic.com","postedSlides":true,"tags":["JavaScript","AngularJS","Yeoman"]}}
Run the example on the command line to ensure that the preceding document is invalid:

We’ve now covered the most important basic types, and we’ll move on to more-complex schemas.
JSON Schema provides the ability to specify repeating fields (with similar names) through pattern
properties (with the patternProperties keyword) based on Regular Expressions. Example 5-24
defines the fields in an address.
{"$schema":"http://json-schema.org/draft-04/schema#","type":"object","properties":{"city":{"type":"string"},"state":{"type":"string"},"zip":{"type":"string"},"country":{"type":"string"}},"patternProperties":{"^line[1-3]$":{"type":"string"}},"additionalProperties":false,"required":["city","state","zip","country","line1"]}
In this example, the ^line[1-3]$ Regular Expression allows for the following address fields in a
corresponding JSON document: line1, line2, and line3. Here’s how to interpret this Regular
Expression:
^ represents the beginning of the string.
line translates to the literal string "line".
[1-3] allows for a single integer between 1 and 3.
$ indicates the end of the string.
Note that only line1 is required, and the others are optional.
The document in Example 5-25 will validate against the preceding Schema.
{"line1":"555 Main Street","line2":"#2","city":"Denver","state":"CO","zip":"80231","country":"USA"}
Example 5-26 is invalid because it has a line4 field, which is out of range.
{"line1":"555 Main Street","line4":"#2","city":"Denver","state":"CO","zip":"80231","country":"USA"}
Run this example to see that the preceding document is invalid:

JSON Schema also uses Regular Expressions to constrain field values.
The Schema in Example 5-27 limits the value of the email field to a standard email address format as specified in IETF RFC 2822.
{"$schema":"http://json-schema.org/draft-04/schema#","type":"object","properties":{"email":{"type":"string","pattern":"^[\\w|-|.]+@[\\w]+\\.[A-Za-z]{2,4}$"},"firstName":{"type":"string"},"lastName":{"type":"string"}},"additionalProperties":false,"required":["email","firstName","lastName"]}
In this example, the Regular Expression specifies a valid email address. Here’s how to interpret this Regular Expression:
^ represents the beginning of the string.
[\\w|-|.]+ matches one-to-many instances of the following pattern:
[\\w|-|.] matches a word character (a-zA-Z0-9_), a dash (-), or a dot(.).
@ indicates the literal “@”.
[\\w]+ matches one-to-many instances of the following pattern:
[\\w] matches a word character (a-zA-Z0-9_).
\\. indicates the literal “.”
[A-Za-z]{2,4} matches two to four occurrences of the following pattern:
[A-Za-z] matches an alphabetic character.
$ indicates the end of the string.
The double backslash (\\) is used by JSON Schema to denote special characters within regular expressions
because the single backslash (\) normally used in standard Regular Expressions won’t work in this
context. This is due to that fact the a single backslash is already used in core JSON document syntax to
escape special characters (e.g., \b for a backspace).
The following document in Example 5-28 is valid because the email address follows the pattern specified in the Schema.
{"email":"larsonrichard@ecratic.com","firstName":"Larson","lastName":"Richard"}
The document in Example 5-29 is invalid because the email address field is missing the trailing .com.
{"email":"larsonrichard@ecratic","firstName":"Larson","lastName":"Richard"}
Run the preceding example to prove that it’s invalid:

Regular Expressions can be daunting and complex at times. Although a full tutorial on Regular Expressions is far beyond the scope of this book, here are some resources to help you master Regular Expressions:
Dependent Properties introduce dependencies between fields in a Schema: one field depends on the
presence of the other. The dependencies keyword is an object that specifies the dependent relationship(s),
where field x maps to an array of fields that must be present if y is populated. In Example 5-30
tags must be present if favoriteTopics is provided in the corresponding JSON document (that is,
favoriteTopic depends on tags).
{"$schema":"http://json-schema.org/draft-04/schema#","type":"object","properties":{"email":{"type":"string","pattern":"^[\\w|-|.]+@[\\w]+\\.[A-Za-z]{2,4}$"},"firstName":{"type":"string"},"lastName":{"type":"string"},"tags":{"type":"array","items":{"type":"string"}},"favoriteTopic":{"type":"string"}},"additionalProperties":false,"required":["email","firstName","lastName"],"dependencies":{"favoriteTopic":["tags"]}}
The JSON document in Example 5-31 is valid because the favoriteTopic is present, and the tags Array is
populated.
{"email":"larsonrichard@ecratic.com","firstName":"Larson","lastName":"Richard","tags":["JavaScript","AngularJS","Yeoman"],"favoriteTopic":"JavaScript"}
The JSON document in Example 5-32 is invalid because the favoriteTopic is present, but the tags Array is
missing.
{"email":"larsonrichard@ecratic.com","firstName":"Larson","lastName":"Richard","favoriteTopic":"JavaScript"}
Run the preceding example, and you’ll see that the document is invalid:

References provide the ability to reuse definitions/validation rules. Think of references as DRY (Do Not Repeat Yourself) for Schema. References can be either Internal (inside the same Schema) or External (in a separate/external Schema). We’ll start with Internal References.
In Example 5-33, you’ll notice that the Regular Expression for the email field has been replaced by a
$ref, a Uniform Resource Identifier (URI) to the actual definition/validation rule for the email field:
# indicates that the definition exists locally within the Schema.
/definitions/ is the path to the definitions object in this Schema. Note that the definitions
keyword indicates the use of a reference.
emailPattern is the path to the emailPattern specification within the definitions object.
JSON Schema leverages JSON Pointer (covered in Chapter 7) to specify URIs (e.g., #/definitions/emailPattern).
{"$schema":"http://json-schema.org/draft-04/schema#","type":"object","properties":{"email":{"$ref":"#/definitions/emailPattern"},"firstName":{"type":"string"},"lastName":{"type":"string"}},"additionalProperties":false,"required":["email","firstName","lastName"],"definitions":{"emailPattern":{"type":"string","pattern":"^[\\w|-|.]+@[\\w]+\\.[A-Za-z]{2,4}$"}}}
Other than the new definitions object, there’s nothing really that new here. We’ve just moved the
definition for email addresses to a common location that can be used throughout the Schema by multiple
fields.
Example 5-34 shows a JSON document that conforms to the preceding Schema.
{"email":"larsonrichard@ecratic.com","firstName":"Larson","lastName":"Richard"}
Example 5-35 is invalid because email is missing the trailing .com.
{"email":"larsonrichard@ecratic","firstName":"Larson","lastName":"Richard"}
Validate this document from the command line, and you’ll see that it’s invalid:

External References provide a way to specify validation rules in an external Schema file. In this case, Schema A references Schema B for a particular set of validation rules. External References enable a development team (or several teams) to reuse common Schemas and definitions across the enterprise.
Example 5-36 shows our speaker Schema that now references an external (second) Schema.
{"$schema":"http://json-schema.org/draft-04/schema#","type":"object","properties":{"email":{"$ref":"http://localhost:8081/ex-14-my-common-schema.json#/definitions/emailPattern"},"firstName":{"type":"string"},"lastName":{"type":"string"}},"additionalProperties":false,"required":["email","firstName","lastName"]}
Notice the two key differences:
The definitions Object has been factored out of this schema. Don’t worry; it comes back really soon.
The email field’s $ref now points to an external Schema (ex-14-my-common-schema.json) to
find the definition/validation rule for this field. We’ll cover the HTTP address to the external Schema
later in this chapter.
Example 5-37 shows the External Schema.
{"$schema":"http://json-schema.org/draft-04/schema#","id":"http://localhost:8081/ex-14-my-common-schema.json","definitions":{"emailPattern":{"type":"string","pattern":"^[\\w|-|.]+@[\\w]+\\.[A-Za-z]{2,4}$"}}}
The definitions object that contains the emailPattern validation rule now resides in the external Schema. But at this point, you may be asking the follow questions:
How does the reference actually work?
How does a JSON Schema Validator locate the external Schema?
In ex-14-exernal-ref-schema.json, the URI prefix (http://localhost:8081/ex-14-my-common-schema.json)
before the # in the $ref tells the JSON Schema processor to look for the emailPattern definition in
an external Schema.
In ex-14-my-common-schema.json (the external Schema), the id field (a JSON Schema keyword) at the
root of the Schema makes the content of the Schema available to external access.
The URI in $ref and id should be an exact match to make the reference work properly.
The definitions object works the same as it did for internal references.
Example 5-38 shows a JSON document that conforms to the Schema. Notice that this document has neither changed nor is it aware of the external Schema.
{"email":"larsonrichard@ecratic.com","firstName":"Larson","lastName":"Richard"}
Example 5-39 shows a document that won’t validate against the Schema because the email is missing the trailing .com.
{"email":"larsonrichard@ecratic","firstName":"Larson","lastName":"Richard"}
There are two ways to validate the preceding document against the Schema:
The filesystem
The web
Let’s start by validating on the filesystem by using the validate tool that we’ve been using all along:

The JSON document (ex-14-external-ref-invalid.json) is invalid as in previous runs, but notice the inclusion of both the main (ex-14-external-ref-schema.json) and external (ex-14-my-common-schema.json) Schemas on the command line.
Now let’s use the web to validate against the external Schema. In this case, we’ll deploy this file as
static content on a web server so that the URI in the $ref and id (http://localhost:8081/ex-14-my-common-schema.json#/definitions/emailPattern)
will work properly. If you haven’t done so before, now would be a great time to install the http-server Node.js module.
To install and run it, follow the instructions in Appendix A (see “Install npm Modules”).
Run http-server (on port 8081) in the same directory where the external Schema resides, and your command
line should look like this:

When you visit http://localhost:8081/ex-14-my-common-schema.json in your browser, you should see the screen in Figure 5-5.
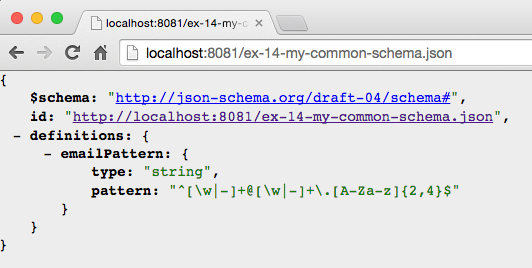
Now that the external Schema is web addressable, we can do the validation, and you’ll see that the document is invalid:
In addition to the requires and dependencies keywords, JSON Schema provides finer-grained mechanisms to
tell the Schema processor which validation rules to use. These additional keywords are as follows:
oneOf One, and only one, rule must match successfully.
anyOf One or more rules must match successfully.
allOf All rules must match successfully.
The oneOf keyword enforces an exclusive choice between validation rules. In the Schema in Example 5-40, the
value of the rating field can either be less than 2.0 or less than 5.0, but not both.
{"$schema":"http://json-schema.org/draft-04/schema#","type":"object","properties":{"email":{"type":"string","pattern":"^[\\w|-|.]+@[\\w]+\\.[A-Za-z]{2,4}$"},"firstName":{"type":"string"},"type":"string"},"postedSlides":{"type":"boolean"},"rating":{"type":"number","oneOf":[{"maximum":2.0},{"maximum":5.0}]}},"additionalProperties":false,"required":["email","firstName","lastName","postedSlides","rating"]}
Example 5-41 is valid because the value of the rating field is 4.1, which matches only one of
the validation rules (< 5.0), but not both.
{"email":"larsonrichard@ecratic.com","firstName":"Larson","lastName":"Richard","postedSlides":true,"rating":4.1}
The JSON document in Example 5-42 is invalid because the value of the rating field is 1.9, which matches both validation rules (< 2.0 and < 5.0).
{"email":"larsonrichard@ecratic.com","firstName":"Larson","lastName":"Richard","postedSlides":true,"rating":1.9}
Validate the preceding document from the command line, and you’ll see that it’s invalid:

The anyOf keyword allows for a match against any (one or more) of the validation rules. In Example 5-43, we’ve expanded the potential values of postedSlides to allow for [Y|y]es and
[N|n]o in addition to a boolean.
{"$schema":"http://json-schema.org/draft-04/schema#","type":"object","properties":{"email":{"type":"string","pattern":"^[\\w|-|.]+@[\\w]+\\.[A-Za-z]{2,4}$"},"firstName":{"type":"string"},"lastName":{"type":"string"},"postedSlides":{"anyOf":[{"type":"boolean"},{"type":"string","enum":["yes","Yes","no","No"]}]},"rating":{"type":"number"}},"additionalProperties":false,"required":["email","firstName","lastName","postedSlides","rating"]}
Example 5-44 is valid because the value of postedSlides is "yes".
{"email":"larsonrichard@ecratic.com","firstName":"Larson","lastName":"Richard","postedSlides":"yes","rating":4.1}
Example 5-45 is invalid because the value of the postedSlides field is "maybe", which is not
in the set of allowed values.
{"email":"larsonrichard@ecratic.com","firstName":"Larson","lastName":"Richard","postedSlides":"maybe","rating":4.1}
Validate this document from the command line, and you’ll see that it’s invalid:

With the allOf keyword, the data must match all of the validation rules. In the Schema in Example 5-46, the
lastName must be a string with a length < 20.
{"$schema":"http://json-schema.org/draft-04/schema#","type":"object","properties":{"email":{"type":"string","pattern":"^[\\w|-|.]+@[\\w]+\\.[A-Za-z]{2,4}$"},"firstName":{"type":"string"},"lastName":{"allOf":[{"type":"string"},{"maxLength":20}]},"postedSlides":{"type":"boolean"},"rating":{"type":"number","maximum":5.0}},"additionalProperties":false,"required":["email","firstName","lastName","postedSlides","rating"]}
Example 5-47 is valid because the length of the lastName is ≤ 20.
{"email":"larsonrichard@ecratic.com","firstName":"Larson","lastName":"Richard","postedSlides":true,"rating":4.1}
Example 5-48 is invalid because the length of the lastName exceeds 20 characters.
{"email":"larsonrichard@ecratic.com","firstName":"Larson","lastName":"ThisLastNameIsWayTooLong","postedSlides":true,"rating":4.1}
Validate the preceding document, and you’ll see that it’s invalid:

We’ve covered the basics of JSON Schema and syntax, and now it’s time to design an API with JSON Schema.
JSON Schema is all about the semantics (the meaning) and structure of the data exchanged by applications and APIs. In the context of API Design, think of a JSON Schema as part of the contract (interface). In this last portion of the chapter, we’ll go from concept to a running Stub API that other applications and APIs can start testing and using.
We’ll use the same speaker model that we’ve been using all along, and iteratively add constraints and
capabilities. Here are the steps we need in order to go from a concept to a running Stub API:
Model a JSON document.
Generate a JSON Schema.
Generate sample data.
Deploy a Stub API with json-server.
Before creating a Schema, we need to know the data that we’re exchanging. Besides the fields and their formats, it’s important to get a good look-and-feel for the data itself. To do this, we need to overcome one of the major issues with JSON itself: creating documents by hand is tedious and error-prone. Use a modeling tool rather than doing a lot of typing. There are several good tools to support this, and my favorite is JSON Editor Online. Refer to “Model JSON Data with JSON Editor Online” in Chapter 1 for further details on the features of JSON Editor Online.
Figure 5-6 shows our speaker model.
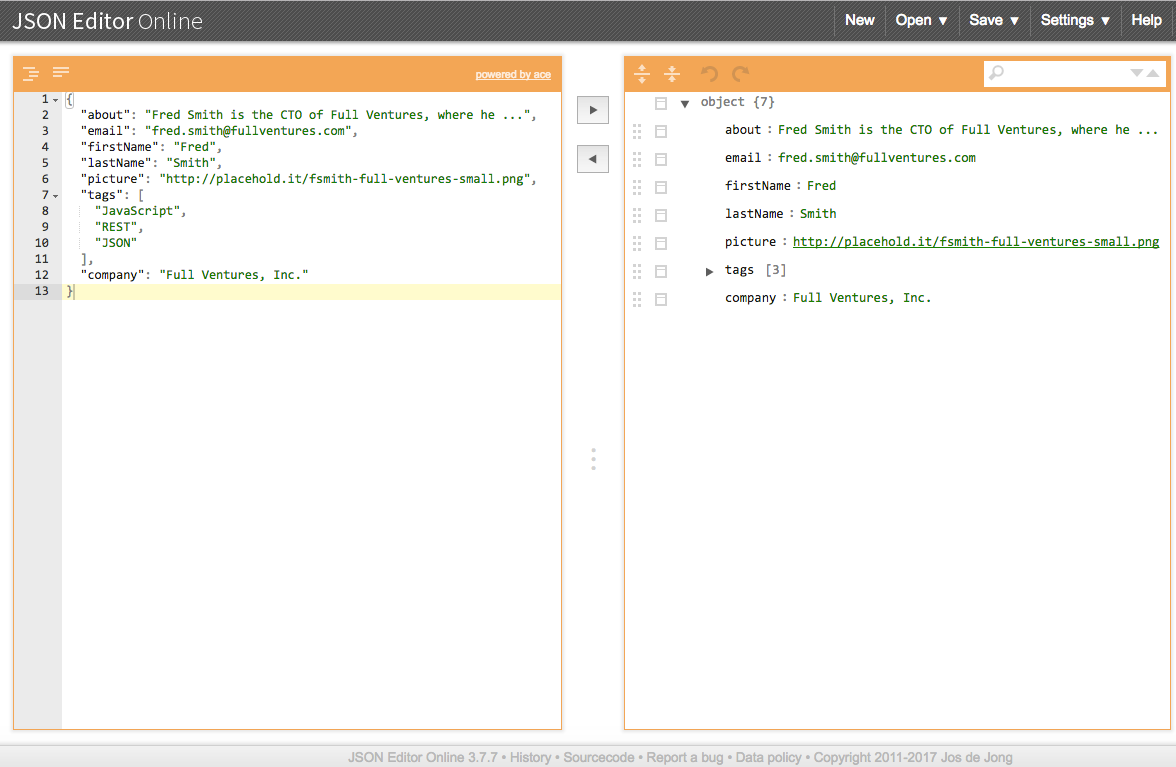
Rather than typing the JSON document, use JSON Editor Online to model the data, and generate a JSON document. In the JSON model on the righthand portion of the screen, click the icon next to an element (i.e., Object, key/value pair, Array) and you’ll see a menu. Select Append or Insert to add elements:
Objects
Name/value pairs
Arrays
After entering a few fields, press the left-arrow button (in the middle of the page) to create the JSON document. You can then iteratively add, test, and review the content of your document until it looks good. Then, save the JSON document, shown in Example 5-49, into a file (with the Save to Disk option under the Save menu).
{"about":"Fred Smith is the CTO of Full Ventures, where he ...","email":"fred.smith@fullventures.com","firstName":"Fred","lastName":"Smith","picture":"http://placehold.it/fsmith-full-ventures-small.png","tags":["JavaScript","REST","JSON"],"company":"Full Ventures, Inc."}
Before going any further, it would be a good idea to validate the JSON document by using JSONLint (either with the CLI or web app). This should validate because JSON Editor Online produces valid JSON, but it’s always good to double-check.
With a valid JSON document in hand, we can now use JSONSchema.net to generate a corresponding JSON Schema based on the document structure and content. Again, save yourself a lot of typing by letting a tool do most of the work for you.
Visit http://jsonschema.net and paste in the JSON document on the left side, as shown in Figure 5-7.
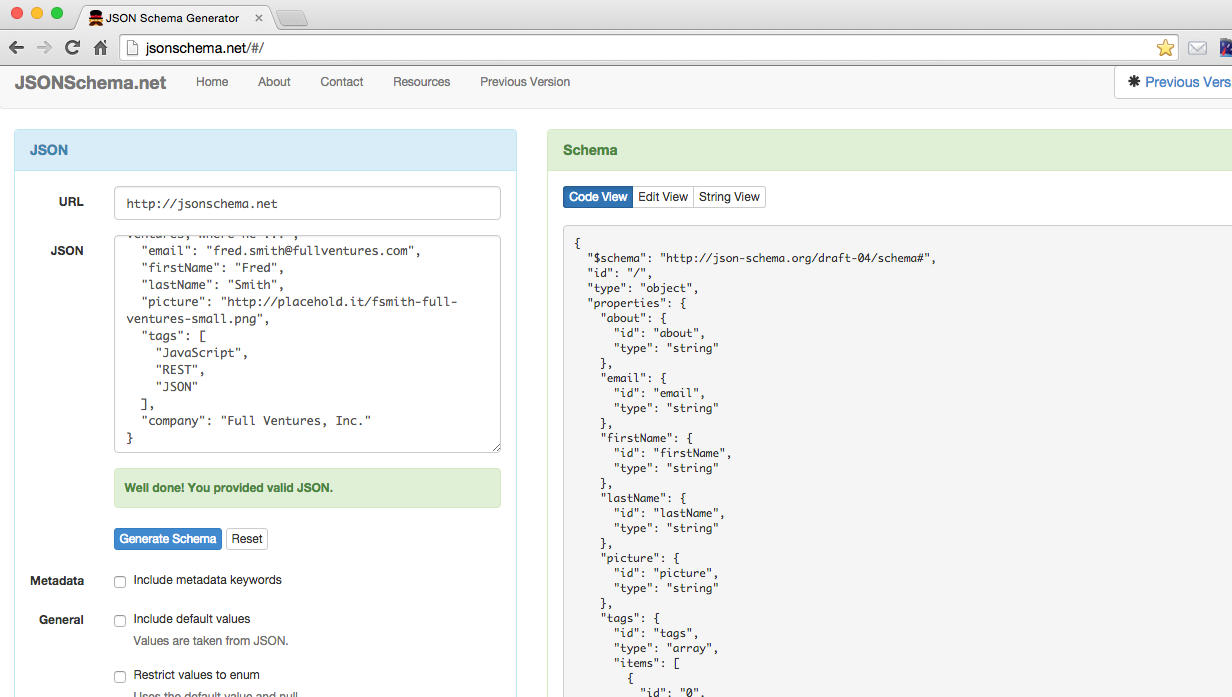
To generate a Schema, start with the default settings, and make the following changes:
Turn off “Use absolute IDs.”
Turn off “Allow additional properties.”
Click the Generate Schema button.
Copy the generated Schema (on the righthand side) to your clipboard.
After saving your clipboard to a file, we now have the Schema in Example 5-50.
{"$schema":"http://json-schema.org/draft-04/schema#","id":"/","type":"object","properties":{"about":{"id":"about","type":"string"},"email":{"id":"email","type":"string"},"firstName":{"id":"firstName","type":"string"},"lastName":{"id":"lastName","type":"string"},"picture":{"id":"picture","type":"string"},"tags":{"id":"tags","type":"array","items":[{"id":"0","type":"string"},{"id":"1","type":"string"},{"id":"2","type":"string"}]},"company":{"id":"company","type":"string"}},"additionalProperties":false,"required":["about","email","firstName","lastName","picture","tags","company"]}
JSONSchema.net is great at generating a base Schema, but it adds fields that we don’t use, plus it doesn’t
do enum, pattern, and so forth. The main takeaway is that JSONSchema.net does about 80 percent of the work for you,
and then you need to fill in a few pieces yourself. We don’t need the id fields at this time, but we do
need to add a Regular Expression to validate the email field (just use the Regex from previous examples).
After making these changes, the Schema should look like Example 5-51.
{"$schema":"http://json-schema.org/draft-04/schema#","type":"object","properties":{"about":{"type":"string"},"email":{"type":"string","pattern":"^[\\w|-|.]+@[\\w]+\\.[A-Za-z]{2,4}$"},"firstName":{"type":"string"},"lastName":{"type":"string"},"picture":{"type":"string"},"tags":{"type":"array","items":[{"type":"string"}]},"company":{"type":"string"}},"additionalProperties":false,"required":["about","email","firstName","lastName","picture","tags","company"]}
Now that we have a JSON Schema, let’s validate the document against the Schema by using the JSON Validate web app. Visit http://jsonvalidate.com/ and paste in the JSON document and Schema, as shown in Figure 5-8.
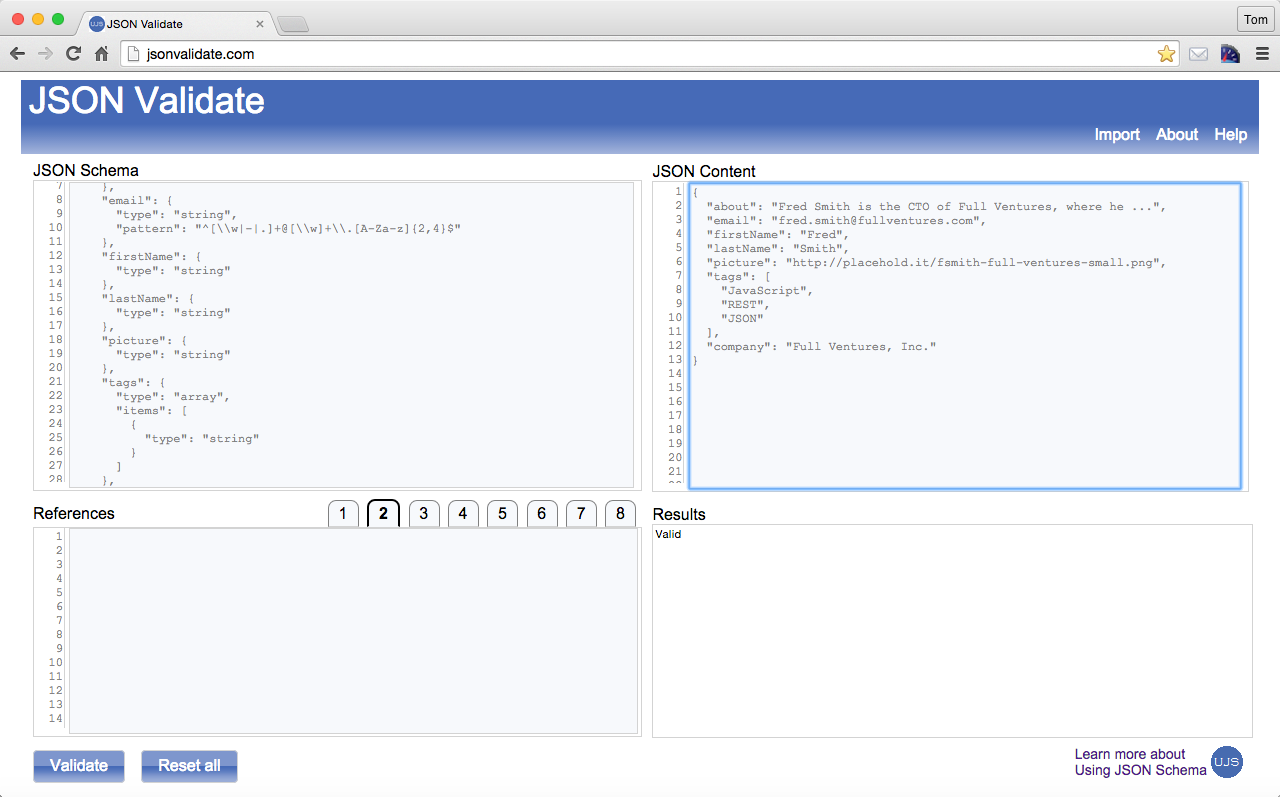
Click the Validate button, and the document should validate against the Schema. You could have used
the validate CLI tool we’ve been using throughout this chapter, but the web app is a great visual.
At this point, we have a JSON document with its corresponding Schema, but we need more data to create an API for testing. We could use JSON Editor Online to generate test data, but there are a couple of issues with this approach because a human would have to randomize and generate massive amounts of data. Even with a GUI, it’s a big manual effort.
JSON Editor Online is great for creating a small JSON document to get the design process going, but we need another approach to generate randomized bulk JSON data for API testing. We’ll use JSON Generator to create our data; visit http://www.json-generator.com/ and you should see the screen in Figure 5-9.
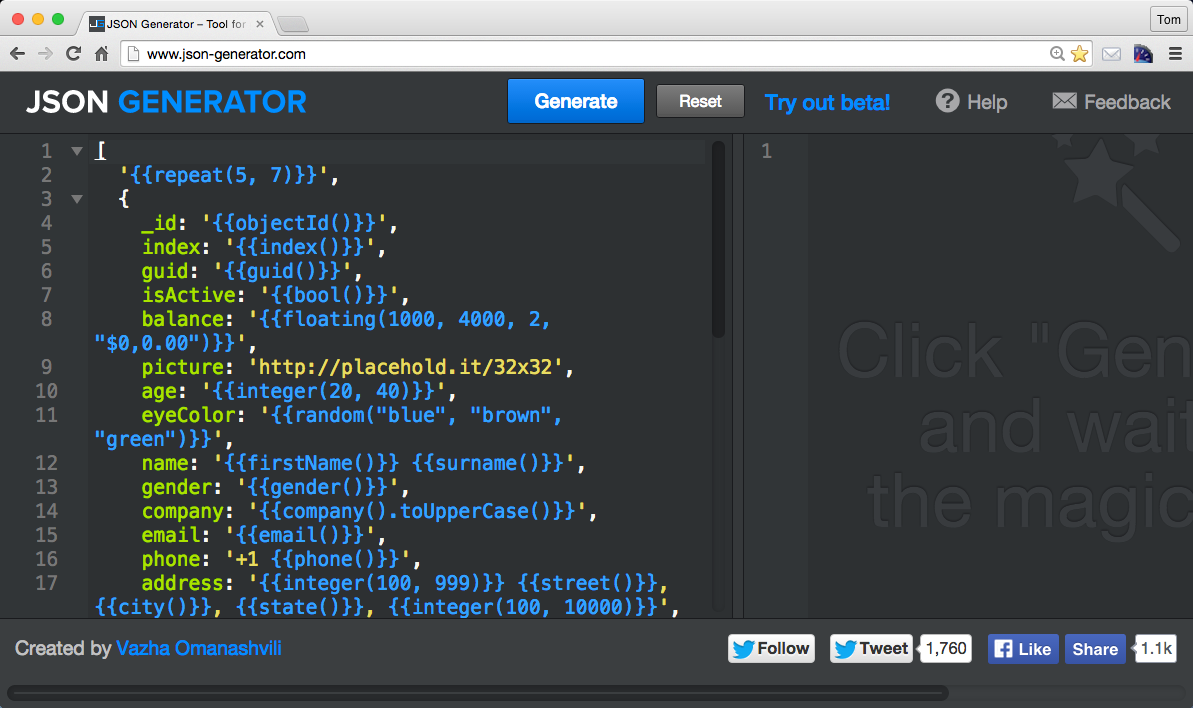
The code on the left side is a template (in the form of a JavaScript Object Literal) that JSON
Generator uses to generate sample JSON data. Notice that this tool has the ability to generate sample/random
data for paragraphs, numbers, names, globally unique identifiers (GUIDs), names, gender, email addresses, etc.
Plus, it has the ability to do this in bulk with the {{repeat}} tag at the top of the template. Click
the Help button for detailed documentation on the tags.
But these default settings are way more than we need. Let’s pare this template down to the fields we need to
generate three speaker objects with random data (see Example 5-52).
// Template for http://www.json-generator.com/['{{repeat(3)}}',{id:'{{integer()}}',picture:'http://placehold.it/32x32',name:'{{firstName()}}',lastName:'{{surname()}}',company:'{{company()}}',:'{{email()}}',about:'{{lorem(1, "paragraphs")}}'}]
After clicking the Generate button, you should see the following JSON document in the web app shown in Figure 5-10 (if you want
more than the three speaker objects, just change the 3 in the repeat tag to a higher number).
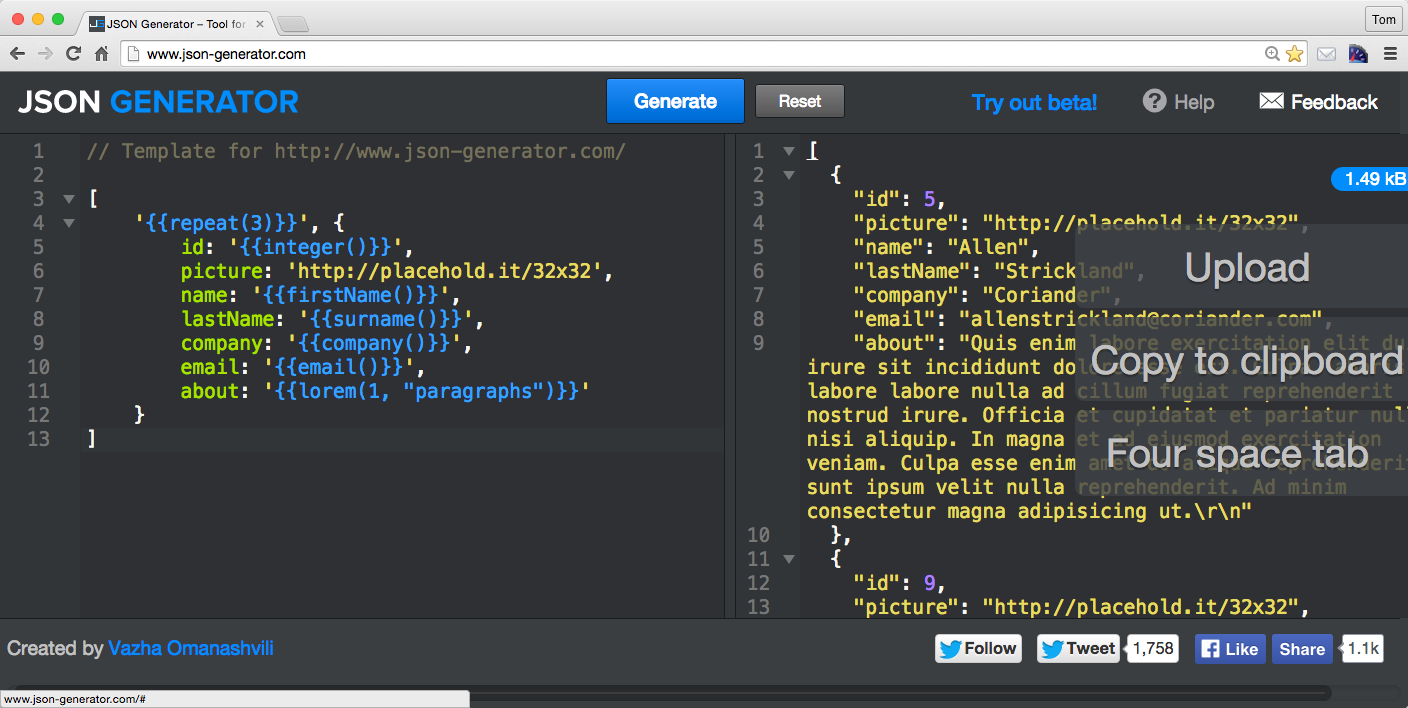
Now, click the Copy to Clipboard button on the righthand side, and paste into a file, as shown in Example 5-53.
[{"id":5,"picture":"http://placehold.it/32x32","name":"Allen","lastName":"Strickland","company":"Coriander","email":"allenstrickland@coriander.com","about":"Quis enim labore ..."},{"id":9,"picture":"http://placehold.it/32x32","name":"Merle","lastName":"Prince","company":"Xylar","email":"merleprince@xylar.com","about":"Id voluptate duis ..."},{"id":8,"picture":"http://placehold.it/32x32","name":"Salazar","lastName":"Ewing","company":"Zentime","email":"salazarewing@zentime.com","about":"Officia qui id ..."}]
We’re almost there, but we need to tweak the data just a bit so that we can deploy the file as an API:
We already have an Array. Let’s name it speakers, and then wrap it with the { and }. We now have a
JSON document with the speakers Array as the root element.
Let’s redo the id fields so that they start at 0.
Our file now looks like Example 5-54.
{"speakers":[{"id":0,"picture":"http://placehold.it/32x32","name":"Allen","lastName":"Strickland","company":"Coriander","email":"allenstrickland@coriander.com","about":"Quis enim labore ..."},{"id":1,"picture":"http://placehold.it/32x32","name":"Merle","lastName":"Prince","company":"Xylar","email":"merleprince@xylar.com","about":"Id voluptate duis ..."},{"id":2,"picture":"http://placehold.it/32x32","name":"Salazar","lastName":"Ewing","company":"Zentime","email":"salazarewing@zentime.com","about":"Officia qui id ..."}]}
At this point, you’re probably wondering why we needed to make those modifications. The changes were needed
so that json-server has the proper URIs (routes) for the Speaker data:
We get the http://localhost:5000/speakers route by encapsulating with the speakers array, with all
the data addressable from there.
We can access the first element with this route: http://localhost:5000/speakers/0.
But we’re getting ahead of ourselves. Let’s get json-server up and running, and then start browsing the
API.
Now that we have a Schema and some test data, it’s time to deploy the sample data as an API so
consumers can start testing it and provide feedback. If you haven’t done so before, now would be a great
time to install the json-server Node.js module. To install and run it, follow the instructions in
Appendix A (see “Install npm Modules”).
Run json-server (on port 5000) in the same directory where the ex-18-speakers-generated-modified.json
file resides, and your command line should look like this:
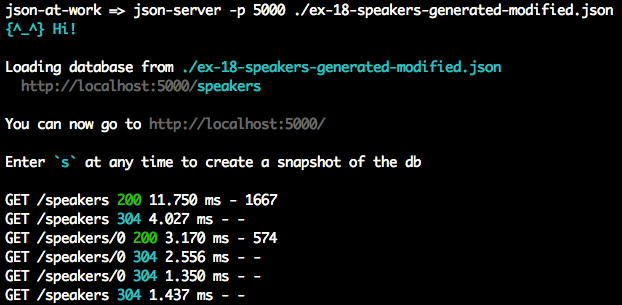
When you visit http://localhost:5000/speakers in your browser, you should see the screen in Figure 5-11.
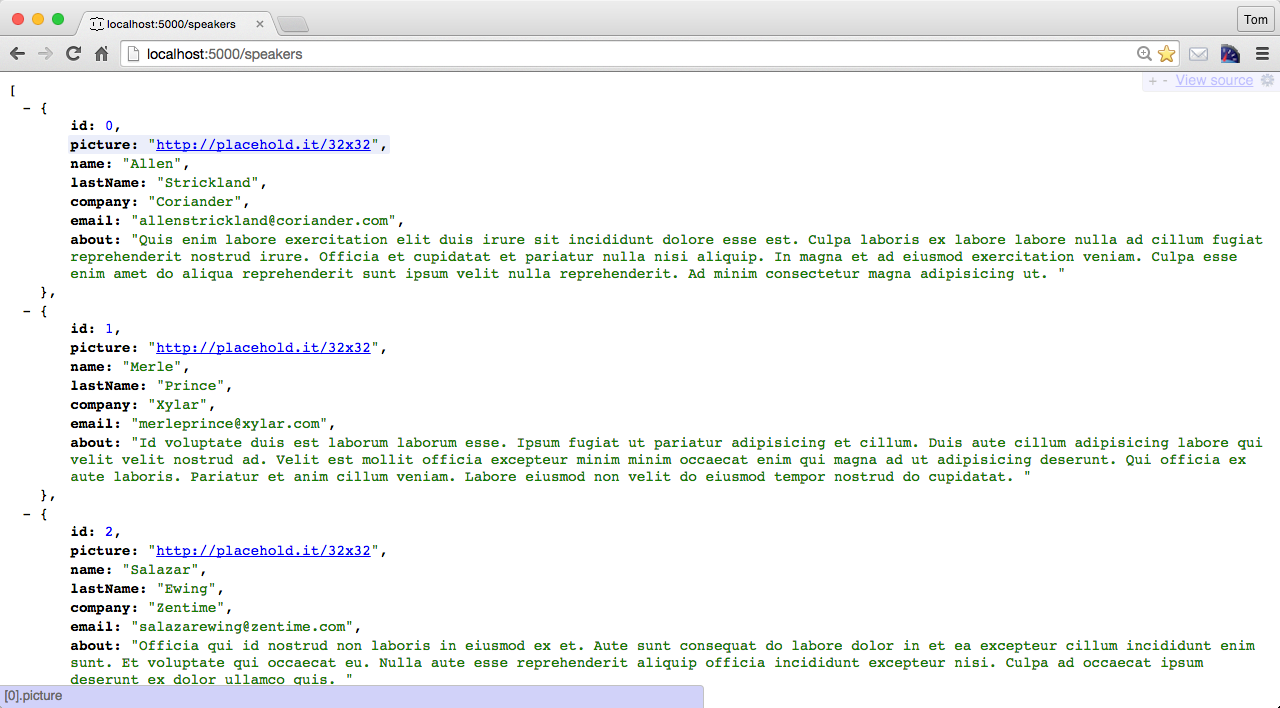
You now have a testable API without writing a single line of code; we just deployed a static JSON file. The beauty of this approach is that this looks, acts, and feels like an API. From here, you can interact with it just as you would with other APIs. You could use your browser, cURL, or make HTTP calls from your favorite language to begin interacting with it.
Now there are limits. With json-server, you can do an HTTP GET only on the data—it’s read only.
After going through this exercise, you should have an appreciation for the powerful JSON-based open source tools that can shorten your API development life cycle. Here’s the bottom line:
Use JSON modeling tools before committing to the final data structure. Iterate with stakeholders early and often.
Writing a JSON document or Schema by hand is tedious and error-prone. Let the tools do most of the work for you and avoid as much typing as possible.
Validate early and often.
Generate bulk randomized JSON data rather than creating it yourself.
Spinning up a Stub API is simple. Don’t write your own testing infrastructure, because someone else has already done it for you. Just use what’s out there. You have better things to do with your time.
We’ve shown how to use the validate command-line tool and the JSON Validate web app to validate a JSON
document against a Schema, but the ultimate goal is to validate from an application.
But JSON Schema isn’t only just for JavaScript and Node.js. Most major platforms have excellent support for JSON Schema v4:
Just use the Java-based json-schema-validator.
Node.js has several good JSON Schema processors. I’ve had success with the following:
ajv is my favorite library to use from a Node.js-based application because it’s clean and simple.
ajv is compatible with popular Node.js-based testing suites (e.g., Mocha/Chai, Jasmine, and Karma).
You can find more information on ajv on the npm site
and on GitHub. We’ll show
how to use ajv in Chapter 10.
ujs-jsonvalidate is a processor we’ve been using all through this chapter to validate against a Schema from
the command line. You can find further usage information on GitHub.
You can find the ujs-jsonvalidate npm module at http://bit.ly/2tj4ODI.
We’ve covered the basics of JSON Schema, but a definitive guide is far beyond the scope of this chapter. In addition to the json-schema.org site mentioned previously, here are a few more resources:
Using JSON Schema by Joe McIntyre provides a wealth of JSON Schema-related reference information and tools, including these:
Now that we’ve shown how to structure and validate JSON instance documents with JSON Schema, we’ll show to how search JSON documents in Chapter 6.
JSON Search libraries and tools make it easier to search JSON documents and quickly access the fields that you’re looking for. JSON Search shines when you need to search through a large JSON document returned from a Web API.
In this chapter, we’ll cover the following:
Making your job easier with JSON Search
Using the major JSON Search libraries and tools
Writing Unit Tests that search the content of JSON documents returned by a Web API
In our examples, we’ll use several JSON Search technologies to search JSON data from a Web API deployed on your local machine. We’ll create Unit Tests to execute the searches and check results.
Imagine that the result set from an API call has several hundred (or more) JSON Objects, and you want to use only a subset of the data (key/value pairs) or apply a search filter (based on your criteria). Without JSON Search, you would have to parse the JSON document and sift through a large data structure by writing custom code. This low-level approach is a tedious, code-intensive chore. You have better things to do with your time. The JSON Search libraries and tools shown in this chapter will reduce your work and make your job easier.
Many libraries (callable from an application) and command-line tools can search JSON documents. Here are the most common, widely used libraries, which we’ll explore later in this chapter:
JSONPath
JSON Pointer
jq
Many high-quality JSON Search libraries and command-line tools are available to search and filter JSON content, but we can’t cover all of them. Here are some others that are worth a look, but we can not discuss them further in this chapter for the sake of brevity:
SpahQL is like jQuery for JSON Objects. The SpahQL library is available in a GitHub repository.
json A command-line tool available on GitHub, and on
the npm repository. Even though
we won’t use json’s search capabilities in this chapter, we’ll still use it to pretty-print JSON documents.
jsawk jsawk is a command-line tool that transforms a JSON document in addition to searching.
Even though we’re not covering these tools, one or more could also be right for your project. Compare
them with JSONPath, JSON Pointer, and jq to see which one works best for you.
Many libraries and tools are available, and it’s hard to choose which one(s) to use. Here are my criteria:
Does it appear to be widely used? How many hits do you see when you do an internet search?
Is the code on GitHub? Is it well maintained?
Does it run on multiple platforms? Do multiple providers support the specification or library interfaces?
Is it well-documented? How easy is it to install? How intuitive is the interface? How easy is it to use?
Is the library associated with a standard (e.g., IETF, WC3, or Ecma)?
We’ll use these guidelines to evaluate each JSON Search product.
We need more realistic test data and a larger, richer JSON document to search against, and the web has an abundant supply. For this chapter and the next, we’ll use an open data set available from a public API rather than the Speaker data from previous chapters. We’ll leverage the cities/weather data from the OpenWeatherMap API. See the full API documentation.
The chapter-6/data/cities-weather-orig.json file contains weather data from the OpenWeatherMap API for
cities within a rectangle by latitude/longitude (in this case, Southern California, United States). Note that
the weather data from OpenWeatherMap changes frequently, so the data I’ve captured for the book example
will not match the current data from the API. Let’s modify the weather data before we use it with
json-server. First, look at the data/cities-weather-orig.json file, and notice that the weather data is
stored in an Array called list. I’ve renamed it to cities for the sake of clarity and testability and
saved the changes in the data/cities-weather.json file. Additionally, I moved the cod, calctime, and
cnt fields (at the beginning of the document) into an Object. This second change was needed for compatibility
with json-server, which accepts only Objects or an Array of Objects. We’ll continue to leverage the
json-server Node.js module from earlier chapters to deploy the city weather data as a Web API. Example 6-1 shows the
modified weather data.
{"other":{"cod":200,"calctime":0.006,"cnt":110},"cities":[...]}
Now, run json-server as follows:
json-server -p 5000 ./cities-weather.json
Visit http://localhost:5000/cities in your browser, and you should see the screen in Figure 6-1.
We now have test JSON data deployed as a Stub API, and we’ll use it for Unit Testing throughout this chapter.
All tests in this chapter will continue to leverage Mocha/Chai within a Node.js environment, just as you saw
in previous chapters. Before going further, be sure to set up your test environment. If you haven’t
installed Node.js yet, refer to Appendix A, and install Node.js (see “Install Node.js” and “Install npm Modules”). If you want to follow along with the Node.js project provided
in the code examples, cd to chapter-6/cities-weather-test and do the following to install all
dependencies for the project:
npm install
If you’d like to set up the Node.js project yourself, follow the instructions in the book’s GitHub repository.
Now that we’ve set up a testing environment, it’s time to start working with JSONPath and the other JSON Search libraries.
Now that we’ve covered the basics of JSON Search, we will compare the following libraries and tools:
JSONPath
JSON Pointer
jq
JSONPath was developed by Stefan Goessner in 2007 to search for and extract data from JSON documents. The original library was developed in JavaScript, but because of its popularity, most modern languages and platforms now support JSONPath.
JSONPath query syntax is based on XPath (which is used to search XML documents). Table 6-1 lists some JSONPath queries based on our cities example.
| JSONPath query | Description |
|---|---|
|
Get all elements in the cities Array. |
|
Get the number of elements in the cities Array. |
|
Get every other element in the cities array. See the description of |
|
Get the last element in the cities Array. |
|
Get all weather subelements. |
|
Get the first three elements in cities Array. |
|
Get the city name for first three elements in the cities Array. |
|
Get the cities where the temp > 84. |
|
Get the cities where the temp is between 84 and 85.5. |
|
Get the cities with cloudy weather. |
|
Get the cities with cloudy weather by using regex. |
These example queries use JSONPath keywords and symbols:
.. returns all elements and subelements that have a particular name.
[] with an index is an Array query, and the index is based on the JavaScript slice()
function. The Mozilla Developer Network (MDN) provides a full description.
Here’s a brief overview of JSONPath slice():
It provides the ability to select a portion of an Array.
The begin parameter (as with JS slice()) is the beginning index, is zero-based, and defaults to zero
if omitted.
The end parameter (as with JS slice()) is the end index (noninclusive), and defaults to the end of
the Array if omitted.
The step parameter (added by JSONPath slice()) represents the step, and defaults to 1. A step
value of 1 returns all Array elements specified by the begin and end parameters; a value of 2 returns
every other (or second) element, and so on.
[?(…)] enables a conditional search. The code inside the parentheses can be any valid JS
expression, including conditionals (e.g., == or >) and Regular Expressions.
A couple of online JSONPath testers enable you to practice JSONPath queries before writing a single line of code. I like the tester provided by Kazuki Hamasaki. Just paste in the data/cities-weather.json document (from the Chapter 6 code examples) in the left text box, and enter a JSONPath query. The results appear in the text box on the righthand side of the page as shown in Figure 6-2.

You’ll notice that only the data values are returned in the JSONPath results text box, and that the keys are not returned.
The Unit Test in Example 6-2 exercises several of the example JSONPath queries that were shown earlier.
This code leverages the jsonpath Node.js module to search against the JSON data returned by the Cities
API that runs on your local machine. See https://github.com/dchester/jsonpath
for a detailed description of the jsonpath module.
'use strict';/* Attribution: Cities Weather data provided by OpenWeatherMap API([http://openweathermap.org]) under Creative Commons Share A LikeLicense (https://creativecommons.org/licenses/by-sa/4.0).Changes were made to the data to work with json-server.This does not imply an endorsement by the licensor.This code is distributed under Creative Commons Share A Like License.*/varexpect=require('chai').expect;varjp=require('jsonpath');varunirest=require('unirest');describe('cities-jsonpath',function(){varreq;beforeEach(function(){req=unirest.get('http://localhost:5000/cities').header('Accept','application/json');});it('should return a 200 response',function(done){req.end(function(res){expect(res.statusCode).to.eql(200);expect(res.headers['content-type']).to.eql('application/json; charset=utf-8');done();});});it('should return all cities',function(done){req.end(function(res){varcities=res.body;expect(cities.length).to.eql(110);done();});});it('should return every other city',function(done){req.end(function(res){varcities=res.body;varcitiesEveryOther=jp.query(cities,'$[0::2]');expect(citiesEveryOther[1].name).to.eql('Rosarito');expect(citiesEveryOther.length).to.eql(55);done();});});it('should return the last city',function(done){req.end(function(res){varcities=res.body;varlastCity=jp.query(cities,'$[(@.length-1)]');expect(lastCity[0].name).to.eql('Moreno Valley');done();});});it('should return the 1st 3 cities',function(done){req.end(function(res){varcities=res.body;varcitiesFirstThree=jp.query(cities,'$[:3]');varcitiesFirstThreeNames=jp.query(cities,'$[:3].name');expect(citiesFirstThree.length).to.eql(3);expect(citiesFirstThreeNames.length).to.eql(3);expect(citiesFirstThreeNames).to.eql(['Rancho Palos Verdes','San Pedro','Rosarito']);done();});});it('should return cities within a temperature range',function(done){req.end(function(res){varcities=res.body;varcitiesTempRange=jp.query(cities,'$[?(@.main.temp >= 84 && @.main.temp <= 85.5)]');for(vari=0;i<citiesTempRange.length;i++){expect(citiesTempRange[i].main.temp).to.be.at.least(84);expect(citiesTempRange[i].main.temp).to.be.at.most(85.5);}done();});});it('should return cities with cloudy weather',function(done){req.end(function(res){varcities=res.body;varcitiesWeatherCloudy=jp.query(cities,'$[?(@.weather[0].main == "Clouds")]');checkCitiesWeather(citiesWeatherCloudy);done();});});it('should return cities with cloudy weather using regex',function(done){req.end(function(res){varcities=res.body;varcitiesWeatherCloudyRegex=jp.query(cities,'$[?(@.weather[0].main.match(/Clo/))]');checkCitiesWeather(citiesWeatherCloudyRegex);done();});});functioncheckCitiesWeather(cities){for(vari=0;i<cities.length;i++){expect(cities[i].weather[0].main).to.eql('Clouds');}}});
Note the following in this example:
The test sets up the URI and Accept for unirest using Mocha’s beforeEach() method,
so that setup occurs in only one place in the code. Mocha executes beforeEach() before running
each test (i.e., it) within the context of the describe.
Each test exercises one or more example JSONPath queries and uses expect-style assertions.
The calls to the jsonpath module work as follows:
jp.query() takes a JavaScript Object and a String-based JSONPath query as parameters, and synchronously
returns the result set as a JavaScript Object.
Each JSONPath query omits the leading .cities because json-server takes the name of the cities Array
(from the cities-weather.json file) and adds cities to the URI:
The URI address is http://localhost:5000/cities.
Use $[:3] to get the first three cities, rather than $.cities[:3].
To run this test from the command line (in a second terminal session), do the following:
cd cities-weather-test

npm test
You should see the following results:
json-at-work => npm test

...

> mocha test

...

cities-jsonpath
  ✓ should return a 200 response
  ✓ should return all cities
  ✓ should return every other city
  ✓ should return the last city
  ✓ should return 1st 3 cities
  ✓ should return cities within a temperature range
  ✓ should return cities with cloudy weather
  ✓ should return cities with cloudy weather using regex

...
If you call console.log() with the cities variable in any of the preceding tests, you’ll see that the
jsonpath module returns a valid JSON document with key/value pairs.
JSONPath is not limited to JavaScript and Node.js. Most major platforms have excellent support for JSONPath, including these:
There are other good JSONPath libraries are available, but please verify that they follow the syntax mentioned in Stefan Goessner’s article. Otherwise, it’s not really JSONPath. To borrow a phrase from The Princess Bride, “You keep using that word, but I do not think it means what you think it means.”
Table 6-2 provides a scorecard for JSONPath based on the evaluation criteria from the beginning of this chapter.
| Mindshare | Y |
|---|---|
Dev community |
Y |
Platforms |
JavaScript, Node.js, Java, Ruby on Rails |
Intuitive |
Y |
Standard |
N |
JSONPath provides a rich set of set of search features and works across most major platforms. The only downsides are that JSONPath is not a standard and lacks a CLI implementation, but don’t let that stop you from using it. JSONPath enjoys wide community usage and acceptance, and has an excellent online tester. JSONPath reduces the amount of code needed to search and access a JSON document, and gets the subset of data that you need.
JSON Pointer is a standard for accessing a single value within a JSON document. The JSON Pointer
specification provides further details.
JSON Pointer’s main purpose is to support the JSON Schema specification’s $ref functionality in locating
validation rules within a Schema (see Chapter 5).
For example, consider the following document:
{"cities":[{"id":5386035,"name":"Rancho Palos Verdes"},{"id":5392528,"name":"San Pedro"},{"id":5358705,"name":"Huntington Beach"}]}
Table 6-3 describes the preceding document’s common JSON Pointer query syntax:
| JSON Pointer query | Description |
|---|---|
|
Get all cities in the Array. |
|
Get the first city. |
|
Get the name of the second city. |
JSON Pointer query syntax is quite simple, and works as follows:
/ is a path separator.
Array indexing is zero-based.
You’ll notice that in the JSON Pointer specification, only the data values are returned when making a query, and that the keys are not returned.
The Unit Test in Example 6-3 exercises some of the example JSON Pointer queries that were shown earlier.
This code leverages the json-pointer Node.js module to search against the cities API.
See https://github.com/manuelstofer/json-pointer
for a detailed description of the json-pointer module.
'use strict';/* Attribution: Cities Weather data provided by OpenWeatherMap API([http://openweathermap.org]) under Creative Commons Share A LikeLicense (https://creativecommons.org/licenses/by-sa/4.0).Changes were made to the data to work with json-server.This does not imply an endorsement by the licensor.This code is distributed under Creative Commons Share A Like License.*/varexpect=require('chai').expect;varpointer=require('json-pointer');varunirest=require('unirest');describe('cities-json-pointer',function(){varreq;beforeEach(function(){req=unirest.get('http://localhost:5000/cities').header('Accept','application/json');});it('should return a 200 response',function(done){req.end(function(res){expect(res.statusCode).to.eql(200);expect(res.headers['content-type']).to.eql('application/json; charset=utf-8');done();});});it('should return the 1st city',function(done){req.end(function(res){varcities=res.body;varfirstCity=null;firstCity=pointer.get(cities,'/0');expect(firstCity.name).to.eql('Rancho Palos Verdes');expect(firstCity.weather[0].main).to.eql('Clear');done();});});it('should return the name of the 2nd city',function(done){req.end(function(res){varcities=res.body;varsecondCityName=null;secondCityName=pointer.get(cities,'/1/name');expect(secondCityName).to.eql("San Pedro");done();});});});
Note the following in this example:
Each test runs an example JSON Pointer query and leverages expect-style assertions.
The calls to the json-pointer module work as follows:
pointer.get() takes a JavaScript Object and a String-based JSON Pointer query as parameters, and
synchronously returns the result set as a JavaScript Object.
Each JSON Pointer query omits the leading .cities because json-server takes the name of
the cities Array (from the cities-weather.json file) and adds cities to the URI:
The URI address is http://localhost:5000/cities.
Use /0 to get the first city, rather than /cities/0.
To run this test from the command line, do the following:
cd cities-weather-test

npm test
You should see the following results:
json-at-work => npm test

...

> mocha test

...

cities-json-pointer
  ✓ should return a 200 response
  ✓ should return the 1st city
  ✓ should return the name of the 2nd city

...
If you invoke console.log() on the firstCity variable in the should return the 1st city test above,
you’ll see that the json-pointer module returns a valid JSON document with key/value pairs.
In addition to Node.js, most major platforms have a JSON Pointer library:
Java—Jackson currently supports JSON Pointer, but JavaEE 8 will provide JSON Pointer support as part of JSR 374, Java API for JSON Processing 1.1.
Several tools claim to implement JSON Pointer, but they really don’t follow the JSON Pointer specification. When evaluating a JSON Pointer library or tool, be sure it follows RFC 6901. Again, if it doesn’t expressly mention RFC 6901, it’s not JSON Pointer.
Table 6-4 shows a scorecard for JSON Pointer based on our criteria.
| Mindshare | Y |
|---|---|
Dev community |
Y |
Platforms |
JavaScript, Node.js, Java, Ruby on Rails |
Intuitive |
Y |
Standard |
Y—RFC 6901 |
JSON Pointer provides a limited set of search capabilities. Each query returns only a single field from a
JSON document. JSON Pointer’s main purpose is to support JSON Schema’s $ref syntax.
jq is a JSON Search tool that provides JSON command-line processing, including filtering and array
slicing. Per the jq GitHub repository,
jq is like sed for JSON. But jq is not limited to the command line; several good libraries enable you to use jq from your favorite Unit-Testing framework (“jq Unit Test” covers
this).
Many people in the UNIX community use cURL to make HTTP calls to Web APIs from the command line. cURL provides the ability to communicate over multiple protocols in addition to HTTP. To install cURL, please see “Install cURL” in Appendix A.
We’ll start by using cURL to make a GET request from the command against the Cities API as follows:
curl -X GET 'http://localhost:5000/cities'
Now that we’re able to get a JSON response from the Cities API, let’s pipe the content to jq
to filter the Cities API data from the command line. Here’s a simple example:
curl -X GET 'http://localhost:5000/cities' | jq .[0]
Run this command, and you should see the following:
Note the following in this example:
cURL makes an HTTP GET call to the OpenWeatherMap API and pipes the JSON response to Standard Output.
jq reads the JSON from Standard Input, selects the first city from the API, and outputs the JSON to
Standard Output.
cURL is a valuable and powerful part of an API developer’s toolkit. cURL also provides the ability to
test an API with all the main HTTP verbs (GET, POST, PUT, and DELETE). We’ve just scratched
the surface with cURL; visit the main site to learn
more.
Table 6-5 shows some basic jq queries.
jq query |
Description |
|---|---|
|
Get the first city. |
|
Get the last city. An index of -1 indicates the last element of an Array. |
|
Get the first three cities, where |
|
Get the first three cities. This is shorthand, and it omits the start index. |
|
Get all cities whose current temperature is >= 80 degrees Fahrenheit and whose min and max temperature ranges between 79 and 92 degrees Fahrenheit (inclusive). |
Here’s how to execute a jq query to get the last city at the command line:
cd chapter-6/data

jq '.cities[-1]' cities-weather.json
You should see the following:
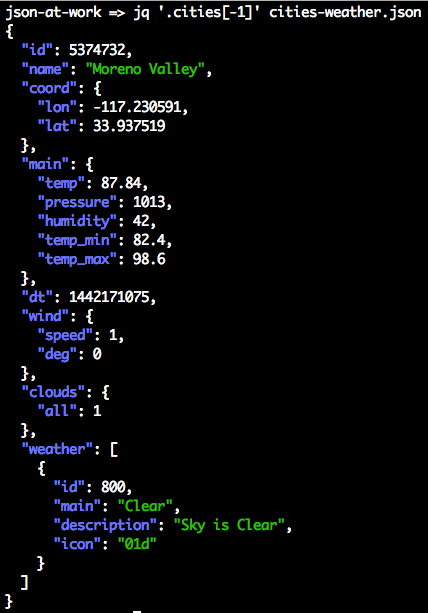
Let’s go deeper with a more concrete example.
jqPlay is a web-based tester for jq, and provides
the ability to iteratively test jq queries against JSON data. To test jqPlay, do the following to get
a new Array of Objects that contain the id and name of the first three cities:
Visit https://jqplay.org and paste the contents of the
chapter-6/data/cities-weather.json file into the JSON text area on the left.
Paste the following jq query into the Filter text box: [[].cities[0:3] | .[] | { id, name }]
You should see the screen in Figure 6-3.
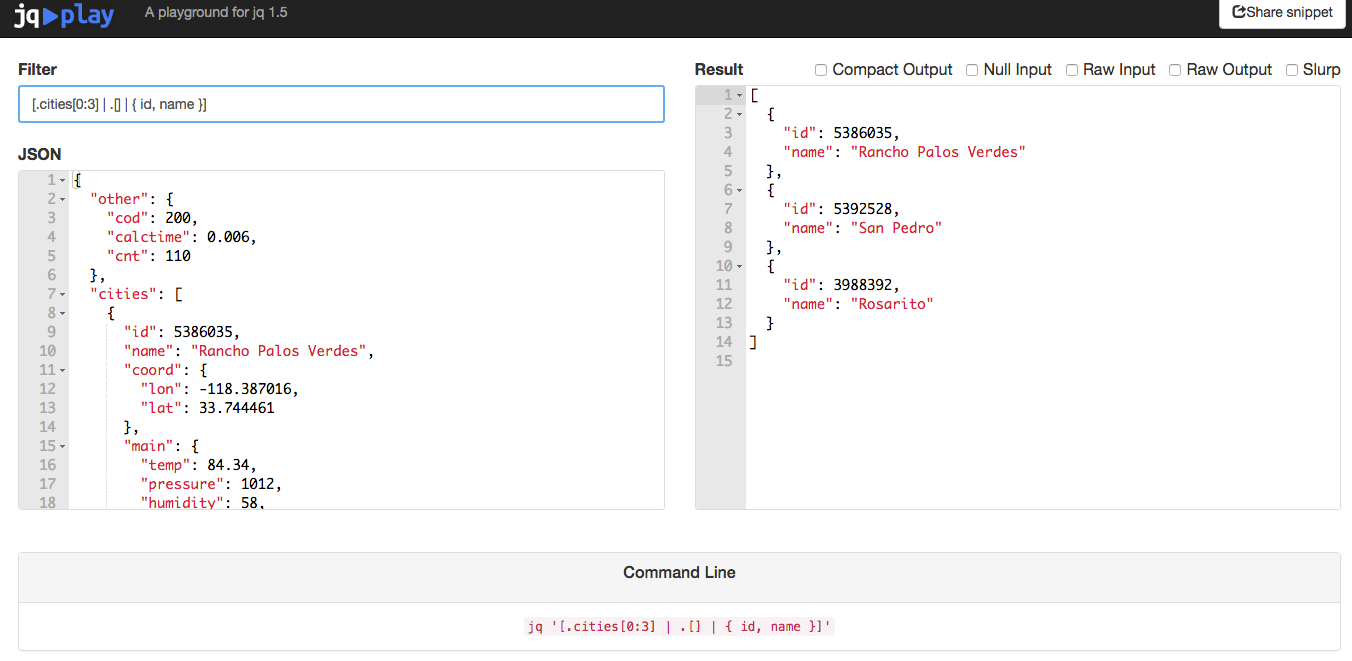
Here’s a breakdown of the [.cities[0:3] | .[] | { id, name }] query:
.cities[0:3] selects the first three elements from the cities Array as a subarray.
{ id, name } selects only the id and name fields:
The surrounding Array braces ([ and ]) convert the result set to an Array.
Scroll to the bottom of the jqplay page, and you’ll see that it has a cheat sheet with links to more
examples and documentation, as shown in Figure 6-4.
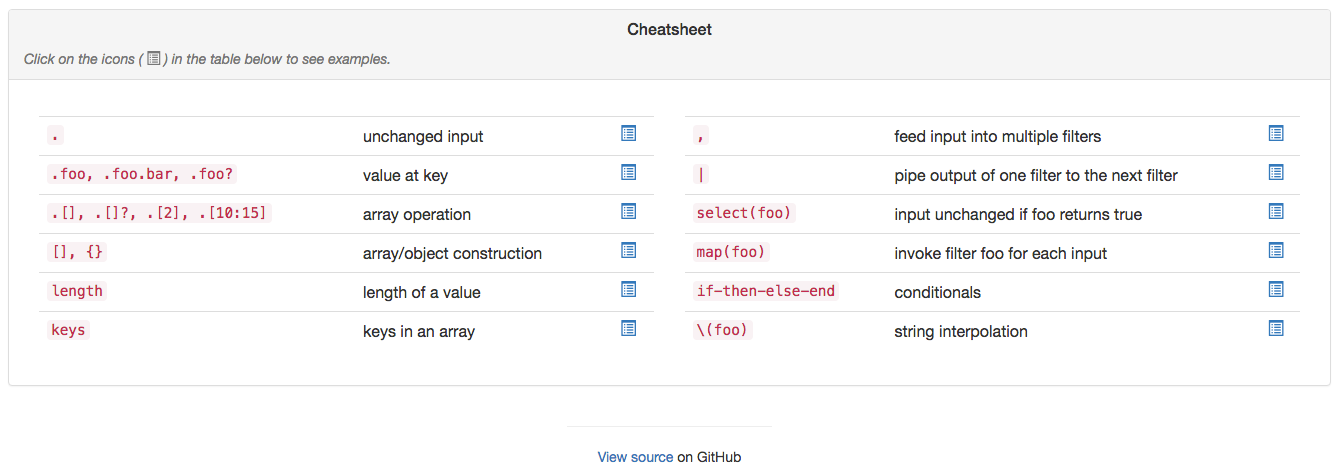
In addition to an online tester, the Node.js community has contributed a nice jq tutorial, which is
available on the npm repository.
Install this tutorial as follows:
npm install -g jq-tutorial
Run jq-tutorial from the command line, and you should see this:
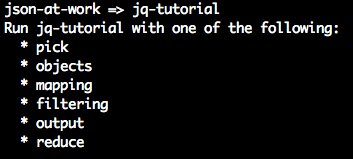
This shows all the available jq tutorials. Then, choose one of the tutorials like this:
jq-tutorial objects
This tutorial will show how to use objects with jq. Follow each learning path, and increase
your overall jq skill level.
The Unit Test in Example 6-4 exercises several of the example jq queries that were shown earlier. This code leverages the node-jq Node.js module
to search against the JSON data returned by the Cities API that runs on your local machine. See
the node-jq documentation on GitHub for a
detailed description.
'use strict';/* Attribution: Cities Weather data provided by OpenWeatherMap API([http://openweathermap.org]) under Creative Commons Share A LikeLicense (https://creativecommons.org/licenses/by-sa/4.0).Changes were made to the data to work with json-server.This does not imply an endorsement by the licensor.This code is distributed under Creative Commons Share A Like License.*/varexpect=require('chai').expect;varjq=require('node-jq');varunirest=require('unirest');var_=require('underscore');describe('cities-jq',function(){varreq;beforeEach(function(){req=unirest.get('http://localhost:5000/cities').header('Accept','application/json');});it('should return a 200 response',function(done){req.end(function(res){expect(res.statusCode).to.eql(200);expect(res.headers['content-type']).to.eql('application/json; charset=utf-8');done();});});it('should return all cities',function(done){req.end(function(res){varcities=res.body;expect(cities.length).to.eql(110);done();});});it('should return the last city',function(done){req.end(function(res){varcities=res.body;jq.run('.[-1]',cities,{input:'json'}).then(function(lastCityJson){// Returns JSON String.varlastCity=JSON.parse(lastCityJson);expect(lastCity.name).to.eql('Moreno Valley');done();}).catch(function(error){console.error(error);done(error);});});});it('should return the 1st 3 cities',function(done){req.end(function(res){varcities=res.body;jq.run('.[:3]',cities,{input:'json'}).then(function(citiesFirstThreeJson){// Returns JSON String.varcitiesFirstThree=JSON.parse(citiesFirstThreeJson);varcitiesFirstThreeNames=getCityNamesOnly(citiesFirstThree);expect(citiesFirstThree.length).to.eql(3);expect(citiesFirstThreeNames.length).to.eql(3);expect(citiesFirstThreeNames).to.eql(['Rancho Palos Verdes','San Pedro','Rosarito']);done();}).catch(function(error){console.error(error);done(error);});});});functiongetCityNamesOnly(cities){return_.map(cities,function(city){returncity.name;});}it('should return cities within a temperature range',function(done){req.end(function(res){varcities=res.body;jq.run('[.[] | select (.main.temp >= 84 and .main.temp <= 85.5)]',cities,{input:'json'}).then(function(citiesTempRangeJson){// Returns JSON String.varcitiesTempRange=JSON.parse(citiesTempRangeJson);for(vari=0;i<citiesTempRange.length;i++){expect(citiesTempRange[i].main.temp).to.be.at.least(84);expect(citiesTempRange[i].main.temp).to.be.at.most(85.5);}done();}).catch(function(error){console.error(error);done(error);});});});it('should return cities with cloudy weather',function(done){req.end(function(res){varcities=res.body;jq.run('[.[] | select(.weather[0].main == "Clouds")]',cities,{input:'json'}).then(function(citiesWeatherCloudyJson){// Returns JSON String.varcitiesWeatherCloudy=JSON.parse(citiesWeatherCloudyJson);checkCitiesWeather(citiesWeatherCloudy);done();}).catch(function(error){console.error(error);done(error);});});});it('should return cities with cloudy weather using regex',function(done){req.end(function(res){varcities=res.body;jq.run('[.[] | select(.weather[0].main | test("^Clo"; "i"))]',cities,{input:'json'}).then(function(citiesWeatherCloudyJson){// Returns JSON String.varcitiesWeatherCloudy=JSON.parse(citiesWeatherCloudyJson);checkCitiesWeather(citiesWeatherCloudy);done();}).catch(function(error){console.error(error);done(error);});});});functioncheckCitiesWeather(cities){for(vari=0;i<cities.length;i++){expect(cities[i].weather[0].main).to.eql('Clouds');}}});
Note the following in this example:
The test sets up the URI and Accept for unirest using Mocha’s beforeEach() method,
so that setup occurs in only one place in the code. Mocha executes beforeEach() before running
each test (i.e., it) within the context of the describe.
Each test exercises one or more example jq queries and uses expect-style assertions.
The calls to the node-jq module work as follows. jq.run() does the following:
Takes a String-based jq query as the first parameter.
Uses an optional second parameter (an Object) that specifies the type of input:
{ input: 'json' } is a JavaScript Object. The Unit Tests use this option because unirest returns
Objects from the HTTP call to the Stub API provided by json-server.
{ input: 'file' } is a JSON file. This is the default if the caller doesn’t specify an input option.
{ input: 'string' } is a JSON String.
Uses an ES6 JavaScript Promise to asynchronously return the result set as a JSON String. In this case, the Unit Tests all need to do the following:
Wrap their code within the then and catch constructs of the Promise.
Use JSON.parse() to parse the result into a corresponding JavaScript object structure.
Visit the MDN site to learn more about the new Promise syntax.
Each jq query omits the leading .cities because json-server takes the name of the cities Array
(from the cities-weather.json file) and adds cities to the URI:
The URI address is http://localhost:5000/cities.
Use $[:3] to get the first three cities, rather than $.cities[:3].
To run this test from the command line (in a second terminal session), do the following:
cd cities-weather-test

npm test
You should see the following results:
json-at-work => npm test

...

> mocha test

...

  cities-jq
    ✓ should return a 200 response
    ✓ should return all cities
    ✓ should return the last city
    ✓ should return the 1st 3 cities
    ✓ should return cities within a temperature range
    ✓ should return cities with cloudy weather
    ✓ should return cities with cloudy weather using regex

...
If you call console.log() with the cities variable in any of these tests, you’ll see that the
node-jq module returns a valid JSON document with key/value pairs.
In addition to Node.js, other major platforms have a jq library:
The ruby-jq gem is available at RubyGems.org, and you can also find it on GitHub.
jackson-jq plugs into the Java Jackson library (from Chapter 4).
Table 6-6 shows how jq stacks up against our evaluation criteria.
| Mindshare | Y |
|---|---|
Dev community |
Y |
Platforms |
CLI—Linux/macOS/Windows, Node.js, Java, Ruby on Rails |
Intuitive |
Y |
Standard |
N |
jq is excellent because it
Enjoys solid support in most languages.
Has excellent documentation.
Provides a rich set of search and filtering capabilities.
Can pipe query results to standard UNIX CLI tools (for example, sort, grep, and uniq).
Works great on the command line with the widely used cURL HTTP client.
Has a fantastic online tester. jqPlay enables you to test jq queries from a simple web interface. This
rapid feedback enables you to iterate to a solution before writing any code.
Has a useful interactive tutorial (see the “jq-tutorial” section).
The only downside to jq is the initial learning curve. The sheer number of options along
with the query syntax can seem overwhelming at first, but the time you spend to learn jq is well worth it.
We’ve covered the basics of jq in this chapter. jq has excellent documentation, and you can find
more detailed information at the following websites:
Based on the evaluation criteria and overall usability, I rank the JSON Search libraries in the following order:
jq
JSONPath
JSON Pointer
Although JSON Pointer is a standard and it can search a JSON document, I rank JSONPath in second place over JSON Pointer for the following reasons:
JSONPath has a richer query syntax.
A JSONPath query returns multiple elements in a document.
But jq is my overwhelming favorite JSON Search tool because it
Works from the command line (JSONPath and JSON Pointer don’t provide this capability). If you work with JSON in automated DevOps environments, you need a tool that works from the command line.
Has an online tester, which makes development faster.
Has an interactive tutorial.
Provides a rich query language.
Has solid library support in most programming languages.
Enjoys a large mindshare in the JSON community.
I’ve successfully used jq to search through JSON responses from other Web APIs
(not from OpenWeatherMap) that contained over 2 million lines of data, and jq performed flawlessly
in a production environment. jq enjoys great mindshare in the JSON community—just do a web search on
“jq tutorial” and you’ll see several excellent tutorials that will help you go deeper.
Now that we’ve shown how to efficiently search JSON documents, we’ll move on to transforming JSON in Chapter 7.
Your application(s) may take in data from multiple APIs, and you’ll often need to convert their JSON response data to a format that integrates with your application architecture.
Many JSON Transform technologies enable you to convert between a JSON document and other data formats (e.g., HTML or XML) or a different JSON structure. Many developers will be familiar with some of these libraries (e.g., Mustache and Handlebars), but we’ll show how to use them in nontraditional ways (more on that later). We’ll also cover libraries (e.g., JSON-T) that are not well-known to the community at large, but are commonly used by members of the JSON community.
Typical types of transformations include the following:
Many web and mobile applications have to handle JSON data from APIs, and this is the most common type of JSON transformation.
Sometimes the JSON response from a Web API isn’t quite what you’re looking for, and you’d like to change the format of the data to make it easier to work with. In this case, you can alter the structure by modifying values and/or removing, adding, and deleting fields. Some of the libraries are analogous to eXtensible Stylesheet Language Transformations (XSLT) for XML (which is used to transform XML documents) in that they use a separate template to describe the transformation.
SOAP/XML-based Web Services still exist, and sometimes you need to consume XML and convert it to JSON for compatibility with newer applications in the enterprise that are based on REST and JSON. Conversely, your applications may need to send XML payloads to SOAP/XML-based Web Services. In this case, you’ll need to convert from JSON to XML.
In this chapter, we’ll show how to do the following:
Convert JSON to HTML
Convert a JSON document to a new (JSON) structure
Convert between XML and JSON
Use JSON Transform libraries
Write Unit Tests that transform the content of JSON documents returned by a Web API
Just as you saw with JSON Search, several libraries are available for each type of transformation, and it’s hard to choose which one(s) to use. We’ll use the same criteria we did in Chapter 6:
Does it appear to be widely used? How many hits do you see when you do an internet search?
Is the code on GitHub? Is it well maintained?
Does it run on multiple platforms? Do multiple providers support the specification or library interfaces?
Is it well-documented? How easy is it to install? How intuitive is the interface? How easy is it to use? How much code do I need to write?
Is the library associated with an official standard (e.g., IETF, WC3, or Ecma)?
We’ll use the same OpenWeatherMap API data that we used in previous chapters for our examples. The original OpenWeatherMap API data was captured in chapter-7/data/cities-weather.json. For the sake of brevity, Example 7-1 provides a shortened version of the data.
{"cities":[{"id":5386035,"name":"Rancho Palos Verdes","coord":{"lon":-118.387016,"lat":33.744461},"main":{"temp":84.34,"pressure":1012,"humidity":58,"temp_min":78.8,"temp_max":93},"dt":1442171078,"wind":{"speed":4.1,"deg":300},"clouds":{"all":5},"weather":[{"id":800,"main":"Clear","description":"Sky is Clear","icon":"02d"}]},{"id":5392528,"name":"San Pedro","coord":{"lon":-118.29229,"lat":33.735851},"main":{"temp":84.02,"pressure":1012,"humidity":58,"temp_min":78.8,"temp_max":91},"dt":1442171080,"wind":{"speed":4.1,"deg":300},"clouds":{"all":5},"weather":[{"id":800,"main":"Clear","description":"Sky is Clear","icon":"02d"}]},{"id":3988392,"name":"Rosarito","coord":{"lon":-117.033333,"lat":32.333328},"main":{"temp":82.47,"pressure":1012,"humidity":61,"temp_min":78.8,"temp_max":86},"dt":1442170905,"wind":{"speed":4.6,"deg":240},"clouds":{"all":32},"weather":[{"id":802,"main":"Clouds","description":"scattered clouds","icon":"03d"}]}]}
Let’s start with a JSON-to-HTML transformation.
Most developers should be familiar with converting JSON from an API response to HTML. For this type of conversion, we’ll look at the following libraries:
Mustache
Handlebars
Refer to “Test Input Data”. We want to simplify the Cities data and display it in an HTML table as shown in Example 7-2.
<!DOCTYPE html><html><head><metacharset="UTF-8"/><title>OpenWeather - California Cities</title><linkrel="stylesheet"href="weather.css"></head><body><h1>OpenWeather - California Cities</h1><tableclass="weatherTable"><thead><tr><th>City</th><th>ID</th><th>Current Temp</th></tr></thead><tr><td>Santa Rosa</td><td>5201</td><td>75</td></tr></table></body></html>
We’ll compare how each library converts the sample JSON input data to the target HTML document.
Mustache uses templates that provide a declarative (codeless) way to convert data into other formats. In this case, we’ll use it to convert JSON data to an HTML document. The Mustache team uses the term logicless to describe their library because templates contain only simple tags without if/then/else clauses or looping constructs. Based on the specification, Mustache expands the tags in a template file with values from a hash or an object that is populated by an application. The beauty of templates (regardless of whether you use Mustache or Handlebars, which reintroduces some conditional logic) is that this approach provides a separation of concerns by factoring out the transformation from application code to external files. External templates enable you to easily add/remove data formats or change how you do the data formatting without modifying application code.
For more information, see the following sites:
The Mustache template in Example 7-3 converts the OpenWeatherMap JSON data to HTML.
<!DOCTYPE html><html><head><metacharset="UTF-8"/><title>OpenWeather - California Cities</title><linkrel="stylesheet"href="weather.css"></head><body><h1>OpenWeather - California Cities</h1><tableclass="weatherTable"><thead><tr><th>City</th><th>ID</th><th>Current Temp</th><th>Low Temp</th><th>High Temp</th><th>Humidity</th><th>Wind Speed</th><th>Summary</th><th>Description</th></tr></thead>{{#cities}}<tr><td>{{name}}</td><td>{{id}}</td>{{#main}}<td>{{temp}}</td><td>{{temp_min}}</td><td>{{temp_max}}</td><td>{{humidity}}</td>{{/main}}<td>{{wind.speed}}</td>{{#weather.0}}<td>{{main}}</td><td>{{description}}</td>{{/weather.0}}</tr>{{/cities}}</table></body></html>
This template works as follows:
The template is based on an HTML document, and Mustache expands each tag with data from the cities Array.
A tag can represent a single field, such as: {{temp}}.
Sections are enclosed within begin (for example, {{#cities}}) and end (for example, {{/cities}}) tags.
A section can correspond to an Array (e.g., cities) or an object (e.g., main).
A section sets the context for the other tags within that section. For example, the {{temp}}
tag inside the {{main}} section could be expressed as {{main.temp}}, and corresponds to main.temp
in the original JSON input document.
The field syntax in a tag can refer to an Array index. For example, {{#weather.0}} refers to
weather[0] from the input JSON document.
Next, we’ll now show a Unit Test that renders the template with Cities data.
All tests in this chapter will continue to leverage Mocha/Chai, just as we saw in previous chapters. Before
going further, be sure to set up your test environment. If you haven’t installed Node yet,
visit Appendix A, and install Node.js (see “Install Node.js” and “Install npm Modules”). If you want to follow along with the Node.js project provided in the code examples, cd to chapter-7/cities-weather-transform-test and do the following to install all dependencies
for the project:
npm install
If you’d like to set up the Node.js project yourself, follow the instructions in the book’s GitHub repository.
Example 7-4 uses the following Node.js modules:
This is available at https://www.npmjs.com/package/mustache. The corresponding GitHub repository can be found at https://github.com/janl/mustache.js.
jsonfile We’ll use this module to read the OpenWeatherMap JSON data from a file and parse it. jsonfile
is available at https://www.npmjs.com/package/jsonfile. Here’s the
jsonfile GitHub repository: https://github.com/jprichardson/node-jsonfile.
The Unit Test in Example 7-4 shows the example Mustache transformations in action.
'use strict';/* Attribution: Cities Weather data provided by OpenWeatherMap API([http://openweathermap.org]) under Creative Commons Share A LikeLicense (https://creativecommons.org/licenses/by-sa/4.0).Changes were made to the data to work with json-server.This does not imply an endorsement by the licensor.This code is distributed under Creative Commons Share A Like License.*/varexpect=require('chai').expect;varjsonfile=require('jsonfile');varfs=require('fs');varmustache=require('mustache');describe('cities-mustache',function(){varjsonCitiesFileName=null;varhtmlTemplateFileName=null;beforeEach(function(){varbaseDir=__dirname+'/../..';jsonCitiesFileName=baseDir+'/data/cities-weather-short.json';htmlTemplateFileName=baseDir+'/templates/transform-html.mustache';});it('should transform cities JSON data to HTML',function(done){jsonfile.readFile(jsonCitiesFileName,function(readJsonFileError,jsonObj){if(!readJsonFileError){fs.readFile(htmlTemplateFileName,'utf8',function(readTemplateFileError,templateFileData){if(!readTemplateFileError){vartemplate=templateFileData.toString();varhtml=mustache.render(template,jsonObj);console.log('\n\n\nHTML Output:\n'+html);done();}else{done(readTemplateFileError);}});}else{done(readJsonFileError);}});});});
This code works as follows:
beforeEach() runs before any Unit Test and does setup. In this case, it builds the filenames for the
input JSON file and the Mustache template.
In the 'should transform cities JSON data to HTML' Unit Test:
jsonfile.readFile() reads and parses the input JSON file into a JavaScript Object (jsonObj).
fs.readFile() reads the Mustache template into a JavaScript Object.
We then convert the Mustache template to a String.
mustache.render() renders the Mustache template into an HTML document using the values provided by
jsonObj (which was read in earlier).
Before you run the Unit Test, open a terminal session and run json-server on port 5000 from your command
line:
cd chapter-7/data

json-server -p 5000 ./cities-weather-short.json
Next, run the preceding test from a second terminal session as follows:
cd chapter-7/cities-weather-transform-test

npm test
You’ll see an HTML document that looks like our HTML target document.
The Architect template editor is an excellent online tester that makes it easy to iteratively test and develop a Mustache template. This tool is great, because it shows how the result changes as you modify the template. This WYSIWIG (What-You-See-Is-What-You-Get) output enables rapid development and debugging.
In the Architect online tool, select Mustache.js in the Engine drop-down, paste the Mustache template, and input JSON into the Template and View text boxes (respectively). You should see the screen in Figure 7-1.
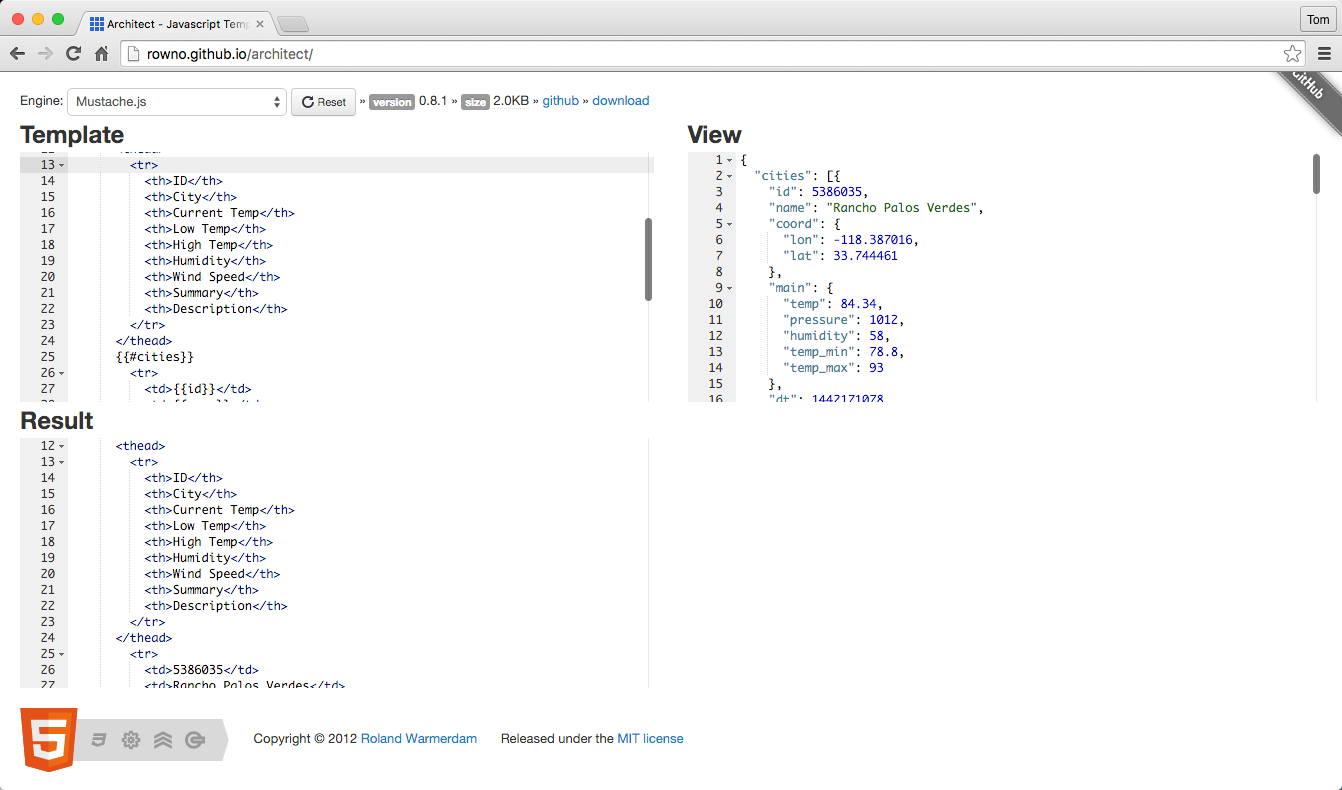
The Architect template editor also works with several other templating engines, including Handlebars (which is covered in the next section), so this is my favorite online template editor.
Remember that this web application is publicly available:
Any data you paste into this app is visible to others. So don’t use this tool with sensitive information (personal, proprietary, and so forth).
A large amount of data will flood your browser. I’ve been successful with up to about 10,000 lines of JSON, but after that this application begins to freeze up.
Mustache also works directly from the command line. If you have installed Node.js, do a global installation of the Mustache Node.js module and run it from the command line (within the book example code directory) as follows:
npm install -g mustache

cd chapter-7

mustache ./data/cities-weather-short.json \
  ./templates/transform-html.mustache > output.html
A quick glance at the Mustache site will show that Mustache enjoys wide cross-platform support, including the following:
Table 7-1 shows a scorecard for Mustache based on the evaluation criteria from the beginning of this chapter.
| Mindshare | Y |
|---|---|
Dev community |
Y |
Platforms |
JavaScript, Node.js, Java, Ruby on Rails |
Intuitive |
Y |
Standard |
N |
Overall, Mustache is a powerful and flexible template engine used by many web developers. Although it’s not a standard, Mustache has a solid specification.
Handlebars is an extension of Mustache, and it also expands the tags in a template file with values from a hash or an object. Handlebars and Mustache are highly compatible, and Mustache templates will usually work with the Handlebars engine. HTML conversion is pretty simple, and we won’t see any major differences between Mustache and Handlebars for now. Handlebars adds a few more features to enhance transformation, and we’ll cover them in “JSON-to-JSON Transform”. For more information on Handlebars, see the following:
Handlebars main site (click the Learn More buttons for further details)
Handlebars extends Mustache by providing additional capabilities, which include the following:
Handlebars has built-in helpers such as if and unless. We’ll show how to leverage
unless in “JSON-to-JSON Transform”.
Handlebars allows a developer to register custom helpers to extend Handlebars. Each
custom helper provides an additional directive that can be used in a template. For example, you could
add a {{fullName}} helper that would combine the firstName and lastName elements for a speaker.
Helpers are powerful, but we don’t cover them further in this book. See the Handlebars website and Jasko Koyn’s Custom Helpers Handlebars.js Tutorial for more information on Handlebars helpers.
The Handlebars GitHub site has a full description of the differences between Handlebars and Mustache.
Let’s use the Handlebars template in Example 7-5 to transform the input JSON to an HTML document.
<!DOCTYPE html><html><head><metacharset="UTF-8"/><title>OpenWeather - California Cities</title><linkrel="stylesheet"href="weather.css"></head><body><h1>OpenWeather - California Cities</h1><tableclass="weatherTable"><thead><tr><th>ID</th><th>City</th><th>Current Temp</th><th>Low Temp</th><th>High Temp</th><th>Humidity</th><th>Wind Speed</th><th>Summary</th><th>Description</th></tr></thead>{{#eachcities}}<tr><td>{{id}}</td><td>{{name}}</td>{{#main}}<td>{{temp}}</td><td>{{temp_min}}</td><td>{{temp_max}}</td><td>{{humidity}}</td>{{/main}}<td>{{wind.speed}}</td>{{#eachweather}}<td>{{main}}</td><td>{{description}}</td>{{/each}}</tr>{{/each}}</table></body></html>
This template works as follows:
Handlebars expands each tag with data from the cities Array.
A tag can represent a single field, such as {{temp}}.
Sections are enclosed within begin (e.g., {{#each cities}}) and end (e.g., {{/cities}}) tags.
A section can correspond to an Array (e.g., cities) or an object (e.g., main).
The each tag (e.g., {{#each cities}}) is used for arrays (in this case, cities).
A section sets the context for the other tags within that section. For example, the {{temp}}
tag inside the {{main}} section could be expressed as {{main.temp}}, and corresponds to
main.temp in the original JSON input document.
The Unit Test in Example 7-6 uses a Handlebars template to render HTML with the Cities data.
'use strict';/* Attribution: Cities Weather data provided by OpenWeatherMap API([http://openweathermap.org]) under Creative Commons Share A LikeLicense (https://creativecommons.org/licenses/by-sa/4.0).Changes were made to the data to work with json-server.This does not imply an endorsement by the licensor.This code is distributed under Creative Commons Share A Like License.*/varexpect=require('chai').expect;varjsonfile=require('jsonfile');varfs=require('fs');varhandlebars=require('handlebars');describe('cities-handlebars',function(){varjsonCitiesFileName=null;varhtmlTemplateFileName=null;beforeEach(function(){varbaseDir=__dirname+'/../..';jsonCitiesFileName=baseDir+'/data/cities-weather-short.json';htmlTemplateFileName=baseDir+'/templates/transform-html.hbs';});it('should transform cities JSON data to HTML',function(done){jsonfile.readFile(jsonCitiesFileName,function(readJsonFileError,jsonObj){if(!readJsonFileError){fs.readFile(htmlTemplateFileName,'utf8',function(readTemplateFileError,templateFileData){if(!readTemplateFileError){vartemplate=handlebars.compile(templateFileData);varhtml=template(jsonObj);console.log('\n\n\nHTML Output:\n'+html);done();}else{done(readTemplateFileError);}});}else{done(readJsonFileError);}});});});
This Handlebars Unit Test is practically identical to its Mustache counterpart, with the following differences:
We don’t need to convert the Handlebars template (that is, read from fs.readFile()) to a String.
It takes two steps to render the template:
handlebars.compile() compiles the template into the template variable.
template() (from the compile) then renders the jsonObj (input JSON) into HTML.
When you run the preceding test with npm test, you’ll see a second HTML document that looks like our HTML
target document.
Two excellent online testers make it easy to iteratively test and develop a Handlebars template: TryHandlebars and Architect.
To use TryHandlebars, copy the Handlebars template and JSON into the Handlebars Template and Context text boxes. The result is shown in Figure 7-2.
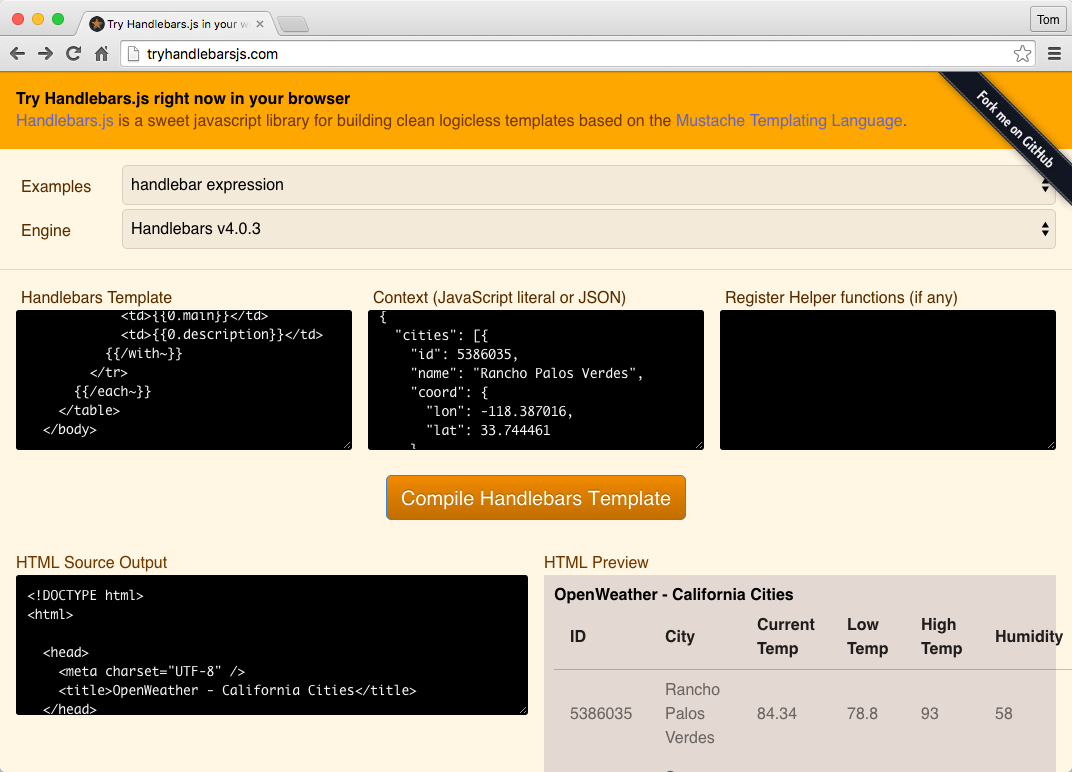
You can also use the Architect template editor. Select Handlebars.js in the Engine drop-down, paste the Handlebars template, and input JSON into the Template and View text boxes (respectively). Click the Compile Handlebars Template button, and you should see the result shown in Figure 7-3.
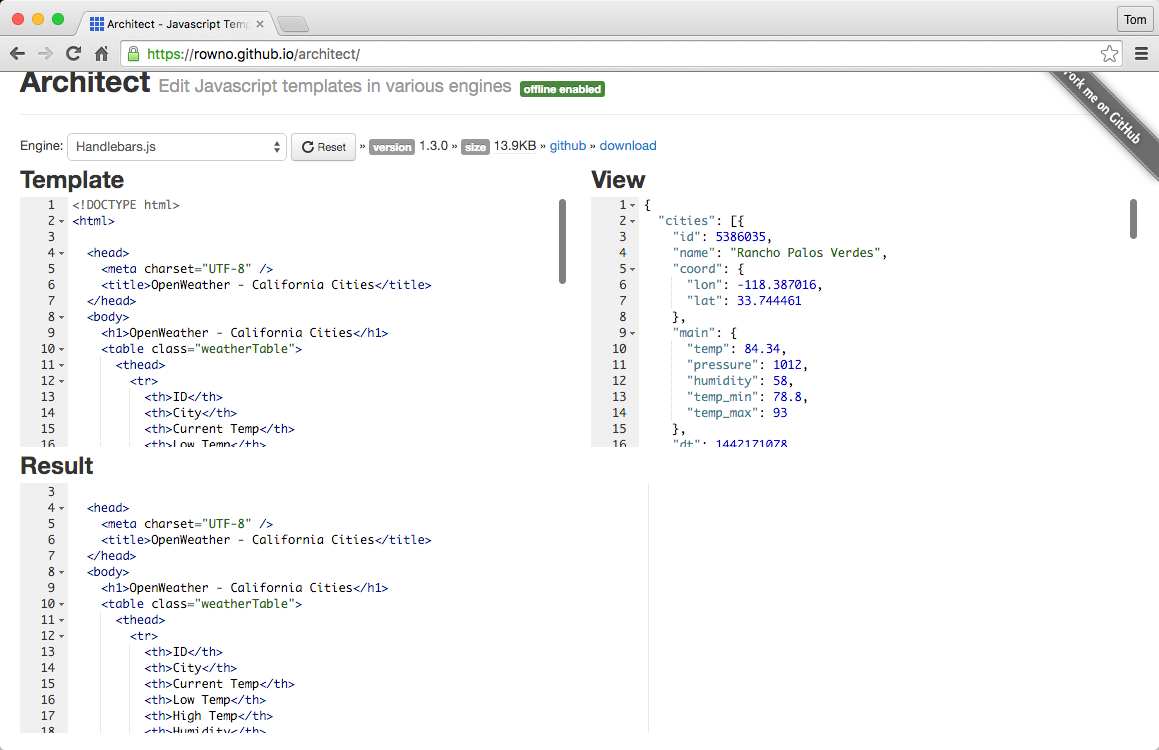
Handlebars also works directly from the command line. If you have installed Node.js, do a global installation of
the hb-interpolate module, which is also available on GitHub:
npm install -g hb-interpolate

cd chapter-7

hb-interpolate -j ./data/cities-weather-short.json \
   -t ./templates/transform-html.hbs > output.html
Table 7-2 provides a scorecard for Handlebars based on the evaluation criteria from the beginning of this chapter.
| Mindshare | Y |
|---|---|
Dev community |
Y |
Platforms |
JavaScript, Node.js, Java, Ruby on Rails |
Intuitive |
Y |
Standard |
N |
Handlebars is another excellent engine that is used by many web developers. Just like Mustache, Handlebars isn’t a standard, and it too has a solid specification and works across multiple platforms.
If you’ve worked with APIs for any length of time in a professional setting, you’ve come to realize that APIs don’t always work the way you want them to. The JSON response from an API is often the most overlooked part of an API’s design, and the data provided by an API is often difficult to use. Even if the data is well-designed, you may not want to use all of it or you may want to convert it to another JSON structure that is better suited to the consuming application (or other applications in your system).
Similar to the discussion in Chapter 6, you could do the following:
Parse the JSON data from an API and manipulate the resulting hash structure programmatically
Write custom code to convert between an input JSON document and another JSON structure
But these approaches are tedious and difficult. There’s no need to write this type of utility code, because libraries are available to do most of the work for you.
The biggest issue I’ve seen in the area of JSON-to-JSON transformation is the lack of standards (official or de facto). In the previous chapter, for example, even though JSONPath is not an official standard, it is a de facto standard. JSONPath is a concept and query language with wide acceptance and implementations on multiple platforms. But with the JSON Transform libraries, it was difficult to find something that was more than just a single-language/platform implementation. I was looking for products that could transcend individual platforms and serve a larger, more universal purpose in the community. It was a journey to find the best solutions, but a few JSON Transform libraries are better than a one-off solution, and I hope you find them useful for your projects.
Several libraries (callable from an application) can transform JSON documents. We’ll look into the following libraries:
JSON Patch
JSON-T
Mustache
Handlebars
If you’re in a hurry, Handlebars is the best choice for JSON-to-JSON transformation (see “Handlebars” and “JSON-to-JSON Transformation Evaluations—The Bottom Line”). Otherwise, let’s walk through the various JSON-to-JSON transformation techniques so you can see why.
Several JSON Transform libraries are available, but we can’t cover all of them. Here are three additional libraries that are worth a look:
jsonapter jsonapter transforms JSON data in a declarative manner that leverages an external template
with transformation rules. The template is analogous to XSL, but that’s where the similarities stop.
jsonapter and its template rules are in pure JavaScript, but XSL had its own separate templating language.
Unfortunately, jsonapter works only with JavaScript and Node.js.
Refer to “Test Input Data” earlier in this chapter. Even though there
are only three elements in the cities array, the data is overly complex for our use.
We don’t want to use all of these fields, so let’s simplify the structure as follows:
Keep the cities array along with id and name.
Make a completely new, flattened weather object.
Add other weather-related fields from other structures to weather:
main.temp, main.humidity, main.temp_min, main.temp_max
wind.speed
weather.0.main and weather.0.description
Rename fields for the sake of clarity.
Given these transformation rules, the output should look like Example 7-7.
{"cities":[{"id":"5386035","name":"Rancho Palos Verdes","weather":{"currentTemp":84.34,"lowTemp":78.8,"hiTemp":93,"humidity":58,"windSpeed":4.1,"summary":"Clear""description":"Sky is Clear"}},{"id":"5392528","name":"San Pedro","weather":{"currentTemp":84.02,"lowTemp":78.8,"hiTemp":91,"humidity":58,"windSpeed":4.1,"summary":"Clear""description":"Sky is Clear"}},{"id":"3988392","name":"Rosarito","weather":{"currentTemp":82.47,"lowTemp":78.8,"hiTemp":86,"humidity":61,"windSpeed":4.6,"summary":"Clouds""description":"scattered clouds"}}]}
We’ll evaluate each of the JSON Transform libraries based on how easy it is to convert the sample JSON input data to the target JSON output.
JSON Patch is an IETF standard that specifies a data format for operations that transform a single resource. JSON Patch works in conjunction with the HTTP PATCH standard. The purpose of HTTP PATCH is to modify a resource produced by an API. In short, HTTP PATCH changes a portion of a resource, whereas HTTP PUT replaces the resource entirely.
JSON Patch is supposed to be used as part of an HTTP Request, and not the Response. JSON Patch is really meant for an API Producer, and not the Consumer. But the context of this chapter is from the API Consumer’s point of view, and we’ll see how far we can go with JSON Patch to transform the data in an HTTP Response.
Table 7-3 shows the main JSON Patch operations that could be used with the OpenWeatherMap data.
| JSON Patch operation | Description |
|---|---|
Add - |
Adds a value to either an existing Object or an Array. It can’t create a completely new Object in a document. |
Remove - |
Removes the |
Replace - |
Replaces a value in the document. This is the same as doing a |
Copy - |
Copies a value from one field to another. |
Move - |
Moves the |
For a full description of JSON Patch, visit the main Patch site.
Each value for path and from is a JSON Pointer, which was covered in Chapter 6.
The Unit Test in Example 7-8 shows the example transformations in action. This code uses the JSON Patch Node.js module. Patch has a corresponding GitHub repository.
The Unit Test in Example 7-8 shows how to use JSON Patch to transform the Cities weather data to the target JSON data structure.
'use strict';/* Attribution: Cities Weather data provided by OpenWeatherMap API([http://openweathermap.org]) under Creative Commons Share A LikeLicense (https://creativecommons.org/licenses/by-sa/4.0).Changes were made to the data to work with json-server.This does not imply an endorsement by the licensor.This code is distributed under Creative Commons Share A Like License.*/varexpect=require('chai').expect;varjsonfile=require('jsonfile');varjsonpatch=require('json-patch');varcitiesTemplate=[{op:'remove',path:'/coord'},{op:'remove',path:'/dt'},{op:'remove',path:'/clouds'},{op:'remove',path:'/weather/0/id'},{op:'remove',path:'/weather/0/icon'},{op:'move',from:'/main/temp',path:'/weather/0/currentTemp'},{op:'move',from:'/main/temp_min',path:'/weather/0/lowTemp'},{op:'move',from:'/main/temp_max',path:'/weather/0/hiTemp'},{op:'move',from:'/main/humidity',path:'/weather/0/humidity'},{op:'move',from:'/weather/0/main',path:'/weather/0/summary'},{op:'move',from:'/wind/speed',path:'/weather/0/windSpeed'},{op:'remove',path:'/main'},{op:'remove',path:'/wind'}];describe('cities-json-patch',function(){varjsonFileName=null;varjsonCitiesFileName=null;beforeEach(function(){varbaseDir=__dirname+'/../../data';jsonCitiesFileName=baseDir+'/cities-weather-short.json';});it('should patch all cities - fail',function(done){jsonfile.readFile(jsonCitiesFileName,function(fileReadError,jsonObj){if(!fileReadError){try{varoutput=jsonpatch.apply(jsonObj,citiesTemplate);console.log('\n\n\n\Original JSON');console.log(jsonObj);console.log('\n\n\n\Patched JSON');console.log(JSON.stringify(output,null,2));done();}catch(transformError){console.error(transformError);done(transformError);}}else{console.error(fileReadError);done(fileReadError);}});});...});
In the example code, the test runs an example JSON Patch transformation. To run this test from the command line, do the following:
cd cities-weather-transform-test

npm test
As you’ll notice, the should patch all cities - fail test fails as follows:
cities-json-patch
{ [PatchConflictError: Value at coord does not exist]
message: 'Value at coord does not exist',
name: 'PatchConflictError' }
  1) should patch all cities - fail
In this example, JSON Patch can’t find the following path to /coord because the underlying JSON Pointer works only with individual objects, and not collections.
Example 7-9 is a second test that almost works.
...describe('cities-json-patch',function(){varjsonFileName=null;varjsonCitiesFileName=null;beforeEach(function(){varbaseDir=__dirname+'/../../data';jsonCitiesFileName=baseDir+'/cities-weather-short.json';});...it('should patch all cities - success (kind of)',function(done){jsonfile.readFile(jsonCitiesFileName,function(fileReadError,jsonObj){if(!fileReadError){try{console.log('\n\n\n\Original JSON');console.log(jsonObj);varoutput=[];for(variinjsonObj['cities']){output.push(jsonpatch.apply(jsonObj['cities'][i],citiesTemplate));}console.log('\n\n\n\Patched JSON');console.log(JSON.stringify(output,null,2));done();}catch(transformError){console.error(transformError);done(transformError);}}else{console.error(fileReadError);done(fileReadError);}});});});
Although the should patch all cities - success (kind of) test runs, it doesn’t quite work for the following reasons:
We want to create a new weather Object rather than use the existing Array, but JSON Patch
doesn’t allow for that.
The test code iterates over the input JSON and transforms each element in the cities array,
and then collects the results in the output Array. This is needed because JSON Patch can work only on a
single resource (an Object) rather than a collection (an Array).
Because JSON Patch is a standard, it enjoys cross-platform support (besides just Node.js), including the following:
See http://jsonpatch.com/#libraries for more platform and library support.
Table 7-4 shows a scorecard for JSON Patch based on the evaluation criteria from the beginning of this chapter.
| Mindshare | Y |
|---|---|
Dev community |
Y |
Platforms |
JavaScript, Node.js, Java, Ruby on Rails |
Intuitive |
N |
Standard |
Y - RFC 6902 |
JSON Patch has the following limitations:
JSON Patch doesn’t allow you to add completely new data structures. It can only modify existing structures and their data.
JSON Patch is designed only to change a single Object, and isn’t designed to work with Arrays. This is because JSON Patch uses JSON Pointer to search for data, where each query returns only a single field from a JSON document.
JSON Patch is not meant to transform the JSON data from an API’s HTTP Response, but it was worth a try. JSON Patch is really designed to work with HTTP PATCH, which specifies how to use JSON to patch portions of a resource’s data through an HTTP Request. JSON Patch is a great fit when you need to implement HTTP PATCH for an API.
But better libraries are available to transform JSON to other JSON data structures, so let’s move on and try JSON-T.
JSON-T was one of the early JSON transform libraries, and it was developed in 2006 by Stefan Goessner (who also created JSONPath). JSON-T is similar to XSLT for XML, and uses a template that contains transformation rules.
JSON-T uses transformation rules defined in a JavaScript Object Literal, where each rule is a key/value pair. Rules are in the following form:
vartransformRules={'ruleName':'transformationRule','ruleName':function...};
Note the following in the preceding form:
Each ruleName or transformationRule must be enclosed by single ('') or double ("") quotes.
Each transformationRule has one or more conversion expressions surrounded by curly braces, like this:
{cities}.
A conversion expression can evaluate to another ruleName or to a field in the document—an Array,
Object, or key/value pair.
The following example shows the JSON-T transformation rules that could be used to transform the OpenWeatherMap data:
vartransformRules={'self':'{"cities":[{cities}]}','cities[*]':'{"id":"{$.id}","name":"{$.name}",'+'"weather":{"currentTemp":{$.main.temp},"lowTemp":{$.main.temp_min},'+'"hiTemp":{$.main.temp_max},"humidity":{$.main.humidity},'+'"windSpeed":{$.wind.speed},"summary":"{$.weather[0].main}",'+'"description":"{$.weather[0].description}"}},'};
This example works as follows:
self is the top-level rule that specifies how to format the new JSON document, and {cities} refers
to the cities[*] rule.
cities[*] specifies how to format the cities Array:
The star syntax in the cities[*] rule indicates that the rule applies to the cities Array elements.
The * resolves to each Array index.
{$.} is shorthand notation. The {$.name} rule tells JSON-T to pull data from the name field of
each cities Array element. Here’s the longer notation: cities[*].name.
For complete documentation on transformation rules, see “Basic Rules” on the main JSON-T site.
The Unit Test in Example 7-10 shows how to use JSON-T, and leverages the jsont Node.js module.
'use strict';/* Attribution: Cities Weather data provided by OpenWeatherMap API([http://openweathermap.org]) under Creative Commons Share A LikeLicense (https://creativecommons.org/licenses/by-sa/4.0).Changes were made to the data to work with json-server.This does not imply an endorsement by the licensor.This code is distributed under Creative Commons Share A Like License.*/varexpect=require('chai').expect;varjsonfile=require('jsonfile');varjsonT=require('../lib/jsont').jsonT;describe('cities-jsont',function(){varjsonCitiesFileName=null;vartransformRules={'self':'{ "cities": [{cities}] }','cities[*]':'{ "id": "{$.id}", "name": "{$.name}", '+'"weather": { "currentTemp": {$.main.temp}, "lowTemp": {$.main.temp_min}, '+'"hiTemp": {$.main.temp_max}, "humidity": {$.main.humidity}, '+'"windSpeed": {$.wind.speed}, "summary": "{$.weather[0].main}", '+'"description": "{$.weather[0].description}" } },'};...beforeEach(function(){varbaseDir=__dirname+'/../../data';jsonCitiesFileName=baseDir+'/cities-weather-short.json';});it('should transform cities JSON data',function(done){jsonfile.readFile(jsonCitiesFileName,function(readFileError,jsonObj){if(!readFileError){varjsonStr=jsonT(jsonObj,transformRules);jsonStr=repairJson(jsonStr);console.log(JSON.stringify(JSON.parse(jsonStr),null,2));done();}else{done(readFileError);}});});});
Notice that the preceding test invokes the repairJson() function in order to produce valid JSON:
functionrepairJson(jsonStr){varrepairedJsonStr=jsonStr;varrepairs=[[/,\s*}/gi,' }'],[/,\s*\]/gi,' ]']];for(vari=0,len=repairs.length;i<len;++i){repairedJsonStr=repairedJsonStr.replace(repairs[i][0],repairs[i][1]);}returnrepairedJsonStr;}// Modify the spec as follows:...jsonStr=repairJson(jsonStr);console.log(JSON.stringify(JSON.parse(jsonStr),null,2));...
Without any modification, JSON-T produces a trailing comma after the last element of the cities
Array, so the transformed JSON would be invalid “as is.” To fix this, the repairJson() function in the
preceding example uses a Regular Expression (Regex) to eliminate the final comma before the closing curly
object bracket (}) or Array brace (]). Although most languages have Regex functionality, this is bad
because you have to add custom code to correct the output. You shouldn’t have to write your own
infrastructure.
In addition to Node.js, JSON-T runs on the following platforms:
JSON-T runs as a JavaScript file, jsont.js.
JSON-T can run as a pure Ruby implementation.
I haven’t been able to find a pure Java implementation of JSON-T.
Table 7-5 shows a scorecard for JSON-T based on the evaluation criteria from the beginning of this chapter.
| Mindshare | Y |
|---|---|
Dev community |
Y |
Platforms |
JavaScript, Node.js, Ruby on Rails |
Intuitive |
N |
Standard |
N |
JSON-T has the following limitations:
Overly complex syntax.
No Java implementation.
Can’t handle an escaped String within a String. For example, JSON-T takes the String,
"escapedString": "I have a \"string within\" a string" and converts it to the
following invalid String: "escapedString": "I have a "string within " a string". Again, this requires a
Regular Expression to fix the problem.
Can’t handle the last element in an Array or Object.
JSON-T is a small improvement over JSON Patch because JSON-T can process an entire document. But JSON-T still requires a developer to write additional code to make it work. JSON-T is a step in the right direction, but it still won’t work in a real development environment. JSON-T is good at converting JSON to HTML, but it’s not designed to convert from one JSON document to another JSON structure.
In the previous section, we saw how Mustache can easily convert from JSON to HTML. We’ll now see how well it can convert the Cities data to the target JSON output document.
Example 7-11 is a Mustache template to do the conversion (template details were described in the JSON-to-HTML section on Mustache).
{"cities":[{{#cities}}{"id":"{{id}}","name":"{{name}}","weather":{{{#main}}"currentTemp":{{temp}},"lowTemp":{{temp_min}},"hiTemp":{{temp_max}},"humidity":{{humidity}},{{/main}}"windSpeed":{{wind.speed}},{{#weather.0}}"summary":"{{main}}""description":"{{description}}"{{/weather.0}}}},{{/cities}}]}
Let’s run this template in the Architect template editor. Select Mustache.js in the Engine drop-down, paste the Mustache template, and input JSON into the Template and View text boxes (respectively). You should see the result in Figure 7-4.
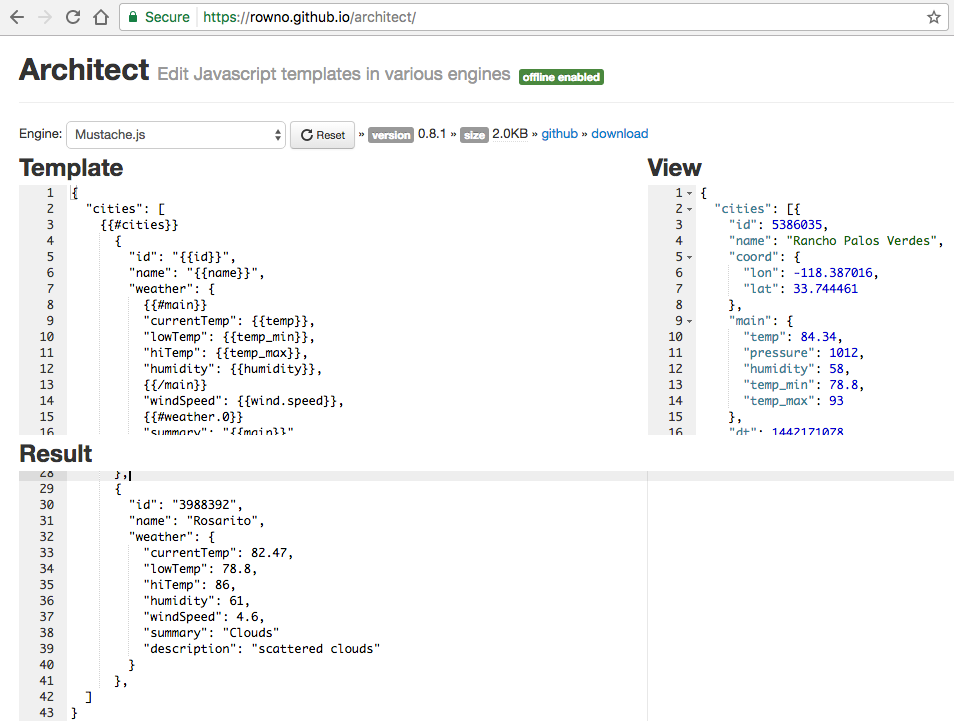
Take a look at line 41 of the resulting JSON (in the Result text box) and you’ll see the trailing comma, which is invalid JSON. You can confirm that the resulting JSON is invalid by pasting it into JSONLint:

As we saw previously, Handlebars does a good job of converting JSON to HTML, and the template in Example 7-12 shows how to convert the Cities JSON data into the target JSON output.
{"cities": [{{#eachcities}}{"id": "{{id}}", "name": "{{name}}", "weather":{{{#main}}"currentTemp":{{temp}}, "lowTemp":{{temp_min}}, "hiTemp":{{temp_max}}, "humidity":{{humidity}},{{/main}}"windSpeed":{{wind.speed}},{{#eachweather}}"summary": "{{main}}", "description": "{{description}}"{{/each}}} }{{#unless@last}},{{/unless}}{{/each}}] }
This template is similar to the one shown in the JSON-to-HTML section on Handlebars, but with one notable difference. The following line does exactly what we need: it emits a comma after each element unless it’s the last element:
{{#unless@last}},{{/unless}}
Here’s how it works:
{{#unless}} is a built-in Handlebars helper that renders the enclosing block only if the condition
returns false.
@last@ is a built-in Handlebars variable that returns false if an element is the last in an Array,
and true if the current element is at the end of the Array.
For more information on {{#unless}} and @last@, visit the Handlebars website.
Let’s run the template in the Architect template editor. Select Handlebars.js in the Engine drop-down, paste the Handlebars template, and input JSON into the Template and View text boxes (respectively). You should see the result shown in Figure 7-5.
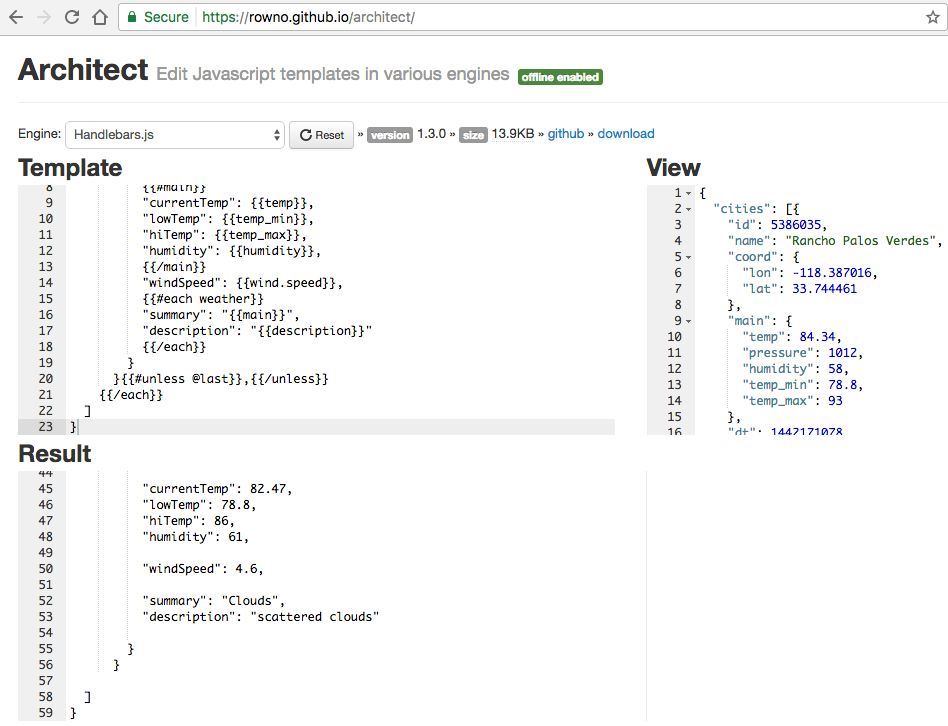
Take a look at line 56 of the resulting JSON (in the Result text box) and you’ll see that there is no trailing comma so this should be valid. You can confirm that the resulting JSON is valid by pasting it into JSONLint, as shown in Figure 7-6.
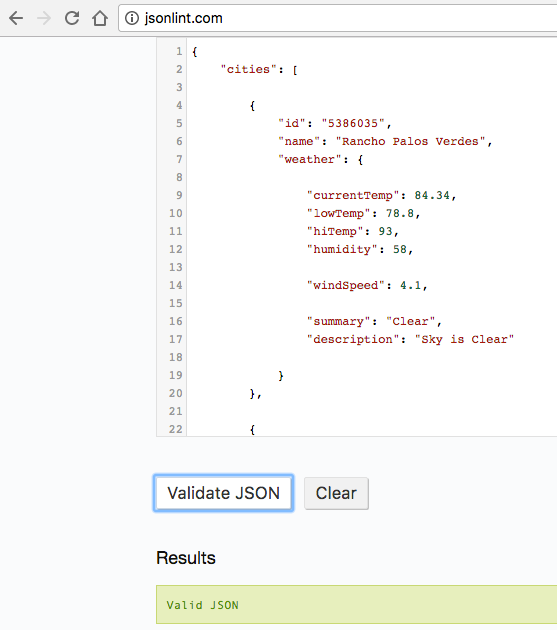
This is exactly what we’re looking for. As noted earlier, Handlebars differs from Mustache in that Handlebars has just enough conditional logic to make the JSON-to-JSON transformation work properly.
Based on the evaluation criteria and overall usability, Handlebars is my overwhelming choice for JSON-to-JSON transformation for the following reasons:
It’s the only library that works “as is.” The conditional logic makes it possible.
It has solid cross-platform support.
The template language is rich enough to meet most transformation needs.
It’s declarative, yet allows for custom logic with custom helpers.
Excellent online tools facilitate development.
We’ve covered JSON-to-JSON conversion, and now it’s time to cover JSON-XML transformation.
Often, developers and architects need to integrate with legacy systems that still use XML. To have a clean separation of concerns, it’s important to add a thin adapter at the boundaries of your system that encapsulates the translation between XML and JSON.
It’s easy to convert XML elements (e.g., <weather>) to/from JSON, but it’s difficult to convert XML
attributes to/from JSON. This is a lossy conversion, which means that you can’t convert the JSON back
to the original XML, and vice versa because JSON doesn’t have a standard way to represent attributes.
Remember that JSON’s core constructs are Objects, Arrays, and key/value pairs.
For example, an XML attribute provides metadata that describes an element, and looks like this:
<weathertemp="84.34"pressure="1012"humidity="58"temp_min="78.8"temp_max="93"/>
In this XML snippet, the temp, pressure, humidity, temp_min, and temp_max attributes describe
the weather element. Back in the days when XML was in vogue (roughly 1998–2008), many XML Schema
designers leveraged XML attributes to:
Reduce the overall payload of messages going over the wire
Simplify the conversion between XML and their native platform (e.g., Java, JS, Ruby, or C#)
We’d like to see how to directly convert between XML and JSON, and several well-known conventions (specifications) describe how to do this:
Badgerfish
Parker
JsonML
Spark
GData
Abdera
This chapter focuses on Badgerfish and Parker because they’re well-known. A full discussion and in-depth comparison of these XML-JSON conversion convention is beyond the scope of this book, but you can find further details at the Open311 wiki.
To compare the Badgerfish and Parker conventions, we’ll start by showing a sample input XML document based on the OpenWeatherMap data. Then, we’ll compare how both conventions would convert from XML to JSON. Example 7-13 provides the input XML.
<?xml version="1.0" encoding="UTF-8" ?><cities><city><id>5386035</id><name>Rancho Palos Verdes</name><coord><lon>-118.387016</lon><lat>33.744461</lat></coord><maintemp="84.34"pressure="1012"humidity="58"temp_min="78.8"temp_max="93"/><dt>1442171078</dt><wind><speed>4.1</speed><deg>300</deg></wind><clouds><all>5</all></clouds><weather><id>800</id><main>Clear</main><description>Sky is Clear</description><icon>02d</icon></weather></city><city><id>5392528</id><name>San Pedro</name><coord><lon>-118.29229</lon><lat>33.735851</lat></coord><maintemp="84.02"pressure="1012"humidity="58"temp_min="78.8"temp_max="91"/><dt>1442171080</dt><wind><speed>4.1</speed><deg>300</deg></wind><clouds><all>5</all></clouds><weather><id>800</id><main>Clear</main><description>Sky is Clear</description><icon>02d</icon></weather></city><city><id>3988392</id><name>Rosarito</name><coord><lon>-117.033333</lon><lat>32.333328</lat></coord><maintemp="82.47"pressure="1012"humidity="61"temp_min="78.8"temp_max="86"/><dt>1442170905</dt><wind><speed>4.6</speed><deg>240</deg></wind><clouds><all>32</all></clouds><weather><id>802</id><main>Clouds</main><description>scattered clouds</description><icon>03d</icon></weather></city></cities>
Badgerfish has an excellent online tester that makes it easy to convert from the input XML to JSON (per the Badgerfish convention). The Badgerfish Online Tester is shown in Figure 7-7.
Paste the input XML into the text box just below the Convert XML to JSON label, click the “Translate XML above to JSON below button” and you’ll see very compact JSON in the resulting text box. You can use JSONLint or your favorite text editor (which includes a JSON beautifier plug-in), and you’ll see the (more readable) JSON output shown in Example 7-14.
{"cities":{"city":[{"id":{"$1":5386035},"name":{"$1":"Rancho Palos Verdes"},"coord":{"lon":{"$1":"-118.387016"},"lat":{"$1":"33.744461"}},"main":{"@temp":"84.34","@pressure":1012,"@humidity":58,"@temp_min":"78.8","@temp_max":93},"dt":{"$1":1442171078},"wind":{"speed":{"$1":"4.1"},"deg":{"$1":300}},"clouds":{"all":{"$1":5}},"weather":{"id":{"$1":800},"main":{"$1":"Clear"},"description":{"$1":"Sky is Clear"},"icon":{"$1":"02d"}}},{"id":{"$1":5392528},"name":{"$1":"San Pedro"},"coord":{"lon":{"$1":"-118.29229"},"lat":{"$1":"33.735851"}},"main":{"@temp":"84.02","@pressure":1012,"@humidity":58,"@temp_min":"78.8","@temp_max":91},"dt":{"$1":1442171080},"wind":{"speed":{"$1":"4.1"},"deg":{"$1":300}},"clouds":{"all":{"$1":5}},"weather":{"id":{"$1":800},"main":{"$1":"Clear"},"description":{"$1":"Sky is Clear"},"icon":{"$1":"02d"}}},{"id":{"$1":3988392},"name":{"$1":"Rosarito"},"coord":{"lon":{"$1":"-117.033333"},"lat":{"$1":"32.333328"}},"main":{"@temp":"82.47","@pressure":1012,"@humidity":61,"@temp_min":"78.8","@temp_max":86},"dt":{"$1":1442170905},"wind":{"speed":{"$1":"4.6"},"deg":{"$1":240}},"clouds":{"all":{"$1":32}},"weather":{"id":{"$1":802},"main":{"$1":"Clouds"},"description":{"$1":"scattered clouds"},"icon":{"$1":"03d"}}}]}}
The core rules of the Badgerfish convention include the following:
Element names become Object properties.
The textual content of an element goes into the $ property of an Object with the same name.
For example, <name>Rancho Palos Verdes</name> becomes "name": { "$1": "Rancho Palos Verdes" }.
Nested elements become nested properties. For example, the following XML
<wind><speed>4.1</speed><deg>300</deg></wind>
becomes
"wind":{"speed":{"$1":"4.1"},"deg":{"$1":300}}
Multiple elements with the same name at the same level become Array elements. The following XML
<city></city><city></city>
becomes
"city":[{...}]
Attributes go in properties whose names begin with @. For example, the following XML
<maintemp="84.02"pressure="1012"humidity="58"temp_min="78.8"temp_max="91"/>
becomes
"main":{"@temp":"84.34","@pressure":1012,"@humidity":58,"@temp_min":"78.8","@temp_max":93}
We’ve glossed over a lot of details, but Badgerfish has excellent documentation and resources. For further information, see the following:
Parker provides a simple conversion, but it ignores XML attributes, so you will lose the attribute data when converting to JSON. Following the Parker convention yields the JSON document in Example 7-15 (based on the input XML).
{"cities":[{"id":5386035,"name":"Rancho Palos Verdes","coord":{"lon":-118.387016,"lat":33.744461},"main":null,"dt":1442171078,"wind":{"speed":4.1,"deg":300},"clouds":{"all":5},"weather":[{"id":800,"main":"Clear","description":"Sky is Clear","icon":"02d"}]},{"id":5392528,"name":"San Pedro","coord":{"lon":-118.29229,"lat":33.735851},"main":null,"dt":1442171080,"wind":{"speed":4.1,"deg":300},"clouds":{"all":5},"weather":[{"id":800,"main":"Clear","description":"Sky is Clear","icon":"02d"}]},{"id":3988392,"name":"Rosarito","coord":{"lon":-117.033333,"lat":32.333328},"main":null,"dt":1442170905,"wind":{"speed":4.6,"deg":240},"clouds":{"all":32},"weather":[{"id":802,"main":"Clouds","description":"scattered clouds","icon":"03d"}]}]}
The core rules of the Parker convention include the following:
Element names become Object properties.
Attributes are ignored.
Nested elements become nested properties.
The Parker convention is simple, but has the following issues:
With these shortcomings in mind, I suggest No Convention (none of the above) to convert the following:
Parse (unmarshal) the XML into Objects/Hashes on your current platform by using a
well-known library (we’ll use xml2js for our Node.js-based examples). Then, convert the Objects/Hashes from
your platform into JSON with JSON.stringify() if you’re using JavaScript. Chapters 3 and 4 show how to
convert Ruby and Java, respectively, to JSON.
Parse the JSON into data structures on your platform using a common library. JSON.parse()
works great for JavaScript. Chapters 3 and 4 show to parse JSON into Ruby and Java. Then, generate an XML
document from your data structure (this is also known as marshaling). Again, we’ll leverage xml2js
from a Node.js-based Mocha/Chai test.
Rather than being concerned with a particular convention/style of conversion, focus on the following:
Do what works best for you.
Use the libraries you already know and have on hand.
Test the conversion results to make sure that you’re not losing any data.
Keep it simple.
Encapsulate everything and make sure that it fits well with the rest of your enterprise application architecture.
In short, choose the best library that you can find on your platform and work with or around the limitations.
XML has been around for a long time, and each major platform has a solid implementation, including the following:
We’ll use xml2js.
There are several good libraries, and two of the best are LibXml and Nokogiri.
Java Architecture for XML Binding (JAXB) has been a mainstay for years in the Java community.
The Unit Test suite in Example 7-16 has methods to test JSON-to-XML and XML-to-JSON conversion, and uses the following technologies:
xml2js To convert XML to/from JavaScript data structures, you can use xml2js, which is also available on GitHub.
JSON.parse() / JSON.stringify() To convert JSON to/from JavaScript structures. You can find more
information about JSON.parse() / JSON.stringify() at MDN
and in Chapter 3.
'use strict';/* Attribution: Cities Weather data provided by OpenWeatherMap API([http://openweathermap.org]) under Creative Commons Share A LikeLicense (https://creativecommons.org/licenses/by-sa/4.0).Changes were made to the data to work with json-server.This does not imply an endorsement by the licensor.This code is distributed under Creative Commons Share A Like License.*/varexpect=require('chai').expect;varjsonfile=require('jsonfile');varfs=require('fs');varxml2js=require('xml2js');describe('json-xml',function(){varjsonCitiesFileName=null;varxmlCitiesFileName=null;beforeEach(function(){varbaseDir=__dirname+'/../..';jsonCitiesFileName=baseDir+'/data/cities-weather-short.json';xmlCitiesFileName=baseDir+'/data/cities-weather-short.xml';});it('should transform cities JSON data to XML',function(done){jsonfile.readFile(jsonCitiesFileName,function(readJsonFileError,jsonObj){if(!readJsonFileError){varbuilder=newxml2js.Builder();varxml=builder.buildObject(jsonObj);console.log('\n\n\nXML Output:\n'+xml);done();}else{done(readJsonFileError);}});});it('should transform cities XML data to JSON',function(done){fs.readFile(xmlCitiesFileName,'utf8',function(readXmlFileError,xmlData){if(!readXmlFileError){varparser=newxml2js.Parser();parser.parseString(xmlData,function(error,xmlObj){if(!error){console.log('\n\n\nJSON Output:\n'+JSON.stringify(xmlObj,null,2));done();}else{done(error);}});}else{done(readXmlFileError);}});});});
The preceding code works as follows:
beforeEach() runs before any Unit Test and does setup. In this case, it builds the filenames for the
input JSON file and the output XML file.
In the 'should transform cities JSON data to XML' Unit Test:
jsonfile.readFile() reads and parses the input JSON file into a JavaScript Object (jsonObj).
xml2js.Builder() creates an Object that can convert from JSON to XML.
builder.buildObject(jsonObj) converts the JavaScript Object (from the input JSON file) into an XML
String.
In the 'should transform cities XML data to JSON' Unit Test:
We’ve shown several JSON Transform libraries to do the following:
Convert JSON to HTML
Either Mustache or JSON will work just fine.
Transform JSON to other, cleaner JSON structures
Choose Handlebars.
Convert between XML and JSON
Don’t worry about the XML/JSON conventions.
Use an XML library that works well on your platform.
Write Unit Tests that transform the content of JSON documents returned by a Web API
Use these JSON Transform techniques to convert JSON data from external APIs into data formats that are compatible with your applications.
Now that we’ve covered the JSON Ecosystem (Schema, Search, and Transform), we’ll move to the final section on JSON in the enterprise; this part of the book covers the following topics:
Hypermedia
MongoDB (NoSQL)
Messaging with Kafka
In Chapter 8, we’ll discuss Hypermedia with JSON in order to show how to interact with an API.
Imagine building an application in HTML for use in a web browser. You can add forms, links, and buttons by using standard HTML, and the browser renders your new controls without requiring a new release of the browser. In the “olden days,” it didn’t work this way. If we released a new version of our server-side application with new functionality, we often had to release a new version of the client code to pair with it. Browsers changed this expectation.
We now live in a world where “rich clients” are coming back in the form of apps on people’s devices. We could just have phones access web pages, but for various reasons, people (and companies) want native apps as icons that they can touch on their devices. So how can we get rich native apps back, while still benefitting from the configurability of the browser? Hypermedia. We send not only the data, but also the actions the user can take on the data, along with a representation of how to trigger that action.
So far, the RESTful API calls and JSON responses in this book have been isolated (without reference to other calls). Each JSON response from the Speakers API has just contained data about the speaker, but without providing any information about other related resources and actions.
Hypermedia enables a REST API to guide its Consumers on the following:
Links to other related resources (e.g., other APIs). For example, a Conference API could provide links to the Reservation, Speaker, or Venue APIs so that Consumers could learn more about the conference and the speakers, and purchase a ticket.
Semantics on the data returned by an API. This metadata documents the data in the JSON response, and defines the meaning of the data elements.
Additional actions that they can take on the current resource exposed by the API. For example, a Speakers API could provide more than just CRUD operations. How about a set of links that lead and guide a speaker through the speaker proposal process (in order to speak at a conference)?
Hypermedia groups resources together and guides a Consumer through a series of calls to achieve a business result. Think of Hypermedia as the API equivalent of a web-based shopping cart that leads the Consumer through the buying process and (hopefully) to an eventual purchase. A Hypermedia format provides a standard way for Consumers to interpret and process the link-related data elements from an API response.
In this chapter, we’ll show how to compare these well-known JSON-based Hypermedia formats:
Siren
JSON-LD
Collection+JSON
json:api
HAL
We’ll use the Speaker data from previous chapters to drive the discussion of Hypermedia formats.
The following invocation to the fictitious myconference Speakers API might return:
GEThttp://myconference.api.com/speakers/123456{"id":"123456","firstName":"Larson","lastName":"Richard","email":"larson.richard@myconference.com","tags":["JavaScript","AngularJS","Yeoman"],"age":39,"registered":true}
To see a list of a speaker’s presentations, make another API call:
GEThttp://myconference.api.com/speakers/123456/presentations[{"id":"1123","speakerId":"123456","title":"Enterprise Node","abstract":"Many developers just see Node as a way to build web APIs ...","audience":["Architects","Developers"]},{"id":"2123","speakerId":"123456","title":"How to Design and Build Great APIs","abstract":"Companies now leverage APIs as part of their online ...","audience":["Managers","Architects","Developers"]}]
Let’s see how to represent the Speaker and Presentation APIs using several Hypermedia formats.
All architects and developers have opinions that shape the way they evaluate a particular technology. Before we review and compare each Hypermedia format, I’ll let you know my opinion on Hypermedia. Hypermedia is powerful and provides rich meta-data to the data returned by an API, but it is controversial. Many people love it, and other people hate it, and I’m somewhere between these two groups.
Many people in the REST and Hypermedia communities believe that adding meta-data on operations and semantic data definitions to a JSON payload is helpful. I respect everyone’s opinion, but I believe in the use of links to other resources only for these reasons:
Additional information on operations and data definitions is unnecessary if you document your API properly in the first place. Why should the JSON data returned from each API call return information on actions and data types? This seems like clutter when you have the following situations:
OpenApi (formerly Swagger), RAML, and API Blueprint can all provide this information in an API’s documentation.
JSON Schema describes the data types for the JSON data representation.
Hypermedia adds complexity to the JSON payload returned by an API. With richer/more functional Hypermedia formats, the following are true:
The original data representation is altered and difficult to interpret. Most of the formats shown in this chapter alter or embed the original data representation of the resource, which makes it harder for Consumers to understand and process.
You have to spend more time and effort to explain how to use your API, and Consumers will move on to something simpler.
The payload is larger and takes up more network bandwidth.
Simple links to other related resources are great because they guide an API Consumer through the use of your API(s) without altering the original JSON data representation.
Structured Interface for Representing Entities (Siren) was developed in 2012.
It was designed to represent data from Web APIs, and works with both JSON and XML.
You can find Siren on GitHub.
Siren’s Internet Assigned Numbers Authority (IANA)
media type is application/vnd.siren+json.
The key concepts in Siren are as follows:
An Entity is a resource that is accessible with a URI. It has properties and Actions.
Example 8-1 shows the Speaker data in Siren format based on the following HTTP Request:
GET http://myconference.api.com/speakers/123456
Accept: application/vnd.siren+json
{"class":["speaker"],"properties":{"id":"123456","firstName":"Larson","lastName":"Richard","email":"larson.richard@myconference.com","tags":["JavaScript","AngularJS","Yeoman"],"age":39,"registered":true},"actions":[{"name":"add-presentation","title":"Add Presentation","method":"POST","href":"http://myconference.api.com/speakers/123456/presentations","type":"application/x-www-form-urlencoded","fields":[{"name":"title","type":"text"},{"name":"abstract","type":"text"},{"name":"audience","type":"text"}]}],"links":[{"rel":["self"],"href":"http://myconference.api.com/speakers/123456"},{"rel":["presentations"],"href":"http://myconference.api.com/speakers/123456/presentations"}]}
In this example, the speaker Entity is defined as follows:
class indicates the class of the resource (in this case, speaker).
properties is an Object that holds the representation of the resource. It’s the real data payload from an API response.
actions describes the Actions that can be taken on a speaker. In this case, the actions indicate that you can add a presentation to a speaker.
links provides links to self (the current resource) and presentations, a URI that returns the list of the speaker’s presentations.
Siren provides excellent metadata for describing the available actions on an Entity (resource). Siren has classes (types) to describe the data, but does not provide data definitions (semantics) like JSON-LD.
JavaScript Object Notation for Linking Data (JSON-LD) became a W3C standard in 2014.
It was designed as a data-linking format to be used with REST APIs, and it works with NoSQL databases such
as MongoDB and CouchDB. You can find more information at the main JSON-LD site, and you can find
it on GitHub. The JSON-LD
media type is application/ld+json, and .jsonld is the file extension. JSON-LD has an active community
and large working group because of its status with the W3C.
Example 8-2 shows the Speaker data in JSON-LD format based on the following HTTP Request:
GET http://myconference.api.com/speakers/123456
Accept: application/vnd.ld+json
{"@context":{"@vocab":"http://schema.org/Person","firstName":"givenName","lastName":"familyName","email":"email","tags":"http://myconference.schema.com/Speaker/tags","age":"age","registered":"http://myconference.schema.com/Speaker/registered"},"@id":"http://myconference.api.com/speakers/123456","id":"123456","firstName":"Larson","lastName":"Richard","email":"larson.richard@myconference.com","tags":["JavaScript","AngularJS","Yeoman"],"age":39,"registered":true,"presentations":"http://myconference.api.com/speakers/123456/presentations"}
In this example, the @context Object provides the overall context for the Speaker
data representation. In this case, @context does more than merely list the fields.
Rather, @context (in conjunction with @vocab) seeks to provide unambiguous semantic
meaning for each data element that comprises the speaker Object. Here are the specifics:
The Schema.org site provides unambiguous definitions for commonly used data elements such as age and Person.
@vocab sets the base type to Person and allows you to
extend it with other fields (e.g., tags or registered) for the speaker.
@id is essentially the URI, the unique ID for accessing a particular speaker.
Notice that the core JSON representation of the speaker remains unchanged, which is a major
selling point if you have an existing API. This additive approach makes it easier to adopt
JSON-LD gradually, without breaking your API Consumers. The existing JSON representation is undisturbed,
which enables you to iteratively add the semantics of data linking to your API’s data representation.
Note that http://myconference.schema.com does not exist. Rather, it’s shown for the sake of the example. If you need a definition that doesn’t exist on Schema.org, you’re free to create one on your own domain. Just be sure that you provide good documentation.
Example 8-3 shows a speaker’s list of presentations in JSON-LD format based on the following HTTP Request:
GET http://myconference.api.com/speakers/123456/presentations
Accept: application/vnd.ld+json
{"@context":{"@vocab":"http://myconference.schema.com/","presentations":{"@type":"@id","id":"id","speakerId":"speakerId","title":"title","abstract":"abstract","audience":"audience"}},"presentations":[{"@id":"http://myconference.api.com/speakers/123456/presentations/1123","id":"1123","speakerId":"123456","title":"Enterprise Node","abstract":"Many developers just see Node as a way to build web APIs or ...","audience":["Architects","Developers"]},{"@id":"http://myconference.api.com/speakers/123456/presentations/2123","id":"2123","speakerId":"123456","title":"How to Design and Build Great APIs","abstract":"Companies now leverage APIs as part of their online strategy ...","audience":["Managers","Architects","Developers"]}]}
In this example, @context indicates that all the data is related to the concept of
presentations. In this case, we need to define presentations inline because the
http://myconference.schema.com/presentations Object doesn’t exist. If the Object did exist, the
@context would look like this:
"@context":"http://myconference.schema.com/presentations"
You can try out the preceding example on the JSON-LD Playground. This is an excellent online tester that validates JSON-LD documents. Use this tool to validate your data format before writing the code for your API.
JSON-LD by itself does not provide information on operations, nor does it provide semantics on the data representations. HYDRA is an add-on to JSON-LD that provides a vocabulary to specify client-server communication.
Here’s where to find more information on HYDRA:
Example 8-4 shows the list of presentations in JSON-LD format enhanced with HYDRA operations:
GET http://myconference.api.com/speakers/123456/presentations
Accept: application/vnd.ld+json
{"@context":["http://www.w3.org/ns/hydra/core",{"@vocab":"http://myconference.schema.com/","presentations":{"@type":"@id","id":"id","speakerId":"speakerId","title":"title","abstract":"abstract","audience":"audience"}}],"presentations":[{"@id":"http://myconference.api.com/speakers/123456/presentations/1123","id":"1123","speakerId":"123456","title":"Enterprise Node","abstract":"Many developers just see Node as a way to build web APIs or ...","audience":["Architects","Developers"]},{"@id":"http://myconference.api.com/speakers/123456/presentations/2123","id":"2123","speakerId":"123456","title":"How to Design and Build Great APIs","abstract":"Companies now leverage APIs as part of their online strategy ...","audience":["Managers","Architects","Developers"]}],"operation":{"@type":"AddPresentation","method":"POST","expects":{"@id":"http://schema.org/id","supportedProperty":[{"property":"title","range":"Text"},{"property":"abstract","range":"Text"}]}}}
Note the following in this example:
operation indicates that you can add a presentation with a POST.
@context points to the HYDRA domain to add the operation keyword.
@vocab adds in the http://myconference.schema.com/ domain and the presentations definition.
JSON-LD by itself is great, because it provides links to other related resources without altering the original data representation. In other words, JSON-LD does not introduce breaking changes to your API Consumers. For the sake of simplicity, use JSON-LD without the overhead of HYDRA.
Collection+JSON was created in 2011, focuses on handling data items in a collection, and is similar to the
Atom Publication/Syndication formats. You can find more information at the main Collection+JSON site,
and on GitHub.
The Collection+JSON media type is application/vnd.collection+json.
To be valid, a Collection+JSON response must have a top-level collection Object that holds the following:
Example 8-5 shows the Speaker data in Collection+JSON format based on the following HTTP request:
GET http://myconference.api.com/speakers/123456
Accept: application/vnd.collection+json
{"collection":{"version":"1.0","href":"http://myconference.api.com/speakers","items":[{"href":"http://myconference.api.com/speakers/123456","data":[{"name":"id","value":"123456"},{"name":"firstName","value":"Larson"},{"name":"lastName","value":"Richard"},{"name":"email","value":"larson.richard@myconference.com"},{"name":"age","value":"39"},{"name":"registered","value":"true"}],"links":[{"rel":"presentations","href":"http://myconference.api.com/speakers/123456/presentations","prompt":"presentations"}]}]}}
Note the following in this example:
The collection Object encapsulates the Speaker data.
The items Array contains all objects in the Speaker collection. Because we queried by ID, there’s
only one Object in the collection.
The data Array contains name/value pairs for each data element that comprises a Speaker.
The links Array provides link relationships to resources related to the speaker. Each link is composed
of:
Collection+JSON also provides the ability to read, write, and query items in a collection, but a full discussion of Collection+JSON is outside the scope of this book. Visit http://amundsen.com/media-types/collection/examples/ for examples, and http://amundsen.com/media-types/tutorials/collection/tutorial-01.html for a tutorial.
Collection+JSON does a nice job of providing link relations, but it completely changes the structure
of the Speaker data by converting it to key/value pairs inside the data Array.
json:api was developed in 2013 and provides conventions for standardizing the format of JSON
requests/responses to/from an API. Although json:api’s main focus is on API request/response data, it also
includes Hypermedia. You can find more information at the main json:api site and on GitHub. The
json:api media type is application/vnd.api+json.
A valid json:api document must have one of the following elements at the top level:
data The data representation for the resource. This contains resource Objects, each of which must have
a type (specifies the data type) and id (unique resource ID) field.
errors An Array of error Objects that shows an error code and message for each error encountered by the API.
meta Contains nonstandard metadata (e.g., copyright and authors, etc.).
Optional top-level elements include the following:
links An Object that holds link relations (hyperlinks) to resources related to the primary resource.
included An Array of embedded resource Objects that are related to the primary resource.
Example 8-6 shows a list of Speakers in json:api format based on the following HTTP Request:
GET http://myconference.api.com/speakers
Accept: application/vnd.api+json
{"links":{"self":"http://myconference.api.com/speakers","next":"http://myconference.api.com/speakers?limit=25&offset=25"},"data":[{"type":"speakers","id":"123456","attributes":{"firstName":"Larson","lastName":"Richard","email":"larson.richard@myconference.com","tags":["JavaScript","AngularJS","Yeoman"],"age":39,"registered":true}},{"type":"speakers","id":"223456","attributes":{"firstName":"Ester","lastName":"Clements","email":"ester.clements@myconference.com","tags":["REST","Ruby on Rails","APIs"],"age":29,"registered":true}},...]}
This example works as follows:
The links Array provides link relationships to resources related to the speaker. In this case, each
element contains the URI to the related resource. Note that there are no restrictions/qualifications
on the link names, but self is commonly understood as the current resource, and next paginate.
The data Array contains a list of the resource objects, each of which has a type (e.g., speakers)
and id to meet the requirements of the json:api format definition. The attributes object holds
the key/value pairs that make up each speaker Object.
Example 8-7 shows how to embed all presentation Objects for a speaker with json:api:
GET http://myconference.api.com/speakers/123456
Accept: application/vnd.api+json
{"links":{"self":"http://myconference.api.com/speakers/123456"},"data":[{"type":"speaker","id":"123456","attributes":{"firstName":"Larson","lastName":"Richard","email":"larson.richard@myconference.com","tags":["JavaScript","AngularJS","Yeoman"],"age":39,"registered":true}}],"included":[{"type":"presentations","id":"1123","speakerId":"123456","title":"Enterprise Node","abstract":"Many developers just see Node as a way to build web APIs or ...","audience":["Architects","Developers"]},{"type":"presentations","id":"2123","speakerId":"123456","title":"How to Design and Build Great APIs","abstract":"Companies now leverage APIs as part of their online ...","audience":["Managers","Architects","Developers"]}]}
In this example, the included Array (part of the json:api specification) specifies
the embedded presentations for the speaker. Although embedding resources reduces the number of API
calls, it introduces tight data coupling between resources because the speaker needs to know the format
and content of the presentation data.
Example 8-8 provides a better way to show relationships between resources with links:
GET http://myconference.api.com/speakers/123456
Accept: application/vnd.api+json
{"links":{"self":"http://myconference.api.com/speakers/123456","presentations":"http://myconference.api.com/speakers/123456/presentations"},"data":[{"type":"speaker","id":"123456","attributes":{"firstName":"Larson","lastName":"Richard","email":"larson.richard@myconference.com","tags":["JavaScript","AngularJS","Yeoman"],"age":39,"registered":true}}]}
In this example, the links Array shows that the speaker has presentations and provides a URI,
but the speaker resource (and API) doesn’t know about the data in the presentation resource. Plus,
there’s less data for the Consumer to process. This loose coupling enables the presentation data to change
without impacting the Speakers API.
json:api has a rich feature set including standardized error messages, pagination, content
negotiation, and policies for Creating/Updating/Deleting resources. In the past, I’ve borrowed portions of
the json:api specification to create API style guides. Plus, there are excellent libraries for most platforms
that simplify working with json:api. The data Array and its resource Objects (which require a type
and id) alter the JSON data representation, but the rest of the Object remains the same. A full discussion
of json:api is outside the scope of this book; visit the JSON API page for examples, and the full specification.
Hypertext Application Language (HAL) became an IETF standard in 2012.
It was designed as a way to link resources using hyperlinks, and works with either JSON or XML.
You can find more information at the main HAL site and on
GitHub.
The HAL media types are application/hal+json and application/hal+xml.
HAL’s format is simple, readable, and doesn’t alter the original data representation. HAL is a popular media type, and is based on the following:
Resources contain links (contained in a _links Object), other resources, and embedded
resources (e.g., an Order contains items) contained in an _embedded Object.
Links provide target URIs that lead to other external resources.
Both the _embedded and _links objects are optional, but one must be present
as the top-level object so that you have a valid HAL document.
Example 8-9 shows the Speaker data in HAL format based on the following HTTP Request:
GET http://myconference.api.com/speakers/123456
Accept: application/vnd.hal+json
{"_links":{"self":{"href":"http://myconference.api.com/speakers/123456"},"presentations":{"href":"http://myconference.api.com/speakers/123456/presentations"}},"id":"123456","firstName":"Larson","lastName":"Richard","email":"larson.richard@myconference.com","tags":["JavaScript","AngularJS","Yeoman"],"age":39,"registered":true}
This example works as follows:
The _links object contains link relations, each of which shows the semantic meaning of a link.
The link relations are as follows:
self is a link to the current speaker resource (self).
presentations are the presentations that this speaker will deliver. In this case,
the presentations Object describes the relationship between the current resource and the
http://myconference.api.com/speakers/123456/presentations hyperlink (through the href key).
Note that next and find are not HAL keywords. HAL allows you to have
custom names for link objects.
Let’s make the example more interesting by getting a list of speakers, as shown in Example 8-10.
GET http://myconference.api.com/speakers
Accept: application/vnd.hal+json
{"_links":{"self":{"href":"http://myconference.api.com/speakers"},"next":{"href":"http://myconference.api.com/speakers?limit=25&offset=25"},"find":{"href":"http://myconference.api.com/speakers{?id}","templated":true}},"speakers":[{"id":"123456","firstName":"Larson","lastName":"Richard","email":"larson.richard@myconference.com","tags":["JavaScript","AngularJS","Yeoman"],"age":39,"registered":true},{"id":"223456","firstName":"Ester","lastName":"Clements","email":"ester.clements@myconference.com","tags":["REST","Ruby on Rails","APIs"],"age":29,"registered":true},...]}
This example works as follows:
In addition to self, here are the following link relations:
next indicates the next set of speaker resources. In other words, this is a way to provide pagination
for an API. In this case, the limit parameter indicates that 25 speaker Objects will be returned in
each API call. The offset parameter indicates that we’re at the 26th Object in the list. This convention
is similar to Facebook’s pagination style.
find provides a hyperlink to find an individual speaker with a templated link, where
{?id} indicates to the caller that they can find the speaker by id in the URI. The templated key
indicates that this is a templated link.
The JSON data representation remains unchanged.
Returning to our first example, let’s embed all presentation Objects for a speaker, as shown in Example 8-11:
GET http://myconference.api.com/speakers/123456
Accept: application/vnd.hal+json
{"_links":{"self":{"href":"http://myconference.api.com/speakers/123456"},"presentations":{"href":"http://myconference.api.com/speakers/123456/presentations"}},"_embedded":{"presentations":[{"_links":{"self":{"href":"http://myconference.api.com/speakers/123456/presentations/1123"}},"id":"1123","title":"Enterprise Node","abstract":"Many developers just see Node as a way to build web APIs ...","audience":["Architects","Developers"]},{"_links":{"self":{"href":"http://myconference.api.com/speakers/123456/presentations/2123"}},"id":"2123","title":"How to Design and Build Great APIs","abstract":"Companies now leverage APIs as part of their online ...","audience":["Managers","Architects","Developers"]}]},"id":"123456","firstName":"Larson","lastName":"Richard","email":"larson.richard@myconference.com","tags":["JavaScript","AngularJS","Yeoman"],"age":39,"registered":true}
In this example, instead of the presentations link relation, we’re using the
_embedded Object to embed the presentation Objects for a speaker. Each presentation Object in turn has a _links Object for related resources.
At first glance, embedding related resources looks reasonable, but I prefer link relations instead for the following reasons:
Embedded resources increase the size of the payload.
The _embedded Object alters the data representation.
It couples the Speakers and Presentation APIs. The Speakers API now has to know about the data structure
of the presentations. With a simple presentations link relation, the Speakers API knows only that there
is a related API.
HAL (minus the embedded resources) is lightweight and provides links to other resources without altering the data representation.
Here’s the bottom line on Hypermedia: keep it simple. Maintain the original structure of the resource representation. Provide solid documentation for your API as part of the design process, and much of the need for Hypermedia (actions, documentation, data typing) is already taken care of. For me, the most useful parts of Hypermedia are the links to other resources. Proponents of full Hypermedia may vehemently disagree (and that’s OK), but here’s my rebuttal:
If your API is difficult to understand, people won’t want to use it.
The original JSON representation is the most important thing. Don’t alter the structure of the resource just for the sake of adhering to a Hypermedia format.
With these considerations in mind, I choose a minimal HAL structure (links only, without embedded resources) as my Hypermedia format. With these caveats, HAL is excellent because it
Is the simplest possible thing that can work
Is a standard
Enjoys wide community support
Has solid cross-platform libraries
Doesn’t alter my JSON data representation
Doesn’t impose requirements for data semantics and operations
Does just what I want, and not a bit more
json:api (with links rather than embedded resources) is my second choice for Hypermedia because it
standardizes JSON requests/responses in addition to providing Hypermedia capabilities, and still respects
the integrity and intent of the original JSON data representation. Of the Hypermedia formats that alter the
JSON data representation, json:api appears to have the least impact. Because of its wide
cross-platform support, you can reduce the formatting work by leveraging a json:api library for your
programming language (this shortens and simplifies development). json:api deserves strong consideration
if you need more than just Hypermedia, and you want to standardize JSON requests/responses across all the
APIs in your enterprise (but API design is outside the scope of this book).
JSON-LD (without HYDRA) is my third favorite Hypermedia format because it’s simple and doesn’t change the JSON data representation. Although the data semantics are not hard to add to an existing API, I don’t see a need for this, because good API documentation combined with JSON Schema does a better job of defining the meaning and structure of the data.
You may disagree with my opinion on Hypermedia, but imagine you’re the architect or team lead and you’re asking your team to use all aspects of Hypermedia to develop an API. Would your developers see Hypermedia as being useful or burdensome? Harkening back to the original days of eXtreme Programming (XP), do the simplest thing that could possibly work. Use the right tools and techniques for the job, and take the following approach:
Document your API properly with OpenApi/Swagger or RAML.
Define your data constructs by using JSON Schema.
Choose HAL, json:api, or JSON-LD as your Hypermedia format, and start out with simple links to related
resources.
Evaluate how well the development process is going:
What’s the team velocity?
How testable is the API?
Ask your API Consumers for feedback. Can they
Easily understand the data representation?
Read and consume the data?
Iterate and evaluate early and often.
Then, see whether you need to add in the operations and data definitions; you probably won’t.
Here are some things to think about when you consider adding Hypermedia to an API:
Hypermedia is not well understood in the community. When I speak on this topic, many developers haven’t heard of it, know little about it, or don’t know what it’s used for. Some education is required even with the simplest Hypermedia format.
Lack of standardization. We’ve covered five of the leading formats, but there are more. Only two (HAL and JSON-LD) in this chapter are backed by a standards body. So there’s no consensus in the community.
Hypermedia (regardless of the format) requires additional serialization/deserialization by both the API Producer and Consumer. So, be sure to choose a widely used Hypermedia format that provides cross-platform library support. This makes life easier for developers. We’ll cover this in the next section when we test with HAL.
As in previous chapters, we’ll test against a Stub API (that provides a JSON response) that doesn’t require us to write any code.
To create the stub, we’ll use the Speaker data from earlier chapters as our test data, which is available
on GitHub,
and deploy it as a RESTful API. Again, we’ll leverage the json-server Node.js module to serve up the
speakers.json file as a Web API. If you need to install json-server, refer to “Install npm Modules” in Appendix A.
Here’s how to run json-server on port 5000 from your local machine:
cd chapter-8/data

json-server -p 5000 ./speakers-hal-server-next-rel.json
Visit http://localhost:5000/speakers in Postman (which we used in earlier
chapters), select GET as the HTTP verb, and click the Send button. You should see all the speakers from
our Stub API, as shown in Figure 8-1.
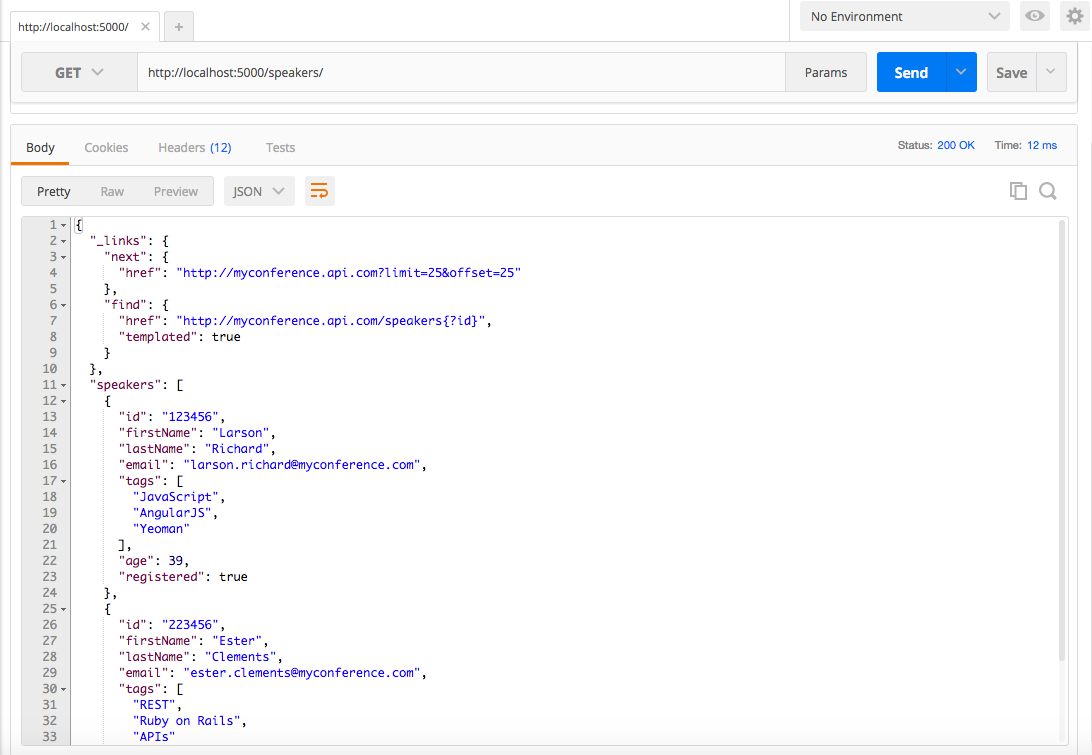
This URI is also viewable from your browser.
Note that we had to massage the Speaker data to work with json-server for this example. Example 8-12 shows the
updated structure that works with HAL.
{"speakers":{"_links":{"self":{"href":"http://myconference.api.com/speakers"},"next":{"href":"http://myconference.api.com?limit=25&offset=25"},"find":{"href":"http://myconference.api.com/speakers{?id}","templated":true}},"speakers":[{"id":"123456","firstName":"Larson","lastName":"Richard","email":"larson.richard@myconference.com","tags":["JavaScript","AngularJS","Yeoman"],"age":39,"registered":true},{"id":"223456","firstName":"Ester","lastName":"Clements","email":"ester.clements@myconference.com","tags":["REST","Ruby on Rails","APIs"],"age":29,"registered":true}]}}
In this example, the outer speakers Object is needed so that json-server will serve up the file
with the proper URI: http://localhost:5000/speakers. The rest of the data (links Object and
speakers Array) remain the same.
Now that we have the API in place, let’s create a Unit Test. We will continue to leverage Mocha/Chai (within
Node.js), just as we saw in previous chapters. Before going further, be sure to set up your test
environment. If you haven’t installed Node.js yet, then refer to Appendix A, and
install Node.js (see “Install Node.js” and “Install npm Modules”). If you want to follow along
with the Node.js project provided in the code examples, cd to chapter-8/myconference and do the
following to install all dependencies for the project:
npm install
If you’d like to set up the Node.js project yourself, follow the instructions in the book’s GitHub repository.
Here are the npm modules in our Unit Test:
We’ve used this in previous chapters to invoke RESTful APIs.
A HAL parser available at https://www.npmjs.com/package/halfred. The corresponding GitHub repository can be found at https://github.com/basti1302/halfred.
The following Unit Test shows how to validate the HAL response from the (Stub) Speakers API.
'use strict';varexpect=require('chai').expect;varunirest=require('unirest');varhalfred=require('halfred');describe('speakers-hal',function(){varreq;beforeEach(function(){halfred.enableValidation();req=unirest.get('http://localhost:5000/speakers').header('Accept','application/json');});it('should return a 200 response',function(done){req.end(function(res){expect(res.statusCode).to.eql(200);expect(res.headers['content-type']).to.eql('application/json; charset=utf-8');done();});});it('should return a valid HAL response validated by halfred',function(done){req.end(function(res){varspeakersHALResponse=res.body;varresource=halfred.parse(speakersHALResponse);varspeakers=resource.speakers;varspeaker1=null;console.log('\nValidation Issues: ');console.log(resource.validationIssues());expect(resource.validationIssues()).to.be.empty;console.log(resource);expect(speakers).to.not.be.null;expect(speakers).to.not.be.empty;speaker1=speakers[0];expect(speaker1.firstName).to.not.be.null;expect(speaker1.firstName).to.eql('Larson');done();});});});
This Unit Test runs as follows:
beforeEach(function() runs before each test, and does the following:
The 'should return a 200 response' test ensures that the Stub API has a successful HTTP response.
The 'should return a valid HAL response validated by halfred' test is the main test, and does the
following:
Invokes halfred.parse() to parse the HAL response from the Stub API. This call returns a halfred
Response object that contains the HAL links and the remaining JSON payload. Please see the halfred
documentation for more information
Uses chai to check for validation errors in the HAL response by testing resource.validationIssues().
We’ll see this call in action when we test with invalid data in our second run of the Unit Test that follows
Uses chai to ensure that the Response object still contains the original speakers Array in the
payload
When you run the Unit Test with npm test, it will pass because the Stub API produces valid HAL data. You
should see the following:
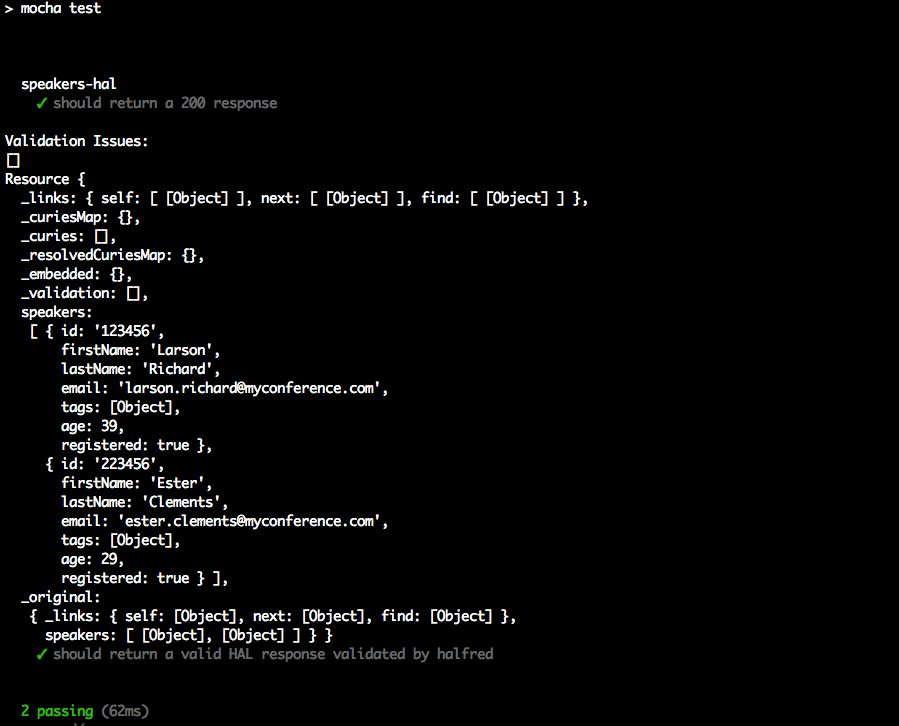
Now that we’ve shown how to validate HAL data, we’ll change the data served up by the Stub API so that it
responds with invalid HAL data. Let’s remove the link to self in the _links object as shown in Example 8-14.
{"speakers":{"_links":{"next":{"href":"http://myconference.api.com?limit=25&offset=25"},"find":{"href":"http://myconference.api.com/speakers{?id}","templated":true}},...}}
Remember that the HAL specification requires the _links object to contain a reference to self.
Restart json-server with the invalid HAL data as follows:
cd chapter-8/data

json-server -p 5000 ./speakers-hal-server-next-rel-invalid.json
Rerun the test, and you should see that halfred catches the HAL validation issue and that the test now
fails:

We’ve shown how to use HAL from the client side with Unit Tests, but the server-side was deployed as a Stub
(using json-server and a JSON file that follows the HAL specification). We have limited server-side coverage
throughout this book to keep the focus on JSON. But here are some server-side libraries that will enable
your RESTful APIs to render HAL-based responses:
Spring HATEOS provides HAL support for Spring-based RESTful APIs in Java. You can find a good tutorial in the Spring documentation.
The roar gem provides HAL support for Ruby on Rails.
express-hal
adds HAL to Express-based NodeJS RESTful APIs.
Regardless of your development platform and which Hypermedia format you choose, be sure to do a spike implementation to test a library before committing to it as a solution. It’s important to ensure that the library is easy to use and that it doesn’t get in the way.
Now that we’ve shown how JSON works with Hypermedia, we’ll move on to Chapter 9 to show how JSON works with MongoDB.
MongoDB is a NoSQL database that enables developers to persist data in document form. This document-based approach works well with JSON, which is also document-oriented. The MongoDB data model is hierarchical, and supports rich data types similar to those we’ve seen in typical JSON documents. Just like JSON documents, MongoDB documents integrate well with Object-Oriented platforms because documents are compatible with Objects, so developers can move data in/out of the database with little or no extra mapping logic. This approach is intuitive to developers and reduces development effort needed to access the database.
In this chapter, we’ll show how to do the following:
Import a JSON document into MongoDB
Perform core CRUD operations with MongoDB
Export MongoDB data to a JSON document
Access MongoDB as a Mock/Stub RESTful API (without writing code)
This chapter focuses on using JSON with MongoDB and provides just enough information to work with the database. This chapter doesn’t cover how to develop applications with MongoDB because that would fill an entire book. For a full description of the rich functionality provided by MongoDB, I recommend reading MongoDB in Action, 2nd Ed by Kyle Banker et al. (Manning).
You may have seen references to Binary JSON (BSON) in the MongoDB documentation. BSON is a binary data format that MongoDB uses internally to serialize JSON documents. See the following for further details:
You can also use BSON to add richer data types to a JSON document.
But for our purposes in this chapter:
JSON is all you need to know to access the database.
JSON is the external interface to MongoDB, and BSON is used only internally by MongoDB.
Before we go any further, let’s install MongoDB. Refer to “Install MongoDB” in Appendix A. With MongoDB in place, you’ll be able to run and build on the examples in this chapter.
MongoDB comprises the following:
The command shell, which is written in JavaScript.
Database drivers, which enable developers to access MongoDB from their platform. 10gen, the creator of MongoDB, provides support for many languages, including Java, Ruby, JavaScript, Node.js, C++, C#/.Net, and many others. Check the MongoDB site for the official supported drivers.
Command-line tools:
The mongod process is similar to other database servers; it accepts connections and processes
commands for Create/Read/Update/Delete (CRUD) operations on the data. Let’s start mongod from the
(macOS and Linux) command line:
mongod &
If MongoDB was installed properly, the log from the initial startup should look similar to this:
2016-06-29T11:05:37.960-0600 I CONTROL  [initandlisten] MongoDB starting : pid...
2016-06-29T11:05:37.961-0600 I CONTROL  [initandlisten] db version v3.2.4
2016-06-29T11:05:37.961-0600 I CONTROL  [initandlisten] git version: e2ee9ffcf...
2016-06-29T11:05:37.961-0600 I CONTROL  [initandlisten] allocator: system
2016-06-29T11:05:37.961-0600 I CONTROL  [initandlisten] modules: none
2016-06-29T11:05:37.961-0600 I CONTROL  [initandlisten] build environment:
2016-06-29T11:05:37.961-0600 I CONTROL  [initandlisten]     distarch: x86_64
2016-06-29T11:05:37.961-0600 I CONTROL  [initandlisten]     target_arch: x86_64
2016-06-29T11:05:37.961-0600 I CONTROL  [initandlisten] options: { config: "/u...
2016-06-29T11:05:37.962-0600 I -        [initandlisten] Detected data files in...
2016-06-29T11:05:37.963-0600 W -        [initandlisten] Detected unclean shutd...
2016-06-29T11:05:37.973-0600 I JOURNAL  [initandlisten] journal dir=/usr/local...
2016-06-29T11:05:37.973-0600 I JOURNAL  [initandlisten] recover begin
2016-06-29T11:05:37.973-0600 I JOURNAL  [initandlisten] info no lsn file in jo...
2016-06-29T11:05:37.973-0600 I JOURNAL  [initandlisten] recover lsn: 0
2016-06-29T11:05:37.973-0600 I JOURNAL  [initandlisten] recover /usr/local/var...
2016-06-29T11:05:37.974-0600 I JOURNAL  [initandlisten] recover applying initi...
2016-06-29T11:05:37.976-0600 I JOURNAL  [initandlisten] recover cleaning up
2016-06-29T11:05:37.976-0600 I JOURNAL  [initandlisten] removeJournalFiles
2016-06-29T11:05:37.977-0600 I JOURNAL  [initandlisten] recover done
2016-06-29T11:05:37.996-0600 I JOURNAL  [durability] Durability thread started
2016-06-29T11:05:37.996-0600 I JOURNAL  [journal writer] Journal writer thread...
2016-06-29T11:05:38.329-0600 I NETWORK  [HostnameCanonicalizationWorker] Start...
2016-06-29T11:05:38.330-0600 I FTDC     [initandlisten] Initializing full-time...
2016-06-29T11:05:38.330-0600 I NETWORK  [initandlisten] waiting for connection...
2016-06-29T11:05:39.023-0600 I FTDC     [ftdc] Unclean full-time diagnostic da...
Out of the box, mongod listens on port 27017, but you can change the port as follows:
mongod --port <your-port-number>
To stop the server, type the following from the command line:
kill <pid>
Here, <pid> is the Process ID (PID) of the mongod process.
Never use kill -9 because this could corrupt the database.
Now that we have the server up and running, let’s import our Speaker data into the database.
We’ll leverage the mongoimport tool to upload the speakers.json file into MongoDB. Even though we’ve
been using the same Speaker data throughout the book, we need to remove the following outer root document
and the Array name:
{"speakers":[]}
The speakers.json file now looks like Example 9-1.
[{"fullName":"Larson Richard","tags":["JavaScript","AngularJS","Yeoman"],"age":39,"registered":true},{"fullName":"Ester Clements","tags":["REST","Ruby on Rails","APIs"],"age":29,"registered":true},{"fullName":"Christensen Fisher","tags":["Java","Spring","Maven","REST"],"age":45,"registered":false}]
This change was needed because we don’t want to insert the contents of the JSON file as an entire
document. If we did that, the result would be a single speakers Array document in the database.
Instead, we want a simple collection of individual speaker documents, each of which corresponds to a
speaker Object from the input file.
When you execute mongoimport from the command line, you should see this:
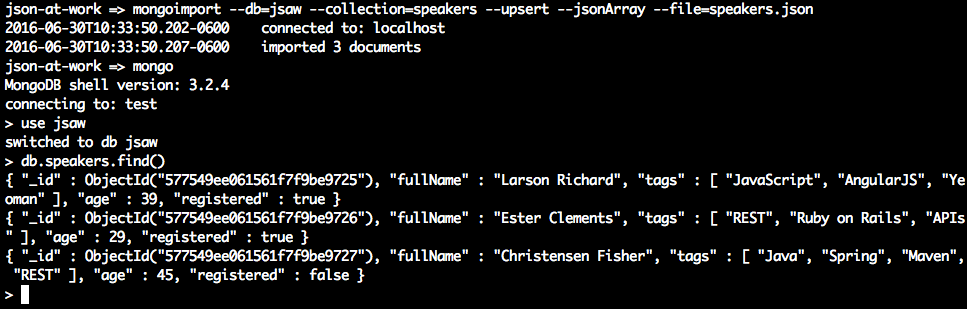
In this example, we used the following:
mongoimport to import the speakers JSON file into the speakers collection in the jsaw database.
mongo to access MongoDB, and select all documents from the speakers collection. See the
next section for further details.
Table 9-1 shows how basic MongoDB concepts relate to relational databases.
| MongoDB | Relational |
|---|---|
Database |
Database instance |
Collection |
Table |
Document |
Row |
Now that the MongoDB server is up and running with some data, it’s time to access the database and start
working with the Speaker data. The mongo shell (which was shown in the previous example) provides MongoDB access from the
command line. Start mongo as follows:
mongo defaults to the test database. We’ll use another database called jsaw (JSON at Work)
to keep the Speaker data separate:
The use command switches context to the jsaw database so that all future commands will affect only
that database. But you may be wondering how the jsaw database was created. This happens in two ways:
Through the mongoimport tool. The --db=jsaw and --collection-speakers command-line options from the
initial import created the speakers collection in the jsaw database.
By inserting a document into a collection from the mongo shell. We’ll show how to do this in the next
section.
To exit the shell, type exit at the prompt. This ends the shell session and returns control back
to the command line.
We’ve worked with some basic operations with the mongo shell, and now we’ll use it for CRUD
operations to modify the Speaker data. The MongoDB query language used in
the shell is based on JavaScript, which makes it easy to access JSON-based documents.
Here’s how to get all documents in the speakers collection (which was just imported into MongoDB):
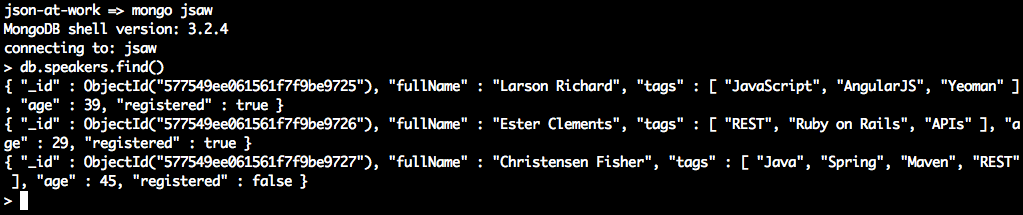
Here’s a breakdown of the shell command (db.speakers.find()):
Shell commands start with db.
speakers is the collection name.
The find() without a query parameter returns all documents from the speakers collection.
Going back to the shell output, notice that the data returned looks like JSON, and it’s so close.
Copy the output from the shell and paste it into JSONLint.
Click the Validate JSON button, and you’ll see that it complains about the _id field.
MongoDB inserted the _id field (an Object ID that serves as a Primary Key) when mongoimport
imported the Speakers data from the JSON input file and created the speakers collection. The output from the MongoDB
shell is not valid JSON because of the following:
It lacks the surrounding Array brackets ([]).
The ObjectId(…) is not a valid JSON value. Valid values include Numbers, Booleans, and double-quoted
Strings.
There are no commas to separate the speaker documents.
We’ve shown how to import valid JSON into MongoDB, and later we’ll show how to export MongoDB collections as valid JSON after going through the remaining CRUD operations.
To return only those speakers who are present on REST, add a query to the find() method:

In this example, we added a query, {tags:'REST’}, which returns only speaker documents
that contain the value 'REST' in their tags Array. The MongoDB query language is based on
JavaScript Object Literal syntax. JavaScript: The Definitive Guide 6th Ed. by David Flanagan (O’Reilly) can
help you improve your knowledge of JavaScript Objects.
Use the following command to get the number of documents in the speakers collection:
> db.speakers.count()
3
Our new speaker, Carl ClojureDev, has decided to add Scala to his technical repertoire.
To add this language to the tags Array, do the following:
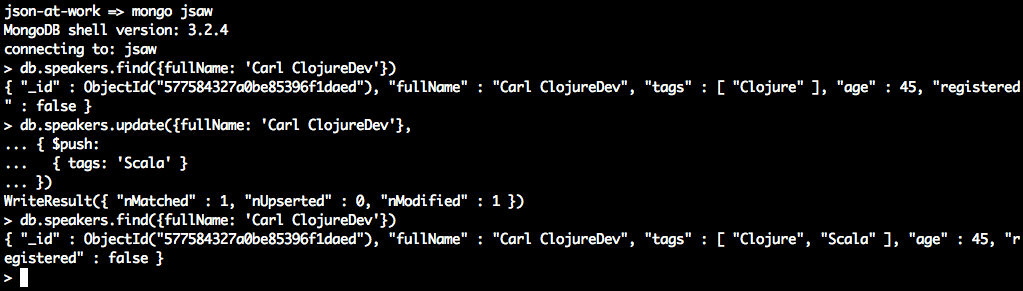
This example uses the update() function as follows:
The {fullName: 'Carl ClojureDev'} query finds the speaker document to update.
The $push operator adds 'Scala' to the tags Array. This is similar to the push() function
in JavaScript.
Note that many other operators support the update() function, such as $set, but
be careful because it sets a field to a completely new value.
Finally, let’s delete the Carl Clojuredev speaker from the collection:
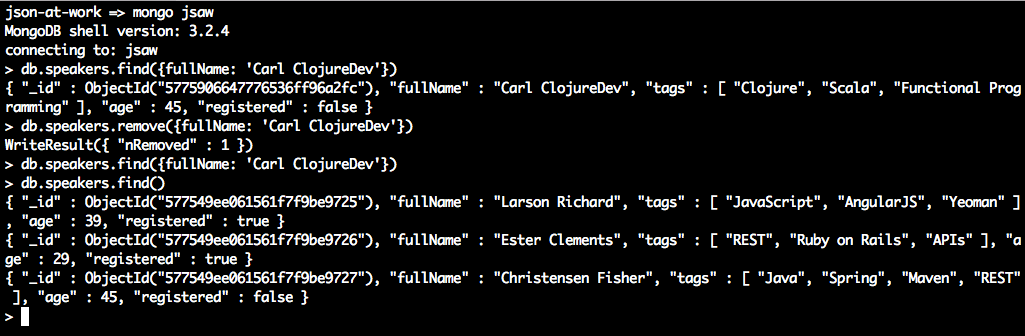
Here we use the remove() function with the {fullName: 'Carl ClojureDev'} query to
delete only that document. Subsequent calls to find() show that this document was deleted
without affecting the rest of the documents in the speakers collection.
Now that we’re comfortable with the MongoDB server and shell, let’s export the data to a valid JSON
document. Use the mongoexport tool as follows, and you should see this:
json-at-work=>mongoexport--db=jsaw--collection=speakers--pretty--jsonArray2016-06-30T12:58:32.270-0600connectedto:localhost[{"_id":{"$oid":"577549ee061561f7f9be9725"},"fullName":"Larson Richard","tags":["JavaScript","AngularJS","Yeoman"],"age":39,"registered":true},{"_id":{"$oid":"577549ee061561f7f9be9726"},"fullName":"Ester Clements","tags":["REST","Ruby on Rails","APIs"],"age":29,"registered":true},{"_id":{"$oid":"577549ee061561f7f9be9727"},"fullName":"Christensen Fisher","tags":["Java","Spring","Maven","REST"],"age":45,"registered":false}]2016-06-30T12:58:32.271-0600exported3records
The mongoexport command in the above example pulls the data from the speakers collection in the jsaw
database and pretty-prints a JSON array to Standard Output. This is a good start, but we need to remove the
MongoDB Object ID (_id) so we have valid JSON and can use the data outside MongoDB. Other
tools are needed to filter out the _id field because the mongoexport utility will always output the _id.
We can get the JSON format we want by combining tools, and jq is just the right tool for the job.
As you’ll recall from Chapter 6, jq is an amazing command-line utility that not only
searches JSON but also has excellent filtering capabilities. jq doesn’t provide the full-blown JSON Transform
capabilities of Handlebars (see Chapter 7), but it’s more than adequate for our needs.
By piping the output from mongoexport to jq, you should see the following:
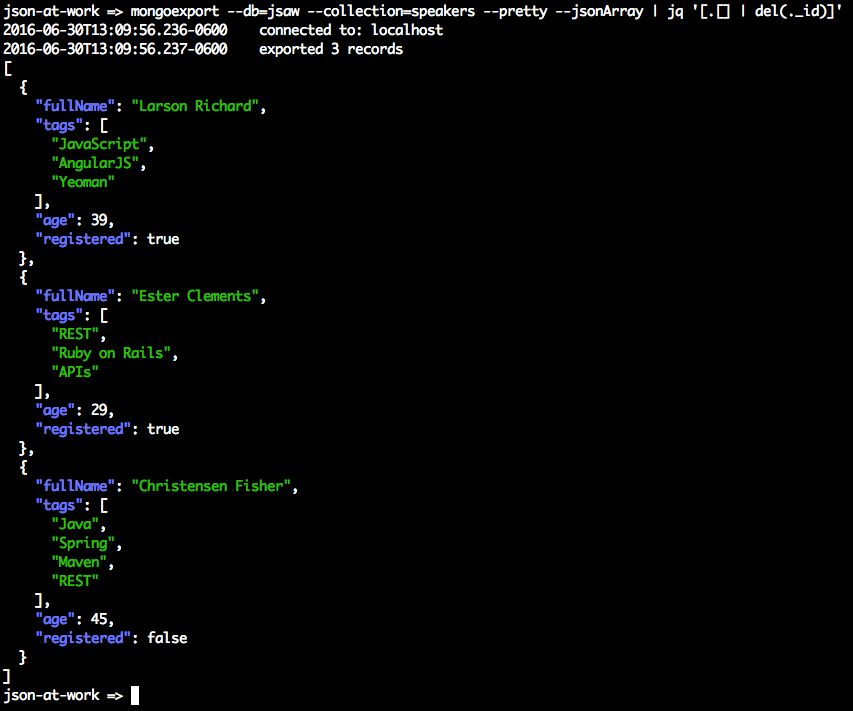
The output is everything we’re looking for: a valid JSON Array of speaker Objects without the MongoDB
Object ID. Here’s a breakdown of the command line:
The mongoexport command is as follows:
--db=jsaw --collection=speakers specifies the speakers collection in the jsaw database.
--pretty --jsonArray ensures that the output is a pretty-printed JSON array.
The mongoexport output goes to Standard Output and gets piped to jq.
The jq expression [.[] | del(._id)] works as follows:
The outer array brackets ([]) ensure that the JSON Array, Objects, and Fields/Keys are preserved in the
final output.
The .[] tells jq to look at the whole Array.
The pipe to the del(._id) command tells jq to delete the _id field from the output.
The jq output goes to Standard Output, which could serve as input to a file.
This is a practical example of the power of jq. Although the jq syntax is a bit terse, it’s
a great addition to your JSON toolbelt. For more details on jq, refer to Chapter 6. You can
also visit the jq manual.
MongoDB is schemaless, which means that the database neither validates data nor does it requires a Schema in order to store data. But the data stored in each document still has a structure that applications expect so that they can reliably work with collections and documents. Object Document Mappers (ODMs) provide additional features on top of MongoDB:
A Schema that validates the data and enforces a common data structure
Object modeling
Object-based data access
There is no single, cross-platform ODM for MongoDB. Rather, each platform has its own library.
Node.js developers typically use Mongoose.
Here’s a brief example of how to specify a speaker Schema, create a model, and insert a speaker into the
database:
varmongoose=require('mongoose');varSchema=mongoose.Schema;mongoose.connect('mongodb://localhost/jsaw');// Specify the Speaker schema.varspeakerSchema=newSchema({fullName:String,tags:[String],age:Number,registered:Boolean});// Create the Speaker model.varSpeaker=mongoose.model('Speaker',speakerSchema);varspeaker=newSpeaker({fullName:'Carl ClojureDev',tags:['Clojure','Functional Programming'],age:45,registered:false});speaker.save(function(err){if(err){console.log(err);}else{console.log('Created Speaker: '+speaker.fullName);}});
A Mongoose model is a constructor based on a Schema, and it encapsulates the details of accessing a MongoDB
collection. A Mongoose document is an instance of a model, and provides access to a MongoDB document. A
Mongoose Schema is not the same thing as a JSON Schema. The json-schema-to-mongoose Node.js module can convert a JSON Schema to an equivalent Mongoose Schema, but this is left as an exercise for
you. In addition to creating a document, Mongoose also provides the ability to read (find()),
update (save() or update()), and delete (remove()) a document.
Other platforms have their own ODMs for accessing MongoDB:
Spring users can leverage Spring Data, which provides POJO mapping to MongoDB. Hibernate OGM provides Java Persistence API (JPA) support for NoSQL databases, including MongoDB.
Mongoid, which is officially supported by MongoDB.
The MEAN Stack is outside the scope of this book, so we can’t do justice to the topic in this chapter and stay focused on JSON. Let’s do something different with MongoDB, and leverage it as a Mock/Stub RESTful API instead. Mock/Stub RESTful APIs are great:
There’s no coding involved, which frees developers from the drudgery of developing and maintaining infrastructure code. Instead, developers can focus on useful code that delivers business value—the business logic of the API.
It pushes the API development team to create an initial design for their API before they start coding. This is also known as “API First” design. By doing it this way, developers are less likely to expose the implementation details of domain Objects and databases because they are designing to an interface (because the Stub API has no implementation).
API consumers have a viable Stub version of an API without having to wait for the completion of the real API.
API developers now have enough time to develop the API properly without having to rush to “get something out the door” to support their consumers.
API developers can gain early feedback on the usability of the API from their consumers and use this information to iteratively update their design and implementation.
We’ll continue to use the Speaker data that we imported earlier in this chapter.
According to the MongoDB documentation, there are several solid REST interfaces (that run as separate servers in front of MongoDB), including these:
Based on Node.js, Crest provides full CRUD (HTTP GET, PUT, POST, and DELETE) capabilities.
You can find details at the GitHub repository.
This is Java-based, provides full CRUD functionality, and is available at http://www.restheart.org.
Based on Ruby, this server provides full CRUD capabilities. You can find it on GitHub.
This is provided by default as part of MongoDB, but it works only with HTTP GET, and
doesn’t provide full REST capabilities (PUT, POST, and DELETE). For further information, see the
Simple REST API documentation at the RESTHeart site.
Either Crest, RESTHeart, or DrowsyDromedary will meet our needs here because they can all handle CRUD
requests from Consumers by supporting all major HTTP verbs. Let’s go with Crest because it’s simple to
install and set up. Refer to Appendix A, and install Crest (see “Install npm Modules”). Then, navigate to the crest directory on your local machine and start the
Crest server by typing node server on the command line. You should see the following:
node server

DEBUG: util.js is loaded
DEBUG: rest.js is loaded
crest listening at http://:::3500
Then, open your browser and enter the following URL: http://localhost:3500/jsaw/speakers.
This tells Crest to do a GET (read/find) on the speakers collection in the jsaw
database on MongoDB. You should see the screen in Figure 9-1.
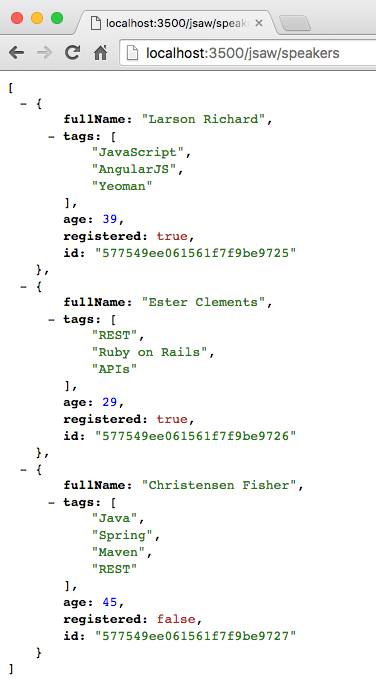
This is a good start, but you can’t do full API testing with your browser because it can only send an HTTP
GET request. Let’s use Postman (from earlier chapters) to fully exercise the Crest/MongoDB-based
Speakers API. Enter the http://localhost:3500/jsaw/speakers URL,
select GET as the HTTP verb, and click the Send button. You should see the screen in Figure 9-2.
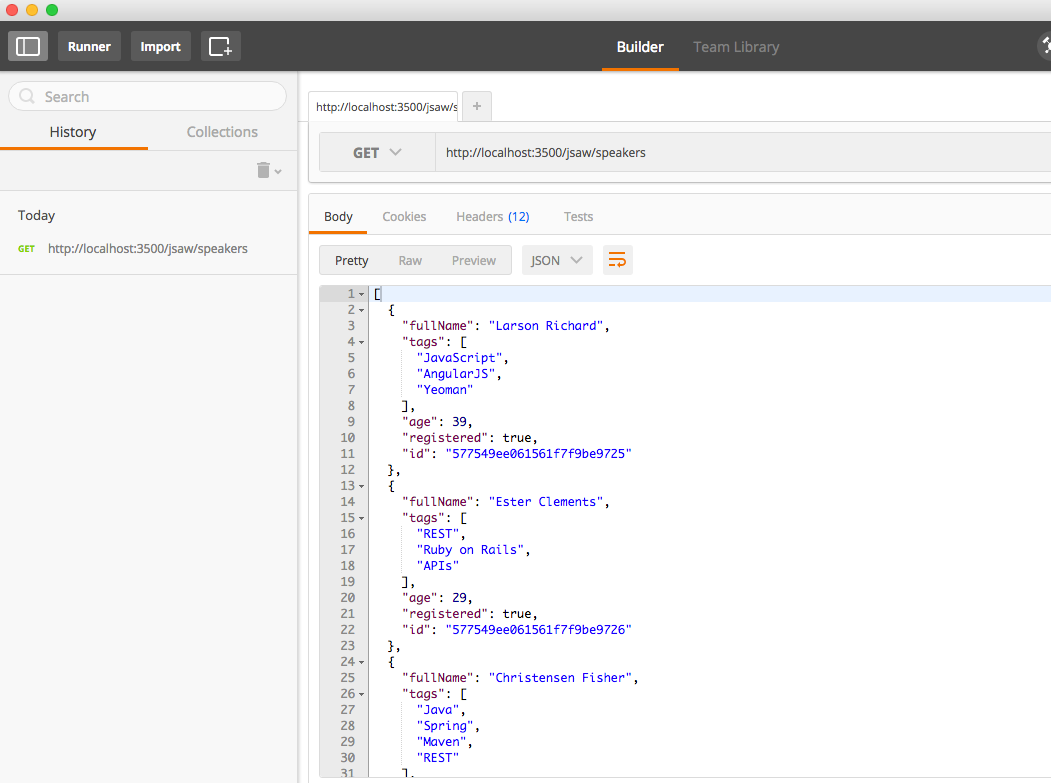
This is what we saw before in the browser, but now we have the ability to modify the data represented by
the API. Let’s delete one of the speaker Objects. First, copy the id for one of the speaker Objects,
and add it to the URL http://localhost:3500/jsaw/speakers/id (where id is the Object ID that you copied).
Then (in Postman) choose DELETE as the HTTP verb, and click the Send button. You should see the
following in the HTTP Response:
{"ok":1}
Now, go back and do another GET on http://localhost:3500/jsaw/speakers and you should see that
Crest invoked MongoDB to delete the selected speaker.
We now have a fully functional Stub REST API that accesses MongoDB and produces valid JSON output, without the need to write code or set up big infrastructure. Use this style of workflow to streamline your API Design and testing, and watch your team’s productivity soar.
In this chapter, we’ve shown the basics of how JSON and MongoDB work together by covering these topics:
Importing a JSON document into MongoDB
Performing core CRUD operations with MongoDB
Exporting MongoDB data to a JSON document
Accessing MongoDB as a Mock/Stub RESTful API (without writing code)
Now that we’ve shown the synergy between JSON and MongoDB, we’ll move on to the final stage of our Enterprise JSON journey and put everything together as we describe how JSON works with Apache Kafka in Chapter 10.
Apache Kafka is a popular distributed scalable messaging system that enables heterogenous applications (those that run on multiple platforms) to communicate asynchronously by passing messages. Kafka was originally developed by the LinkedIn engineering team as part of a major rearchitecture effort. After the company moved from monolithic applications to Microservices, they created Kafka to fill the need for a universal data pipeline capable of processing large message volumes in order to integrate the services and applications across their enterprise. In 2011, LinkedIn open sourced Kafka to the Apache Foundation. Today, many companies successfully leverage Kafka as the central messaging platform in their enterprise architecture strategy. You can find more information about Kafka on the Apache Kafka main page.
Kafka differs from other messaging systems (e.g., Java Message Service, or JMS) in that it is not tied to a particular platform. Although Kafka was written in Java, Producers and Consumers can be written in different languages. To demonstrate this, we’ll have a Node.js-based Consumer and a Consumer written in Bourne Shell in our end-to-end example.
Kafka supports both binary and text messages. The most popular text formats are plain/flat text, JSON, and Apache Avro. The Kafka APIs (used by Producers and Consumers) communicate over TCP. In this chapter, we’ll use Kafka as a traditional messaging system with JSON-based messages, and show how to do the following:
Produce/consume JSON messages with Kafka from the command line
Design and implement a small end-to-end example that leverages Kafka with JSON
Typical Kafka use cases include the following:
Applications publish messages that are consumed by other applications. Kafka uses an asynchronous (i.e., the sender doesn’t wait for a response) publish/subscribe (or pub/sub) messaging model that decouples Producers from Consumers.
Applications publish real-time usage information (e.g., clicks, visitors, sessions, page views, and purchases) to Kafka Topics. Then a streaming application such as Apache Spark/Spark Streaming reads messages from the various topics, transforms the data (e.g., map/reduce), and sends it to a data store such as Hadoop (via Flume). You can add analytics tools (e.g., data visualization) on top of the target data store.
Applications can publish statistics (e.g., message counts, number of transactions, response time, HTTP status codes, and counts) for review by operations personnel to monitor and track performance, usage, and potential issues.
Applications across an enterprise can publish their log messages to a Kafka Topic, which makes them available to log management applications—e.g., the ELK (ElasticSearch, Logstash, Kibana) stack. Kafka could be used in front of Logstash to receive large data volumes and allow Logstash to perform more-expensive operations at its own pace without losing messages.
Here are some of the key concepts in Kafka’s architecture:
Registers for or Subscribes to a Topic and reads messages as they become available.
A named channel, a message feed/stream for a category of messages. In our example,
new-proposals-recvd contains messages that represent new speaker session proposals at MyConference.
You can also think of a Topic as a stream of business events, including orders and product returns.
A Topic is divided into one or more Partitions.
In a distributed environment, a Topic is replicated across multiple Partitions (each of which is managed by a separate Broker).
A unique ID for a message within a Partition. This is how Kafka maintains the ordering and sequencing of messages.
This is all you need to know in order to produce/consume JSON messages for this chapter. Many other important areas are not covered in this book in order to maintain brevity and focus, including Durability, Consumer Groups, Delivery Guarantees, and Replication. Kafka is a big topic that warrants its own book, and you can find more information in Kafka: The Definitive Guide, by Neha Narkhede et al. (O’Reilly).
For our example, we will have a single Broker (Kafka server), and each Topic will have a single Partition.
Kafka is a general-purpose messaging system that integrates with other message-processing systems to build larger, more powerful messaging applications. Kafka’s ecosystem includes, but is not limited to the following:
Used for stream processing (see “Kafka Use Cases”).
Provides integration with Hive to create a SQL-like interface to Kafka Topics.
The standalone Consumer pulls data from Kafka Topics and loads it into ElasticSearch.
A management console for Kafka that enables administrators to work with Kafka Clusters, Topics, Consumers, and so forth.
Moves large amounts of data from a channel (e.g., a Kafka topic) to the Hadoop Distributed File System (HDFS).
A data serialization alternative to pure JSON that provides richer data structures. Avro is not a standard, but has its own Schemas (which have no relationship to JSON Schema) that are written in JSON. Avro is an alternative to JSON that provides richer data structures and a more compact data format. Avro started as part of Hadoop, and eventually became its own project.
This list is just a small sample of other systems that work with Kafka. See the Kafka Ecosystem page for a full description of the Kafka Ecosystem.
Before we look at the command-line interface, let’s install Kafka and Apache ZooKeeper to run and build all the examples in this chapter. Refer to “Install Apache Kafka” in Appendix A, and install Kafka and ZooKeeper.
Now it’s time to configure Kafka so that it allows us to delete Topics (this setting is turned off by default). Edit the KAFKA-INSTALL-DIR/KAFKA_VERSION/libexec/config/server.properties file (where KAFKA-INSTALL-DIR is the directory where your installation procedure installed Kafka, and KAFKA_VERSION is the installed Kafka version) as follows:
# Switch to enable topic deletion or not, default value is false delete.topic.enable=true
At this point, you may be wondering why you need ZooKeeper in addition to Kafka. The short answer is that ZooKeeper is required in order to run Kafka. In other words, Kafka (as a distributed application) is designed to run within the ZooKeeper environment. ZooKeeper is a server that coordinates distributed processes by managing the following: naming, status information, configuration, location information, synchronization, failover, etc. The naming registry uses a hierarchical namespace that is similar to a filesystem.
ZooKeeper is used by several well-known projects, including Kafka, Storm, Hadoop MapReduce, HBase, and Solr (Cloud Edition), and so forth. To learn more, visit the ZooKeeper main page.
Kafka comes with a built-in CLI that enables developers to experiment with Kafka without leaving the command line. We’ll demonstrate how to start Kafka, publish JSON messages, and then shutdown the Kafka infrastructure.
To use the convenience scripts and avoid lots of typing, please be sure to visit the chapter-10/scripts directory (from the code examples) and change the file permissions so that all scripts will be executable:
chmod +x *.sh
Here are the steps (in the required order) to start Kafka and then publish/consume messages:
Start ZooKeeper.
Start the Kafka server.
Create a Topic.
Start a Consumer.
Publish a message to a Topic.
Consume a message.
Clean up and shut down Kafka:
Stop the Consumer.
Delete a Topic.
Shutdown Kafka.
Stop ZooKeeper.
As mentioned earlier, Kafka requires ZooKeeper. To start ZooKeeper, run the following command in a new terminal:
./start-zookeeper.sh
Example 10-1 shows the script.
zkServer start
You should see the following:
Now it’s time to start a Kafka server (from a new terminal):
./start-kafka.sh
The script looks like Example 10-2
kafka-server-start /usr/local/etc/kafka/server.properties
In this script, the server.properties file has configuration settings for Kafka. We edited this file earlier to enable the ability to delete topics.
The Kafka server should now be running. This command prints a lot of logging messages, and you should see the following when the server reaches the steady state:

Next, let’s create the test-proposals-recvd Topic to receive new speaker session proposals.
To create the Topic, run the script as follows (from a new terminal):
./create-topic.sh test-proposals-recvd
The script runs the kafka-topics command as shown in Example 10-3.
...
kafka-topics --zookeeper localhost:2181 --create \
--topic $1 --partitions 1 \
--replication-factor 1This script works as follows:
$1 is the command-line variable that has the Topic name (in this case, test-proposals-recvd).
We kept things simple by using only a single partition (an ordered sequence of records) and one replica for the Topic. A Partition can be replicated across multiple servers for fault tolerance and load balancing. In a production configuration, you would have multiple replicas to support large message volumes.
When you run the preceding script, you should see this:

Let’s make sure that the new Topic was created properly by running the following script:
./list-topics.sh
The script uses the kafka-topics command as shown in Example 10-4.
kafka-topics --zookeeper localhost:2181 --list
You should see that the test-proposals-recvd Topic was created:
The __consumer_offsets is a low-level, internal Kafka implementation detail—pay no attention to it.
We’re concerned only with the Topic that we created.
Now that we have a Topic, it’s time to produce and consume messages. First, we’ll create a Consumer
that subscribes to the test-proposals-recvd topic with the following script:
./start-consumer.sh test-proposals-recvd
This script uses the kafka-console-consumer command as shown in Example 10-5.
...
kafka-console-consumer --bootstrap-server localhost:9092 \
--topic $1In this script, $1 is the command-line variable that has the Topic name
(in this case, test-proposals-recvd) that the Consumer is listening on.
You should see that the Consumer is now polling/waiting for a new message, so there’s no output yet:

It’s now time to publish a JSON message to our topic with the following script (in a new terminal):
./publish-message.sh '{ "message": "This is a test proposal." }' test-proposals-recvd
Example 10-6 provides the script.
...
echo $MESSAGE_FROM_CLI | kafka-console-producer \
--broker-list localhost:9092 \
--topic $TOPIC_NAME_FROM_CLI
...Note the following in this script:
We use echo to print the JSON message to Standard Output and pipe it to the kafka-console-producer
command.
$MESSAGE_FROM_CLI is the command-line variable that has the JSON message to publish.
$TOPIC_NAME_FROM_CLI is the command-line variable that has the Topic name (in this case,
test-proposals-recvd).
When you publish the message, you should see the following:

The message doesn’t show in this terminal window.
When you revisit the terminal window where you started the Consumer, you should see that the Consumer
has read and printed the message from the test-proposals-recvd Topic:

We now have a simple CLI-based example with Kafka that produces and consumes JSON messages. Now let’s clean up.
Here are the steps to clean up and shut down Kafka:
Stop the Consumer.
Delete a Topic (optional).
Stop Kafka.
Stop ZooKeeper.
We’ll now delete the test-proposals-recvd Topic with the following script (this is optional):
./delete-topic.sh test-proposals-recvd
Example 10-7 shows the script.
... kafka-topics --zookeeper localhost:2181 --delete --topic $1
In this script, $1 is the command-line variable that has the Topic name
(in this case, test-proposals-recvd).
You should see the following on your screen:

To stop Kafka, just press Ctrl-C in the terminal window where you started Kafka or you can do a graceful shutdown as follows:
./stop-kafka.sh
Example 10-8 shows the script.
kafka-server-stop
This script uses the kafka-server-stop command to stop the Kafka server. The controlled/graceful
shutdown takes a while and produces a lot of log messages. If you return to the terminal window where you
started the Kafka server, you should see the following message at the end:

If you deleted the test-proposals-recvd Topic in the previous section, it won’t exist when you restart
Kafka. If you did not delete this Topic, it will be there upon a Kafka restart.
Let’s finish up by stopping ZooKeeper. Type the following from the command line:
./stop-zookeeper.sh
Example 10-9 shows the script.
zkServer stop
At this point, all the Kafka-related infrastructure should be stopped, and you should see the following:
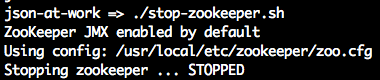
Kafka enjoys wide support across the major application development platforms, including the following libraries:
Spring is widely used for integration within the Java community, and provides support through the Spring Kafka library.
Karafka is a gem you can find on GitHub.
kafka-node is a module we’ll use for the end-to-end example in the next section. You can find more
information on kafka-node on npm and GitHub.
We’ve shown how to use Kafka at the command line, and we’ll now combine that with Node.js-based applications that consume and produce messages. For our final example, we’re going to create an application that enables speakers to submit proposals to speak at MyConference (a fictitious company). Each speaker will submit a proposal, which is reviewed by a member of the MyConference proposal team. The speaker is then notified by email on the MyConference reviewer’s decision.
We’ll continue to use the Speaker data that we’ve used in previous chapters, but we need to add a few more elements to make this a fully dressed proposal. Example 10-10 shows the upgraded speaker session proposal.
{"speaker":{"firstName":"Larson","lastName":"Richard","email":"larson.richard@ecratic.com","bio":"Larson Richard is the CTO of ... and he founded a JavaScript meetup ..."},"session":{"title":"Enterprise Node","abstract":"Many developers just see Node as a way to build web APIs or ...","type":"How-To","length":"3 hours"},"conference":{"name":"Ultimate JavaScript Conference by MyConference","beginDate":"2017-11-06","endDate":"2017-11-10"},"topic":{"primary":"Node.js","secondary":["REST","Architecture","JavaScript"]},"audience":{"takeaway":"Audience members will learn how to ...","jobTitles":["Architects","Developers"],"level":"Intermediate"},"installation":["Git","Laptop","Node.js"]}
In this example, we have the following Objects:
speaker The speaker’s contact information.
session A description of the session, including title and length.
conference Tells which conference the speaker is applying for. MyConference runs multiple events, so this is important.
topic Primary and secondary topics covered in the talk.
audience The audience level (beginner, intermediate, or advanced).
installation Installation instructions (if any) that the audience should follow before attending the session.
Here are the components needed for the MyConference application:
Uses the publish-message.sh script to send the JSON-based speaker session
proposal on the speaker’s behalf to the new-proposals-recvd Topic. In the real world, this would be
a nice AngularJS application with a solid UX design that invokes a RESTful API, but we’ll stick with an
extremely simple shell script interface to keep the focus on JSON.
Listens on the new-proposals-recvd Topic, accepts/rejects a
proposal, and sends a corresponding message to the proposals-reviewed Topic for further processing. In
an enterprise-level architecture, we would put a RESTful API in front to receive the speaker proposal and
then publish the message to the new-proposals-recvd Topic. But again, we’re not showing an API here to
simplify the example.
Listens on the proposals-reviewed Topic, generates an acceptance/rejection email (based on the reviewer’s decision), and sends a notification email to the speaker.
Acts as MyConference’s Email Server to send notification emails.
Serves as the speaker’s Email Client to receive notification emails.
For the Email Client and Server, we’ll use MailCatcher, a simple email emulator to simplify infrastructure setup.
Figure 10-1 shows the overall flow and the way the components interact.
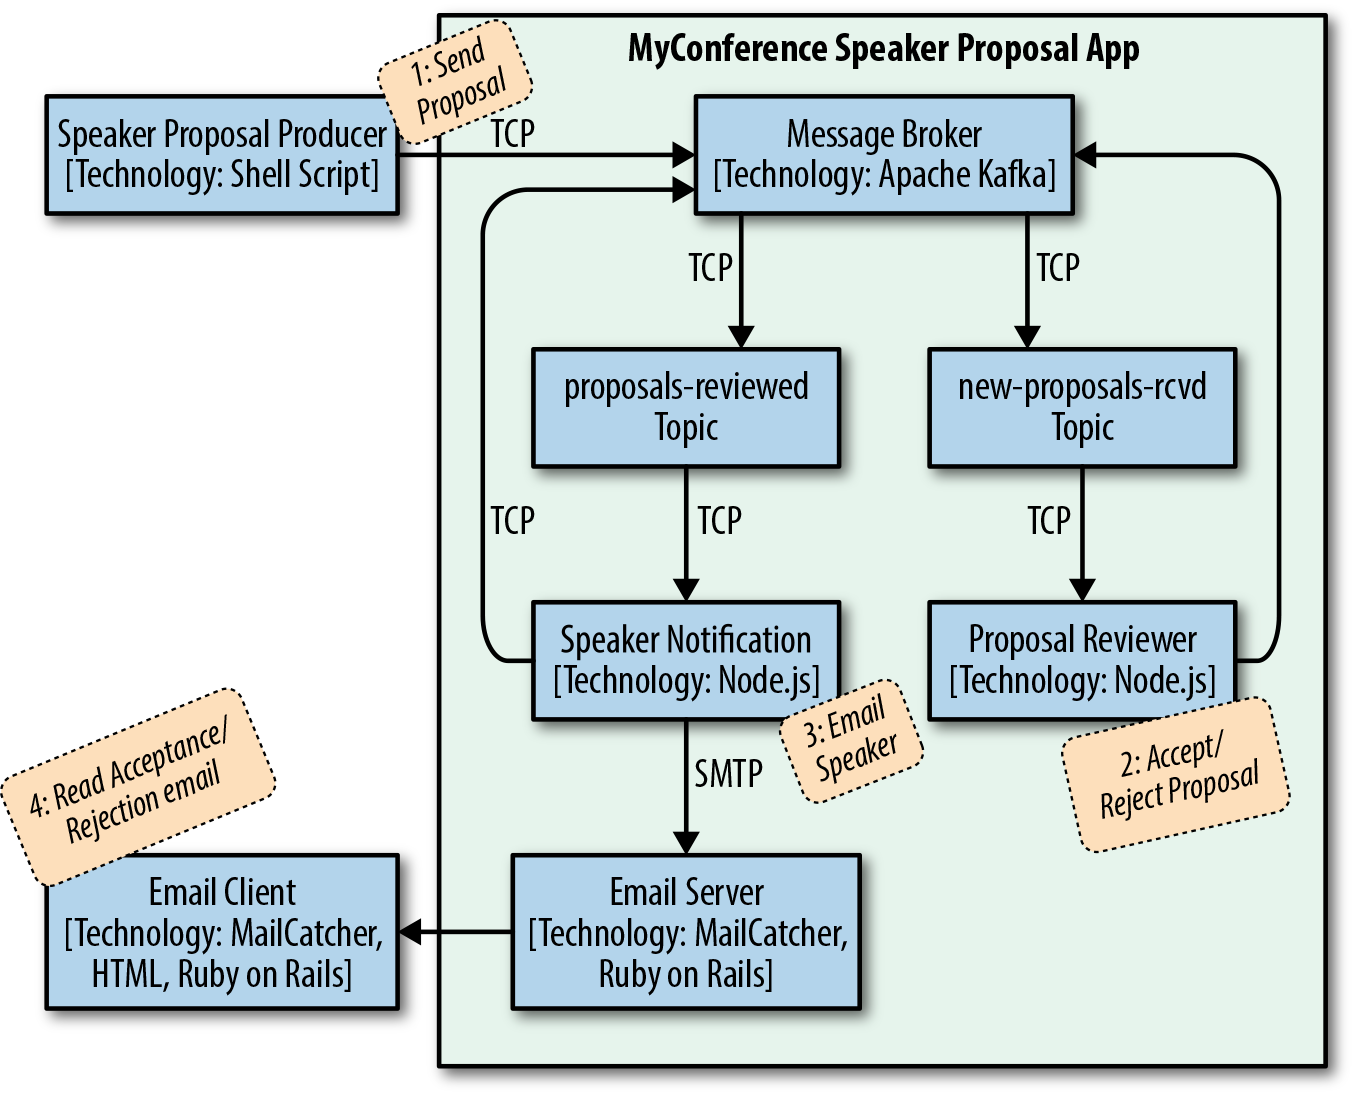
The flow of this diagram is as follows:
The Speaker uses the Speaker Proposal Producer to send a proposal to the new-proposals-recvd Topic
within the MyConference application.
The Proposal Reviewer receives a proposal message on new-proposals-recvd Topic, makes a
decision, and sends the acceptance/rejection message to the proposals-reviewed Topic.
The Speaker Notifier receives an acceptance/rejection message on the proposals-reviewed Topic, creates
a notification email message, and sends it.
The Speaker reviews the notification email message(s).
It’s now time to walk through some code and run the example.
If you ran through the CLI example, the steps should look familiar (refer to that section if you need to refresh your memory). We’ll need four terminal sessions to run the example. Do the following to get started:
Create terminal session 1.
Start ZooKeeper.
Start Kafka.
Create terminal session 2.
Create the proposals-reviewed Topic.
Create the new-proposals-recvd Topic.
With the core Kafka components in place, let’s set up an Email Server to receive acceptance/rejection notification email messages.
We’ll use MailCatcher. A Simple Mail (SMTP) server is a great tool for testing emails without forcing you to send a real email. MailCatcher has the characteristics we need for this example:
Follows standards—MailCatcher is based on the Simple Mail Transfer Protocol (SMTP).
Easy installation.
Simple startup/shutdown.
Security is optional. I know this sounds scary, but we don’t want to go through the hassle of setting up the user ID/password for an email server. For simple examples and prototyping as we’re doing here, this is OK. Of course, for bigger prototypes and real-world situations, you definitely want to secure access to your email server. MailCatcher will work well for bigger examples because it can also accept user credentials.
Nice web UI that shows email messages sent to the server.
For more information on MailCatcher, visit its website.
If you haven’t installed Ruby on Rails yet, refer to “Install Ruby on Rails” in
Appendix A, and install it. Install the mailcatcher gem on the command line
(staying in terminal session 2) as follows (also see “Install Ruby Gems” in Appendix A):
gem install mailcatcher
Start the MailCatcher server as follows, and you should see the following on your screen:
json-at-work => mailcatcher Starting MailCatcher ==> smtp://127.0.0.1:1025 ==> http://127.0.0.1:1080 *** MailCatcher runs as a daemon by default. Go to the web interface to quit.
MailCatcher runs as a daemon in the background, which enables you to do other things in the current terminal session. We’ll visit the MailCatcher web UI after we have some emails to review (see “Review Notification Email Messages with MailCatcher” later in this chapter).
The Proposal Reviewer and Speaker Notifier are both written in Node.js. If you haven’t installed Node.js
yet, refer to Appendix A, and install Node.js (see “Install Node.js”
and “Install npm Modules”). If you want to follow along with the Node.js project provided in
the code examples, cd to chapter-10/myconference and do the following to install all dependencies
for the project:
npm install
If you’d like to set up the Node.js project yourself, follow the instructions in the book’s GitHub repository.
We’ll use the publish-message.sh script (that you saw earlier) to send the contents of
the speakerProposal.json file to the new-proposals-recvd Topic.
In the same terminal session (2), run the following command from the scripts directory:
./publish-message.sh -f ../data/speakerProposal.json new-proposals-recvd
The Proposal Reviewer accepts/rejects proposals randomly (see the next section for details), so you’ll need to run this script three to five times (or more) to get acceptance and rejection and notification messages for the Speaker.
The Proposal Reviewer does the following:
Listens on the new-proposals-recvd Topic to receive Speaker session proposals
Validates the proposal and decides to accept or reject it
Sends the decision on the proposal to the proposals-reviewed Topic for further processing
myconference/proposalReviewer.js includes the full Proposal Reviewer application. Example 10-11 shows the portion of the code (along with setup) that receives the Speaker session proposals on
the new-proposals-recvd Topic.
varkafka=require('kafka-node');...constNEW_PROPOSALS_RECEIVED_TOPIC='new-proposals-recvd';...varconsumer=newkafka.ConsumerGroup({fromOffset:'latest',autoCommit:true},NEW_PROPOSALS_RECEIVED_TOPIC);// Use incoming JSON message.// Use JSON.parse() and JSON.stringify() to process JSON.consumer.on('message',function(message){// console.log('received kafka message', message);processProposal(message);});consumer.on('error',function(err){console.log(err);});process.on('SIGINT',function(){console.log('SIGINT received - Proposal Reviewer closing. '+'Committing current offset on Topic: '+NEW_PROPOSALS_RECEIVED_TOPIC+' ...');consumer.close(true,function(){console.log('Finished committing current offset. Exiting with graceful shutdown ...');process.exit();});});
Note the following in this example:
Use the kafka-node npm module to consume/produce Kafka messages. You can find more information on
kafka-node on the npm site and on GitHub.
Listen on and consume messages from the new-proposals-recvd Topic as follows:
Instantiate and use the ConsumerGroup Object to consume Kafka messages on the new-proposals-recvd
Topic. The fromOffset: 'latest' parameter indicates that we want to receive the latest message on the
Topic, and autoCommit: true tells the consumer to commit each message automatically after it is consumed
(this marks the message as processed).
consumer.on('message' …) listens for a message and invokes processProposal() (more on this later)
to process the incoming Speaker proposal that was just received.
consumer.on('error' …) prints an error message for any errors encountered when processing the
message.
process.on('SIGINT' …) listens for a SIGINT (process shutdown), commits the current offset, and does a graceful exit:
consumer.close(…) commits the current offset. This ensures that the current message is marked as read,
and that the Consumer on this Topic will receive the next message on the topic upon restart.
Example 10-12 shows how to validate the Speaker proposal and make a decision.
...varfs=require('fs');varAjv=require('ajv');...constSPEAKER_PROPOSAL_SCHEMA_FILE_NAME='./schemas/speakerProposalSchema.json';...functionprocessProposal(proposal){varproposalAccepted=decideOnProposal();varproposalMessage=proposal.value;varproposalMessageObj=JSON.parse(proposalMessage);console.log('\n\n');console.log('proposalMessage = '+proposalMessage);console.log('proposalMessageObj = '+proposalMessageObj);console.log('Decision - proposal has been ['+(proposalAccepted?'Accepted':'Rejected')+']');if(isSpeakerProposalValid(proposalMessageObj)&&proposalAccepted){acceptProposal(proposalMessageObj);}else{rejectProposal(proposalMessageObj);}}functionisSpeakerProposalValid(proposalMessage){varajv=Ajv({allErrors:true});varspeakerProposalSchemaContent=fs.readFileSync(SPEAKER_PROPOSAL_SCHEMA_FILE_NAME);varvalid=ajv.validate(speakerProposalSchemaContent,proposalMessage);if(valid){console.log('\n\nJSON Validation: Speaker proposal is valid');}else{console.log('\n\nJSON Validation: Error - Speaker proposal is invalid');console.log(ajv.errors+'\n');}returnvalid;}functiondecideOnProposal(){returnMath.random()>=0.5;}functionacceptProposal(proposalMessage){varacceptedProposal={decision:{accepted:true,timeSlot:{date:"2017-11-06",time:"10:00"}},proposal:proposalMessage};varacceptedProposalMessage=JSON.stringify(acceptedProposal);console.log('Accepted Proposal = '+acceptedProposalMessage);publishMessage(acceptedProposalMessage);}functionrejectProposal(proposalMessage){varrejectedProposal={decision:{accepted:false},proposal:proposalMessage};varrejectedProposalMessage=JSON.stringify(rejectedProposal);console.log('Rejected Proposal = '+rejectedProposalMessage);publishMessage(rejectedProposalMessage);}...
After the Proposal Reviewer receives a Speaker proposal message, processProposal() does the following:
decideOnProposal() randomly chooses to accept or reject the proposal to keep things simple. In a real
system, an application would put the proposal into someone’s work inbox, and a human would review and make
a decision.
JSON.parse() parses the proposal message to ensure that it is syntactically correct (it
follows basic JSON formatting rules).
isSpeakerProposalValid() uses the ajv npm module to validate against a JSON Schema (schemas/speakerProposalSchema.json):
If the Speaker proposal was accepted, acceptProposal() does the following:
Creates an acceptance object with fields to indicate that the proposal was accepted, and the time slot when the speaker will deliver the presentation at the conference
Uses JSON.stringify() to convert the acceptance object to JSON
Invokes publishMessage() to send the acceptance message to the proposals-reviewed Topic
If the Speaker proposal was rejected (or its format was invalid), rejectProposal() does the following:
Creates a rejection Object with fields to indicate that the proposal was rejected
Uses JSON.stringify() to convert the rejection Object to JSON
Invokes publishMessage() to send the rejection message to the proposals-reviewed Topic
Example 10-13 shows how to send an acceptance/rejection message on to the proposals-reviewed Topic.
...constPROPOSALS_REVIEWED_TOPIC='proposals-reviewed';...varproducerClient=newkafka.Client(),producer=newkafka.HighLevelProducer(producerClient);...functionpublishMessage(message){varpayloads=[{topic:PROPOSALS_REVIEWED_TOPIC,messages:message}];producer.send(payloads,function(err,data){console.log(data);});}producer.on('error',function(err){console.log(err);});
This code publishes messages to the proposals-reviewed Topic as follows:
Instantiates and uses the HighLevelProducer Object to publish messages to the proposals-reviewed
Topic. The instantiation for HighLevelProducer actually happens toward the beginning of the file, but we
show it here for convenience.
publishMessage() invokes producer.send() to send the message.
producer.on('message' …) listens for a message and invokes processProposal() (more on this later)
to process the incoming Speaker proposal that was just received.
We’ve only touched on the kafka-node Objects used by Producers and Consumers. For further details, visit the kafka-node module documentation to learn more about the following:
HighLevelProducer
ConsumerGroup
Client
Now that we’ve looked at Proposal Reviewer code, create a new terminal session (3) and run the following command (from the myconference directory) to start the Proposal Reviewer:
node proposalReviewer.js
When Speaker proposal messages arrive on the new-proposals-recvd Topic, you should see that
the Proposal Reviewer logs the proposals it receives and the decisions it makes (on the
proposals-reviewed Topic):
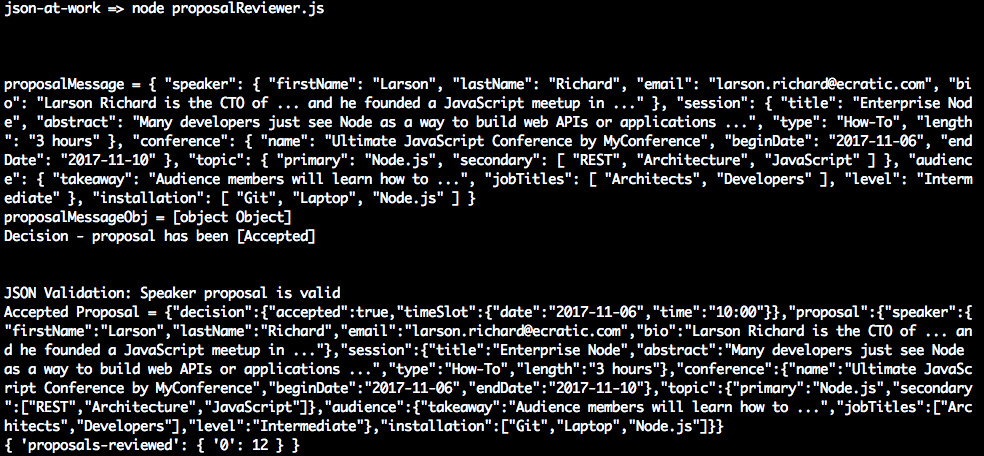
After the decision has been made to accept/reject a proposal, the Speaker Notifier:
Listens on the proposals-reviewed Topic for accepted/rejected proposals
Formats an acceptance/rejection email
Sends the acceptance/rejection email
myconference/speakerNotifier.js includes the full Speaker Notifier application. Example 10-14 shows the portion of the code (along with setup) that receives the accepted/rejected proposals on
the proposals-reviewed Topic.
varkafka=require('kafka-node');...constPROPOSALS_REVIEWED_TOPIC='proposals-reviewed';...varconsumer=newkafka.ConsumerGroup({fromOffset:'latest',autoCommit:true},PROPOSALS_REVIEWED_TOPIC);...consumer.on('message',function(message){// console.log('received message', message);notifySpeaker(message.value);});consumer.on('error',function(err){console.log(err);});process.on('SIGINT',function(){console.log('SIGINT received - Proposal Reviewer closing. '+'Committing current offset on Topic: '+PROPOSALS_REVIEWED_TOPIC+' ...');consumer.close(true,function(){console.log('Finished committing current offset. Exiting with graceful shutdown ...');process.exit();});});...
The Speaker Notifier listens on and consumes messages from the proposals-reviewed Topic as follows:
Instantiates and uses the ConsumerGroup Object to consume Kafka messages on the proposals-reviewed
Topic. The setup for this consumer is similar to the code in the Proposal Reviewer.
consumer.on('message' …) listens for a message and invokes notifySpeaker() (more on this later)
to process the incoming acceptance/rejection message that was just received.
consumer.on('error' …) and process.on('SIGINT' …) function in the same manner as the Proposal
Reviewer example.
Example 10-15 shows how to process the accepted/rejected proposals and formats a corresponding acceptance/rejection email using Handlebars (which was covered in Chapter 7).
...varhandlebars=require('handlebars');varfs=require('fs');...constEMAIL_FROM='proposals@myconference.com';constACCEPTED_PROPOSAL_HB_TEMPLATE_FILE_NAME='./templates/acceptedProposal.hbs';constREJECTED_PROPOSAL_HB_TEMPLATE_FILE_NAME='./templates/rejectedProposal.hbs';constUTF_8='utf8';...functionnotifySpeaker(notification){varnotificationMessage=createNotificationMessage(notification);sendEmail(notificationMessage);}functioncreateNotificationMessage(notification){varnotificationAsObj=JSON.parse(notification);varproposal=notificationAsObj.proposal;console.log('Notification Message = '+notification);varmailOptions={from:EMAIL_FROM,// sender addressto:proposal.speaker.,// list of receiverssubject:proposal.conference.name+' - '+proposal.session.title,// Subjecthtml:createEmailBody(notificationAsObj)};returnmailOptions;}functioncreateEmailBody(notification){// Read Handlebars Template file.varhbTemplateContent=fs.readFileSync(((notification.decision.accepted)?ACCEPTED_PROPOSAL_HB_TEMPLATE_FILE_NAME:REJECTED_PROPOSAL_HB_TEMPLATE_FILE_NAME),UTF_8);// Compile the template into a function.vartemplate=handlebars.compile(hbTemplateContent);varbody=template(notification);// Render the template.console.log('Email body = '+body);returnbody;}...
After the Speaker Notifier receives an acceptance/rejection message, notifySpeaker() does the following:
Invokes createNotificationMessage() to create the notification email to send to the Speaker:
Uses JSON.parse() to parse the acceptance/rejection message into an Object
Invokes createEmailBody():
Invokes sendEmail() to send the notification email to the Speaker (see the next example)
Example 10-16 shows how to send an acceptance/rejection email.
...varnodeMailer=require('nodemailer');...constMAILCATCHER_SMTP_HOST='localhost';constMAILCATCHER_SMTP_PORT=1025;vartransporter=nodeMailer.createTransport(mailCatcherSmtpConfig);...functionsendEmail(mailOptions){// send mail with defined transport objecttransporter.sendMail(mailOptions,function(error,info){if(error){console.log(error);}else{console.log('Email Message sent: '+info.response);}});}
The Speaker Notifier sends email messages to the MailCatcher server as follows:
Instantiates and uses the nodemailer transporter Object to send email. The MAILCATCHER_SMTP_…
constants indicate the host and port used by the MailCatcher on your local machine. The instantiation
for the nodemailer transporter Object actually happens toward the beginning the file, but we show it
here for convenience.
sendEmail() invokes transporter.sendMail() to send the email message.
nodemailer is a generic npm module that sends email messages by using SMTP. You can find
more information on ajv on the npm site
and on the nodemailer Community Page.
Now, create a new terminal session (4) and run the following command (from the myconference directory) to start the Speaker Notifier:
node speakerNotifier.js
When accepted/rejected proposal messages arrive on the proposals-reviewed Topic, you should see
that the Speaker Notifier logs the accepted/rejected proposals it receives and the email
notifications it sends:
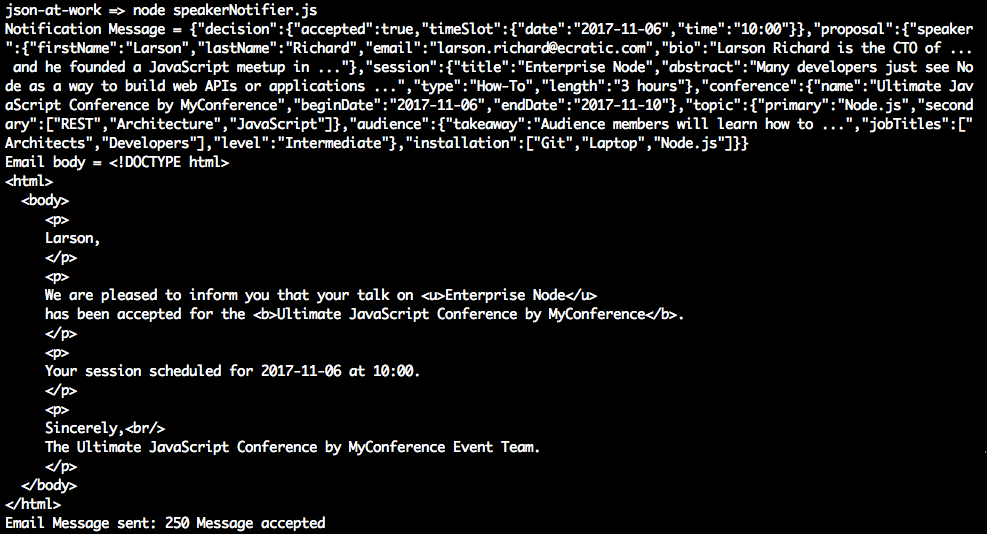
To wrap up our example, let’s look at the notification messages (generated by the Speaker Notifier) sent to the prospective MyConference speakers.
Visit http://localhost:1080 on your machine and you’ll see the MailCatcher user interface. Figure 10-2 shows the summary page that lists the email messages generated by the MyConference application (using Handlebars).
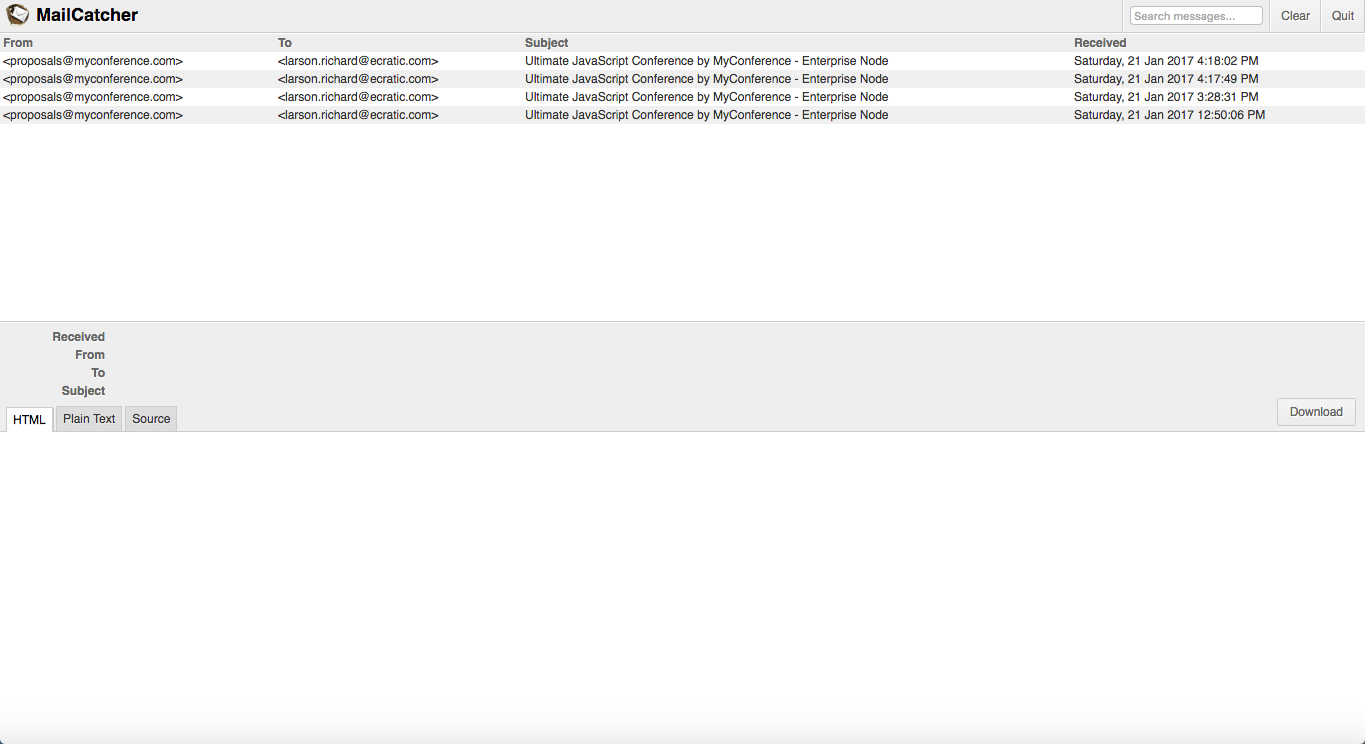
Click some of the messages until you see an Acceptance message indicating that the session proposal was accepted, as shown in Figure 10-3.
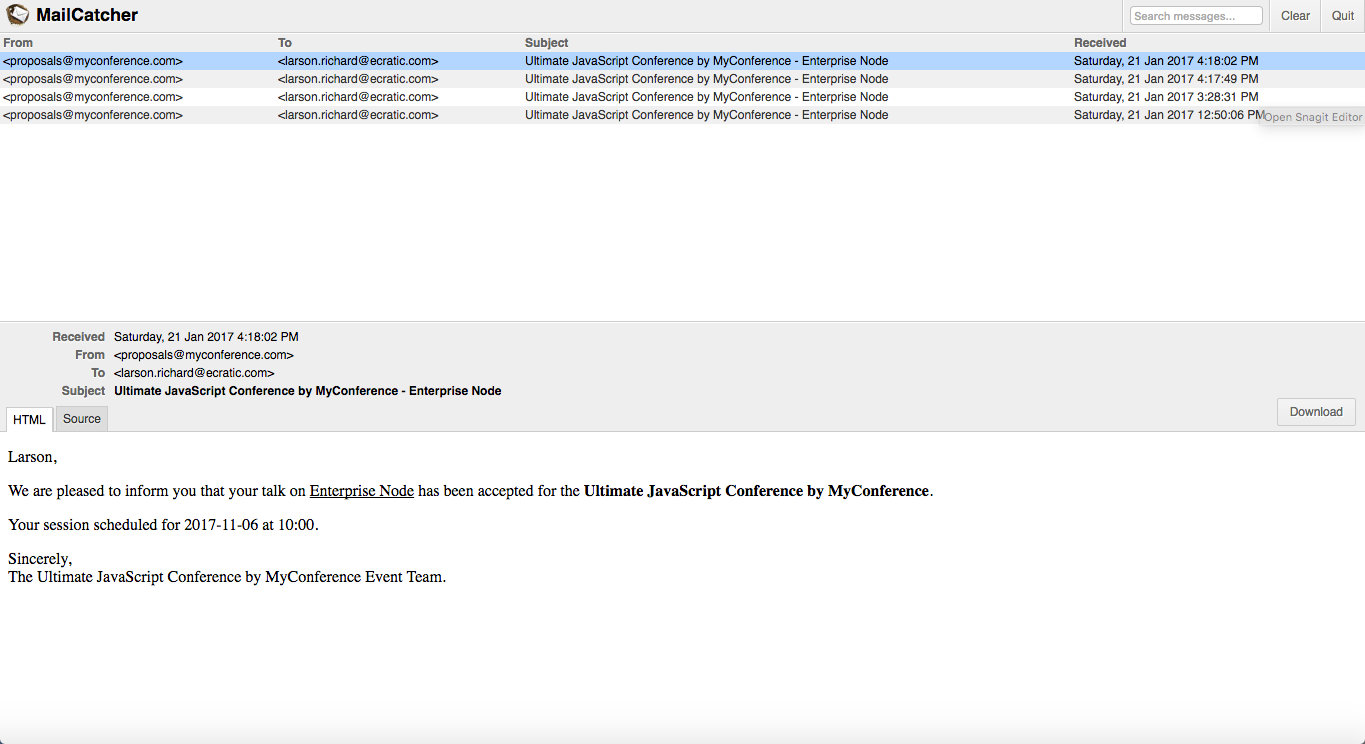
Figure 10-4 shows a sample rejection message.
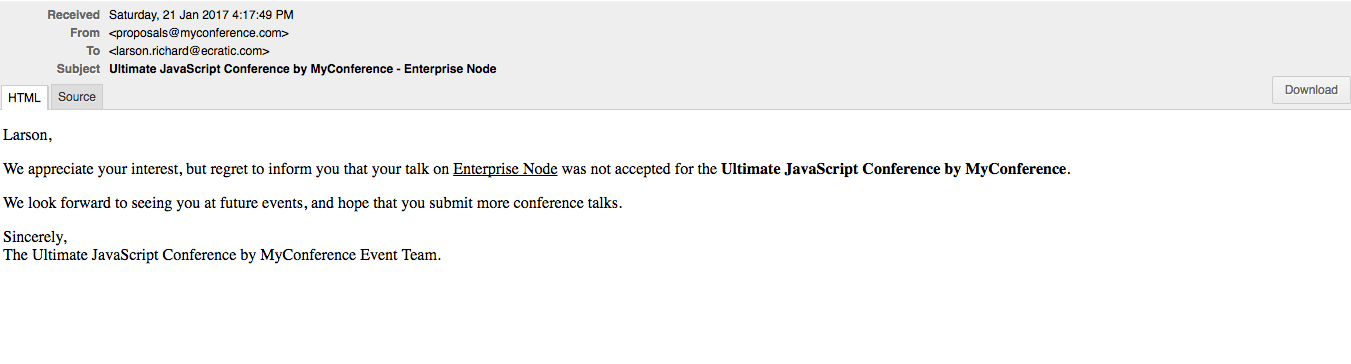
The MailCatcher web UI controls work as follows:
Download the current email message by clicking the Download button. This saves the message as a file (with the extension .eml) in EML format, which
Follows the MIME 822 standard
Is compatible with MS Outlook and Outlook Express, Apple Mail, Mozilla Thunderbird, and other email clients
Preserves the original HTML format and headers
Shut down the MailCatcher background process by clicking on the Quit button on the upper-right side of the page
In this chapter, we’ve shown how to do the following:
This appendix provides an installation guide and setup instructions to support the code examples in this book.
This section shows how to install JSON-based tools in the browser.
JSONView pretty-prints JSON in Chrome or Firefox. Follow the installation instructions on the JSONView site for your browser.
Use JSONLint to validate JSON documents online. JSONLint doesn’t require an installation.
Use JSON Editor Online to model JSON documents. Since this is a web app, there’s nothing to install.
Postman provides the ability to fully test a RESTful API. It can send
HTTP GET, POST, PUT, and DELETE requests and set HTTP headers.
You can install Postman as a Chrome extension or as a standalone GUI
application on macOS, Linux, or Windows. Visit the
Postman site for installation instructions.
This book uses Node.js version
v6.10.2, which is the current latest
stable version as of this writing.
Although you could use the installation package from the Node.js site, it’s difficult to change versions. Instead, let’s use Node Version Manager (NVM). NVM makes it easy to install/uninstall Node.js, and upgrade to newer versions.
First, install NVM by using one of the following methods:
Next, let’s make sure that NVM runs properly. Source it from a shell as follows:
source ~/.nvm/nvm.sh
Now NVM will work properly for the remainder of the installation process.
If you’re running bash, do the following so that NVM is automatically sourced (configured):
In $HOME/.bashrc, add these lines:
source ~/.nvm/nvm.sh export NVM_HOME=~/.nvm/v6.10.2
In $HOME/.bashrc_profile, add this line:
[[ -s $HOME/.nvm/nvm.sh ]] && . $HOME/.nvm/nvm.sh # This loads NVM
Note that similar steps apply to the Bourne Shell or Korn Shell.
Now that NVM is installed, use it to install Node.js:
Type nvm ls-remote to see what remote (not on your local
machine) versions of Node.js are available to install.
Install version v6.10.2 with the following command:
nvm install v6.10.2
All Node.js versions are installed in $HOME/.nvm.
Set the default Node.js version to be used in any new shell:
nvm alias default v6.10.2
Without this, neither the node or npm commands will work properly
when you exit the current shell.
Now, exit your current shell.
From a new shell, upgrade to the latest version of npm:
npm update -g npm
Then, do the following health checks:
nvm ls, and you should see
... -> v6.10.2 system default -> v6.10.2
node -v, which yields v6.10.2
npm -v, and it looks like 4.6.1
To see a full list of NVM’s capabilities, type nvm --help.
When you check out the Node.js Request-Eval-Print-Loop (REPL), you should see this:
json-at-work => node -> .exit
npm may require you to run as sudo, and this can get cumbersome and
annoying. This also can be a security risk because packages can contain
scripts, and npm is running with root privilege. To avoid this, do the
following:
sudo chown -R $USER ~/.nvm
This works if you installed Node.js with NVM (all Node.js installations go under that directory). This tip was inspired by Isaac Z. Schlueter from How to Node.
Out of the box, the default behavior of the REPL leaves a bit to be
desired because you see undefined after most lines of JavaScript, hitting
the Enter key, breathing, and so forth. This is because JavaScript
functions always return something. If nothing is returned, undefined is returned by default. This behavior can be annoying
and unproductive. Here’s a sample session:
json-at-work => node -> Hit Enter -> undefined -> var y = 5 -> undefined -> .exit
To turn off undefined in the REPL, add the following to .bashrc (or
your setup for Bourne or Korn Shell):
source ~/.nvm/nvm.sh
...
alias mynode="node -e \"require('repl').start({ignoreUndefined: true})\""
Now, exit the current shell and start a new shell. Rather than
redefining node, it’s safer to define a new alias (in this case,
mynode). This way, node will still work properly from the command
line and be able to run JavaScript files. Meanwhile, mynode serves as
your new REPL command:
json-at-work => mynode -> var x = 5 -> .exit
You now have a Node.js REPL that does what you want—no more annoying
undefined. You’re welcome.
NVM also works well on Windows thanks to Corey Butler’s
nvm-windows application.
This is a port of nvm to a Windows environment. I successfully used
nvm-windows on Windows 7.
Here are the steps:
Visit the
nvm-windows
Downloads page.
Download the latest nvm-setup.zip to your Downloads folder.
Unzip nvm-setup.zip with your favorite zip tool.
Run nvm-setup.exe, which is a wizard. Accept all defaults and the MIT License agreement:
Download to C:\Users{username}\AppData\Roaming\nvm.
Click Finish when the install completes.
This sets up the necessary environment variables to run Node.js on your Windows machine.
Ensure that NVM is on your PATH:
Navigate to Control Panel → System → Advanced System Settings.
Click Environment Variables on the Advanced System Settings pop up.
NVM_HOME should have been added to Env Vars during install: C:\Users{username}\AppData\Roaming\nvm
NVM_SYMLINK should point to C:\Program Files\nodejs
Both NVM_HOME and NVM_SYMLINK should be on the PATH.
Install Node.js with
nvm-windows:
Type nvm list available to get a list of available versions.
Type nvm install v6.10.2
Set the version of Node.js: nvm use v6.10.2
Test the install: node -v
If you have a previous installation of Node.js that isn’t quite working
properly anymore, you may need to completely uninstall it from your
machine. This includes both the node and npm executables.
Uninstalls can be complicated, and credit for the Mac uninstall
instructions goes to
Clay at
Hungred Dot Com. If Homebrew was used to install Node.js, simply
type brew uninstall node at the prompt.
If you didn’t use Homebrew, do the following:
cd to /usr/local/lib and delete any node executable and
node_modules.
cd to /usr/local/include and delete any node and the node_modules
directory.
cd to /usr/local/bin and delete any node executable.
You may also need to do the following:
rm -rf /usr/local/bin/npm rm -rf /usr/local/share/man/man1/node.1 rm -rf /usr/local/lib/dtrace/node.d rm -rf $USER/.npm
Credit for the Linux uninstall instructions goes to Stack Overflow and GitHub. Do the following:
Find the node installation by typing which node. Let’s assume it’s
at /usr/local/bin/node.
cd to /usr/local.
Execute the following:
sudo rm -rf bin/node sudo rm -rf bin/npm sudo rm -rf lib/node_modules/npm sudo rm -rf lib/node sudo rm -rf share/man/*/node.*
Credit for the Windows uninstall instructions goes to Team Treehouse. Here are the steps:
Open the Windows Control Panel.
Choose Programs and Features.
Click “Uninstall a program.”
Select Node.js, and click the Uninstall link.
Yeoman consists of the following:
yo (for Scaffolding)
For the code examples in this book, you’ll need both
gulp and
grunt-cli for the Build System.
Although gulp is used as the primary build tool,
you still need grunt-cli to run
some of the gulp tasks.
I chose bower for Package Management.
Here are the installation steps:
Install yo:
npm install -g yo
Test the yo installation: yo --version
Install bower:
npm install -g bower
Test the bower installation: bower --version
Install gulp:
npm install -g gulp-cli
Test the gulp installation: gulp --version
Install grunt-cli:
npm install -g grunt-cli
Test the grunt-cli installation: grunt --version
Refer to the Yeoman setup page for more information.
See the generator-webapp GitHub
page. Install the generator as follows:
npm install -g generator-webapp
We use the following npm modules at the command line, so we install them globally:
This is the npm equivalent of the JSONLint site
used to validate a JSON document. You can find
jsonlint in the GitHub repository.
To install:
npm install -g jsonlint
To validate a JSON document:
jsonlint basic.json
json provides the ability to work with
JSON (e.g., pretty-printing) from the command line. It’s similar
to jq, but not as powerful.
To install:
npm install -g json
Visit the json GitHub
repository for usage instructions.
json is available as an npm
module.
This is the npm equivalent of the JSON Validate
site used to validate a JSON document against a JSON Schema.
ujs-jsonvalidate can be found in the
GitHub repository.
To install:
npm install -g ujs-jsonvalidate
To validate a JSON document:
validate basic.json basic-schema.json
http-server is a simple Web Server that serves up files in the current
directory structure on the local host system as static content. I like
http-server because it has solid documentation, and the command-line
options and shutdown are intuitive. Here’s the
http-server in the GitHub
Repository and http-server in the
npm repository.
To install:
npm install -g http-server
To run:
http-server -p 8081
To access:
http://localhost:8081
To shut down: press Ctrl-C
json-server is a Stub REST server that takes a JSON file and exposes
it as a RESTful service. You can find json-server in the GitHub
repository.
To install:
npm install -g json-server
To run:
json-server -p 5000 ./speakers.json
To access:
http://localhost:5000/speakers
Crest is a small REST server that provides a RESTful wrapper for
MongoDB. You can find Crest in the GitHub
Repository. The global npm installation would be the simplest way to
install Crest, but this is broken. Instead, do a git clone as
follows:
cd to the directory where your other development projects reside.
We’ll call this directory projects:
cd projects
Clone the repository:
git clone git://github.com/Cordazar/crest.git
Navigate to the crest directory:
cd crest
Update the config.json file to remove the username and password.
Of course, this isn’t secure, but you can re-add these fields and set
them to proper values later; just make sure that the settings match
your MongoDB password. We just want to get started quickly. The
config.json file should now look like this:
{"db":{"port":27017,"host":"localhost"},"server":{"port":3500,"address":"0.0.0.0"},"flavor":"normal","debug":true}
Be sure to install and start MongoDB first.
In a separate tab or command shell, start Crest by typing
node server on the command line. You should see the following:
node server DEBUG: util.js is loaded DEBUG: rest.js is loaded crest listening at http://:::3500
jq-tutorial is an npm
module that provides a nice jq tutorial from the command line. Install
it as follows:
npm install -g jq-tutorial
Then run it from the command line:
jq-tutorial
There are several ways to install Ruby on Rails:
Ruby Version Manager (RVM) + the rails gem
rbenv + the rails gem
I prefer RVM for macOS and Linux because it’s easy to upgrade to switch between Ruby versions. Install RVM by visiting the RVM site and following the installation instructions.
Use RVM to install Ruby as follows:
See the available versions of Ruby:
rvm list known
Install Ruby v2.4.0 as follows:
rvm install 2.4.0
Check the Ruby version, and you should see something like this:
ruby -v ruby 2.4.0
After installing Ruby, you can install Rails as follows:
gem install rails
Check the Rails version, and it should look like this:
rails -v Rails Rails 5.0.2
And you’re done.
You can easily upgrade to new versions of Ruby and Rails by following these steps:
Install a new version of Ruby (2.x for example):
rvm install 2.x
Use the new version:
rvm use 2.x
Install the rails gem as shown previously.
Use Rails Installer for a Windows environment, and do the following:
Download the installer for Windows.
Run the installer and follow the defaults.
I’ve used Rails Installer on Windows 7, and it worked properly. The Rails Installer page has excellent information on RoR tutorials and how to get help with installation issues.
We use the following Ruby gems outside Rails, so we install them globally:
multi_json provides a wrapper
that invokes the most common JSON gems on behalf of the caller by
choosing the fastest JSON gem that has been loaded in an application’s
environment. Install it as follows:
gem install multi_json
Optimized JSON (oj), is considered by
many to be the fastest Ruby-based JSON processor available. Install it
as follows:
gem install oj
awesome_print
pretty-prints a Ruby object and is used for debugging purposes. Install
it as follows:
gem install awesome_print
activesupport
provides functionality that has been extracted from Rails.
ActiveSupport’s JSON module provides the ability to convert keys between
camel case and snake case. Install it as follows:
gem install activesupport
mailcatcher is a simple mail (SMTP)
server. It’s a great tool for testing emails without forcing you to send
a real email. Install it as follows:
gem install mailcatcher
See the MongoDB installation documentation and follow the instructions to install and start MongoDB on your platform.
Our Java environment depends on the following:
We’re using Java Standard Edition (SE) 8 for this book, so visit the Oracle Java SE 8 download site.
You’ll see the term JDK (for Java Developer Kit) on that page. JDK is the old name for Java SE. Just look for Java SE Development Kit, accept the license agreement, and do the proper download for your operating system. After you’ve downloaded and run the installer, you’ll want to set up your Java command-line environment for your operating system.
Follow the instructions that follow for you system. Then run this:
java -version
You should see something similar to this
java version "1.8.0_72" Java(TM) SE Runtime Environment (build 1.8.0_72-b15) Java HotSpot(TM) 64-Bit Server VM (build 25.72-b15, mixed mode)
In .bashrc, do the following to set up JAVA_HOME and add it to your
PATH:
...
export JAVA_HOME=/usr/java/jdk1.x.y/bin/java # x and y are the minor and
patch versions
...
export PATH=...:$\{JAVA_HOME}/bin:...
Then, refresh your environment:
source ~/.bashrc
Credit for Java setup on Linux goes to nixCraft.
The Java Windows Installer usually puts the JDK in one of the following directories: C:\Program Files\Java or C:\Program Files (x86)\Java.
Then, do the following:
Right-click the My Computer icon on your desktop and select Properties.
Click the Advanced tab.
Click the Environment Variables button.
Under System Variables, click New.
Enter the variable name as JAVA_HOME.
Enter the variable value as the installation path for the Java Development Kit (see where the installer put the JDK directory).
Click OK.
Click Apply Changes.
Credit for the Java setup on Windows goes to Robert Sindall.
Gradle is used for building source and test code.
Visit the Gradle Installation Guide
and follow the instructions for your operating system. After you’ve
completed the installation, run gradle -v from the command line and
you should see something like this:
gradle -v ------------------------------------------------------------ Gradle 3.4.1 ------------------------------------------------------------
On macOS, I succesfully used Homebrew to install Gradle.
jq provides JSON-based command-line
processing. To install it, just follow the
download instructions on the jq
GitHub repository.
jq works with and depends on cURL.
cURL provides the ability to communicate over multiple protocols, including HTTP. Use this to make HTTP calls to RESTful APIs from the command line.
Just as with Linux, cURL may already be installed on your Mac. Check it as follows:
curl --version
If it’s already there, there’s nothing else to do. Otherwise, you’ll need to install it. I use Homebrew as my package installer on macOS, so use the following command to install cURL on a Mac:
brew install curl
Check whether cURL is already installed by entering the following command:
curl --version
If it isn’t there, do the following from the command line:
sudo apt-get install curl
This should work on Ubuntu or Debian.
To install cURL on Windows, do the following:
Visit the cURL Download Wizard.
Select the type of package: curl executable.
Select the Operating System: either Windows/Win32 or Win64.
Select the Flavor: either Cygwin (if you use
Cygwin) or Generic (if you don’t use
Cygwin).
Select the Win32 version (only if you selected Windows/Win32 previously): Unspecified.
Credit for the cURL Windows installation instructions goes to Stack Overflow.
We use Apache Kafka in Chapter 10 for JSON-based messaging. Kafka depends on Apache ZooKeeper so you’ll need to install ZooKeeper, too. Before going any further, be sure to install the Java Environment on your machine (because Kafka is based on Java).
Homebrew is the easiest way to install Kafka on macOS. Do the following from the command line:
brew install kafka
This installs both Kafka and ZooKeeper. You’re done.
Install ZooKeeper as follows:
Download ZooKeeper from the ZooKeeper Releases page.
Extract the TAR file from the GZipped file you downloaded (current/latest ZooKeeper download):
tar -zxf ZooKeeper-3.4.9.tar.gz
Add system environment variables in ~/.bashrc:
export ZooKeeper_HOME = <Zookeeper-Install-Path>/zookeeper-3.4.9 export PATH=$PATH:$ZOOKEEPER_HOME/bin
Install Kafka as follows:
Download Kafka from the Kafka Downloads page.
Extract the TAR file from the GZipped file you downloaded (current/latest Kafka download):
tar -zxf kafka_2.11-0.10.1.1.tgz
Add system environment variables in ~/.bashrc:
export KAFKA_HOME = <Kafka-Install-Path>/zookeeper-3.4.9 export PATH=$PATH:$KAFKA_HOME/bin
Credit for the Apache Kafka installation on UNIX instructions goes to TutorialsPoint.
Download ZooKeeper from the ZooKeeper Downloads page.
Use your favorite zip tool to unzip the ZooKeeper file to the C:
drive.
Add System Variables as follows:
In Windows, navigate to Control Panel → System → Advanced System Settings → Environment Variables.
Create the following new System Variable (current/latest ZooKeeper download):
ZOOKEEPER_HOME = C:\zookeeper-3.4.9
Add ZooKeeper to your PATH by editing that variable and adding this at the end:
;%ZOOKEEPER_HOME%\bin;
Install Kafka as follows:
Download Kafka from the Kafka Downloads page.
Use your favorite zip tool to unzip the Kafka file to the C: drive.
Add System Variables as follows:
In Windows, navigate to Control Panel → System → Advanced System Settings → Environment Variables.
Create the following new System Variable (current/latest Kafka download):
KAFKA_HOME = C:\kafka_2.11-0.10.1.1
Add Kafka to your PATH by editing that variable and adding this at the end:
;%KAFKA_HOME%\bin;
Credit for the Apache Kafka installation on Windows instructions goes to Gopal Tiwari’s article on DZone.
The AsciiDoc version of Appendix A in the book was generated by Pandoc from the original Markdown in the JSON at Work GitHub examples repository.
JSON has an active and vibrant community. Visit the following groups and lists to get involved and learn more:
Douglas Crockford’s JSON site where it all started.
This Yahoo Group is affiliated with the JSON.org site.
json-ietf Mailing List This list is for the JSON IETF (Internet Engineering Task Force) Working Group that maintains the JSON IETF specification.
Another great source of JSON tutorials, tools, and articles.
The JSON Schema specification is maintained in this GitHub Repository.
This Google group is associated with the JSON Schema Specification Working Group.
api-craft Google Group This group focuses on API Design and development.
The animal on the cover of JSON at Work is the Siberian jay (Perisoreus infaustus), a small bird native to northern Eurasia. Its habitat range is extremely large, stretching from Sweden in the west to China in the east. They make their nests in coniferous trees found in dense boreal forests (also known as taiga).
Siberian jays can grow to be 29 centimeters long and can weigh up to 79 grams. They have long tails and brown and gray coloring. Siberian jays are omnivorous, feeding on berries and seeds as well as insects, carrion, and small rodents. Females lay their eggs once a year in March or April, and raise their young before the winter arrives.
There is some evidence that the European population of Siberian jays is declining as a result of human-caused deforestation. However, because of their massive range across sparsely inhabitated regions of Asia, the Siberian jay not currently listed as endangered or threatened.
Many of the animals on O’Reilly covers are endangered; all of them are important to the world. To learn more about how you can help, go to animals.oreilly.com.
The cover image is from Riverside Natural History. The cover fonts are URW Typewriter and Guardian Sans. The text font is Adobe Minion Pro; the heading font is Adobe Myriad Condensed; and the code font is Dalton Maag’s Ubuntu Mono.
Practical Data Integration for the Web
Copyright © 2017 Vertical Slice, Inc. All rights reserved.
Printed in the United States of America.
Published by O’Reilly Media, Inc., 1005 Gravenstein Highway North, Sebastopol, CA 95472.
O’Reilly books may be purchased for educational, business, or sales promotional use. Online editions are also available for most titles (http://oreilly.com/safari). For more information, contact our corporate/institutional sales department: 800-998-9938 or corporate@oreilly.com.
See http://oreilly.com/catalog/errata.csp?isbn=9781449358327 for release details.
The O’Reilly logo is a registered trademark of O’Reilly Media, Inc. JSON at Work, the cover image, and related trade dress are trademarks of O’Reilly Media, Inc.
While the publisher and the author have used good faith efforts to ensure that the information and instructions contained in this work are accurate, the publisher and the author disclaim all responsibility for errors or omissions, including without limitation responsibility for damages resulting from the use of or reliance on this work. Use of the information and instructions contained in this work is at your own risk. If any code samples or other technology this work contains or describes is subject to open source licenses or the intellectual property rights of others, it is your responsibility to ensure that your use thereof complies with such licenses and/or rights.
978-1-449-35832-7
[LSI]
To everyone who produces or consumes JSON data with web/mobile applications, REST APIs, and messaging systems—I hope this makes your job easier.
To the unsung JSON community that produces JSON-based tools and libraries for the rest of us—thank you for all your hard work to make JSON useful and meaningful.
JavaScript Object Notation (JSON) has become the de facto standard for RESTful interfaces, but an ecosystem of little-known standards, tools, and technologies is available that architects and developers can start using today to build well-designed applications. JSON is more than just a simple replacement for XML when you make an AJAX call. It is becoming the backbone of any serious data interchange over the internet. Solid standards and best practices can be used to harness the energy and enthusiasm around JSON to build truly elegant, useful, and efficient applications.
The only thing missing is a book to pull everything together. This book aims to help developers leverage JSON so that they can build enterprise-class applications and services. My goals are to promote the use of JSON tooling and the concept of message/document design as a first-class citizen in the fast-growing API community.
My journey into JSON began in 2007 when I was leading a large web portal project, and we had to populate a drop-down list with several thousand entries. At that time, I was reading Head First AJAX by Rebecca Riordan (O’Reilly), so I had a decent architectural approach. AJAX would solve overall latency and page load issues, but what about the data? I had been using XML successfully for several years, but it seemed like overkill for the task at hand—moving data from the backend of a web application to the View. Head First AJAX mentioned a new data format called JSON, and it looked like the way to go. My team began looking into APIs that would convert our Java objects into JSON, and chose the one that had the simplest and shortest JUnit tests—the goal was to do the simplest thing that could possibly work. We put the application under rigorous load testing, and the Java-to-JSON conversion was never a performance issue. The application scaled up in production, and the users saw their drop-down list in a timely manner.
Along my journey, I considered the use of JSON with web applications, RESTful APIs, and messaging. As of 2009, I was still working with XML because XML Schema provided the semantic validation needed for meaningful data interchange. So, my position at that time was to use JSON for web user interfaces, or UIs (for speed), and XML for Web Services and Messaging (for integration). But then I heard about JSON Schema in 2010, and found that I had no further need for XML. The JSON Schema specification is still under development, but it’s sufficiently mature enough now to use for enterprise-class integration.
At this point, I was hooked on or, more accurately, obsessed with JSON. I began looking around the internet to see what else JSON could do, and I found copious APIs, online tools, search capabilities, and more. In short, anything that has been done with XML can (and should) now be done with JSON.
I then began to look for JSON in books, and was disappointed when I could find only a chapter or two on the topic in a JavaScript or RESTful Web Services book. I saw a growing JSON community along with lots of tool support and articles and blogs, but there was no single place—other than Douglas Crockford’s JSON site—that pulled everything together.
This book is for architects and developers who design/implement web and mobile applications, RESTful APIs, and messaging applications. Code examples are in JavaScript, Node.js, Ruby on Rails, and Java. If you’re a Groovy, Go, Scala, Perl, Python, Clojure, or C# developer, you’ll need to follow along with the code examples provided. But rest assured that most major/modern languages provide excellent JSON support. For the architect, I’ve provided guidelines, best practices, and architecture and design diagrams where appropriate. But in addition to providing visionary leadership, real architects prove their ideas with working code. While I love working with JSON and writing code, it’s entirely meaningless without use cases, and a business and technical context. For developers, this book is packed with code examples, tooling, and Unit Tests, along with a GitHub repository (see “Code Examples”).
Chapters 5–10 only have code examples only in Node.js to keep things simple and focused. But it’s not hard to translate these examples into your platform of choice.
When I wrote JBoss at Work with Scott Davis back in the mid-2000s, our vision was to write a book that developers could use at work on their daily jobs. In the same manner, the purpose of JSON at Work is to provide practical examples to developers based on my real-world integration experience with JSON. To that end, I’ve baked Unit Testing (wherever feasible) into every chapter. It’s simple: if there’s no test for a piece of code, then that code doesn’t exist. Period.
Expect to roll up your sleeves and look at code. Whether you’re an architect or developer, you’ll find something here to help you on your job.
By reading and following this book’s examples, you’ll learn how to do the following:
JSON basics and how to model JSON data
Use JSON with Node.js, Ruby on Rails, and Java
Structure JSON documents with JSON Schema to design and test APIs
Search the contents of JSON documents with JSON Search tools
Convert JSON documents to other data formats with JSON Transform tools
Use JSON as part of an enterprise architecture
Compare JSON-based Hypermedia formats, including HAL and json:api
Leverage MongoDB to store and access JSON documents
Use Apache Kafka to exchange JSON-based messages between services
Use freely available JSON tools and utilities to simplify testing
Invoke APIs in your favorite programming language with simple utilities and libraries
Here’s a sample of the JSON tooling you’ll use in this book:
JSON editors/modelers
Unit-Testing tools (e.g., Mocha/Chai, Minitest, JUnit)
JSON Validators
A JSON Schema Generator
JSON Search tools
JSON Transform (templating) tools
This book is not for you if your only interest in JSON is to make AJAX calls from JavaScript. Although I cover this topic, it’s just the tip of the iceberg. Plenty of JavaScript books have the chapter you’re looking for.
Developers looking for a deep reference on REST, Ruby on Rails, Java, JavaScript, etc. won’t find it here. This book relies on these technologies, but focuses on how to use JSON with these languages and technologies.
This book consists of the following parts:
Appendices
Chapter 1, JSON Overview, starts with an overview of the JSON data format, describes best practices in JSON usage, and introduces the tools used throughout the book.
Chapter 2, JSON in JavaScript, shows how to use JSON with JavaScript, Node.js, and Mocha/Chai Unit Tests.
Chapter 3, JSON in Ruby on Rails, describes how to convert between Ruby objects and JSON, and integrate with Rails.
Chapter 4, JSON in Java, tells you how to use JSON with Java and Sprint Boot.
Chapter 5, JSON Schema, helps you structure JSON documents with JSON Schema. Along the way, you’ll generate a JSON Schema and design an API with it.
Chapter 6, JSON Search, shows how to search JSON documents with jq and JSONPath.
Chapter 7, JSON Transform, provides the tools you’ll need transform a poorly designed JSON document to a better designed/more useful JSON document. Plus, it shows how to convert between JSON and other formats such as XML and HTML.
Chapter 8, JSON and Hypermedia, looks at how to use JSON with several well-known Hypermedia formats (e.g.,
HAL and jsonapi).
Chapter 9, JSON and MongoDB, shows how to leverage MongoDB to store and access JSON documents.
Chapter 10, JSON Messaging with Kafka, describes how to use Apache Kafka to exchange JSON-based messages between services.
Appendix A, Installation Guides, shows how to install the applications you’ll need to run the code examples in this book.
Appendix B, JSON Community, provides further information and links to connect you to the JSON community (e.g., standards and tutorials) and to help you go further with JSON.
All code examples for this book are freely available from the JSON at Work examples GitHub repository.
This book is here to help you get your job done. In general, if example code is offered with this book, you may use it in your programs and documentation. You do not need to contact us for permission unless you’re reproducing a significant portion of the code. For example, writing a program that uses several chunks of code from this book does not require permission. Selling or distributing a CD-ROM of examples from O’Reilly books does require permission. Answering a question by citing this book and quoting example code does not require permission. Incorporating a significant amount of example code from this book into your product’s documentation does require permission.
We appreciate, but do not require, attribution. An attribution usually includes the title, author, publisher, and ISBN. For example: “JSON at Work by Tom Marrs (O’Reilly). Copyright 2017 Vertical Slice, Inc., 978-1-449-35832-7.”
If you feel your use of code examples falls outside fair use or the permission given above, feel free to contact us at permissions@oreilly.com.
Safari (formerly Safari Books Online) is a membership-based training and reference platform for enterprise, government, educators, and individuals.
Members have access to thousands of books, training videos, Learning Paths, interactive tutorials, and curated playlists from over 250 publishers, including O’Reilly Media, Harvard Business Review, Prentice Hall Professional, Addison-Wesley Professional, Microsoft Press, Sams, Que, Peachpit Press, Adobe, Focal Press, Cisco Press, John Wiley & Sons, Syngress, Morgan Kaufmann, IBM Redbooks, Packt, Adobe Press, FT Press, Apress, Manning, New Riders, McGraw-Hill, Jones & Bartlett, and Course Technology, among others.
For more information, please visit http://oreilly.com/safari.
Please address comments and questions concerning this book to the publisher:
We have a web page for this book, where we list errata, examples, and any additional information. You can access this page at http://bit.ly/json-at-work.
To comment or ask technical questions about this book, send email to bookquestions@oreilly.com.
For more information about our books, courses, conferences, and news, see our website at http://www.oreilly.com.
Find us on Facebook: http://facebook.com/oreilly
Follow us on Twitter: http://twitter.com/oreillymedia
Watch us on YouTube: http://www.youtube.com/oreillymedia
First of all, I’d like to acknowledge Douglas Crockford for creating and standardizing the JSON data format. JSON is the data language of REST and Microservices, and the overall community is indebted to his vision and efforts.
I appreciate my O’Reilly editor, Megan Foley, and my former editor, Simon St. Laurent, for believing in this book and for their patience and guidance on the project. Thanks for sticking with me and helping me throughout the project. I would also like to thank my O’Reilly copy edit team, Nick Adams and Sharon Wilkey, whose diligent work improved the quality of this manuscript.
Thanks to Matthew McCullough and Rachel Roumeliotis from the O’Reilly Open Source Convention (OSCON), Jay Zimmerman from No Fluff Just Stuff (NFJS), and Dilip Thomas from the Great Indian Developer Summit (GIDS) for giving me the chance to speak about JSON and REST at your conferences. It’s always fun to speak at conferences, and I hope to continue doing this well into the future.
I’m grateful to my technical reviewers who provided valuable feedback on this book: Joe McIntyre, David Bock, Greg Ostravich, and Zettie Chinfong. I would also like to thank the following people who helped shape and mold my ideas on how to talk about JSON: Matthew McCullough, Scott Davis, Cristian Vyhmeister, Senthil Kumar, Sean Pettersen, John Gray, Doug Clark, Will Daniels, Dan Carda, and Peter Piper.
The Colorado Front Range technical community is world class, and I’ve had fun presenting at the following user groups to help refine my material:
HTML5 Denver
Denver Open Source User Group (DOSUG)
Colorado Springs Open Source User Group (CS OSUG)
Denver Java User Group (DJUG)
Boulder Java User Group (BJUG)
BoulderJS Meetup
Thanks to my friends in the Toastmasters community who encouraged me, believed in me, and pushed me to finish the book: Darryle Brown, Deborah Frauenfelder, Elinora Reynolds, Betty Funderburke, Tom Hobbs, Marcy Brock, and many, many others. You have inspired me to communicate clearly, to “Lift as You Climb,” and to “Travel Beyond.”
There is an amazing JSON community on the internet. Much of this book is based on the great work that you’ve done and continue to do. You’ve inspired me to tell your story and to connect the dots.
To my late parents, Al and Dorene Marrs, who loved me and always believed in me and supported me—I know you’re in a better place. You inspired me to be adaptable, to innovate, and to work hard. You always encouraged me to do my very best. Thank you for everything you did for me.
Finally, to my beautiful wife, Linda, and my daughter, Abby—I love you. Thanks for your patience with me while I spent my evenings and weekends on the manuscript and code.
The JavaScript Object Notation (JSON) data format enables applications to communicate over a network, typically through RESTful APIs. JSON is technology-agnostic, nonproprietary, and portable. All modern languages (e.g., Java, JavaScript, Ruby, C#, PHP, Python, and Groovy) and platforms provide excellent support for producing (serializing) and consuming (deserializing) JSON data. JSON is simple: it consists of developer-friendly constructs such as Objects, Arrays, and name/value pairs. JSON is not limited to Representational State Transfer (REST); it also works with the following:
Node.js (which stores project metadata in package.json)
NoSQL databases such as MongoDB (see Chapter 9)
Messaging platforms such as Kafka (see Chapter 10)
In the early days, REST’s detractors derided RESTful Web Services as being non-standard, but (just like HTTP) JSON is in fact a standard. Both the Internet Engineering Task Force (IETF) and Ecma International (formerly the European Computer Manufacturers Association, or ECMA) have recognized JSON as a standard. Douglas Crockford originally created JSON in 2001, and initially standardized it in 2006 under RFC 4627 through the IETF; see the JSON specification. In the fall of 2013, Ecma International also standardized JSON under ECMA 404; see their JSON specification. With Ecma recognition (per Douglas Crockford; see his Google+ page), JSON is now considered a formal international data processing standard.
In March 2014, Tim Bray published an updated version of Douglas Crockford’s original standard as IETF RFC 7158 and RFC 7159 to correct errata with the original IETF 4627 standard (thus rendering it obsolete).
Before we go further, let’s look at a small JSON sample. Example 1-1 shows a simple JSON document.
{"thisIs":"My first JSON document"}
A valid JSON document can be either of the following:
An Object surrounded by curly braces, { and }
An Array enclosed by brackets, [ and ]
The preceding example shows an Object that contains a single key/value pair, where the key,
"thisIs", has a value of "My first JSON document".
Just to keep us honest, let’s validate this document by using JSONLint. Just paste the text into the text area, click the Validate button, and you should see the page in Figure 1-1.
Example 1-2 presents a simple JSON Array.
["also","a","valid","JSON","doc"]
In JSONLint, paste the JSON Array into the text area, and click the Validate button, and you should get the result shown in Figure 1-2.
But we’re getting ahead of ourselves. We’ll cover JSON syntax more thoroughly in “Core JSON”.
Although standardization through Ecma International and the IETF has helped JSON gain industry acceptance, other factors have popularized JSON:
The explosive growth of RESTful APIs based on JSON
The simplicity of JSON’s basic data structures
The increasing popularity of JavaScript
JavaScript’s resurgence is boosting JSON’s popularity. Over the past several years, we have seen the rise of JavaScript as a first-class development language and environment. This ecosystem includes platforms such as Node.js, and Mode/View/Controller (MVC) frameworks such as AngularJS, React, Backbone, and Ember. There has also been a tremendous increase in the number of books and websites showing best practices in JavaScript Objects and Patterns. According to Douglas Crockford, JSON is a subset of JavaScript’s Object Literal notation, and fits seamlessly into JavaScript development.
Thousands of RESTful APIs leverage JSON. A sample list of popular JSON-based RESTful APIs includes the following:
Salesforce
GitHub
DropBox
Tumblr
Amazon Web Services (AWS)
To see the thousands of available JSON-based REST APIs available, visit ProgrammableWeb, and do a search on REST and JSON. Then, take several weeks to review the results.
JSON is simple and is gradually replacing XML as the primary data interchange format on the internet. JSON is easy to read, and its structures easily translate to concepts well understood by software developers—Arrays, Objects, and name/value pairs. We don’t have to scratch our heads or argue anymore about what should be an Element or an Attribute. Objects and their data members are a much better fit for Object-Oriented (OO) design and development. A document formatted in JSON is usually smaller than its XML equivalent, because JSON has less overhead and is more compact. This is due to the lack of begin and end tags surrounding each data element. So, at an enterprise level, JSON is more efficient to process than XML, because JSON documents can be transmitted over a network and processed faster than their XML counterparts.
Although Douglas Crockford initially intended JSON to be a data interchange format (typically with REST), JSON is now finding a home in configuration files for widely used products such as Node.js and Sublime Text. Node.js has a package.json file that it uses to define its standard npm package structure; we’ll cover this in Chapter 2. Sublime Text, a popular IDE in the web development community, uses JSON to configure its appearance along with its package managers.
The Core JSON data format includes JSON Data and Value Types. We’ll also cover versions, comments, and File/MIME Types.
JSON has the following core Data Types:
Consists of a key (a data attribute) and a value.
Now that we’ve covered basic definitions, let’s dig deeper into each Data Type.
Example 1-3 shows some sample name/value pairs.
{"conference":"OSCON","speechTitle":"JSON at Work","track":"Web APIs"}
Name/value pairs have the following characteristics:
Each name (e.g., "conference")
Is on the left side of the colon (:)
Is a String, and must be surrounded by double quotes
The value (e.g., "OSCON") is to the right of the colon. In the preceding example, the value type is a String, but there are several other Value Types.
We’ll cover Strings and other valid Value Types further in “JSON Value Types”.
Objects consist of name/value pairs. Example 1-4 shows a sample Object that represents an address.
{"address":{"line1":"555 Any Street","city":"Denver","stateOrProvince":"CO","zipOrPostalCode":"80202","country":"USA"}}
Example 1-5 shows an Object with a nested Array.
{"speaker":{"firstName":"Larson","lastName":"Richard","topics":["JSON","REST","SOA"]}}
Example 1-6 shows an Object that contains another Object.
{"speaker":{"firstName":"Larson","lastName":"Richard","topics":["JSON","REST","SOA"],"address":{"line1":"555 Any Street","city":"Denver","stateOrProvince":"CO","zipOrPostalCode":"80202","country":"USA"}}}
Objects have the following characteristics:
Are enclosed within a beginning left curly brace ({) and an ending right curly brace (})
Consist of comma-separated, unordered, name/value pairs
Can be empty, { }
Can be nested within other Objects or Arrays
Example 1-7 shows an Array (containing nested Objects and Arrays) that describes conference presentations, including title, length, and abstract.
{"presentations":[{"title":"JSON at Work: Overview and Ecosystem","length":"90 minutes","abstract":["JSON is more than just a simple replacement for XML when","you make an AJAX call."],"track":"Web APIs"},{"title":"RESTful Security at Work","length":"90 minutes","abstract":["You’ve been working with RESTful Web Services for a few years","now, and you’d like to know if your services are secure."],"track":"Web APIs"}]}
Arrays have the following characteristics:
Are enclosed within a beginning left brace ([) and an ending right brace (])
Consist of comma-separated, ordered values (see the next section)
Can be empty, [ ]
Can be nested within other Arrays or Objects
Have indexing that begins at 0 or 1
JSON Value Types represent the Data Types that occur on the righthand side of the colon (:) of
a Name/Value Pair. JSON Value Types include the following:
object
array
string
number
boolean
null
We’ve already covered Objects and Arrays; now let’s focus on the remaining Value Types:
string, number, boolean, and null.
Example 1-8 shows valid JSON Strings.
["fred","fred\t","\b","","\t","\u004A"]
Strings have the following properties:
Strings consist of zero or more Unicode characters enclosed in quotation marks (""). Please see the
following list for additional valid characters.
Strings wrapped in single quotes (') are not valid.
Additionally, JSON Strings can contain the following backslash-escaped characters:
\" Double quote
\\ Backslash
\/ Forward slash
\b Backspace
\f Form feed
\n Newline
\r Carriage return
\t Tab
\u Trailed by four hex digits
Example 1-9 shows valid numbers in JSON.
{"age":29,"cost":299.99,"temperature":-10.5,"unitCost":0.2,"speedOfLight":1.23e11,"speedOfLight2":1.23e+11,"avogadro":6.023E23,"avogadro2":6.023E+23,"oneHundredth":10e-3,"oneTenth":10E-2}
Numbers follow JavaScript’s double-precision floating-point format and have the following properties:
Numbers are always in base 10 (only digits 0–9 are allowed) with no leading zeros.
Numbers can have a fractional part that starts with a decimal pont (.).
Numbers can have an exponent of 10, which is represented with the e or E notation with a plus or
minus sign to indicate positive or negative exponentiation.
Octal and hexadecimal formats are not supported.
Unlike JavaScript, numbers can’t have a value of NaN (not a number for invalid numbers) or Infinity.
Example 1-10 shows a Boolean value in JSON.
{"isRegistered":true,"emailValidated":false}
Booleans have the following properties:
Booleans can have a value of only true or false.
The true or false value on the righthand side of the colon(:) is not surrounded by quotes.
Although technically not a Value Type, null is a special value in JSON. Example 1-11 shows a
null value for the line2 key/property.
{"address":{"line1":"555 Any Street","line2":null,"city":"Denver","stateOrProvince":"CO","zipOrPostalCode":"80202","country":"USA"}}
null values have the following characteristics:
Are not not surrounded by quotes
Indicate that a key/property has no value
Act as a placeholder
According to Douglas Crockford, there will never be another version of the core JSON standard. This isn’t because JSON is perfect; nothing is perfect. The purpose of a sole JSON version is to avoid the pitfalls of having to support backward compatibility with previous versions. Crockford believes that a new data format should replace JSON when the need arises within the development community.
But as you’ll see in subsequent chapters, this “no versions” philosophy applies only to the core JSON data format. For example, in Chapter 5, that specification is currently at version 0.5 as of this writing. Please note that these JSON-related specifications were created by others in the JSON community.
There are no comments in a JSON document. Period.
According to his postings on the Yahoo! JSON group and Google+, Crockford initially allowed comments, but removed them early on for the following reasons:
He believed that comments weren’t useful.
JSON parsers had difficulties supporting comments.
People were abusing comments. For example, he noticed that comments were being used for parsing directives, which would have destroyed interoperability.
Removing comments simplified and enabled cross-platform JSON support.
According to the core JSON specification, .json is the standard JSON file type when storing JSON
data on filesystems. JSON’s Internet Assigned Numbers Authority (IANA) media (or MIME) type is
application/json, which can be found at the IANA Media Types site. RESTful Web Service Producers and Consumers use a technique known as content negotiation (which leverages the JSON MIME type in HTTP Headers) to indicate that they are exchanging JSON data.
JSON is all about interoperability, and it’s important to provide JSON data feeds in a way that Consumers expect. Google has published a JSON Style Guide to support maintainability and best practices.
The Google JSON Style Guide is extensive, and here are the most important things for an API designer and developer:
Property Names
Date Property Values
Enum Values
Property Names (in Google parlance) are on the left side of the colon in a name/value pair (and Property Values are on the righthand side of the hyphen). Two main styles can be used to format a JSON Property Name:
lowerCamelCase
snake_case
With lowerCamelCase, a name is created by joining one or more words to look like a single word, and the
first letter in each word is capitalized (except for the first word). Both the Java and JavaScript
communities use lowerCamelCase in their coding guides. With snake_case, all letters are lowercase,
and words are separated with an underscore (_). But the Ruby on Rails community prefers snake_case.
Google, along with the majority of RESTful APIs, uses lowerCamelCase for its Property Names, as shown in Example 1-12.
{"firstName":"John Smith"}
You may think that Date formats aren’t that important, but they are. Imagine exchanging date information between a Producer and Consumer who come from different countries or continents. Even within a single enterprise, two development groups will likely use different date formatting conventions. It is important to consider the semantics of how to interpret timestamps so that we have consistent date/time processing and interoperability across all time zones. The Google JSON Style Guide prefers that dates follow the RFC 3339 format, as shown in Example 1-13.
{"dateRegistered":"2014-03-01T23:46:11-05:00"}
The preceding date provides a Coordinated Universal Time (UTC) offset (from UTC/GMT—Greenwich Mean Time) of
-5 hours, which is US Eastern Standard Time. Note that RFC 3339 is a profile of ISO 8601. The main
difference is notably that the International Standards Organization’s ISO 8601 allows
the replacement of the T (which separates the date and time) with a space, and RFC 3339 does not allow
this.
Geographical APIs (e.g., Google Maps) and APIs related to a geographical information system (GIS) use latitude/longitude data. To support consistency, the Google JSON Style Guide recommends that latitude/longitude data follows the ISO 6709 standard. According to Google Maps, the coordinates for the Empire State Building in New York City are 40.748747° N, 73.985547° W, and would be represented in JSON as shown in Example 1-14.
{"empireStateBuilding":"40.748747-73.985547"}
This example follows the ±DD.DDDD±DDD.DDDD format, with the following conventions:
Latitude comes first.
North (of the equator) latitude is positive.
East (of the prime meridian) longitude is positive.
The latitude/longitude is represented as a String. It can’t be a Number because of the minus sign.
Although the Google JSON Style Guide is silent on this topic, here are a few rules of thumb:
JSON is a serialization format, not a presentation format. So, indentation is meaningless to an API Producer or Consumer.
Many JSON Formatters let the user choose between two, three, or four spaces when beautifying a JSON document.
JSON originated from JavaScript (as part of the ECMA 262 standard), but unfortunately there is no single consensus throughout the JavaScript community. Many people and coding style guides prefer two spaces, so this is the convention used in this book for consistency. It’s OK if you prefer another style here, but be consistent.
Our examples throughout this book cover conference-related data, including the following:
Speakers
Sessions
We’ll start by creating a simple JSON data store for speakers and publishing it to a Stub RESTful API by taking the following steps:
Model JSON data with JSON Editor Online
Generate sample JSON data with JSON Generator
Create and deploy a Stub API (for future testing)
Our architectural style is based on the concept of noBackend. With noBackend, the developer doesn’t have to worry about the nuts and bolts of application servers or databases at the early stages of application development.
The first seven chapters of this book use noBackEnd architecture to maintain focus on our application
from a business perspective (services and data first) so that we can support not only UI-based
(e.g., mobile, tablet, and web) clients, but APIs and non-web-based client applications as well. We’ll deploy
JSON data with simple tools such as json-server to emulate a RESTful API.
By using this approach, we take an interface-first approach to designing and building an API, which provides the following:
More Agile, rapid, iterative frontend development due to the decoupling from the backend.
Faster feedback on the API itself. Get the data and URI out there quickly for rapid review.
A cleaner interface between the API and its Consumers.
A separation of concerns between the Resource (e.g., speakers as JSON data) exposed by the API and its (eventual) internal implementation (e.g., application server, business logic, and data store). This makes it easier to change implementation in the future. If you create and deploy a real API with Node.js/Rails/Java (or other framework) too early, you’ve already made design decisions at a very early stage that will make it difficult to change after you start working with API Consumers.
A Stub API does the following:
Eliminates the initial need to work with servers and databases
Allows API Producers (those developers who write the API) to focus on API Design, how best to present the data to the Consumers, and initial testing
Enables API Consumers (e.g., UI developers) to work with the API at an early stage and provide feedback to the API development team
By using the lightweight tools in this book, you’ll see that you can go a long way before writing code and deploying it on a server. Of course, you’ll eventually need to implement an API, and we’ll show how to do that when we cover JavaScript, Ruby on Rails, and Java in Chapters 2–4.
Creating a valid JSON document of any real size or complexity is tedious and error-prone. JSON Editor Online is a great web-based tool that does the following:
Enables you to model your JSON document as Objects, Arrays, and name/value pairs
Makes it easier to rapidly generate the text for a JSON document in an iterative manner
JSONmate is another solid editor on the web, but we don’t cover it further in this book.
In addition to JSON modeling and text generation, JSON Editor Online provides the following features:
Validation occurs as you type JSON data in the JSON text area on the left side of the page. If you forget a closing double quote for a value (e.g., "firstName": "Ester,), an X will show next to the following line of JSON text along with hover text that explains the validation error.
Click the Indent button at the upper-left corner of the JSON text area.
After creating some Objects and key/value pairs (with the Append (+) button) in the JSON model on the right side of the page, generate JSON text by clicking the left-arrow button (in the upper-middle portion of the page). You should see the changes reflected in the JSON text area on the left side of the page.
Modify some data in the JSON text area and click the right-arrow button, and you should see the changes in the JSON model on the righthand side of the page.
You can save a JSON document to your local machine by selecting the Save to Disk option under the Save menu.
You can import a JSON document from your computer by choosing the Open from Disk option from the Open menu.
Please remember that JSON Editor Online is publicly available, which means that any data you paste into this app is visible to others. So don’t use this tool with sensitive information (personal, proprietary, and so forth).
After you’re finished modeling Speaker data, click the right-arrow button to generate a pretty-printed (indented) JSON document that represents the model. Figure 1-3 shows JSON Editor Online with our initial Speakers model.
This is just a rough model, but this initial sketch is a decent starting point. Use the initial model to visualize JSON data, get early feedback, and iterate quickly on the design. This approach enables you to refine the JSON data structure throughout the development life cycle without investing heavily in implementation and infrastructure.
JSON Editor Online provides a decent start, but we want to generate lots of test data quickly. Test data can be problematic because of the sensitivity of the data, and the data volume needed to do any meaningful testing. Even with JSON Editor Online, it will take a great deal of effort to create the volume of test data we’re looking for. We need another tool to help create the data we need to create our first version of the API, and that’s where JSON Generator comes in. This excellent tool was used to create our speakers.json test data file. The template used to generate the speakers.json file is available on GitHub. Chapter 5 covers JSON Generator in more detail.
To create the Stub API, we’ll use the Speaker data we just created and deploy it as a RESTful API. We’ll
leverage the json-server Node.js module to serve up the speakers.json file as a Web API; this enables us
to prototype quickly. You can find more information on the json-server GitHub page.
Before going further, please set up your development environment. Refer to Appendix A to do the following:
Install Node.js. json-server is a Node.js module, so you need to install Node.js first. Refer to “Install Node.js”.
Install json-server. See “Install npm Modules”.
Install JSONView and Postman. See “Install JSON Tools in the Browser”. JSONView pretty-prints JSON in Chrome and Firefox. Postman can also run as a standalone GUI application on most major operating systems.
Open a terminal session and run json-server on port 5000 from your command line:
cd chapter-1 json-server -p 5000 ./speakers.json
You should see the following:
Visit http://localhost:5000/speakers in your browser, and (with JSON pretty-printing provided by JSONView) you should see all the speakers from our Stub API as shown in Figure 1-4.
You can also get a single speaker by adding the id to the URI as follows:
http://localhost:5000/speakers/0.
This is a good start, but a web browser has limited testing functionality; it can only send HTTP GET
requests. Postman provides the ability to fully test a RESTful API. It can send HTTP GET, POST, PUT,
and DELETE requests and set HTTP Headers.
Let’s use Postman to delete the first speaker in the API as follows:
Enter the http://localhost:5000/speakers/0 URL.
Choose DELETE as the HTTP verb.
Click the Send button.
You should see that the DELETE ran properly in Postman with a 200 (OK) HTTP Status, as shown in Figure 1-5.
Now, ensure that the first speaker has truly been deleted by revisiting http://localhost:5000/speakers/0 in your browser. You should now see the empty response shown in Figure 1-6.
You can stop json-server by pressing Ctrl-C at the command line.
With the Stub API in place, we can now invoke it from any HTTP client (e.g., JavaScript, Ruby, or Java) to consume the data from an external application. Although most of our examples in subsequent chapters use an HTTP GET, rest assured that json-server can handle all the core HTTP verbs (GET,
POST, PUT, DELETE). Although not covered in this book, Mountebank
is an alternative server that provides more robust functionality for stubbing and mocking APIs and protocols.
The main point here is that an API Producer can use JSON-based tools to prototype a testable RESTful API without having to write any code. This technique is powerful because it enables the API Consumer to test without having to wait for the API to be 100 percent complete. At the same time, the API development team can iteratively upgrade the design and prototype.
We started by covering the basics of JSON. We modeled JSON data with JSON Editor Online, and deployed it with a Stub API.
The next three chapters show how to use JSON with the following core platforms:
JavaScript
Ruby on Rails
Java
In Chapter 2, you’ll learn how to use JSON in JavaScript with the Stub API we just created with json-server.
We’ve covered the basics of the JSON data interchange format, and in this chapter we’ll begin to develop applications with JSON. JSON began as a subset of the JavaScript definition for Objects and Arrays, but rest assured that JSON is now decoupled from JavaScript. JSON is language-agnostic and works across multiple platforms. Because JSON has its roots in JavaScript, this is where we begin our journey.
Here’s what we’ll cover:
Using JavaScript serialization/deserialization with JSON.stringify() and JSON.parse()
Working with JavaScript Objects and JSON
Making RESTful API calls and testing the results with Mocha/Chai Unit Tests
Building a small JSON-based web application
In our examples, we’ll leverage Node.js, scaffold a web application with Yeoman, and make RESTful API calls
to pull in the data we created on json-server in the previous chapter. That’s a lot of moving pieces and
parts, so we’ll iteratively build on each concept. But before we develop our web app, we need to start
with the basics of JavaScript serialization/deserialization and Objects.
Before we go any further, let’s start building our development environment by installing Node.js. Please go to Appendix A, and follow the instructions in “Install Node.js”.
Applications need to serialize (or flatten) their information into JSON in order to produce data for other applications in a platform-neutral manner. An application must also be able to deserialize (or unflatten) JSON data consumed from external sources into data structures for use by that application.
The JSON stringifier/parser Object was originally developed by Douglas Crockford, has been part of the
JavaScript library as of ECMAScript 5 in 2009,
and provides the following methods:
JSON.stringify() serializes to JSON
JSON.parse() deserializes from JSON
Additionally, the JSON Object
Was originally developed by Crockford
Can’t be instantiated
Has no other functionality
We’ll start by serializing some basic JavaScript Data Types:
Number
String
Array
Boolean
Object (Literal)
Example 2-1 shows how to use JSON.stringify() to serialize simple Data Types.
varage=39;// Integerconsole.log('age = '+JSON.stringify(age)+'\n');varfullName='Larson Richard';// Stringconsole.log('fullName = '+JSON.stringify(fullName)+'\n');vartags=['json','rest','api','oauth'];// Arrayconsole.log('tags = '+JSON.stringify(tags)+'\n');varreqistered=true;// Booleanconsole.log('registered = '+JSON.stringify(reqistered)+'\n');varspeaker={firstName:'Larson',lastName:'Richard',:'larsonrichard@ecratic.com',about:'Incididunt mollit cupidatat magna excepteur do tempor ex non ...',company:'Ecratic',tags:['json','rest','api','oauth'],registered:true};console.log('speaker = '+JSON.stringify(speaker));
When you run the preceding file with node from the command line, you should get the following:
JSON.stringify() doesn’t do anything too interesting with the scalar types (Number, String, Boolean).
Things begin to get interesting with the speaker Object Literal because here JSON.stringify() initially
generates a valid, yet unattractive, JSON String. JSON.stringify() has other parameters that enhance
serialization. According to the Mozilla Developer Network (MDN) JavaScript Guide,
here is the method signature:
JSON.stringify(value[,replacer[,space]])
The parameter list is as follows:
value (required) The JavaScript value to serialize.
replacer (optional) Either a function or an array. If a function is provided, the stringify() method
invokes the replacer function for each key/value pair in an Object.
space (optional) Indentation—either a Number or String. If a Number is used, this value specifies the number of spaces used for each indentation level.
Let’s leverage the replacer and space parameters to pretty-print the speaker Object and filter out
some data elements, as shown in Example 2-2.
varspeaker={firstName:'Larson',lastName:'Richard',:'larsonrichard@ecratic.com',about:'Incididunt mollit cupidatat magna excepteur do tempor ex non ...',company:'Ecratic',tags:['json','rest','api','oauth'],registered:true};functionserializeSpeaker(key,value){return(typeofvalue==='string'||Array.isArray(value))?undefined:value;}// Pretty Print.console.log('Speaker (pretty print):\n'+JSON.stringify(speaker,null,2)+'\n');// Pretty print and filter out Strings and Arrays.console.log('Speaker without Strings and Arrays:\n'+JSON.stringify(speaker,serializeSpeaker,2));
Running the preceding file yields the following:
The first JSON.stringify() call pretty-prints the JSON output with an indentation level of 2. The second
call uses the serializeSpeaker() function as a replacer (JavaScript functions are treated as expressions
and can be passed as parameters). serializeSpeaker() checks the type of each value and returns undefined
for Strings and Arrays. Otherwise, this function returns the value “as is.”
JSON.stringify() does one of the following with an undefined value:
Omits the value if it’s part of an Object
Converts the value to null if that value belongs to an Array
As you’ve seen, JSON serialization makes the most sense with Objects. Let’s customize
JSON.stringify()’s output by adding a toJSON() method to our speaker Object, as shown in Example 2-3.
varspeaker={firstName:'Larson',lastName:'Richard',:'larsonrichard@ecratic.com',about:'Incididunt mollit cupidatat magna excepteur do tempor ex non ...',company:'Ecratic',tags:['json','rest','api','oauth'],registered:true};speaker.toJSON=function(){return"Hi there!";}console.log('speaker.toJSON(): '+JSON.stringify(speaker,null,2));
Serialization works as follows:
If an Object has a toJSON() method, JSON.stringify() outputs the value returned by the Object’s
toJSON() method rather than stringifying the Object. Although the use of toJSON() is legal, it’s probably
a bad idea. toJSON() defeats the whole purpose of JSON.stringify(), because the developer is now
responsible for serializing the entire Object structure. This could work with simple Objects such as speaker
(as currently defined), but you’ll end up writing lots of code to serialize more complex Objects that
contain other Objects.
Originally, JavaScript developers used the eval() function to parse JSON.
eval() takes a String parameter that could be a JavaScript expression, a statement, or a sequence of
statements. Consider Example 2-4.
varx='{ "sessionDate": "2014-10-06T13:30:00.000Z" }';console.log('Parse with eval(): '+eval('('+x+')').sessionDate+'\n');console.log('Parse with JSON.parse(): '+JSON.parse(x).sessionDate);
Running the preceding file yields the following:
In this case, both eval() and JSON.parse() work the same and parse the date properly. So what’s the
problem? Let’s look at another example with a JavaScript statement embedded in the String; see Example 2-5.
varx='{ "sessionDate": new Date() }';console.log('Parse with eval(): '+eval('('+x+')').sessionDate+'\n');console.log('Parse with JSON.parse(): '+JSON.parse(x).sessionDate);
When we run this, we now see the following:
We passed in text that contains a JavaScript statement, new Date(), and eval() executes that statement.
Meanwhile, JSON.parse() correctly rejects the text as invalid JSON. Although we passed in only a fairly
innocuous statement to create a Date, someone else could pass in malicious code and eval() would still
execute it. Even though eval() can be used to parse JSON, it is considered a bad/unsafe practice because
it opens the door to any valid JavaScript expression, leaving your application vulnerable to attacks. Because of this security issue, the eval() function has been deprecated (for parsing JSON) in favor of JSON.parse().
Let’s return to our Speaker example, and use JSON.parse() to deserialize a JSON String into a speaker
Object, as shown in Example 2-6.
varjson='{'+// Multi-line JSON string.'"firstName": "Larson",'+'"lastName": "Richard",'+'"email": "larsonrichard@ecratic.com",'+'"about": "Incididunt mollit cupidatat magna excepteur do tempor ex non ...",'+'"company": "Ecratic",'+'"tags": ['+'"json",'+'"rest",'+'"api",'+'"oauth"'+'],'+'"registered": true'+'}';// Deserialize JSON string into speaker object.varspeaker=JSON.parse(json);// Print 2nd speaker object.console.log('speaker.firstName = '+speaker.firstName);
When we run this file, we get the following:
JSON.parse() takes a JSON String as input and parses it into a fully functional JavaScript Object. We’re
now able to access the speaker Object’s data members.
So far, we’ve shown how core JavaScript Data Types and simple Object Literal–style JavaScript Objects interact with JSON. But we’ve glossed over some details, and now it’s time to go a bit deeper. There are several ways to create (or instantiate) JavaScript Objects, and we’ll focus on Object Literal form because this type of Object is the one that is the closest match to a JSON Object.
We’ve already shown the speaker Object in Object Literal form, but we’ll show it again
in Example 2-7 for reference.
varspeaker={firstName:'Larson',lastName:'Richard',:'larsonrichard@ecratic.com',about:'Incididunt mollit cupidatat magna excepteur do tempor ex non ...',company:'Ecratic',tags:['json','rest','api','oauth'],registered:true,name:function(){return(this.firstName+' '+this.lastName);}};
With Object Literal syntax, you define an Object’s properties (both data and functions) inside the curly
braces. In the preceding example, the speaker Object is instantiated and populated with data. If you never
need to create another instance of the speaker Object in your application, Object Literal is a good
approach because it provides a simple yet modular way to group an Object’s data and functionality. The real
drawback to the Object Literal approach is that you can create only one instance of speaker, and you can’t
reuse the name() method.
So far we’ve been using Node.js from the command line to execute JavaScript files. Let’s change things up a bit and start using Node.js’s interpreter, the Request-Eval-Print-Loop (REPL), instead. The REPL is really great because it provides instant feedback on your code, and enables you to iteratively debug and improve your application. You can find in-depth coverage of the REPL in the Node.js documentation. But nothing is perfect, and neither is the REPL. One of my pet annoyances is the following:
For each statement that doesn’t produce output, the interpreter outputs undefined. Many people find this distracting, and there’s a way to turn it off. See Appendix A (“Taming the REPL—mynode”) to configure a command alias I affectionately call mynode that I
find easier to work with than the standard Node.js REPL.
Without further ado, let’s work with our speaker Object by using the mynode REPL:
In this run, you’ll notice that we can interact with the speaker Object by calling its methods and
viewing the results in the interpreter.
Here are some of the commands you’ll need to use the REPL:
.clear Clear the context of the REPL session.
.breakGo back to the REPL prompt. Use this to break out of a multiline statement.
.exit Exit the REPL session.
.save Save the REPL session to a file.
We’ve glossed over many details of Object-Oriented JavaScript, and there are several other ways to interact with objects. We’ve shown just enough OO here so that we can work with JavaScript Objects and JSON in a meaningful way within an application. Complete, in-depth coverage of JavaScript Objects is far beyond the scope of this book. To gain a deeper understanding, here are a few excellent resources:
Now that you know how to serialize/deserialize JSON to/from a speaker Object, we’re ready to run a simple
server-side Unit Test against a Stub API provided by json-server. We’ll also use this Stub API when we later
create a small web application.
Test-Driven Development (TDD) is an approach that uses Unit Testing to drive development. Here’s a typical flow:
Write some tests.
Run the tests, which fail because there isn’t any code.
Write just enough code to make the tests pass.
Refactor the code to improve design and flexibility.
Rerun tests and fix code until all tests pass.
TDD-style Unit Tests tend to be procedural.
Behavior-Driven Development (BDD) is an approach that tests a User Story based on acceptance criteria and expected outcomes. BDD-style tests read like English sentences; for example: “Speakers should receive their payment from the Conference within 30 days.” For more information on BDD, please see Dan North’s excellent article, “Introducing BDD”. Some people see BDD as a refinement to TDD, and I tend to agree because a developer would follow the same workflow as TDD.
Both BDD and TDD are solid approaches, and can be combined to form a robust test suite for an application. The Unit Tests in this chapter use a BDD-style approach for assertions.
Here are the tools for our server-side Unit Test:
Mocha is a JavaScript Unit Test framework that runs in both Node.js and a browser. We’ll leverage Mocha from the command line within a Node.js project, and add a few features to support JSON-based API testing. You can find more details at the Mocha website.
Chai is an assertion library that complements JavaScript testing frameworks and adds a richer set
of assertions, in this case to Mocha. Chai enables developers to write TDD or BDD style tests. The tests in this chapter use the expect (BDD) assertion
style, but you’re free to experiment with the should (BDD) or assert (TDD) assertion styles. Use the
approach that makes you comfortable. For more details on Chai, visit the Chai Asssertion Library website.
Before going further, please be sure to set up your test environment. If you haven’t installed Node.js yet, see Appendix A, and install Node.js (see “Install Node.js” and
“Install npm Modules”). If you want to follow along with the Node.js project provided in the code
examples, cd to chapter-2/speakers-test and do the following to install all dependencies for the
project:
npm install
If you’d like to set up the Node.js project yourself, follow the instructions in the book’s GitHub repository.
Our Unit Test will invoke an API with HTTP, so we’ll include Unirest in our testing repertoire. Unirest is an open source cross-platform REST client provided by the Mashape team. There are implementations in JS, Node.js, Ruby on Rails (RoR) and Java. Unirest is simple and works well in any client code that makes HTTP calls to REST APIs, but it’s also great for Unit Testing. Unirest enables cleaner Unit Tests because you can do a one-time setup (e.g., URI, Headers) and then make multiple HTTP calls throughout the test suite. For detailed documentation, visit the Unirest website.
Unirest is great because it’s cross-platform, and the concepts and method signatures are similar regardless of the language implementation. There are other excellent Java-based HTTP libraries (e.g., Apache Commons HTTPComponents HttpClient, but as a polyglot (multilanguage) developer, I prefer Unirest. Please note that Unirest is not just for Unit Tests. It’s widely used as an HTTP client wrapper by APIs (which invoke other APIs), and by web and mobile client applications.
We’ll use the Speaker data from Chapter 1 as our test data and deploy it as a RESTful API. Again, we’ll
leverage the json-server Node.js module to serve up the data/speakers.json file as a Web API. If you need
to install json-server, please refer to “Install npm Modules” section of Appendix A.
Here’s how to run json-server on port 5000 from your local machine:
cd chapter-2/data json-server -p 5000 ./speakers.json
The Unit Test in Example 2-8 shows how to use Unirest to make an API call to the Speaker Stub API provided by
json-server.
'use strict';varexpect=require('chai').expect;varunirest=require('unirest');varSPEAKERS_ALL_URI='http://localhost:5000/speakers';describe('speakers',function(){varreq;beforeEach(function(){req=unirest.get(SPEAKERS_ALL_URI).header('Accept','application/json');});it('should return a 200 response',function(done){req.end(function(res){expect(res.statusCode).to.eql(200);expect(res.headers['content-type']).to.eql('application/json; charset=utf-8');done();});});it('should return all speakers',function(done){req.end(function(res){varspeakers=res.body;varspeaker3=speakers[2];expect(speakers.length).to.eql(3);expect(speaker3.company).to.eql('Talkola');expect(speaker3.firstName).to.eql('Christensen');expect(speaker3.lastName).to.eql('Fisher');expect(speaker3.tags).to.eql(['Java','Spring','Maven','REST']);done();});});});
In this Unit Test, the following occurs:
The test sets up the URI and Accept Header for unirest by using Mocha’s beforeEach() method,
so that setup occurs in only one place in the code. Mocha executes beforeEach() before running
each test (i.e., it) within the context of the describe.
The should return all speakers test is the most interesting, and it works as follows:
req.end() executes the Unirest GET request asynchronously, and the anonymous (unnamed)
function processes the HTTP response (res) from the API call.
We populate the speakers object with the HTTP Response Body (res.body). At this point, the JSON
from the API has already been parsed by Unirest and converted to a corresponding JavaScript Object (in
Object Literal form).
We use Chai’s BDD-style expect assertions to check for expected results:
We have three speakers.
The third speaker’s company, firstName, lastName, and tags match the values in the speakers.json
file.
To run this test from the command line (in a second terminal session), do the following:
cd chapter-2/speakers-test npm test
You should see the following results:
json-at-work => npm test
...
> mocha test
...
speakers
✓ should return a 200 response
✓ should return all speakers
2 passing
Now that you know how to serialize/deserialize JSON to/from a speaker Object and how to do a Unit Test
with the Speaker Stub API (on json-server), we’re ready to build a simple web application that
leverages the API data and presents it to a user.
We’ll develop the web application in three iterations:
Iteration 1—generate a basic web application with Yeoman.
Iteration 2—make an HTTP call with jQuery.
Iteration 3—consume Speaker data from a Stub API (with json-server) and use a template.
Yeoman provides an easy way to create (i.e., scaffold) a web application and simplify developer workflow, and is similar to Gradle and Maven (from the Java community), and Ruby on Rails. We’ll use Yeoman to set up, develop, and run the example application. To install Yeoman (which depends on Node.js), refer to Appendix A, and follow the instructions in “Install Yeoman”.
Yeoman provides the following functionality:
Creates the development environment
Runs the application
Automatically reloads the browser when changes are saved
Manages package dependencies
Minifies the application’s code and packages it for deployment
Yeoman follows the philosophy of convention over configuration:
Automates setup
Just works
Uses standardized directory structures
Provides Dependency Management
Assumes reasonable defaults
Encourages best practices
Enables tool-based developer workflow (e.g., test, lint, run, and package)
Please review the following Yeoman tutorials for more information:
Yeoman consists of the following tools:
Yo generates the directory structure and Grunt/Gulp/Bower configuration files for an application.
You can use either Gulp or Grunt to build, run, test, and package an application.
Either Bower or npm can be used to manage and download package dependencies.
Although Grunt is a solid build tool, and npm is an excellent package manager, we’ll use Gulp and Bower for our examples because the Yeoman generator for the web application uses these tools.
Yeoman leverages generators to build and scaffold a project. Each generator creates a default preconfigured boilerplate application. There are over 1,000 generators, and Yeoman provides a complete official list.
Let’s start with a simple application that has no real functionality, and hardcode the Speaker data into
a table. We’ll add the speaker functionality in Iterations 2 and 3. With Yeoman installed, we’ll use the
generator-webapp generator to create our application that comes out-of-the-box with web pages, CSS
stylesheets, Bootstrap 4, jQuery, Mocha, and Chai.
If you’d like to set up the Yeoman project yourself, follow the instructions in the book’s GitHub
repository.
If you want to follow along with the Yeoman project provided in the code examples, cd to
chapter-2/speakers-web-1. In either case, do the following to start the application from the command line:
gulp serve
This command starts a local web server and shows the main page (index.html) in your default browser. You should see the page in Figure 2-1 at http://localhost:9000.
Note that if you keep the application running, you can see changes take effect as you save them because this application automatically refreshes with LiveReload.
The generator-webapp Yeoman generator creates a nice starter application, and it’s time to customize
it. First, let’s change the title, Header, and jumbotron (i.e., remove the Splendid! button) in
index.html as shown in Example 2-9.
<!doctype html><htmllang=""><head>...<title>JSON at Work - MyConference</title>...</head><body>...<divclass="header">...<h3class="text-muted">JSON at Work - Speakers</h3></div>...<divclass="jumbotron"><h1class="display-3">Speakers</h1><pclass="lead">Your conference lineup.</p></div>...</body></html>
Let’s add a table with some hardcoded Speaker data in the index.html file, as shown in Example 2-10.
<!doctype html><htmllang="">...<body>...<tableclass="table table-striped"><thead><tr><th>Name</th><th>About</th><th>Topics</th></tr></thead><tbodyid="speakers-tbody"><tr><td>Larson Richard</td><td>Incididunt mollit cupidatat magna excepteur do tempor ...</td><td>JavaScript, AngularJS, Yeoman</td></tr><tr><td>Ester Clements</td><td>Labore tempor irure adipisicing consectetur velit. ...</td><td>REST, Ruby on Rails, APIs</td></tr><tr><td>Christensen Fisher</td><td>Proident ex Lorem et Lorem ad. Do voluptate officia ...</td><td>Java, Spring, Maven, REST</td></tr></tbody></table>...</body></html>
We now have a web application that displays the sample Speaker data, as shown in Figure 2-2.
Here are the key application files and directories generated by generator-webapp:
app/ contains the application’s code (for example, HTML, JavaScript, and CSS).
index.html is the application’s main page.
images/ holds the application’s images.
scripts/ is a directory that has the application’s JavaScript (and other scripting language) files.
main.js is the application’s main JavaScript file. We’ll work with this more in Iteration 2.
styles/ is the folder that holds CSS and related styling files.
bower_components/ contains the project dependencies installed by Bower: Bootstrap, jQuery, Mocha, and Chai.
node_modules/ contains the project dependencies required by Node.js, including Gulp.
test/ holds test specs used by the chosen testing framework(s). In this case, we’re using Mocha and Chai.
gulpfile.js is the Gulp build script used to build and run the application.
package.json is used by Node.js to manage dependencies that Gulp needs to execute the project scripts.
dist/ contains build-related artifacts created by gulp build.
To wrap up our discussion on generator-webapp, here are the other important commands you’ll need to know:
Stop the application (the web server).
gulp lint Use lint to validate the JavaScript files in the application.
gulp +serve:test Test the web application. In this case, it runs PhantomJS with Mocha and Chai.
gulp build Build and package the application for deployment.
gulp clean Clean the artifacts generated when testing and building the application.
You can get the full list of commands by typing gulp --tasks at the command line.
Please shut down the web application before moving to Iteration 2.
In Iteration 1, we developed a web application with Speaker data hardcoded in the main page, and now it’s time to add “live” content and functionality.
We’ll take the following steps:
Factor the hardcoded Speaker data out of the main page.
Add a separate JSON file to hold the Speaker data.
Use jQuery to populate the main page with Speaker data from the JSON file.
If you’d like to set up the Yeoman project for Iteration 2 by yourself, do the following:
Follow the instructions in the book’s GitHub repository.
Don’t forget to copy the app/index.html file from Iteration 1.
Or if you want to follow along with the Yeoman project provided in the code examples, cd to
chapter-2/speakers-web-2. In either case, do the following to start the application from the command line:
gulp serve
This command starts the local web server as shown in Iteration 1. You should see the page in Figure 2-3 at http://localhost:9000.
This has the hardcoded Speaker data table in the main page (in index.html) that you saw earlier. Please keep the web application running so you can see changes take effect as you save them.
Now, let’s remove the rows from the table body. The HTML for the speakers table now looks like Example 2-11.
<!doctype html><htmllang="">...<body>...<tableclass="table table-striped"><thead><tr><th>Name</th><th>About</th><th>Topics</th></tr></thead><tbodyid="speakers-tbody"></tbody></table>...</body></html>
In this example, we now have an empty table that has only a header row. We use Bootstrap’s
table-striped CSS class so that we’ll have zebra-striped rows. Notice the speakers-tbody ID on the
<tbody> element that holds the table’s content. Later, jQuery will use this ID to populate the table
rows.
We now need a separate JSON file to hold the Speaker data. Please see the new /speakers-web-2/app/data/speakers.json file that has the Speaker data for the application (this was copied from /chapter-2/data/speakers.json).
To complete Iteration 2, the upgraded app/scripts/main.js file now uses jQuery to populate the speakers table with the data from the app/data/speakers.json file, as shown in Example 2-12.
'use strict';console.log('Hello JSON at Work!');$(document).ready(function(){functionaddSpeakersjQuery(speakers){$.each(speakers,function(index,speaker){vartbody=$('#speakers-tbody');vartr=$('<tr></tr>');varnameCol=$('<td></td>');varaboutCol=$('<td></td>');vartopicsCol=$('<td></td>');nameCol.text(speaker.firstName+' '+speaker.lastName);aboutCol.text(speaker.about);topicsCol.text(speaker.tags.join(', '));tr.append(nameCol);tr.append(aboutCol);tr.append(topicsCol);tbody.append(tr);});}$.getJSON('data/speakers.json',function(data){addSpeakersjQuery(data.speakers);});});
In this example, we put the code inside jQuery’s $(document).ready() so that the entire page
(including the DOM) is “ready” (fully loaded). $.getJSON() is a jQuery method that makes an
HTTP GET request on a URL and converts the JSON response to a JavaScript object. In this case, the
app/data/speakers.json file is addressable as a URL through HTTP because it is deployed as a part of the
web application. The $.getJSON() callback method then delegates the job of populating the speakers table
to the addSpeakersjQuery() function.
The addSpeakersjQuery() method loops through the speakers array by using the jQuery .each() method. The
.each() function does the following:
Finds the <tbody> element in the speakers table by using the speakers-tbody ID we showed in the
index.html file
Creates a row and its columns by filling in the <tr> and <td> elements with the data from the
speaker object
Appends the new row to the <tbody> element
For more information on jQuery’s getJSON() function, see the jQuery Foundation website.
If you kept the web application running, you should now see the screen in Figure 2-4.
The main page looks the same, but we were expecting that. We’ve improved the application by factoring out the hardcoded Speaker data from the main page, and we’re now making an HTTP call. At this point, we have some of the elements of a real web application that populates its pages dynamically, but here are the drawbacks:
The JSON data comes from a file within the web application, and we want it to come from a RESTful API.
The JavaScript code knows about HTML elements on the main page. We would like to reduce the amount of HTML and DOM manipulation.
Please shut down the web application before moving to Iteration 3.
In Iteration 2, we made an HTTP call to populate the main page with Speaker data from a JSON file, and we’re
now going to get the data from the Stub API provided by json-server that was used in Chapter 1. We’re also going to factor the HTML and DOM manipulation out of the JavaScript into an external Mustache
template.
We’ll take the following steps:
Modify the HTTP call to point to the json-server URI.
Use a Mustache template to remove the HTML and DOM manipulation from JavaScript.
If you’d like to set up the Yeoman project for Iteration 2 by yourself, do the following:
Follow the instructions in the book’s GitHub Repository.
Don’t forget to copy the following files from Iteration 2:
app/index.html
app/scripts/main.js
Or if you want to follow along with the Yeoman project provided in the code examples, cd to
chapter-2/speakers-web-3.
Next, let’s modify the HTTP call in main.js to point to the Speaker Stub API (provided by
json-server), as shown in Example 2-13.
...$.getJSON('http://localhost:5000/speakers',function(data){addSpeakersjQuery(data);});...
The code now invokes the Speaker Stub API provided by json-server. Note that data is passed
to addSpeakersjQuery() because json-server doesn’t emit the named speakers Array.
First, open a new terminal session and run json-server on port 5000 from your command line:
cd chapter-2/data json-server -p 5000 ./speakers.json
Start the web application (in another terminal session) from the command line:
gulp serve
This command starts the local web server as shown in Iterations 1 and 2. You should see the same Speaker data when you visit http://localhost:9000 in your browser. But the web application is in better shape because it’s using data from an API rather than a file. Please keep the web application running so you can see changes take effect as you save them.
To complete Iteration 3, let’s factor out the HTML/DOM manipulation from our JavaScript code into a
Mustache template. Mustache bills itself as providing logic-less templates, which means that there are no
control statements (e.g., for or if) needed to generate HTML from JavaScript and other languages.
Mustache works with multiple languages.
Example 2-14 is our Mustache template that generates HTML content based on Speaker data.
<!--[speakers-mustache-template.html]This is the template for items in the speakers array when the app first loads--><scriptid="speakerTemplate"type="text/html">{{#.}}<tr><td>{{firstName}}{{lastName}}</td><td>{{about}}</td><td>{{tags}}</td></tr>{{/.}}</script>
Note the following about this example:
The template is an external file to keep the HTML out of our JavaScript code.
The template code resides within a <script> element.
The HTML is structured just as it would be in a regular web page.
Mustache fills in the data by using variables enclosed in double parentheses.
The context enables Mustache to loop through the Array of Speaker data. We have an anonymous (nameless) collection that we received from the HTTP call, so we enclose all our elements within a
beginning {{#.}} and closing {{/.}} to set the context. Note that if we had a named Array
(e.g., speakers), the context would begin with {{#speakers}} and end with {{/speakers}}.
Each variable represents a field name within the specified context. For example, the {{firstName}}
variable gets data from the firstName field for the current element in the Speaker data Array.
Please review Wern Ancheta’s excellent article, “Easy Templating with Mustache.js” for a deeper discussion on Mustache.
Besides Mustache, a couple of other solid templating libraries are frequently used by the JavaScript community:
This is a general utility library, but it includes some templating functionality.
In addition, most MVC frameworks (AngularJS, Ember, and Backbone) have some form of templating. We’ll cover Mustache and Handlebars more thoroughly in Chapter 7.
Example 2-15 shows our refactored app/scripts/main.js file that now uses Mustache.
'use strict';console.log('Hello JSON at Work!');$(document).ready(function(){functionaddSpeakersMustache(speakers){vartbody=$('#speakers-tbody');$.get('templates/speakers-mustache-template.html',function(templatePartial){vartemplate=$(templatePartial).filter('#speakerTemplate').html();tbody.append(Mustache.render(template,speakers));}).fail(function(){alert("Error loading Speakers mustache template");});}$.getJSON('http://localhost:5000/speakers',function(data){addSpeakersMustache(data);});});
In this example, the addSpeakerMustache() function converts the Speaker data (that we received from
json-server) into HTML by using our Mustache template. We use the jQuery’s $.get() method to pull in the external
Mustache template. When the $.get() call completes, we then find the main page’s <tbody> element (just
as before) and then use the append() method to append the HTML content that was created by
Mustache.render() (based on the template and Speaker data).
But we’re not quite done, because we need to add Mustache to the web application:
Use Bower to install Mustache into the web application. From the command line in the
speakers-web-3 directory, type bower install mustache.
Add Mustache to app/index.html (right after main.js) as shown in Example 2-16.
<!doctype html><htmllang="">...<body>...<scriptsrc="bower_components/mustache.js/mustache.js"></script>...</body></html>
If you kept the web application running, you should now see the screen in Figure 2-5.
Notice that Mustache formats the Speaker data a little differently, but we improved the web application
by making an API call to the Stub API (provided by json-server) and by templating the HTML with Mustache.
Of course, you can go further by using AngularJS or React, but this is left as an exercise for you.
Please don’t forget to shut down both the web application and json-server with a Ctrl-C in each
terminal session.
A deeper, more thorough knowledge of JavaScript is needed to truly understand Node.js and other JavaScript frameworks (e.g., Angular, React, Ember, Backbone, etc.), and package/build management tools such as Yeoman. If JavaScript Objects are new to you, and all the curly braces, parentheses, and semicolons are a boiling sea of syntax, then take heart because you are not alone. Every JavaScript developer encounters these issues along their path.
Here are a few websites where you can go to deepen and broaden your skills:
JavaScriptIsSexy provides excellent, freely available tutorials to help you reach an intermediate or advanced level. The main tutorials include these three:
As you work through these (and similar) resources, Objects and Functional Expressions will become commonplace as you reach the intermediate-to-advanced level of JavaScript. At that point, you will have a much more enjoyable and productive experience when developing with current JavaScript tools and frameworks.
We started with simple conversion between JavaScript and JSON and went all the way to develop a working web
application and a Unit Test that makes a RESTful API call to json-server. For the sake of brevity and
clarity, we’ve covered “just enough” of several technologies for you to understand core concepts and build simple
applications. But we’ve just scratched the surface of JavaScript, Node.js, and Yeoman.
Now that we’ve developed a web application with JavaScript and JSON, we’ll move on to use JSON with Ruby on Rails in Chapter 3.
We’ve shown how to use JSON in JavaScript, and in this chapter we’ll show how to use JSON with our second platform—Ruby on Rails (RoR).
We’ll cover the following:
Performing Ruby/JSON serialization/deserialization with MultiJson
Working with Ruby Objects and JSON
Understanding the importance of JSON camel casing
Using JSON with Minitest
Making RESTful API calls and testing the results with Minitest and jq
Building a simple JSON-based API with Rails 5
In our examples, we’ll make RESTful API calls to work with the data we deployed on json-server in
Chapter 1. We’ll then create a more realistic JSON-based Web API. But before we develop a
RESTful API, let’s start with the fundamentals of converting between Ruby and JSON.
Before we go any further, let’s start building our development environment by installing RoR. Please go to Appendix A, and follow the instructions in “Install Ruby on Rails”.
Several good JSON gems provide Ruby/JSON serialization/deserialization functionality, including these:
JSON The default JSON gem provided in Ruby.
oj Optimized JSON, considered by many to be the fastest Ruby-based JSON processor available.
yajl Yet Another JSON Library.
There are many other JSON gems in addition to this list, and it’s hard to choose.
Rather than forcing a developer to know how to use each JSON gem,
MultiJson encapsulates this choice by providing a wrapper
that invokes the most common JSON gems on behalf of the caller by choosing the fastest JSON gem that has
been loaded in an application’s environment. Encapsulating JSON gems like this decouples an application
from a particular JSON implementation. For further information on how MultiJson chooses a JSON
implementation, see its GitHub repository. For detailed documentation, visit the MultiJson documentation on RubyDoc.
Since MultiJson defaults to the standard JSON gem, let’s install the oj gem to optimize performance.
gem install multi_json gem install oj
Now that we’ve installed the oj gem, MultiJson will default to oj rather than the standard JSON
gem.
Applications need to convert a Ruby Data Type to JSON (serialize) and vice versa (deserialize) to exchange JSON data with other applications.
The MultiJson Object provides the following methods:
MultiJson.dump() serializes Ruby to JSON.
MultiJson.load() deserializes from JSON to Ruby.
Note that MultiJson.dump() does the following:
Uses traditional Ruby snake case (first_name) rather than the recommended cross-platform camel
case (firstName) when serializing the speaker Object with oj.
Doesn’t generate a JSON String when serializing the speaker Object with the JSON engine. This is because the JSON gem doesn’t serialize a class unless it implements a to_json() method.
Uses snake case (first_name) rather than camel case (firstName) for key names.
According to the RubyDoc MultiJson documentation, here is the method signature for MultiJson.dump():
#dump(object, options = {})The options provided depend on the underlying JSON implementation (in this case oj) because
MultiJson is a wrapper.
We’ll start by serializing some basic Ruby Data Types:
Integer
String
Boolean
Array
Hash
Object
Example 3-1 shows how to serialize/deserialize simple Ruby data types with MultiJson and oj.
require'multi_json'puts"Current JSON Engine =#{MultiJson.current_adapter()}"putsage=39# Integerputs"age =#{MultiJson.dump(age)}"putsfull_name='Larson Richard'# Stringputs"full_name =#{MultiJson.dump(full_name)}"putsreqistered=true# Booleanputs"reqistered =#{MultiJson.dump(reqistered)}"putstags=%w(JavaScript, AngularJS, Yeoman)# Array of Stringsputs"tags =#{MultiJson.dump(tags)}"puts={:'larsonrichard@ecratic.com'}# Hashputs"email =#{MultiJson.dump()}"putsclassSpeakerdefinitialize(first_name,last_name,,about,company,tags,registered)@first_name=first_name@last_name=last_name=@about=about@company=company@tags=tags@registered=registeredendendspeaker=Speaker.new('Larson','Richard','larsonrichard@ecratic.com','Incididunt mollit cupidatat magna excepteur do tempor ex non ...','Ecratic',%w(JavaScript, AngularJS, Yeoman),true)puts"speaker (using oj gem) =#{MultiJson.dump(speaker)}"puts
When you run ruby basic_data_types_serialize.rb from the command line, you should get the following:
MultiJson.dump() doesn’t do much with the scalar types (Integer, String, and Boolean). Things begin to
get interesting with the speaker Object because here MultiJson.dump() initially generates a valid, yet
unattractive, JSON String. As you’ll soon see, MultiJson.dump() has other parameters that enhance
serialization.
To make things more readable, we’ll leverage the :pretty ⇒ true option to pretty-print the JSON output
from the speaker Object, as shown in Example 3-2. Although pretty-printing is more attractive to look at, it is inefficient, and
should be used only for debugging purposes.
require'multi_json'...speaker=Speaker.new('Larson','Richard','larsonrichard@ecratic.com','Incididunt mollit cupidatat magna excepteur do tempor ex non ...','Ecratic',%w(JavaScript, AngularJS, Yeoman),true)puts"speaker (using oj gem) =#{MultiJson.dump(speaker,pretty:true)}"puts
Running the preceding code yields the following pretty-printed speaker Object:
MultiJson can also deserialize JSON. Let’s use the MultiJson.load() method to deserialize JSON into a
Ruby Hash. But this causes an impedance mismatch because the speaker Object’s initialize() method
takes Strings (which match the speaker Object’s attributes) as parameters. We’ll need to convert Hash to
a set of attributes to instantiate a speaker Object. Fortunately, it’s unnecessary to write any code to
convert the Hash because the well-known OpenStruct makes the Hash (from decoding JSON) look like an
object.
Example 3-3 shows the use of OpenStruct.
require'ostruct'h={first_name:'Fred'}m=OpenStruct.new(h)putsm# prints: #<OpenStruct first_name="Fred">putsm.first_name# prints: Fred
OpenStruct is a data structure that is similar to a Hash, and it allows you define key/value pairs of
attributes and their values. OpenStruct is part of Ruby Core and provides the ability to access keys as
attributes. For more information about OpenStruct, see the Ruby Core documentation.
When we instantiate a new speaker Object, it would be great to print out the new object in a readable
manner for debugging purposes. With puts, you’d normally see something like this:
puts speaker # #<Speaker:0x007f84412e0e38>
With the awesome_print gem, the output is much more attractive. For more information, see the
awesome_print GitHub repository.
Before running the code in Example 3-4, install the awesome_print gem from the command line:
gem install awesome_print
require'multi_json'require'ostruct'require'awesome_print'puts"Current JSON Engine =#{MultiJson.current_adapter()}"putsclassSpeakerdefinitialize(first_name,last_name,,about,company,tags,registered)@first_name=first_name@last_name=last_name=@about=about@company=company@tags=tags@registered=registeredendendspeaker=Speaker.new('Larson','Richard','larsonrichard@ecratic.com','Incididunt mollit cupidatat magna excepteur do tempor ex non ...','Ecratic',%w(JavaScript, AngularJS, Yeoman),true)json_speaker=MultiJson.dump(speaker,pretty:true)puts"speaker (using oj gem) =#{MultiJson.dump(speaker)}"putsostruct_spkr=OpenStruct.new(MultiJson.load(json_speaker))speaker2=Speaker.new(ostruct_spkr.first_name,ostruct_spkr.last_name,ostruct_spkr.,ostruct_spkr.about,ostruct_spkr.company,ostruct_spkr.tags,ostruct_spkr.registered)puts"speaker 2 after MultiJson.load()"apspeaker2puts
Run this example, and we’ll see that the preceding code successfully deserialized the JSON String stored
in json_speaker into an OpenStruct Object and finally into another speaker instance—speaker2. Note
the use of awesome_print’s ap method rather than the built-in puts to pretty-print the Object.
Although multi_json and oj efficiently process JSON, sometimes developers need more control over the
data to be serialized.
If you haven’t noticed, JSON Keys/Property Names are usually in camel case form. For example, a Key that
represents someone’s first name would normally be expressed as firstName. But up to this point, we’ve
seen that Ruby’s JSON libraries natively express Keys in snake case (first_name). While this
may be OK for small code examples and Unit Tests that no one else will use, snake case is incompatible
with the rest of the world. Here’s why:
JSON must be interoperable. Although my stance on this will probably offend many ardent Rubyists, and
others may call this bike shedding, the whole point of JSON and REST is interoperability across
heterogeneous applications. There are other programming languages than Ruby, and the rest of the world is
expecting camel case (firstName). If your API works in a way that is unexpected, people won’t
want to use it.
The major players use camel-cased JSON:
Google has standardized on camel case in their Google JSON Style Guide.
The majority of JSON-based public APIs (e.g., Amazon AWS, Facebook, and LinkedIn) use camel-cased JSON.
Avoid platform bleed-through. JSON should look the same regardless of the platform/programming language that generates or consumes it. The Ruby on Rails community prefers snake case, which is just fine within that platform, but this local programming language idiom shouldn’t be reflected in an API.
The ActiveSupport gem provides functionality that has been extracted from Rails, including time zones, internationalization, and JSON encoding/decoding. ActiveSupport’s JSON module provides the ability to do the following:
Convert between camel case and snake case
Choose which portions of an Object to serialize
You can install ActiveSupport from the command line as follows:
gem install activesupport
We’ll use ActiveSupport::JSON.encode() to serialize a speaker Object into JSON, as shown in Example 3-5.
require'active_support/json'require'active_support/core_ext/string'...speaker=Speaker.new('Larson','Richard','larsonrichard@ecratic.com','Incididunt mollit cupidatat magna excepteur do tempor ex non ...','Ecratic',%w(JavaScript, AngularJS, Yeoman),true)json=ActiveSupport::JSON.encode(speaker).camelize(first_letter=:lower)puts"Speaker as camel-cased JSON\n#{json}"putsjson=ActiveSupport::JSON.encode(speaker,only:['first_name','last_name']).camelize(first_letter=:lower)puts"Speaker as camel-cased JSON with only firstName and lastName\n#{json}"puts
In the code example, you’ll notice that ActiveSupport::JSON.encode() provides the following
options:
Camel case (firstName) Key names by chaining with the camelize() method. Note that
the first letter of each Key is capitalized by default, so you’ll need to use the first_letter = :lower
parameter to get lower camel case format.
Limit the portions of the speaker Object to serialize by using the only: parameter.
When you run the code, you should see the following:
But if you only want to convert from snake case to camel case, the awrence gem is a simple alternative. awrence
converts snake-cased Hash keys to camel case, which you can then convert to camel-cased JSON. I haven’t
tried this gem yet, so this is left as an exercise for you.
ActiveSupport also has the ability to deserialize JSON. We’ll now use the decode() method to
deserialize JSON into a Ruby Hash. Just as before, we’ll leverage OpenStruct and awesome_print to
help with instantiation and printing, as shown in Example 3-6.
require'multi_json'require'active_support/json'require'active_support/core_ext/string'require'ostruct'require'awesome_print'...speaker=Speaker.new('Larson','Richard','larsonrichard@ecratic.com','Incididunt mollit cupidatat magna excepteur do tempor ex non ...','Ecratic',%w(JavaScript, AngularJS, Yeoman),true)json_speaker=ActiveSupport::JSON.encode(speaker)puts"speaker (using oj gem) =#{ActiveSupport::JSON.encode(speaker)}"putsostruct_spkr=OpenStruct.new(ActiveSupport::JSON.decode(json_speaker))speaker2=Speaker.new(ostruct_spkr.first_name,ostruct_spkr.last_name,ostruct_spkr.,ostruct_spkr.about,ostruct_spkr.company,ostruct_spkr.tags,ostruct_spkr.registered)puts"speaker 2 after ActiveSupport::JSON.decode()"apspeaker2puts
You’ll see the following result when you run the preceding code from the command line:
The plissken gem is an alternative that converts from camel-cased Hash keys (that originated from JSON) to snake case. We’ll use plissken in our upcoming Unit Tests.
Now that you know how to serialize/deserialize JSON to/from a speaker Object, we’re ready to run a simple
server-side Unit Test against a Stub API provided by json-server (which we used in previous chapters).
The two most common Ruby testing frameworks are Minitest, which is part of Ruby Core and RSpec. Both Minitest and RSpec are excellent, but we can use only one of them in this chapter to keep the focus on JSON.
On one hand, Minitest
Is part of the Ruby Standard Library, so there’s nothing else to install.
Is lightweight and simple.
Has most of the functionality that RSpec provides.
On the other hand, RSpec
Requires you to install a separate rspec gem, but enjoys wide acceptance in the Ruby and Rails communities.
Is large and complex. The RSpec code base is about eight times larger than Minitest.
Has a richer set of matchers than Minitest.
For me, it’s really a matter of taste, and you’ll be fine with either framework. I chose Minitest because it comes standard with Ruby.
Minitest lets you choose between BDD (Minitest::Spec) and TDD (Minitest::Test) style testing. Let’s go
with Minitest::Spec for the following reasons:
I prefer BDD’s simple English-style sentences that describe each test.
It looks similar to RSpec, so the tests will look familiar to those developers who use RSpec.
It’s consistent with the JavaScript-base Mocha/Chai testing in the rest of this book.
This chapter covers only the basics of Minitest. To learn more, see Chris Kottom’s excellent book, The Minitest Cookbook.
Before going further, be sure to set up your test environment. If you haven’t installed Ruby on Rails
yet, refer to Appendix A, and install Ruby on Rails (see “Install Ruby on Rails” and “Install Ruby Gems”). If you want to follow along with the Ruby project provided in
the code examples, cd to chapter-3/speakers-test and do the following to install all dependencies
for the project:
bundle install
Bundler provides dependency management for Ruby projects.
If you’d like to set up the speakers-test Ruby project yourself, follow the instructions in the book’s GitHub
repository.
We’ll use the Speaker data from earlier chapters as our test data and deploy it as a RESTful API. Again,
we’ll leverage the json-server Node.js module to serve up the data/speakers.json file as a Web API. If
you need to install json-server, refer to “Install npm Modules” in Appendix A.
Here’s how to run json-server on port 5000 from your local machine:
cd chapter-3/data json-server -p 5000 ./speakers.json
You can also get a single speaker by adding the id to the URI as follows: http://localhost:5000/speakers/1.
With the Stub API in place, it’s time to write some Unit Tests.
Our Unit Test will do the following:
Make HTTP calls to the Stub Speakers API
Check the values from the HTTP Response Body against expected values
As in previous chapters, we’ll continue to leverage the open source Unirest API wrapper,
but this time we’ll use the Ruby implementation.
Please note that the Unirest gem takes the JSON in the HTTP Response Body, parses it into a Ruby
Hash, and returns it to the caller (inside the HTTP Response Body). This means that the Unit Test
won’t be testing directly against JSON data, but rather it will test against the Hash that was populated
by the JSON response from the API.
The Unit Test in Example 3-7 shows how to use Unirest to invoke the Speaker Stub API provided by json-server
and test the response.
require'minitest_helper'require'unirest'require'awesome_print'require'ostruct'require'plissken'require'jq/extend'require_relative'../models/speaker'describe'Speakers API'doSPEAKERS_ALL_URI='http://localhost:5000/speakers'beforedo@res=Unirest.getSPEAKERS_ALL_URI,headers:{'Accept'=>"application/json"}endit'should return a 200 response'doexpect(@res.code).must_equal200expect(@res.headers[:content_type]).must_equal'application/json; charset=utf-8'endit'should return all speakers'dospeakers=@res.bodyexpect(speakers).wont_be_nilexpect(speakers).wont_be_emptyexpect(speakers.length).must_equal3endit'should validate the 3rd speaker as an Object'dospeakers=@res.bodyostruct_spkr3=OpenStruct.new(speakers[2].to_snake_keys())expect(ostruct_spkr3.company).must_equal'Talkola'expect(ostruct_spkr3.first_name).must_equal'Christensen'expect(ostruct_spkr3.last_name).must_equal'Fisher'expect(ostruct_spkr3.tags).must_equal['Java','Spring','Maven','REST']speaker3=Speaker.new(ostruct_spkr3.first_name,ostruct_spkr3.last_name,ostruct_spkr3.,ostruct_spkr3.about,ostruct_spkr3.company,ostruct_spkr3.tags,ostruct_spkr3.registered)expect(speaker3.company).must_equal'Talkola'expect(speaker3.first_name).must_equal'Christensen'expect(speaker3.last_name).must_equal'Fisher'expect(speaker3.tags).must_equal['Java','Spring','Maven','REST']endit'should validate the 3rd speaker with jq'dospeakers=@res.bodyspeaker3=speakers[2]speaker3.jq('.company'){|value|expect(value).must_equal'Talkola'}speaker3.jq('.tags'){|value|expect(value).must_equal['Java','Spring','Maven','REST']}speaker3.jq('.email'){|value|expect(value).must_equal'christensenfisher@talkola.com'}speaker3.jq('. | "\(.firstName) \(.lastName)"'){|value|expect(value).must_equal'Christensen Fisher'}endend
Note the following in this Unit Test:
The minitest_helper consolidates configuration and setup and factors it out of this test. We’ll cover
Minitest Helpers later in this chapter.
The test executes the Unirest GET request synchronously (and gets a response) with Minitest’s before
method, so that setup occurs in only one place in the code. Minitest executes before before running
each test (i.e., it) within the context of the describe.
The should return all speakers test does the following:
Ensures that the HTTP Response Body is not empty
Checks whether the Speakers API returns three speakers
The should validate the 3rd speaker as an Object test works as follows:
Populate the speakers Hash from the HTTP Response Body (@res.body). At this point, the JSON
from the API has already been parsed by Unirest and converted to a Ruby Hash.
Use OpenStruct.new() to convert the Hash for the third speaker into an OpenStruct, an Object-like
structure. The to_snake_keys() method (from the plissken gem) converts the camel-cased (firstName) Hash keys to snake case (first_name) for compatibility with Ruby.
Use Minitest BDD-style expect assertions to check for expected results:
The third speaker’s company, first_name, last_name, and tags match the values in the
speakers.json file.
The should validate the 3rd speaker with jq test works as follows:
Use jq queries (e.g.,
.company) to check the same fields as in the previous test. jq simplifies Unit Testing by
enabling a developer to query the JSON-based Hashes without the need to convert to an object. jq is a
powerful JSON search tool, and Chapter 6 covers it in greater detail.
The . | "\(.firstName) \(.lastName)" query does a String interpolation to combine the firsName and
lastName fields into the speaker’s full name for testing purposes.
The ruby-jq gem provides a solid Ruby-based jq implementation.
To run this test, use bundle exec rake from the command line, and you should see the following:
rake is a commonly used build utility
for Ruby projects. In the bundle exec rake command, the following occurs:
rake uses the gems that Bundler listed in this project’s Gemfile.
rake has been configured to use test as the default task.
The Rakefile defines the build tasks, and looks like Example 3-8.
require'rake/testtask'Rake::TestTask.new(:test)do|t|t.libs=%w(lib test)t.pattern='test/**/*_spec.rb't.warning=falseendtask:default=>:test
By default, Minitest is silent and doesn’t indicate that tests are passing. In the preceding Unit Test run,
notice that passing tests show in the output. The speakers-test project leverages the minitest-reporters
gem to make
the output more readable.
The Minitest Helper in Example 3-9 configures the minitest and minitest-reporters gems for use by the
speakers_spec.
require'minitest/spec'require'minitest/autorun'require"minitest/reporters"Minitest::Reporters.use!Minitest::Reporters::SpecReporter.new
For the sake of completeness, Example 3-10 shows the Speaker Plain Old Ruby Object (PORO)
that holds the Speaker data.
classSpeakerattr_accessor:first_name,:last_name,,:about,:company,:tags,:registereddefinitialize(first_name,last_name,,about,company,tags,registered)@first_name=first_name@last_name=last_name=@about=about@company=company@tags=tags@registered=registeredendend
The preceding code is plain and simple:
speaker.rb resides in the models directory to follow commonly accepted Ruby project conventions.
attr_accessor defines the Speaker’s data members (e.g., first_name) and accessor methods
(getters/readers and setters/writers) for the data members.
initialize() initializes the data members when Speaker.new() is called.
Before moving on, you can stop json-server by pressing Ctrl-C at the command line.
So far, the Unit Tests have done a decent job of testing JSON data, but something is missing. The code had to check for the existence of all the expected fields, which is clumsy and cumbersome. Imagine how arduous this would be for larger, deeper, more complex JSON documents. There’s a solution for this problem: JSON Schema (this is covered in Chapter 5).
We’ve shown how to deploy and interact with a Stub API, and now it’s time to build a small RESTful API with Ruby on Rails.
Now that you know how to serialize/deserialize JSON to/from a speaker Object and how to do a Unit Test
with the Speaker Stub API (from json-server), we’re ready to build a simple web application that
leverages the API data and presents it to a user.
We’ll continue to use the Speaker data to create an API with Rails 5. This version of Rails includes
rails-api, which provides the ability to create an API-only Rails application. rails-api began as a
separate gem,
but it has been merged into Rails.
We’ll build two Rails-based API applications to demonstrate some of the features of AMS:
speakers-api-1 Create an API with camel-cased JSON.
speakers-api-2 Create an API that customizes the JSON representation.
Before we create anything, let’s determine how the APIs will render JSON.
There are several options for rendering JSON in Ruby on Rails. Here’s a list of the most widely used techniques:
AMS provides functionality to objects that need some ActiveRecord features, such as serialization and validation. AMS is part of the Rails API, and you can find documentation on GitHub.
A Domain-Specific Language (DSL) builder that uses a separate template (i.e., outside the controller) that controls the output. For further details, please see Jbuilder on GitHub.
Ruby API Builder Language (RABL) generates JSON, XML, PList, MessagePack, and BSON. This gem also uses a template file. The RABL GitHub repository has details.
Here are a few considerations to help choose a JSON serialization approach:
JSON generation should be done outside application objects because an object should have no knowledge of external representations. This means that you shouldn’t have code in your object that renders JSON. According to Uncle Bob Martin, a class should have only one reason to change; this is known as the Single Responsibility Principle (the first of the five SOLID principles of OO Design). For further details, see his The Principles of OOD site. When you introduce JSON formatting to an Object, that Object now has a second reason to change, because it has two responsibilities (making it more difficult to change the code in the future):
The original functionality of the object
JSON encoding
Don’t clutter Controllers or Models with JSON generation. This also violates Single Responsibility and makes the Controller/Model code less flexible. Use external templates to clean up Controllers and Models and factor out messy, complex formatting logic.
Control which attributes of an object to serialize and which ones to omit.
Although these guidelines may sound a bit strict, the whole point here is interoperability and consistency. But there are no silver bullets, and it’s perfectly acceptable to have different opinions. In which case, do the following:
Know why you believe what you believe. Back up your position with sound software engineering and architectural principles.
Work and play well with others. Determine whether your approach fits with the overall community rather than just a single language, platform, or segment within a particular technical community.
Now that we’ve established some evaluation criteria, let’s review the options.
Based on the preceding considerations and a review of all the options, it’s a tough decision because AMS, RABL,
and Jbuilder each provide most (if not all) of what we’re looking for. AMS factors out serialization into
a Serializer Object, and RABL and Jbuilder both use external templates. Because RABL can’t emit lower camel
case,
it’s out of the running, which reduces our options to AMS and Jbuilder.
Choosing between AMS and Jbuilder is difficult:
Each provides the same quality of JSON representation.
Their performance is similar when you configure Rails to use oj.
It comes down to which approach you prefer:
Programmatic JSON serialization with Serializer Objects (AMS) or with templates (Jbuilder)
JSON serialization in the Controller (AMS) or in the View (Jbuilder)
There are great arguments on both sides:
Using AMS is a good approach because everything is Ruby-based. Jbuilder templates introduce the need for developers to learn a new DSL.
Jbuilder forces you to think about the JSON representation first, and pushes you to decouple from the underlying database.
As many people in the Rails community would say, “it’s a wash.” In other words, it’s a toss-up between AMS and Jbuilder; either approach produces great JSON responses for an API. I chose AMS because it’s part of Rails and there’s no need to learn a new DSL for templating.
We’ll take the following steps to create and deploy the speakers-api-1 API with Rails 5:
Set up the project.
Write source code:
Model
Serializer
Controller
Deploy the API.
Test with Postman.
The speakers-api-1 project already exists in the Chapter 3 code examples under the chapter-3/speakers-api-1 directory, so you don’t need to create this project. But for the sake of completeness, the following sidebar explains how the project was created.
Even though the project is already set up, you will need to install the gems to run the project. Do the following:
cd speakers-api-1 bundle exec spring binstub --all
In this command, Bundler installs the gems specified in the project’s Gemfile.
The Speaker class in Example 3-11 is a PORO that represents the Speaker data that
the API will render as JSON.
classSpeaker<ActiveModelSerializers::Modelattr_accessor:first_name,:last_name,,:about,:company,:tags,:registereddefinitialize(first_name,last_name,,about,company,tags,registered)@first_name=first_name@last_name=last_name=@about=about@company=company@tags=tags@registered=registeredendend
This code doesn’t do much; it just provides the data members, constructors, and
accessor methods (getters and setters) for a speaker. This code doesn’t know anything about
JSON formatting. The Speaker class inherits from ActiveModel::Serializer so that AMS will convert
it to JSON.
AMS provides Serializers (separate from Controllers and Models) that serialize Objects into JSON.
The SpeakerSerializer already exists, but the following sidebar explains how it was created.
Example 3-12 shows the SpeakerSerializer that AMS uses to render speaker Objects as JSON.
classSpeakerSerializer<ActiveModel::Serializerattributes:first_name,:last_name,,:about,:company,:tags,:registeredend
In this code, attributes lists all fields to be serialized into JSON.
In a Rails application, a Controller handles HTTP Requests and returns HTTP Responses. In our case, the
Speaker JSON data is returned in the Response Body. The SpeakersController already exists, but the following sidebar explains how it was created.
Example 3-13 provides the full SpeakersController that implements the index and show methods.
require'speaker'classSpeakersController<ApplicationControllerbefore_action:set_speakers,only:[:index,:show]# GET /speakersdefindexrenderjson:@speakersend# GET /speakers/:iddefshowid=params[:id].to_i-1ifid>=0&&id<@speakers.lengthrenderjson:@speakers[id]elserenderplain:'404 Not found',status:404endendprivatedefset_speakers@speakers=[]@speakers<<Speaker.new('Larson','Richard','larsonrichard@ecratic.com','Incididunt mollit cupidatat magna ...','Ecratic',['JavaScript','AngularJS','Yeoman'],true)@speakers<<Speaker.new('Ester','Clements','esterclements@acusage.com','Labore tempor irure adipisicing consectetur ...','Acusage',['REST','Ruby on Rails','APIs'],true)@speakers<<Speaker.new('Christensen','Fisher','christensenfisher@talkola.com','Proident ex Lorem et Lorem ad ...','Talkola',['Java','Spring','Maven','REST'],true)endend
Note the following in this code:
The speakers Array is hardcoded, but it’s for test purposes only. In a real application, a separate Data Layer would populate the speakers from a database or an external API call.
The index method does the following:
Responds to HTTP GET requests on the /speakers URI.
Retrieves the entire speakers Array and renders it as a JSON Array in an HTTP Response Body.
The show method does the following:
Responds to HTTP GET requests on the /speakers/{id} URI (where id represents a speaker ID).
Retrieves a speaker (based on the speaker ID) and renders it as a JSON object in an HTTP Response Body.
If id in the HTTP Request is out-of-bounds, the Controller renders a 404 (Not Found) HTTP
Status Code with a plain-text message in the HTTP Response with render plain.
When the Controller invokes the render method, Rails looks for a matching Serializer to serialize the
speaker Object, and invokes the SpeakerSerializer by default.
The Controller and Serializer are decoupled and know nothing about each other. The serialization code exists only in the Serializer and does not reside in the Controller or the Model. The Controller, Model, and Serializer each do one thing.
In a Rails application, the Routes file maps URLs to Controller methods that execute when the URL is
invoked. The rails generate controller command that was shown earlier created the routes shown in Example 3-14.
Rails.application.routes.drawdoget'speakers/index'get'speakers/show'# For details on the DSL available within this file,# see http://guides.rubyonrails.org/routing.htmlend
You can shorten the Routes file with Resource-based routing as shown in Example 3-15.
Rails.application.routes.drawdoresources:speakers,:only=>[:show,:index]# For details on the DSL available within this file,# see http://guides.rubyonrails.org/routing.htmlend
Instead of separate routes for the index and show methods, this resourceful route defines them
with a single line of code.
By default, AMS renders JSON keys with snake case (first_name and last_name). Out of the box, the
serialized JSON (when the user invokes http://localhost:3000/speakers/1 with an HTTP GET) looks like this:
{"first_name":"Larson","last_name":"Richard","email":"larsonrichard@ecratic.com","about":"Incididunt mollit cupidatat magna ...","company":"Ecratic","tags":["JavaScript","AngularJS","Yeoman"],"registered":true}
To make our JSON output compatible with non-Ruby clients, let’s add camel casing by adding the global initializer file shown in Example 3-16.
ActiveModelSerializers.config.key_transform=:camel_lower
Now that the Speakers API is up and running, let’s test with Postman (as we did in Chapter 1) to get the
first speaker. In the Postman GUI, do the following:
Enter the http://localhost:3000/speakers/1 URL.
Choose GET as the HTTP verb.
Click the Send button.
You should see that the GET ran properly in Postman with the speaker JSON data in the HTTP Response Body
text area and a 200 (OK) HTTP Status, as shown in Figure 3-1.
You can stop speakers-api-1 by pressing Ctrl-C at the command line.
AMS’s JSON customization functionality goes beyond camel-casing. The second API application will show how
AMS can customize (alter) the JSON representation of each speaker. Except for the new
SpeakerSerializer, speakers-api-2 has all the same code as the original speakers-api-1 project,
so we’ll just focus on serialization.
Before going further, please install the gems to run the speakers-api-2 project. Do the following:
cd speakers-api-2 bundle exec spring binstub --all
This new version of the SpeakerSerializer provides a new name field (which combines the first_name
and last_name) without changing the original speaker Object, as shown in Example 3-17.
classSpeakerSerializer<ActiveModel::Serializerattributes:name,,:about,:company,:tags,:registereddefname"#{object.first_name}#{object.last_name}"endend
Note the following in this example:
attributes references name instead of first_name and last_name.
In the name method:
The object refers to the speaker Object being rendered.
Combine the first_name and last_name fields by using String interpolation to render a single name
field. The original Speaker model knows nothing about the name attribute created by the Serializer.
The ability to customize the JSON representation with attributes is powerful because it decouples
the Model from the JSON output.
In the speakers-api-2 directory, run rails s to deploy the API at
http://localhost:3000/speakers.
In the Postman GUI, invoke HTTP GET on http://localhost:3000/speakers/1
and you should see the screen in Figure 3-2.
Don’t forget to stop the speakers-api-2 application by pressing Ctrl-C at the command line.
We started with simple conversions between Ruby and JSON, discussed the importance of JSON camel casing, and then demonstrated how to call a (Stub) JSON-based Web API (and tested its contents with Minitest). We then finished by creating a RESTful API with Rails 5 and tested it with Postman.
Now that we’ve developed a JSON-based application with Ruby on Rails, we’ll move on to use JSON with Java (and Spring Boot) in Chapter 4.
We’ve shown how to use JSON with JavaScript and Ruby on Rails, and we’ll now move to Java, our third and final platform for this book. Here’s what we’ll cover:
Performing Java/JSON serialization/deserialization with Jackson
Working with Java Objects and JSON
Using JSON with JUnit
Making RESTful API calls and testing the results with JUnit and JsonUnit
Building a small JSON-based API with Spring Boot
In our examples, we’ll make RESTful API calls to work with the data we deployed on json-server in the
previous chapter. We’ll then move to create a more realistic JSON-based Web API. Before we develop a
RESTful API, we need to start with the basics of Java serialization/deserialization with JSON, and
then add more complexity.
This chapter uses Gradle for building source and test code. If you haven’t installed Java and Gradle, go to Appendix A and see “Install the Java Environment” and “Install Gradle”. After that, you will have a basic environment that enables you to run the examples.
Gradle leverages the concepts from earlier Java-based build systems—Apache Ant and Maven. Gradle is widely used and provides the following functionality for Java projects:
Project structure (a common/standard project directory structure)
Dependency Management (for JAR files)
A common build process
The gradle init utility initializes a project by creating a core directory structure and some
initial implementations for the build script, along with simple Java source and test code. Here are the
key directories and files in a Gradle project:
src/main/ contains source code and resources.
java/ is the Java source code.
resources/ contains the resources (e.g., properties, data files—JSON in our case) used by the source code.
test/main/ contains source code and resources.
java/ is the Java source code.
resources/ contains the resources (e.g., properties, data files—JSON in our case) used by the source code.
build/ contains the .class files generated by compiling the source and test code.
libs/ contains the JAR or WAR files that result from building the project.
gradlew is the Gradle wrapper that enables you to run a project as an executable JAR. We’ll cover this in more detail in the Spring Boot section later.
build.gradle is initiated for you by gradle init, but you need to fill it in with project-specific
dependencies. Gradle uses a Groovy-based DSL for its build scripts (rather than
XML).
build/ contains build-related artifacts created by gradle build or gradle test.
Here are the most important Gradle tasks you’ll need to know in order to work with Gradle.
You can see these tasks when you type gradle tasks on the command line:
gradle build Build the project.
gradle classes Compile Java source code.
gradle clean Delete the build directory.
gradle jar Compile Java source code and package it (along with Resources) into a JAR.
gradle javadoc Generate JavaDoc documentation from the Java source code.
gradle test Run Unit Tests (includes Java source and test code compile).
gradle testClasses Compile Java test code.
Here’s how the example projects were created:
gradle init --type java-application was used to create the initial speakers-test and speakers-web
applications.
The generated build.gradle file and the Java application and test files are stubs. They have been replaced with actual code for the examples in this chapter.
Gradle is well-documented, and here are some tutorials and references to help you go deeper:
Gradle Beyond the Basics, by Tim Berglund (O’Reilly)
Now that we’ve covered the basics of Gradle, it’s time to look at Java-based JSON libraries, and then move on to coding examples.
JUnit is a widely used Unit-Testing framework. The tests in this chapter use JUnit because of its common acceptance in the Java community. JUnit tests are procedural, so the Unit Tests are TDD-style. If you’d like to combine JUnit with BDD, Cucumber is a solid choice. To learn more about BDD and Cucumber in Java, see Micha Kops’ excellent article on “BDD Testing with Cucumber, Java and JUnit”.
There are several solid JSON libraries for Java/JSON serialization/deserialization, including these:
You can find details about Jackson in the GitHub repository.
Gson is provided by Google.
This library is provided by Doug Crockford.
JSON support was introduced into the Java platform in JavaEE 7 as part of the Java Specification Request (JSR) 353 initiative. JSR-353 is a standalone implementation, and you can integrate it with your Java SE applications as of Java SE 8. Java SE 9 will provide native JSON support as part of the Java Enhancement Proposal (JEP) 198 initiative.
All examples in this chapter use Jackson because it
Is widely used (especially by the Spring community)
Provides excellent functionality
Has worked well for a long time
Is well maintained with an active development community
Has good documentation
Additionally, we’ll maintain focus by sticking with one Java/JSON library. As mentioned, the other libraries work well, so feel free to try them on your own.
Let’s start with the basics of Java serialization/deserialization.
Java applications need to convert from Java data structures to JSON (serialize) and convert from JSON to Java (deserialize).
As in previous chapters, we’ll start by serializing some basic Java data types:
integer
string
array
boolean
Example 4-1 shows a simple Unit Test that uses Jackson and JUnit 4 to serialize/deserialize simple Java data types.
packageorg.jsonatwork.ch4;importstaticorg.junit.Assert.*;importjava.io.*;importjava.util.*;importorg.junit.Test;importcom.fasterxml.jackson.core.*;importcom.fasterxml.jackson.core.type.*;importcom.fasterxml.jackson.databind.*;publicclassBasicJsonTypesTest{privatestaticfinalStringTEST_SPEAKER="age = 39\n"+"fullName = \"Larson Richard\"\n"+"tags = [\"JavaScript\",\"AngularJS\",\"Yeoman\"]\n"+"registered = true";@TestpublicvoidserializeBasicTypes(){try{ObjectMappermapper=newObjectMapper();Writerwriter=newStringWriter();intage=39;StringfullName=newString("Larson Richard");List<String>tags=newArrayList<String>(Arrays.asList("JavaScript","AngularJS","Yeoman"));booleanregistered=true;Stringspeaker=null;writer.write("age = ");mapper.writeValue(writer,age);writer.write("\nfullName = ");mapper.writeValue(writer,fullName);writer.write("\ntags = ");mapper.writeValue(writer,tags);writer.write("\nregistered = ");mapper.configure(SerializationFeature.INDENT_OUTPUT,true);mapper.writeValue(writer,registered);speaker=writer.toString();System.out.println(speaker);assertTrue(TEST_SPEAKER.equals(speaker));assertTrue(true);}catch(JsonGenerationExceptionjge){jge.printStackTrace();fail(jge.getMessage());}catch(JsonMappingExceptionjme){jme.printStackTrace();fail(jme.getMessage());}catch(IOExceptionioe){ioe.printStackTrace();fail(ioe.getMessage());}}@TestpublicvoiddeSerializeBasicTypes(){try{StringageJson="{ \"age\": 39 }";ObjectMappermapper=newObjectMapper();Map<String,Integer>ageMap=mapper.readValue(ageJson,newTypeReference<HashMap<String,Integer>>(){});Integerage=ageMap.get("age");System.out.println("age = "+age+"\n\n\n");assertEquals(39,age.intValue());assertTrue(true);}catch(JsonMappingExceptionjme){jme.printStackTrace();fail(jme.getMessage());}catch(IOExceptionioe){ioe.printStackTrace();fail(ioe.getMessage());}}}
In this example, the @Test annotation tells JUnit to run the serializeBasicTypes() and
deSerializeBasicTypes() methods as part of the test. These Unit Tests don’t do many assertions on the JSON
data itself. We’ll cover assertions in more detail later when we test against a Web API.
Here are the most important Jackson classes and methods that serialize/deserialize to/from JSON:
ObjectMapper.writeValue() converts a Java data type to JSON (and in this case, outputs to a Writer).
ObjectMapper.readValue() converts JSON to a Java data type.
Run a single Unit Test from the command line as follows:
cd chapter-4/speakers-test +gradle test --tests org.jsonatwork.ch4.BasicJsonTypesTest+
You should see these results:
This example isn’t too exciting right now because it serializes/deserializes only simple data types to/from JSON. Serialization/deserialization gets more interesting when Objects are involved.
Now that we have a decent grasp of Jackson and how to work with simple Java data types, let’s wade in
deeper with Objects. Example 4-2 shows how to use Jackson to serialize/deserialize a
single speaker Object, and then how to deserialize a JSON file into multiple speaker Objects.
packageorg.jsonatwork.ch4;importstaticorg.junit.Assert.*;importjava.io.*;importjava.net.*;importjava.util.*;importorg.junit.Test;importcom.fasterxml.jackson.core.*;importcom.fasterxml.jackson.databind.*;importcom.fasterxml.jackson.databind.type.*;publicclassSpeakerJsonFlatFileTest{privatestaticfinalStringSPEAKER_JSON_FILE_NAME="speaker.json";privatestaticfinalStringSPEAKERS_JSON_FILE_NAME="speakers.json";privatestaticfinalStringTEST_SPEAKER_JSON="{\n"+" \"id\" : 1,\n"+" \"age\" : 39,\n"+" \"fullName\" : \"Larson Richard\",\n"+" \"tags\" : [ \"JavaScript\", \"AngularJS\", \"Yeoman\" ],\n"+" \"registered\" : true\n"+"}";@TestpublicvoidserializeObject(){try{ObjectMappermapper=newObjectMapper();Writerwriter=newStringWriter();String[]tags={"JavaScript","AngularJS","Yeoman"};Speakerspeaker=newSpeaker(1,39,"Larson Richard",tags,true);StringspeakerStr=null;mapper.configure(SerializationFeature.INDENT_OUTPUT,true);speakerStr=mapper.writeValueAsString(speaker);System.out.println(speakerStr);assertTrue(TEST_SPEAKER_JSON.equals(speakerStr));assertTrue(true);}catch(JsonGenerationExceptionjge){jge.printStackTrace();fail(jge.getMessage());}catch(JsonMappingExceptionjme){jme.printStackTrace();fail(jme.getMessage());}catch(IOExceptionioe){ioe.printStackTrace();fail(ioe.getMessage());}}privateFilegetSpeakerFile(StringspeakerFileName)throwsURISyntaxException{ClassLoaderclassLoader=Thread.currentThread().getContextClassLoader();URLfileUrl=classLoader.getResource(speakerFileName);URIfileUri=newURI(fileUrl.toString());FilespeakerFile=newFile(fileUri);returnspeakerFile;}@TestpublicvoiddeSerializeObject(){try{ObjectMappermapper=newObjectMapper();FilespeakerFile=getSpeakerFile(SpeakerJsonFlatFileTest.SPEAKER_JSON_FILE_NAME);Speakerspeaker=mapper.readValue(speakerFile,Speaker.class);System.out.println("\n"+speaker+"\n");assertEquals("Larson Richard",speaker.getFullName());assertEquals(39,speaker.getAge());assertTrue(true);}catch(URISyntaxExceptionuse){use.printStackTrace();fail(use.getMessage());}catch(JsonParseExceptionjpe){jpe.printStackTrace();fail(jpe.getMessage());}catch(JsonMappingExceptionjme){jme.printStackTrace();fail(jme.getMessage());}catch(IOExceptionioe){ioe.printStackTrace();fail(ioe.getMessage());}}@TestpublicvoiddeSerializeMultipleObjects(){try{ObjectMappermapper=newObjectMapper();FilespeakersFile=getSpeakerFile(SpeakerJsonFlatFileTest.SPEAKERS_JSON_FILE_NAME);JsonNodearrNode=mapper.readTree(speakersFile).get("speakers");List<Speaker>speakers=newArrayList<Speaker>();if(arrNode.isArray()){for(JsonNodeobjNode:arrNode){System.out.println(objNode);speakers.add(mapper.convertValue(objNode,Speaker.class));}}assertEquals(3,speakers.size());System.out.println("\n\n\nAll Speakers\n");for(Speakerspeaker:speakers){System.out.println(speaker);}System.out.println("\n");Speakerspeaker3=speakers.get(2);assertEquals("Christensen Fisher",speaker3.getFullName());assertEquals(45,speaker3.getAge());assertTrue(true);}catch(URISyntaxExceptionuse){use.printStackTrace();fail(use.getMessage());}catch(JsonParseExceptionjpe){jpe.printStackTrace();fail(jpe.getMessage());}catch(JsonMappingExceptionjme){jme.printStackTrace();fail(jme.getMessage());}catch(IOExceptionioe){ioe.printStackTrace();fail(ioe.getMessage());}}}
Note the following in this JUnit test:
serializeObject() creates a Speaker Object and serializes it to Standard Output by using the
ObjectMapper.writeValueAsString() method and System.out.println(). The test sets the
SerializationFeature.INDENT_OUTPUT to true to indent/pretty-print the JSON output.
deSerializeObject() calls getSpeakerFile() to read a JSON input file (which contains a single
speaker JSON Object), and uses the ObjectMapper.readValue() method to deserialize it into a
Speaker Java Object.
deSerializeMultipleObjects() does the following:
Calls getSpeakerFile() to read a JSON input file, which contains an array of JSON speaker Objects.
Invokes the ObjectMapper.readTree() method to get a JsonNode Object, which is a pointer to the
root node of the JSON document that was in the file.
Visits each node in the JSON tree and uses the ObjectMapper.convertValue() method to deserialize each
speaker JSON object into a Speaker Java Object.
Prints out each Speaker Object in the list.
getSpeakerFile() finds a file on the classpath and does the following:
Gets the ContextClassLoader from the current Thread of execution.
Uses the ClassLoader.getResource() method to find the filename as a resource within the
current classpath.
Constructs a File Object based on the URI of the filename.
Each of the preceding tests uses JUnit’s assertion methods to test the results of JSON serialization/deserialization.
You’ll see the following when you run the test from the command line using
gradle test --tests org.jsonatwork.ch4.SpeakerJsonFlatFileTest:
Jackson offers much more functionality than can be shown in this chapter. Refer to the following resources for some great tutorials:
Java Jackson Tutorial, by Eugen Paraschiv
Jackson Tutorial, Tutorials Point
Jackson JSON Java Parser API Example Tutorial, by Pankaj (JournalDev)
Java JSON Jackson Introduction, by Mithil Shah
Until now, we’ve been using JUnit to test against the data from JSON flat files. We’ll now do a more realistic test against an API. But we need an API to test against without writing a lot of code or creating lots of infrastructure. We’ll show how to create a simple Stub API (which produces a JSON response) without writing a single line of code.
To create the Stub, we’ll use the Speaker data from earlier chapters as our test data, which is available at GitHub
and deploy it as a RESTful API. We’ll leverage the json-server Node.js module to serve up the speakers.json
file as a Web API. If you need to install json-server, refer to “Install npm Modules”
in Appendix A. Here’s how to run json-server on port 5000 from your local machine (using
a second terminal session):
cd chapter-4/speakers-test/src/test/resources json-server -p 5000 ./speakers.json
You can also get a single speaker by adding the id to the URI as follows: http://localhost:5000/speakers/1.
With the Stub API in place, it’s time to write some Unit Tests.
Our Unit Test will do the following:
Make HTTP calls to the Stub Speakers API
Check the JSON (from the HTTP Response) against expected values
As in earlier chapters, we’ll continue to leverage the open source Unirest API wrapper, but this time we’ll use the Java version.
In the previous JUnit tests in the chapter, we ensured that only bare minimum functionality was working (no exceptions were thrown), and it’s now time to make our tests a bit more sophisticated. The remaining Unit Tests will look at the JSON content returned from an HTTP Response, and verify that it matches the expected output. We could search through the data and do a comparison with custom code, or we could use a library to reduce the amount of work. JsonUnit has many helpful matchers to simplify JSON comparison in JUnit tests. We’ll cover the basics of JsonUnit in these Unit Tests, but it provides much deeper functionality than we can cover here, including the following:
Regular Expressions
More matchers
The ability to ignore specific fields and values
The Unit Test in Example 4-3 pulls everything together by invoking the Stub API and comparing the JSON response with expected values.
packageorg.jsonatwork.ch4;importstaticorg.junit.Assert.*;importjava.io.*;importjava.net.*;importjava.util.*;importorg.apache.http.*;importorg.junit.Test;importcom.fasterxml.jackson.core.*;importcom.fasterxml.jackson.databind.*;importcom.mashape.unirest.http.HttpResponse;importcom.mashape.unirest.http.Unirest;importcom.mashape.unirest.http.exceptions.*;importcom.mashape.unirest.request.*;importstaticnet.javacrumbs.jsonunit.fluent.JsonFluentAssert.assertThatJson;publicclassSpeakersApiJsonTest{privatestaticfinalStringSPEAKERS_ALL_URI="http://localhost:5000/speakers";privatestaticfinalStringSPEAKER_3_URI=SPEAKERS_ALL_URI+"/3";@TestpublicvoidtestApiAllSpeakersJson(){try{Stringjson=null;HttpResponse<String>resp=Unirest.get(SpeakersApiJsonTest.SPEAKERS_ALL_URI).asString();assertEquals(HttpStatus.SC_OK,resp.getStatus());json=resp.getBody();System.out.println(json);assertThatJson(json).node("").isArray();assertThatJson(json).node("").isArray().ofLength(3);assertThatJson(json).node("[0]").isObject();assertThatJson(json).node("[0].fullName").isStringEqualTo("Larson Richard");assertThatJson(json).node("[0].tags").isArray();assertThatJson(json).node("[0].tags").isArray().ofLength(3);assertThatJson(json).node("[0].tags[1]").isStringEqualTo("AngularJS");assertThatJson(json).node("[0].registered").isEqualTo(true);assertTrue(true);}catch(UnirestExceptionue){ue.printStackTrace();}}@TestpublicvoidtestApiSpeaker3Json(){try{Stringjson=null;HttpResponse<String>resp=Unirest.get(SpeakersApiJsonTest.SPEAKER_3_URI).asString();assertEquals(HttpStatus.SC_OK,resp.getStatus());json=resp.getBody();System.out.println(json);assertThatJson(json).node("").isObject();assertThatJson(json).node("fullName").isStringEqualTo("Christensen Fisher");assertThatJson(json).node("tags").isArray();assertThatJson(json).node("tags").isArray().ofLength(4);assertThatJson(json).node("tags[2]").isStringEqualTo("Maven");assertTrue(true);}catch(UnirestExceptionue){ue.printStackTrace();}}}
Note the following in this JUnit test:
testApiAllSpeakersJson():
Gets a list of all speakers from the Speakers API by calling Unirest.get() with http://localhost:5000/speakers
Verifies that the HTTP Status Code is OK (200).
Gets the JSON document (which contains an array of speaker Objects) from the HTTP Response Body.
Makes a series of assertions on the JSON document with JSONUnit’s assertThatJson() to verify that
We have an array of three speaker objects.
Each field (for example, fullName, tags, and registered) in each speaker object matches the
expected values.
When you run gradle test, you should see the following as part of the output:
testApiSpeaker3Json():
Gets speaker 3 from the Speakers API by calling Unirest.get() with http://localhost:5000/speakers/3
Verifies that the HTTP Response Code is OK (200)
Gets the JSON document (which contains a single speaker Object) from the HTTP Response Body.
Makes a series of assertions on the JSON document with JSONUnit’s assertThatJson() to verify that
We have a single speaker Object.
Each field in the speaker Object has the expected values.
When you run gradle test, you should see the following as part of the output:
This Unit Test only touches upon the basics of the Unirest Java library, which also provides the following:
Full HTTP verb coverage (GET, POST, PUT, DELETE, PATCH)
The ability to do custom mappings from an HTTP Response Body to a Java Object
Asynchronous (i.e., nonblocking) requests
Timeouts
File uploads
And much more
Visit the Unirest website for further information on the Unirest Java library.
Before moving on, you can stop json-server by pressing Ctrl-C at the command line.
We’ve shown how to deploy and interact with a Stub API, and now it’s time to build a small RESTful API.
We’ll continue to use the Speaker data to create an API (chapter-4/speakers-api in the examples) with Spring Boot. The Spring Framework makes it easier to develop and deploy Java-based Web applications and RESTful APIs. Spring Boot makes it easier to create Spring-based applications by providing defaults. With Spring Boot:
There are no tedious, error-prone XML-based configuration files.
Tomcat and/or Jetty can be embedded, so there is no need to deploy a WAR (Web application ARchive) separately. You still could use Spring Boot and Gradle to build and deploy a WAR file to Tomcat. But as you’ll see, an executable JAR simplifies a developer’s environment because it reduces the amount of setup and installations, which enables iterative application development.
We’ll take the following steps to create and deploy the Speakers API with Spring Boot:
Write source code:
Model
Controller
Application
Create a build script (build.gradle).
Deploy an embedded JAR with gradlew.
Test with Postman.
The Speaker class in Example 4-4 is a Plain Old Java Object (POJO) that represents the Speaker
data that the API will render as JSON.
packageorg.jsonatwork.ch4;importjava.util.ArrayList;importjava.util.Arrays;importjava.util.List;publicclassSpeaker{privateintid;privateintage;privateStringfullName;privateList<String>tags=newArrayList<String>();privatebooleanregistered;publicSpeaker(){super();}publicSpeaker(intid,intage,StringfullName,List<String>tags,booleanregistered){super();this.id=id;this.age=age;this.fullName=fullName;this.tags=tags;this.registered=registered;}publicSpeaker(intid,intage,StringfullName,String[]tags,booleanregistered){this(id,age,fullName,Arrays.asList(tags),registered);}publicintgetId(){returnid;}publicvoidsetId(intid){this.id=id;}publicintgetAge(){returnage;}publicvoidsetAge(intage){this.age=age;}publicStringgetFullName(){returnfullName;}publicvoidsetFullName(StringfullName){this.fullName=fullName;}publicList<String>getTags(){returntags;}publicvoidsetTags(List<String>tags){this.tags=tags;}publicbooleanisRegistered(){returnregistered;}publicvoidsetRegistered(booleanregistered){this.registered=registered;}@OverridepublicStringtoString(){returnString.format("Speaker [id=%s, age=%s, fullName=%s, tags=%s, registered=%s]",id,age,fullName,tags,registered);}}
There’s nothing exciting in this code. It just provides the data members, constructors, and
accessor methods (getters and setters) for a speaker. This code doesn’t know anything about
JSON because (as you’ll soon see) Spring automatically converts this object to JSON.
In a Spring application, the Controller handles the HTTP Requests and returns HTTP Responses. In our
case, the speaker JSON data is returned in the response body. Example 4-5 shows the SpeakerController.
packageorg.jsonatwork.ch4;importjava.util.*;importorg.springframework.web.bind.annotation.*;importorg.springframework.http.*;@RestControllerpublicclassSpeakerController{privatestaticSpeakerspeakers[]={newSpeaker(1,39,"Larson Richard",newString[]{"JavaScript","AngularJS","Yeoman"},true),newSpeaker(2,29,"Ester Clements",newString[]{"REST","Ruby on Rails","APIs"},true),newSpeaker(3,45,"Christensen Fisher",newString[]{"Java","Spring","Maven","REST"},false)};@RequestMapping(value="/speakers",method=RequestMethod.GET)publicList<Speaker>getAllSpeakers(){returnArrays.asList(speakers);}@RequestMapping(value="/speakers/{id}",method=RequestMethod.GET)publicResponseEntity<?>getSpeakerById(@PathVariablelongid){inttempId=((newLong(id)).intValue()-1);if(tempId>=0&&tempId<speakers.length){returnnewResponseEntity<Speaker>(speakers[tempId],HttpStatus.OK);}else{returnnewResponseEntity(HttpStatus.NOT_FOUND);}}}
Note the following in this code:
The @RestController annotation identifies the SpeakerController class as a Spring MVC Controller that
processes HTTP Requests.
The speakers array is hardcoded, but it’s for test purposes only. In a real application, a separate Data Layer would populate the speakers from a database or an external API call.
The getAllSpeakers() method does the following:
Responds to HTTP GET requests on the /speakers URI.
Retrieves the entire speakers Array as an ArrayList and returns it as a JSON Array in an HTTP Response
Body.
The @RequestMapping annotation binds the /speakers URI to the getAllSpeakers() method for an HTTP
GET Request.
The getSpeakerById() method does the following:
Responds to HTTP GET requests on the /speakers/{id} URI (where id represents a speaker ID).
Retrieves a speaker (based on the speaker ID) and returns it as a JSON Object in an HTTP Response Body.
The @PathVariable annotation binds the speaker ID from the HTTP Request path to the id parameter
for lookup.
The ResponseEntity return value type enables you to set the HTTP Status Code and/or the speakers
in the HTTP Response.
In both of the preceding methods, the Speaker Object is automatically converted to JSON without any extra
work. By default, Spring is configured to use Jackson behind the scenes to do the Java-to-JSON conversion.
As mentioned earlier, we could package the Speakers API as a WAR file and deploy it on an application server such as Tomcat. But it’s easier to run our API as a standalone application from the command line. To do this we need to do the following:
Add a Java main() method
Package the application as an executable JAR
The Application class in Example 4-6 provides the main() method that we need.
packageorg.jsonatwork.ch4;importorg.springframework.boot.SpringApplication;importorg.springframework.boot.autoconfigure.SpringBootApplication;@SpringBootApplicationpublicclassApplication{publicstaticvoidmain(String[]args){SpringApplication.run(Application.class,args);}}
In this example, the @SpringBootApplication annotation registers our application with Spring and wires up
the SpeakerController and Speaker.
That’s all the code that we need. Now, let’s look at the build.gradle script to build the application.
Gradle uses a script called build.gradle to build an application. Example 4-7 shows the build script for the speakers-api project.
buildscript{repositories{mavenCentral()}dependencies{classpath("org.springframework.boot:spring-boot-gradle-plugin:1.5.2.RELEASE")}}applyplugin:'java'applyplugin:'org.springframework.boot'ext{jdkVersion="1.8"}sourceCompatibility=jdkVersiontargetCompatibility=jdkVersiontasks.withType(JavaCompile){options.encoding='UTF-8'}jar{baseName='speakers-api'version='0.0.1'}repositories{mavenCentral()}test{testLogging{showStandardStreams=true// Show standard output & standard error.}ignoreFailures=false}dependencies{compile([group:'org.springframework.boot',name:'spring-boot-starter-web'])}
Note the following in this build.gradle script:
The jar block defines the name of the application’s JAR file
repositories tells Gradle to pull application dependencies from the Maven Central Repository.
testLogging tells Gradle to show Standard Output and Standard Error when running tests.
dependencies defines the JARs that the speakers-api depends on.
This is a simple build, but Gradle has far more powerful build functionality. Visit the “Wiring Gradle Build Scripts” section of the Gradle User Guide to learn more.
We’ve covered the build script, and now it’s time to deploy the Speakers API.
The gradlew script was generated by the gradle init command that was used to create the speakers-api project.
To learn more about how to create a Gradle project, see “Creating New Gradle Builds”
from the Gradle User Guide.
gradlew pulls everything together and simplifies deployment by taking the following steps:
Invokes the build.gradle script to build the application and uses the Spring Boot plug-in to build the executable JAR
Deploys the Speakers API (as an executable JAR) to http://localhost:8080/speakers on an embedded (bundled) Tomcat server
In the speakers-api directory, run ./gradlew bootRun to deploy the application, and you’ll see the following (at the
end of all the log messages):
Now that the Speakers API is up and running, let’s test with Postman (as we did in Chapter 1) to get the
first speaker. In the Postman GUI, do the following:
Enter the http://localhost:8080/speakers/1 URL.
Choose GET as the HTTP verb.
Click the Send button.
You should see that the GET ran properly in Postman with the speaker JSON data in the HTTP Response Body
text area and a 200 (OK) HTTP Status, as shown in Figure 4-1.
You can stop gradlew by pressing Ctrl-C at the command line.
As promised, development and deployment is simpler because we didn’t do any of the following:
Create or modify XML-based configuration metadata for Spring or Java EE (i.e., web.xml)
Deploy a WAR file
Install Tomcat
Note that we took these deployment steps to show how to set up a simple development environment for a Web API. You still need to deploy a WAR file to an application server when you move into shared (e.g., Staging, User Acceptance Testing, Production) environments so that you have the ability to tune and load-test the application.
With the basics of JSON usage on several core platforms (JavaScript, Ruby on Rails, and Java) behind us, we’ll move deeper into the JSON ecosystem in the next three chapters:
JSON Schema
JSON Search
JSON Transform
In Chapter 5, we’ll show how to structure and validate JSON documents with JSON Schema.
We’ve covered the basics of JSON using our core platforms (JavaScript, Ruby on Rails, and Java), and now it’s time to wade in deeper. In this chapter, we’ll show how to leverage JSON Schema to define the structure and format of JSON documents exchanged between applications:
JSON Schema overview
Core JSON Schema—basics and tooling
How to design and test an API with JSON Schema
In our examples, we’ll design an API with JSON Schema after we progressively walk through the concepts of JSON Schema. As noted in the preface, from now on we will write all our examples in Node.js to keep the size of the chapters to a minimum. But know that the other platforms work well with JSON Schema. If you haven’t installed Node.js already, now would be a great time. Follow the instructions in Appendix A.
Many architects and developers are unfamiliar with JSON Schemas. Before going into details, it’s important to know what a JSON Schema is, how it helps, and why/when to use it. Along the way, we’ll look at the JSON Schema Specification and show a simple example.
The difference is in the type of validation. When you validate a JSON document without a Schema, you’re validating only the syntax of the document. This type of validation guarantees only that the document is well-formed (i.e., matching braces, double quotes for keys, and so forth). This type of validation is known as syntactic validation, and we’ve done this before with tools such as JSONLint, and the JSON parsers for each platform.
Syntactic validation is a good start, but at times you need to validate at a deeper level by using semantic validation. What if you have the following situations:
You (as an API Consumer) need to ensure that a JSON response from an API contains a valid Speaker, or
a list of Orders?
You (as an API Producer) need to check incoming JSON to make sure that the Consumer can send you only the fields you’re expecting?
You need to check the format of a phone number, a date/time, a postal code, an email address, or a credit card number?
This is where JSON Schema shines, and this type of validation is known as semantic validation. In this case, you’re validating the meaning of the data, not just the syntax. JSON Schema is also great for API Design because it helps define the interface, and we’ll cover that later in this chapter.
Before talking too much more about JSON Schema, let’s look at Example 5-1 to get a feel for the syntax.
{"$schema":"http://json-schema.org/draft-04/schema#","type":"object","properties":{"email":{"type":"string"},"firstName":{"type":"string"},"lastName":{"type":"string"}}}
This Schema specifies that a document can have three fields (email, firstName, and lastName), where
each one is a string. We’ll gloss over Schema syntax for now, but don’t worry—we’ll cover it soon.
Example 5-2 shows a sample JSON instance document that corresponds to the preceding Schema.
{"email":"larsonrichard@ecratic.com","firstName":"Larson","lastName":"Richard"}
The json-schema.org site, shown in Figure 5-1, is the starting place to go for all things related to JSON Schema, including copious documentation and examples.
From here, you can find example Schemas, great validation libraries for most major platforms, along with the JSON Schema Standard GitHub repository (where the standard is maintained). The GitHub repository is shown in Figure 5-2.
Here you can track updates, issues, and progress with the JSON Schema standard (more on that later in “The Current State of the JSON Schema Standard”).
JSON Schema provides the ability to validate the content and semantics of a document, and here are some real-world use cases:
The Open Web Application Project (OWASP) Web Service Security Cheat Sheet recommends that Web Services should validate their payloads by using a Schema. Granted, they still talk about XML Schema, but their concern is still applicable to JSON. OWASP calls for validation of field lengths (min/max) and fixed format fields (e.g., phone number or postal code) to help secure a service.
JSON isn’t just for APIs anymore. Many enterprises use JSON as the preferred format to send payloads over messaging systems such as Apache Kafka (we’ll cover this in more detail in Chapter 10). The message Producer and Consumer are completely decoupled in this style of architecture, and JSON Schema can help ensure that the reader receives messages in a format that it’s expecting.
JSON is a first-class citizen in API Design. JSON Schema helps define an API’s contract by specifying the format, content, and structure of a document.
With the structure and rigor of JSON Schema, this may seem counterintuitive. We’ll show a streamlined prototyping workflow with JSON Schema and related tooling when we design an API later in this chapter.
As mentioned in the Preface, as of 2009 I wasn’t sure that JSON was ready for the enterprise. I loved its speed and simplicity, but I didn’t see a way to guarantee the structure and content of JSON documents between applications. But when I learned about JSON Schema in 2010, I changed my position and came to accept JSON as a viable enterprise-class data format.
The JSON Schema Specification is at implementation draft 4 (v0.4), and the next implementation draft 6 (v0.6) is on the way. Draft 5 (v0.5) was published late last year as a working draft to capture work in progress and was not an implementation draft. But don’t let the 0.x version number concern you. As you’ll see in our examples, JSON Schema is robust, provides solid validation capabilities today, and there is a wide variety of working JSON Schema libraries for every major programming platform. You can find more details in the JSON Schema draft 4 spec.
JSON Schema fills the same role with JSON as XML Schema did with XML documents, but with the following differences:
A JSON document does not reference a JSON Schema. It’s up to an application to validate a JSON document against a Schema.
JSON Schemas have no namespace.
JSON Schema files have a .json extension.
Now that you have an overview of JSON Schema, it’s time to go deeper. JSON Schema is powerful, but it can be tedious, and we’ll show some tools to make it easier. We’ll then cover basic data types and core keywords that provide a foundation for working with JSON Schema on real-world projects.
JSON Schema syntax can be a bit daunting, but developers don’t have to code everything by hand. Several excellent tools can make life much easier.
We’ve already covered JSON Editor Online in Chapter 1, but it’s worth another brief mention. Start modeling a JSON document with this tool to get a feel for the data. Use this tool to generate the JSON document and avoid all the typing. When you’re finished, save the JSON document to the clipboard.
Once you have your core concept, the JSONSchema.net application generates a JSON Schema based on the JSON document that was created earlier with JSON Editor Online (see Figure 5-3). The JSONSchema.net application alone will save you 80 percent of the typing required to create a Schema. I always start my Schema work with this application and then make incremental upgrades.
Here are the steps to generate the initial Schema with JSONSchema.net:
Paste in a JSON document on the left side.
Start with the default settings, and make the following changes:
Turn off “Use absolute IDs.”
Turn off “Allow additional properties.”
Turn off “Allow additional items.”
Click the Generate Schema button.
Copy the generated Schema to your clipboard.
After you’ve created a JSON Schema, the JSON Validate application validates a JSON document against that Schema, as shown in Figure 5-4.
To validate the JSON document against the Schema, do the following:
Paste the JSON document and Schema into the JSON Validate application.
Remove all id fields from the Schema because they’re not needed.
Click the Validate button to validate the document.
But sometimes you don’t have good internet connectivity, so it’s great to have tools that run
locally. Plus, if you have sensitive data, it’s safer to run examples on your machine from the command-line interface (CLI). The validate module is the Node.js equivalent of the jsonvalidate.com site. To install and
run it, follow the instructions in Appendix A (see “Install npm Modules”).
Both jsonvalidate.com and validate are part of the Using JSON Schema site (a great Schema resource),
which can be found on GitHub.
You’ve already seen the JSONLint site in Chapter 1, but you can also use JSONLint from the command line by
using the jsonlint Node.js module. To install and run it, follow the instructions in Appendix A (see “Install npm Modules”).
I’ve used jsonlint only for syntactic validation, but if you run jsonlint --help from the command line,
you’ll notice that it can also do semantic validation with a Schema. For more information, see
the jsonlint documentation on GitHub.
We’ll leverage validate from the command line to work through the examples.
Here are the core keywords in any JSON Schema:
$schema Specifies the JSON Schema (spec) version. For example,
“$schema": "http://json-schema.org/draft-04/schema#" specifies that the schema conforms to version 0.4,
while http://json-schema.org/schema# tells a JSON Validator to use the current/latest version of the
specification (which is 0.4 as of this writing). Using the latter of these two options is risky because
some JSON Validators default to a previous version, so an earlier version (and not the current/latest)
version will be used. To play it safe, always specify the version so that you (and the JSON Validator)
are sure about the version you’re using.
type Specifies the data type for a field. For example: "type": "string".
properties Specifies the fields for an object. It contains type information.
The document in Example 5-3 contains the basic JSON types (for example, string, number, boolean) that you’ve
seen before.
{"email":"larsonrichard@ecratic.com","firstName":"Larson","lastName":"Richard","age":39,"postedSlides":true,"rating":4.1}
JSON Schema uses the same basic data types as the Core JSON data types from Chapter 1 (string,
number, array, object, boolean, null), but adds an integer type that specifies whole numbers.
The number type still allows both whole and floating-point numbers.
The JSON Schema in Example 5-4 describes the structure of the preceding document.
{"$schema":"http://json-schema.org/draft-04/schema#","type":"object","properties":{"email":{"type":"string"},"firstName":{"type":"string"},"lastName":{"type":"string"},"age":{"type":"integer"},"postedSlides":{"type":"boolean"},"rating":{"type":"number"}}}
In this example, note the following:
The $schema field indicates that JSON Schema v0.4 rules will be used for validating the document.
The first type field mentioned indicates that there is an Object at the root level of the JSON
document that contains all the fields in the document.
email, firstName, lastName are of type string
age is an integer. Although JSON itself has only a number type, JSON Schema provides the
finer-grained integer type.
postedSlides is a boolean.
rating is a number, which allows for floating-point values.
Run the preceding example using validate, and you’ll see that the document is valid for this Schema.
Although the preceding Schema is a decent start, it doesn’t go far enough. Let’s try the following changes to the JSON document that we want to validate:
Add an extra field (e.g., company).
Remove one of the expected fields (e.g., postedSlides).
Example 5-5 shows our modified JSON document.
{"email":"larsonrichard@ecratic.com","firstName":"Larson","lastName":"Richard","age":39,"rating":4.1,"company":"None"}
Right now there’s nothing to prevent you from invalidating the document, as you’ll see in the following run:
At this point, you might be thinking that JSON Schema isn’t useful because it’s not validating as expected. But we can make the validation process function as expected by adding simple constraints. First, to prevent extra fields, use the code in Example 5-6.
{"$schema":"http://json-schema.org/draft-04/schema#","type":"object","properties":{"email":{"type":"string"},"firstName":{"type":"string"},"lastName":{"type":"string"},"postedSlides":{"type":"boolean"},"rating":{"type":"number"}},"additionalProperties":false}
In this example, setting additionalProperties to false disallows any extra fields in the document root Object. Copy the previous JSON document (ex-2-basic-types-invalid.json) to a new version
(ex-3-basic-types-no-addl-props-invalid.json) and try validating against the preceding Schema. You should now
see the following:
This is getting better, but it still isn’t what we want because there’s no guarantee that all the expected fields will be in the document. To reach a core level of semantic validation, we need to ensure that all required fields are present, as shown in Example 5-7.
{"$schema":"http://json-schema.org/draft-04/schema#","type":"object","properties":{"email":{"type":"string"},"firstName":{"type":"string"},"lastName":{"type":"string"},"postedSlides":{"type":"boolean"},"rating":{"type":"number"}},"additionalProperties":false,"required":["email","firstName","lastName","postedSlides","rating"]}
In this example, the required Array specifies the fields that are required, so these fields must
be present for a document to be considered valid. Note that a field is considered optional if not
mentioned in the required Array.
Example 5-8 shows the modified JSON document (without the required rating field, plus an unexpected age field) to validate.
{"email":"larsonrichard@ecratic.com","firstName":"Larson","lastName":"Richard","postedSlides":true,"age":39}
When running this example from the command line, the document is now considered invalid:
We finally have what we want:
No extra fields are allowed.
All fields are required.
Now that we have basic semantic validation in place, let’s move on to validating number fields in JSON documents.
As you’ll recall, a JSON Schema number type can be a floating-point or whole number. The Schema in Example 5-9
validates the average rating for a speaker’s conference presentation, where the range varies from 1.0
(poor) to 5.0 (excellent).
{"$schema":"http://json-schema.org/draft-04/schema#","type":"object","properties":{"rating":{"type":"number","minimum":1.0,"maximum":5.0}},"additionalProperties":false,"required":["rating"]}
Example 5-10 is a valid JSON document because the rating is within the 1.0–5.0 range.
{"rating":4.99}
Example 5-11 is an invalid document, where the rating is greater than 5.0.
{"rating":6.2}
Run this from the command line, and you’ll see that the preceding document is invalid:
JSON Schema provides the ability to validate Arrays. Arrays can hold any of the JSON Schema basic types
(string, number, array, object, boolean, null). The Schema in Example 5-12 validates the
tags field, which is an Array of type string.
{"$schema":"http://json-schema.org/draft-04/schema#","type":"object","properties":{"tags":{"type":"array","items":{"type":"string"}}},"additionalProperties":false,"required":["tags"]}
Example 5-13 is a valid JSON document for the preceding Schema.
{"tags":["fred"]}
The document in Example 5-14 is not valid because we’ve added an integer to the tags Array.
{"tags":["fred",1]}
Run the preceding example to verify that the document is invalid:
JSON Schema provides the ability to specify the minimum (minItems) and maximum (maxItems) number of items
in an Array. The Schema in Example 5-15 allows for two to four items in the tags Array.
{"$schema":"http://json-schema.org/draft-04/schema#","type":"object","properties":{"tags":{"type":"array","minItems":2,"maxItems":4,"items":{"type":"string"}}},"additionalProperties":false,"required":["tags"]}
The JSON document conforms in Example 5-16 to the preceding Schema.
{"tags":["fred","a"]}
The document in Example 5-17 is invalid because the tags Array has five items.
{"tags":["fred","a","x","betty","alpha"]}
Run the preceding example to verify:
The enum keyword constrains a field’s value to a fixed set of unique values, specified in an Array.
The Schema in Example 5-18 limits the set of allowable values in the tags Array to one of "Open Source",
"Java", "JavaScript", "JSON", or "REST".
{"$schema":"http://json-schema.org/draft-04/schema#","type":"object","properties":{"tags":{"type":"array","minItems":2,"maxItems":4,"items":{"enum":["Open Source","Java","JavaScript","JSON","REST"]}}},"additionalProperties":false,"required":["tags"]}
The document in Example 5-19 is valid based on the preceding Schema.
{"tags":["Java","REST"]}
This document in Example 5-20 is not valid because the value "JS" is not one of the values in the Schema’s enum.
{"tags":["Java","REST","JS"]}
Run this example to show that the document is invalid:
JSON Schema enables you to specify an object. This is the heart of semantic validation because it
enables you to validate Objects exchanged between applications. With this capability, both an API’s
Consumer and Producer can agree on the structure and content of important business concepts such as a
person or order. The Schema in Example 5-21 specifies the content of a speaker Object.
{"$schema":"http://json-schema.org/draft-04/schema#","type":"object","properties":{"speaker":{"type":"object","properties":{"firstName":{"type":"string"},"lastName":{"type":"string"},"email":{"type":"string"},"postedSlides":{"type":"boolean"},"rating":{"type":"number"},"tags":{"type":"array","items":{"type":"string"}}},"additionalProperties":false,"required":["firstName","lastName","email","postedSlides","rating","tags"]}},"additionalProperties":false,"required":["speaker"]}
This Schema is similar to previous examples, with the addition of a top-level speaker object nested
inside the root object.
The JSON document in Example 5-22 is valid against the preceding Schema.
{"speaker":{"firstName":"Larson","lastName":"Richard","email":"larsonrichard@ecratic.com","postedSlides":true,"rating":4.1,"tags":["JavaScript","AngularJS","Yeoman"]}}
The document in Example 5-23 is invalid because the speaker Object is missing the required rating field.
{"speaker":{"firstName":"Larson","lastName":"Richard","email":"larsonrichard@ecratic.com","postedSlides":true,"tags":["JavaScript","AngularJS","Yeoman"]}}
Run the example on the command line to ensure that the preceding document is invalid:
We’ve now covered the most important basic types, and we’ll move on to more-complex schemas.
JSON Schema provides the ability to specify repeating fields (with similar names) through pattern
properties (with the patternProperties keyword) based on Regular Expressions. Example 5-24
defines the fields in an address.
{"$schema":"http://json-schema.org/draft-04/schema#","type":"object","properties":{"city":{"type":"string"},"state":{"type":"string"},"zip":{"type":"string"},"country":{"type":"string"}},"patternProperties":{"^line[1-3]$":{"type":"string"}},"additionalProperties":false,"required":["city","state","zip","country","line1"]}
In this example, the ^line[1-3]$ Regular Expression allows for the following address fields in a
corresponding JSON document: line1, line2, and line3. Here’s how to interpret this Regular
Expression:
^ represents the beginning of the string.
line translates to the literal string "line".
[1-3] allows for a single integer between 1 and 3.
$ indicates the end of the string.
Note that only line1 is required, and the others are optional.
The document in Example 5-25 will validate against the preceding Schema.
{"line1":"555 Main Street","line2":"#2","city":"Denver","state":"CO","zip":"80231","country":"USA"}
Example 5-26 is invalid because it has a line4 field, which is out of range.
{"line1":"555 Main Street","line4":"#2","city":"Denver","state":"CO","zip":"80231","country":"USA"}
Run this example to see that the preceding document is invalid:
JSON Schema also uses Regular Expressions to constrain field values.
The Schema in Example 5-27 limits the value of the email field to a standard email address format as specified in IETF RFC 2822.
{"$schema":"http://json-schema.org/draft-04/schema#","type":"object","properties":{"email":{"type":"string","pattern":"^[\\w|-|.]+@[\\w]+\\.[A-Za-z]{2,4}$"},"firstName":{"type":"string"},"lastName":{"type":"string"}},"additionalProperties":false,"required":["email","firstName","lastName"]}
In this example, the Regular Expression specifies a valid email address. Here’s how to interpret this Regular Expression:
^ represents the beginning of the string.
[\\w|-|.]+ matches one-to-many instances of the following pattern:
[\\w|-|.] matches a word character (a-zA-Z0-9_), a dash (-), or a dot(.).
@ indicates the literal “@”.
[\\w]+ matches one-to-many instances of the following pattern:
[\\w] matches a word character (a-zA-Z0-9_).
\\. indicates the literal “.”
[A-Za-z]{2,4} matches two to four occurrences of the following pattern:
[A-Za-z] matches an alphabetic character.
$ indicates the end of the string.
The double backslash (\\) is used by JSON Schema to denote special characters within regular expressions
because the single backslash (\) normally used in standard Regular Expressions won’t work in this
context. This is due to that fact the a single backslash is already used in core JSON document syntax to
escape special characters (e.g., \b for a backspace).
The following document in Example 5-28 is valid because the email address follows the pattern specified in the Schema.
{"email":"larsonrichard@ecratic.com","firstName":"Larson","lastName":"Richard"}
The document in Example 5-29 is invalid because the email address field is missing the trailing .com.
{"email":"larsonrichard@ecratic","firstName":"Larson","lastName":"Richard"}
Run the preceding example to prove that it’s invalid:
Regular Expressions can be daunting and complex at times. Although a full tutorial on Regular Expressions is far beyond the scope of this book, here are some resources to help you master Regular Expressions:
Dependent Properties introduce dependencies between fields in a Schema: one field depends on the
presence of the other. The dependencies keyword is an object that specifies the dependent relationship(s),
where field x maps to an array of fields that must be present if y is populated. In Example 5-30
tags must be present if favoriteTopics is provided in the corresponding JSON document (that is,
favoriteTopic depends on tags).
{"$schema":"http://json-schema.org/draft-04/schema#","type":"object","properties":{"email":{"type":"string","pattern":"^[\\w|-|.]+@[\\w]+\\.[A-Za-z]{2,4}$"},"firstName":{"type":"string"},"lastName":{"type":"string"},"tags":{"type":"array","items":{"type":"string"}},"favoriteTopic":{"type":"string"}},"additionalProperties":false,"required":["email","firstName","lastName"],"dependencies":{"favoriteTopic":["tags"]}}
The JSON document in Example 5-31 is valid because the favoriteTopic is present, and the tags Array is
populated.
{"email":"larsonrichard@ecratic.com","firstName":"Larson","lastName":"Richard","tags":["JavaScript","AngularJS","Yeoman"],"favoriteTopic":"JavaScript"}
The JSON document in Example 5-32 is invalid because the favoriteTopic is present, but the tags Array is
missing.
{"email":"larsonrichard@ecratic.com","firstName":"Larson","lastName":"Richard","favoriteTopic":"JavaScript"}
Run the preceding example, and you’ll see that the document is invalid:
References provide the ability to reuse definitions/validation rules. Think of references as DRY (Do Not Repeat Yourself) for Schema. References can be either Internal (inside the same Schema) or External (in a separate/external Schema). We’ll start with Internal References.
In Example 5-33, you’ll notice that the Regular Expression for the email field has been replaced by a
$ref, a Uniform Resource Identifier (URI) to the actual definition/validation rule for the email field:
# indicates that the definition exists locally within the Schema.
/definitions/ is the path to the definitions object in this Schema. Note that the definitions
keyword indicates the use of a reference.
emailPattern is the path to the emailPattern specification within the definitions object.
JSON Schema leverages JSON Pointer (covered in Chapter 7) to specify URIs (e.g., #/definitions/emailPattern).
{"$schema":"http://json-schema.org/draft-04/schema#","type":"object","properties":{"email":{"$ref":"#/definitions/emailPattern"},"firstName":{"type":"string"},"lastName":{"type":"string"}},"additionalProperties":false,"required":["email","firstName","lastName"],"definitions":{"emailPattern":{"type":"string","pattern":"^[\\w|-|.]+@[\\w]+\\.[A-Za-z]{2,4}$"}}}
Other than the new definitions object, there’s nothing really that new here. We’ve just moved the
definition for email addresses to a common location that can be used throughout the Schema by multiple
fields.
Example 5-34 shows a JSON document that conforms to the preceding Schema.
{"email":"larsonrichard@ecratic.com","firstName":"Larson","lastName":"Richard"}
Example 5-35 is invalid because email is missing the trailing .com.
{"email":"larsonrichard@ecratic","firstName":"Larson","lastName":"Richard"}
Validate this document from the command line, and you’ll see that it’s invalid:
External References provide a way to specify validation rules in an external Schema file. In this case, Schema A references Schema B for a particular set of validation rules. External References enable a development team (or several teams) to reuse common Schemas and definitions across the enterprise.
Example 5-36 shows our speaker Schema that now references an external (second) Schema.
{"$schema":"http://json-schema.org/draft-04/schema#","type":"object","properties":{"email":{"$ref":"http://localhost:8081/ex-14-my-common-schema.json#/definitions/emailPattern"},"firstName":{"type":"string"},"lastName":{"type":"string"}},"additionalProperties":false,"required":["email","firstName","lastName"]}
Notice the two key differences:
The definitions Object has been factored out of this schema. Don’t worry; it comes back really soon.
The email field’s $ref now points to an external Schema (ex-14-my-common-schema.json) to
find the definition/validation rule for this field. We’ll cover the HTTP address to the external Schema
later in this chapter.
Example 5-37 shows the External Schema.
{"$schema":"http://json-schema.org/draft-04/schema#","id":"http://localhost:8081/ex-14-my-common-schema.json","definitions":{"emailPattern":{"type":"string","pattern":"^[\\w|-|.]+@[\\w]+\\.[A-Za-z]{2,4}$"}}}
The definitions object that contains the emailPattern validation rule now resides in the external Schema. But at this point, you may be asking the follow questions:
How does the reference actually work?
How does a JSON Schema Validator locate the external Schema?
In ex-14-exernal-ref-schema.json, the URI prefix (http://localhost:8081/ex-14-my-common-schema.json)
before the # in the $ref tells the JSON Schema processor to look for the emailPattern definition in
an external Schema.
In ex-14-my-common-schema.json (the external Schema), the id field (a JSON Schema keyword) at the
root of the Schema makes the content of the Schema available to external access.
The URI in $ref and id should be an exact match to make the reference work properly.
The definitions object works the same as it did for internal references.
Example 5-38 shows a JSON document that conforms to the Schema. Notice that this document has neither changed nor is it aware of the external Schema.
{"email":"larsonrichard@ecratic.com","firstName":"Larson","lastName":"Richard"}
Example 5-39 shows a document that won’t validate against the Schema because the email is missing the trailing .com.
{"email":"larsonrichard@ecratic","firstName":"Larson","lastName":"Richard"}
There are two ways to validate the preceding document against the Schema:
The filesystem
The web
Let’s start by validating on the filesystem by using the validate tool that we’ve been using all along:
The JSON document (ex-14-external-ref-invalid.json) is invalid as in previous runs, but notice the inclusion of both the main (ex-14-external-ref-schema.json) and external (ex-14-my-common-schema.json) Schemas on the command line.
Now let’s use the web to validate against the external Schema. In this case, we’ll deploy this file as
static content on a web server so that the URI in the $ref and id (http://localhost:8081/ex-14-my-common-schema.json#/definitions/emailPattern)
will work properly. If you haven’t done so before, now would be a great time to install the http-server Node.js module.
To install and run it, follow the instructions in Appendix A (see “Install npm Modules”).
Run http-server (on port 8081) in the same directory where the external Schema resides, and your command
line should look like this:
When you visit http://localhost:8081/ex-14-my-common-schema.json in your browser, you should see the screen in Figure 5-5.
Now that the external Schema is web addressable, we can do the validation, and you’ll see that the document is invalid:
In addition to the requires and dependencies keywords, JSON Schema provides finer-grained mechanisms to
tell the Schema processor which validation rules to use. These additional keywords are as follows:
oneOf One, and only one, rule must match successfully.
anyOf One or more rules must match successfully.
allOf All rules must match successfully.
The oneOf keyword enforces an exclusive choice between validation rules. In the Schema in Example 5-40, the
value of the rating field can either be less than 2.0 or less than 5.0, but not both.
{"$schema":"http://json-schema.org/draft-04/schema#","type":"object","properties":{"email":{"type":"string","pattern":"^[\\w|-|.]+@[\\w]+\\.[A-Za-z]{2,4}$"},"firstName":{"type":"string"},"type":"string"},"postedSlides":{"type":"boolean"},"rating":{"type":"number","oneOf":[{"maximum":2.0},{"maximum":5.0}]}},"additionalProperties":false,"required":["email","firstName","lastName","postedSlides","rating"]}
Example 5-41 is valid because the value of the rating field is 4.1, which matches only one of
the validation rules (< 5.0), but not both.
{"email":"larsonrichard@ecratic.com","firstName":"Larson","lastName":"Richard","postedSlides":true,"rating":4.1}
The JSON document in Example 5-42 is invalid because the value of the rating field is 1.9, which matches both validation rules (< 2.0 and < 5.0).
{"email":"larsonrichard@ecratic.com","firstName":"Larson","lastName":"Richard","postedSlides":true,"rating":1.9}
Validate the preceding document from the command line, and you’ll see that it’s invalid:
The anyOf keyword allows for a match against any (one or more) of the validation rules. In Example 5-43, we’ve expanded the potential values of postedSlides to allow for [Y|y]es and
[N|n]o in addition to a boolean.
{"$schema":"http://json-schema.org/draft-04/schema#","type":"object","properties":{"email":{"type":"string","pattern":"^[\\w|-|.]+@[\\w]+\\.[A-Za-z]{2,4}$"},"firstName":{"type":"string"},"lastName":{"type":"string"},"postedSlides":{"anyOf":[{"type":"boolean"},{"type":"string","enum":["yes","Yes","no","No"]}]},"rating":{"type":"number"}},"additionalProperties":false,"required":["email","firstName","lastName","postedSlides","rating"]}
Example 5-44 is valid because the value of postedSlides is "yes".
{"email":"larsonrichard@ecratic.com","firstName":"Larson","lastName":"Richard","postedSlides":"yes","rating":4.1}
Example 5-45 is invalid because the value of the postedSlides field is "maybe", which is not
in the set of allowed values.
{"email":"larsonrichard@ecratic.com","firstName":"Larson","lastName":"Richard","postedSlides":"maybe","rating":4.1}
Validate this document from the command line, and you’ll see that it’s invalid:
With the allOf keyword, the data must match all of the validation rules. In the Schema in Example 5-46, the
lastName must be a string with a length < 20.
{"$schema":"http://json-schema.org/draft-04/schema#","type":"object","properties":{"email":{"type":"string","pattern":"^[\\w|-|.]+@[\\w]+\\.[A-Za-z]{2,4}$"},"firstName":{"type":"string"},"lastName":{"allOf":[{"type":"string"},{"maxLength":20}]},"postedSlides":{"type":"boolean"},"rating":{"type":"number","maximum":5.0}},"additionalProperties":false,"required":["email","firstName","lastName","postedSlides","rating"]}
Example 5-47 is valid because the length of the lastName is ≤ 20.
{"email":"larsonrichard@ecratic.com","firstName":"Larson","lastName":"Richard","postedSlides":true,"rating":4.1}
Example 5-48 is invalid because the length of the lastName exceeds 20 characters.
{"email":"larsonrichard@ecratic.com","firstName":"Larson","lastName":"ThisLastNameIsWayTooLong","postedSlides":true,"rating":4.1}
Validate the preceding document, and you’ll see that it’s invalid:
We’ve covered the basics of JSON Schema and syntax, and now it’s time to design an API with JSON Schema.
JSON Schema is all about the semantics (the meaning) and structure of the data exchanged by applications and APIs. In the context of API Design, think of a JSON Schema as part of the contract (interface). In this last portion of the chapter, we’ll go from concept to a running Stub API that other applications and APIs can start testing and using.
We’ll use the same speaker model that we’ve been using all along, and iteratively add constraints and
capabilities. Here are the steps we need in order to go from a concept to a running Stub API:
Model a JSON document.
Generate a JSON Schema.
Generate sample data.
Deploy a Stub API with json-server.
Before creating a Schema, we need to know the data that we’re exchanging. Besides the fields and their formats, it’s important to get a good look-and-feel for the data itself. To do this, we need to overcome one of the major issues with JSON itself: creating documents by hand is tedious and error-prone. Use a modeling tool rather than doing a lot of typing. There are several good tools to support this, and my favorite is JSON Editor Online. Refer to “Model JSON Data with JSON Editor Online” in Chapter 1 for further details on the features of JSON Editor Online.
Figure 5-6 shows our speaker model.
Rather than typing the JSON document, use JSON Editor Online to model the data, and generate a JSON document. In the JSON model on the righthand portion of the screen, click the icon next to an element (i.e., Object, key/value pair, Array) and you’ll see a menu. Select Append or Insert to add elements:
Objects
Name/value pairs
Arrays
After entering a few fields, press the left-arrow button (in the middle of the page) to create the JSON document. You can then iteratively add, test, and review the content of your document until it looks good. Then, save the JSON document, shown in Example 5-49, into a file (with the Save to Disk option under the Save menu).
{"about":"Fred Smith is the CTO of Full Ventures, where he ...","email":"fred.smith@fullventures.com","firstName":"Fred","lastName":"Smith","picture":"http://placehold.it/fsmith-full-ventures-small.png","tags":["JavaScript","REST","JSON"],"company":"Full Ventures, Inc."}
Before going any further, it would be a good idea to validate the JSON document by using JSONLint (either with the CLI or web app). This should validate because JSON Editor Online produces valid JSON, but it’s always good to double-check.
With a valid JSON document in hand, we can now use JSONSchema.net to generate a corresponding JSON Schema based on the document structure and content. Again, save yourself a lot of typing by letting a tool do most of the work for you.
Visit http://jsonschema.net and paste in the JSON document on the left side, as shown in Figure 5-7.
To generate a Schema, start with the default settings, and make the following changes:
Turn off “Use absolute IDs.”
Turn off “Allow additional properties.”
Click the Generate Schema button.
Copy the generated Schema (on the righthand side) to your clipboard.
After saving your clipboard to a file, we now have the Schema in Example 5-50.
{"$schema":"http://json-schema.org/draft-04/schema#","id":"/","type":"object","properties":{"about":{"id":"about","type":"string"},"email":{"id":"email","type":"string"},"firstName":{"id":"firstName","type":"string"},"lastName":{"id":"lastName","type":"string"},"picture":{"id":"picture","type":"string"},"tags":{"id":"tags","type":"array","items":[{"id":"0","type":"string"},{"id":"1","type":"string"},{"id":"2","type":"string"}]},"company":{"id":"company","type":"string"}},"additionalProperties":false,"required":["about","email","firstName","lastName","picture","tags","company"]}
JSONSchema.net is great at generating a base Schema, but it adds fields that we don’t use, plus it doesn’t
do enum, pattern, and so forth. The main takeaway is that JSONSchema.net does about 80 percent of the work for you,
and then you need to fill in a few pieces yourself. We don’t need the id fields at this time, but we do
need to add a Regular Expression to validate the email field (just use the Regex from previous examples).
After making these changes, the Schema should look like Example 5-51.
{"$schema":"http://json-schema.org/draft-04/schema#","type":"object","properties":{"about":{"type":"string"},"email":{"type":"string","pattern":"^[\\w|-|.]+@[\\w]+\\.[A-Za-z]{2,4}$"},"firstName":{"type":"string"},"lastName":{"type":"string"},"picture":{"type":"string"},"tags":{"type":"array","items":[{"type":"string"}]},"company":{"type":"string"}},"additionalProperties":false,"required":["about","email","firstName","lastName","picture","tags","company"]}
Now that we have a JSON Schema, let’s validate the document against the Schema by using the JSON Validate web app. Visit http://jsonvalidate.com/ and paste in the JSON document and Schema, as shown in Figure 5-8.
Click the Validate button, and the document should validate against the Schema. You could have used
the validate CLI tool we’ve been using throughout this chapter, but the web app is a great visual.
At this point, we have a JSON document with its corresponding Schema, but we need more data to create an API for testing. We could use JSON Editor Online to generate test data, but there are a couple of issues with this approach because a human would have to randomize and generate massive amounts of data. Even with a GUI, it’s a big manual effort.
JSON Editor Online is great for creating a small JSON document to get the design process going, but we need another approach to generate randomized bulk JSON data for API testing. We’ll use JSON Generator to create our data; visit http://www.json-generator.com/ and you should see the screen in Figure 5-9.
The code on the left side is a template (in the form of a JavaScript Object Literal) that JSON
Generator uses to generate sample JSON data. Notice that this tool has the ability to generate sample/random
data for paragraphs, numbers, names, globally unique identifiers (GUIDs), names, gender, email addresses, etc.
Plus, it has the ability to do this in bulk with the {{repeat}} tag at the top of the template. Click
the Help button for detailed documentation on the tags.
But these default settings are way more than we need. Let’s pare this template down to the fields we need to
generate three speaker objects with random data (see Example 5-52).
// Template for http://www.json-generator.com/['{{repeat(3)}}',{id:'{{integer()}}',picture:'http://placehold.it/32x32',name:'{{firstName()}}',lastName:'{{surname()}}',company:'{{company()}}',:'{{email()}}',about:'{{lorem(1, "paragraphs")}}'}]
After clicking the Generate button, you should see the following JSON document in the web app shown in Figure 5-10 (if you want
more than the three speaker objects, just change the 3 in the repeat tag to a higher number).
Now, click the Copy to Clipboard button on the righthand side, and paste into a file, as shown in Example 5-53.
[{"id":5,"picture":"http://placehold.it/32x32","name":"Allen","lastName":"Strickland","company":"Coriander","email":"allenstrickland@coriander.com","about":"Quis enim labore ..."},{"id":9,"picture":"http://placehold.it/32x32","name":"Merle","lastName":"Prince","company":"Xylar","email":"merleprince@xylar.com","about":"Id voluptate duis ..."},{"id":8,"picture":"http://placehold.it/32x32","name":"Salazar","lastName":"Ewing","company":"Zentime","email":"salazarewing@zentime.com","about":"Officia qui id ..."}]
We’re almost there, but we need to tweak the data just a bit so that we can deploy the file as an API:
We already have an Array. Let’s name it speakers, and then wrap it with the { and }. We now have a
JSON document with the speakers Array as the root element.
Let’s redo the id fields so that they start at 0.
Our file now looks like Example 5-54.
{"speakers":[{"id":0,"picture":"http://placehold.it/32x32","name":"Allen","lastName":"Strickland","company":"Coriander","email":"allenstrickland@coriander.com","about":"Quis enim labore ..."},{"id":1,"picture":"http://placehold.it/32x32","name":"Merle","lastName":"Prince","company":"Xylar","email":"merleprince@xylar.com","about":"Id voluptate duis ..."},{"id":2,"picture":"http://placehold.it/32x32","name":"Salazar","lastName":"Ewing","company":"Zentime","email":"salazarewing@zentime.com","about":"Officia qui id ..."}]}
At this point, you’re probably wondering why we needed to make those modifications. The changes were needed
so that json-server has the proper URIs (routes) for the Speaker data:
We get the http://localhost:5000/speakers route by encapsulating with the speakers array, with all
the data addressable from there.
We can access the first element with this route: http://localhost:5000/speakers/0.
But we’re getting ahead of ourselves. Let’s get json-server up and running, and then start browsing the
API.
Now that we have a Schema and some test data, it’s time to deploy the sample data as an API so
consumers can start testing it and provide feedback. If you haven’t done so before, now would be a great
time to install the json-server Node.js module. To install and run it, follow the instructions in
Appendix A (see “Install npm Modules”).
Run json-server (on port 5000) in the same directory where the ex-18-speakers-generated-modified.json
file resides, and your command line should look like this:
When you visit http://localhost:5000/speakers in your browser, you should see the screen in Figure 5-11.
You now have a testable API without writing a single line of code; we just deployed a static JSON file. The beauty of this approach is that this looks, acts, and feels like an API. From here, you can interact with it just as you would with other APIs. You could use your browser, cURL, or make HTTP calls from your favorite language to begin interacting with it.
Now there are limits. With json-server, you can do an HTTP GET only on the data—it’s read only.
After going through this exercise, you should have an appreciation for the powerful JSON-based open source tools that can shorten your API development life cycle. Here’s the bottom line:
Use JSON modeling tools before committing to the final data structure. Iterate with stakeholders early and often.
Writing a JSON document or Schema by hand is tedious and error-prone. Let the tools do most of the work for you and avoid as much typing as possible.
Validate early and often.
Generate bulk randomized JSON data rather than creating it yourself.
Spinning up a Stub API is simple. Don’t write your own testing infrastructure, because someone else has already done it for you. Just use what’s out there. You have better things to do with your time.
We’ve shown how to use the validate command-line tool and the JSON Validate web app to validate a JSON
document against a Schema, but the ultimate goal is to validate from an application.
But JSON Schema isn’t only just for JavaScript and Node.js. Most major platforms have excellent support for JSON Schema v4:
Just use the Java-based json-schema-validator.
Node.js has several good JSON Schema processors. I’ve had success with the following:
ajv is my favorite library to use from a Node.js-based application because it’s clean and simple.
ajv is compatible with popular Node.js-based testing suites (e.g., Mocha/Chai, Jasmine, and Karma).
You can find more information on ajv on the npm site
and on GitHub. We’ll show
how to use ajv in Chapter 10.
ujs-jsonvalidate is a processor we’ve been using all through this chapter to validate against a Schema from
the command line. You can find further usage information on GitHub.
You can find the ujs-jsonvalidate npm module at http://bit.ly/2tj4ODI.
We’ve covered the basics of JSON Schema, but a definitive guide is far beyond the scope of this chapter. In addition to the json-schema.org site mentioned previously, here are a few more resources:
Using JSON Schema by Joe McIntyre provides a wealth of JSON Schema-related reference information and tools, including these:
Now that we’ve shown how to structure and validate JSON instance documents with JSON Schema, we’ll show to how search JSON documents in Chapter 6.
JSON Search libraries and tools make it easier to search JSON documents and quickly access the fields that you’re looking for. JSON Search shines when you need to search through a large JSON document returned from a Web API.
In this chapter, we’ll cover the following:
Making your job easier with JSON Search
Using the major JSON Search libraries and tools
Writing Unit Tests that search the content of JSON documents returned by a Web API
In our examples, we’ll use several JSON Search technologies to search JSON data from a Web API deployed on your local machine. We’ll create Unit Tests to execute the searches and check results.
Imagine that the result set from an API call has several hundred (or more) JSON Objects, and you want to use only a subset of the data (key/value pairs) or apply a search filter (based on your criteria). Without JSON Search, you would have to parse the JSON document and sift through a large data structure by writing custom code. This low-level approach is a tedious, code-intensive chore. You have better things to do with your time. The JSON Search libraries and tools shown in this chapter will reduce your work and make your job easier.
Many libraries (callable from an application) and command-line tools can search JSON documents. Here are the most common, widely used libraries, which we’ll explore later in this chapter:
JSONPath
JSON Pointer
jq
Many high-quality JSON Search libraries and command-line tools are available to search and filter JSON content, but we can’t cover all of them. Here are some others that are worth a look, but we can not discuss them further in this chapter for the sake of brevity:
SpahQL is like jQuery for JSON Objects. The SpahQL library is available in a GitHub repository.
json A command-line tool available on GitHub, and on
the npm repository. Even though
we won’t use json’s search capabilities in this chapter, we’ll still use it to pretty-print JSON documents.
jsawk jsawk is a command-line tool that transforms a JSON document in addition to searching.
Even though we’re not covering these tools, one or more could also be right for your project. Compare
them with JSONPath, JSON Pointer, and jq to see which one works best for you.
Many libraries and tools are available, and it’s hard to choose which one(s) to use. Here are my criteria:
Does it appear to be widely used? How many hits do you see when you do an internet search?
Is the code on GitHub? Is it well maintained?
Does it run on multiple platforms? Do multiple providers support the specification or library interfaces?
Is it well-documented? How easy is it to install? How intuitive is the interface? How easy is it to use?
Is the library associated with a standard (e.g., IETF, WC3, or Ecma)?
We’ll use these guidelines to evaluate each JSON Search product.
We need more realistic test data and a larger, richer JSON document to search against, and the web has an abundant supply. For this chapter and the next, we’ll use an open data set available from a public API rather than the Speaker data from previous chapters. We’ll leverage the cities/weather data from the OpenWeatherMap API. See the full API documentation.
The chapter-6/data/cities-weather-orig.json file contains weather data from the OpenWeatherMap API for
cities within a rectangle by latitude/longitude (in this case, Southern California, United States). Note that
the weather data from OpenWeatherMap changes frequently, so the data I’ve captured for the book example
will not match the current data from the API. Let’s modify the weather data before we use it with
json-server. First, look at the data/cities-weather-orig.json file, and notice that the weather data is
stored in an Array called list. I’ve renamed it to cities for the sake of clarity and testability and
saved the changes in the data/cities-weather.json file. Additionally, I moved the cod, calctime, and
cnt fields (at the beginning of the document) into an Object. This second change was needed for compatibility
with json-server, which accepts only Objects or an Array of Objects. We’ll continue to leverage the
json-server Node.js module from earlier chapters to deploy the city weather data as a Web API. Example 6-1 shows the
modified weather data.
{"other":{"cod":200,"calctime":0.006,"cnt":110},"cities":[...]}
Now, run json-server as follows:
json-server -p 5000 ./cities-weather.json
Visit http://localhost:5000/cities in your browser, and you should see the screen in Figure 6-1.
We now have test JSON data deployed as a Stub API, and we’ll use it for Unit Testing throughout this chapter.
All tests in this chapter will continue to leverage Mocha/Chai within a Node.js environment, just as you saw
in previous chapters. Before going further, be sure to set up your test environment. If you haven’t
installed Node.js yet, refer to Appendix A, and install Node.js (see “Install Node.js” and “Install npm Modules”). If you want to follow along with the Node.js project provided
in the code examples, cd to chapter-6/cities-weather-test and do the following to install all
dependencies for the project:
npm install
If you’d like to set up the Node.js project yourself, follow the instructions in the book’s GitHub repository.
Now that we’ve set up a testing environment, it’s time to start working with JSONPath and the other JSON Search libraries.
Now that we’ve covered the basics of JSON Search, we will compare the following libraries and tools:
JSONPath
JSON Pointer
jq
JSONPath was developed by Stefan Goessner in 2007 to search for and extract data from JSON documents. The original library was developed in JavaScript, but because of its popularity, most modern languages and platforms now support JSONPath.
JSONPath query syntax is based on XPath (which is used to search XML documents). Table 6-1 lists some JSONPath queries based on our cities example.
| JSONPath query | Description |
|---|---|
|
Get all elements in the cities Array. |
|
Get the number of elements in the cities Array. |
|
Get every other element in the cities array. See the description of |
|
Get the last element in the cities Array. |
|
Get all weather subelements. |
|
Get the first three elements in cities Array. |
|
Get the city name for first three elements in the cities Array. |
|
Get the cities where the temp > 84. |
|
Get the cities where the temp is between 84 and 85.5. |
|
Get the cities with cloudy weather. |
|
Get the cities with cloudy weather by using regex. |
These example queries use JSONPath keywords and symbols:
.. returns all elements and subelements that have a particular name.
[] with an index is an Array query, and the index is based on the JavaScript slice()
function. The Mozilla Developer Network (MDN) provides a full description.
Here’s a brief overview of JSONPath slice():
It provides the ability to select a portion of an Array.
The begin parameter (as with JS slice()) is the beginning index, is zero-based, and defaults to zero
if omitted.
The end parameter (as with JS slice()) is the end index (noninclusive), and defaults to the end of
the Array if omitted.
The step parameter (added by JSONPath slice()) represents the step, and defaults to 1. A step
value of 1 returns all Array elements specified by the begin and end parameters; a value of 2 returns
every other (or second) element, and so on.
[?(…)] enables a conditional search. The code inside the parentheses can be any valid JS
expression, including conditionals (e.g., == or >) and Regular Expressions.
A couple of online JSONPath testers enable you to practice JSONPath queries before writing a single line of code. I like the tester provided by Kazuki Hamasaki. Just paste in the data/cities-weather.json document (from the Chapter 6 code examples) in the left text box, and enter a JSONPath query. The results appear in the text box on the righthand side of the page as shown in Figure 6-2.
You’ll notice that only the data values are returned in the JSONPath results text box, and that the keys are not returned.
The Unit Test in Example 6-2 exercises several of the example JSONPath queries that were shown earlier.
This code leverages the jsonpath Node.js module to search against the JSON data returned by the Cities
API that runs on your local machine. See https://github.com/dchester/jsonpath
for a detailed description of the jsonpath module.
'use strict';/* Attribution: Cities Weather data provided by OpenWeatherMap API([http://openweathermap.org]) under Creative Commons Share A LikeLicense (https://creativecommons.org/licenses/by-sa/4.0).Changes were made to the data to work with json-server.This does not imply an endorsement by the licensor.This code is distributed under Creative Commons Share A Like License.*/varexpect=require('chai').expect;varjp=require('jsonpath');varunirest=require('unirest');describe('cities-jsonpath',function(){varreq;beforeEach(function(){req=unirest.get('http://localhost:5000/cities').header('Accept','application/json');});it('should return a 200 response',function(done){req.end(function(res){expect(res.statusCode).to.eql(200);expect(res.headers['content-type']).to.eql('application/json; charset=utf-8');done();});});it('should return all cities',function(done){req.end(function(res){varcities=res.body;expect(cities.length).to.eql(110);done();});});it('should return every other city',function(done){req.end(function(res){varcities=res.body;varcitiesEveryOther=jp.query(cities,'$[0::2]');expect(citiesEveryOther[1].name).to.eql('Rosarito');expect(citiesEveryOther.length).to.eql(55);done();});});it('should return the last city',function(done){req.end(function(res){varcities=res.body;varlastCity=jp.query(cities,'$[(@.length-1)]');expect(lastCity[0].name).to.eql('Moreno Valley');done();});});it('should return the 1st 3 cities',function(done){req.end(function(res){varcities=res.body;varcitiesFirstThree=jp.query(cities,'$[:3]');varcitiesFirstThreeNames=jp.query(cities,'$[:3].name');expect(citiesFirstThree.length).to.eql(3);expect(citiesFirstThreeNames.length).to.eql(3);expect(citiesFirstThreeNames).to.eql(['Rancho Palos Verdes','San Pedro','Rosarito']);done();});});it('should return cities within a temperature range',function(done){req.end(function(res){varcities=res.body;varcitiesTempRange=jp.query(cities,'$[?(@.main.temp >= 84 && @.main.temp <= 85.5)]');for(vari=0;i<citiesTempRange.length;i++){expect(citiesTempRange[i].main.temp).to.be.at.least(84);expect(citiesTempRange[i].main.temp).to.be.at.most(85.5);}done();});});it('should return cities with cloudy weather',function(done){req.end(function(res){varcities=res.body;varcitiesWeatherCloudy=jp.query(cities,'$[?(@.weather[0].main == "Clouds")]');checkCitiesWeather(citiesWeatherCloudy);done();});});it('should return cities with cloudy weather using regex',function(done){req.end(function(res){varcities=res.body;varcitiesWeatherCloudyRegex=jp.query(cities,'$[?(@.weather[0].main.match(/Clo/))]');checkCitiesWeather(citiesWeatherCloudyRegex);done();});});functioncheckCitiesWeather(cities){for(vari=0;i<cities.length;i++){expect(cities[i].weather[0].main).to.eql('Clouds');}}});
Note the following in this example:
The test sets up the URI and Accept for unirest using Mocha’s beforeEach() method,
so that setup occurs in only one place in the code. Mocha executes beforeEach() before running
each test (i.e., it) within the context of the describe.
Each test exercises one or more example JSONPath queries and uses expect-style assertions.
The calls to the jsonpath module work as follows:
jp.query() takes a JavaScript Object and a String-based JSONPath query as parameters, and synchronously
returns the result set as a JavaScript Object.
Each JSONPath query omits the leading .cities because json-server takes the name of the cities Array
(from the cities-weather.json file) and adds cities to the URI:
The URI address is http://localhost:5000/cities.
Use $[:3] to get the first three cities, rather than $.cities[:3].
To run this test from the command line (in a second terminal session), do the following:
cd cities-weather-test npm test
You should see the following results:
json-at-work => npm test ... > mocha test ... cities-jsonpath ✓ should return a 200 response ✓ should return all cities ✓ should return every other city ✓ should return the last city ✓ should return 1st 3 cities ✓ should return cities within a temperature range ✓ should return cities with cloudy weather ✓ should return cities with cloudy weather using regex ...
If you call console.log() with the cities variable in any of the preceding tests, you’ll see that the
jsonpath module returns a valid JSON document with key/value pairs.
JSONPath is not limited to JavaScript and Node.js. Most major platforms have excellent support for JSONPath, including these:
There are other good JSONPath libraries are available, but please verify that they follow the syntax mentioned in Stefan Goessner’s article. Otherwise, it’s not really JSONPath. To borrow a phrase from The Princess Bride, “You keep using that word, but I do not think it means what you think it means.”
Table 6-2 provides a scorecard for JSONPath based on the evaluation criteria from the beginning of this chapter.
| Mindshare | Y |
|---|---|
Dev community |
Y |
Platforms |
JavaScript, Node.js, Java, Ruby on Rails |
Intuitive |
Y |
Standard |
N |
JSONPath provides a rich set of set of search features and works across most major platforms. The only downsides are that JSONPath is not a standard and lacks a CLI implementation, but don’t let that stop you from using it. JSONPath enjoys wide community usage and acceptance, and has an excellent online tester. JSONPath reduces the amount of code needed to search and access a JSON document, and gets the subset of data that you need.
JSON Pointer is a standard for accessing a single value within a JSON document. The JSON Pointer
specification provides further details.
JSON Pointer’s main purpose is to support the JSON Schema specification’s $ref functionality in locating
validation rules within a Schema (see Chapter 5).
For example, consider the following document:
{"cities":[{"id":5386035,"name":"Rancho Palos Verdes"},{"id":5392528,"name":"San Pedro"},{"id":5358705,"name":"Huntington Beach"}]}
Table 6-3 describes the preceding document’s common JSON Pointer query syntax:
| JSON Pointer query | Description |
|---|---|
|
Get all cities in the Array. |
|
Get the first city. |
|
Get the name of the second city. |
JSON Pointer query syntax is quite simple, and works as follows:
/ is a path separator.
Array indexing is zero-based.
You’ll notice that in the JSON Pointer specification, only the data values are returned when making a query, and that the keys are not returned.
The Unit Test in Example 6-3 exercises some of the example JSON Pointer queries that were shown earlier.
This code leverages the json-pointer Node.js module to search against the cities API.
See https://github.com/manuelstofer/json-pointer
for a detailed description of the json-pointer module.
'use strict';/* Attribution: Cities Weather data provided by OpenWeatherMap API([http://openweathermap.org]) under Creative Commons Share A LikeLicense (https://creativecommons.org/licenses/by-sa/4.0).Changes were made to the data to work with json-server.This does not imply an endorsement by the licensor.This code is distributed under Creative Commons Share A Like License.*/varexpect=require('chai').expect;varpointer=require('json-pointer');varunirest=require('unirest');describe('cities-json-pointer',function(){varreq;beforeEach(function(){req=unirest.get('http://localhost:5000/cities').header('Accept','application/json');});it('should return a 200 response',function(done){req.end(function(res){expect(res.statusCode).to.eql(200);expect(res.headers['content-type']).to.eql('application/json; charset=utf-8');done();});});it('should return the 1st city',function(done){req.end(function(res){varcities=res.body;varfirstCity=null;firstCity=pointer.get(cities,'/0');expect(firstCity.name).to.eql('Rancho Palos Verdes');expect(firstCity.weather[0].main).to.eql('Clear');done();});});it('should return the name of the 2nd city',function(done){req.end(function(res){varcities=res.body;varsecondCityName=null;secondCityName=pointer.get(cities,'/1/name');expect(secondCityName).to.eql("San Pedro");done();});});});
Note the following in this example:
Each test runs an example JSON Pointer query and leverages expect-style assertions.
The calls to the json-pointer module work as follows:
pointer.get() takes a JavaScript Object and a String-based JSON Pointer query as parameters, and
synchronously returns the result set as a JavaScript Object.
Each JSON Pointer query omits the leading .cities because json-server takes the name of
the cities Array (from the cities-weather.json file) and adds cities to the URI:
The URI address is http://localhost:5000/cities.
Use /0 to get the first city, rather than /cities/0.
To run this test from the command line, do the following:
cd cities-weather-test npm test
You should see the following results:
json-at-work => npm test ... > mocha test ... cities-json-pointer ✓ should return a 200 response ✓ should return the 1st city ✓ should return the name of the 2nd city ...
If you invoke console.log() on the firstCity variable in the should return the 1st city test above,
you’ll see that the json-pointer module returns a valid JSON document with key/value pairs.
In addition to Node.js, most major platforms have a JSON Pointer library:
Java—Jackson currently supports JSON Pointer, but JavaEE 8 will provide JSON Pointer support as part of JSR 374, Java API for JSON Processing 1.1.
Several tools claim to implement JSON Pointer, but they really don’t follow the JSON Pointer specification. When evaluating a JSON Pointer library or tool, be sure it follows RFC 6901. Again, if it doesn’t expressly mention RFC 6901, it’s not JSON Pointer.
Table 6-4 shows a scorecard for JSON Pointer based on our criteria.
| Mindshare | Y |
|---|---|
Dev community |
Y |
Platforms |
JavaScript, Node.js, Java, Ruby on Rails |
Intuitive |
Y |
Standard |
Y—RFC 6901 |
JSON Pointer provides a limited set of search capabilities. Each query returns only a single field from a
JSON document. JSON Pointer’s main purpose is to support JSON Schema’s $ref syntax.
jq is a JSON Search tool that provides JSON command-line processing, including filtering and array
slicing. Per the jq GitHub repository,
jq is like sed for JSON. But jq is not limited to the command line; several good libraries enable you to use jq from your favorite Unit-Testing framework (“jq Unit Test” covers
this).
Many people in the UNIX community use cURL to make HTTP calls to Web APIs from the command line. cURL provides the ability to communicate over multiple protocols in addition to HTTP. To install cURL, please see “Install cURL” in Appendix A.
We’ll start by using cURL to make a GET request from the command against the Cities API as follows:
curl -X GET 'http://localhost:5000/cities'
Now that we’re able to get a JSON response from the Cities API, let’s pipe the content to jq
to filter the Cities API data from the command line. Here’s a simple example:
curl -X GET 'http://localhost:5000/cities' | jq .[0]
Run this command, and you should see the following:
Note the following in this example:
cURL makes an HTTP GET call to the OpenWeatherMap API and pipes the JSON response to Standard Output.
jq reads the JSON from Standard Input, selects the first city from the API, and outputs the JSON to
Standard Output.
cURL is a valuable and powerful part of an API developer’s toolkit. cURL also provides the ability to
test an API with all the main HTTP verbs (GET, POST, PUT, and DELETE). We’ve just scratched
the surface with cURL; visit the main site to learn
more.
Table 6-5 shows some basic jq queries.
jq query |
Description |
|---|---|
|
Get the first city. |
|
Get the last city. An index of -1 indicates the last element of an Array. |
|
Get the first three cities, where |
|
Get the first three cities. This is shorthand, and it omits the start index. |
|
Get all cities whose current temperature is >= 80 degrees Fahrenheit and whose min and max temperature ranges between 79 and 92 degrees Fahrenheit (inclusive). |
Here’s how to execute a jq query to get the last city at the command line:
cd chapter-6/data jq '.cities[-1]' cities-weather.json
You should see the following:
Let’s go deeper with a more concrete example.
jqPlay is a web-based tester for jq, and provides
the ability to iteratively test jq queries against JSON data. To test jqPlay, do the following to get
a new Array of Objects that contain the id and name of the first three cities:
Visit https://jqplay.org and paste the contents of the
chapter-6/data/cities-weather.json file into the JSON text area on the left.
Paste the following jq query into the Filter text box: [[].cities[0:3] | .[] | { id, name }]
You should see the screen in Figure 6-3.
Here’s a breakdown of the [.cities[0:3] | .[] | { id, name }] query:
.cities[0:3] selects the first three elements from the cities Array as a subarray.
{ id, name } selects only the id and name fields:
The surrounding Array braces ([ and ]) convert the result set to an Array.
Scroll to the bottom of the jqplay page, and you’ll see that it has a cheat sheet with links to more
examples and documentation, as shown in Figure 6-4.
In addition to an online tester, the Node.js community has contributed a nice jq tutorial, which is
available on the npm repository.
Install this tutorial as follows:
npm install -g jq-tutorial
Run jq-tutorial from the command line, and you should see this:
This shows all the available jq tutorials. Then, choose one of the tutorials like this:
jq-tutorial objects
This tutorial will show how to use objects with jq. Follow each learning path, and increase
your overall jq skill level.
The Unit Test in Example 6-4 exercises several of the example jq queries that were shown earlier. This code leverages the node-jq Node.js module
to search against the JSON data returned by the Cities API that runs on your local machine. See
the node-jq documentation on GitHub for a
detailed description.
'use strict';/* Attribution: Cities Weather data provided by OpenWeatherMap API([http://openweathermap.org]) under Creative Commons Share A LikeLicense (https://creativecommons.org/licenses/by-sa/4.0).Changes were made to the data to work with json-server.This does not imply an endorsement by the licensor.This code is distributed under Creative Commons Share A Like License.*/varexpect=require('chai').expect;varjq=require('node-jq');varunirest=require('unirest');var_=require('underscore');describe('cities-jq',function(){varreq;beforeEach(function(){req=unirest.get('http://localhost:5000/cities').header('Accept','application/json');});it('should return a 200 response',function(done){req.end(function(res){expect(res.statusCode).to.eql(200);expect(res.headers['content-type']).to.eql('application/json; charset=utf-8');done();});});it('should return all cities',function(done){req.end(function(res){varcities=res.body;expect(cities.length).to.eql(110);done();});});it('should return the last city',function(done){req.end(function(res){varcities=res.body;jq.run('.[-1]',cities,{input:'json'}).then(function(lastCityJson){// Returns JSON String.varlastCity=JSON.parse(lastCityJson);expect(lastCity.name).to.eql('Moreno Valley');done();}).catch(function(error){console.error(error);done(error);});});});it('should return the 1st 3 cities',function(done){req.end(function(res){varcities=res.body;jq.run('.[:3]',cities,{input:'json'}).then(function(citiesFirstThreeJson){// Returns JSON String.varcitiesFirstThree=JSON.parse(citiesFirstThreeJson);varcitiesFirstThreeNames=getCityNamesOnly(citiesFirstThree);expect(citiesFirstThree.length).to.eql(3);expect(citiesFirstThreeNames.length).to.eql(3);expect(citiesFirstThreeNames).to.eql(['Rancho Palos Verdes','San Pedro','Rosarito']);done();}).catch(function(error){console.error(error);done(error);});});});functiongetCityNamesOnly(cities){return_.map(cities,function(city){returncity.name;});}it('should return cities within a temperature range',function(done){req.end(function(res){varcities=res.body;jq.run('[.[] | select (.main.temp >= 84 and .main.temp <= 85.5)]',cities,{input:'json'}).then(function(citiesTempRangeJson){// Returns JSON String.varcitiesTempRange=JSON.parse(citiesTempRangeJson);for(vari=0;i<citiesTempRange.length;i++){expect(citiesTempRange[i].main.temp).to.be.at.least(84);expect(citiesTempRange[i].main.temp).to.be.at.most(85.5);}done();}).catch(function(error){console.error(error);done(error);});});});it('should return cities with cloudy weather',function(done){req.end(function(res){varcities=res.body;jq.run('[.[] | select(.weather[0].main == "Clouds")]',cities,{input:'json'}).then(function(citiesWeatherCloudyJson){// Returns JSON String.varcitiesWeatherCloudy=JSON.parse(citiesWeatherCloudyJson);checkCitiesWeather(citiesWeatherCloudy);done();}).catch(function(error){console.error(error);done(error);});});});it('should return cities with cloudy weather using regex',function(done){req.end(function(res){varcities=res.body;jq.run('[.[] | select(.weather[0].main | test("^Clo"; "i"))]',cities,{input:'json'}).then(function(citiesWeatherCloudyJson){// Returns JSON String.varcitiesWeatherCloudy=JSON.parse(citiesWeatherCloudyJson);checkCitiesWeather(citiesWeatherCloudy);done();}).catch(function(error){console.error(error);done(error);});});});functioncheckCitiesWeather(cities){for(vari=0;i<cities.length;i++){expect(cities[i].weather[0].main).to.eql('Clouds');}}});
Note the following in this example:
The test sets up the URI and Accept for unirest using Mocha’s beforeEach() method,
so that setup occurs in only one place in the code. Mocha executes beforeEach() before running
each test (i.e., it) within the context of the describe.
Each test exercises one or more example jq queries and uses expect-style assertions.
The calls to the node-jq module work as follows. jq.run() does the following:
Takes a String-based jq query as the first parameter.
Uses an optional second parameter (an Object) that specifies the type of input:
{ input: 'json' } is a JavaScript Object. The Unit Tests use this option because unirest returns
Objects from the HTTP call to the Stub API provided by json-server.
{ input: 'file' } is a JSON file. This is the default if the caller doesn’t specify an input option.
{ input: 'string' } is a JSON String.
Uses an ES6 JavaScript Promise to asynchronously return the result set as a JSON String. In this case, the Unit Tests all need to do the following:
Wrap their code within the then and catch constructs of the Promise.
Use JSON.parse() to parse the result into a corresponding JavaScript object structure.
Visit the MDN site to learn more about the new Promise syntax.
Each jq query omits the leading .cities because json-server takes the name of the cities Array
(from the cities-weather.json file) and adds cities to the URI:
The URI address is http://localhost:5000/cities.
Use $[:3] to get the first three cities, rather than $.cities[:3].
To run this test from the command line (in a second terminal session), do the following:
cd cities-weather-test npm test
You should see the following results:
json-at-work => npm test
...
> mocha test
...
cities-jq
✓ should return a 200 response
✓ should return all cities
✓ should return the last city
✓ should return the 1st 3 cities
✓ should return cities within a temperature range
✓ should return cities with cloudy weather
✓ should return cities with cloudy weather using regex
...
If you call console.log() with the cities variable in any of these tests, you’ll see that the
node-jq module returns a valid JSON document with key/value pairs.
In addition to Node.js, other major platforms have a jq library:
The ruby-jq gem is available at RubyGems.org, and you can also find it on GitHub.
jackson-jq plugs into the Java Jackson library (from Chapter 4).
Table 6-6 shows how jq stacks up against our evaluation criteria.
| Mindshare | Y |
|---|---|
Dev community |
Y |
Platforms |
CLI—Linux/macOS/Windows, Node.js, Java, Ruby on Rails |
Intuitive |
Y |
Standard |
N |
jq is excellent because it
Enjoys solid support in most languages.
Has excellent documentation.
Provides a rich set of search and filtering capabilities.
Can pipe query results to standard UNIX CLI tools (for example, sort, grep, and uniq).
Works great on the command line with the widely used cURL HTTP client.
Has a fantastic online tester. jqPlay enables you to test jq queries from a simple web interface. This
rapid feedback enables you to iterate to a solution before writing any code.
Has a useful interactive tutorial (see the “jq-tutorial” section).
The only downside to jq is the initial learning curve. The sheer number of options along
with the query syntax can seem overwhelming at first, but the time you spend to learn jq is well worth it.
We’ve covered the basics of jq in this chapter. jq has excellent documentation, and you can find
more detailed information at the following websites:
Based on the evaluation criteria and overall usability, I rank the JSON Search libraries in the following order:
jq
JSONPath
JSON Pointer
Although JSON Pointer is a standard and it can search a JSON document, I rank JSONPath in second place over JSON Pointer for the following reasons:
JSONPath has a richer query syntax.
A JSONPath query returns multiple elements in a document.
But jq is my overwhelming favorite JSON Search tool because it
Works from the command line (JSONPath and JSON Pointer don’t provide this capability). If you work with JSON in automated DevOps environments, you need a tool that works from the command line.
Has an online tester, which makes development faster.
Has an interactive tutorial.
Provides a rich query language.
Has solid library support in most programming languages.
Enjoys a large mindshare in the JSON community.
I’ve successfully used jq to search through JSON responses from other Web APIs
(not from OpenWeatherMap) that contained over 2 million lines of data, and jq performed flawlessly
in a production environment. jq enjoys great mindshare in the JSON community—just do a web search on
“jq tutorial” and you’ll see several excellent tutorials that will help you go deeper.
Now that we’ve shown how to efficiently search JSON documents, we’ll move on to transforming JSON in Chapter 7.
Your application(s) may take in data from multiple APIs, and you’ll often need to convert their JSON response data to a format that integrates with your application architecture.
Many JSON Transform technologies enable you to convert between a JSON document and other data formats (e.g., HTML or XML) or a different JSON structure. Many developers will be familiar with some of these libraries (e.g., Mustache and Handlebars), but we’ll show how to use them in nontraditional ways (more on that later). We’ll also cover libraries (e.g., JSON-T) that are not well-known to the community at large, but are commonly used by members of the JSON community.
Typical types of transformations include the following:
Many web and mobile applications have to handle JSON data from APIs, and this is the most common type of JSON transformation.
Sometimes the JSON response from a Web API isn’t quite what you’re looking for, and you’d like to change the format of the data to make it easier to work with. In this case, you can alter the structure by modifying values and/or removing, adding, and deleting fields. Some of the libraries are analogous to eXtensible Stylesheet Language Transformations (XSLT) for XML (which is used to transform XML documents) in that they use a separate template to describe the transformation.
SOAP/XML-based Web Services still exist, and sometimes you need to consume XML and convert it to JSON for compatibility with newer applications in the enterprise that are based on REST and JSON. Conversely, your applications may need to send XML payloads to SOAP/XML-based Web Services. In this case, you’ll need to convert from JSON to XML.
In this chapter, we’ll show how to do the following:
Convert JSON to HTML
Convert a JSON document to a new (JSON) structure
Convert between XML and JSON
Use JSON Transform libraries
Write Unit Tests that transform the content of JSON documents returned by a Web API
Just as you saw with JSON Search, several libraries are available for each type of transformation, and it’s hard to choose which one(s) to use. We’ll use the same criteria we did in Chapter 6:
Does it appear to be widely used? How many hits do you see when you do an internet search?
Is the code on GitHub? Is it well maintained?
Does it run on multiple platforms? Do multiple providers support the specification or library interfaces?
Is it well-documented? How easy is it to install? How intuitive is the interface? How easy is it to use? How much code do I need to write?
Is the library associated with an official standard (e.g., IETF, WC3, or Ecma)?
We’ll use the same OpenWeatherMap API data that we used in previous chapters for our examples. The original OpenWeatherMap API data was captured in chapter-7/data/cities-weather.json. For the sake of brevity, Example 7-1 provides a shortened version of the data.
{"cities":[{"id":5386035,"name":"Rancho Palos Verdes","coord":{"lon":-118.387016,"lat":33.744461},"main":{"temp":84.34,"pressure":1012,"humidity":58,"temp_min":78.8,"temp_max":93},"dt":1442171078,"wind":{"speed":4.1,"deg":300},"clouds":{"all":5},"weather":[{"id":800,"main":"Clear","description":"Sky is Clear","icon":"02d"}]},{"id":5392528,"name":"San Pedro","coord":{"lon":-118.29229,"lat":33.735851},"main":{"temp":84.02,"pressure":1012,"humidity":58,"temp_min":78.8,"temp_max":91},"dt":1442171080,"wind":{"speed":4.1,"deg":300},"clouds":{"all":5},"weather":[{"id":800,"main":"Clear","description":"Sky is Clear","icon":"02d"}]},{"id":3988392,"name":"Rosarito","coord":{"lon":-117.033333,"lat":32.333328},"main":{"temp":82.47,"pressure":1012,"humidity":61,"temp_min":78.8,"temp_max":86},"dt":1442170905,"wind":{"speed":4.6,"deg":240},"clouds":{"all":32},"weather":[{"id":802,"main":"Clouds","description":"scattered clouds","icon":"03d"}]}]}
Let’s start with a JSON-to-HTML transformation.
Most developers should be familiar with converting JSON from an API response to HTML. For this type of conversion, we’ll look at the following libraries:
Mustache
Handlebars
Refer to “Test Input Data”. We want to simplify the Cities data and display it in an HTML table as shown in Example 7-2.
<!DOCTYPE html><html><head><metacharset="UTF-8"/><title>OpenWeather - California Cities</title><linkrel="stylesheet"href="weather.css"></head><body><h1>OpenWeather - California Cities</h1><tableclass="weatherTable"><thead><tr><th>City</th><th>ID</th><th>Current Temp</th></tr></thead><tr><td>Santa Rosa</td><td>5201</td><td>75</td></tr></table></body></html>
We’ll compare how each library converts the sample JSON input data to the target HTML document.
Mustache uses templates that provide a declarative (codeless) way to convert data into other formats. In this case, we’ll use it to convert JSON data to an HTML document. The Mustache team uses the term logicless to describe their library because templates contain only simple tags without if/then/else clauses or looping constructs. Based on the specification, Mustache expands the tags in a template file with values from a hash or an object that is populated by an application. The beauty of templates (regardless of whether you use Mustache or Handlebars, which reintroduces some conditional logic) is that this approach provides a separation of concerns by factoring out the transformation from application code to external files. External templates enable you to easily add/remove data formats or change how you do the data formatting without modifying application code.
For more information, see the following sites:
The Mustache template in Example 7-3 converts the OpenWeatherMap JSON data to HTML.
<!DOCTYPE html><html><head><metacharset="UTF-8"/><title>OpenWeather - California Cities</title><linkrel="stylesheet"href="weather.css"></head><body><h1>OpenWeather - California Cities</h1><tableclass="weatherTable"><thead><tr><th>City</th><th>ID</th><th>Current Temp</th><th>Low Temp</th><th>High Temp</th><th>Humidity</th><th>Wind Speed</th><th>Summary</th><th>Description</th></tr></thead>{{#cities}}<tr><td>{{name}}</td><td>{{id}}</td>{{#main}}<td>{{temp}}</td><td>{{temp_min}}</td><td>{{temp_max}}</td><td>{{humidity}}</td>{{/main}}<td>{{wind.speed}}</td>{{#weather.0}}<td>{{main}}</td><td>{{description}}</td>{{/weather.0}}</tr>{{/cities}}</table></body></html>
This template works as follows:
The template is based on an HTML document, and Mustache expands each tag with data from the cities Array.
A tag can represent a single field, such as: {{temp}}.
Sections are enclosed within begin (for example, {{#cities}}) and end (for example, {{/cities}}) tags.
A section can correspond to an Array (e.g., cities) or an object (e.g., main).
A section sets the context for the other tags within that section. For example, the {{temp}}
tag inside the {{main}} section could be expressed as {{main.temp}}, and corresponds to main.temp
in the original JSON input document.
The field syntax in a tag can refer to an Array index. For example, {{#weather.0}} refers to
weather[0] from the input JSON document.
Next, we’ll now show a Unit Test that renders the template with Cities data.
All tests in this chapter will continue to leverage Mocha/Chai, just as we saw in previous chapters. Before
going further, be sure to set up your test environment. If you haven’t installed Node yet,
visit Appendix A, and install Node.js (see “Install Node.js” and “Install npm Modules”). If you want to follow along with the Node.js project provided in the code examples, cd to chapter-7/cities-weather-transform-test and do the following to install all dependencies
for the project:
npm install
If you’d like to set up the Node.js project yourself, follow the instructions in the book’s GitHub repository.
Example 7-4 uses the following Node.js modules:
This is available at https://www.npmjs.com/package/mustache. The corresponding GitHub repository can be found at https://github.com/janl/mustache.js.
jsonfile We’ll use this module to read the OpenWeatherMap JSON data from a file and parse it. jsonfile
is available at https://www.npmjs.com/package/jsonfile. Here’s the
jsonfile GitHub repository: https://github.com/jprichardson/node-jsonfile.
The Unit Test in Example 7-4 shows the example Mustache transformations in action.
'use strict';/* Attribution: Cities Weather data provided by OpenWeatherMap API([http://openweathermap.org]) under Creative Commons Share A LikeLicense (https://creativecommons.org/licenses/by-sa/4.0).Changes were made to the data to work with json-server.This does not imply an endorsement by the licensor.This code is distributed under Creative Commons Share A Like License.*/varexpect=require('chai').expect;varjsonfile=require('jsonfile');varfs=require('fs');varmustache=require('mustache');describe('cities-mustache',function(){varjsonCitiesFileName=null;varhtmlTemplateFileName=null;beforeEach(function(){varbaseDir=__dirname+'/../..';jsonCitiesFileName=baseDir+'/data/cities-weather-short.json';htmlTemplateFileName=baseDir+'/templates/transform-html.mustache';});it('should transform cities JSON data to HTML',function(done){jsonfile.readFile(jsonCitiesFileName,function(readJsonFileError,jsonObj){if(!readJsonFileError){fs.readFile(htmlTemplateFileName,'utf8',function(readTemplateFileError,templateFileData){if(!readTemplateFileError){vartemplate=templateFileData.toString();varhtml=mustache.render(template,jsonObj);console.log('\n\n\nHTML Output:\n'+html);done();}else{done(readTemplateFileError);}});}else{done(readJsonFileError);}});});});
This code works as follows:
beforeEach() runs before any Unit Test and does setup. In this case, it builds the filenames for the
input JSON file and the Mustache template.
In the 'should transform cities JSON data to HTML' Unit Test:
jsonfile.readFile() reads and parses the input JSON file into a JavaScript Object (jsonObj).
fs.readFile() reads the Mustache template into a JavaScript Object.
We then convert the Mustache template to a String.
mustache.render() renders the Mustache template into an HTML document using the values provided by
jsonObj (which was read in earlier).
Before you run the Unit Test, open a terminal session and run json-server on port 5000 from your command
line:
cd chapter-7/data json-server -p 5000 ./cities-weather-short.json
Next, run the preceding test from a second terminal session as follows:
cd chapter-7/cities-weather-transform-test npm test
You’ll see an HTML document that looks like our HTML target document.
The Architect template editor is an excellent online tester that makes it easy to iteratively test and develop a Mustache template. This tool is great, because it shows how the result changes as you modify the template. This WYSIWIG (What-You-See-Is-What-You-Get) output enables rapid development and debugging.
In the Architect online tool, select Mustache.js in the Engine drop-down, paste the Mustache template, and input JSON into the Template and View text boxes (respectively). You should see the screen in Figure 7-1.
The Architect template editor also works with several other templating engines, including Handlebars (which is covered in the next section), so this is my favorite online template editor.
Remember that this web application is publicly available:
Any data you paste into this app is visible to others. So don’t use this tool with sensitive information (personal, proprietary, and so forth).
A large amount of data will flood your browser. I’ve been successful with up to about 10,000 lines of JSON, but after that this application begins to freeze up.
Mustache also works directly from the command line. If you have installed Node.js, do a global installation of the Mustache Node.js module and run it from the command line (within the book example code directory) as follows:
npm install -g mustache cd chapter-7 mustache ./data/cities-weather-short.json \ ./templates/transform-html.mustache > output.html
A quick glance at the Mustache site will show that Mustache enjoys wide cross-platform support, including the following:
Table 7-1 shows a scorecard for Mustache based on the evaluation criteria from the beginning of this chapter.
| Mindshare | Y |
|---|---|
Dev community |
Y |
Platforms |
JavaScript, Node.js, Java, Ruby on Rails |
Intuitive |
Y |
Standard |
N |
Overall, Mustache is a powerful and flexible template engine used by many web developers. Although it’s not a standard, Mustache has a solid specification.
Handlebars is an extension of Mustache, and it also expands the tags in a template file with values from a hash or an object. Handlebars and Mustache are highly compatible, and Mustache templates will usually work with the Handlebars engine. HTML conversion is pretty simple, and we won’t see any major differences between Mustache and Handlebars for now. Handlebars adds a few more features to enhance transformation, and we’ll cover them in “JSON-to-JSON Transform”. For more information on Handlebars, see the following:
Handlebars main site (click the Learn More buttons for further details)
Handlebars extends Mustache by providing additional capabilities, which include the following:
Handlebars has built-in helpers such as if and unless. We’ll show how to leverage
unless in “JSON-to-JSON Transform”.
Handlebars allows a developer to register custom helpers to extend Handlebars. Each
custom helper provides an additional directive that can be used in a template. For example, you could
add a {{fullName}} helper that would combine the firstName and lastName elements for a speaker.
Helpers are powerful, but we don’t cover them further in this book. See the Handlebars website and Jasko Koyn’s Custom Helpers Handlebars.js Tutorial for more information on Handlebars helpers.
The Handlebars GitHub site has a full description of the differences between Handlebars and Mustache.
Let’s use the Handlebars template in Example 7-5 to transform the input JSON to an HTML document.
<!DOCTYPE html><html><head><metacharset="UTF-8"/><title>OpenWeather - California Cities</title><linkrel="stylesheet"href="weather.css"></head><body><h1>OpenWeather - California Cities</h1><tableclass="weatherTable"><thead><tr><th>ID</th><th>City</th><th>Current Temp</th><th>Low Temp</th><th>High Temp</th><th>Humidity</th><th>Wind Speed</th><th>Summary</th><th>Description</th></tr></thead>{{#eachcities}}<tr><td>{{id}}</td><td>{{name}}</td>{{#main}}<td>{{temp}}</td><td>{{temp_min}}</td><td>{{temp_max}}</td><td>{{humidity}}</td>{{/main}}<td>{{wind.speed}}</td>{{#eachweather}}<td>{{main}}</td><td>{{description}}</td>{{/each}}</tr>{{/each}}</table></body></html>
This template works as follows:
Handlebars expands each tag with data from the cities Array.
A tag can represent a single field, such as {{temp}}.
Sections are enclosed within begin (e.g., {{#each cities}}) and end (e.g., {{/cities}}) tags.
A section can correspond to an Array (e.g., cities) or an object (e.g., main).
The each tag (e.g., {{#each cities}}) is used for arrays (in this case, cities).
A section sets the context for the other tags within that section. For example, the {{temp}}
tag inside the {{main}} section could be expressed as {{main.temp}}, and corresponds to
main.temp in the original JSON input document.
The Unit Test in Example 7-6 uses a Handlebars template to render HTML with the Cities data.
'use strict';/* Attribution: Cities Weather data provided by OpenWeatherMap API([http://openweathermap.org]) under Creative Commons Share A LikeLicense (https://creativecommons.org/licenses/by-sa/4.0).Changes were made to the data to work with json-server.This does not imply an endorsement by the licensor.This code is distributed under Creative Commons Share A Like License.*/varexpect=require('chai').expect;varjsonfile=require('jsonfile');varfs=require('fs');varhandlebars=require('handlebars');describe('cities-handlebars',function(){varjsonCitiesFileName=null;varhtmlTemplateFileName=null;beforeEach(function(){varbaseDir=__dirname+'/../..';jsonCitiesFileName=baseDir+'/data/cities-weather-short.json';htmlTemplateFileName=baseDir+'/templates/transform-html.hbs';});it('should transform cities JSON data to HTML',function(done){jsonfile.readFile(jsonCitiesFileName,function(readJsonFileError,jsonObj){if(!readJsonFileError){fs.readFile(htmlTemplateFileName,'utf8',function(readTemplateFileError,templateFileData){if(!readTemplateFileError){vartemplate=handlebars.compile(templateFileData);varhtml=template(jsonObj);console.log('\n\n\nHTML Output:\n'+html);done();}else{done(readTemplateFileError);}});}else{done(readJsonFileError);}});});});
This Handlebars Unit Test is practically identical to its Mustache counterpart, with the following differences:
We don’t need to convert the Handlebars template (that is, read from fs.readFile()) to a String.
It takes two steps to render the template:
handlebars.compile() compiles the template into the template variable.
template() (from the compile) then renders the jsonObj (input JSON) into HTML.
When you run the preceding test with npm test, you’ll see a second HTML document that looks like our HTML
target document.
Two excellent online testers make it easy to iteratively test and develop a Handlebars template: TryHandlebars and Architect.
To use TryHandlebars, copy the Handlebars template and JSON into the Handlebars Template and Context text boxes. The result is shown in Figure 7-2.
You can also use the Architect template editor. Select Handlebars.js in the Engine drop-down, paste the Handlebars template, and input JSON into the Template and View text boxes (respectively). Click the Compile Handlebars Template button, and you should see the result shown in Figure 7-3.
Handlebars also works directly from the command line. If you have installed Node.js, do a global installation of
the hb-interpolate module, which is also available on GitHub:
npm install -g hb-interpolate cd chapter-7 hb-interpolate -j ./data/cities-weather-short.json \ -t ./templates/transform-html.hbs > output.html
Table 7-2 provides a scorecard for Handlebars based on the evaluation criteria from the beginning of this chapter.
| Mindshare | Y |
|---|---|
Dev community |
Y |
Platforms |
JavaScript, Node.js, Java, Ruby on Rails |
Intuitive |
Y |
Standard |
N |
Handlebars is another excellent engine that is used by many web developers. Just like Mustache, Handlebars isn’t a standard, and it too has a solid specification and works across multiple platforms.
If you’ve worked with APIs for any length of time in a professional setting, you’ve come to realize that APIs don’t always work the way you want them to. The JSON response from an API is often the most overlooked part of an API’s design, and the data provided by an API is often difficult to use. Even if the data is well-designed, you may not want to use all of it or you may want to convert it to another JSON structure that is better suited to the consuming application (or other applications in your system).
Similar to the discussion in Chapter 6, you could do the following:
Parse the JSON data from an API and manipulate the resulting hash structure programmatically
Write custom code to convert between an input JSON document and another JSON structure
But these approaches are tedious and difficult. There’s no need to write this type of utility code, because libraries are available to do most of the work for you.
The biggest issue I’ve seen in the area of JSON-to-JSON transformation is the lack of standards (official or de facto). In the previous chapter, for example, even though JSONPath is not an official standard, it is a de facto standard. JSONPath is a concept and query language with wide acceptance and implementations on multiple platforms. But with the JSON Transform libraries, it was difficult to find something that was more than just a single-language/platform implementation. I was looking for products that could transcend individual platforms and serve a larger, more universal purpose in the community. It was a journey to find the best solutions, but a few JSON Transform libraries are better than a one-off solution, and I hope you find them useful for your projects.
Several libraries (callable from an application) can transform JSON documents. We’ll look into the following libraries:
JSON Patch
JSON-T
Mustache
Handlebars
If you’re in a hurry, Handlebars is the best choice for JSON-to-JSON transformation (see “Handlebars” and “JSON-to-JSON Transformation Evaluations—The Bottom Line”). Otherwise, let’s walk through the various JSON-to-JSON transformation techniques so you can see why.
Several JSON Transform libraries are available, but we can’t cover all of them. Here are three additional libraries that are worth a look:
jsonapter jsonapter transforms JSON data in a declarative manner that leverages an external template
with transformation rules. The template is analogous to XSL, but that’s where the similarities stop.
jsonapter and its template rules are in pure JavaScript, but XSL had its own separate templating language.
Unfortunately, jsonapter works only with JavaScript and Node.js.
Refer to “Test Input Data” earlier in this chapter. Even though there
are only three elements in the cities array, the data is overly complex for our use.
We don’t want to use all of these fields, so let’s simplify the structure as follows:
Keep the cities array along with id and name.
Make a completely new, flattened weather object.
Add other weather-related fields from other structures to weather:
main.temp, main.humidity, main.temp_min, main.temp_max
wind.speed
weather.0.main and weather.0.description
Rename fields for the sake of clarity.
Given these transformation rules, the output should look like Example 7-7.
{"cities":[{"id":"5386035","name":"Rancho Palos Verdes","weather":{"currentTemp":84.34,"lowTemp":78.8,"hiTemp":93,"humidity":58,"windSpeed":4.1,"summary":"Clear""description":"Sky is Clear"}},{"id":"5392528","name":"San Pedro","weather":{"currentTemp":84.02,"lowTemp":78.8,"hiTemp":91,"humidity":58,"windSpeed":4.1,"summary":"Clear""description":"Sky is Clear"}},{"id":"3988392","name":"Rosarito","weather":{"currentTemp":82.47,"lowTemp":78.8,"hiTemp":86,"humidity":61,"windSpeed":4.6,"summary":"Clouds""description":"scattered clouds"}}]}
We’ll evaluate each of the JSON Transform libraries based on how easy it is to convert the sample JSON input data to the target JSON output.
JSON Patch is an IETF standard that specifies a data format for operations that transform a single resource. JSON Patch works in conjunction with the HTTP PATCH standard. The purpose of HTTP PATCH is to modify a resource produced by an API. In short, HTTP PATCH changes a portion of a resource, whereas HTTP PUT replaces the resource entirely.
JSON Patch is supposed to be used as part of an HTTP Request, and not the Response. JSON Patch is really meant for an API Producer, and not the Consumer. But the context of this chapter is from the API Consumer’s point of view, and we’ll see how far we can go with JSON Patch to transform the data in an HTTP Response.
Table 7-3 shows the main JSON Patch operations that could be used with the OpenWeatherMap data.
| JSON Patch operation | Description |
|---|---|
Add - |
Adds a value to either an existing Object or an Array. It can’t create a completely new Object in a document. |
Remove - |
Removes the |
Replace - |
Replaces a value in the document. This is the same as doing a |
Copy - |
Copies a value from one field to another. |
Move - |
Moves the |
For a full description of JSON Patch, visit the main Patch site.
Each value for path and from is a JSON Pointer, which was covered in Chapter 6.
The Unit Test in Example 7-8 shows the example transformations in action. This code uses the JSON Patch Node.js module. Patch has a corresponding GitHub repository.
The Unit Test in Example 7-8 shows how to use JSON Patch to transform the Cities weather data to the target JSON data structure.
'use strict';/* Attribution: Cities Weather data provided by OpenWeatherMap API([http://openweathermap.org]) under Creative Commons Share A LikeLicense (https://creativecommons.org/licenses/by-sa/4.0).Changes were made to the data to work with json-server.This does not imply an endorsement by the licensor.This code is distributed under Creative Commons Share A Like License.*/varexpect=require('chai').expect;varjsonfile=require('jsonfile');varjsonpatch=require('json-patch');varcitiesTemplate=[{op:'remove',path:'/coord'},{op:'remove',path:'/dt'},{op:'remove',path:'/clouds'},{op:'remove',path:'/weather/0/id'},{op:'remove',path:'/weather/0/icon'},{op:'move',from:'/main/temp',path:'/weather/0/currentTemp'},{op:'move',from:'/main/temp_min',path:'/weather/0/lowTemp'},{op:'move',from:'/main/temp_max',path:'/weather/0/hiTemp'},{op:'move',from:'/main/humidity',path:'/weather/0/humidity'},{op:'move',from:'/weather/0/main',path:'/weather/0/summary'},{op:'move',from:'/wind/speed',path:'/weather/0/windSpeed'},{op:'remove',path:'/main'},{op:'remove',path:'/wind'}];describe('cities-json-patch',function(){varjsonFileName=null;varjsonCitiesFileName=null;beforeEach(function(){varbaseDir=__dirname+'/../../data';jsonCitiesFileName=baseDir+'/cities-weather-short.json';});it('should patch all cities - fail',function(done){jsonfile.readFile(jsonCitiesFileName,function(fileReadError,jsonObj){if(!fileReadError){try{varoutput=jsonpatch.apply(jsonObj,citiesTemplate);console.log('\n\n\n\Original JSON');console.log(jsonObj);console.log('\n\n\n\Patched JSON');console.log(JSON.stringify(output,null,2));done();}catch(transformError){console.error(transformError);done(transformError);}}else{console.error(fileReadError);done(fileReadError);}});});...});
In the example code, the test runs an example JSON Patch transformation. To run this test from the command line, do the following:
cd cities-weather-transform-test npm test
As you’ll notice, the should patch all cities - fail test fails as follows:
cities-json-patch
{ [PatchConflictError: Value at coord does not exist]
message: 'Value at coord does not exist',
name: 'PatchConflictError' }
1) should patch all cities - fail
In this example, JSON Patch can’t find the following path to /coord because the underlying JSON Pointer works only with individual objects, and not collections.
Example 7-9 is a second test that almost works.
...describe('cities-json-patch',function(){varjsonFileName=null;varjsonCitiesFileName=null;beforeEach(function(){varbaseDir=__dirname+'/../../data';jsonCitiesFileName=baseDir+'/cities-weather-short.json';});...it('should patch all cities - success (kind of)',function(done){jsonfile.readFile(jsonCitiesFileName,function(fileReadError,jsonObj){if(!fileReadError){try{console.log('\n\n\n\Original JSON');console.log(jsonObj);varoutput=[];for(variinjsonObj['cities']){output.push(jsonpatch.apply(jsonObj['cities'][i],citiesTemplate));}console.log('\n\n\n\Patched JSON');console.log(JSON.stringify(output,null,2));done();}catch(transformError){console.error(transformError);done(transformError);}}else{console.error(fileReadError);done(fileReadError);}});});});
Although the should patch all cities - success (kind of) test runs, it doesn’t quite work for the following reasons:
We want to create a new weather Object rather than use the existing Array, but JSON Patch
doesn’t allow for that.
The test code iterates over the input JSON and transforms each element in the cities array,
and then collects the results in the output Array. This is needed because JSON Patch can work only on a
single resource (an Object) rather than a collection (an Array).
Because JSON Patch is a standard, it enjoys cross-platform support (besides just Node.js), including the following:
See http://jsonpatch.com/#libraries for more platform and library support.
Table 7-4 shows a scorecard for JSON Patch based on the evaluation criteria from the beginning of this chapter.
| Mindshare | Y |
|---|---|
Dev community |
Y |
Platforms |
JavaScript, Node.js, Java, Ruby on Rails |
Intuitive |
N |
Standard |
Y - RFC 6902 |
JSON Patch has the following limitations:
JSON Patch doesn’t allow you to add completely new data structures. It can only modify existing structures and their data.
JSON Patch is designed only to change a single Object, and isn’t designed to work with Arrays. This is because JSON Patch uses JSON Pointer to search for data, where each query returns only a single field from a JSON document.
JSON Patch is not meant to transform the JSON data from an API’s HTTP Response, but it was worth a try. JSON Patch is really designed to work with HTTP PATCH, which specifies how to use JSON to patch portions of a resource’s data through an HTTP Request. JSON Patch is a great fit when you need to implement HTTP PATCH for an API.
But better libraries are available to transform JSON to other JSON data structures, so let’s move on and try JSON-T.
JSON-T was one of the early JSON transform libraries, and it was developed in 2006 by Stefan Goessner (who also created JSONPath). JSON-T is similar to XSLT for XML, and uses a template that contains transformation rules.
JSON-T uses transformation rules defined in a JavaScript Object Literal, where each rule is a key/value pair. Rules are in the following form:
vartransformRules={'ruleName':'transformationRule','ruleName':function...};
Note the following in the preceding form:
Each ruleName or transformationRule must be enclosed by single ('') or double ("") quotes.
Each transformationRule has one or more conversion expressions surrounded by curly braces, like this:
{cities}.
A conversion expression can evaluate to another ruleName or to a field in the document—an Array,
Object, or key/value pair.
The following example shows the JSON-T transformation rules that could be used to transform the OpenWeatherMap data:
vartransformRules={'self':'{"cities":[{cities}]}','cities[*]':'{"id":"{$.id}","name":"{$.name}",'+'"weather":{"currentTemp":{$.main.temp},"lowTemp":{$.main.temp_min},'+'"hiTemp":{$.main.temp_max},"humidity":{$.main.humidity},'+'"windSpeed":{$.wind.speed},"summary":"{$.weather[0].main}",'+'"description":"{$.weather[0].description}"}},'};
This example works as follows:
self is the top-level rule that specifies how to format the new JSON document, and {cities} refers
to the cities[*] rule.
cities[*] specifies how to format the cities Array:
The star syntax in the cities[*] rule indicates that the rule applies to the cities Array elements.
The * resolves to each Array index.
{$.} is shorthand notation. The {$.name} rule tells JSON-T to pull data from the name field of
each cities Array element. Here’s the longer notation: cities[*].name.
For complete documentation on transformation rules, see “Basic Rules” on the main JSON-T site.
The Unit Test in Example 7-10 shows how to use JSON-T, and leverages the jsont Node.js module.
'use strict';/* Attribution: Cities Weather data provided by OpenWeatherMap API([http://openweathermap.org]) under Creative Commons Share A LikeLicense (https://creativecommons.org/licenses/by-sa/4.0).Changes were made to the data to work with json-server.This does not imply an endorsement by the licensor.This code is distributed under Creative Commons Share A Like License.*/varexpect=require('chai').expect;varjsonfile=require('jsonfile');varjsonT=require('../lib/jsont').jsonT;describe('cities-jsont',function(){varjsonCitiesFileName=null;vartransformRules={'self':'{ "cities": [{cities}] }','cities[*]':'{ "id": "{$.id}", "name": "{$.name}", '+'"weather": { "currentTemp": {$.main.temp}, "lowTemp": {$.main.temp_min}, '+'"hiTemp": {$.main.temp_max}, "humidity": {$.main.humidity}, '+'"windSpeed": {$.wind.speed}, "summary": "{$.weather[0].main}", '+'"description": "{$.weather[0].description}" } },'};...beforeEach(function(){varbaseDir=__dirname+'/../../data';jsonCitiesFileName=baseDir+'/cities-weather-short.json';});it('should transform cities JSON data',function(done){jsonfile.readFile(jsonCitiesFileName,function(readFileError,jsonObj){if(!readFileError){varjsonStr=jsonT(jsonObj,transformRules);jsonStr=repairJson(jsonStr);console.log(JSON.stringify(JSON.parse(jsonStr),null,2));done();}else{done(readFileError);}});});});
Notice that the preceding test invokes the repairJson() function in order to produce valid JSON:
functionrepairJson(jsonStr){varrepairedJsonStr=jsonStr;varrepairs=[[/,\s*}/gi,' }'],[/,\s*\]/gi,' ]']];for(vari=0,len=repairs.length;i<len;++i){repairedJsonStr=repairedJsonStr.replace(repairs[i][0],repairs[i][1]);}returnrepairedJsonStr;}// Modify the spec as follows:...jsonStr=repairJson(jsonStr);console.log(JSON.stringify(JSON.parse(jsonStr),null,2));...
Without any modification, JSON-T produces a trailing comma after the last element of the cities
Array, so the transformed JSON would be invalid “as is.” To fix this, the repairJson() function in the
preceding example uses a Regular Expression (Regex) to eliminate the final comma before the closing curly
object bracket (}) or Array brace (]). Although most languages have Regex functionality, this is bad
because you have to add custom code to correct the output. You shouldn’t have to write your own
infrastructure.
In addition to Node.js, JSON-T runs on the following platforms:
JSON-T runs as a JavaScript file, jsont.js.
JSON-T can run as a pure Ruby implementation.
I haven’t been able to find a pure Java implementation of JSON-T.
Table 7-5 shows a scorecard for JSON-T based on the evaluation criteria from the beginning of this chapter.
| Mindshare | Y |
|---|---|
Dev community |
Y |
Platforms |
JavaScript, Node.js, Ruby on Rails |
Intuitive |
N |
Standard |
N |
JSON-T has the following limitations:
Overly complex syntax.
No Java implementation.
Can’t handle an escaped String within a String. For example, JSON-T takes the String,
"escapedString": "I have a \"string within\" a string" and converts it to the
following invalid String: "escapedString": "I have a "string within " a string". Again, this requires a
Regular Expression to fix the problem.
Can’t handle the last element in an Array or Object.
JSON-T is a small improvement over JSON Patch because JSON-T can process an entire document. But JSON-T still requires a developer to write additional code to make it work. JSON-T is a step in the right direction, but it still won’t work in a real development environment. JSON-T is good at converting JSON to HTML, but it’s not designed to convert from one JSON document to another JSON structure.
In the previous section, we saw how Mustache can easily convert from JSON to HTML. We’ll now see how well it can convert the Cities data to the target JSON output document.
Example 7-11 is a Mustache template to do the conversion (template details were described in the JSON-to-HTML section on Mustache).
{"cities":[{{#cities}}{"id":"{{id}}","name":"{{name}}","weather":{{{#main}}"currentTemp":{{temp}},"lowTemp":{{temp_min}},"hiTemp":{{temp_max}},"humidity":{{humidity}},{{/main}}"windSpeed":{{wind.speed}},{{#weather.0}}"summary":"{{main}}""description":"{{description}}"{{/weather.0}}}},{{/cities}}]}
Let’s run this template in the Architect template editor. Select Mustache.js in the Engine drop-down, paste the Mustache template, and input JSON into the Template and View text boxes (respectively). You should see the result in Figure 7-4.
Take a look at line 41 of the resulting JSON (in the Result text box) and you’ll see the trailing comma, which is invalid JSON. You can confirm that the resulting JSON is invalid by pasting it into JSONLint:
As we saw previously, Handlebars does a good job of converting JSON to HTML, and the template in Example 7-12 shows how to convert the Cities JSON data into the target JSON output.
{"cities": [{{#eachcities}}{"id": "{{id}}", "name": "{{name}}", "weather":{{{#main}}"currentTemp":{{temp}}, "lowTemp":{{temp_min}}, "hiTemp":{{temp_max}}, "humidity":{{humidity}},{{/main}}"windSpeed":{{wind.speed}},{{#eachweather}}"summary": "{{main}}", "description": "{{description}}"{{/each}}} }{{#unless@last}},{{/unless}}{{/each}}] }
This template is similar to the one shown in the JSON-to-HTML section on Handlebars, but with one notable difference. The following line does exactly what we need: it emits a comma after each element unless it’s the last element:
{{#unless@last}},{{/unless}}
Here’s how it works:
{{#unless}} is a built-in Handlebars helper that renders the enclosing block only if the condition
returns false.
@last@ is a built-in Handlebars variable that returns false if an element is the last in an Array,
and true if the current element is at the end of the Array.
For more information on {{#unless}} and @last@, visit the Handlebars website.
Let’s run the template in the Architect template editor. Select Handlebars.js in the Engine drop-down, paste the Handlebars template, and input JSON into the Template and View text boxes (respectively). You should see the result shown in Figure 7-5.
Take a look at line 56 of the resulting JSON (in the Result text box) and you’ll see that there is no trailing comma so this should be valid. You can confirm that the resulting JSON is valid by pasting it into JSONLint, as shown in Figure 7-6.
This is exactly what we’re looking for. As noted earlier, Handlebars differs from Mustache in that Handlebars has just enough conditional logic to make the JSON-to-JSON transformation work properly.
Based on the evaluation criteria and overall usability, Handlebars is my overwhelming choice for JSON-to-JSON transformation for the following reasons:
It’s the only library that works “as is.” The conditional logic makes it possible.
It has solid cross-platform support.
The template language is rich enough to meet most transformation needs.
It’s declarative, yet allows for custom logic with custom helpers.
Excellent online tools facilitate development.
We’ve covered JSON-to-JSON conversion, and now it’s time to cover JSON-XML transformation.
Often, developers and architects need to integrate with legacy systems that still use XML. To have a clean separation of concerns, it’s important to add a thin adapter at the boundaries of your system that encapsulates the translation between XML and JSON.
It’s easy to convert XML elements (e.g., <weather>) to/from JSON, but it’s difficult to convert XML
attributes to/from JSON. This is a lossy conversion, which means that you can’t convert the JSON back
to the original XML, and vice versa because JSON doesn’t have a standard way to represent attributes.
Remember that JSON’s core constructs are Objects, Arrays, and key/value pairs.
For example, an XML attribute provides metadata that describes an element, and looks like this:
<weathertemp="84.34"pressure="1012"humidity="58"temp_min="78.8"temp_max="93"/>
In this XML snippet, the temp, pressure, humidity, temp_min, and temp_max attributes describe
the weather element. Back in the days when XML was in vogue (roughly 1998–2008), many XML Schema
designers leveraged XML attributes to:
Reduce the overall payload of messages going over the wire
Simplify the conversion between XML and their native platform (e.g., Java, JS, Ruby, or C#)
We’d like to see how to directly convert between XML and JSON, and several well-known conventions (specifications) describe how to do this:
Badgerfish
Parker
JsonML
Spark
GData
Abdera
This chapter focuses on Badgerfish and Parker because they’re well-known. A full discussion and in-depth comparison of these XML-JSON conversion convention is beyond the scope of this book, but you can find further details at the Open311 wiki.
To compare the Badgerfish and Parker conventions, we’ll start by showing a sample input XML document based on the OpenWeatherMap data. Then, we’ll compare how both conventions would convert from XML to JSON. Example 7-13 provides the input XML.
<?xml version="1.0" encoding="UTF-8" ?><cities><city><id>5386035</id><name>Rancho Palos Verdes</name><coord><lon>-118.387016</lon><lat>33.744461</lat></coord><maintemp="84.34"pressure="1012"humidity="58"temp_min="78.8"temp_max="93"/><dt>1442171078</dt><wind><speed>4.1</speed><deg>300</deg></wind><clouds><all>5</all></clouds><weather><id>800</id><main>Clear</main><description>Sky is Clear</description><icon>02d</icon></weather></city><city><id>5392528</id><name>San Pedro</name><coord><lon>-118.29229</lon><lat>33.735851</lat></coord><maintemp="84.02"pressure="1012"humidity="58"temp_min="78.8"temp_max="91"/><dt>1442171080</dt><wind><speed>4.1</speed><deg>300</deg></wind><clouds><all>5</all></clouds><weather><id>800</id><main>Clear</main><description>Sky is Clear</description><icon>02d</icon></weather></city><city><id>3988392</id><name>Rosarito</name><coord><lon>-117.033333</lon><lat>32.333328</lat></coord><maintemp="82.47"pressure="1012"humidity="61"temp_min="78.8"temp_max="86"/><dt>1442170905</dt><wind><speed>4.6</speed><deg>240</deg></wind><clouds><all>32</all></clouds><weather><id>802</id><main>Clouds</main><description>scattered clouds</description><icon>03d</icon></weather></city></cities>
Badgerfish has an excellent online tester that makes it easy to convert from the input XML to JSON (per the Badgerfish convention). The Badgerfish Online Tester is shown in Figure 7-7.
Paste the input XML into the text box just below the Convert XML to JSON label, click the “Translate XML above to JSON below button” and you’ll see very compact JSON in the resulting text box. You can use JSONLint or your favorite text editor (which includes a JSON beautifier plug-in), and you’ll see the (more readable) JSON output shown in Example 7-14.
{"cities":{"city":[{"id":{"$1":5386035},"name":{"$1":"Rancho Palos Verdes"},"coord":{"lon":{"$1":"-118.387016"},"lat":{"$1":"33.744461"}},"main":{"@temp":"84.34","@pressure":1012,"@humidity":58,"@temp_min":"78.8","@temp_max":93},"dt":{"$1":1442171078},"wind":{"speed":{"$1":"4.1"},"deg":{"$1":300}},"clouds":{"all":{"$1":5}},"weather":{"id":{"$1":800},"main":{"$1":"Clear"},"description":{"$1":"Sky is Clear"},"icon":{"$1":"02d"}}},{"id":{"$1":5392528},"name":{"$1":"San Pedro"},"coord":{"lon":{"$1":"-118.29229"},"lat":{"$1":"33.735851"}},"main":{"@temp":"84.02","@pressure":1012,"@humidity":58,"@temp_min":"78.8","@temp_max":91},"dt":{"$1":1442171080},"wind":{"speed":{"$1":"4.1"},"deg":{"$1":300}},"clouds":{"all":{"$1":5}},"weather":{"id":{"$1":800},"main":{"$1":"Clear"},"description":{"$1":"Sky is Clear"},"icon":{"$1":"02d"}}},{"id":{"$1":3988392},"name":{"$1":"Rosarito"},"coord":{"lon":{"$1":"-117.033333"},"lat":{"$1":"32.333328"}},"main":{"@temp":"82.47","@pressure":1012,"@humidity":61,"@temp_min":"78.8","@temp_max":86},"dt":{"$1":1442170905},"wind":{"speed":{"$1":"4.6"},"deg":{"$1":240}},"clouds":{"all":{"$1":32}},"weather":{"id":{"$1":802},"main":{"$1":"Clouds"},"description":{"$1":"scattered clouds"},"icon":{"$1":"03d"}}}]}}
The core rules of the Badgerfish convention include the following:
Element names become Object properties.
The textual content of an element goes into the $ property of an Object with the same name.
For example, <name>Rancho Palos Verdes</name> becomes "name": { "$1": "Rancho Palos Verdes" }.
Nested elements become nested properties. For example, the following XML
<wind><speed>4.1</speed><deg>300</deg></wind>
becomes
"wind":{"speed":{"$1":"4.1"},"deg":{"$1":300}}
Multiple elements with the same name at the same level become Array elements. The following XML
<city></city><city></city>
becomes
"city":[{...}]
Attributes go in properties whose names begin with @. For example, the following XML
<maintemp="84.02"pressure="1012"humidity="58"temp_min="78.8"temp_max="91"/>
becomes
"main":{"@temp":"84.34","@pressure":1012,"@humidity":58,"@temp_min":"78.8","@temp_max":93}
We’ve glossed over a lot of details, but Badgerfish has excellent documentation and resources. For further information, see the following:
Parker provides a simple conversion, but it ignores XML attributes, so you will lose the attribute data when converting to JSON. Following the Parker convention yields the JSON document in Example 7-15 (based on the input XML).
{"cities":[{"id":5386035,"name":"Rancho Palos Verdes","coord":{"lon":-118.387016,"lat":33.744461},"main":null,"dt":1442171078,"wind":{"speed":4.1,"deg":300},"clouds":{"all":5},"weather":[{"id":800,"main":"Clear","description":"Sky is Clear","icon":"02d"}]},{"id":5392528,"name":"San Pedro","coord":{"lon":-118.29229,"lat":33.735851},"main":null,"dt":1442171080,"wind":{"speed":4.1,"deg":300},"clouds":{"all":5},"weather":[{"id":800,"main":"Clear","description":"Sky is Clear","icon":"02d"}]},{"id":3988392,"name":"Rosarito","coord":{"lon":-117.033333,"lat":32.333328},"main":null,"dt":1442170905,"wind":{"speed":4.6,"deg":240},"clouds":{"all":32},"weather":[{"id":802,"main":"Clouds","description":"scattered clouds","icon":"03d"}]}]}
The core rules of the Parker convention include the following:
Element names become Object properties.
Attributes are ignored.
Nested elements become nested properties.
The Parker convention is simple, but has the following issues:
With these shortcomings in mind, I suggest No Convention (none of the above) to convert the following:
Parse (unmarshal) the XML into Objects/Hashes on your current platform by using a
well-known library (we’ll use xml2js for our Node.js-based examples). Then, convert the Objects/Hashes from
your platform into JSON with JSON.stringify() if you’re using JavaScript. Chapters 3 and 4 show how to
convert Ruby and Java, respectively, to JSON.
Parse the JSON into data structures on your platform using a common library. JSON.parse()
works great for JavaScript. Chapters 3 and 4 show to parse JSON into Ruby and Java. Then, generate an XML
document from your data structure (this is also known as marshaling). Again, we’ll leverage xml2js
from a Node.js-based Mocha/Chai test.
Rather than being concerned with a particular convention/style of conversion, focus on the following:
Do what works best for you.
Use the libraries you already know and have on hand.
Test the conversion results to make sure that you’re not losing any data.
Keep it simple.
Encapsulate everything and make sure that it fits well with the rest of your enterprise application architecture.
In short, choose the best library that you can find on your platform and work with or around the limitations.
XML has been around for a long time, and each major platform has a solid implementation, including the following:
We’ll use xml2js.
There are several good libraries, and two of the best are LibXml and Nokogiri.
Java Architecture for XML Binding (JAXB) has been a mainstay for years in the Java community.
The Unit Test suite in Example 7-16 has methods to test JSON-to-XML and XML-to-JSON conversion, and uses the following technologies:
xml2js To convert XML to/from JavaScript data structures, you can use xml2js, which is also available on GitHub.
JSON.parse() / JSON.stringify() To convert JSON to/from JavaScript structures. You can find more
information about JSON.parse() / JSON.stringify() at MDN
and in Chapter 3.
'use strict';/* Attribution: Cities Weather data provided by OpenWeatherMap API([http://openweathermap.org]) under Creative Commons Share A LikeLicense (https://creativecommons.org/licenses/by-sa/4.0).Changes were made to the data to work with json-server.This does not imply an endorsement by the licensor.This code is distributed under Creative Commons Share A Like License.*/varexpect=require('chai').expect;varjsonfile=require('jsonfile');varfs=require('fs');varxml2js=require('xml2js');describe('json-xml',function(){varjsonCitiesFileName=null;varxmlCitiesFileName=null;beforeEach(function(){varbaseDir=__dirname+'/../..';jsonCitiesFileName=baseDir+'/data/cities-weather-short.json';xmlCitiesFileName=baseDir+'/data/cities-weather-short.xml';});it('should transform cities JSON data to XML',function(done){jsonfile.readFile(jsonCitiesFileName,function(readJsonFileError,jsonObj){if(!readJsonFileError){varbuilder=newxml2js.Builder();varxml=builder.buildObject(jsonObj);console.log('\n\n\nXML Output:\n'+xml);done();}else{done(readJsonFileError);}});});it('should transform cities XML data to JSON',function(done){fs.readFile(xmlCitiesFileName,'utf8',function(readXmlFileError,xmlData){if(!readXmlFileError){varparser=newxml2js.Parser();parser.parseString(xmlData,function(error,xmlObj){if(!error){console.log('\n\n\nJSON Output:\n'+JSON.stringify(xmlObj,null,2));done();}else{done(error);}});}else{done(readXmlFileError);}});});});
The preceding code works as follows:
beforeEach() runs before any Unit Test and does setup. In this case, it builds the filenames for the
input JSON file and the output XML file.
In the 'should transform cities JSON data to XML' Unit Test:
jsonfile.readFile() reads and parses the input JSON file into a JavaScript Object (jsonObj).
xml2js.Builder() creates an Object that can convert from JSON to XML.
builder.buildObject(jsonObj) converts the JavaScript Object (from the input JSON file) into an XML
String.
In the 'should transform cities XML data to JSON' Unit Test:
We’ve shown several JSON Transform libraries to do the following:
Convert JSON to HTML
Either Mustache or JSON will work just fine.
Transform JSON to other, cleaner JSON structures
Choose Handlebars.
Convert between XML and JSON
Don’t worry about the XML/JSON conventions.
Use an XML library that works well on your platform.
Write Unit Tests that transform the content of JSON documents returned by a Web API
Use these JSON Transform techniques to convert JSON data from external APIs into data formats that are compatible with your applications.
Now that we’ve covered the JSON Ecosystem (Schema, Search, and Transform), we’ll move to the final section on JSON in the enterprise; this part of the book covers the following topics:
Hypermedia
MongoDB (NoSQL)
Messaging with Kafka
In Chapter 8, we’ll discuss Hypermedia with JSON in order to show how to interact with an API.
Imagine building an application in HTML for use in a web browser. You can add forms, links, and buttons by using standard HTML, and the browser renders your new controls without requiring a new release of the browser. In the “olden days,” it didn’t work this way. If we released a new version of our server-side application with new functionality, we often had to release a new version of the client code to pair with it. Browsers changed this expectation.
We now live in a world where “rich clients” are coming back in the form of apps on people’s devices. We could just have phones access web pages, but for various reasons, people (and companies) want native apps as icons that they can touch on their devices. So how can we get rich native apps back, while still benefitting from the configurability of the browser? Hypermedia. We send not only the data, but also the actions the user can take on the data, along with a representation of how to trigger that action.
So far, the RESTful API calls and JSON responses in this book have been isolated (without reference to other calls). Each JSON response from the Speakers API has just contained data about the speaker, but without providing any information about other related resources and actions.
Hypermedia enables a REST API to guide its Consumers on the following:
Links to other related resources (e.g., other APIs). For example, a Conference API could provide links to the Reservation, Speaker, or Venue APIs so that Consumers could learn more about the conference and the speakers, and purchase a ticket.
Semantics on the data returned by an API. This metadata documents the data in the JSON response, and defines the meaning of the data elements.
Additional actions that they can take on the current resource exposed by the API. For example, a Speakers API could provide more than just CRUD operations. How about a set of links that lead and guide a speaker through the speaker proposal process (in order to speak at a conference)?
Hypermedia groups resources together and guides a Consumer through a series of calls to achieve a business result. Think of Hypermedia as the API equivalent of a web-based shopping cart that leads the Consumer through the buying process and (hopefully) to an eventual purchase. A Hypermedia format provides a standard way for Consumers to interpret and process the link-related data elements from an API response.
In this chapter, we’ll show how to compare these well-known JSON-based Hypermedia formats:
Siren
JSON-LD
Collection+JSON
json:api
HAL
We’ll use the Speaker data from previous chapters to drive the discussion of Hypermedia formats.
The following invocation to the fictitious myconference Speakers API might return:
GEThttp://myconference.api.com/speakers/123456{"id":"123456","firstName":"Larson","lastName":"Richard","email":"larson.richard@myconference.com","tags":["JavaScript","AngularJS","Yeoman"],"age":39,"registered":true}
To see a list of a speaker’s presentations, make another API call:
GEThttp://myconference.api.com/speakers/123456/presentations[{"id":"1123","speakerId":"123456","title":"Enterprise Node","abstract":"Many developers just see Node as a way to build web APIs ...","audience":["Architects","Developers"]},{"id":"2123","speakerId":"123456","title":"How to Design and Build Great APIs","abstract":"Companies now leverage APIs as part of their online ...","audience":["Managers","Architects","Developers"]}]
Let’s see how to represent the Speaker and Presentation APIs using several Hypermedia formats.
All architects and developers have opinions that shape the way they evaluate a particular technology. Before we review and compare each Hypermedia format, I’ll let you know my opinion on Hypermedia. Hypermedia is powerful and provides rich meta-data to the data returned by an API, but it is controversial. Many people love it, and other people hate it, and I’m somewhere between these two groups.
Many people in the REST and Hypermedia communities believe that adding meta-data on operations and semantic data definitions to a JSON payload is helpful. I respect everyone’s opinion, but I believe in the use of links to other resources only for these reasons:
Additional information on operations and data definitions is unnecessary if you document your API properly in the first place. Why should the JSON data returned from each API call return information on actions and data types? This seems like clutter when you have the following situations:
OpenApi (formerly Swagger), RAML, and API Blueprint can all provide this information in an API’s documentation.
JSON Schema describes the data types for the JSON data representation.
Hypermedia adds complexity to the JSON payload returned by an API. With richer/more functional Hypermedia formats, the following are true:
The original data representation is altered and difficult to interpret. Most of the formats shown in this chapter alter or embed the original data representation of the resource, which makes it harder for Consumers to understand and process.
You have to spend more time and effort to explain how to use your API, and Consumers will move on to something simpler.
The payload is larger and takes up more network bandwidth.
Simple links to other related resources are great because they guide an API Consumer through the use of your API(s) without altering the original JSON data representation.
Structured Interface for Representing Entities (Siren) was developed in 2012.
It was designed to represent data from Web APIs, and works with both JSON and XML.
You can find Siren on GitHub.
Siren’s Internet Assigned Numbers Authority (IANA)
media type is application/vnd.siren+json.
The key concepts in Siren are as follows:
An Entity is a resource that is accessible with a URI. It has properties and Actions.
Example 8-1 shows the Speaker data in Siren format based on the following HTTP Request:
GET http://myconference.api.com/speakers/123456 Accept: application/vnd.siren+json
{"class":["speaker"],"properties":{"id":"123456","firstName":"Larson","lastName":"Richard","email":"larson.richard@myconference.com","tags":["JavaScript","AngularJS","Yeoman"],"age":39,"registered":true},"actions":[{"name":"add-presentation","title":"Add Presentation","method":"POST","href":"http://myconference.api.com/speakers/123456/presentations","type":"application/x-www-form-urlencoded","fields":[{"name":"title","type":"text"},{"name":"abstract","type":"text"},{"name":"audience","type":"text"}]}],"links":[{"rel":["self"],"href":"http://myconference.api.com/speakers/123456"},{"rel":["presentations"],"href":"http://myconference.api.com/speakers/123456/presentations"}]}
In this example, the speaker Entity is defined as follows:
class indicates the class of the resource (in this case, speaker).
properties is an Object that holds the representation of the resource. It’s the real data payload from an API response.
actions describes the Actions that can be taken on a speaker. In this case, the actions indicate that you can add a presentation to a speaker.
links provides links to self (the current resource) and presentations, a URI that returns the list of the speaker’s presentations.
Siren provides excellent metadata for describing the available actions on an Entity (resource). Siren has classes (types) to describe the data, but does not provide data definitions (semantics) like JSON-LD.
JavaScript Object Notation for Linking Data (JSON-LD) became a W3C standard in 2014.
It was designed as a data-linking format to be used with REST APIs, and it works with NoSQL databases such
as MongoDB and CouchDB. You can find more information at the main JSON-LD site, and you can find
it on GitHub. The JSON-LD
media type is application/ld+json, and .jsonld is the file extension. JSON-LD has an active community
and large working group because of its status with the W3C.
Example 8-2 shows the Speaker data in JSON-LD format based on the following HTTP Request:
GET http://myconference.api.com/speakers/123456 Accept: application/vnd.ld+json
{"@context":{"@vocab":"http://schema.org/Person","firstName":"givenName","lastName":"familyName","email":"email","tags":"http://myconference.schema.com/Speaker/tags","age":"age","registered":"http://myconference.schema.com/Speaker/registered"},"@id":"http://myconference.api.com/speakers/123456","id":"123456","firstName":"Larson","lastName":"Richard","email":"larson.richard@myconference.com","tags":["JavaScript","AngularJS","Yeoman"],"age":39,"registered":true,"presentations":"http://myconference.api.com/speakers/123456/presentations"}
In this example, the @context Object provides the overall context for the Speaker
data representation. In this case, @context does more than merely list the fields.
Rather, @context (in conjunction with @vocab) seeks to provide unambiguous semantic
meaning for each data element that comprises the speaker Object. Here are the specifics:
The Schema.org site provides unambiguous definitions for commonly used data elements such as age and Person.
@vocab sets the base type to Person and allows you to
extend it with other fields (e.g., tags or registered) for the speaker.
@id is essentially the URI, the unique ID for accessing a particular speaker.
Notice that the core JSON representation of the speaker remains unchanged, which is a major
selling point if you have an existing API. This additive approach makes it easier to adopt
JSON-LD gradually, without breaking your API Consumers. The existing JSON representation is undisturbed,
which enables you to iteratively add the semantics of data linking to your API’s data representation.
Note that http://myconference.schema.com does not exist. Rather, it’s shown for the sake of the example. If you need a definition that doesn’t exist on Schema.org, you’re free to create one on your own domain. Just be sure that you provide good documentation.
Example 8-3 shows a speaker’s list of presentations in JSON-LD format based on the following HTTP Request:
GET http://myconference.api.com/speakers/123456/presentations Accept: application/vnd.ld+json
{"@context":{"@vocab":"http://myconference.schema.com/","presentations":{"@type":"@id","id":"id","speakerId":"speakerId","title":"title","abstract":"abstract","audience":"audience"}},"presentations":[{"@id":"http://myconference.api.com/speakers/123456/presentations/1123","id":"1123","speakerId":"123456","title":"Enterprise Node","abstract":"Many developers just see Node as a way to build web APIs or ...","audience":["Architects","Developers"]},{"@id":"http://myconference.api.com/speakers/123456/presentations/2123","id":"2123","speakerId":"123456","title":"How to Design and Build Great APIs","abstract":"Companies now leverage APIs as part of their online strategy ...","audience":["Managers","Architects","Developers"]}]}
In this example, @context indicates that all the data is related to the concept of
presentations. In this case, we need to define presentations inline because the
http://myconference.schema.com/presentations Object doesn’t exist. If the Object did exist, the
@context would look like this:
"@context":"http://myconference.schema.com/presentations"
You can try out the preceding example on the JSON-LD Playground. This is an excellent online tester that validates JSON-LD documents. Use this tool to validate your data format before writing the code for your API.
JSON-LD by itself does not provide information on operations, nor does it provide semantics on the data representations. HYDRA is an add-on to JSON-LD that provides a vocabulary to specify client-server communication.
Here’s where to find more information on HYDRA:
Example 8-4 shows the list of presentations in JSON-LD format enhanced with HYDRA operations:
GET http://myconference.api.com/speakers/123456/presentations Accept: application/vnd.ld+json
{"@context":["http://www.w3.org/ns/hydra/core",{"@vocab":"http://myconference.schema.com/","presentations":{"@type":"@id","id":"id","speakerId":"speakerId","title":"title","abstract":"abstract","audience":"audience"}}],"presentations":[{"@id":"http://myconference.api.com/speakers/123456/presentations/1123","id":"1123","speakerId":"123456","title":"Enterprise Node","abstract":"Many developers just see Node as a way to build web APIs or ...","audience":["Architects","Developers"]},{"@id":"http://myconference.api.com/speakers/123456/presentations/2123","id":"2123","speakerId":"123456","title":"How to Design and Build Great APIs","abstract":"Companies now leverage APIs as part of their online strategy ...","audience":["Managers","Architects","Developers"]}],"operation":{"@type":"AddPresentation","method":"POST","expects":{"@id":"http://schema.org/id","supportedProperty":[{"property":"title","range":"Text"},{"property":"abstract","range":"Text"}]}}}
Note the following in this example:
operation indicates that you can add a presentation with a POST.
@context points to the HYDRA domain to add the operation keyword.
@vocab adds in the http://myconference.schema.com/ domain and the presentations definition.
JSON-LD by itself is great, because it provides links to other related resources without altering the original data representation. In other words, JSON-LD does not introduce breaking changes to your API Consumers. For the sake of simplicity, use JSON-LD without the overhead of HYDRA.
Collection+JSON was created in 2011, focuses on handling data items in a collection, and is similar to the
Atom Publication/Syndication formats. You can find more information at the main Collection+JSON site,
and on GitHub.
The Collection+JSON media type is application/vnd.collection+json.
To be valid, a Collection+JSON response must have a top-level collection Object that holds the following:
Example 8-5 shows the Speaker data in Collection+JSON format based on the following HTTP request:
GET http://myconference.api.com/speakers/123456 Accept: application/vnd.collection+json
{"collection":{"version":"1.0","href":"http://myconference.api.com/speakers","items":[{"href":"http://myconference.api.com/speakers/123456","data":[{"name":"id","value":"123456"},{"name":"firstName","value":"Larson"},{"name":"lastName","value":"Richard"},{"name":"email","value":"larson.richard@myconference.com"},{"name":"age","value":"39"},{"name":"registered","value":"true"}],"links":[{"rel":"presentations","href":"http://myconference.api.com/speakers/123456/presentations","prompt":"presentations"}]}]}}
Note the following in this example:
The collection Object encapsulates the Speaker data.
The items Array contains all objects in the Speaker collection. Because we queried by ID, there’s
only one Object in the collection.
The data Array contains name/value pairs for each data element that comprises a Speaker.
The links Array provides link relationships to resources related to the speaker. Each link is composed
of:
Collection+JSON also provides the ability to read, write, and query items in a collection, but a full discussion of Collection+JSON is outside the scope of this book. Visit http://amundsen.com/media-types/collection/examples/ for examples, and http://amundsen.com/media-types/tutorials/collection/tutorial-01.html for a tutorial.
Collection+JSON does a nice job of providing link relations, but it completely changes the structure
of the Speaker data by converting it to key/value pairs inside the data Array.
json:api was developed in 2013 and provides conventions for standardizing the format of JSON
requests/responses to/from an API. Although json:api’s main focus is on API request/response data, it also
includes Hypermedia. You can find more information at the main json:api site and on GitHub. The
json:api media type is application/vnd.api+json.
A valid json:api document must have one of the following elements at the top level:
data The data representation for the resource. This contains resource Objects, each of which must have
a type (specifies the data type) and id (unique resource ID) field.
errors An Array of error Objects that shows an error code and message for each error encountered by the API.
meta Contains nonstandard metadata (e.g., copyright and authors, etc.).
Optional top-level elements include the following:
links An Object that holds link relations (hyperlinks) to resources related to the primary resource.
included An Array of embedded resource Objects that are related to the primary resource.
Example 8-6 shows a list of Speakers in json:api format based on the following HTTP Request:
GET http://myconference.api.com/speakers Accept: application/vnd.api+json
{"links":{"self":"http://myconference.api.com/speakers","next":"http://myconference.api.com/speakers?limit=25&offset=25"},"data":[{"type":"speakers","id":"123456","attributes":{"firstName":"Larson","lastName":"Richard","email":"larson.richard@myconference.com","tags":["JavaScript","AngularJS","Yeoman"],"age":39,"registered":true}},{"type":"speakers","id":"223456","attributes":{"firstName":"Ester","lastName":"Clements","email":"ester.clements@myconference.com","tags":["REST","Ruby on Rails","APIs"],"age":29,"registered":true}},...]}
This example works as follows:
The links Array provides link relationships to resources related to the speaker. In this case, each
element contains the URI to the related resource. Note that there are no restrictions/qualifications
on the link names, but self is commonly understood as the current resource, and next paginate.
The data Array contains a list of the resource objects, each of which has a type (e.g., speakers)
and id to meet the requirements of the json:api format definition. The attributes object holds
the key/value pairs that make up each speaker Object.
Example 8-7 shows how to embed all presentation Objects for a speaker with json:api:
GET http://myconference.api.com/speakers/123456 Accept: application/vnd.api+json
{"links":{"self":"http://myconference.api.com/speakers/123456"},"data":[{"type":"speaker","id":"123456","attributes":{"firstName":"Larson","lastName":"Richard","email":"larson.richard@myconference.com","tags":["JavaScript","AngularJS","Yeoman"],"age":39,"registered":true}}],"included":[{"type":"presentations","id":"1123","speakerId":"123456","title":"Enterprise Node","abstract":"Many developers just see Node as a way to build web APIs or ...","audience":["Architects","Developers"]},{"type":"presentations","id":"2123","speakerId":"123456","title":"How to Design and Build Great APIs","abstract":"Companies now leverage APIs as part of their online ...","audience":["Managers","Architects","Developers"]}]}
In this example, the included Array (part of the json:api specification) specifies
the embedded presentations for the speaker. Although embedding resources reduces the number of API
calls, it introduces tight data coupling between resources because the speaker needs to know the format
and content of the presentation data.
Example 8-8 provides a better way to show relationships between resources with links:
GET http://myconference.api.com/speakers/123456 Accept: application/vnd.api+json
{"links":{"self":"http://myconference.api.com/speakers/123456","presentations":"http://myconference.api.com/speakers/123456/presentations"},"data":[{"type":"speaker","id":"123456","attributes":{"firstName":"Larson","lastName":"Richard","email":"larson.richard@myconference.com","tags":["JavaScript","AngularJS","Yeoman"],"age":39,"registered":true}}]}
In this example, the links Array shows that the speaker has presentations and provides a URI,
but the speaker resource (and API) doesn’t know about the data in the presentation resource. Plus,
there’s less data for the Consumer to process. This loose coupling enables the presentation data to change
without impacting the Speakers API.
json:api has a rich feature set including standardized error messages, pagination, content
negotiation, and policies for Creating/Updating/Deleting resources. In the past, I’ve borrowed portions of
the json:api specification to create API style guides. Plus, there are excellent libraries for most platforms
that simplify working with json:api. The data Array and its resource Objects (which require a type
and id) alter the JSON data representation, but the rest of the Object remains the same. A full discussion
of json:api is outside the scope of this book; visit the JSON API page for examples, and the full specification.
Hypertext Application Language (HAL) became an IETF standard in 2012.
It was designed as a way to link resources using hyperlinks, and works with either JSON or XML.
You can find more information at the main HAL site and on
GitHub.
The HAL media types are application/hal+json and application/hal+xml.
HAL’s format is simple, readable, and doesn’t alter the original data representation. HAL is a popular media type, and is based on the following:
Resources contain links (contained in a _links Object), other resources, and embedded
resources (e.g., an Order contains items) contained in an _embedded Object.
Links provide target URIs that lead to other external resources.
Both the _embedded and _links objects are optional, but one must be present
as the top-level object so that you have a valid HAL document.
Example 8-9 shows the Speaker data in HAL format based on the following HTTP Request:
GET http://myconference.api.com/speakers/123456 Accept: application/vnd.hal+json
{"_links":{"self":{"href":"http://myconference.api.com/speakers/123456"},"presentations":{"href":"http://myconference.api.com/speakers/123456/presentations"}},"id":"123456","firstName":"Larson","lastName":"Richard","email":"larson.richard@myconference.com","tags":["JavaScript","AngularJS","Yeoman"],"age":39,"registered":true}
This example works as follows:
The _links object contains link relations, each of which shows the semantic meaning of a link.
The link relations are as follows:
self is a link to the current speaker resource (self).
presentations are the presentations that this speaker will deliver. In this case,
the presentations Object describes the relationship between the current resource and the
http://myconference.api.com/speakers/123456/presentations hyperlink (through the href key).
Note that next and find are not HAL keywords. HAL allows you to have
custom names for link objects.
Let’s make the example more interesting by getting a list of speakers, as shown in Example 8-10.
GET http://myconference.api.com/speakers Accept: application/vnd.hal+json
{"_links":{"self":{"href":"http://myconference.api.com/speakers"},"next":{"href":"http://myconference.api.com/speakers?limit=25&offset=25"},"find":{"href":"http://myconference.api.com/speakers{?id}","templated":true}},"speakers":[{"id":"123456","firstName":"Larson","lastName":"Richard","email":"larson.richard@myconference.com","tags":["JavaScript","AngularJS","Yeoman"],"age":39,"registered":true},{"id":"223456","firstName":"Ester","lastName":"Clements","email":"ester.clements@myconference.com","tags":["REST","Ruby on Rails","APIs"],"age":29,"registered":true},...]}
This example works as follows:
In addition to self, here are the following link relations:
next indicates the next set of speaker resources. In other words, this is a way to provide pagination
for an API. In this case, the limit parameter indicates that 25 speaker Objects will be returned in
each API call. The offset parameter indicates that we’re at the 26th Object in the list. This convention
is similar to Facebook’s pagination style.
find provides a hyperlink to find an individual speaker with a templated link, where
{?id} indicates to the caller that they can find the speaker by id in the URI. The templated key
indicates that this is a templated link.
The JSON data representation remains unchanged.
Returning to our first example, let’s embed all presentation Objects for a speaker, as shown in Example 8-11:
GET http://myconference.api.com/speakers/123456 Accept: application/vnd.hal+json
{"_links":{"self":{"href":"http://myconference.api.com/speakers/123456"},"presentations":{"href":"http://myconference.api.com/speakers/123456/presentations"}},"_embedded":{"presentations":[{"_links":{"self":{"href":"http://myconference.api.com/speakers/123456/presentations/1123"}},"id":"1123","title":"Enterprise Node","abstract":"Many developers just see Node as a way to build web APIs ...","audience":["Architects","Developers"]},{"_links":{"self":{"href":"http://myconference.api.com/speakers/123456/presentations/2123"}},"id":"2123","title":"How to Design and Build Great APIs","abstract":"Companies now leverage APIs as part of their online ...","audience":["Managers","Architects","Developers"]}]},"id":"123456","firstName":"Larson","lastName":"Richard","email":"larson.richard@myconference.com","tags":["JavaScript","AngularJS","Yeoman"],"age":39,"registered":true}
In this example, instead of the presentations link relation, we’re using the
_embedded Object to embed the presentation Objects for a speaker. Each presentation Object in turn has a _links Object for related resources.
At first glance, embedding related resources looks reasonable, but I prefer link relations instead for the following reasons:
Embedded resources increase the size of the payload.
The _embedded Object alters the data representation.
It couples the Speakers and Presentation APIs. The Speakers API now has to know about the data structure
of the presentations. With a simple presentations link relation, the Speakers API knows only that there
is a related API.
HAL (minus the embedded resources) is lightweight and provides links to other resources without altering the data representation.
Here’s the bottom line on Hypermedia: keep it simple. Maintain the original structure of the resource representation. Provide solid documentation for your API as part of the design process, and much of the need for Hypermedia (actions, documentation, data typing) is already taken care of. For me, the most useful parts of Hypermedia are the links to other resources. Proponents of full Hypermedia may vehemently disagree (and that’s OK), but here’s my rebuttal:
If your API is difficult to understand, people won’t want to use it.
The original JSON representation is the most important thing. Don’t alter the structure of the resource just for the sake of adhering to a Hypermedia format.
With these considerations in mind, I choose a minimal HAL structure (links only, without embedded resources) as my Hypermedia format. With these caveats, HAL is excellent because it
Is the simplest possible thing that can work
Is a standard
Enjoys wide community support
Has solid cross-platform libraries
Doesn’t alter my JSON data representation
Doesn’t impose requirements for data semantics and operations
Does just what I want, and not a bit more
json:api (with links rather than embedded resources) is my second choice for Hypermedia because it
standardizes JSON requests/responses in addition to providing Hypermedia capabilities, and still respects
the integrity and intent of the original JSON data representation. Of the Hypermedia formats that alter the
JSON data representation, json:api appears to have the least impact. Because of its wide
cross-platform support, you can reduce the formatting work by leveraging a json:api library for your
programming language (this shortens and simplifies development). json:api deserves strong consideration
if you need more than just Hypermedia, and you want to standardize JSON requests/responses across all the
APIs in your enterprise (but API design is outside the scope of this book).
JSON-LD (without HYDRA) is my third favorite Hypermedia format because it’s simple and doesn’t change the JSON data representation. Although the data semantics are not hard to add to an existing API, I don’t see a need for this, because good API documentation combined with JSON Schema does a better job of defining the meaning and structure of the data.
You may disagree with my opinion on Hypermedia, but imagine you’re the architect or team lead and you’re asking your team to use all aspects of Hypermedia to develop an API. Would your developers see Hypermedia as being useful or burdensome? Harkening back to the original days of eXtreme Programming (XP), do the simplest thing that could possibly work. Use the right tools and techniques for the job, and take the following approach:
Document your API properly with OpenApi/Swagger or RAML.
Define your data constructs by using JSON Schema.
Choose HAL, json:api, or JSON-LD as your Hypermedia format, and start out with simple links to related
resources.
Evaluate how well the development process is going:
What’s the team velocity?
How testable is the API?
Ask your API Consumers for feedback. Can they
Easily understand the data representation?
Read and consume the data?
Iterate and evaluate early and often.
Then, see whether you need to add in the operations and data definitions; you probably won’t.
Here are some things to think about when you consider adding Hypermedia to an API:
Hypermedia is not well understood in the community. When I speak on this topic, many developers haven’t heard of it, know little about it, or don’t know what it’s used for. Some education is required even with the simplest Hypermedia format.
Lack of standardization. We’ve covered five of the leading formats, but there are more. Only two (HAL and JSON-LD) in this chapter are backed by a standards body. So there’s no consensus in the community.
Hypermedia (regardless of the format) requires additional serialization/deserialization by both the API Producer and Consumer. So, be sure to choose a widely used Hypermedia format that provides cross-platform library support. This makes life easier for developers. We’ll cover this in the next section when we test with HAL.
As in previous chapters, we’ll test against a Stub API (that provides a JSON response) that doesn’t require us to write any code.
To create the stub, we’ll use the Speaker data from earlier chapters as our test data, which is available
on GitHub,
and deploy it as a RESTful API. Again, we’ll leverage the json-server Node.js module to serve up the
speakers.json file as a Web API. If you need to install json-server, refer to “Install npm Modules” in Appendix A.
Here’s how to run json-server on port 5000 from your local machine:
cd chapter-8/data json-server -p 5000 ./speakers-hal-server-next-rel.json
Visit http://localhost:5000/speakers in Postman (which we used in earlier
chapters), select GET as the HTTP verb, and click the Send button. You should see all the speakers from
our Stub API, as shown in Figure 8-1.
This URI is also viewable from your browser.
Note that we had to massage the Speaker data to work with json-server for this example. Example 8-12 shows the
updated structure that works with HAL.
{"speakers":{"_links":{"self":{"href":"http://myconference.api.com/speakers"},"next":{"href":"http://myconference.api.com?limit=25&offset=25"},"find":{"href":"http://myconference.api.com/speakers{?id}","templated":true}},"speakers":[{"id":"123456","firstName":"Larson","lastName":"Richard","email":"larson.richard@myconference.com","tags":["JavaScript","AngularJS","Yeoman"],"age":39,"registered":true},{"id":"223456","firstName":"Ester","lastName":"Clements","email":"ester.clements@myconference.com","tags":["REST","Ruby on Rails","APIs"],"age":29,"registered":true}]}}
In this example, the outer speakers Object is needed so that json-server will serve up the file
with the proper URI: http://localhost:5000/speakers. The rest of the data (links Object and
speakers Array) remain the same.
Now that we have the API in place, let’s create a Unit Test. We will continue to leverage Mocha/Chai (within
Node.js), just as we saw in previous chapters. Before going further, be sure to set up your test
environment. If you haven’t installed Node.js yet, then refer to Appendix A, and
install Node.js (see “Install Node.js” and “Install npm Modules”). If you want to follow along
with the Node.js project provided in the code examples, cd to chapter-8/myconference and do the
following to install all dependencies for the project:
npm install
If you’d like to set up the Node.js project yourself, follow the instructions in the book’s GitHub repository.
Here are the npm modules in our Unit Test:
We’ve used this in previous chapters to invoke RESTful APIs.
A HAL parser available at https://www.npmjs.com/package/halfred. The corresponding GitHub repository can be found at https://github.com/basti1302/halfred.
The following Unit Test shows how to validate the HAL response from the (Stub) Speakers API.
'use strict';varexpect=require('chai').expect;varunirest=require('unirest');varhalfred=require('halfred');describe('speakers-hal',function(){varreq;beforeEach(function(){halfred.enableValidation();req=unirest.get('http://localhost:5000/speakers').header('Accept','application/json');});it('should return a 200 response',function(done){req.end(function(res){expect(res.statusCode).to.eql(200);expect(res.headers['content-type']).to.eql('application/json; charset=utf-8');done();});});it('should return a valid HAL response validated by halfred',function(done){req.end(function(res){varspeakersHALResponse=res.body;varresource=halfred.parse(speakersHALResponse);varspeakers=resource.speakers;varspeaker1=null;console.log('\nValidation Issues: ');console.log(resource.validationIssues());expect(resource.validationIssues()).to.be.empty;console.log(resource);expect(speakers).to.not.be.null;expect(speakers).to.not.be.empty;speaker1=speakers[0];expect(speaker1.firstName).to.not.be.null;expect(speaker1.firstName).to.eql('Larson');done();});});});
This Unit Test runs as follows:
beforeEach(function() runs before each test, and does the following:
The 'should return a 200 response' test ensures that the Stub API has a successful HTTP response.
The 'should return a valid HAL response validated by halfred' test is the main test, and does the
following:
Invokes halfred.parse() to parse the HAL response from the Stub API. This call returns a halfred
Response object that contains the HAL links and the remaining JSON payload. Please see the halfred
documentation for more information
Uses chai to check for validation errors in the HAL response by testing resource.validationIssues().
We’ll see this call in action when we test with invalid data in our second run of the Unit Test that follows
Uses chai to ensure that the Response object still contains the original speakers Array in the
payload
When you run the Unit Test with npm test, it will pass because the Stub API produces valid HAL data. You
should see the following:
Now that we’ve shown how to validate HAL data, we’ll change the data served up by the Stub API so that it
responds with invalid HAL data. Let’s remove the link to self in the _links object as shown in Example 8-14.
{"speakers":{"_links":{"next":{"href":"http://myconference.api.com?limit=25&offset=25"},"find":{"href":"http://myconference.api.com/speakers{?id}","templated":true}},...}}
Remember that the HAL specification requires the _links object to contain a reference to self.
Restart json-server with the invalid HAL data as follows:
cd chapter-8/data json-server -p 5000 ./speakers-hal-server-next-rel-invalid.json
Rerun the test, and you should see that halfred catches the HAL validation issue and that the test now
fails:
We’ve shown how to use HAL from the client side with Unit Tests, but the server-side was deployed as a Stub
(using json-server and a JSON file that follows the HAL specification). We have limited server-side coverage
throughout this book to keep the focus on JSON. But here are some server-side libraries that will enable
your RESTful APIs to render HAL-based responses:
Spring HATEOS provides HAL support for Spring-based RESTful APIs in Java. You can find a good tutorial in the Spring documentation.
The roar gem provides HAL support for Ruby on Rails.
express-hal
adds HAL to Express-based NodeJS RESTful APIs.
Regardless of your development platform and which Hypermedia format you choose, be sure to do a spike implementation to test a library before committing to it as a solution. It’s important to ensure that the library is easy to use and that it doesn’t get in the way.
Now that we’ve shown how JSON works with Hypermedia, we’ll move on to Chapter 9 to show how JSON works with MongoDB.
MongoDB is a NoSQL database that enables developers to persist data in document form. This document-based approach works well with JSON, which is also document-oriented. The MongoDB data model is hierarchical, and supports rich data types similar to those we’ve seen in typical JSON documents. Just like JSON documents, MongoDB documents integrate well with Object-Oriented platforms because documents are compatible with Objects, so developers can move data in/out of the database with little or no extra mapping logic. This approach is intuitive to developers and reduces development effort needed to access the database.
In this chapter, we’ll show how to do the following:
Import a JSON document into MongoDB
Perform core CRUD operations with MongoDB
Export MongoDB data to a JSON document
Access MongoDB as a Mock/Stub RESTful API (without writing code)
This chapter focuses on using JSON with MongoDB and provides just enough information to work with the database. This chapter doesn’t cover how to develop applications with MongoDB because that would fill an entire book. For a full description of the rich functionality provided by MongoDB, I recommend reading MongoDB in Action, 2nd Ed by Kyle Banker et al. (Manning).
You may have seen references to Binary JSON (BSON) in the MongoDB documentation. BSON is a binary data format that MongoDB uses internally to serialize JSON documents. See the following for further details:
You can also use BSON to add richer data types to a JSON document.
But for our purposes in this chapter:
JSON is all you need to know to access the database.
JSON is the external interface to MongoDB, and BSON is used only internally by MongoDB.
Before we go any further, let’s install MongoDB. Refer to “Install MongoDB” in Appendix A. With MongoDB in place, you’ll be able to run and build on the examples in this chapter.
MongoDB comprises the following:
The command shell, which is written in JavaScript.
Database drivers, which enable developers to access MongoDB from their platform. 10gen, the creator of MongoDB, provides support for many languages, including Java, Ruby, JavaScript, Node.js, C++, C#/.Net, and many others. Check the MongoDB site for the official supported drivers.
Command-line tools:
The mongod process is similar to other database servers; it accepts connections and processes
commands for Create/Read/Update/Delete (CRUD) operations on the data. Let’s start mongod from the
(macOS and Linux) command line:
mongod &
If MongoDB was installed properly, the log from the initial startup should look similar to this:
2016-06-29T11:05:37.960-0600 I CONTROL [initandlisten] MongoDB starting : pid...
2016-06-29T11:05:37.961-0600 I CONTROL [initandlisten] db version v3.2.4
2016-06-29T11:05:37.961-0600 I CONTROL [initandlisten] git version: e2ee9ffcf...
2016-06-29T11:05:37.961-0600 I CONTROL [initandlisten] allocator: system
2016-06-29T11:05:37.961-0600 I CONTROL [initandlisten] modules: none
2016-06-29T11:05:37.961-0600 I CONTROL [initandlisten] build environment:
2016-06-29T11:05:37.961-0600 I CONTROL [initandlisten] distarch: x86_64
2016-06-29T11:05:37.961-0600 I CONTROL [initandlisten] target_arch: x86_64
2016-06-29T11:05:37.961-0600 I CONTROL [initandlisten] options: { config: "/u...
2016-06-29T11:05:37.962-0600 I - [initandlisten] Detected data files in...
2016-06-29T11:05:37.963-0600 W - [initandlisten] Detected unclean shutd...
2016-06-29T11:05:37.973-0600 I JOURNAL [initandlisten] journal dir=/usr/local...
2016-06-29T11:05:37.973-0600 I JOURNAL [initandlisten] recover begin
2016-06-29T11:05:37.973-0600 I JOURNAL [initandlisten] info no lsn file in jo...
2016-06-29T11:05:37.973-0600 I JOURNAL [initandlisten] recover lsn: 0
2016-06-29T11:05:37.973-0600 I JOURNAL [initandlisten] recover /usr/local/var...
2016-06-29T11:05:37.974-0600 I JOURNAL [initandlisten] recover applying initi...
2016-06-29T11:05:37.976-0600 I JOURNAL [initandlisten] recover cleaning up
2016-06-29T11:05:37.976-0600 I JOURNAL [initandlisten] removeJournalFiles
2016-06-29T11:05:37.977-0600 I JOURNAL [initandlisten] recover done
2016-06-29T11:05:37.996-0600 I JOURNAL [durability] Durability thread started
2016-06-29T11:05:37.996-0600 I JOURNAL [journal writer] Journal writer thread...
2016-06-29T11:05:38.329-0600 I NETWORK [HostnameCanonicalizationWorker] Start...
2016-06-29T11:05:38.330-0600 I FTDC [initandlisten] Initializing full-time...
2016-06-29T11:05:38.330-0600 I NETWORK [initandlisten] waiting for connection...
2016-06-29T11:05:39.023-0600 I FTDC [ftdc] Unclean full-time diagnostic da...
Out of the box, mongod listens on port 27017, but you can change the port as follows:
mongod --port <your-port-number>
To stop the server, type the following from the command line:
kill <pid>
Here, <pid> is the Process ID (PID) of the mongod process.
Never use kill -9 because this could corrupt the database.
Now that we have the server up and running, let’s import our Speaker data into the database.
We’ll leverage the mongoimport tool to upload the speakers.json file into MongoDB. Even though we’ve
been using the same Speaker data throughout the book, we need to remove the following outer root document
and the Array name:
{"speakers":[]}
The speakers.json file now looks like Example 9-1.
[{"fullName":"Larson Richard","tags":["JavaScript","AngularJS","Yeoman"],"age":39,"registered":true},{"fullName":"Ester Clements","tags":["REST","Ruby on Rails","APIs"],"age":29,"registered":true},{"fullName":"Christensen Fisher","tags":["Java","Spring","Maven","REST"],"age":45,"registered":false}]
This change was needed because we don’t want to insert the contents of the JSON file as an entire
document. If we did that, the result would be a single speakers Array document in the database.
Instead, we want a simple collection of individual speaker documents, each of which corresponds to a
speaker Object from the input file.
When you execute mongoimport from the command line, you should see this:
In this example, we used the following:
mongoimport to import the speakers JSON file into the speakers collection in the jsaw database.
mongo to access MongoDB, and select all documents from the speakers collection. See the
next section for further details.
Table 9-1 shows how basic MongoDB concepts relate to relational databases.
| MongoDB | Relational |
|---|---|
Database |
Database instance |
Collection |
Table |
Document |
Row |
Now that the MongoDB server is up and running with some data, it’s time to access the database and start
working with the Speaker data. The mongo shell (which was shown in the previous example) provides MongoDB access from the
command line. Start mongo as follows:
mongo defaults to the test database. We’ll use another database called jsaw (JSON at Work)
to keep the Speaker data separate:
The use command switches context to the jsaw database so that all future commands will affect only
that database. But you may be wondering how the jsaw database was created. This happens in two ways:
Through the mongoimport tool. The --db=jsaw and --collection-speakers command-line options from the
initial import created the speakers collection in the jsaw database.
By inserting a document into a collection from the mongo shell. We’ll show how to do this in the next
section.
To exit the shell, type exit at the prompt. This ends the shell session and returns control back
to the command line.
We’ve worked with some basic operations with the mongo shell, and now we’ll use it for CRUD
operations to modify the Speaker data. The MongoDB query language used in
the shell is based on JavaScript, which makes it easy to access JSON-based documents.
Here’s how to get all documents in the speakers collection (which was just imported into MongoDB):
Here’s a breakdown of the shell command (db.speakers.find()):
Shell commands start with db.
speakers is the collection name.
The find() without a query parameter returns all documents from the speakers collection.
Going back to the shell output, notice that the data returned looks like JSON, and it’s so close.
Copy the output from the shell and paste it into JSONLint.
Click the Validate JSON button, and you’ll see that it complains about the _id field.
MongoDB inserted the _id field (an Object ID that serves as a Primary Key) when mongoimport
imported the Speakers data from the JSON input file and created the speakers collection. The output from the MongoDB
shell is not valid JSON because of the following:
It lacks the surrounding Array brackets ([]).
The ObjectId(…) is not a valid JSON value. Valid values include Numbers, Booleans, and double-quoted
Strings.
There are no commas to separate the speaker documents.
We’ve shown how to import valid JSON into MongoDB, and later we’ll show how to export MongoDB collections as valid JSON after going through the remaining CRUD operations.
To return only those speakers who are present on REST, add a query to the find() method:
In this example, we added a query, {tags:'REST’}, which returns only speaker documents
that contain the value 'REST' in their tags Array. The MongoDB query language is based on
JavaScript Object Literal syntax. JavaScript: The Definitive Guide 6th Ed. by David Flanagan (O’Reilly) can
help you improve your knowledge of JavaScript Objects.
Use the following command to get the number of documents in the speakers collection:
> db.speakers.count() 3
Our new speaker, Carl ClojureDev, has decided to add Scala to his technical repertoire.
To add this language to the tags Array, do the following:
This example uses the update() function as follows:
The {fullName: 'Carl ClojureDev'} query finds the speaker document to update.
The $push operator adds 'Scala' to the tags Array. This is similar to the push() function
in JavaScript.
Note that many other operators support the update() function, such as $set, but
be careful because it sets a field to a completely new value.
Finally, let’s delete the Carl Clojuredev speaker from the collection:
Here we use the remove() function with the {fullName: 'Carl ClojureDev'} query to
delete only that document. Subsequent calls to find() show that this document was deleted
without affecting the rest of the documents in the speakers collection.
Now that we’re comfortable with the MongoDB server and shell, let’s export the data to a valid JSON
document. Use the mongoexport tool as follows, and you should see this:
json-at-work=>mongoexport--db=jsaw--collection=speakers--pretty--jsonArray2016-06-30T12:58:32.270-0600connectedto:localhost[{"_id":{"$oid":"577549ee061561f7f9be9725"},"fullName":"Larson Richard","tags":["JavaScript","AngularJS","Yeoman"],"age":39,"registered":true},{"_id":{"$oid":"577549ee061561f7f9be9726"},"fullName":"Ester Clements","tags":["REST","Ruby on Rails","APIs"],"age":29,"registered":true},{"_id":{"$oid":"577549ee061561f7f9be9727"},"fullName":"Christensen Fisher","tags":["Java","Spring","Maven","REST"],"age":45,"registered":false}]2016-06-30T12:58:32.271-0600exported3records
The mongoexport command in the above example pulls the data from the speakers collection in the jsaw
database and pretty-prints a JSON array to Standard Output. This is a good start, but we need to remove the
MongoDB Object ID (_id) so we have valid JSON and can use the data outside MongoDB. Other
tools are needed to filter out the _id field because the mongoexport utility will always output the _id.
We can get the JSON format we want by combining tools, and jq is just the right tool for the job.
As you’ll recall from Chapter 6, jq is an amazing command-line utility that not only
searches JSON but also has excellent filtering capabilities. jq doesn’t provide the full-blown JSON Transform
capabilities of Handlebars (see Chapter 7), but it’s more than adequate for our needs.
By piping the output from mongoexport to jq, you should see the following:
The output is everything we’re looking for: a valid JSON Array of speaker Objects without the MongoDB
Object ID. Here’s a breakdown of the command line:
The mongoexport command is as follows:
--db=jsaw --collection=speakers specifies the speakers collection in the jsaw database.
--pretty --jsonArray ensures that the output is a pretty-printed JSON array.
The mongoexport output goes to Standard Output and gets piped to jq.
The jq expression [.[] | del(._id)] works as follows:
The outer array brackets ([]) ensure that the JSON Array, Objects, and Fields/Keys are preserved in the
final output.
The .[] tells jq to look at the whole Array.
The pipe to the del(._id) command tells jq to delete the _id field from the output.
The jq output goes to Standard Output, which could serve as input to a file.
This is a practical example of the power of jq. Although the jq syntax is a bit terse, it’s
a great addition to your JSON toolbelt. For more details on jq, refer to Chapter 6. You can
also visit the jq manual.
MongoDB is schemaless, which means that the database neither validates data nor does it requires a Schema in order to store data. But the data stored in each document still has a structure that applications expect so that they can reliably work with collections and documents. Object Document Mappers (ODMs) provide additional features on top of MongoDB:
A Schema that validates the data and enforces a common data structure
Object modeling
Object-based data access
There is no single, cross-platform ODM for MongoDB. Rather, each platform has its own library.
Node.js developers typically use Mongoose.
Here’s a brief example of how to specify a speaker Schema, create a model, and insert a speaker into the
database:
varmongoose=require('mongoose');varSchema=mongoose.Schema;mongoose.connect('mongodb://localhost/jsaw');// Specify the Speaker schema.varspeakerSchema=newSchema({fullName:String,tags:[String],age:Number,registered:Boolean});// Create the Speaker model.varSpeaker=mongoose.model('Speaker',speakerSchema);varspeaker=newSpeaker({fullName:'Carl ClojureDev',tags:['Clojure','Functional Programming'],age:45,registered:false});speaker.save(function(err){if(err){console.log(err);}else{console.log('Created Speaker: '+speaker.fullName);}});
A Mongoose model is a constructor based on a Schema, and it encapsulates the details of accessing a MongoDB
collection. A Mongoose document is an instance of a model, and provides access to a MongoDB document. A
Mongoose Schema is not the same thing as a JSON Schema. The json-schema-to-mongoose Node.js module can convert a JSON Schema to an equivalent Mongoose Schema, but this is left as an exercise for
you. In addition to creating a document, Mongoose also provides the ability to read (find()),
update (save() or update()), and delete (remove()) a document.
Other platforms have their own ODMs for accessing MongoDB:
Spring users can leverage Spring Data, which provides POJO mapping to MongoDB. Hibernate OGM provides Java Persistence API (JPA) support for NoSQL databases, including MongoDB.
Mongoid, which is officially supported by MongoDB.
The MEAN Stack is outside the scope of this book, so we can’t do justice to the topic in this chapter and stay focused on JSON. Let’s do something different with MongoDB, and leverage it as a Mock/Stub RESTful API instead. Mock/Stub RESTful APIs are great:
There’s no coding involved, which frees developers from the drudgery of developing and maintaining infrastructure code. Instead, developers can focus on useful code that delivers business value—the business logic of the API.
It pushes the API development team to create an initial design for their API before they start coding. This is also known as “API First” design. By doing it this way, developers are less likely to expose the implementation details of domain Objects and databases because they are designing to an interface (because the Stub API has no implementation).
API consumers have a viable Stub version of an API without having to wait for the completion of the real API.
API developers now have enough time to develop the API properly without having to rush to “get something out the door” to support their consumers.
API developers can gain early feedback on the usability of the API from their consumers and use this information to iteratively update their design and implementation.
We’ll continue to use the Speaker data that we imported earlier in this chapter.
According to the MongoDB documentation, there are several solid REST interfaces (that run as separate servers in front of MongoDB), including these:
Based on Node.js, Crest provides full CRUD (HTTP GET, PUT, POST, and DELETE) capabilities.
You can find details at the GitHub repository.
This is Java-based, provides full CRUD functionality, and is available at http://www.restheart.org.
Based on Ruby, this server provides full CRUD capabilities. You can find it on GitHub.
This is provided by default as part of MongoDB, but it works only with HTTP GET, and
doesn’t provide full REST capabilities (PUT, POST, and DELETE). For further information, see the
Simple REST API documentation at the RESTHeart site.
Either Crest, RESTHeart, or DrowsyDromedary will meet our needs here because they can all handle CRUD
requests from Consumers by supporting all major HTTP verbs. Let’s go with Crest because it’s simple to
install and set up. Refer to Appendix A, and install Crest (see “Install npm Modules”). Then, navigate to the crest directory on your local machine and start the
Crest server by typing node server on the command line. You should see the following:
node server DEBUG: util.js is loaded DEBUG: rest.js is loaded crest listening at http://:::3500
Then, open your browser and enter the following URL: http://localhost:3500/jsaw/speakers.
This tells Crest to do a GET (read/find) on the speakers collection in the jsaw
database on MongoDB. You should see the screen in Figure 9-1.
This is a good start, but you can’t do full API testing with your browser because it can only send an HTTP
GET request. Let’s use Postman (from earlier chapters) to fully exercise the Crest/MongoDB-based
Speakers API. Enter the http://localhost:3500/jsaw/speakers URL,
select GET as the HTTP verb, and click the Send button. You should see the screen in Figure 9-2.
This is what we saw before in the browser, but now we have the ability to modify the data represented by
the API. Let’s delete one of the speaker Objects. First, copy the id for one of the speaker Objects,
and add it to the URL http://localhost:3500/jsaw/speakers/id (where id is the Object ID that you copied).
Then (in Postman) choose DELETE as the HTTP verb, and click the Send button. You should see the
following in the HTTP Response:
{"ok":1}
Now, go back and do another GET on http://localhost:3500/jsaw/speakers and you should see that
Crest invoked MongoDB to delete the selected speaker.
We now have a fully functional Stub REST API that accesses MongoDB and produces valid JSON output, without the need to write code or set up big infrastructure. Use this style of workflow to streamline your API Design and testing, and watch your team’s productivity soar.
In this chapter, we’ve shown the basics of how JSON and MongoDB work together by covering these topics:
Importing a JSON document into MongoDB
Performing core CRUD operations with MongoDB
Exporting MongoDB data to a JSON document
Accessing MongoDB as a Mock/Stub RESTful API (without writing code)
Now that we’ve shown the synergy between JSON and MongoDB, we’ll move on to the final stage of our Enterprise JSON journey and put everything together as we describe how JSON works with Apache Kafka in Chapter 10.
Apache Kafka is a popular distributed scalable messaging system that enables heterogenous applications (those that run on multiple platforms) to communicate asynchronously by passing messages. Kafka was originally developed by the LinkedIn engineering team as part of a major rearchitecture effort. After the company moved from monolithic applications to Microservices, they created Kafka to fill the need for a universal data pipeline capable of processing large message volumes in order to integrate the services and applications across their enterprise. In 2011, LinkedIn open sourced Kafka to the Apache Foundation. Today, many companies successfully leverage Kafka as the central messaging platform in their enterprise architecture strategy. You can find more information about Kafka on the Apache Kafka main page.
Kafka differs from other messaging systems (e.g., Java Message Service, or JMS) in that it is not tied to a particular platform. Although Kafka was written in Java, Producers and Consumers can be written in different languages. To demonstrate this, we’ll have a Node.js-based Consumer and a Consumer written in Bourne Shell in our end-to-end example.
Kafka supports both binary and text messages. The most popular text formats are plain/flat text, JSON, and Apache Avro. The Kafka APIs (used by Producers and Consumers) communicate over TCP. In this chapter, we’ll use Kafka as a traditional messaging system with JSON-based messages, and show how to do the following:
Produce/consume JSON messages with Kafka from the command line
Design and implement a small end-to-end example that leverages Kafka with JSON
Typical Kafka use cases include the following:
Applications publish messages that are consumed by other applications. Kafka uses an asynchronous (i.e., the sender doesn’t wait for a response) publish/subscribe (or pub/sub) messaging model that decouples Producers from Consumers.
Applications publish real-time usage information (e.g., clicks, visitors, sessions, page views, and purchases) to Kafka Topics. Then a streaming application such as Apache Spark/Spark Streaming reads messages from the various topics, transforms the data (e.g., map/reduce), and sends it to a data store such as Hadoop (via Flume). You can add analytics tools (e.g., data visualization) on top of the target data store.
Applications can publish statistics (e.g., message counts, number of transactions, response time, HTTP status codes, and counts) for review by operations personnel to monitor and track performance, usage, and potential issues.
Applications across an enterprise can publish their log messages to a Kafka Topic, which makes them available to log management applications—e.g., the ELK (ElasticSearch, Logstash, Kibana) stack. Kafka could be used in front of Logstash to receive large data volumes and allow Logstash to perform more-expensive operations at its own pace without losing messages.
Here are some of the key concepts in Kafka’s architecture:
Registers for or Subscribes to a Topic and reads messages as they become available.
A named channel, a message feed/stream for a category of messages. In our example,
new-proposals-recvd contains messages that represent new speaker session proposals at MyConference.
You can also think of a Topic as a stream of business events, including orders and product returns.
A Topic is divided into one or more Partitions.
In a distributed environment, a Topic is replicated across multiple Partitions (each of which is managed by a separate Broker).
A unique ID for a message within a Partition. This is how Kafka maintains the ordering and sequencing of messages.
This is all you need to know in order to produce/consume JSON messages for this chapter. Many other important areas are not covered in this book in order to maintain brevity and focus, including Durability, Consumer Groups, Delivery Guarantees, and Replication. Kafka is a big topic that warrants its own book, and you can find more information in Kafka: The Definitive Guide, by Neha Narkhede et al. (O’Reilly).
For our example, we will have a single Broker (Kafka server), and each Topic will have a single Partition.
Kafka is a general-purpose messaging system that integrates with other message-processing systems to build larger, more powerful messaging applications. Kafka’s ecosystem includes, but is not limited to the following:
Used for stream processing (see “Kafka Use Cases”).
Provides integration with Hive to create a SQL-like interface to Kafka Topics.
The standalone Consumer pulls data from Kafka Topics and loads it into ElasticSearch.
A management console for Kafka that enables administrators to work with Kafka Clusters, Topics, Consumers, and so forth.
Moves large amounts of data from a channel (e.g., a Kafka topic) to the Hadoop Distributed File System (HDFS).
A data serialization alternative to pure JSON that provides richer data structures. Avro is not a standard, but has its own Schemas (which have no relationship to JSON Schema) that are written in JSON. Avro is an alternative to JSON that provides richer data structures and a more compact data format. Avro started as part of Hadoop, and eventually became its own project.
This list is just a small sample of other systems that work with Kafka. See the Kafka Ecosystem page for a full description of the Kafka Ecosystem.
Before we look at the command-line interface, let’s install Kafka and Apache ZooKeeper to run and build all the examples in this chapter. Refer to “Install Apache Kafka” in Appendix A, and install Kafka and ZooKeeper.
Now it’s time to configure Kafka so that it allows us to delete Topics (this setting is turned off by default). Edit the KAFKA-INSTALL-DIR/KAFKA_VERSION/libexec/config/server.properties file (where KAFKA-INSTALL-DIR is the directory where your installation procedure installed Kafka, and KAFKA_VERSION is the installed Kafka version) as follows:
# Switch to enable topic deletion or not, default value is false delete.topic.enable=true
At this point, you may be wondering why you need ZooKeeper in addition to Kafka. The short answer is that ZooKeeper is required in order to run Kafka. In other words, Kafka (as a distributed application) is designed to run within the ZooKeeper environment. ZooKeeper is a server that coordinates distributed processes by managing the following: naming, status information, configuration, location information, synchronization, failover, etc. The naming registry uses a hierarchical namespace that is similar to a filesystem.
ZooKeeper is used by several well-known projects, including Kafka, Storm, Hadoop MapReduce, HBase, and Solr (Cloud Edition), and so forth. To learn more, visit the ZooKeeper main page.
Kafka comes with a built-in CLI that enables developers to experiment with Kafka without leaving the command line. We’ll demonstrate how to start Kafka, publish JSON messages, and then shutdown the Kafka infrastructure.
To use the convenience scripts and avoid lots of typing, please be sure to visit the chapter-10/scripts directory (from the code examples) and change the file permissions so that all scripts will be executable:
chmod +x *.sh
Here are the steps (in the required order) to start Kafka and then publish/consume messages:
Start ZooKeeper.
Start the Kafka server.
Create a Topic.
Start a Consumer.
Publish a message to a Topic.
Consume a message.
Clean up and shut down Kafka:
Stop the Consumer.
Delete a Topic.
Shutdown Kafka.
Stop ZooKeeper.
As mentioned earlier, Kafka requires ZooKeeper. To start ZooKeeper, run the following command in a new terminal:
./start-zookeeper.sh
Example 10-1 shows the script.
zkServer start
You should see the following:
Now it’s time to start a Kafka server (from a new terminal):
./start-kafka.sh
The script looks like Example 10-2
kafka-server-start /usr/local/etc/kafka/server.properties
In this script, the server.properties file has configuration settings for Kafka. We edited this file earlier to enable the ability to delete topics.
The Kafka server should now be running. This command prints a lot of logging messages, and you should see the following when the server reaches the steady state:
Next, let’s create the test-proposals-recvd Topic to receive new speaker session proposals.
To create the Topic, run the script as follows (from a new terminal):
./create-topic.sh test-proposals-recvd
The script runs the kafka-topics command as shown in Example 10-3.
...
kafka-topics --zookeeper localhost:2181 --create \
--topic $1 --partitions 1 \
--replication-factor 1This script works as follows:
$1 is the command-line variable that has the Topic name (in this case, test-proposals-recvd).
We kept things simple by using only a single partition (an ordered sequence of records) and one replica for the Topic. A Partition can be replicated across multiple servers for fault tolerance and load balancing. In a production configuration, you would have multiple replicas to support large message volumes.
When you run the preceding script, you should see this:
Let’s make sure that the new Topic was created properly by running the following script:
./list-topics.sh
The script uses the kafka-topics command as shown in Example 10-4.
kafka-topics --zookeeper localhost:2181 --list
You should see that the test-proposals-recvd Topic was created:
The __consumer_offsets is a low-level, internal Kafka implementation detail—pay no attention to it.
We’re concerned only with the Topic that we created.
Now that we have a Topic, it’s time to produce and consume messages. First, we’ll create a Consumer
that subscribes to the test-proposals-recvd topic with the following script:
./start-consumer.sh test-proposals-recvd
This script uses the kafka-console-consumer command as shown in Example 10-5.
...
kafka-console-consumer --bootstrap-server localhost:9092 \
--topic $1In this script, $1 is the command-line variable that has the Topic name
(in this case, test-proposals-recvd) that the Consumer is listening on.
You should see that the Consumer is now polling/waiting for a new message, so there’s no output yet:
It’s now time to publish a JSON message to our topic with the following script (in a new terminal):
./publish-message.sh '{ "message": "This is a test proposal." }' test-proposals-recvd
Example 10-6 provides the script.
...
echo $MESSAGE_FROM_CLI | kafka-console-producer \
--broker-list localhost:9092 \
--topic $TOPIC_NAME_FROM_CLI
...Note the following in this script:
We use echo to print the JSON message to Standard Output and pipe it to the kafka-console-producer
command.
$MESSAGE_FROM_CLI is the command-line variable that has the JSON message to publish.
$TOPIC_NAME_FROM_CLI is the command-line variable that has the Topic name (in this case,
test-proposals-recvd).
When you publish the message, you should see the following:
The message doesn’t show in this terminal window.
When you revisit the terminal window where you started the Consumer, you should see that the Consumer
has read and printed the message from the test-proposals-recvd Topic:
We now have a simple CLI-based example with Kafka that produces and consumes JSON messages. Now let’s clean up.
Here are the steps to clean up and shut down Kafka:
Stop the Consumer.
Delete a Topic (optional).
Stop Kafka.
Stop ZooKeeper.
We’ll now delete the test-proposals-recvd Topic with the following script (this is optional):
./delete-topic.sh test-proposals-recvd
Example 10-7 shows the script.
... kafka-topics --zookeeper localhost:2181 --delete --topic $1
In this script, $1 is the command-line variable that has the Topic name
(in this case, test-proposals-recvd).
You should see the following on your screen:
To stop Kafka, just press Ctrl-C in the terminal window where you started Kafka or you can do a graceful shutdown as follows:
./stop-kafka.sh
Example 10-8 shows the script.
kafka-server-stop
This script uses the kafka-server-stop command to stop the Kafka server. The controlled/graceful
shutdown takes a while and produces a lot of log messages. If you return to the terminal window where you
started the Kafka server, you should see the following message at the end:
If you deleted the test-proposals-recvd Topic in the previous section, it won’t exist when you restart
Kafka. If you did not delete this Topic, it will be there upon a Kafka restart.
Let’s finish up by stopping ZooKeeper. Type the following from the command line:
./stop-zookeeper.sh
Example 10-9 shows the script.
zkServer stop
At this point, all the Kafka-related infrastructure should be stopped, and you should see the following:
Kafka enjoys wide support across the major application development platforms, including the following libraries:
Spring is widely used for integration within the Java community, and provides support through the Spring Kafka library.
Karafka is a gem you can find on GitHub.
kafka-node is a module we’ll use for the end-to-end example in the next section. You can find more
information on kafka-node on npm and GitHub.
We’ve shown how to use Kafka at the command line, and we’ll now combine that with Node.js-based applications that consume and produce messages. For our final example, we’re going to create an application that enables speakers to submit proposals to speak at MyConference (a fictitious company). Each speaker will submit a proposal, which is reviewed by a member of the MyConference proposal team. The speaker is then notified by email on the MyConference reviewer’s decision.
We’ll continue to use the Speaker data that we’ve used in previous chapters, but we need to add a few more elements to make this a fully dressed proposal. Example 10-10 shows the upgraded speaker session proposal.
{"speaker":{"firstName":"Larson","lastName":"Richard","email":"larson.richard@ecratic.com","bio":"Larson Richard is the CTO of ... and he founded a JavaScript meetup ..."},"session":{"title":"Enterprise Node","abstract":"Many developers just see Node as a way to build web APIs or ...","type":"How-To","length":"3 hours"},"conference":{"name":"Ultimate JavaScript Conference by MyConference","beginDate":"2017-11-06","endDate":"2017-11-10"},"topic":{"primary":"Node.js","secondary":["REST","Architecture","JavaScript"]},"audience":{"takeaway":"Audience members will learn how to ...","jobTitles":["Architects","Developers"],"level":"Intermediate"},"installation":["Git","Laptop","Node.js"]}
In this example, we have the following Objects:
speaker The speaker’s contact information.
session A description of the session, including title and length.
conference Tells which conference the speaker is applying for. MyConference runs multiple events, so this is important.
topic Primary and secondary topics covered in the talk.
audience The audience level (beginner, intermediate, or advanced).
installation Installation instructions (if any) that the audience should follow before attending the session.
Here are the components needed for the MyConference application:
Uses the publish-message.sh script to send the JSON-based speaker session
proposal on the speaker’s behalf to the new-proposals-recvd Topic. In the real world, this would be
a nice AngularJS application with a solid UX design that invokes a RESTful API, but we’ll stick with an
extremely simple shell script interface to keep the focus on JSON.
Listens on the new-proposals-recvd Topic, accepts/rejects a
proposal, and sends a corresponding message to the proposals-reviewed Topic for further processing. In
an enterprise-level architecture, we would put a RESTful API in front to receive the speaker proposal and
then publish the message to the new-proposals-recvd Topic. But again, we’re not showing an API here to
simplify the example.
Listens on the proposals-reviewed Topic, generates an acceptance/rejection email (based on the reviewer’s decision), and sends a notification email to the speaker.
Acts as MyConference’s Email Server to send notification emails.
Serves as the speaker’s Email Client to receive notification emails.
For the Email Client and Server, we’ll use MailCatcher, a simple email emulator to simplify infrastructure setup.
Figure 10-1 shows the overall flow and the way the components interact.
The flow of this diagram is as follows:
The Speaker uses the Speaker Proposal Producer to send a proposal to the new-proposals-recvd Topic
within the MyConference application.
The Proposal Reviewer receives a proposal message on new-proposals-recvd Topic, makes a
decision, and sends the acceptance/rejection message to the proposals-reviewed Topic.
The Speaker Notifier receives an acceptance/rejection message on the proposals-reviewed Topic, creates
a notification email message, and sends it.
The Speaker reviews the notification email message(s).
It’s now time to walk through some code and run the example.
If you ran through the CLI example, the steps should look familiar (refer to that section if you need to refresh your memory). We’ll need four terminal sessions to run the example. Do the following to get started:
Create terminal session 1.
Start ZooKeeper.
Start Kafka.
Create terminal session 2.
Create the proposals-reviewed Topic.
Create the new-proposals-recvd Topic.
With the core Kafka components in place, let’s set up an Email Server to receive acceptance/rejection notification email messages.
We’ll use MailCatcher. A Simple Mail (SMTP) server is a great tool for testing emails without forcing you to send a real email. MailCatcher has the characteristics we need for this example:
Follows standards—MailCatcher is based on the Simple Mail Transfer Protocol (SMTP).
Easy installation.
Simple startup/shutdown.
Security is optional. I know this sounds scary, but we don’t want to go through the hassle of setting up the user ID/password for an email server. For simple examples and prototyping as we’re doing here, this is OK. Of course, for bigger prototypes and real-world situations, you definitely want to secure access to your email server. MailCatcher will work well for bigger examples because it can also accept user credentials.
Nice web UI that shows email messages sent to the server.
For more information on MailCatcher, visit its website.
If you haven’t installed Ruby on Rails yet, refer to “Install Ruby on Rails” in
Appendix A, and install it. Install the mailcatcher gem on the command line
(staying in terminal session 2) as follows (also see “Install Ruby Gems” in Appendix A):
gem install mailcatcher
Start the MailCatcher server as follows, and you should see the following on your screen:
json-at-work => mailcatcher Starting MailCatcher ==> smtp://127.0.0.1:1025 ==> http://127.0.0.1:1080 *** MailCatcher runs as a daemon by default. Go to the web interface to quit.
MailCatcher runs as a daemon in the background, which enables you to do other things in the current terminal session. We’ll visit the MailCatcher web UI after we have some emails to review (see “Review Notification Email Messages with MailCatcher” later in this chapter).
The Proposal Reviewer and Speaker Notifier are both written in Node.js. If you haven’t installed Node.js
yet, refer to Appendix A, and install Node.js (see “Install Node.js”
and “Install npm Modules”). If you want to follow along with the Node.js project provided in
the code examples, cd to chapter-10/myconference and do the following to install all dependencies
for the project:
npm install
If you’d like to set up the Node.js project yourself, follow the instructions in the book’s GitHub repository.
We’ll use the publish-message.sh script (that you saw earlier) to send the contents of
the speakerProposal.json file to the new-proposals-recvd Topic.
In the same terminal session (2), run the following command from the scripts directory:
./publish-message.sh -f ../data/speakerProposal.json new-proposals-recvd
The Proposal Reviewer accepts/rejects proposals randomly (see the next section for details), so you’ll need to run this script three to five times (or more) to get acceptance and rejection and notification messages for the Speaker.
The Proposal Reviewer does the following:
Listens on the new-proposals-recvd Topic to receive Speaker session proposals
Validates the proposal and decides to accept or reject it
Sends the decision on the proposal to the proposals-reviewed Topic for further processing
myconference/proposalReviewer.js includes the full Proposal Reviewer application. Example 10-11 shows the portion of the code (along with setup) that receives the Speaker session proposals on
the new-proposals-recvd Topic.
varkafka=require('kafka-node');...constNEW_PROPOSALS_RECEIVED_TOPIC='new-proposals-recvd';...varconsumer=newkafka.ConsumerGroup({fromOffset:'latest',autoCommit:true},NEW_PROPOSALS_RECEIVED_TOPIC);// Use incoming JSON message.// Use JSON.parse() and JSON.stringify() to process JSON.consumer.on('message',function(message){// console.log('received kafka message', message);processProposal(message);});consumer.on('error',function(err){console.log(err);});process.on('SIGINT',function(){console.log('SIGINT received - Proposal Reviewer closing. '+'Committing current offset on Topic: '+NEW_PROPOSALS_RECEIVED_TOPIC+' ...');consumer.close(true,function(){console.log('Finished committing current offset. Exiting with graceful shutdown ...');process.exit();});});
Note the following in this example:
Use the kafka-node npm module to consume/produce Kafka messages. You can find more information on
kafka-node on the npm site and on GitHub.
Listen on and consume messages from the new-proposals-recvd Topic as follows:
Instantiate and use the ConsumerGroup Object to consume Kafka messages on the new-proposals-recvd
Topic. The fromOffset: 'latest' parameter indicates that we want to receive the latest message on the
Topic, and autoCommit: true tells the consumer to commit each message automatically after it is consumed
(this marks the message as processed).
consumer.on('message' …) listens for a message and invokes processProposal() (more on this later)
to process the incoming Speaker proposal that was just received.
consumer.on('error' …) prints an error message for any errors encountered when processing the
message.
process.on('SIGINT' …) listens for a SIGINT (process shutdown), commits the current offset, and does a graceful exit:
consumer.close(…) commits the current offset. This ensures that the current message is marked as read,
and that the Consumer on this Topic will receive the next message on the topic upon restart.
Example 10-12 shows how to validate the Speaker proposal and make a decision.
...varfs=require('fs');varAjv=require('ajv');...constSPEAKER_PROPOSAL_SCHEMA_FILE_NAME='./schemas/speakerProposalSchema.json';...functionprocessProposal(proposal){varproposalAccepted=decideOnProposal();varproposalMessage=proposal.value;varproposalMessageObj=JSON.parse(proposalMessage);console.log('\n\n');console.log('proposalMessage = '+proposalMessage);console.log('proposalMessageObj = '+proposalMessageObj);console.log('Decision - proposal has been ['+(proposalAccepted?'Accepted':'Rejected')+']');if(isSpeakerProposalValid(proposalMessageObj)&&proposalAccepted){acceptProposal(proposalMessageObj);}else{rejectProposal(proposalMessageObj);}}functionisSpeakerProposalValid(proposalMessage){varajv=Ajv({allErrors:true});varspeakerProposalSchemaContent=fs.readFileSync(SPEAKER_PROPOSAL_SCHEMA_FILE_NAME);varvalid=ajv.validate(speakerProposalSchemaContent,proposalMessage);if(valid){console.log('\n\nJSON Validation: Speaker proposal is valid');}else{console.log('\n\nJSON Validation: Error - Speaker proposal is invalid');console.log(ajv.errors+'\n');}returnvalid;}functiondecideOnProposal(){returnMath.random()>=0.5;}functionacceptProposal(proposalMessage){varacceptedProposal={decision:{accepted:true,timeSlot:{date:"2017-11-06",time:"10:00"}},proposal:proposalMessage};varacceptedProposalMessage=JSON.stringify(acceptedProposal);console.log('Accepted Proposal = '+acceptedProposalMessage);publishMessage(acceptedProposalMessage);}functionrejectProposal(proposalMessage){varrejectedProposal={decision:{accepted:false},proposal:proposalMessage};varrejectedProposalMessage=JSON.stringify(rejectedProposal);console.log('Rejected Proposal = '+rejectedProposalMessage);publishMessage(rejectedProposalMessage);}...
After the Proposal Reviewer receives a Speaker proposal message, processProposal() does the following:
decideOnProposal() randomly chooses to accept or reject the proposal to keep things simple. In a real
system, an application would put the proposal into someone’s work inbox, and a human would review and make
a decision.
JSON.parse() parses the proposal message to ensure that it is syntactically correct (it
follows basic JSON formatting rules).
isSpeakerProposalValid() uses the ajv npm module to validate against a JSON Schema (schemas/speakerProposalSchema.json):
If the Speaker proposal was accepted, acceptProposal() does the following:
Creates an acceptance object with fields to indicate that the proposal was accepted, and the time slot when the speaker will deliver the presentation at the conference
Uses JSON.stringify() to convert the acceptance object to JSON
Invokes publishMessage() to send the acceptance message to the proposals-reviewed Topic
If the Speaker proposal was rejected (or its format was invalid), rejectProposal() does the following:
Creates a rejection Object with fields to indicate that the proposal was rejected
Uses JSON.stringify() to convert the rejection Object to JSON
Invokes publishMessage() to send the rejection message to the proposals-reviewed Topic
Example 10-13 shows how to send an acceptance/rejection message on to the proposals-reviewed Topic.
...constPROPOSALS_REVIEWED_TOPIC='proposals-reviewed';...varproducerClient=newkafka.Client(),producer=newkafka.HighLevelProducer(producerClient);...functionpublishMessage(message){varpayloads=[{topic:PROPOSALS_REVIEWED_TOPIC,messages:message}];producer.send(payloads,function(err,data){console.log(data);});}producer.on('error',function(err){console.log(err);});
This code publishes messages to the proposals-reviewed Topic as follows:
Instantiates and uses the HighLevelProducer Object to publish messages to the proposals-reviewed
Topic. The instantiation for HighLevelProducer actually happens toward the beginning of the file, but we
show it here for convenience.
publishMessage() invokes producer.send() to send the message.
producer.on('message' …) listens for a message and invokes processProposal() (more on this later)
to process the incoming Speaker proposal that was just received.
We’ve only touched on the kafka-node Objects used by Producers and Consumers. For further details, visit the kafka-node module documentation to learn more about the following:
HighLevelProducer
ConsumerGroup
Client
Now that we’ve looked at Proposal Reviewer code, create a new terminal session (3) and run the following command (from the myconference directory) to start the Proposal Reviewer:
node proposalReviewer.js
When Speaker proposal messages arrive on the new-proposals-recvd Topic, you should see that
the Proposal Reviewer logs the proposals it receives and the decisions it makes (on the
proposals-reviewed Topic):
After the decision has been made to accept/reject a proposal, the Speaker Notifier:
Listens on the proposals-reviewed Topic for accepted/rejected proposals
Formats an acceptance/rejection email
Sends the acceptance/rejection email
myconference/speakerNotifier.js includes the full Speaker Notifier application. Example 10-14 shows the portion of the code (along with setup) that receives the accepted/rejected proposals on
the proposals-reviewed Topic.
varkafka=require('kafka-node');...constPROPOSALS_REVIEWED_TOPIC='proposals-reviewed';...varconsumer=newkafka.ConsumerGroup({fromOffset:'latest',autoCommit:true},PROPOSALS_REVIEWED_TOPIC);...consumer.on('message',function(message){// console.log('received message', message);notifySpeaker(message.value);});consumer.on('error',function(err){console.log(err);});process.on('SIGINT',function(){console.log('SIGINT received - Proposal Reviewer closing. '+'Committing current offset on Topic: '+PROPOSALS_REVIEWED_TOPIC+' ...');consumer.close(true,function(){console.log('Finished committing current offset. Exiting with graceful shutdown ...');process.exit();});});...
The Speaker Notifier listens on and consumes messages from the proposals-reviewed Topic as follows:
Instantiates and uses the ConsumerGroup Object to consume Kafka messages on the proposals-reviewed
Topic. The setup for this consumer is similar to the code in the Proposal Reviewer.
consumer.on('message' …) listens for a message and invokes notifySpeaker() (more on this later)
to process the incoming acceptance/rejection message that was just received.
consumer.on('error' …) and process.on('SIGINT' …) function in the same manner as the Proposal
Reviewer example.
Example 10-15 shows how to process the accepted/rejected proposals and formats a corresponding acceptance/rejection email using Handlebars (which was covered in Chapter 7).
...varhandlebars=require('handlebars');varfs=require('fs');...constEMAIL_FROM='proposals@myconference.com';constACCEPTED_PROPOSAL_HB_TEMPLATE_FILE_NAME='./templates/acceptedProposal.hbs';constREJECTED_PROPOSAL_HB_TEMPLATE_FILE_NAME='./templates/rejectedProposal.hbs';constUTF_8='utf8';...functionnotifySpeaker(notification){varnotificationMessage=createNotificationMessage(notification);sendEmail(notificationMessage);}functioncreateNotificationMessage(notification){varnotificationAsObj=JSON.parse(notification);varproposal=notificationAsObj.proposal;console.log('Notification Message = '+notification);varmailOptions={from:EMAIL_FROM,// sender addressto:proposal.speaker.,// list of receiverssubject:proposal.conference.name+' - '+proposal.session.title,// Subjecthtml:createEmailBody(notificationAsObj)};returnmailOptions;}functioncreateEmailBody(notification){// Read Handlebars Template file.varhbTemplateContent=fs.readFileSync(((notification.decision.accepted)?ACCEPTED_PROPOSAL_HB_TEMPLATE_FILE_NAME:REJECTED_PROPOSAL_HB_TEMPLATE_FILE_NAME),UTF_8);// Compile the template into a function.vartemplate=handlebars.compile(hbTemplateContent);varbody=template(notification);// Render the template.console.log('Email body = '+body);returnbody;}...
After the Speaker Notifier receives an acceptance/rejection message, notifySpeaker() does the following:
Invokes createNotificationMessage() to create the notification email to send to the Speaker:
Uses JSON.parse() to parse the acceptance/rejection message into an Object
Invokes createEmailBody():
Invokes sendEmail() to send the notification email to the Speaker (see the next example)
Example 10-16 shows how to send an acceptance/rejection email.
...varnodeMailer=require('nodemailer');...constMAILCATCHER_SMTP_HOST='localhost';constMAILCATCHER_SMTP_PORT=1025;vartransporter=nodeMailer.createTransport(mailCatcherSmtpConfig);...functionsendEmail(mailOptions){// send mail with defined transport objecttransporter.sendMail(mailOptions,function(error,info){if(error){console.log(error);}else{console.log('Email Message sent: '+info.response);}});}
The Speaker Notifier sends email messages to the MailCatcher server as follows:
Instantiates and uses the nodemailer transporter Object to send email. The MAILCATCHER_SMTP_…
constants indicate the host and port used by the MailCatcher on your local machine. The instantiation
for the nodemailer transporter Object actually happens toward the beginning the file, but we show it
here for convenience.
sendEmail() invokes transporter.sendMail() to send the email message.
nodemailer is a generic npm module that sends email messages by using SMTP. You can find
more information on ajv on the npm site
and on the nodemailer Community Page.
Now, create a new terminal session (4) and run the following command (from the myconference directory) to start the Speaker Notifier:
node speakerNotifier.js
When accepted/rejected proposal messages arrive on the proposals-reviewed Topic, you should see
that the Speaker Notifier logs the accepted/rejected proposals it receives and the email
notifications it sends:
To wrap up our example, let’s look at the notification messages (generated by the Speaker Notifier) sent to the prospective MyConference speakers.
Visit http://localhost:1080 on your machine and you’ll see the MailCatcher user interface. Figure 10-2 shows the summary page that lists the email messages generated by the MyConference application (using Handlebars).
Click some of the messages until you see an Acceptance message indicating that the session proposal was accepted, as shown in Figure 10-3.
Figure 10-4 shows a sample rejection message.
The MailCatcher web UI controls work as follows:
Download the current email message by clicking the Download button. This saves the message as a file (with the extension .eml) in EML format, which
Follows the MIME 822 standard
Is compatible with MS Outlook and Outlook Express, Apple Mail, Mozilla Thunderbird, and other email clients
Preserves the original HTML format and headers
Shut down the MailCatcher background process by clicking on the Quit button on the upper-right side of the page
In this chapter, we’ve shown how to do the following:
This appendix provides an installation guide and setup instructions to support the code examples in this book.
This section shows how to install JSON-based tools in the browser.
JSONView pretty-prints JSON in Chrome or Firefox. Follow the installation instructions on the JSONView site for your browser.
Use JSONLint to validate JSON documents online. JSONLint doesn’t require an installation.
Use JSON Editor Online to model JSON documents. Since this is a web app, there’s nothing to install.
Postman provides the ability to fully test a RESTful API. It can send
HTTP GET, POST, PUT, and DELETE requests and set HTTP headers.
You can install Postman as a Chrome extension or as a standalone GUI
application on macOS, Linux, or Windows. Visit the
Postman site for installation instructions.
This book uses Node.js version
v6.10.2, which is the current latest
stable version as of this writing.
Although you could use the installation package from the Node.js site, it’s difficult to change versions. Instead, let’s use Node Version Manager (NVM). NVM makes it easy to install/uninstall Node.js, and upgrade to newer versions.
First, install NVM by using one of the following methods:
Next, let’s make sure that NVM runs properly. Source it from a shell as follows:
source ~/.nvm/nvm.sh
Now NVM will work properly for the remainder of the installation process.
If you’re running bash, do the following so that NVM is automatically sourced (configured):
In $HOME/.bashrc, add these lines:
source ~/.nvm/nvm.sh export NVM_HOME=~/.nvm/v6.10.2
In $HOME/.bashrc_profile, add this line:
[[ -s $HOME/.nvm/nvm.sh ]] && . $HOME/.nvm/nvm.sh # This loads NVM
Note that similar steps apply to the Bourne Shell or Korn Shell.
Now that NVM is installed, use it to install Node.js:
Type nvm ls-remote to see what remote (not on your local
machine) versions of Node.js are available to install.
Install version v6.10.2 with the following command:
nvm install v6.10.2
All Node.js versions are installed in $HOME/.nvm.
Set the default Node.js version to be used in any new shell:
nvm alias default v6.10.2
Without this, neither the node or npm commands will work properly
when you exit the current shell.
Now, exit your current shell.
From a new shell, upgrade to the latest version of npm:
npm update -g npm
Then, do the following health checks:
nvm ls, and you should see
... -> v6.10.2 system default -> v6.10.2
node -v, which yields v6.10.2
npm -v, and it looks like 4.6.1
To see a full list of NVM’s capabilities, type nvm --help.
When you check out the Node.js Request-Eval-Print-Loop (REPL), you should see this:
json-at-work => node -> .exit
npm may require you to run as sudo, and this can get cumbersome and
annoying. This also can be a security risk because packages can contain
scripts, and npm is running with root privilege. To avoid this, do the
following:
sudo chown -R $USER ~/.nvm
This works if you installed Node.js with NVM (all Node.js installations go under that directory). This tip was inspired by Isaac Z. Schlueter from How to Node.
Out of the box, the default behavior of the REPL leaves a bit to be
desired because you see undefined after most lines of JavaScript, hitting
the Enter key, breathing, and so forth. This is because JavaScript
functions always return something. If nothing is returned, undefined is returned by default. This behavior can be annoying
and unproductive. Here’s a sample session:
json-at-work => node -> Hit Enter -> undefined -> var y = 5 -> undefined -> .exit
To turn off undefined in the REPL, add the following to .bashrc (or
your setup for Bourne or Korn Shell):
source ~/.nvm/nvm.sh
...
alias mynode="node -e \"require('repl').start({ignoreUndefined: true})\""
Now, exit the current shell and start a new shell. Rather than
redefining node, it’s safer to define a new alias (in this case,
mynode). This way, node will still work properly from the command
line and be able to run JavaScript files. Meanwhile, mynode serves as
your new REPL command:
json-at-work => mynode -> var x = 5 -> .exit
You now have a Node.js REPL that does what you want—no more annoying
undefined. You’re welcome.
NVM also works well on Windows thanks to Corey Butler’s
nvm-windows application.
This is a port of nvm to a Windows environment. I successfully used
nvm-windows on Windows 7.
Here are the steps:
Visit the
nvm-windows
Downloads page.
Download the latest nvm-setup.zip to your Downloads folder.
Unzip nvm-setup.zip with your favorite zip tool.
Run nvm-setup.exe, which is a wizard. Accept all defaults and the MIT License agreement:
Download to C:\Users{username}\AppData\Roaming\nvm.
Click Finish when the install completes.
This sets up the necessary environment variables to run Node.js on your Windows machine.
Ensure that NVM is on your PATH:
Navigate to Control Panel → System → Advanced System Settings.
Click Environment Variables on the Advanced System Settings pop up.
NVM_HOME should have been added to Env Vars during install: C:\Users{username}\AppData\Roaming\nvm
NVM_SYMLINK should point to C:\Program Files\nodejs
Both NVM_HOME and NVM_SYMLINK should be on the PATH.
Install Node.js with
nvm-windows:
Type nvm list available to get a list of available versions.
Type nvm install v6.10.2
Set the version of Node.js: nvm use v6.10.2
Test the install: node -v
If you have a previous installation of Node.js that isn’t quite working
properly anymore, you may need to completely uninstall it from your
machine. This includes both the node and npm executables.
Uninstalls can be complicated, and credit for the Mac uninstall
instructions goes to
Clay at
Hungred Dot Com. If Homebrew was used to install Node.js, simply
type brew uninstall node at the prompt.
If you didn’t use Homebrew, do the following:
cd to /usr/local/lib and delete any node executable and
node_modules.
cd to /usr/local/include and delete any node and the node_modules
directory.
cd to /usr/local/bin and delete any node executable.
You may also need to do the following:
rm -rf /usr/local/bin/npm rm -rf /usr/local/share/man/man1/node.1 rm -rf /usr/local/lib/dtrace/node.d rm -rf $USER/.npm
Credit for the Linux uninstall instructions goes to Stack Overflow and GitHub. Do the following:
Find the node installation by typing which node. Let’s assume it’s
at /usr/local/bin/node.
cd to /usr/local.
Execute the following:
sudo rm -rf bin/node sudo rm -rf bin/npm sudo rm -rf lib/node_modules/npm sudo rm -rf lib/node sudo rm -rf share/man/*/node.*
Credit for the Windows uninstall instructions goes to Team Treehouse. Here are the steps:
Open the Windows Control Panel.
Choose Programs and Features.
Click “Uninstall a program.”
Select Node.js, and click the Uninstall link.
Yeoman consists of the following:
yo (for Scaffolding)
For the code examples in this book, you’ll need both
gulp and
grunt-cli for the Build System.
Although gulp is used as the primary build tool,
you still need grunt-cli to run
some of the gulp tasks.
I chose bower for Package Management.
Here are the installation steps:
Install yo:
npm install -g yo
Test the yo installation: yo --version
Install bower:
npm install -g bower
Test the bower installation: bower --version
Install gulp:
npm install -g gulp-cli
Test the gulp installation: gulp --version
Install grunt-cli:
npm install -g grunt-cli
Test the grunt-cli installation: grunt --version
Refer to the Yeoman setup page for more information.
See the generator-webapp GitHub
page. Install the generator as follows:
npm install -g generator-webapp
We use the following npm modules at the command line, so we install them globally:
This is the npm equivalent of the JSONLint site
used to validate a JSON document. You can find
jsonlint in the GitHub repository.
To install:
npm install -g jsonlint
To validate a JSON document:
jsonlint basic.json
json provides the ability to work with
JSON (e.g., pretty-printing) from the command line. It’s similar
to jq, but not as powerful.
To install:
npm install -g json
Visit the json GitHub
repository for usage instructions.
json is available as an npm
module.
This is the npm equivalent of the JSON Validate
site used to validate a JSON document against a JSON Schema.
ujs-jsonvalidate can be found in the
GitHub repository.
To install:
npm install -g ujs-jsonvalidate
To validate a JSON document:
validate basic.json basic-schema.json
http-server is a simple Web Server that serves up files in the current
directory structure on the local host system as static content. I like
http-server because it has solid documentation, and the command-line
options and shutdown are intuitive. Here’s the
http-server in the GitHub
Repository and http-server in the
npm repository.
To install:
npm install -g http-server
To run:
http-server -p 8081
To access:
http://localhost:8081
To shut down: press Ctrl-C
json-server is a Stub REST server that takes a JSON file and exposes
it as a RESTful service. You can find json-server in the GitHub
repository.
To install:
npm install -g json-server
To run:
json-server -p 5000 ./speakers.json
To access:
http://localhost:5000/speakers
Crest is a small REST server that provides a RESTful wrapper for
MongoDB. You can find Crest in the GitHub
Repository. The global npm installation would be the simplest way to
install Crest, but this is broken. Instead, do a git clone as
follows:
cd to the directory where your other development projects reside.
We’ll call this directory projects:
cd projects
Clone the repository:
git clone git://github.com/Cordazar/crest.git
Navigate to the crest directory:
cd crest
Update the config.json file to remove the username and password.
Of course, this isn’t secure, but you can re-add these fields and set
them to proper values later; just make sure that the settings match
your MongoDB password. We just want to get started quickly. The
config.json file should now look like this:
{"db":{"port":27017,"host":"localhost"},"server":{"port":3500,"address":"0.0.0.0"},"flavor":"normal","debug":true}
Be sure to install and start MongoDB first.
In a separate tab or command shell, start Crest by typing
node server on the command line. You should see the following:
node server DEBUG: util.js is loaded DEBUG: rest.js is loaded crest listening at http://:::3500
jq-tutorial is an npm
module that provides a nice jq tutorial from the command line. Install
it as follows:
npm install -g jq-tutorial
Then run it from the command line:
jq-tutorial
There are several ways to install Ruby on Rails:
Ruby Version Manager (RVM) + the rails gem
rbenv + the rails gem
I prefer RVM for macOS and Linux because it’s easy to upgrade to switch between Ruby versions. Install RVM by visiting the RVM site and following the installation instructions.
Use RVM to install Ruby as follows:
See the available versions of Ruby:
rvm list known
Install Ruby v2.4.0 as follows:
rvm install 2.4.0
Check the Ruby version, and you should see something like this:
ruby -v ruby 2.4.0
After installing Ruby, you can install Rails as follows:
gem install rails
Check the Rails version, and it should look like this:
rails -v Rails Rails 5.0.2
And you’re done.
You can easily upgrade to new versions of Ruby and Rails by following these steps:
Install a new version of Ruby (2.x for example):
rvm install 2.x
Use the new version:
rvm use 2.x
Install the rails gem as shown previously.
Use Rails Installer for a Windows environment, and do the following:
Download the installer for Windows.
Run the installer and follow the defaults.
I’ve used Rails Installer on Windows 7, and it worked properly. The Rails Installer page has excellent information on RoR tutorials and how to get help with installation issues.
We use the following Ruby gems outside Rails, so we install them globally:
multi_json provides a wrapper
that invokes the most common JSON gems on behalf of the caller by
choosing the fastest JSON gem that has been loaded in an application’s
environment. Install it as follows:
gem install multi_json
Optimized JSON (oj), is considered by
many to be the fastest Ruby-based JSON processor available. Install it
as follows:
gem install oj
awesome_print
pretty-prints a Ruby object and is used for debugging purposes. Install
it as follows:
gem install awesome_print
activesupport
provides functionality that has been extracted from Rails.
ActiveSupport’s JSON module provides the ability to convert keys between
camel case and snake case. Install it as follows:
gem install activesupport
mailcatcher is a simple mail (SMTP)
server. It’s a great tool for testing emails without forcing you to send
a real email. Install it as follows:
gem install mailcatcher
See the MongoDB installation documentation and follow the instructions to install and start MongoDB on your platform.
Our Java environment depends on the following:
We’re using Java Standard Edition (SE) 8 for this book, so visit the Oracle Java SE 8 download site.
You’ll see the term JDK (for Java Developer Kit) on that page. JDK is the old name for Java SE. Just look for Java SE Development Kit, accept the license agreement, and do the proper download for your operating system. After you’ve downloaded and run the installer, you’ll want to set up your Java command-line environment for your operating system.
Follow the instructions that follow for you system. Then run this:
java -version
You should see something similar to this
java version "1.8.0_72" Java(TM) SE Runtime Environment (build 1.8.0_72-b15) Java HotSpot(TM) 64-Bit Server VM (build 25.72-b15, mixed mode)
In .bashrc, do the following to set up JAVA_HOME and add it to your
PATH:
...
export JAVA_HOME=/usr/java/jdk1.x.y/bin/java # x and y are the minor and
patch versions
...
export PATH=...:$\{JAVA_HOME}/bin:...
Then, refresh your environment:
source ~/.bashrc
Credit for Java setup on Linux goes to nixCraft.
The Java Windows Installer usually puts the JDK in one of the following directories: C:\Program Files\Java or C:\Program Files (x86)\Java.
Then, do the following:
Right-click the My Computer icon on your desktop and select Properties.
Click the Advanced tab.
Click the Environment Variables button.
Under System Variables, click New.
Enter the variable name as JAVA_HOME.
Enter the variable value as the installation path for the Java Development Kit (see where the installer put the JDK directory).
Click OK.
Click Apply Changes.
Credit for the Java setup on Windows goes to Robert Sindall.
Gradle is used for building source and test code.
Visit the Gradle Installation Guide
and follow the instructions for your operating system. After you’ve
completed the installation, run gradle -v from the command line and
you should see something like this:
gradle -v ------------------------------------------------------------ Gradle 3.4.1 ------------------------------------------------------------
On macOS, I succesfully used Homebrew to install Gradle.
jq provides JSON-based command-line
processing. To install it, just follow the
download instructions on the jq
GitHub repository.
jq works with and depends on cURL.
cURL provides the ability to communicate over multiple protocols, including HTTP. Use this to make HTTP calls to RESTful APIs from the command line.
Just as with Linux, cURL may already be installed on your Mac. Check it as follows:
curl --version
If it’s already there, there’s nothing else to do. Otherwise, you’ll need to install it. I use Homebrew as my package installer on macOS, so use the following command to install cURL on a Mac:
brew install curl
Check whether cURL is already installed by entering the following command:
curl --version
If it isn’t there, do the following from the command line:
sudo apt-get install curl
This should work on Ubuntu or Debian.
To install cURL on Windows, do the following:
Visit the cURL Download Wizard.
Select the type of package: curl executable.
Select the Operating System: either Windows/Win32 or Win64.
Select the Flavor: either Cygwin (if you use
Cygwin) or Generic (if you don’t use
Cygwin).
Select the Win32 version (only if you selected Windows/Win32 previously): Unspecified.
Credit for the cURL Windows installation instructions goes to Stack Overflow.
We use Apache Kafka in Chapter 10 for JSON-based messaging. Kafka depends on Apache ZooKeeper so you’ll need to install ZooKeeper, too. Before going any further, be sure to install the Java Environment on your machine (because Kafka is based on Java).
Homebrew is the easiest way to install Kafka on macOS. Do the following from the command line:
brew install kafka
This installs both Kafka and ZooKeeper. You’re done.
Install ZooKeeper as follows:
Download ZooKeeper from the ZooKeeper Releases page.
Extract the TAR file from the GZipped file you downloaded (current/latest ZooKeeper download):
tar -zxf ZooKeeper-3.4.9.tar.gz
Add system environment variables in ~/.bashrc:
export ZooKeeper_HOME = <Zookeeper-Install-Path>/zookeeper-3.4.9 export PATH=$PATH:$ZOOKEEPER_HOME/bin
Install Kafka as follows:
Download Kafka from the Kafka Downloads page.
Extract the TAR file from the GZipped file you downloaded (current/latest Kafka download):
tar -zxf kafka_2.11-0.10.1.1.tgz
Add system environment variables in ~/.bashrc:
export KAFKA_HOME = <Kafka-Install-Path>/zookeeper-3.4.9 export PATH=$PATH:$KAFKA_HOME/bin
Credit for the Apache Kafka installation on UNIX instructions goes to TutorialsPoint.
Download ZooKeeper from the ZooKeeper Downloads page.
Use your favorite zip tool to unzip the ZooKeeper file to the C:
drive.
Add System Variables as follows:
In Windows, navigate to Control Panel → System → Advanced System Settings → Environment Variables.
Create the following new System Variable (current/latest ZooKeeper download):
ZOOKEEPER_HOME = C:\zookeeper-3.4.9
Add ZooKeeper to your PATH by editing that variable and adding this at the end:
;%ZOOKEEPER_HOME%\bin;
Install Kafka as follows:
Download Kafka from the Kafka Downloads page.
Use your favorite zip tool to unzip the Kafka file to the C: drive.
Add System Variables as follows:
In Windows, navigate to Control Panel → System → Advanced System Settings → Environment Variables.
Create the following new System Variable (current/latest Kafka download):
KAFKA_HOME = C:\kafka_2.11-0.10.1.1
Add Kafka to your PATH by editing that variable and adding this at the end:
;%KAFKA_HOME%\bin;
Credit for the Apache Kafka installation on Windows instructions goes to Gopal Tiwari’s article on DZone.
The AsciiDoc version of Appendix A in the book was generated by Pandoc from the original Markdown in the JSON at Work GitHub examples repository.
JSON has an active and vibrant community. Visit the following groups and lists to get involved and learn more:
Douglas Crockford’s JSON site where it all started.
This Yahoo Group is affiliated with the JSON.org site.
json-ietf Mailing List This list is for the JSON IETF (Internet Engineering Task Force) Working Group that maintains the JSON IETF specification.
Another great source of JSON tutorials, tools, and articles.
The JSON Schema specification is maintained in this GitHub Repository.
This Google group is associated with the JSON Schema Specification Working Group.
api-craft Google Group This group focuses on API Design and development.
The animal on the cover of JSON at Work is the Siberian jay (Perisoreus infaustus), a small bird native to northern Eurasia. Its habitat range is extremely large, stretching from Sweden in the west to China in the east. They make their nests in coniferous trees found in dense boreal forests (also known as taiga).
Siberian jays can grow to be 29 centimeters long and can weigh up to 79 grams. They have long tails and brown and gray coloring. Siberian jays are omnivorous, feeding on berries and seeds as well as insects, carrion, and small rodents. Females lay their eggs once a year in March or April, and raise their young before the winter arrives.
There is some evidence that the European population of Siberian jays is declining as a result of human-caused deforestation. However, because of their massive range across sparsely inhabitated regions of Asia, the Siberian jay not currently listed as endangered or threatened.
Many of the animals on O’Reilly covers are endangered; all of them are important to the world. To learn more about how you can help, go to animals.oreilly.com.
The cover image is from Riverside Natural History. The cover fonts are URW Typewriter and Guardian Sans. The text font is Adobe Minion Pro; the heading font is Adobe Myriad Condensed; and the code font is Dalton Maag’s Ubuntu Mono.