Table of Contents for
JSON at Work
 JSON at Work
Published by
O'Reilly Media, Inc., 2017
JSON at Work
Published by
O'Reilly Media, Inc., 2017
- nav
- Cover
- JSON at Work
- JSON at Work
- Dedication
- Preface
- I. JSON Overview and Platforms
- 1. JSON Overview
- 2. JSON in JavaScript
- 3. JSON in Ruby on Rails
- 4. JSON in Java
- II. The JSON Ecosystem
- 5. JSON Schema
- 6. JSON Search
- 7. JSON Transform
- III. JSON in the Enterprise
- 8. JSON and Hypermedia
- 9. JSON and MongoDB
- 10. JSON Messaging with Kafka
- A. Installation Guides
- B. JSON Community
- Index
- About the Author
- Colophon
Chapter 4. JSON in Java
We’ve shown how to use JSON with JavaScript and Ruby on Rails, and we’ll now move to Java, our third and final platform for this book. Here’s what we’ll cover:
-
Performing Java/JSON serialization/deserialization with Jackson
-
Working with Java Objects and JSON
-
Using JSON with JUnit
-
Making RESTful API calls and testing the results with JUnit and JsonUnit
-
Building a small JSON-based API with Spring Boot
In our examples, we’ll make RESTful API calls to work with the data we deployed on json-server in the
previous chapter. We’ll then move to create a more realistic JSON-based Web API. Before we develop a
RESTful API, we need to start with the basics of Java serialization/deserialization with JSON, and
then add more complexity.
Java and Gradle Setup
This chapter uses Gradle for building source and test code. If you haven’t installed Java and Gradle, go to Appendix A and see “Install the Java Environment” and “Install Gradle”. After that, you will have a basic environment that enables you to run the examples.
Gradle Overview
Gradle leverages the concepts from earlier Java-based build systems—Apache Ant and Maven. Gradle is widely used and provides the following functionality for Java projects:
-
Project structure (a common/standard project directory structure)
-
Dependency Management (for JAR files)
-
A common build process
The gradle init utility initializes a project by creating a core directory structure and some
initial implementations for the build script, along with simple Java source and test code. Here are the
key directories and files in a Gradle project:
-
src/main/ contains source code and resources.
-
java/ is the Java source code.
-
resources/ contains the resources (e.g., properties, data files—JSON in our case) used by the source code.
-
-
test/main/ contains source code and resources.
-
java/ is the Java source code.
-
resources/ contains the resources (e.g., properties, data files—JSON in our case) used by the source code.
-
-
build/ contains the .class files generated by compiling the source and test code.
-
libs/ contains the JAR or WAR files that result from building the project.
-
-
gradlew is the Gradle wrapper that enables you to run a project as an executable JAR. We’ll cover this in more detail in the Spring Boot section later.
-
build.gradle is initiated for you by
gradle init, but you need to fill it in with project-specific dependencies. Gradle uses a Groovy-based DSL for its build scripts (rather than XML). -
build/ contains build-related artifacts created by
gradle buildorgradle test.
Here are the most important Gradle tasks you’ll need to know in order to work with Gradle.
You can see these tasks when you type gradle tasks on the command line:
gradle build-
Build the project.
gradle classes-
Compile Java source code.
gradle clean-
Delete the build directory.
gradle jar-
Compile Java source code and package it (along with Resources) into a JAR.
gradle javadoc-
Generate JavaDoc documentation from the Java source code.
gradle test-
Run Unit Tests (includes Java source and test code compile).
gradle testClasses-
Compile Java test code.
Here’s how the example projects were created:
-
gradle init --type java-applicationwas used to create the initial speakers-test and speakers-web applications. -
The generated build.gradle file and the Java application and test files are stubs. They have been replaced with actual code for the examples in this chapter.
Gradle is well-documented, and here are some tutorials and references to help you go deeper:
-
Gradle Beyond the Basics, by Tim Berglund (O’Reilly)
Now that we’ve covered the basics of Gradle, it’s time to look at Java-based JSON libraries, and then move on to coding examples.
Just Enough Unit Testing with JUnit
JUnit is a widely used Unit-Testing framework. The tests in this chapter use JUnit because of its common acceptance in the Java community. JUnit tests are procedural, so the Unit Tests are TDD-style. If you’d like to combine JUnit with BDD, Cucumber is a solid choice. To learn more about BDD and Cucumber in Java, see Micha Kops’ excellent article on “BDD Testing with Cucumber, Java and JUnit”.
Java-Based JSON Libraries
There are several solid JSON libraries for Java/JSON serialization/deserialization, including these:
- Jackson
-
You can find details about Jackson in the GitHub repository.
- Gson
-
Gson is provided by Google.
- JSON-java
-
This library is provided by Doug Crockford.
- Java SE (Standard Edition)
-
JSON support was introduced into the Java platform in JavaEE 7 as part of the Java Specification Request (JSR) 353 initiative. JSR-353 is a standalone implementation, and you can integrate it with your Java SE applications as of Java SE 8. Java SE 9 will provide native JSON support as part of the Java Enhancement Proposal (JEP) 198 initiative.
All examples in this chapter use Jackson because it
-
Is widely used (especially by the Spring community)
-
Provides excellent functionality
-
Has worked well for a long time
-
Is well maintained with an active development community
-
Has good documentation
Additionally, we’ll maintain focus by sticking with one Java/JSON library. As mentioned, the other libraries work well, so feel free to try them on your own.
Let’s start with the basics of Java serialization/deserialization.
JSON Serialization/Deserialization with Jackson
Java applications need to convert from Java data structures to JSON (serialize) and convert from JSON to Java (deserialize).
Serialization/Deserialization with Simple Java Data Types
As in previous chapters, we’ll start by serializing some basic Java data types:
-
integer -
string -
array -
boolean
Example 4-1 shows a simple Unit Test that uses Jackson and JUnit 4 to serialize/deserialize simple Java data types.
Example 4-1. speakers-test/src/test/java/org/jsonatwork/ch4/BasicJsonTypesTest.java
packageorg.jsonatwork.ch4;importstaticorg.junit.Assert.*;importjava.io.*;importjava.util.*;importorg.junit.Test;importcom.fasterxml.jackson.core.*;importcom.fasterxml.jackson.core.type.*;importcom.fasterxml.jackson.databind.*;publicclassBasicJsonTypesTest{privatestaticfinalStringTEST_SPEAKER="age = 39\n"+"fullName = \"Larson Richard\"\n"+"tags = [\"JavaScript\",\"AngularJS\",\"Yeoman\"]\n"+"registered = true";@TestpublicvoidserializeBasicTypes(){try{ObjectMappermapper=newObjectMapper();Writerwriter=newStringWriter();intage=39;StringfullName=newString("Larson Richard");List<String>tags=newArrayList<String>(Arrays.asList("JavaScript","AngularJS","Yeoman"));booleanregistered=true;Stringspeaker=null;writer.write("age = ");mapper.writeValue(writer,age);writer.write("\nfullName = ");mapper.writeValue(writer,fullName);writer.write("\ntags = ");mapper.writeValue(writer,tags);writer.write("\nregistered = ");mapper.configure(SerializationFeature.INDENT_OUTPUT,true);mapper.writeValue(writer,registered);speaker=writer.toString();System.out.println(speaker);assertTrue(TEST_SPEAKER.equals(speaker));assertTrue(true);}catch(JsonGenerationExceptionjge){jge.printStackTrace();fail(jge.getMessage());}catch(JsonMappingExceptionjme){jme.printStackTrace();fail(jme.getMessage());}catch(IOExceptionioe){ioe.printStackTrace();fail(ioe.getMessage());}}@TestpublicvoiddeSerializeBasicTypes(){try{StringageJson="{ \"age\": 39 }";ObjectMappermapper=newObjectMapper();Map<String,Integer>ageMap=mapper.readValue(ageJson,newTypeReference<HashMap<String,Integer>>(){});Integerage=ageMap.get("age");System.out.println("age = "+age+"\n\n\n");assertEquals(39,age.intValue());assertTrue(true);}catch(JsonMappingExceptionjme){jme.printStackTrace();fail(jme.getMessage());}catch(IOExceptionioe){ioe.printStackTrace();fail(ioe.getMessage());}}}
In this example, the @Test annotation tells JUnit to run the serializeBasicTypes() and
deSerializeBasicTypes() methods as part of the test. These Unit Tests don’t do many assertions on the JSON
data itself. We’ll cover assertions in more detail later when we test against a Web API.
Here are the most important Jackson classes and methods that serialize/deserialize to/from JSON:
-
ObjectMapper.writeValue()converts a Java data type to JSON (and in this case, outputs to aWriter). -
ObjectMapper.readValue()converts JSON to a Java data type.
Run a single Unit Test from the command line as follows:
cd chapter-4/speakers-test

+gradle test --tests org.jsonatwork.ch4.BasicJsonTypesTest+
You should see these results:
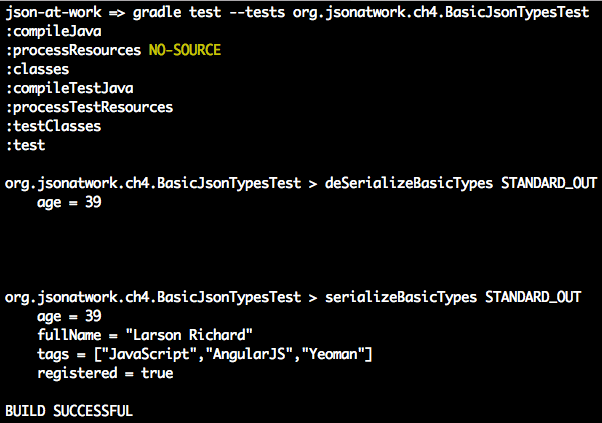
This example isn’t too exciting right now because it serializes/deserializes only simple data types to/from JSON. Serialization/deserialization gets more interesting when Objects are involved.
Serialization/Deserialization with Java Objects
Now that we have a decent grasp of Jackson and how to work with simple Java data types, let’s wade in
deeper with Objects. Example 4-2 shows how to use Jackson to serialize/deserialize a
single speaker Object, and then how to deserialize a JSON file into multiple speaker Objects.
Example 4-2. speakers-test/src/test/java/org/jsonatwork/ch4/SpeakerJsonFlatFileTest.java
packageorg.jsonatwork.ch4;importstaticorg.junit.Assert.*;importjava.io.*;importjava.net.*;importjava.util.*;importorg.junit.Test;importcom.fasterxml.jackson.core.*;importcom.fasterxml.jackson.databind.*;importcom.fasterxml.jackson.databind.type.*;publicclassSpeakerJsonFlatFileTest{privatestaticfinalStringSPEAKER_JSON_FILE_NAME="speaker.json";privatestaticfinalStringSPEAKERS_JSON_FILE_NAME="speakers.json";privatestaticfinalStringTEST_SPEAKER_JSON="{\n"+" \"id\" : 1,\n"+" \"age\" : 39,\n"+" \"fullName\" : \"Larson Richard\",\n"+" \"tags\" : [ \"JavaScript\", \"AngularJS\", \"Yeoman\" ],\n"+" \"registered\" : true\n"+"}";@TestpublicvoidserializeObject(){try{ObjectMappermapper=newObjectMapper();Writerwriter=newStringWriter();String[]tags={"JavaScript","AngularJS","Yeoman"};Speakerspeaker=newSpeaker(1,39,"Larson Richard",tags,true);StringspeakerStr=null;mapper.configure(SerializationFeature.INDENT_OUTPUT,true);speakerStr=mapper.writeValueAsString(speaker);System.out.println(speakerStr);assertTrue(TEST_SPEAKER_JSON.equals(speakerStr));assertTrue(true);}catch(JsonGenerationExceptionjge){jge.printStackTrace();fail(jge.getMessage());}catch(JsonMappingExceptionjme){jme.printStackTrace();fail(jme.getMessage());}catch(IOExceptionioe){ioe.printStackTrace();fail(ioe.getMessage());}}privateFilegetSpeakerFile(StringspeakerFileName)throwsURISyntaxException{ClassLoaderclassLoader=Thread.currentThread().getContextClassLoader();URLfileUrl=classLoader.getResource(speakerFileName);URIfileUri=newURI(fileUrl.toString());FilespeakerFile=newFile(fileUri);returnspeakerFile;}@TestpublicvoiddeSerializeObject(){try{ObjectMappermapper=newObjectMapper();FilespeakerFile=getSpeakerFile(SpeakerJsonFlatFileTest.SPEAKER_JSON_FILE_NAME);Speakerspeaker=mapper.readValue(speakerFile,Speaker.class);System.out.println("\n"+speaker+"\n");assertEquals("Larson Richard",speaker.getFullName());assertEquals(39,speaker.getAge());assertTrue(true);}catch(URISyntaxExceptionuse){use.printStackTrace();fail(use.getMessage());}catch(JsonParseExceptionjpe){jpe.printStackTrace();fail(jpe.getMessage());}catch(JsonMappingExceptionjme){jme.printStackTrace();fail(jme.getMessage());}catch(IOExceptionioe){ioe.printStackTrace();fail(ioe.getMessage());}}@TestpublicvoiddeSerializeMultipleObjects(){try{ObjectMappermapper=newObjectMapper();FilespeakersFile=getSpeakerFile(SpeakerJsonFlatFileTest.SPEAKERS_JSON_FILE_NAME);JsonNodearrNode=mapper.readTree(speakersFile).get("speakers");List<Speaker>speakers=newArrayList<Speaker>();if(arrNode.isArray()){for(JsonNodeobjNode:arrNode){System.out.println(objNode);speakers.add(mapper.convertValue(objNode,Speaker.class));}}assertEquals(3,speakers.size());System.out.println("\n\n\nAll Speakers\n");for(Speakerspeaker:speakers){System.out.println(speaker);}System.out.println("\n");Speakerspeaker3=speakers.get(2);assertEquals("Christensen Fisher",speaker3.getFullName());assertEquals(45,speaker3.getAge());assertTrue(true);}catch(URISyntaxExceptionuse){use.printStackTrace();fail(use.getMessage());}catch(JsonParseExceptionjpe){jpe.printStackTrace();fail(jpe.getMessage());}catch(JsonMappingExceptionjme){jme.printStackTrace();fail(jme.getMessage());}catch(IOExceptionioe){ioe.printStackTrace();fail(ioe.getMessage());}}}
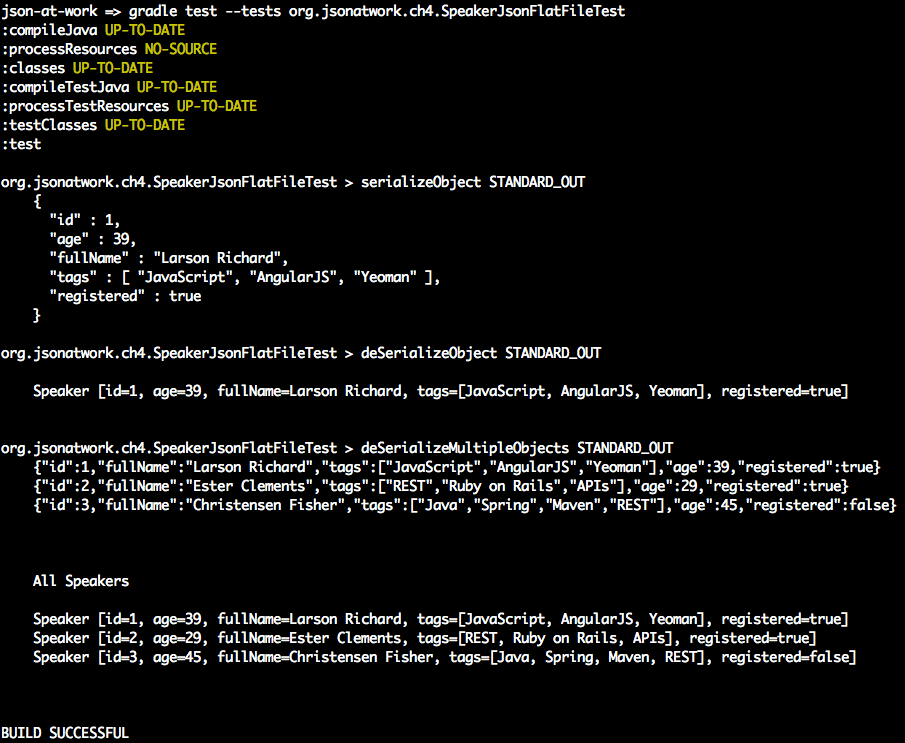
Note the following in this JUnit test:
-
serializeObject()creates aSpeakerObject and serializes it to Standard Output by using theObjectMapper.writeValueAsString()method andSystem.out.println(). The test sets theSerializationFeature.INDENT_OUTPUTtotrueto indent/pretty-print the JSON output. -
deSerializeObject()callsgetSpeakerFile()to read a JSON input file (which contains a singlespeakerJSON Object), and uses theObjectMapper.readValue()method to deserialize it into aSpeakerJava Object. -
deSerializeMultipleObjects()does the following:-
Calls
getSpeakerFile()to read a JSON input file, which contains an array of JSONspeakerObjects. -
Invokes the
ObjectMapper.readTree()method to get aJsonNodeObject, which is a pointer to the root node of the JSON document that was in the file. -
Visits each node in the JSON tree and uses the
ObjectMapper.convertValue()method to deserialize eachspeakerJSON object into aSpeakerJava Object. -
Prints out each
SpeakerObject in the list.
-
-
getSpeakerFile()finds a file on the classpath and does the following:-
Gets the
ContextClassLoaderfrom the currentThreadof execution. -
Uses the
ClassLoader.getResource()method to find the filename as a resource within the current classpath. -
Constructs a
FileObject based on the URI of the filename.
-
Each of the preceding tests uses JUnit’s assertion methods to test the results of JSON serialization/deserialization.
You’ll see the following when you run the test from the command line using
gradle test --tests org.jsonatwork.ch4.SpeakerJsonFlatFileTest:
Jackson offers much more functionality than can be shown in this chapter. Refer to the following resources for some great tutorials:
-
Java Jackson Tutorial, by Eugen Paraschiv
-
Jackson Tutorial, Tutorials Point
-
Jackson JSON Java Parser API Example Tutorial, by Pankaj (JournalDev)
-
Java JSON Jackson Introduction, by Mithil Shah
Unit Testing with a Stub API
Until now, we’ve been using JUnit to test against the data from JSON flat files. We’ll now do a more realistic test against an API. But we need an API to test against without writing a lot of code or creating lots of infrastructure. We’ll show how to create a simple Stub API (which produces a JSON response) without writing a single line of code.
Test Data
To create the Stub, we’ll use the Speaker data from earlier chapters as our test data, which is available at GitHub
and deploy it as a RESTful API. We’ll leverage the json-server Node.js module to serve up the speakers.json
file as a Web API. If you need to install json-server, refer to “Install npm Modules”
in Appendix A. Here’s how to run json-server on port 5000 from your local machine (using
a second terminal session):
cd chapter-4/speakers-test/src/test/resources

json-server -p 5000 ./speakers.json
You can also get a single speaker by adding the id to the URI as follows: http://localhost:5000/speakers/1.
With the Stub API in place, it’s time to write some Unit Tests.
JSON and JUnit Testing with APIs
Our Unit Test will do the following:
-
Make HTTP calls to the Stub Speakers API
-
Check the JSON (from the HTTP Response) against expected values
As in earlier chapters, we’ll continue to leverage the open source Unirest API wrapper, but this time we’ll use the Java version.
In the previous JUnit tests in the chapter, we ensured that only bare minimum functionality was working (no exceptions were thrown), and it’s now time to make our tests a bit more sophisticated. The remaining Unit Tests will look at the JSON content returned from an HTTP Response, and verify that it matches the expected output. We could search through the data and do a comparison with custom code, or we could use a library to reduce the amount of work. JsonUnit has many helpful matchers to simplify JSON comparison in JUnit tests. We’ll cover the basics of JsonUnit in these Unit Tests, but it provides much deeper functionality than we can cover here, including the following:
-
Regular Expressions
-
More matchers
-
The ability to ignore specific fields and values
The Unit Test in Example 4-3 pulls everything together by invoking the Stub API and comparing the JSON response with expected values.
Example 4-3. speakers-test/src/test/java/org/jsonatwork/ch4/SpeakersJsonApiTest.java
packageorg.jsonatwork.ch4;importstaticorg.junit.Assert.*;importjava.io.*;importjava.net.*;importjava.util.*;importorg.apache.http.*;importorg.junit.Test;importcom.fasterxml.jackson.core.*;importcom.fasterxml.jackson.databind.*;importcom.mashape.unirest.http.HttpResponse;importcom.mashape.unirest.http.Unirest;importcom.mashape.unirest.http.exceptions.*;importcom.mashape.unirest.request.*;importstaticnet.javacrumbs.jsonunit.fluent.JsonFluentAssert.assertThatJson;publicclassSpeakersApiJsonTest{privatestaticfinalStringSPEAKERS_ALL_URI="http://localhost:5000/speakers";privatestaticfinalStringSPEAKER_3_URI=SPEAKERS_ALL_URI+"/3";@TestpublicvoidtestApiAllSpeakersJson(){try{Stringjson=null;HttpResponse<String>resp=Unirest.get(SpeakersApiJsonTest.SPEAKERS_ALL_URI).asString();assertEquals(HttpStatus.SC_OK,resp.getStatus());json=resp.getBody();System.out.println(json);assertThatJson(json).node("").isArray();assertThatJson(json).node("").isArray().ofLength(3);assertThatJson(json).node("[0]").isObject();assertThatJson(json).node("[0].fullName").isStringEqualTo("Larson Richard");assertThatJson(json).node("[0].tags").isArray();assertThatJson(json).node("[0].tags").isArray().ofLength(3);assertThatJson(json).node("[0].tags[1]").isStringEqualTo("AngularJS");assertThatJson(json).node("[0].registered").isEqualTo(true);assertTrue(true);}catch(UnirestExceptionue){ue.printStackTrace();}}@TestpublicvoidtestApiSpeaker3Json(){try{Stringjson=null;HttpResponse<String>resp=Unirest.get(SpeakersApiJsonTest.SPEAKER_3_URI).asString();assertEquals(HttpStatus.SC_OK,resp.getStatus());json=resp.getBody();System.out.println(json);assertThatJson(json).node("").isObject();assertThatJson(json).node("fullName").isStringEqualTo("Christensen Fisher");assertThatJson(json).node("tags").isArray();assertThatJson(json).node("tags").isArray().ofLength(4);assertThatJson(json).node("tags[2]").isStringEqualTo("Maven");assertTrue(true);}catch(UnirestExceptionue){ue.printStackTrace();}}}
Note the following in this JUnit test:
-
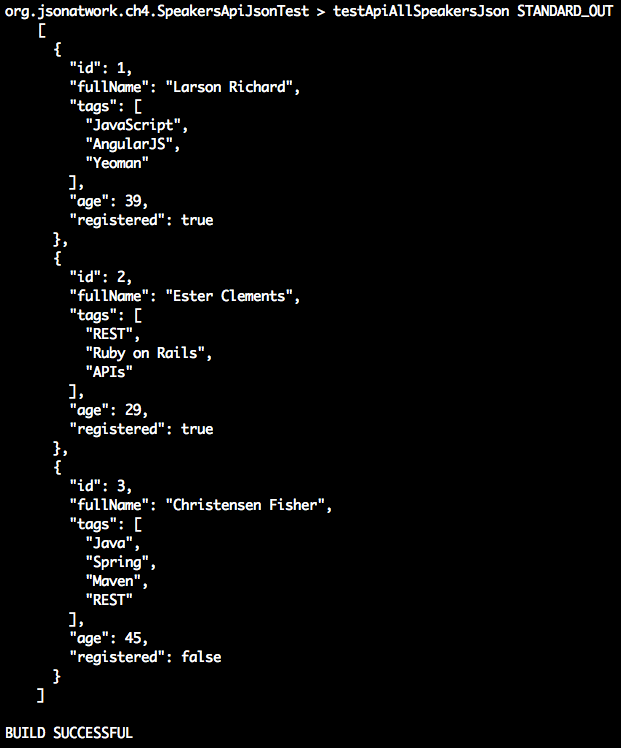
testApiAllSpeakersJson():-
Gets a list of all speakers from the Speakers API by calling
Unirest.get()with http://localhost:5000/speakers -
Verifies that the HTTP Status Code is
OK(200). -
Gets the JSON document (which contains an array of
speakerObjects) from the HTTP Response Body. -
Makes a series of assertions on the JSON document with JSONUnit’s
assertThatJson()to verify that-
We have an array of three
speakerobjects. -
Each field (for example,
fullName,tags, andregistered) in eachspeakerobject matches the expected values.
-
-
When you run
gradle test, you should see the following as part of the output:
-
-
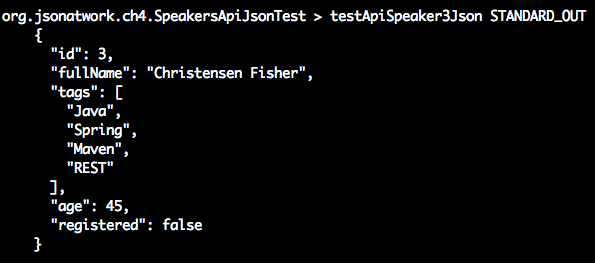
testApiSpeaker3Json():-
Gets speaker 3 from the Speakers API by calling
Unirest.get()with http://localhost:5000/speakers/3 -
Verifies that the HTTP Response Code is
OK(200) -
Gets the JSON document (which contains a single
speakerObject) from the HTTP Response Body. -
Makes a series of assertions on the JSON document with JSONUnit’s
assertThatJson()to verify that-
We have a single
speakerObject. -
Each field in the
speakerObject has the expected values.
-
-
When you run
gradle test, you should see the following as part of the output:
-
This Unit Test only touches upon the basics of the Unirest Java library, which also provides the following:
-
Full HTTP verb coverage (
GET,POST,PUT,DELETE,PATCH) -
The ability to do custom mappings from an HTTP Response Body to a Java Object
-
Asynchronous (i.e., nonblocking) requests
-
Timeouts
-
File uploads
-
And much more
Visit the Unirest website for further information on the Unirest Java library.
Before moving on, you can stop json-server by pressing Ctrl-C at the command line.
We’ve shown how to deploy and interact with a Stub API, and now it’s time to build a small RESTful API.
Build a Small Web API with Spring Boot
We’ll continue to use the Speaker data to create an API (chapter-4/speakers-api in the examples) with Spring Boot. The Spring Framework makes it easier to develop and deploy Java-based Web applications and RESTful APIs. Spring Boot makes it easier to create Spring-based applications by providing defaults. With Spring Boot:
-
There are no tedious, error-prone XML-based configuration files.
-
Tomcat and/or Jetty can be embedded, so there is no need to deploy a WAR (Web application ARchive) separately. You still could use Spring Boot and Gradle to build and deploy a WAR file to Tomcat. But as you’ll see, an executable JAR simplifies a developer’s environment because it reduces the amount of setup and installations, which enables iterative application development.
We’ll take the following steps to create and deploy the Speakers API with Spring Boot:
-
Write source code:
-
Model
-
Controller
-
Application
-
-
Create a build script (build.gradle).
-
Deploy an embedded JAR with
gradlew. -
Test with Postman.
Create the Model
The Speaker class in Example 4-4 is a Plain Old Java Object (POJO) that represents the Speaker
data that the API will render as JSON.
Example 4-4. speakers-api/src/main/java/org/jsonatwork/ch4/Speaker.java
packageorg.jsonatwork.ch4;importjava.util.ArrayList;importjava.util.Arrays;importjava.util.List;publicclassSpeaker{privateintid;privateintage;privateStringfullName;privateList<String>tags=newArrayList<String>();privatebooleanregistered;publicSpeaker(){super();}publicSpeaker(intid,intage,StringfullName,List<String>tags,booleanregistered){super();this.id=id;this.age=age;this.fullName=fullName;this.tags=tags;this.registered=registered;}publicSpeaker(intid,intage,StringfullName,String[]tags,booleanregistered){this(id,age,fullName,Arrays.asList(tags),registered);}publicintgetId(){returnid;}publicvoidsetId(intid){this.id=id;}publicintgetAge(){returnage;}publicvoidsetAge(intage){this.age=age;}publicStringgetFullName(){returnfullName;}publicvoidsetFullName(StringfullName){this.fullName=fullName;}publicList<String>getTags(){returntags;}publicvoidsetTags(List<String>tags){this.tags=tags;}publicbooleanisRegistered(){returnregistered;}publicvoidsetRegistered(booleanregistered){this.registered=registered;}@OverridepublicStringtoString(){returnString.format("Speaker [id=%s, age=%s, fullName=%s, tags=%s, registered=%s]",id,age,fullName,tags,registered);}}
There’s nothing exciting in this code. It just provides the data members, constructors, and
accessor methods (getters and setters) for a speaker. This code doesn’t know anything about
JSON because (as you’ll soon see) Spring automatically converts this object to JSON.
Create the Controller
In a Spring application, the Controller handles the HTTP Requests and returns HTTP Responses. In our
case, the speaker JSON data is returned in the response body. Example 4-5 shows the SpeakerController.
Example 4-5. speakers-api/src/main/java/org/jsonatwork/ch4/SpeakerController.java
packageorg.jsonatwork.ch4;importjava.util.*;importorg.springframework.web.bind.annotation.*;importorg.springframework.http.*;@RestControllerpublicclassSpeakerController{privatestaticSpeakerspeakers[]={newSpeaker(1,39,"Larson Richard",newString[]{"JavaScript","AngularJS","Yeoman"},true),newSpeaker(2,29,"Ester Clements",newString[]{"REST","Ruby on Rails","APIs"},true),newSpeaker(3,45,"Christensen Fisher",newString[]{"Java","Spring","Maven","REST"},false)};@RequestMapping(value="/speakers",method=RequestMethod.GET)publicList<Speaker>getAllSpeakers(){returnArrays.asList(speakers);}@RequestMapping(value="/speakers/{id}",method=RequestMethod.GET)publicResponseEntity<?>getSpeakerById(@PathVariablelongid){inttempId=((newLong(id)).intValue()-1);if(tempId>=0&&tempId<speakers.length){returnnewResponseEntity<Speaker>(speakers[tempId],HttpStatus.OK);}else{returnnewResponseEntity(HttpStatus.NOT_FOUND);}}}
Note the following in this code:
-
The
@RestControllerannotation identifies theSpeakerControllerclass as a Spring MVC Controller that processes HTTP Requests. -
The
speakersarray is hardcoded, but it’s for test purposes only. In a real application, a separate Data Layer would populate thespeakersfrom a database or an external API call. -
The
getAllSpeakers()method does the following:-
Responds to HTTP
GETrequests on the /speakers URI. -
Retrieves the entire
speakersArray as anArrayListand returns it as a JSON Array in an HTTP Response Body. -
The
@RequestMappingannotation binds the /speakers URI to thegetAllSpeakers()method for an HTTPGETRequest.
-
-
The
getSpeakerById()method does the following:-
Responds to HTTP
GETrequests on the /speakers/{id} URI (whereidrepresents a speaker ID). -
Retrieves a
speaker(based on the speaker ID) and returns it as a JSON Object in an HTTP Response Body. -
The
@PathVariableannotation binds the speaker ID from the HTTP Request path to theidparameter for lookup. -
The
ResponseEntityreturn value type enables you to set the HTTP Status Code and/or thespeakersin the HTTP Response.
-
In both of the preceding methods, the Speaker Object is automatically converted to JSON without any extra
work. By default, Spring is configured to use Jackson behind the scenes to do the Java-to-JSON conversion.
Register the Application
As mentioned earlier, we could package the Speakers API as a WAR file and deploy it on an application server such as Tomcat. But it’s easier to run our API as a standalone application from the command line. To do this we need to do the following:
-
Add a Java
main()method -
Package the application as an executable JAR
The Application class in Example 4-6 provides the main() method that we need.
Example 4-6. speakers-api/src/main/java/org/jsonatwork/ch4/Application.java
packageorg.jsonatwork.ch4;importorg.springframework.boot.SpringApplication;importorg.springframework.boot.autoconfigure.SpringBootApplication;@SpringBootApplicationpublicclassApplication{publicstaticvoidmain(String[]args){SpringApplication.run(Application.class,args);}}
In this example, the @SpringBootApplication annotation registers our application with Spring and wires up
the SpeakerController and Speaker.
That’s all the code that we need. Now, let’s look at the build.gradle script to build the application.
Write the Build Script
Gradle uses a script called build.gradle to build an application. Example 4-7 shows the build script for the speakers-api project.
Example 4-7. speakers-api/build.gradle
buildscript{repositories{mavenCentral()}dependencies{classpath("org.springframework.boot:spring-boot-gradle-plugin:1.5.2.RELEASE")}}applyplugin:'java'applyplugin:'org.springframework.boot'ext{jdkVersion="1.8"}sourceCompatibility=jdkVersiontargetCompatibility=jdkVersiontasks.withType(JavaCompile){options.encoding='UTF-8'}jar{baseName='speakers-api'version='0.0.1'}repositories{mavenCentral()}test{testLogging{showStandardStreams=true// Show standard output & standard error.}ignoreFailures=false}dependencies{compile([group:'org.springframework.boot',name:'spring-boot-starter-web'])}
Note the following in this build.gradle script:
-
The
jarblock defines the name of the application’s JAR file -
repositoriestells Gradle to pull application dependencies from the Maven Central Repository. -
testLoggingtells Gradle to show Standard Output and Standard Error when running tests. -
dependenciesdefines the JARs that the speakers-api depends on.
This is a simple build, but Gradle has far more powerful build functionality. Visit the “Wiring Gradle Build Scripts” section of the Gradle User Guide to learn more.
We’ve covered the build script, and now it’s time to deploy the Speakers API.
Deploy the API
The gradlew script was generated by the gradle init command that was used to create the speakers-api project.
To learn more about how to create a Gradle project, see “Creating New Gradle Builds”
from the Gradle User Guide.
gradlew pulls everything together and simplifies deployment by taking the following steps:
-
Invokes the build.gradle script to build the application and uses the Spring Boot plug-in to build the executable JAR
-
Deploys the Speakers API (as an executable JAR) to http://localhost:8080/speakers on an embedded (bundled) Tomcat server
In the speakers-api directory, run ./gradlew bootRun to deploy the application, and you’ll see the following (at the
end of all the log messages):
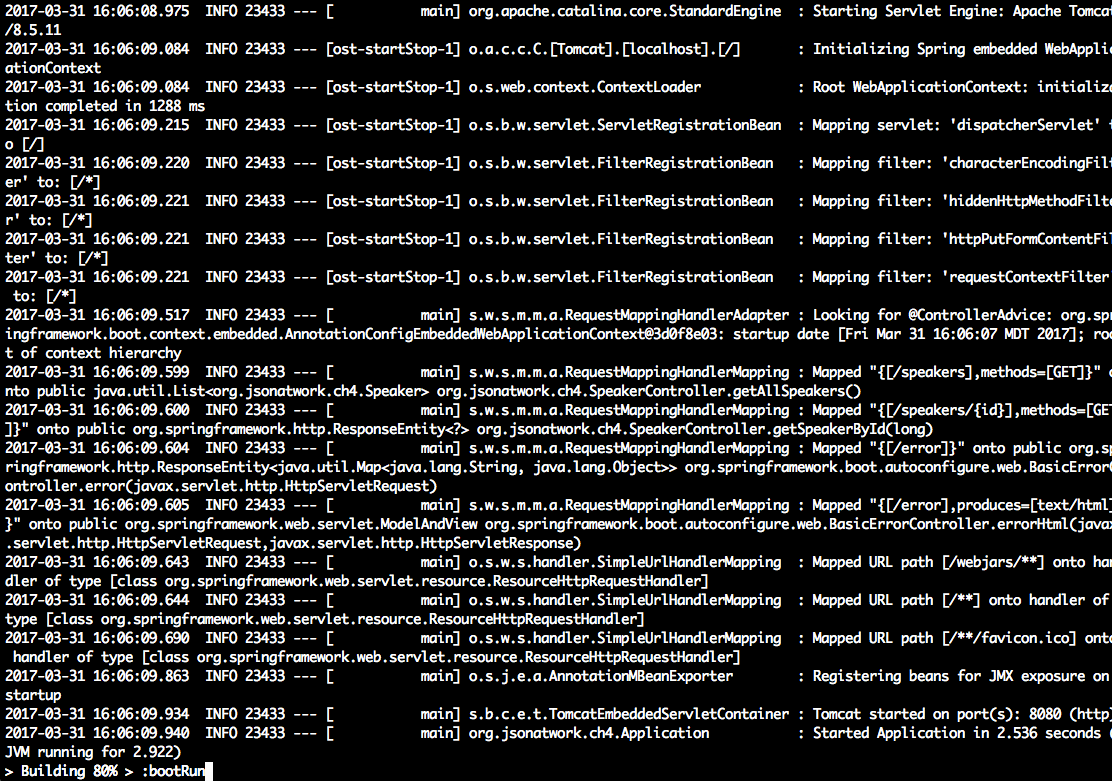
Test the API with Postman
Now that the Speakers API is up and running, let’s test with Postman (as we did in Chapter 1) to get the
first speaker. In the Postman GUI, do the following:
-
Enter the http://localhost:8080/speakers/1 URL.
-
Choose
GETas the HTTP verb. -
Click the Send button.
You should see that the GET ran properly in Postman with the speaker JSON data in the HTTP Response Body
text area and a 200 (OK) HTTP Status, as shown in Figure 4-1.
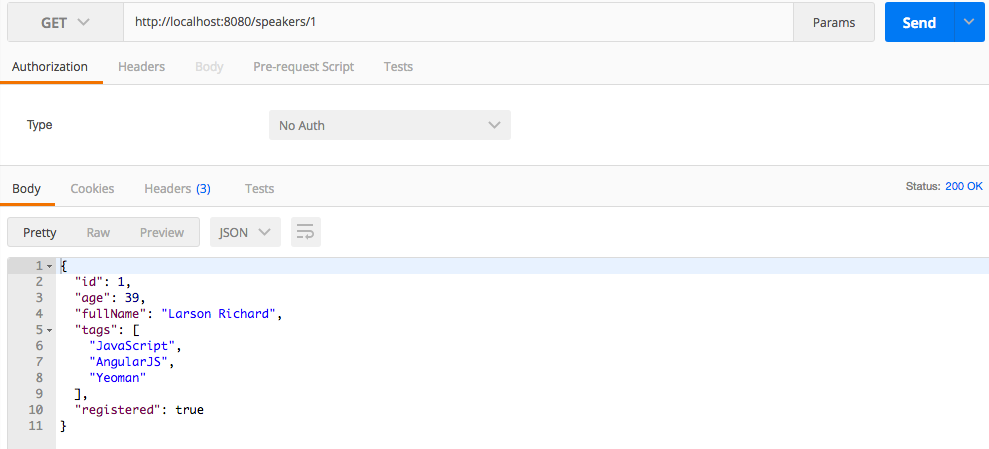
Figure 4-1. Speakers API on Postman
You can stop gradlew by pressing Ctrl-C at the command line.
As promised, development and deployment is simpler because we didn’t do any of the following:
-
Create or modify XML-based configuration metadata for Spring or Java EE (i.e., web.xml)
-
Deploy a WAR file
-
Install Tomcat
Note that we took these deployment steps to show how to set up a simple development environment for a Web API. You still need to deploy a WAR file to an application server when you move into shared (e.g., Staging, User Acceptance Testing, Production) environments so that you have the ability to tune and load-test the application.
What’s Next?
With the basics of JSON usage on several core platforms (JavaScript, Ruby on Rails, and Java) behind us, we’ll move deeper into the JSON ecosystem in the next three chapters:
-
JSON Schema
-
JSON Search
-
JSON Transform
In Chapter 5, we’ll show how to structure and validate JSON documents with JSON Schema.