Table of Contents for
JSON at Work
 JSON at Work
Published by
O'Reilly Media, Inc., 2017
JSON at Work
Published by
O'Reilly Media, Inc., 2017
- nav
- Cover
- JSON at Work
- JSON at Work
- Dedication
- Preface
- I. JSON Overview and Platforms
- 1. JSON Overview
- 2. JSON in JavaScript
- 3. JSON in Ruby on Rails
- 4. JSON in Java
- II. The JSON Ecosystem
- 5. JSON Schema
- 6. JSON Search
- 7. JSON Transform
- III. JSON in the Enterprise
- 8. JSON and Hypermedia
- 9. JSON and MongoDB
- 10. JSON Messaging with Kafka
- A. Installation Guides
- B. JSON Community
- Index
- About the Author
- Colophon
Chapter 9. JSON and MongoDB
MongoDB is a NoSQL database that enables developers to persist data in document form. This document-based approach works well with JSON, which is also document-oriented. The MongoDB data model is hierarchical, and supports rich data types similar to those we’ve seen in typical JSON documents. Just like JSON documents, MongoDB documents integrate well with Object-Oriented platforms because documents are compatible with Objects, so developers can move data in/out of the database with little or no extra mapping logic. This approach is intuitive to developers and reduces development effort needed to access the database.
In this chapter, we’ll show how to do the following:
-
Import a JSON document into MongoDB
-
Perform core CRUD operations with MongoDB
-
Export MongoDB data to a JSON document
-
Access MongoDB as a Mock/Stub RESTful API (without writing code)
This chapter focuses on using JSON with MongoDB and provides just enough information to work with the database. This chapter doesn’t cover how to develop applications with MongoDB because that would fill an entire book. For a full description of the rich functionality provided by MongoDB, I recommend reading MongoDB in Action, 2nd Ed by Kyle Banker et al. (Manning).
What About BSON?
You may have seen references to Binary JSON (BSON) in the MongoDB documentation. BSON is a binary data format that MongoDB uses internally to serialize JSON documents. See the following for further details:
You can also use BSON to add richer data types to a JSON document.
But for our purposes in this chapter:
-
JSON is all you need to know to access the database.
-
JSON is the external interface to MongoDB, and BSON is used only internally by MongoDB.
MongoDB Setup
Before we go any further, let’s install MongoDB. Refer to “Install MongoDB” in Appendix A. With MongoDB in place, you’ll be able to run and build on the examples in this chapter.
MongoDB Server and Tools
MongoDB comprises the following:
-
The command shell, which is written in JavaScript.
-
Database drivers, which enable developers to access MongoDB from their platform. 10gen, the creator of MongoDB, provides support for many languages, including Java, Ruby, JavaScript, Node.js, C++, C#/.Net, and many others. Check the MongoDB site for the official supported drivers.
-
Command-line tools:
MongoDB Server
The mongod process is similar to other database servers; it accepts connections and processes
commands for Create/Read/Update/Delete (CRUD) operations on the data. Let’s start mongod from the
(macOS and Linux) command line:
mongod &
If MongoDB was installed properly, the log from the initial startup should look similar to this:
2016-06-29T11:05:37.960-0600 I CONTROL  [initandlisten] MongoDB starting : pid...
2016-06-29T11:05:37.961-0600 I CONTROL  [initandlisten] db version v3.2.4
2016-06-29T11:05:37.961-0600 I CONTROL  [initandlisten] git version: e2ee9ffcf...
2016-06-29T11:05:37.961-0600 I CONTROL  [initandlisten] allocator: system
2016-06-29T11:05:37.961-0600 I CONTROL  [initandlisten] modules: none
2016-06-29T11:05:37.961-0600 I CONTROL  [initandlisten] build environment:
2016-06-29T11:05:37.961-0600 I CONTROL  [initandlisten]     distarch: x86_64
2016-06-29T11:05:37.961-0600 I CONTROL  [initandlisten]     target_arch: x86_64
2016-06-29T11:05:37.961-0600 I CONTROL  [initandlisten] options: { config: "/u...
2016-06-29T11:05:37.962-0600 I -        [initandlisten] Detected data files in...
2016-06-29T11:05:37.963-0600 W -        [initandlisten] Detected unclean shutd...
2016-06-29T11:05:37.973-0600 I JOURNAL  [initandlisten] journal dir=/usr/local...
2016-06-29T11:05:37.973-0600 I JOURNAL  [initandlisten] recover begin
2016-06-29T11:05:37.973-0600 I JOURNAL  [initandlisten] info no lsn file in jo...
2016-06-29T11:05:37.973-0600 I JOURNAL  [initandlisten] recover lsn: 0
2016-06-29T11:05:37.973-0600 I JOURNAL  [initandlisten] recover /usr/local/var...
2016-06-29T11:05:37.974-0600 I JOURNAL  [initandlisten] recover applying initi...
2016-06-29T11:05:37.976-0600 I JOURNAL  [initandlisten] recover cleaning up
2016-06-29T11:05:37.976-0600 I JOURNAL  [initandlisten] removeJournalFiles
2016-06-29T11:05:37.977-0600 I JOURNAL  [initandlisten] recover done
2016-06-29T11:05:37.996-0600 I JOURNAL  [durability] Durability thread started
2016-06-29T11:05:37.996-0600 I JOURNAL  [journal writer] Journal writer thread...
2016-06-29T11:05:38.329-0600 I NETWORK  [HostnameCanonicalizationWorker] Start...
2016-06-29T11:05:38.330-0600 I FTDC     [initandlisten] Initializing full-time...
2016-06-29T11:05:38.330-0600 I NETWORK  [initandlisten] waiting for connection...
2016-06-29T11:05:39.023-0600 I FTDC     [ftdc] Unclean full-time diagnostic da...
Out of the box, mongod listens on port 27017, but you can change the port as follows:
mongod --port <your-port-number>
To stop the server, type the following from the command line:
kill <pid>
Here, <pid> is the Process ID (PID) of the mongod process.
Never use kill -9 because this could corrupt the database.
Importing JSON into MongoDB
Now that we have the server up and running, let’s import our Speaker data into the database.
We’ll leverage the mongoimport tool to upload the speakers.json file into MongoDB. Even though we’ve
been using the same Speaker data throughout the book, we need to remove the following outer root document
and the Array name:
{"speakers":[]}
The speakers.json file now looks like Example 9-1.
Example 9-1. speakers.json
[{"fullName":"Larson Richard","tags":["JavaScript","AngularJS","Yeoman"],"age":39,"registered":true},{"fullName":"Ester Clements","tags":["REST","Ruby on Rails","APIs"],"age":29,"registered":true},{"fullName":"Christensen Fisher","tags":["Java","Spring","Maven","REST"],"age":45,"registered":false}]
This change was needed because we don’t want to insert the contents of the JSON file as an entire
document. If we did that, the result would be a single speakers Array document in the database.
Instead, we want a simple collection of individual speaker documents, each of which corresponds to a
speaker Object from the input file.
When you execute mongoimport from the command line, you should see this:
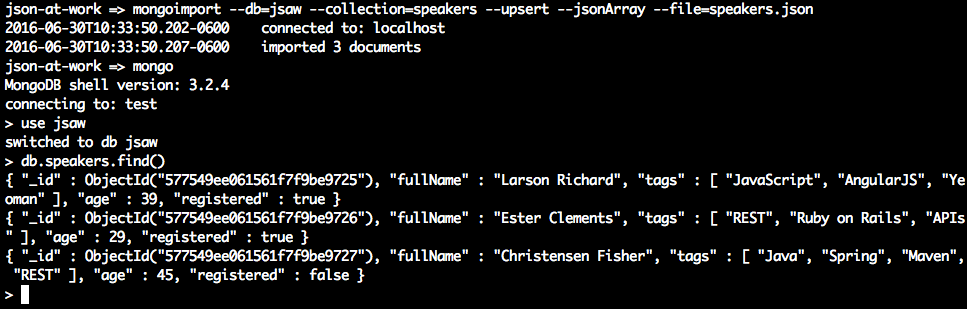
In this example, we used the following:
-
mongoimportto import thespeakersJSON file into thespeakerscollection in thejsawdatabase. -
mongoto access MongoDB, and select all documents from thespeakerscollection. See the next section for further details.
Table 9-1 shows how basic MongoDB concepts relate to relational databases.
| MongoDB | Relational |
|---|---|
Database |
Database instance |
Collection |
Table |
Document |
Row |
MongoDB Command Shell
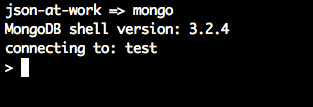
Now that the MongoDB server is up and running with some data, it’s time to access the database and start
working with the Speaker data. The mongo shell (which was shown in the previous example) provides MongoDB access from the
command line. Start mongo as follows:
mongo defaults to the test database. We’ll use another database called jsaw (JSON at Work)
to keep the Speaker data separate:
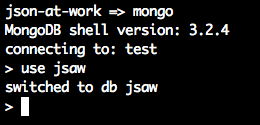
The use command switches context to the jsaw database so that all future commands will affect only
that database. But you may be wondering how the jsaw database was created. This happens in two ways:
-
Through the
mongoimporttool. The--db=jsawand--collection-speakerscommand-line options from the initial import created thespeakerscollection in thejsawdatabase. -
By inserting a document into a collection from the
mongoshell. We’ll show how to do this in the next section.
To exit the shell, type exit at the prompt. This ends the shell session and returns control back
to the command line.
Basic CRUD with mongo
We’ve worked with some basic operations with the mongo shell, and now we’ll use it for CRUD
operations to modify the Speaker data. The MongoDB query language used in
the shell is based on JavaScript, which makes it easy to access JSON-based documents.
Query documents
Here’s how to get all documents in the speakers collection (which was just imported into MongoDB):
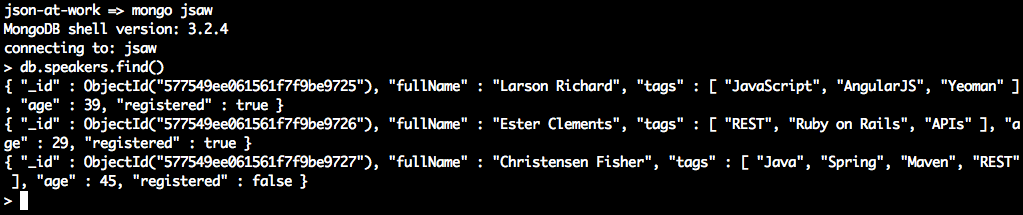
Here’s a breakdown of the shell command (db.speakers.find()):
-
Shell commands start with
db. -
speakersis the collection name. -
The
find()without a query parameter returns all documents from thespeakerscollection.
Going back to the shell output, notice that the data returned looks like JSON, and it’s so close.
Copy the output from the shell and paste it into JSONLint.
Click the Validate JSON button, and you’ll see that it complains about the _id field.
MongoDB inserted the _id field (an Object ID that serves as a Primary Key) when mongoimport
imported the Speakers data from the JSON input file and created the speakers collection. The output from the MongoDB
shell is not valid JSON because of the following:
-
It lacks the surrounding Array brackets (
[]). -
The
ObjectId(…)is not a valid JSON value. Valid values include Numbers, Booleans, and double-quoted Strings. -
There are no commas to separate the
speakerdocuments.
We’ve shown how to import valid JSON into MongoDB, and later we’ll show how to export MongoDB collections as valid JSON after going through the remaining CRUD operations.
To return only those speakers who are present on REST, add a query to the find() method:

In this example, we added a query, {tags:'REST’}, which returns only speaker documents
that contain the value 'REST' in their tags Array. The MongoDB query language is based on
JavaScript Object Literal syntax. JavaScript: The Definitive Guide 6th Ed. by David Flanagan (O’Reilly) can
help you improve your knowledge of JavaScript Objects.
Use the following command to get the number of documents in the speakers collection:
> db.speakers.count()
3
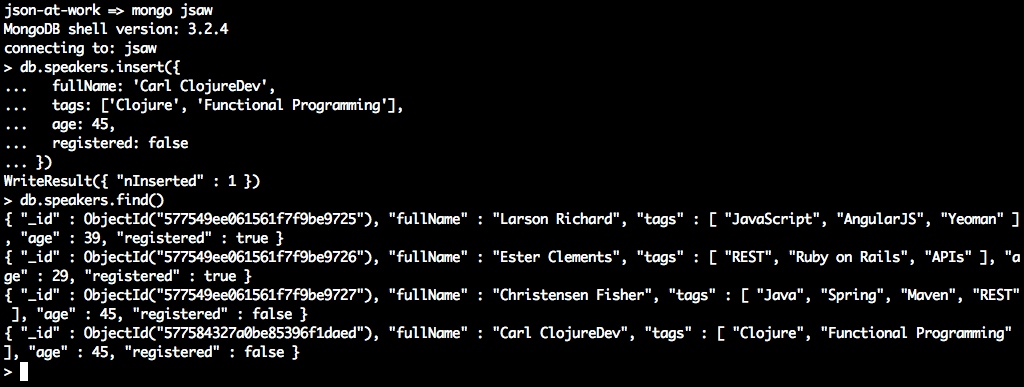
Update a document
Our new speaker, Carl ClojureDev, has decided to add Scala to his technical repertoire.
To add this language to the tags Array, do the following:
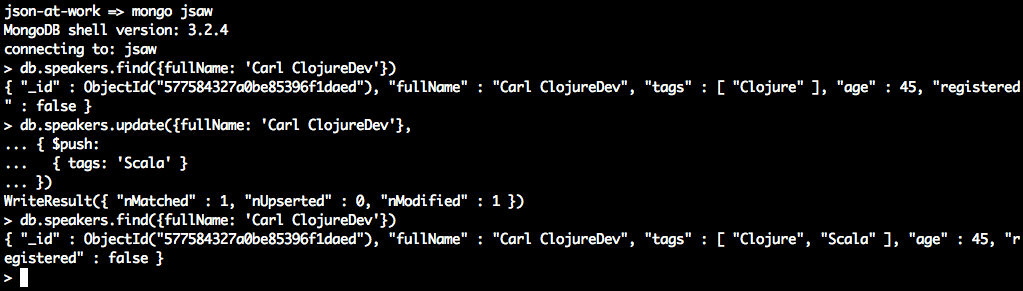
This example uses the update() function as follows:
-
The
{fullName: 'Carl ClojureDev'}query finds thespeakerdocument to update. -
The
$pushoperator adds'Scala'to thetagsArray. This is similar to thepush()function in JavaScript.
Note that many other operators support the update() function, such as $set, but
be careful because it sets a field to a completely new value.
Delete a document
Finally, let’s delete the Carl Clojuredev speaker from the collection:
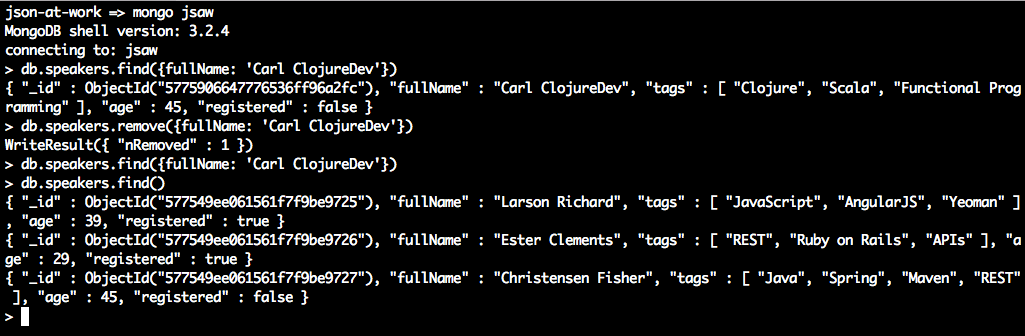
Here we use the remove() function with the {fullName: 'Carl ClojureDev'} query to
delete only that document. Subsequent calls to find() show that this document was deleted
without affecting the rest of the documents in the speakers collection.
Exporting from MongoDB to a JSON Document
Now that we’re comfortable with the MongoDB server and shell, let’s export the data to a valid JSON
document. Use the mongoexport tool as follows, and you should see this:
json-at-work=>mongoexport--db=jsaw--collection=speakers--pretty--jsonArray2016-06-30T12:58:32.270-0600connectedto:localhost[{"_id":{"$oid":"577549ee061561f7f9be9725"},"fullName":"Larson Richard","tags":["JavaScript","AngularJS","Yeoman"],"age":39,"registered":true},{"_id":{"$oid":"577549ee061561f7f9be9726"},"fullName":"Ester Clements","tags":["REST","Ruby on Rails","APIs"],"age":29,"registered":true},{"_id":{"$oid":"577549ee061561f7f9be9727"},"fullName":"Christensen Fisher","tags":["Java","Spring","Maven","REST"],"age":45,"registered":false}]2016-06-30T12:58:32.271-0600exported3records
The mongoexport command in the above example pulls the data from the speakers collection in the jsaw
database and pretty-prints a JSON array to Standard Output. This is a good start, but we need to remove the
MongoDB Object ID (_id) so we have valid JSON and can use the data outside MongoDB. Other
tools are needed to filter out the _id field because the mongoexport utility will always output the _id.
We can get the JSON format we want by combining tools, and jq is just the right tool for the job.
As you’ll recall from Chapter 6, jq is an amazing command-line utility that not only
searches JSON but also has excellent filtering capabilities. jq doesn’t provide the full-blown JSON Transform
capabilities of Handlebars (see Chapter 7), but it’s more than adequate for our needs.
By piping the output from mongoexport to jq, you should see the following:
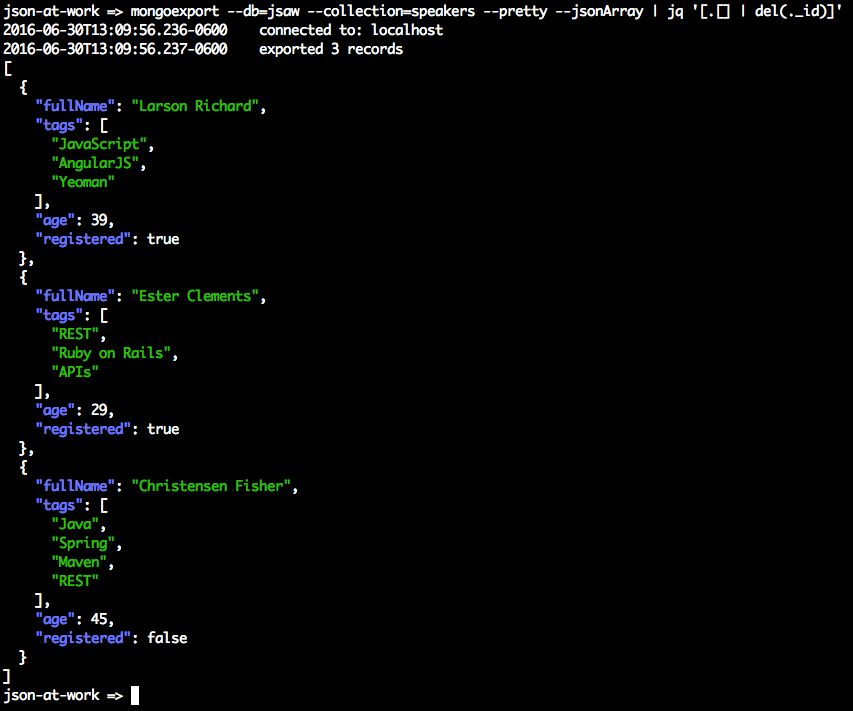
The output is everything we’re looking for: a valid JSON Array of speaker Objects without the MongoDB
Object ID. Here’s a breakdown of the command line:
-
The
mongoexportcommand is as follows:-
--db=jsaw --collection=speakersspecifies thespeakerscollection in thejsawdatabase. -
--pretty --jsonArrayensures that the output is a pretty-printed JSON array.
-
-
The
mongoexportoutput goes to Standard Output and gets piped tojq. -
The
jqexpression[.[] | del(._id)]works as follows:-
The outer array brackets (
[]) ensure that the JSON Array, Objects, and Fields/Keys are preserved in the final output. -
The
.[]tellsjqto look at the whole Array. -
The pipe to the
del(._id)command tellsjqto delete the_idfield from the output.
-
-
The
jqoutput goes to Standard Output, which could serve as input to a file.
This is a practical example of the power of jq. Although the jq syntax is a bit terse, it’s
a great addition to your JSON toolbelt. For more details on jq, refer to Chapter 6. You can
also visit the jq manual.
What About Schema?
MongoDB is schemaless, which means that the database neither validates data nor does it requires a Schema in order to store data. But the data stored in each document still has a structure that applications expect so that they can reliably work with collections and documents. Object Document Mappers (ODMs) provide additional features on top of MongoDB:
-
A Schema that validates the data and enforces a common data structure
-
Object modeling
-
Object-based data access
There is no single, cross-platform ODM for MongoDB. Rather, each platform has its own library.
Node.js developers typically use Mongoose.
Here’s a brief example of how to specify a speaker Schema, create a model, and insert a speaker into the
database:
varmongoose=require('mongoose');varSchema=mongoose.Schema;mongoose.connect('mongodb://localhost/jsaw');// Specify the Speaker schema.varspeakerSchema=newSchema({fullName:String,tags:[String],age:Number,registered:Boolean});// Create the Speaker model.varSpeaker=mongoose.model('Speaker',speakerSchema);varspeaker=newSpeaker({fullName:'Carl ClojureDev',tags:['Clojure','Functional Programming'],age:45,registered:false});speaker.save(function(err){if(err){console.log(err);}else{console.log('Created Speaker: '+speaker.fullName);}});
A Mongoose model is a constructor based on a Schema, and it encapsulates the details of accessing a MongoDB
collection. A Mongoose document is an instance of a model, and provides access to a MongoDB document. A
Mongoose Schema is not the same thing as a JSON Schema. The json-schema-to-mongoose Node.js module can convert a JSON Schema to an equivalent Mongoose Schema, but this is left as an exercise for
you. In addition to creating a document, Mongoose also provides the ability to read (find()),
update (save() or update()), and delete (remove()) a document.
Other platforms have their own ODMs for accessing MongoDB:
- Java
-
Spring users can leverage Spring Data, which provides POJO mapping to MongoDB. Hibernate OGM provides Java Persistence API (JPA) support for NoSQL databases, including MongoDB.
- Ruby
-
Mongoid, which is officially supported by MongoDB.
RESTful API Testing with MongoDB
The MEAN Stack is outside the scope of this book, so we can’t do justice to the topic in this chapter and stay focused on JSON. Let’s do something different with MongoDB, and leverage it as a Mock/Stub RESTful API instead. Mock/Stub RESTful APIs are great:
-
There’s no coding involved, which frees developers from the drudgery of developing and maintaining infrastructure code. Instead, developers can focus on useful code that delivers business value—the business logic of the API.
-
It pushes the API development team to create an initial design for their API before they start coding. This is also known as “API First” design. By doing it this way, developers are less likely to expose the implementation details of domain Objects and databases because they are designing to an interface (because the Stub API has no implementation).
-
API consumers have a viable Stub version of an API without having to wait for the completion of the real API.
-
API developers now have enough time to develop the API properly without having to rush to “get something out the door” to support their consumers.
-
API developers can gain early feedback on the usability of the API from their consumers and use this information to iteratively update their design and implementation.
Test Input Data
We’ll continue to use the Speaker data that we imported earlier in this chapter.
Providing a RESTful Wrapper for MongoDB
According to the MongoDB documentation, there are several solid REST interfaces (that run as separate servers in front of MongoDB), including these:
- Crest
-
Based on Node.js, Crest provides full CRUD (HTTP
GET,PUT,POST, andDELETE) capabilities. You can find details at the GitHub repository. - RESTHeart
-
This is Java-based, provides full CRUD functionality, and is available at http://www.restheart.org.
- DrowsyDromedary
-
Based on Ruby, this server provides full CRUD capabilities. You can find it on GitHub.
- Simple REST API
-
This is provided by default as part of MongoDB, but it works only with HTTP
GET, and doesn’t provide full REST capabilities (PUT,POST, andDELETE). For further information, see the Simple REST API documentation at the RESTHeart site.
Either Crest, RESTHeart, or DrowsyDromedary will meet our needs here because they can all handle CRUD
requests from Consumers by supporting all major HTTP verbs. Let’s go with Crest because it’s simple to
install and set up. Refer to Appendix A, and install Crest (see “Install npm Modules”). Then, navigate to the crest directory on your local machine and start the
Crest server by typing node server on the command line. You should see the following:
node server

DEBUG: util.js is loaded
DEBUG: rest.js is loaded
crest listening at http://:::3500
Then, open your browser and enter the following URL: http://localhost:3500/jsaw/speakers.
This tells Crest to do a GET (read/find) on the speakers collection in the jsaw
database on MongoDB. You should see the screen in Figure 9-1.
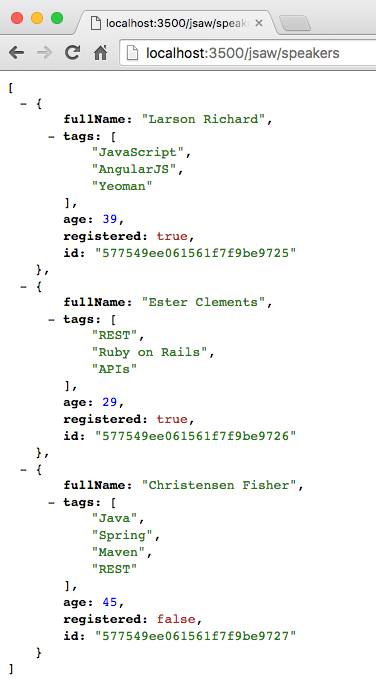
Figure 9-1. Speakers data served by MongoDB/Crest and viewed from the browser
This is a good start, but you can’t do full API testing with your browser because it can only send an HTTP
GET request. Let’s use Postman (from earlier chapters) to fully exercise the Crest/MongoDB-based
Speakers API. Enter the http://localhost:3500/jsaw/speakers URL,
select GET as the HTTP verb, and click the Send button. You should see the screen in Figure 9-2.
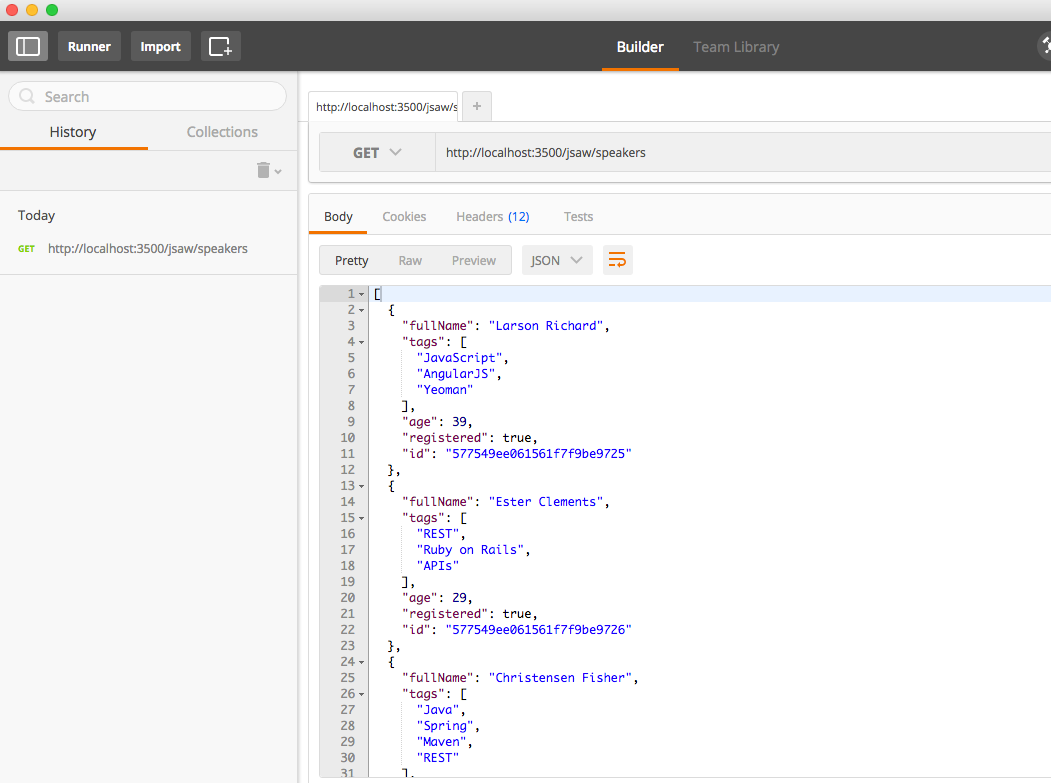
Figure 9-2. Speakers data served by MongoDB/Crest and viewed from Postman
This is what we saw before in the browser, but now we have the ability to modify the data represented by
the API. Let’s delete one of the speaker Objects. First, copy the id for one of the speaker Objects,
and add it to the URL http://localhost:3500/jsaw/speakers/id (where id is the Object ID that you copied).
Then (in Postman) choose DELETE as the HTTP verb, and click the Send button. You should see the
following in the HTTP Response:
{"ok":1}
Now, go back and do another GET on http://localhost:3500/jsaw/speakers and you should see that
Crest invoked MongoDB to delete the selected speaker.
We now have a fully functional Stub REST API that accesses MongoDB and produces valid JSON output, without the need to write code or set up big infrastructure. Use this style of workflow to streamline your API Design and testing, and watch your team’s productivity soar.
What We Covered
In this chapter, we’ve shown the basics of how JSON and MongoDB work together by covering these topics:
-
Importing a JSON document into MongoDB
-
Performing core CRUD operations with MongoDB
-
Exporting MongoDB data to a JSON document
-
Accessing MongoDB as a Mock/Stub RESTful API (without writing code)
What’s Next?
Now that we’ve shown the synergy between JSON and MongoDB, we’ll move on to the final stage of our Enterprise JSON journey and put everything together as we describe how JSON works with Apache Kafka in Chapter 10.