Table of Contents for
Building Isomorphic JavaScript Apps
 Building Isomorphic JavaScript Apps
Published by
O'Reilly Media, Inc., 2016
Building Isomorphic JavaScript Apps
Published by
O'Reilly Media, Inc., 2016
- Cover
- nav
- Building Isomorphic JavaScript Apps
- Building Isomorphic JavaScript Apps
- Preface
- I. Introduction and Key Concepts
- 1. Why Isomorphic JavaScript?
- 2. Isomorphic JavaScript as a Spectrum
- 3. Different Categories of Isomorphic JavaScript
- 4. Going Beyond Server-Side Rendering
- II. Building Our First App
- 5. Getting Started
- 6. Serving Our First HTML Document
- 7. Architecting Our Application
- 8. Transporting the Application to the Client
- 9. Creating Common Abstractions
- 10. Serializing, Deserializing, and Attaching
- 11. Closing Thoughts
- III. Real-World Solutions
- 12. Isomorphic React.js at WalmartLabs
- 13. Full Stack Angular
- 14. Brisket
- 15. “Colony” Case Study: Isomorphic Apps Without Node
- 16. Final Thoughts
- Index
- About the Authors
- Colophon
Chapter 8. Transporting the Application to the Client
Up until now our efforts have been focused on building a solid foundation for our application. In this chapter we will begin to reap the benefits of our careful planning as we update our server-only application to run on the client. If we have done our job well, this should be a fairly easy task; once we are done, we will have the core of a fully functioning isomorphic JavaScript application. However, before we begin the process of porting our application to the client, we need to make some additions to our build process and modify the structure of the application.
Bundling Our Application for the Client
This first thing we need to do in order to run our application on the client is to create an application bundle file that contains our entire application source. This file will be included by ./src/index.html, which is served as the first page response from the server.
Note
If your application is large you may want to split it up into multiple bundles to improve the initial page load experience.
Selecting a Bundling Library
There are two primary bundling libraries currently being leveraged by the community to create client application bundles: Browserify and Webpack.
Asynchronous Module Definition (AMD)
There is a third bundling library, the RequireJS Optimizer, that leverages RequireJS, which implements the AMD pattern: an API specifies a mechanism for defining modules such that the module and its dependencies can be asynchronously loaded. However, the industry has been moving toward more synchronous module loading patterns such as CommonJS, so we will not be covering it.
Browserify was created to allow you to develop your client applications as if you were writing a Node application by using the Node require syntax to include dependencies. It also has client versions of some core Node libraries, so that you can include them and make use of their APIs as you would on the server.
Webpack was created to bundle all resource types—CSS, AMD, SASS, images, CoffeeScript, etc.—for the client. It has some built-in plugins and supports the concept of code splitting, which allows you to easily split your application into multiple files so that you do not have to load the entire application at once.
Both libraries are excellent choices, and you can accomplish the same results with either. Their approaches are just a bit different. We’ll be using Browserify because it will not require complex configuration for our use case, which makes it slightly easier to get started.
Creating Our Bundle Task
In this section we will create our first application bundle for the client. The bundle task itself is extremely easy to execute, but it requires some initial setup. The first step in the process is to install some new build tools, starting with the browserify module:
$npminstallbrowserify--save-dev
Later in the process we will use browserify to create a task in gulpfile.js that builds our application bundle. We also need to install the babelify module:
$npminstallbabelify--save-dev
Babelify is a Browserify transform that transforms our source from ES6 to ES5, just like our compile task. This seems a bit redundant, but if we ever need to add other transforms in the future—e.g., brfs—then it will be necessary to bundle from source and use a transformer as opposed to bundling from the already compiled distribution. We will be piping a conventional text stream from Browserify to Gulp, so we need to install vinyl-source-stream as well:
$npminstallvinyl-source-stream--save-dev
Node Streams
A stream is an abstract interface implemented by various objects in Node. For example, a request to an HTTP server is a stream, as is stdout. Streams are readable, writable, or both. All streams are instances of EventEmitter.
Next we need to provide some instructions to Browserify, so that it will bundle up client-specific implementations when necessary. Adding the browser property to the package.json file, as shown here:
{"browser":{"./src/index.js":"./src/index.client.js"}}
lets Browserify know that when it encounters a specific file, ./src/index.js, it should package a different file, .src/index.client.js, which contains an implementation for the client. This might seem a bit counterintuitive since we are writing code that is supposed to run on the client and the server, but there are times when we don’t really have an option (e.g., we can’t run a hapi server on the client). The key is to limit and isolate these patches of code to pieces that change infrequently, so that our daily development isn’t greatly impacted by context switching between environments.
The final step is to update our gulpfile.js file. First we need to include our newly installed modules:
varbrowserify=require('browserify');varsource=require('vinyl-source-stream');
Next we need to create our new bundle task:
gulp.task('bundle',function(){varb=browserify({entries:'src/index.js',debug:true}).transform('babelify',{presets:['es2015']});returnb.bundle().pipe(source('build/application.js')).pipe(gulp.dest('dist'));});
This task will run ./src/index.client.js through browserify tracing any dependencies found. It creates a single file, which gets written to ./dist/build/application.js. Next, we will add the bundle task to our default task:
gulp.task('default',function(callback){sequence(['compile','watch','copy','bundle'],'start',callback);});
Finally, we need to update our watch task so that the bundle is written when we make a source code change:
gulp.task('watch',function(){gulp.watch('src/**/*.js',['compile','bundle'])gulp.watch('src/**/*.html',['copy']);});
That’s it! We are now ready to create our bundle—but first we need to add the client implementation that we specified in our package.json.
Adding Our Client Implementation
In ./src/index.js, the entry point for our application, we instantiate a hapi server. This is just the kind of environment-specific code that we need to ensure doesn’t make it to the client. We already took a look at how to specify different implementations for the client and the server in the previous section by leveraging the browser property in the package.json file, where we defined a file, ./src/index.client.js, to substitute for ./src/index.js. Our first pass on this will simply be to print “hello browser” to the console:
console.log('hello browser');
Now we need to include a link to the file in our application template ./src/index.html, as shown in Example 8-1.
Example 8-1. Including the application bundle in the page template
<html><head><metacharset="utf-8"><title>And the man in the suit has just bought a new car From the profit he's made on your dreams</title></head><body>{{body}}</body><scripttype="text/javascript"src={{application}}></script></html>
We will pass the path to the application bundle file as a property of the rendering context in ./src/index.js, as illustrated in Example 8-2.
Example 8-2. Adding the bundle path to the template rendering context
constAPP_FILE_PATH='/application.js';constapplication=newApplication({'/hello/{name*}':HelloController},{server:server,document:function(application,controller,request,reply,body,callback){nunjucks.render('./index.html',{body:body,application:APP_FILE_PATH},(err,html)=>{if(err){returncallback(err,null);}callback(null,html);});}});
Finally, we need to add a route to our server in ./src/index.js that serves our bundle:
server.route({method:'GET',path:APP_FILE_PATH,handler:(request,reply)=>{reply.file('dist/build/application.js');}});
Now when we execute our default Gulp task at the terminal and open http://localhost:8000/ in a browser we should see the same result, as before, but if we open the console in the browser we should see “hello browser”. If you see this message, then congratulations—you just served your first application bundle! While this example is trivial, the steps and understanding required to set it up will benefit us as we proceed with making our application isomorphic.
Responding to User Requests
In the previous chapter we identified the URL as the mechanism through which a user makes requests of our application. We used this cornerstone of the Web as the starting point for building our application framework on the server. We took incoming requests and mapped them to a route handler that executed a controller action. This was used to construct a response for the client request. This request/response lifecycle constitutes the core of our application framework, and we must ensure that the client supports the contracts defined by this lifecycle so that our application code executes in a predictable manner.
The first part of this contract is that we need to respond to the request the user makes (i.e., the URL). On the server this is an HTTP request. On the client we will not have an HTTP request object, but we still want to execute the application code on the client in order to take advantage of the SPA model’s performance benefits. On the client we will likely be responding to a user clicking on a link, which updates the URL in the browser’s address bar. It is this changing of the URL that we must respond to on the client, like we respond to an HTTP request on the server. In order to execute our request/reply lifecycle on the client, we essentially want to hijack these clicks that would normally change the URL and make an HTTP request for an HTML document, causing a full page load. We also want to ensure that we do not break the browser history, so that when a user navigates forward or backward using the browser this works as expected. Fortunately, there is already a native interface, the History API, that we can utilize.
Leveraging the History API
Before the History API existed, SPAs used hash fragments as a workaround for routing to “pages” within an application on the client. Hash fragment changes create new entries in the browser history without reloading the page, but SEO is not supported because hash fragments are not sent to the server as part of an HTTP request. The reason they are not sent is because they were designed to link to a position in a document. The History API was created to ensure that URLs still serve their intended purpose—identifying unique resources—within SPAs and that their contents are properly indexed by search engines.
The History API is very simple. There is a stack onto which you can push a state object, title, and URL. For our purposes, mapping URLs to routes in a routing table, we are only concerned with two methods and one event:
History.replaceState-
This method updates the most recent entry on the history stack. This is useful for adding a state object to a server-rendered page.
History.pushState-
This method pushes a state object, optional title, and optional URL onto the stack. This is helpful for storing URL state that can be used to improve the responsiveness of client-side navigations. For example, all the data required to render a page could be stored in the state object, which could be used to short-circuit network requests for data when navigating to previously rendered pages.
PopStateEvent-
This event is fired when the active history entry changes, such as when the user clicks the browser’s back button. Listening for this event can be used to trigger client-side navigations to a route.
These methods and this event will be used to trigger route requests for unique resources via URLs on the client, just as an HTTP GET request is used on the server.
Responding to and Calling the History API
In this section we will update our application core to work with the History API to facilitate client-side routing. Before we implement this, though, a word of caution. In this section we will be creating our first real abstraction. I typically avoid abstractions like the plague because they hide details, which obfuscates meaning, making code more difficult to follow and brittle—as James Coplien says, “Abstraction is evil.” However, sometimes abstractions are necessary, which is true in this case because we cannot run a server on the client.
In “Adding Our Client Implementation” we created a client bundle that logged “hello browser”. The entry point for this bundle was ./src/index.js, which we configured in our package.json to point to the client implementation, ./src/index.client.js, of ./src/index.js, which is the entry point for the server. This server entry imports the application core, ./src/lib/index.js, and starts the application. We need to follow the same form for the client implementation, as shown in Example 8-3.
Example 8-3. Client bundle entry point
importApplicationfrom'./lib';importHelloControllerfrom'./HelloController';constapplication=newApplication({'/hello/{name*}':HelloController},{// query selector for the element in which// the controller response should be injectedtarget:'body'});application.start();
Note
For the time being we are going to focus simply on working with the History API and not on code reuse. We will find the reuse points after we have completed the initial client implementation. Also, in this section we will be ignoring route definitions, which will be covered in “Routing on the Client”.
Next we need implement the client Application class that will encapsulate the History API code—but first we need to add a new property to our package.json browser field:
{"browser":{"./src/index.js":"./src/index.client.js","./src/lib/index.js":"./src/lib/index.client.js"}}
This will instruct Browserify to use ./src/lib/index.client.js when bundling. Now we can start to fill in our Application class in ./src/lib/index.client.js, as seen in Example 8-4.
Example 8-4. Application class stub
exportdefaultclassApplication{navigate(url,push=true){}start(){}}
This is the form against which we will be coding in this section. We will begin by implementing the start method. The first thing we need to do is add an event listener for the PopStateEvent (Example 8-5).
For the time being this event handler simply logs the current URL so that we can confirm that it is working as expected. In “Routing on the Client” we will hook in our client-side routing, which will execute a route handler that matches the URL.
Next we need to implement an opt-in click event handler that will be used to execute a route handler when a user clicks on an href or another element that opts-in and provides the required data. The opt in should be declarative and unobtrusive, so that the application framework can easily listen for clicks without impacting the rest of the application. A good mechanism for achieving this goal is using data-* attributes. We can use this interface to define our own data-* attribute and use it to detect click events that should be handled by the application framework (Example 8-6).
Example 8-6. Application class start method event listeners
start(){// create event listener popstatethis.popStateListener=window.addEventListener('popstate',(e)=>{// body omitted for brevity});// create click listener that delegates to navigate method// if it meets the criteria for executingthis.clickListener=document.addEventListener('click',(e)=>{let{target}=e;letidentifier=target.dataset.navigate;lethref=target.getAttribute('href');if(identifier!==undefined){// if user clicked on an href then prevent// the default browser action (loading a new HTML doc)if(href){e.preventDefault();}// navigate using the identifier if one was defined.// or the hrefthis.navigate(identifier||href);}});}
This implementation places a single event listener on the document, filters by the data attribute data-navigate, and calls a new (yet to be implemented) method called navigate if it meets the identifying criteria. Next, we need to implement the navigate method referenced in the click event handler (Example 8-7).
The navigate method is another placeholder executing a route handler that matches a URL against a path in a routing table. For now we are just pushing an empty state object and a URL onto the history stack to confirm that it works.
Now that we have our stub implementations, we need to update our template for the /{name*} route with some links to test our stubs. Currently the template is a hardcoded string in the HelloController class (defined in ./src/hello-controller.js), because it was simple and did not warrant the overhead of a filesystem read. However, since we are expanding the template, now seems like a good time to move it to a separate file, ./src/hello.html (Example 8-8).
Example 8-8. Template for HelloController class
<p>hello{{fname}}{{lname}}</p><ul><li><ahref="/mortimer/smith"data-navigate>Mortimer Smith</a></li><li><ahref="/bird/person"data-navigate>Bird Person</a></li><li><ahref="/revolio/clockberg"data-navigate>Revolio Clockberg</a></li></ul>
Lastly, we need to update the HelloController class (Example 7-7) to read the template from the filesystem, as shown in Example 8-9.
Example 8-9. HelloController class toString method
toString(callback){nunjucks.render('hello.html',getName(this.context),(err,html)=>{if(err){returncallback(err,null);}callback(null,html);});}
If you execute gulp in the terminal and open your browser to http://localhost:8000, you should see the new page with the links. You should be able to click through the links, see the address bar update in the browser, and see the log statements in the console. You should see the same behavior when using the browser’s forward and backward history controls. We now have our hooks into the browser history!
On the surface these stubs that make use of the History API appear trivial, but they will be the resource request interface to our application, just like the HTTP GET request is on the server. The common factor between the server and client implementations is the URL. It is like the signature of a function. This signature is then used to match a route in a routing table. On the server the routing table is part of hapi. On the client we cannot run hapi, but we should use the same router, so that routes are matched and applied using the same algorithm. In the next section we will explore how this can be accomplished.
Routing on the Client
As you clicked through links and navigated backward and forward through browser history in the previous section, you may have noticed that the hello message on the page did not update as the path parameters changed. This is because we were not executing a controller action and rendering the response. In order to do this we need a client router that uses the same route-matching algorithm as hapi. Fortunately, hapi modularized its HTTP router, call, and since Browserify was designed to run Node modules on the client we can use it! But first we need to install it:
$npminstallcall--save
Next we need to import the call module into our application framework client source, ./src/lib/index.client.js, and code the client implementations for constructor and registerRoutes, as seen in Example 8-10.
Example 8-10. Using the call HTTP router in the Application class
importCallfrom'call';exportdefaultclassApplication{constructor(routes,options){// save routes as lookup table for controllersthis.routes=routes;this.options=options;// create a call router instancethis.router=newCall.Router();this.registerRoutes(routes);}registerRoutes(routes){// loop through routes and add them// to the call router instancefor(letpathinroutes){this.router.add({path:path,method:'get'});}}navigate(url,push=true){// omitted for brevity}start(){// omitted for brevity}}
In the constructor and registerRoutes methods we used call to create our router and register our application routes. These route definitions will be used by the navigate method to match URLs to controllers in the this.routes property we set in the constructor (Example 8-11).
Executing the Controller Response Flow
Now that we can match URLs to controllers, we can execute the same response flow as we did on the server:
-
Create a controller instance.
-
Execute a controller action.
-
Render a response.
Creating a controller instance
When a controller instance is created, it is passed a context object that contains the path and query parameters. On the server these values are extracted from the request object, which we do not have on the client. In the next chapter we will cover creating lightweight façades for the request and reply objects that will contain abstractions for query and path parameters, but for now we will add the code to the Application class’s navigate method:
navigate(url,push=true){// preceding code omitted for brevityif(route&&Controller){constcontroller=newController({query:search,params:params});}// following code omitted for brevity}
We now have the ability to create controller instances on the client just as we do on the server. However, you might have spotted an issue in the code. If not, then take another look at how we are populating the query property of the context object. The value is a string, not an object with decoded values, so we need to parse the search value we deconstructed from urlParts into an object. If you are like me you have probably written this code numerous times throughout the years, but never filed it off anywhere. Fortunately, others are more organized than me, so we can get a module for just this purpose from npm:
$npminstallquery-string--save
We can import this module and use it to parse the search value:
navigate(url,push=true){// preceding code omitted for brevityif(route&&Controller){constcontroller=newController({// parse search string into objectquery:query.parse(search),params:params});}}
Now our client application route response implementation passes the expected arguments when creating a controller, so at this point the controller cannot tell if it was constructed on the client or the server. Eureka! We have created our first façade! Again, it’s important to keep abstractions to a minimum, and in this case, we’re making them in our application framework only because the code is unlikely to change frequently, unlike our application code.
Executing a controller action
Executing the controller action for the instance we created is essentially the same as on the server, as you can see in Example 8-12. The only difference is that we will be passing function stubs for the request and reply arguments—we will create these façades in the next chapter.
Rendering a controller response
On the client we need to allow for an alternate rendering implementation for toString in ./src/lib/Controller.js:
render(target,callback){this.toString(function(err,body){if(err){returncallback(err,null);}document.querySelector(target).innerHTML=body;callback(null,body);});}
This will allow us to take advantage of different rendering patterns optimized for the client, such as the React.js virtual DOM, as opposed to a template library that uses string concatenation.
If you run the default Gulp task in the terminal, open your browser to http://localhost:8000/, and navigate through the links you will now see the page change, but not in the manner anticipated. The hello message is always “hello hello.html Sanchez”. This is because we have not configured Nunjucks for the client or added a handler on the server to process template file requests, so each request returns ./src/index.html and the controller uses the path parameter “index.html” for fname. Let’s fix this. In .src/index.client.js (Example 8-13), we’ll configure Nunjucks to read from the absolute path of /templates on the browser.
Example 8-13. Configuring Nunjucks for the client
importApplicationfrom'./lib';importHelloControllerfrom'./hello-controller';importnunjucksfrom'nunjucks';// configure nunjucks to read from the dist directorynunjucks.configure('/templates');constapplication=newApplication({'/hello/{name*}':HelloController},{// query selector for the element in which// the controller response should be injectedtarget:'body'});application.start();
Now Nunjucks will make Ajax requests for /templates/{template_file_name}. Next we need to add a handler to the server to reply with the appropriate template in ./src/index.js, as seen in Example 8-14.
Example 8-14. Defining a route handler for template files
importHapifrom'hapi';importApplicationfrom'./lib';importHelloControllerfrom'./hello-controller';importnunjucksfrom'nunjucks';importpathfrom'path';// section omitted for brevityserver.route({method:'GET',path:'/templates/{template*}',handler:{file:(request)=>{returnpath.join('dist',request.params.template);}}});// following code omitted for brevity
Now if we go back to the browser and navigate through the links we should see the name changing accordingly as we render the controller response as described in Figure 8-1. Success! We now have the basis for our isomorphic JavaScript application! However, we left behind a bit of mess, so in the next section we will do some housekeeping.
Note
We are making a non-cached Ajax call for every template in this example. This isn’t very efficient, but it is simple, defers loading, and works well when developing. In some cases you will want to precompile your templates for the client, and sometimes the server as well.
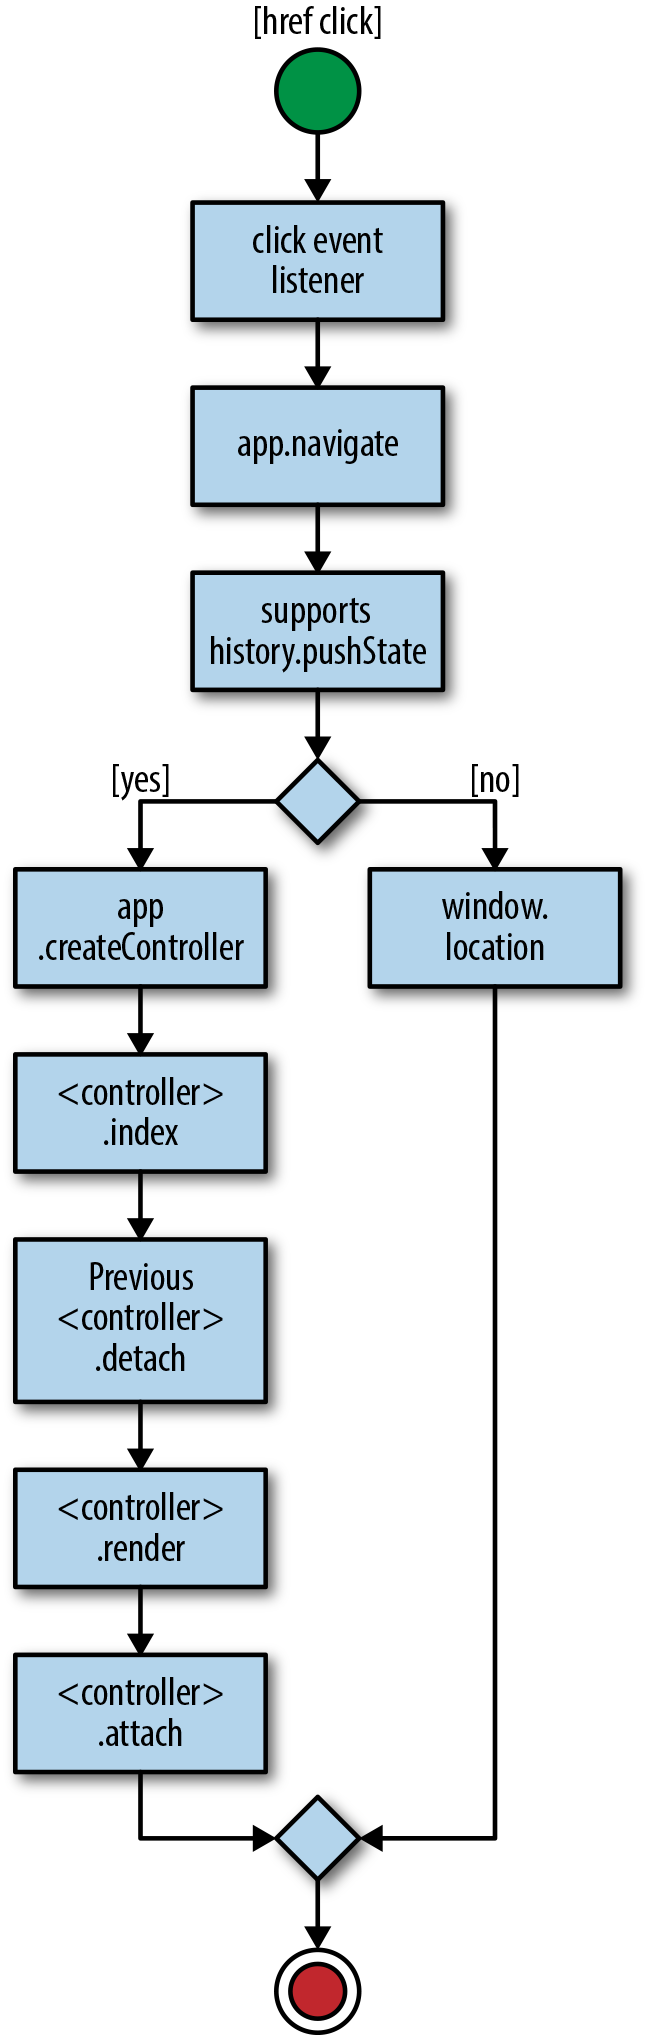
Figure 8-1. Navigation in response to href click event
Organizing Our Code
We’ve accomplished our goal of transporting our framework and application code to the client. It works well, but we duplicated some code in our application, in ./src/index.js and ./src/index.client.js. For instance, our application instantiation and initialization code, which contains the route definitions, appears in both files. This duplication of route definitions is not ideal because when we add, remove, or modify a route we have to remember to do it in two different places. Additionally, we have muddled our application code with environment implementation details. As the application grows over time these files will likely become out of sync and more difficult to maintain. We can improve the maintainability by moving the environment details to options files, so that ./src/index.js is easier to read and becomes the entry point for both the client and the server. Let’s start by creating the server options file, ./src/options.js, and moving the environment-specific details to this new file (Example 8-15).
Example 8-15. Application options for the server
importHapifrom'hapi';importpathfrom'path';importnunjucksfrom'nunjucks';constserver=newHapi.Server({debug:{request:['error']}});server.connection({host:'localhost',port:8000});constAPP_FILE_PATH='/application.js';server.route({method:'GET',path:APP_FILE_PATH,handler:(request,reply)=>{reply.file('dist/build/application.js');}});server.route({method:'GET',path:'/templates/{template*}',handler:{file:(request)=>{returnpath.join('dist',request.params.template);}}});exportdefault{nunjucks:'./dist',server:server,document:function(application,controller,request,reply,body,callback){nunjucks.render('./index.html',{body:body,application:APP_FILE_PATH},(err,html)=>{if(err){returncallback(err,null);}callback(null,html);});}};
We then need to do the same for the client by creating ./src/options.client.js (Example 8-16).
Example 8-16. Application options for the client
exportdefault{target:'body',nunjucks:'/templates'};
Now we need to update our the property in our package.json file to reflect these changes:
{"browser":{"./src/lib/index.js":"./src/lib/index.client.js","./src/options.js":"./src/options.client.js"}}
Finally, we need to update ./src/index.js to use the new configuration modules, as shown in Example 8-17.
Example 8-17. Unified application entry point
importApplicationfrom'./lib';importHelloControllerfrom'./HelloController';importnunjucksfrom'nunjucks';importoptionsfrom'./options';nunjucks.configure(options.nunjucks);constapplication=newApplication({'/hello/{name*}':HelloController},options);application.start();
These small changes should help ease development and maintenance costs immensely as the application grows over time.
Summary
In this chapter we took our framework and application code from the server to the client, making it an isomorphic code base. We familiarized ourselves with common build patterns and leveraged the History API to respond to URL changes in the browser using the same lifecycle as we did on the server. We will continue to build upon this work in the next chapter, where we will create lightweight façades to some commonly needed features of isomorphic applications.