Table of Contents for
Building Isomorphic JavaScript Apps
 Building Isomorphic JavaScript Apps
Published by
O'Reilly Media, Inc., 2016
Building Isomorphic JavaScript Apps
Published by
O'Reilly Media, Inc., 2016
- Cover
- nav
- Building Isomorphic JavaScript Apps
- Building Isomorphic JavaScript Apps
- Preface
- I. Introduction and Key Concepts
- 1. Why Isomorphic JavaScript?
- 2. Isomorphic JavaScript as a Spectrum
- 3. Different Categories of Isomorphic JavaScript
- 4. Going Beyond Server-Side Rendering
- II. Building Our First App
- 5. Getting Started
- 6. Serving Our First HTML Document
- 7. Architecting Our Application
- 8. Transporting the Application to the Client
- 9. Creating Common Abstractions
- 10. Serializing, Deserializing, and Attaching
- 11. Closing Thoughts
- III. Real-World Solutions
- 12. Isomorphic React.js at WalmartLabs
- 13. Full Stack Angular
- 14. Brisket
- 15. “Colony” Case Study: Isomorphic Apps Without Node
- 16. Final Thoughts
- Index
- About the Authors
- Colophon
Chapter 7. Architecting Our Application
If you have been working as a frontend developer for long enough, you probably remember a time before the proliferation of the MV* libraries that now both complicate and improve web development. If you have been in the industry even longer, you can probably recall the days before jQuery. For me, those memories are colored by the frustration of attempting to debug a 4,000-line JavaScript file that was a comprised of miscellaneous functions and “classes,” which made references to other 4,000-line JavaScript files. Even if you cannot remember those days of yore, you have probably encountered similar difficult-to-follow, frustrating code.
Most often, the source of the frustration is a lack of form and structure, the building blocks of a good architecture. As James Coplien and Gertrud Bjørnvig put it in Lean Architecture: For Agile Software Development (Wiley), we can “think of form as being the essential shape or arrangement of a thing without regard to what it is made of, and of structure as the reification of form.” In our case an example of form is an Application class that accepts route definitions. An example of structure is the ES6 module format that uses export and import.
Another overly utilized component of architecture is abstraction. The key to properly utilizing abstraction is to use it only when necessary, because it hides details, which makes code more difficult to follow and read. Otherwise, you end up with numerous wrapper functions with convoluted implementations that become very brittle over time. We will be leveraging abstractions to solve a few commonly encountered problems when developing isomorphic JavaScript applications, such as getting and setting cookies, but it’s important not to go overboard.
Placing emphasis on form and structure early on reduces the likelihood of unexpected outcomes and improves the maintainability of our code. Along with a healthy skepticism of abstractions, this will ensure our application stands the industry test of time (five years).
Understanding the Problem
We already know that we are creating an isomorphic JavaScript application, but what does that mean in terms of architecture? In order to answer that question we must first define the problem we’re aiming to solve. Our goal is to efficiently serve an SEO-compliant user interface in a web browser. The efficiency aspect of our goal relates to running the application on both client and server, so that it can take advantage of the benefits of both environments. Since it will have to run on the client and the server, we must start thinking in terms of abstracting the environments without introducing unnecessary complexities. So where do we begin? From the beginning of the user request with the innovation that connects us all: the URL.
Responding to User Requests
The URL is what connects a user to your application. Your application uses the URL to map to specific resources that are returned by your application logic. This is what makes the Web work, and what makes it a fitting place to start adding structure to our application. In the examples from the previous chapters we used the hapi server.route API for adding routes to our application that respond to user requests. This approach works well for applications that only run on the server and leverage hapi as their application server. But in our case we want our application to run on the client in addition to the server, so referencing hapi directly will not suffice. Additionally, direct references to hapi throughout your application code tightly couple your code to hapi, making it difficult to swap it out later if desired or necessary.
Abstractions
Sometimes people take abstractions too far. For instance, creating an API wrapper around a library in your application or framework simply to make replacing a library in the future easier is not a good reason. It is not a wise investment of time because you are solving for a problem that has not yet occurred and may never occur. Abstractions should provide an immediate or imminent value. Good form and structure should be used to help ensure longevity of software in favor of numerous, premature abstractions.
Creating the Application Class
The first step to providing structure when responding to user requests is to create an application class that can be reused across your applications. The purpose of this class is to reduce boilerplate and provide an interface that will eventually be used on both the client and the server.
In the case of defining user routes we need an interface that will allow our application’s ./src/index.js file to do something like Example 7-1.
Example 7-1. Using an Application class
importHapifrom'hapi';importnunjucksfrom'nunjucks';importApplicationfrom'./lib';// configure nunjucks to read from the dist directorynunjucks.configure('./dist');// create a server with a host and portconstserver=newHapi.Server();server.connection({host:'localhost',port:8000});functiongetName(request){// function body omitted for brevity}constapplication=newApplication({// responds to http://localhost:8000/'/':function(request,reply){// read template and compile using context objectnunjucks.render('index.html',getName(request),function(err,html){// reply with HTML responsereply(html);});}},{server:server});application.start();
Note
Earlier, we spoke about making the correct abstractions. Abstracting the server instantiation details in this case did not provide a benefit, so we left them intact. In the future these details could be moved to a separate module, if the configuration grows and makes the application file difficult to follow or we are registering numerous hapi plugins.
If your first reaction to Example 7-1 was “I don’t see the benefit,” don’t worry; that is the correct reaction! We’d be wrong to do nothing more than implement an application class to support this code, because this would only encapsulate the implementation details without providing any benefits. In our case we are providing a foundation that we will progressively build upon, and the benefits will reveal themselves over the course of Part II. Now that we have cleared that up, let’s get to the implementation. We define our Application class in ./src/lib/index.js, as shown in Example 7-2.
Example 7-2. Application class
exportdefaultclassApplication{constructor(routes,options){this.server=options.server;this.registerRoutes(routes);}registerRoutes(routes){for(letpathinroutes){this.addRoute(path,routes[path]);}}addRoute(path,handler){this.server.route({path:path,method:'GET',handler:handler});}start(){this.server.start();}}
We now have a basic application façade that we will eventually amend with a client implementation. This is a great start, but as noted earlier we haven’t added any real benefit to our application other than preparing it for transport to the client later. In order to add some value at this stage we need to reduce some of the boilerplate code associated with route definitions and add some more structure to how we are responding to user requests.
Creating a Controller
We can further improve the structure and reduce boilerplate by creating a common way to respond to URLs. In order to do that we need to create an interface that application developers can code against. As with the application structure we set up in Example 7-2, there will be little if any benefit at this point, within the context of current example, but we will build on this foundation.
In Struts, Ruby on Rails, ASP.Net, etc., controllers have action methods that are called by the framework. The controllers and actions are mapped to paths in a route table. These action methods contain the business logic for processing incoming requests and responding accordingly. In our case we want to respond with a user interface, which will be a payload of HTML. Knowing that, let’s begin by defining a basic interface, as shown in Example 7-3 (./src/lib/controller.js).
Example 7-3. Controller class
exportdefaultclassController{constructor(context){this.context=context;}index(application,request,reply,callback){callback(null);}toString(callback){callback(null,'success');}}
The constructor method creates an instance of the Controller class. The argument context contains metadata related to the route, such as path and query parameters. This data will be useful on the client when a controller instance persists after the action has replied to the request.
The index method is the default action for a controller instance, which accepts four arguments:
-
applicationis a reference to the application that defined the route. This will be useful in the future for accessing application-level methods and properties. -
requestis the hapirequestobject. This can be used for request-level actions such as reading header or cookie values. In the future this object will be normalized, so that it functions the same across the client and the server. -
replyis the hapireplyobject. This can be used to redirect a request, as inreply.redirect(some/url). In the future this object will be normalized, so that it functions the same across the client and the server. -
callbackis a Node-style callback for asynchronous control flow. If the first parameter isnull, the handler that called the action method will proceed forward in the request/reply lifecycle. If it is anError, the application responds with an error (we will cover error responses in more detail later).
toString is the method that will be called by the application framework after the action method callback has been executed without erring. The second parameter of a successful callback should be the string to be rendered.
Constructing a Controller Instance
Now that we have defined a contract for responding to resource requests, we can move more of the logic associated with defining routes to our application framework. If you remember, our ./src/index.js still contains route definitions with inline functions (see Example 7-4).
Example 7-4. Inline route handler
constapplication=newApplication({// responds to http://localhost:8000/'/':function(request,reply){// read template and compile using context objectnunjucks.render('index.html',getName(request),function(err,html){// reply with HTML responsereply(html);});}},{server:server});
Now that we have a base controller this can be transformed to the version in Example 7-5.
Example 7-5. Using the Controller class
importHapifrom'hapi';importApplicationfrom'./lib';importControllerfrom'./lib/controller'constserver=newHapi.Server();server.connection({host:'localhost',port:8000});constapplication=newApplication({'/':Controller},{server:server});application.start();
That looks a lot better. We successfully removed the rendering and response implementation details, making our application much easier to read. At a glance we can now quickly discern that Controller will be responding to http://localhost:8000/. This is a true work of art. The downside is that it will not work! We need to implement code in src/lib/index.js that will create an instance that responds via a route handler. The change we need to make is to update our Application class’s addRoute method, as shown in Example 7-6, to create a handler that creates a controller instance and follows the lifecycle contract of the controller.
Example 7-6. Application class addRoute method
addRoute(path,Controller){this.server.route({path:path,method:'GET',handler:(request,reply)=>{constcontroller=newController({query:request.query,params:request.params});controller.index(this,request,reply,(err)=>{if(err){returnreply(err);}controller.toString((err,html)=>{if(err){returnreply(err);}reply(html);});});}});}
Note
Some new syntax is introduced in this example that might be a bit confusing if you are not familiar with these constructs: arrow functions. The purpose of using arrow functions in this case is to lexically bind this, so that we do not have to create variables such as self or that, or explicitly bind functions to set the context.
If you open up http://localhost:8000/ in your browser you should see “success,” which is the expected result, but not the desired result.
Extending the Controller
In our previous route handler we passed the file contexts of ./src/index.html to Nunjucks, compiled it, provided a context object, and finally replied with string that was the result of the template function. Let’s take a look at what this would look like in our new world. Example 7-7 shows the extended Controller class (./src/HelloController.js).
Example 7-7. Extending the base Controller
importControllerfrom'./lib/controller';importnunjucksfrom'nunjucks';// configure nunjucks to read from the dist directorynunjucks.configure('./dist');functiongetName(context){// function body omitted for brevity}exportdefaultclassHelloControllerextendsController{toString(callback){// read template and compile using context objectnunjucks.render('index.html',getName(this.context),(err,html)=>{if(err){returncallback(err,null);}callback(null,html);});}}
This functions essentially the same as Example 7-4, but we have encapsulated the logic responsible for replying to http://localhost:8000/ in our controller. If we wanted, we could make this the base controller for the application and create some conventions for resolving to a template file based on the route. For instance, we could make the request.uri part of the context object and use request.uri.path to locate the template in a corresponding directory in ./dist. We are not going to implement this convention-based approach, but the point is that you can put common application-specific code in a base controller to promote reuse.
Next we need to update ./src/index.js to use our new controller and update the route path to accept optional path parameters, as seen in Example 7-8.
Example 7-8. Accepting path parameters
importHapifrom'hapi';importApplicationfrom'./lib';importHelloControllerfrom'./hello-controller';constserver=newHapi.Server();server.connection({host:'localhost',port:8000});constapplication=newApplication({'/hello/{name*}':HelloController},{server:server});application.start();
If you open up http://localhost:8000/ in your browser you should now see the expected hello message.
Improving the Response Flow
In preparation for porting the code to the client, there is one last implementation that we are going to change. Instead of the controller reading and creating the HTML response, we are going to create an API for returning a page template in which we can inject the results from the controller’s toString callback. The new version of ./src/HelloController.js can be seen in Example 7-9.
Example 7-9. Creating an inline template
importControllerfrom'./lib/controller';importnunjucksfrom'nunjucks';functiongetName(context){// function body omitted for brevity}exportdefaultclassHelloControllerextendsController{toString(callback){nunjucks.renderString('<p>hello </p>',getName(this.context),(err,html)=>{if(err){returncallback(err,null);}callback(null,html);});}}
The reason we are doing this is so that when our application transitions to an SPA on the client our routes will only return the HTML for a route as opposed to an entire document. This also has certain performance advantages. For example, on the server we could potentially limit the amount of file system I/O. On the client we could create a layout that has a header and footer that don’t rerender when navigating or that doesn’t require us to reparse <script> tags. From the application’s perspective, these are the changes that we will make to ./src/index.js (Example 7-10).
Example 7-10. Defining the application HTML document
importHapifrom'hapi';importApplicationfrom'./lib';importHelloControllerfrom'./hello-controller';importnunjucksfrom'nunjucks';// configure nunjucks to read from the dist directorynunjucks.configure('./dist');constserver=newHapi.Server();server.connection({host:'localhost',port:8000});constapplication=newApplication({'/hello/{name*}':HelloController},{server:server,document:function(application,controller,request,reply,body,callback){nunjucks.render('./index.html',{body:body},(err,html)=>{if(err){returncallback(err,null);}callback(null,html);});}});application.start();
These changes will allow us to inject a controller’s toString callback value, the body argument, into a page template without imposing a technology choice on the framework. Let’s implement the application framework changes now. The final version of the addRoute method is shown in Example 7-11.
Example 7-11. Replying to a resource request (Application class addRoute method)
addRoute(path,Controller){this.server.route({path:path,method:'GET',handler:(request,reply)=>{constcontroller=newController({query:request.query,params:request.params});controller.index(this,request,reply,(err)=>{if(err){returnreply(err);}controller.toString((err,html)=>{if(err){returnreply(err);}this.document(this,controller,request,reply,html,function(err,html){if(err){returnreply(err);}reply(html);});});});}});}
Now the application framework is responsible for composing the HTML document response, but the implementation details of the HTML string construction are left up to the application developer. The final change we need to make is to our template, as seen in Example 7-12 (./src/index.html).
Example 7-12. Adding an outlet for the document body
<head><metacharset="utf-8"><title>And the man in the suit has just bought a new car From the profit he's made on your dreams</title></head><body>{{body}}</body></html>
If we open the browser to http://localhost:8000/ we should see the expected “hello world” message.
Note
There is an ES6 template string API that works well for embedding expressions into strings. The reason we are not using it is because we are reading from the filesystem. Converting the file contents string into a template string would require the use of eval (e.g., eval(templateStr);), which presents some security risks.
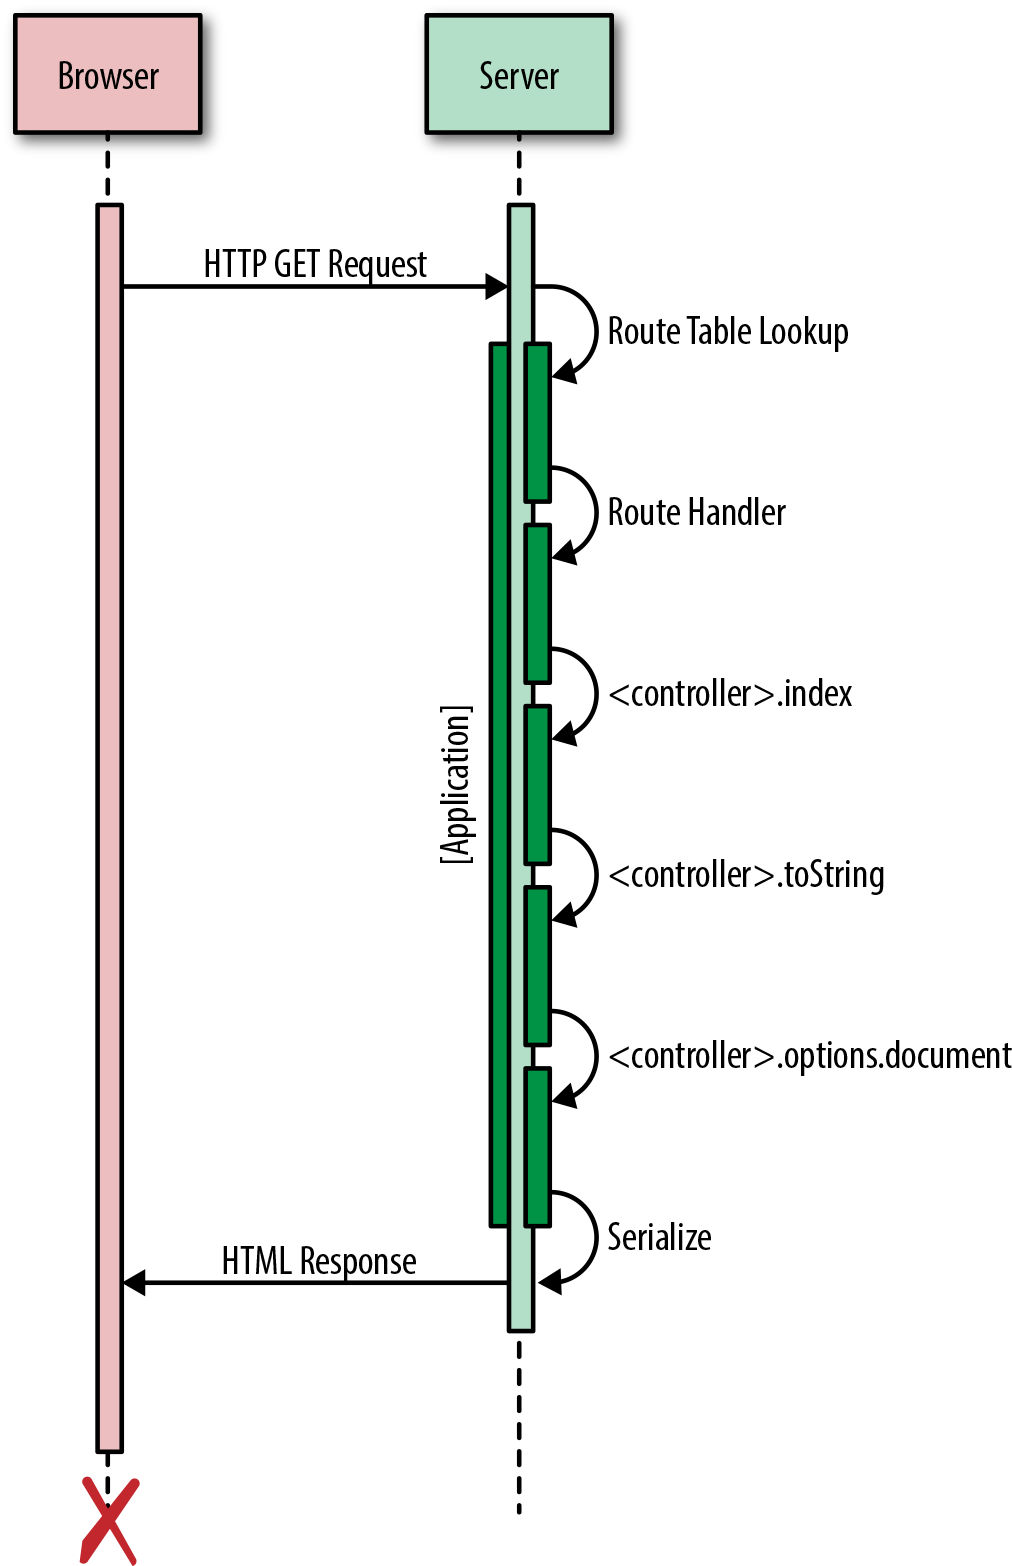
Figure 7-1 illustrates the completed request/reply lifecycle.
Summary
In this chapter we created a solid foundation upon which we can build. We achieved this by adding form and structure to our application. We defined a clear contract between the application and the framework for responding to resource requests. These deliberate actions will allow us to easily swap out pieces in the future, enabling us to easily respond to change wholesale or gradually as we experiment with new technologies. More importantly, this will help ensure stability. In the next chapter the real fun begins, as we start porting our application and framework to the client!
Completed Code Examples
You can install the completed code examples from this chapter by executing npm install thaumoctopus-mimicus@"0.3.x" in your terminal.