
You may be familiar with weather balloons. Sometimes up to 20 feet in diameter, they can be filled with helium, given a small scientific payload, and made to ascend to the upper limits of the atmosphere, taking and recording various sensor readings as they go. Then, when the outside pressure becomes significantly less than the interior pressure of the balloon, they burst, and the payload falls back to Earth with the assistance of a small parachute. The group that launched the balloon tracks down the fallen package and retrieves the data. In this way, scientists and hobbyists can learn a great deal about the upper reaches of the atmosphere.
Although operating the radio-controlled airplane with a Raspberry Pi in the previous chapter was cool, it was also somewhat tame in that we logged its position and uploaded its path data to Google Earth. The concept behind this project, building a weather balloon, is very simple but more advanced. We’ll inflate and launch a small weather balloon capable of sending the Raspberry Pi to at least 30,000 feet. We’ll then program the Pi to take a picture every so often, giving us a pictorial record of our flight, and we will also use a small GPS unit to log our Pi’s trip.
But we won’t stop there, because that’s kind of boring, and it’s been done by many different hobbyists and professionals. In addition, we’ll get an update, in real time, as to what the balloon is doing—its latitude, longitude, and even altitude—by programming the Pi to record itself speaking its coordinates every 15 seconds or so. Then, we’ll broadcast that recording to a radio on the ground. All we need to do is tune our small FM radio to a pre-assigned frequency, and we’ll be able to hear our balloon talking to us, giving us live updates on its condition.
Let’s go shopping for parts!
Caution
In the United States, FAA regulations require you to notify the agency 6 to 24 hours before your launch with relevant information, such as the time and place of the launch, predicted altitude, balloon description, and forecast of the landing location. The FAA also requires you to keep track of the balloon’s location and have the ability to update the FAA with that information should it be required. Regulations differ for moored versus free balloons; for more information, see the full regulations at http://www.gpo.gov/fdsys/pkg/CFR-2012-title14-vol2/pdf/CFR-2012-title14-vol2-part101.pdf .
A Shopping List of Parts
Raspberry Pi with camera board
LiPo battery and 5V regulator to power the Pi
Latex weather balloon 6-7 feet in diameter
GPS receiver ( https://www.adafruit.com/products/746 )
Antenna for GPS (optional) ( https://www.adafruit.com/products/851 )
Handheld AM/FM radio
10-foot length of wire
Small Styrofoam cooler
Model-rocket parachute
Hand warmers
Fishing line—at least 5,000 yards
1-foot surgical tubing, about 1-inch inner diameter (ID)
Helium—about 250 cubic feet
Duct tape, electrical tape, rubber bands, zip ties
Setting Up the GPS Receiver
As with the RC plane project in Chapter 10, an integral part of this project involves getting the GPS unit up and running with your Pi. To do this, you’re going to install the Python gpsd module and use the Pi’s Universal Asynchronous Receiver/Transmitter (UART) pins, #7 and #8. The Python gpsd module is part of a larger library of code designed to allow devices such as the Pi to monitor attached GPS and Automatic Identification System (AIS) receivers, with ports to C, C++, Java, and Python. It allows you to “read” the National Marine Electronics Association–formatted data transmitted by most GPS receivers.
The UART interface is an old one; it’s basically a serial (RS-232) connection, but for our purposes it’s all we need. It consists of a positive (+) and negative (–) connection for power, as well as transmit and receive pins. Start by typing the following line to install the software needed to read the GPS, gpsd, and its associated programs:
Next, we need to disable the default gpsd systemd service, as the one we installed should overwrite it. Do this with
Now, we need to disable the serial getty service:
We also need to force the Pi’s CPU to a fixed frequency and enable the UART interface. Ordinarily, the CPU’s frequency will vary according to the load, but this can unfortunately screw with sensitive items like GPS modules. This will slightly affect your Pi’s performance, but it’s unlikely you’ll notice much of a difference. To do this, edit the /boot/config.txt file:
and change the last line from
to
Now, reboot by typing
Connect the receiver’s VIN to the Pi’s 5V (pin #2).
Connect the GND to Pi pin #6.
Connect the Rx to Pi Tx (pin #8).
Connect the Tx to Pi Rx (pin #10).
When the receiver’s LED starts to blink, you’ll know you have power. The GPS receiver we’re using has two blink rates. When it’s powered but has no GPS fix, it blinks once per second. When it has a fix, it blinks once per fifteen seconds.
When you have a fix, you can test your gpsd program. Enter
(to kill any running instances) and then
Then, start the generic GPS client by typing
The cgps client is a generic viewer; it simply takes the data the gpsd program is receiving and displays it to the user.
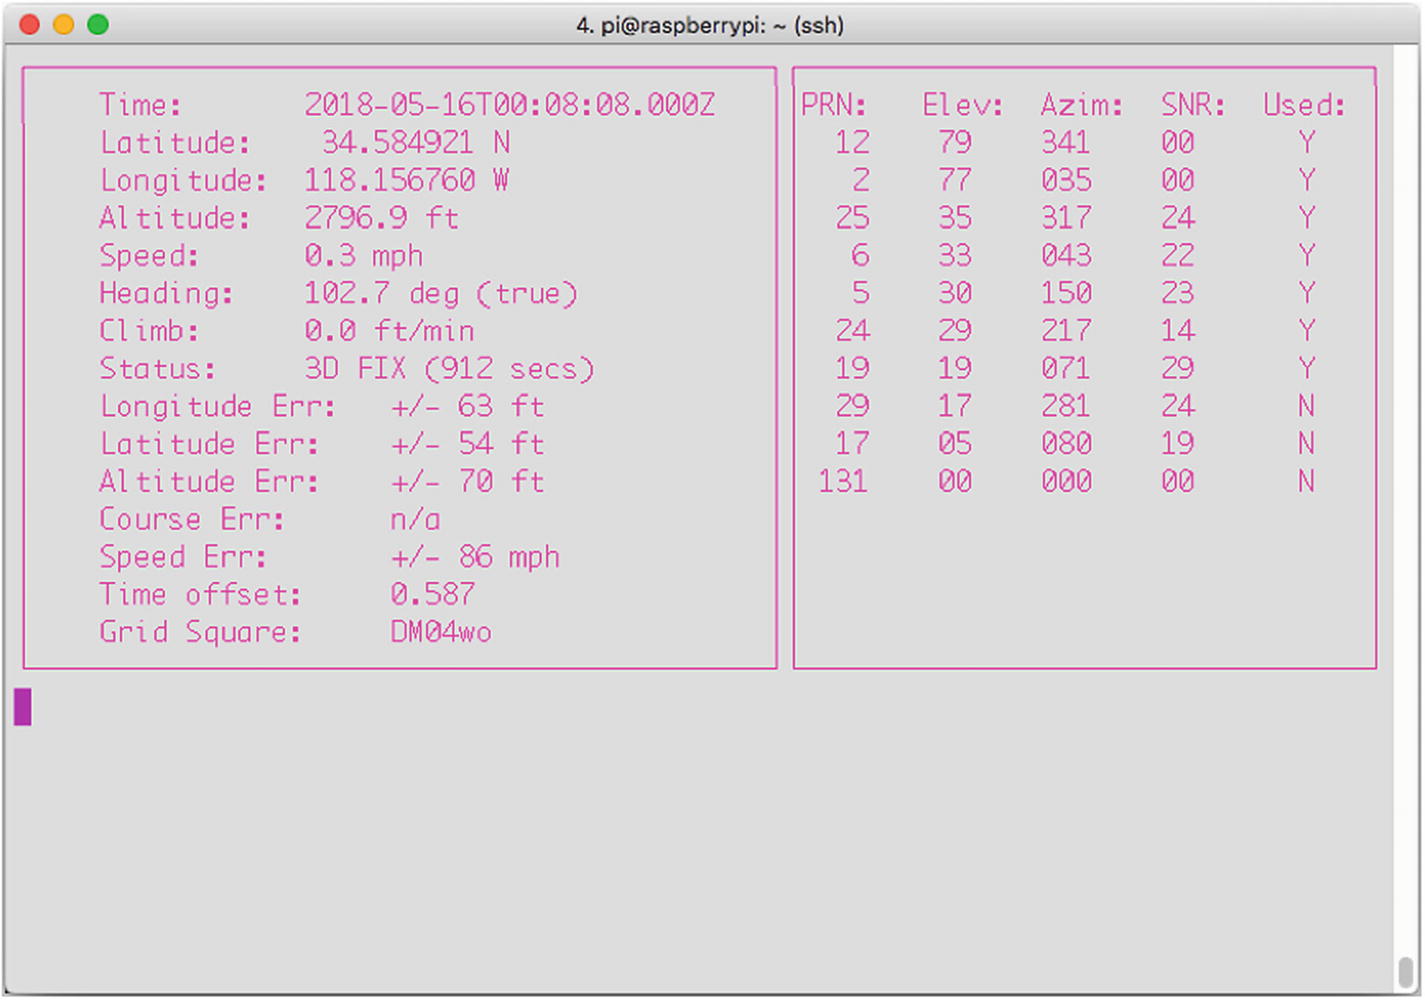
The cgps stream
We won’t be using the cgps display—it’s just a handy way of making sure the GPS unit is hooked up correctly and is working. We’ll instead use Python’s gps module to communicate with the GPS board.
Storing the GPS Data
For this project, you’ll be writing the GPS data into a file to be read, recorded, and transmitted later. We could use a logging file for this, as we did for the RC plane project, but it’s also important that you learn to use Python to read from and write to normal files. In your terminal, start a Python prompt and type
‘r’ The file is read-only.
‘w’ The file is only for writing. (Previous data will be erased each time the file is opened.)
‘a’ The file will be appended to.
‘r+’ The file is open for both reading and writing.
To continue, type
If you now exit your Python prompt by pressing Ctrl+d and list your directory contents, you’ll see testfile.txt listed, and viewing its contents will show you the line you just entered. Now, try it again: start another Python prompt and type
and exit your Python prompt. Because you opened the file using a 'w' parameter, all the original text was overwritten. This is what you’ll be doing in our GPS location file. We’re not interested in saving the locations as we did before in the plane’s log file; rather, each location will be recorded and then transmitted, and then we can overwrite it with the next location by opening it with the 'w' flag.
Installing PiFM
To get your Pi to talk to you over the radio, you’ll need to use a handy little hack developed by the members of the Imperial College Robotics Society in London. The module, called PiFM , uses the Pi’s existing hardware to turn it into a nice little FM transmitter.
To use the module, you’ll first have to download it. In your /balloon directory, open a terminal and type
When it’s done downloading, extract it by typing
This will place a compiled binary, as well as the source code and a few sound files, in your directory. You’re now ready to use the PiFM package. To try it out, attach a foot-long wire to your Pi’s pin #7 (GPIO pin #4). Now, in your terminal, type
and tune your radio to 100.0 FM. You should be rewarded with a familiar tune. If by chance you don’t hear anything, try adding ‘22050’ to the end of the command, as that extra parameter (the sample rate of the sound file) may need to be stated explicitly, depending on the version of software you have.
Congratulations! You’ve turned your Pi into a radio transmitter. Now, let’s make it a DJ.
Installing Festival
I’m pretty sure most of us would love it if our computers would talk to us. Luckily, since we’re using Linux, we have a few options when it comes to a good speech synthesizer program. The one we’ll be using, Festival, is free and very easy to use. It also comes with a handy text-to-speech recording function that we’ll be using.
Festival is available from your standard Pi repositories, which means that to use it, you only need to type
in your terminal, and it will download and install. Once the download and installation process is complete, try it out. Plug a pair of headphones into your Pi’s 3.5mm audio out jack. Then, in your terminal, type the following:
and your Pi will proceed to speak to you. (In case you don’t know, that line is spoken by the computer, HAL, in the classic movie 2001: A Space Odyssey . If you haven’t seen it, put this book down and go watch it. Now. I’ll wait.)
Okay, so now you can make your Pi speak whatever line you tell it to in the command line. While that’s pretty cool, we need to have it read a line from a text file: something like “Current altitude 10,000 feet, current position 92 degrees latitude, 164 degrees longitude.” The easiest way to do that is to use Festival’s very handy text2wave function. This function reads from a file—position.txt, for example—and makes a recording of it. Its syntax is
Now, knowing that we’ll be updating the position.txt file every 15 seconds, we can just use the text2wave function to re-record its contents before broadcasting that recording using PiFM.
There’s one small snag, however: text2wave encodes its recordings using a sample rate of 44100 kHz, and PiFM needs a recording with a sample rate of 22050 kHz. This requires another program for our toolkit—FFMPEG.
Installing FFMPEG
In the world of audio and video encoders, decoders, and transcoders, FFMPEG is definitely one of the most popular and powerful programs available. It can transcode movie files from MPG to AVI format, separate an AVI file into its individual frames, and even separate the audio from a film, run it through successive filters, and re-attach it to the video.
However, while all those feats are impressive, all we need to use it for is to change our audio from 44100 kHz to 22050 kHz. Start by grabbing the source file with
When it’s finished downloading, extract it to its own directory with
When it’s finished extracting, cd into the resulting directory with
and then type
to configure the installation. When that’s done, enter
and then
to install the ffmpeg library. It’s not a small library, so feel free to grab a cup of coffee or a nap while it compiles.
Substituting avconv
If installing ffmpeg from source gives you the heebie-jeebies, there is another option: using ffmpeg’s replacement on the Pi, avconv . This library should already exist on your Pi, so no installation is necessary.
Now, to convert our position.wav file, we use the following syntax:
or
That’s it—position.wav has now been re-encoded with a 22050 kHz sample rate and is ready to be broadcasted. If we want to broadcast the contents of position.wav, we would type in a terminal
(103.5 FM is the frequency it will be broadcasted to. Adjust for your local stations, of course.)
Preparing the Pi
If you’re reading this chapter after the RC plane chapter, you may recognize much of the setup here, as many of the parts of these projects are very similar. The first thing you need to do is to make sure that the gpsd module will be running every time you start the Pi. To do that, open your rc.local file by typing
and add the following line to the end:
Note
For more information about the rc.local file, see the sidebar in Chapter 10.
Now the gpsd module will run every time we start the Pi.
However, we’re not done in the rc.local file. It’s likely that when you launch the balloon, you’ll want to just power the Pi and launch, without having to worry about logging in and starting up the program you’ve written. Luckily, you can do that with the rc.local file too. Upon startup, after the gpsd module launches, you’ll want to give your GPS board a few seconds to get a fix on some satellites before it starts logging data. To do that, after the gpsd line just shown, add the line
to make the Pi pause for 45 seconds, and then add the line
(Make sure this line matches wherever you’re storing your balloon program, of course.) Your balloon program will now start automatically, 45 seconds after your GPS module begins to read data from its satellite fixes.
Using Threading and Objects
An important programming feature we’ll be using in this project is threads. If you already built the RC plane project in Chapter 10, this will be old hat to you. If you haven’t, however, here’s a quick rundown.
Threads are important because they allow your program and processor to do several tasks at once, and they don’t tie up all the memory and processing power doing one simple task. A simple call to import threading gives you the full power of threads and all they can do for you.
What do threads actually do? Threads allow your computer to (seemingly) execute several tasks at once. I say “seemingly” because the processor can still execute only one process at a time, but threads allow it to switch back and forth between processes so fast it seems to be executing them simultaneously. For more of an introduction to threads, see the sidebar in Chapter 10.
We’ll use them to poll the GPS receiver. By using a thread, our main buffer won’t fill up with data as we continue to get data, and we can still log the data in our position.txt file for later use. To use threads in the most efficient way possible, we’ll create an object called a Poller that will request information from the GPS receiver every 15 seconds using the gps module. Every time we get a position reading, we’ll update the text file and take a picture.
Note
For a refresher on objects, classes, and object-oriented programming, see the sidebar in Chapter 10.
Our thread object will be defined like so:
From the main portion of the program, we can start the thread by declaring a new myObject object (a new thread):
and then start it with
The thread is now running with its own instance of the myObject, called newObject. Our thread (as shown in the final code at the end of the chapter) will be initiated with
Once it has been started, it will continue to execute its function (in our case, collecting GPS data, transmitting it, and taking pictures) until we quit the program or power off the Pi.
Connecting the Bits
The construction of this weather balloon project can be rather involved, so set aside a few hours to get everything ready.
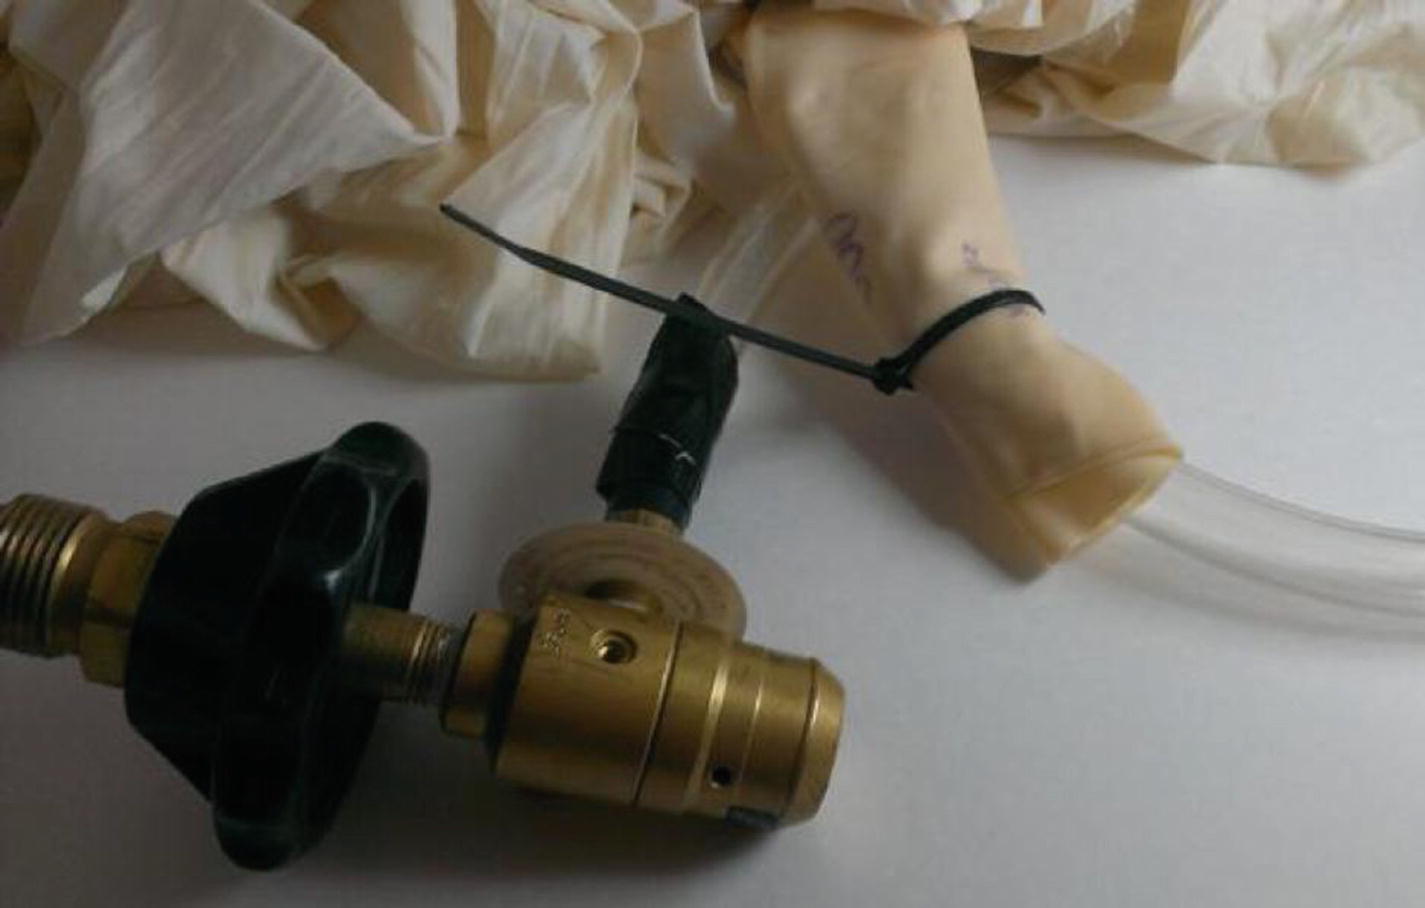
Regulator-to-balloon neck setup
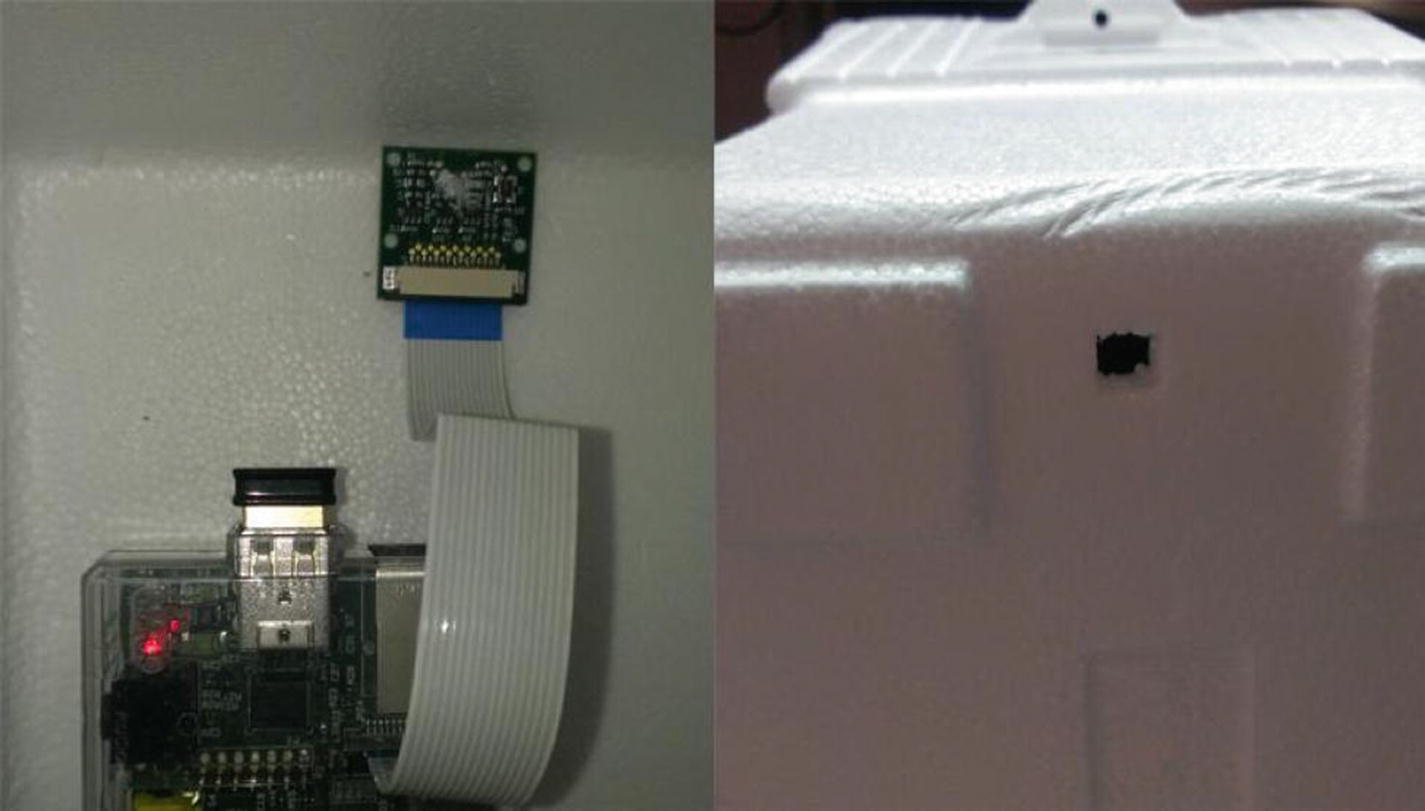
Camera positioned in the cooler
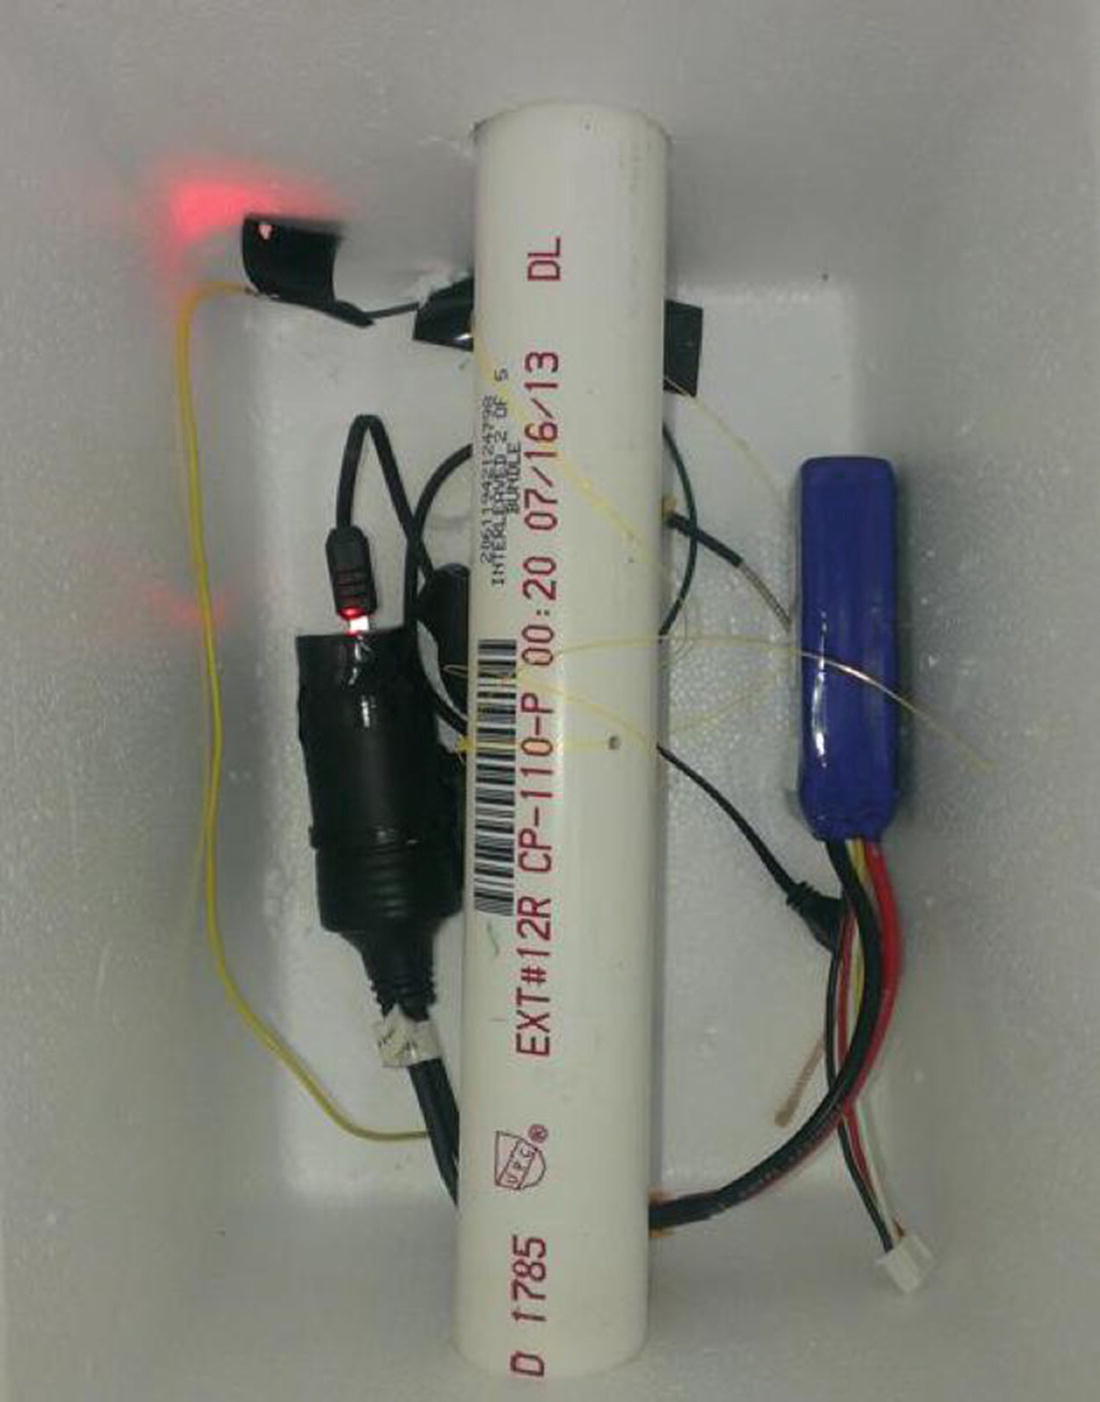
Interior of the cooler showing the tether attached to a PVC pipe
Now, break open the hand warmers and activate them by shaking and mixing the contents. Lay them on the bottom of the cooler and put your Pi and battery pack on top of them. The hand warmers are important because it gets pretty cold in the upper atmosphere—cold enough to cause your electronics to stop working. The warmers should keep the interior of the cooler warm enough to allow your Pi to continue working at the apex of its flight.
You’ll need to attach the parachute to the lid of your cooler as a way to save your Pi in case the balloon bursts. I found that the best way to do this is to poke a hole in the lid, thread the parachute strings through the hole, and secure them to the lid with hot glue. Then, loosely tie a string around the chute—tightly enough to keep the parachute closed upon ascent, but loosely enough to allow the chute to break free and open if the cooler begins tumbling in free fall.
The last things to do are power up the Pi, tape the lid tightly onto the cooler, and attach it to the filled balloon. When the balloon is at its desired volume (and this will vary with the weight of your payload, so some experimentation is necessary), remove it from the tank and tie off the end with either zip ties or rubber bands. Then, attach the neck of the balloon to your cooler, again using zip ties, and release it. The balloon will float into the atmosphere, taking pictures as it goes. Meanwhile, tune your radio to 103.5 FM (or whatever station you set in your final code) and listen to the live updates as your balloon tells you exactly how high it is. Unless it bursts (always a distinct possibility), the balloon should travel to the end of the attached fishing line, which is a good reason to get as much line as you can, in order to allow your balloon to ascend as high as possible. When it’s time to retrieve your balloon, use the attached fishing line to reel it back in. To save your arm muscles, you may want to attach the fishing-line spool to an electric drill.
Note
Check with your local branch of the FAA or its equivalent before flying your balloon to determine the best time and place to launch.
Reviewing the Photo Results

High-altitude picture

High-altitude picture

High-altitude picture

High-altitude picture

High-altitude picture
The Final Code
This code (available as balloon.py from Apress.com) will query the GPS board, record and transmit its coordinates, and take a picture periodically with the onboard camera:
Summary
In this chapter, you programmed your Pi to get its location from a GPS module and transmit its location to you so that you could stay on the ground and send it into the upper atmosphere to take pictures. You worked with threads again, as well as a bit more with object-oriented code, and got a few good pictures from on high, I hope.
In the next chapter, we’ll go in the opposite direction and send the Pi underwater.