In this chapter, you learn two ways to turn your Raspberry Pi into a media server or media playback device.
Hardware Used in This Chapter
Raspberry Pi 3
Wired or wireless network
Selecting a Distro
There are no shortage of media-centric Linux distros available for the Raspberry Pi. Here’s a partial list, all available in BerryBoot-compatible distros from the Alex Goldscheidt BerryServer web site ( http://berryboot.alexgoldcheidt.com/ ).
LibreElec 8.0.1 (Pi 1, Zero, Zero W; Pi 2, Pi 3)
Max2Play (Pi 2, Pi 3)
OSMC (Pi 1, Pi Zero; Pi 2, Pi 3)
PeachPi TV LTS (all versions)
Pi MusicBox
RasPlex 1.8.1 (Pi 1, Pi Zero, Pi Zero W; Pi 2, Pi 3)
In this chapter, we will examine how to set up a classic media server (LibreElec) and a Plex server client (RasPlex).
BerryBoot, WD PiDrive, and Media Serving
Why use BerryBoot-compatible images? BerryBoot-compatible images work very well with the WD PiDrive BerryBoot edition (1TB hard disk) and your Raspberry Pi. By using BerryBoot edition PiDrive or another 2.5-inch portable USB 3.0 hard disk drive instead of a high-capacity microSD card, you can store media on a fast, durable hard disk for faster access and relieve wear on the microSD card’s flash memory.
To install any BerryBoot-compatible image, download it, extract it, copy the .IMG file to a USB flash drive, and then connect the drive to your Raspberry Pi connected to your PiDrive BerryBoot edition. Use the option to install an OS from USB flash.
Note
To extract a BerryBoot .xz image file directly to an image file with Linux or MacOS (OSX), use this command from a command prompt or terminal session: tar -Jxf name-of-the-image.img.tar.xz (replace name-of-the-image with actual image name).
Here’s the step-by-step process for Windows, starting with downloading the file to your computer. In this example, we’ll use Windows along with the free 7-Zip archive file extractor. Get 7-Zip from www.7-zip.org/ . Install it before continuing, and see the web site for the specifics of the extraction options 7-Zip offers .
Visit the BerryServer web site ( http://berryboot.alexgoldcheidt.com ) and select a distro by clicking the Download for Berryboot button.
After the file (XZ extension) is downloaded, open Windows Explorer or File Explorer, right-click the file, and select 7-Zip and one of the extraction options. The extracted file has an extension of TAR (Figure 8-1).

Figure 8-1. Performing the first of two extractions with 7-Zip (XY to TAR)
Right-click the .tar file, and select 7-Zip and one of the extraction options. The extracted file is the IMG file used by BerryBoot (Figure 8-2).
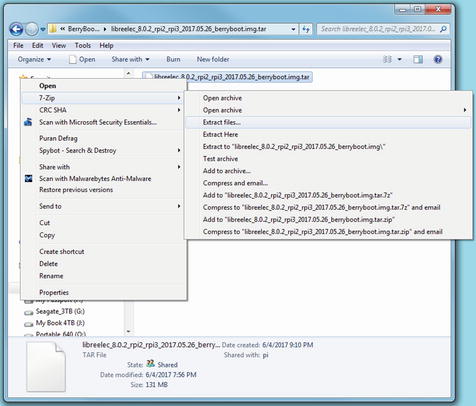
Figure 8-2. Performing the second of two extractions with 7-Zip (TAR to IMG)
Copy the IMG file to a USB flash drive that uses the default FAT32 file system.
Tip To find out what file system the flash drive uses, right-click it in Windows Explorer/File Explorer and select Properties. The file system will be listed. If the drive is using NTFS, copy any files you want to keep, and then reformat it as FAT32. You can use the SD Formatter utility discussed in Chapter 2.
Safely eject the USB flash drive from your system .
Connect the USB flash drive to your Raspberry Pi running BerryBoot.
Start the Raspberry Pi. Select the Edit menu option when it appears.
Click the small down arrow on the Add OS button to open the menu shown in Figure 8-3.
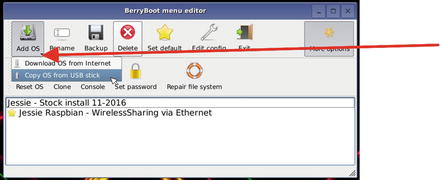
Figure 8-3. Opening the Add OS menu and selecting the Copy OS from USB stick option
Select Copy OS from USB stick.
Select the desired .img file and click Open. The .img file is copied to the Raspberry Pi’s drive.
To make the new OS the default, select it and click Set default (Figure 8-4).
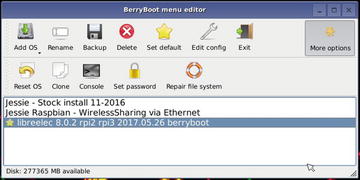
Figure 8-4. Preparing to restart the Raspberry Pi after installing LibreElec in BerryBoot
Click Exit to restart your Raspberry Pi.
Using LibreELEC
LibreELEC is one of several Raspberry Pi distros based on the open source Kodi media player and manager. Here’s how to get started.
Click Next when prompted.
The default hostname is LibreELEC. You can change it when prompted. Click Next after creating a new name (Figure 8-5), or to keep the existing name.
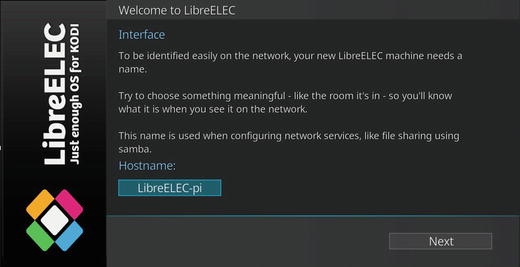
Figure 8-5. Renaming the LibreELEC host
If your Raspberry Pi is not connected to a wired network, select a wireless network from the list.
After you enter the password (encryption key), the network is listed as Online and your device’s IP address is listed (Figure 8-6). Click Next to continue.
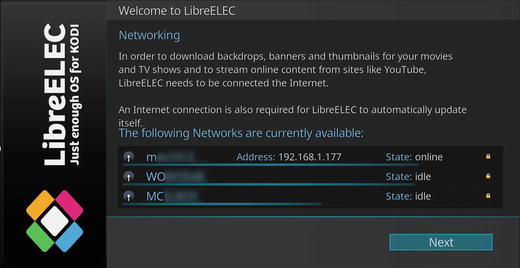
Figure 8-6. Available wireless networks after connecting with one
By default, Samba is enabled. You can also enable SSH . Make your choices and click Next to continue.
Click Next to complete setup.
Adding Media Files
LibreELEC supports playback of movies, TV shows, music, music videos, live TV radio, pictures, and videos. Whether you are using media on a local drive or a network drive, the setup process is similar.
Note
Click the Options icon (gearbox) visible in Figure 8-7 to change many different types of general and media-specific settings.
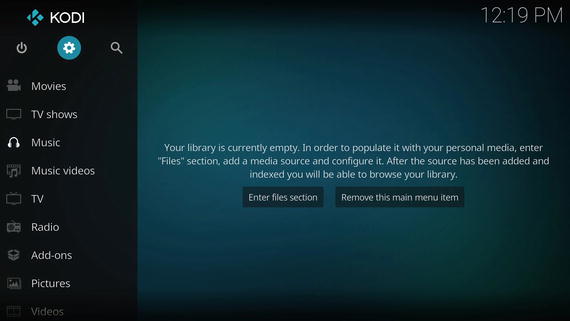
Figure 8-7. Beginning the process of setting up the music library
Let’s look at browsing for media files on the network. We’ll browse for music, but the same basic process is used for other types of media.
From the main menu (Figure 8-7), click Music.
Click Enter files section to browse for music.
In the Browse for library dialog , select the location that contains the files you want (Figure 8-8). Click OK to continue.
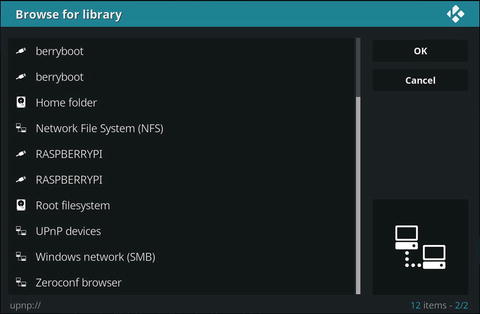
Figure 8-8. Selecting where to browse for media
Note In this example, we selected Windows network (SMB) to use files stored on a workgroup network share. Choose Network File System (NFS) to browse music files on a MacOS (OSX) computer. Scroll through the list to locate files on a local drive.
If you select a Windows network, select the workgroup that contains the media, and click OK.
Click the network share that contains the media, and click OK .
If the share is password protected, you are prompted for a username and password. Provide a username and password that is already set up on that share.
Continue to browse until you locate the folder that includes the media you want. Click Add (Figure 8-9), then enter a name for the source, and click OK.
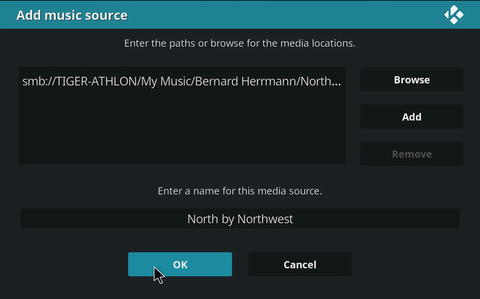
Figure 8-9. Selecting a source for music
Click Yes when prompted to add the media from the selected source to your library.
The source is listed the next time you open the appropriate media icon from the main menu.
Select the media to play.
Figure 8-10 shows a typical album listing, and Figure 8-11 shows a typical pictures folder.
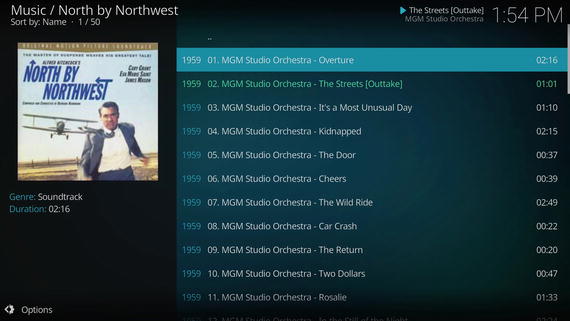
Figure 8-10. A track listing from the classic Hitchcock thriller’s soundtrack album
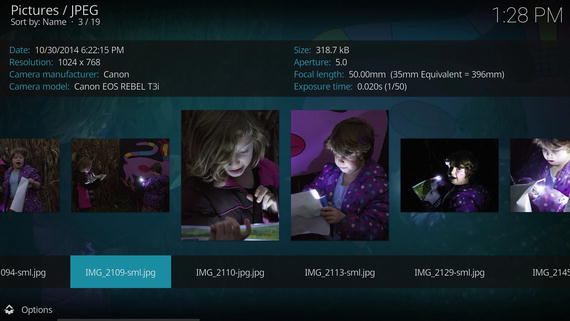
Figure 8-11. Select a photo to see selected camera and exposure metadata
Note
Click the Options button (lower left-hand corner ) to change display and playback options for different types of media.
Connecting to a PLEX Server with RasPlex
PLEX servers have become very popular ways to store music and recorded video for use on home networks. So, it’s not surprising that Raspberry Pi supports access to the media on a PLEX server with RasPlex.
Although RasPlex is based on Kodi , its user interface is quite different from LibreELEC or most other Kodi-derived media players. RasPlex is optimized for use with a remote control or a keyboard (in its default full-screen mode, mice are not supported).
Tip
The Flirc USB (flirc.tv) enables standard IR remote controls to work with a Raspberry Pi or other computer being used as a media center. If your HDTV supports CEC, you can control it with RasPlex. See https://forums.plex.tv/discussion/69014/remote-for-rasplex and https://github.com/RasPlex/RasPlex/wiki/Remote-Controls for details.
Here’s how to connect to a PLEX server with RasPlex. In the following example, we use up, down, left, and right arrow and Enter keys on the keyboard.
From the Welcome screen, highlight Next and press Enter on your keyboard or remote.
If your Raspberry Pi is not connected to a network and has a wireless adapter, select a wireless network when prompted. Enter the encryption key and select Next to continue.
Samba is already enabled, and you can also enable SSH. Select Next to continue.
If the RasPlex display does not properly fill the screen, select Do Calibrate. Otherwise, select Next.
To log into your MyPlex account (and log into your local PLEX server), select Sign in to Plex when prompted.
You can log in by entering the PIN displayed in RasPlex on a computer connected to plex.tv/pin, or highlight Manual and enter your username and password.
Select OK to complete signin.
To improve performance, select Start precaching and select either your local server or the plex.tv server .
When image precaching is complete, select Next .
Select your favorite media type, and then choose from available items on the Plex server (Figure 8-12).
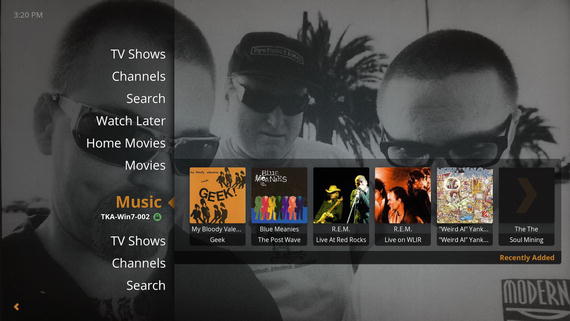
Figure 8-12. Scroll up and down to select a media type, and then to the right to select what to play
To change settings, press the left arrow key from the home dialog shown in Figure 8-12. This displays a menu with options for changing channel settings, system settings, network connections, and other options (Figure 8-13).
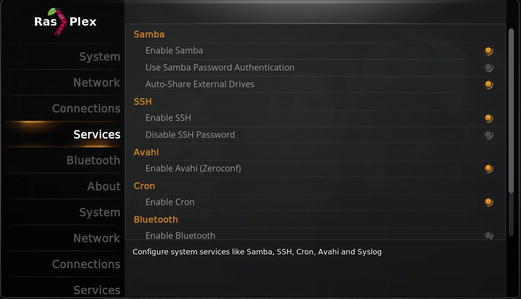
Figure 8-13. Changing services in RasPlex
Troubleshooting
Check the following if you have problems with setup, configuration, or media playback:
Network Settings
You don’t need to set up a wireless network in advance. However, if you prefer to use a wired network, connect your Ethernet cable before you start the configuration process .
If you are unable to log into a network share, go to that computer or device and make sure you are using a username that is already set up on that computer or device along with the correct password.
Audio Playback
If an HDMI connection is being used with any media playback app, the default is to send audio and video to the HDMI display. If the display is a computer monitor with no speakers, you won’t hear anything. Use the configuration settings in the distro to redirect audio to the correct playback device.
Summary
There are many media-centric Linux distros available for the Raspberry Pi. Many are based on the Kodi distros for Intel x86 and x64 processors.
BerryBoot and a WD PiDrive make setting up a media server and storing a large amount of media easy.
LibreELEC supports playback of movies, TV shows, music, music videos, live TV radio, pictures, and videos. Media can be stored on the Raspberry Pi or a network location.
RasPlex connects to an existing PLEX server for media playback.