In this chapter, you will learn about using the Raspberry Pi’s built-in MicroSD card slot, SD adapters for microSD cards, USB flash drives, USB card readers, and the WDLabs PiDrives made for Raspberry Pi. Depending upon the Raspberry Pi model in use, some USB drives might be connected via a USB 2.0 hub. Many of these devices are pictured in Figure 3-1.
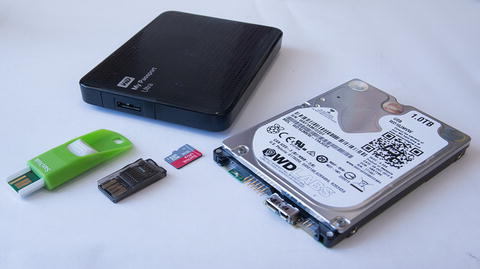
Figure 3-1. USB flash drive, card reader, microSD card, USB external hard disk, and WDLabs PiDrive
Recommended Memory Card Types
Modern Raspberry Pi boards are designed to use microSD cards of at least 4GB in size if you are recording an image direct to the card (RISC OS, a non-Linux OS, can use a 2GB microSD card). For NOOBS and similar OS loaders and boot managers, at least 8GB is recommended.
The Raspberry Pi SD-cards page ( www.raspberrypi.org/documentation/installation/sd-cards.md ) recommends using at least a Class 6 card. While there are no official listings of tested cards, the following unofficial sources can be helpful when selecting cards to use.
The eLinux RPi SD cards page http://elinux.org/RPi_SD_cards )
The Raspberry Pi Dramble microSD cards Benchmarks ( www.pidramble.com/wiki/benchmarks/microsd-cards )
The eLinux RPi card page has a user-supplied database of cards that are listed as working or not working along with details such as size, speed class, part number, notes, and date added.
The Dramble Benchmarks page shows over a dozen brand-name and generic cards tested on Raspberry Pi 2, Pi 3, and Pi 3 with overclocked card reader. Four tests were performed: hdparm buffered, dd write, 4K random read, 4K random write. The page also provides instructions on how to run speed tests yourself.
Tip
To overclock the Raspberry Pi 3 card reader, use the following command to create a bash script (use 84 or 72 in place of 100 if you want to try this on a Raspberry Pi 2):
sudo bash -c 'printf "dtoverlay=sdhost,overclock_50=100\n" >> /boot/config.txt' Reboot the computer and the card reader runs faster. For more details, see www.jeffgeerling.com/blog/2016/how-overclock-microsd-card-reader-on-raspberry-pi-3 .
Figure 3-2 illustrates some of the microSD cards that can be used with a Raspberry Pi.
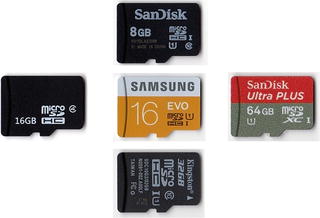
Figure 3-2. 8GB, 16GB, and 32GB microSD cards can be used by Raspberry Pi without reformatting. However, a 64GB card must be reformatted as FAT32 before it can be recognized.
Table 3-1 provides a reference to microSD card speed ratings.
Table 3-1. MicroSD Card Speed Ratings
Card Speed | Write Speed* | Read Speed* | Notes |
|---|---|---|---|
C4 | 4MBps | C-class cards do not have read-speed requirements | |
C6 | 6MBPs | V6** | |
C8 | 8MBps | ||
C10 | 10MBps | V8 | |
U1 | 10MBps | 10MBps | V10 |
U3 | 30MBps | 10MBps | V30 |
Note
If you still use the original Model A or Model B Raspberry Pi boards that use full-size SD cards, you can also use microSD cards with a microSD to SD card adapter.
Expanding a Partition on a Flash Memory Card
Raspbian with PIXEL and many other Linux distros that include a desktop GUI use the full capacity of the memory card. However, some Linux distros and other operating systems made for the Raspberry Pi are configured to work with small-capacity (4GB or smaller) memory cards. To use the additional capacity of 8GB or larger cards, you must expand the partition after the OS is installed.
Table 3-2 lists some of the distros available for Raspberry Pi and whether their default installations use the entire capacity of a memory card by default.
Table 3-2. Raspberry Pi Distros and Expanded Partitions
Distro | Partition Exp. | Method |
|---|---|---|
Raspian with PIXEL (also known as Raspian) | Yes | N/A |
Raspbian Jesse Lite | Yes | N/A |
CentOS | No | root-fs expand |
RISC OS | No | SystemDisc app |
FedBerry Minimal | No | fedberry-config |
FedBerry | Yes | N/A |
Determining the Current Partition Size (Parted)
There are a variety of utilities included in Linux distros that can be used for determining partition size. The most powerful one, because it can also be used to change partition sizes, is parted. However, it is easy to use parted to view partition sizes. Open a terminal session and run this command:
sudo parted -lIn Figure 3-3, parted is run from a terminal session in RaspEX to show that the entire 16GB capacity of the flash drive is in use.
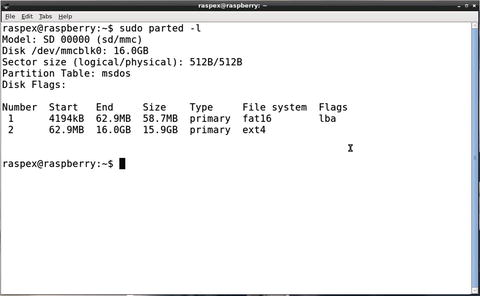
Figure 3-3. RaspEx, which includes a GUI, uses the entire capacity of a 16GB memory card
However, the CentOS distro shown in Figure 3-4 is using only 4GB of a 64GB microSD card (the card was formatted as FAT32 before CentOS was written to it).
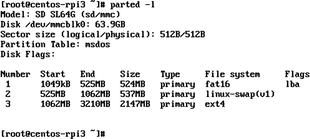
Figure 3-4. CentOS , which launches to the command line, is only using 3GB of the 64GB memory card it is installed on
Expanding the Partition Using Parted
A disk partition that is not in use can be resized (expanded) by using the parted command-line tool. However, using parted requires that the system be booted up in rescue mode, which unmounts partitions and turns off swap space, or these changes must be made manually after a normal boot.
As an alternative, some Linux distros include resizing utilities that can be run without unmounting the current drive.
Expanding the Partition with RootFS-Expand (CentOS)
On current releases of CentOS, the Linux Root partition can be expanded to use the remaining space on the drive by using the root-fs expand utility. Rootfs-expand must be run using the root account:
/usr/local/bin/rootfs-expandTip
To switch to the root account, use the command sudo su (and provide the root user’s password when prompted).
Figure 3-5 shows the output from rootfs-expand and parted -l to display the changed size of Partition 3.
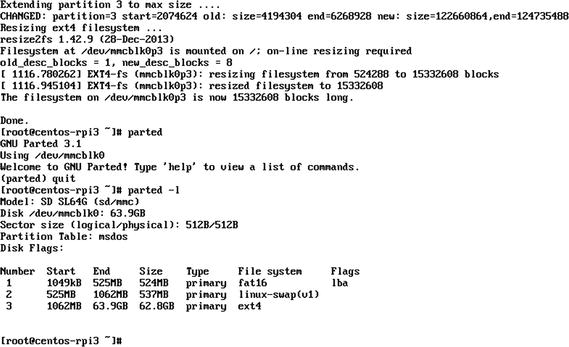
Figure 3-5. Using rootfs-expand and parted -l to see the expanded partition on a system running CentOS
Expanding the Partition Used by RISC OS
The version of RISC OS used by Raspberry Pi creates a RISC OS file system with a capacity of just under 2GB, even on larger flash drives. For this reason, preprogrammed RISC OS cards sold for use with Raspberry Pi are 2GB cards. To extend the RISC OS FileCore file system to use the entire capacity of larger microSD cards, use the SystemDisc utility available from Piccolo Systems ( www.piccolosystems.com ).
As an alternative, you might prefer to create an additional disk partition on the unused space. To learn how to create a FAT32 file system on a larger card, search the Raspberry Pi Forums at www.raspberrypi.org/forums for “RISCOS on a 4Gb SD Card” for instructions .
Connecting a USB Flash Drive or Memory Card
A flash memory card used with Linux needs to have at least one partition that uses a file system supported by the distro, typically ext4 or FAT32. Some distros, typically those with a GUI, automatically mount a flash memory card or USB card reader’s card when it is connected. If not, follow this procedure (this example uses the Raspbian Jessie Lite distro):
Determine the currently connected drive and device name (Figure 3-6). To view the drive and device name (and partitions), use parted (see command syntax below Figure 3-6).

Figure 3-6. Using parted -l to display the disk name (mmcblk0) and partitions
sudo parted -lCreate a folder that can be used as a mount point for the drive:
sudo mkdir -p /media/USBConnect the USB flash drive or insert a card into the card reader. If you are running a GUI , most systems will automatically display the name of the device when you connect it (and mount it for you). To list disks and partitions, use this command:
sudo ls -1 /dev/disk/by-uuidIn this example (Figure 3-7), the new drive (listed first in this example) is known as sda1 (device name is sda, partition #1). If a second drive is connected, it will be known as sdb1, and so on.

Figure 3-7. Using ls -l /dev/disk/by-uuid to display the device name and partition(s) on the newly connected drive
Run parted -l again to see the file system used by the drive (in this example, shown in Figure 3-8, it is fat32). You need this information to mount the drive properly for use. Note that Linux refers to any USB storage device as Generic Mass-Storage (scsi).
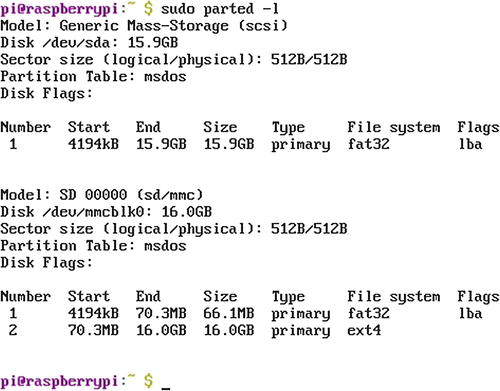
Figure 3-8. Using parted -l to display the file system used by the new drive ( fat32)
Mount the drive as a read-only device into the folder created in Step 2 with
sudo mount -t vfat /dev/sda1 /media/USBNote that vfat = FAT32. You can now use commands such as ls, cp (copies files from the device, and so on).
Unmount the drive with
sudu umount /dev/sda1.
Mounting a Drive for Read/Write Access
The preceding section covers how to mount a drive for read-only access from the command line. However, if you want to write to the drive (copy files to the drive, delete files on the drive, add a folder to the drive, or make other changes), you need to perform two additional tasks:
Determine your uid and gid values
Use that information as part of the syntax for a mount command
To determine your uid and gid, use the command id. These values are listed first. The values shown in Figure 3-9 may vary on systems with multiple users or if you are using the root account.

Figure 3-9. Using id to display uid and gid values for the current user
Use this information in the mount syntax to use the drive as a read/write device:
mount -t vfat /dev/sda1 /media/USB -o rw,uid=1000,gid=1000,umask=133,dmask=022You can delete files (rm) from the USB drive, copy files (cp) to the drive, make folders (mkdir) on the drive, and so on. The umount command is the same as before.
Partitioning a Flash Memory Card or USB Drive
Partitions on flash memory cards and USB drives prepared by Windows typically use the FAT32 file system. Although this file system is supported by Linux, the ext4 file system is a better choice if the partition will be used only by Linux or accessed over a network. Here’s how to create an ext4 partition and file system. The following assumes that the existing partition contains no data (it will be removed in the process).
Caution
The existing partition on the drive will be destroyed and recreated. Be sure to copy any data needed to another location before starting this process! If you must change partition types or sizes on a drive containing data without losing data, use Gparted (gparted.org).
Connect the drive.
Mount the drive as a read/write device.
Use fdisk to start the repartitioning process:
sudo fdisk /dev/sdaType m to see available commands (Figure 3-10).
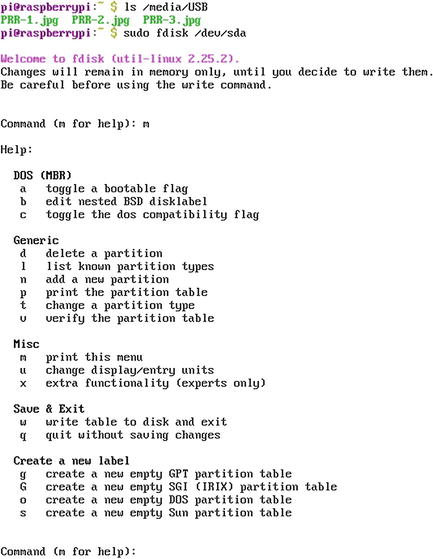
Figure 3-10. Running fdisk on a mounted flash drive
Type p to list the partitions on the selected drive.
Type d to delete the partition.
Type w to write changes to the partition and exit .
Restart fdisk as in Step 3.
Type p to view current partitions (no partitions should be visible [Figure 3-11]).
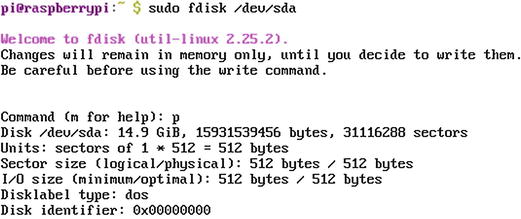
Figure 3-11. Fdisk displays no partitions on the drive.
Type n to create a new partition.
Type p to create a primary partition.
Type 1 to create the first primary partition.
Press Enter to use the default value for the first partition.
Press Enter to use the default value for the second partition.
Type w to write the new partition table and exit (Figure 3-12).
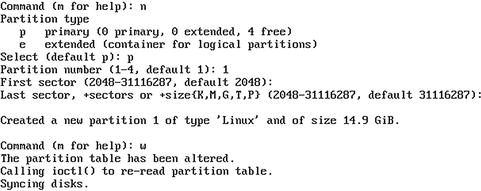
Figure 3-12. Creating a new partition with fdisk
Formatting a Drive with ext4 File System
After a new partition has been created with fdisk, it must be formatted. Linux uses the mkfs utility to perform this task. If you don’t specify the file system, mkfs defaults to the old ext2 file system. You must also specify the device. To create an ext4 file system on /dev/sda1, use the command shown in Figure 3-13:
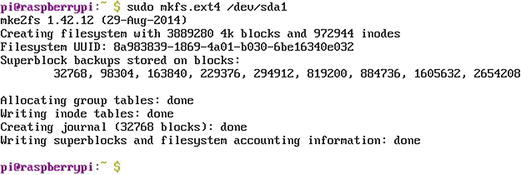
Figure 3-13. Using mkfs to create a file system on a drive partitioned with ext4
sudo mkfs.ext4 /dev/sda1 Adding and Using an External Hard Drive
If more storage space is needed than is available on a USB flash drive or microSD memory card, you can use a USB hard drive with your Raspberry Pi. Using a USB hard drive, particularly a mechanical drive (non-SSD), is recommended if you are using your Raspberry Pi for logging, DVR media recording, or other apps that involve a lot of data writing and rewriting.
If your Linux distro has a GUI installed, the drive is mounted automatically. If you are using Linux without a GUI, you must mount the drive manually.
You can connect either a bus-powered or self-powered USB hard drive to a Raspberry Pi. We recommend using a USB 2.0 powered hub if you prefer to use bus-powered USB drives, especially with Raspberry Pi boards that use a 2A or smaller power supply.
Raspberry Pi boards have a limit of 1.2A total current draw for all USB ports, and default to providing a maximum of 600mA per port. Some bus-powered USB drives might not work properly with this limit. On B+, Pi 2, and Pi 3 boards, the following setting in the config.txt file can be used to raise the per-port amperage limit to 1.2A:
max_usb_current=1 Note
Config.txt is located in the /boot folder. You must be logged in as root (use sudo su to change to the root account).
To use a USB drive (hard disk or flash) as the root file system (in other words, to boot from the external drive), you must
Determine which drive is the external drive.
Clone the current boot drive to the external drive (the external drive’s contents will be overwritten).
Change boot parameters to use the external drive as root. The Raspberry Pi’s onboard microSD/SD card is used to direct the system to boot from the external drive.
Note
The Adafruit web site has a complete step-by-step procedure and scripts to run to perform this process. Go to https://learn.adafruit.com/external-drive-as-raspberry-pi-root/ .
Adding and Using a WDLabs Pi Drive
As noted in the previous section, Raspberry Pi boards can be connected to USB hard drives as well as USB flash drives or card readers. However, there are several issues to consider:
Making effective use of the large storage space. For many users, a multiboot configuration is the best way to manage this space.
Power requirements. A power supply that provides less than 2.0A may prevent a bus-powered USB drive from working. A marginal power supply may cause the Raspberry Pi to display a 20-pixel-square RGB rainbow box in the upper right-hand side of the display.
Desktop clutter. A Raspberry Pi board uses very little desk space, but connecting it to a USB hard drive makes the combination about twice the size with plenty of cables everywhere.
Western Digital’s line of WD Labs PiDrives are designed to help overcome each of these issues:
The PiDrive Node Zero (314GB hard disk) and PiDrive Foundation Editions (250GB or 375GB hard disk) include a customized version of NOOBS that can load multiple instances of Raspbian Lite OS into as many as five partitions on the drive. These partitions are referred to as Project Spaces by Western Digital (Figure 3-14). Each instance of Raspbian Lite can be customized individually. At startup, you can choose which instance to boot.
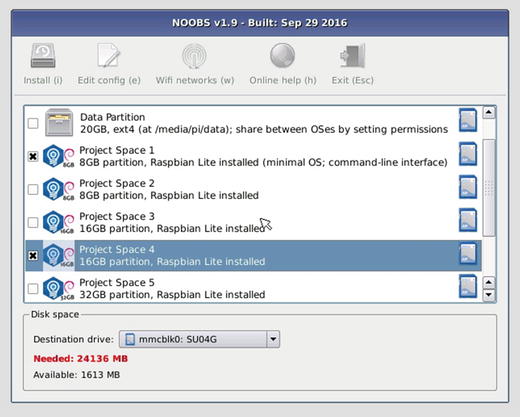
Figure 3-14. PiDrive’s version of NOOBS is preparing to install multiple copies of Raspbian Lite into separate Project Space partitions
The PiDrive BerryBoot Edition (1TB hard disk) includes a customized version of BerryBoot. BerryBoot can be used to install different operating systems onto the drive. Each OS can use the remaining free space on the drive, so it is not necessary to manually resize installed OS images (Figure 3-15).
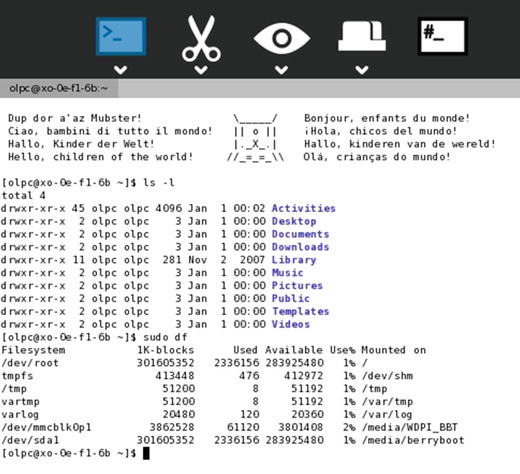
Figure 3-15. Sugar, a child-oriented version of Linux available through BerryBoot, can access all of the remaining disk space on the WDLabs PiDrive
Note
You can download WD’s PiDrive Foundation Edition Software (based on NOOBS) or BerryBoot from http://wdlabs.wd.com/downloads/ .
To reduce desktop and cable clutter, the PiDrive Foundation Edition and BerryBoot editions include a PiDrive cable that can power the hard drive and Raspberry Pi from a single power source (Figure 3-16).
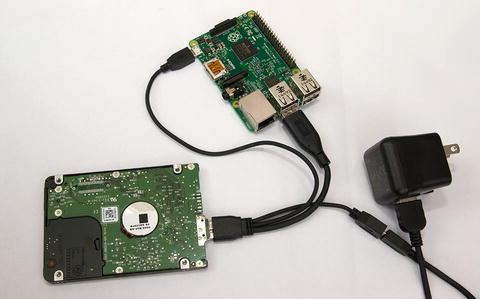
Figure 3-16. WDLabs offers a 3A (shown) power supply and USB cable that provides plenty of power to run both a PiDrive and a full-size or smaller Raspberry Pi board through the special PiDrive cable
WDLabs Pi Drives are also customized to use less power than standard 2.5-in. hard disks and can be installed along with the Raspberry Pi in cases that provide easy access to the Raspberry Pi’s board connectors.
The PiDrive Node Zero features a specially designed daughterboard that enables a Raspberry Pi Zero, which normally has one Micro-USB port, to feature two full-size USB ports and use only one cable to power both board and drive. In Figure 3-17, the daughterboard, drive, and Pi Zero board are shown without the mounting hardware that holds them together.

Figure 3-17. WDLabs PiDrive Node Zero uses this daughterboard (shown without mounting hardware) to connect to the Pi Zero’s Micro-USB data and power ports and the PiDrive’s USB port
Note
Western Digital has stopped producing PiDrive hardware products. However, these products will be sold as long as inventory is available. See http://wdlabs.wd.com/category/wd-pidrive/ for details.
Wireless Drives
Wireless drives are available in both hard disk and USB flash memory form factors. Because they connect to the Raspberry Pi via Wi-Fi, they will be discussed in Chapter 4.
Troubleshooting
Typical problems with mass storage on Raspberry Pi include the following:
Incorrectly formatted media
Not enough power
Drive can’t be mounted in read/write mode
Defective cables
Incorrectly Formatted Media
If a flash memory card is not properly formatted (FAT32, ext4, or other file systems supported by Linux), it cannot be recognized by the Raspberry Pi board and the system will not start it. 64GB or larger microSD cards must be formatted as FAT32 before they can be used on a Raspberry Pi.
Reformat the card and be sure to use an OS supported by the Raspberry Pi board (see Chapter 2 for details).
If a boot manager (NOOBS, BerryBoot, PINN, and so on) cannot locate the OS after installation, make sure the drive where the OS is located is working. If the OS is on a USB drive, make sure the drive is plugged in and powered on. If the drive is connected to a USB port via a cable, make sure the cable is designed to support USB 2.0 or faster speeds (very thin cables are not recommended). With BerryBoot, open the Options menu and use the Repair File System option if the drive is properly inserted or connected but is not working.
Not Enough Power
If you are using a USB hard drive with have at least a 2A power supply and are not using all of the USB ports on the Pi, use the config.txt option to increase maximum USB port power. With a Pi Zero, upgrade to a higher-amperage power supply as the typical bundled power supply is only 1A.
With a Pi B+, Pi 2, or Pi 3, consider using a 3A power supply if you use bus-powered USB drives, The WDLabs PiDrive cable can be purchased separately (see https://www.wdc.com/products/wdlabs/wd-pidrive-cable.html or third-party vendors) to simplify cable management, and it works with any bus-powered USB drive that uses the standard USB 3.0 micro-B connector.
With any Pi model, consider using a powered USB 2.0 hub to enable multiple devices (including drives) to be connected to a separate power supply from the Pi.
Caution
Some 2.5-inch enclosures used to convert internal SATA laptop drives into external drives use a USB 3.0 Type A cable for the drive connection.
Drive Can’t Be Mounted in Read/Write Mode
One of the advantages of working with external storage devices with a Linux GUI is that drives are normally mounted automatically in read/write mode when you connect them. However, Linux checks drives for possible errors (so-called “dirty drives”) and will mount them in read-only mode if the drive might have errors (due to incorrect ejection from a host computer, etc.). If you are unable to write to a USB drive that was mounted in read/write mode, use the command dmesg to view drive-related events:
sudo dmesg Summary
To get the most out of your Raspberry Pi, make sure you understand how to expand the storage space used by your preferred operating system to use the full capacity of your flash memory. Learn commands for mounting a new drive and using it in read/write mode if you use a command-prompt (non-GUI) Linux distro or other operating system. If you want to have a multiboot configuration so you can choose the operating system to run when you start your Pi, consider adding a USB hard disk to store and access your operating systems.