
To turn your Raspberry Pi into a print and scan server, you need to perform the following tasks, all of which are covered in this chapter:
Connect your printer, scanner, or multifunction (print/scan/copy) device to your Raspberry Pi
Install and configure CUPS (Common Unix Print Service) on your Raspberry Pi
Create users that can connect remotely to a CUPS printer
Install and configure SANE (Scanner Access Now Easy) on your Raspberry Pi
Create users that can connect remotely to a SANE scanner
Install CUPS or SANE clients (if necessary) to remote systems that will connect to the printer, scanner, or multifunction device
There is also an optional task:
Configuring the Raspberry Pi for headless booting and remote control with SSH
Hardware Used in This Chapter
A multifunction unit (print/scanner/copier)
Raspberry Pi Node Zero (or other Raspberry Pi model using flash memory or a hard disk [recommended])
Connecting via USB
Most printers or multifunction (print/scan/copy) devices connect via USB. However, unlike Windows or MacOS (OSX), which can automatically detect USB devices, you must manually configure a printer or multifunction device after you connect it to your Raspberry Pi.
Caution
Boot your computer, log into it, and then connect your printer or multifunction device. If you connect the printer/device first, you could cause a kernel panic because Raspbian or other OSes will try to read the USB port or card reader.
If you use a Raspberry Pi Zero, ZeroW, 1, or 1+, you have only one USB port. If you need more than one USB port (for example, for a wireless or wired network adapter or a USB drive), be sure to choose a supported USB hub that has its own power supply. See http://elinux.org/RPi_Powered_USB_Hubs for a large list of tested hubs.
Caution
Some powered USB hubs can use one USB port to power some Raspberry Pi models. Be sure to review the notes on the eLinux page listed in the preceding paragraph to determine which hubs can do this.
Selecting a Distro
To reduce computing overhead and space requirements, it makes sense to use a GUI-less Linux distro such as Raspbian Jessie Lite for your print and scan server.
Note
Because of the limited lifespan of flash memory cards when used for frequent writes, I recommend installing Raspbian Jessie Lite or other Linux distros to a hard disk drive. I used the Pi Node Zero from WDLabs, which features a low-power 2.5-inch WD hard disk drive and a built-in two-port USB hub. For more information about using Pi Node Zero and other hard disks with Raspberry Pi, see Chapter 3.
Manual Connections to a Wireless Network
To install CUPS, Samba, and drivers for your printer and scanner, you need to connect to the Internet.
If you use a wireless network, it might be necessary to manually configure Raspbian Jessie Lite to use it. Here are two clues that your system doesn’t have a working wireless connection :
Running an apt-get command results in errors (Figure 6-1)
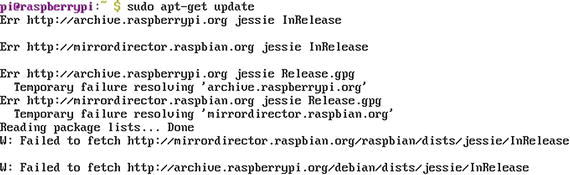
Figure 6-1. Errors such as Temporary failure resolving… or Failed to fetch while running an apt-get command indicate a lack of a network connection
ifconfig doesn’t display a valid address for your wireless adapter (Figure 6-2)
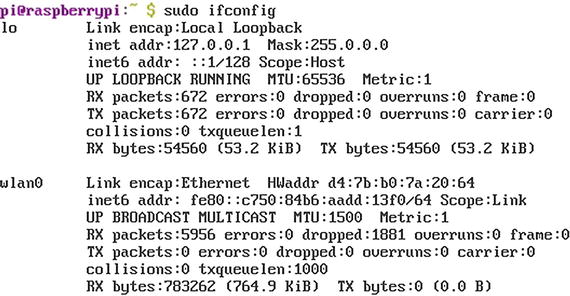
Figure 6-2. wlan0 has no IPv4 (inet) address, indicating it has no network connection
To set up a wireless configuration , follow these steps:
Open the wpa_supplicant.conf file for editing [nano is the default text editor]:
sudo nano /etc/wpa_supplicant/wpa_supplicant.confAdd the following statements to the end of the file (use your actual SSID and encryption key in place of the placeholders):
network={ssid="YourSSID"psk="YourEncryptionKey"}To save changes, press Ctrl-X, then Y when prompted.
Reboot: sudo reboot.
After rebooting, run sudo ifconfig wlan0 to verify that you now have a working Internet connection (Figure 6-3).
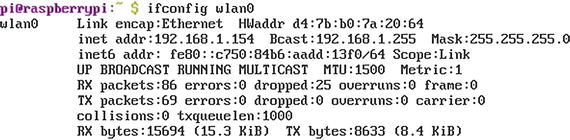
Figure 6-3. After rebooting, wlan0 now has a valid IPv4 (inet) address received from the DHCP server in the wireless router
Be sure to note the IP(v4) address of your Raspberry Pi. In Figure 6-3, it is 192.168.1.154. You will use the Pi’s IP address to connect to CUPS remotely.
Installing and Using CUPS
After verifying that you have a working Internet connection, the next step is to update your system and install CUPS:
sudo apt-get updatesudo apt-get install cups
Note
Depending upon the printer or multifunction unit you use, CUPS might already include drivers for your device, or you might need to add drivers. See “Installing Printer Drivers,” in this chapter for details.
Adding Users to the Print Administration Group
Unless you add your account to the Print Administration group, the only user that can administer print jobs would be root (su). Switch to the root (su) account with sudo su and use the usermod command to add your user account (pi) to the group:
usermod -a -G lpadmin pi To view the groups a particular user (pi) belongs to:
groups pi Figure 6-4 illustrates the groups user pi belongs to before and after using usermod.

Figure 6-4. Adding the user pi to the lpadmin group
To return to the normal user account, enter the command exit.
Configuring CUPS for Remote Administration
The next step in setting up a printer is to run CUPS to name the printer and install the appropriate printer driver. However, CUPS is configured from a web browser. By editing the CUPS configuration file (cupsd.conf), we can allow remote administration via another computer’s web browser:
sudo nano/etc/cups/cupsd.conf Make the following changes:
Replace Listen localhost: 631 with Port 631
In the sections headed <Location />, <Location /admin>, <Location /admin/conf>, add the line
Allow @local after the line Order allow, denySave changes by pressing Ctrl-X, Y.
Restart with
sudo service cups restart Logging into CUPS Remotely
If you are using an older printer or multifunction device, it’s likely that CUPS already has a suitable printer driver. In this section, you learn how to log into CUPS from a remote computer’s web browser, select a printer, and configure it.
To connect to your Raspberry Pi from another computer on the network:
Open a web browser.
Enter the Pi’s IP(v4) address (replace the xxx in the following example with the actual number) and port number into the browser window: xxx.xxx.xxx.xxx:631.
The CUPS home tab appears (Figure 6-5).
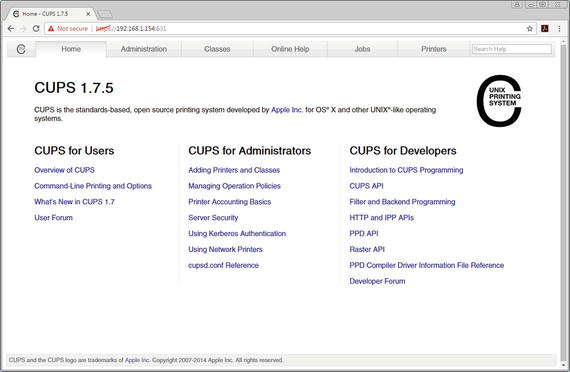
Figure 6-5. Logging into CUPS remotely
Selecting and Configuring a Printer with CUPS
After opening CUPS, click Adding Printers and Classes to start the printer selection process :
Click the local printer
Click Continue (Figure 6-6)
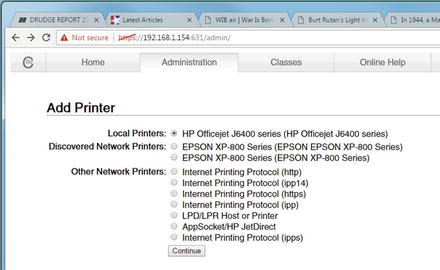
Figure 6-6. Starting the Add Printer process
On the next dialog, enter the location (optional)
Click the empty Share This Printer box to check it
Click Continue (Figure 6-7)
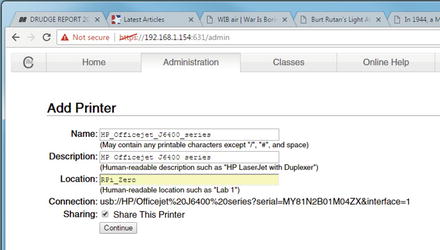
Figure 6-7. Specifying the location and enabling printer sharing
Select the printer make (if not already selected) and model
Click Add Printer (Figure 6-8)
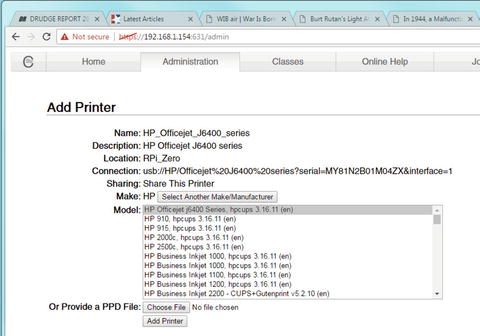
Figure 6-8. Adding the printer
Note If you do not find your printer model, you have two options: select a similar model and see if it works by creating a document and printing it, or download and install the correct printer driver (next section) and rerun CUPS afterward.
Select the options desired for the printer, such as the default paper size, media type, and print quality (Figure 6-9) on the General tab.
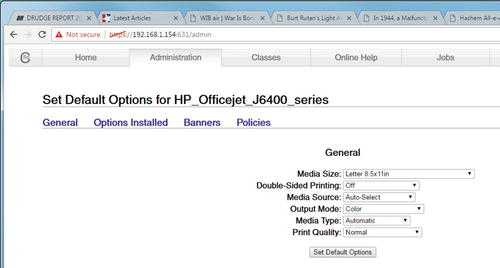
Figure 6-9. Setting default options for the printer
Click other tabs to set up all desired options.
Click Set Default Options when you are finished.
Installing Printer Drivers
If your printer or multifunction device is not listed in CUPS and a satisfactory substitute driver is not available, you need to download the correct driver.
Note
To support a multifunction device for printing and scanning, you need to use CUPS (for printing) and SANE (for scanning). See “Installing and Configuring SANE,” in this chapter.
To search for printer drivers to install, use the apt-cache search command (replace printerdriver with the actual brand of printer):
sudo apt-cache search printerdriver Note
apt-cache can also be used to display details of a particular package (sudo apt-cache show pkgname) or dependencies (sudo apt-cache showpkg pkgname). For more information, see www.tecmint.com/useful-basic-commands-of-apt-get-and-apt-cache-for-package-management/ .
In Figure 6-10, I searched for an Epson printer driver with sudo apt-cache epson. The search located several utility packages as well as the actual Epson printer driver I needed.
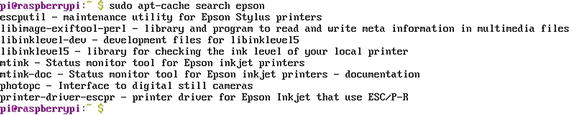
Figure 6-10. Searching for printer drivers and utiliies with the apt-cache search command
To install the printer driver, use this command replace printer-driver-yourprinter with the actual printer driver file name):
sudo apt-get install printer-driver-yourprinter Tip
For most HP printers and multifunction devices, download and install HPLIP (the HP Linux Printing and Imaging system).
Installing and Configuring Samba
To enable your Raspberry Pi to receive print and scan jobs, install and configure Samba, which provides SMB/CIFS file and print support to network clients running Windows, Linux, or MacOS (OSX) operating systems. Installing Samba is easy:
sudo apt-get install samba After Samba is installed, use this command to open and edit its configuration files :
sudo nano /etc/samba/smb.conf Make the following changes to the [global] section (replace Workgroup_name with the actual name of your workgroup) and add the security = user command:
workgroup = Workgroup_name...security = user
In the [printers] section make sure the browseable and guest OK settings are set to yes:
browsable = yesguest ok = yes
Press Ctrl-X, Y to exit and save changes. To complete the process, restart Samba:
sudo /etc/init.d/samba restart The default Samba configuration will automatically share any printers installed.
Connecting to a Samba Print Server with Windows
To connect to a Samba print server using Windows 7 :
Open Control Panel.
Click View Devices and Printers.
Click Add a printer.
Click Add a network, wireless, or Bluetooth printer (Figure 6-11).
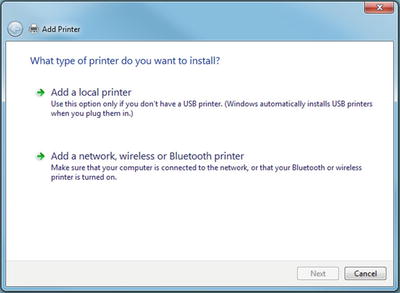
Figure 6-11. Searching for a network printer
Click Next.
Select the printer (Figure 6-12).
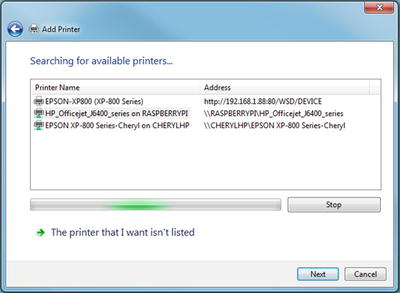
Figure 6-12. Selecting the network printer
Click Next .
Click OK on the No driver found alert.
Select the printer name and model from the Add Printer Wizard dialog (Figure 6-13).
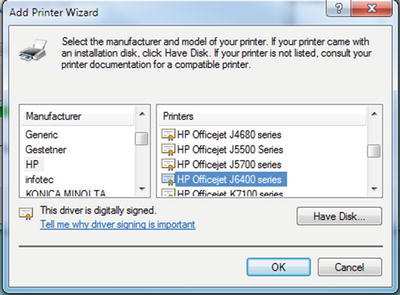
Figure 6-13. Selecting the printer driver
Click OK.
Click Next.
If you want to use this printer as the default, click the Set as the default printer check box (Figure 6-14).

Figure 6-14. Finishing printer setup
Click Print a test page.
Click Close.
Click Finish.
To connect to a Samba print server using Windows 8.1 or 10:
Open Settings.
Click Devices.
Click Printers & scanners.
Click Add a printer or scanner (Figure 6-15).
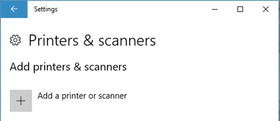
Figure 6-15. Starting the Add a printer process in Windows 10
Click The printer that I want isn’t listed.
Click Select a shared printer by name.
Click Browse.
Click the Raspberry Pi (default name RASPBERRYPI), then click Select.
Click your printer, then click Select.
Click Next (Figure 6-16).

Figure 6-16. Selecting the printer by name
Click OK on the No driver found alert.
Continue with Steps 8-14 from the Windows 7 instructions. Close Settings after you are finished.
Note
If your printer is not listed in the Add Printer Wizard dialog, quit the process, download and install the appropriate printer driver, and restart the process. With some printers, you might need to connect the printer to your Windows computer to install the driver. After the driver is installed, you can disconnect the printer, delete the printer, and reconnect the printer to your Raspberry Pi. You can then follow these instructions to install the printer as a network printer.
Connecting to a Samba Print Server with MacOS (OSX)
Connecting to a Samba print server with MacOS (OSX) is a lot simpler than it is in Windows:
Click System Preferences (Figure 6-17)
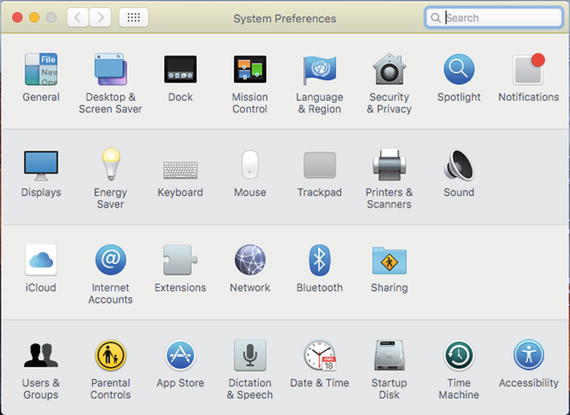
Figure 6-17. Opening System Preferences
Click Printers and Scanners
Click the + (Plus) sign in the Printers window (Figure 6-18)
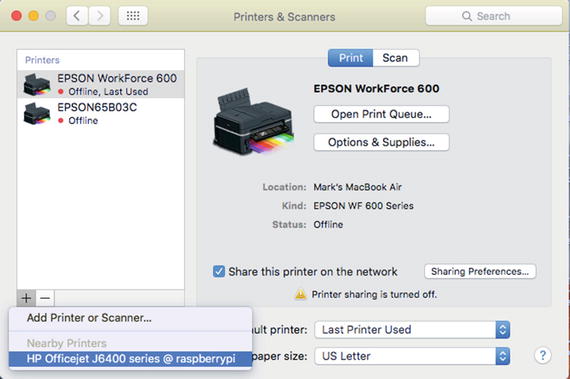
Figure 6-18. Selecting the printer hosted on the Raspberry Pi
Click the printer attached to the Raspberry Pi
Configure the printer (Figure 6-19)
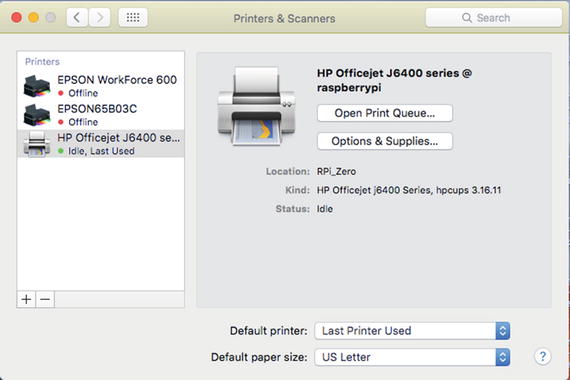
Figure 6-19. Configuring the printer
Installing and Configuring SANE
Most printers are actually multifunction devices (print, scan, copy, etc.). To enable a Raspberry Pi to be used as a scanner server (using the scanner function of the device, or a dedicated scanner), install SANE (Scanner Access Now Easy):
sudo apt-get updatesudo apt-get install sane
To determine if your scanner is detected, run sane-find-scanner:
sudo sane-find-scannerFigure 6-20 illustrates the output from my system. It’s normal, by the way, for this command to find other USB devices, such as a USB wireless adapter. Note the location of the scanner (libusb:001:007). We will need to use this information later to complete scanner setup.
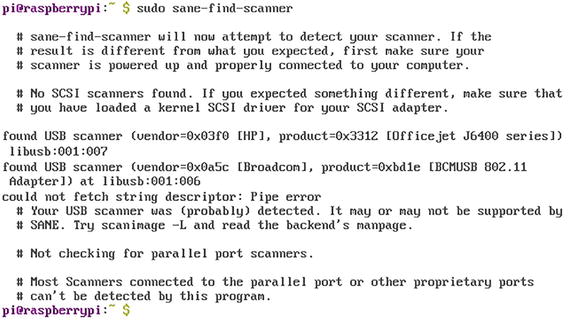
Figure 6-20. Using sane-find-scanner to locate the installed scanner or multifunction device
To determine if scanimage (the scanning utility built into SANE) can use the scanner, run
sudo scanimage -L Available scanners are identified (Figure 6-21).

Figure 6-21. Using sudo scanimage -L to locate available scanners. The Epson all-in-one device is available via the network, and the HP Officejet is connected to the Raspberry Pi via a USB port.
Tip
If scanimage -L detects two or more scanners (see Figure 6-21), edit the dll.conf file used by SANE to support scanners: sudo nano /etc/sane.d/dll.conf. Place a # in front of the scanner brand(s) that you do not want to use. After saving your changes and exiting, run sudo scanimage -L again. This time, only one scanner should be listed.
To test the scanner , insert a document or photo and use one of the following commands:
sudo scanimage >test.tiff (this creates a TIF file that can be used with Windows, MacOS/OSX, and Linux apps)
sudo scanimage >test.pnm (this creates a file that can be used by the open source GIMP image editor)
Configuring SANE as a Server
To configure SANE to run as a server, we need to edit two files that control how SANE works, saned and saned.conf:
Edit saned with sudo nano /etc/default/saned
Change Run=No to Run=Yes[This enables saned to run automatically].
Make sure Run_As_User=saned is present and not commented out.
Save changes and exit.
Edit saned.conf with sudo nano /etc/sane.d/saned.conf
Add the following line to enable any device on your local network (assumes default gateway/router is at 192.168.1.1) to connect to the scanner:
192.168.1.0/24
Save changes and exit.
Next, use an ls -l command to determine the ownership of the 007 file used by the scanner (Figure 6-22):
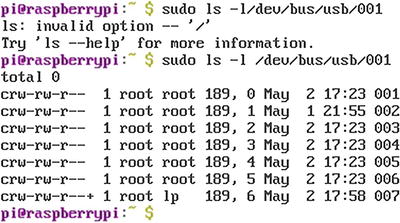
Figure 6-22. Determining the ownership of the 007 file used by the HP OfficeJet multifunction device
sudo ls -l /dev/bus/usb/001 The output shows that 007 is owned by the lp group. To add a user to that group, use the adduser command :
sudo adduser saned lp [or sudo usermod -a -G lp saned]
To enable and restart the saned.socket unit, use these commands:
sudo systemctl enable saned.socketsudo systemctl restart saned.socket
Reboot the system with sudo reboot after making these changes .
Connecting to SANE from Windows
There are several scanner apps available for Windows that support SANE scanners on a network:
SaneTWAIN http://sanetwain.ozuzo.net/
xSANE Win32 www.npackd.org/p/org.xsane.xsane/0.991
SwingSANE http://swingsane.com/
SaneTWAIN was designed for 32-bit versions of Windows, but will run in 64-bit versions of Windows. To get it to run, use the following compatibility settings: Windows XP Service Pack 2, Run as Administrator.
SANEWinDS supports a wide variety of output file types, but it does not offer a preview mode for selecting photo size dynamically. If you don’t like the original scan, you must perform an additional scan after making changes.
xSANE Win32 has not been updated for several years, and works with scanners that are supported by standard SANE backends. It does not support scanners or all-in-one units that rely on additional software , such as HP.
SwingSANE uses JAVA to connect to SANE backends on other devices. It does not require scanner drivers to be configured on the client PC.
Connecting to SANE from MacOS (OSX)
MacOS supports SANE scanners hosted on Raspberry Pi or other Linux devices using third-party SANE-TWAIN for MacOS X ( www.ellert.se/twain-sane/ ; see https://macmanus.nl/2015/11/10/fixed-use-unsupported-scanner-in-osx-10-11-el_capitan/ for installation order and other help). SwingSANE can also be used with OSX (MacOS).
Unfortunately, Linux-hosted all-in-one devices are detected by Printer and Scanner preferences as printers because of the CUPS driver used to share the device.
SANE’s standard list of scanners is very outdated. If MacOS were a true Linux distro, you could install Linux multifunction drivers available from HP (HPLIP), Epson, and so on. Unfortunately, MacOS is not Linux, although it uses a Linux-like terminal interface that supports many Linux commands.
If you need access to the scanner on an all-in-one (multifunction) device on a network that includes Linux, Windows, and MacOS (OSX) devices, consider using a MacOS or Windows computer as the host.
Headless Boot
If you plan to use your Raspberry Pi as a dedicated print/scan server, you want it to be as inconspicuous as possible. Ditching the display, mouse, and keyboard and using SSH for remote access and headless booting enables you to put the Pi anywhere it can be powered. You can use raspi-config to set up your Raspberry Pi:
sudo raspi-config
Select Advanced options
Select SSH
Enabled? <Yes>
<OK>
<Finish>
Connecting via SSH Using Windows
To connect with your Raspberry Pi via SSH, you can use browser-based extensions such as FireSSH (Firefox), Secure Shell for Chrome, a Windows GUI such as PuTTY, or a command-line app (Cygwin). PuTTY is the most often-recommended Windows utility, and it is the app we use in this chapter.
Note
To learn more about using SSH in Windows, see www.makeuseof.com/tag/4-easy-ways-to-use-ssh-in-windows/ .
PuTTY is available from www.chiark.greenend.org.uk/~sgtatham/putty/latest.html . It’s available in 32-bit or 64-bit Windows versions as well as a UNIX archive. If you prefer to choose the components you like, the SSH and Telnet, SCP, SFTP, and other PuTTY components can also be downloaded separately.
To connect to a remote computer (such as your Raspberry Pi) using PuTTY:
Start PuTTY
Enter the IP address for the remote computer
Make sure SSH is selected as the connection type
Click Open (Figure 6-23)
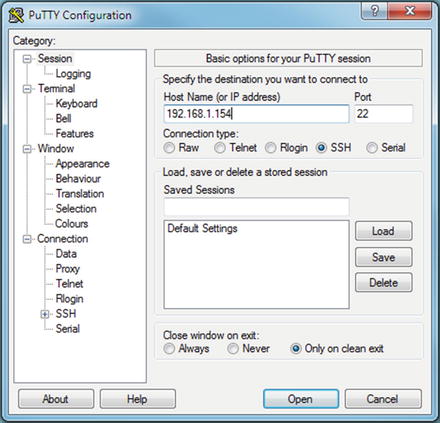
Figure 6-23. Preparing to log into a Raspberry Pi with PuTTY
After making the connection , enter the username and password you use for the Raspberry Pi (Figure 6-24).
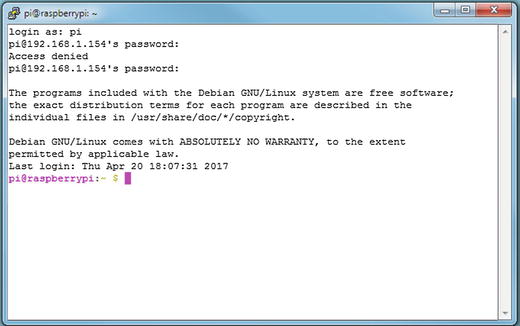
Figure 6-24. Logging into the Raspberry Pi via SSH
Troubleshooting
If you cannot connect to a printer share remotely:
Make sure the Raspberry Pi has a working network connection with ifconfig
Make sure the Raspberry Pi is in the same workgroup as the computer you are connecting from
Make sure you have entered the correct IP address and port number to open CUPS on the Raspberry Pi
Make sure CUPS has been configured to permit network connections
Make sure Samba has been installed and is properly configured
Make sure you have installed the correct drivers on your client system
If you cannot find a printer driver you can use with CUPS :
Make sure you have installed the correct drivers for use by CUPS
If you have drivers for similar models, try a similar model’s driver, perform a test print, and see if it works
If you cannot find a scanner driver you can use with SANE :
Make sure you have installed the correct drivers for use by SANE
If you have drivers for similar models, try a similar model’s driver, perform a test scan, and see if it works
If you cannot connect to SANE remotely:
Make sure you have installed the drivers needed to connect to SANE on your computer (varies by SANE helper app)
Summary
Almost all printers, scanners, and multifunction devices connect via USB ports. You might need to add a USB hub to your Raspberry Pi if it doesn’t have an available USB port. Following are additional tasks covered:
Use a GUI-less (command-line) distro such as Raspbian Jessie Lite and install it to a hard disk.
You might need to manually configure your Raspberry Pi to use a wireless connection.
Use CUPS to configure your printer or multifunction device’s print features.
If CUPS does not have built-in support for your printer or multifunction device, search for and install a suitable printer driver.
Use Samba to enable your Raspberry Pi to receive print and scan jobs.
To connect to your printer with Windows, use View Devices and Printers (Windows 7) or Settings (Windows 8.1/10).
To connect to your printer with MacOS (OSX), use Printer and Scanners from System Preferences.
Use SANE to configure your scanner or multifunction device’s scanner features.
You can choose from a variety of Windows and MacOS (OSX) scanner apps to access a scanner controlled by SANE.
Enable SSH if you want to boot your Raspberry Pi without a keyboard or display.