Thanks to its onboard USB port(s) and camera connector, a Raspberry Pi can be a small, yet powerful imaging and video tool. In this chapter, you learn how to use the camera connector to connect to cameras made especially for the Pi, connect to webcams made for PCs, capture stills and video from these sources, and scan images and documents with a multifunction device or dedicated image scanner.
Hardware Used in This Chapter
Raspberry Pi (various models)
Raspberry Pi camera
Webcam
Image scanners
Connecting a Camera to the Camera Port
Almost all Raspberry Pi models (with the exception of the earliest Pi Zero) feature a camera port. Cameras made for the Raspberry Pi (Figure 7-1) are available in two types:
5-megapixel (5MP) resolution (shown)
8MP resolution
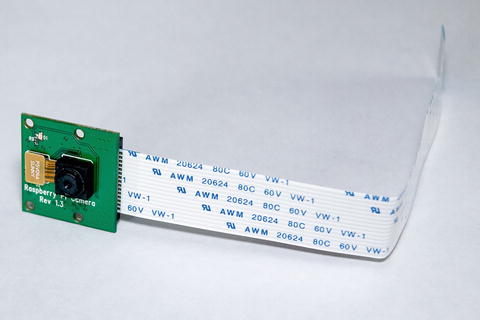
Figure 7-1. The 5MP version of the Raspberry Pi camera with the normal interface cable attached
Note
The 5MP version is labeled Raspberry Pi Camera Rev 1.3 and uses a green printed circuit board (PCB) , as shown in Figure 7-1. The 8MP version is labeled Raspberry Pi Camera v2.3 and has a green PCB. The NoIR versions designed for near-infrared imaging have black PCBs. For technical details, see http://elinux.org/Rpi_Camera_Module .
Both versions include a detachable ribbon cable that connects to the camera port. Pi Zero models with a camera port use a smaller cable (available separately) to connect to the camera port on the end of the board (refer to Figure 7-3).
Follow this procedure to safely connect the camera cable to the camera port on all models other than the Raspberry Pi Zero:
Shut down the Raspberry Pi (sudo shutdown)
Disconnect power to the Raspberry Pi
Discharge any static electricity in your body by touching a metal object
Remove the camera from its antistatic bag
Pull up the two side clips on the camera port; use tweezers to help perform this task if the Pi is in a case
Slide the cable into the camera port, making sure the silver-colored connectors are facing toward the HDMI port (Figure 7-2)
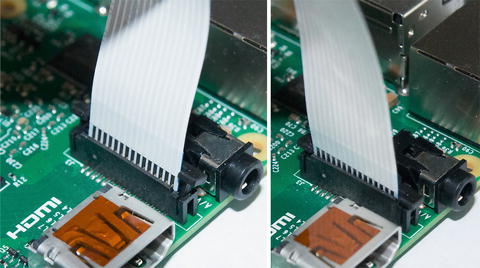
Figure 7-2. Inserting the camera cable into the Raspberry Pi camera port (left) and securing the cable clamp (right)
Push down on the side clips to hold the cable in place
After checking your installation, connect power to the Raspberry Pi and boot it
Swapping Cables for a Raspberry Pi Zero
The original version of the Raspberry Pi Zero did not include a camera port. However, starting with version 1.3, and with all versions of the Raspberry Pi Zero W (which includes Wi-Fi and Bluetooth support), you can connect a Raspberry Pi camera to the Pi Zero. However, a cable swap is needed, as the Pi Zero camera port is significantly smaller than the camera port used by other Pi modules:
Pull up the two side clips on the camera’s cable connector
Slide the cable out of the camera
Connect the Raspberry Pi Zero camera cable into the camera, making sure the connectors are facing toward the camera’s PCB (Figure 7-3)
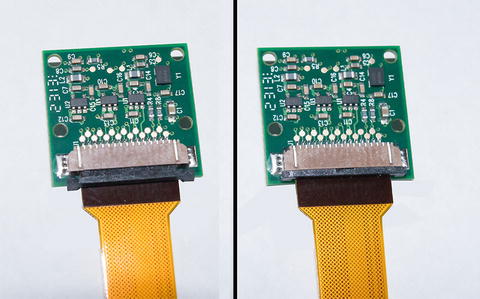
Figure 7-3. Sliding the Pi Zero camera cable into the camera connector (left) and snapping the clamp shut (right)
Push down on the side clips to hold the cable in place
Pull up the two side clips on the Pi Zero’s camera cable connector
Slide the narrow end of the cable into the camera cable connector, making sure the connector side is facing the Pi Zero PCB (Figure 7-4)
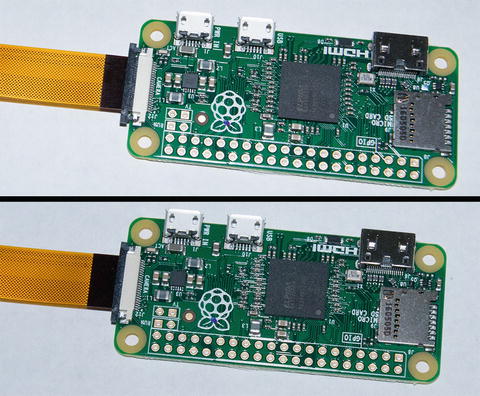
Figure 7-4. Sliding the Pi Zero camera cable into the Pi Zero/Zero W camera connector (top) and snapping the clamp shut (bottom)
Snap the retaining clamp shut
After checking your installation, connect power to the Raspberry Pi Zero or Zero W and boot it
Enabling the Camera Port
The camera port is not enabled in the default Raspbian Lite installation. To enable it, follow these steps:
sudo raspi-config
Select 5. Interfacing options
Select P1. Camera (Figure 7-5)

Figure 7-5. Enabling the Raspberry Pi camera using raspi-config
Press the Enter key twice to enable the camera option
Select Finish
Restart your Raspberry Pi (sudo restart) and the camera will be available for use after you log in
Note
If you use Ubuntu MATE instead of Raspbian, you can still use raspi-config to configure your Raspberry Pi. See https://larrylisky.com/2016/11/24/enabling-raspberry-pi-camera-v2-under-ubuntu-mate/ for details.
If you are unable to use raspi-config to enable your Raspberry Pi camera , edit your Pi’s config.txt file thus:
sudo nano /boot/config.txt [using the default nano editor]
start_x=1 [x=0 disables the camera]
gpu_mem=125 [minimum system RAM to use for Pi’s GPU; use 160 (megabytes) with a 1GB or larger RPi]
Save changes with Ctrl-X, Y, and Enter, and exit editor
sudo reboot
Tip
The BerryBoot boot manager might prevent raspi-config from running in its default installation. To fix this problem, see https://raspberrypi.stackexchange.com/questions/50642/sudo-raspi-config-not-working-boot-partition-not-mounted .
The camera port is enabled in the default Raspbian with PIXEL (PIXEL is the default GUI in a Raspbian Jessie installation). To verify that it is enabled :
Click the Raspberry icon in the upper left-hand corner to open the RPi menu
Click Preferences
Click Raspberry Pi Configuration
Click the Interfaces tab
If Camera is set as Disabled, click Enabled (see Figure 7-6)
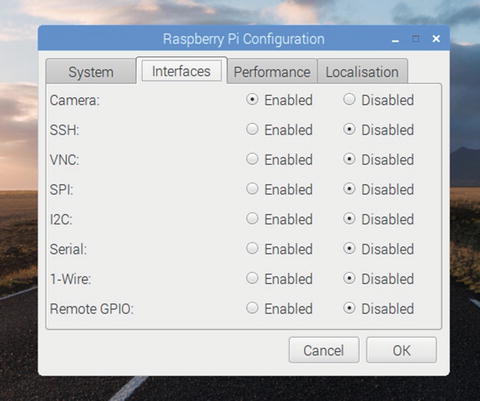
Figure 7-6. Enabling the Raspberry Pi camera using Raspbian with PIXEL
Click OK
Using Raspivid to Capture Video
Both Raspbian and Raspbian Lite include the command-line raspivid video capture utility. Raspivid can be run from any user account; it does not require root access. It has many options for resolution, preview size, image effects, metering, and many others.
Raspivid Options and Examples
To see all of the options supported by raspivid, enter raspivid | more. For more details, see http://elinux.org/Rpi_Camera_Module#RaspiVid . Here are a few examples [explanations in square brackets]:
-d [Runs raspivid in demonstration mode, using the various metering, color, and other special modes]
-t 0 [sets raspivid to run until the program is canceled with Ctrl-C; no image will be saved. When the -t option is not used, recording runs for 5000ms/5 seconds]
-t 15000 [captures video for 15000ms/5 seconds]
-ifx negative [reverses colors as in a color negative; see Figure 7-7]
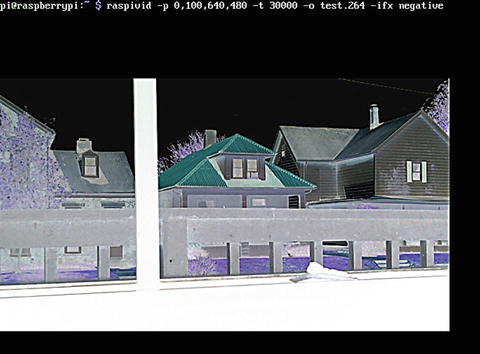
Figure 7-7. Running raspivid from the command prompt in Raspbian Jessie Lite
-ifx cartoon [makes video appear as it’s in a cartoon]
-ifx gpen [black and white, no gray scale, pen effect; see Figure 7-8]
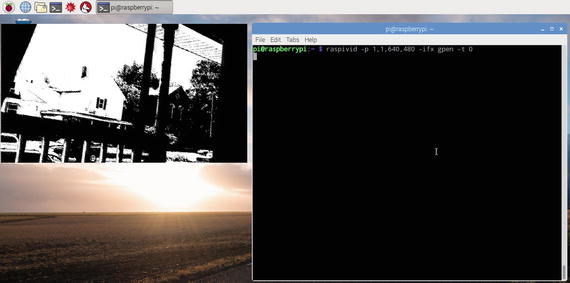
Figure 7-8. Running raspivid from a terminal session in Raspbian Jessie with PIXEL
-awb incandescent [sets white balance for incandescent light (about 2700-3200K)]
-mm backlit [sets metering mode for backlit scenes]
-fps 30 [sets framerate to 30fps]
-w 1280 [sets recording width to 1280 pixels]
-h 720 [sets recording height to 720 pixels]
-o test.264 [saves recording as test.264; use any file name desired]
-hf [flip image horizontally]
In the example shown in Figure 7-7, raspivid is run from the command prompt on a system using Raspbian Jessie Lite . When a preview window is used, it overlays any text already onscreen.
raspivid -p 0,100,640,480 -t 30000 -o test.264 -ifx negative In the example shown in Figure 7-8, raspivid is run from the command prompt after opening a terminal session with Raspbian Jessie with Pixel. When a preview window is used, it is displayed in a separate window.
raspivid -p 1,1,640,480 -ifx gpen -t 0 Playing Videos with OMXplayer
To play back your videos with Raspbian Lite, install the OMXPlayer program:
sudo apt-get updatesudo apt-get omxplayer
To play a video called test.264 with omxplayer’s normal settings :
omxplayer test.264 By default, omxplayer plays videos in full-screen, stretching the image if necessary. To see all options for omxplayer, enter omxplayer |more
Here are two examples [explanations in square brackets}:
-l 00:02:37 [start video at 2 minute-37 second mark]
-aspect-mode letterbox [plays video without stretching to fill screen]
Converting Recordings with MP4Box
By default raspivid captures videos as raw H.264 streams. However, most video players cannot play back H.264 or other raw video streams unless they are packaged as a common video format, such as MP4.
Note
When I saved video files using the .264 extension and copied them to a Windows computer, Windows Media Player displayed a warning that the file type was unknown, but it played the files. However, Apple Quick Time could not play the files at all.
The MP4Box utility provides a simple command-line method for file conversion. MP4Box is contained in the GPAC Project on Advanced Content. To install it on your Raspberry Pi:
sudo apt-get update sudo apt-get install gpac [if prompted after using this command, rerun this command with --fix-missing]
MP4Box (note the capitalization) has many options. To see them, run
MP4Box To convert a file called test.264 into an MP4 file called test.mp4 running at 30fps, use this command:
MP4Box -fps 30 -add test.264 test.mp4 The mp4 file played flawlessly on Windows Media Player. MP4Box can only convert one file at a time. However, by using a Python script (see http://raspi.tv/2013/another-way-to-convert-raspberry-pi-camera-h264-output-to-mp4 for details), you can convert multiple files from the command line.
Note
To learn more about gpac or to download versions for other platforms, see https://packages.debian.org/jessie/gpac .
Using Raspistill to Take Photos
The raspistill program, like raspivid, is included in Raspbian and Raspbian Lite. Raspistill, like Raspivid, can be run from any user account; it does not require root access. It has many options for resolution, preview size, image effects, metering, and many others.
Raspistill’s commands and syntax are similar to those in Raspivid. To see all of the commands, enter raspistill | more. For more details, see http://elinux.org/Rpi_Camera_Module#RaspiStill . Here are some examples:
-sh -100 [minimum sharpness; maximum is 100]
-ifx sketch [sharp edges are outlined, colors are faded]
-ifx film [simulated film grain]
-w 2048 [sets photo width to 2048 pixels]
-h 1536 [sets photo height to 1536 pixels]
-o image.jpg [saves photo as image.jpg]
-hf [flip image horizontally]
Figure 7-9 illustrates the use of -ifx sketch.
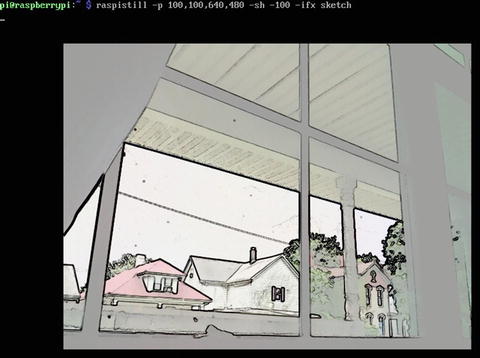
Figure 7-9. A demonstration of the -ifx sketch special effects setting with raspistill
Taking Time-Lapse Photos with Raspistill
Raspistill includes options that can be used to take time-lapse sequences:
-tl [timelapse; -tl 60000 takes a picture every 60000ms/60 seconds]
-t [total time to capture photos; -t 3600000 takes pictures at the interval set by -tl for 3,600,000ms/60 minutes]
-o photo_%04d.jpg [captures image as photo_0001.jpg, etc.]
The following command displays a 640×480 preview at 100 pixels from the left and 100 pixels from the top of the display, sets sharpness at the maximum level, adjusts EV 12 (values are –25 to 25, each step is 1/6 stop), uses a shutter speed of .2 or 1/5 second, takes a picture every 60 seconds for one hour, saving each picture as photo_xxxx.jpg (starting with 0001):
raspistill -p 100,100,640,480 -sh 100 -ev 12 -ss 20000 -tl 60000 -t3600000 -o photo_%04d.jpg Tip
By default, the red LED activity light on the camera module blinks when you take a picture or shoot a video. This could affect the quality of time-lapse photos or videos shot in dim light or startle some subjects. To disable this option, edit the /boot/config.txt file and make the following change: disable_camera_led=1 Save your changes, restart your Raspberry Pi, and your camera will no longer blink while shooting. To re-enable the LED, edit /boot/config.txt and change the line to disable_camera_led=0.
Viewing Raspistill Photo Metadata
Raspistill, like almost any other camera app, stores exposure and other information in the picture file itself. This metadata (also known as EXIF data ) can be viewed in any recent version of Windows by following these steps (steps in parentheses are for touchscreens):
Right-click (press and hold) the picture file in Windows Explorer/File Explorer
Click (tap) Properties
Click (tap) the Details tab
Scroll down to the Image and Camera sections for resolution, f-stop, shutter speed, exposure time, and other settings [see Figure 7-10]

Figure 7-10. Viewing exposure and camera metadata with Windows Explorer
Click (tap) OK to close the Properties dialog
Tip
To view EXIF data on a system running MacOS (OSX) , open the Photos app, point to a picture, and Control-click it. From the menu, select Get Info. In addition to seeing camera, lens, and exposure data, you can also add a title, description, keyword, and location .
Controlling the Raspberry Pi Camera with Python
The Python 3.x programming language is already installed in Raspian Jessie with PIXEL. To install picamera , the Python package for using the Raspberry Pi camera module, use the following commands:
sudo easy_install3 picamera Immediately afterward, use this command to update to the latest version of picamera :
sudo easy_install3 -U picamera Picamera has two advantages over raspistills and raspivid :
You can create scripts (“recipes”) that you can store and reuse.
Picamera provides many more options for controlling capture settings and output than Raspistill and Raspivid .
To use picamera, open a Python session from the command line: python
Tip
When you use picamera in a Python script, the camera preview covers up most or all of your screen. Use SSH to log into your Pi from another system and run Python remotely (Figure 7-11). The remote session will enable you to start Python and enter or paste in script commands because the camera preview window is displayed on the Raspberry Pi’s own display.
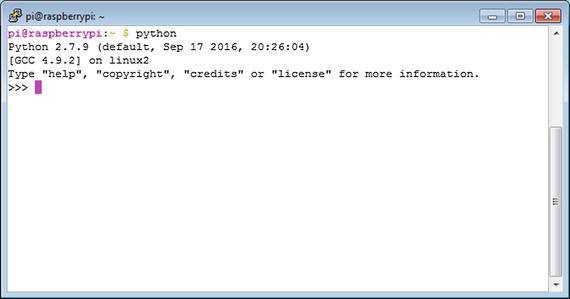
Figure 7-11. Starting Python remotely using SSH. Enter Python commands or paste in a script at the >>> prompt.
For complete coverage of picamera, go to https://picamera.readthedocs.io/en/release-1.13/ . Here is a script adapted from this source. This version captures a 3.1MP photo :
from time import sleepfrom picamera import PiCameracamera = PiCamera()camera.resolution = (2048,1536)camera.start_preview()# Camera warm-up timesleep(2)camera.capture('test.jpg')
Here is another script adapted from this source. This version captures two H.264 video streams at the same time in two different resolutions (Figure 7-12):
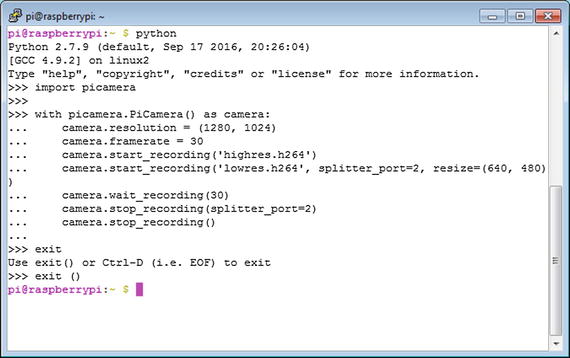
Figure 7-12. Using picamera in a Python script to create two video files with different resolutions at the same time. Use exit () to close Python .
import picamerawith picamera.PiCamera() as camera:camera.resolution = (1280, 1024)camera.framerate = 30camera.start_recording('highres.h264')camera.start_recording('lowres.h264', splitter_port=2, resize=(640, 480))camera.wait_recording(30)camera.stop_recording(splitter_port=2)camera.stop_recording()
Controlling Your Raspberry Pi Camera with Android or iOS
Whether you use an Android smartphone or tablet or an iOS iPhone or iPad, you can use your Raspberry Pi camera remotely and enjoy the benefits of easy control of the Pi camera’s many options.
Using RaspiCAM Remote for Android
There are a number of Raspberry Pi camera apps available in Google Play (the Android app store). RaspiCAM Remote is a free app with high ratings, minimal setup requirements, and video or still photo capture, so we chose it as the example Android app for this book.
When you open RaspiCAM Remote , the startup dialog prompts you to enter the IP address and login information for the Raspberry Pi (Figure 7-13). Click the connect (double-cable plug) icon to connect to your Raspberry Pi .
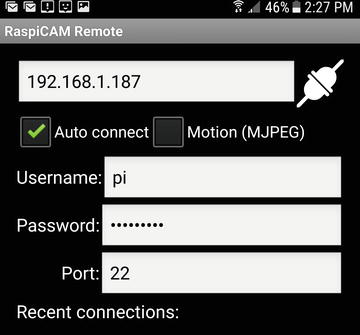
Figure 7-13. Using RaspiCAM Remote to connect to a Raspberry Pi
After you connect, use the icons at the bottom of the screen to open the setup menu , select video mode (enabled in this example), select still photo mode, or capture a video/image (Figure 7-14). RaspiCAM Remote provides a live preview of what the camera sees with the effects and settings you select, making it easy to capture the video or photo you want.
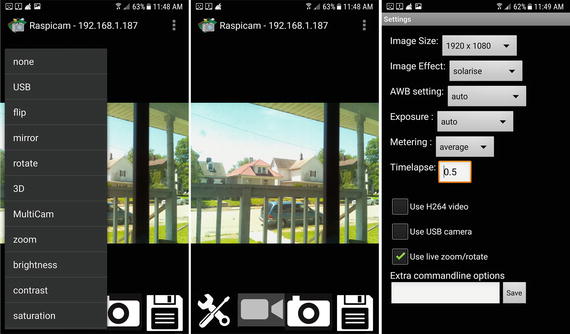
Figure 7-14. RaspiCAM’s shooting menu (center), setup menu (left), and image settings menu (right). Tap the floppy disc icon to shoot video or grab a still photo.
RaspiCAM Remote’s pictures are stored on your Android device, rather than on your Raspberry Pi, so you don’t need to copy them manually between your computer and your Android device. In Gallery, look for them in the Pictures section.
Using BerryCam for iOS
BerryCam, which captures still images only, requires the user to install the berryCam.py Python script on the Raspberry Pi as well as install a client app on the mobile device. This script is required to enable BerryCam clients to connect to the Raspberry Pi and use its camera. To install BerryCam on the Raspberry Pi, go to http://fotosyn.com/berrycam/repo/ and follow the directions.
After berryCam is installed on the Raspberry Pi, open it using this command (Figure 7-15): sudo python berryCam.py &
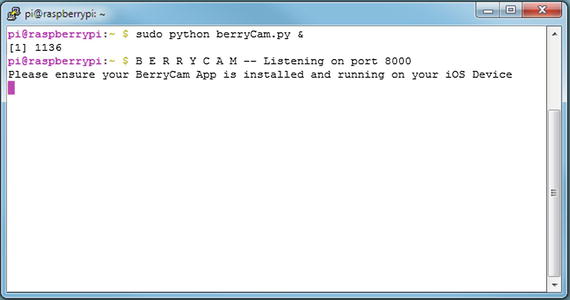
Figure 7-15. Starting the berryCam script on the Raspberry Pi
As long as this script is running, you can connect to your Raspberry Pi from an iOS device running the BerryCam app.
To log into the Raspberry Pi and take pictures, install the BerryCam app from the App Store. When you start it, click the settings (gearbox) icon shown on the opening dialog and enter the correct IP address for your Raspberry Pi (Figure 7-16). Make any other adjustments you want, then tap Done (top left of the Settings dialog).

Figure 7-16. When you start the BerryCam client in iOS (left), you must enter the correct IP address for the Raspberry Pi on the Settings screen (right)
To capture an image with BerryCam, press the camera button. After the capture is made, it is displayed on your iOS device along with the camera settings (Figure 7-17). Use the initial capture to point the camera in the right direction and to make changes in camera settings.
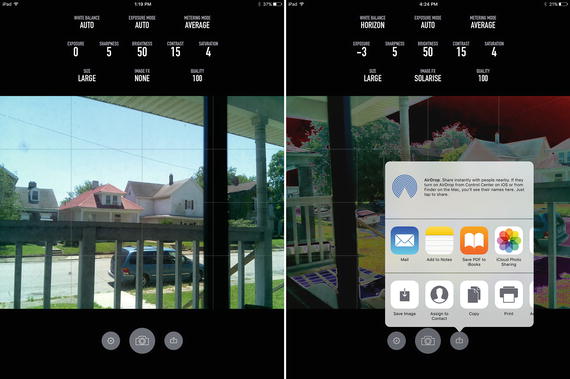
Figure 7-17. Capturing an image with default settings (left) and with custom exposure, white balance, and special effects settings (right)
By default, images captured by BerryCam are stored in the berrycam folder on your Raspberry Pi. The captures for each date are stored in a folder named after the capture date.
When you capture an image , click the upload button shown in Figure 7-17 to have the option to save your images to your iOS device. If you choose this option, the pictures will not be stored on your Raspberry Pi.
Note
The first time you choose to save images to your iOS from BerryCam, you are prompted to give permission to the BerryCam app. If you don’t give permission to the app, the pictures will be stored on the Raspberry Pi.
For users who want to connect from an iOS, Android, Windows, Windows Mobile, Linux, or MacOS (OSX) device to a Raspberry Pi camera using the same BerryCam interface, you can download BerryCam Express from https://pitography.github.io/BerryCamExpress/ . BerryCam Express provides source code so that user can also learn modern programming techniques .
Using a Webcam with a Raspberry Pi
There are several ways to use a USB webcam with a Raspberry Pi:
Install a simple command-line webcam package such as fswebcam
Install a GUI-based webcam package such as guvcview
Use the USB option available in RaspiCAM Remote
Using Fswebcam
To install the fswebcam package:
sudo apt-get install fswebcam To capture an image called webcampic.jpg using the default resolution:
fswebcam webcampic.jpg During the capture, your system displays the resolution used to capture the image (see Figure 7-18). As you can see, the default resolution is extremely low, matching the resolution of the very first USB webcams available over a decade ago. Fswebcam does not provide a preview image. To aim the webcam as desired, open the first image capture you make and use it to help aim the webcam. In Figure 7-18, we used the file manager in Raspbian with PIXEL to display the captured image. Note that the default image has an image capture time banner along the bottom edge.
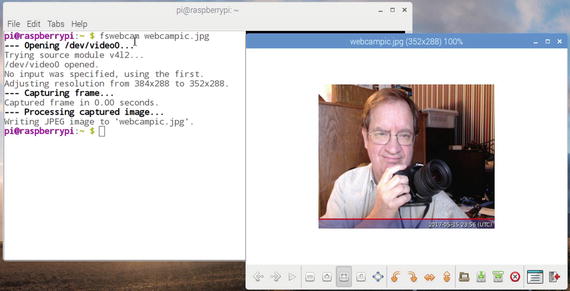
Figure 7-18. Fswebcam used with default settings (left) captures a small image from a webcam (right)
To get a higher-quality image, specify the webcam’s recommended resolution with the -r option. To omit the banner, use the --no-banner option (Figure 7-19):
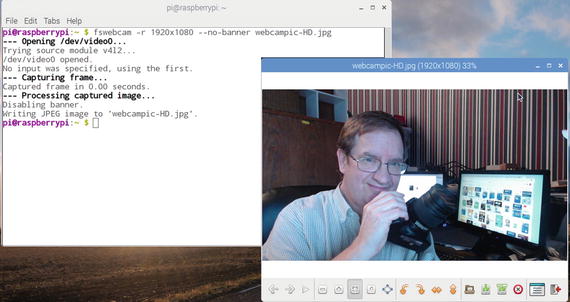
Figure 7-19. Specifying the resolution and no-banner options produces a larger, higher-quality image with no distracting banner on the bottom edge of the image
fswebcam -r 1920x1080 --no-banner webcampic_HD.jpgNote
To learn more about using a webcam with Raspberry Pi, see www.raspberrypi.org/documentation/usage/webcams/ . If you are wanting to purchase a webcam for use with Raspberry Pi, see http://elinux.org/RPi_USB_Webcams for test results. The webcam used in this section was a Logitech HD Pro Webcam C910 with autofocus.
Capturing Video or Stills Using Guvcview
If you want to use a single package to capture video or still images from a USB webcam, install the guvcview package:
sudo apt-get guvcview If you install this using Add / Remove Software in Raspbian with PIXEL GUI, this package is listed as GTK+ base UVC Viewer.
Guvcview is designed to work with many image and audio sources and to output image and video files. It has many options. To see them, enter
guvcview --help-all The following command line starts guvcview without audio [-ao none], with YUYV image format enabled [-f YUYV], a resolution of 640×480 [-x 640x480], and video capture (if selected) using H264 [-u h264]:
guvcview -ao none -f YUYV -x 640x480 -u h264 When guvcview starts, it opens a preview window, a control panel window, and display status information in the original command-line window (Figure 7-20). The control panel provides separate settings for image controls, H264 format controls, video controls, and audio controls. You can also select the video/still and audio inputs to use if more than one are available.
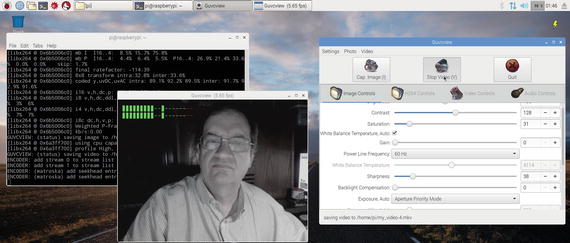
Figure 7-20. While guvcview runs, you can use the control panel (right) to adjust exposure, video, and audio settings and capture video or still images. The preview window (center) shows volume settings when recording video, and a steady stream of status messages are displayed in the terminal window (left).
Using RaspiCAM Remote with a Webcam
RaspiCAM Remote also works with USB webcams. To use it with a webcam:
Start RaspiCAM Remote
Open the setup menu (refer to Figure 7-14).
Select USB.
Close the app.
Restart it.
Select the capture option (video or stills).
Figure 7-21 shows the author’s smartphone controlling the webcam on his Raspberry Pi.
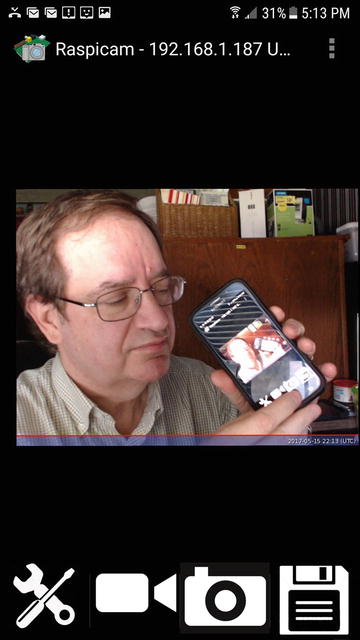
Figure 7-21. RaspiCAM Remote capturing a still image while being controlled by the author’s Samsung Galaxy 6 smartphone
Connecting to an Image Scanner
Raspbian with PIXEL also supports many image scanner packages, once you install SANE (Scanner Access Now Easy). In Chapter 6, we discuss how to use SANE for scanning remotely. In this chapter, we discuss how to install SANE and packages that enable you to scan, adjust, and save images directly on your Raspberry Pi.
Installing SANE with PIXEL, Other Linux GUIs
SANE, the backends , and the frontends needed can all be downloaded from the Raspbian with PIXEL software repository. In this example, I will be installing scanning components needed to use the scanner built into the Epson XP-800 multifunction device .
After searching for SANE in the software repository (Add / Remove Software), I selected the following packages (version numbers omitted, as these change over time):
Xsane
Xsane-common
Sane scanner graphical frontends (sane)
Simple scanning utility (simple-scan)
API library for scanners (libsane)
API library for scanners: extra backends(libsane)
API library for scanners: utilities (sane-utils)
Click Apply to start the process. After providing your password and clicking OK, the installation process continues. During the installation process , SANE checks for local or network scanners and identifies them. To determine if a scanner (or scanner component of a multifunction device) is supported, go to www.sane-project.org/sane-mfgs.html and look up the manufacturer and model number of your scanner/multifunction device.
Caution
Epson and HP multifunction devices are well-supported by SANE in Raspbian. However, most recent Canon multifunction devices are not supported for use on Raspbian (Canon’s Linux drivers are for x86 or x64 processors, not ARM processors such as those used by Raspberry Pi).
After installing SANE, try one or more of the scanning apps installed. In this chapter, we show you how to use Simple Scan and Xscan. In Raspbian with PIXEL, both can be started from the Graphics section of the Raspbian menu (Figure 7-22).
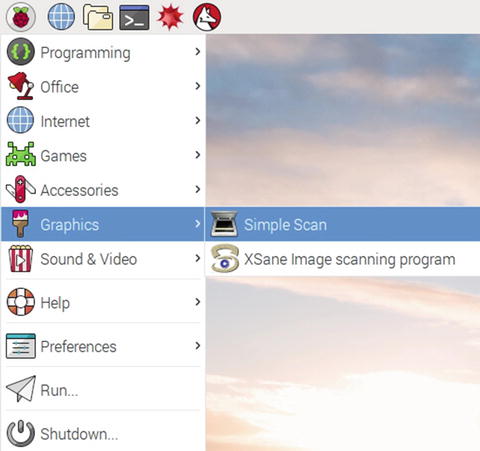
Figure 7-22. Use the Graphics menu in Raspbian with PIXEL to start scanning utilities
Using Simple Scan
Simple Scan supports auto document feeders (ADF). It offers simple document and photo scanning, and is a good choice for properly exposed documents and photos. To configure Simple Scan :
Click the scanner icon.
Click Preferences (Figure 7-23).
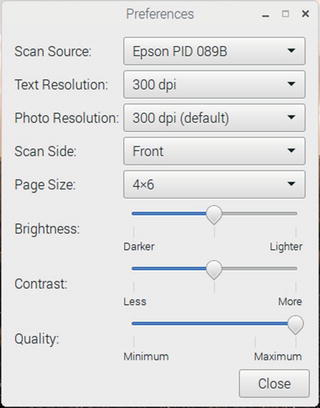
Figure 7-23. Use the Preferences menu to adjust scan resolution, image type, scan document size, and other options
If more than one scanner is available, open Scan Source to choose a different scanner.
Default Text resolution is 150 dpi. Open Text Resolution to change it.
Default Photo resolution is 300 dpi. Open Photo Resolution to change it.
To use an ADF, select Front and Back from the Scan Side menu .
To choose a specific page size, open the Page Size menu and select the size desired. If you choose 4×6, be sure to position the photo vertically against the top corner marking on the scanner.
Adjust Brightness, Contrast, and Quality sliders as desired.
Click Close when ready to scan.
To select what to scan :
Open the Scan menu.
Select All pages from feeder to use the ADF; to scan a single page from the ADF or flatbed, choose Single Page.
Select Text or Photo.
To scan the document or picture :
Click Scan (Figure 7-24).
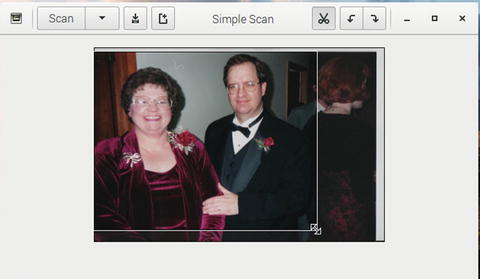
Figure 7-24. Rotating and cropping an image after scanning. The Save button is the second button to the left from the Simple Scan window title .
Use the Rotate tools (arrows) or Crop tool (scissors) as needed.
After the photo or document is scanned, click the Save icon.
To save the document or picture:
Enter a new name (ScannedDocument.ext is the default).
Select the location .
Select the file type.
Click Save.
Using Xscan
Xscan offers many more scan enhancements than Simple Scan, making it suitable for use in scanning photos that may need exposure or color compensation. To configure Xscan :
Enter a file name (Figure 7-25).
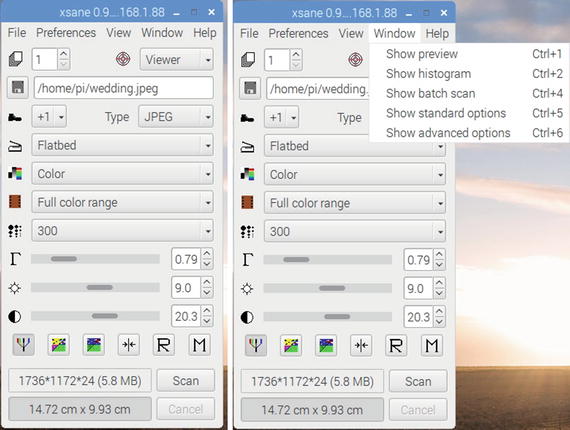
Figure 7-25. The Xscan menu provides a full range of settings for image type and scanning options. Open the Window menu to show a scan preview or set up additional options.
Select an extension.
Select the image source (flatbed or ADF [Auto Document Feeder]).
Select the image type (lineart, gray, or color).
If you are scanning color slides or negatives, open the Full color range menu and select the film type. Use Full color range for scanning prints.
To scan a photo for printing at its original size, adjust the resolution to 300. Other resolutions range from 75 to 4800.
Use the sliders to adjust gamma, brightness, and contrast .
Open the Window menu and choose Preview, Histogram , and other options as desired.
To select what to scan :
Open the Preview menu.
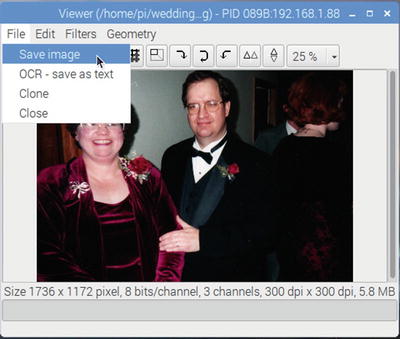
Click Acquire Preview (Figure 7-26).

Figure 7-26. Preparing to scan a photo after adjusting its histogram
After the preview scan is finished, adjust the size of the dotted bounding border around the area to scan.
To adjust the histogram in the image, open the Histogram menu and adjust the sliders along the bottom of the Raw image view.
To adjust the gamma, open the Gamma menu and select the desired setting.
To scan and save the document or picture:
Troubleshooting
If you have problems with the hardware or apps in this chapter, check the following:
Raspberry Pi Camera Issues
Correct orientation of the cable when plugged into the Pi camera connector.
If you swap cables on the camera module, be sure to check cable orientation.
If you reversed either end of the cable and applied power, you have probably ruined your camera module.
If you are using a 1A power supply for a Pi Zero or Pi Zero W and your system won’t boot or becomes unstable, upgrade to a 2.5A or larger power supply. The camera module requires 250mA.
Camera App Issues
You must install packages as superuser (sudo).
If you get an error message, rerun the installation using the recommended options.
If a package doesn’t work after installation, reboot your Pi.
If your camera app uses Python, be sure to use the recommended version.
If you use BerryCam, the berryCam Python script must be running before you can connect from an iOS mobile device.
Network Issues
Make sure you specify the correct IP address of your Pi when a remote app asks for it. Use ifconfig to see the Pi’s IP address.
If you switch between wired and wireless network connections, be sure to recheck the IP address.
Webcam Issues
Shut down the Raspberry Pi before connecting a webcam. Although USB devices are supposed to be hot-swappable, it can be easy to damage your Pi if it’s not in a case.
If your Pi won’t boot or becomes unstable after you connect a webcam, upgrade to a larger power supply (2.5A or higher).
Check the webcam compatibility list if you are not sure which webcams are suitable choices.
Scanner Issues
SANE’s level of support on Raspbian and other Raspberry Pi distros lags behind versions of SANE made for x86 or x64 processor-based version of Linux such as Debian, Ubuntu, and so on.
With an HP scanner or multifunction device, install HPlib and the HP multifunction library to enable printing and scanning.
Summary
Cameras for the Raspberry Pi are available in 5MP and 8MP versions. Infrared (IR) versions are also available.
To connect a camera to a Raspberry Pi Zero with a camera port or to a Pi Zero W, the standard camera cable must be swapped for a narrower replacement cable.
Use raspi-config to enable the camera port on Raspbian Lite.
Raspbian with PIXEL and Raspbian Lite include the command-line raspivid video capture utility.
If you use Raspbian Lite, install the omxplayer package to play back your videos.
Install the MP4Box package to convert H.264 video files created by raspivid into a format compatible with Apple Quick Time and other video player apps for Windows and MacOS.
Raspbian with PIXEL and Raspbian Lite include the command-line raspistill photo capture utility.
Raspistill can also be used to shoot time-lapse sequences.
The picamera program for Python supports both still photo and video capture.
To control the Raspberry Pi camera with an Android smartphone or tablet, install RaspiCAM Remote on the Android device.
To control the Raspberry Pi camera with an iOS smartphone or tablet, install the BerryCam Python code on your Raspberry Pi and the BerryCam app on the iOS device.
USB webcams on Raspbian/Raspbian Lite are supported by command-line (fswebcam), GUI-based (guvcview), and RaspiCAM Remote.
To use an image scanner or the scanner function in a multifunction device, install SANE with the appropriate drivers.
Simple Scan and Xscan are two of the many scanning apps available for Raspbian with SANE.