
In this chapter, you will learn how to connect your Raspberry Pi to workgroup networks found in home office and small business environments using wired or wireless connections. Your Raspberry Pi will need a working wireless network connection, using either integrated wireless hardware (Raspberry Pi 3 or the Raspberry Pi Zero W) or an RPi-compatible Wi-Fi USB adapter. Most topics also support a wired Ethernet adapter.
Distro and Raspberry Pi Configuration
To connect to workgroup networks, Linux uses Samba. Samba is an open source implementation of Windows SMB networking. Many distros already have Samba installed, so if you only want to connect to shared folders, your Raspberry Pi may already be ready to connect. However, unless you already have a user ID on systems with shared resources, you will need to set up a user account on those systems. The following example assumes that a user called pi has been added to the user accounts on the Windows or OSX (MacOS) share.
Connecting to a Windows Share with PIXEL
To connect to a Windows share from Raspbian with PIXEL, follow this procedure:
Open the distro’s file manager.
Enter smb://servername/sharename. (Replace servername/sharename with actual server name and share name: see Figure 4-1.) If you prefer, you can also enter smb://WORKGROUP (use the actual name of your workgroup) to see a list of servers with PIXEL or FedBerry. You can then navigate to the server needed.
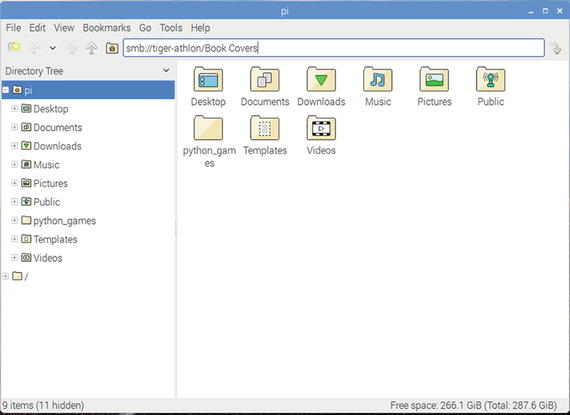
Figure 4-1. Entering the path to a shared folder on a server on the local network
When prompted, provide the username and password for the sharename (Figure 4-2).
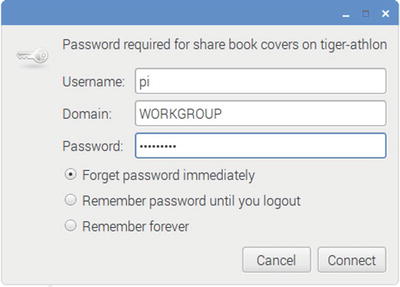
Figure 4-2. Logging into the server
Select how long to retain the password, then click Connect.
The share opens (Figure 4-3).
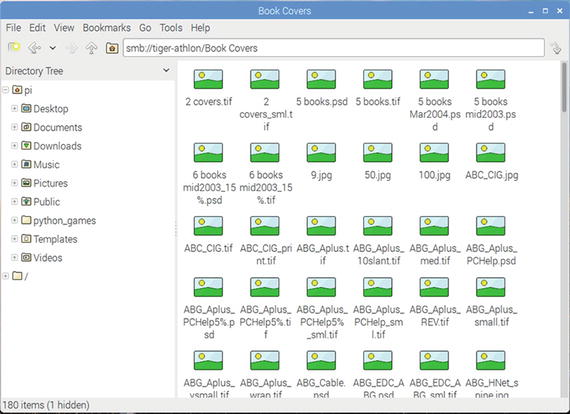
Figure 4-3. Contents of the share as viewed in PIXEL
Some other file managers , such as the one in Ubuntu MATE (Figure 4-4), can display network shares without the need to enter a path.
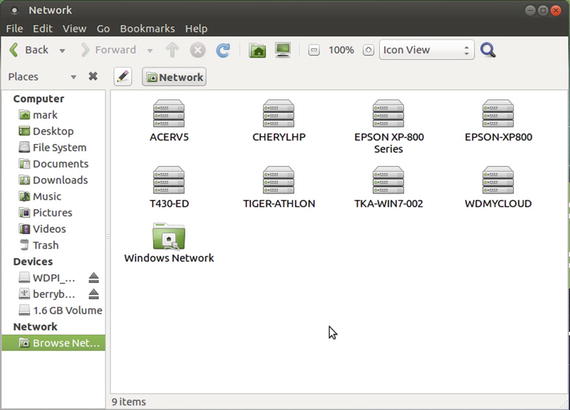
Figure 4-4. Navigating to a Windows share with Ubuntu MATE
Connecting to a Windows Share from the Command Line with smbclient
To connect to a Windows share from the command line, use smbclient. This might not be preinstalled on minimal distros for Raspberry Pi, but it can be installed from your distro’s package manager.
Tip
To assure that you are getting the latest version of packages, run sudo apt-get update before installing any packages. When installing any package, some package components might not be available on the first try. Rerun the install command to load any packages that did not install on the first attempt.
To determine if smbclient is already installed, run it from the command line. If you get a command not found error, you will need to install smbclient. From a terminal prompt, run sudo apt-get install smbclient. To connect with a remote server and download a file :
Enter smbclient//servername/sharename.
When prompted, enter the password for the username .
When the smb: \>? prompt appears, you are logged into the remote computer. You can use commands to list files (ls) and other file management commands.
To copy a file from the remote computer: enter get filename.ext.
To close the connection, enter quit.
Note
If the sharename is more than one word, for example, Jim’s Files, surround it with double-quotes: smbclient//servername/"share name".
Connecting to Different Workgroups
During the login process , you can specify the name of the workgroup you are connecting with. If you are using a file manager, the login window prompts you for the workgroup or domain name (refer to Figure 4-2). You can replace the default WORKGROUP name with the name of the workgroup you are connecting with. Some file managers may use Samba as the default domain. With the command line smbclient, the -W=workgroup option is used to set the workgroup if it is different from the default name WORKGROUP. When connecting to a Windows share, it may not be necessary to specify the workgroup. Try the connection without specifying the workgroup name.
The situation is much different if you want to configure your Raspberry Pi to receive connections from other computers. You must install Samba’s server features. And, if the workgroup is not named WORKGROUP, you must also create (or modify) the /etc/smb.conf file to indicate the correct workgroup name.
Connecting to an OSX (MacOS) Share from Raspbian PIXEL
The process of connecting to an OSX (MacOS ) share from Raspbian Pixel is similar to the process for connecting to a Windows share, but with one major difference: use Apple File Protocol (afp://) instead of smb://.:
Open the distro’s file manager.
Enter afp://servername.
When prompted, provide the username and password for the sharename (Figure 4-5).
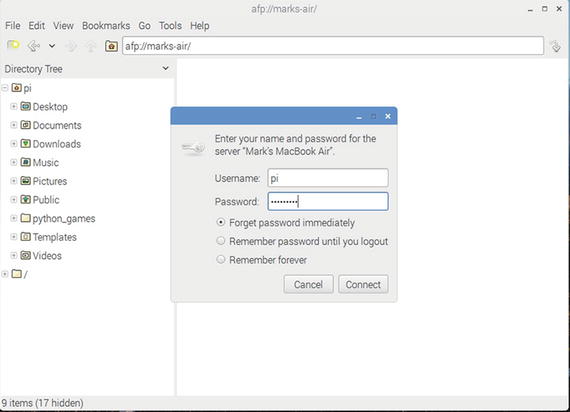
Figure 4-5. Logging into a MacOS (OSX) share with Raspbian with PIXEL
Select how long to retain the password, then click Connect.
Select a share.
Log in again if prompted, using the same username and password as in Step 3.
The share opens (Figure 4-6).
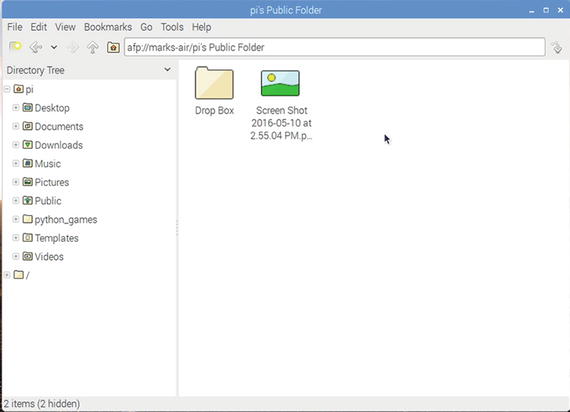
Figure 4-6. Working with a MacOS (OSX) share with Raspbian with PIXEL
Note
To configure an OSX share and determine the correct address, open Settings ➤ Sharing ➤ turn on File Sharing, and note the correct afp:// path to the share . Select the folder to share, the user(s) to share it with, and the share level (read or read/write). Create a new user at Settings ➤ Users and Groups.
Using Wireless Drives
Wireless drives are available in both hard disk and USB flash memory form factors from vendors such as Seagate, Western Digital, SanDisk, and others. In this section, we discuss using SanDisk and Seagate wireless drives. To connect to a wireless drive from a Raspberry Pi, you must know the following:
The device’s IP address
The device’s home folder
The login username (and password, if required)
Connecting to a SanDisk Connect Wireless Flash Drive
The SanDisk Connect wireless flash drive supports WebDAV for read access, so you can access its contents via your Raspberry Pi’s web browser. To configure the device to be available on an existing wireless network:
Install the SanDisk Connect app on an iOS or Android smartphone or tablet.
Start the app and connect to the SanDisk wireless flash drive.
Open the Settings menu.
Turn on Internet connection.
Connect to the wireless network you normally use. Provide the encryption key for the network if prompted.
For details, see https://kb.sandisk.com/app/answers/detail/a_id/3802/ .
Note
The SanDisk Connect wireless flash drive is primarily designed to work as a wireless media source for Android and iOS mobile devices.
To determine the IP address for the wireless flash drive :
Start the app and connect to the SanDisk wireless flash drive.
Open the Settings menu.
Tap About.
Tap WFD in the Drives listing.
Note the drive’s IP address.
To connect to the wireless flash drive:
Start your Raspberry Pi and open the web browser.
Enter the IP address and file location: http://192.168.x.x/wfd/ (use the actual IP address values in place of the example values). See Figure 4-7.
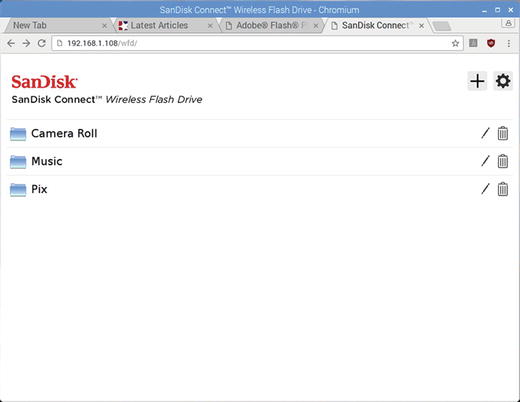
Figure 4-7. Connecting to a SanDisk Connect wireless flash drive using the Chromium browser
The folders on the drive are visible. Open a folder to view, open, or download drive contents.
Note
Unfortunately, you cannot make any changes to the files or folders on the SanDisk drive when you connect wirelessly. To write to the drive or make other changes, connect it to a USB port on your Raspberry Pi or other computer. It behaves just like any other flash drive when connected via USB.
Connecting to a Seagate Wireless Plus Drive
The Seagate Wireless Plus drive is primarily designed to work as a wireless media source for Android and iOS mobile devices. However, it also supports uploading as well as downloading through its web interface. You can connect to the drive wirelessly and also access your normal wireless network. Here’s how.
Turn on the Seagate Wireless Plus drive.
The green light is the power light; the blue light is the Wi-Fi light.
When the Wi-Fi light remains on (stops blinking), open the Wi-Fi connection dialog on your Raspberry Pi and click the Seagate Wireless FMP icon (Figure 4-8).
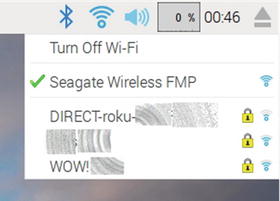
Figure 4-8. Connecting to a Seagate Wireless Plus drive using Raspbian with PIXEL’s wireless connection manager
After verifying your connection, open your web browser and navigate to http://172.25.0.1.
The Seagate Wireless Plus drive opens. To reconnect to the Internet, click the Wi-Fi icon (Figure 4-9).
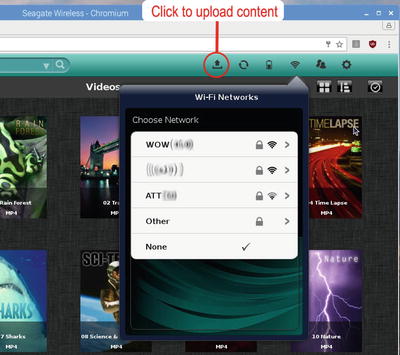
Figure 4-9. Preparing to connect to the default wireless network through the Seagate Wireless Plus’s network dialog
Choose your wireless network.
Enter the encryption key (wireless password). If you plan to use this drive frequently, click the “Connect to this network automatically” box. If you are using the drive on a public network, click the “Secure the network” box.
Click “Join network.”
Click OK. When the screen refreshes, you are connected to the drive and to your normal wireless network.
You can view, play back, or download content from the Seagate Wireless Plus, but, unlike the SanDisk Wireless drive, you can also upload content to the drive from the Raspberry Pi:
Click the upload icon (refer to Figure 4-9).
Click Browse.
Navigate to the location of the file you want to upload .
Click the file, then click Open.
Click Upload. The dialog box confirms that the file is uploaded.
Note
You can download multiple files from the drive by checking them. However, if you want to copy multiple files to the drive, connect it to a USB port on your Raspberry Pi or other computer. It behaves just like any other hard drive when connected via USB.
As long as you are connected wirelessly to the Seagate Wireless Plus, it will pass Internet traffic to and from your wireless network. When the drive is turned off, you must reconnect manually to your normal wireless network. The drive can be configured through its web interface (change the default SSID, require passwords for connection, and so on).
Printing to a Network Printer
To print from a Raspberry Pi to a USB or network printer, you must install CUPS (Common Unix Printing System). To install CUPS, open a terminal session and use the following command:
sudo apt-get install cups Configuring CUPS
After installing CUPS, you need to add your user account (pi) to the default user group created by CUPS (lpadmin):
sudo usermod -a -G lpadmin pi CUPS is configured through your web browser. By default, you must use the web browser on your Raspberry Pi, using the loopback interface. 631 is the post number used by CUPS. Either of the following addresses in your web browser will start CUPS:
http://127.0.0.1:631
http://localhost:631
Tip
To configure CUPS to be configured from any computer on your network, you can modify the cupsd.conf file. For details, see www.howtogeek.com/169679/how-to-add-a-printer-to-your-raspberry-pi-or-other-linux-computer/ .
The CUPS opening dialog (Figure 4-10) has options for users, administrators, and developers. To add a printer, open the Administration tab . Follow these steps to add a printer :
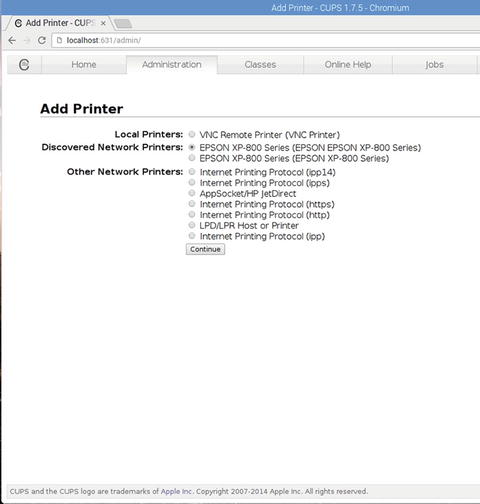
Figure 4-10. Selecting a network printer with CUPS
Click Add Printer.
Log in with username and password to continue.
Select the printer. Note that physical printers, network printers, and print protocols are all available. In this example, I selected the Epson XP-800 series printer (Figure 4-10).
Confirm or change the name, description, and location (optional).
Click the box to share the printer with others (use only with a locally connected printer).
Click Continue.
Select your printer driver (Figure 4-11).
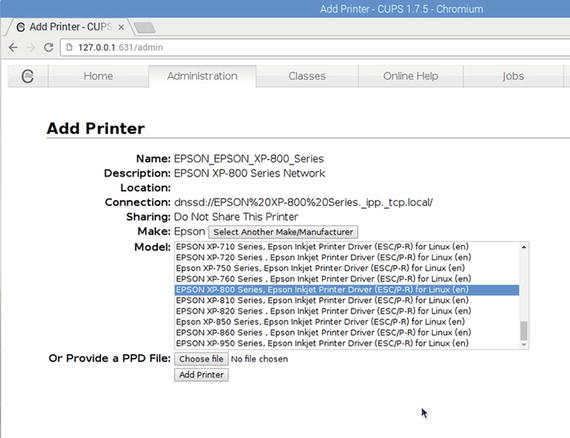
Figure 4-11. Selecting a printer driver with CUPS
Click Add Printer. The Set Default Options dialog (next section) opens.
Note
If CUPS does not list your printer, exit CUPS. Search the software repositories for a driver for your printer and install it. Rerun CUPS after installing the updated driver and select it. If you are using a multifunction (print/scan device), you will use CUPS for printing and SANE for scanning.
Setting Printer Defaults
The Set Default Options for your printer are displayed next. Select the default paper size, paper or media type, and other settings you will most typically use. When you are finished selecting options, click Set Default Options.
Testing Your Printer
To determine if you can connect to the printer, open the Maintenance menu and select Print Self Test Page. The printer will print a self-test page , such as a printhead color pattern or other default (varies with printer). To test fonts, colors, and graphics settings, create a document and print it.
Note
To learn how to set up your Raspberry Pi to act as a print and scan server, see Chapter 6.
Scanning with a Network Scanner
To scan to a local or network scanner (including multifunction devices), use SANE (Scanner Access Now Easy ). To learn more about SANE, go to www.sane-project.org/ . SANE is an application programming interface (API) for scanning. SANE calls the graphical and command-line apps that use SANE for scanning as frontends. The drivers used by SANE to connect to a particular scanner are known as backends . In other words, to scan to a local or network scanner, download SANE, one or more frontends, and the backend (driver) needed for your scanner. Keep in mind that some scanners and multifunction devices are not compatible with SANE. Check the SANE database of compatible devices and with your scanner or multifunction device vendor to determine compatibility.
Note
The process of installing SANE and its frontends and backends is identical for both network and USB connected scanners. For details, see Chapter 7.
Raspberry Pi Linux Samba Server Configuration
Raspbian with PIXEL is already ready to connect to Windows or MacOS (OSX) shares. However, if you want to share folders on Raspbian or other Linux distros on your Raspberry Pi, you must install Samba’s server features. Open a terminal session to install these features:
sudo apt-get updatesudo apt-get install samba samba-common-bin
Note
You can install more than one package at a time by placing them on the command line as in this example. The first package in this example is samba, and the second is samba-common-bin, which adds support for commands such as testparm.
Creating Local Users
If you want to create additional users that can connect to a network share on your Raspberry Pi, you must first of all create them as local users. In the following example, replace username with the username you want to use, such as marcus:
sudo adduser username.
At the prompt Enter new UNIX password:, type the password you want to use.
At the prompt Retype new UNIX password:, retype the same password.
When prompted, you can enter user information (Full Name, Room Number, Work Phone, Home Phone, Other) or just press the Enter key.
Press Y if the information is correct. The new user is created (see Figure 4-12).

Figure 4-12. Setting up a new local user
Creating a Network User
To make the user pi a network user:
sudo smbpasswd -a pi
At the prompt New smb password:, type a password
At the prompt Retype new smb password:., retype the same password
Repeat for any users you created in the Creating Local Users section.
Tip
You can use separate UNIX (local access) and smb (network access) passwords for each user, but it’s a lot easier to use the same password text for the UNIX and smb passwords for a given user. For example, if user marcus has the UNIX password thisbook, use thisbook for the smb password for marcus .
Configuring smb.conf
After installing Samba and setting up users, we need to determine which folder we want to share. Only the files and folders in the folder we share will be available to others on the network. You can create a new folder or use an existing folder, such as the user’s home folder.
Samba has many configuration options. Some, but not nearly all, are stored as comments in the Samba configuration file /etc/samba/smb.conf. We need to configure the following:
Workgroup name
WINS support
Folder to share
How folder will be shared
To edit /etc/samba/smb.conf, open a terminal session and run this command:
sudo texteditor /etc/samba/smb.conf(replace texteditor with leafpad, nano, or your preferred text editor)
The following statements need to be uncommented or added to smb.conf. To uncomment a statement , remove the ; from the front of the statement:
workgroup = WORKGROUPwins support = yes
Note
Change the workgroup name WORKGROUP to the actual workgroup name.
If you created a folder called share , add the following section into the ===Share Definitions=== section to complete the needed configuration:
[pihome]comment = Pihomepath = /home/pi/sharenrowseable = Yeswriteable = Yesonly guest = nocreate mask = 0777directory mask = 0777public = no
Here’s what each statement means:
[pihome] - The following statements set up a shared folder on your Raspberry Pi
comment = Pihome
path = /home/pi/share - The folder being shared (share) is located beneath the pi folder; change share to the actual name of the folder
browseable = Yes - The folder specified with path= can be viewed
writeable = Yes - The folder specified with path= can be written (files saved, deleted, or changed by a network user) to as well as read (omit this for a read-only share)
only guest = no - Disables guest access
create mask = 0777 - Enables read/write/execute permission to all users who can log into the share; change to 0700 to make the share read-only
directory mask = 0777 - Enables read/write/execute permission to all users who can log into the share; change to 0700 to make the share read-only
public = no - Disables public access
Note
For more about mask values in Samba , see https://lists.samba.org/archive/samba/2003-March/063429.html . For a complete and well-cross-referenced guide to Samba configuration statements, see www.samba.org/samba/docs/man/manpages/smb.conf.5.html .
To enable each user to connect to its home folders with read/write access, make the following changes to the [Homes] section:
[Homes]Comment = Home DirectoriesBrowseable = noread-only = nowriteable=Yescreate mask=0775directory mask=0775valid users = %Susername map = /etc/samba/sambausers
After completing these edits, save your changes. As a result of these changes, any smb (network) user will see two shares when they connect to the Raspberry Pi: the share folder and their personal folder (refer to Figure 4-15).
Logging into the Raspberry Pi
Here’s how to log into your new Raspberry Pi share from a remote computer on the LAN:
Open your system’s file manager.
Open Network.
Open RASPBERRYPI.
Enter your username and password when prompted and click OK (Figure 4-13).
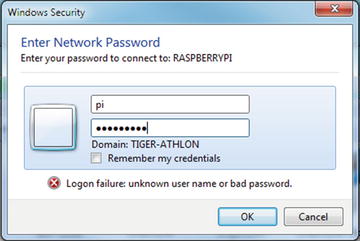
Figure 4-13. Logging into a Raspberry Pi using Windows
Open your share (Figure 4-14).
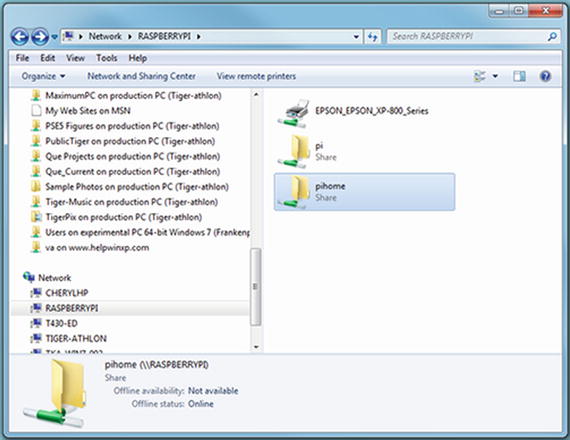
Figure 4-14. Selecting from the remote user’s home folder or the common share folder using Windows
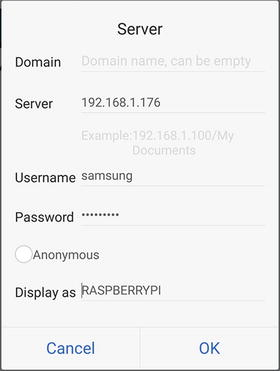
Figure 4-15. Configuring login information for the Raspberry Pi shares
Connecting to Raspberry Pi from an Android Device
To connect to a Raspberry Pi share from Android, you can use one of these methods:
Install a file management app on your mobile device and use it to connect to your Raspberry Pi share(s).
Configure Raspberry Pi for SSH connections, configure your mobile device for SSH connections, and use FTP.
Configure Raspberry Pi for SSH connections and install an SSH app on your mobile device. Some available apps include Connectbot (Android), JuiceSSH (Android), and Termius (Android, iOS, Windows, Linux, and MacOS).
If all you want is access to a shared file or folder on the Raspberry Pi, the first option is simpler.
Note
Using SSH for headless booting and control of a Raspberry Pi is covered in Chapter 6.
The following example uses the free ES File Explorer, one of many file managers available from the Google Play store:
After installing ES File Explorer, open it on your Android device .
Open menu (three-bar icon) ➤ Network ➤ LAN.
Click Scan to detect all devices on the network.
Press and hold the RASPBERRYPI icon to check it.
Click Edit Server.
Turn off Anonymous.
Enter the username and password for your shared folder.
Click OK (Figure 4-15).
Navigate to the shared folder.
Connecting to Raspberry Pi from an iOS Device
As with Android, you can use a file management app or SSH to connect to a Raspberry Pi share from iOS. The following example uses the free File Explorer by Skyjos, one of many file managers available from the app store:
After installing File Explorer, open it on your iOS device.
Click the plus (+) sign to set up a new connection.
Click Linux/Unix from the New Connection list.
Scroll down and select RASPBERRYPI from Network Neighborhood (Figure 4-16).
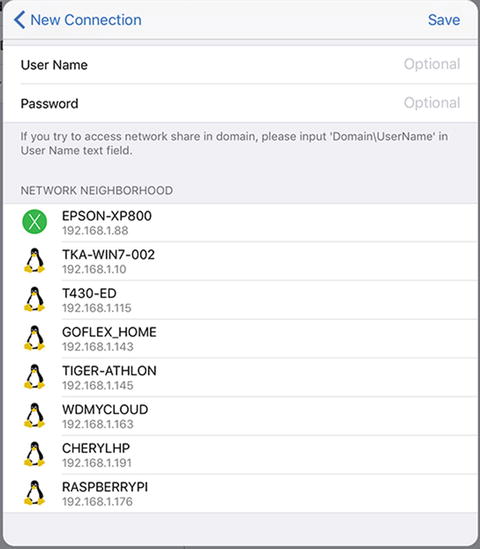
Figure 4-16. Selecting from the remote user’s home folder or the common share folder using Windows
Click Registered User on the login dialog.
Enter your login name .
Enter your password.
Click Login (must login each time) or Save & Login (saves login information).
Click the shared folder you want to use.
Troubleshooting
If you cannot connect to a network share from a Raspberry Pi, make sure you have
Configured the share settings properly
Connection type (smb or afp)
Username
Password
If you cannot connect to a Raspberry Pi share, make sure you have
Created and properly configured a user share
Local user created
SMB user created
smb.conf syntax
Summary
Raspberry Pi uses Samba to connect to workgroup networks. Install Samba if it is not already installed. You can connect via a file manager or by using smbclient. Although wireless flash and hard drives are primarily intended for use with mobile devices, a Raspberry Pi can connect with them for read-only or read/write use, depending upon the specific drive in question. CUPS is used to connect to compatible network printers. SANE is used to connect to compatible network scanners. Use CUPS and SANE to connect to the printing and scanning functions of compatible multifunction devices.