
When you move your Raspberry Pi from the comfort of your home or office into a mobile environment, you’re faced with three questions:
How much power does it use?
Can I control how much power it uses?
What can I use for an alternative power source?
In this chapter we’ll review all three of these questions. Let’s start with power usage.
Power Usage
The model of Raspberry Pi you use and the accessories you use have a huge impact on power usage. If you are planning to use battery power, knowing how much power your Raspberry PI uses is vital to know before you purchase a battery power source.
According to the Raspi.TV’s Raspberry Pi 2 – Power and Performance Measurement web site ( http://raspi.tv/2015/raspberry-pi2-power-and-performance-measurement ), the Raspberry Pi 2 is far more economical when running at idle, loading the LXDE GUI, watching a full HD (1080p) video, and recording a 1080p video than the Pi Model B, and uses only slightly more power than its immediate predecessor, the Pi B+. However, when multicore apps are run, the current draw increases from 280mA (one core) to 420mA (four cores).
Test results at idle on Jeff Geerling’s Raspberry Pi Dramble page ( www.pidramble.com/wiki/benchmarks/power-consumption ) is the source for the graph shown in Figure 10-1. All of these test results were measured after Geerling disabled onboard HDMI and the activity LEDs on each Pi model.

Figure 10-1. Enabling Wi-Fi (Pi 3) or using a USB Wi-Fi adapter (other models) increases power consumption, but the built-in Wi-Fi in Pi 3 (also used in Pi Zero, not shown) uses only about half the power at idle of a USB Wi-Fi adapter
Configuring the Raspberry Pi for Minimal Power Consumption
As you learned from the previous section, the amount of power a Raspberry Pi consumes can be adjusted by changing its configuration. If you’re accustomed to configuring a PC or MacOS computer, though, tweaking a Pi is a completely different story. Instead of power management in the system firmware (BIOS or UEFI) or operating system dialogs, the Pi uses commands issued from the terminal (command line) or inserted into the startup procedure.
Another difference is that Pi power consumption involves disabling ports and devices, and because of how the Pi is designed internally, disabling a port or onboard device can disable more than you expected.
Disabling HDMI
If you are using a Raspberry Pi in a headless configuration (using a remote device to control it), turning off the HDMI port is a no-pain way to save power (about 25mA). Per Jeff Geerling, you can disable HDMI in two ways. From the command line (Raspbian or similar Linux distros):
/usr/bin/tvservice -o To disable HDMI at boot, edit /etc/rc.local and add
/usr/bin/tvservice -oTo reenable HDMI from the command line:
/usr/bin/tvservice -p Disabling Onboard LEDs
Individual LEDs can be disabled from the command line (see https://www.jeffgeerling.com/blogs/jeff-geerling/controlling-pwr-act-leds-raspberry-pi ). For Raspberry Pi 2, B+, and A+, run sudo nano /boot/config.txt and add these commands to disable both LEDs at boot:
# Disable the ACT LED.dtparam=act_led_trigger=nonedtparam=act_led_activelow=off# Disable the PWR LED.dtparam=pwr_led_trigger=nonedtparam=pwr_led_activelow=off
Save changes, exit, and reboot.
With Raspberry Pi Zero, there’s only one LED to disable. It can be disabled from the command line, or at boot time. Run sudo nano /boot/config.txt and add these commands:
# Disable the ACT LED on the Pi Zero.dtparam=act_led_trigger=nonedtparam=act_led_activelow=on
The LEDs on the Raspberry Pi 3 appear to have different default behaviors depending upon the specific Linux distro used. For details, see the discussion thread at www.jeffgeerling.com/blogs/jeff-geerling/controlling-pwr-act-leds-raspberry-pi .
Enabling Login and Control via TTY
Disabling USB ports on the B+, Pi 2, and Pi 3 reduces power consumption significantly, increasing runtime by several hours when using the Pi for periodic photo captures. Unfortunately, these models implement their UBS ports though a hub that also controls the Ethernet port (see https://babaawesam.com/2014/01/24/power-saving-tips-for-raspberry-pi/ ). Consequently, these steps must be performed before you can boot your system without USB/Ethernet support :
Enable Serial with raspi-config or the equivalent in Raspbian with PIXEL or other GUIs
Connect a USB to TTL cable (Figure 10-2) from your PC or MacOS computer’s USB port to the appropriate pins on the GPIO bus:
Green: connect to RXD (receive) pin - PIN 10 (physical)/ GPIO 14
White: connect to TXD (transmit) pin - PIN 8 (physical) / GPIO 15
Black: connect to GND (ground) pin - PIN 6 or 14 (physical)
Red: connect to 5V power pin - PIN 2 or 4 (physical) only if the Micro-USB power cable is NOT connected to the Raspberry Pi (see inset in Figure 10-2)
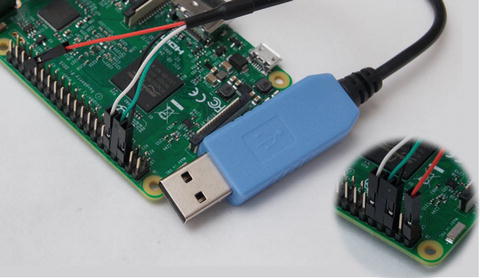
Figure 10-2. A USB-to-TTL (debug) cable enables you to connect to your Raspberry Pi’s GPIO pins for remote control via TTY. The inset (lower right) shows the use of the red power cable in place of the normal Micro-USB power connector on the Raspberry Pi.
Install the appropriate driver for your USB to TTY cable on your PC or MacOS computer. Older cables use the Prolific 2303 chipset driver, while newer cables use the SiLabs CP210X chipset. If you are not certain which cable you use, install both. Most Linux distros already have the appropriate driver installed.
You can connect directly to your Raspberry Pi from MacOS’s terminal with one of these commands (depending upon the cable’s chipset):
screen /dev/cu.PL2303* 115200OR
screen /dev/cu.usbserial 115200To connect from another Linux computer, use
sudo screen /dev/ttyUSB0 115200To connect from Windows, download and install PuTTY ( www.chiark.greenend.org.uk/~sgtatham/putty/latest.html ):
Use Windows Device Manager to determine the COM port used by the USB-TTL cable.
Use the Serial Line connection option in PuTTY , specifying the COM port used by the cable and the speed of 115200 (Figure 10-3).
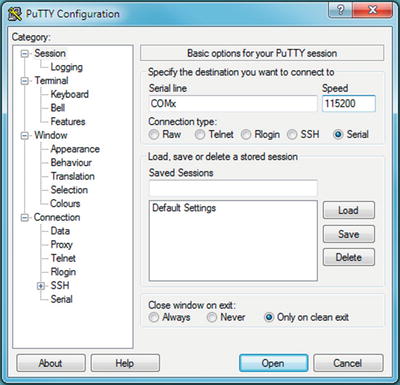
Figure 10-3. Connecting to the Raspberry Pi with PuTTY. Replace COMX with the actual COM port number as reported by Windows Device Manager.
Log into your Raspberry Pi when prompted.
Tip
These steps are adapted from the detailed discussion for MacOS, Windows, and Linux connections at https://learn.adafruit.com/adafruits-raspberry-pi-lesson-5-using-a-console-cable?view=all . That page also contains illustrations and driver links.
Disabling USB Hub and Ethernet
After booting and logging into your Raspberry Pi via TTL, use the following commands to disable the USB hub which also controls Ethernet:
#!/bin/bash#Code to stop/etc/init.d/networking stopecho 0 > /sys/devices/platform/bcm2708_usb/buspower;echo "Bus power stopping"#!/bin/bash#Code to startecho 1 > /sys/devices/platform/bcm2708_usb/buspower;echo "Bus power starting"sleep 2;/etc/init.d/networking start
If this script does not work, see https://babaawesam.com/2014/01/24/power-saving-tips-for-raspberry-pi/ for a workaround.
Choosing a Power Source
If you want to take your Pi “on the road,” you have two choices:
Battery power
12V AC car adapter
Battery power enables you to use your Pi anywhere as long as the battery holds out. A 12V AC car adapter lets you use your Pi on a long car trip. In the following sections, you learn how to make the best choice for your needs.
Estimated Battery Runtimes
You don’t need to reduce power consumption before looking at alternative power sources for your Raspberry Pi, but if you decide to use a battery, the combination of larger battery size (measured in mAh) and reduced power drain provides longer runtime.
What level of runtime can you expect? The Spell Foundry Raspberry Pi Battery Life Calculator web site ( http://spellfoundry.com/raspberry-pi-battery-runtime-calculator/ ) provides typical estimated runtimes for standard RPi models in different configurations:
Selected Pi model
Pi with USB Wi-Fi adapter
Pi with Pi Camera
Pi with USB Wi-Fi adapter and Pi Camera
You might be surprised to discover that using the standard 5MP or 8MP Raspberry Pi camera has a much larger impact on battery life than using a USB Wi-Fi adapter. Figure 10-4 illustrates estimated runtimes based on a standard 2000mAh battery for four current Raspberry Pi models:
Pi Zero
Pi A+
Pi 2
Pi 3
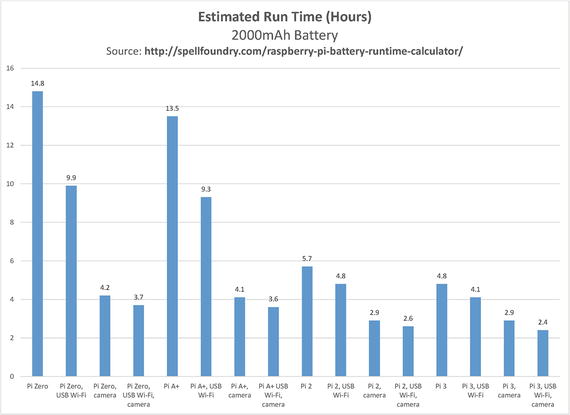
Figure 10-4. The single biggest impact on estimated runtime is using the Pi’s camera
Figure 10-5 illustrates estimated runtimes for the same models based on a 4000mAh battery.
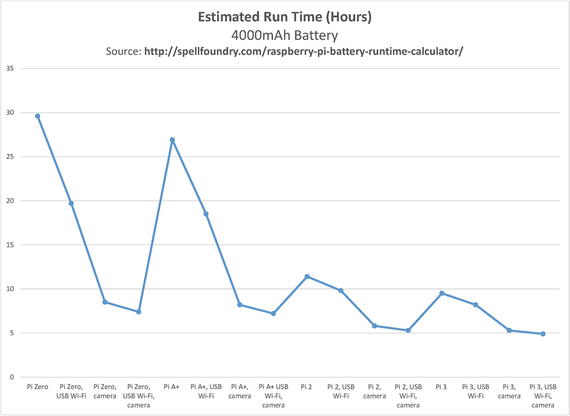
Figure 10-5. Doubling the mAh (milliampere-hour) rating doubles the runtime
To increase battery life over these figures, use the tips provided in the section “Configuring the Raspberry Pi for Minimal Power Consumption ,” in this chapter.
Car Chargers and Raspberry Pi
Car chargers that plug into the 12V auxiliary power jack would seem, at first glance, to be the perfect power source for a Raspberry Pi that’s away from home. Unfortunately, car chargers are not intended to provide the precise voltage levels needed to reliably operate a Raspberry Pi.
For example, a 5V DC charger with a 1A output does not provide nearly enough power for a Raspberry Pi other than a Pi Zero. A 5V DC charger with a 2.1A or higher output has the same rating as the power supplies made for Raspberry Pi 2 and 3. However, poor voltage regulation (such as dropping from 5V to 4.5V under load) can prevent a Raspberry Pi from booting or could cause it to crash after starting.
For recommendations for chargers, see the following:
www.raspberrypi.org/forums/viewtopic.php?f=26&t=48661 “Using a mirco [sic] USB car charger with the Raspberry Pi”
www.buyraspberrypi.com.au/shop/12-volt-to-5-volt-3000ma-step-down-transformer/ (similar products are available in other markets)
Poor-quality cables that have excessive resistance (typically those made with thin wires) can also prevent your Pi from receiving full power. For recommendations and comparisons, see the following:
www.raspberrypi.org/forums/viewtopic.php?f=63&t=165393 “Best Micro-USB cables ”
www.cpmspectrepi.uk/raspberry_pi/MoinMoinExport/USBcableResChk.html “USB Hub & PSU Cable Resistance Checks ”
Using Intelligent Power Management Peripherals
Raspberry Pi computers do not have onboard power management features , and as a consequence cannot detect low battery levels or shut down before battery power is exhausted. When a Raspberry Pi shuts down unexpectedly, the chances of memory card corruption are very high. This can lead to the loss of data stored on the memory card, such as time-lapse photos, videos, network monitoring logs, and so on.
As we learned in Chapter 9, the Pi’s GPIO pins can be used for a wide variety of peripherals that add new features. In this section, you learn about a few of the devices that use the GPIO pins to provide the missing pieces of power management.
MoPi Mobile Power for Raspberry Pi
The MoPi mobile power peripheral for Raspberry Pi connects to the first 26 pins of the 40-pin GPIO interface on newer models and also supports the early models that have a 26-pin GPIO interface. MoPi uses the I2C bus, the 5V out pin, and a ground pin. It offers the ability to connect to almost any type of power supply that can produce at least 6.2V DC under load (maximum is 20V DC).
Although it includes two default battery profiles (nonrechargeable or nonbattery; eight NiMH rechargeable batteries) that are jumper-selectable , MoPi includes a configuration utility that is used to select power supply type, number of individual battery cells, and battery chemistry.
The software used by MoPi includes
simbamond : SIMple Battery MONitor daemon (system service)
mopi : Configuration tool similar in appearance to raspi-config
mopicli : Command-line interface (CLI) for mopi
monit : Monitors simbamond and other system statuses
In addition to providing optimized power for the Pi, MoPi can shut down the Pi in a controlled manner before the battery source runs out of power, acts as a UPS when both battery and nonbattery power is available, supports hot-swapping of power supplies, and has an integrated on-off switch. MoPi supports programs in Python.
The current model does not support the Raspberry Pi 3 (but supports the Pi 2 and all other models). An updated version (tentatively named MoPi ++) will support the Pi 3 and is expected by the end of 2017.
To learn more about MoPi, see https://pi.gate.ac.uk/pages/mopi.html . To order MoPi, see https://pi.gate.ac.uk/pages/get-mopi.html .
LiFePO4wered/Pi 3
The LiFePO4wered/Pi 3 is optimized for extreme portability. Like the MoPi, it uses the I2C bus for communications. However, it uses only the first eight pins of the Pi’s header. It is compatible with all 40-pin GPIO Raspberry Pi models. A Pi Zero will need to have an eight-pin header installed. Minor adjustments are needed to run on Model A and Model B.
It includes a 1500mAh lithium iron phosphate (LiFePO) cell that has a nominal output voltage of 3.2V, a smart USB charge controller , autoadjusting for input amperages ranging from 1.33A to 500mA, MPPT (solar cell) compatibility, power management, auto shutdown when battery voltage approaches critical levels, a wake timer, auto boot when sufficient power is restored, and charge and power LEDs.
LiFePO4wered/Pi 3 uses a CLI (command-line interface) tool to change parameters. To learn more about the /Pi 3 and original /Pi versions or to purchase, go to http://lifepo4wered.com/ .
Note
LiFePO (also known as LFP) batteries, unlike standard lithium-ion batteries, are nonflammable and will not explode. They are designed to work at temperatures above 60 degrees C. Their nominal 3.2V voltage remains the same throughout the discharge cycle. They have a low self-discharge rate, enabling them to stay charged even when stored for a long time and are designed to exceed 1,000 charge/discharge cycles.
Sleepy Pi and Sleepy Pi 2
Sleepy Pi (26-pin Raspberry Pi) and Sleepy Pi 2 (40-pin Raspberry Pi) combines the microcontroller interfacing of an Arduino with a real-time clock and wake-on-demand circuitry, current monitor, and support for battery power ranging from 5.5-30V DC.
Like the other products we’ve examined, Sleepy Pi/Pi 2 connect via the I2C header pins. However, because Sleepy Pi products also contain the ATMEGA328P chip for Arduino functions, many additional pins are used (see Figure 10-6).
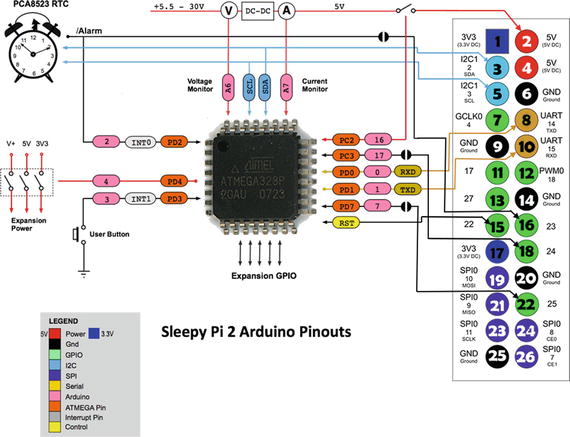
Figure 10-6. How the Sleepy Pi 2 routes signals between its built-in Arduino chip and the Raspberry Pi’s GPIO pins (adapted from a diagram at http://spellfoundry.com/product/sleepy-pi-2/ )
Both products are available in low-profile and stackable versions. The stackable version can be used with other add-on devices. For more information or to order in the EU , see http://spellfoundry.com/products/ . To order in the United States and Canada, visit http://buyapi.ca/ .
Caution
The Sleepy Pi/Pi 2 boards have 3.3V (also known as 3V3 ) GPIO pins, compared to 5V GPIO pins on some Arduino boards. Check GPIO voltages when running an Arduino app on a Sleepy Pi/Pi 2 board.
Comparing Power Management Products for Raspberry Pi
The three products highlighted in the preceding are just some of the power management products made for Raspberry Pi. Whichever products you’re interested in, a table such as the following (Table 10-1) can be useful in determining the features you need.
Table 10-1. Selected Raspberry Pi Add-ons for Power Management Comparison
Product | Power Source | Power Monitoring | Stackable | RTC | Notes |
|---|---|---|---|---|---|
Sleepy Pi | User-supplied | Yes | Yes* | Yes | Arduino included |
LiFePO4wered/Pi 3 | 1500mAh LFP battery | Yes | Yes* | No | Smart USB and solar charging |
MoPi | User-supplied | Yes | Yes* | No | Very compact |
Troubleshooting
Disabling Raspberry Pi features or connecting devices to your Pi’s GPIO pins can be risky if you’re careless. To avoid problems, use these guidelines :
Make a backup copy (clone) of your current OS installation before you experiment. If you make a mistake, you still have your original.
Be sure to carefully review commands you add to configuration files or run from CLI when configuring your Pi or a peripheral.
Double-check compatibility before buying or installing a power management device.
Never install a device to the GPIO pins while the Pi is powered.
If you are planning to run your Pi from TTY, check TTY login and operation before you disable your HDMI port.
If you have problems after you make configuration changes or connect a peripheral, check the following:
Make sure you have installed all updates needed for Raspbian.
Install the latest version of the peripheral’s software. Depending upon the peripheral, you might need to install the software before or after connecting the peripheral.
Check commands and programs for typos.
Summary
Even though the Raspberry Pi was never designed to be “on the road,” careful optimization of power requirements, using the largest batteries available, using well-regulated 12V DC car chargers, and power management devices can help the Pi perform as well away from home as in the home, office, or classroom. With many Raspberry Pi models and a variety of approaches to power available, be sure to check compatibility before buying. Use a USB voltage and current tester to verify the quality of power you get from battery or 12V car charger power sources.