The Raspberry Pi family of single-board computers has broad operating systems support in both Linux and non-Linux environments. Your first step in expanding your Raspberry Pi is choosing the right distro or operating system for the job (or jobs) you want to perform with your Raspberry Pi.
In this chapter, you’ll take a tour of the major Linux distros and other operating systems available for Raspberry Pi. You’ll learn what they include, what tasks they’re designed to perform, what they look like, and the specific Raspberry Pi versions they support. Whether you use a diminutive Raspberry Pi Zero, the highest-performance Raspberry Pi 3 Model B, or another option, you’ll find several choices to consider.
This chapter also covers installation methods, including the use of NOOBS and alternatives such as BerryBoot and PIIN.
Raspbian
Most Raspberry Pi boards (with the exception of the Raspberry Pi Zero and Zero W) are bundled with Raspbian, a Linux distro that is based on Debian. Raspbian is officially supported by the Raspberry Pi foundation; you can download the latest version of Raspbian for all Pi versions from the foundation’s web site.
Raspbian is available in two forms: Raspbian Jessie with Pixel includes the PIXEL desktop , and Raspbian Jessie Lite is a minimal version. Both are available through the NOOBS installer included on the Raspberry Pi flash drive included with most Raspberry Pi boards.
Note
To learn more about using NOOBS, see “Using NOOBS,” in this chapter.
Raspbian with PIXEL includes several programming languages and tools, making it a good choice for a ready-to-use programming environment. It also includes LibreOFFICE, a web browser, e-mail, and other office apps.
Raspbian Lite boots to a command line. It’s fully customizable; you can add your choice of GUI, languages, web browser, and so on. If you’re new to Linux, be prepared for a long slog.
Note
For a step-by-step tutorial on creating a customized Raspbian Lite configuration with your choice of GUI, icons, and more, see the article [GUIDE]Raspbian Lite with PIXEL/LXDE/XFCE/MATE/Openbox GUI in the Raspberry Pi forum ( www.raspberrypi.org/forums/viewtopic.php?f=66&t=133691 ).
Raspbian with PIXEL Fast Facts
Here’s a quick summary of Raspbian with PIXEL.
Web site: www.raspberrypi.org/downloads/raspbian/
Recommended uses: programming, office applications, Python games, Minecraft
Raspberry Pi versions supported: all
How to install: via NOOBS, BerryBoot, or PINN; command line (Linux, OSX); Win32DiskImager (Windows)
Tip
Whether you install Raspbian with PIXEL or Raspbian Lite, use these two commands first from the command prompt (Lite) or from a terminal session (PIXEL) to assure you have the most up-to-date Raspbian OS files:
sudo apt-get update
sudo apt-get dist-upgrade
Figures 2-1 and 2-2 illustrate the PIXEL desktop and some of the installed apps and tools .
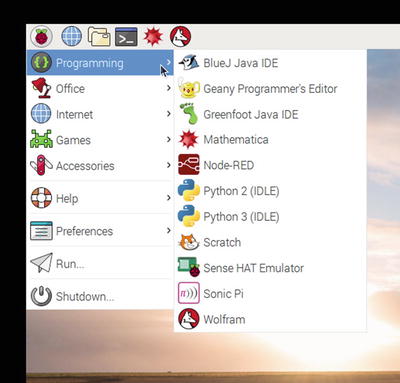
Figure 2-1. Programming tools and languages included with Raspbian’s PIXEL desktop
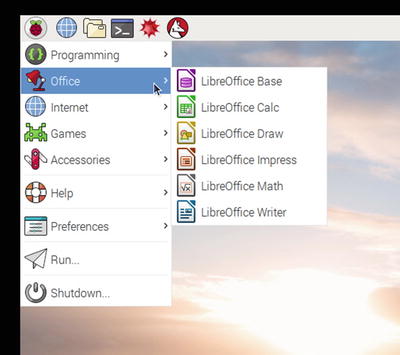
Figure 2-2. Raspbian’s PIXEL desktop includes LibreOffice
Raspbian Lite Fast Facts
Here’s a quick summary of Raspbian Lite.
Web site: www.raspberrypi.org/downloads/raspbian/
Recommended uses: command-line Linux, headless operation, great for DIY customization
Raspberry Pi versions supported: all
How to install: via NOOBS, BerryBoot, or PINN; command line (Linux, OSX); Win32DiskImager (Windows)
The default command-line interface for Raspbian Lite and the raspi-config configuration utility window are shown in Figure 2-3.
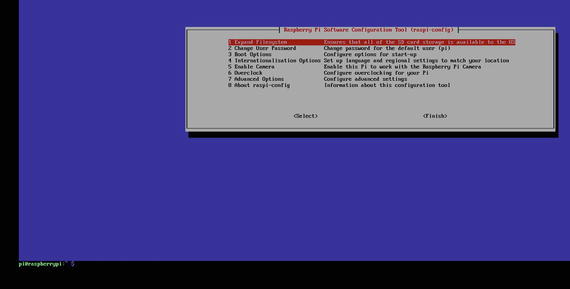
Figure 2-3. A few configuration options are available through the raspi-config utility, but most changes to your system must be applied via the command line
Note
By default, Raspbian Lite requires the user to log in. The default username is pi and the password is raspberry. If you prefer to log in automatically, use raspi-config to change this option. For other default passwords, see www.raspberry-pi-geek.com/howto/Passwords .
Other Linux Distros Available with NOOBS
The following Linux distros can be installed using NOOBS, the boot manager included with most Raspberry Pi boards.
LibreELEC_R Pi 2 Overview and Fast Facts
LibreELEC_R Pi 2 , unlike Raspbian, is a single-purpose distro, made especially for entertainment and media serving. As Figure 2-4 illustrates, it is a Raspberry Pi version of the KODI open source media player.
Web site: http://libreelec.tv
Recommended uses: entertainment and media serving (based on Kodi)
Raspberry Pi versions supported: Pi 2, Pi 3
How to install: via NOOBS , BerryBoot , or PINN; LibreELEC USB-SD Creator (available for Windows, OSX, and Linux)
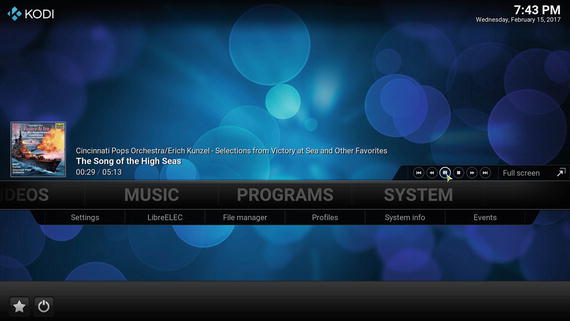
Figure 2-4. Playing an album track through Libre-ELEC
Lakka_R Pi 2 Overview and Fast Facts
Lakka is based on RetroArch Linux, a popular Linux distro used for retro gameplay. Lakka can be used with a wide variety of ROMs and game images and contains emulation cores for classic 8-bit and 16-bit consoles as well as DOSBOX and other IBM gaming environments.
Web site: www.lakka.tv
Recommended uses: retro gaming emulation
Raspberry Pi versions supported: Pi 2, Pi 3 (older Pi versions also supported with separate download)
How to install: via NOOBS, BerryBoot, or PINN; command line (Linux, OSX); Win32DiskImager (Windows)
Figures 2-5 and 2-6 illustrate the Lakka_R Pi 2 configuration menu .

Figure 2-5. The Lakka-R Pi 2 main menu

Figure 2-6. Playing Vectrex Blitz with Lakka-R Pi 2
OSMC_P2 Overview and Fast Facts
OSMC_P2 is also based on KODI, but differs mainly in its user interface. OSMC_P2 provides a very clean and easy-to-use configuration dialog (Figure 2-7).
Web site: https://osmc.tv
Recommended uses: open source media center
Raspberry Pi versions supported: Pi 2, Pi 3
How to install: via NOOBS, BerryBoot, or PINN; downloadable installer for Windows, OSX, and Linux
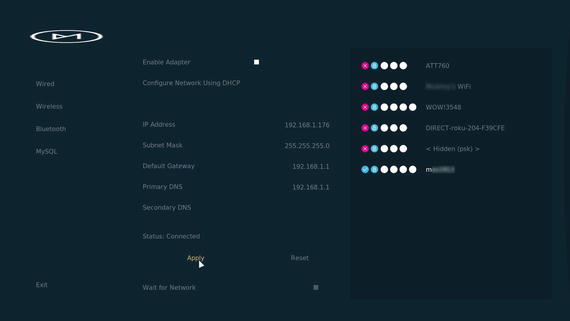
Figure 2-7. Configuring the wireless network with OSMC_P2
RISC OS Overview and Fast Facts
RISC OS may look like Linux, but it isn’t. It’s actually the latest version of Arthur. Arthur dates back to 1987, when it was first developed for the Acorn Archimedes. Unlike Linux distros, Windows, or OSX, RISC OS puts the scroll wheel (which is also a button) on typical mice to work. For example, to close down a RISC OS session, you can use the middle button/wheel to click the Raspberry Pi icon in the lower right-hand corner and select Shutdown (or use Ctrl-Shift-F12).
Web site: www.riscosopen.org/content/
Recommended uses: for programming in BBC BASIC, experimenting with a non-Linux OS
Raspberry Pi versions supported: Pi Model A, B, A+, B, 2 (for Pi 3, install updated Beta RPi ROM with a date of 2017 or newer)
How to install: via NOOBS, BerryBoot, or PINN; command line (Linux, OSX); Win32DiskImager (Windows)
Note
Because RISC OS is not based on Linux, use the RISC Open Org web site as the recommended app source. For a list of apps included in RISC OS, see www.riscosopen.org/wiki/documentation/show/Software%20information . The Nut Pi apps package provides a cost-effective and easy way to add more options. It’s available from www.riscosopen.org/content/sales/nutpi .
Figure 2-8 illustrates the RISC OS desktop.
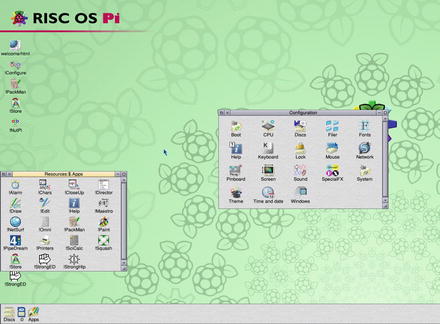
Figure 2-8. A portion of the RISC OS desktop with open Resources/Apps and Configuration windows
Windows 10 IoT Core Overview and Fast Facts
Windows 10 IoT (Internet of Things) Core, like RISC OS , isn’t a Linux distro. However, unlike any other operating system that can be installed using NOOBS, Windows 10 IoT Core isn’t a stand-alone OS. It’s designed to be controlled and configured by a computer running Windows 10 that is running the Windows 10 IoT Core Dashboard. Users can create apps in C#, C++, or Python using the free Visual Studio Community app and send them to the Raspberry Pi for execution. Apps can control the Raspberry Pi by itself or to devices connected to the Raspberry Pi.
Recommended uses: for building projects and apps; use in conjunction with a PC running Windows 10
Raspberry Pi versions supported: Pi 2, Pi 3
How to install: via NOOBS, BerryBoot, or PINN; command line (Linux, OSX); Win32DiskImager (Windows); from Windows 10 IoT on PC (Figure 2-9)
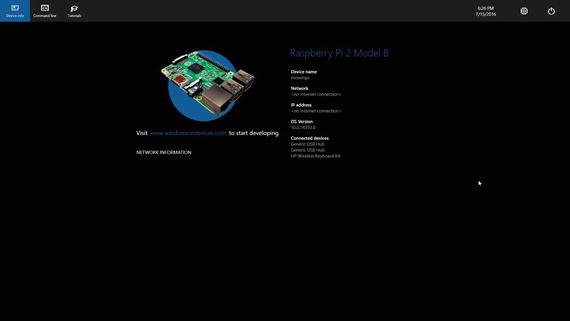
Figure 2-9. A Raspberry Pi 2 running Windows 10 IoT Core
Other Linux Distros Available with PINN
The following Linux distros can be installed using PINN, an alternative to NOOBS available from Source Forge.
Arch Linux ARM
Arch Linux ARM provides the classic Linux terminal interface, using pacman as the package manager. Choose Arch Linux ARM if you want to build a completely customized Linux environment from scratch. When installed from PINN, choose Arch 2 for R Pi 2 or Arch64 for R Pi 3. The initial Arch Linux installation is very fast because, unlike most Linux distros for Raspberry Pi, Arch Linux includes hardly any packages. It’s up to you to decide what to add and install what you want.
Web site: https://archlinuxarm.org/
Recommended uses: full customization of Linux from terminal to a variety of GUIs
Raspberry Pi versions supported: all*
How to install: via PINN or Berryblue; command line (Linux, OSX); Win32DiskImager (Windows).
*Download images available from https://sourceforge.net/projects/archlinux-rpi2/ (for R Pi 2, 3) or https://sourceforge.net/projects/archlinuxrpi/ (for R Pi Zero, 1, 1+)
RetroPie
RetroPie is a classic game emulator that has support for games from Atari 2600 and Intellivison to Playstation 2, IBM PC, and arcade consoles. You can use it with a gamepad or keyboard.
Web site: https://retropie.org.uk/
Recommended uses: game emulator
Raspberry Pi versions supported: all (R Pi 3 recommended)
How to install: via PINN or BerryBoot; command line (Linux, OSX); Win32DiskImager (Windows); Apple Pi Baker (OSX); Etcher (Linux, OSX, Windows)
Using NOOBS
NOOBS is short for “New Out of Box Setup ,” and is provided on the microSD card included with most Raspberry Pi boards. It can also be downloaded from www.raspberrypi.org/downloads/noobs/ . NOOBS makes installing supported operating systems very simple.
Note
NOOBS is available in two forms: NOOBS, which contains Raspbian, or NOOBS Lite, which does not include any operating system. To learn how to create a bootable copy of NOOBS, see “Creating Your Media,” in this chapter.
Installing an OS with NOOBS
To install an OS with NOOBS :
Insert the NOOBS flash card into the Raspberry Pi.
Connect power to the Raspberry Pi.
To install Raspbian from NOOBS, click the empty check box and click the Install icon.
To install another OS (or to install any OS with NOOBS Lite), you must have an Internet connection. If a wired connection is not present, but a supported Wi-Fi connection is available, click the Wifi Networks icon.
Select a network, and enter the password. Click the OK button.
The default language is English (UK). Use the menu at the bottom of the screen to choose the language desired and to change the keyboard setting.
To install any listed OS, click its empty check box and click the Install icon (Figure 2-10).
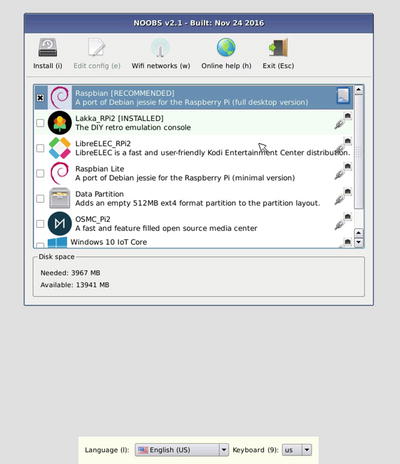
Figure 2-10. Preparing to install Raspbian with NOOBS
The OS is downloaded and installed. A progress bar informs you of the installation steps.
Click OK when finished. The system reboots and your select OS launches.
Restarting NOOBS
One significant advantage of installing supported operating systems with NOOBS over creating a dedicated flash card for an OS is the ability to reboot the system, restart NOOBS, and install a different operating system on the same media. This does not create a multiboot environment, but makes experimenting easier than if you needed to create a unique flash memory card for each OS. To return to NOOBS, start the Raspberry Pi and watch for the recovery mode prompt shown in Figure 2-11. Hold down either Shift key until the NOOBS menu (refer to Figure 2-10) appears.
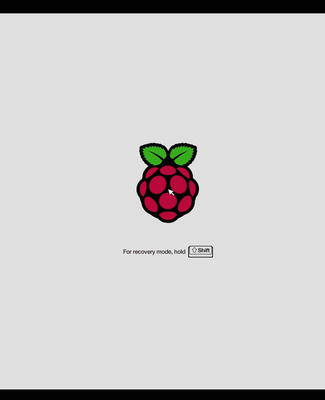
Figure 2-11. The recovery mode prompt. Hold down the Shift key to restart NOOBS
Note
PINN uses the same recovery mode prompt as NOOBS to return to the OS installation or configuration menu. See “Using PINN: An Alternative to NOOBS,” in this chapter for more about PINN.
From the NOOBS OS menu, you can also select the installed operating system and change its startup options :
Click the empty check box for the installed OS.
Click Edit config.
Click the appropriate tab.
Make the changes needed in config.txt or other configuration files (Figure 2-12).
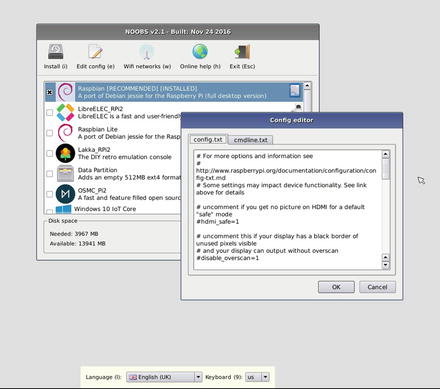
Figure 2-12. Editing the config.txt configuration file for Raspbian (already installed)
Click OK when finished.
Using PINN: An Alternative to NOOBS
PINN (PINN is not NOOBS) is an enhanced alternative to NOOBS. Get PINN (technically, Pinn-Lite, because it is not bundled with an OS), from https://sourceforge.net/projects/pinn/files/ .
Note
To learn how to create a bootable copy of PINN, see “Creating Your Media,” in this chapter.
PINN’s main menu (Figure 2-13) is very similar to NOOBS, but it includes operating systems not currently available through NOOBS (Arch 2, Arch 64, and RetroPie2). As with NOOBS Lite, you must have a network connection to select and download an OS.
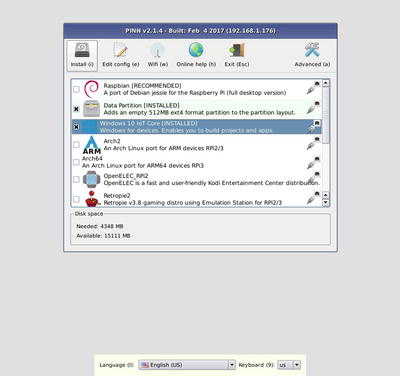
Figure 2-13. PINN’s main menu
Click the Advanced icon to see the options to clone the PINN flash memory card or to password-protect the installed operating system (Figure 2-14).
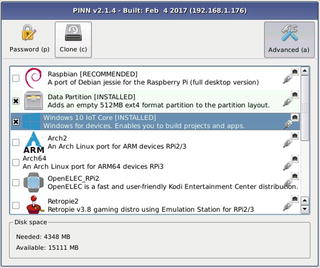
Figure 2-14. PINN’s Advanced menu
Here’s how to use the Clone option :
Make sure the Raspberry Pi is disconnected from power.
Connect a USB card reader to the Raspberry Pi.
Insert a microSD card (at least 8GB) into the card reader.
Insert a PINN microSD card into the Raspberry Pi.
Connect the Raspberry Pi to power.
After PINN boots, click the Advanced icon.
Click the Clone icon.
Make sure that the Copy From Device is the Internal SD card and that the Copy To Device is the card reader (Figure 2-15).
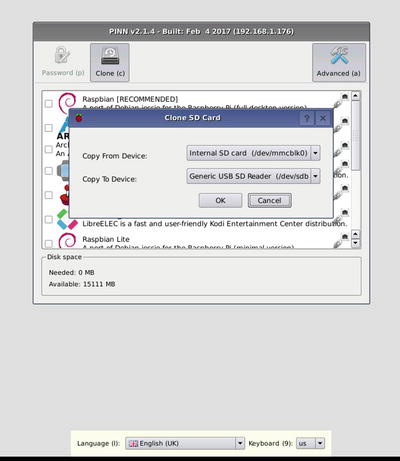
Figure 2-15. Preparing to clone the PINN card
Click OK to continue .
Click Yes to confirm the operation .
Click OK on the Clone Completed message. The card in the card reader now has a copy of the PINN memory card and any installed operating system.
Using BerryBoot
BerryBoot ( www.berryterminal.com ) takes a different approach than NOOBS or PINN to make OS installation easier. Unlike NOOBS and PINN, BerryBoot supports installing operating system images from USB flash drives, installing operating systems to a drive separate from the boot drive, and supports multibooting from a single microSD card.
Note
To learn how to create a bootable copy of BerryBoot, see “Creating Your Media,” in this chapter.
Installing BerryBoot
After booting your Raspberry Pi with BerryBoot, the Welcome configuration dialog appears (Figure 2-16). Select the appropriate settings for overscan, network connection (if Wifi is selected, you will be prompted to select a network and log into it), audio, timezone, and keyboard location. Click OK to continue.
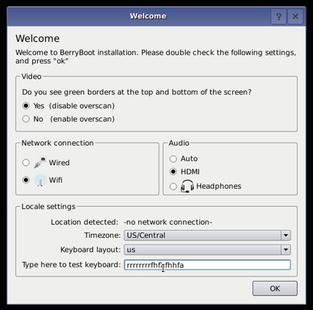
Figure 2-16. Initial BerryBoot configuration
To install BerryBoot to the boot drive, select the first drive listed. To install BerryBoot to a different drive, insert the appropriate media, then select the drive (Figure 2-17).
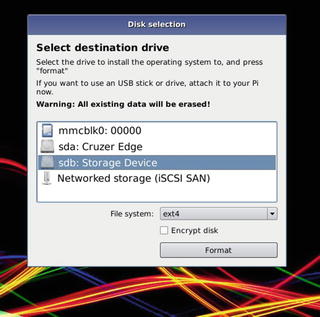
Figure 2-17. Preparing to install BerryBoot to a drive
Installing an OS with BerryBoot
After BerryBoot is installed, you can choose an operating system to download and install from the BerryBoot OS menu (Figure 2-18). Click Popular to choose from distros such as Raspbian, OpenElec, Android KitKat, Ubuntu with MATE desktop, and others. Click Others to choose from less-common distros including Raspbian Lite, Puppy Linux, Sugar, and others. Click Appliances to turn your Raspberry Pi into a specialized device.
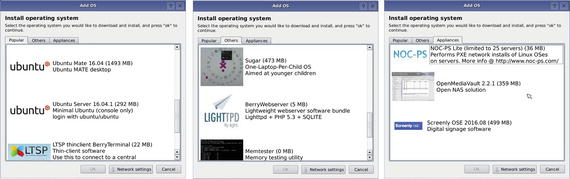
Figure 2-18. Details from BerryBoot’s Popular, Others, and Appliances tabs
To install a listed OS , click it and click OK. After the OS is downloaded and installed, click OK on the Installation Finished dialog to restart the system and boot the new OS.
To install a distro you downloaded manually:
Click Cancel.
After BerryBoot restarts, the BerryBoot menu editor appears.
Click and hold Add OS, and select Copy OS from USB stick (Figure 2-19 ).
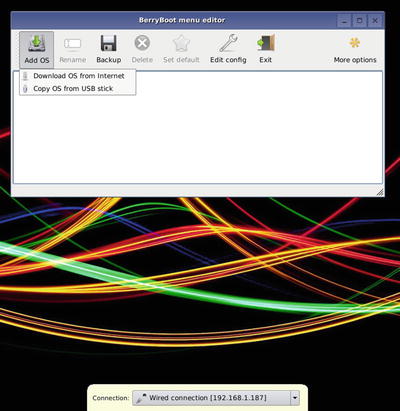
Figure 2-19. The BerryBoot menu editor preparing to install an OS from USB
Navigate to a folder containing the OS you want to install.
Select it and click Open (Figure 2-20 ).
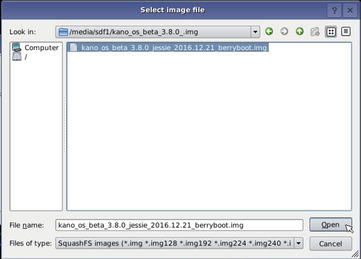
Figure 2-20. Preparing to install Kano OS from a USB drive
After BerryBoot copies the files, the OS is added to the boot menu.
To set up a multiboot configuration , open the Add OS menu and select an OS to download or install from USB. Figure 2-21 illustrates the menu editor after adding Puppy Linux via download and Kano OS from USB, setting Kano OS as the default OS, and renaming Kano OS from its original longer name.
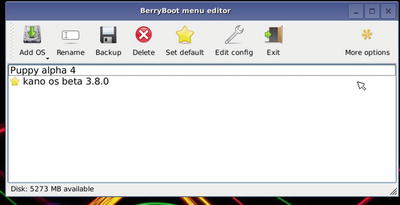
Figure 2-21. BerryBoot’s multiboot, default OS, and renaming options in use
To make a backup of an OS, select it and click Backup. You can back up the OS as originally configured, or with any changes you have made (installed packages, etc.). The Edit config options works the same way as in NOOBS or PINN, enabling you to edit startup files such as config.txt.
More Options for BerryBoot
Click More options to display the options shown in Figure 2-22. Select an OS and then click an option to use it:
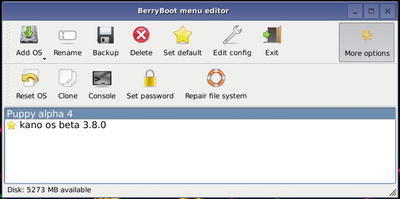
Figure 2-22. BerryBoot’s More Options menu
Reset OS: Sets the selected OS to its as-installed configuration.
Console: Enables a BerryBoot console session. Press Ctrl-Alt-F2 to open the session (username: root, no password).
Set password: Password-protects the selected OS.
Repair file system: Runs fsck with the appropriate options.
Clone: Opens the Export menu, which provides options for cloning the SD card, exporting an OS image, or importing an OS image (Figure 2-23).
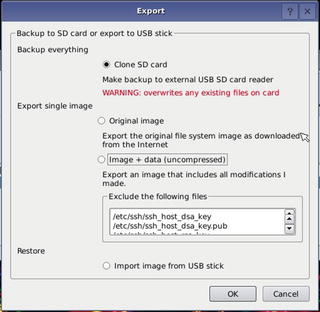
Figure 2-23. BerryBoot’s Export (Clone) menu
Loading an OS with BerryBoot
The BerryBoot boot menu (Figure 2-24) appears after you restart your system or apply power to your system. If you selected a default OS , it boots unless you select another option (a different OS or the menu editor).
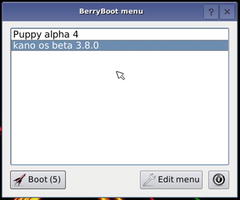
Figure 2-24. Preparing to load an OS from the BerryBoot boot menu
Other Linux Distros for Raspberry Pi
BerryBoot can install almost any Linux distro that is available in an appropriate image file format. Many of these can be downloaded from Alex Goldcheidt’s BerryServer web site ( http://berryboot.alexgoldcheidt.com/ ).
If you prefer to download a Linux distro directly from the creator’s web site, here are some links for other popular and useful free distros:
FreeBSD
FreeBSD is based on BSD, a version of UNIX developed by the University of California, Berkeley. Available from www.freebsd.org/where.html (Links to R Pi-B and R Pi 2 SD card images). To get a version of FreeBSD for Raspberry Pi 3, go to http://www.raspbsd.org/raspberrypi.html . FreeBSD loads to the command line. Uname: freebsd PW: freebsd.
NetBSD
NetBSD is also based on BSD. Available from https://netbsd.org/releases/ (link to evbarm download).
Fedora and CentOS
Fedora is the basis for RedHat Enterprise. It is updated more frequently than RedHat and thus supports newer technologies more quickly than Fedora. Available from http://fedoraproject.org/wiki/Raspberry_Pi .
CentOS is a free version of RedHat Enterprise and is owned by RedHat. Like RedHat Enterprise, CentOS stresses stability and has less frequent updates than Fedora. Available from www.centos.org/ , https://wiki.centos.org/Download (Links for R Pi 2, R Pi 3).
OpenWRT
OpenWRT, originally developed as an enhanced open source replacement for the firmware in many Ethernet and wireless Ethernet routers, can also be installed on the Raspberry Pi. Available from https://wiki.openwrt.org/toh/raspberry_pi_foundation/raspberry_pi .
Choosing the Best Distro for the Task
Start by determining what it is you want to do with your Raspberry Pi. If you want to use your Raspberry Pi as a computing appliance, you can choose from media playback distros, signage distros, router distros, and many others, some of which were described earlier in this chapter. To use your Raspberry Pi with Windows 10, choose the Windows 10 IoT.
For general-purpose computing , you have two options:
Distros that are bundled with preinstalled apps and a GUI desktop
Distros that include the command line only
Distros that include a lot of preinstalled apps and a GUI desktop such as Raspbian, Ubuntu MATE, or Kano OS get you started in a hurry. Kano OS (used by the Kano Computer Kit) is also an excellent choice for teaching elementary or middle school students how computers work.
Choose distros such as FreeBSD, Ubuntu Server, NetBSD, CentOS, or Fedora if you prefer to choose your own GUI, languages, and utilities.
Use an OS selector such as NOOBS or PINN or an OS selector and boot manager such as BerryBoot to make trying different distros easy.
Creating Your Media
If you have a microSD card with NOOBS already installed, you’re ready to start. However, if you need an updated version, prefer to use PINN or BerryBoot, or want to download your preferred OS directly to a microSD card, you need to install some free utilities, especially if you use Windows or OSX as your preferred primary OS. Be sure to see the distro web site for specific media creation recommendations.
Windows
If you use Windows and want to create your own microSD (or SD) boot media for Raspberry Pi, you should download and install the following free apps:
7-Zip ( www.7-zip.org/ )
SD Card Formatter ( www.sdcard.org/downloads/formatter_4 )
FAT32 Format ( www.ridgecrop.demon.co.uk/index.htm?guiformat.htm )
Win32 Disk Imager ( https://sourceforge.net/projects/win32diskimager/ )
In most cases, you use the tools in the following order:
Use 7-Zip to uncompress image files for Raspberry Pi (it also works with other Linux and non-Linux distros as well as Windows ZIP files and other Windows archive files). 7-Zip can run from the context (right-click) menu in Windows Explorer or File Manager (Figure 2-25).
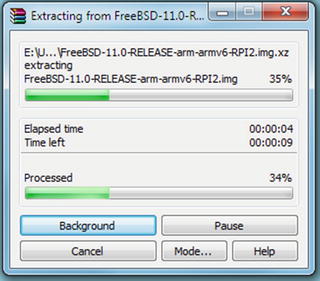
Figure 2-25. Uncompressing a downloaded OS file using 7-Zip
Use SD Card Formatter to format microSD or SD cards . It creates a FAT32 file system on cards, including cards previously formatted with other file systems. Turn on Format Size Adjustment to remove existing partitions (Figure 2-26).
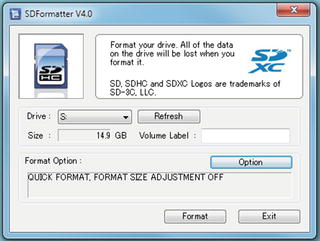
Figure 2-26. Formatting a microSD card with SD Card Formatter
If you want to use a 64GB SDXC card, you also need to format it with the FAT32 Format tool (guiformat.exe) so the drive is using the proper file system.
Use Win32 Disk Imager to write the image (.img) file that was uncompressed using 7-Zip to your media (Figure 2-27).

Figure 2-27. Writing an OS image with Win32DiskImager
Note
Before using card format or disk imager apps, be sure to determine which drive letter is used by your microSD (SD, microSD in SD adapter) card. You don’t want to format the wrong card (or your hard disk!) or write a 2GB image file over your 2TB hard disk’s contents.
OSX (MacOS)
If you use OSX (MacOS) and want to create your own microSD (or SD) boot media for Raspberry Pi, you should download and install the following free apps:
SD Card Formatter ( www.sdcard.org/downloads/formatter_4 )
ApplePi-Baker ( www.tweaking4all.com/hardware/raspberry-pi/macosx-apple-pi-baker/ )
Note
ApplePi-Baker should be used as a replacement for older OSX (macOS) GUI imaging apps recommended by most web sites. Versions of OSX (macOS) beginning with OSX 10.9 Mavericks do not work with older GUI imaging apps.
Linux
The Etcher utility available from http://etcher.io/ (also available for Windows and OSX/macOS) can be used to copy an image to a flash memory card. For other suggestions, see www.fossmint.com/3-best-gui-enabled-usb-image-writer-tools-on-linux/ .
Summary
In addition to Raspian with PIXEL and Raspbian Lite, there are many operating systems designed for use with your Raspberry Pi. Choose the Linux distro or non-Linux OS to use based on whether you’re wanting to run apps, create your own programs, or use your Pi as a retro gaming system, as a media player, or for specialized tasks. Utilities such as NOOBS, PENN, and BerryBoot make it easy to select the OS to install, and utilities available for Windows, MacOS, and Linux enable you to create customized installation media for your favorite operating systems.