Table of Contents for
The Adobe Photoshop Lightroom Classic CC Book, Second Edition
 The Adobe Photoshop Lightroom Classic CC Book, Second Edition
Published by
Adobe Press, 2019
The Adobe Photoshop Lightroom Classic CC Book, Second Edition
Published by
Adobe Press, 2019
- Contents
- Cover Page
- Title Page
- Copyright Page
- Dedications
- Introduction
- Contents
- 1 Introducing Adobe Photoshop Lightroom
- 2 Importing photos
- 3 The Library module
- 4 Develop module image editing
- The Tone Curve Panel
- Easing the Workflow
- 5 The art of black and white
- 6 Sharpening and noise reduction
- 7 Exporting from Lightroom
- 8 Printing
- 9 Presenting your work
- 10 Managing your photos in Lightroom
- 11 Lightroom CC/mobile
- 12 Lightroom preferences and settings
- Index
12 Lightroom preferences and settings
How to best customize settings for your workflow
I have reserved this final chapter to go into more detail about certain aspects of Lightroom, including how you can customize the program to suit specific ways of working. The first part of the chapter provides a more detailed summary of the Lightroom preferences. The options described here can be accessed by choosing Lightroom ![]() Preferences (Mac) or Edit
Preferences (Mac) or Edit ![]() Preferences (PC) (or use the
Preferences (PC) (or use the  [Mac] or
  [PC] keyboard shortcut). Where relevant, I have included references to earlier chapters in the book. The latter portion of the chapter provides information and details on the Lightroom settings, such as the template settings files and catalog folder.
I decided to keep these topics separate, mainly because I did not want to clutter the earlier chapters with information that might have been too distracting. This is an unashamedly technical section aimed at advanced users, although I have tried to keep the explanations as clear and simple as possible.
General Preferences
Let’s begin with the General preferences (Figure 12.3).
Show Splash Screen
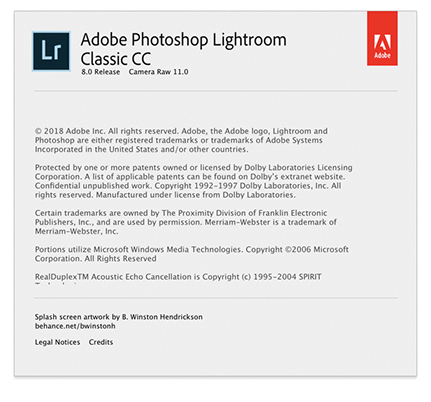
At the top, you can select the desired language you wish to use. If you deselect “Show splash screen during startup,” you can avoid seeing the Lightroom splash screen (Figure 12.1) each time you launch Lightroom. This is just a cosmetic thing, and it depends on whether you want to see the splash screen as the program loads. After the program launches, if you select About Adobe Photoshop Lightroom Classic CC from the Lightroom menu (Mac) or Help menu (PC), you will see the Figure 12.2 splash screen, where you can read the full credits for the Lightroom team who worked on the program.
Check for Updates
When you first installed Lightroom, you had the option to choose whether to be notified automatically of any updates to the program. In case you missed doing this, you can check the “Automatically check for updates” option.
Tip
You can reset the Lightroom application preferences by holding down the  keys as you launch Lightroom. However, resetting the preferences at launch clears only the user preferences and not the startup preferences.
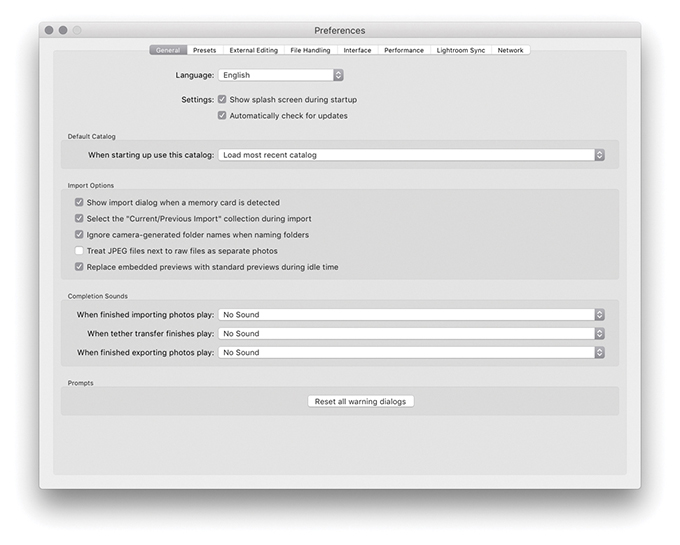
Catalog Selection
In the Default Catalog section, you can choose which catalog should be used each time you launch Lightroom, such as “Load most recent catalog” or “Prompt me when starting Lightroom.” You can also jump directly to the Catalog Settings by clicking the Go to Catalog Settings button at the bottom of the dialog. As the text message here points out, this allows you to apply catalog-specific settings. For more information about these settings and working with catalogs in Lightroom, refer to Chapter 3.
Note
The Import dialog can recognize almost any USB or FireWire device as something to import from, such as a connected iPhone or iPad.
Import Options
When the “Show import dialog when a memory card is detected” item is checked, this forces the Import dialog to appear automatically whenever you insert a camera card into the computer. The “Select the ‘Current/Previous Import’ collection during import” option is checked by default, meaning that the Current/Previous Import collection is always shown whenever you import new files. This is what most people will expect to see happen. But if you prefer to have the import process happen in the background, then deselect this option. The “Ignore camera-generated folder names when naming folders” option can help shorten the import process if you wish to import everything directly from a camera card into a single Lightroom folder. For example, maybe you have a camera card with photos that were shot using more than one camera and they have ended up in several different folders. When this option is checked, the card folder contents are all grouped into one folder ready to be imported.
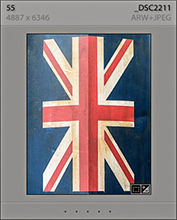
Some cameras are able to capture and store JPEG file versions alongside their raw capture files. If you shoot with the camera in the raw + JPEG mode, the “Treat JPEG files next to raw files as separate photos” option governs the import behavior for such files. If left unchecked, Lightroom treats raw and JPEG photos as a combined import and displays them as a single raw + JPEG import in the catalog (Figure 12.4). This option effectively treats the JPEGs as if they were sidecar files, and if you move or rename the catalog photo in Lightroom, the associated JPEG is moved or renamed, too. If this item is checked, Lightroom imports the raws with accompanying JPEGs and displays them as separate photos. If you have already imported raw + JPEG photos with “Treat JPEG files next to raw files as separate photos” switched off, it is possible to view the JPEGs as separate photos. First, go to the General tab of the Preferences dialog and turn the “Treat JPEG files next to raw files as separate photos” option on. Then choose Library ![]() Synchronize Folder. This will then carry out a search for the JPEG photos and allow you to import them separately. Conversely, if you have imported raw + JPEG photos as separate photos, you can deselect the “Treat JPEG files next to raw files as separate photos” option and synchronize the folder. This will give you the option to “Remove missing photos from catalog,” removing the JPEG photo catalog linking and leaving you with combined raw + JPEG catalog photos.
Synchronize Folder. This will then carry out a search for the JPEG photos and allow you to import them separately. Conversely, if you have imported raw + JPEG photos as separate photos, you can deselect the “Treat JPEG files next to raw files as separate photos” option and synchronize the folder. This will give you the option to “Remove missing photos from catalog,” removing the JPEG photo catalog linking and leaving you with combined raw + JPEG catalog photos.
Where embedded previews are present in place of Lightroom-built previews, you can enable “Replace embedded previews with Standard previews during idle time” to have Lightroom update and replace these.
Completion Sounds And Prompts
In the Completion Sounds section, you can choose an alert sound to play after completing an import or export from Lightroom or tethered transfer. You will often see warning dialogs with a “Don’t show again” check box at the bottom. If you click the “Reset all warning dialogs” button, you can restore all default warning alerts.
Presets Preferences
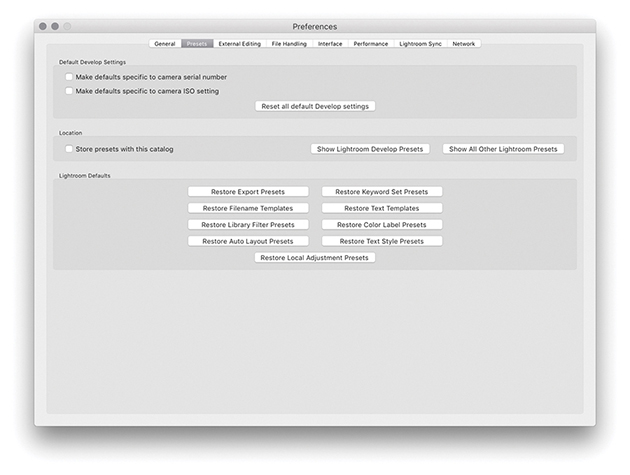
The Lightroom Presets preferences are shown in Figure 12.5. You will notice the “Apply auto tone adjustments” and “Apply auto mix when first converting to black and white” settings have gone. Mainly because these options were never used much; most people found the auto-tone setting to be too hit and miss to be enabled as a default. However, the new Auto Settings is now regarded as being more reliable.
Camera-Linked Settings
The Default Develop Settings section is linked to a feature found in the Develop module Develop menu called Set Default Settings, discussed on page 370. Basically, if you check “Make defaults specific to camera serial number” and “Make defaults specific to camera ISO setting,” you can use these check boxes to determine whether certain default settings can be made camera-specific and/or ISO-specific. The “Reset all default Develop settings” button lets you revert all the Develop settings to their original defaults.
Location Section
If you would like Lightroom to save the custom presets you have created within the main catalog folder, you can check the “Store presets with this catalog” option. This is useful if you are migrating library images from one computer to another because it saves having to transfer the custom settings (such as your Develop settings) separately, should you wish to share your custom settings with other users. But then again, you might prefer not to also share your custom presets. This preference item gives you that choice. There is also a Show Lightroom Presets Folder button, which conveniently opens the Lightroom presets folder (wherever it is stored) so you can quickly access the folders that contain your Lightroom presets.
Tip
There are some negative implications when storing presets with the catalog (see page 13 for more detail).
Lightroom Defaults Section
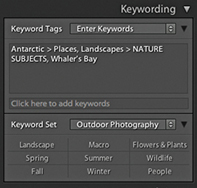
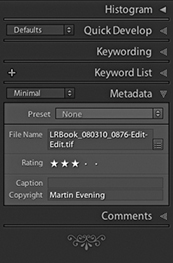
The other buttons in this section are all reset buttons that can be used to restore various Lightroom settings. For example, the Restore Export Presets button restores the preset list that is used in the File ![]() Export dialog (see page 450), and clicking Restore Keyword Set Presets resets the Keyword Sets template list. To explain this in more detail, if you go to the Library module Keywording panel (Figure 12.6), you will notice that Lightroom provides a few Keyword Set templates that can be used for keywording photos such as Portrait Photography, Wedding Photography, and Outdoor Photography (Figure 12.7). If you click the Keyword Set menu in the Keywording panel (or choose Metadata
Export dialog (see page 450), and clicking Restore Keyword Set Presets resets the Keyword Sets template list. To explain this in more detail, if you go to the Library module Keywording panel (Figure 12.6), you will notice that Lightroom provides a few Keyword Set templates that can be used for keywording photos such as Portrait Photography, Wedding Photography, and Outdoor Photography (Figure 12.7). If you click the Keyword Set menu in the Keywording panel (or choose Metadata ![]() Keyword Set
Keyword Set ![]() Edit), you can customize the default Keyword Sets. Restore Keyword Set Presets therefore restores the original Keyword Sets.
Edit), you can customize the default Keyword Sets. Restore Keyword Set Presets therefore restores the original Keyword Sets.

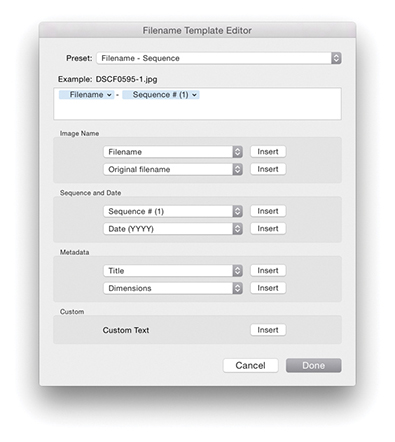
The Restore Filename Templates button restores the default file rename templates used in the Export dialog and Filename Template Editor (Figure 12.8). However, this does not affect any of the custom templates you may have added here; it merely resets the settings for the default templates that you may have edited. The same thing applies to the Restore Text Templates button—this restores the default settings in the Text Template Editor dialog (Figure 12.9), which is used in the Slideshow, Print, and Web modules.

You can save Filter presets that include things like “Filter by one star or higher” or the column layouts in the Metadata Filter bar (see page 620). The Restore Library Filter Presets button can therefore be used to reset the Filter Presets, in case you inadvertently update the default settings with a new (and incorrect) setting. On page 637, I mentioned the potential confusion that can be caused through using color label text descriptions that do not match the text descriptions used in Bridge or by another Lightroom user who sends you images labeled using another label description system. The Restore Color Label Presets button resets the label text descriptions to the default setting: Red, Yellow, Green, Blue, Purple.
The Restore Auto Layout Presets and Restore Text Style Presets buttons relate to the Book module. The Restore Local Adjustment Presets button resets the pop-up menu settings and all other default tool presets for the Adjustment Brush, Graduated Filter, and Radial Filter tools.
File Handling Preferences
The File Handling preferences are shown in Figure 12.10.
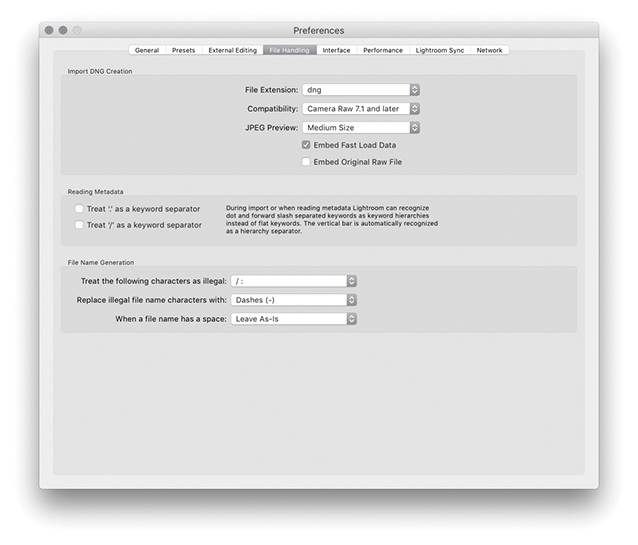
Import DNG Creation
The Import DNG Creation options in the File Handling preferences refer only to the DNG settings that are used whenever you choose to import photos using the Copy as DNG option. First, we have the File Extension options, which can use lowercase dng or uppercase DNG.
As the Camera Raw specifications have been updated, so has the DNG file format. Because of this, you have the option to specify which versions of Camera Raw you wish your DNG files to be compatible with. If you are using Lightroom with Photoshop CS6 or later, then you would want to select the “Camera Raw 7.1 and later” option. If, on the other hand, you are working with an older version of Photoshop, you might want to select one of the other options. For example, if you select the “Camera Raw 2.4 or later” option, this means that when you choose Copy as DNG at the import stage, the DNGs you create will be compatible with Lightroom 1.0 or Photoshop CS. When I say “compatible,” I mean the DNG files can be opened in older versions of Lightroom or Photoshop’s Camera Raw. However, this will not allow you to see or access any settings adjustments that are specific to a later version of Camera Raw. Let’s say you edited a DNG image in Lightroom using Process Version 3 or later using the updated noise-reduction adjustments or applied a Radial filter and added IPTC Extensions metadata information. An older version of Lightroom or Camera Raw would be able to open the image, but it would only be able to read the image and metadata settings that were understood by that older version of Lightroom or Camera Raw. If you can assume this will not be a problem and you are not bothered about maintaining backward compatibility, selecting a later version allows you to create DNG files that can take advantage of the latest DNG specifications. If you import your files as DNG using the older compatibility specification and change your mind later, you can always export your photos as DNGs and select a later compatibility version.
Note
The DNG 1.3 specification that coincided with the release of Camera Raw 5.4 saw the addition of correction and enhancement parameters, known as “opcodes.” These allow complex processing, such as geometric distortion correction, to be moved off of the camera hardware and into a DNG reader program. In the case of Lightroom and Camera Raw, this enhancement enables the DNG 1.3 format to read optical lens correction metadata that has been embedded in the raw files of certain camera systems and to store this in the DNG format. For instance, the lens correction data contained in the Panasonic DMC-LX3 raw camera files can be read when using Camera Raw 5.4 or Lightroom 2.4 or later. A lens correction adjustment is then applied at the Camera Raw processing stage after the demosaicing stage. If you refer back to Chapter 4, you will see an example of a message that appears in the Lens Corrections panel where a lens profile correction has already been applied automatically.
Next is the JPEG Preview section, which can be set to None, Medium Size, or Full Size. DNG previews are based on the Lightroom Develop settings applied at the time a DNG file was created, such as at the import stage using the assigned import Develop settings. But these previews will no longer be valid once anything further is done to alter the settings associated with the DNG or when a DNG file is viewed in a different raw editor program (unless that other program is Bridge and is using the latest version of Camera Raw). It so happens that Lightroom takes no chances when it encounters a new DNG, because Lightroom always rebuilds the preview cache based on the embedded Develop settings rather than the embedded preview. However, if you import DNG photos into Lightroom using the Embedded & Sidecar option for generating the initial previews, Lightroom makes use of any embedded previews. The previews may, of course, eventually get updated, but the initial DNG previews are the ones used at the time the DNG files are imported.
If you wanted to trim the file size, you could choose not to embed a preview, knowing that new previews would be generated again when a DNG file is managed elsewhere. A medium-sized preview economizes on the file size and is suitable for standard library browsing. After all, most of the photos in your catalog probably have only medium-sized JPEG previews. But if you want the embedded previews (and remember, these are the previews embedded in the file and not the Lightroom catalog previews) to always be accessible at full resolution and you do not consider the resulting increased file size to be a burden, then choose the Full Size preview option. This has the added benefit that, should you want to view these DNGs in other applications, you can preview the DNGs at full resolution using a preview that was generated by Lightroom. Photos processed in Lightroom as DNGs should preview exactly the same when viewed in other applications (but only after you have exported them). Generating full-sized previews in a DNG file also means that high-quality prints can be made via external programs based on the Lightroom-rendered settings.
The Embed Fast Load Data option will dramatically improve the image-loading performance in the Develop module compared to proprietary raw files. This embeds data inside the DNG file so that it loads faster when adjusting settings, but it does increase the file size slightly. It also allows you to store derivative versions of raw originals more efficiently on cloud servers (where space may be limited). Incidentally, loading proprietary raw cache files is now also on a par with fast-load previews in DNG.
Embed Original Raw File embeds a copy of the original proprietary raw file inside the DNG file. This option lets you preserve the original raw file data within the DNG file format but with the ability to reverse the process in order to access the original raw file format. The penalty for doing this is increased file sizes, and I do mean a big increase, because you will be storing two versions of the raw file data in a single file. One argument in favor of doing this is that by preserving the raw file in its original form, you can still access the original raw file and process it in the proprietary raw processing program. For example, the proprietary CR2 raw files produced by Canon cameras allow the storing of dust-spotting data that can only be written or read using Canon’s own software. If you choose not to embed the original raw file, you lose the means to extract the original raw file and process your photos using the camera manufacturer’s software.
Note
In Lightroom, there is support for multi-core reading of tiled DNG images. The DNG format has, for a while now, been arranging the raw data into distinct tiled sections that are each compressed separately. As a consequence, Lightroom is able to read the raw data stored in such DNGs faster, which will be particularly noticeable when you are reading from files stored on solid-state drives (SSDs). As far as I know, cameras that create native DNG files are not yet saving tiled DNGs, but they should do so in the future.
Convert and Export Dng Options
The Import DNG Creation settings discussed here can also be found in the Export dialog, as well as in the dialog that results from choosing Library ![]() Convert Photo to DNG (Figure 12.11). In the case of the Convert Photos to DNG dialog, you have an option to “Only convert raw files.” Select this option to filter the conversion process so that it applies only to raw originals and not JPEGs or other non-raw photos. You can also turn on the “Delete originals after successful conversion” option if you wish to clear all the original raw files from the folders. I always check this because I am usually comfortable with removing the original raws after I have converted everything to DNG.
Convert Photo to DNG (Figure 12.11). In the case of the Convert Photos to DNG dialog, you have an option to “Only convert raw files.” Select this option to filter the conversion process so that it applies only to raw originals and not JPEGs or other non-raw photos. You can also turn on the “Delete originals after successful conversion” option if you wish to clear all the original raw files from the folders. I always check this because I am usually comfortable with removing the original raws after I have converted everything to DNG.
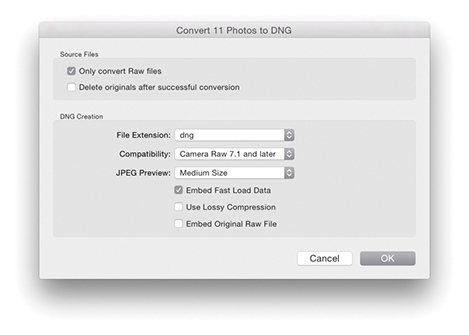
DNG compression
The standard DNG file format applies what is known as lossless compression. This method compresses the file size without incurring any data loss. And by this I mean no loss of image data and no loss of metadata or any other secret source data that is embedded in the original proprietary raw file. DNG compression usually results in a file that is slightly smaller than the original. The DNG compression method is often more efficient than that used by the camera manufacturers—but not always, as it may sometimes yield slightly bigger files.
DNG with lossy compression
The Use Lossy Compression option allows you to create lossy DNGs and this option is only available in the Convert to DNG and Export dialog settings. When this option is selected, the DNG conversion produces a linearized demosaiced version of the raw file adding lossy compression, making the saved file size significantly smaller. However, because the raw file data is kept in its linear form, it responds just like a regular DNG when making Develop adjustments. Such files read quicker because they are smaller, and because they are already demosaiced, the early-stage raw processing can be skipped. This, in turn, speeds up the raw image processing. The compression applied here is quite safe (equivalent to, say, a quality 10 JPEG setting), but having said that, it is nonetheless lossy and is not advised for use as a regular raw archive format. In the Export dialog, you also have the option to export files as lossy DNGs at reduced pixel dimensions (see page 456).
The lossy DNG format offers significant advantages over some small raw formats like Canon’s sRAW and mRaw, in which much, including the white balance, is baked into the demosaiced sRAW or mRaw file. However, while it is possible to convert standard DNG files to lossy DNG, once you have applied the conversion, you cannot remake a proper raw DNG by converting a lossy DNG back to the non-lossy DNG format. Lossy DNGs offer a number of interesting possibilities. For example, lossy DNGs allow you to archive raw files as economically as possible (making the saved file size a lot smaller). But bear in mind that this does involve baking in the Camera Raw demosaic processing. JPEGs can be converted to lossy DNG without further degradation to the image and without increasing file size. So, lossy DNG can bring some benefits when used as a container for JPEG originals. I have found it useful for archiving a sequence of time-lapse captures that had been shot using raw. It has also made it possible for me to supply raw images as downloads for this book. Will camera manufacturers be willing to support lossy DNG? It could certainly offer an alternative to shooting JPEG—you could end up with the same size capture file, but with raw characteristics. This could revolutionize workflows for photographers who need to upload files quickly and who would normally shoot JPEG.
Updating DNG previews for third-party viewing
The DNG file format has been around for a number of years now and widely adopted as a preferred format for archiving raw camera files. One snag, though, is that the DNG-created previews may not always be up to date. This is not necessarily a problem if you are using DNG in Bridge or Lightroom, because the previews can easily be rebuilt when transferring DNG files from one Lightroom/Bridge setup to another. However, it is less convenient when working with other DNG-aware programs that are unable to rebuild a Camera Raw–generated preview. To get around this, you can go to the Library module Metadata menu and choose Update DNG Previews & Metadata. This does two things: It updates the metadata the same way as the Save Metadata to Files command does and rebuilds the JPEG previews contained within the DNG files.
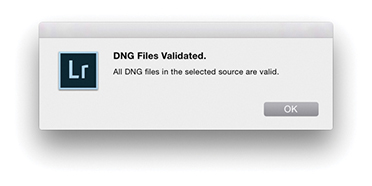
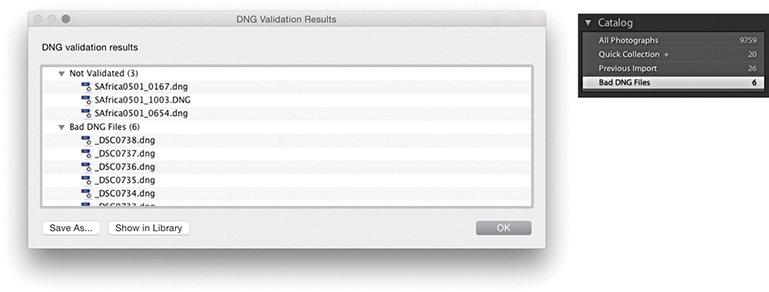
Validating DNG files
A Validate DNG Files feature is located in the Library module Library menu. This can be used to carry out a DNG health check, although be warned that it can take a long time to process a large batch of files. Running a DNG validation check should not disrupt your work in Lightroom. You can either select a small number of files in the Library module first, or if you want to check the entire catalog, do so overnight. If no errors are found, you’ll see the dialog shown in Figure 12.12. If errors are found when running a Validate DNG check, you will see the dialog shown in Figure 12.13, which will include a more accurate report as to which DNGs may be suspect. When there are bad DNGs, these files will be added to a temporary Bad DNG Files collection that will be added to the Catalog panel. This could just mean a broken link between the catalog photo and the actual original, not that the source file (wherever it might be) is broken.
Note
Only DNG files that have been created using Adobe software can be properly validated in this way. Unfortunately, DNG files that have been created in-camera at the capture stage cannot be validated because they do not contain the necessary checksum.
Checking DNG metadata status
There is a DNG view mode for the Metadata panel. This lets you see all the settings associated with a DNG file that would previously have been hidden. For example, this panel view mode can inform you as to whether lossy compression has been used (see page 563). You can also use the Filter bar to filter by file type, which can distinguish between DNG files that are lossy or lossless.
Reading Metadata Options
If only there could be agreement on common standards for the way metadata information is handled between different programs. Adobe’s open-source XMP specification has certainly gone a long way toward providing the industry with a versatile standard format for storing metadata information. But there are still a few gotchas that can prevent the smooth integration of informational data from one program to another. The Reading Metadata section in the File Handling preferences (Figure 12.10) is there to help resolve such inconsistencies. If you select “Treat ‘.’ as a keyword separator” and “Treat ‘/’ as a keyword separator,” this enables Lightroom to better interpret the keyword hierarchy conventions used in other programs.
Tip
In order to take advantage of recent speed improvements in Lightroom, you can do two things. Make sure all new DNGs contain “fast load data.” In addition, you can increase the Camera Raw cache size. This helps speed up the raw processing for proprietary raw files and older DNGs that have not been saved with “fast load data.”
Filename Generation Options
Filenames that contain illegal characters can also cause hiccups when you import such files into Lightroom. The “Treat the following characters as illegal characters” item can be set to recognize “/:” as an illegal character, or you can select the extended list of characters to encompass more potential bad characters that would need to be replaced. In the “Replace illegal file name characters with” section, you can then choose a suitable replacement character to use, such as a hyphen (-), an underscore (_), or similar characters. Some database and FTP systems may prefer spaces to be removed from filenames. For example, when I upload files to my publisher, the FTP server does not allow files with spaces in the filenames to be uploaded. This is where the “When a file name has a space” item can come in useful, because you can choose to replace a space with a hyphen (-) or underscore (_) character.
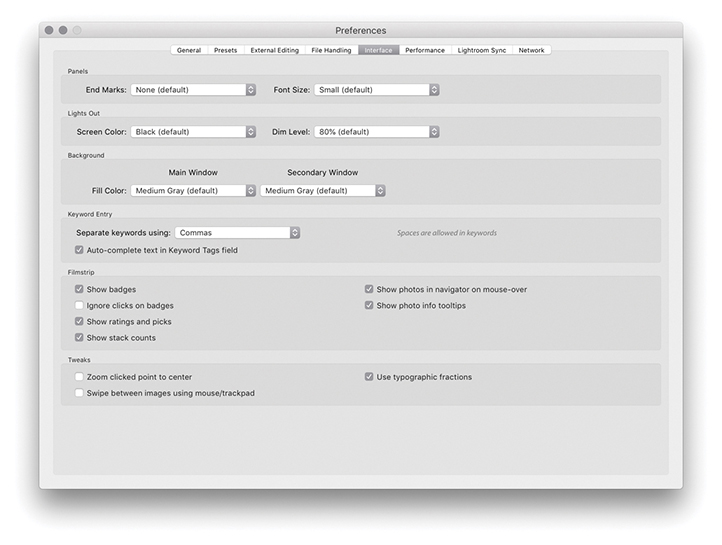
Interface Preferences
The Interface Preferences are shown in Figure 12.15.
Panel End Mark
The panel end mark is a squiggly symbol that can be made to appear at the bottom of the panel list in the Lightroom modules (Figure 12.14). You can access the panel end mark options via the End Marks menu in the Interface preferences (Figure 12.15). Or, you can right-click the end of the panels list, navigate to the Panel End Mark submenu, and select the Small Flourish panel end-mark option. Lightroom no longer installs a selection of panel end marks. As a consequence, there remains just one panel end mark (Small Flourish), and the default option here is None.
Custom panel end marks
Would you like to create your own panel end mark design? Well, it is actually not that difficult to do. To start with, take a screenshot of one of the Small Flourish panel end marks to get an idea of the scale of the design and how it will look against the panel background color. Next, create a new custom design in Photoshop scaled to the correct size on a transparent layer, and save this graphic using the PNG file format (which supports transparency). Now go to the Panel End Mark menu and select Go to Panel End Marks Folder (from the Interface preferences End Marks menu). This reveals the folder in the Finder/Explorer location where the panel end-mark image files need to be stored. Place the PNG file you have just created in there and reopen the Preferences dialog. You will now see your custom design listed in the Panel End Mark menu.
Creating a Custom Splash Screen
If you want, you can replace the standard Lightroom splash screen with your own design. To do this, you will first need to create a design in Photoshop and save it as a PNG. Once you have done that, go to Username/Library/Application Support/Adobe/Lightroom (Mac) or Username\AppData\Roaming\ Adobe\Lightroom (PC), and place it inside a folder you name as Splash Screen. The next time you launch Lightroom, you will see this as the new splash screen. To revert to the standard splash screen, make sure the Splash Screen folder is empty.
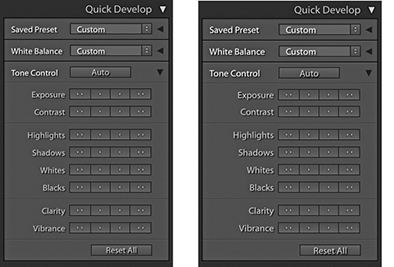
Panel Font Size
There are two font size options: Small (which is the default setting) and Large. If you refer to Figure 12.16, you can see how the difference between these two settings is actually quite subtle. By choosing the Large setting, you can make the panel fonts more legible when viewing on a large screen at a distance. Notice how the Large panel font size setting also makes the panels slightly bigger in size. This change does not take effect until after you have relaunched Lightroom.
Lights Out
The Lightroom Interface preferences let you customize the appearance of the interface when using the Lights Out and Lights Dim mode. Bear in mind that these preference settings also allow you to create a “Lights up” setting. So, instead of using black as the Lights Out color, you could try setting it to light gray or white. I find using Lights Out with white is a handy alternative to selecting the Soft Proofing option as a way to quickly check how an image appears against white.
Background
The Background section lets you customize the background appearance in the Lightroom modules. You can set the fill color to several different shades of gray, as well as white or black. Lightroom also provides preference options for those working with a two-display setup, letting you customize the background options for both displays independently.
Keyword Entry
Spaces are normally allowed when entering keywords in the Keywording panel, and you separate keywords by typing a comma between the keywords. If you prefer to use spaces to separate the keywords, this is an option. If you do this, however, you have to remember to type quotes around any keywords that contain spaces. For example, the keyword Cape Fear would need to be entered as “Cape Fear.” If you don’t use quotes, you’ll end up with two keywords: Cape and Fear. The “Auto-complete text in Keyword Tags field” option is on by default and assists auto-complete as you enter keywords in the Keywording panel. If you go to the Catalog Settings Metadata tab section and click “Clear all suggestion lists,” this clears the cached keywords and flushes out any misspelled keywords.
Filmstrip Options
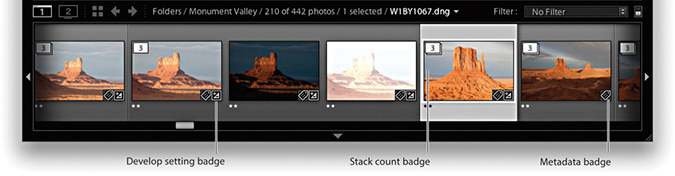
In the Filmstrip section you have the “Show badges,” “Ignore clicks on badges,” “Show ratings and picks,” “Show stack counts,” “Show photos in Navigator on mouse-over,” and “Show photo info tooltips” options. Some examples of badges are shown in Figure 12.17. With these items checked, you have fuller access to Library module functions while working in other modules. For example, let’s say you are working in the Develop module. You can use the Filmstrip to see at a glance all the current source images, with their labels, ratings, and pick status. You can hover over individual images to see a slightly larger preview in the Navigator panel, and the tooltip floating window can be used to quickly reveal the filename, time of capture, and pixel dimensions. The badge icons indicate whether keyword metadata has been added or the Develop settings have been edited. Clicking a metadata badge, for example, takes you to the Library module and expands the Keywording panel ready for you to inspect the keywords entered there. Clicking the Develop edit badge takes you to the Develop module, where you can resume editing the Develop settings. On the other hand, you may want to prevent accidental clicking, which is why there is an “Ignore clicks on badges” option. The “Show stack counts” badge displays a badge for image stacks along with a stack count number. These Filmstrip options extend the usefulness of the Filmstrip as a way to manage the Lightroom catalog photos.
Interface Tweaks
When “Zoom clicked point to center” is selected, the Loupe view uses the click point as the center for its magnified view. To understand how this works, try clicking the corner of a photo in the standard Loupe view. If “Zoom clicked point to center” is turned on, the corner zooms in to become centered on the screen. When this option is off, the photo zooms in with the corner point positioned beneath the pointer. Personally, I find that deselecting this option provides you with a more logical zoom behavior.
Note
Lightroom will use the comma as a delimiter, even when spaces is selected. In these instances, the comma effectively overrides spaces. Lightroom also happens to strip commas from keywords whenever spaces is used as a delimiter. Doing this manages to make the use of spaces as a delimiter function work, although this will not please people who use commas in, say, words or numbers.
Note
The “Use typographic fractions” option is not present in the Windows version; instead, you will see “Use system preference for font smoothing.” On a PC, you will also see an Enable Open GL for Video option. If the video card for your computer supports OpenGL, I suggest you leave this option on.
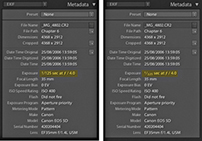
The “Use typographic fractions” option affects the way the fractions are presented in the Metadata panel in the Library module. When this option is selected, Lightroom uses proper fraction characters or superscript and subscript characters. For example, Figure 12.18 shows how a shutter speed is displayed when this option is on and off.
When the “Swipe between images using mouse/trackpad” option is selected, you can use a single-finger swipe gesture to navigate photos in the Library module viewed in the Loupe view mode. But this can also drive you kind of crazy with the way Lightroom can suddenly start rapidly scrolling as you browse images.
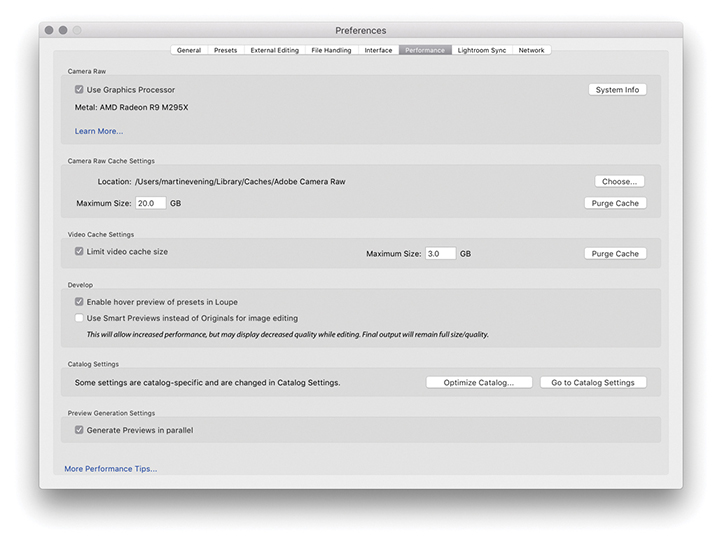
Performance Preferences
The Performance preferences (Figure 12.19) are mostly covered in Chapter 1.
Camera Raw and Video Cache Settings
Whenever you attempt to view an image in the Develop module, Lightroom builds full, high-quality previews direct from the master image data. In the case of raw files, the early-stage processing includes the decoding and decompression of the raw data, as well as the linearization and demosaic processing. All this has to take place first, before progressing to the stage that allows you to adjust things like the Basic panel Develop controls. The Camera Raw cache is therefore used to store the unchanging, early-stage raw processing data that is used to generate the Develop module previews so that this initial processing step can be skipped the next time you view that image. If you increase the Camera Raw cache size, more image data can be held in the cache. This, in turn, will result in swifter Develop module preview generation when you load these photos. The revised 5 GB cache limit should ensure better performance. The Camera Raw cache used to have an upper limit of 50 GB, but this has now been removed so that you can set the cache limit as high as you like. Bear in mind here that the Camera Raw cache file sizes have been much reduced in size. Since version 3.6, the Camera Raw cache has been making the Camera Raw cache files more compact. This means you can now cache a lot more files than was the case before within the limits set for the Camera Raw cache size. Consequently, you no longer need to devote quite so much disk space to the Camera Raw cache as was previously the case. For example, these days, a 20 GB cache should allow you to store around 20,000 cache files.
Note
“Enable hover preview of presets in Loupe” lets you turn off the Preset Preview while hovering in the Develop module Loupe view (although the preview will still update in the Navigator panel). This preference controls only the Presets hover preview behavior. Whenever you open the Profile Browser, Lightroom always previews the profile effect on hovering. However, you can always press the  key to temporarily turn off the profile preview. This lets you do a quick before and after comparison of a profile effect without having to move the mouse.
Note
If the Generate Previews in Parallel option is enabled in the Lightroom Performance preferences, multiple previews can be generated concurrently. Whether this can provide speed benefits or not will be dependent on your system hardware. When this is enabled, more system resources are utilized. Otherwise, when left disabled, previews are generated one at a time.
The “Limit video cache size” option lets you set a precise limit for the size of the video cache. This is all to do with the video playback performance when viewing and editing video files in the Library module.
Selecting “Use Smart Previews instead of Originals for image editing” can certainly speed up performance in the Develop module, but at the expense of working with a lower-resolution Smart Preview image with lesser image quality.
Other settings that affect performance are located in the Catalog Settings, which you can quickly access by clicking on the Go to Catalog Settings button. You will also find that choosing Optimize Catalog can help improve the overall Lightroom performance.
Note
The Camera Raw cache folder is stored in the Adobe Camera Raw folder located in the Library/Caches folder (Mac) or Username\AppData\Local\Adobe\Camera Raw folder (PC). Note that the Camera Raw cache folder shares its data between Camera Raw in Photoshop/Bridge and Lightroom.
Lightroom Cc Preferences
The Lightroom CC/Lightroom mobile preferences are discussed in Chapter 1.
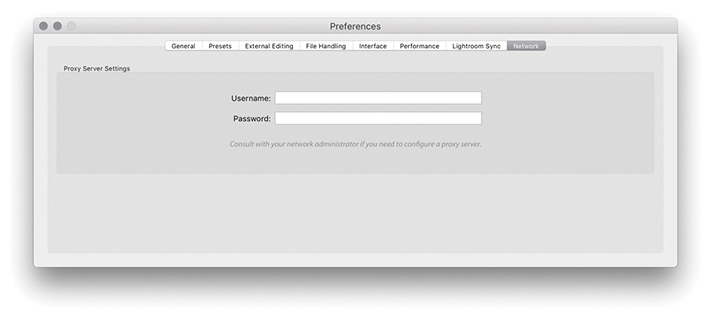
Network Preferences
The Lightroom Network preferences are shown in Figure 12.20. If you are using a proxy authentication server to access the Internet, you are advised to go to the Network preference section and enter your proxy authentication username and password. Lightroom can then use this information to get you out to the external Internet.
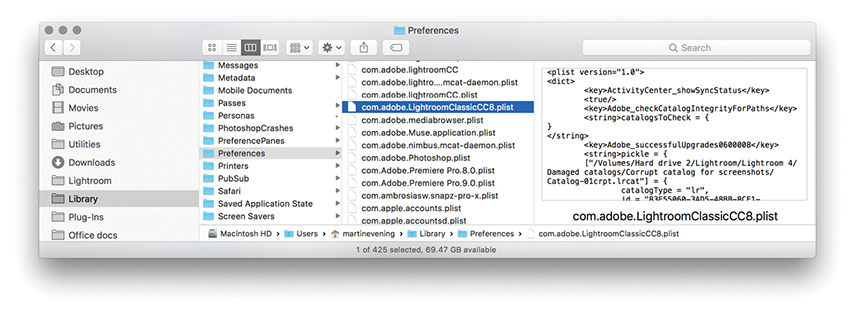
Lightroom settings and templates
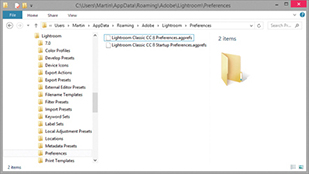
The Lightroom preference file keeps a record of all your custom program settings. On a Mac, the preference file is named com.adobe.LightroomClassicCC8.plist and is located in the Username/Library/Preferences folder (Figure 12.21). On Windows, the Lightroom ClassicCC8 Preferences.agprefs file is located in the Username\AppData\Roaming\Adobe\Lightroom\Preferences folder (Figure 12.22). If the Lightroom program is behaving strangely and you have reason to believe that the preferences might be corrupted, then try resetting the preferences. To reset the Lightroom preferences, hold down  as you restart Lightroom and select Reset Preferences from the dialog box.
Note
You can install custom settings simply by double-clicking them. This opens a dialog asking you to confirm if you wish to add the preset to Lightroom. You can also import presets using the contextual menu in the Presets or Template Browser panels.
Note
Once you have established your Lightroom settings the way you like, I suggest making a copy of the Lightroom preference file. If the preference file should ever become corrupted, you can simply replace the corrupted file with the saved copy. This saves you from having to reconfigure the Lightroom preferences all over again. This tip can be applied to working with Photoshop as well.
Incidentally, a few of the critical preferences have been moved out of the main preference file. As a consequence of this, when you delete the Lightroom preferences, this does not make it forget essential things, such as which catalog you were using or which catalogs you had already successfully upgraded.
Note
The startup preference file is located here: Username/Library/Application Support/Adobe/Lightroom/Preferences/Lightroom Classic CC 8 Startup Preferences.agprefs (Mac) and Username\App Data\Roaming\Adobe\Lightroom\Preferences\Lightroom Classic CC 8 Startup Preferences.agprefs (PC).
Accessing saved template settings
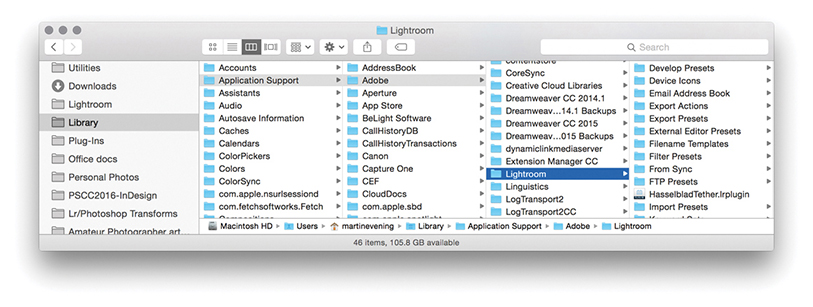
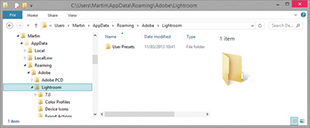
When you save a setting in any of the Lightroom modules, the saved template settings are normally stored in the Lightroom Presets folder. The quickest way to locate this folder is to go to the Lightroom Presets preferences and click the Show Lightroom Presets Folder button. Or, for macOS, use the Username/Library/Application Support/Adobe/Lightroom folder (Figure 12.23). On Windows, use the following path directory: Username\AppData\Roaming\Adobe\Lightroom folder (Figure 12.24). Inside this folder, you will see a set of subfolders that contain the default and custom settings for the various Lightroom modules. You can make copies of these files and distribute them as preset settings for other Lightroom users to install on their computers, which they can do by dragging presets into the folder directories shown below.
A Develop presets folder may be seen stored in the Lightroom. This will contain legacy Develop presets, now all preceded with a tilde character and be disabled in this particular location. From now on, Develop presets are stored as XMP presets in a commonly accessible Camera Raw folder. To add Develop presets to Lightroom, it is best to import these via the Presets panel menu. Develop presets will then be added to the Settings folder. On a Mac go to: Library/Application Support/Adobe/Camera Raw/Settings/Adobe/Presets. On a PC go to: Username\AppData\Roaming\Adobe\CameraRaw\Settings\.
Note that the AppData folder on a PC computer is normally hidden. To reveal the folder on Windows, go to the Control Panel, select Appearance and Personalization, choose Folder Options, and click the View tab. Here, you will see the option “Show hidden files and folders.” On a Mac, the user’s Library folder is normally hidden. To reveal it, hold down the  key as you click the Go menu in the Finder. Similarly, on a PC, the file extensions are often hidden by default, so you may not always see the file extensions, such as .lrtemplate and .lrcat.
Lightroom Previews Data
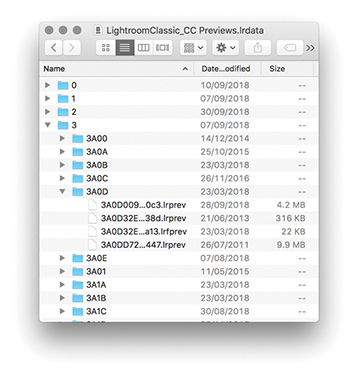
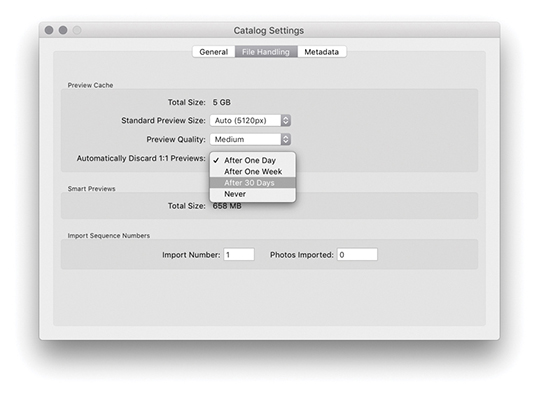
The Lightroom Previews.lrdata file is a self-contained file that holds all the previews and thumbnail data. In Figure 12.25, I used the context menu to show the package contents of the Lightroom Previews.lrdata file. This particular package was just over 300 GB in size and contained lots of .lrprev files. These are the thumbnail and preview cache files that are used by Lightroom to display the photos in the Library module and Filmstrip. The size of the thumbnail cache depends on how you set the File Handling preferences in the Catalog Settings dialog (Figure 12.26). If you want to keep the Lightroom Previews.lrdata size to a minimum, select Automatically Discard 1:1 Previews, and then choose the After One Day or the After One Week option. If you do not mind it growing in size, select After 30 Days or, even, Never. The choice is yours, but because hard-drive space is now so cheap, if you can spare the disk space, you might as well set this to Never. Otherwise, Lightroom will have to constantly re-render the 1:1 previews for the most commonly visited folders.
Tip
I say hard-drive space is cheap, but this is not so true if you have the Lightroom catalog stored on an internal SSD. There are definite benefits to using an SSD to store the Lightroom catalog data, but it does come at a cost, and the storage space on such drives is usually more limited.
System Information
If you ever need to see an overview of your system setup, you can choose Help ![]() System Info. This opens the dialog shown in Figure 12.27.
System Info. This opens the dialog shown in Figure 12.27.
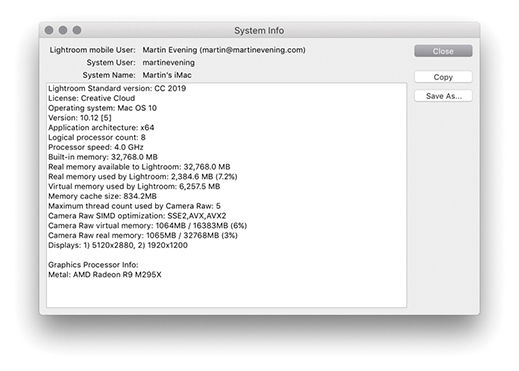
If you look closely, you will notice the line: “Camera Raw SIMD optimization.” This provides information about whether your system has a recent-generation Intel chip (either Sandy Bridge or Haswell), which if present, should make working in the Develop module faster. Just about every computer that supports Lightroom should at least list SSE2. However, if you see AVX listed, then your system will support this new Develop module performance improvement. If your computer lists AVX2, then you should see an additional small improvement over AVX.
An Ideal Lightroom Computer
The ideal computer setup for Lightroom depends on the size of the files you intend on working with. The raw file captures you will be working with may range in size from 5 to 50 megapixels, and the larger files will certainly place more demands on your computer resources. So, when looking for an ideal computer to run Lightroom, you definitely need to take the typical image file sizes into account. The most important factors affecting Lightroom performance are the processor speed and the amount of RAM that is available for Lightroom to use. These are followed by the speed and size of the hard disk and, to a lesser extent, the processing power of the graphics card. Lightroom is optimized to run on the latest Intel computer processors; at a minimum, you need a Mac featuring an Intel processor with 64-bit support with 4 GB of RAM and running macOS X 10.12 or later. And on the PC side, you need an Intel® or AMD processor with 64-bit support with 4 GB of RAM, running Windows 10 64-bit (64-bit), version 1703 or later.
RAM
You will benefit from having as much RAM as possible, but you should take into account that the operating system and any other open applications will also consume some of that RAM. For example, if you happen to have just 4 GB of RAM installed on your computer, the operating system will use about 200 MB, while another 50 MB might be eaten up by various utilities. These days, 8 GB is a more realistic minimum starting point and most computers ship with at least 8 GB of RAM. But you should see significant improvements in performance if you install more than this, especially now that Lightroom is able to run as a 64-bit program and can therefore access RAM beyond the previous 4 GB limit.
Graphics Card
Until recently, the graphics card did not play such a vital role in Lightroom’s overall performance. All you needed was a card capable of running the screen display at its native resolution. However, Lightroom is able to take advantage of GPU support to offer faster Develop module performance. Currently, this applies to interactive image editing only, providing improved navigation and slider adjustment response. The GPU performance improvements will be most noticeable on bigger displays, especially high-pixel-density displays, and are also dependent on the video card, of course. So, the advice now is to select a fast video card for optimum Lightroom Develop performance when configuring your computer.
Note
From time to time, Adobe may need to temporarily disable GPU support for some graphics cards due to compatibility issues and driver bugs that result in poorer performance than expected when GPU support is enabled.
Hard Drives
On both the Mac and the PC, a default Lightroom installation installs the Lightroom catalog folder (which contains the catalog and previews files) inside the user’s Pictures or My Pictures folder. As your catalog grows bigger, these catalog files will increase in size, although there are options in the preferences to limit how long the 1:1 previews are preserved, automatically deleting them after a certain number of days. Don’t forget that the Camera Raw cache can also be allowed to grow, and this, too, can consume more disk space (though not as much as was the case with earlier versions of Lightroom). Another factor is multiple saved History states, which can cause the catalog to become bloated.
The main considerations when selecting a hard drive are the interface type, hard-drive configuration, speed, and buffer memory. All these factors will affect the overall speed. Let’s start with the interface connection. Internal drives usually offer a fast SATA interface connection, and one option would be to add extra-fast internal drives. However, the trend now is for smaller desktop machines that rely on external storage. The latest external interface connections include Thunderbolt (Mac) and USB 3.1 (both Mac and PC), which can offer suitably fast data access to rival a SATA or USB-C interface.
The hard-drive spindle speed determines how fast data can be written to and retrieved from the disk drive unit. Most 3.5-inch desktop drives have a spindle speed of 7200 RPM, whereas the smaller 2.5-inch drives found in some laptops and portable bus-powered drives mostly run at a speed of 4200 to 5400 RPM. You can get 7200 RPM 2.5-inch drives, but they are more expensive and are usually offered only as a custom option when buying a laptop. SSDs are increasingly popular these days. The maximum storage for an SSD is currently 2 TB; these are expensive, but they are really fast, and I use these drives as the main hard drive on my desktop and laptop computers. There have been horror stories about hardware failure with SSDs, so do your homework before leaping to make a purchase.
Tip
When assessing your overall storage requirements, do not try to build a system to last you the next five years. Buy the storage system you need today, but make it expandable for the future.
Drive Configurations
Multiple hard drives can be configured in a variety of ways, using various RAID methods. You need a minimum of two disks to configure a RAID system, and most off-the-shelf RAID solutions are sold as a bay dock that can accommodate two or more drives with a built-in RAID controller. For some people, RAID is the perfect solution, but for small photography businesses, it can be overkill.
Just a bunch of disks
There are varied opinions about which is the best way to manage a photography archive storage system. In my view, RAID storage is great but not always the best solution for all photographers. A perfect solution would be to have a high-capacity RAID drive system that is capable of storing all your images securely on a single RAID unit. I have seen photographers work with such setups, but even so, it is quite costly to have a multidrive unit that holds all your data running continuously and consumes lots of power just so that once or twice a year you can dig up a photo you shot six years ago. If you analyze your storage requirements, you will most likely find that the majority of files you access are those that have been shot in the last few years and you don’t need to have instant fast access to everything you have shot all the time.
A simpler solution is known as the “just a bunch of disks” solution, or JBOD for short. With a JBOD setup, you can have a file-storage system that is scalable to meet your expanding storage needs, which is economical to maintain, as well as reliable (provided that you maintain a proper backup strategy). In my office, I use four 4 TB drives to store all the current catalog files and back these up to alternating sets of four external 4 TB drives. I also have other drives that are used to store all my older raw and master file images that date back over the last 23 years, plus matching drives that are used for backing up to. Most of the time, I do not need to have these drives running. Whenever I need to access any of the older images, I can switch on the necessary hard drive, as directed by Lightroom. JBOD can never be as foolproof as a RAID system, but it may be more appropriate for those photographers who think it would be an acceptable-enough solution for their storage needs.