Table of Contents for
The Adobe Photoshop Lightroom Classic CC Book, Second Edition
 The Adobe Photoshop Lightroom Classic CC Book, Second Edition
Published by
Adobe Press, 2019
The Adobe Photoshop Lightroom Classic CC Book, Second Edition
Published by
Adobe Press, 2019
- Contents
- Cover Page
- Title Page
- Copyright Page
- Dedications
- Introduction
- Contents
- 1 Introducing Adobe Photoshop Lightroom
- 2 Importing photos
- 3 The Library module
- 4 Develop module image editing
- The Tone Curve Panel
- Easing the Workflow
- 5 The art of black and white
- 6 Sharpening and noise reduction
- 7 Exporting from Lightroom
- 8 Printing
- 9 Presenting your work
- 10 Managing your photos in Lightroom
- 11 Lightroom CC/mobile
- 12 Lightroom preferences and settings
- Index
3 The Library module
Introducing Lightroom catalogs and the Library module features

Photograph: The British Museum, London, © 2014 Martin Evening
Sony DSC RX100 | 10.4mm | 200 ISO | f/5.6 @ 1/250th
In this chapter, we are going to take a first look at how the Lightroom catalog works and how to use the Library module controls to navigate and manage your photos.
The Lightroom catalog is a key component of the program. Lightroom’s underlying architecture and central database are designed to provide speed and flexibility when managing and viewing your photos. This can be seen by the way Lightroom allows you to view and update your files more quickly, provides a well-thought-out interface for managing your images, and ties in smoothly with the Book, Slideshow, Print, and Web modules.
To begin with, we will look at what is inside the Lightroom catalog folder and how to keep your catalog data backed up and protected.
About Lightroom Catalogs
To understand Lightroom, you need to understand the role of the catalog and how it is central to the way files are managed. The Lightroom catalog references the files you import into Lightroom, creating links from the catalog to the original files, wherever they are stored on the computer. Previews are stored with the catalog to let you navigate the catalog contents, while Smart Previews can be used as proxies, which can make the catalog portable and independent of the original photos. A browser program like Bridge can also be used to manage image collections, but the disadvantage of this approach is Bridge displays all types of files and the photos you are looking for must be present on the system, which makes the Bridge workflow more rigidly desk-bound.
Lightroom actively encourages you to manage your photos better. As an image collection grows in size, you have to be especially careful as to how you organize everything so you know where all your files are when you want them. Suppose you were to fall ill and a co-worker needed to locate a specific image? How easy would it be for her to find it on your computer? In situations like this, what you require is a cataloging system that can manage your images and keep track of where everything is stored. The Lightroom catalog is written using the SQLite3 database format, which stores all the catalog data in a single file along with previews and Smart Previews data files that are easily transferable for cross-platform use. As you import your photos into Lightroom, the catalog keeps track of where the files are kept, as well as all the information associated with those files, such as the metadata and Develop settings. There is no known limit as to how many photos the catalog file can reference.
When you first installed Lightroom, a new Lightroom catalog folder was created in the username/Pictures folder (Mac) or the My Documents/My Pictures folder (PC). This folder contains a catalogname.lrcat catalog file (the master catalog file that contains all the catalog database metadata) and a catalogname Previews.lrdata file that contains the previews data (Figure 3.1). These two files store all the critical data that relates to the current Lightroom catalog. You may also see a catalogname Smart Previews.lrdata file. This will be dependent on whether you chose to build Smart Previews for any of your library images (see page 151). The catalogname.helper.lrdata database file is linked to the new folder search feature (see page 86). This file remains after the application is closed. It contains folder search data and is sort of a persistent cache for folder search optimization. The file isn’t very big in size and doesn’t require a backup. Each time you launch Lightroom, it checks to see if there is a helper.lrdata file and, if missing, creates a new one.

Tip
If you need to rename the catalog file, close down Lightroom, go to the Lightroom folder and rename the .lrcat, Previews.lrdata, Smart Previews.lrdata and helper.lrdata files. Just make sure the suffixes remain unaltered and that you change only the first part of the names (the prefix).
While Lightroom is running, a catalogname.lrcat-wal file will be present. This contains temporary internal work files that have not been written to the catalog database file yet. If Lightroom should suffer a crash, it may temporarily remain in the folder until Lightroom has been relaunched and had a chance to recover all the data. Whatever happens, do not delete this file because it may contain important data that can help Lightroom recover recently modified data information. The other temporary file is a catalogname.lock file, which is there to prevent other Lightroom users from accessing the same catalog file over a computer network. Should you suffer a computer crash while working in Lightroom and experience problems when relaunching the program, it could be because a .lock file is still present in the Lightroom catalog folder. If this is the case, try manually deleting the .lock file via the system Finder/Explorer. Lightroom should then relaunch as normal.
You may also see a Lightroom Settings folder. This shows up only if the “Store presets with catalog” option is checked in the Lightroom Presets preferences (see page 13). When checked, a Lightroom Settings folder is added inside the Lightroom catalog folder. This lets you store newly created Lightroom settings (all except profiles and Develop presets) locally within the Lightroom catalog. It may be useful if you want to keep certain catalog settings restricted to specific catalogs (such as FTP settings you might wish to keep private). The downside is if you later decide to uncheck this option, Lightroom will revert to referencing the main user Lightroom folder. As a consequence of this, some settings presets may appear to be missing because the catalog-stored Lightroom Settings folder will not be synchronized with the one stored in the user Lightroom folder.
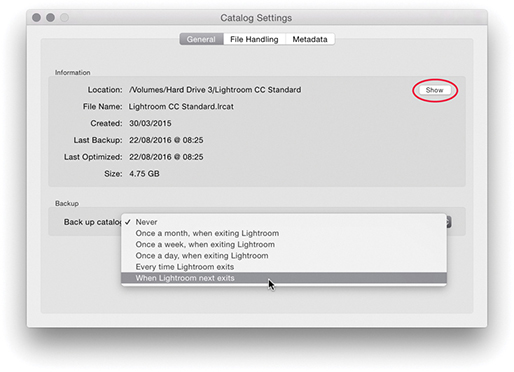
If you go to the Lightroom menu (Mac) or Edit menu (PC) and choose Catalog Settings, this opens the Catalog Settings dialog shown in Figure 3.2. Here you can click the Show button (circled) to reveal the current location of the catalog in the Finder/Explorer. The Lightroom catalog folder does not have to be in the Pictures/My Pictures folder. You can move it to any drive location you like. Having said that, you cannot store the catalog on a network attached server (NAS) drive, on optical media, or within a locked (read-only) folder.
Note
The user Lightroom folder is not the same thing as the Lightroom catalog folder. The user Lightroom folder contains various Lightroom presets and templates. It can be found in the following locations: username/Library/Application Support/Adobe/Lightroom folder (Mac) or username/App Data/Roaming/Adobe/Lightroom folder (PC). However, you will notice that Lightroom profiles and Develop presets are now stored separately in a Camera Raw folder that is shared with Camera Raw for Photoshop. These are stored in username/Library/Application Support/Adobe/Camera Raw/Settings (Mac), or username/App Data/Roaming/Adobe/Camera Raw/Settings (PC).
Backing up the Catalog File
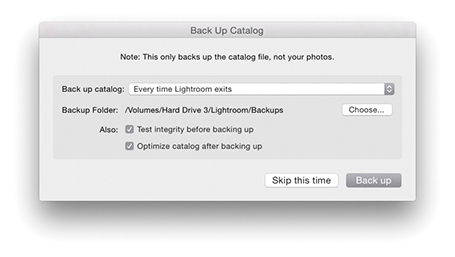
The most important component is the catalogname.lrcat catalog file, which is why you need to safeguard it as you would a financial accounts file or other important data documents and remember to carry out regular backups. They say there are only two types of computer users: those who have experienced a loss of essential data and those who are about to. In the General section of the Catalog Settings, you can choose how often Lightroom creates a backup copy of the Lightroom catalog database file. This includes options to schedule the backup procedure to take place after you have quit Lightroom. I strongly advise you to select one of these options because it provides an extra level of built-in backup security that may well prevent you from losing all your catalog data information. When Lightroom is due for a catalog backup, the Back Up Catalog dialog will appear at the designated time (Figure 3.3). This gives you the option to skip the backup for now or proceed.
Note
Your Lightroom catalog will most likely consist of tens of thousands of metadata and preview files. It can therefore take a long time for some backup software or virus-checking programs to process such a huge number of individual files, even though the files may be quite small. In fact, it’s best to exclude the Lightroom catalog and previews folder from virus checking, especially if real-time virus monitoring is enabled.
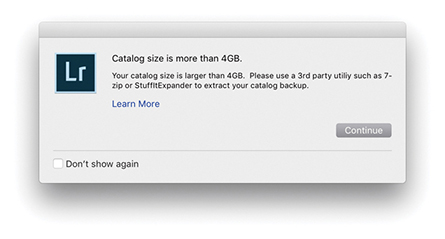
When you click the “Back up” button in the Back Up Catalog dialog, Lightroom creates a duplicate backup version of the main catalog file and saves it to the designated Backups folder, such as the one shown in Figure 3.1. Each time you back up the Lightroom catalog, Lightroom creates a new backup copy of the .lrcat catalog file and stores it in a new, dated folder within the Backups folder. If the catalog is bigger than 4 GB, you’ll see the dialog shown in Figure 3.4, which points out the backup catalog will be saved as a compressed ZIP file. If at any stage you notice there is a problem with the catalog not opening, you’ll have an opportunity to replace the current (corrupt) database with a previously backed-up copy of the catalog, placing the decompressed backup catalog in the root-level Lightroom folder. When you relaunch Lightroom, it will launch using this last backed-up version of the catalog. Over time, you may accumulate a lot of backup catalogs in the Backups folder, and it makes sense to cull the older ones as they become too out-of-date to be of any practical use.
The Back Up Catalog dialog contains an identical pop-up menu to the one in the Catalog Settings dialog that allows you to set the backup frequency. Click the Choose button to select the location where the backup catalog file should be stored. By default, the Backups folder is stored with the main Lightroom catalog folder, but you can store this folder anywhere you like on your system. After all, you might prefer the security of having the backup catalog stored on a separate drive to the master catalog. Next is an option to test the integrity of the catalog before backing up. Depending on the size of your catalog, an integrity check (Figure 3.5) should take only a few minutes to complete and can offer you peace of mind that your catalog file is in good shape.
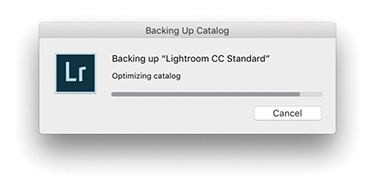
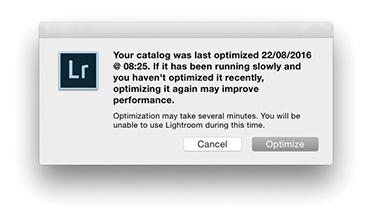
All metadata edits, such as image adjustments and keywords, are written to the catalog file. This happens on a continuous basis and can, over time, lead to data fragmentation. So, if you find Lightroom is running more slowly than expected, you may want to optimize the catalog. You can do this by selecting the “Optimize catalog after backing up” option in the Back Up Catalog dialog. You can also optimize the catalog at any time choosing File ![]() Optimize Catalog. This displays the dialog shown in Figure 3.6, where you should click the Optimize button. It may take a few minutes to complete, but you should afterwards see an improvement in Lightroom’s performance. This process also highlights any potential problems within the catalog file and initiates a repair if necessary.
Optimize Catalog. This displays the dialog shown in Figure 3.6, where you should click the Optimize button. It may take a few minutes to complete, but you should afterwards see an improvement in Lightroom’s performance. This process also highlights any potential problems within the catalog file and initiates a repair if necessary.
Backup Strategies
A mirrored RAID system can be useful in a mission-critical environment to ensure continuity of data access, but this does not amount to the same thing as having a fail-safe backup strategy. For that, you need to perform scheduled backups to a secondary set of drives, which should be stored in a safe location, such as in a fireproof safe or somewhere off-site. In a simple office setup, you could have one drive on the computer that’s used to hold the main Lightroom image catalog and a duplicate external drive of similar capacity to make regular, scheduled backups to. With this kind of setup, it is important that backups are scheduled manually. If a problem were to occur on the master disk, such as an accidental file deletion or a directory corruption, you would have the opportunity to rectify the problem by copying data over from the backup drive. And because you are keeping the data on a separate drive, it can be stored in a separate location away from the main computer. For added security, I suggest using two external backup drives and swapping over the backup disk that is connected to the computer and the one that is kept off-site. As long as the files are stored on read/write disk media, they may still be vulnerable to accidental erasure or a virus attack that could infiltrate the backup drives. To further reduce the risk, you could make DVD or Blu-ray disc copies of your image files and keep them in an appropriate storage location. It would be a pain to have to reload all the data from DVD/Blu-ray discs, but it would at least ensure that the data is free from virus attack or human error. For more about disc setups, see Chapter 12.
Backup Software
You can use various programs to carry out data backups. For macOS, I can recommend both ChronoSync from Econ Technologies (econtechnologies.com) and Carbon Copy Cloner by Mike Bombich (bombich.com). I make regular backups of all the drives on my system. Whenever I want to back up any data, I simply switch on a backup drive and run the backup process. I have the settings configured so that Carbon Copy Cloner first compares all the data on the source disk (the drive I want to back up) with the target disk (the drive I want to store the backup data on) and copies all the newly added files. Setting up the backup drives and copying all the data does take a long time the first time around, but after that, if you carry out regular backups, like once a day or each week, the backup procedure can be carried out quite quickly. If you are in the habit of leaving your computer and drives turned on overnight, you can always schedule the backups to take place in the early hours of the morning.
Time Machine and the Lightroom Catalog
A key feature of macOS, Time Machine, creates automatic backups of your data while you work and allows you to retrieve any lost or overwritten data. To prevent Time Machine from corrupting the Lightroom catalog, Lightroom marks an open catalog file as “being in use” and excluded from a Time Machine backup whenever Lightroom is running. This prevents Time Machine from backing up the catalog while it may be in an incomplete state or in the process of being modified. When Lightroom quits, it takes the catalog off the exclusion list. This means Time Machine can still create backups of the Lightroom catalog, but only while Lightroom is not in use. If you want to restore the Lightroom catalog from a Time Machine backup, you must make sure that Lightroom is not running before allowing Time Machine to run.
Catalog Corruption
Catalog corruption is rare, but distressing nonetheless should it happen to you. It can occur for a number of reasons, such as the computer shutting down suddenly during a power outage or drives being improperly disconnected. To avoid the nasty effects of a power loss affecting the stability of your computer system, you should consider getting an uninterruptible power supply unit. The main computer and display in my office are both connected to the main electricity via an APC ES 700 UPS backup unit. This is capable of providing enough power protection to keep the computer and display running for many minutes after a power cut.
Here’s what to do to avoid the worst consequences. First, remember to make regular backups of the Lightroom catalog and to be on the safe side, choose a different drive to save the backup catalog to. The latest solid-state drives offer faster read/write speeds, but when they fail, they fail completely. So you need to anticipate what you would do if you were to lose all the data on the disk. This need not be a problem if you are in the habit of making scheduled backups of all your data to separate disks, where ideally, you keep one set of disks stored off-site (as well as backing up the catalog).
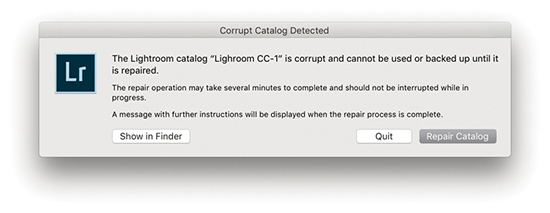
If the catalog does become corrupted, as you launch Lightroom you will see the dialog shown in Figure 3.7. It will always be worth trying to repair the affected catalog first. But if you choose to do this, it is best to quit Lightroom and make a backup copy of the catalog before repairing, just in case your attempts at a repair end up causing further damage to an already sick catalog file. If the catalog is too damaged to repair, you will be asked to choose a different catalog to launch with.
Sync Catalog Disaster Recovery
Should you have cloud syncing enabled and you happen to lose your main Sync catalog, it is possible to download the cloud sync data back to your computer, rather than have to delete all data from the cloud and re-upload all over again. To do this, create a new catalog and then start syncing the Lightroom mobile data to the new empty catalog. From there you will have to carry out a careful catalog merge to sync the recovered data with your most recent catalog (see page 149).
The main lesson here is to maintain backups of the catalog file, both locally as well as on separate backup hard drives. If you haven’t yet backed up your catalog, I suggest you do so now, just as I would also advise you to make scheduled backups of all your computer data.
Creating and Opening Catalogs
When you first install Lightroom, it will by default create an empty new catalog. One catalog should be all you need. Personally, I find it more convenient to keep everything in one place, and it really does not bother me if personal and client photos are stored in the same place—the search functions in Lightroom make it easy to filter and search the photos I am looking for. The notion you should keep separate catalogs for different activities or shoots stems from a Bridge-style “file browser” mentality, where the cataloging power of Lightroom is perhaps not fully appreciated. It has sometimes been suggested you should consider having one catalog for personal photographs, another for studio work, another for weddings, and so on. Although this approach may seem to make sense because different catalogs can be used to segregate your photos into neat groups, it is much simpler (and easier) to segregate your images when everything is contained in the one catalog. Also, you can sync to Lightroom CC/Lightroom mobile from only one Lightroom Classic CC catalog. However, let’s say two or more family members share the same computer. In this situation, each computer user might want to maintain a separate Lightroom catalog. It is certainly the case that a professional photographer may want to run Lightroom on more than one computer and have separate catalogs on each. In such cases, it is important to make sure there is always one master catalog that is regarded as the “primary” database. Things can get really complicated if your workflow involves maintaining separate catalogs. There should always be one catalog that is regarded as the parent catalog and all the other catalogs are subordinate to it.
Creating a New Catalog
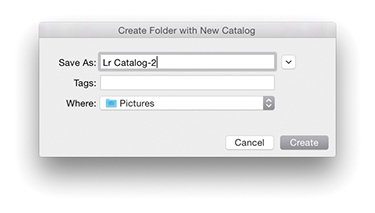
To create a new catalog, choose File ![]() New Catalog. This opens the Create Folder with New Catalog dialog shown in Figure 3.8. Choose a disk location and type in the name you wish to give the catalog. This creates a new catalog folder containing an .lrcat and a Previews.lrdata file.
New Catalog. This opens the Create Folder with New Catalog dialog shown in Figure 3.8. Choose a disk location and type in the name you wish to give the catalog. This creates a new catalog folder containing an .lrcat and a Previews.lrdata file.
Opening an Existing Catalog
To open an existing, alternative catalog, choose File ![]() Open Catalog. This opens the system Finder dialog where you can navigate to locate the correct Lightroom catalog folder. Here, you will need to select the catalogname.lrcat file and click the Open button to open it. You can also choose File
Open Catalog. This opens the system Finder dialog where you can navigate to locate the correct Lightroom catalog folder. Here, you will need to select the catalogname.lrcat file and click the Open button to open it. You can also choose File ![]() Open Recent to select a recently opened catalog. Alternatively, you can double-click a catalog.lrcat file itself. Whenever you create a new catalog or load an existing catalog, Lightroom always needs a restart, because you can have only a single catalog open at a time. Or, you can hold down the
Open Recent to select a recently opened catalog. Alternatively, you can double-click a catalog.lrcat file itself. Whenever you create a new catalog or load an existing catalog, Lightroom always needs a restart, because you can have only a single catalog open at a time. Or, you can hold down the  key (Mac) or
  key (PC) as you start up Lightroom. This opens the Select Catalog dialog shown in Figure 3.9.
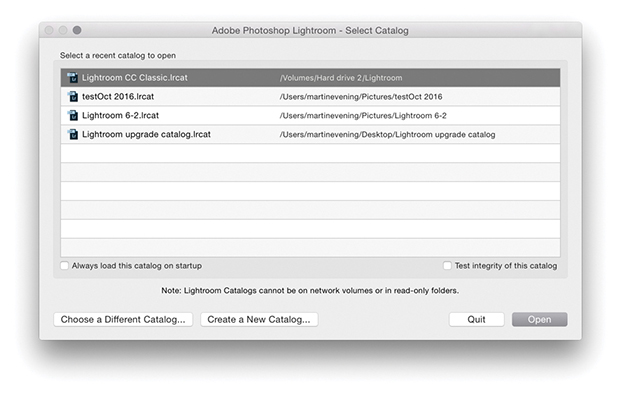
Now let’s look at the options in this dialog. If you check “Always load this catalog on startup,” you can choose to make the selected catalog the default catalog that will open from now on each time you launch Lightroom. The “Test integrity of this catalog” option does the same thing as the option in the Back Up Catalog dialog—it lets you check to see if the catalog is in good shape before you launch it. Although it is a good thing to validate the catalog every now and then, I suspect most people would rather just get on with things and open the catalog straight away. If you don’t see the Lightroom catalog you are looking for listed, you can always click the Choose a Different Catalog button and navigate to locate the correct Lightroom catalogname.lrcat file. Or, you can click the Create a New Catalog button to create a brand-new Lightroom catalog in a new folder location. This, of course, is the same as choosing File ![]() New Catalog.
New Catalog.
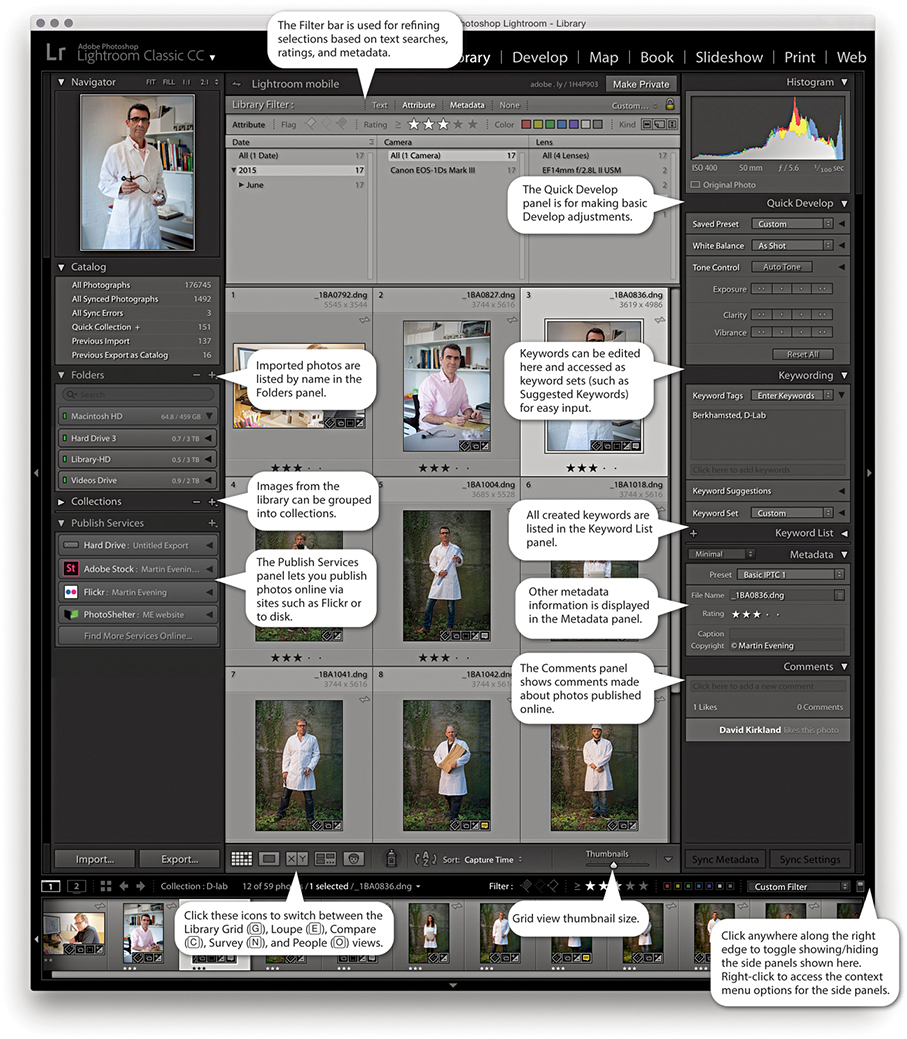
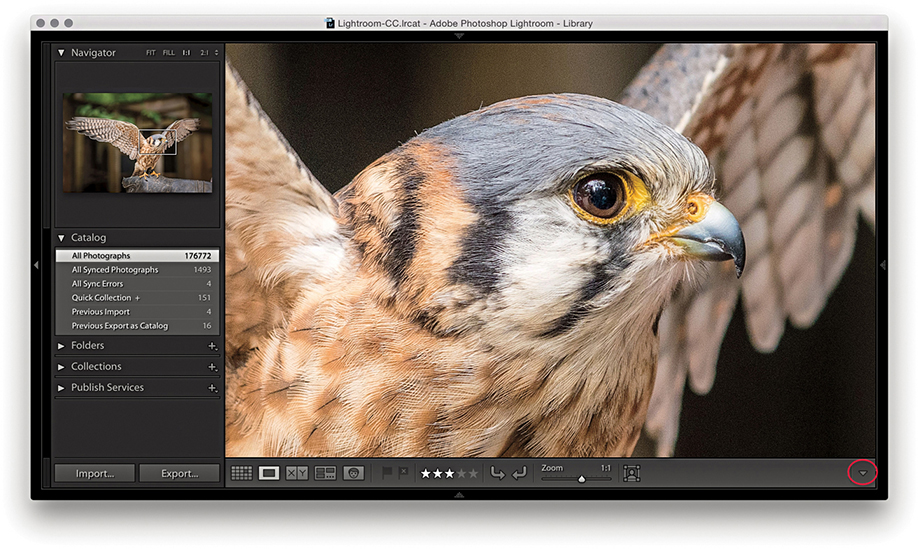
The Library Module Panels
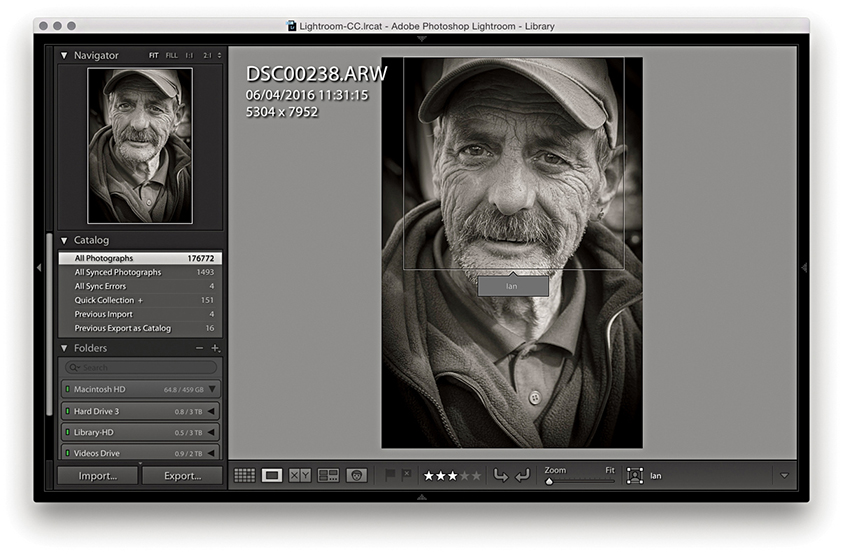
When the Library module is selected (Figure 3.10), the contents of the catalog can be displayed in a Grid view, which provides a multiple-image view using a grid cell layout; Loupe view, which shows a magnified, single-image view; Compare view, which lets you compare two photos side by side; or Survey view, where all the photos in a current selection are displayed in the content area. The Library module controls are split between the left and right panels. The Catalog panel lets you view All Photographs (the contents of the entire catalog), All Synced Photographs, a Quick Collection of images, or the Previous Import of images. Additional items may appear listed in the Catalog panel such as Missing Photos—these are temporary collections that can easily be removed via the context menu (see page 78). The Folders panel lists all the folders in the catalog by volume and alphabetical order and displays only the folders of those photos that have been explicitly imported into Lightroom. You can use the Folders panel to select specific image folders, but as you will discover in this chapter, there are also other ways you can search and locate the photos in the catalog. The Collections panel can be used to select a group of photos from the catalog and save them as a named collection. However, unlike with folders, an individual image can exist in any number of collections. Lightroom also has the ability to create Smart Collections, which are collections created automatically based on custom rule settings (see page 142). You can use the  key to add favorite images to what is known as the target collection. By default this will be the Quick Collection in the Catalog panel, but you can actually make any collection the target collection.
Tip
You can use the  key (Mac) or
  key (PC) in combination with a keypad number (1, 2, 3, etc.) to toggle showing and hiding individual panels. For example, Quick Develop = 1, Keywording = 2, Keyword List = 3, etc. You can also right-click to access the context menu options for the panels and use this to hide/reveal individual panels in any of the Lightroom modules.
  double-clicking in a grid cell takes you directly to the Develop module, and double-clicking on a photo in the Develop module takes you directly back to the Library Grid view.
Using the Publish Services panel, you can publish collections of photos to sites such as Flickr. You can then use Lightroom to manage photos that have been published online and view any feedback comments via the Comments panel.
The Filter bar, located at the top of the Content area, provides a one-stop location for making refined photo selections based on text searches, ratings, and/or metadata. For example, you can filter the catalog based on a keyword search combined with a ratings filter, followed by a metadata filter based on which camera the photograph was taken with. The Quick Develop panel lets you make basic Develop adjustments without having to switch over to the Develop module. The Keywording panel is where you go to enter or edit new keyword metadata; plus, you can select keyword sets, including a Suggested Keywords set, which offers adaptable keyword suggestions based on your current photo selection. Keywords can be applied to images by dragging keywords onto selections in the content area, by dragging photos onto keywords, or by making a selection and adding keywords via the Keywording panel on the right. Other metadata information, such as the camera’s EXIF data, can be viewed via the Metadata panel, which offers several view mode options. You can also use this panel to add custom IPTC metadata, such as the title, caption, and copyright information.
Making the Interface More Compact
If you are working on a computer with a small display, you will be pleased to know that you can collapse both the Navigator and the Histogram displays. This lets you view and work more easily with the panels below. At the same time, the other panels slide beneath as you scroll down the panel list. This, too, can be helpful for those who have limited screen real estate.
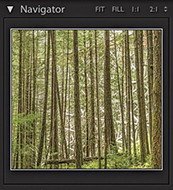
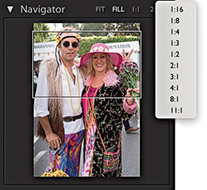
The Navigator Panel
The Navigator panel (Figure 3.11) displays a preview of the currently selected image and provides a number of controls for zooming and scrolling photos (see page 105). The Navigator panel will also update as you hover over the Folders panel or Collections panel lists. When you do this, it previews the first photo that appears in the folder, thus providing a visual reference, making it easier to locate the folder or collection of photos you are looking for.
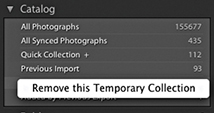
The Catalog Panel
The Catalog panel (Figure 3.12) offers several choices for displaying files. All Photographs displays all the files (showing the total number of photos in the catalog). All Synced Photographs displays files synced to Lightroom CC. Quick Collection displays all files in the current Quick Collection, and Previous Import lets you view the most recently imported files. It is important to remember to select All Photographs if you want a filter search to include everything that is in the catalog. I know this may seem obvious, but it is so easy to forget and then wonder why a search has turned up no results! As you work with Lightroom, other items will appear listed in the Catalog panel, such as Missing Photos. These are classed as temporary collections and can easily be removed. Just right-click to access the context menu and select Remove this Temporary Collection.
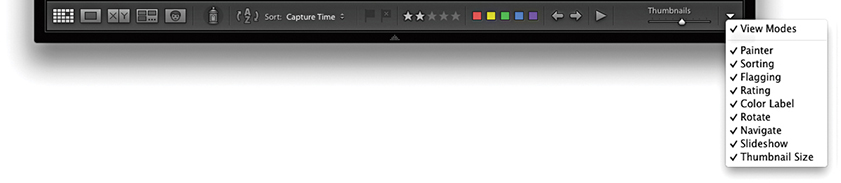
The Library Module Toolbar
The default Library module Toolbar contains the Grid, Loupe, Compare, Survey, and People view mode buttons, as well as the Painter, Sort control, and Thumbnails slider (Figure 3.13). You can customize the Toolbar by clicking the Toolbar options to add Rating, Flagging, Color Labels, Rotate, Navigate, and Slideshow playback controls. The Library module Toolbar can be customized individually for both Grid and Loupe views. For all Lightroom modules you can use the  keyboard shortcut to toggle showing/hiding the Toolbar (you can also just hold down the key to temporarily access the Toolbar). Each time you do this, you will see a message reminding you to use the same shortcut to reveal the Toolbar again. Also, the items you see listed here will vary depending on whether you are in the Grid view or Loupe view mode.
The Folders Panel
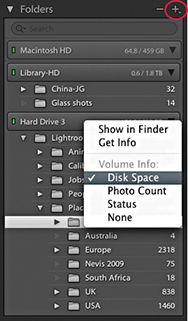
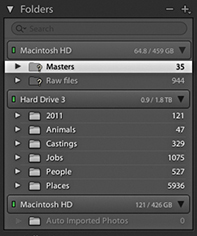
As photos are imported into Lightroom, the folder locations appear in the Folders panel, listed in alphabetical order and segregated by the different hard-drive volume headers (Figure 3.14). Each of these volume header bars can be collapsed by clicking it. The green light in the volume header indicates that a disk drive is connected and has ample free storage space. As the drive nears its full capacity, the light will turn yellow, then orange, and finally red (indicating the hard drive is full). If a disk drive is currently offline, you will notice the volume header name appears in black, and if a folder name within it appears dimmed, this means there are broken links to one or more of the images contained within that folder. The numbers displayed in the volume header bar indicate the number of free gigabytes of data that are left on that drive alongside the total gigabyte capacity. You can right-click the volume header bar to access the context menu shown in Figure 3.14, where you can change the display to show instead the photo count, the online/offline status, or none of these.
Parent Folders and Subfolders
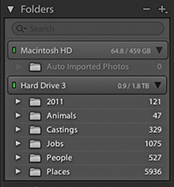
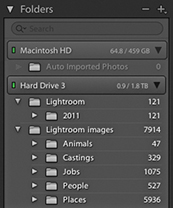
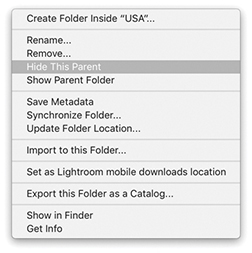
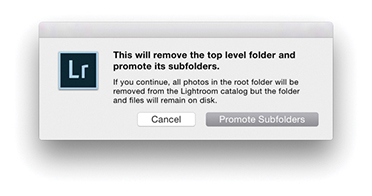
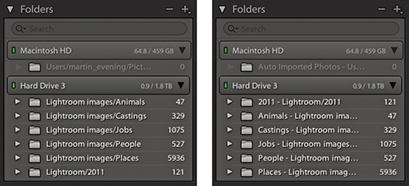
The Folders panel can be used to manage the folders that make up the Lightroom catalog—they can then be grouped into folders any way you like (as long as the individual folders are stored on the same volume). Folder names that are longer than about 30 characters will appear visibly truncated in the Folders panel, so it is best to keep names short. In some ways, the Folders panel looks like the list tree folder view you would find in a file browser program; the folder structure that is displayed in the Folders panel does, in fact, have a direct relationship with the system folders. But there is one key difference: the apparent absence of parent folders. When you first import photos, Lightroom, by default, lists the folders in as compact a hierarchy as possible. To expand the list view to show a complete hierarchy of folders, you will need to -click the top-level folder. In Figure 3.15, I imported a folder of images called Jobs that was contained in a system parent folder called Lightroom images. But you can see that the top-level Lightroom images folder was not included here. A browser program would methodically list every folder in the folder tree hierarchy, but in Lightroom the aim is to provide the user with a tidy view of the imported folders. Keeping the folder hierarchy compact makes the Folders panel navigation easier, since you don’t always have to expand the panel’s width to view folders nested several levels deep. Should you wish to reveal the top-level folders, you can do this on a folder-by-folder basis. Right-click the top-level folder (not a subfolder) to reveal the context menu, and select Show Parent Folder. This will change the Folders panel view to include showing the parent folders (Figure 3.16). If you want to reverse this process, you can do so by again going to the context menu (Figure 3.17) and selecting the Hide This Parent option, which reverts to the Folders panel view seen in Figure 3.15. If any loose files happen to be in the parent folder, files that aren’t located in any of the subfolders, a warning dialog opens (Figure 3.18). Clicking Promote Subfolders will remove those loose files from the catalog, but not actually delete them from the computer. It is therefore best to proceed with caution here when choosing to hide parent folders.
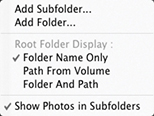
If you click the Folders panel menu button (circled in Figure 3.14), this reveals the pop-up menu options shown in Figure 3.19. Here, you will see further options for how the root folders are displayed. You can keep to the default option, Folder Name Only, or you can select the Path From Volume option to identify the folders or the Folder And Path option (both are shown in Figure 3.20). These particular folder views can be used for instances where you wish to hide the parent folders but still need to see a full folder path or partial folder path view within the folder header.
Show Photos in Subfolders
Also listed in the Folders panel menu (Figure 3.19) is the Show Photos in Subfolders option. This is always on by default and allows you to see everything that’s contained in each folder, including all subfolders. When this option is disabled, you get to see only the files selected in each root-level folder (you can also switch this option on or off via the Library module Library menu). If the folder you select contains no images and just subfolders of images, you’ll see a “No photos selected” message in the content area. Lightroom explains this more clearly by saying “No photos in selected folder, subfolders not shown.”
Incidentally, when Show Photos in Subfolders is selected, you won’t be able to apply a custom sort order or stack photos across multiple folders. You can apply a custom sort order only when viewing a folder that contains no subfolders.
As you will have gathered by now, Lightroom gives you a lot of options, and this is a good example of where, if your workflow requires special attention to the identification of folders, Lightroom lets you do so. I think most people will be happy to stick with the default setup, although understanding how to manage the Show Parent Folder/Promote Subfolders commands is certainly important and useful to know.
Locating a Folder at the System Level
Here is an example of how you can locate the system folder via the computer’s Finder/Explorer.
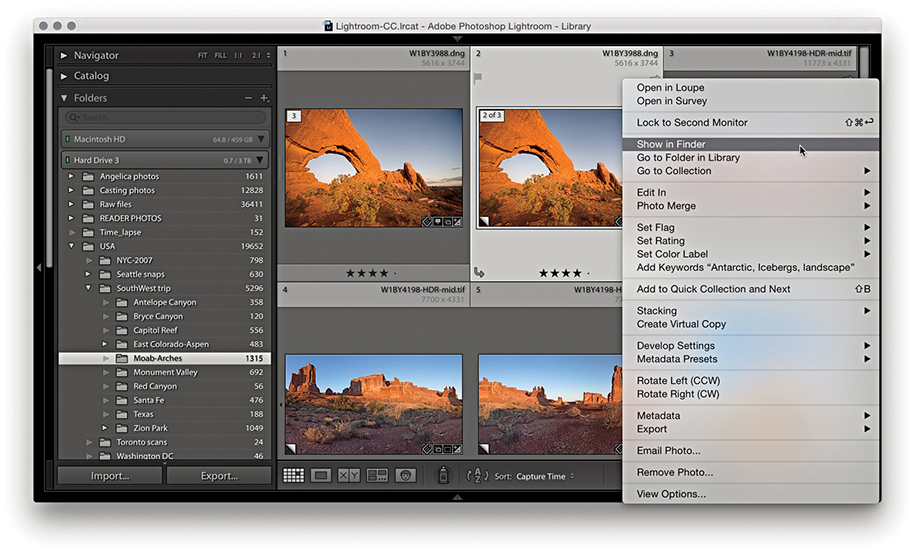
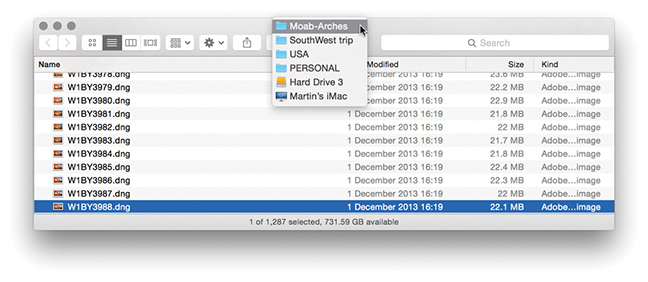
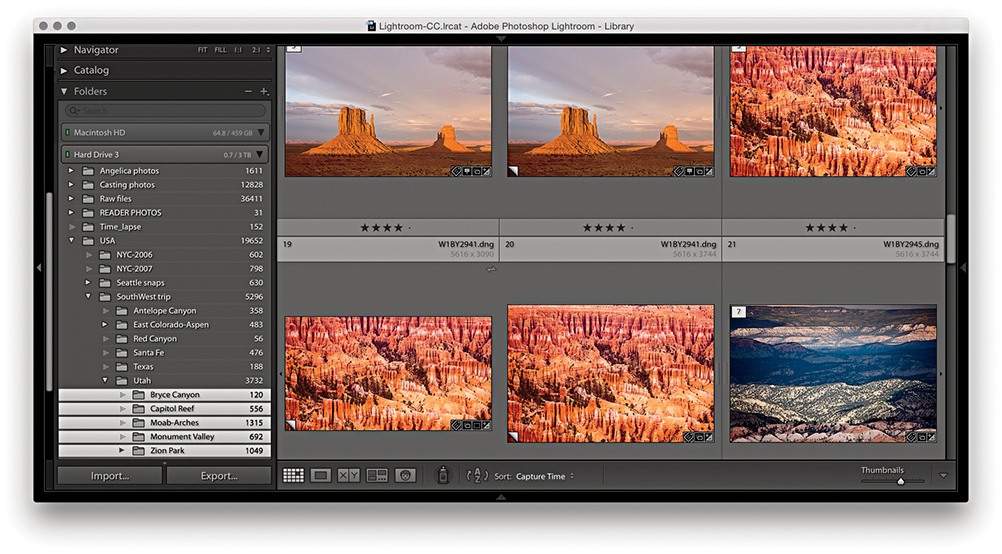
1. Here is a view of the Folders panel in Lightroom and the associated system folder. To reveal the system folder from within Lightroom, I selected a photo that resided in the Moab-Arches folder, right-clicked to reveal the context menu, and chose Show in Finder (Show in Explorer on a PC).
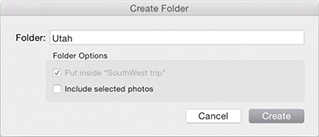
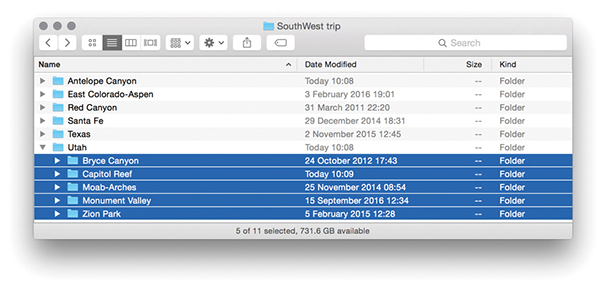
2. In Lightroom, I created a new folder called Utah, as a child of the USA/SouthWest trip folder. I then moved the Bryce Canyon, Capitol Reef, Moab-Arches, Monument Valley, and Zion Park folders inside the new Utah folder. As you can see, this placed the five folders inside the new Utah subfolder. This folder move step was also mirrored at the system level.
The Folders Panel/System Folders Relationship
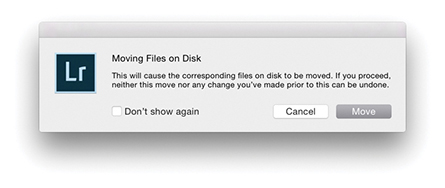
As was shown in the preceding steps, any changes you make to the folder structure within Lightroom, such as moving or renaming a folder, is reflected at the system level and the system folders will correspond with the folders listed in the Lightroom Folders panel. In addition to rearranging the hierarchy of folders, you can freely move files from one folder to another by selecting the files you want to move and dragging them across. This will prompt the dialog shown in Figure 3.21, which gives you a further warning if there is not enough room on the destination drive. You’ll sometimes find it helps after you initiate a move if you then deselect the folder view in Lightroom, as this frees Lightroom from displaying an update of the previews in the content area. There is also a potential issue of what might happen if there were to be a computer crash while moving files. Lightroom effectively copies and deletes files during a move process, and there is the risk you may lose some data. An alternative option is to copy the files at the system level and then relink using the Synchronize Folder command described on page 88.
Maintaining Folder Links
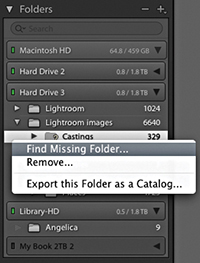
If you happen to move folders containing Lightroom catalog-referenced files at the system level or rename them, then things start to get a little more complicated. If a folder is moved or the folder name is changed at the system level, the Lightroom Folders panel alerts you by showing a question mark over the relevant folder icon (see Figure 3.22). If the folder link is broken, then all the imported files within that folder will have broken links, too. The easiest way to restore a folder link is to right-click that particular folder to access the context menu, select Find Missing Folder, and navigate to find the correct folder (wherever it has now been moved to or however it has been renamed).
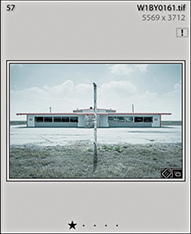
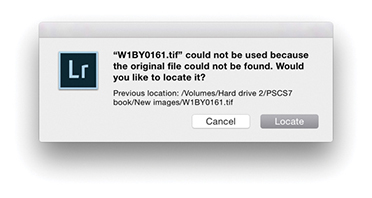
If the folder link is okay and it is only the files within that folder that have broken links, Lightroom displays an exclamation point icon in the grid cell (Figure 3.23). To restore a broken file link, click the exclamation point icon to open the missing link dialog shown in Figure 3.24. You can then click the Locate button to relocate the original source photo on the computer. Once this has been done for one photo, all the other missing files in that folder should automatically update as well.
This also raises an important point about the risks of working with both Lightroom Classic CC and Lightroom CC/Lightroom mobile. Adobe doesn’t officially support or recommend using both side by side, and there are good reasons for this. They want photographers to either adopt a desktop-centric workflow (Lightroom Classic CC), or a server-based workflow (Lightroom CC). If you sync from Lightroom Classic CC to Lightroom CC, there is always the risk of things going wrong if the master files that are primarily stored on the desktop are synced from Classic to Lightroom CC/Lightroom mobile. It is possible to move files around in Lightroom Classic CC, rename them, or rename folders and they’ll keep in sync. But if the master files get deleted, they won’t be backed up in the cloud, which could cause all kinds of tech support problems for Adobe.
As long as you are aware of this and can take personal responsibility for making sure proper backup procedures are in place, I don’t see why this should prevent you adopting a workflow in which Lightroom Classic CC and Lightroom CC/Lightroom mobile work together. I personally find it immensely useful that when I take photos using my smartphone, these are added to Lightroom CC for iOS, automatically backed up to the cloud and appear downloaded to the computer running Lightroom Classic CC. Furthermore, I can sync collections to Lightroom CC/Lightroom mobile as synced albums that can also be made publicly accessible for easy web sharing with friends or clients. Because of this feature, it has been well over a year since I last used the Web module in Lightroom Classic CC.
Maintaining Volume Links
If the entire volume is missing, either because you renamed it or because the drive is not switched on, the volume header will appear dimmed and you will see question marks over the folders (Figure 3.25). Once the drive has been correctly named or you have switched the drive back on, the volume header will indicate that the drive is live again, and the folder links should be restored.
Managing Folders and Collections
Let’s now look at the ways you can manage folders and collections.
Folders Panel Search Field
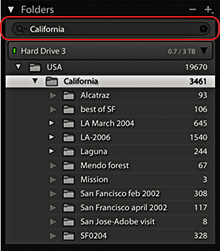
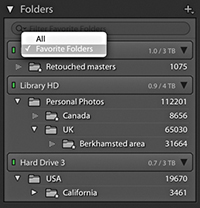
A folder-specific search field has been added to the top of the Folders panel, where you will find that folder searches are pretty much instantaneous and the search feature feels robust. In the Figure 3.26 example, I carried out a search for California. This short-listed a parent folder named California and the subfolders within it. Folder searching also includes support for non-English unicode characters.
Marking Folders as Favorites
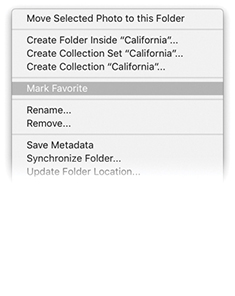
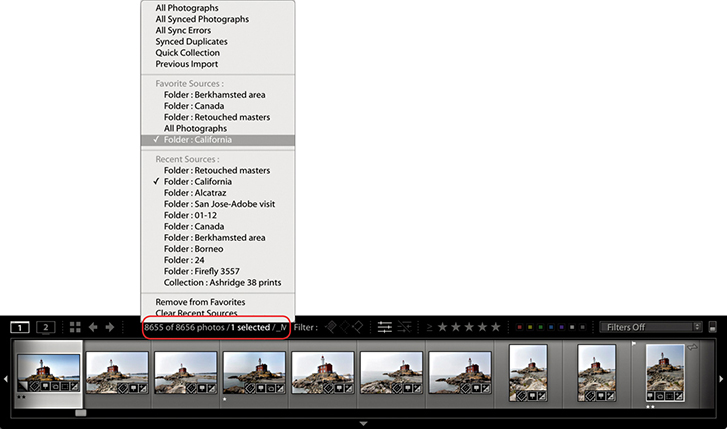
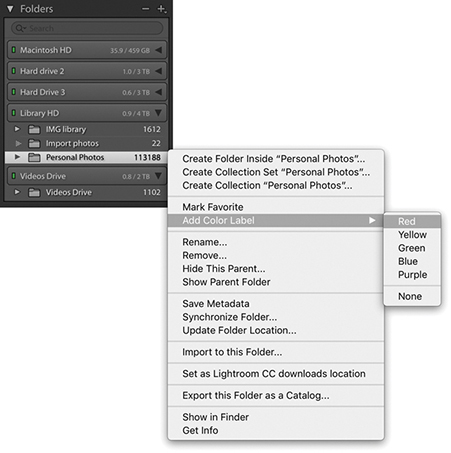
To designate a folder as a favorite, right-click the folder to access the context menu, then choose Mark Favorite (Figure 3.27). Folders marked as favorites will also appear listed in the Favorite Sources section of the Filmstrip Sources menu (Figure 3.28).
If you go to the Folders panel filter (Figure 3.29), you can select Favorite Folders to filter the folders you have marked as favorites, which are marked with a star in the bottom right corner.
Adding Color Labels to Folders
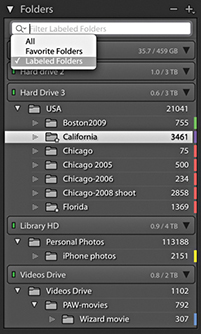
You can apply color labels to folders and filter the color-labeled folders just as you can filter favorite folders via the Folders panel Filter bar.
To apply a color label to a folder, right-click on a folder name in the Folders panel. Navigate to Add Color Label in the context menu and select a color from the submenu (Figure 3.30). To remove a color label, select None. To filter by colored folders, click on the magnifying glass in the Folders panel Filter bar and select Labeled Folders (Figure 3.31).
Synchronizing Folders
Unfortunately, Lightroom cannot automatically detect if new images have been added to a folder at the system level. For example, let’s say you import a folder at the start of a project and as you switch between working Lightroom and Bridge (or the Finder/Explorer), some files may get deleted or new files get added. This can lead to a situation where the Folder view in Lightroom is no longer an accurate representation of what is in the actual system folders.
Therefore, if you need to reconcile changes that have been made to the folder contents at the system level, you can go to the Library module Library menu and choose “Synchronize folder.” When you do this, the Synchronize Folder dialog appears (Figure 3.32) and starts scanning the system folder to see if the folder contents match those shown in the corresponding Lightroom catalog folder. This provides some initial information about the differences between the two, such as whether there are any new photos to import, whether any photos in the Lightroom catalog are missing their master images, and whether any metadata changes have been made externally for which the Lightroom catalog will need to be updated.
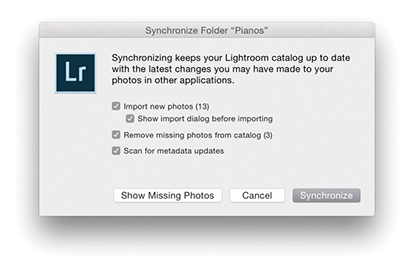
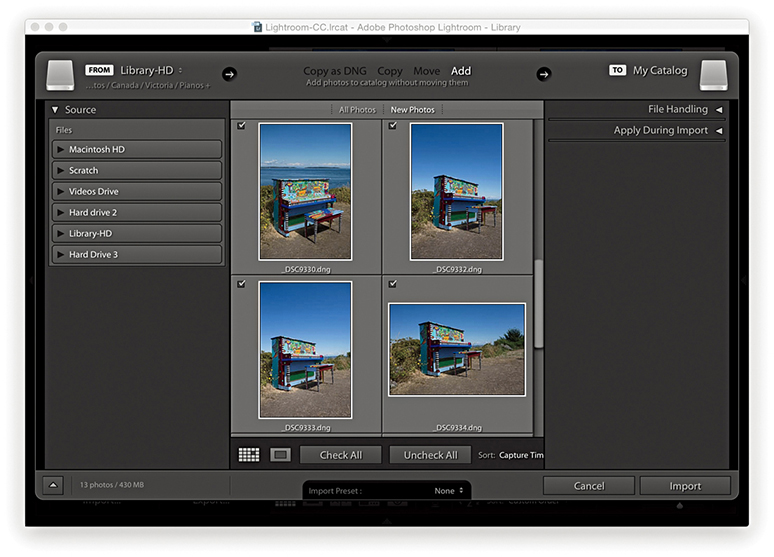
If you check the “Import new photos” option, you can choose to import any new files that have been found and add them to the catalog. By default, the Synchronize Folder dialog automatically imports files to the same folder in which they currently reside. It does this without showing the Import dialog and without modifying the filename, Develop settings, metadata, or keywords. However, you can choose “Show Import dialog before importing,” which will open the Import Photos dialog shown in Figure 3.33 and default to selecting the New Photos segmenting option. The main reason for choosing to show the Import Photos dialog when synchronizing a folder is so you can adjust any of the settings as you carry out the import and update the Lightroom catalog. If you happen to have removed any photos from the folder at the system level, you can check the “Remove missing photos from the catalog” option to also remove the files from the catalog. Basically, these options allow you to keep the Lightroom catalog updated with new additions, as well as remove photos that are no longer located in the original system folder.
The “Scan for metadata updates” option works exactly the same as the “Read metadata from files” option in the Library module Metadata menu (see page 628). For example, if you have edited the metadata in any of the catalog images using an external program, such as Bridge, which saves the metadata edits you make back to the file’s XMP header space (or to an XMP sidecar file), you can use the Synchronize Folder dialog to synchronize such metadata changes with the Lightroom catalog.
Finding the Link from the Catalog to a Folder
With Lightroom, you are free to organize and sort your photos in ways that are not directly dependent on your knowing the underlying photo structure.
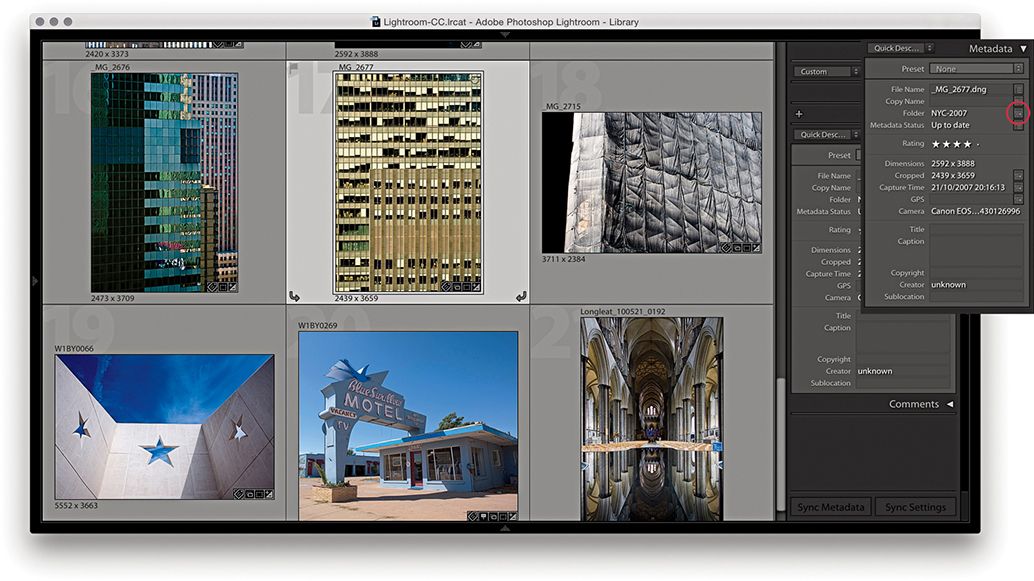
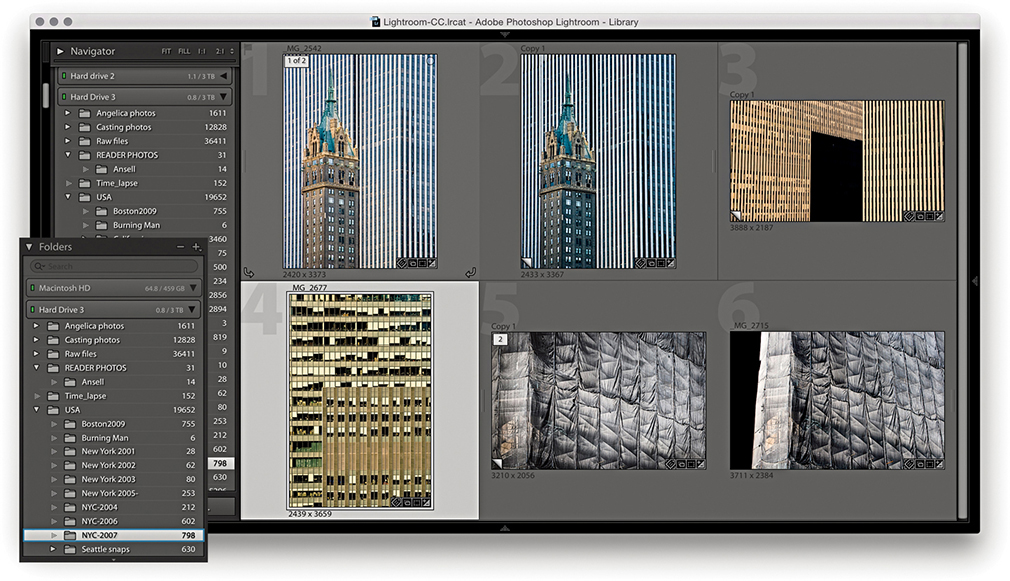
1. Here, I opened a collection of architectural photos in which the photos originated from different folders. I selected an image and clicked the Folder Action button in the Metadata panel (circled), which then took me to a Folder view for that particular photo (the folder is highlighted here in blue).

2. If I wanted to see where the photo actually resided at the system level, I could choose Photo ![]() Show in Finder (Mac) or Show in Explorer (PC), or I could use
Show in Finder (Mac) or Show in Explorer (PC), or I could use  (Mac) or
  (PC) to reveal the image in a new Finder/Explorer window. I chose a third method: I simply dragged a photo from the content area to a Bridge alias/shortcut.
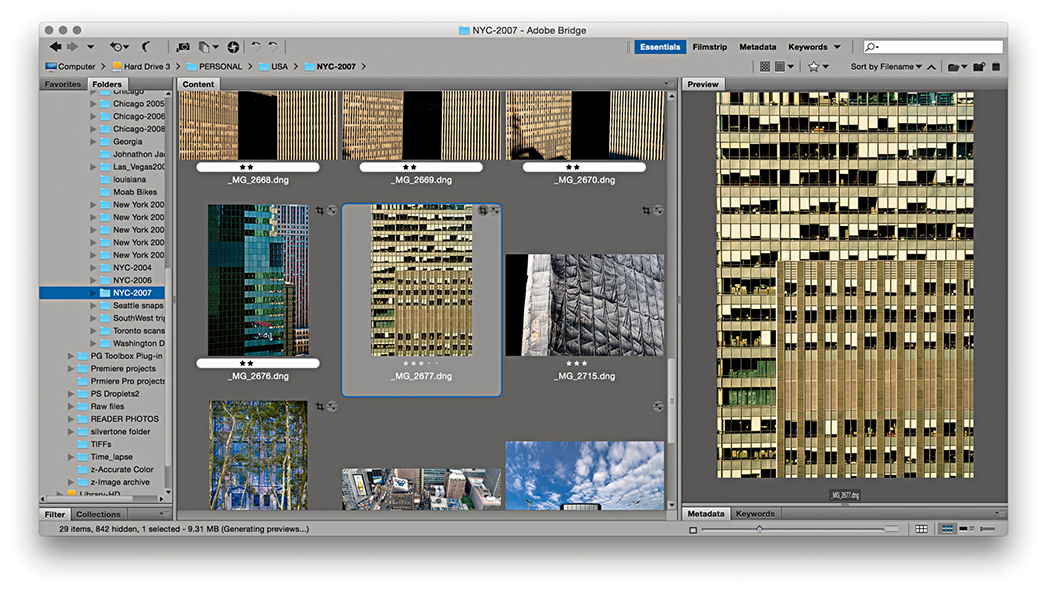
3. Dragging the file to the Bridge shortcut displayed the photo’s folder in a new Bridge window with the photo selected.
How to Organize Your Folders
People often ask how using a Lightroom catalog is different from using the Finder or a browser program to locate your images. With a system folder/browser setup, you need to know exactly where everything is kept in order to access the files. Therefore, to retrieve photos, you need to have personal knowledge of how the photos are stored: which folders are on which drives, as well as how the subfolders are arranged. If you are well organized, you might have your files sorted by date, alphabetical order, or a combination of both. Of course, if you have already added metadata to your images in the form of IPTC metadata or keywords, you can use the search command in a program like Bridge to help find the photos you are looking for. However, such searches are made easier if you use a dedicated cataloging program like Lightroom. This is because Lightroom shows you only the image and video files that have been imported and allows you to manage everything by referencing the metadata stored in the catalog.
Since the early days of personal computing, most of us have grown accustomed to relying on folder hierarchies to organize our computer documents. In fact, for a lot of people, the folder name may be the only meaningful method of identification they have for the files stored on their computers. Still, today, it seems a logical way to sort one’s files. On my computer, I have an Office documents folder inside a general Documents folder and within that a series of subfolders for things like letters, accounts files, and job quotes. But when it comes to organizing images, folder management has some distinct limitations. When you import a new set of images, how should you categorize them? Should you put them into folders arranged by date, by subject, or by job reference? When it comes to organizing photographs, it isn’t always so straightforward.
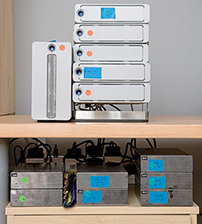
Even so, while Lightroom and other cataloging programs are not folder dependent in the way browser programs like Bridge are, the Folders panel in Lightroom remains an important navigational tool for most Lightroom users. Therefore, when working with a large catalog of images, it is important to consider early on how you are best going to organize your image files. When I first started shooting digitally, Lightroom didn’t exist and I thought I would sort all my work into A–Z folders. Now, because of the space limitations on hard drives back then, this meant I ended up spanning a lot of hard drives (Figure 3.34). Needless to say, it was not an ideal solution, and the biggest problem was that of scalability. I had to hope there would be enough room on each drive to accommodate a growing image library. Things got really difficult one year when the A–C drive started to run out of space (because I shot a lot for my A–C clients). With the arrival of Lightroom, I soon realized that the folder location where the files were kept no longer mattered so much. From there on, as I added new images, I found that the file organization did not need to be rigidly determined by which drives the files and folders were stored on. Basically, when you make use of metadata information to manage your files, the folder storage method you use is less relevant.
So, how should you organize your files and folders for Lightroom? I have seen a number of strategies suggested. The main thing you need to consider, as I said, is the scalability of the system you are going to use. As your collection of photographs grows, how well will your folder organization keep pace with this? I find it helps to split my catalog photos into different categories. For example, I have one drive for raw files shot on assignment, another to store the derivative versions that have been edited in Photoshop, and another to store all my personal work. This leaves me with quite a bit of breathing space on each drive; each is currently running at around 60% to 80% capacity. Not too long from now I will probably migrate all my files to even bigger drives. This is a process I see being repeated every few years or so.
Attempting to organize folders by name can prove tricky because you have to decide whether to primarily sort by location or job reference or some other criteria. But despite such drawbacks, it is a system that many people feel comfortable with. From my own point of view, I also find myself dependent on having a folder structure that integrates well when browsing in Bridge (because I need to demo Bridge workflows in my other books). I therefore find it necessary still to use a job-name or location-name hierarchy when cataloging my photos. This is what works for me because of my particular requirements. If you are mostly going to rely on Lightroom to catalog your photos, you could use a date-import folder structure. Importing everything into dated folders keeps things simple: The folder structure you use is agnostic as to the types of images you are importing (i.e., whether the photos are work or personal). It also allows you to be consistent and makes it easier to manage the catalog as more drives are required.
Lastly, you can use folders as a tool for segregating images in an image-processing workflow. In Chapter 2, I suggested importing your photos to a standard import folder. Here, you can think of using folders as part of a workflow pipeline in which the first thing you do is simply get the photos from the camera card onto the computer without having to immediately think about where the imported photos will eventually end up. In Figure 3.35, I have adapted a folder workflow first suggested by Peter Krogh, in which all photos are imported to an Import folder. From there, the next stage would be to move them to a Photos to keyword folder. This would be another holding folder, which would be like a reminder that the photos in there needed to be keyworded before they are promoted into one of the main catalog folders. At this point, you could then choose to categorize these main folders using descriptions, dates, or whatever works best for your setup. This kind of workflow offers simplicity and enforces good working practice where files are added to the main catalog only after they have been properly keyworded and you are ready to decide where they should go. If you use keywords to tag your images, it should not matter how the folders are structured. In fact, when you think about it, the way a computer actually segregates files into folders is done by applying a folder metadata tag to the files—the folder designation is simply another type of metadata. It takes just as much time to select all the photos from an imported shoot and assign a keyword tag as it does to name a folder. Hence, a workflow folder pipeline approach forces you to first think about assigning keywords to your images before you eventually place them into their final folders. I do not think it is necessary to be too prescriptive here as to how you should go about this.

The main thing to think about is how well will your method of archiving cope as your image library collection expands? One option is the bucket system, which Peter Krogh advocates in The DAM Book: Digital Asset Management for Photographers, 3rd Edition. In this system, the catalog files are divided into a dated hierarchy of folders of equal size and the folder capacity matches that of DVD or Blu-ray recordable media. The idea here is that you have a DVD or Blu-ray disc that matches each folder in the catalog. In the event of file corruption or data loss (in chich the error may have been copied across to a backup drive), you will always have an optical, read-once media disc available to restore the files from (think 3-2-1; see the Tip). A system like this can provide the ultimate security for your data. In practice, I think most people will be fine as long as they carry out regular, scheduled backups to one or more backup drives.
Tip
If you want to keep your data safe, Peter Krogh recommends you use the 3-2-1 backup rule: Have at least three independent copies of your data. Store the copies on two different types of media, and keep one backup copy offsite.
The Filter Bar
The Filter bar (Figure 3.36) consists of a Text search section for searching by filename, caption, keywords, and so forth. The Attribute section duplicates the filter controls at the bottom of the Filmstrip, while the Metadata section lets you filter by various metadata criteria. The metadata search options reduce as you narrow the search criteria at each stage. A downside to using the Filter bar is that it does take up quite a bit of space in the content area, but you can use the  keyboard shortcut to toggle showing/hiding the Filter bar.

Exploring the Library Module
The Library module’s two main views, Grid and Loupe, offer plenty of options to help you tailor them to your workflow and display the details you need most.
Grid View Options
As new photos are imported, low-resolution previews will appear in the Grid view. If the camera used to capture the images has the camera orientation information embedded in the metadata, the thumbnail previews should correctly rotate to portrait or landscape mode accordingly. Otherwise, you can use the rotate buttons to rotate the images manually or use  to rotate left and
  to rotate right (Mac), or use
  and
and  (PC).
(PC).
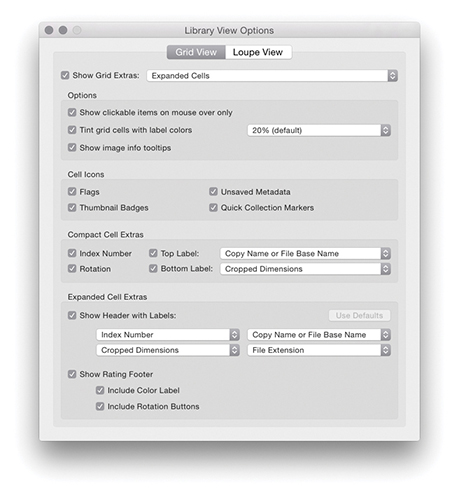
To open the Library View Options, choose View ![]() View Options (or press
View Options (or press  [Mac] or
  [PC]) and click the Grid View button (Figure 3.37). There are essentially two modes for the Library Grid View: Compact Cells (Figure 3.38), which primarily shows the thumbnail with less data information, and Expanded Cells (Figure 3.39), which displays additional options in each cell. The “Show clickable items on mouse over only” option refers to the Quick Collection markers and rotation buttons. When you select this option, such clickable items are revealed only as you hover over a cell. When the “Tint grid cells with label colors” option is selected, this shades the entire cell border when you apply a color label to a photo and you can adjust the intensity of the tint color. “Show image info tooltips” enables you see additional info messages when rolling over the cell badge icons.
If you want the image’s flag status to appear in the cell border, check the Flags option in the Cell Icons section. The Flag icons indicate if an image has been identified as a pick ( ) or as a reject (
 ) (see page 126 for more about working with flags). The Thumbnail Badges are the small icons you see in the bottom-right corner. Five types of badges can be displayed here, depending on what attributes have been applied to each image. If you double-click the Keywords badge (
 ), this automatically takes you to the Keywording panel in the Library module, where you can start adding or editing keywords linked to this particular image. Double-clicking the Crop badge (
 ) takes you to the Develop module and activates the Crop overlay. If you double-click the Develop settings badge (
 ), you also go directly to the Develop module, and if you click the Collections badge (
 ), a pop-up menu appears allowing you to select from one or more collections the photo belongs to. Lastly, there is a Map badge to indicate if a photo has GPS data (
![]() ). Clicking this takes you to the photo’s map location in the Map module, while -clicking takes you directly to a Google Maps view in your web browser. Check the Unsaved Metadata option if you wish to see an alert in the top-right corner if a photo’s metadata is out of sync with the main catalog (this is discussed later in Chapter 10). If a photo has been added to a Quick Collection, it will be identified in the Grid view with a filled circle Quick Selection Marker in the top-right corner. You can also click this circle to toggle adding or removing an image from a Quick Collection.
). Clicking this takes you to the photo’s map location in the Map module, while -clicking takes you directly to a Google Maps view in your web browser. Check the Unsaved Metadata option if you wish to see an alert in the top-right corner if a photo’s metadata is out of sync with the main catalog (this is discussed later in Chapter 10). If a photo has been added to a Quick Collection, it will be identified in the Grid view with a filled circle Quick Selection Marker in the top-right corner. You can also click this circle to toggle adding or removing an image from a Quick Collection.
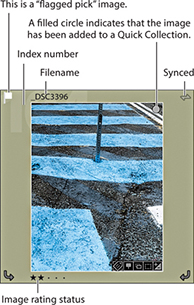
Figure 3.38 shows an example of a Compact Cell view (which is the default view when you first launch Lightroom). This particular cell view has the grid cell Index Number (the large dimmed number in the cell background) displayed in the Top Label section, along with the Copy Name or File Base Name (selected from the Figure 3.40 list). The Bottom Label section has room for the Rotation buttons, plus one other custom item from the Figure 3.40 list. When Rating is selected, the image rating is displayed, with five stars as the highest rated and no stars as the lowest. Although it is possible to assign star ratings by clicking the dots in the grid cell area, an easier way to assign ratings is to enter numbers (1–5) or use the square bracket keys ( ,
,  ) on the keyboard.
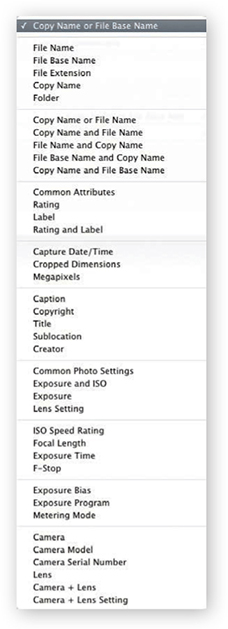
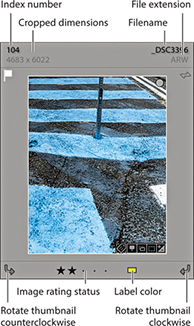
Figure 3.39 shows an example of an Expanded Cells view. You can use the Show Header with Labels check box in the Expanded Cell Extras section to turn the header display options on or off. With the Expanded Cells view, there is room for two rows of information in the header, and you can use the pull-down menu list shown in Figure 3.40 to customize the information displayed here. You can also check the Show Rating Footer option to enable adding the Include Color Label and Include Rotation Buttons options. That concludes all the customizable options for the Grid cells, but note you can use the  keyboard shortcut to cycle through the three Grid cell views: “Compact view with no badges,” “Compact view with badges showing,” and “Expanded view with badges showing.”
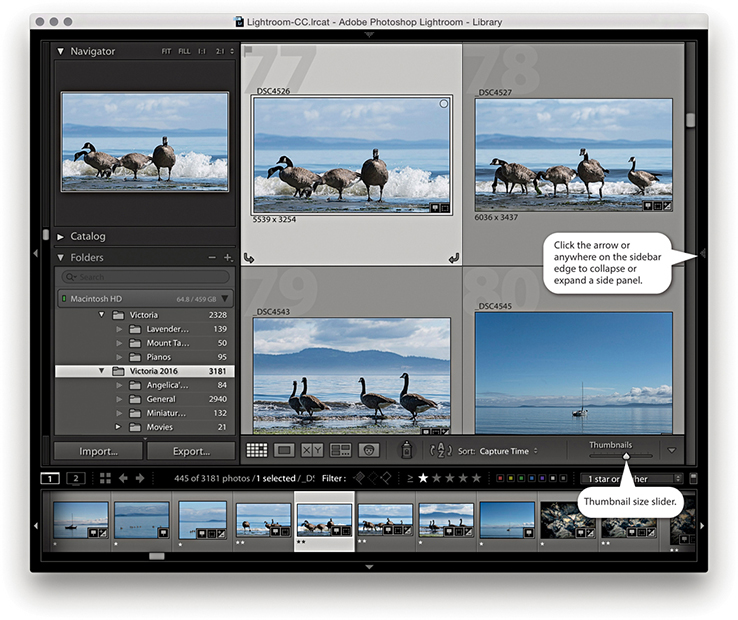
Library Grid Navigation
The main way to browse photos in the catalog is to use the Library module in the Grid view mode (Figure 3.41). You can navigate the Grid view by clicking on individual cells or use the arrow keys on the keyboard to move from one cell to the next. The Home and End keys on the computer keyboard can be used to move the Grid view to the first or last image, and you can also scroll the grid contents using the Page Up and Page Down keys next to these two keys. To make the thumbnail sizes bigger or smaller, you can drag the Thumbnails slider in the Toolbar, or use the keyboard + and – keys to increase or decrease the number of cells per row. The Library grid cells are displayed in the main content area, and the side panels can be hidden by clicking the left or right sidebar edges—this collapses the panels to the edge of the Lightroom window. The panels can then be revealed by rolling the pointer toward either sidebar edge or kept locked in place by clicking the sidebar edges. An even easier way to manage the Library Grid view is to use the  key to toggle having the side panels in view or with both hidden, enlarging the content area to fill the complete width of the window. And, you can use
  to toggle showing the side plus top and bottom panels.
Note
Lightroom Classic CC uses new APIs, which means Windows users should see faster rendering in the Grid, Filmstrip, and Loupe views. Windows 10 also supports GPU acceleration in Library module.
Note
Here are some keyboard shortcuts for navigating between the Grid and Loupe views. The  key always takes you to the Library Grid view from whichever module you are currently in, and the
  key always takes you to the Library module Loupe view. The
  (Mac) or
  (PC) key combination takes you from Grid to Loupe standard view, and the
  (Mac) or
  (PC) key combination takes you from the standard Loupe view back to Grid view. More Loupe view shortcuts are listed on page 105.
The selected thumbnails are shown in both the Grid and Filmstrip with a light-gray surround. Within a photo selection of two or more photos, there will always be a primary or “most selected” image (which will also be the one displayed in the Navigator). You can tell which this is because in the Grid or Filmstrip, the primary selected image is the one shaded a slightly lighter gray than all the other selected thumbnail cells. When a selection of photos is active, you can click to make another image in the photo selection the most active. Or, you can use the  key (Mac) or key (PC) combined with the left/right arrows to select another photo as the “most selected” image within the current photo selection. Some macOS users may experience problems navigating using the keyboard arrows. If you do, go to the System Preferences and select Keyboard
 ![]() Keyboard Shortcuts. At the very bottom, you will see “Full Keyboard Access: In windows and dialogs, press Tab to move the keyboard focus between.” Make sure the “Text boxes and Lists only” option is selected here.
Keyboard Shortcuts. At the very bottom, you will see “Full Keyboard Access: In windows and dialogs, press Tab to move the keyboard focus between.” Make sure the “Text boxes and Lists only” option is selected here.
You can reorder the way the photos appear by dragging the thumbnails within the Grid or Filmstrip. As you move a photo from one location to another, you will see a thick black line appear between the cells. Release to drop the photo (or photos) in this new location. But it is important to stress here that you can do this only when working with a single folder or single collection view. Otherwise, you will find custom ordering is disabled. For example, if you have multiple folders selected or you have selected a folder that contains one or more subfolders, you will not be able to drag images to reorder them. Similarly, if you create a collection set that contains other collections or if you are viewing a temporary collection in the Catalog panel, custom ordering will be disabled.
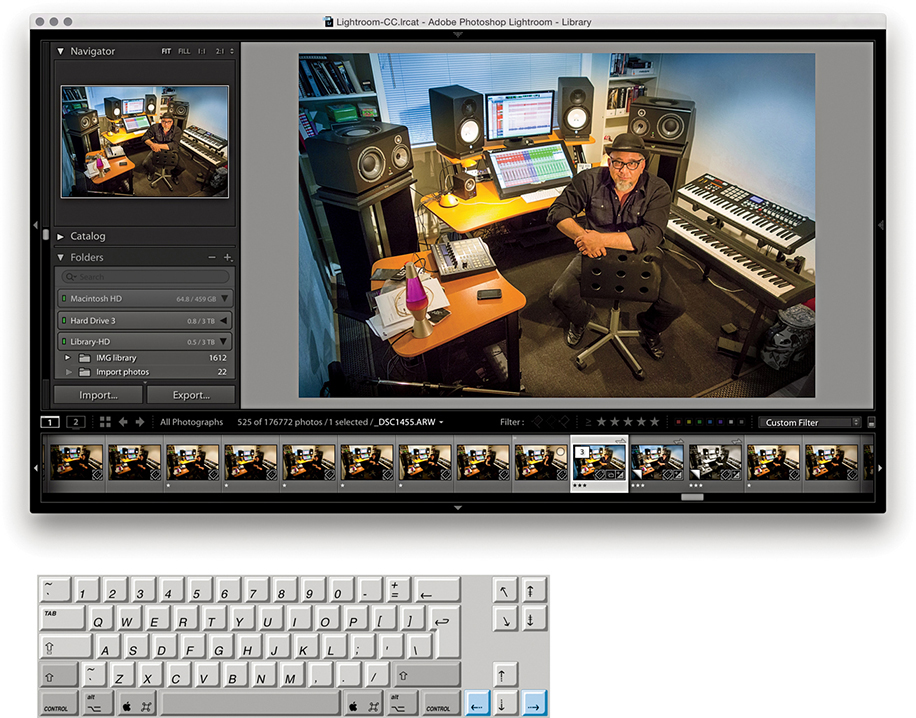
Working in Loupe view
Lightroom offers two Loupe viewing modes: standard and close-up. The standard Loupe view either fits the whole image within the content area or fills the entire width of the content area; these are described as Fit and Fill (Fit is shown in Figure 3.42). The close-up Loupe view can be set to a 1:1 magnification or an alternative zoomed-in custom view setting, such as 2:1 or higher. The simplest way to switch to the Loupe view is to double-click an image in the Grid or Filmstrip. If you have more than one photo currently selected, the photo you double-click is the one that will fill the screen. The photo selection will still be preserved in the Filmstrip, and you can use the Left and Right Arrow keys to navigate through these photos. If you double-click the Loupe view image, you will return to the Grid view once more.
Loupe Preview Updates in Library Module
As you switch from the Develop to the Library module Loupe view, there is an optimization in place for the Library Loupe view to reuse the Develop module rendering instead of having to re-render a JPEG preview. This typically happens if you made an edit in the Develop module and the Library module JPEG preview therefore becomes out-of-date. Consequently, your images should display faster as you progress from one to the next.
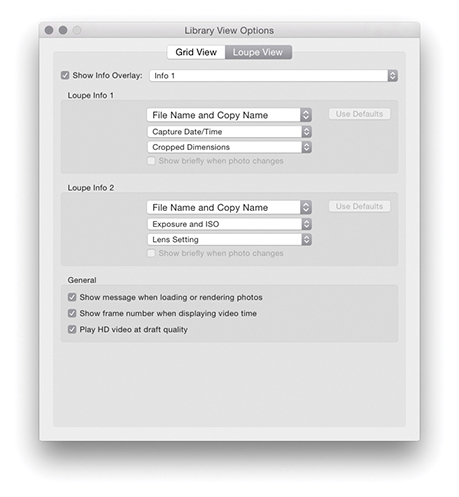
Loupe View Options
The Loupe view options in the Library View Options dialog ( [Mac] or [PC]) can be used to customize the Loupe view (Figure 3.43). When the Show Info Overlay option is selected, Lightroom displays an info overlay in the top-left corner, which can use the Loupe Info settings Info 1 or Info 2, as configured below. If the Show Info Overlay option is unselected, you then have the option to select the “Show briefly when photo changes” option for when a new image is displayed in the Loupe view. This means the info overlay will fade after a few seconds when you select a new image in the Loupe view. You can also control the Loupe view options by using the  (Mac) or
  (PC) shortcut to toggle switching the Loupe view information on or off. Or, you can also use the
  key to cycle between showing Info 1 and Info 2, as well as switching the Info display off. Figure 3.44 shows a Library module Loupe view captured with a Loupe Info 1 overlay.
Tip
The View menu contains an item called Enable Mirror Image Mode. However, when you check this option, it flips all the photos in the catalog horizontally and not just those in the current Library selection. So, remember to deselect it after you are finished! To turn it off, just select it from the View menu again. A better option now is to go to the Photo menu and choose Flip Horizontal or Flip Vertical. These commands are applied to individual images only.
When the “Show message when loading or rendering photos” option is selected, you will see status messages appear in the content area, such as when an image is loading an updated preview or you have just assigned a new flag or star rating to a photo. The other two options relate to displaying video files. You can choose to display the frame number when displaying the video time. This shows finer time increments in the video timeline display. Enabling the “Play HD video at draft quality” option can improve playback performance in the Library module Loupe view, but at the expense of lower video image quality.
Draw Face Region Overlay
When the Draw Face Region tool is selected in the Toolbar, it enables the face recognition feature. This will display a rectangular face region around any faces found in an image and will include text that either shows the person’s name or says “Unnamed.” When the Draw Face Region tool is selected, you can also click and drag inside the Loupe view to manually define face regions.
Working with Photos in Both Grid and Loupe View
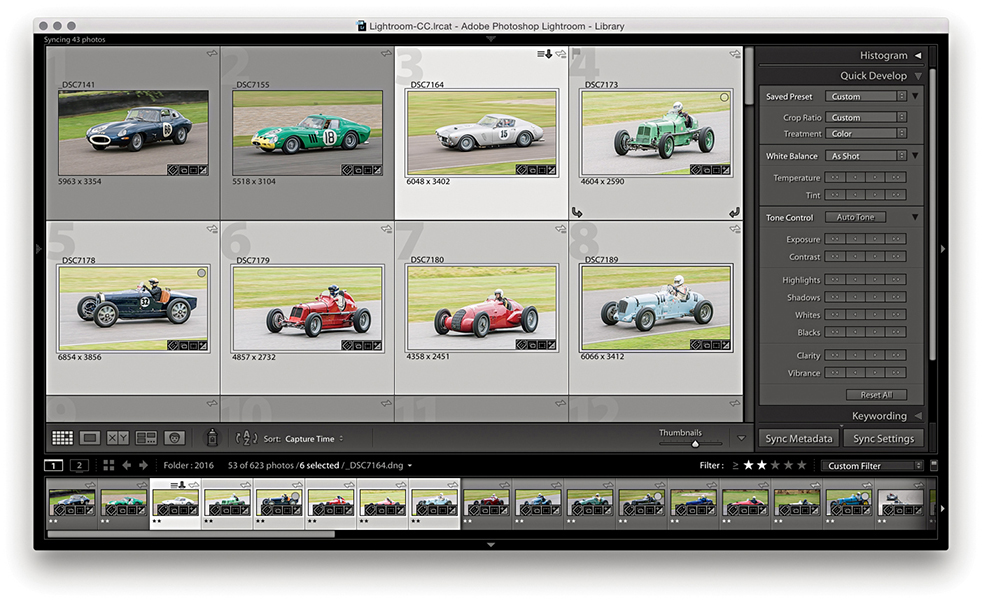
1. In the Grid view mode, you can make a selection of photos, and the selection will be mirrored in the Filmstrip below.
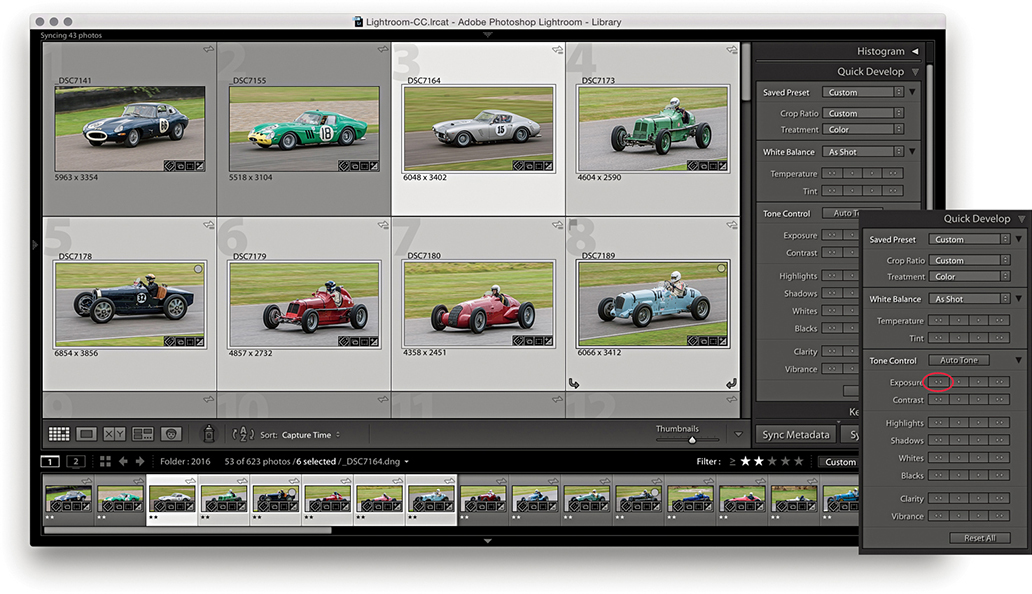
2. If you use Quick Develop to make Develop adjustments, these are applied to all photos in the grid and Filmstrip selection (the Quick Develop panel is ideal for such adjustments). Here, I decreased the Exposure for all the selected images.

3. If you go to the Loupe view mode and apply a Quick Develop adjustment (such as convert to Black & White), however, the adjustment is applied only to the current photo, even though the photo selection remains active in the Filmstrip.
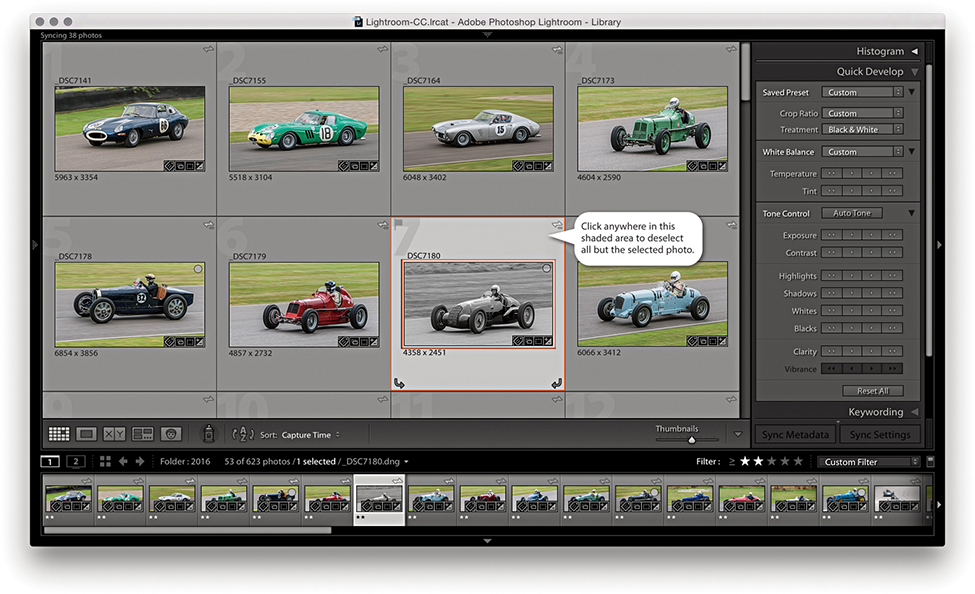
4. Back in the Grid view, you can deselect a photo selection by clicking anywhere in the cell border area to deselect all but the selected photo.
Loupe View Navigation
From the standard Loupe view, you can magnify the image preview in a number of ways. A further click will normally zoom in to a 1:1 magnification, centered on where you click (see Note). Another click will take you back to the previous Loupe view (Figure 3.45 shows a close-up Loupe view). Zooming is made faster by the fact that Lightroom renders only the portion of the image you have selected to view in close-up instead of rendering the whole image first. The close-up Loupe view is handy for checking image detail. You can navigate from one image to the next in a selection, using the keyboard Arrow keys, and inspect the same area of each image in close-up view. In the View menu is an item called Lock Zoom Position ( [Mac] or
  [PC]). When selected, it locks the zoom position when switching between images. When the Lock Zoom Position is unselected, the zoom position is remembered for each individual image. Be aware that if the Draw Face Region tool is enabled (see Figure 3.38), you will be in the Define Face Region mode, where you can click and drag to define a new face region. To exit this mode, you will need to click in the Toolbar to disable the Draw Face Region tool. You can then click and zoom again to navigate the image.
Note
In the Lightroom Interface preferences, the “Zoom clicked point to center” option lets you alter the zooming behavior. When this option is unselected, zooming in close fills the screen to best fit the content area. When it is selected, where you click is always centered on the screen. I find zooming is more natural when the option is left unselected: After you zoom in, the pointer remains positioned over the point where you originally clicked.
You can scroll by click-dragging the photo. Alternatively, you can drag the white rectangle in the Navigator panel (Figure 3.46) to quickly scroll the image with a minimum amount of movement. In the full-screen Loupe view shown in Figure 3.45, the rectangle in the Navigator represented the area that was currently visible in the content area (relative to the whole image). Lastly, you have the Zoom view slider in the Toolbar. This lets you magnify the image from a Fit view, right up to an 11:1 magnification.
Loupe Zoom Views
There are actually four different Loupe views, and the Navigator panel displays a highlighted zoom view readout in the top-right corner of whichever one is currently in use. They are (in order of magnification): Fit view, which displays a standard Loupe view, filling the available content area both horizontally and vertically; Fill view, which magnifies the standard Loupe view to fill the width of the available content area onscreen, cropping the top and bottom of the picture as necessary; close-up Loupe view, which offers a standard 1:1 view; and a second close-up view, which offers customized magnification levels. You can extend the close-up Loupe view range for this view mode by selecting a new zoom view from the Navigator fly-out menu (Figure 3.46). Therefore, the Loupe zoom essentially offers two zoom modes: a standard view and a close-up view. You can use the Navigator panel to set the standard view to either Fit or Fill, and the close-up view to either 1:1 or one of the custom magnified views. The zoom view modes you select via the Navigator panel also establish how Lightroom behaves when you use either a single-click or press the  to toggle between the two zoom views.
Loupe View Shortcuts
By now, you will have come to realize that there are umpteen ways to zoom in and out of an image between the Grid view and Loupe view modes. It is not easy to remember all the zoom shortcuts, so I suggest you play with the various methods described here and just get used to working with whatever method suits you best. For example, you can use the  keys (Mac) or
  keys (PC) to zoom in progressively from the Grid view to the standard Loupe view to the magnified Loupe view. And you can use the
  keys (Mac) or
  keys (PC) to progressively zoom out again. You can use the
  keys (Mac) or
  keys (PC) with the
  and
and  buttons to zoom in and out in gradual increments from the Grid view to an 11:1 Loupe view. You can also use the
  key to toggle directly between the grid and close-up Loupe view. When you are in the close-up Loupe view, you can use the to toggle between the close-up and standard Loupe views. If you press the key again after this, you can toggle between the standard and close-up Loupe views. I sometimes find it useful to use the
  key to cycle between the Grid view and the two different Loupe views. Press once to go from the Grid view to the standard Loupe view, press again to go to the close-up Loupe view, and press once more to return to the Grid view.
Loupe Overlay View
The Loupe Overlay menu (Figure 3.47) can be accessed via the View menu in both the Library and Develop modules (or use the  [Mac] or
  [PC] keyboard shortcut). This lets you add one or more types of overlay to a photo. You can choose to add a grid, movable crosshair guides, a layout image, or a combination of all three. Basically, you need to go to the Loupe Overlay menu, select an item you wish to enable, and then return to the same menu and select again to disable or select another item.
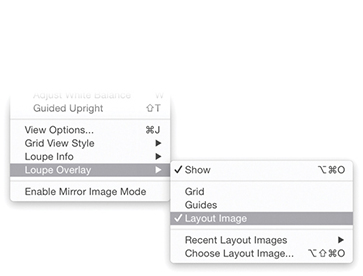
Note
Zoom to Fit and Zoom to Fill for the Loupe view can magnify the image beyond 1:1. This allows the Loupe view to render a larger image when the image is heavily cropped or you are working with a (size-limited) Smart Preview using a high-resolution display.
Grid and Guides
The Grid view is useful for checking the perspective correction in an image. When the Grid view is enabled, it overlays the image with a grid (Figure 3.48). To reveal the Grid Size and Opacity options at the top of the content area view, hold down the key (Mac) or key (PC). You can then click and hold on either the Size or Opacity values to reveal a scrubby slider and drag right or left to increase or decrease these values. (Note that the Grid Size and Opacity options will not be available if a Develop tool is currently selected.)

Enabling Guides overlays the image with movable crosshair guides (Figure 3.49). By default, these appear centered on the image view. If you hold down the key (Mac) or key (PC), you can click where the guides intersect and drag to reposition them and double-click the crosshair intersection to reset to the center again. This feature might be useful for still-life photographers, as you can check if something is correctly positioned or aligned in an image. It might also be useful when preparing images to go in a slideshow presentation. For example, if you were preparing a slideshow of landscape images, you could use the guides to ensure that the horizon level was aligned identically in a photo sequence. Or, you could use it to help align image elements so they appeared to fade smoothly from one image to another.
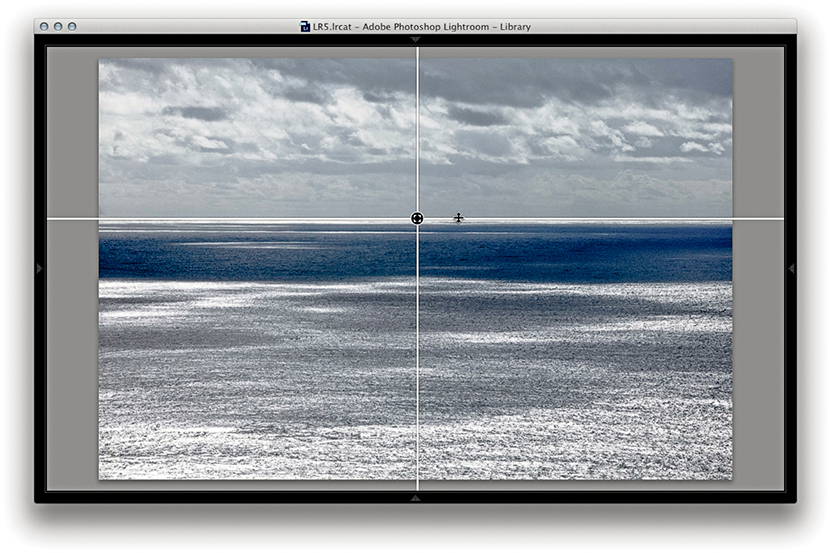
Layout Image
To load an image as an overlay, go to the Library module and choose View ![]() Loupe Overlay
Loupe Overlay ![]() Choose Layout Image (or use the
Choose Layout Image (or use the  [Mac] or
  [PC] keyboard shortcut). You will then need to select a PNG file and click Choose. To enable the Layout Overlay view, choose View
 ![]() Layout Overlay
Layout Overlay ![]() Show Layout Overlay (or use the [Mac] or [PC] keyboard shortcut).
Show Layout Overlay (or use the [Mac] or [PC] keyboard shortcut).
This feature is useful if you wish to overlay images with a layout so you can see which images work well within a particular layout design and is particularly useful when shooting tethered in the studio. It can also be helpful if you need to use an art director’s layout as a guide to how things should be arranged in a shot. And finally, it might be a good way to compare and align a reference photograph with what you are about to shoot. For example, if shooting tethered, you could use an existing photo as a reference and use a Layout Image Loupe Overlay view to help align what you are shooting to get it to match the overlay photo. It is all too easy to delete an overlay layout image by accident, or lose track of a previously used overlay layout image when you switch to use a different image. With this in mind, I suggest you create a dedicated subfolder within the Lightroom presets folder in which to store overlay layout images.
The main thing to note here is that the overlay image must be saved as a PNG file. The PNG file format supports transparency. So, if you were editing a scanned layout in Photoshop, you would want to create a semitransparent layer and then save it as a PNG, ready to load as a layout overlay in Lightroom.
If you hold down the key (Mac) or key (PC), this reveals the Opacity and Matte opacity options at the bottom of the content area view. You can then click and hold on either the Opacity or Matte values to reveal a scrubby slider and drag right or left to increase or decrease the values. With the key (Mac)/ key (PC) still held down, you can adjust the size of the overlay image relative to the image view and double-click inside the overlay to reset the bounds of the image. You can see an example of the layout overlay being resized in Figure 3.50.
The Layout Overlay Feature in Use
To create the layout overlay shown in use in Figure 3.50, I opened a cover page layout design in InDesign. This included the page-layout lettering and graphics and semitransparent overlay areas, top and bottom. I saved the layout page as a PDF. I then opened the PDF via Photoshop and saved it using the PNG file format. I then chose View ![]() Layout Overlay
Layout Overlay ![]() Choose Image to load this as a layout overlay and chose View
Choose Image to load this as a layout overlay and chose View ![]() Layout Overlay
Layout Overlay ![]() Show Layout Overlay so that this overlapped the images displayed in the Fit/Fill Loupe views. With this overlay active, I could navigate through some of the images I was considering using as a cover image for this book.
Show Layout Overlay so that this overlapped the images displayed in the Fit/Fill Loupe views. With this overlay active, I could navigate through some of the images I was considering using as a cover image for this book.
Previews and Preview Appearance
There are various preview options available in Lightroom. Which you should choose depends on what you wish to prioritize: speed or accuracy.
Initial Import Photos Dialog Preview-Building Options
The File Handling panel in the Import Photos dialog offers a choice of options for building the initial previews (Figure 3.51). The Minimal option is quickest as it makes use of the thumbnail previews present in the incoming files. Lightroom assumes everything to be in the sRGB space, and the previews are updated only once all the images have been imported. Such previews are usually fine as a rough visual of how the image looks, but they will not offer much in the way of detail, because these are just the thumbnail JPEG previews that were embedded in the file at the time of capture.
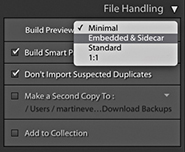
If Embedded & Sidecar is selected, Lightroom uses whatever larger previews are available as it imports the images, utilizing either the embedded JPEG previews or sidecar file previews to quickly build the thumbnails. Depending on the camera default settings you are using, these will most likely look different once Lightroom has had a chance to build proper previews from the image data. As explained in the previous chapter, this now only happens after photos are selected (or you can configure the preferences to build previews when idle). In Figure 3.52, you can see a typical example of the change in appearance from a low-res, camera-embedded JPEG thumbnail to a Lightroom-generated preview using the Adobe Standard profile (see: “Camera-embedded previews vs. Lightroom previews” on page 112). If you are importing photographs that have already been edited in Lightroom (or some other program), this option makes full use of the larger previews that are already present. This is a particularly useful choice when importing DNG files, as there is a good chance that the previews will already be based on previously applied Camera Raw/Lightroom Develop settings. In such circumstances, the previews will most likely not appear to change after being imported. Also, when the Embedded & Sidecar option is selected, Lightroom will make use of the best preview available. Therefore, if you shoot using the raw + JPEG mode and the JPEGs are full size, Lightroom will take advantage of these to use as an embedded preview.
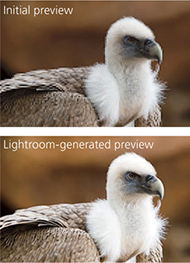
When Standard is selected, Lightroom avoids using the embedded previews altogether and renders the standard previews directly. It reads the full image data and builds the thumbnails and initial previews to a standard size only, based on the default Lightroom Develop settings. The standard-sized previews will let you see a greater level of detail when displaying large grid cell thumbnails in the content area or when viewing at a standard-sized Loupe view.
If the 1:1 option is selected, Lightroom reads the full image data, builds thumbnails, and creates standard and full-sized 1:1 previews. The advantage of the Standard or 1:1 option is that you won’t always get confused by seeing low-resolution previews that show one color interpretation (the embedded preview version), only for them to be replaced shortly by a new color interpretation (the Lightroom-processed standard-sized preview version). When you render standard-sized or 1:1 previews, the Camera Raw cache also gets updated. Lightroom Classic CC generates standard and 1:1 previews fast enough that you should notice better walk-through performance, especially at 1:1.
Smart Previews play a role, too, in allowing access to proxy versions of your image assets when these are offline and speeding up the standard view Develop module editing, but this does not affect the previews, as viewed in the Library module.
How Lightroom Previews are Generated
Whenever you launch Lightroom, it initially loads all the low-resolution thumbnails and, within 30 seconds or so, starts running checks on the current catalog contents, checking the thumbnails in order of quality. Lightroom looks to see if any of the standard-resolution thumbnails need to be rebuilt first before going on to build new previews for the images (Figure 3.53). At the same time, it checks existing thumbnail previews against their modification dates. If any file has been modified since the last time a preview was built, Lightroom rebuilds a new set of previews, starting with a standard preview, followed by high-quality previews (on demand). Lightroom does this in the background as and when it can. Once again, with Embedded previews, an embedded preview is displayed unless you choose to select a photo, or the preference option to rebuild previews when idle is enabled. The normal preview rebuilding process usually takes a while to complete, so not every image will have a preview that is available for use right away—it really depends on the size of your files and how many are waiting to be processed. Lightroom tries to let you start working on an image as soon as you select it, but doing so will divert Lightroom to process this image first, before it resumes processing the remaining files in the background.
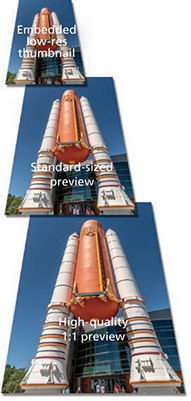
Having said all the above, you also need to check the Lightroom General preferences. If the “Replace embedded previews with standard previews during idle time” option is unselected, then the Loupe view may retain the embedded previews and not update to display larger, Standard, or 1:1 previews until you have explicitly instructed Lightroom to generate such previews, or you have viewed the photos via the Develop module (which will always generate an updated Standard preview). If this option is enabled, then Lightroom will gradually generate Standard previews during idle time to replace the embedded previews.
The 1:1 previews are generated only whenever you choose to zoom in on an image and inspect it close up. But you can force Lightroom to build 1:1 previews in advance. You can do this via the Import Photos dialog File Handling panel, or you can do it after everything has been imported by going to the Library module Library ![]() Previews menu and choosing Render 1:1 Previews. This forces Lightroom to generate 1:1 previews for all the selected photos. These will, at the same time, regenerate the standard-sized previews. 1:1 previews are useful because they can speed up the time it takes to review images at a 1:1 zoom view or higher. There is also an option in the Catalog Settings File Handling section (see page 113) that lets you automatically discard 1:1 previews after a designated period of time. If you are unconcerned about the Previews.lrdata file getting too big, you can choose to never discard the 1:1 previews. After all, unless you are using a solid-state drive, hard-disk space is quite cheap these days. If you go to the Library
Previews menu and choosing Render 1:1 Previews. This forces Lightroom to generate 1:1 previews for all the selected photos. These will, at the same time, regenerate the standard-sized previews. 1:1 previews are useful because they can speed up the time it takes to review images at a 1:1 zoom view or higher. There is also an option in the Catalog Settings File Handling section (see page 113) that lets you automatically discard 1:1 previews after a designated period of time. If you are unconcerned about the Previews.lrdata file getting too big, you can choose to never discard the 1:1 previews. After all, unless you are using a solid-state drive, hard-disk space is quite cheap these days. If you go to the Library ![]() Previews submenu, you can also choose the Discard 1:1 Previews option. This opens the warning dialog shown in Figure 3.54.
Previews submenu, you can also choose the Discard 1:1 Previews option. This opens the warning dialog shown in Figure 3.54.
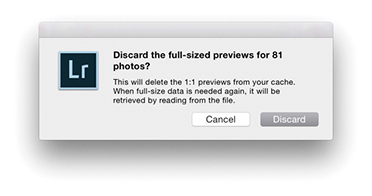
Tip
If you choose to render standard or 1:1 previews and only one image is selected, Lightroom will ask if you wish to build previews for that one photo only or build all (the same applies when choosing to discard previews).
Camera-Embedded Previews vs. Lightroom Previews
Many people say they prefer the look of the camera-generated previews, and in some cases the camera-embedded preview may indeed look better than the default Lightroom-rendered version. But it can be argued that this, like the original embedded preview, is just another initial interpretation of the image and simply a starting point before making further Develop adjustments. Or, you could say it is because users have yet to establish appropriate camera default settings to apply on import (see page 370). For example, the camera default settings could include a suitable camera profile as a starting point for the preview generation. If you go to the Basic panel Profile Browser in the Develop module and select the Camera Standard profile, you can get the Lightroom preview to more closely match the look of a camera JPEG (Figure 3.55), providing, that is, all the other settings are applied using the default Develop settings.
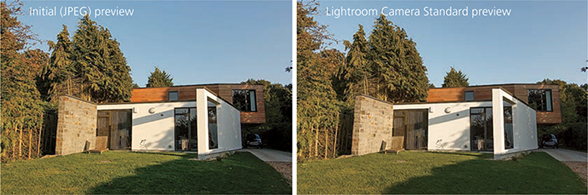
Missing Previews
You may come across grid cells that have missing previews, like the example shown in Figure 3.56. This could be for a number of reasons. It might be that the preview cache has become corrupted or the file itself is corrupt. If you see an exclamation point icon in the top-right corner, it could also mean that the image is currently offline, or the link has become broken (see page 84).
Preview Size and Quality
The size of the individual preview cache files is dependent on how you set the Preview Cache settings in the Catalog Settings (Figure 3.57). Here you can select the pixel size for the standard previews. My advice is to select a pixel size that’s suited to your display size. If you are working with Lightroom on a small laptop computer, you probably will not need the standard-sized previews to be any bigger than 1024 pixels in either dimension. There is no point in making the standard previews unnecessarily large, as this will simply consume more hard-drive space than is needed. The Auto option works out the optimum size for you based on the screen resolution. For example, with a HiDPI display the native resolution will typically be twice the screen resolution, which can be very large on a 5K display. The preview quality also determines how much compression is applied to the preview files. If the Low Preview Quality option is selected, the preview cache files will be more compact (at the expense of image quality). The High setting applies the least amount of compression and the best image preview quality (but the preview file sizes will be almost double). The Medium setting is probably the most suitable setting to choose for optimum preview image quality, but without consuming too much disk space. Whichever you choose, all previews are rendered using the Adobe RGB space.
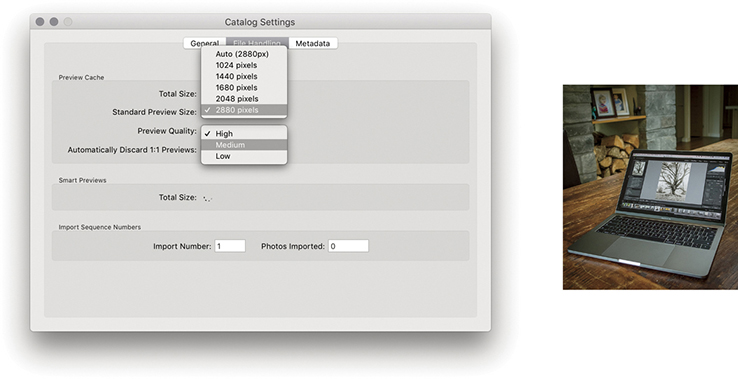
Note
If Standard Preview Size is set to Auto, the maximum image dimension in the Camera Raw cache now adapts to the resolution of the display (instead of being capped at 2880 pixels). As a result, Library display performance is improved for high-resolution images working with Quick Develop and improves the speed of Grid thumbnail updates when copying and pasting or syncing settings.
Working in Survey View
If you have multiple image selections active, you can view all the selected photos at once by clicking the Survey view button in the Library module Toolbar, or switch views by pressing the  key (this keyboard shortcut works from any of the Lightroom modules). Whenever you are in Survey view, the content area is used to display the selected images as big as possible. The relationship between the Survey and Loupe views is the same as that between the Grid and Loupe views. So, if you double-click an image in the Survey view, you are taken to the standard Loupe view, and double-clicking the photo takes you back to the Survey view again.
Note
Although it is possible to drag photos in a Survey view to change the order in which they appear, you may sometimes find this is easier said than done. You may often find yourself fighting with the Survey view mechanism, which is designed to optimize the size and placement of photos on the screen.
Figure 3.58 shows a Survey view of the photos currently selected in the Filmstrip. (I will discuss the Filmstrip a little later in this chapter.) The arrangement and size of the individual Survey view previews adjust dynamically according to the number of photos you have selected and the amount of screen real estate that is available in the content area. So, depending on the number of photos you have selected, the orientation of those photos, and the physical size of the content area, Lightroom adjusts the Survey view to display all the selected photos as big as possible. However, if you make a really large selection of photos and choose to view them in the Survey view, there is a cut-off point. Lightroom may show only the first 100 or so photos and will display the number of remaining photos in the bottom-right corner to tell you how many photos in the current selection are not included in the visible Survey view.
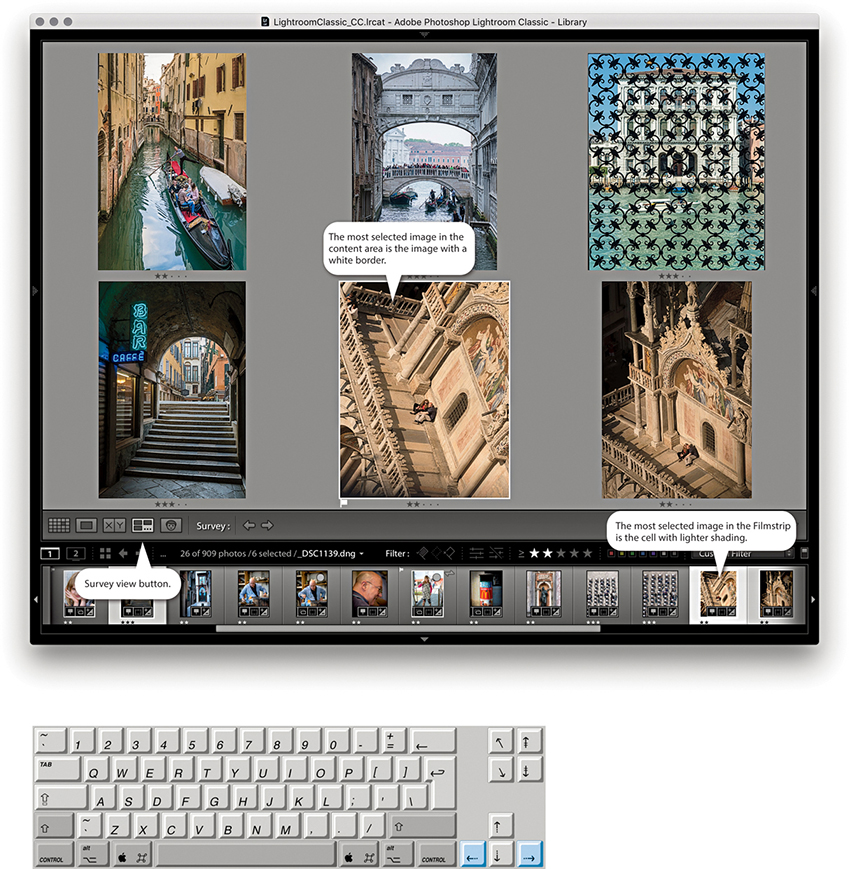
The primary, or most selected, image is displayed with a white border, and you can navigate the photos displayed in a Survey view by click-selecting individual images or using the Left and Right Arrow keys to navigate between them. You can remove photos from a Survey view selection by clicking the X icon in the bottom-right corner, or by -clicking (Mac) or -clicking (PC) the photos you wish to deselect (clicking either in the Survey view content area or in the Filmstrip). The Survey view images will then automatically resize to make full use of the screen space now available in the content area. Note that removing a photo from a Survey view simply removes it from the selection and does not remove it from the catalog.
Personally, I find the Survey view mode to be a useful tool for editing selections of photos, more so, in fact, than the Compare view that is described on page 116. I find it particularly helpful when I am working with clients and have arrived at a shortlist of favorite shots. By using the Survey view mode, the client can see all the final candidate images on the screen at once, much in the same way you would sort through a final selection of photographs on a light box. When editing personal work, I love the simplicity of the Survey view and how it provides you with a quick overview of a final selection of pictures and helps you gauge how well they work alongside each other.
Working in Compare View
If you make an image selection and click the Compare view button in the Toolbar (or use the  key shortcut), Lightroom displays the current, “most selected” image as a select image and the one immediately to the right in the Filmstrip selection as a candidate image. In this setup, the select image stays locked and you can use the keyboard Arrow keys to navigate through the remaining photos in the selection to change the candidate image view and thereby compare different candidate photos with the current select image (Figure 3.59). When you find a candidate image that you would like to make the new select, you can click the “Make current candidate image the new select” button to promote this as the new select image (or use the Up Arrow on the keyboard). A white border in the Compare view indicates which image is active, and you can use the Zoom view slider to adjust the zoom setting. When the zoom lock is switched on, you can lock the level of magnification and synchronize the zoom and scrolling across both image views.
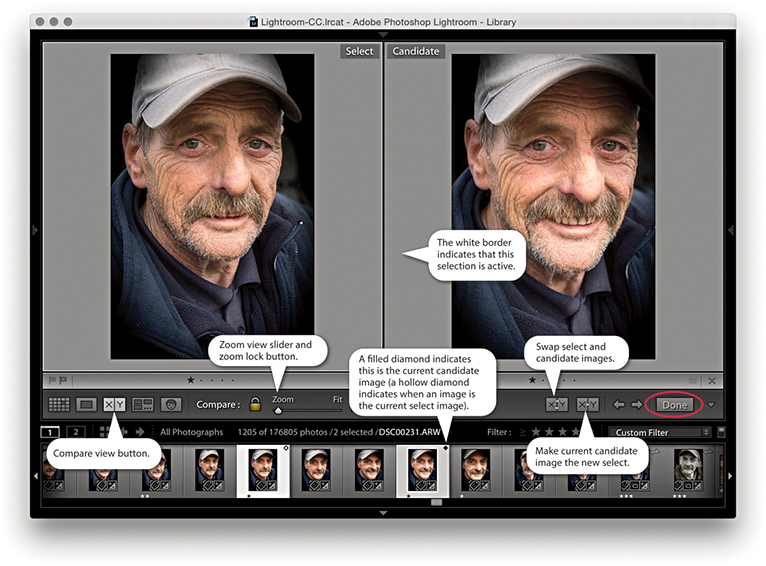
Note
If only one image is selected in the grid when you switch to the Compare view, whichever photo you had selected immediately prior to this becomes the initial candidate image. If you then highlight the candidate image, Lightroom lets you cycle through all the images in the current folder/collection as you navigate using the Arrow keys.
If the Navigator panel is open, you can use it to navigate the Compare view display (Figure 3.60). Use a single click in the Navigator preview to zoom in to whatever the close-up view zoom level is, and then click and drag the zoomed-in rectangle to analyze different areas of the two images as they are viewed side by side. Of course, you still have the zoom lock button in the Toolbar to unlock the zoom and scrolling for the two images in order to navigate each separately. To return to the normal zoomed-out view, just double-click anywhere inside the Navigator preview. When you have decided which image is the favorite select, click the Done button (circled in Figure 3.59) to display the current select image in a standard Loupe view.
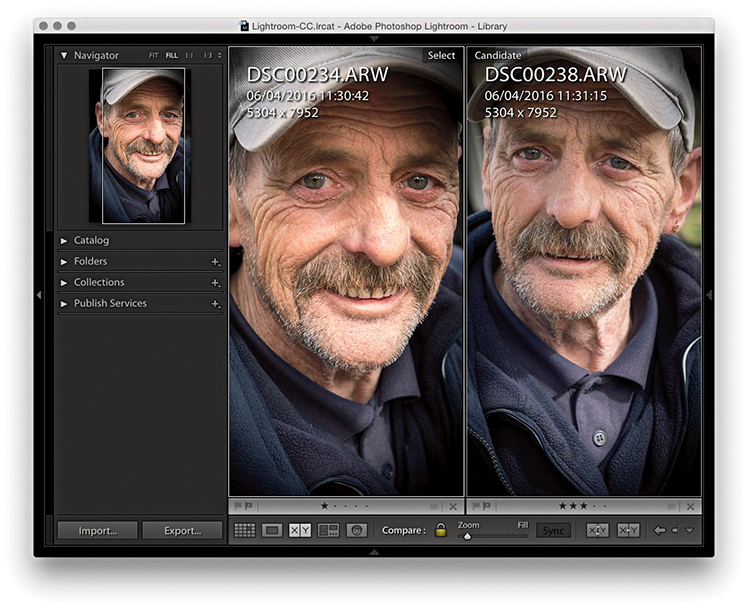
Compare View Mode in Action
The following steps show an example of the Compare view being used to edit a selection of photos made via the Filmstrip.
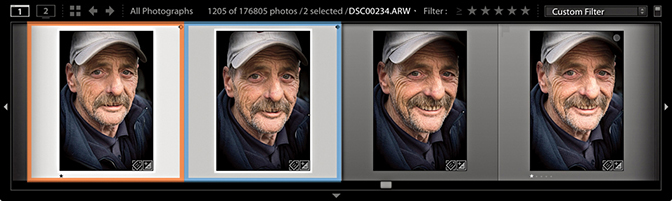
1. In the Filmstrip, you can tell which photo is the select and which is the candidate by the icon in the top-right corner. The select photo (orange border) is indicated with a hollow diamond, and the current candidate photo (blue border) is indicated by a filled diamond.
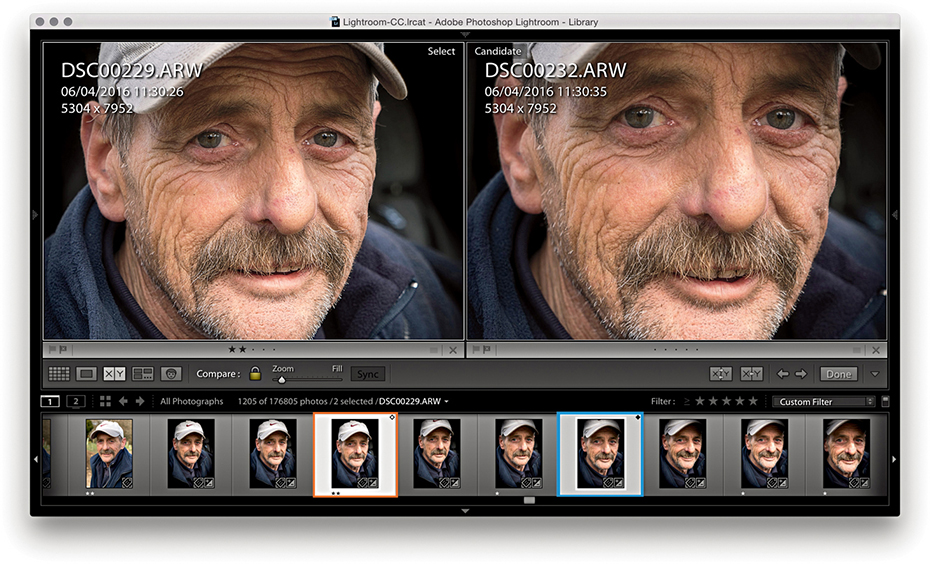
2. In this step, I had the photo highlighted with the orange border as the current select and the photo highlighted with the blue border as the current candidate.
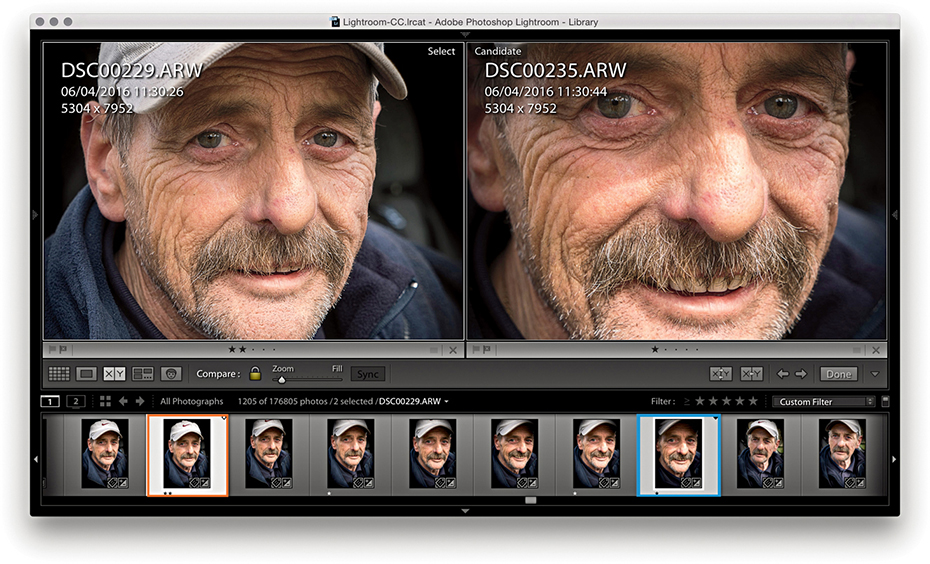
3. I proceeded to use the Right Arrow key to move forward through the Filmstrip selection and compared other photos with the original select.
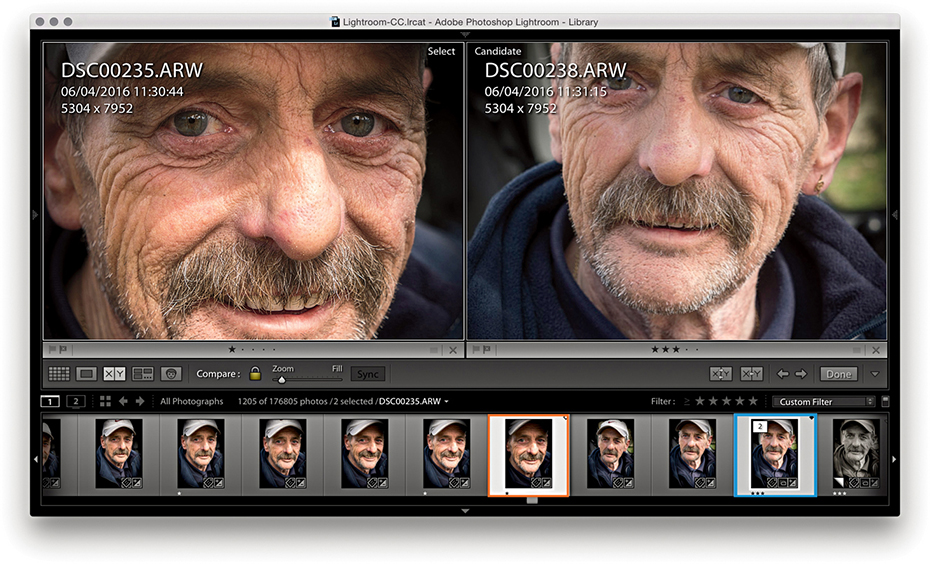
4. When I had found a new photo that I liked more, I used the Up Arrow key to promote this candidate photo to become the new select and continued searching for alternative candidates.
Navigating Photos Via the Filmstrip
The Filmstrip is located at the bottom of the Lightroom window. You don’t get to see the same amount of information in the Filmstrip as you can see in the Library grid cells, although the Lightroom Interface preferences does have an option to “Show ratings and picks” in the Filmstrip, which allows these two additional items to appear at the bottom of the thumbnail cells in the Filmstrip (Figure 3.61). Plus, you can choose to show badges as well as stack counts for any stacked photos (see page 132).
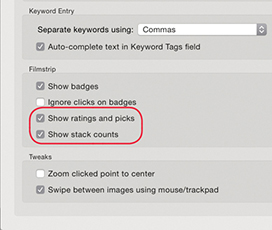
The Filmstrip is always accessible as you move between modules in Lightroom and provides a secondary, Library view of the catalog contents (Figure 3.63). Therefore, when working in the other Lightroom modules, the Filmstrip provides an overview of the currently filtered photos in the catalog (Figure 3.62). As with the Library module Grid view, the Filmstrip lets you make selections of photos. Editing by dragging is possible via the Filmstrip, and any sort order changes you make will be reflected in the Library module Grid view (although dragging won’t always be possible; see page 98 for the reasons why). Where custom sort order edits are possible, these are remembered when you save a selection of photos as a collection.
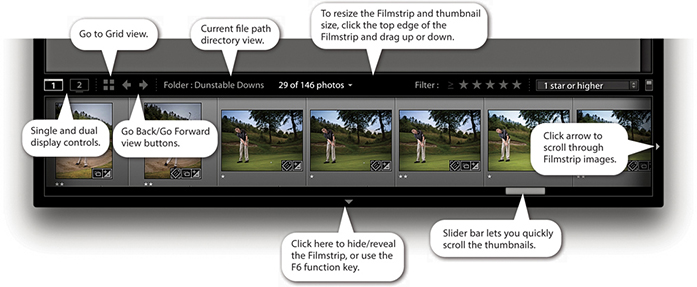
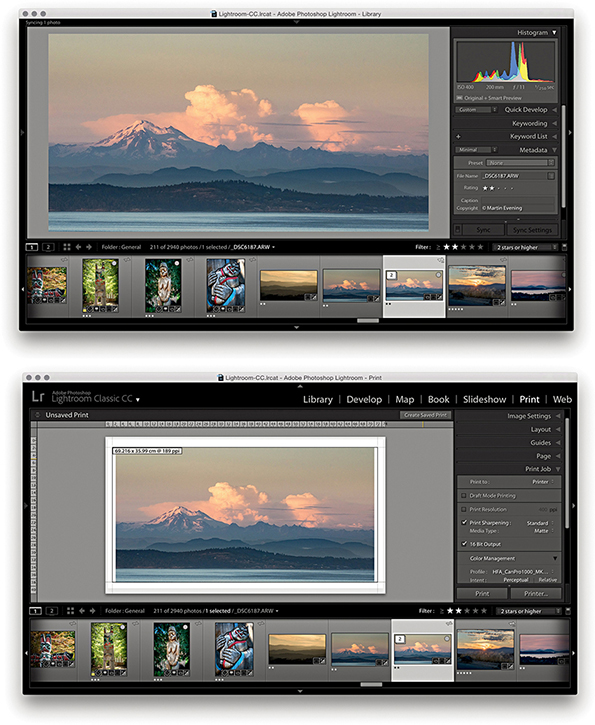
The Filmstrip allows you to navigate through your photos just as you can in the Library Grid view. For example, you can press the Left or Right Arrow key to progress through the folder thumbnails one at a time, or hold down an Arrow key to quickly navigate through the thumbnails and see the Loupe preview update as you do so. Or, you can drag the Filmstrip’s slider bar, or click and hold down the side arrows to scroll even more quickly through the Filmstrip view.
Working with a Dual-Display Setup
Lightroom can take advantage of a dual-display setup by opening a second Lightroom window on the other display. Assuming you have two displays, there are several ways you can do this. You can go to the Window ![]() Secondary Display submenu shown in Figure 3.64 and select Show, or access this menu by right-clicking the second display button (circled in Figure 3.65). You can also use the F11 (Mac) or F11 (PC) keyboard shortcut to toggle the second display on or off, or to open a secondary display window, while the
Secondary Display submenu shown in Figure 3.64 and select Show, or access this menu by right-clicking the second display button (circled in Figure 3.65). You can also use the F11 (Mac) or F11 (PC) keyboard shortcut to toggle the second display on or off, or to open a secondary display window, while the  F11 (Mac) or
  F11 (PC) shortcut can be used to toggle the second display to appear in full-screen or window mode. However, if you are using a single-display setup, the second display can only as a new window open.
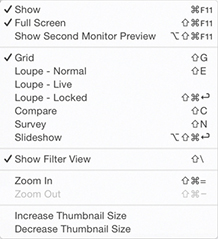

Let’s now look at how you might use a dual-display setup. Figure 3.65 shows a secondary display Loupe view ( toggles showing/hiding a secondary Loupe view window), where there are three options in the top-right corner. The Normal mode displays the current image and updates it whenever you make a new image active. The Live view updates as you hover over the photos in the main Grid view or the Filmstrip, which is handy if you want to inspect other photos in close-up without losing the current image selection. It also means that if you have the second display set to a 1:1 view, you can run the pointer over the photos in a Grid view and use the 1:1 Loupe view as a quick focus checker. You should try this out—it’s like running a large magnifying glass over a set of contact sheets. The Locked view option locks the Loupe view in place and does not update until you unlock from this view mode. This offers an alternative way for you to compare photos side by side, which leads me to the secondary Compare view mode shown in Figure 3.66 (
 toggles showing/hiding the secondary Compare window). The secondary Compare view shown here works just like the main Compare view. Figure 3.67 shows the secondary display Grid view (
 toggles showing/hiding the secondary Loupe window). You have here the same controls as are found in the normal Grid view, including a menu list of recently visited folders/collections, a thumbnails slider to adjust the size of the Grid display, and a
  keyboard shortcut to show/hide the Filter bar. Basically, the keyboard shortcuts for the secondary display are just the same as those used for the normal display, except you add a
  key to the shortcut.
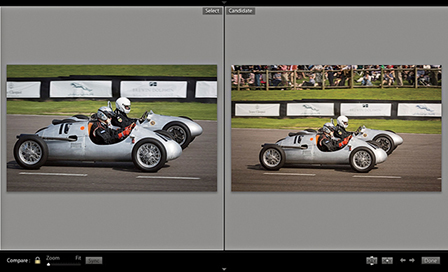
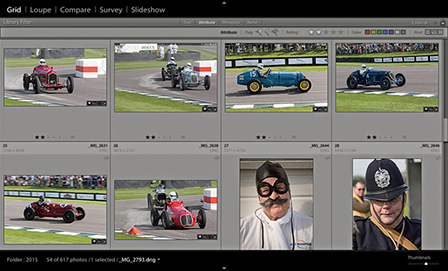
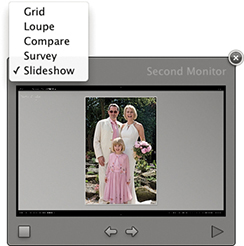
Tip
If the F11 shortcut isn’t working on a Mac, go to System Preferences ![]() Keyboard. Click the Keyboard tab and check the “Use all F1, F2, etc. as standard function keys” button.
Keyboard. Click the Keyboard tab and check the “Use all F1, F2, etc. as standard function keys” button.
Tip
You have the same zoom controls in the secondary Loupe view window as you do in the Navigator panel, but you can set the Loupe zoom to different magnification settings. This means you can preview a photo in a “Fit to screen” Loupe view on one screen while using, say, a 1:1 view on the other.
Working with Two Displays
Now let’s look at a few examples of how a second display view can be useful when working in Lightroom. The figures on the facing page suggest three ways that a second display view can ease your workflow. Figure 3.69 shows how you can have a selection of photos in Survey view mode on the main display and use a Compare view on the second display. In the Figure 3.70 example, the Loupe view is used on the main display with a Grid view on the second display. With this kind of setup, you can have full access to the Grid and Loupe views at once, instead of having to rely on the Filmstrip. The one thing you cannot have is two Grid views active at the same time. If you are in Grid view mode in the main window and select the Grid view for the secondary display, the main window automatically switches to a Loupe view mode. And lastly, you can combine any module view on the main screen with a Grid, Loupe, Compare, Survey, or Slideshow view on the second display. In the Figure 3.71 example, I used the main display to work on a photo in the Develop module, where I was able to use the Develop tools to edit the image. Meanwhile, I had the current selection of photos displayed in the Survey view mode on the secondary display. With this kind of setup, you can use the second display to select photos from the Survey view and edit them directly in Develop, thereby bridging the gap when working in these two separate modules. However, the second display must be in full-screen mode for you to access the Slideshow option; otherwise, it will be hidden.
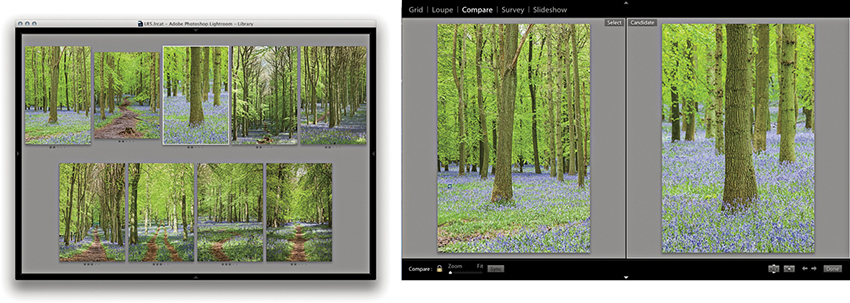
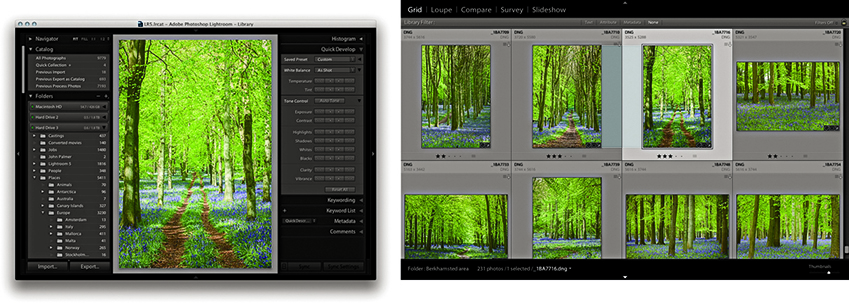

It is possible that you may want to use this feature to control a separate display that is set up for clients to view picture selections. If the secondary window is active and in full-screen mode, you can go to the Window ![]() Second Display menu and choose Show Second Monitor Preview (
Second Display menu and choose Show Second Monitor Preview ( F11 [Mac] or
  F11 [PC]). This opens the control preview shown in Figure 3.68. This might be useful where you want to control a display that was set up in a different location and you were using it to preview photos to clients. This kind of setup could be useful for wedding and portrait photographers when presenting photographs on a separate display.
Rating Images Using Flags
The next step in managing your images is to determine which photos you like best by assigning ratings to them. In the days of film, you would use a pen or pencil to mark the shots worth keeping with a cross and the ones you liked best with two crosses. These same editing principles can be applied when using the numbered rating system to edit photos from a shoot, where you can progressively mark the pictures you like best. The flag controls in the Toolbar provide an even simpler method for marking favorite and rejected photographs (Figure 3.72). This simple approach lets you mark the pictures you like with a flag by clicking the Pick Flag button in the Toolbar ( ) (or use the
  keyboard shortcut). Click the Reject Flag button in the Toolbar to mark an image as a reject (
 ) (or use the
  keyboard shortcut). And, you can use the
  keyboard shortcut as a kind of undo command to mark a photo as being unflagged. You can therefore use the key to remove a pick or reject flag status from any image. Meanwhile, the
  key can be used to toggle between a pick and unflagged status. Another approach to working with flags is to use
  (Mac) or
  (PC) to increase the flag status and use
  (Mac) or
  (PC) to decrease flag status. Lastly, you can use
  (Mac) or
  (PC) to select the flagged photos only.

Having marked photos with flag ratings, you can then use the filter controls in the Filmstrip to display your flagged selections. These flag filter buttons are cumulative, which means you can click each to show or hide the flagged, unflagged, or rejected photos. In Figure 3.73, you can see the flag filter buttons in the Filmstrip, which can be used to filter photos according to their flag status. In the content area above, you can see the flag status as applied to the grid view cells. Notice how a reject flag status also dims a rejected cell in the Grid view and Filmstrip.
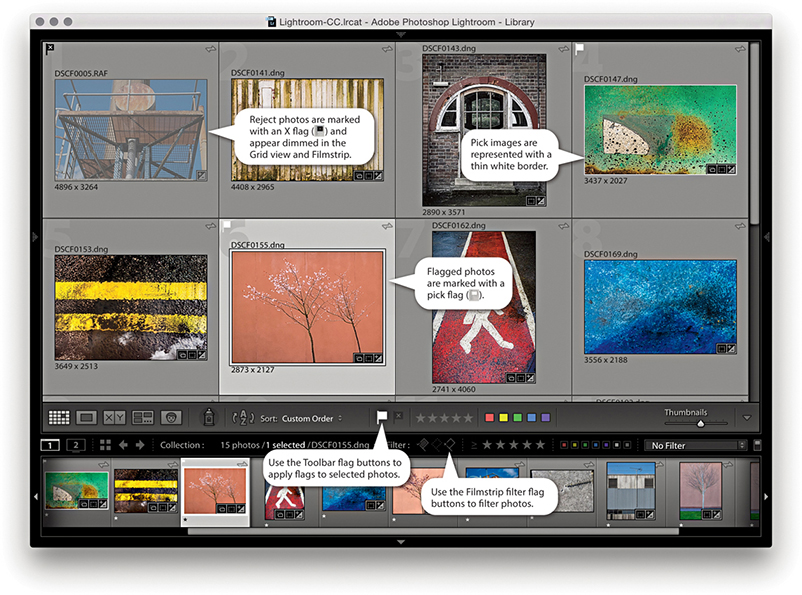 or ) to mark your favorite images and use the Reject Flag button (or press ) to mark photos as rejects.
One more important thing to point out here is that flag ratings cannot be saved to the XMP space. Therefore, flag ratings can’t be viewed in other programs. Star ratings, on the other hand, are universal and can be written to XMP data.
Refine Photos Command
From the Library menu, you can choose the Refine Photos command. This opens the dialog shown in Figure 3.74. This informs you that if you proceed with this command, Lightroom will automatically mark the unflagged photos as rejects and mark the previously picked photos as being unflagged. The intention here is to let you make successive passes at the image-selection editing stage and use flagging (in a rather brutal way) to narrow down your final picture choices. This is not an approach I would personally recommend.
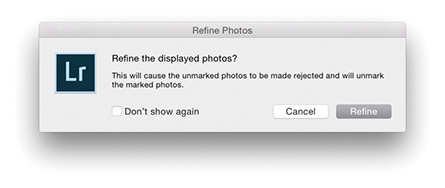
Rating Images Using Numbered Star Ratings
The most effective way to rate your images is to use the keyboard numbers  through
  to assign a specific-numbered star rating. Or, you can use the Right Bracket key to increase the rating and the Left Bracket key to decrease the rating for a file (Figure 3.75). You can use the key plus a number to apply a rating and move to the next photo. Or, do so with the
  key enabled.
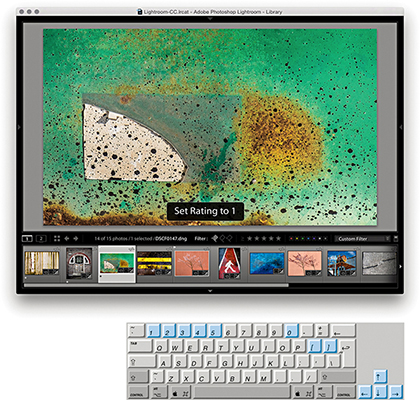
You can assign star ratings to reflect a photo’s importance. For example, you can use a one-star rating to make a first pass selection of your favorite images and afterwards use a one star or higher filter to view the one-star photos only. In Figure 3.76, you can see how I used the filter controls in the Filmstrip to display only those images that had a one-star rating or higher. Then, you can make a further ratings edit in which you assign higher star ratings to those you consider to be the very best photos. If you have second thoughts about the photos you previously rated as one star, you can give these a zero rating to remove them from the filtered view. You can save a ratings filter as a filter preset. In Figure 3.77, a filter for three stars or higher was active. I went to the Custom Filter menu and chose Save Current Settings as New Preset and saved this as a 3 stars or higher filter.
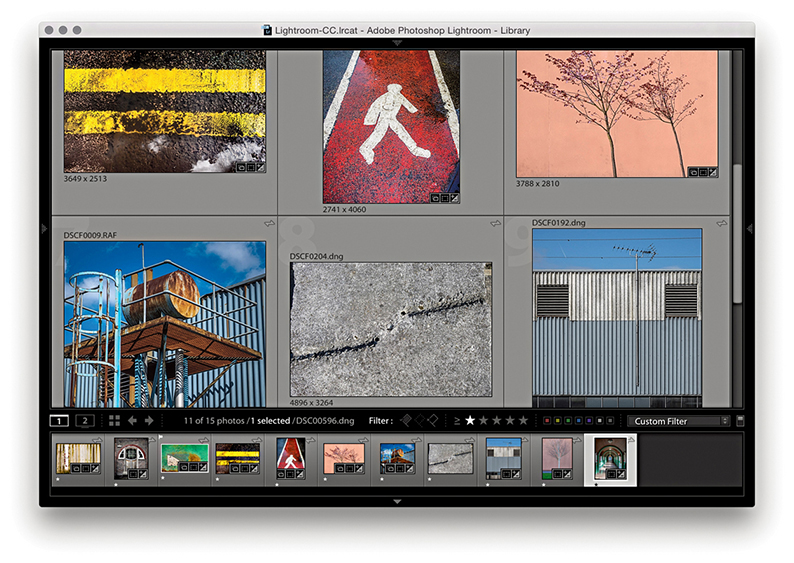
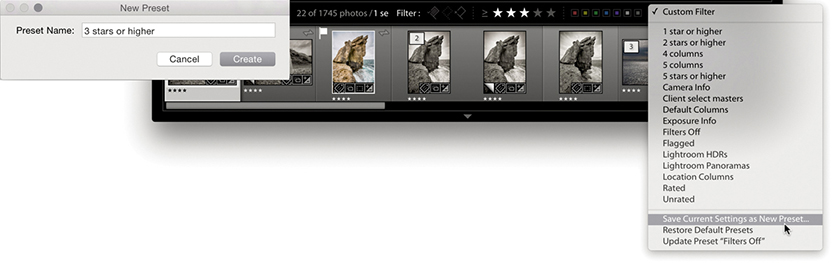
Note
When you are in Grid view, you can click the empty dots just below the thumbnail to apply a star rating. You can also adjust the star rating by clicking one of these stars and dragging. Also, clicking a star resets the photo’s rating to zero. However, these methods are quite fiddly, especially when using a large computer display with a fine screen resolution. All in all, the keyboard shortcuts provide the quickest solution for rating photos.
I suggest you use the higher ratings sparingly. I use a zero rating for images that have yet to be rated or are unsuitable for further consideration and a one-star rating for pictures that are possible contenders. During a second-pass picture edit, I use a two-star rating to mark my favorite images, and later I may use three stars to mark the final-choice images. I prefer not to assign the higher star ratings too freely. This leaves me some headroom to assign higher ratings later. I want to be careful as to how I allocate my four- or five-star ratings. These should be reserved for the very best shots only.
Rating Images Using Color Labels
Flags can be used as a simple way to mark photos as rejects or keepers and star ratings can be used to assign levels of importance. Color labels, on the other hand, can be used in conjunction with the above rating systems to segregate catalog photos into different groupings.
You can assign color labels via the Photo ![]() Set Color Label menu and choosing a label color. Color labels can also be assigned by clicking a color label button on the Toolbar (Figure 3.78), or you can use keyboard numbers to assign labels as follows: red (
Set Color Label menu and choosing a label color. Color labels can also be assigned by clicking a color label button on the Toolbar (Figure 3.78), or you can use keyboard numbers to assign labels as follows: red ( ), yellow (
 ), green (
 ), blue (
 ) (there is no keyboard shortcut available for purple). These number shortcuts have a toggle action, so you can press to apply a red label and press again to remove it. You can use the key plus a number to apply a color label and move to the next photo. Or, do so with the key enabled. Lastly, you can add a color label by typing in the name in the Color Label field of the Metadata panel. The Library grid and Filmstrip cells normally appear tinted when you apply a color label. You can customize the Library View Options (Figure 3.79) by adjusting the intensity of the tint color from the default 20% setting. Or, you can deselect the “Tint cells with label colors” option and, instead, check the Include Color Label item in the Show Rating Footer section.

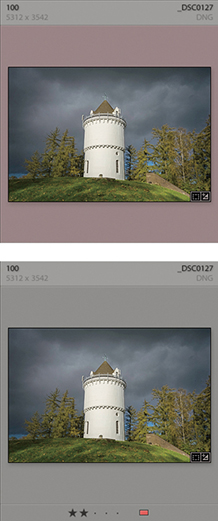
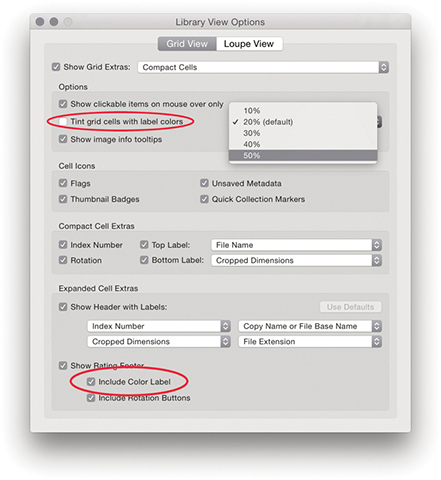
Color Label Sets
If you go to the Metadata ![]() Color Label Set menu, you can replace the default color set (which uses color names to describe the color labels) with something different. The options available here include: Bridge Default, Lightroom Default, and Review Status. Choose Edit to open the Edit Color Label Set dialog, shown in Figure 3.80, where you can apply custom descriptions to the color labels. It is important to note that color labels are specific to the color label set that is currently in use. Whenever you apply a color label filter, it filters only those files that were labeled using the current color label set. So, here is the problem: If you select a new color label set, label your photos using this new set, and apply, say, a purple color label filter, you will only be able to filter the purple-labeled photos that were edited using that specific color label set only. You will not be able to filter any of the purple-labeled photos that were labeled using another color label set. Furthermore, those photos labeled using a different color label set will be displayed using a white label. The reason for this is because when you filter by color label, the label color and label text description must both match. So, if color label filters are not working as expected, you should check that you have the correct color label set active. Because color labeling can so easily fall apart when different color labels sets are used, I recommend you decide on one color label set to work with and stick with it.
Color Label Set menu, you can replace the default color set (which uses color names to describe the color labels) with something different. The options available here include: Bridge Default, Lightroom Default, and Review Status. Choose Edit to open the Edit Color Label Set dialog, shown in Figure 3.80, where you can apply custom descriptions to the color labels. It is important to note that color labels are specific to the color label set that is currently in use. Whenever you apply a color label filter, it filters only those files that were labeled using the current color label set. So, here is the problem: If you select a new color label set, label your photos using this new set, and apply, say, a purple color label filter, you will only be able to filter the purple-labeled photos that were edited using that specific color label set only. You will not be able to filter any of the purple-labeled photos that were labeled using another color label set. Furthermore, those photos labeled using a different color label set will be displayed using a white label. The reason for this is because when you filter by color label, the label color and label text description must both match. So, if color label filters are not working as expected, you should check that you have the correct color label set active. Because color labeling can so easily fall apart when different color labels sets are used, I recommend you decide on one color label set to work with and stick with it.
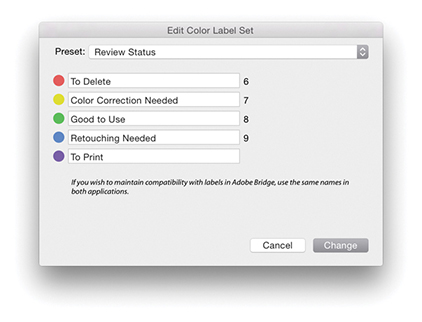
Note
If you use color labels in Bridge to classify your photos, the color label settings are preserved when you import them into Lightroom or you modify a Lightroom imported image via Bridge. However, this does assume that the Bridge color label set matches the one currently used in Lightroom. The problem here is that it is possible for Lightroom and Bridge to use entirely different text descriptions for their color labels. So although the color label colors may match, the text descriptions will not and this can lead to metadata confusion where neither program is able to read the other program’s files properly. For more about color label sorting and how to deal with white labels and color label metadata conflicts, see page 607 and page 637.
Other Ways you can use Color Labels
While ratings can be used to indicate how much you like an image, color labels provide an overlapping means for classifying images into categories that have nothing to do with how much you rate an individual photo. For example, on a wedding shoot, you could use red labels to classify photos of the preparations, yellow labels for all the ceremony group shots, and green labels for the reception. For what it’s worth, I mostly tend to use color labels in an arbitrary fashion that will change from job to job. On a model casting, I might use color labels to arrange prospective models into different groups.
Grouping Photos into Stacks
Just as photographers would group slides into piles on a light box, Lightroom lets you group photos into stacks. You can do this manually by selecting a group of images from the Grid or Filmstrip and choosing Photo ![]() Stacking
Stacking ![]() Group into Stack or by using the
Group into Stack or by using the  (Mac) or
  (PC) keyboard shortcut. From there, you can press
  to collapse the stack so all the stacked images are represented by a single thumbnail and press again to expand the stack. The number of images in a stack is indicated in the upper-left corner of the cell and also in the Filmstrip, providing you have this option turned on in the Interface preferences. If you need to unstack the stacked images, choose Photo
 ![]() Stacking
Stacking ![]() Unstack or press
Unstack or press  (Mac) or
  (PC). To remove files from a stack, select the individual image or images you wish to remove and choose Photo
 ![]() Stacking
Stacking ![]() Remove from Stack. This lets you remove files from a stack group while preserving the rest of the stack contents. If you single-click the stack badge in the Filmstrip or use the key to expand a stack, it does so with the first photo in the stack selected. If you double-click or -click the thumbnail stack button in the Grid view or Filmstrip, the stack expands with all the photos in the stack selected.
Remove from Stack. This lets you remove files from a stack group while preserving the rest of the stack contents. If you single-click the stack badge in the Filmstrip or use the key to expand a stack, it does so with the first photo in the stack selected. If you double-click or -click the thumbnail stack button in the Grid view or Filmstrip, the stack expands with all the photos in the stack selected.
The easiest way to access the Stacking submenu is to right-click in the Grid view or Filmstrip. This lets you quickly access the Stacking submenu options from the main context menu (Figure 3.81). If you want to remove an image or selection of images from a stack, select the image or images first, and then use the context menu to choose Remove from Stack. Similarly, you can use this same menu to choose Collapse All Stacks or Expand All Stacks.
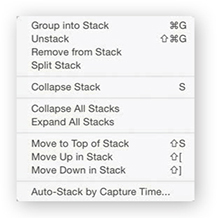
If you create a stack to group a series of related photos, it may be that the first image in the sequence does not best represent all the other photos in the stacked group. To switch photos, expand the stack, select the photograph you like most in the series, and use  to move that image up or use
  to move an image down the stacking order. Or, to make things simpler, just select the photo you want to have represent all the images in the stack and use the Move to Top of Stack command (
 ).
).
Whenever you choose Photo ![]() Create Virtual Copy, the virtual copy (proxy) image is automatically grouped in the stack along with the master image. Also, when you choose Photo
Create Virtual Copy, the virtual copy (proxy) image is automatically grouped in the stack along with the master image. Also, when you choose Photo ![]() Edit in Photoshop, there is also a preference for stacking the edited copy photos with the originals.
Edit in Photoshop, there is also a preference for stacking the edited copy photos with the originals.
Automatic Stacking
The Auto-Stack by Capture Time feature lets you automatically group a whole folder of images into stacks based on the embedded capture date and time metadata. The following steps demonstrate how to use the Auto-Stack feature to automatically group a series of image captures into stacks.
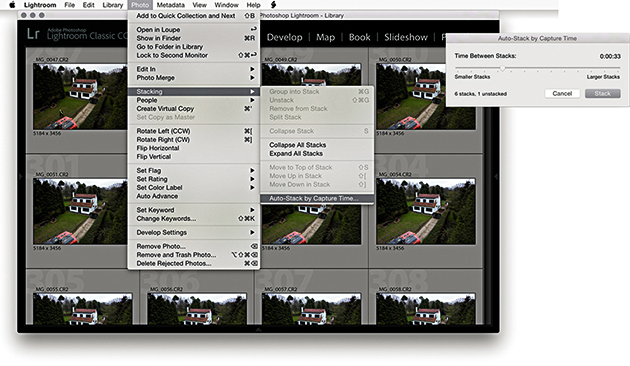
1. Here is a Library view of a folder containing over 900 photos from a time-lapse sequence. I wanted to automatically stack the folder contents, so I went to the Photo ![]() Stacking menu and chose Auto-Stack by Capture Time. I adjusted the Time Between Stacks slider to be between 33 seconds of each other.
Stacking menu and chose Auto-Stack by Capture Time. I adjusted the Time Between Stacks slider to be between 33 seconds of each other.
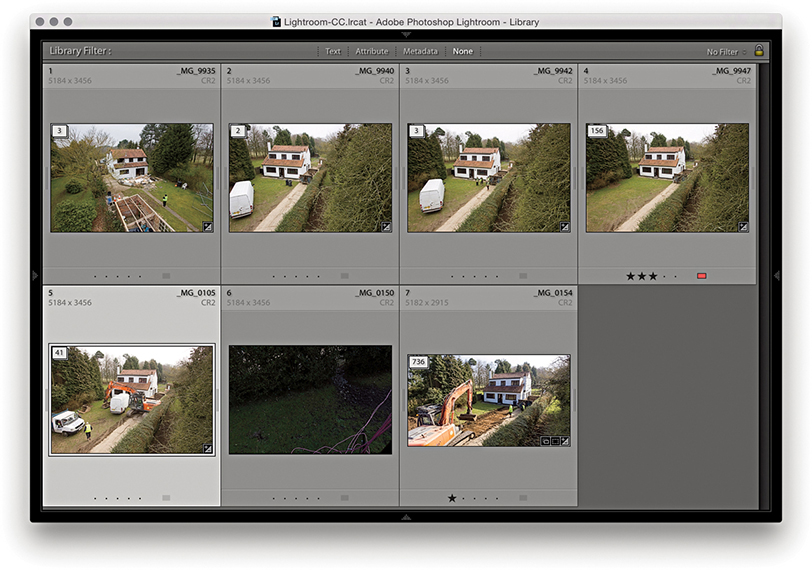
2. The photos in the content area were now stacked, but the stacks remained expanded. To collapse the stacks, I clicked the badge icon in the top-left corner. (Clicking again expands the stacks.) I could have also right-clicked to access the context menu and chosen Collapse All Stacks.
Making Image Selections
A photo selection is a temporary collection of images (Figure 3.82), and selections can be used in a number of different ways. For example, you might want to make a selection and apply the same rating to all the selected images. Or, you might want to select a group of images in order to synchronize the Develop settings with whichever is the most selected image in the Grid or Filmstrip. When making image selections via the Library Grid or Filmstrip, you can use the key to make a contiguous selection of images (that is, a continuous selection from point A to point E). Alternatively, you can use the key (Mac) or key (PC) to make a noncontiguous (nonconsecutive) selection of images, such as: A, C, and E. You can also use the Forward Slash key ( ) as a shortcut to deselect the most active photo in a Grid or Filmstrip selection. By using the key, you deselect the most selected image in a photo selection, which removes it from the selection and makes the photo immediately to the right (or left) in the selection the most active.

Quick Collections
A selection provides only a temporary way of linking images together in a group. As soon as you deselect a selection or select a different folder in the catalog, the selection vanishes. Of course, you can still choose Edit ![]() Undo or use the keyboard shortcut
Undo or use the keyboard shortcut  (Mac) or
  (PC) to recover a selection, but the main point is that selections provide only a temporary means of grouping images. If you want to make a picture selection more permanent, you can convert a selection to a Quick Collection by choosing Photo
 ![]() Add to Quick Collection or by pressing the key. Any images that have been added to a Quick Collection will be marked with a filled circle in the top-right corner in both the Library Grid and Filmstrip views. You can keep adding more images to the Quick Collection, but there can be only one Quick Collection. However, it is possible to make other collections the “target collection” instead of the Quick Selection (see page 141).
Add to Quick Collection or by pressing the key. Any images that have been added to a Quick Collection will be marked with a filled circle in the top-right corner in both the Library Grid and Filmstrip views. You can keep adding more images to the Quick Collection, but there can be only one Quick Collection. However, it is possible to make other collections the “target collection” instead of the Quick Selection (see page 141).
Note
There is no way to embed collections information within the file metadata. Collections that have been created in Lightroom are specific to the Lightroom catalog and the computer on which you created them. The only way to preserve collections when transferring images is to export as a catalog, and then use the Import from Catalog feature to import and add the catalog contents to another Lightroom catalog. A workaround is to assign keywords to collections (and make these all children of a Collections keyword). You can then re-create collections using the saved keyword metadata.
You can view the photos in the Quick Collection by clicking Quick Collection in the Catalog panel (Figure 3.83), choosing File ![]() Show Quick Collection, or using the
Show Quick Collection, or using the  (Mac) or
  (PC) shortcut. You can then choose File
 ![]() Return to Previous Content (or press or again) to return to the previous Library module view. With Quick Collections, you can make selections of photos from separate sources and group them in what is effectively a temporary collection. Quick Collections remain “sticky” for however long you find it useful to keep the images grouped this way. A Quick Collection is always remembered even after you quit Lightroom—no saving or naming is necessary—and the images remain grouped this way until you decide to remove them from the collection. If you want to save a Quick Collection as a permanent collection, you can do so by using
Return to Previous Content (or press or again) to return to the previous Library module view. With Quick Collections, you can make selections of photos from separate sources and group them in what is effectively a temporary collection. Quick Collections remain “sticky” for however long you find it useful to keep the images grouped this way. A Quick Collection is always remembered even after you quit Lightroom—no saving or naming is necessary—and the images remain grouped this way until you decide to remove them from the collection. If you want to save a Quick Collection as a permanent collection, you can do so by using  (Mac) or
  (PC). This shortcut opens the Save Quick Collection dialog (Figure 3.84), which lets you save the current Quick Collection as a normal catalog collection. Once you have done this, it is good housekeeping practice to clear the Quick Collection, which you can do by choosing File
 ![]() Clear Quick Collection or using
Clear Quick Collection or using  (Mac) or
  (PC). Figure 3.85 shows an example of how a Quick Collection can be made up of photos from more than one source folder.
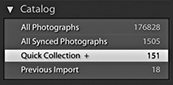
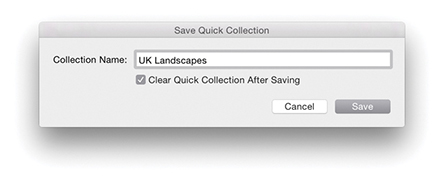 (Mac) or (PC) to save a Quick Collection as a permanent collection and add it to the Collections panel.
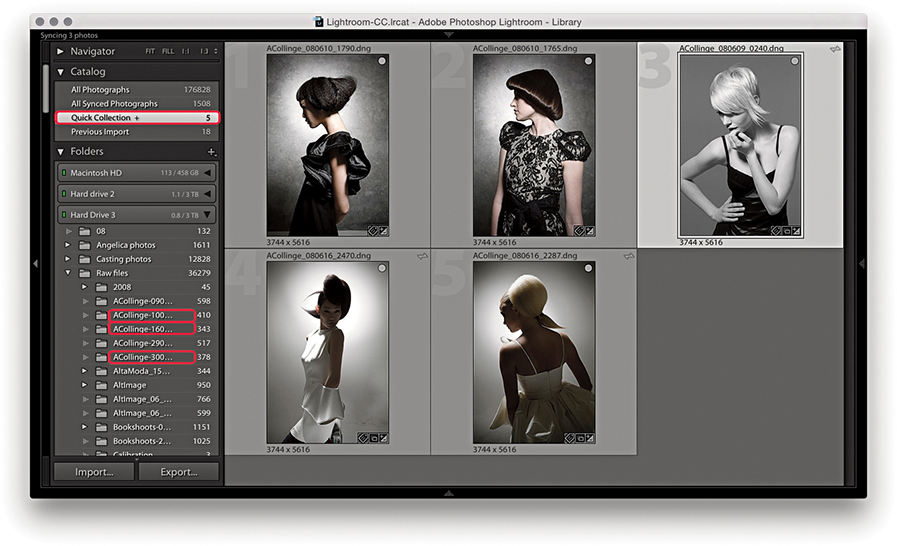
You can group images from different source locations (i.e., different folders) and then select Quick Collection to view all the selected images at once. In the example shown here, I highlighted the source folder locations in the Folders panel for the photos that made up this current Quick Collection.
Collections
As I just explained, a Quick Collection can be converted into a collection. You can also convert any selection of photos made in the Library Grid view or Filmstrip into a collection directly via the Collections panel. Although catalog images can exist in single folders only, you can use collections to create multiple references of the master photos. Collections are therefore useful for grouping images together from different folders in ways that are meaningful or useful. When working within the Library module, you can save selections as standard collections ( ). Such collections can then be accessed by clicking a collection in the Collections panel within any module in Lightroom. Standard collections are simply saved collections of photos that can be accessed anywhere in Lightroom and have no other special attributes.
To create a new collection from within the Library module, click the + button in the Collections panel (Figure 3.86) or use the  (Mac) or
  (PC) shortcut. This opens the Create Collection dialog shown in Figure 3.87. Here, you have the option to save a new collection to the top-level hierarchy within the Collections folder or save within a collection set (see page 142). You will normally want to keep “Include selected photos” selected. You can also select the “Make new virtual copies” option if you wish to create virtual copies only from the master photos when creating a new collection. This might be useful if you want to create a new collection for the purpose of creating say, black-and-white versions of the selected master photo images. “Set as target collection” will make this collection the target for quick collection additions in place of the Quick Collection in the Catalog panel (you’ll see a plus sign appear next to the collection). “Sync with Lightroom CC” is normally checked by default, allowing you to sync a collection. To make the collections management easier, you can filter collections. In Figure 3.88, I applied a filter to the Collections panel. In this instance, I typed “ashridge,” which shortlisted the two collections shown here.
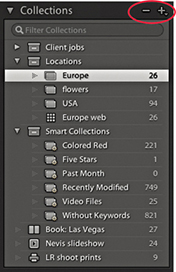

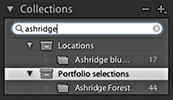
Module Collections
Module-specific collections can be used to store settings that have been applied in the Web, Slideshow, Print, or Book “create” modules. So, when working with a selection of images in any of these modules, you can save the combination of the image selection and module settings as a module collection. Figure 3.86 contains examples of the different collection types, which are distinguished by the collection icon appearance: Book (![]() ), Slideshow (
), Slideshow ( ), Print (
 ), and Web (
 ). These can perhaps be thought of as project containers or saved documents of a work in progress. For example, when working on a book layout in the Book module, you will want to be able to save the selection of photos to be included in the book layout along with all the Book module work associated with that collection of images.
Whenever you make a selection of photos and enter the Book, Slideshow, Print, or Web modules, you normally have the freedom to play around with the settings without saving anything. After all, you won’t necessarily need to create a new collection each time you visit, say, the Print module. But when you do want to permanently save the work you’ve done, you have the option to do so.
In Figure 3.89, you can see examples of the Create bars for the four “create” modules. These are made visible by default, but you can use the Backslash key (\) to toggle showing/hiding them. The Create bar is displayed prominently in order to prompt you to save what you are doing as a module collection and not lose any work. This is particularly important when working in the Book module, because this can include information about the way the pages have been laid out, as well as any text that might have been added. To create a module collection, just click the Create button to open the Create dialog (Figure 3.90). You can then enter a name, select a Set to contain the collection, choose to make new virtual copies, or set as the target collection.
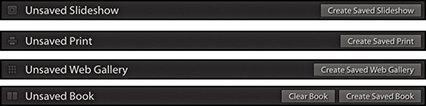
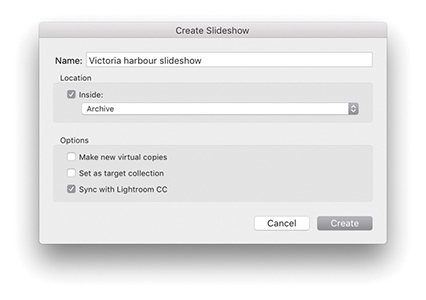
Clicking the Collections panel + button also opens a menu from which you can launch the Create dialog to create a module-specific collection for the particular module you are working in (Figure 3.91).

Let’s say you want to create a new module collection, such as a new slideshow collection. This will add a new module collection to the Collections panel, which you will be prompted to name via the Create dialog (Figure 3.90), and the Web collection will have a special icon () to distinguish it from other types of collections in that panel. The current Filmstrip contents are used as the source and preserve everything that is in that Filmstrip selection, such as a custom sort order.
Module collections can be created from any collection of photos except for Smart Collections, but photos that have been added to a module collection can be shared across other module collections. Therefore, a single photo can be used in multiple Book collections, as well as in other Slideshow, Print, and Web collections.
To duplicate an existing collection, -drag a collection within the Collections panel. This can be useful where you need to, say, duplicate a current book collection to create variations of the current book layout.
Collection Badge Icons
When a photo is in a collection, you will see a badge icon (![]() )in the Filmstrip cells and Library module Grid view cells. If you click this badge, you will see a list of all the collections the photo belongs to and can navigate to these directly (Figure 3.92). And, if you are in the Library Grid view and hover over a collection name, you will see thin white borders around all the photos that belong to that collection. Whenever you work in the Book module, the Filmstrip indicates whether photos that are part of a Book collection are actually included in the layout or not. For example, in Figure 3.93, the numbers at the top of the Filmstrip cells indicated how many times a photo had been used in a specific book project. If there is no number, it means a photo has not been included in the book layout yet.
)in the Filmstrip cells and Library module Grid view cells. If you click this badge, you will see a list of all the collections the photo belongs to and can navigate to these directly (Figure 3.92). And, if you are in the Library Grid view and hover over a collection name, you will see thin white borders around all the photos that belong to that collection. Whenever you work in the Book module, the Filmstrip indicates whether photos that are part of a Book collection are actually included in the layout or not. For example, in Figure 3.93, the numbers at the top of the Filmstrip cells indicated how many times a photo had been used in a specific book project. If there is no number, it means a photo has not been included in the book layout yet.
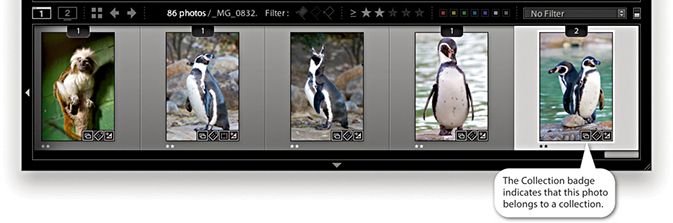
The Module Collections in use
Now let’s look at working with different types of collections. When you are in the Library, Develop, or Map module, clicking a collection of any kind selects the photos in that collection and filters the current Library Grid view and/or Filmstrip. If you double-click a module collection, it selects the photos in that collection and takes you to the create module associated with it.
However, when you are in one of the create modules—Book, Slideshow, Print, or Web—you can select any collection that is specific to that module to switch working between different collections of that module type. So, if you are in the Book module, you can click on other book collections to switch between different book projects. If you then single-click another type of module collection, this will select the photos in that collection and take you to the associated module. For example, if I were to click on the Landscape book collection highlighted in Figure 3.94, this would filter the catalog to select the 48 photos in that collection. If I were in the Library, Develop, or Map module, I would have to double-click the collection to select the photos and take me to the Book module. But if I were in the Slideshow, Print, or Web module, this would also take me straight to the Book module. Once in the Book module, I would see the book collection with the book layout in the same state as the last time I worked on it. If I were to then select one of the other Book module collections listed in Figure 3.94, this would let me switch between different book projects. If I then clicked on the Scotland Prints Print module collection, this would select the photos contained in that collection and take me to the Print module using the print settings that were applied at the time the Print collection was last saved. Remember also, when you work on a saved module collection, any edits you make to the module settings are saved automatically, overwriting the previous module collection settings.

Editing Collections
The photos in a collection can easily be edited. You can add photos to a collection by dragging them onto a collection name (Figure 3.95). Photos can be removed from a Quick Collection or a collection by selecting the photo or photos in the Library Grid view or Filmstrip and pressing the  key. When you do this, you are removing the photos from the collection selection only and not actually removing them from the catalog or deleting them from the hard disk. Similarly, once you remove a photo from the catalog, it can no longer be in a collection. So, if you happen to delete or remove a photo from the catalog that is part of a Book collection, it will also be removed from the book layout. What if the photo belongs to a collection synced with Lightroom CC/Lightroom mobile? Then you will see the dialog shown in Figure 3.96. Clicking No removes the photo from this collection and All Synced Photographs, but not if the photo is also in another Lightroom mobile synced collection. Clicking Yes keeps it in All Synced Photographs.
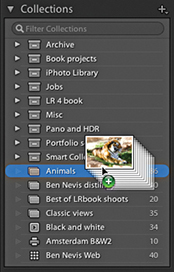
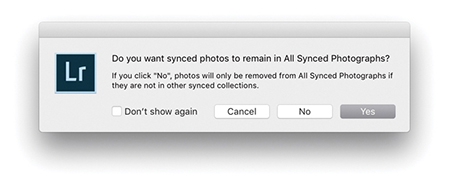
Deleting collections in Lightroom Classic CC should be fast, although this depends on the catalog size as well as the number of collections and images in a collection. Lastly, if you wish to rename a collection, you can do so via the Collections panel context menu, shown in Figure 3.97.

Target Collection
By default, the Quick Collection is always the target collection, but you can assign any other collection to be the target collection instead. To do this, select a collection and choose Set as Target Collection from the context menu shown in Figure 3.97. When a collection has been promoted in this way, you will see a + appear after the name, (but note you cannot set a Smart Collection as the target collection). You can then select photos in the Library Grid or Filmstrip and press the key to toggle adding/removing them to the target collection (you will see a message flash up on the screen to remind you which collection the photo is being added to). You can also use the Painter tool to select photos and add them to the current target collection (see page 592 for more about working with the Painter tool); plus, there is a “Set as target collection” option included in the Create Collection dialog (Figure 3.98). To reset the Quick Collection as the target collection, use the  (Mac) or
  (PC) shortcut.
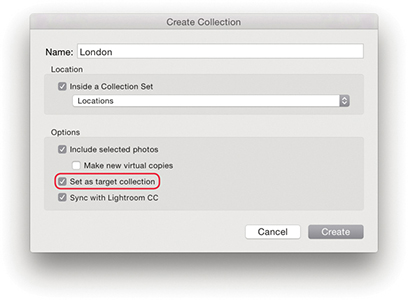
Collection Sets
To help organize and manage your collections, you can create collection sets. To add a new collection set, click the + button in the Collections panel header (Figure 3.99), or right-click anywhere in the Collections panel to access the context menu. Choose Create Collection Set, name it, and click Create. This adds a new collection set ( ). These can be used to contain individual collections and Smart Collections. You cannot place photos directly inside a collection set, but you can have collection sets nested inside collection sets.
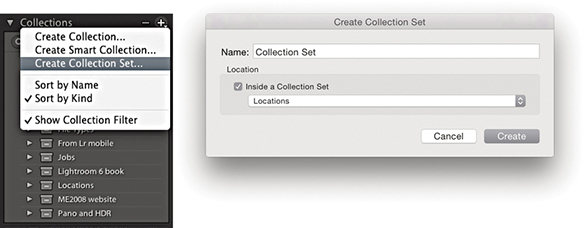
Smart Collections
Smart Collections can be used to set rules for which photos should be in a collection. Photos that match these criteria are then automatically added. To do this, click the + button, or use the context menu and select Create Smart Collection (![]() ). This opens the dialog shown in Figure 3.100, where you can set up a series of rules (also known as Boolean operators) to determine which files will be filtered by a particular Smart Collection. In the example shown here, I used a Keywords filter to select photos with the keyword Jobs, a File Type filter to select TIFF file type photos, and an Edit Date filter to select images that were captured throughout the year 2009. In the Match section, I selected “all.” This meant that files would have to match all the combined rules before being added. Choose “any” when you want to select photos that match multiple terms, but not exclusively so. There are also Smart Collection options for things like megapixel size, Smart Preview status, number of color channels, bit-depth mode, and color profile, filtering by applied Lens Corrections, as well as “Is Empty” and “Isn’t empty” filters for the Title field.
). This opens the dialog shown in Figure 3.100, where you can set up a series of rules (also known as Boolean operators) to determine which files will be filtered by a particular Smart Collection. In the example shown here, I used a Keywords filter to select photos with the keyword Jobs, a File Type filter to select TIFF file type photos, and an Edit Date filter to select images that were captured throughout the year 2009. In the Match section, I selected “all.” This meant that files would have to match all the combined rules before being added. Choose “any” when you want to select photos that match multiple terms, but not exclusively so. There are also Smart Collection options for things like megapixel size, Smart Preview status, number of color channels, bit-depth mode, and color profile, filtering by applied Lens Corrections, as well as “Is Empty” and “Isn’t empty” filters for the Title field.

After you create a Smart Collection, you can double-click to edit the Smart Collection settings. Figure 3.101 shows the Edit Smart Collection dialog, where I changed the File Type from TIFF to Raw. So instead of selecting all the TIFF master retouch files from that year, I could edit the Smart Collection to filter all the raw files associated with client jobs for that year into a Smart Collection.
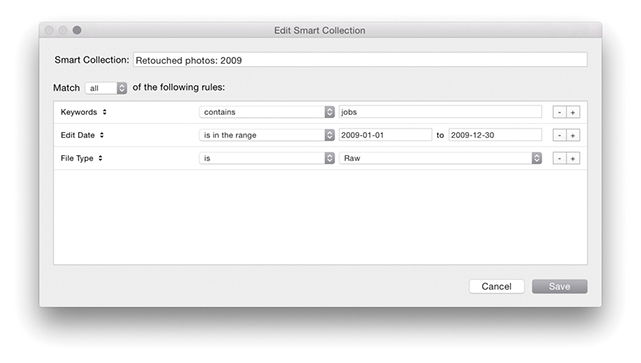
Smart Collections can filter based on static criteria, such as the number of star ratings assigned to images or the keywords added. You can create Smart Collections to filter photos that have missing copyright notices or that have not been keyworded yet, or to search by metadata status. You can even create a Smart Collection based on whether the camera flash fired or not. Other Smart Collections can be more dynamic, such as “photos that have been shot in the last month.” Using the Collections panel context menu, you can export Smart Collections settings for selected Smart Collections. This allows you to share your Smart Collections settings with other users (Figure 3.102). Alternatively, simply export a catalog with, say, a single photo in it. This will let you achieve the same thing when you import from catalog, but preserves your Smart Collection hierarchy.

Create Collections From Folders
If you go to the Folders panel context menu, you can quickly create collections from folders. Simply right-click on a folder (or multiple folders). This reveals the context menu show in Figure 3.103. Next, choose Create Collection “[Folder Name]” to create a collection that will then appear in the Collections panel, containing the selected folder or folders. If you wish to maintain the hierarchy of any nested folders, select the Create Collection Set option.
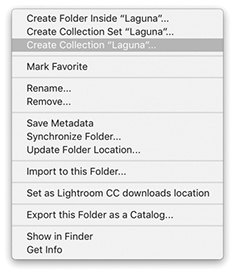
Create Collections from a Map Pin in the Map Module
A new menu option has been added to the map pin context menu in the Map module. This lets you quickly create a collection from a group of photos at that pin location. This can only be done for one pin location group. Therefore, if you wish to group a number of pin locations into a single collection in this way, zoom out far enough, as I did in Figure 3.104 below, so that all the local pins become merged into a single group before right-clicking and choosing Create Collection.
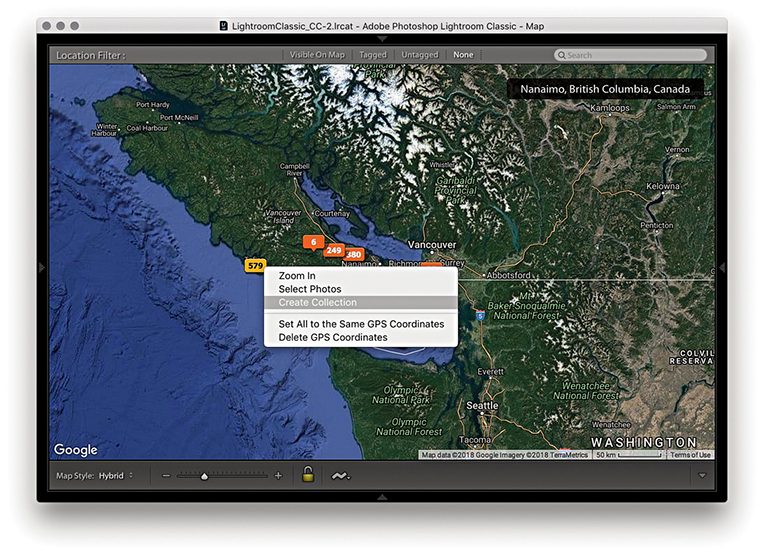
Library Edit Filter
There is an Edit filter in the Library Module Metadata Browser, which you can use to filter Edited or Unedited images (Figure 3.105). There are also matching Edit filter buttons in the Attributes section as well (Figure 3.106).


Smart Collections Based on Adjustments
Similarly, when creating a Smart Collection you can filter by Has Adjustments or by Has Edits under the Develop category (Figure 3.107). Has Adjustments includes images that have adjustments, but doesn’t include images that have been cropped, whereas Has Edits includes images that have adjustments and/or have been cropped.
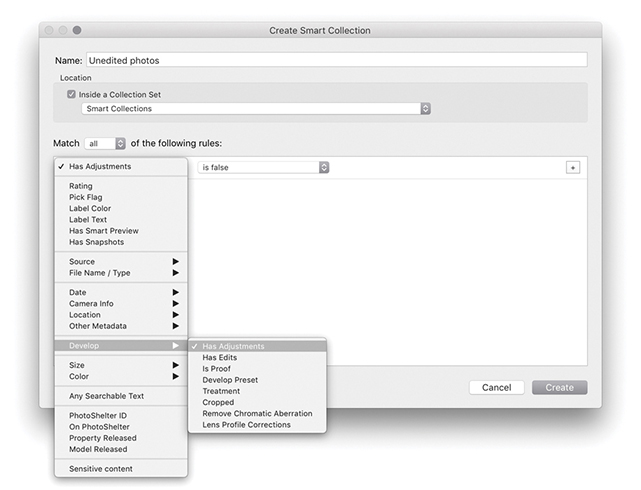
Removing and Deleting Photos
What should you do with your reject images? I personally prefer not to delete anything because you never know when a reject photo might still be useful. For instance, there have been occasions when I have taken a photograph and not thought too much of it, only to discover later that the photo had a greater significance than I had realized at the time. If you do want to delete photos marked as rejects using the reject flag or keyboard shortcut, however, you can go to the Photo menu and choose Delete Rejected Photos or use the  (Mac) or
  (PC) shortcut. This sends all your rejected photos directly to the trash, ready to be deleted.
If you select an image and press the key, you will see the dialog shown in Figure 3.108. Clicking Remove simply removes a photo from the Lightroom catalog and the original remains on the computer hard disk. To avoid seeing this dialog, you can instead use  . If the photo is part of a published collection, such as Flickr, you will see a warning dialog asking if you wish to remove or leave the photos on the published service still. The other option is Delete from Disk. This removes the photos from the catalog and sends them to the system Trash/Recycle bin. A warning message reminds you this process cannot be undone, although the files will not be completely deleted until you choose to empty the Trash/Recycle bin. Alternatively, you can use
  (Mac) or
  (PC) to remove a photo and send it to the Trash/Recycle bin, where again, you will still be able to recover the files before they are permanently deleted—you can always rescue the deleted images from the trash and import them back into the Lightroom catalog again. The fact that the Delete command does not irrevocably remove files from your system provides a margin of safety. However, as discussed in “Editing collections” on page 140, if the photo or photos you are about to delete are also in synced collections, you need to consider what will happen here. The Figure 3.108 dialog points out that clicking Delete from Disk removes the photo from the disk as well as from any collections synced to Lightroom CC. If these are masters stored with Lightroom Classic CC there will be no backup on the cloud.
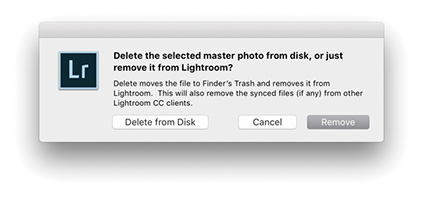 command in Lightroom.
Whenever you work with photos that are offline and are therefore working with Smart Previews only, the Delete option is deliberately made unavailable. This is a deliberate policy to prevent users from deleting photos that are currently offline.
Exporting Catalogs
To export a catalog, select All Photographs from the Catalog panel or select a specific folder, and choose File ![]() Export as Catalog. This opens the dialog shown in Figure 3.109, where you can choose the location to save the catalog to and add a tag if you wish. If you have first created an active selection, you can select or deselect the “Export selected photos only” option to decide whether to export the entire catalog or just the selected photos. Or, you can select a collection or collection set and use a right-click to select “Export this Collection as a Catalog.” Just bear in mind you can use the Export as Catalog feature to create new, separate catalogs only and can’t simultaneously export and add to an existing catalog.
Export as Catalog. This opens the dialog shown in Figure 3.109, where you can choose the location to save the catalog to and add a tag if you wish. If you have first created an active selection, you can select or deselect the “Export selected photos only” option to decide whether to export the entire catalog or just the selected photos. Or, you can select a collection or collection set and use a right-click to select “Export this Collection as a Catalog.” Just bear in mind you can use the Export as Catalog feature to create new, separate catalogs only and can’t simultaneously export and add to an existing catalog.
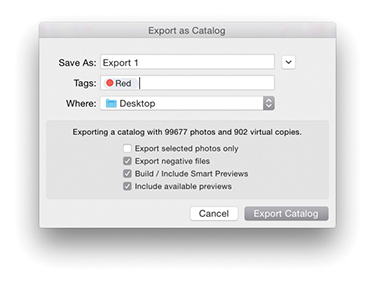
Exporting with Negatives
A catalog export will, at a minimum, export all the metadata information, including snapshots and virtual copies. If you want a catalog export to include all the master photos (i.e., the raw files, JPEGs, TIFFs, and PSD image files), then check “Export negative files.” Just to be clear, the Export as Catalog dialog refers to the master files as the negative files.
Note
A catalog export is different from a normal file export. A catalog export exports everything that is associated with the files in the catalog, such as the snapshots and virtual copy versions of the masters (although it does not include Publish Services data). When you include the negative files in an export, the master files are exported in their original, unflattened state. This means any files you edited in Photoshop will be exported with the layers preserved.
You can use this command to create an exact duplicate of your catalog with all the photos in the original catalog copied to a new catalog folder, preserving the hierarchy of all the folders that make up the current catalog. Or, you might want to use it to export a subsection of the catalog. For example, when I am on location working on a laptop computer, I will return with files that have been imported into the laptop Lightroom catalog that I then wish to add to the main Lightroom desktop catalog. I could simply choose to save all the metadata and copy the files (with their updated metadata) across to the main catalog. But, when I choose to export as a catalog, I can create a copy of not just the files but also the preview data that has already been generated plus any virtual copies that I might have made. You can then use the Import from Catalog feature (see page 149) to add the exported Lightroom catalog information and files to the main catalog on a separate computer running Lightroom. Of course, when you choose to export the master negatives with a catalog export, this can considerably slow down the export process and you will see the progress bar indicator in the top panel of the Library window (Figure 3.110). Furthermore, when creating a new exported catalog, you’ll need to have at least 200 MB of free disk space on your computer, which Lightroom uses as a temporary file storage directory.

If you check the “Export negative files,” Build Smart Previews, and “Include available previews” options, you can end up with an exported catalog that looks like the one shown in Figure 3.111, where the catalog folder has an .lrcat catalog file, a Smart Previews.lrdata file that contains Smart Preview versions (when generated), and a Previews.lrdata file that contains the thumbnails and preview image data, along with a subfolder containing the master negatives.
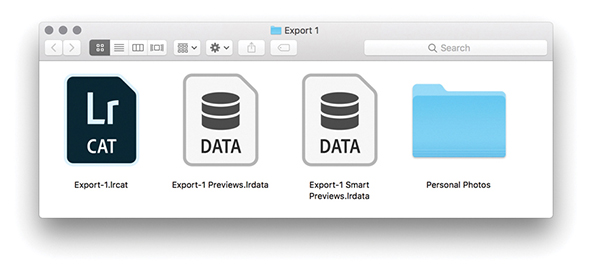
Including Smart Previews
If the Build Smart Previews option is selected, this adds a Smart Previews.lrdata file, enabling you to create an export catalog that looks and feels almost like a normal catalog with master images. If you don’t include Smart Previews, there will be limitations as to what you can do in Lightroom when working with a catalog that is also missing the master negatives. You’ll be able to add such things as ratings and keywords, but you will not be able to make adjustments in the Develop module or via the Library module Quick Develop panel. For more about Smart Previews, see “Working with Smart Previews” on page 151.
Including Available Previews
If you check the “Include available previews” option, this adds a Previews.lrdata file to the export folder, which, as you might expect, contains all available previews that have been rendered in Lightroom. This includes the Library Grid thumbnails, Standard-resolution Loupe views (in whatever form they have been rendered), and 1:1 rendered views (if available) as part of the export.
Lightroom goes through several stages of preview rendering. At a minimum, Lightroom should have stored thumbnail and Standard previews of each photo in the catalog. You should at least see good-quality thumbnails, but if Lightroom has not had a chance to render proper standard-sized previews (at the pixel size you set in the Preferences dialog), then the standard/full-screen Loupe view previews may look pixelated (because they’ll be nothing more than enlarged thumbnails). However, if you export a catalog that contains Smart Previews, it will be possible for the catalog to subsequently render standard-sized previews from the available Smart Previews.
The “Include available previews” option is therefore more critical when exporting a catalog that does not include Smart Previews or master negatives. If a catalog is exported without either of these, there will be no way to re-render them. In which case, you may want to consider choosing Library ![]() Previews
Previews ![]() Render Standard-Sized Previews before you export the catalog. If you think you’ll need to include full-resolution previews, you may also want to choose the Render 1:1 Previews option. By at least selecting the Render Standard-Sized Previews option, you’ll have decent screen previews when working on the exported catalog.
Render Standard-Sized Previews before you export the catalog. If you think you’ll need to include full-resolution previews, you may also want to choose the Render 1:1 Previews option. By at least selecting the Render Standard-Sized Previews option, you’ll have decent screen previews when working on the exported catalog.
Tip
Exporting a catalog without previews is a good approach to use when time is short, especially if the Previews.lrdata file is quite big. As long as the negatives are available, new previews can always be rebuilt.
Most of the time you will want to include previews as part of an export. But there are also some good reasons why you might not always want to include them. For example, if you need to export a catalog that contains just the most recent metadata edits (so that you can sync these up with a master catalog), then deselecting “Include available previews” saves having to carry out this extra step and makes the export process much faster. Basically, you can use an export with no negatives and no previews as a means to simply export the most recent metadata edits from one catalog to another.
Exporting without Negatives
If you deselect the “Export negative files” option, you can export a complete catalog that does not use up so much disk space and is lightweight enough to run from a laptop computer with limited free disk space. The advantage of this approach is that you can export a large catalog relatively quickly. But the usability of such a catalog will depend on having the Build Smart Previews and “Include available previews” options selected so you can preview the catalog contents.
Opening and Importing Catalogs
To open an exported catalog as a separate new catalog, choose File ![]() Open Catalog. This opens the Open Catalog dialog (Figure 3.112), which asks if you wish to relaunch Lightroom. This is because Lightroom must always relaunch when loading a new catalog. If, instead, you want to import an exported catalog and merge the contents into your current Lightroom catalog, you’ll want to select File
Open Catalog. This opens the Open Catalog dialog (Figure 3.112), which asks if you wish to relaunch Lightroom. This is because Lightroom must always relaunch when loading a new catalog. If, instead, you want to import an exported catalog and merge the contents into your current Lightroom catalog, you’ll want to select File ![]() Import from Another Catalog, locate the recently exported .lrcat file, and import it. If the catalog you are about to import excludes negative files, it will import directly. Otherwise, you‘ll see the Import from Catalog dialog shown in Figure 3.113, where you can choose to import the images by referencing them in their present location or by copying to a new location and adding them to a current Lightroom catalog.
Import from Another Catalog, locate the recently exported .lrcat file, and import it. If the catalog you are about to import excludes negative files, it will import directly. Otherwise, you‘ll see the Import from Catalog dialog shown in Figure 3.113, where you can choose to import the images by referencing them in their present location or by copying to a new location and adding them to a current Lightroom catalog.
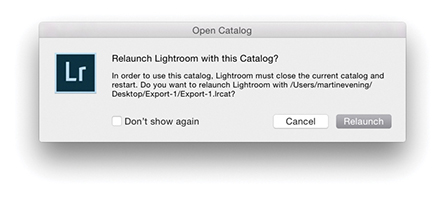
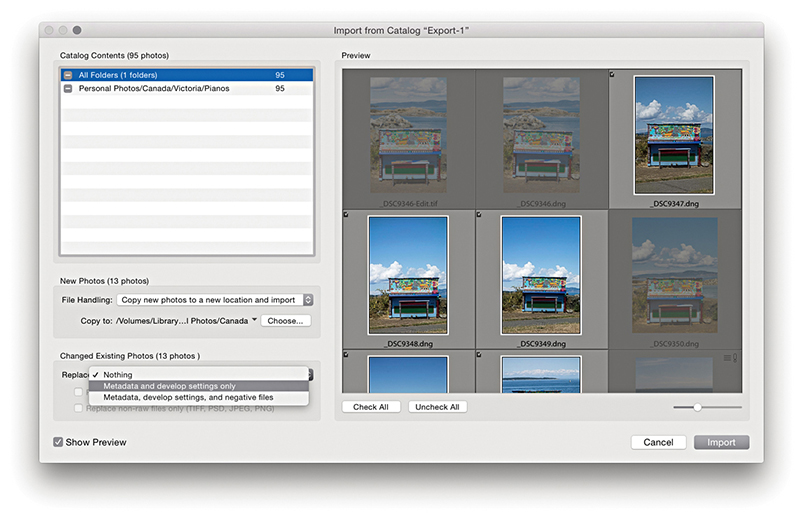
New Photos Section
If the files you are about to import already exist in the current catalog, you have the option to decide what will be preserved and what will get replaced during the import process. For example, in Figure 3.113, some photos already existed in the catalog. The New Photos section let me decide how to handle importing these new images and the Changed Existing Photos section allowed me to decide how to handle the duplicates.
Note
When importing from a catalog, Lightroom allows you to import changes into the main catalog even if the original file is currently offline in both catalogs.
Changed Existing Photos Section
The Changed Existing Photos section in the Import from Catalog dialog covers all eventualities. From the Replace menu, you can choose to replace the metadata and develop settings only or to replace the settings plus negative files. For example, in Figure 3.113, I selected the “Metadata and develop settings only” option from the Replace menu so that the import updated the metadata only for these files.
If you are worried about overwriting the current Develop settings, you can choose “Preserve old settings as a virtual copy” (especially if you also choose to replace “Metadata, develop settings, and negative files”). If you want to avoid overwriting any of the raw masters, you can select the “Replace non-raw files only” option, which can save time, because the raw files will not be overwritten and only the metadata edit settings will be imported to the catalog. As an extra security option, any photos that are exactly the same (i.e., they share the same creation date) will not be imported or overwrite the originals.
Limitations when Excluding Negatives
Where the master files have been excluded from an export, the Folders panel displays such catalog folders with the folder names dimmed because the links to the master folders are considered offline (Figure 3.114). If Smart Previews are available, you can edit photos using Quick Develop and the Develop module. But if no Smart Previews are available, the Develop module (and Quick Develop) will be accessible but inoperative: You will be able to see which Develop settings have been used but that is all. You will be able to use the Slideshow module to run slideshows (providing the pre-rendered previews are good enough) and use the Web module to generate web galleries. However, the Web module may remind you that the “best-available previews” are being used in place of the original masters (although to be honest, this is not always likely to be a problem). The Print and Book modules need to reference the original files, so you will not be able to output work from a catalog that is missing the master negatives.
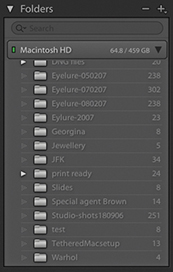
Export and Import Summary
You use the File ![]() Open Catalog command to load individual catalogs, but Lightroom can run only one catalog at a time. There is nothing to stop you from working with multiple catalogs, but a single catalog is probably all you need, even if you have a very large collection of photographs to manage. You can use File
Open Catalog command to load individual catalogs, but Lightroom can run only one catalog at a time. There is nothing to stop you from working with multiple catalogs, but a single catalog is probably all you need, even if you have a very large collection of photographs to manage. You can use File ![]() Export as Catalog to create a new catalog, but you can’t export a catalog and add to an existing catalog in one go. If that is your goal, you will have to export a catalog first, and then use File
Export as Catalog to create a new catalog, but you can’t export a catalog and add to an existing catalog in one go. If that is your goal, you will have to export a catalog first, and then use File ![]() Import from Another Catalog to merge the catalog data. Depending on the catalog you are importing from, you can either import the complete catalog contents (images and metadata) or update the metadata information only (without importing any photos).
Import from Another Catalog to merge the catalog data. Depending on the catalog you are importing from, you can either import the complete catalog contents (images and metadata) or update the metadata information only (without importing any photos).
Working with Smart Previews
Smart Previews are lightweight versions of the master images (resized to 2560 pixels along the long edge) that can be used in place of the original raw files throughout the application, including the Develop module. They are stored as lossy DNG file versions of the original masters in a Smart Previews.lrdata file within the catalog folder.
Choosing to generate Smart Previews as you import new photos can prove useful in a number of ways. When working in the Develop module at a standard Fit or Fill screen view, a Smart Preview can load more quickly, allowing you to start work sooner on a small (proxy) version rather than waiting for the entire master image to load. This might help when editing large capture files. There is also an item in the Performance preferences for Lightroom to fully use Smart Previews in place of originals for image editing. The Smart Preview status is indicated in the Histogram panel in the Library and Develop modules (Figure 3.115), along with a brief description of the four indicated states. Figure 3.116 shows the Grid cell badge for an image where only the Smart Preview is available. An identical badge is also displayed in the Filmstrip.
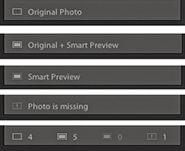
Another benefit is that Smart Previews are easily portable with the catalog, letting you work offline more effectively. As I mentioned previously, a catalog without negatives has certain restrictions, but if you generate Smart Previews for some or all of your catalog images, you will be able to work offline more effectively. You can use the Develop module and Quick Develop to edit original images offline, and once the catalog is reunited with the originals, the edits applied offline are updated automatically. Note that original files are prioritized over Smart Previews and these will always be used when available—a Smart Preview is used only in the absence of an original file. There are some limitations, though. Because Smart Previews are reduced-sized versions, when editing a Smart Preview, you won’t be able to evaluate an image properly to adjust the Detail panel settings or other adjustments that require working at a proper 1:1 view mode (when zooming to 1:1, this zooms to the maximum Smart Preview resolution rather than a true 1:1). Smart Previews can be built from photos only and not video files. Smart Previews can be exported as JPEGs and used with Publish Services. You can geotag photos using the Map module. You can lay out a book in the Book module using Smart Previews, but not actually create a print book (to do that, the originals will need to be online).
How to Create Smart Previews
Whenever you import photos into Lightroom, you have the option to generate Smart Previews of photos as they are imported (Figure 3.117) or when you import from another catalog. As for images that are already in your catalog, you can generate Smart Previews for these by going to the Library module and choosing Library ![]() Previews
Previews ![]() Build Smart Previews (use Delete Smart Previews to discard). If the original files are not available when you choose to build Smart Previews, you will see an error message. There is also a Build Smart Previews check box in the Export as Catalog dialog (Figure 3.109). If you intend to build a large number of Smart Previews at once, be warned this process may take hours to complete. Finally, to see which photos have Smart Previews and which do not, the easiest thing to do is to create a Smart Collection, such as the one shown in Figure 3.118, where I filtered the photos that had no Smart Preview (but were also not video files).
Build Smart Previews (use Delete Smart Previews to discard). If the original files are not available when you choose to build Smart Previews, you will see an error message. There is also a Build Smart Previews check box in the Export as Catalog dialog (Figure 3.109). If you intend to build a large number of Smart Previews at once, be warned this process may take hours to complete. Finally, to see which photos have Smart Previews and which do not, the easiest thing to do is to create a Smart Collection, such as the one shown in Figure 3.118, where I filtered the photos that had no Smart Preview (but were also not video files).
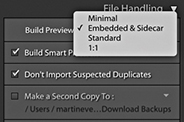
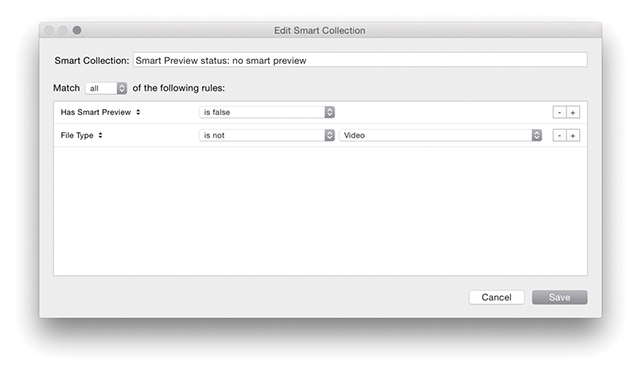
Making the Catalog Portable
Up until recently, there has been no easy answer to the problem of how to share a catalog between two or more computers. You can use the Export as Catalog command to export the catalog settings to an external hard drive and use the Import from Another Catalog command to import and update the exported settings to update a catalog on another computer. This is a fairly cumbersome process, but if you are interested, there is an example of how this procedure works that you can download as a PDF from the book’s website.
Note
Working with Smart Previews can help you achieve faster Lightroom performance, because Lightroom can work more quickly when using Smart Preview (compact, lower-resolution) versions of the master files. To help you take advantage of this, the Performance preferences include an option to use Smart Previews in place of the originals when editing in the Develop module.
Bear in mind that if you choose to generate Smart Previews for all the photos in your catalog, the resulting Smart Previews file may end up being quite large. In fact, the Smart Previews.lrdata file could easily grow to be just as big as your Previews.lrdata file if you were to build Smart Previews for all your photos. With this in mind, you need to plan carefully where the Lightroom catalog folder is stored and if there is enough room on the drive to allow for expansion.
Downloadable Content:

However, thanks to Smart Previews, there is another way. If you place the entire catalog on an external drive and choose to generate Smart Previews for all the photos in the catalog, it can be made portable between different computers, so long as both are able to run Lightroom. This way you can transfer from working on one computer to another in a matter of a few minutes. You can have all the master assets stored on one computer system and be able to edit the files whether working online or offline, plus preserve the Publish Services settings. If this sounds appealing, it makes sense to use an external drive that is easy to carry around and that does not require an external power source; ideally, a solid-state drive (SSD) that provides fast read/write access and has enough disk capacity to hold the catalog file plus previews and Smart Previews data. These days, a 512 GB SSD would not be unreasonably expensive, and it would be just about big enough for most Lightroom users’ needs. I have tried this approach, and it works very well. You can edit offline remotely, and as soon as the catalog is reunited with the master images on the main computer, Lightroom updates them automatically. Having said that, there are some pitfalls to be aware of. I recommend regular catalog updates to a backup folder on the host computer, as well as regular scheduled backups of the drive holding the catalog to include the previews and Smart Previews files. Also be aware of the consequences if the external drive holding the catalog were to lose its connection. This happened to me while using a drive that proved to be unreliable. No lasting damage was done, but the incident highlighted a major weakness in this way of working. Weigh these considerations carefully before doing the same. The following steps explain in more detail how this can be done.
Tip
There is also the option of placing the catalog file on Dropbox.com and having it synced to two computers. However, you need to make sure the catalog is accessed in this way by using only one computer at a time and is fully synced to avoid creating what might best be described as a DAM mess.
1. Let’s say you have all the master catalog asset files stored on a main computer and wish to continue working with the catalog remotely. With my setup shown here, the catalog files, including the Smart Previews, were stored on an external drive.
2. I closed Lightroom on the main computer, disconnected the external drive, and reconnected it to a laptop computer. I opened Lightroom on the laptop, launching the same catalog stored on the external drive.
3. I was then able to edit the catalog on the laptop. This could have included making Develop module edits (providing Smart Previews were available for those images).
4. I quit Lightroom on the laptop, disconnected the drive, and reconnected it to the main computer. I then launched Lightroom again, opening the same catalog. The Develop edits made while working on the laptop were automatically synchronized to the main computer.