Table of Contents for
The Adobe Photoshop Lightroom Classic CC Book, Second Edition
 The Adobe Photoshop Lightroom Classic CC Book, Second Edition
Published by
Adobe Press, 2019
The Adobe Photoshop Lightroom Classic CC Book, Second Edition
Published by
Adobe Press, 2019
- Contents
- Cover Page
- Title Page
- Copyright Page
- Dedications
- Introduction
- Contents
- 1 Introducing Adobe Photoshop Lightroom
- 2 Importing photos
- 3 The Library module
- 4 Develop module image editing
- The Tone Curve Panel
- Easing the Workflow
- 5 The art of black and white
- 6 Sharpening and noise reduction
- 7 Exporting from Lightroom
- 8 Printing
- 9 Presenting your work
- 10 Managing your photos in Lightroom
- 11 Lightroom CC/mobile
- 12 Lightroom preferences and settings
- Index
9 Presenting your work
How to make use of the Book and Slideshow modules
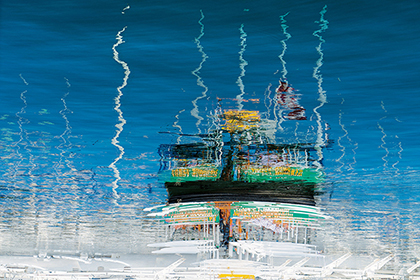
Victoria Harbour, BC, Canada © 2018 Martin Evening
Sony A7rII | 70mm | ISO 200 | f8 @ 1/500
This chapter is all about how to present your photographs for output in the form of a book or slideshow. Previous editions of this book included a section on the Web module, but that content can now be found in a PDF on the book website. I made this move because Lightroom CC/mobile now offers an efficient, integrated web experience with the ability to make images viewable on personal devices, or share photos via a web page interface and have them update dynamically. Lightroom CC/mobile is discussed in more detail in Chapter 11.
The Book module provides all the necessary tools to produce professional-looking books. The Slideshow module can be used to create slideshow presentations for business or personal use. These can be played on the computer directly or exported as self-contained presentations.
The Book Module
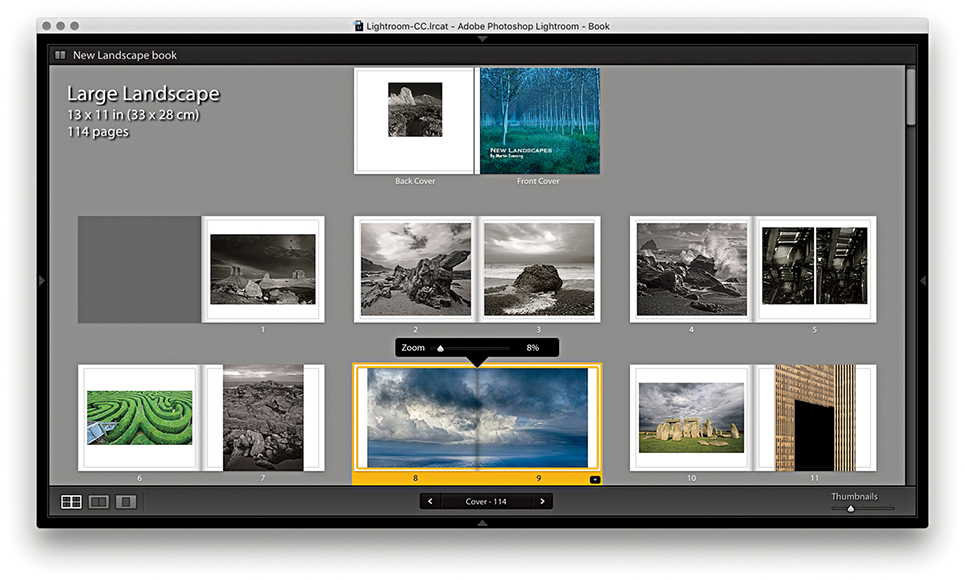
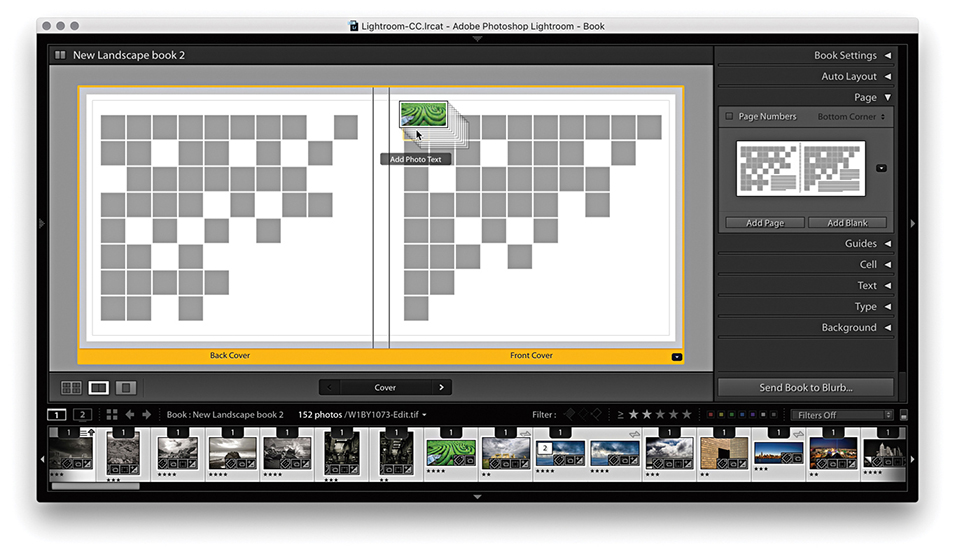
In the Book module (Figure 9.1), you can create new book projects based on a current selection of images or a saved collection from the Collections panel on the left. The main content area lets you view a book layout as a multi-page view (Figure 9.1), as double-page spreads, or as a single-page view, including a close-up view. In the multi-page view, you get to see a complete overview of a book project and can adjust the zoom view via the Toolbar Thumbnails slider. Double-click a page or click on the spread or page-view buttons in the Toolbar to view these pages in closer detail. You can drag images to individual pages to change photos, click photos to adjust the zoom setting, or right-click to use the context menu to adjust how a photo fits or fills a photo cell and choose different page-layout options.

Note
Whenever you work in the Book, Slideshow, Print, or Web modules, you are preparing photos for some kind of output. You can therefore class these modules as being “create” modules (that is to say, modules that are used to create some kind of output). It also implies that when you visit these particular modules, you are effectively doing the same thing as creating a new document and that you might well want to save the work you do in them. As you work through this chapter, it should become apparent why it is often desirable to save your work as a saved module collection (or creation). You can do this when creating a book, slideshow, print layout, or web gallery. Basically, it is a good thing to be prompted to save the work you have been doing as a collection with the module settings stored in it. At no time is this more important than when working in the Book module.
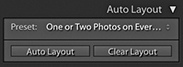
The panels on the right are used to manage a book layout. The Book Settings panel is where you initially configure the book format size and cover type and select the paper you want the book to be printed on. You can then click the Auto Layout button in the Auto Layout panel to create an instant book layout. There is also the option here to output a book as a PDF or JPEG files. As you fine-tune a book layout, you can also see a price update of how much a book will cost when printed locally. The Auto Layout panel, as I just mentioned, lets you create instant layouts and clear previous ones so you can start afresh. The Page panel has more than 180 professionally designed page layouts to choose from, and the Guides panel allows you to show or hide the various book-layout guides. Using the Cell panel, you can control the padding for either the photo or text cells—this provides a nice simple method for controlling the positioning of the text and photos on each page. The Text panel lets you automatically add text using custom, IPTC caption, or IPTC Title metadata.
The Book module contains most of the rich text attributes of the Adobe Text Engine. Here, you have all text-styling features that are normally found in other Adobe programs such as InDesign and Photoshop. The default page background color is paper white. Using the Background panel, you can change the background to apply any color you like, such as a black background. You can also choose to use images here, or select one of the background graphics that come supplied with the Book module.
The Book module includes a direct connection to Blurb, a photo book vendor that has proven popular with a lot of photographers. I do not know whether there will be plans in the future to extend this functionality to produce books through other book service vendors, although it is possible to produce a PDF output. This may offer a means to produce layouts that can be printed elsewhere, but only if the page formats are exactly the same. So, yes, the Book module is steering you toward using a specific service provider, but it is no more proprietary than the way, say, Apple’s Photos app is linked to Apple’s own book printing service.
Creating a New Book
To create a book, you first need to select a collection of images. You can do this by selecting photos from the Collections panel via the Book module. To begin with, you will be in the multi-page layout view. The selected photos will appear in the Filmstrip, but the book layout will be empty. The best way to create a layout is to select a preset from the Auto Layout panel and click the Auto Layout button. This creates an instant book layout based on the preset settings. If you want to try an alternative auto layout, click the Clear Layout button, or click Clear Book in the Create bar (Figure 9.2), and click Auto Layout again. It is important to familiarize yourself with this procedure. If you exit the Book module, select another set of images, and revisit the Book module, the previous book layout (and selection of images) will still be active. At this point, you can do one of two things. You can click the Clear Layout button to clear the previous layout and Filmstrip selection, or you can click the Create Saved Book button in the Create bar. This opens the Create Book dialog shown in Figure 9.3 and lets you save the current layout work as a new Book collection. If you have selected a subset of the Filmstrip selection for use in the book, remember to check the “Include only used photos” option. Basically, you use the Clear Layout button each time you wish to start a new layout and the Create Saved Book button to save a new Book collection. If a photo you have included in a book layout is currently offline, you will see a red exclamation point badge in the top-left corner of the photo cell. You will also see a warning message if the combination of the layout preset option and number of images selected means a book will exceed the maximum 240 pages.


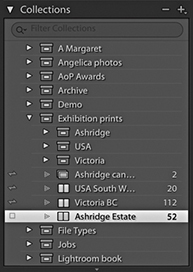
Once saved as a Book collection, the settings are updated automatically as you edit the layout. This is both a good thing and a bad thing. It is good because any changes you make are saved automatically. At the same time, if you make drastic edits to a layout, you lose what went before. In Figure 9.4, you can see the Collections panel (which is common to all modules). Here, you can see that I had already saved a number of Book collections (![]() ), which were book projects I had created previously. If you do not want to run the risk of overwriting a layout that you have got just right, you can always
), which were book projects I had created previously. If you do not want to run the risk of overwriting a layout that you have got just right, you can always  -drag a Book collection to create a duplicate, which you can then edit as a variation of the master version.
Book Settings Panel
The Book Settings panel options are shown in Figure 9.5. Here, you can choose from different types of Blurb book styles, such as Blurb Photo Book, Blurb Magazine, and Blurb Trade Book styles. The Magazine format can be used to create high-end magazines with a semi-gloss cover or velvet finish paper. Trade Books meanwhile, offer an affordable, alternative book format. Or, you can generate a PDF book layout, or create JPEG files. Next, you have the book format options, where you can select a Square, Portrait, or Landscape format in a small, standard, or large size. Not all combinations are possible, as these are dependent on the available Blurb layouts. For example, you can create a landscape book in a standard or large format, but you can create a portrait book in a standard format only. The initial content area preview gives you a rough idea of how your book might look depending on what you choose here. When creating a book, you also have the following cover options: a Hardcover Image Wrap, a Hardcover Dust Jacket, or a Softcover (Softcover is not available for the large books). If creating a PDF or JPEG output, you can choose the Hardcover Image Wrap, Hardcover Dust Jacket, or No Cover options.
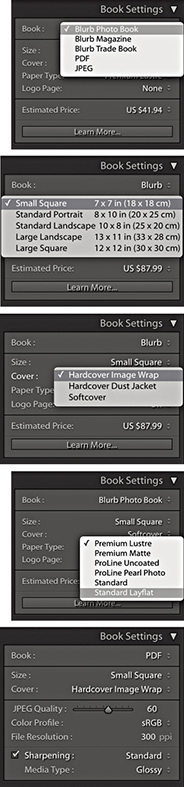
There are six paper type options to choose from. Standard is the cheapest. It looks pretty much like the Premium Lustre paper but is a lighter weight. Premium Lustre, Premium Matte, and ProLine Uncoated use heavier-weight paper and offer better-quality finishes. ProLine Pearl Photo is the heaviest-weight paper with a glossy finish and also the most expensive. Photo books created using Layflat paper have seamless spreads. This opens up the available design options for center-spread layouts. When using Standard Layflat, the minimum page count is 33 pages. This is due to the binding requirements.
Below that is the Logo Page option. This is on by default and adds a small Blurb logo to the last page of the book. You can disable this, but doing so will add to the cost of the book. You will see a book price update at the bottom of the panel. Bear in mind that the book price reflects the cost of the book with the current selected paper and cover finish but does not include the cost of delivery, which can add quite a bit more to your final book order. Do bear in mind that discounts should be available when you place an order for ten or more copies of a book. You can click the Estimated Price menu to select the currency price that reflects where you live (which also affects subsequent book delivery costs).
PDF and JPEG Book Export
If PDF is selected as the output, you will see the Book Settings panel view (bottom of Figure 9.5), which allows you to export a Book project as a PDF document. The following settings are also the same if choosing to output as JPEG files. To start with, you have similar Size and Cover options. You can use the JPEG Quality slider to determine how much compression should be used. Obviously, a lower-quality setting generates a more compact PDF document at the expense of image quality. The Color Profile can be set to sRGB, Display P3, Adobe RGB, or ProPhoto RGB. sRGB is the safest choice to make here if you want the PDF to be compatible with other printers. If you choose the Other option, you can select other RGB profiles, such as custom printer profiles. The Sharpening controls are the same as those used in the Print module, letting you apply a low, standard, or high sharpening for glossy or matte media type. Strictly speaking, these are intended for preparing images for inkjet output rather than halftone reproduction on an Indigo press. Even so, it is better to apply this type of sharpening than no sharpening at all. Incidentally, sharpening is applied by default when you output via the Blurb panel. In these instances, the sharpening always uses the Standard setting. The PDF option can also be used to produce PDF books that will look good when presented on a tablet device such as an iPad. For this type of output, you will probably want to keep the sharpening switched off.
When Blurb is selected as the output in the Book Settings panel, you will see an Export Book as PDF button at the bottom of the left-hand panel section. In these circumstances, the Export Book to PDF button is useful if you want to create a PDF proof of your book before you commit to spending money on having a book published. If you use this option, you can create a PDF proof of your book and use it to view the layout in Adobe Acrobat Reader DC or Adobe Acrobat DC Pro. You could perhaps use this PDF to print the pages on a desktop printer and check them before getting the book printed through Blurb.
Preview Panel
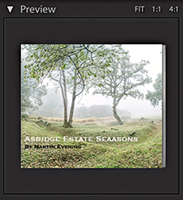
The Preview panel (Figure 9.6) shows a preview of the page or pages you are currently working on. There are three view options. Fit lets you see a double-page spread view, 1:1 shows a single-page view, and 4:1 shows a magnified view suited for close-up inspection of text. When using the 1:1 or 4:1 views, you can drag the rectangle that appears in the Preview area to scroll the page.
Toolbar
The Toolbar (Figure 9.7) offers some of the same Book view options as the Preview panel, allowing you to switch from a multi-page layout ( ) to a spread layout view (
 ) or a single-page view (
 ). In the multi-page view mode, you can use the Thumbnails slider to make the multi-page view bigger or smaller. Note that if you click in the page count display in the center, you can type in a page number to select. In the spread or single-page view, you can click the page arrow buttons to navigate from one spread (or page) to the next.

Auto Layout Panel
With any new project, you are going to be confronted with the dreaded “blank page” scenario. When designing a book, it can help if you have some elementary design skills, but with so many layout options to choose from, it is easy to get overwhelmed with so much choice. But if you click the Auto Layout button in the Auto Layout panel (Figure 9.8) at the beginning of a project, Lightroom will automatically generate a complete book layout for you based on the current Auto Layout preset setting. But read the following section first before you try this.
Tip
To go to a multi-page view, use  (Mac) or
  (PC). To go to a spread view, use
  (Mac) or
  (PC). To go to a single-page view, use
  (Mac) or
  (PC). To go to a zoomed page view, use
  (Mac) or
  (PC). Use
  (Mac) or (PC) to go to the next view mode and
  (Mac) or
  (PC) to go to the previous view mode. Use the
  and
and  keys on their own to make the multi-page view bigger or smaller. While in a spread or single-page view, double-clicking toggles going to a zoom page view and back again.
Auto Layout Preset Editor
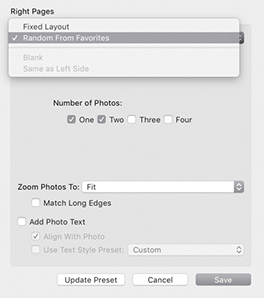
For the Auto Layout button to work, you either need to select a Fixed Layout preset or, if Random From Favorites is selected, have first added a few layouts as favorites for each type of page layout, such as 1 Photo, 2 Photos, or 3 Photos. To find out how to add favorites, see Figure 9.18 on page 524.
To select a preset go to the Auto Layout panel Preset menu. To create a new preset, select Edit Auto Layout Preset. This opens the Auto Layout Preset Editor (Figure 9.9). Here, you can select a supplied preset from the Preset menu. Or, you can choose to edit the left and right pages independently or leave one page blank. If you wish to keep the pages consistent, keep the Left Pages menu set to Same as Right Side so that the Right pages options govern the layout for both sides.

Tip
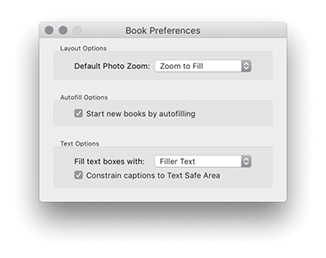
The Text Options in the Book preferences (see Figure 9.27 on page 529) must be set to Fill text boxes with Title metadata or Caption metadata in order for photo captions to be filled automatically.
In the Fixed Layout mode (Figure 9.9), you can select a specific page-layout option. First choose the layout type (1 Photo, 2 Photos, etc.), and then choose a specific layout from the scrolling menu. Next, you have the Zoom Photos options. Here, you can choose to let the photos zoom to fit the photo cells or zoom to fill. Below that is a Match Long Edges option. When checked, this can help you standardize the longest edge size for all the photos placed in a book layout. So, regardless of whether they are landscape or portrait, the longest edges match.
When the Add Photo Texts option is selected, captions are automatically added to the text frames (see Tip). These can be aligned to the photos and make use of a pre-created text style preset selected from the pop-up menu at the bottom.
As just mentioned, when Random From Favorites is selected (Figure 9.10), this restricts the layout selection to favorite layouts only, i.e., page layouts you have designated as “favorites.” In the middle is the Number of Photos option. This lets you decide how many photos you wish to place on each page: one, two, three, or four. When you let the auto layout do its thing, it randomly chooses from the favorite page layouts that allow that many photos per page. When you have finished customizing the Auto Layout Preset Editor, save the settings as a new preset. In this instance, the preset enabled the One and Two boxes, meaning it would select only favorite layouts with one and two photos per page.
Editing the Book Pages
The auto-layout option can certainly help break the ice and get a book project started, but at some stage, you will almost certainly want to edit the pages and refine the layout. Figure 9.12 shows a multi-page layout view of a book project. As you can see, this gives you the ability to see an overview of a book and make some basic edits. For example, you can select individual pages by clicking them (or clicking just below a page) and drag the yellow bar to change the page order. If you hold down the  key, you can click to add more pages to a selection. Use
  (Mac) or
  (PC) to select all of the pages in a layout and
  (Mac) or
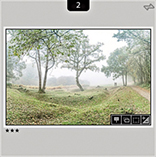
  (PC) to select all pages including the cover. You can also click photo cells or text cells to edit them. So, for example, you can drag photos from one photo cell to another and swap their positions. If you drag a photo from the Filmstrip to a photo cell, you can remove a photo that is there and replace it with the one you have just dragged. Figure 9.11 shows a close-up view of a Filmstrip cell viewed in the Book module. The count number at the top indicates how many times this photo has been used in a book project (such as once on the cover and once inside the book). If you use the context menu (right-click a cell), you can remove a photo and leave the cell blank. When you click a photo cell, you will see the Zoom slider for reducing or increasing the zoom setting.
Clicking the Spread View button ( [Mac],
  [PC]) takes you to a double-page view like the one shown in Figure 9.13. This lets you preview the pages in a book as double-page spreads and get a better feel for the final layout and how the pages will look. In this example, I had a single landscape image running across both pages. Here, I right-clicked to deselect the Zoom Photo to Fill Cell option, and then clicked and dragged the photo to move it to the left of the photo cell. I had to be careful setting the Zoom level so the photo did not reproduce any bigger than the actual pixel resolution would allow. You can also select multiple photo cells and use the zoom slider to zoom all at once, or right-click to enable or disable the Zoom To Fill Cell setting.
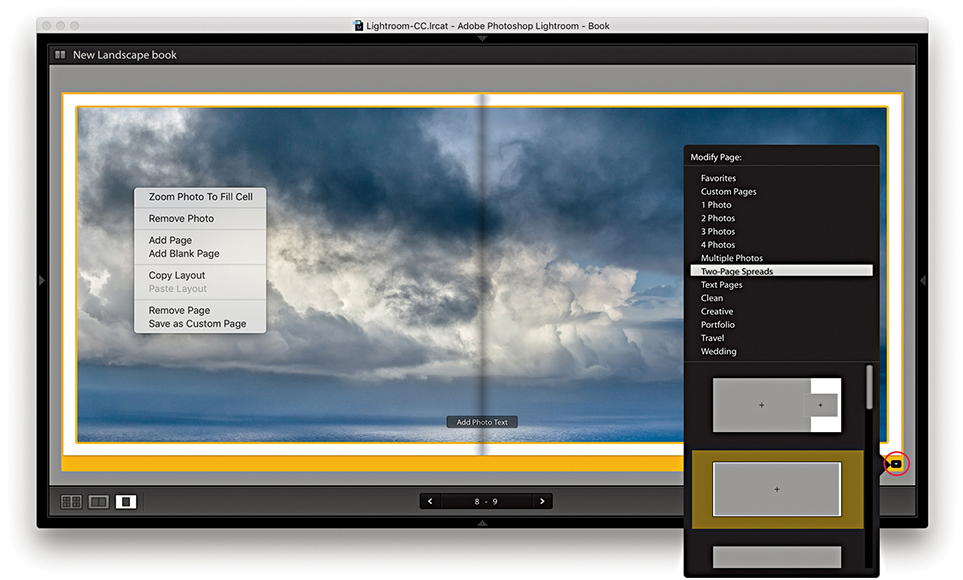
In the spread view, you can click the arrow buttons in the Toolbar to navigate from one spread to the next (or use the keyboard Arrow keys). If you click the Change Page Layout button (circled), you can open the layout menu, which shows here the Two-Page Spreads layout options. You can access all of the available page layouts from here; they are listed in groups. Some layout options let you choose different combinations of photo cells, as well as text cells, and thereby experiment with all different kinds of layout possibilities. In this instance, there were 11 options to choose from, including a double-page spread with margins (the one currently selected).
The single-page view is shown in Figure 9.14 ( [Mac],
  [PC]) and can be used to edit individual pages.
Editing the Cover Pages
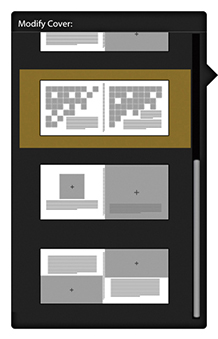
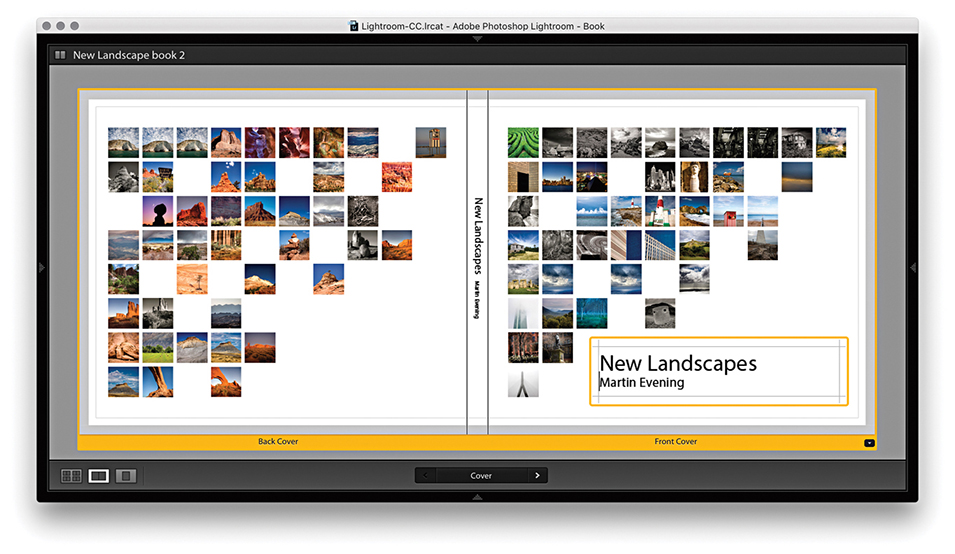
The front and back cover pages are displayed at the top of the multi-page layout view, and have separate template options. Of these, the one highlighted in Figure 9.15 is quite interesting, as it allows you to place multiple images from the book in the cover design. This layout is shown in use in Figure 9.16, which also illustrates how you can drag a selection of photos from the Filmstrip to auto-populate the squares. Once photos have been added to a layout, you can rearrange them by dragging from one cell to another (Figure 9.17). Other layout options allow you to place full-bleed images on both the front and back cover pages with overlaid text. Lightroom makes use of the first image in the collection as the front cover image and the last image in the collection as the back cover image. To add text to the spine, click in the spine text box and text will be applied rotated 90 degrees. Depending on how you set the size of the type, you may need to adjust the baseline shift so the spine text appears centered across the width of the spine. Discussed later are ways you can set the text in the text cells and, in particular, how you can maintain control over the justification and cell padding, as well as how to precisely place the text on the cover pages.
Page Panel
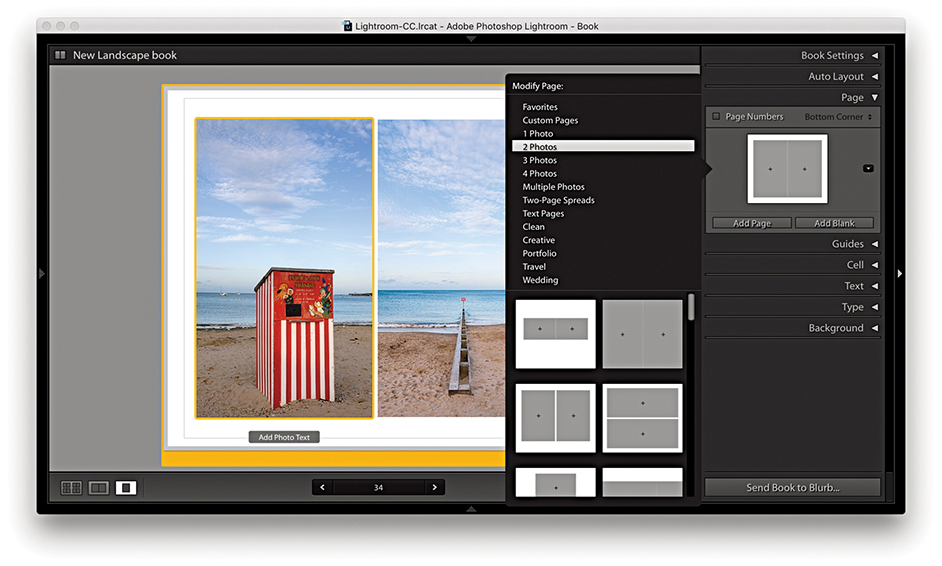
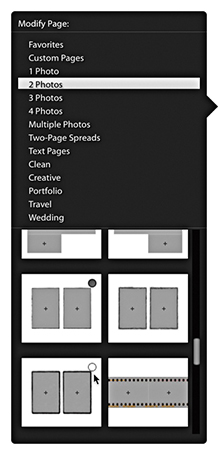
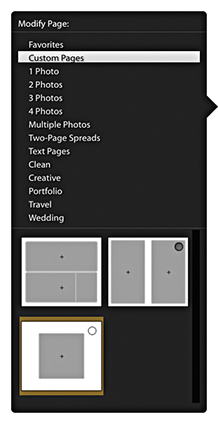
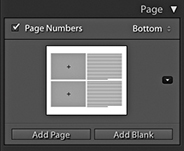
Figure 9.18 shows the Page panel with a four-photo page layout. You can click the Add Page button to add a new page using whatever page template is currently shown in the Page panel preview. Or, you can click the Add Blank button to add blank pages. If you click anywhere in the middle section, this opens the page layout picker shown in Figure 9.19, where you have multiple options to select from different layout groupings, such as 1 Photo, 2 Photos, or custom design layouts, such as Portfolio or Wedding.
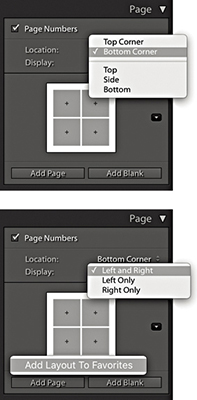
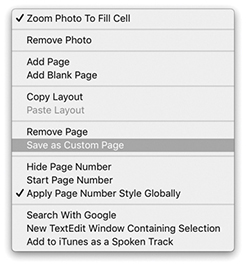
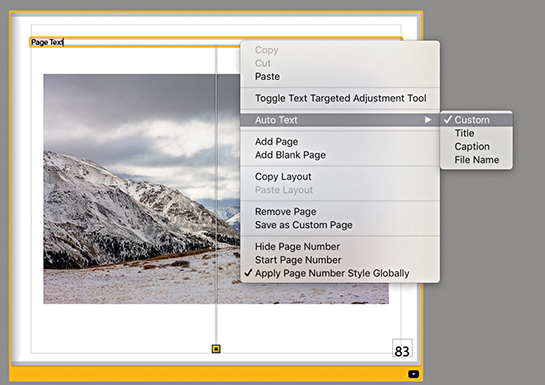
To add page numbers to a book layout, select the Page Numbers box. From the Location menu, you can then choose where the page numbers should appear in the page layout. Below that is the Display menu where you can choose to have numbers displayed on both pages or left pages or right pages only. The default font used here is Myriad Pro in quite a big font size, but it is easy to change. Highlight the page number text on any page, go to the Type panel, select a new font, and adjust. Then, right-click to access the context menu shown in Figure 9.20 and select Apply Page Number Style Globally to update all the other pages. As you can see, the context menu also includes the options Hide Page Number and Start Page Number (i.e., start the numbering from this page on).
You can choose Edit ![]() Copy Layout to copy a selected layout (
Copy Layout to copy a selected layout ( [Mac] or
  [PC]). This can be a single page or a selection of pages. You can then choose Edit
 ![]() Paste Layout (
Paste Layout ( [Mac] or
  [PC]) to paste the selected layout. This adds new empty pages at the selected insertion point using the copied layout settings (but does not include the images themselves).
Marking Page Layouts as Favorites
Favorite page layouts are used when generating an auto layout. To mark layouts as favorites, go to the page layout picker (Figure 9.19). As you move the pointer over the layouts, you can click in a layout’s hollow circle to add it as a favorite (indicated by a filled circle). Or, you can right-click a layout to choose Add Layout to Favorites to mark it as a favorite (see Figure 9.18). To remove a layout from the Favorites list, right-click again or click inside the filled circle.
Saving Custom Page Layouts
It is possible to edit the preset page layouts to create a custom page layout setting. For example, if you use the cell padding sliders to adjust the layout of a page preset layout, you can modify an existing layout to create a custom layout of your own. Having done that, right-click the modified page layout in the content area to access the context menu shown in Figure 9.20 and select Save as Custom Page. This then adds the modified page layout as a new User Page setting (Figure 9.21), which will also appear listed in the Page panel Layout menu. Photo text settings are also included when you save custom page layouts.
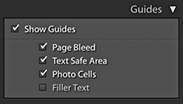
Guides Panel
The Book module has a Guides panel (Figure 9.22). Here, you have the option of showing/hiding various guides ( [Mac] or
  [PC]). If you intend to publish photographs as full-bleed images, it is critical that you allow enough room for the page bleed. You have to bear in mind that when producing a printed book, it is never going to be possible for the final trimmed product to be aligned exactly the way it appears laid out on the computer. You may not notice this when you pick up a book, but there is a margin of error of around a millimeter or so between all the pages after they have been trimmed. Therefore, it is customary to allow a bleed area of around 3 mm outside the specified page area when placing page elements that are intended to overflow the page edge. You can see these when enabling Page Bleed guides (
 [Mac] or
  [PC]). Similarly, it is not a good idea to create a page layout in which graphics or text are placed too close to the edge of the page, which is why most books have quite generous margins. In the case of the Book module, the Text Safe Area is defined by the thin yellow lines and can be shown or hidden using
  (Mac) or
  (PC). The golden rule is to keep safely within these margins or, if you want to print full page, make sure the images fill to the page-bleed edges. Next is the Photo Cells option, which allows you to turn their visibility on or off (
 [Mac] or
  [PC]).
Whenever you create a sample layout, prior to adding actual text it can be helpful to see the empty text frames filled with sample, filler text. This is usually done by filling with the often-used Lorem ipsum Latin text. When the Filler Text option is checked, this temporarily fills the text frames and provides a rough indication of how the page will look when the proper text has been added (the filler text you see in the layout will not actually print). As soon as you click inside a text frame, the filler text vanishes, allowing you to fill the text frame with real text instead. You can also toggle this on or off using  (Mac) or
  (PC).
(PC).
Cell Panel
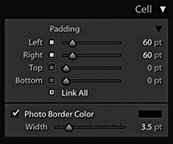
The Cell panel can be used to pad the position of a photo within a photo frame or text within a text frame and thereby fine-tune the placement of images and text within a layout. The default mode for the Cell panel is a compact view with a single padding slider. Click the arrow (circled) to access the expanded view shown in Figure 9.23. In this view mode, you can individually adjust the sliders to alter the padding within a frame and click the lock buttons to lock one or more sliders. Or, click the Link All button at the bottom to lock all sliders.

With a cell selected, you can check the Photo Border Color box to add a border to the cell. To ensure that the photo fills the cell completely, choose Zoom Photo to Fill Cell from the context menu.
Customizing Page Layout Cells
You can refine the layout with custom-sized cells within a page layout. These can be any size you want and not restricted by the standard padding. You can add multiple cells to a page layout, move them to the front or back and place a cell exactly where you want it. When you have finished editing a layout you can save this as a custom page layout setting.
To add a new cell to a page, go to a full page view and select a page layout. Right-click anywhere on the page and choose Add Cell ![]() Photo or Photo Description from the context menu. To resize a cell, click on the cell to activate it. Then click on the square icon in the center of the bounding box and drag to reposition it. Or, you can hold down the key and use the keyboard arrow keys to move a selected cell. To adjust the size of a cell, drag one of the corner handles of the bounding box. You can arrange the placement of a cell by sending it forward or backward on a layout. Select a cell, right-click and choose one of the Send to Back or Bring To Front options from the context menu. Lastly, you can use the same context menu to save the edited layout as a custom page.
Photo or Photo Description from the context menu. To resize a cell, click on the cell to activate it. Then click on the square icon in the center of the bounding box and drag to reposition it. Or, you can hold down the key and use the keyboard arrow keys to move a selected cell. To adjust the size of a cell, drag one of the corner handles of the bounding box. You can arrange the placement of a cell by sending it forward or backward on a layout. Select a cell, right-click and choose one of the Send to Back or Bring To Front options from the context menu. Lastly, you can use the same context menu to save the edited layout as a custom page.
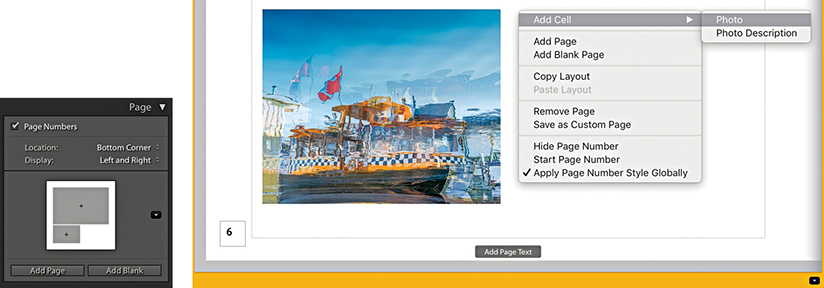
1. To add a new photo cell to a Book page layout, right-click and choose Add Cell ![]() Photo from the context menu (here, I chose to add a Photo cell).
Photo from the context menu (here, I chose to add a Photo cell).
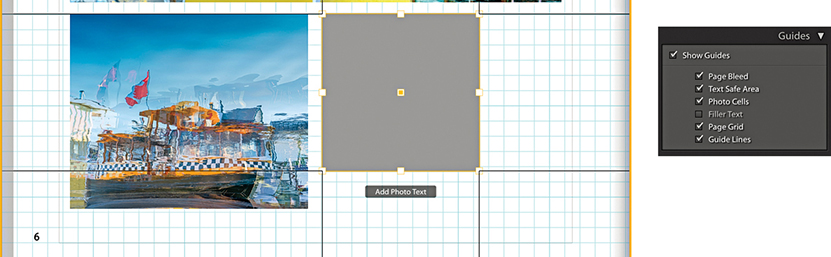
2. To move the added cell, click to activate the cell, click the square in the center and drag to reposition. Having the Page Grid and Guide Lines selected in the Guides panel as you do this can help.
3. To resize a cell, click and drag any of the corner handles.
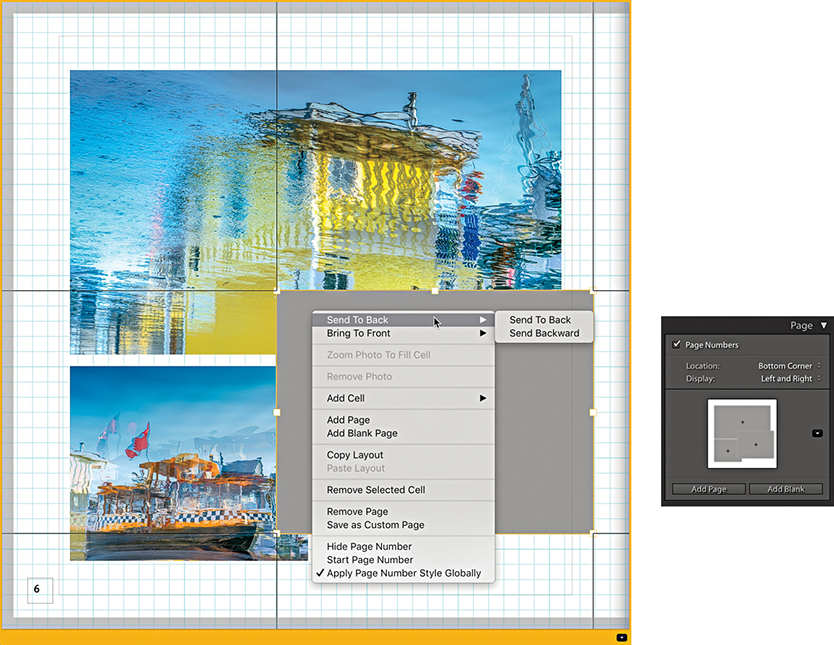
4. To adjust the arrangement of the cells, click to select a cell. Next, right-click to access the context menu, and choose to send either backward or forward. You can also use this menu to choose Save as Custom Page and save the new layout.
Text Panel
The Text panel (Figure 9.24) can be used to add text to individual photos or page layouts. When you view a new page layout in a single-page or spread view, you will see an Add Page Text box overlay at the bottom of each page. When you click on it, the text box becomes active, the words “Page Text” are highlighted, and the Page Text options are enabled in the Text panel. You can now start typing to overwrite the current text and add a page caption to that particular page. The buttons at the bottom of the panel can be used to anchor the page text to the top or bottom of the page layout. While the page text box is active, you can click the yellow border to manually offset the text box or you can drag the Offset slider in the Text panel.
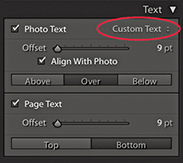
If you click to select an actual photo, an Add Photo Text overlay appears. As with the Page Text, when you click this overlay, the words “Photo Text” will be highlighted and the Photo Text options enabled in the Text panel. And again, you can manually offset the text by dragging the Photo Text box or dragging the Offset slider. The alignment options allow you to align the text just above, just below, or overlaying the selected photo. When the Align With Photo check box is selected, the text box left-aligns to the photo boundary and automatically realigns the caption text as you adjust the zoom setting or padding for the associated photo cell. When the box is unselected, the text box left-aligns to the left edge of the page layout.
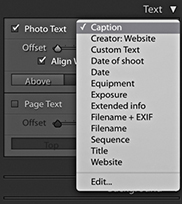
You can also choose an auto-fill text option for the Photo Text using the custom text menu shown circled in Figure 9.24. Figure 9.25 shows a list of the options that are available. These include items that can be pulled from the file metadata.
Text Box Layouts
Some page layouts include text boxes for placing text and are there to help you maintain continuity in a layout design when adding text (Figure 9.26). These are represented in a page layout by a thin-line, rectangular guide outline. To enter custom text, click inside a box and start typing. If the Filler Text option is checked in the Guides panel (Figure 9.22), you will initially see filler text appear in these text boxes. This disappears as soon as you click in the text box.
Adding Auto Text
You can auto-add text within the page layout text boxes. To do this, right-click to access the context menu and select one of the options from the Auto Text menu shown in Figure 9.28. By default, this is set to Custom (which overrides the auto-text option). Any text that you have already entered will remain in the text box and not be edited. If you select the Title, Caption, or File Name option, Lightroom reads and adds the data that may have been entered in these metadata fields and auto-fills the text box accordingly. If multiple type styles have been applied to the text in a particular text cell, when Auto Text is applied it utilizes the first character in the box to format the rest of the text. A useful tip is to make sure you fill out the Title and Caption fields via the Library module. You can then use these metadata entries to populate the text cells using the Auto Text feature. You can then easily reformat the page layout and have the text boxes preserve the pre-selected auto content. Likewise, this means Lightroom can access the Title or Caption data if you place the same images in another book creation.
If the associated metadata fields happen to be empty, the text box will be left blank. If you replace a photo in a photo cell, the text will update automatically as you change images. If you click a text box and delete the current text or start typing, this turns off Auto Text mode, and the text box reverts to the Custom mode again.
If you go to the Book menu, you can select Book Preferences to open the Book Preferences dialog (Figure 9.27). Here, you can configure the Autofill options so that when you start a new book, the text cells are autofilled by default. Below this are the Text options where you can choose to fill using Filler Text, Title, Caption, or File Name.
Type Panel
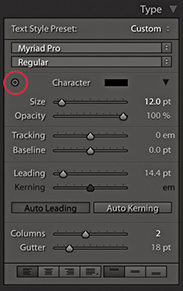
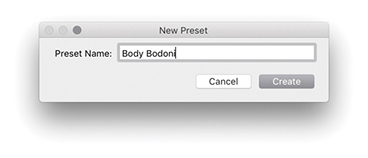
In any book design project, it is important to have full control of the text. The Book module has a number of type controls in the Type panel (Figure 9.29). These utilize the same Adobe type engine used in other Adobe products. The Book module may not offer all the type features that can be found in Adobe Illustrator or Adobe InDesign, but there is enough here to help you produce decent-looking text in a book. At the top of the panel is the Text Style Preset menu, where you can select text presets. The title – sans serif and caption – sans serif text style presets use Myriad Pro. This is a modern sans-serif font and offers a nice wide range of styles from Condensed to Black, while the caption – serif and title – serif styles use the Adobe Garamond Pro serif typeface. As you start editing the character settings in the section below, you can choose Save Current Settings as New Preset. This opens the save dialog shown in Figure 9.30, which lets you add the character settings as a new text style.
Type Panel Character Controls
When setting the type, you will want to have quick access to all the available fonts and associated type options. In the Type panel, click the disclosure triangle (circled in Figure 9.29) to reveal the full list of options. Here, you can set the character color, size, and opacity. It helps to have some understanding of working with fonts. If you are unsure, try making a test print with your desktop printer at 100% to see how the text settings actually look when printed. With the various book projects I have worked on, I have used a font size of between 7 points and 10.7 points for the captions and body text. For example, the body text in this book uses an 8.5-point typeface. You will probably want to experiment with different font sizes, and it is possible to end up with a mixture of font sizes in a final layout. As a rule, designers prefer to use a serif typeface for body text (serif text is characterized by semistructural details at the ends of the font strokes). Examples of this are Times New Roman and Garamond. This is because it is argued that serif text is easier to read. For headings, bolder sans-serif typefaces are commonly used, such as Gill Sans or Arial. But rules are made to be broken. The Adobe Photoshop Lightroom Classic CC Book uses Gotham Book for the headings and Frutiger Light (a sans-serif typeface) for the body text.
The Tracking slider narrows or widens the gap between selected characters. This can be used to create deliberately condensed or spaced-out lettering, or it can be used to fine-tune body text where you find that text added to a frame is just starting to overflow (and you wish to condense it slightly), or you wish to deliberately force the text to flow in a way that avoids ugly hyphenation. The Baseline slider can be used to adjust the text relative to the default baseline. You can therefore use this to adjust the type up or down. The Leading slider adjusts the width between the baselines. In most instances, you are best off leaving this set to the 0 or Auto setting, but there are times where you may want to tweak this. For example, when designing a cover, it is quite likely that you will want to experiment with different leading settings. To quickly return to the default Auto setting, select the text and click the Auto Leading button.
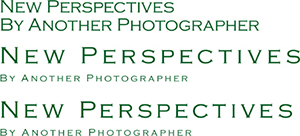
Kerning is kind of similar to tracking, but is used to adjust individual characters by placing the type cursor between two characters and then adjusting the width of the gap. The aim with kerning is to balance the gap between individual characters to create even spaces. Text is auto-kerned by default, but when it comes to large headings, you can make the typesetting look more professional by spending a little extra time balancing the individual characters. This is something that you only really need to do when setting type for the cover or such elements as chapter headings. The trick is to look at the empty space formed between each of the characters and try to get them all roughly balanced. In Figure 9.31, the top two lines show an imaginary book title in the Copperplate Gothic Light typeface sized at 18 points with Auto Leading enabled. Below that I modified the text by setting the Tracking to +200. I made the book title 24 point and the author name 10 point. The bottom version used the same settings, except I modified the kerning slightly between some of the characters to improve the balance of the type. If you decide you need to reset the kerning, select the text and click the Auto Kerning button. To learn more about type kerning or test your typography skills, check out Kerntype, a kerning game, available at type.method.ac/#.
Tip
You can use  (Mac) or
  (PC) to select all type boxes. This selects all the type boxes in the current view. Once you have selected multiple text objects, you can edit the text within them using the Type panel settings.
Target Adjustment Tool Options
The Type panel also features a Target Adjustment tool (circled), which, when selected, can be used to directly modify type. Drag horizontally over a selection to adjust the size, and drag vertically to adjust the leading. If you hold down the  (Mac) or
  (PC) key and drag horizontally, you can adjust the tracking. If you hold down the (Mac) or (PC) key and drag vertically, you can adjust the baseline shift. If you drag horizontally over the cursor insertion point, you adjust the kerning. Also, -dragging temporarily deactivates the Target Adjustment tool, which allows you to alter your text selection before releasing the key and modifying the type settings again. Finally, you can use the
  key to exit the Target Adjustment mode.
The Columns slider can be used to set one or more columns within a text cell, and the Gutter slider lets you adjust the width between multiple columns.
Type Panel Frame Controls
The Frame buttons (at the bottom of Figure 9.32) can be used to control how text is placed within the text cells. From left to right, you can choose to align text to the left, center, right, or with full justification. The next three buttons allow you to also align the text to the top, middle, or bottom of the cell. You can then use the Cell panel (which is shown again in Figure 9.33) to pad the text, adjusting the sliders to pad the left, right, top, and bottom edges. As I mentioned earlier, when you click the boxes next to each of these sliders, you can link the individual padding settings. Or, you can click the Link All button at the bottom to link all the sliders together.
Background Panel
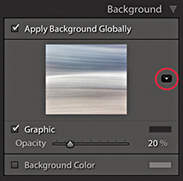
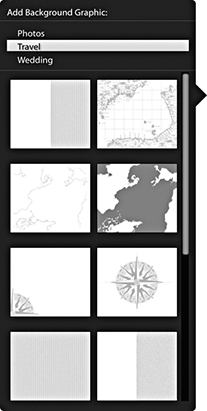
Most people will want to have their photos printed against a paper-white background. But if you wish, you can use the Background panel (Figure 9.34) to edit the background and choose another color instead. For example, I have had a Blurb book printed using black as the background color, which, in my opinion, printed really well. The Apply Globally option is checked by default, so whatever settings you choose to apply here will be applied to all the inside pages. If you deselect this option, you will have the option to apply custom background settings to individual pages. If you click the Graphic option, you can also add a graphic image that fills the entire page bleed areas. To do this, you have to select an image from the Filmstrip and drag this up to the Background graphic preview area. You can then adjust the Opacity slider to set the opacity. If you click the downward arrow (circled), you can access the custom graphic backgrounds shown in Figure 9.35. You can also combine the Graphic and Background Color settings to achieve the desired mix of background image and color shade.
Publishing Your Book
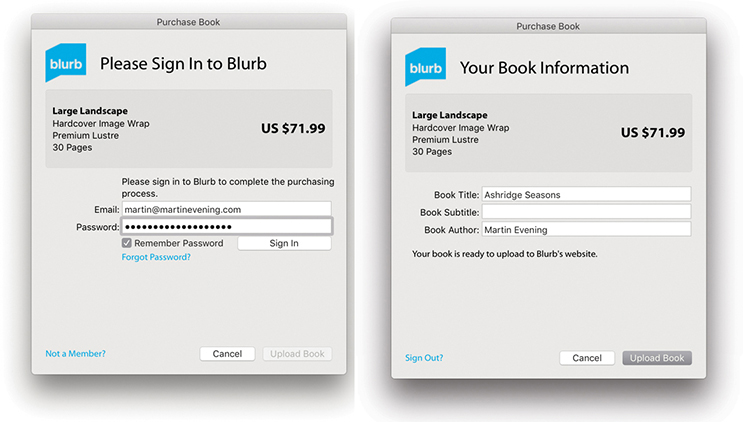
Once your book project is complete, you are all ready to publish, which you can do by clicking the Send Book to Blurb button at the bottom. This opens the first of the two dialogs shown in Figure 9.36. First, you need to log in as a new member or enter your existing login information. Next, you will be asked to give the book a title, a subtitle, and an author name. These are not required, but they will help you identify individual book projects when visiting the Blurb store. The remaining dialogs take you through the pricing options, where you can choose to order multiple books to gain a discount or enter promo codes. Although you are shown a price for getting the book printed, this does not include the delivery cost. Delivery times vary depending on which territory you live in and where your nearest Blurb printing center is located.
Pause and Resume the Upload of a Book to Blurb
During the initial phase, you will have to wait while the rendering of book content to PDF is going on. This may take a while depending on the size of your book. As Lightroom starts to upload the PDF file, you can then pause and resume the upload of the pages to Blurb. To do this, go to the Activity and Status area at the upper-left corner of the window (next to the Lightroom icon). Here, you can pause and resume the upload of the pages to Blurb via the expanded progress bar.
The Slideshow Module
The Slideshow module (Figure 9.37) can be used to create onscreen presentations that can be played directly via the Slideshow module.

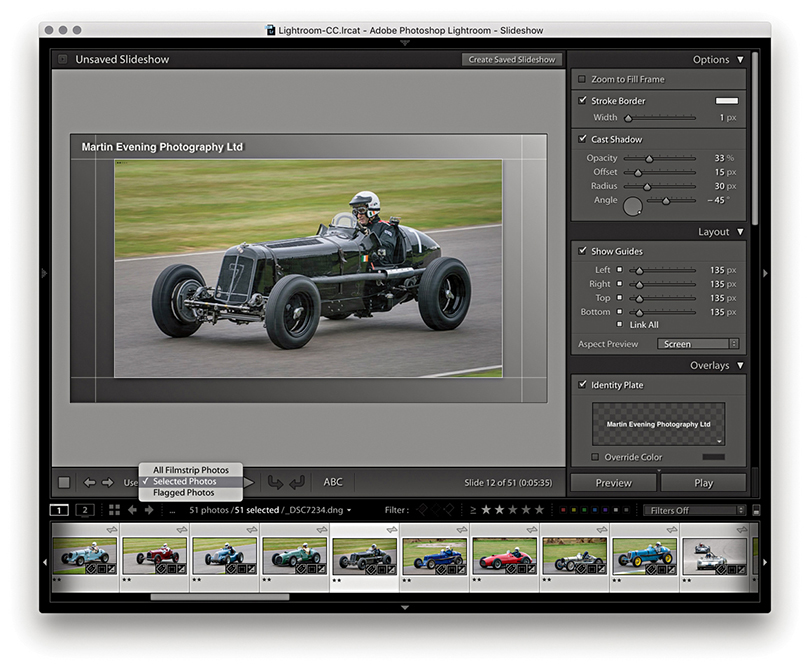
The Options panel can be used to manage the framing and offers the ability to edit the Stroke Border styles and image Cast Shadow options for slideshow images. The Layout panel in the Slideshow module is similar to the Layout panel in the Print module and can be used to set up the margin widths for the slide frames. The Overlays panel is also similar to the one in the Print module, where you can add elements to a slideshow template design, such as a custom identity plate, custom watermark, or rating stars information. When you enable the Text Overlays option, you can add custom text objects with full text-editing control and optional drop shadows. The Backdrop panel lets you set a backdrop color and color-wash effect. You also have the option to add an image from the Filmstrip as a backdrop. The Titles panel lets you add slides at the beginning and end of a slideshow during playback, with the option to use the Identity Plate Editor to place saved custom text captions or graphics and a Music panel for managing multiple soundtracks. Meanwhile, the Playback panel can be used to control slide length and fades and randomize options, sync the slides to the music, and add pan and zoom effects.
Note
There is HiDPI support for preview images in the Slideshow module. But this only affects people who are working with one of the most recent MacBook Pro or iMac computers with Retina displays or other comparable PC hardware.
As with most of the other modules, the Slideshow settings can be saved as a custom template setting via the Template Browser. As you hover over the presets listed, the Preview panel generates a quick preview using the current, most selected image in the Filmstrip selection. The playback controls in the Slideshow Toolbar can be used to quickly switch to the Preview mode. This lets you preview how the slideshow will look in the content area before clicking the main Play button. You can also initiate an impromptu slideshow while in the Library, Develop, or Print module by using  (Mac) or
  (PC); whenever you do so, the currently selected Slideshow template is used. Any time you want to exit a slideshow, just press . A built-in sleep override prevents the screen from going to sleep during a slideshow presentation.
You can save Slideshow image collections (plus the Slideshow settings used) as Slideshow collections via the Collections panel. This then lets you quickly select Slideshow collections while working in other modules.
Using the Slideshow module Slideshow menu you can choose one of the following Export Slideshow options. Slideshows can be exported as self-contained PDF documents (use  [Mac] or
  [PC]), as individual JPEG slide images for use in third-party slideshow presentations ( [Mac] or [PC]). You can even export slideshows as movies (
 [Mac] or
  [PC]).
The Slide Editor View
Figure 9.38 shows the Slide Editor view, which always displays the most selected Filmstrip image. You can change the image view by using the Left and Right Arrow keys to navigate through the selected images in the Filmstrip. As adjustments are made to the Slideshow settings in the panels on the right, these changes are reflected in the Slide Editor view. The Toolbar has preview playback controls and options for choosing which photos are displayed in a slideshow. You can choose from All Filmstrip Photos, Selected Photos, or Flagged Photos. As with other Lightroom modules, you can toggle showing and hiding the Toolbar using the  keyboard shortcut.
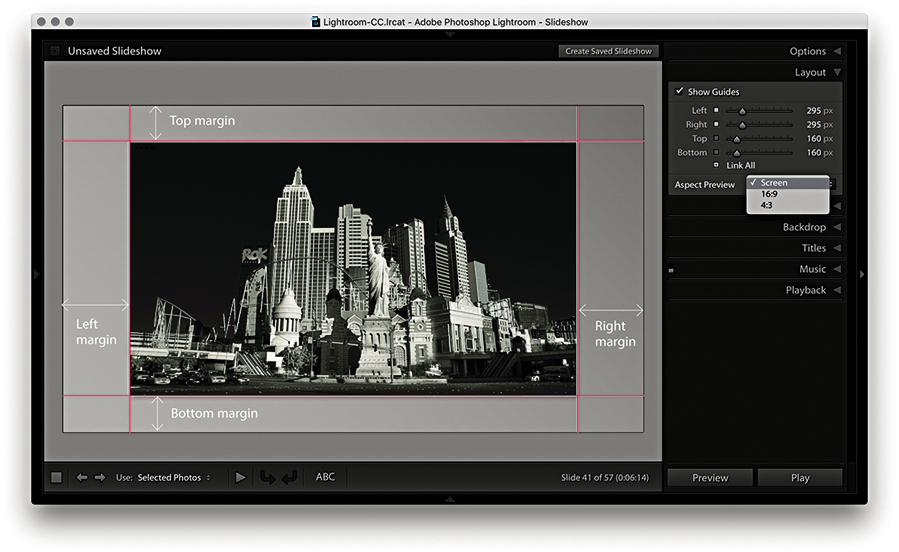
Layout Panel
The Layout panel lets you edit the slide layout by specifying the margins for the image display. In Figure 9.39, the layout guides are highlighted in red. You can adjust the margins by dragging the slider controls. Or, you can double-click the panel boxes, enter a pixel value, and fine-tune this setting using the Up and Down Arrow keys. A single Arrow key press increases or decreases the pixel dimensions by 1 unit, and pressing and an Arrow key increases or decreases the pixel dimensions 10 units at a time. You can also drag on the guides directly within the content area to adjust the margin widths. The unit dimensions have linking check boxes next to them. This means that when two or more boxes are checked, as you adjust one value, the other field values are linked. For example, in Figure 9.39, I checked the boxes for the left and right margins only. This meant that as I adjusted the width for the right margin, the left margin was adjusted by the same amount. You can hide the slide layout guides at any time by unchecking the Show Guides box in the Layout panel or by using the (Mac) or (PC) shortcut. In the Aspect Preview menu, you can select Screen to make the aspect ratio of the Slideshow match the proportions of the computer display you are working on, or you can select a fixed ratio of 16:9 or 4:3. This is something you want to consider early on, especially if you plan to export a slideshow to play on a different screen.
Options Panel
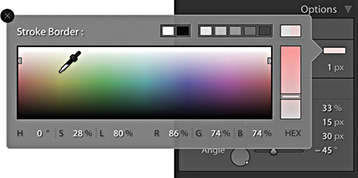
Now let’s look at how the photographs are displayed within the slide frames. At the top of the Options panel (Figure 9.40) is the Zoom to Fill Frame check box. In the Figure 9.42 example, this was unchecked, and as you can see in the Slide Editor view, the image was centered within the margins (as specified in the Layout panel). If the Zoom to Fill Frame option is checked (Figure 9.43), the photo resizes and expands to fill the available space. You should be aware that when you select this option, it automatically centers each image in the slideshow as it applies the necessary cropping to the picture. In Figure 9.43, you will notice that the cropped view is aligned more toward the top of the frame. This is because I clicked on the slide preview image and dragged it downward to preserve more of the top of the photo. This tweaking overrides the automatic cropping and is applied on a per-image basis. In other words, you can pre-edit a selection of pictures that are to be included in a slideshow and customize the cropping for each image. Just be aware that these adjustments are lost as soon as you make a new selection of images. If you end up spending time making custom tweaks to a slideshow presentation, you will definitely want to save these adjustments as a Slideshow collection. In these two examples, I also checked the Stroke Border option to add a light-gray stroke to the slideshow frame images (use the Stroke Border slider to adjust the thickness). If you want to change the stroke color, double-click the color swatch to open the color picker dialog shown in Figure 9.41.
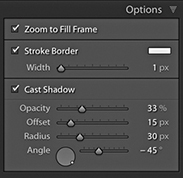
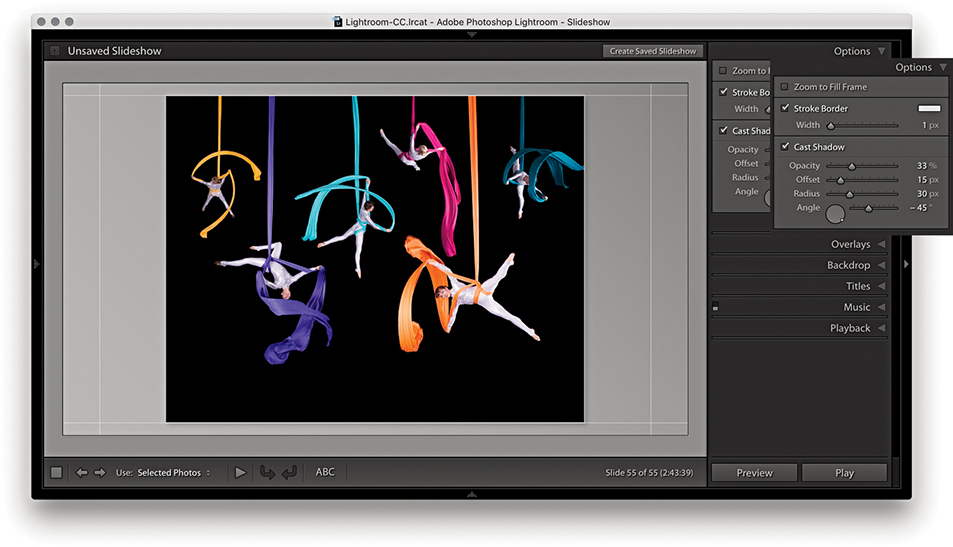
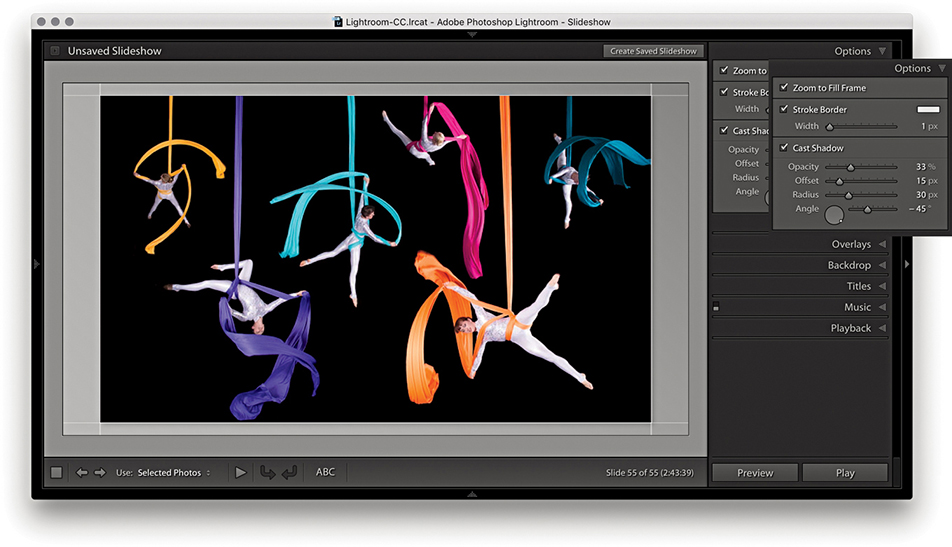
If you select the Cast Shadow option, you can add drop shadows behind the photographs. This applies a black shadow, and by adjusting the Opacity, Offset, Radius, and Angle sliders (or adjusting the angle wheel), you can customize the way the shadow effect looks. As you adjust the angle setting, the shadow preview temporarily hardens to a flat shape, but as you release the adjustment controls, the shadow is re-rendered in the Slide Editor view.
Overlays Panel
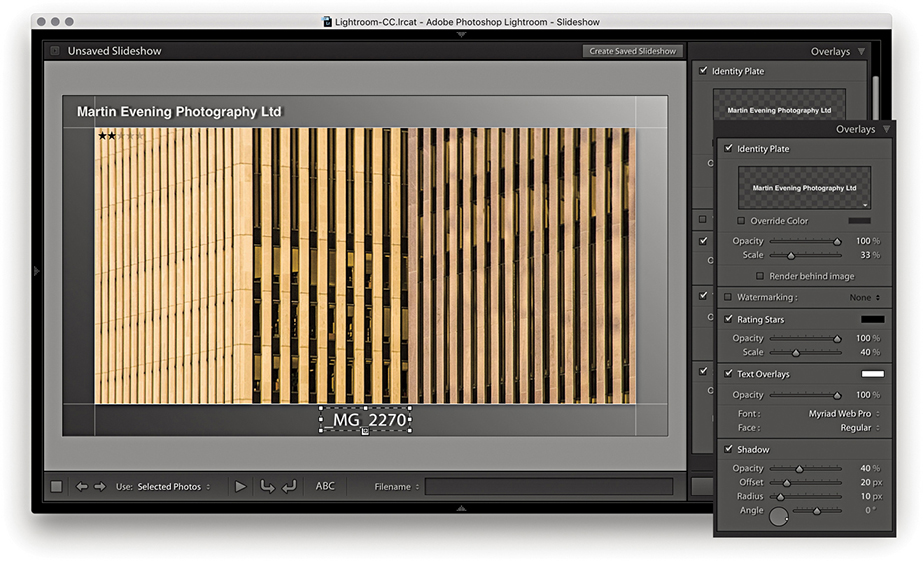
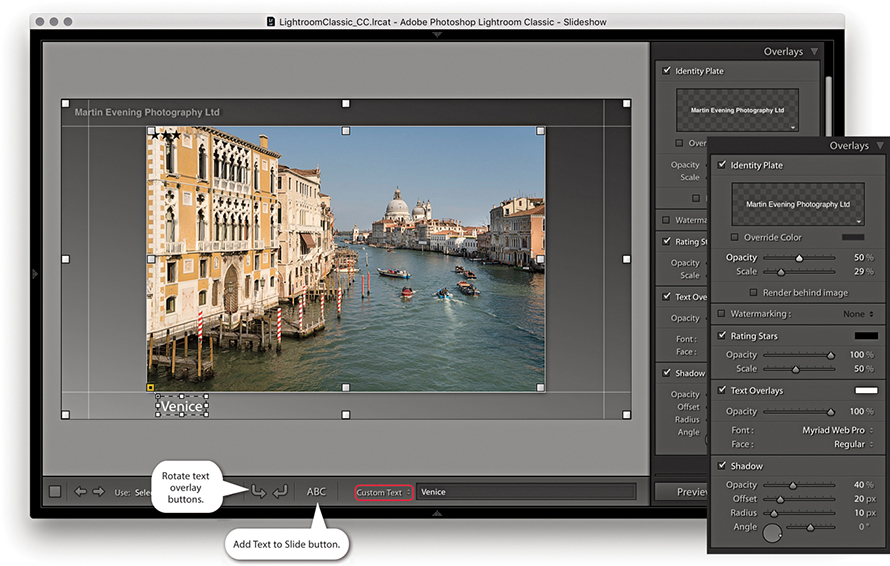
Having established the layout margins and image placement, you can begin adding content to the slide frames. If you enable the Identity Plate option, you can select a custom preset template by clicking the identity plate preview, and choosing Edit from the drop-down menu to create a new one. The Opacity and Scale properties let you customize the identity plate appearance and decide whether you want the identity plate to be on top or placed behind each slide image. Once enabled, the identity plate can be repositioned by simply clicking and dragging anywhere inside the slide frame area. In this respect, the identity plate is just like any other custom object. The Watermarking option allows you to select a custom watermark setting such as was discussed in Chapter 7 (see pages 459 to 460). The Rating Stars options let you display the current image star rating, as well as adjust the color and scale size. As with all custom objects, you can scale each object by dragging a corner or side handle. The Text Overlays check box toggles displaying all other text objects apart from the identity plate and ratings. For example, in Figure 9.44, this option is checked, which allows you to see a filename text object that I had placed centered below the image. The Shadow check box can be used to apply a drop shadow effect to each overlay object and apply independent shadow settings to each.
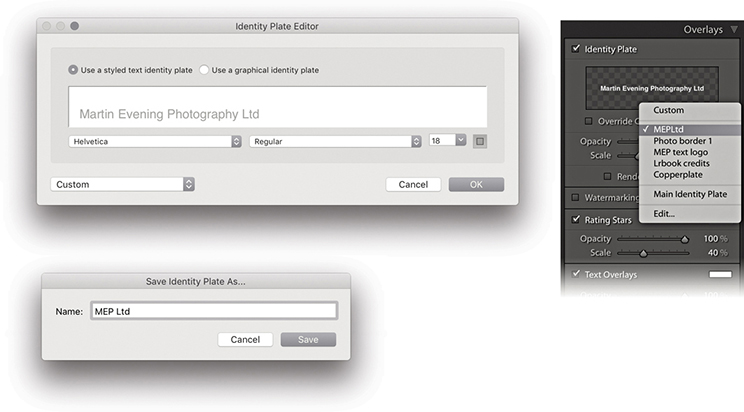
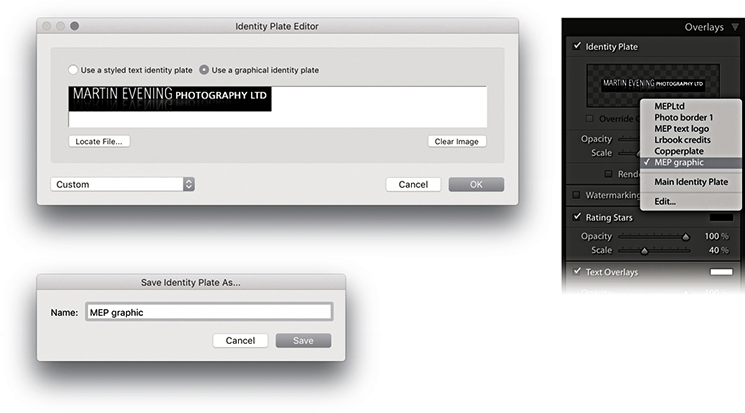
Creating a Custom Identity Plate
I will discuss working with text overlays shortly, but let’s take a quick look at the Identity Plate options first (Figures 9.45 and 9.46). To open the Identity Plate Editor, click the identity plate preview in the Overlays panel and choose a pre-saved Identity Plate setting, or select Edit.
Adding Custom Text Overlays
To add a custom text overlay, click the Add Text to Slide button (Figure 9.47). This opens a text box next to it in the Toolbar, where you can type to add custom text. Click  , and the text appears as a new text overlay in the Slide Editor view. You can add as many text overlays as you like and re-edit them. To hide a Custom Text box, click the Add Text to Slide button a second time. You can also use the Rotate buttons on the Toolbar to rotate text overlays by 90 degrees and to remove a text overlay; just click to highlight it and press
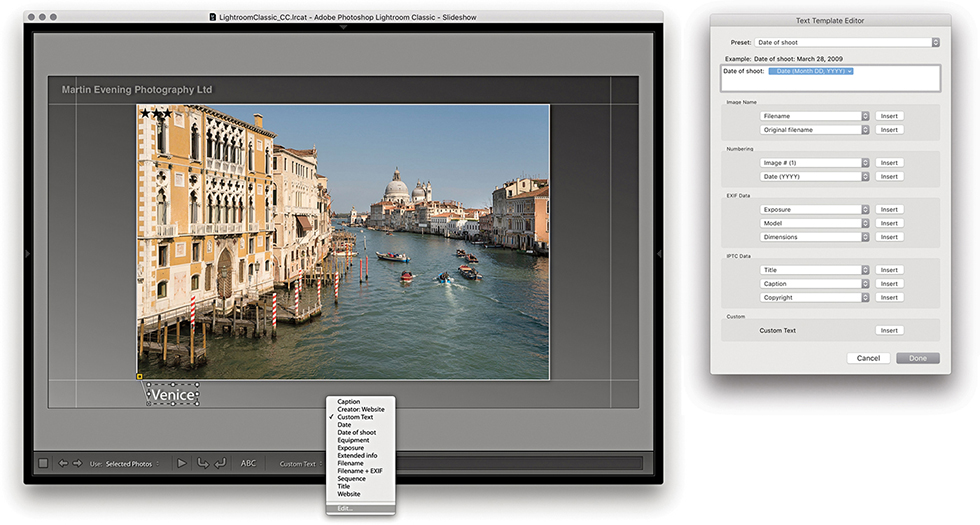
  . If you click to select a text object in the Slide Editor view, you can edit the content by typing in the Toolbar text field. Or, you can click on the Text Overlays menu (circled) to reveal the options shown in Figure 9.48 and select an item from the list such as Date or Filename. Choosing Edit opens the Text Template Editor (Figure 9.48). This lets you add various metadata items as tokens. Just click an Insert button to add new tokens to a template design, and combine these with custom text to create your own custom text overlay presets. In Figure 9.49, I show how you could create text overlays using different tokens, such as Date (Month, DD, YYYY).
Backdrop Panel
The Slideshow frame appearance can be modified via the Backdrop panel. With the Color Wash controls, you can set up different color scheme combinations using the Color Wash and Background Color swatches, as well as adjust the Opacity and Angle sliders to fine-tune the effect. You can also place an image as a backdrop. The first time you check the Background Image option, you will not see anything happen, because you have to select a photograph from the Filmstrip first and drag it into the backdrop area (or Background image preview) for the background image to register. After that, you can use the check box to toggle the backdrop image on or off. The Color Wash colors can be combined with the applied backdrop image and used to mute the backdrop image contrast. Whenever an image is applied to the backdrop, you still retain full control over the Color Wash Color, Background Color, and Color Wash settings, and you can mix them any way you like to achieve the desired look for the backdrop. Remember also that all the settings, including those in the Backdrop panel, can be saved as a template. So, you can create Backdrop panel designs that use different background images and save them to the Template Browser panel. The following steps show how I went about creating a custom backdrop design for a slideshow.
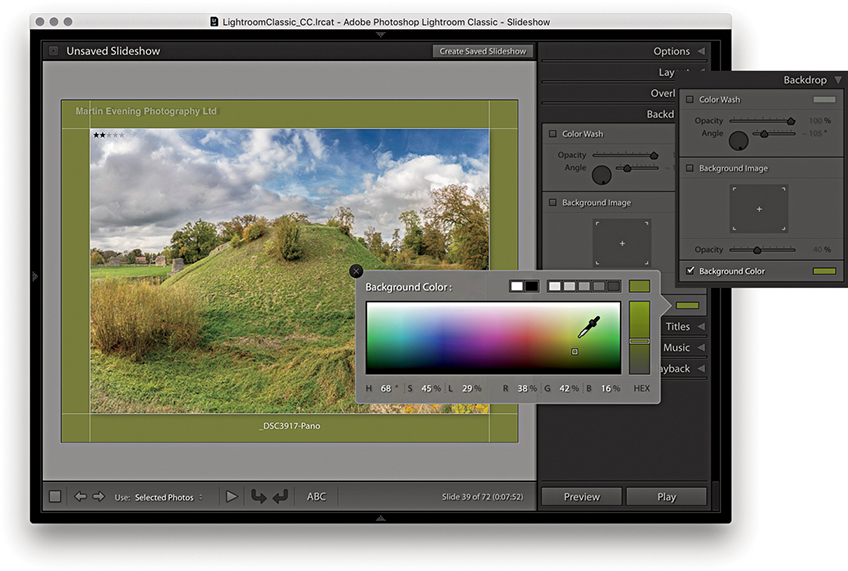
1. To start, I checked the Background Color option to enable it and clicked the background color swatch to choose a backdrop color.
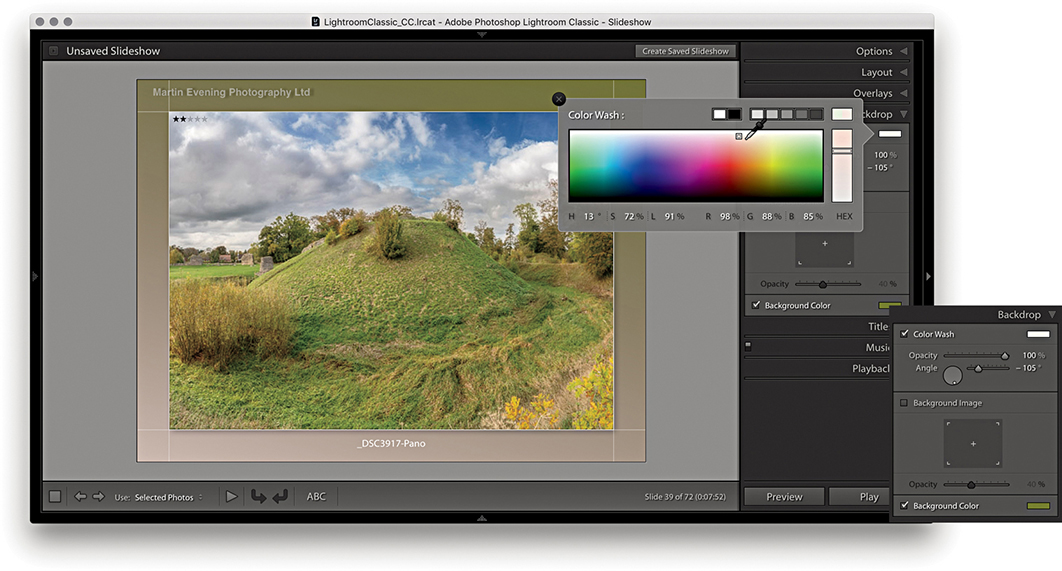
2. With the Color Wash option checked, I was able to introduce a secondary color to apply a gradient wash across the backdrop.
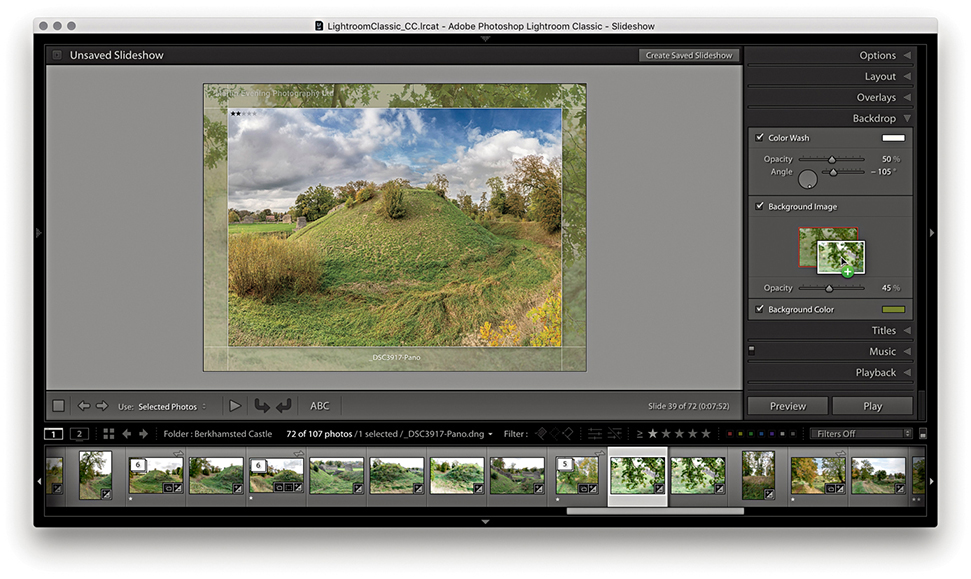
3. I added an image to the backdrop by dragging a photo from the Filmstrip into the slide Background Image preview area and then adjusted the Background Image opacity.
Titles Panel
The Titles panel can be used to add intro and ending screens to a slideshow presentation. You can add these using the Identity Plate Editor, as shown below. You simply select the Add Identity Plate options to add a screen at the beginning and/or end. The Titles panel also has a few extra controls so you can scale the identity plate and override the text color, as well as set the background color for the intro and ending screens.
Tip
On PCs you can add multiple lines of text in the identity plate directly. takes the cursor to next line.
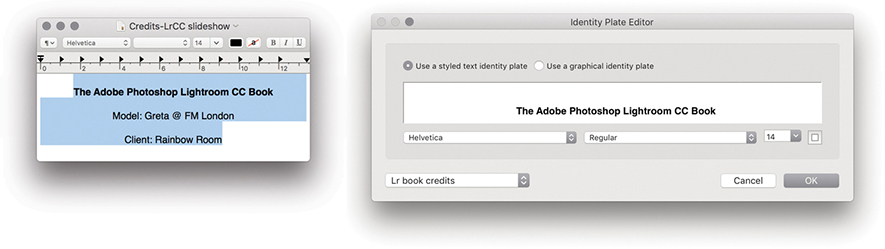
1. Because the Identity Plate Editor dialog has limited text-formatting options, I used a text editor program to write the credits. I made the first line bold, added soft returns (using  ), and centered the text. I copied and pasted this into the Identity Plate Editor dialog and saved it as a new styled text identity plate.

2. I then selected a standard identity plate company logo for the Intro screen and selected the credit list for the ending screen. This screen preview shows where the last image in the slideshow sequence faded to the ending screen credits.
Music Panel
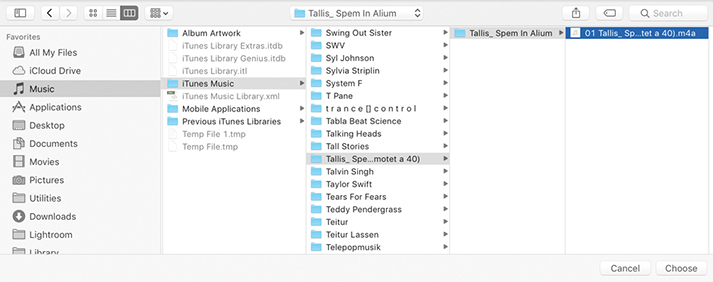
Music soundtracks can be added to a slideshow via the Music panel shown in Figure 9.50, which allows you to select soundtrack audio files to add to a slideshow presentation. To add these, click the + button. On the computer setup in my office, I maintain a complete MP3 music library and use the system Finder (Figure 9.51) to select the music I wish to have played in the background. You can add multiple audio tracks; the track duration appears alongside each soundtrack name. To remove a soundtrack from the Music panel, click the – button. If a music track you have selected later appears to be missing, you will see a warning icon in the Music panel that alerts you to relink.
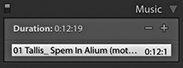
Music soundtracks cannot be saved as part of a PDF Slideshow export, but you can save a music soundtrack with a video export. If a video is ultimately going to be published to a wider audience, you must ensure you have the rights to use the music. You will not be able to play any music files that are DRM protected.
Playback Panel
The Playback panel can be used to configure the slideshow playback settings. There are two modes for this panel. Figure 9.52 shows the Automatic mode, which gives you manual control over the playback attributes.
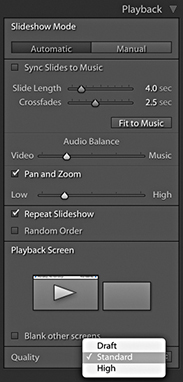
If you check the Sync Slides to Music box, Lightroom automatically detects the beats in the music and sets the slide transition speed accordingly. So, if the music track you have selected has a slow beat, the crossfade transitions will be longer, and if it has a fast-paced beat, they will be faster. Checking this option also disables the slide transition controls and Fit to Music button below, and the music will fade to silent with the last photo, thus avoiding an abrupt end to the show. When deselected, you can manually adjust the times for the Slide Length and Crossfades. If you want the slideshow to run at a fast speed, you can try selecting shorter slide and transition duration times, but bear in mind that the ability to play back at a faster speed is governed by the size of the master library image files and whether these have been fully cached yet, not to mention the performance of your computer. If you click the Fit to Music button, this auto-sets the exact slide duration required for all the slides in the slideshow to play at an even pace from start to finish based on the length of the selected soundtrack (or soundtracks).
Because Lightroom lets you incorporate video files into a slideshow presentation, there may be audio tracks in the video clips. Therefore, there is an Audio Balance slider that allows you to adjust the balance between the volume of the video clips and the music soundtrack. This is a global slider control and does not allow you to control the mix for individual video-clip components. If you need more control than this, you will probably be better off using a video-editing program instead.
Pan and Zoom Options
When the Pan and Zoom option is checked, this enables automatic pan and zoom style transitions between slides, applying a Ken Burns–style effect to the slideshow images. For those of you who are unfamiliar with this term, Ken Burns is a documentary film director and producer (The Vietnam War TV series) credited with incorporating pans and zooms of stills images in order to bring more life to static pictures. It is a style that is much used these days for slideshow and movie presentations and most notably featured in Apple video-editing applications. To apply this type of effect to your slideshows, enable the Pan and Zoom option and adjust the Pan and Zoom slider. A Low setting will result in gentle pans and zooms, while a High setting will result in more sweeping movements. After adjusting the Zoom Ratio setting, click the Preview button to check out the result.
Should you wish, you can check the Repeat Slideshow option to have the slideshow run in a loop and check the Random Order option to shuffle the play order.
Manual Mode
Clicking the Manual button switches the Playback panel to Manual mode, as shown in Figure 9.53. This disables and hides the music sync, the slide length, crossfade controls, and Fit to Music button, as well as the audio balance and Pan and Zoom options.
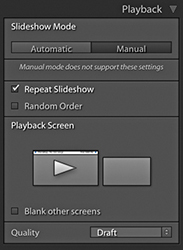
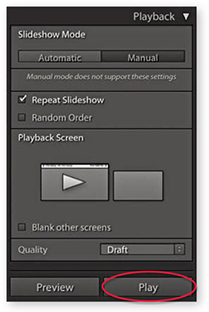
Playback Screen and Quality Settings
The Playback screen section displays a representation of connected computer displays. All the Playback panels shown here were captured with Lightroom running on a computer with two displays. The big arrow indicates which display the slideshow will appear on when in Play mode, and in such instances, you can click either display. Check the “Blank other screens” option to blank out the other display during Play mode.
The Quality menu offers a choice of Draft, Standard, or High playback settings, which determine how a slideshow will preview on playback within the application. If you want to see a rough preview, select the Draft option. For higher-quality preview playback, select Standard or High. The thing to be aware of here is that this menu option affects the playback quality of the preview only; exported slideshows always play at best quality.
Play and Preview
You will now be ready to play the slideshow. To do this, choose Slideshow ![]() Run Slideshow or click the Play button in the bottom-right corner (circled in Figure 9.54). Or, you can press to launch a full-screen slideshow using the currently selected slideshow template settings. When you switch to full Play mode, the display fades to black and then fades up to show the slides in sequence. You can pause a slideshow by clicking the Pause button or by pressing the
Run Slideshow or click the Play button in the bottom-right corner (circled in Figure 9.54). Or, you can press to launch a full-screen slideshow using the currently selected slideshow template settings. When you switch to full Play mode, the display fades to black and then fades up to show the slides in sequence. You can pause a slideshow by clicking the Pause button or by pressing the  . To stop a slideshow, just press the key. If you just want to see a quick preview of a slideshow, click the Preview button next to the Play button (). This allows you to preview a slideshow within the content area using the current quality settings. While you are in Preview mode, you can interact with the slideshow using the navigation keys located on the Toolbar (Figure 9.55).

Navigating Slideshow Photos
You can manually override a slideshow sequence by using the Left and Right Arrow keys to go backward or forward through the sequence. Use the to pause a slideshow, and press the again to resume playing.
Impromptu Slideshows
If you want to run an impromptu slideshow in any of Lightroom’s modules, press (Mac) or (PC). Press to then cancel or exit a slideshow.
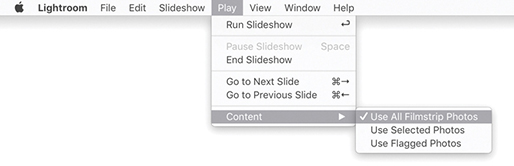
Slideshows and Selections
There are Slideshow module options in the Toolbar (Figure 9.56), as well as in the Play ![]() Content submenu (Figure 9.57). These determine which images are accessed from the Filmstrip when playing a slideshow (providing more than one image is selected). If All Filmstrip Photos is selected, the slideshow plays all the photos in the current Filmstrip starting from the most selected image or the target image. If Selected Photos is selected, the Slideshow module plays only the selected images, and if Flagged Photos is selected, only those photos that have been rated as flagged images will be played.
Content submenu (Figure 9.57). These determine which images are accessed from the Filmstrip when playing a slideshow (providing more than one image is selected). If All Filmstrip Photos is selected, the slideshow plays all the photos in the current Filmstrip starting from the most selected image or the target image. If Selected Photos is selected, the Slideshow module plays only the selected images, and if Flagged Photos is selected, only those photos that have been rated as flagged images will be played.

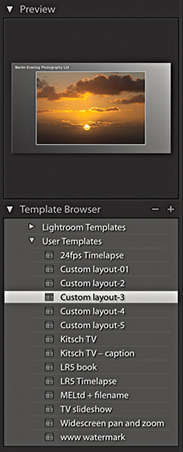
Template Browser Panel
After you have gone to all the trouble of designing a slideshow layout with measured margins, identity plate, customized text objects, and backdrop image, it makes sense to save it as a template that can be used again later. To do this, click the + button in the Template Browser panel header and give the template a descriptive name. Figure 9.58 shows a template that I created on some of the earlier pages of this chapter and saved as Custom layout-3. As you roll over the other template presets in the list, you will see a preview based on whichever is the most selected image in the Slide Editor view. As with the other Lightroom modules, you can remove a template by highlighting it and clicking the – button in the Template Browser panel. You can also update the settings for a particular template by right-clicking and choosing Update with Current Settings. There is no nesting capability built into the Template Browser panel, although to be honest it is not something that you are likely to need, because there should be enough room to accommodate all the slideshow templates you might use. You can see how social and wedding photographers might find it useful to take a standard layout design and save variations of this template with alternative music playback settings to suit the music tastes of different clients, and how art photographers might like to create custom slideshows for exhibition displays on a large screen.
When you save a template that includes a specific backdrop image and, for whatever reason, that image is no longer available in the library, you may see an error warning in the preview. However, if you select a template in which the backdrop image is missing from the library, Lightroom will look to substitute the last used backdrop image.
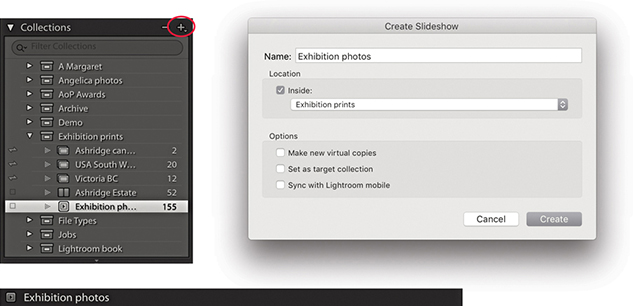
Creating a Slideshow Collection
Once you have completed work on a specific Slideshow presentation, you can choose Slideshow ![]() Create Saved Slideshow, use
Create Saved Slideshow, use  (Mac) or
  (PC), or click the + button circled in the Collections panel to save the current slideshow settings and collection of photos as a Slideshow collection. In the Create Slideshow dialog, name the collection and click Create to save (Figure 9.59).
Exporting a Slideshow
In addition to displaying slideshows, you can also export them. For example, you can export a self-contained slideshow in the Adobe PDF format, which can be played via the freely available Adobe Acrobat Reader DC program or any other program capable of reading PDF files (such as Apple Preview). Or, you can export individual JPEG slides that can be placed as pages in presentation programs such as Microsoft Powerpoint or Apple Keynote. The Export buttons are positioned at the bottom left of the screen and are shown in Figure 9.60. Normally, you will see two options—Export to PDF and Export to Video—but if you hold down the key, the Export to PDF button will change to Export to JPEG, which completes the three export options available in Lightroom. (You can also access these via the Slideshow menu or use the keyboard shortcuts mentioned in the following sections.)
 key, Export PDF changes to Export JPEG.
Exporting Slideshows to PDF
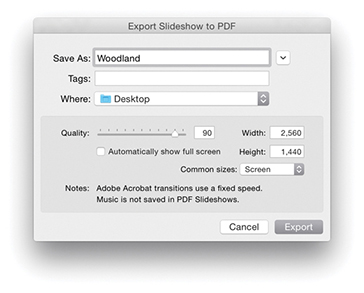
To export a PDF slideshow, choose Slideshow ![]() Export PDF Slideshow, or use (Mac) or (PC). Figure 9.61 shows the Export Slideshow to PDF dialog, where you can name and choose a destination to save the exported PDF to. Below this, you have the PDF export options, such as the Quality slider (to set the amount of compression used) and the Width and Height sections (to determine how large the slideshow document will be). You need to take into account the likely computer display size that the exported slideshow will be played on. For example, most computers will have an LCD display that uses a wide-screen format ratio—something like 16:9. If you want to scale down the slide size but preserve the full slide area, the size dimensions must match the ratio of the current pixel width and pixel height of your display. However, to make life easier for you, the Common Sizes menu will be set to the current monitor display resolution (actually the format of the slideshow slides will have already been influenced by the computer display you are working with). If you click this menu, you can easily select a common monitor resolution size for other typical computer screens. The “Automatically show full screen” option determines whether the slideshow starts playing in full-screen mode when the person who receives the slideshow opens the exported slideshow PDF document on his or her computer.
Export PDF Slideshow, or use (Mac) or (PC). Figure 9.61 shows the Export Slideshow to PDF dialog, where you can name and choose a destination to save the exported PDF to. Below this, you have the PDF export options, such as the Quality slider (to set the amount of compression used) and the Width and Height sections (to determine how large the slideshow document will be). You need to take into account the likely computer display size that the exported slideshow will be played on. For example, most computers will have an LCD display that uses a wide-screen format ratio—something like 16:9. If you want to scale down the slide size but preserve the full slide area, the size dimensions must match the ratio of the current pixel width and pixel height of your display. However, to make life easier for you, the Common Sizes menu will be set to the current monitor display resolution (actually the format of the slideshow slides will have already been influenced by the computer display you are working with). If you click this menu, you can easily select a common monitor resolution size for other typical computer screens. The “Automatically show full screen” option determines whether the slideshow starts playing in full-screen mode when the person who receives the slideshow opens the exported slideshow PDF document on his or her computer.
Note
Adobe Acrobat Reader DC is a free PDF player program for Mac or PC. To download the latest version, go to get.adobe.com/reader. Only the latest versions of Adobe Reader are able to play a slideshow with transition dissolves, and even then, they will be of a fixed speed.
When you play a PDF slideshow in Adobe Acrobat DC Pro or Acrobat Reader DC using the full-screen mode, the default view fills the entire screen. This is fine if you make the slideshow match the full-screen pixel resolution. However, if you want to play the slideshow at the actual pixel resolution, press  (Mac) or
  (PC) when viewing in Adobe Acrobat DC Pro or Acrobat Reader DC.
The compression settings can be adjusted according to how you intend to use a slideshow. If a PDF slideshow is to be distributed by CD or DVD, use a full-screen size and best-quality compression setting. If you intend to send a slideshow by email, you’ll want to keep the pixel size and compression settings low enough so you don’t send an attachment that is too large.
Exporting Slideshows to JPEG
To export a slideshow to JPEG files, choose Slideshow ![]() Export JPEG Slideshow, or use (Mac) or (PC). This opens the Export Slideshow to JPEGs dialog shown in Figure 9.62, where again, you can select the desired compression and screen size settings. This option is mainly useful if you wish to prepare individual JPEG slides that can then be incorporated into, say, a Microsoft PowerPoint or Apple Keynote presentation.
Export JPEG Slideshow, or use (Mac) or (PC). This opens the Export Slideshow to JPEGs dialog shown in Figure 9.62, where again, you can select the desired compression and screen size settings. This option is mainly useful if you wish to prepare individual JPEG slides that can then be incorporated into, say, a Microsoft PowerPoint or Apple Keynote presentation.
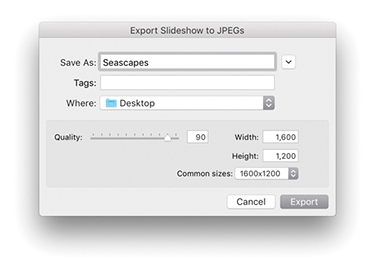
Exporting Slideshows to Video
The Export Video feature can be used to export high-quality movie slideshows (Figure 9.63). By utilizing the H.264 movie format, you can generate movie files that can be uploaded to any of the popular video-sharing websites such as YouTube. You can also optimize video files to be played back on mobile media devices such as the iPhone. Lightroom Classic CC has recently upgraded the framework used for the video rendering, which should result in faster processing times.
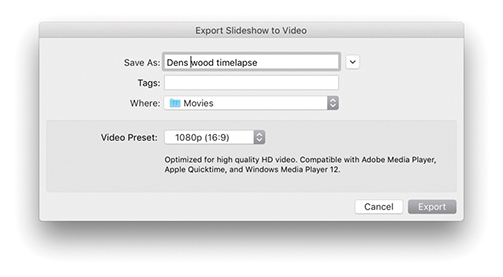
To export a video, click the Export Video button, go to the Slideshow menu, and choose Export Slideshow to Video, or use the (Mac) or (PC) keyboard shortcut. Here is a summary of the various video-output options, as described in the Information section of the Export Slideshow to Video dialog: 480x270 is suitable for mobile devices, such as the iPhone and Android, and 640x480 is suitable for small handheld devices and web use. 720p provides medium-size HD quality, which can be used for online sharing (e.g., YouTube, Facebook, Blip.tv, etc.) and also for home media/entertainment (e.g., AppleTV or Windows Media Center). Lastly, 1080p provides high-bit-rate HD video at 1920x1080 pixels. All of the above are compatible with Adobe Media Player, Apple Quicktime, and Windows Media Player 12 and will export using H.264 video at 30 fps.
Exporting a Timelapse Video
Figure 9.64 shows an example of a time-lapse movie that was made directly from Lightroom. This was created by making a sequence of photos shot once every 6 seconds and making them into a slideshow. To create this, I used a custom 29.97 fps time-lapse Slideshow template that was created by Sean McCormack. This Slideshow template is available for download via the Lightroom Blog website (tinyurl.com/qedzggv).
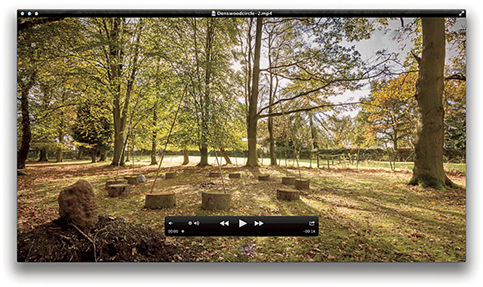
Licensing Audio Tracks
If your video export is to include an audio soundtrack, this does raise the question of whether it is legitimate to do so, because one of the big problems facing the music industry has been the illegal sharing of music downloads. If you produce a slideshow movie that includes original, unlicensed music, you cannot expect to export such a movie and publish it to a wider audience. For example, if you purchase an iTunes Plus track, this does not allow you to redistribute it if it is used in a slideshow movie. In any case, websites such as YouTube will notify you of copyright infringements if an uploaded file contains unlicensed music. So, if you plan to create a slideshow movie, make sure you have acquired the rights where necessary to use the soundtrack material. There are websites where you can purchase music for this type of usage, such as Getty’s audio division at pumpaudio.com. CreativeCommons.Org is another source of music for slideshows and videos. Another solution is to check out websites or social networking pages for unsigned music artists and see if you can strike up some kind of reciprocal deal. Sometimes a band might be interested in letting you use their music if you let them use your edited movie. The musician Moby licenses some of his B sides and other unreleased material for free for non-commercial film usage. Check out mobygratis.com to check out the conditions for use and how to sign up.