Table of Contents for
The Adobe Photoshop Lightroom Classic CC Book, Second Edition
 The Adobe Photoshop Lightroom Classic CC Book, Second Edition
Published by
Adobe Press, 2019
The Adobe Photoshop Lightroom Classic CC Book, Second Edition
Published by
Adobe Press, 2019
- Contents
- Cover Page
- Title Page
- Copyright Page
- Dedications
- Introduction
- Contents
- 1 Introducing Adobe Photoshop Lightroom
- 2 Importing photos
- 3 The Library module
- 4 Develop module image editing
- The Tone Curve Panel
- Easing the Workflow
- 5 The art of black and white
- 6 Sharpening and noise reduction
- 7 Exporting from Lightroom
- 8 Printing
- 9 Presenting your work
- 10 Managing your photos in Lightroom
- 11 Lightroom CC/mobile
- 12 Lightroom preferences and settings
- Index
Red Eye Correction Tool
There are several ways you can prevent red eye from happening. Most compact cameras allow you to set the flash to an anti-red-eye mode with a pre-flash, or you can use a flash gun so the flash source is not so close to the lens axis. But for those times when you cannot prevent it, the Red Eye Correction tool can correct photographs in which the direct camera flash has caused the pupils in someone’s eyes to appear bright red.
To use the Red Eye Correction tool, place the tool’s crosshair over the middle of the pupil and drag outward to draw a circle that defines the area you wish to correct (Figure 4.100). Lightroom automatically detects the red-eye area that needs to be repaired and fixes it. Before applying the Red Eye Correction tool, you can adjust the size of the circle by using the Bracket keys: The Left Bracket ( ) makes it smaller, and the Right Bracket (
 ) makes it bigger. To be honest, the circle size does not always make much difference, because, once you click with the tool, you can drag to define the area you wish to affect. The circle size is probably more relevant if you are going to be clicking with the Red Eye Correction tool rather than dragging. Also, you do not have to be particularly accurate, and it is interesting to observe how this tool behaves even if you lazily drag to include an area that is a lot bigger than the area you need to correct. Lightroom always knows which area to correct, because the circle shrinks to create an overlay representing the area that has been targeted for the red-eye correction.
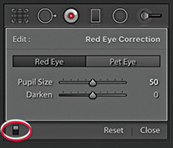
After you have applied the tool to a photo, the Red Eye Correction tool options appear (Figure 4.101). Here, you can adjust the sliders to fine-tune the Pupil Size area you want to correct and decide how much you want to darken the pupil. You can use the On/Off button at the bottom of the Tool Options (circled in Figure 4.90) to toggle showing and hiding all Red Eye Correction tool edits. You can revise the Red Eye removal settings by clicking a circle to reactivate it, or use the  key to remove individual red-eye corrections. If you do not like the results, you can always click the Reset button in the Tool Options panel to delete all the Red Eye Correction retouching and start over again.
This feature raises an interesting question: If you know Lightroom can repair red eye so neatly, do you really need to use the anti-red-eye flash mode? This may sound like a lazy approach to photography, but in my experience, the anti-red-eye flash mode often ruins the opportunity to grab spontaneous snapshots. There is nothing worse than seeing a great expression or something special going on between a group of people, and then having to wait a few seconds for the camera to get up to speed, firing a few pre-flashes before taking the full-flash exposure. These days I prefer to shoot using the normal flash mode and let Lightroom fix any red-eye problems that might occur.
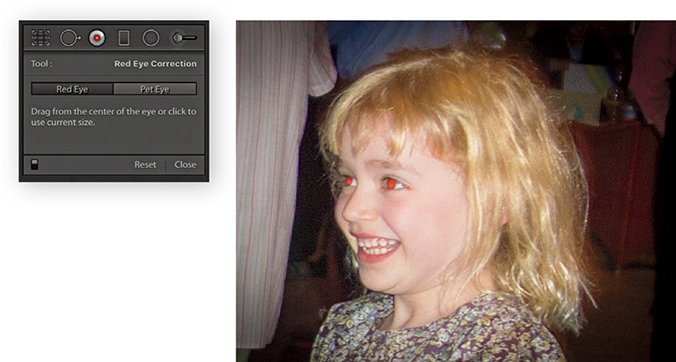
1. I started with close-up view of a photograph that needed red eyes removed.
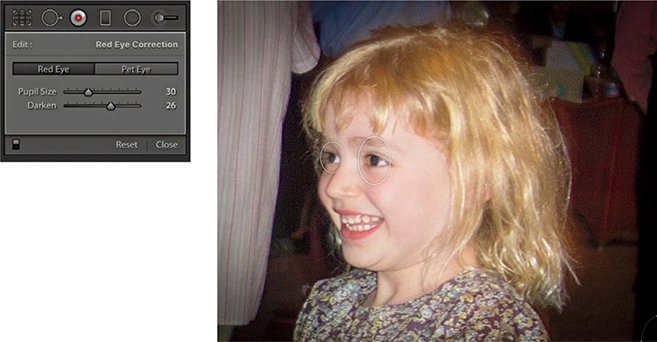
2. I selected the Red Eye Correction tool and clicked both eyes. This automatically got rid of the red-eye effect. I then adjusted the Darken slider so the pupils did not appear too dark.
Pet Eye mode
In animals, the pupil discoloration caused by the camera flash is more likely to be a green or yellow color. The Red Eye Correction tool also features a Pet Eye mode to give your favorite dog or cat a more natural look. The Pet Eye controls let you adjust each pupil independently by adjusting the Pupil Size slider. You can also check the Add Catchlight box to enable adding a synthetic catchlight highlight, which you can then drag to position over each eye.
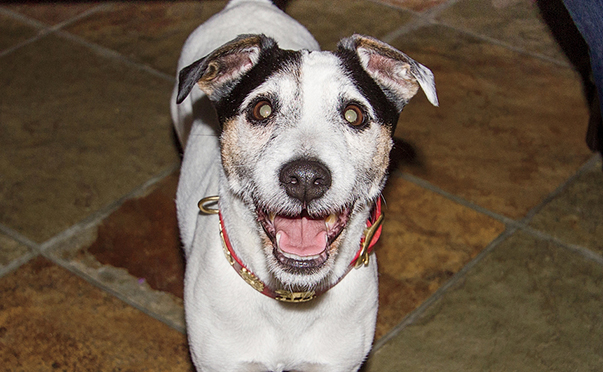
1. As you can see in this close-up view, the flash reflected back off the dog’s eyes.
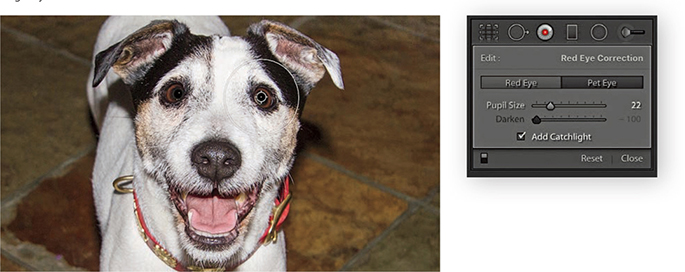
2. I used the Red Eye correction tool in Pet Eye mode to correct both eyes, with the Add Catchlight option enabled.
Localized Adjustments
Let’s now take a look at the Adjustment Brush, Graduated Filter, and Radial Filter tools. These are more than just tools for dodging and burning, because you have (in the case of the Adjustment Brush) a total of 16 effects to choose from, not to mention dual brush settings and an Auto Mask option. Just like the Spot Removal and Red Eye Correction tools, these tools are nondestructive and there is no need for Lightroom to create an edit copy of the master image first. When localized adjustments are applied to an image, the adjustments are saved as instruction edits that are automatically updated as you make further Develop module adjustments, plus you can synchronize localized adjustment work across multiple images using the Sync Settings command.
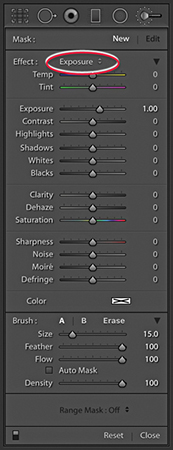
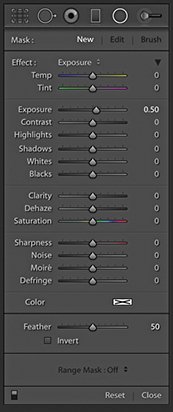
Initial Adjustment Brush options
When you first start working with the Adjustment Brush ( ), the panel may display all its options (Figure 4.102) or be in compact display mode (Figure 4.103). In addition, you will be in the New mode, ready to create a fresh set of brush strokes as soon as you choose an adjustment effect. To do so, select one from the Effect menu or adjust any of the sliders below, such as Temp, Exposure, or Contrast. Although very similar, these sliders aren’t all exact copies of the identically named sliders in the Basic panel. For example, the Saturation slider is actually a hybrid of the Saturation and Vibrance adjustments found in the Basic panel.
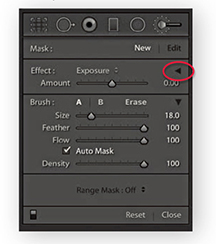
In Figure 4.102, the Exposure effect is selected; positive values will lighten, and negative values will darken. Beyond these basic dodge and burn tool settings, you can use any combination of sliders here to establish different types of localized adjustment effects. You can then save these combinations as custom settings, which can then be accessed via the Effect menu. If you would like a simpler interface to work with, click the disclosure triangle next to the Effect drop-down menu (circled in Figure 4.103) to collapse the slider options. In this compact mode, you can use the Amount slider to control whatever combination of effect settings you have selected in the Effect menu. You can expand the Adjustment Brush options by clicking the disclosure triangle again.
Below this are the Brush settings. The Size slider controls the overall size of the brush (Figure 4.104). You can use the  and
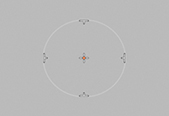
and  keys to make the brush bigger or smaller. Or, you can scroll with your trackpad, mouse, or tablet to vary the brush size. The inner circle represents the core brush size, while the outer circle represents the outer feather radius. As you adjust the Feather slider, the outer circle expands or contracts to indicate the hardness or softness of the brush. Or, you can use
  to make the brush edge harder or
  to make it softer. The Flow slider is kind of like an airbrush control: By selecting a low Flow setting, you can apply a series of brush strokes that successively build to create a stronger effect. You will notice that as you brush back and forth with the Adjustment Brush, the paint effect gains opacity (if you are using a pressure-sensitive tablet such as a Wacom™, the flow of the brush strokes is automatically linked to the pen pressure). It can often help to set the Flow to a low amount to begin with and use multiple brush strokes to gradually build up a particular effect. The Density slider at the bottom limits the maximum brush opacity. At a Density of 100, the flow of the brush strokes builds to maximum opacity, but if you reduce the Density, this limits the maximum opacity for the brush. In fact, if you reduce the Density and paint, you can erase the paint strokes back to a desired Density setting. When the Density is set to 0, the brush acts like an eraser. The A and B buttons can be used to create two separate brush settings so you can easily switch between two different brushes as you work.

To reset the settings to 0 and clear any currently selected color, double-click Effect, or hold down the  key; Effect will change to Reset (circled in Figure 4.105). Or, you can hold down the
  key and click an Effect slider name to reset everything except that slider setting. If you need to reset everything (as in resetting the image without any Adjustment Brush adjustments), you can select individual brush pins to make them active and press the Delete key. Or, click the Reset button at the bottom to delete all the pin markers that have been added to an image. To exit the Adjustment Brush tool mode of operation, you can click the Close button, click the Adjustment Brush button at the top, or press
  . You can use the On/Off button at the bottom (circled in Figure 4.106) to toggle showing/hiding all Adjustment Brush edits.

 key is held down, Effect changes to Reset.
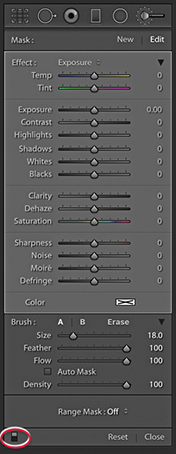
Now let’s look at how to work with the Adjustment Brush. Where you first click adds a brush pin to the image. This appears just like any other overlay, and you can hide it using the  key (or use the View
 ![]() Tool Overlay options to govern the show/hide behavior for these overlays). The brush pin is a marker for the brush strokes you are about to add and can later be used as a reference marker whenever you need to locate and edit a particular group of brush strokes. The important thing to understand here is that you click once and can keep clicking and dragging to create a single group of brush strokes. When you edit the brush strokes, you can adjust the effect slider settings for the group as a whole. So you can come back later and say “Let’s make this series of brush strokes a little stronger,” or “Let’s add more saturation.” Consequently, you only need to create new brush groups when you need to apply a different kind of adjustment to another part of the photo. In recent years, Lightroom Classic CC has added improvements that should reduce the rough, jagged edges and result in smoother curves. Although not always perfectly smooth, the overall responsiveness has improved.
Tool Overlay options to govern the show/hide behavior for these overlays). The brush pin is a marker for the brush strokes you are about to add and can later be used as a reference marker whenever you need to locate and edit a particular group of brush strokes. The important thing to understand here is that you click once and can keep clicking and dragging to create a single group of brush strokes. When you edit the brush strokes, you can adjust the effect slider settings for the group as a whole. So you can come back later and say “Let’s make this series of brush strokes a little stronger,” or “Let’s add more saturation.” Consequently, you only need to create new brush groups when you need to apply a different kind of adjustment to another part of the photo. In recent years, Lightroom Classic CC has added improvements that should reduce the rough, jagged edges and result in smoother curves. Although not always perfectly smooth, the overall responsiveness has improved.
Localized adjustments have the same full-strength potential as global adjustments and the effects all have linear incremental behavior except for the Temp, Tint, Highlights, Shadows, and Clarity adjustments. These effects have nonlinear incremental behavior, which means they only increase in strength by 50% relative to the previous localized adjustment each time you add a new pin group. Lightroom also allows for “connect the dots” type drawing. (This is similar to the way you can work using the Spot Removal tool.) When painting with the Adjustment Brush, click, hold down the  key, and click again to create a straight-line brush stroke between those two points.
Editing the Adjustment Brush strokes
To edit a series of brush strokes, click an existing brush pin marker to select it (a black dot appears in the center of the pin). This takes you into Edit mode (Figure 4.106), where you can start adding more brush strokes or edit the current brush settings. When you are done editing, press or click the New button to return to the New adjustment mode, where you can click on the image to add a new set of brush strokes. You can erase brush strokes by clicking the Erase button to enter Eraser mode, or simply hold down the
  key to erase as you paint. You can undo a brush stroke or series of strokes using the Undo command (
 [Mac] or
  [PC]).
Saving effect settings
As you discover certain combinations of effect sliders you would like to use again, you can save these via the Effect menu (Figure 4.107). For example, you will find here a preset setting called Soften Skin that uses a combination of negative Clarity and positive Sharpness to produce a skin-smoothing effect (see page 316). Also, if you wish to use a combination of the Adjustment Brush and Graduated Filter or Radial Filter tools to apply a particular type of effect, it might be useful to save the settings used for the Adjustment Brush so these can easily be shared when using other local adjustment tools.

Localized adjustment position and editing
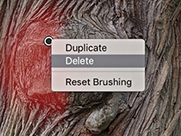
Adjustment Brush strokes can be repositioned by selecting and dragging Edit Pins. When you add a local adjustment—an Adjustment Brush, Radial Filter, or Graduated Filter—there is a context menu for the brush pins (right-click a pin to reveal), which lets you duplicate a selected adjustment or delete it (Figure 4.108). You can also use the -drag (Mac) or
  - (PC) shortcut to duplicate a localized brush adjustment. This applies when selecting and editing all types of localized adjustments.
Earlier versions of Lightroom allowed you to select a pin and drag left or right to decrease or increase the strength of an effect. To do this now, you must hold down the  key as you drag on a pin.
Exposure dodging with the Adjustment Brush
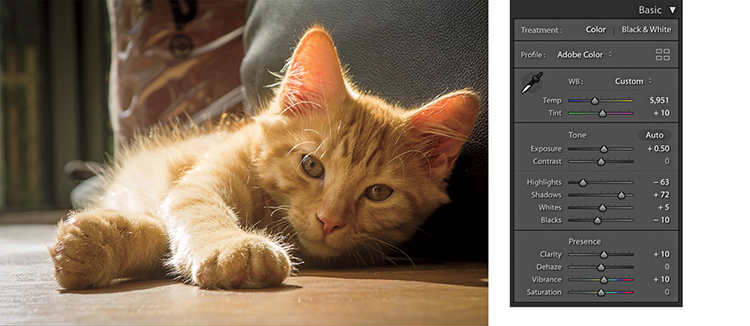
1. I applied some Basic adjustments to this photograph to optimize the brightness and contrast in the image.
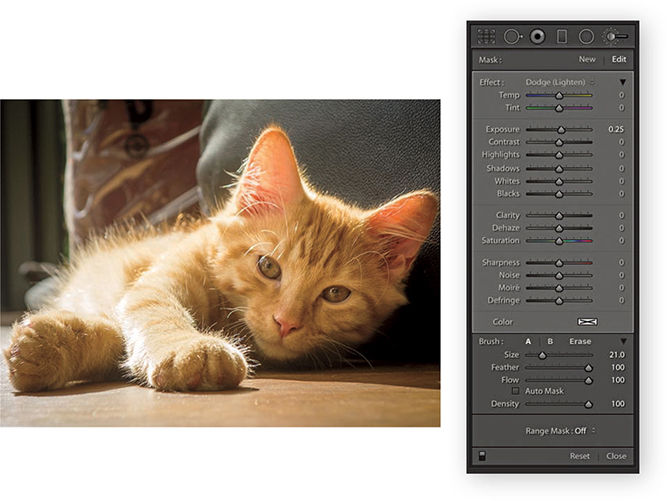
2. I selected the Adjustment Brush and chose a Dodge (Lighten) setting from the Effect menu. I then clicked on the photo and painted to lighten the kitten’s face.
Auto Mask
The Auto Mask option cleverly masks the image as you paint with the Adjustment Brush. It works by analyzing the area where you click with the Adjustment Brush and applies the effect only to those areas that match the same tone and color. For Auto Mask to work, the paint strokes in a pin group do not have to all be based on the same color. As you paint, the Auto Mask resamples continuously when calculating the mask. Figure 4.109 shows an example of the Auto Mask feature in action, and the next series of steps show in detail how I was able to use successive strokes to selectively modify the lightness of the tarmac. The Auto Mask feature works remarkably well at auto-selecting areas of a picture based on color, but to fine-tune the edges, you may need to switch back and forth with the key held down to erase those areas where the Adjustment Brush effect spills over the edges (remember, the Auto Mask option can also be used in Erase mode). Here, I was able to carefully select the road and lighten it. You can hold down the
  key (Mac) or
  key (PC) to temporarily switch the Adjustment Brush into Auto Mask mode (or revert back to Normal mode if Auto Mask is already selected). Although the Auto Mask can do a great job at auto-selecting the areas you want to paint, extreme adjustments can lead to ugly artifacts appearing in some parts of the image. It is always a good idea to check such adjustments at a 1:1 view to make sure the automasking hasn’t created any speckled edges. However, when editing in Version 4 or 5, the Auto Mask edges are now much smoother.
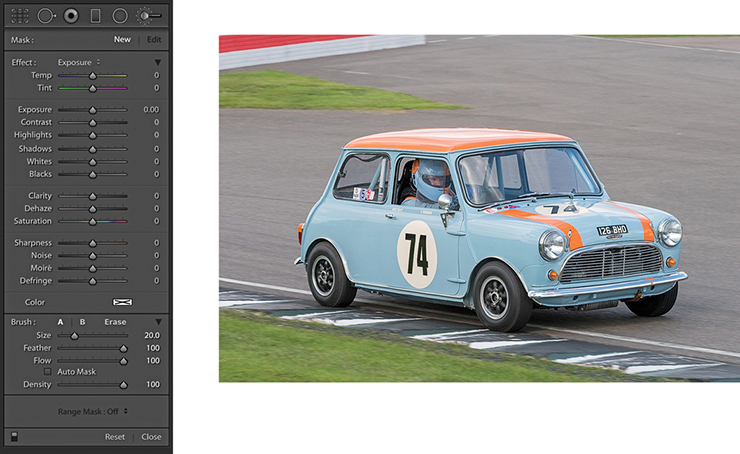
1. With the original photograph open, I began by clicking the Adjustment Brush to reveal the tool options.
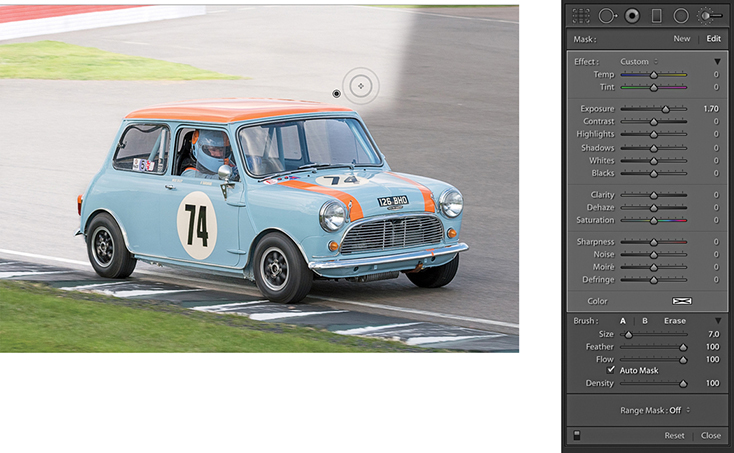
2. I set the Exposure slider to +1.70 and started painting. Because Auto Mask was checked, the brush lightened only the gray (sampled color) areas.
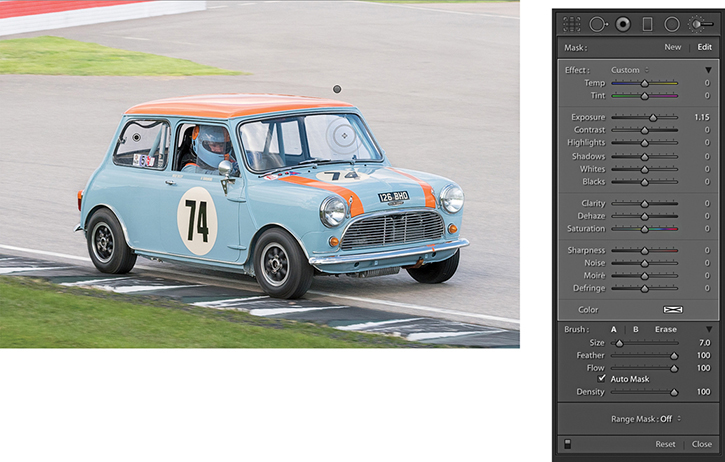
3. I completed the first pass brush work surrounding the car. I then added a new brush group to lighten the windows. Finally, I adjusted both brush groups, setting the Exposure to +1.15.
Previewing the brush stroke areas
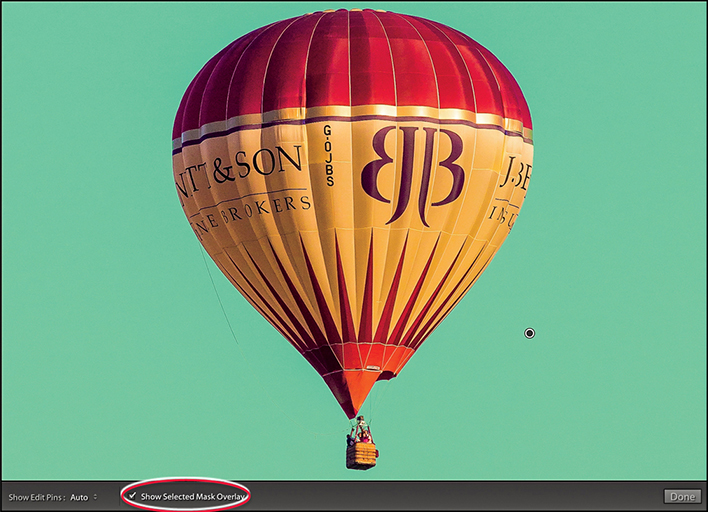
As you roll the brush over a pin marker, you’ll see a temporary overlay view of the painted region (Figure 4.110). The colored overlay represents the areas that have been painted. You can also press to switch the mask on or off and use
  to cycle the mask display through the red, green, white, or black overlay colors. Lightroom also has a Show Selected Mask Overlay option in the Toolbar.
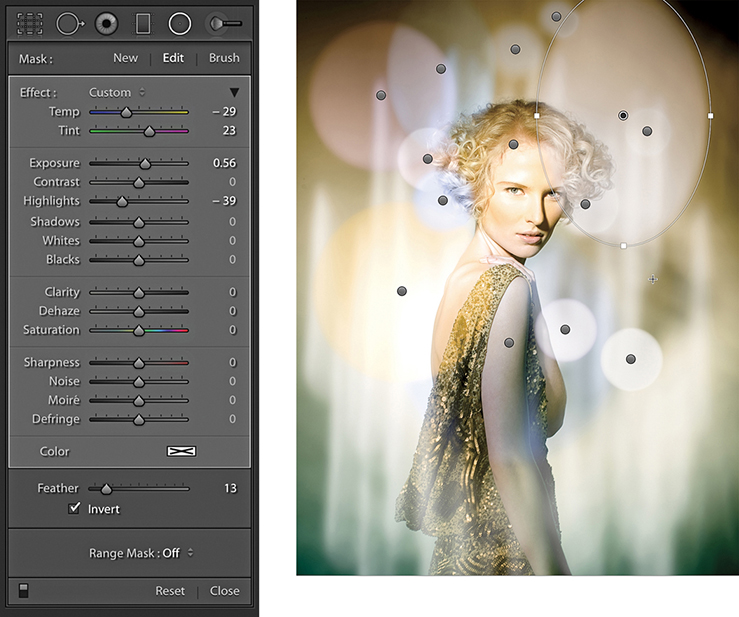
Beauty retouching using negative clarity
On page 226, I showed an example of how you could use a negative Clarity adjustment on a black-and-white image to create a diffuse printing type effect. You can also use a negative Clarity effect as an Adjustment Brush effect for softening skin tones. Personally, I have an aversion to the over-retouched look of some beauty portraits, but the Soften Skin setting, which uses Clarity set to –100 and Sharpness to 25, works really well as a skin-smoothing Adjustment Brush. To illustrate how well this works, in the example opposite I used the Adjustment Brush with the Soften Skin Effect setting to retouch the skin tones in a beauty photograph. Here, I painted over the areas of the face that I felt needed softening. After adding the Soften Skin effect, I used the Spot Removal tool to clean up the photograph further.
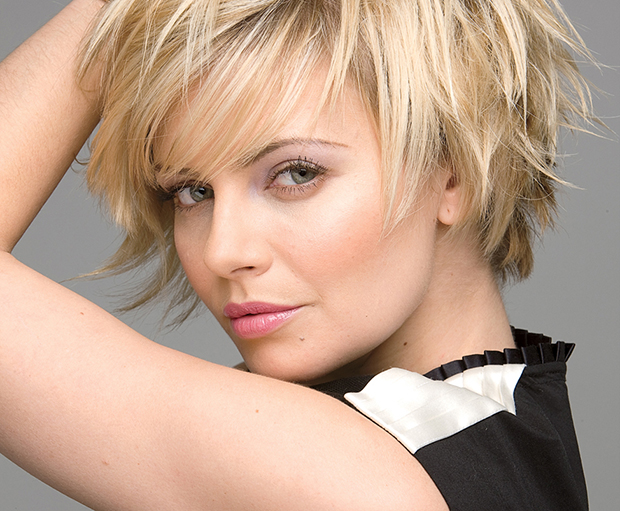
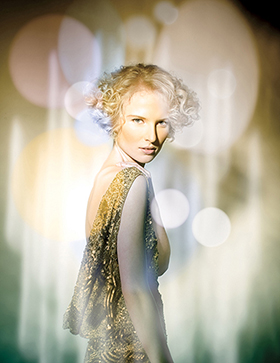
1. I began with a close-up view of a beauty photograph with no localized adjustments applied.
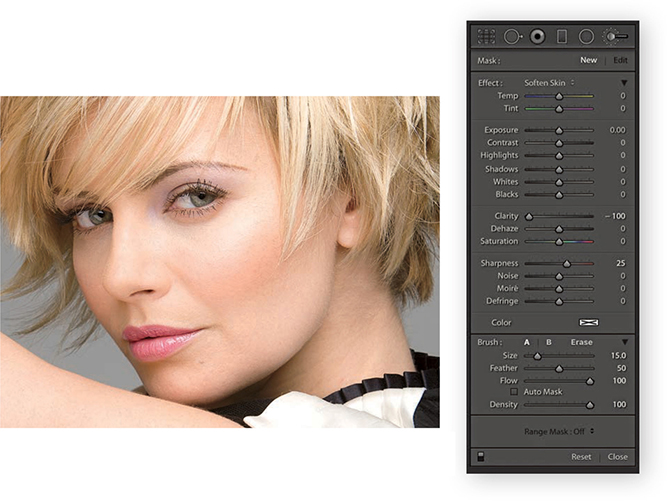
2. I selected the Adjustment Brush with the Soften Skin effect and painted with the brush to soften the skin tones more.
Hand-coloring using a Color effect
The Color effect can be used to add a color overlay to your photographs (it is like working with the Brush tool and Color blending mode in Photoshop. You can use it to change, say, someone’s hair or eye color. Or, if dealing with images that require extreme highlight recovery, using a Color effect can help burned-out highlights blend better with their surrounding areas. In the example shown here, I started with an image that had been converted to black and white and added an Adjustment Brush Color effect with Auto Mask selected. Although the image was now in black and white, Lightroom was actually referencing the underlying color data when calculating the Auto Mask. The Auto Mask feature was therefore able to do a good job of detecting the mask edges based on the underlying colors of the flower heads, stems, and leaves. You can use the color picker to sample not just from the color ramp or preview image, but from anywhere on the desktop. Click and hold in the color ramp, and then drag to anywhere you would like to sample a new color from.
Note
If you see an X in the color swatch, this means no color is selected.
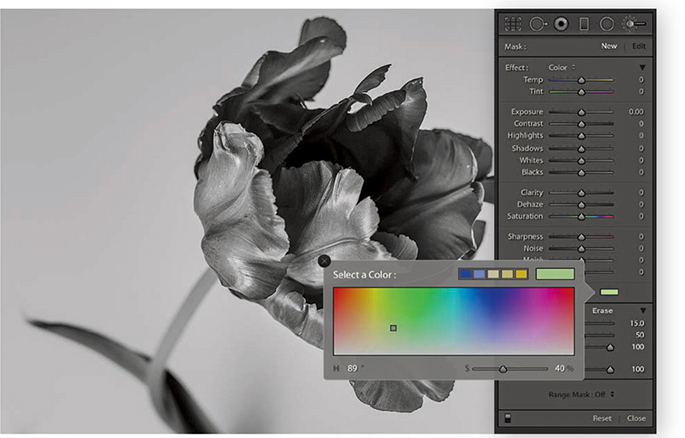
1. Originally in color, this image was converted to black and white in Lightroom. I selected the Adjustment Brush and selected the Color effect from the Effect menu. I then clicked the color swatch to open the color picker shown here, and chose a green color to paint with.
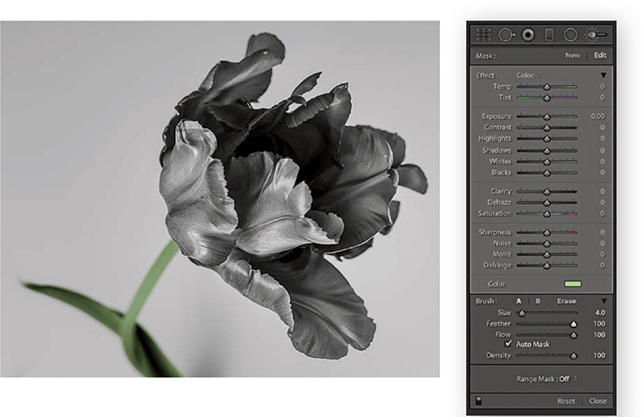
2. With Auto Mask checked, I brushed along the stem and leaf.
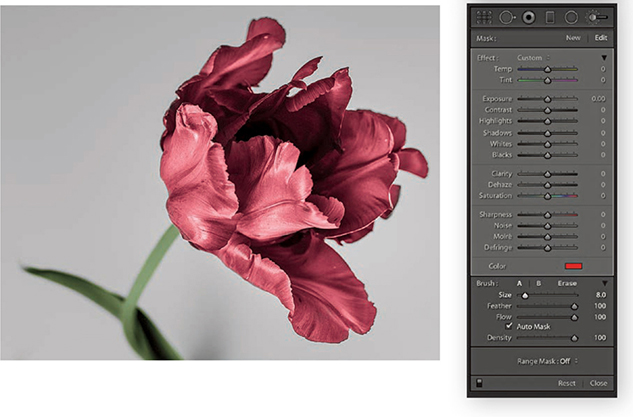
3. I then created a new set of paint strokes. This time I selected a red color and began painting the flower petals, again with the Auto Mask option checked.
Localized Temperature slider adjustments
Let’s now have a look at what you can do using the Temp and Tint slider adjustments. The Temp slider can be used to adjust the white balance locally by dragging to the left to make the white point cooler or dragging to the right to make it warmer. The Tint slider lets you modify the Tint value. The Temp and Tint sliders should therefore be seen as constrained color adjustment controls that allow you to adjust the white point in localized areas. Remember that localized color adjustments, including the use of the Temp and Tint sliders, apply adjustments that are relative to everything else in the image. Therefore, as you continue working in the Develop module, the color adjustments you have made using the localized correction tools will adjust relative to any global color adjustments you might make.
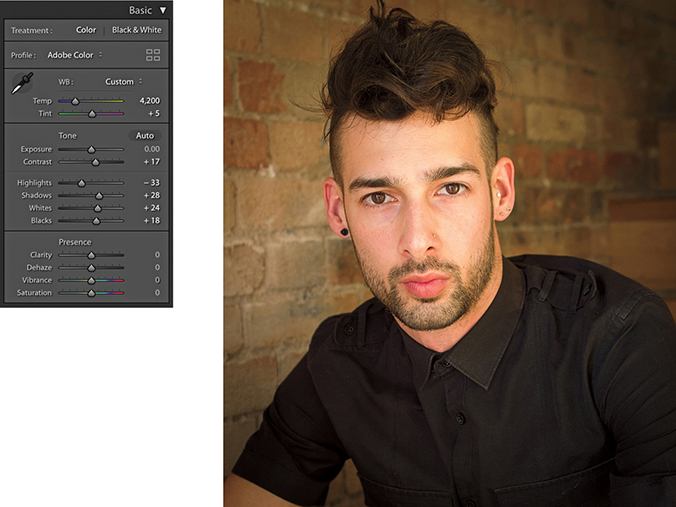
1. For this photograph, I had already carried out most of the desired image corrections. The warm white balance that was set in the Basic panel suited the skin tones in this portrait.
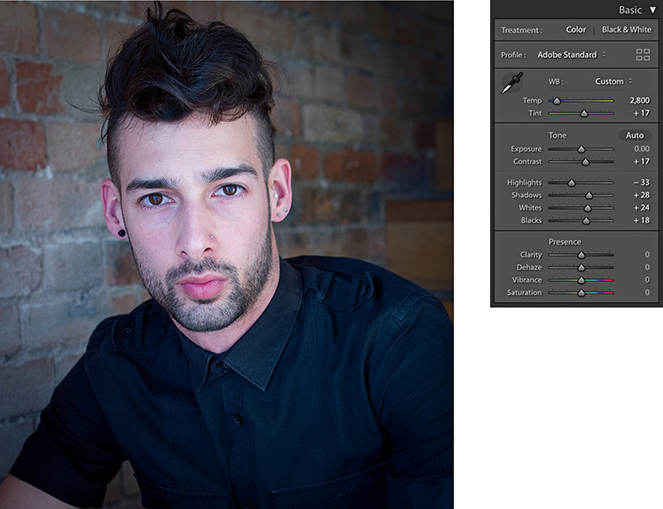
2. Staying in the Basic panel, I adjusted the Temp slides to apply a cooler “baseline” white balance to the image.
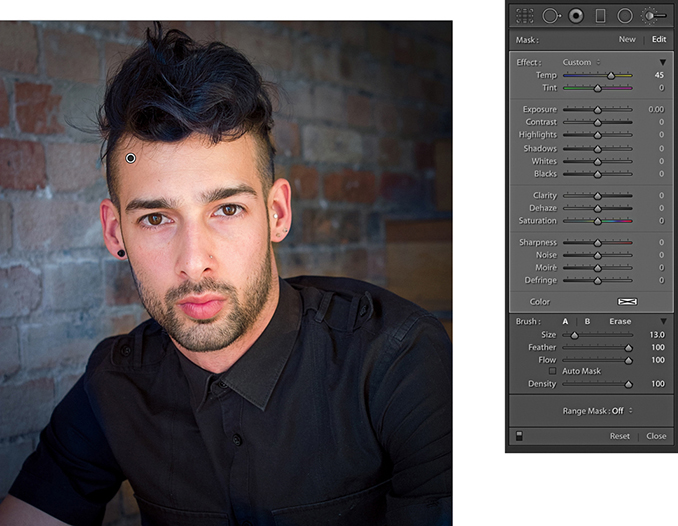
3. I then selected the Adjustment Brush, adjusted the Temp slider to select a warmer white balance, and carefully painted over the face and body to apply a warm color balance that contrasted nicely with the cooler background color.
Localized Shadows adjustments
The Adjustments panel also contains Highlights, Shadows, Whites, and Blacks sliders. As you might expect, these let you manipulate the highlight and shadow areas as a localized adjustment.
In the example shown here, the photograph was shot against a black backdrop, but it was not as deep a black as I would have liked. By applying a negative Shadows adjustment as a localized adjustment, I was able to darken the background, but without darkening the subject. I also applied a second pass adjustment in which I set the Blacks slider to –30. This helped darken everything to black. Incidentally, localized Whites and Blacks adjustments are applied downstream of the global Whites and Blacks adjustments you apply via the Basic panel. These are, therefore, best used to stretch locally the tone range at the top end (using the Whites slider) or bottom end (using the Blacks slider). To perform a highlight or shadow recovery, you should use Highlights or Shadows rather than the Whites and Blacks sliders.
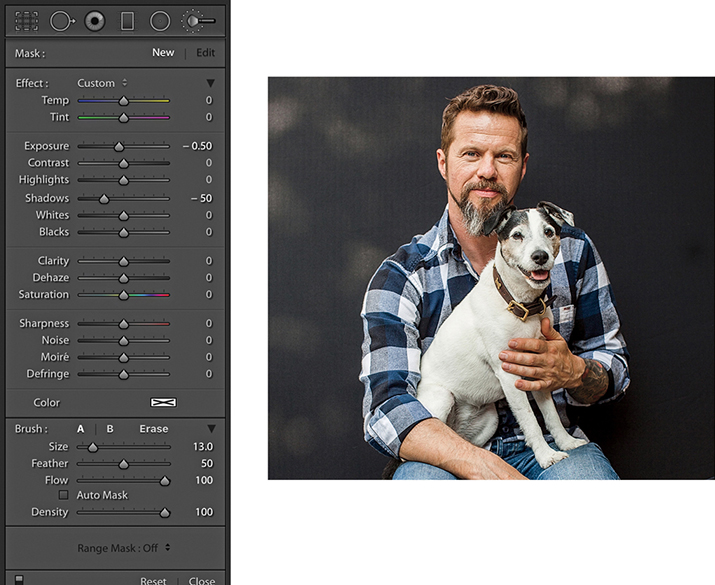
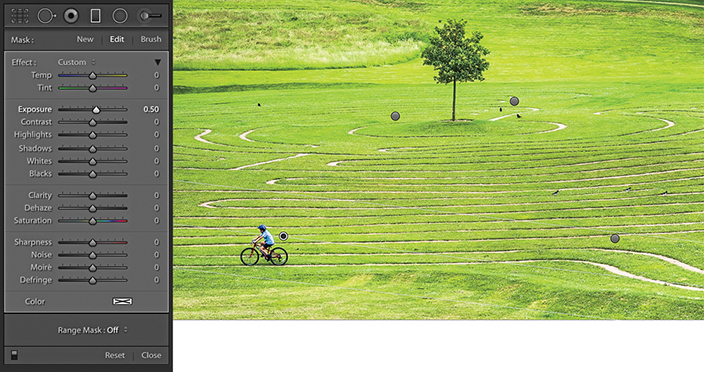
1. In this photograph, I optimized the image as usual. However, in doing so, I could not get the backdrop to go completely black.
2. Here, I selected the Adjustment Brush, set the Exposure slider to –0.50 and the Shadows slider to –50, and brushed over the backdrop area.
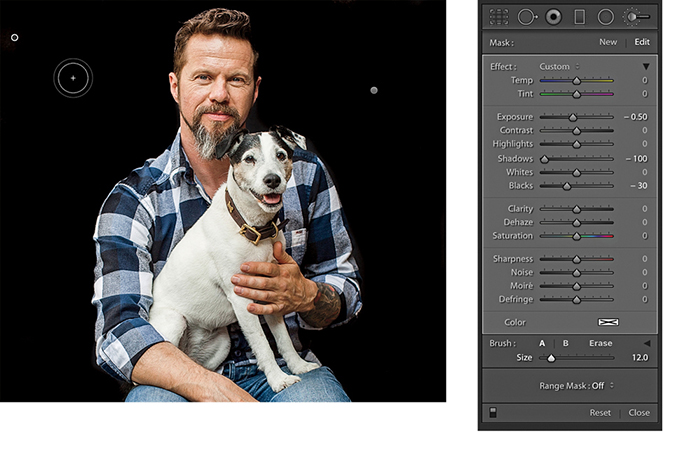
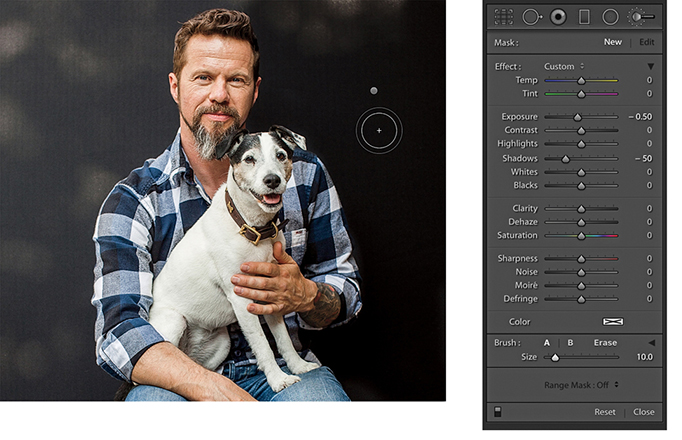
3. To make the backdrop even blacker, I applied a second pass painting with the brush set to –0.50 Exposure, –100 Shadows, and –30 Black. This allowed me to make the backdrop go completely to black.
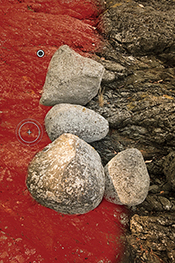
Clarity and Sharpness adjustments
A Clarity setting can be used to selectively paint in more midtone contrast. In the example shown here, I used a Positive Clarity and a positive Sharpness setting to bring out more detail in the surface of the rocks. I did not want to add more sharpening or clarity in the sky area, as this would have made any image noise more noticeable. With the Auto Mask option checked, I painted the rock area only, avoiding the sky area.
Whenever you adjust the Sharpness slider in the adjustment tools to add more sharpness, you are essentially adding a greater Amount value of sharpness based on the settings that have already been established in the Detail panel Sharpening section. A negative Sharpness setting in the 0 to –50 range can be used to fade out existing sharpening. Therefore, if you apply –50 sharpness, you can paint to disable any capture sharpening. As you apply a negative Sharpness in the range of –50 to –100, you start to apply anti-sharpening. This can produce a gentle lens blur effect, but you can always strengthen it by applying successive, separate Adjustment Brush groups. I show a further example of localized sharpening in Chapter 6.
A useful tip is to pump up the settings you are working with to produce a stronger effect than what is needed so you can see the results of your retouching more clearly. You can then edit the amounts applied and reduce the slider settings to achieve the desired adjustment strength.
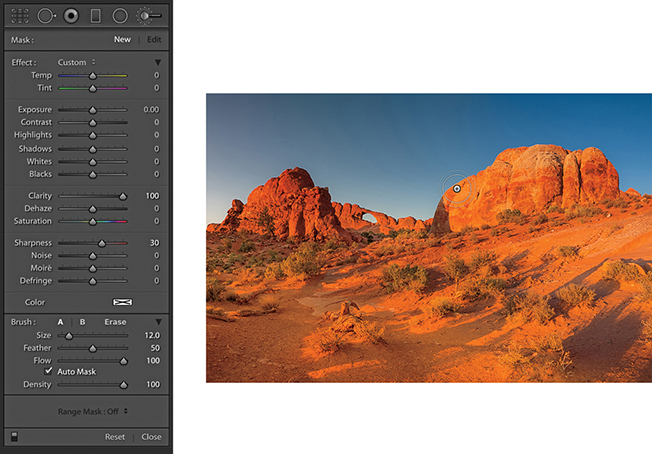
1. Here, you can see that I selected the Adjustment Brush tool and adjusted the Effect settings to add 100 Clarity combined with 30 Sharpness. I then clicked on the rocks and started painting to apply the combined Clarity and Sharpness adjustment effect (with Auto Mask checked).
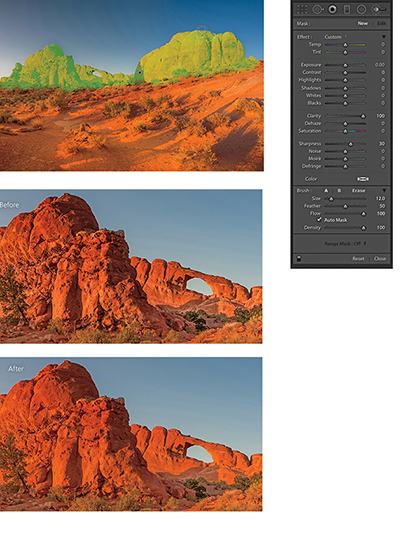
2. I applied this adjustment to the rock areas only, and you can see here an overlay view of the painted area (top) and close-up views that show the Before and After versions.
Graduated Filter Tool
Everything I have described so far about working with the Adjustment Brush more or less applies to working with the Graduated Filter tool ( ) (Figure 4.111), which allows you to add linear Graduated Filter fade adjustments. To use the tool, you click on a photo to set the start point for the Graduated Filter (the point with the maximum effect strength), drag to define the spread of the Graduated Filter, and release at the point where you want it to finish (the point of minimum effect strength). This allows you to apply linear graduated adjustments between these two points. There is no midtone control with which you can offset a Graduated Filter effect, and there are no further graduation options. If you hold down the
 key, Effect will change to Reset. Click this to reset all the sliders to 0 and clear any currently selected color. Or, you can hold down the
  key and click an Effect slider name to reset everything except that slider setting. You can also double-click slider names to reset them to a 0 setting.
Graduated Filter effects are indicated by a pin marker, and you can move a Graduated Filter once it has been applied by clicking and dragging the pin. The parallel lines indicate the spread of the Graduated Filter, and you can change the width of the filter by dragging the outer lines. If you want to edit the angle of a Graduated Filter effect, you can do so by clicking and dragging the middle line.
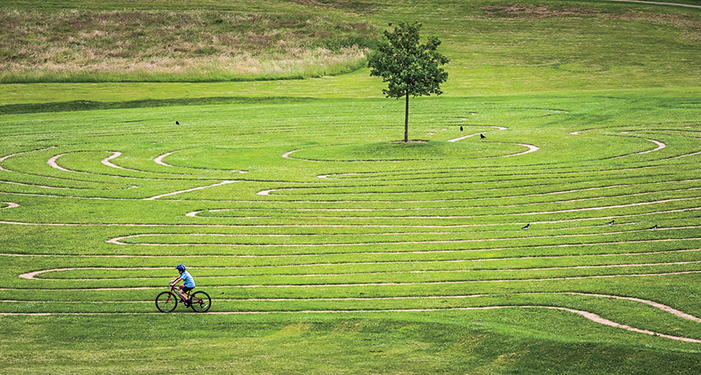
1. In this first step, I applied just the main Basic panel adjustments to optimize the highlights, shadows, and contrast.
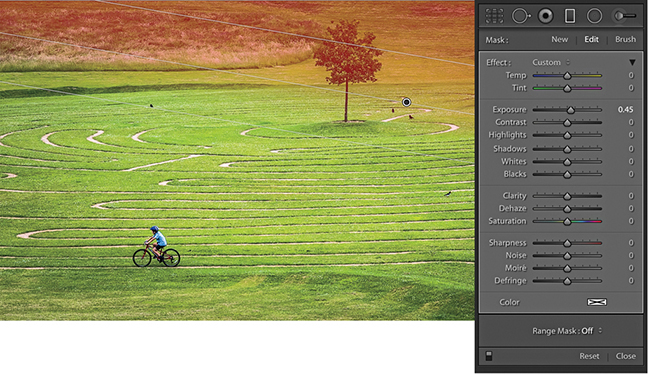
2. I clicked the Graduated Filter tool to reveal the Graduated Filter options, set the Exposure slider to 0.45, and dragged diagonally downward to lighten the top-right section of the photo.
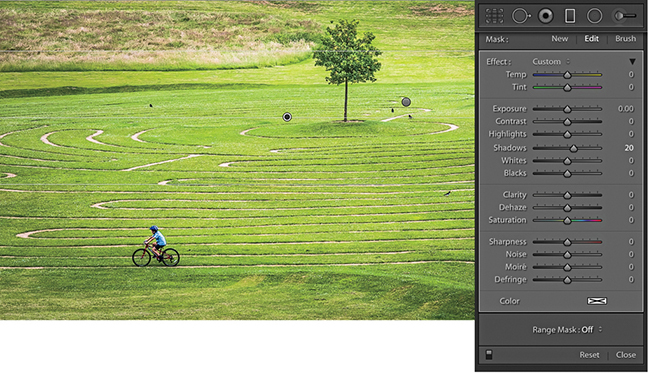
3. I applied a second Graduated Filter, dragging from the top downward to lighten the Shadows.
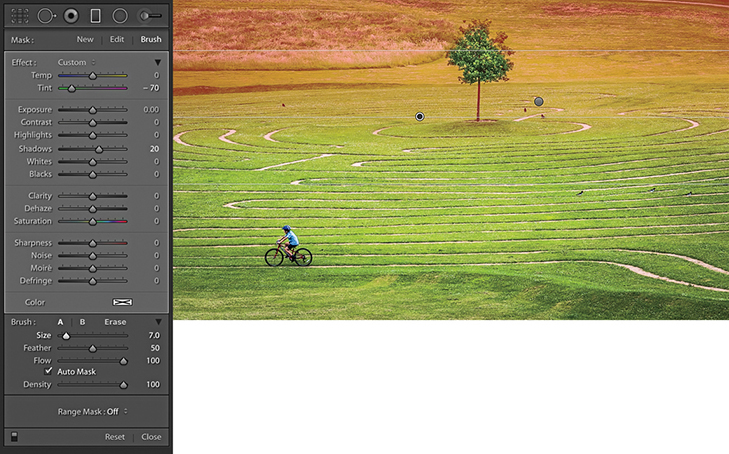
4. I then dragged the Tint slider to the left to make the Graduated Filter effect more green. I also selected the Brush to mask out the tree (there is more on brush editing in the following section).
5. Lastly, I added two further Graduated Filters to the bottom half of the picture, where I applied positive Exposure adjustments.
Brush editing a Graduated Filter effect
When the Brush option is selected, you can brush paint to add to or erase from the mask. To edit a Graduated Filter effect in this way, click on the Brush button to switch to brush editing mode, or use the  keyboard shortcut to toggle between this and editing the Graduated Filter settings. You can then adjust the Brush parameter settings at the bottom, choosing either an A or B brush, or the Erase mode. Check the Show Selective Mask Overlay option in the Toolbar (
 ) to help visualize the extent of the Graduated Filter and the manual brush editing.
It is important to understand that two mask controls are in force here. You have a Graduated Filter mask (that you can continue to modify), plus a brush edit mask you can use to mask specific areas of an image. Therefore, you can enter the brush edit mode to remove or restore areas to be affected by a Graduated Filter or Radial Filter adjustment and independently adjust the extent of the actual adjustment. The following steps show how to refine a Graduated Filter adjustment, but will also apply to working with Radial Filters as well.
Tip
You can use  to toggle between the A and B brushes.
1. I added a number of Graduated Filter adjustments to the image, including a darkening Exposure adjustment to the sky, which, as you can see here, covered the top section of the pagoda.
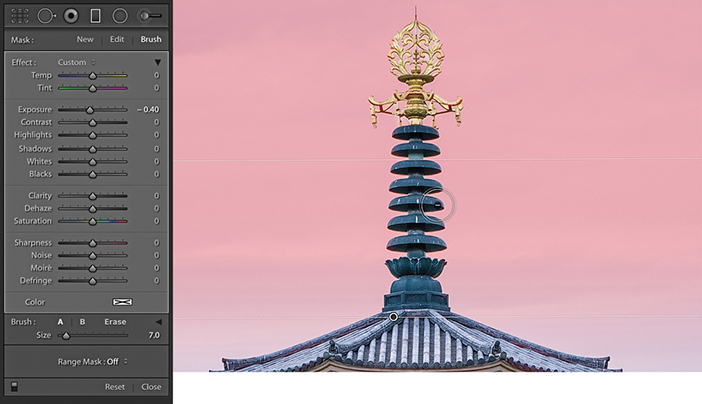
2. I then clicked the Brush button to enter Brush editing mode. Using the Erase brush in Auto Mask mode, I erased the mask where it overlapped the top of the pagoda.
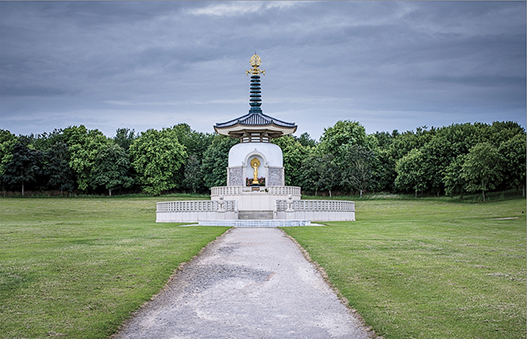
3. In this final version, I hid the Graduated Filter mask and pins.
Radial Filter Tool
The Radial Filter ( ) can be used to create off-center vignettes and has the same range of options as the Graduated Filter, except you will notice at the bottom of the tool options, there is a Feather slider with which to soften the boundary edge (Figure 4.112). To apply a Radial Filter adjustment, you simply drag in the preview image to define the area you wish to adjust. This adds an ellipse shape with four corner handles you can drag to refine the shape. You can also drag anywhere on the boundary edge to rotate the ellipse shape; plus, you can click and drag on the central pin to reposition it. If you initially hold down the
  key and drag, this adds a Radial Filter that scales from the anchor point. Holding down the
  key and dragging adds a Radial Filter scaled around the center point and constrained to a circle. Holding down the
  (Mac) or
  (PC) key and double-clicking anywhere in the preview area adds a new adjustment auto-centered within the current (cropped) image frame area. If you
  (Mac) or
  (PC) + double-click an existing Radial Filter, this will expand it to fill the current cropped image area. To exit working with the Radial Filter, you can click the Radial Filter button, use the
  shortcut, or double-click an existing Radial Filter adjustment to apply and dismiss. Use the
  shortcut to hide the bounding box.
By default, a new adjustment will have a zero effect at the center and get stronger toward the outer edges of the ellipse and beyond. You can switch this around by checking the Invert box just below the Radial Filter Feather slider, or use the Apostrophe key ( ) to toggle between these two modes. As with all localized adjustments, if you hold down the
  key and click the pin, you can drag left and right to dynamically modify the current active slider settings, making them increase or decrease in strength. Lastly, you can use
  (Mac) or
  (PC) plus a click and drag to duplicate an existing Radial Filter adjustment.
There are lots of potential uses for this localized adjustment. The most obvious example is you can use it to apply more controllable vignette adjustments to darken or lighten the corners. For example, instead of simply lightening or darkening using the Exposure slider, you can use the Highlights or Shadows sliders to achieve more subtle types of adjustments. Or, you might want to adjust the Saturation setting so that either the corners or center of the image appear desaturated or more saturated. I mostly use the Radial Filter in preference to the Adjustment Brush as a tool for applying localized adjustments to specific areas of a photograph.
As with the Graduated Filter, you can add multiple Radial Filter adjustments to an image. Once added, a Radial Filter adjustment is represented by a pin marker. Click a pin to make it active. You then will see the elliptical outline of a Radial Filter adjustment, and can then re-edit the adjustment settings.
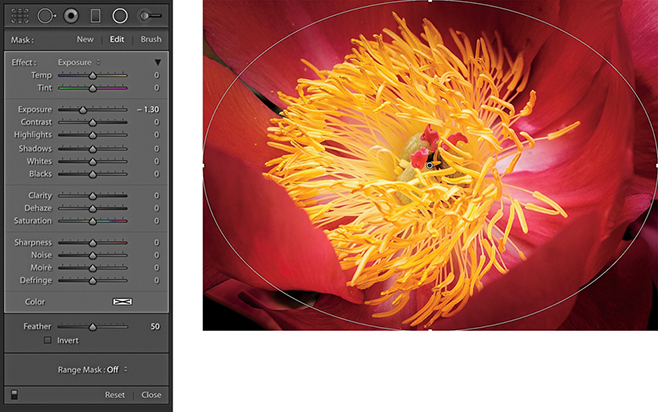
1. I opened an image in Lightroom and selected the Radial Filter tool. I held down the  (Mac) or
  (PC) key and double-clicked inside the preview area to add a new adjustment that filled the current frame area from the center pin outward. I set the Exposure slider to −1.29 to darken the outer edges.
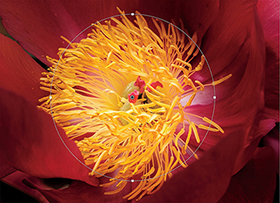
2. I then dragged the handles to realign the Radial Filter effect so the Radial Filter adjustment was centered around the stamen in the middle of the flower.
Correcting edge sharpness with the Radial Filter
Another thing the Radial Filter can be useful for is sharpening the edges of a photo. If you own decent lenses, edge sharpness shouldn’t be a problem, but with lesser optics, selectively giving the edges an extra sharpening does help. For example, I sometimes like to photograph using a Sony RX-100 camera, which is a great little compact camera that shoots raw images, but the edge sharpness is not as sharp as what I am used to with my regular digital SLR lenses. To address this, I have found it helps if I use the Radial Filter to apply a Sharpness adjustment that gains strength from the center outward.
Tip
If you think this technique might be useful, consider creating a “corner sharpening” preset that you can quickly apply to other photos that have been shot with the same lens. In Lightroom, it is also possible to save such a setting as a camera default. It would not make sense to do this for a digital SLR because you could not make it lens-specific, but it could be applied to, say, a compact camera that had a fixed lens.
Adding light flare effects
This particular technique can be used with any of the Filter adjustments. But in the example below, I used just the Radial Filter on its own to add a series of adjustments that lightened the image and, in some instances, added a color tint as well. Such effects will suit being saved either as a profile or as a preset. If saved as a preset, this would give you the opportunity to edit the radial circles directly, which you can’t do with profiles.
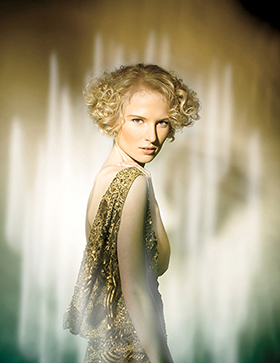
1. Here is the photo I selected to edit. You can see that I had already added some light flare effects with the studio lighting.
2. I selected the Radial Filter and added a number of filter adjustments to add some light flare effects to the image.
3. This shows the final result with the pin overlays hidden.
Color Range Masking
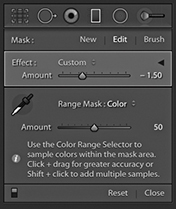
In addition to Auto Mask, Lightroom also offers Range Masking with Color, Luminance and Depth Range Masking controls. The Range Mask options are located at the bottom of the Adjustment Brush, Graduated Filter, and Radial Filter panels. For example, if you apply a localized adjustment and the Color Range Mask option is selected (Figure 4.113), you can add a mask to the localized adjustment based on a sampled color. To do this, select the Color Range Selector tool (the big eyedropper). With a single click, you can restrict the Color Range Mask area based on a sampled color, such as a blue sky. The Amount slider can then be used to adjust the depth of the Color Range Mask selection. Dragging the slider to the left narrows the range, while dragging to the right widens, but you will notice how the Color Range Mask selection becomes smoother and more diffuse as you do this. For more precise masking, a lower Amount setting is best. To preview a Color Range Mask, you can hold down the  key as you drag the Amount slider to see a temporary black-and-white mask preview. Plus, you can use
  to toggle the colored overlay. To refine a Color Range Mask selection, you can click again with the Color Range Selector to sample a new color or you can marquee drag to make a broader color range selection. To add more sample points, click or drag again with the
  key held down. By doing this, you can sample up to five color points. However, as you exceed that number, the oldest sample points will be removed. When using the Range mask in Color mode, you can remove individual sample points by holding down the
  key while clicking on them. To exit the Color Range Selector mode, click in the Color Range Selector dock or press the
  key.
key.
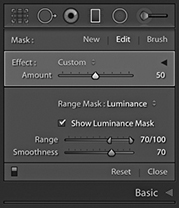
Alternatively, you can select the Range Mask Luminance mode (Figure 4.114). You can then use the Range slider to control the range of luminance tones that are selected within a localized adjustment selection. To do this, drag the shadow (left) and highlight (right) handles on the slider to control the range of luminance tones. The Smoothness slider can be used to modify the smoothness of the selection, which is similar to adjusting the Amount slider in the Color Range mode. When “Show Luminance Mask” is selected, the red color shows the area to which the adjustment is applied intersected with the Luminance range mask adjustments. As with the Range Mask in Color mode, you can hold down the  key to see a black-and-white mask visualization here.
The Color Range and Luminance Range mask controls make it much easier to selectively mask localized adjustments. Previously, only the Auto Mask was available, and the mask edges could sometimes end up revealing ugly edge artifacts. By comparison, the Range Mask edges are more diffuse and have much smoother edge blends. In extreme cases, you are still likely to see some edge artifacts, but this can be mitigated by increasing the Color Range Mask Amount slider or increasing the Luminance Range Mask Smoothness slider.
It is also possible to combine a Range Mask with the Auto Mask, although this does add more complexity. If working with the Adjustment Brush, you should set the Develop settings and paint broadly over the subject with Auto Mask switched off and without aiming for a perfect outline. Next, select Color or Luminance from the Range Mask menu. In the Range Mask Color mode, select the Eyedropper tool and click to sample the colors you want the adjustment to affect. Having done that, adjust the Color Range Mask Amount slider to fine-tune the adjustment. Or, select the Range Mask Luminance mode and proceed to adjust the Range and Smoothness sliders. Having done that, you can revert to working with the Adjustment brush in Add or Subtract modes with Auto Mask on or off to refine the original adjustment selection.
If editing a Graduated Filter or Radial Filter adjustment, the best approach is to add a Filter effect, adjust the Develop sliders, and select the desired method from the Range Mask menu. Refine the mask as usual by sampling colors/adjusting the luminance range values, or depth range and then smoothing. Lastly, switch to the Brush edit mode working in the Add or Erase mode. Adding reveals (dependent on the Filter Mask and Range Mask selection), while erasing hides the adjustment completely. You can do this with Auto Mask on or off.
To sum up, an Adjustment Brush adjustment can be determined by the defined area (with or without Auto Mask) + Range Mask. A Graduated Filter or Radial Filter adjustment can be determined by the defined area + Range Mask + Brush edit, where Auto Mask can add further refined control.
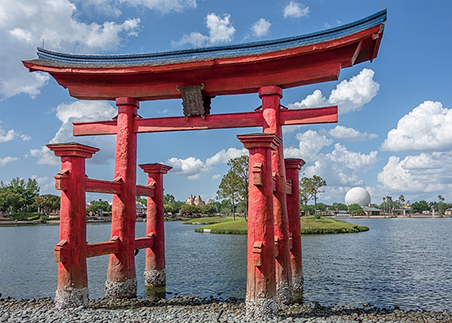
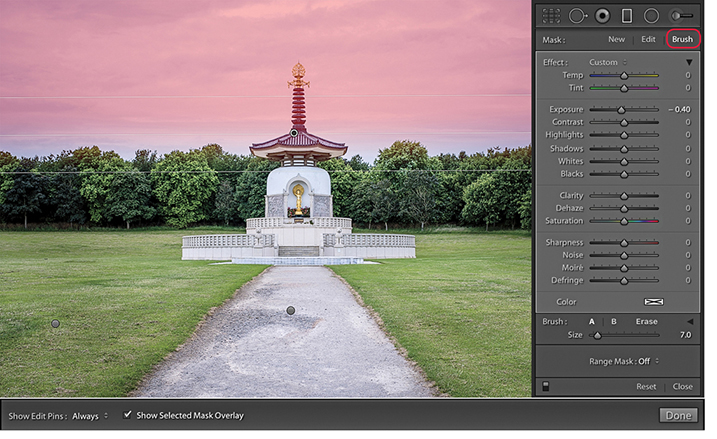
1. With this photograph, I wanted to use the Graduated Filter tool to selectively darken the sky, but without darkening the Japanese shrine.
2. I selected the Graduated Filter tool and added a darkening filter adjustment to the sky using a –0.90 Exposure and a +30 Clarity setting.

3. I went to the Range Mask menu and selected Color. I then selected the Color Range Selector tool and clicked and dragged over the blue sky area I wished to define as being part of the adjustment. This automatically added a mask, based on the sampled colors, that masked the shrine (and the white clouds) from the Graduated Filter adjustment.
Luminance Range Masking
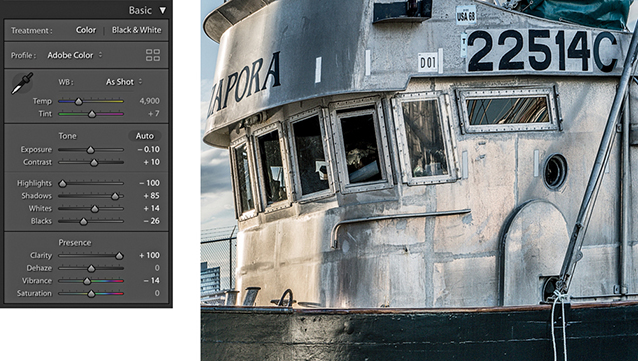
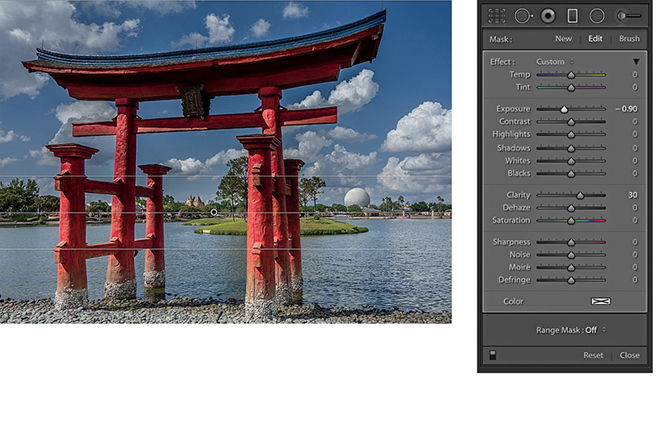
1. I first optimized the Basic panel settings and set Clarity to +100.
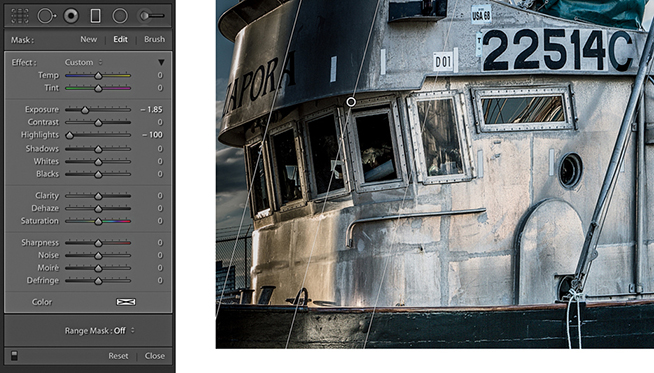
2. I added a darkening Graduated Filter to the left side, setting the Exposure slider to –1.85 and the Highlights slider to –100.
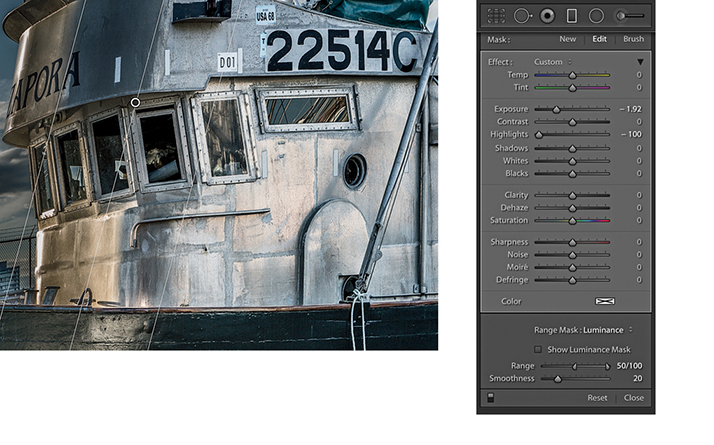
3. In the Range Mask options, I selected Luminance from the Range mask menu and dragged the Range slider shadow handle inward to the 50 setting. This refinement to the Graduated Filter masked the deep shadow areas.
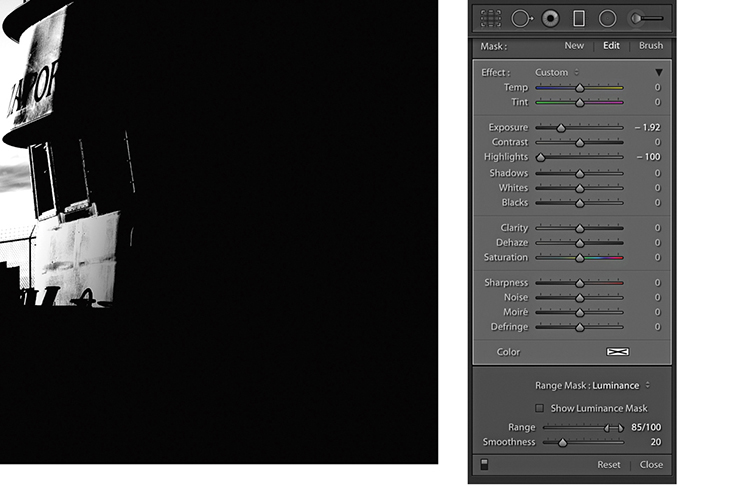
4. I held down the key to see a mask preview as I continued to drag the Range slider shadow handle to 85, which protected more of the shadows.
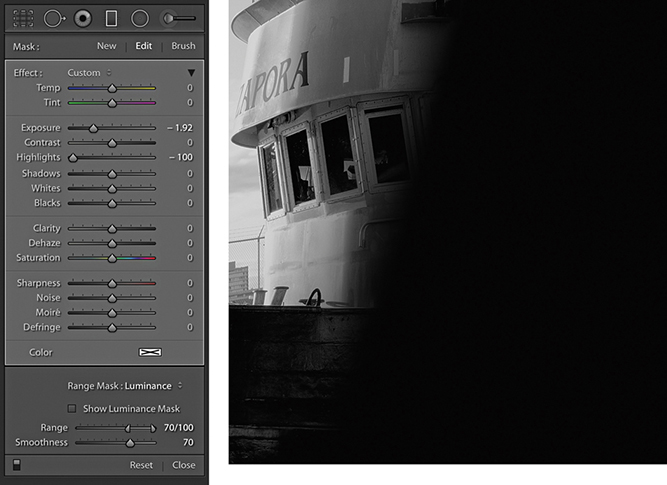
5. I dragged the Smoothness slider, while I again held down the key. The mask preview here shows the Range Mask with a Smoothness setting of 70.
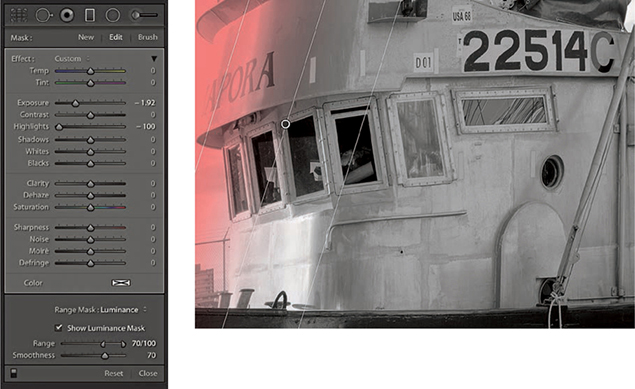
6. I then enabled the Show Luminance mask, which displayed a red overlay that represented the coverage of the filter effect.
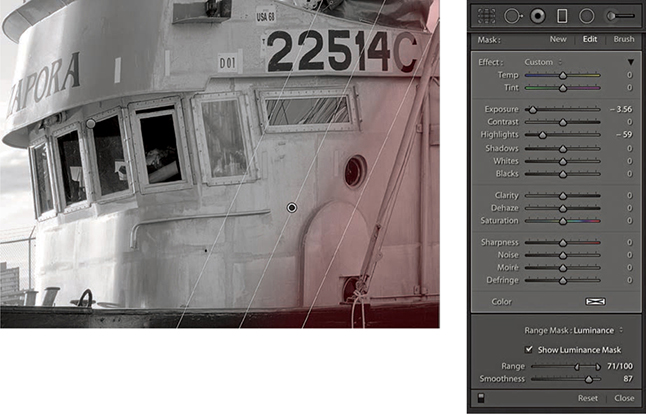
7. Finally, I added a second Graduated Filter adjustment to darken the bottom right area of the boat. I again enabled the Show Luminance Mask.
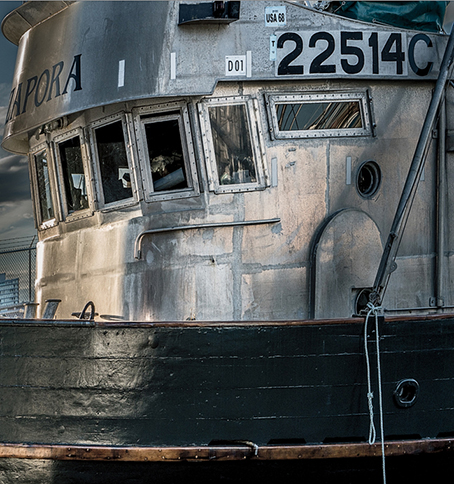
8. Here’s the final image with the two Graduated filters applied.
Depth Range Masking
New to Lightroom Classic CC is the ability to edit using a range mask based on focus depth. The Depth Range Mask option is available only for images that have embedded depth map data (see Figure 4.115). This means it is currently limited to HEIC files captured on an Apple iPhone 7+, 8+ and X, running iOS 11 or later using the “Portrait” mode in the built-in iOS camera app. With such images, you can select a mask region based on the depth information of the image. For all other file types, the Depth option will remain grayed out. The Apple HEIC format is essentially a container format that can contain 16-bit data as well as sequences of images, such as a series of photos that build a depth map of a scene.
To apply a Depth Range mask, first apply a localized adjustment. Then from the Range Mask menu choose Depth. If you click to select the Depth Range Selector tool, you can use it to sample a depth point in the image and also adjust the Range sliders to define a range of depth values either side of the point where you clicked. Or, you can drag with the Depth Range Selector tool to define the Range settings. Selecting the Show Depth Mask check box shows a grayscale representation of the underlying depth mask combined with a red overlay that indicates the local adjustment selection area. This also takes into account the Depth Range and Smoothness slider settings. If you  -drag either the Range or Smoothness sliders, you will see a black-and-white mask preview in which white represents the area the local adjustment is applied to and black the area that is masked.
Note
When you shoot in Portrait mode with the iOS native app, the iPhone camera creates both a JPEG version, with the portrait blur effect applied to it plus an HEIC original without the blur effect.
Note
You can capture depth map images using the Lightroom CC for mobile camera. But to do so, you must enable an option via the Technology Preview preferences. There are similar controls to edit depth map images using the mobile app.
1. This photo was shot using an Apple iPhone XS in Portrait mode and imported into Lightroom as an HEIC file.
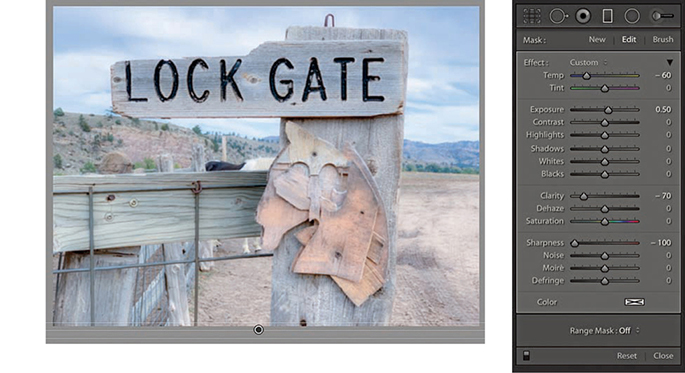
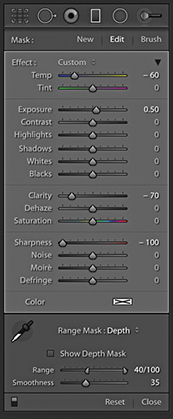
2. I added a Linear Graduated filter adjustment that applied a blue cast, lightened the exposure, and softened the sharpness.

3. I selected Depth from the Range Mask menu and turned on the Show Depth Mask option to reveal the underlying depth map represented as a red overlay. I then used the Depth Range Selector to sample the desired depth and auto-set the Range.
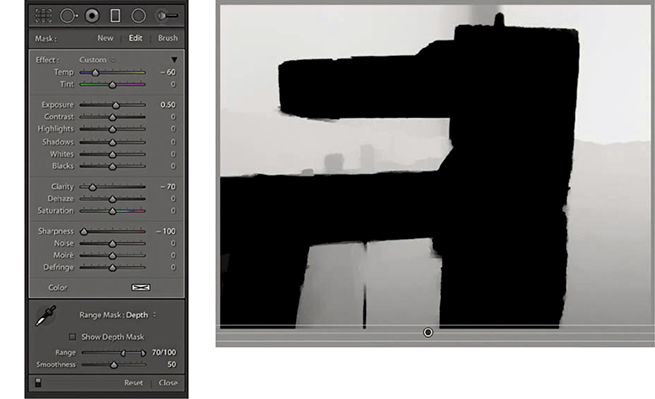
4. When I held down the key and dragged the Range and Smoothness sliders, I could see a mask preview where white represented the applied adjustment area.
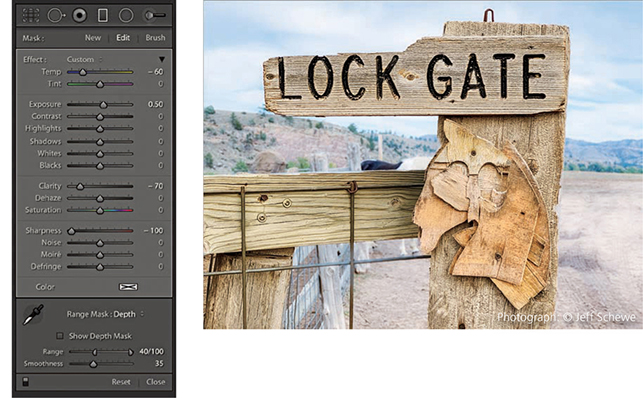
5. For this final version, I set the Smoothness slider to 35 to achieve a tighter and sharper mask edge.
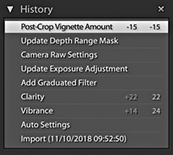
History Panel
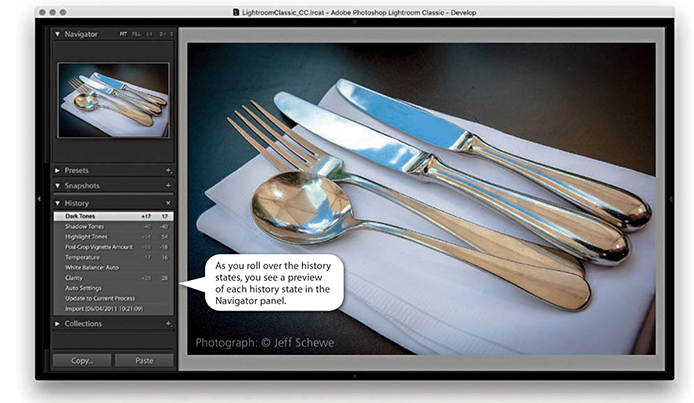
Every step you apply in the Develop module is recorded as a separate history state in the History panel (Figure 4.116), which is located just below Presets and Snapshots panels (Figure 4.117). The History feature in Lightroom has a unique advantage over Photoshop in that the history steps are always saved after you quit Lightroom. The History panel is therefore useful because it allows you to revert to any previous Develop module setting and access an unlimited number of history states without incurring the efficiency overhead that is normally associated with Photoshop image editing and History. However, keeping multiple history states can lead to the catalog ballooning in size. There are several ways you can navigate through a file’s history. You can go to the History panel and click to select a history step. This will let you jump quickly to a specific state. Or, you can roll the pointer over the list of history states in the History panel to preview them in the Navigator panel and use this to help select the one you are after. Figure 4.116 shows how the History panel looked after I had made a series of Develop adjustments to the image. Here, the original history state is date stamped at the time of import and subsequent history states are listed in ascending order. Notice that the numbers in the middle column show the number of units up or down that the settings were shifted, and the right column lists the new settings values.
You can also choose Edit ![]() Undo or use
Undo or use  (Mac) or
  (PC) to undo the last step. As you repeatedly apply an undo, the history steps are removed from the top of the list one by one, but you can restore these steps by choosing Edit
 ![]() Redo or using the
Redo or using the  (Mac) or (
 (PC) shortcut. However, if you carry out a series of undos in this way and then quit Lightroom, you will not be able to recover those history steps later. Also, if you click to select a specific history step and then adjust any of the Lightroom Develop settings, this, too, will erase all the previously recorded history steps from that point onward in history. Lastly, if you click the Clear button in the History panel, you can delete all the history steps currently associated with a photo or a selection of photos made in the Filmstrip. Clearing the history can be useful if the number of history steps is getting out of control and you need to manage the history list better.
Note
In Lightroom Classic CC, the Develop History and Metadata values are compressed, which should result in improved responsiveness.
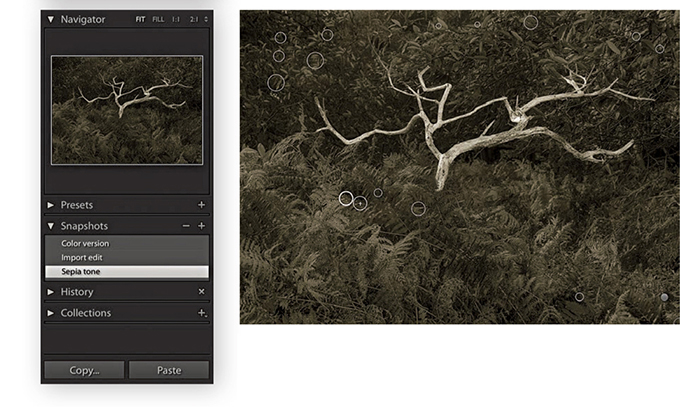
Snapshots Panel
Another way to manage your history states is to use the Snapshots panel. Snapshots can be used to store specific history states as a saved image setting (Figure 4.118). It is often more efficient to use the Snapshots panel to save specific history states, as this can make it easier for you to retrieve history states that are of particular importance or usefulness, instead of having to wade through a long list of previously recorded history states from the History panel.
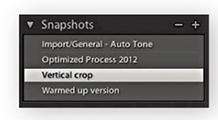
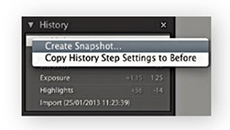
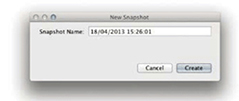
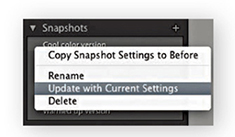
To work with Snapshots, use the current image state, or select a history state you want to record as a snapshot, and click the + button in the Snapshots panel. You can also use the context menu shown in Figure 4.119 to create a snapshot from a selected history state. This then opens the New Snapshot dialog (Figure 4.120), which lets you create a new snapshot. You can use the provided date/time stamp as the name for the new snapshot or rename the snapshot using a descriptive term, and then click Create. Snapshots are always arranged alphabetically in the Snapshots panel, and the Navigator panel preview will update as you hover over snapshots listed there. To load a snapshot, simply click a snapshot to select it. If you want to update the settings for a particular snapshot, you can do so via the context menu: Right-click a snapshot and select Update with Current Settings (see Figure 4.121) to update a snapshot with the current history state. You can therefore use the Snapshots panel to save multiple variations of a master photo, such as a color-enhanced or a black-and-white version of the original. Also, unlike history steps, Snapshots can be saved to the XMP metadata and therefore made readable in Camera Raw, or vice versa. To delete a snapshot, click the minus button.
The Sync Snapshots command in the Develop module Settings menu (see page 349) is particularly useful for updating existing snapshots with new settings. For example, if you have just spent some time removing blemishes or cropping an image, it can be handy to use the Sync Snapshots command to update the Spot Removal and Crop settings across all the previously created snapshots.
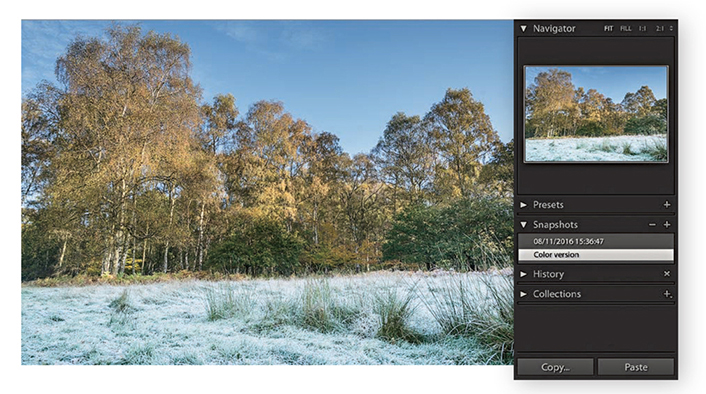
1. When I imported this image, I created a date-stamped snapshot. Then after editing the photograph, I created a new snapshot and named it “Color version.”
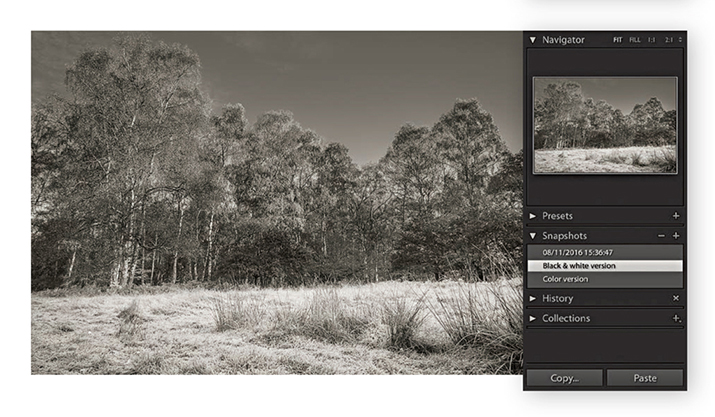
2. I then converted the image to black and white and created another snapshot, naming it “Black & white version.”
How to synchronize snapshots
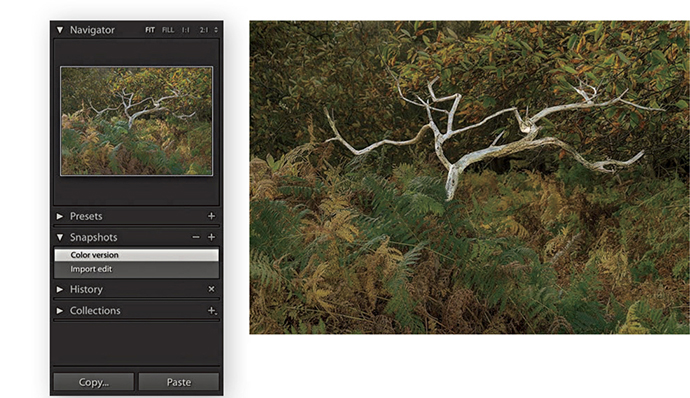
1. In this example, the current Develop settings were saved as a new snapshot, which I named “Color version.”
2. I continued editing the photo and saved a new black-and-white snapshot. However, this snapshot now included a lot of spotting work that I carried out since saving the previous snapshot.
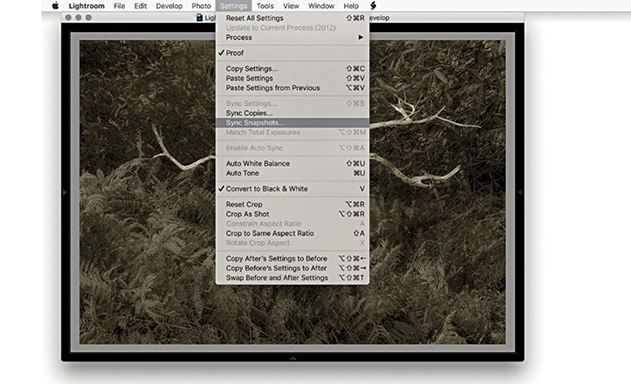
3. To update the other snapshots, I went to the Settings menu and chose Sync Snapshots to open the Synchronize With Snapshots dialog.
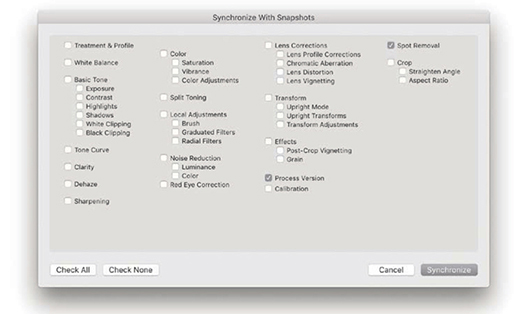
4. In the Synchronize With Snapshots dialog, I made sure only the Spot Removal option was selected and clicked Synchronize to update all the other snapshots in the Snapshots panel with the most recent Spot Removal settings.
Easing the Workflow
The following sections outline some of the ways you can further improve your workflow as you work in Lightroom.
Making Virtual Copies
In addition to making snapshot versions, you can create virtual copies of your master photos by going to the Library module and choosing Photo ![]() Create Virtual Copy (
Create Virtual Copy ( [Mac] or
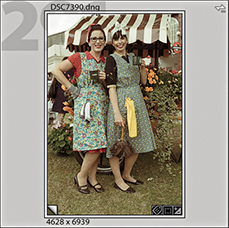
  [PC]). This makes a virtual copy of the master image (Figure 4.122) that is automatically grouped in a stack with the master photo. As the name suggests, you are making a proxy version of the master. It may look and behave like a separate photo, but it is, in fact, a virtual representation of the original master that you can continue to edit in Lightroom as if it were the original image. When viewing the Library Grid view or Filmstrip, you can tell which images are virtual copies by the turned-page badge in the bottom-left corner.
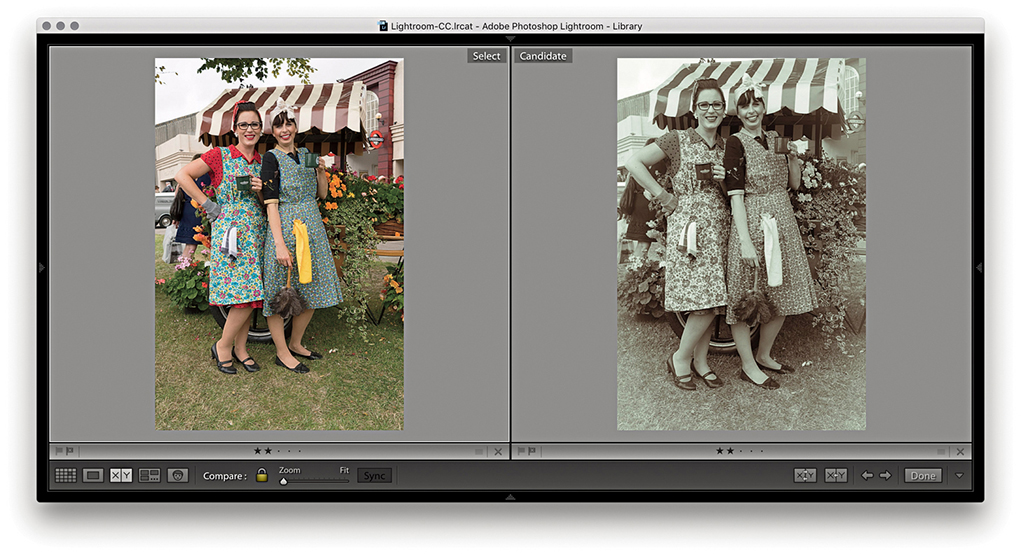
So, what is the difference between a virtual copy and a snapshot? Well, a snapshot is a saved history state that is a variation of the master. You have the advantage of being able to synchronize specific edit adjustments across all the snapshot versions but lack the potential to create multiple versions as distinct entities that behave as if they were actual copies of the original. A virtual copy on the other hand is like an independent snapshot image, because when you create a virtual copy, you have the freedom to apply different types of edits and preview these edits as separate image versions. You could, for example, create various black-and-white renderings and experiment with alternative crops on each virtual copy version. The example on the page opposite shows how you might use the Compare view mode to compare a virtual copy version of a photo alongside the master version (or you could use the Survey view to compare multiple versions at once). Virtual copies also make it possible for you to create collections that have different settings. For example, you can use the Create Virtual Copy command to create black-and-white versions as well as colorized versions from a master image, and then segregate these virtual copies into separate collections. The downside of virtual copies is that while Snapshots can be shared with Camera Raw, you can’t share virtual copy settings, as they are unique to Lightroom only. Camera Raw recognizes only settings that have been applied to the master image.
You also have the freedom to modify the metadata in individual virtual copy images. For example, you may want to modify and remove certain metadata from a virtual copy version so that when you create an export from the virtual copy, you can control which metadata items are visible in the exported file. For instance, when submitting photos to clients, you may wish to exclude certain metadata that cannot normally be removed automatically at the export stage.
Making a virtual copy the new master
After you have created one or more virtual copies, you can then choose the Photo ![]() Set Copy as Master command to make any virtual copy version of an image become the new master version (and make the old master version become a virtual copy).
Set Copy as Master command to make any virtual copy version of an image become the new master version (and make the old master version become a virtual copy).
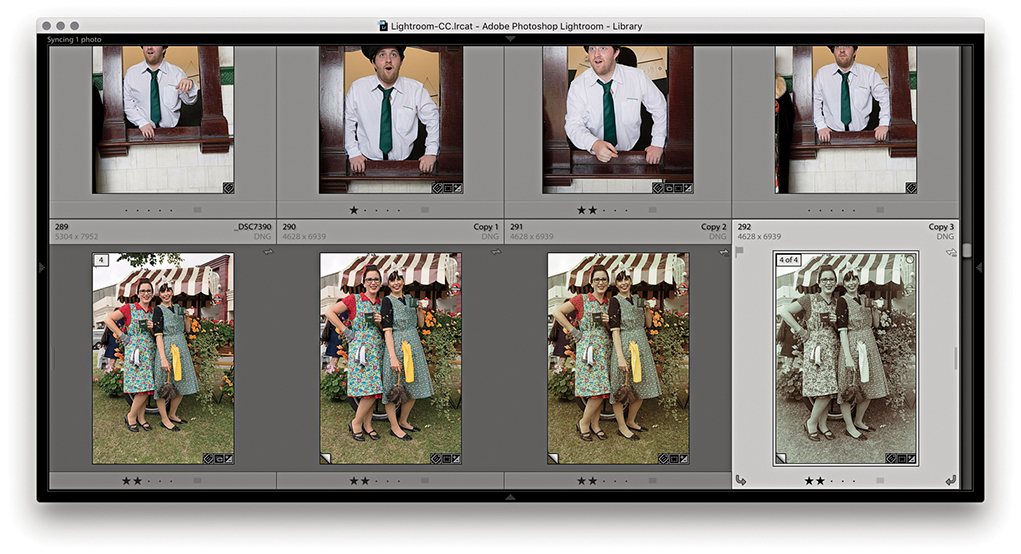
1. As you make new virtual copies of a master file, these are automatically stacked with the original master image.
2. One of the advantages of having virtual copy versions of a master file is that you can explore applying different Develop settings and compare these against the original master.
Synchronizing Develop Settings
Let’s look at ways the Develop settings can be applied to multiple images. Whenever you have a selection of images selected in the Develop module, the Previous button changes to Sync (Figure 4.123). Clicking the Sync button lets you synchronize the Develop settings across two or more photos, based on the settings in the target photo, and opens the Synchronize Settings dialog (or you can use the  [Mac] or
  [PC] keyboard shortcut ). If you hold down the
  key, the Sync button loses the ellipsis (Figure 4.124), and clicking the button will bypass the Synchronize Settings dialog and apply a synchronization based on the last used Synchronize settings. In this mode you will see a Set Default button. This lets you set the current Develop settings as the new default settings for files shot with a particular camera plus its specific serial number and ISO setting. What gets set here all depends on how the preferences have been configured (see page 371).

 key bypasses the Synchronize Settings dialog.
Note
Whenever you choose to synchronize the Develop settings, Lightroom checks the process version status of the most selected image when deciding what to do. If the Process Version option is on, it applies the process version of the most selected photo to all the other photos (if the selected photos already share the same process version as the most selected photo, no conversion needs to take place). If the Process Version box is not selected, things can become more unpredictable. In this situation, the process version will not be referenced when making a synchronization. Therefore, if you attempt to synchronize Version 1 settings to Version 5 images, such settings as Recovery or Fill Light will not be translated. Similarly, if you try to synchronize a Version 5 image to Version 1 or 2 photos, adjustments such as Highlights and Shadows will not be recognized.
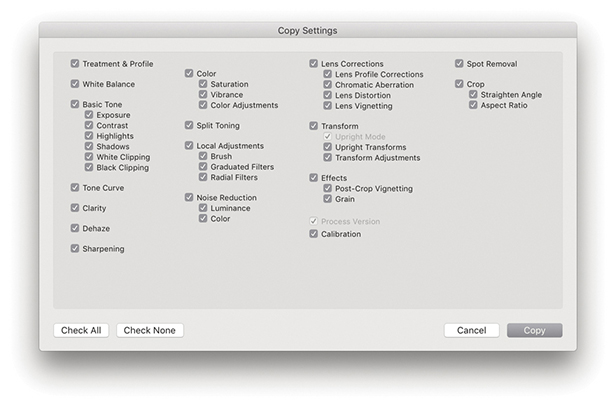
If you click Check All in the Synchronize Settings dialog, every item will be checked. If you click Check None, you can then choose any subset of synchronization settings. Whether you choose to save everything or just a subset of settings will have important consequences for how the photos are synchronized. In some cases, synchronizing everything might well be the easiest and most practical option. But you will not necessarily always want to synchronize everything across all the selected photos. Sometimes you’ll need to think carefully about which specific settings you should synchronize. If not, you may end up overwriting settings that should have been left as they were (although you can always recover a previous image version via the History panel on an image-by-image basis). For example, if your imported photos have the camera default settings applied for Sharpening, Noise Reduction, and Calibration, you will want to be careful not to overwrite these settings. The sync behavior can also be critically affected by the process version of the most selected and other photos (see Note).
Auto Sync mode
If you  -click (Mac) or
  -click (PC) the Sync button, it switches to Auto Sync mode (Figure 4.125) and stays as such until you click the Auto Sync button to revert back to Sync mode again. In Auto Sync mode, you first make a selection of photos, and as you adjust the Develop settings for the most selected image, you will see these adjustments propagated across all the images in the selection. You will notice that there is a switch to the left of the Sync/Auto Sync buttons. Clicking this toggles between the Sync and Auto Sync modes, or you can use the
  (Mac) or
  (PC) keyboard shortcut. Lastly, there is the Reset button, which can be used to reset photos back to their Lightroom default settings.
 key (Mac) or key (PC) to switch to the Auto Sync mode.
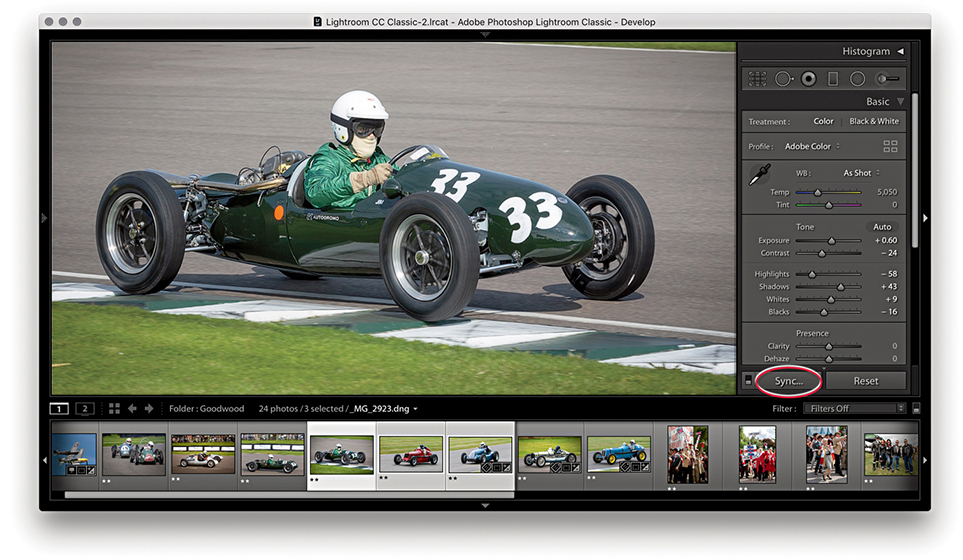
1. The Develop settings in the most selected photo can be synchronized with other photos in a selection by clicking the Sync button (circled) or using the  (Mac) or
  (PC) keyboard shortcut.
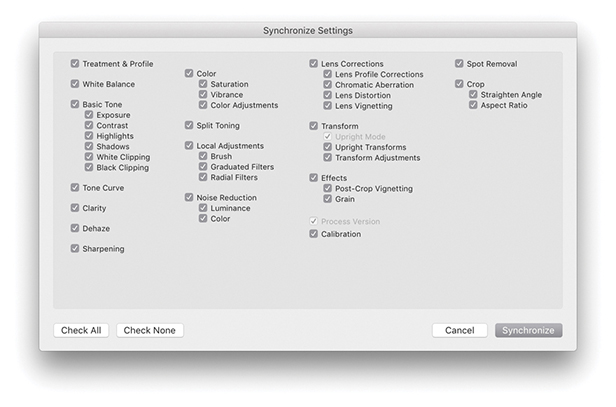
2. In the Synchronize Settings dialog, I selected the Check All settings option. This should be used with caution, because synchronizing everything may overwrite important Develop settings in the selected photos.
Copying and Pasting Develop Settings
Another way to synchronize images is to copy and paste the Develop settings from one photo to another using the Copy and Paste buttons in the Develop module (Figure 4.126). You can also do this by selecting a photo from the Library Grid or Filmstrip and use  (Mac) or
  (PC) to copy the settings. Either method opens the Copy Settings dialog shown in Figure 4.127. Here, you can specify the settings you want to copy. If you
  -click the Copy button, you can bypass this Copy Settings dialog completely. So, if you had previously clicked the Check All button to apply all the settings in the Copy Settings dialog,
  -clicking the Copy button copies all settings without showing the dialog. After you have copied the Develop settings, you can select a photo or selection of photos via the Library module Grid view or Filmstrip and click the Paste button to apply the current copied settings (or use the
  [Mac] or
  [PC] shortcut).
Note
Whenever you copy the Develop settings, Lightroom utilizes the Basic panel settings associated with the process version of the selected image, and Lightroom will automatically want to include the process version of the image in the copy settings. You can override this by disabling the Process Version box, but see the Note on page 352 for information about how Lightroom handles process version conflicts that might arise when the process version of the image you are pasting to does not match that of the image you copied the settings from. Applying any of the default Lightroom presets will automatically update a photo to Version 5.
Applying a previous Develop setting
As you navigate the Filmstrip, Lightroom temporarily stores the Develop settings of each photo you click on. This allows you to apply a “Previous” Develop setting to any photo. When you click on the Previous button (circled in Step 2), this simply applies all the Develop settings from the previously selected photo. You can also use the  (Mac) or
  (PC) shortcut to apply a Previous setting. If more than one photo is selected in the Filmstrip, the Previous button will say Sync instead. If you still wish to apply a Previous setting, hold down the
  key and the Sync button will change to Previous. Click it, and Lightroom will apply a copy of the previous image settings to the most selected photo in the Filmstrip.
1. Whenever you select a photo in the Filmstrip, Lightroom automatically stores the Develop settings as a Copy All setting.
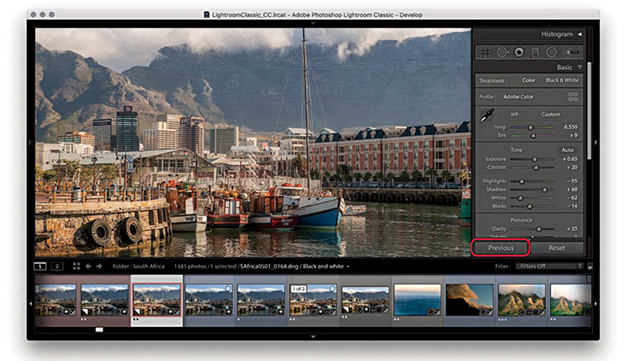
2. If you then select another photo in the Filmstrip and click the Previous button, Lightroom pastes all the Develop settings from the previously selected photo.
Lightroom and Camera Raw Compatibility
Lightroom and Camera Raw share the same Camera Raw processing engine. This means any development adjustments that are applied in one program can be recognized and read by the other. However, you need to bear in mind that new features are added with each new Camera Raw release, making Camera Raw version-specific. If you are subscribed to a Creative Cloud plan, you will have immediate access to the latest updates for Lightroom and Photoshop and can therefore maintain full compatibility. You can open files processed in earlier versions of Camera Raw or Lightroom and edit them. But problems can arise when you share files that have been edited in the latest version of Lightroom or Camera Raw with someone using an older version. This is because Lightroom and Camera Raw cannot be expected to provide full backward compatibility for older versions. For example, if you are using the most current version of Lightroom, you can add, say, a Depth Range mask to a localized adjustment. If you edit an image using these controls and share the raw files, only another user using the same version of Camera Raw or Lightroom will be able to read the files and edit the Depth Range mask settings. If you share the files with someone using an older (incompatible) version of Camera Raw or Lightroom, the person will be able to open the file and see the later verison edit changes applied in the preview but not have the controls to edit these adjustments. Therefore, you need to take version compatibility into account when sharing catalogs or exported raw files with other Lightroom users.
Making Camera Raw edits accessible in Lightroom
For Camera Raw edits to be visible in Lightroom, you need to make sure that image adjustments applied in Camera Raw are also saved to the file’s XMP space. To do this, launch Photoshop and choose Photoshop ![]() Preferences
Preferences ![]() Camera Raw to open the Camera Raw Preferences dialog (Figure 4.128). In the dialog, go to the “Save image settings in” menu and select “Sidecar ‘.xmp’ files”
Camera Raw to open the Camera Raw Preferences dialog (Figure 4.128). In the dialog, go to the “Save image settings in” menu and select “Sidecar ‘.xmp’ files”

Making Lightroom edits accessible in Camera Raw
To allow Camera Raw to read Develop module adjustments that have been applied in Lightroom, you need to save the edits to the files’ XMP space. You can do this by choosing Photo ![]() Save Metadata to File, or by using the
Save Metadata to File, or by using the  (Mac) or
  (PC) keyboard shortcut.
Keeping Lightroom edits in sync
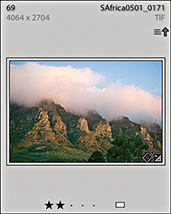
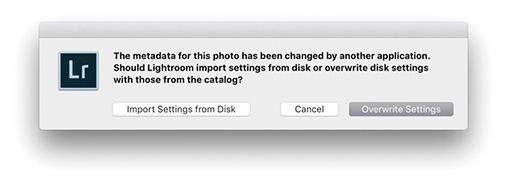
If Lightroom detects that a file’s metadata has been edited externally, Lightroom displays a metadata status conflict warning badge in the thumbnail cell (providing you have the Unsaved Metadata option checked in the Library View options: Grid View Cell Icons section). This may appear as an upward arrow (Figure 4.129), indicating the metadata has been edited externally, such as in Camera Raw. Clicking this badge opens the dialog shown in Figure 4.130, where you can choose to import the settings from disk to Lightroom or overwrite with the current Lightroom catalog settings. You can instead import external settings by choosing Metadata ![]() Read Metadata from files (in the Library module) or Photo
Read Metadata from files (in the Library module) or Photo ![]() Read Metadata from file (in the Develop module). If you are unsure about the current metadata conflict status, choose Library
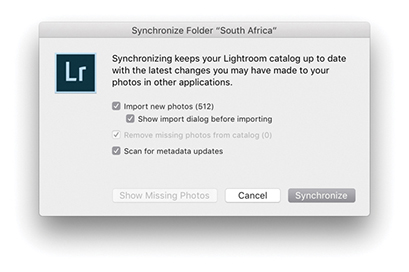
Read Metadata from file (in the Develop module). If you are unsure about the current metadata conflict status, choose Library ![]() Synchronize Folder (Figure 4.131). The Synchronize Folder command will run a quick check to determine if everything is in sync between Lightroom and update the badge icons for any metadata conflicts.
Synchronize Folder (Figure 4.131). The Synchronize Folder command will run a quick check to determine if everything is in sync between Lightroom and update the badge icons for any metadata conflicts.
Note
If you have unsaved metadata changes in Lightroom, you will see a downward arrow in the top-right corner. If you have unsaved metadata changes in Lightroom and have also made external metadata changes, you will see an exclamation point badge. In either of these situations, clicking the badge opens a dialog like the one in Figure 4.130 with options to resolve the sync conflict.
Synchronizing Lightroom with Camera Raw
The following steps illustrate how to keep a set of photos in sync when switching between Lightroom and Adobe Camera Raw.

1. Here is a selection of photos in Lightroom with only the default settings applied so far.
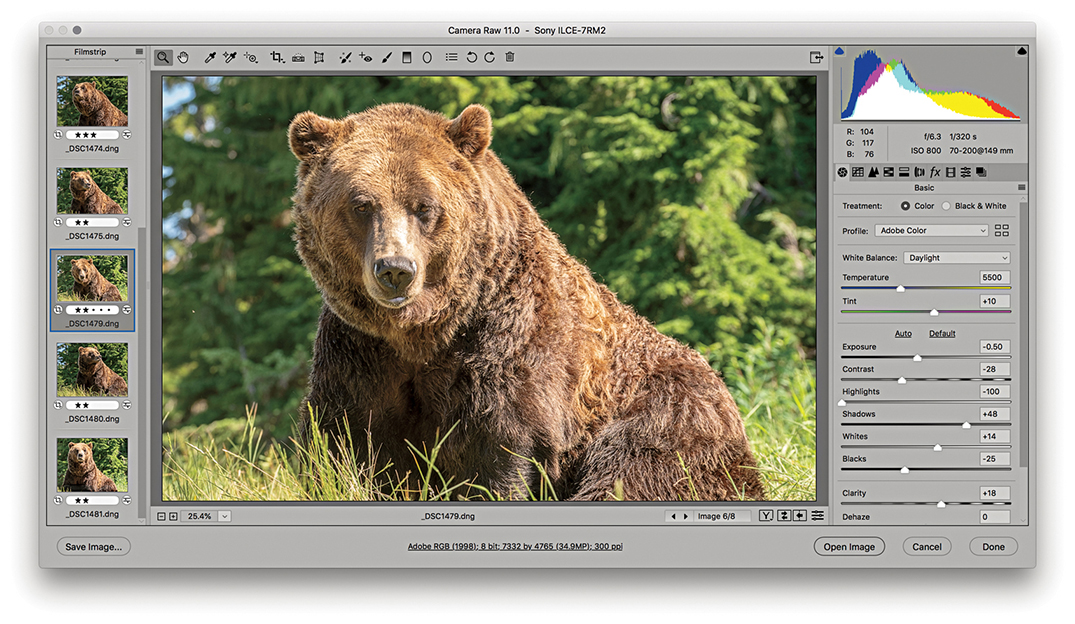
2. I opened the same photo selection in Camera Raw, optimized the settings, and synchronized these settings with all the selected photos.
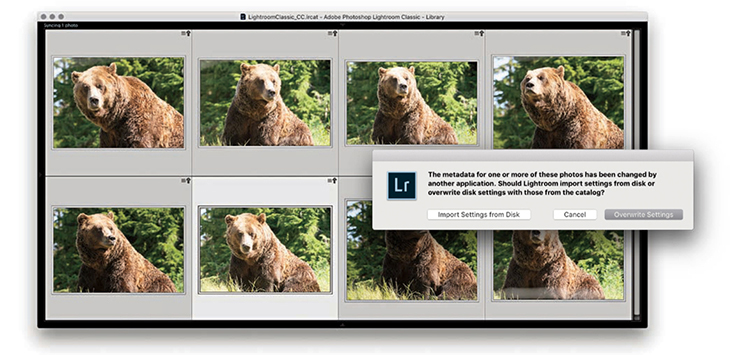
3. In Lightroom, the “out-of-sync” photos displayed a metadata status change warning icon with an upward arrow, indicating the settings had been changed externally. I clicked the badge and then clicked the Import Settings from Disk button to import the Camera Raw adjusted settings (sometimes you won’t see the badges straight away and may want to choose Metadata ![]() Read metadata from file).
Read metadata from file).
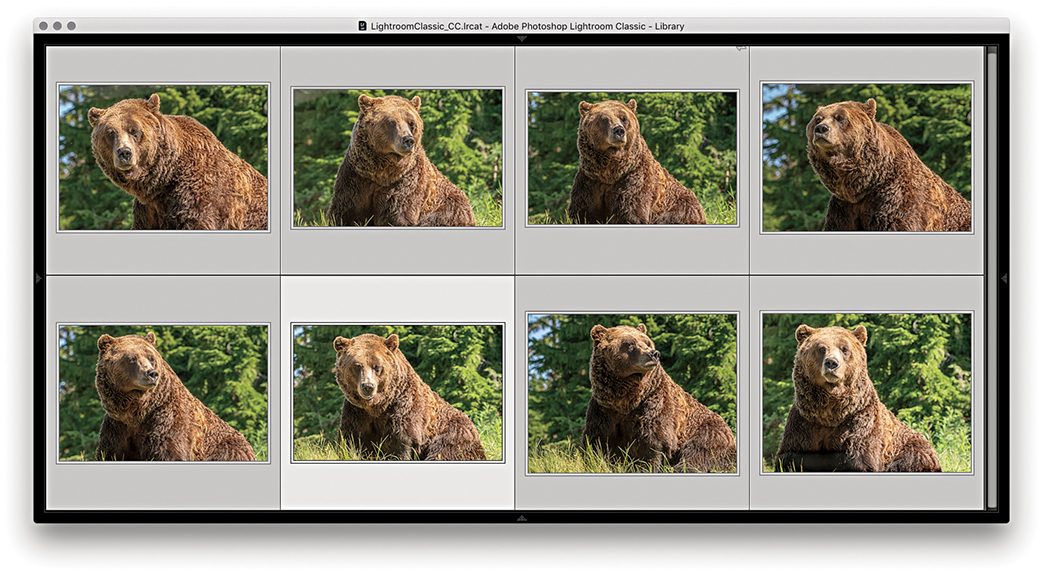
4. The externally adjusted settings now appeared updated in Lightroom.
Saving Develop Settings as Presets
If you have created a setting you are likely to use again, it is a good idea to save it as a preset. For example, it is a tedious process to go through all the clicks to access different profiles via the Basic panel Profile Browser. Instead, you can create Develop presets to save your favorite profile settings. Figure 4.132 shows an expanded view of the Develop module Presets panel in which you can see a list of Develop presets. To help you get started, the top sections contain some Lightroom-supplied presets. To add your own presets, click the + button at the top of the Presets panel (circled). This opens the New Develop Preset dialog shown in Figure 4.133, where you can choose which settings you want to include. The process version of the current selected photo determines which Basic panel adjustments are displayed here. The process version warning symbol also reminds you that process versions affect the available settings and subsequent preset behavior.
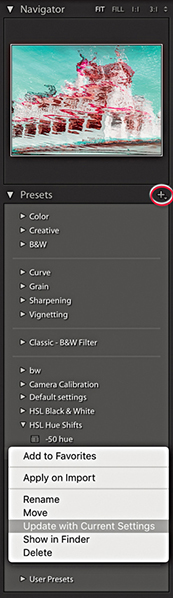
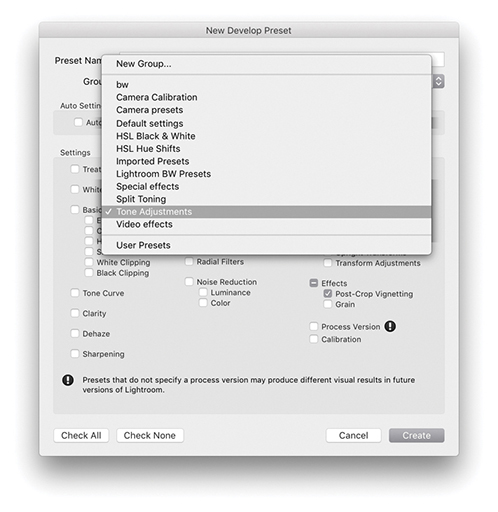
If the Process Version box is checked when you save a preset, the process version is included when applying the preset to other images. If the photos to which you apply a preset share the same process version, no conversion will take place, but if they do not share the same process version, they will be converted.
If the Process Version box is not checked when you create a preset, things become more unpredictable. In this situation, the process version will not be referenced when applying the preset. Therefore, if you apply a Version 1 preset to a Version 5 image, settings such as Recovery or Fill Light will not be translated. Similarly, if you apply a Version 5 preset to a Version 1 or 2 photo, settings such as Highlights and Shadows will not be recognized.
When you have decided which to check, give the preset a name, choose a folder location to save the preset to, and click the Create button to add it as a new preset to the list. As you roll over the list of presets, you get to see an instant preview in the Navigator panel, as shown in Figure 4.132. You can update existing settings by right-clicking to reveal a context menu for the presets (which also allows you to select a preset to apply in the Import dialog for the next time you do an import).
New Preset groups can be added via the New Develop Preset dialog shown in Figure 4.133. Just select New Group from the top of the Group menu.
Updating older presets
When installing the most recent versions of Lightroom, the presets you may have had loaded in Lightroom will have been updated from LUA to the XMP format. Consequently, after the conversion to XMP, the original LUA-based .lrtemplate presets are renamed with a ~ prefix. This is so the .lrtemplate presets will remain visible to earlier versions of Lightroom that might be running on the same machine. The only thing you are likely to notice is that when first updating Lightroom, you’ll see a dialog indicating an update is in progress. After that, your presets will appear listed as normal in the Lightroom Develop module Presets panel. At the system folder level, the older LUA presets will remain in the Lightroom Develop Presets folder (prefixed with a ~). Meanwhile, the new XMP preset versions will be stored in a folder that’s shared with the Camera Raw plug-in. This means that custom Lightroom presets are now all shared between Lightroom and Camera Raw, and any presets you had created in Camera Raw will now also appear in Lightroom. As you move over your presets list, the main preview now updates as well as in the Navigator panel. Lightroom will keep checking the system on every launch in case there are presets that have recently been added in the old format that need to be updated.
You can import a ZIP archive of presets provided the ZIP archive contains XMP presets. To carry out an import, go to the File menu and choose File ![]() Import Develop Profiles and Presets. This can be used to import both presets and profiles. To import new presets only, go to the Presets panel (Figure 4.134), click the plus (+) icon at the upper-right corner, and choose Import Presets from the menu. When the import dialog appears, select the ZIP archive containing the presets you want to import. Lightroom then automatically places the presets and profiles in the correct locations on your system.
Import Develop Profiles and Presets. This can be used to import both presets and profiles. To import new presets only, go to the Presets panel (Figure 4.134), click the plus (+) icon at the upper-right corner, and choose Import Presets from the menu. When the import dialog appears, select the ZIP archive containing the presets you want to import. Lightroom then automatically places the presets and profiles in the correct locations on your system.
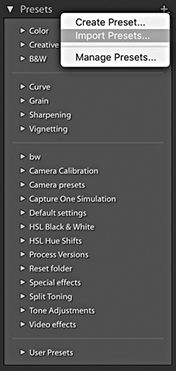
Note
Imported presets are stored in a folder named Adobe/CameraRaw/Imported Settings, whereas manually installed presets are stored in a folder named Adobe/CameraRaw/Settings.
Managing presets
To manage presets sets, click on the + icon at the top of the Presets panel and select Manage Presets to open the Manage Presets dialog (Figure 4.135). If you are missing the Lightroom Classic presets, you can restore hidden presets by going to the Manage Presets dialog again via the Presets panel. Or, you can right-click on any Preset set name and select the Reset Hidden Presets option.
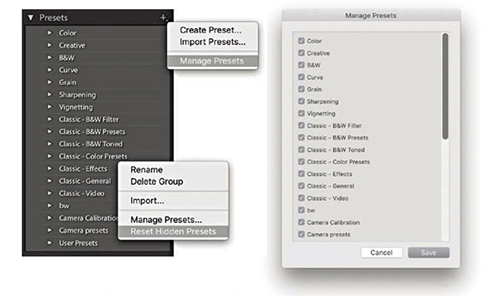
By default, new presets are automatically placed in alphabetical order in a folder called User Presets (which can be seen at the bottom of Figure 4.135). To make presets more manageable, you can organize your presets into folder groupings. This can be done by adding new groups via the New Develop Preset dialog shown in Figure 4.133.
Auto Settings preset adjustments
The Auto Settings option lets you include an Auto Settings adjustment as part of a preset. In some instances, this might be considered useful, because you can get Lightroom to combine an auto correction with other Develop adjustments. Because it can lead to different tone settings being applied to each image, this might not always produce the results you were after (even though the Auto Settings logic is now substantially improved in Lightroom). So, just be aware of this when you include Auto Settings in a saved Develop preset setting; the results you get may sometimes be unpredictable.
Creating a new Develop preset
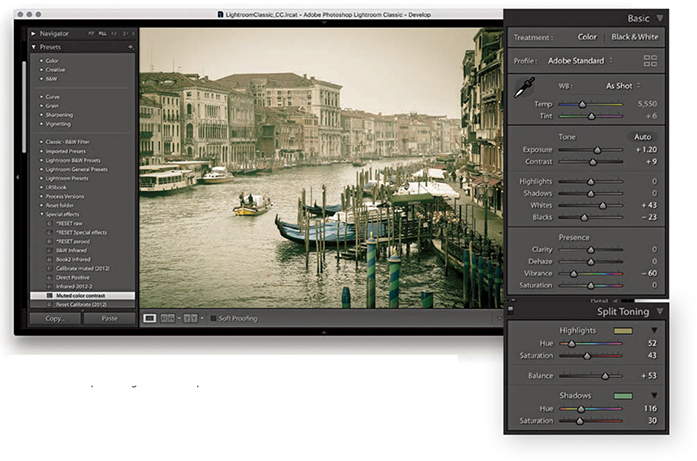
1. After adjusting this photograph in the Develop module, I wanted to save the current Develop settings as a new preset.
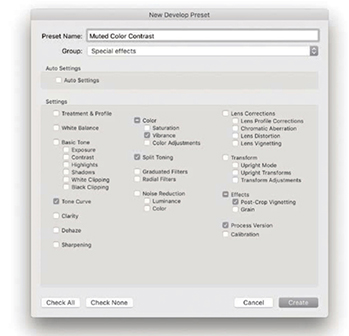
2. I clicked the Presets panel’s + icon to open the New Develop Preset dialog and selected only those settings that were relevant for this effect. I named the preset setting Muted Color Contrast and saved it to the Special effects folder.
The art of creating Develop presets
Lightroom Develop presets have proved incredibly popular. Lots of Lightroom users have gotten into sharing their preset creations. Although it is possible to encapsulate a complete Develop module look in a single preset, it seems to me that the best way to use Develop presets is to break them down into smaller chunks. In my experience, the trick is to save as few settings as possible when creating a preset. You often see Develop presets where the creator checks too many boxes and ends up with a preset that adjusts not just the settings it needs to adjust, but other settings, too. In many cases, it is not always obvious which settings a Develop setting is meant to be altering, and applying the preset may overwrite settings it shouldn’t. Or, the creator includes White Balance or Exposure settings that may have been relevant for the pictures the creator used to test the Develop setting with, but are not necessarily suited for other people’s photographs. More importantly, all the process version revisions since Version 3 have had a significant impact on Develop preset compatibility. However, if you apply a legacy preset to a Version 5 image, the absence of a process version tag should mean such settings still translate okay to the Version 5 image (except for those settings that are specific to Version 1 or 2, such as Fill Light). In Figure 4.133, I deliberately left the Process Version box unselected. Because of this there was a reminder to include the process version when saving a new setting.
For all the above reasons, it can now be better sometimes to save favorite Develop settings as an enhanced profile, rather than as a Develop preset. As was mentioned earlier in this chapter, you can save any combination of Lightroom Develop settings as a custom profile, which will then appear listed in the User Presets group, although you can create custom groups to save your profiles in. You can apply a custom profile as a custom look to any image, raw or non-raw without affecting the Develop settings. And, you can adjust the Amount slider to alter the strength of the profile look. On the other hand, it can sometimes be better to apply a preset, because it can often be useful to access and modify the Develop settings. You might prefer to select a Split Toning preset rather than a Split Toning profile, because with a preset you can easily tweak the Split Toning panel settings the preset applied.
If you want to create a profile, apply the desired Develop settings to an image and choose  (Mac) or
  (PC) to save the metadata to the file. Right-click on the image and choose Show in Finder from the context menu. This opens the relevant folder via the Finder/Explorer with the original image selected. Double-click to open the photo via Camera Raw. Now, if this causes the image to open in some other program, drag the file on top of the Photoshop program icon to open in Camera Raw. In the Camera Raw Presets tab,
  -click the New Preset button to save as a new profile. The saved profile will then be shared with Lightroom (see the book website for more details on creating profiles). Anyway, sticking with working with Develop presets, in the following section, I have provided a quick guide on how to create neatly trimmed presets.
Tip
If the Develop settings have been applied to a non-raw file, such as a JPEG, locate the file via Bridge and choose File ![]() Open in Camera Raw. Here, you will want to make sure the Camera Raw preferences are set to open JPEGs and HEICs with settings (or TIFFs with settings).
Open in Camera Raw. Here, you will want to make sure the Camera Raw preferences are set to open JPEGs and HEICs with settings (or TIFFs with settings).
Understanding how presets work
Even with a Develop setting like the one described on page 363 and analyzed below in Figure 4.136, it can get confusing. A Develop preset like this is doing several things at once. It is adjusting the Contrast, reducing the Vibrance, and adding a split-tone effect. Incorporating all these Develop settings into one preset has disadvantages and can lead to messy situations like that described in Figure 4.137.
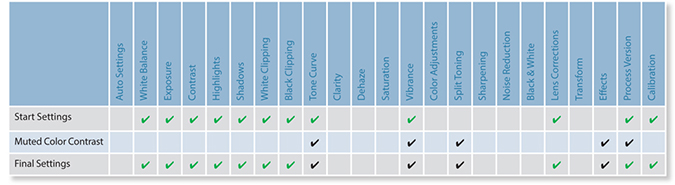
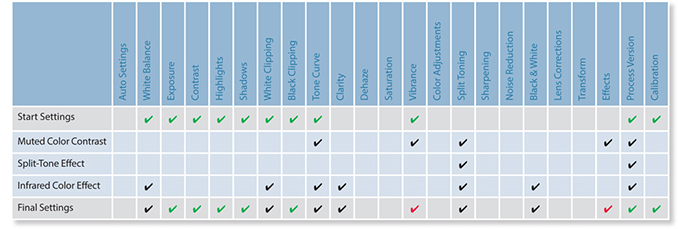
How to prevent preset contamination
As I have just explained, when I create presets I like to trim them down so that each preset performs a discrete task, such as a black-and-white conversion or a split-tone coloring effect. That way, I find I have more options to combine different settings and prevent getting into a situation like the one shown in Figure 4.137, where the end result was a contaminated mess. For example, I may apply one preset to modify the contrast and another preset to apply a coloring effect. I then keep these presets stored in individual preset folders so it is easy for me to locate the presets that can be used to apply, say, different black-and-white conversions or cross-processing effects.
Tip
Preset names must be unique. You cannot have two presets sharing the same name, even if they are stored in separate folders.
The chart shown in Figure 4.138 summarizes a series of Develop preset steps that were applied in the step-by-step example that begins on the page opposite. The final setting does include lots of red check marks where the settings have changed cumulatively, but this does not matter as much as in the Figure 4.137 example, because the whole point is to build up the settings one step at a time. You will notice that I included a *RESET Special Effects step. This preset is designed to cancel out previous preset settings and therefore acts like a “clear settings” button. To illustrate this, I have used crosses to indicate the items that are returned to their default settings. Therefore, when applying, say, different split-tone effects, you can click each of the presets in turn to see a full-screen view of what the end result will look like, without fear of messing up any of the settings that have been applied already. To clear a Split Toning preset adjustment, you can simply select a specially created Split Toning “reset” preset. You can also use  (Mac) or
  (PC) to undo a preset setting, or use the
  (Mac) or
  (PC) shortcut to reset all the Develop settings.
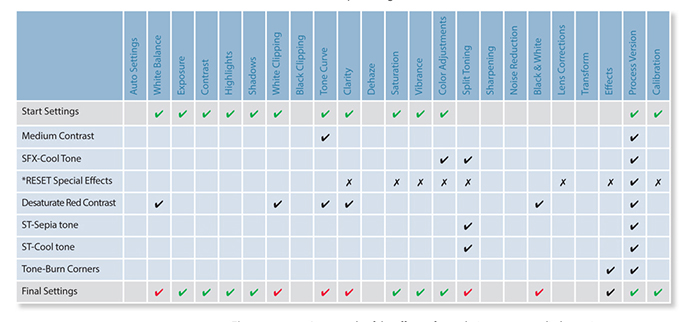
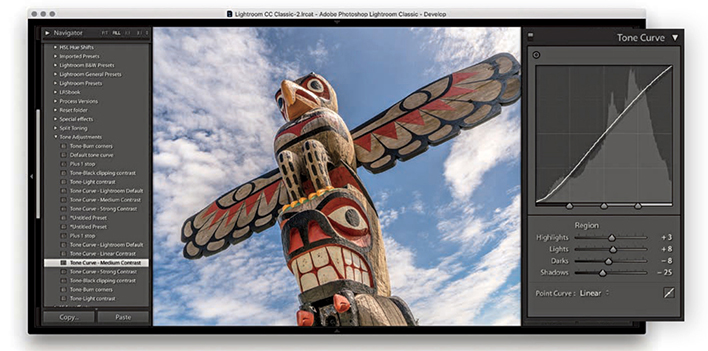
1. Here, I went through a list of tone adjustment presets and selected the Tone Curve-Medium Contrast preset to apply a moderate contrast boost to the image.
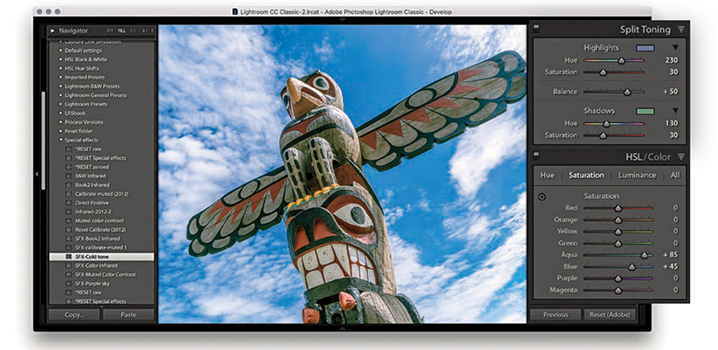
2. I wanted to try some special effect coloring presets, so I selected an SFX-Cold tone preset from my Special Effects preset folder. In case I wish to reset the preset settings, I have included a RESET setting in each folder that resets all the relevant sliders to zero.
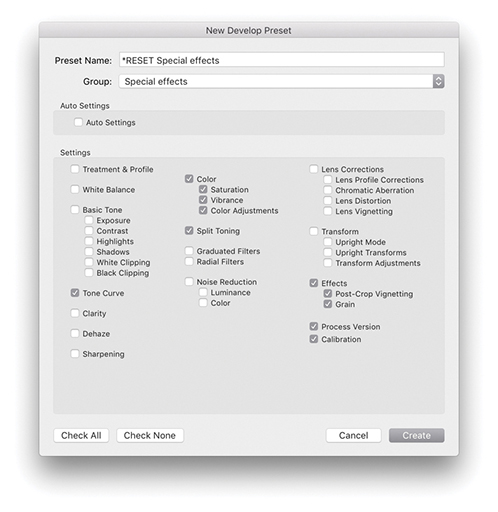
3. I selected a *RESET Special effects preset. Shown here are the settings I saved when creating this preset (which zeroed all the items checked here). I use all caps so the reset presets stand out more. And, I place an asterisk at the beginning of the name so the preset appears listed first in each of the preset folders.
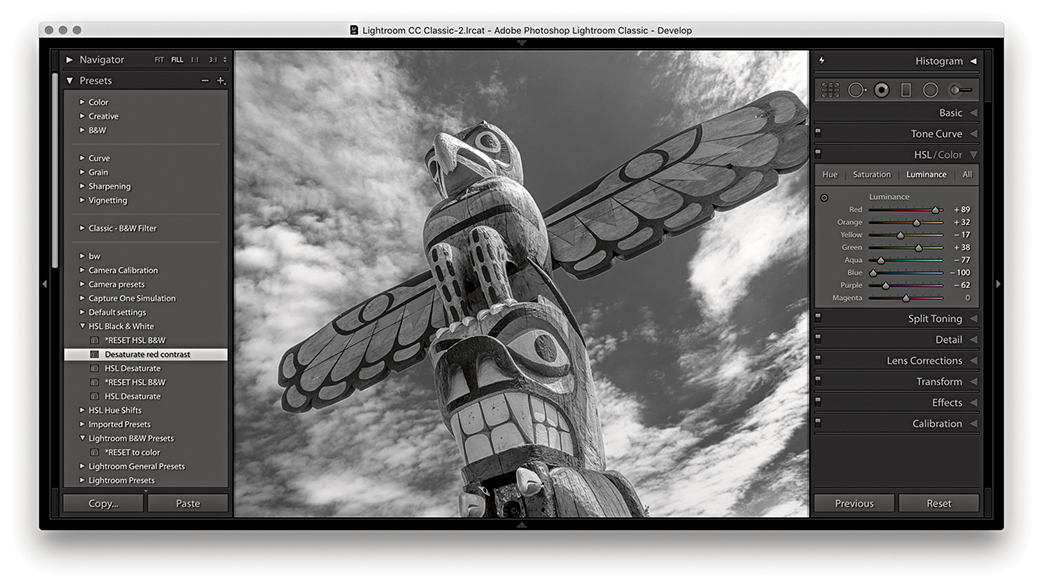
4. I applied a Desaturate red contrast preset from the HSL Black & White folder.
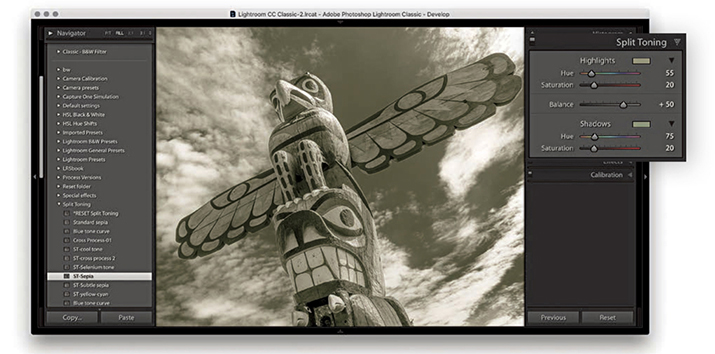
5. I then went to the Split Toning folder and selected the ST-Sepia split-toning effect.
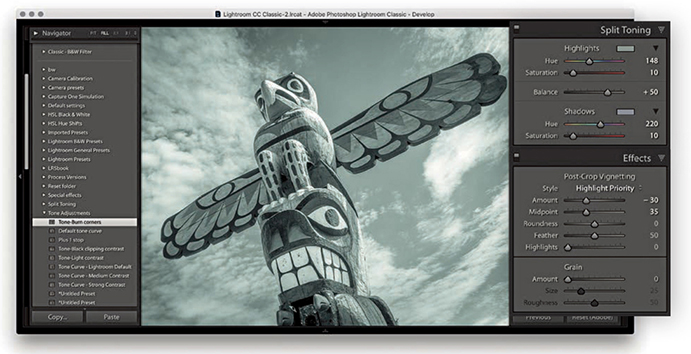
6. Finally, I selected the ST-cool tone split-tone preset and also added a Tone-Burn corners preset from the Tone Adjustments folder.
Creating Default Develop Camera Settings
There are some Develop settings you may wish to apply as standard at the import stage. For example, you want to always apply a Profile lens correction, you may want to apply a particular camera profile or a modified sharpening setting. To do this, you can go to the Develop module Develop menu and choose Set Default Settings. This opens the New Develop Preset dialog shown in Step 3, where you can click the Update to Current Settings button to update the default settings for the camera model listed in the same dialog. But if at the same time you have “Make defaults specific to camera serial number” and “Make defaults specific to camera ISO setting” checked in the Lightroom Presets preferences, clicking Update to Current Settings will make the default setting specific to the camera serial number and ISO setting. This is useful if you wish to apply specific noise reduction settings based on the camera’s ISO metadata. The combination of the Set Default Settings and Default Develop Settings preferences allows you to establish the default settings that are applied to all newly imported photos.
Tip
The default Develop settings shown here work well for the cameras and lenses I shoot with. However, be warned that including Enable Profile Corrections in the Lens Corrections panel may cause incorrect profiles to be applied to some lenses. It’s rare, but can happen.
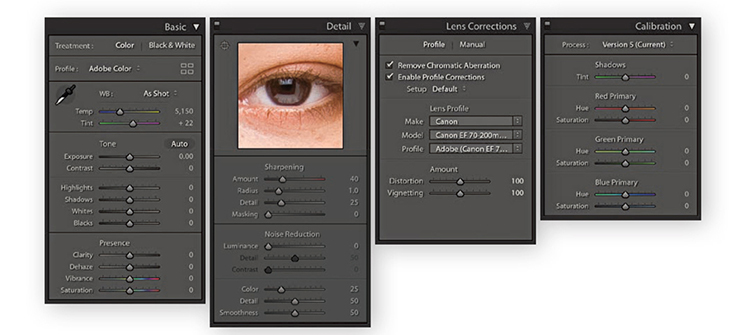
1. To create a default camera preset setting, first select a photo shot with a particular camera that is representative of how the camera performs at a specific ISO setting. In the Basic panel, the White Balance setting should be left set to As Shot and the Adobe Color profile selected (or choose another profile if you prefer). In the Detail panel, set an optimum sharpness and noise reduction that would make a suitable starting point for future image editing. In the Lens Corrections panel, I recommend checking Enable Profile Corrections and Remove Chromatic Aberrations. In the Camera Calibration panel, I suggest checking to make sure that the process version is set to Version 5. In all the other panels, it is essential that the sliders are at their default settings.
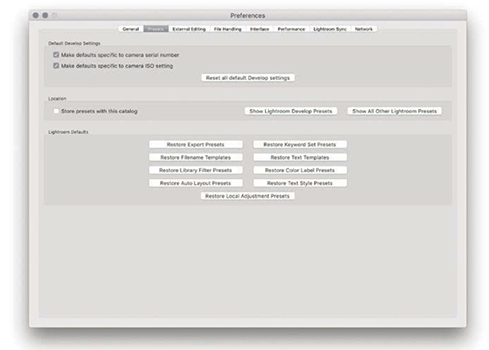
2. Go to the Lightroom Presets preferences ( [Mac] or
  [PC]) and make sure that “Make defaults specific to camera ISO setting” is checked. It is important that you do this before proceeding to the next step. You can also check “Make defaults specific to camera serial number” if you want the settings to be camera-body specific.
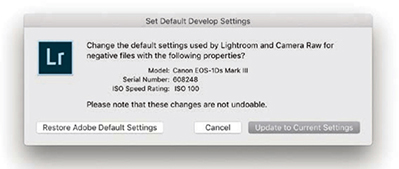
3. Now go back to the photo you worked on in Step 1 and choose Develop ![]() Set Default Settings. This opens the dialog shown here, where you need to click the Update to Current Settings button. Do this and Lightroom will automatically make this the default setting for all newly imported photos that match the camera model, serial number, and ISO setting. When camera default settings are applied to a photo, there will be no badge on the thumbnail to indicate that it contains edits, because Lightroom treats such edits as default values. Although this may seem obvious, it is easy to forget you have applied camera default settings and then wonder why the Lightroom-rendered image looks different from what you expected, yet has no badge to indicate changed settings.
Set Default Settings. This opens the dialog shown here, where you need to click the Update to Current Settings button. Do this and Lightroom will automatically make this the default setting for all newly imported photos that match the camera model, serial number, and ISO setting. When camera default settings are applied to a photo, there will be no badge on the thumbnail to indicate that it contains edits, because Lightroom treats such edits as default values. Although this may seem obvious, it is easy to forget you have applied camera default settings and then wonder why the Lightroom-rendered image looks different from what you expected, yet has no badge to indicate changed settings.