Table of Contents for
The Adobe Photoshop Lightroom Classic CC Book, Second Edition
 The Adobe Photoshop Lightroom Classic CC Book, Second Edition
Published by
Adobe Press, 2019
The Adobe Photoshop Lightroom Classic CC Book, Second Edition
Published by
Adobe Press, 2019
- Contents
- Cover Page
- Title Page
- Copyright Page
- Dedications
- Introduction
- Contents
- 1 Introducing Adobe Photoshop Lightroom
- 2 Importing photos
- 3 The Library module
- 4 Develop module image editing
- The Tone Curve Panel
- Easing the Workflow
- 5 The art of black and white
- 6 Sharpening and noise reduction
- 7 Exporting from Lightroom
- 8 Printing
- 9 Presenting your work
- 10 Managing your photos in Lightroom
- 11 Lightroom CC/mobile
- 12 Lightroom preferences and settings
- Index
2 Importing photos
A guide to the various ways you can bring your photos into Lightroom

Photograph: © 2011 Rob Cadman
Canon EOS 550D | 22mm | 3200 ISO | f9 @ 1/60th
Lightroom is essentially a catalog management program and raw image processor combined into one. It is important, though, to appreciate how Lightroom differs from browser programs such as Bridge, which you simply point at a folder to inspect the contents. The browser method is best suited for those times when you need the freedom to search everything that’s on your computer. The downside of this approach is that you first have to know where to look in order to find what you are searching for. Plus, you will be shown all the files that are contained in each folder. If there are also lots of non-image files to sort through, this can make image browsing quite tricky.
Lightroom is different. This is because you must import your photos first and, in doing so, make a conscious decision as to which photos you want to have added to the catalog. As you will come to learn in this chapter, the Lightroom import procedure provides an adaptable import workflow, one that can be streamlined through the use of Import presets, as well as offers the ability to import files directly from the camera using a tethered shooting setup.
The Main Import Dialog
To import photos into Lightroom, you need to click the Import button in the Library module. The first time you choose to import photos into Lightroom, it will do so via the expanded Import dialog shown in Figure 2.1. As you can see, there are lots of options here, so let me take you through them one by one and in the order you should use them.
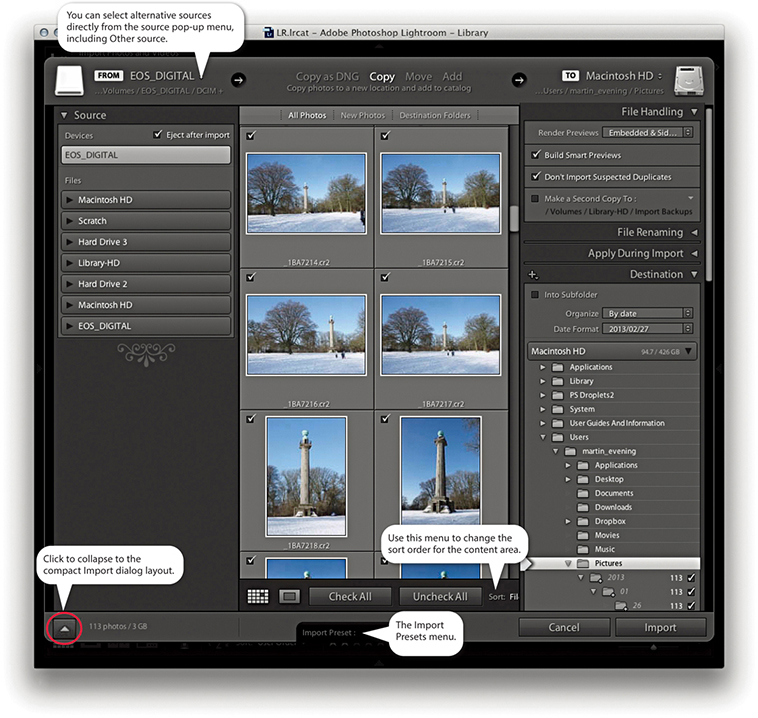
At the top is the import workflow bar. This displays a summary of the current configured import workflow, showing from left to right the import source, the import method, and the destination folder. You mainly use this to select the import method: Copy as DNG, Copy, Move, or Add. Below the workflow bar, you will see, on the left, the Source panel, which is used to select the source device (or folder) to import from. In the center is the content area. This displays thumbnails of the images that are to be imported and offers options to segment the thumbnail display into different groupings. For example, you can choose to display photos by showing all photos, show new photos only, or segment by destination folders (how the photos will finally be imported, according to the Destination panel settings). You can use this central section to select all or select individual photos, as well as see Loupe view previews of the files you are about to import.
Note
In the expanded mode, the Import dialog behaves more like a file browser. The browsing experience is slightly more refined, though, as Lightroom knows to wait for a folder to be selected in the Source panel before populating the content area with the images that are available to import.
The panels on the right are used to manage the photos as they are imported. In the File Handling panel at the top, you decide how to render the initial previews, whether to import suspected duplicates, and where (if at all) to create secondary backups. Remember, there can be only one physical copy of each image in any particular folder location. It is possible to import more than one copy of a file to the catalog by disabling the Don’t Import Suspected Duplicates option, but it is not recommended that you do so. The File Renaming panel can be used to apply a file-renaming scheme. The Apply During Import panel can be used to apply a Develop preset and/or a metadata template setting to the files as they are imported; plus, you can enter keywords to apply on import here. Then there is the Destination panel, which lets you choose the folder the files should be imported to and how they should be organized within that destination folder. At the bottom, notice the Import Presets menu. Here you can save Import dialog settings as custom presets. This can make it easy for you to select favorite import settings without having to reconfigure everything in the Import dialog each time you want to import files into Lightroom.
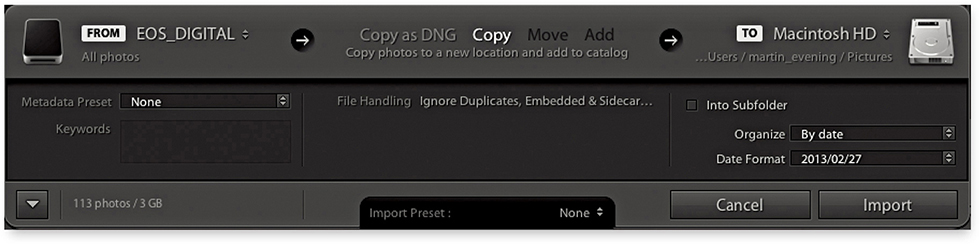
If you click the button circled at the bottom of Figure 2.1, you can switch to the compact view shown in Figure 2.2. This provides an abbreviated summary of the import settings. This simpler interface is ideal if you have already saved a number of import presets. When working in this mode, all you need to do is to select an appropriate import preset.
Copy as DNG, Copy, Move, or Add?
Let’s look more carefully at the ways in which images can be imported, starting with those that are relevant to camera card imports only: The Copy as DNG option copies the files from the card and at the same time converts them to the DNG file format. This option offers peace of mind, because the DNG file format is an Adobe-devised format for archiving raw capture files and widely regarded as a more versatile and, therefore, more appropriate file format for the long-term archival storage of raw camera files. The DNG conversion process also conveniently flags any files that happen to be corrupted as they are imported. When you choose Copy as DNG, the Lightroom DNG converter should report a problem if it is unable to convert a supported raw file. However, this does not guarantee that all file corruptions will be reported. Only those problems that the Lightroom/Adobe Camera Raw processor is able to detect will be highlighted. So the Convert to DNG on import is therefore a useful data verification process. The DNG conversion also only takes place as a background task after the photos have been imported, making this a more attractive option. Copy as DNG is mainly useful if the folder of images you are copying from contains unconverted raw images. You can convert non-raw images such as JPEGs to DNG (though this does not actually convert them into raw files).
The Copy option makes a straightforward copy of all the images that are on the memory card and stores them in the designated destination folder or subfolder. The Copy option can be used to make copies of the files to the chosen destination folder location and add them to the catalog. But remember, you don’t want to end up creating more duplicate versions of master images than you need to, so “copying” files is mainly used whenever you need to copy files from a camera card or a DVD.
If your intention is to import photographs from existing folders on your computer and add them to the Lightroom catalog, the two options you want to focus on are Move and Add. The Move option copies files from the selected source folder, copies them to the destination folder, and then deletes the folder and files from the original location. This might be a solution for importing photos into Lightroom, placing them in the exact folder location you want them to be in, but not end up with yet more duplicate images. The downsides are that copying files still takes time and potentially is risky should Lightroom crash mid-move. With an Add import, you are telling Lightroom to “reference” the files where they are currently located on the computer. When you add files at the import stage, it takes a minimal amount of time to complete the import process.
You also have to bear in mind that Lightroom does not place any real restrictions as to how or where the images are stored—they can be kept anywhere you like. Also, Windows users can import iPhone Live photos for which both the image and the video are imported.
To summarize, I suggest you use Copy or Copy as DNG for all card imports and use Add or Move for importing files that are already on the computer system.
DNG Benefits
A benefit of converting to DNG is that, for raw files, conversion typically results in smaller files, because the lossless compression is optimized on a per-image basis. Also, when loading DNG images in the Develop module, the compressed image data is stored as tiled information that can be read/decompressed in parallel on multi-core machines. Although some cameras support the DNG format, such as Leica, Pentax, and now iPhones, converting DNG capture files to DNG in Lightroom can still be worthwhile sometimes, specifically to take advantage of the way Lightroom converts to DNG. Incidentally, the raw file data in proprietary raw images is converted to DNG format behind the scenes as it is opened in Camera Raw or Lightroom.
Note
When files are converted to DNG, the conversion process aims to preserve all the proprietary MakerNote information that is contained in the raw original. If the data is there, external, DNG-compatible software should have no problem reading it. However, there are known instances of manufacturers placing MakerNote data in odd places, such as alongside the embedded JPEG preview (which is discarded during the conversion process). Basically, the DNG format is designed to allow full compatibility between different products, but this, in turn, is dependent on proper implementation by third parties.
Note
Lightroom can’t completely convert dual pixel raw files (such as those captured with the Canon 5D Mk IV) to DNG, but it does preserve both parts of the dual pixel raw data within a single DNG. At this point, Lightroom only processes one part of the dual pixel raw data.
Converting to DNG After Import
You can choose to convert the imported photos to DNG after importing, as well. You can do this by going to the Library menu and choosing Convert Photos to DNG. The Convert Photos to DNG dialog is shown in Figure 2.3. In the Source Files section, you can choose to convert raw files only. Normally, you want to convert only raw images to DNG, but it is possible to convert JPEGs or TIFFs to lossy DNG without increasing the file size. You can also choose to delete the original raw files after successfully converting them to DNG, which can help you avoid ending up with duplicate raw versions of your images.
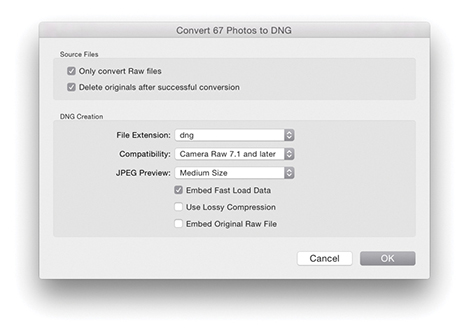
So should you keep the original raws? It all depends on whether you feel comfortable discarding the originals and keeping just the DNGs. Some proprietary software, such as Canon DPP, is able to recognize and process dust spots from the sensor using a method that relies on reading private XMP metadata information that is stored in the proprietary raw file. If you delete the original CR2 files, you won’t be able to process the DNG versions in DPP unless you chose to embed the original raw file data (because this will allow you to extract the raw originals).
The options in the DNG Creation section are the same as those in the Lightroom File Handling DNG Import preferences (see pages 710 to 714 for advice on which options to select here). If you apply lossy compression when converting to DNG, you can preserve the full pixel resolution but at a reduced file size. Lossy DNGs are almost like normal DNGs, except the raw data is 8 bit and permanently demosaiced, but kept in a linear form (see page 714). You can choose whether to embed the original raw file in the DNG image or not. This does give you the flexibility of reverting to the original raw file format state, but the downside is that you will end up with DNG files that are at least twice the size of the original. Personally, I have no trouble converting everything I shoot to DNG and never bother to embed the original raw data. I do, however, sometimes keep backup copies of the original raw files as an extra insurance policy, but in practice I’ve never had cause to use these—or at least not yet! Mostly, I would say it is safe to leave this option unchecked: Convert everything to DNG, and delete the raw originals as you do so.
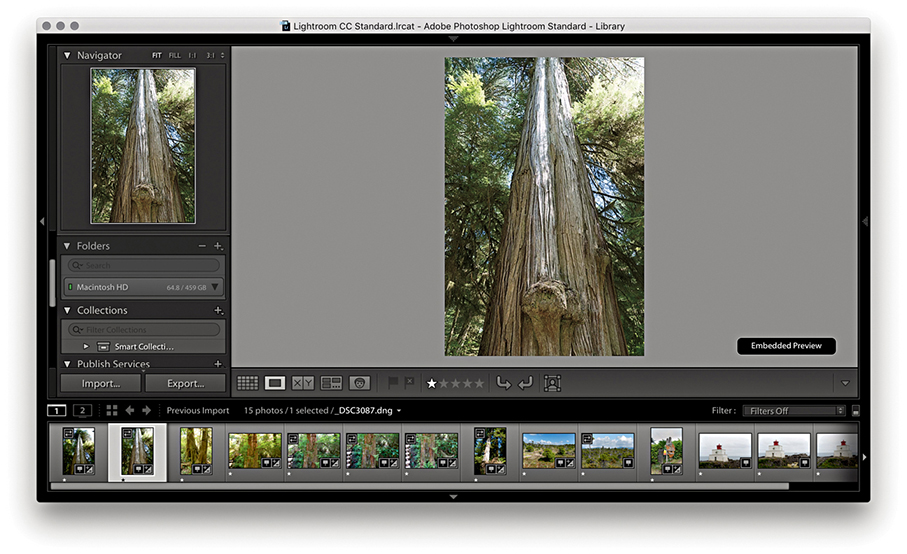
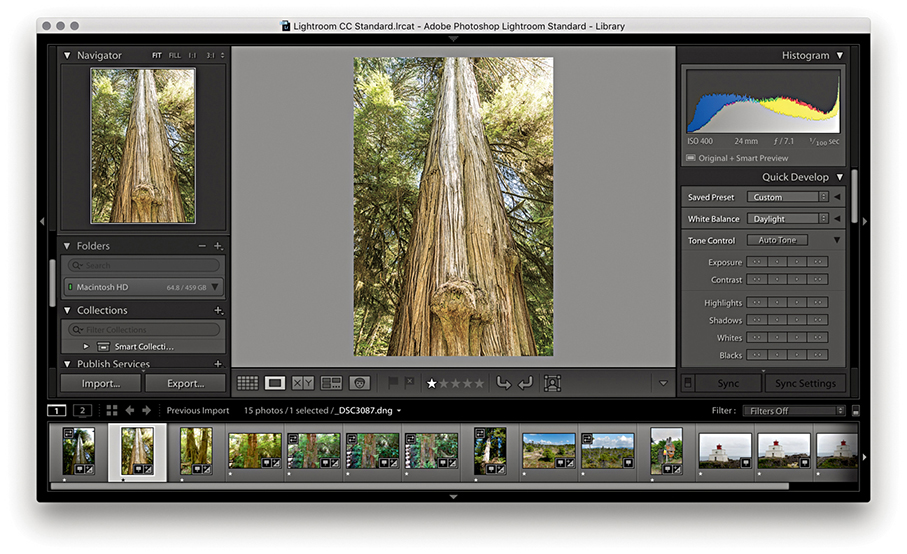
Import and Library Module Previews
You may wonder why the Import Photos previews and Library Grid view previews don’t match. This is because the Import Photos dialog only reads the camera vendors’ embedded previews. Once the files have been imported, previews can be rendered based on the default Develop module settings Lightroom applies, hence the change in preview appearance. If you would prefer the Lightroom previews to match the camera profile settings (what might be called the camera JPEG look), you can do so by selecting the Camera Standard profile (if available) in the Profile Browser. I discuss this later in Chapter 4, the Develop module chapter.
Import Options Preferences
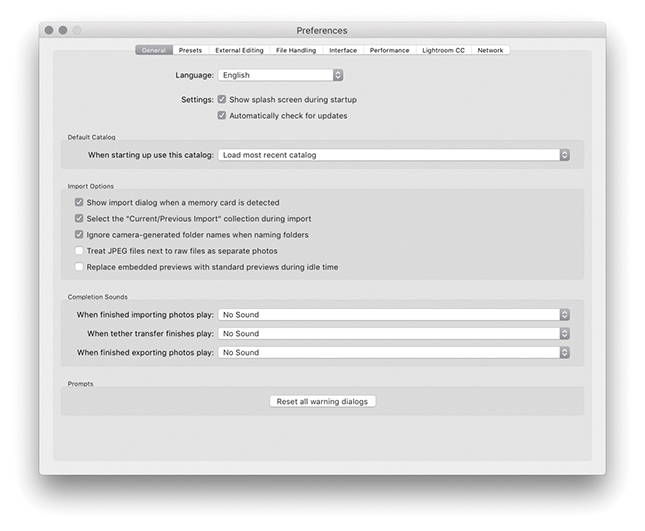
Before you import any photos, go to the Lightroom menu (Mac) or Edit menu (PC) and choose Preferences. In the General preferences Import Options section (Figure 2.4), make sure the “Show Import dialog when a memory card is detected” option is checked. Lightroom should automatically launch the Import Photos dialog every time a memory card or device is detected. The “Select the ‘Current/Previous Import’ collection during import” option is checked by default in order to maintain earlier Lightroom behavior. This ensures Lightroom takes you to the Current/Previous Import items in the Catalog panel as the files start to import. If you choose to uncheck this item, the import process will instead happen in the background. This will allow you to continue working in Lightroom and preserve your current image selection. Check the “Ignore camera-generated folder names when naming folders” option if you wish to import everything directly from a camera card into a single Lightroom folder. If you shoot with the camera set to the raw + JPEG mode, leave “Treat JPEG files next to raw files as separate photos” unchecked, and Lightroom will treat the raw and JPEG photos as a combined import. If the “Replace embedded previews with standard previews during idle time” option is checked, this gets Lightroom to update the low-res embedded previews with bigger, Standard previews
Importing Files from a Card

1. To start importing photos, insert a memory card into the computer so that it mounts on the Desktop. If the “Show Import dialog when a memory card is detected” option is unchecked, you will have to import the photos manually using one of the following manual methods: Choose File ![]() Import Photos and Video, click the Import button in the Library module, or use the
Import Photos and Video, click the Import button in the Library module, or use the  (Mac) or
  (PC) keyboard shortcut.
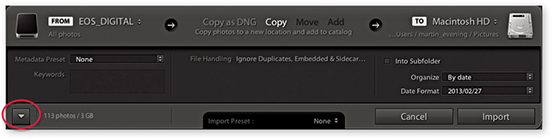
2. If the Lightroom Preferences are configured as shown in Figure 2.4, Lightroom will automatically open the Import Photos dialog. How the Import Photos dialog is displayed when opened will depend on whether you last used the compact interface (shown above) or had checked the expand dialog button (circled) to reveal the full range of options in the expanded mode view. I used the compact interface here and, in this example, the EOS_DIGITAL camera card appeared in the From section. In the workflow section, you can choose Copy as DNG, Copy, Move, or Add. For card imports, the choice boils down to Copy as DNG or Copy.

3. The To section initially points to your computer’s Pictures folder. This is a sensible default, but if you wish, you can select an alternative destination folder.

4. For camera card imports, you need to choose whether to import your images into separate, dated folders with the “By date” option or all into the same folder with the “Into one folder” option. There is a lot to be said for the “By date” option: Your files are imported and placed in dated folders, and this provides a neatly ordered way to manage your camera card imports. However, to make this work effectively, you’ll need to tag the imported photos with keywords; otherwise, you’ll experience difficulties later when tracking down specific photos. Importing photos into one folder (and naming the folder appropriately) will allow you to search for photos by the Folders panel name as well as by keywords. The keywording can be done at the import stage or after, working in the Library module.
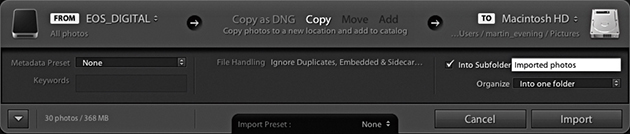
5. If you select the “Into one folder” option, then you will most likely want to check the Into Subfolder box (as shown here) and type in a name for the subfolder you wish to create in the destination location. To keep things easy (and repeatable), I suggest that every time you import photos from a card, you do so to a standard import folder. I usually name this “Imported photos.”
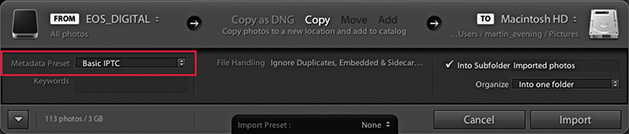
6. If you already have a prepared IPTC metadata template, it is a good idea to select that template from the Metadata Preset menu list (circled).
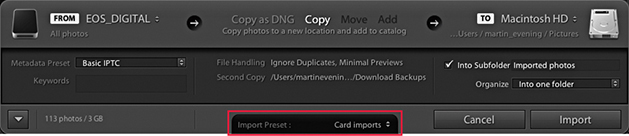
7. After you configure all these settings, you can go to the Import Preset menu and save the import settings as a new preset for future use. When you are done, just click the Import button to commence the camera card import. Lightroom then imports the files from the card to the Lightroom catalog. As the images are imported, the thumbnails start to appear one by one in the Library module view. Meanwhile, the status indicator in the top-left corner shows the import progress. Often, there may be two or more processes taking place at once, and the progress bars give you a visual indication of how the import process is progressing. If more than one operation is taking place at a time, you will see the grouped status indicator (seen on the right). If you click the identity plate area, you can view the Activity Center, which is described in the following section.

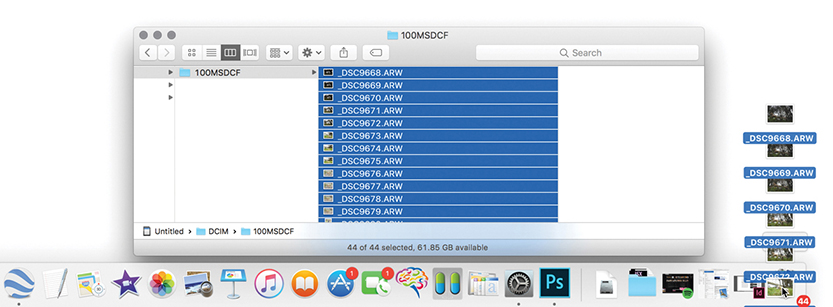
8. Normally, you shouldn’t encounter any problems when importing files from a camera card. But if you choose the Copy Photos as DNG option, you will be alerted to any corruptions in the files as they are imported. After you have successfully imported all the images to the computer, you can safely eject the camera card and prepare it for reuse. However, at this stage, I usually prefer to completely delete all the files on the card before removing it from the computer. This way, when you reinsert the card in the camera, you won’t be distracted by the fact that there are still images left on it. For example, when I carry out a studio shoot, I find it helps to establish a routine in which the files are deleted immediately via the computer before ejecting. I find that on a busy session, it helps to avoid confusion if you clear the cards as soon as the files have been imported. Otherwise, you may pick up a card, put it back in the camera, and not be sure if you have imported its files already or not. I would still advise you to reformat the card using the camera formatting option before capturing more images. This good housekeeping practice can help reduce the risk of file corruption as new capture files are written to the card.
Activity Center
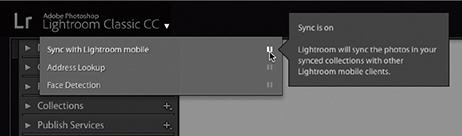
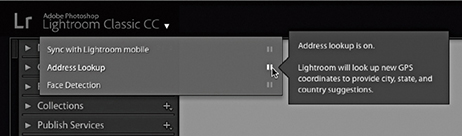
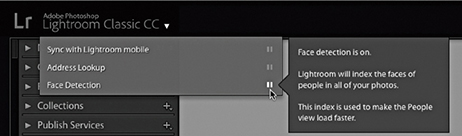
Regardless of which identity plate you have selected, clicking anywhere in the identity plate area opens the Activity Center shown in Figures 2.5 through 2.7. As you hover over the items in the Activity Center, you‘ll see help dialogs that explain the functions more fully. For example, in Figure 2.5, you can click “Sync with Lightroom mobile” to turn synchronization on or off. In Figure 2.6, clicking Address Lookup disables or enables Lightroom looking up GPS coordinates to provide IPTC location suggestions. The Face Detection highlighted in Figure 2.7 turns on or off the background process that indexes faces, which is used when carrying out a People search. This search is quite an intensive process, so some users may wish to pause either to free up processor resources, conserve disk space, or simply because they have no desire to make use of this feature.
Note
The default option is for the catalog sync to be off, although when it is enabled you can sync to only one catalog at a time. Also, you need to understand that enabling syncing applies just to collections that you select to sync with Lightroom CC/Lightroom mobile. If the catalog is being upgraded for the first time from Lightroom 6/CC or earlier, sync will be on by default. When the sync is enabled, you can choose to pause or resume syncing via the Activity Center. In the paused state, you can still have syncing enabled for collections, but these will all be paused until you choose to resume syncing.
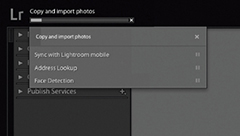
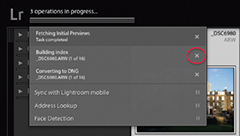
The Activity Center also lists various background operations, such as copying and importing photos (Figure 2.8). By default, the only background task that now shows up in the identity plate area is the Sync progress. The other background tasks appear in the Activity Center. If you look closely, you’ll see a dark gray progress bar for each individual activity. In Figure 2.9, Lightroom has finished importing photos, but now lists the additional processes in progress, such as fetching initial previews, building a local index of the current import, and (in this example) converting the imported files to DNG. The Activity Center also shows the current progress for other activities such as generating a Photo Merge. You can cancel any of these activities by clicking the X button (such as the one circled in Figure 2.9).
Source Panel
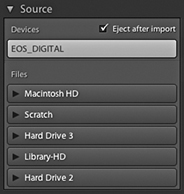
You use the Source panel to navigate and find the photos you wish to import. The Source panel view displays any found devices at the top under Devices, including camera cards, tethered cameras (when the camera card contains files), as well as smartphones. So, when you insert a camera card or connect a camera, it should appear listed in the Devices section and selected as the source (Figure 2.10). Normally, Lightroom lets you import from only one card device at a time. However, if your computer is able to see memory cards as separate drive volumes and they appear listed under Files rather than Devices, you can import files from several camera cards at once. If the card is selected under Devices, you can check the “Eject after import” option to have the card ejected after all the photos have been imported—this saves you having to do so manually at the system level.
For all other types of image imports from a hard drive into the Lightroom catalog (using Copy as DNG, Copy, Move, or Add), you can select a folder listed in the Files section. Lightroom will list all connected and available directory volumes regardless of whether they contain image or video files or not.
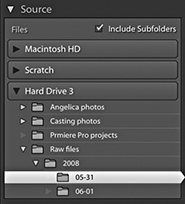
The volume headers in the Source panel can be expanded for you to locate the folders you wish to import from, just as you would in a regular file browser program (Figure 2.11). It is also possible to select multiple folders from the Source panel. Use the  key to select a contiguous list of folders, or
  -click (Mac) or
  -click (PC) to make a discontiguous selection. When you’re selecting folders to import from in the Source panel, they don’t all have to be on the same drive. You can import from multiple folders that are on different drives. The procedure here is to click the volume header you want to import from to expand it and view the root-level folders. From there, you can click the arrows to the left of each folder to expand the folder hierarchy and reveal the subfolder contents (Figure 2.11).
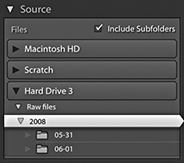
When you have folders nested several folders deep inside other folders, you may find it helps if you double-click on a selected folder to reveal a more compact hierarchy, such as the one shown in Figure 2.12. If you compare this with Figure 2.11, you’ll notice how the same folder is selected, but in the Figure 2.12 example, only the folders belonging to that specific folder hierarchy are displayed and all the other folders are hidden. Basically, if you double-click a folder, the Source panel folder hierarchy changes to reveal just those folders that belong to that parent folder’s directory. This is known as a docked folder view. Double-click the parent folder to return to the fuller hierarchy view of parent folders. The docked method can at first seem confusing and the folders appear to dance around unexpectedly. Once you spend a little time familiarizing yourself with the double-click method of navigation, the shuffling you see won’t be so distracting.
When you click to select a folder listed in the Source panel, the files contained in that folder will appear in the main content area and, depending on whether the Include Subfolders option is checked, all subfolders will be included as well.
Content Area
As you navigate using the Source panel, the files to be imported are displayed in a Grid view in the content area, and you can use the Thumbnails slider in the Toolbar (Figure 2.13) to adjust the size of the grid cells. As with the Library module Grid view, you can double-click a grid cell or use the  key to switch to a Loupe view of the selected file. The Loupe view mode lets you see bigger previews before you import the images into Lightroom. This may be useful if you are importing photos from a folder and need to ensure you have the right ones selected before you carry out an import and to check for things like sharpness. The Loupe view Toolbar options (Figure 2.14) can be used to adjust the Loupe view zoom setting; you can also use the Spacebar to toggle the preview between a zoom-to-fit and a close-up zoom view (and use
  to return to the Grid view).


In the Grid view, each cell has a check box next to it. You can use the Check All and Uncheck All buttons in the Toolbar (Figure 2.13) to select or deselect the photos in the current Grid view that you wish to import. With all the cells deselected, you can make a custom cell selection. Use a -click to make contiguous selections of photos, or use a -click (Mac) or -click (PC) to make a discontiguous selection, and then click any one of the check boxes to select or deselect all the photos that are in that selection. Furthermore, in both the Grid and Loupe views, you can use the “pick” keyboard shortcut ( ) to add a photo to an import selection and use the “unpick” keyboard shortcut (either
  or
or  ) to remove a photo and use
  to toggle between selecting and unselecting. If you hold down the
  key as you apply these key shortcuts, you can auto advance to the next photo. Lastly, you can use the
  to toggle adding or removing a photo from an import selection. You will notice a Sort menu in the Grid view Toolbar (Figure 2.13). This lets you sort files by Capture Time, Checked State, or File Name, and can play a useful role in helping you determine which files you wish to select when making an import. You can also sort by File and Media Type, which allows you to quickly select specific file types and remove certain types of files at the import stage.
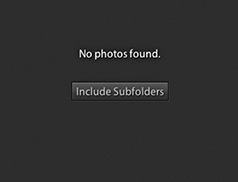
The Lightroom Import dialog can show only supported image and video files. If no files can be imported, you’ll see a “No photos found” message. If you select a folder to import from in the Source panel and Include Subfolders happens to be unchecked, you may see an Include Subfolders button in the middle of the content area (Figure 2.15). Clicking this displays the subfolder contents.
Content Area Segmenting Options
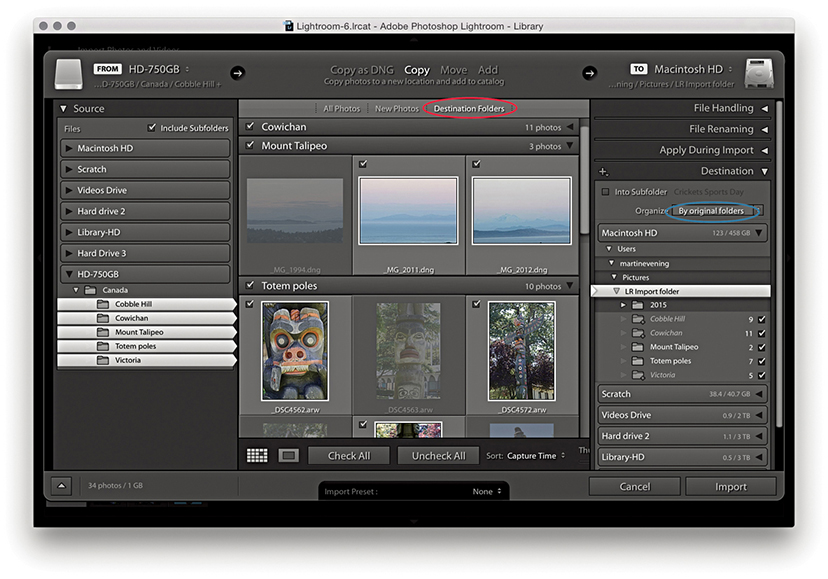
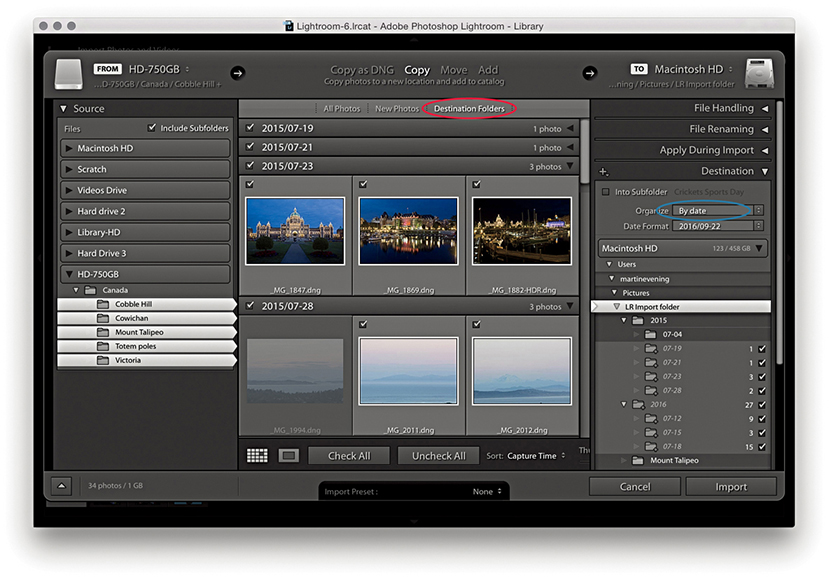
How the photos are segmented in the content area depends on which option you have selected in the bar at the top of the content area (Figure 2.16). As you might expect, the All Photos option shows all files without any segmenting. The New Photos option is useful, as it hides any duplicate photos. The Destination Folders option works in conjunction with whichever Organize option you have selected in the Destination panel (see page 52) to determine how the photos appear segmented. If the “Into one folder” option is selected, there will be no segmenting of the files. If the “By original folders” option is selected, the files in the content area will appear segmented in subfolder groupings, matching the selected source folder. If the “By date” option is selected, the files in the content area will appear segmented by the date the files were captured. To illustrate this, Figure 2.16 shows photos ready to import with the Destination Folders option. Here, the Destination panel has Organize set to “By original folders” (circled in blue) and the photos are separated into Source folder named segments in the content area.
The Grid view cells provide some visual clues regarding import status. You will notice that some of the thumbnails are grayed out. This is because the Don’t Import Suspected Duplicates option in the File Handling section was checked and these are duplicate photos that won’t be imported. Files that are unselected are displayed with a dark vignette, meaning they won’t be included in the import.
In the Figure 2.17 example, the photos are ready to import by Destination Folders. Because the Destination panel has Organize set to “By date” (circled in blue), the photos are separated into dated segments in the content area. You will notice the date destination folders appear in italics in the Destination panel. Basically, this tells you that these folders have not been created yet and also tells you how many files will be placed in these new folders. If the card contains multiple folders, there will be an option to import photos “By original folders.” This option is useful when your camera is set to limit the number of files in any given folder (e.g., 100 photos per folder).
File Handling Panel
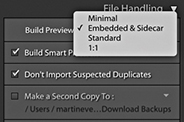
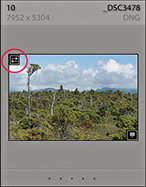
The File Handling panel (Figure 2.18) is where you decide how the imported photos should be managed. The Build Previews menu lets you determine how the previews should be rendered during the import process. The default setting here is Minimal, which imports the photos and discards the embedded previews. The Embedded & Sidecar option makes use of any previews that are embedded in the original images or sidecar files, although such previews may offer only a rough guide as to the images’ appearance. You can also choose to build Standard previews (at the size determined in the Catalog Settings) or choose 1:1, which will build full-size previews. Incidentally, the previews are rendered concurrently at the file import stage before proceeding to render the finer-quality previews. Of the four options, Embedded & Sidecar makes the most sense, because although the previews may not be as accurate, this is still the fastest way to get some kind of preview to appear as the files are imported. This in turn enables faster performance when importing and browsing raw images. Basically, the embedded previews are now retained until you edit them or choose to generate new previews. Therefore, after import you’ll see only embedded previews, which are identified by a double-arrow badge in the top-left corner (Figure 2.19). There is a preference in the General preferences (Figure 2.4) to replace embedded previews with Standard previews during idle time, but this is disabled by default (see also the following section on Embedded previews after import).
Build Smart Previews
The Build Smart Previews item creates small proxy versions as you import and archive these to a Smart Previews data file that’s stored in the catalog. As you do so, you will see a separate progress indicator for the Smart Preview generation, which you can cancel without canceling the entire import. These are generated more quickly in Lightroom Classic CC on computers systems with quad-core or higher CPUs. For more about working with Smart Previews, see page 151.
Suspect Duplicates
When the Don’t Import Suspected Duplicates option is selected, Lightroom carries out a file check to determine whether a file is a suspected duplicate. First, it checks the filename for a match, then it checks the file size and EXIF metadata to see if the original capture date/time and file length match.
Add to Collection
When the Add to Collection box is checked, you can simultaneously add imported files to a specific collection. For example, this lets you import photos to collections that are synced with Lightroom CC/Lightroom mobile.
Embedded Previews After Import
1. Here, I selected new photos to import from a card using Embedded & Sidecar.
2. Once imported, the Loupe previews retain the embedded previews and do not update, thereby making the import process faster.
3. After you select an image or apply any image adjustments to the photo, the embedded preview is replaced by a Lightroom-generated preview. If “Replace embedded previews with Standard previews during idle time” is selected in the General preferences, all the previews will eventually become updated without your having to select each photo in turn.
File Format Compatibility
Lightroom is able to import all the supported raw file formats plus DNG. Non-raw images can be in 8-bit or 16-bit mode; in the RGB, Lab, CMYK, or grayscale color space; and saved using the TIFF, JPEG, PSD, PNG, or HEIF file formats. CMYK, grayscale, and Lab mode images can be edited in the Develop module, but when you do so, the edit calculations are carried out in RGB and exported as RGB only. It is therefore best to just use the Library module to simply manage your CMYK images and not attempt to edit them in the Develop module.
Note
PNG files can be imported into Lightroom, but when you choose the “Edit in” command, a PNG will open up in Photoshop as a TIFF or PSD. Any transparency contained in the original will be supported and will appear white in Lightroom. However, there is no PNG option available when exporting from Lightroom (other than to export a PNG image using the original file format).
The High Efficiency Image Format (HEIF) was recently adopted by Apple for iPhone photos captured using devices updated to iOS11. HEIC is the name Apple have given this new format, which is actually more of a container for photos and audio. The chief advantage is that HEIC offers better file compression and can therefore store image files more efficiently than JPEG. The new format also supports 16-bit, which for some captures may result in less banding.
Tip
Although Lightroom does not support PSB, you can import TIFF or PSD files that contain embedded or linked PSB format Smart Objects. Another workaround is to use John Ellis’s AnyFile plug-in for Lightroom: johnrellis.com/lightroom/anyfile.htm.
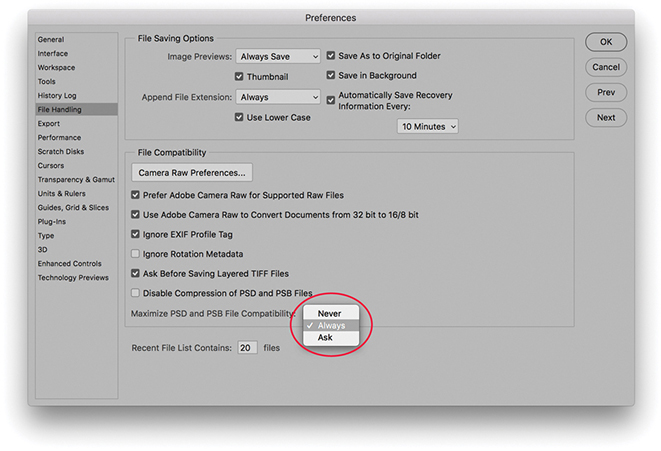
To ensure your layered Photoshop format (PSD) files are recognized in Lightroom, the PSD files must be saved from Photoshop with the Maximize PSD and PSB File Compatibility option enabled in the Photoshop File Handling preferences (Figure 2.20) before you save layered PSD files via Photoshop. If you ever find you are unable to import PSD files into Lightroom, try switching on this option in Photoshop and resave the PSDs overwriting the originals. If there are no compatibility problems, everything should import successfully, but if there are files Lightroom cannot process, you’ll encounter a feedback dialog like the one shown in Figure 2.21.
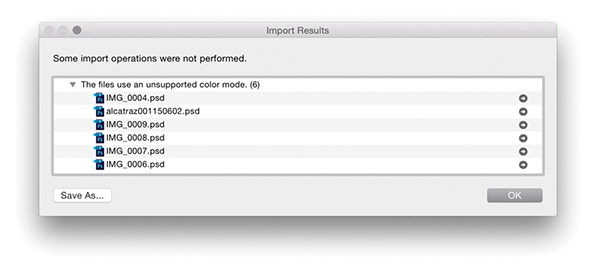
Why Files May Fail to be Imported
Images may fail to be imported into Lightroom for a number of reasons. It could be the files you tried to import are in an unsupported color mode, such as Index Color mode. Perhaps the file size is too big because it exceeds the maximum pixel width of 65,000 pixels (although 65,000 pixels should be enough to satisfy nearly everyone’s needs). It could be due to files having become corrupted because of a hardware corruption (this can particularly be a problem at the camera card import stage). Or, if you have the Don’t Import Suspected Duplicates option checked, the images may already be in the catalog.
Making Backup Copies of Imported Files
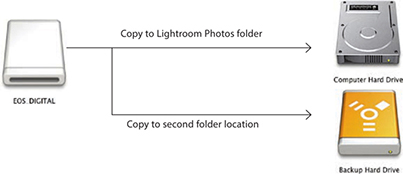
Whenever you choose Copy as DNG, Copy, or Move to import files into Lightroom, you can check the Make a Second Copy To box and select a folder for storing backups of the files that are about to be imported. The backup option is therefore extremely useful when importing photos from a camera card, because you never know when a hard-disk failure might occur. If you copy the original camera files to a separate backup drive at the import stage (Figure 2.22), the chances of losing all your camera files due to disk failure or human error will be greatly diminished. The backup copy images are always stored in their original file state with no Develop settings or metadata settings applied to them. What you end up with is an exact copy of the files that were captured on the original camera card before they were imported into Lightroom. After you have renamed and edited the master selection of images and backed these up, you no longer need to keep the initial backup copy files. Nonetheless, it’s a wise precaution at the camera card import stage to temporarily keep more than one copy of the master files stored on the system.
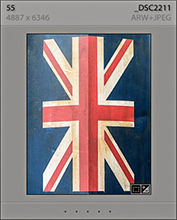
Photos Shot as Raw + JPEG
If your camera is set to capture both raw + JPEG images and the “Treat JPEG files next to raw files as separate photos” option is unselected in the General Lightroom preferences (which is the default setting), imported photos will appear to be imported to the Lightroom catalog as a single raw + JPEG image (Figure 2.23). What actually happens is the raw file and accompanying JPEG are both copied to the destination folder during the import process, but only the raw file is actually imported into Lightroom. You will see such imports named using an extension suffix such as .CR2+JPEG or .NEF+JPEG. If you decide later to import the JPEGs as separate photos, you can select the “Treat JPEG files next to raw files as separate photos” option in the preferences, select the relevant folder, and from the Library module Library menu, choose Synchronize Folder. This will then allow you to import the JPEGs (that accompanied the imported raw files) as separate JPEG photos.
File Renaming Panel
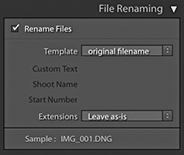
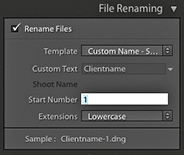
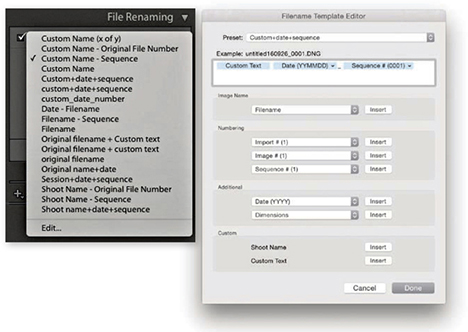
If you intend to rename your files, it is important that you rename them as early as possible. On work shoots, I prefer to apply a standardized form of file renaming at the import stage and discourage clients from renaming the files themselves. Ideally, the renaming should be carried out at the import stage, which can be done by checking Rename Files in the File Renaming panel (Figure 2.24). The Template menu contains several file-renaming templates ready for immediate use. For example, if you select the Custom Name – Sequence template (Figure 2.25), you can enter text in the Custom Text field, and the imported files will be renamed using this custom text, followed by a sequence number starting with the number entered in the Start Number box. For an initial import of images, you may well want the numbering to start at 1, but if you are adding files to an existing shoot, you will want to set the numbering so that it follows consecutively from the last number in the current image sequence. However, you’ll be glad to know that once the start number has been set, Lightroom automatically readjusts the numbering sequence as you import additional images to the same folder.
Choosing the Edit option from the bottom of the Template list (Figure 2.26) opens the Filename Template Editor, which allows you to customize and save your own File Naming template designs using tokens, such as Date, Sequence or Additional items. In the Figure 2.26 example, I clicked the Insert button next to the Custom Text item in the dialog to add a Custom Text token at the beginning of the Filename template. Next, I went to the Additional section and added a Date format token. I then went to the Numbering section and added a four-digit Sequence number token. This template was then saved and added to the File Renaming Template list. I have used this particular template a lot on jobs, inserting the client name into the Custom text field in the File Renaming template, so the files will be renamed something like: clientname161201_0001.
Note
The Julian Day of the Year option in the date format options is applicable to things like astronomical dating.
Some photographers prefer to use the Custom Name – Original File Number template. With this template, the sequence number uses the original, camera-generated file number, and the file-renamed sequence numbers therefore keep rolling over from one job to the next. So, instead of your imported images always being numbered from say, 1 to 500, you will end up with a much broader distribution of sequence numbers throughout the catalog. Consequently, this can make it easier for you if you need to narrow down an image selection based on a sequence-number-only search. Let’s say, for example, a client orders a photo, giving you just the last four numbers and nothing else. If you reset the numbers when renaming so that they start from 0001 before each job, then every shoot you import will most likely have photos that are renamed with sequence numbers in the 0001–0100 range. If, on the other hand, you use the Custom Name – Original File Number template to rename your photos, the chances are there won’t be so many other photos in your catalog that have the exact same four-digit number. This method of renaming should work in most instances, although I am aware that with certain camera models there is a compatibility problem where the camera-assigned sequence number cannot be recognized. Lastly, the Sample filename at the bottom of the File Naming panel gives you an advance indication of how the chosen renaming will be applied to the imported files.
Renaming Files Later
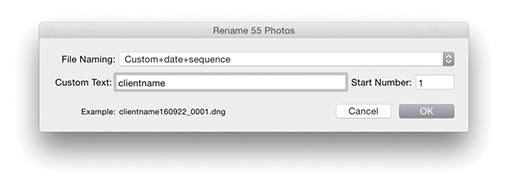
Although it is always best to rename files at the import stage, files can be renamed at any time after you have imported them into Lightroom. To do this, make a selection of images in the Library module using the Grid or Filmstrip and choose Library ![]() Rename Photos (alternatively, you can use the F2 keyboard shortcut). This opens the Rename Photos dialog shown in Figure 2.27, where you can use the File Naming menu to select a custom file-renaming template like the ones just discussed, or choose Edit from the File Naming menu to open the Filename Template Editor. In the Figure 2.27 example, I selected the Custom+date+sequence template that was used in Figure 2.26; all I had to do was to enter the custom text (such as the client name) and a start number for the number sequence.
Rename Photos (alternatively, you can use the F2 keyboard shortcut). This opens the Rename Photos dialog shown in Figure 2.27, where you can use the File Naming menu to select a custom file-renaming template like the ones just discussed, or choose Edit from the File Naming menu to open the Filename Template Editor. In the Figure 2.27 example, I selected the Custom+date+sequence template that was used in Figure 2.26; all I had to do was to enter the custom text (such as the client name) and a start number for the number sequence.
I find that the only time I ever need to use the Rename Photos dialog is when I have to correct files that have been imported out of sequence. For example, when I shoot using the tethered mode in Lightroom, things go wrong only when I am at my busiest! Consequently, I do sometimes end up manually importing files from the camera card and adding these to the files that have been correctly imported (and automatically renamed). This is where I find the original file-number renaming really helpful. Renaming files based on the sequence number contained in the original camera-generated filename is far more reliable than manually trying to work out how to renumber files so that they fit within an existing sequence of imports.
Apply During Import Panel
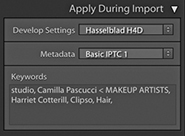
The Apply During Import panel (Figure 2.28) lets you select the Develop settings and metadata information you wish to apply to photos as they are imported into Lightroom. For example, the Develop Settings menu lets you access all of the Develop settings you currently have saved in the Develop module Presets list. This is extremely useful because it means you can instruct Lightroom to apply a favorite Develop preset to photos as they are imported. In Figure 2.28, I selected the Develop setting preset for shooting with a Hasselblad camera, which applied a custom camera profile calibration.
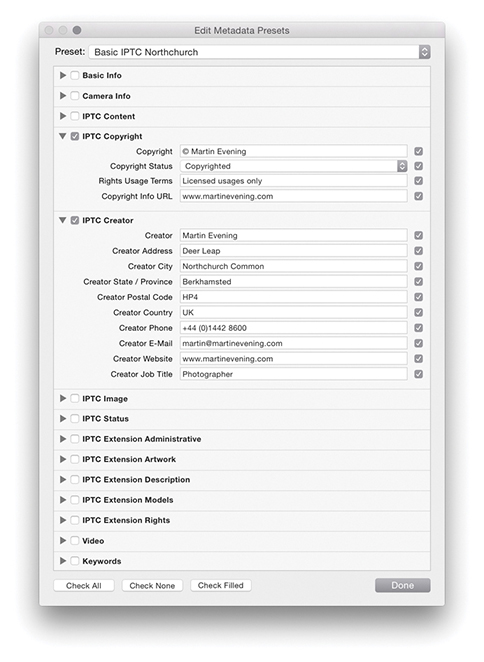
Sensible folder naming and file naming can certainly make it easier to retrieve images later, but as your library grows, you will begin to appreciate the benefit of using EXIF metadata and other types of metadata to help keep track of all your files, especially when searching a large catalog collection of photographs. The Library module offers a number of ways to search for a specific image or group of images. For instance, you can use the Library Filter bar to search for files using criteria such as by Date, Camera, or File Type. This method of searching requires no prior input from you of course. In the Apply During Import panel, you have the option to add custom metadata and keywords to your photos as they are imported. Next to the Metadata item is a pop-up list. This lets you select a pre-saved metadata template (see page 570 for more about working with metadata templates). Or, you can click New to open the Edit Metadata Presets dialog shown in Figure 2.29.
The Keywords section can be used to add shoot-specific metadata, such as the location name or other descriptive terms for the photos you are about to import. Also, once you have an established keyword list, as you begin to type a keyword, Lightroom will auto-complete your entries by referring to the current Keyword List panel contents. Basically, adding metadata at the time of import can greatly assist you later when searching for specific images, and the metadata information you add will also be applied to any derivative files that are created from the master photos.
Destination Panel
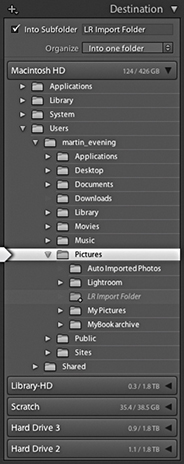
The Destination panel appears only when you carry out an import using Copy as DNG, Copy, or Move. After you select a source folder, you need to decide where the imported photos should go. The Destination panel lets you select a destination folder for the imported photos. The folder hierarchy display works exactly like the Source panel. Single-click the arrows to the left of a folder to reveal the subfolder hierarchy, double-click the folder name to show a compact hierarchy view, double-click a parent folder to reveal the folder list that the parent folder belongs to. The volume headers in the Destination panel reveal how much disk space remains out of the total hard-drive volume capacity.
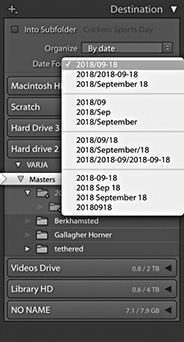
Imported photos can be organized in one of three ways. The “Into one folder” import option allows you to import the selected photos to a specific, named folder location. In addition, you can check the Into Subfolder option and specify a new subfolder as the target folder location. For example, you could choose Users/Username/Pictures/ as the folder destination, select the “Into one folder” option, and type the name of the subfolder destination. In the Figure 2.30 example, I named the subfolder LR Import Folder so the full destination directory path would therefore be: Users/Username/Pictures/LR Import Folder/. Another option is to segment the photos by Original Folders. If the source images on the drive are contained in more than one folder, this option preserves the same source folder hierarchy structure when the files are imported. Lastly, you can choose to organize By Date. This segments the imported photos into dated folders, and the way it does so depends on which date segment option you have selected from the Date Format menu (Figure 2.31). Note that when you choose either the Original Folders or By Date option, you can click Destination Folders in the content area workflow bar (Figures 2.16 and 2.17) to preview how the photos will be segmented before you click Import.
Planning where to Store Your Imported Photos
The files can be imported to any drive destination you like. The only restriction is that the catalog file cannot be stored on a network attached storage (NAS) device. The Lightroom catalog can’t be shared with other users across a network, and this intentional storage limitation is designed to avoid corruption.
How you plan to organize your photos and the folders they are stored in is a topic I will be addressing in more detail in the following chapter, where we will look at working with the Folders panel in the Library module in more detail. For now, let’s just consider the various options that can be implemented here and ways to make the import workflow as smooth as possible.
There are four main approaches I see photographers using. By far the most popular is one of total chaos: Photographers are haphazard and inconsistent in the way they organize photos into their computer system folders. You should at least try to segment your imported files by putting them into named folders that have some kind of systematic structure. If you mainly shoot on assignment, you could import your photos to folders that use the client name plus date. I actually find this works pretty well for all my studio shoots. Alternatively, you could use a folder name hierarchy, in which, for instance, Rome trip photos go inside an Italy folder inside a Travel folder. This can make finding photos by subject or location relatively easy. When choosing to import your files into one folder, you can use the directory to locate the folder to download to and check the Into Subfolder option to specify a subfolder (Figure 2.32). A third method is to segment by date (Figure 2.31). This system can work well whether you shoot mainly on assignment or for pleasure. Plus, if you are using keyword metadata to extensively catalog all your photos, it really should not matter which folder your photos live in because you can search for everything by metadata. It can be argued that organizing your photo imports by date offers a much more consistent approach to folder organization and is specially suited to those users who systematically apply keywords to all their photos.

With the above methods you need to take into account the scalability of the system you choose to implement. This is something I’ll also discuss in more detail in the next chapter. So, instead of worrying too much at the import stage about where your imported images should eventually be stored, there is a fourth option: Use a series of workflow folders to store the incoming files before you decide where best to store them for the long term. There is much to be said for such a system. Instead of trying to work out at the import stage which folder the photos should go into or what hierarchy to use, you just import everything into the same import folder. This folder can be regarded as an initial holding folder to store all new, incoming images before you decide where they should eventually go. For example, when I am on location, I download everything to a laptop computer. The laptop is required to store the imported images only temporarily before they are transferred to the main computer archive. It therefore makes sense to use a standard import folder such as the “LR Import Folder” location, shown in the Figure 2.30 example. It is then pretty easy to create a standard import preset (see following page) that you can use for every job. This method of importing can help standardize the import process and has the added advantage you don’t need to think too much about where to store the images just yet. You just use the same import preset for each and every shoot import.
Importing to a Selected Destination Folder
You may often find yourself working with a folder of images and wish to import more photos to this same folder. You could go to the Import dialog and manually locate the relevant folder, but there is an easier way. While you have the folder highlighted in the Library module Folders panel, right-click to access the context menu shown in Figure 2.33, and select “Import to this Folder.” This launches the Import dialog with the current folder preselected as the destination folder.

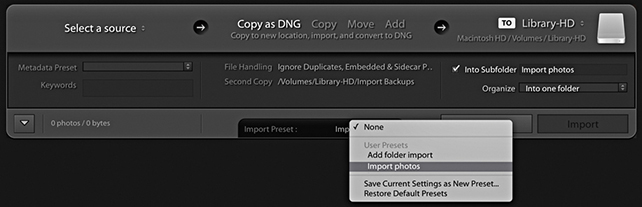
Import Presets Menu
As you can see, there are quite a lot of panels to configure in the Import dialog, and most of the settings are ones that you will want to apply regularly to each and every import. For example, you will probably want to add IPTC metadata to everything you import and want to keep the file-handling settings the same. Plus, as I pointed out earlier, there are some good reasons for importing photos to a standard import folder. With this in mind, Lightroom enables you to save Import dialog settings as Import presets. The Import Presets menu (Figure 2.34) is at the bottom of the Import dialog, and if you choose Save Current Settings as New Preset, you can add the current Import dialog configuration as a saved setting. It also means that you can work more effectively in the compact Import dialog, where the preset settings are clearly summarized. Even if the import settings might need to be varied slightly each time, selecting a preset and then tweaking it ensures greater consistency between one import and the next and still saves you time. You can save modified settings as new presets or choose to update the current Import preset settings. Either way, import presets can greatly simplify your workflow at the import stage.
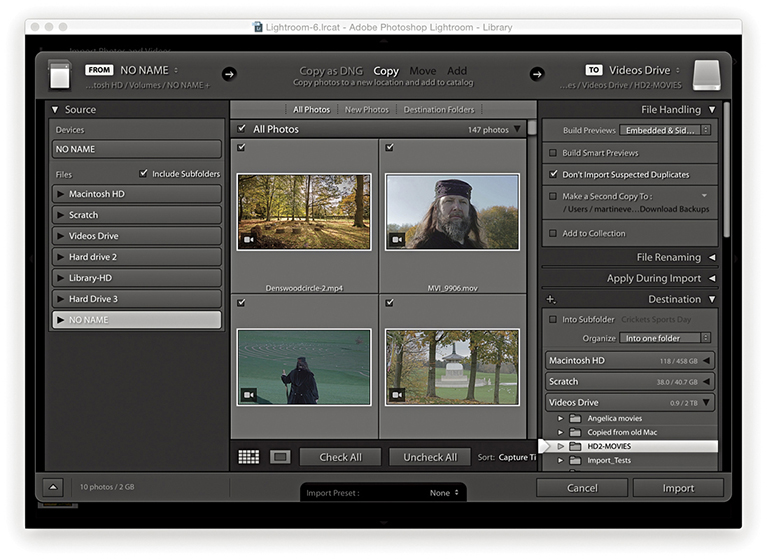
Importing Video Files
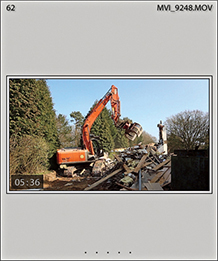
Lightroom supports the MP4, MOV, and AVCHD video formats. This means you can import the video files along with your regular still images (Figure 2.36). In addition to that, AVI support is available for Windows, (but has recently been dropped from macOS), while HEVC encoded videos (H.265) are now supported on macOS 10.13 or later, but not yet on Windows.
Once video files have been imported into Lightroom they can be distinguished from regular image files by the time-clip duration badge that appears in the bottom-left corner of the Grid/Filmstrip thumbnails (Figure 2.35). To filter for video files, you can use an Attributes search (I’ll be discussing that aspect of Lightroom toward the end of the book). Lightroom does, however, support direct video playback and limited video editing. This means you can double-click video files in the Library grid and play them directly in the Library module Loupe view. You can also edit the timeline start/finish times, as well as apply certain types of Quick Develop adjustments. For more information about video-clip editing in Lightroom, see page 237 in chapter 4.
Adding Photos to the Catalog
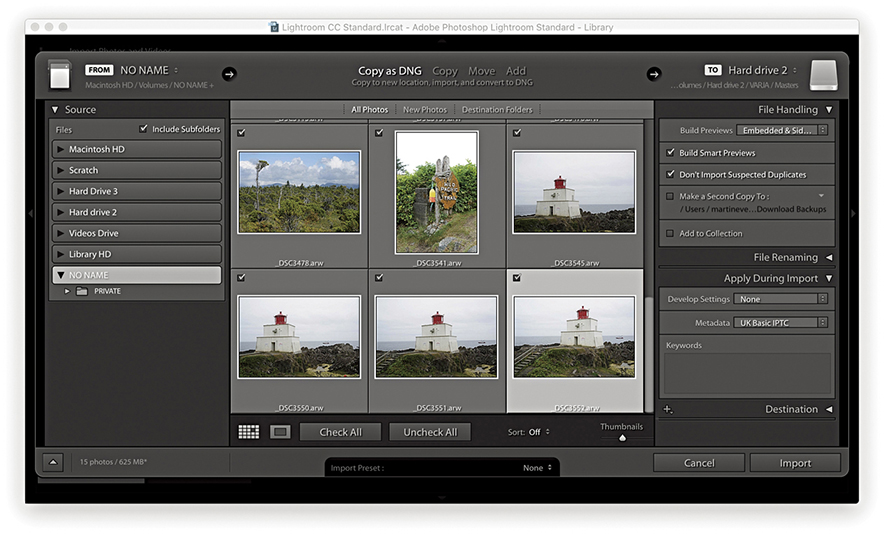
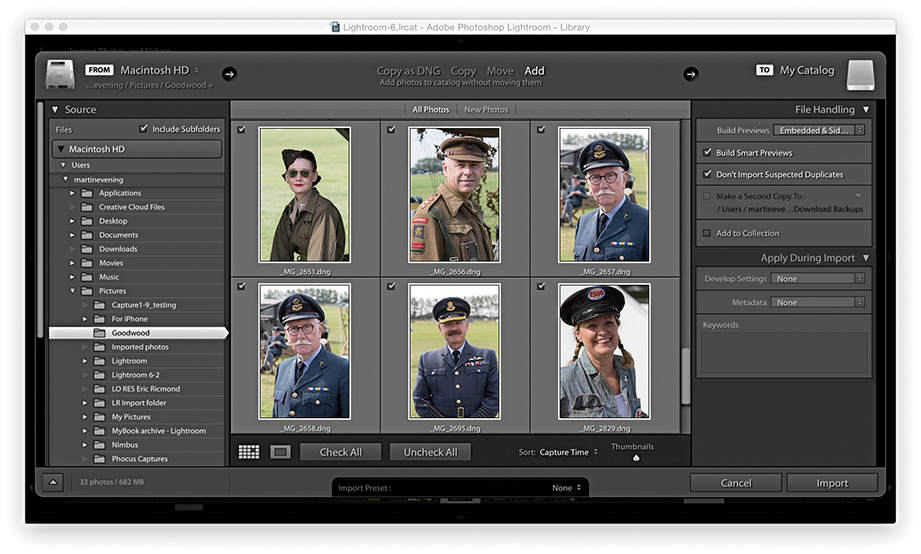
Importing photos using the Add method is the quickest and most efficient way to build up a Lightroom catalog from scratch and add photos from existing folders. If you are setting up Lightroom for the first time and have all your images neatly structured in, say, your My Pictures folder, all you have to do is choose Add, select the topmost folder (the root directory), and click Import. This lets you import all the photos in one go, and the folder directory on your computer will appear mirrored in the Lightroom Folders panel. In the Figure 2.37 example below, I selected a folder from the Source panel and chose the Add option from the Workflow bar. You’ll notice how, when the Add option is selected, only the File Handling and Apply During Import panels are displayed in the right panel section. If the folder you are importing from contains subfolders, you’ll need to check the Include Subfolders option in the Source panel because you will want these to be included in the import. In the File Handling panel, I chose Embedded & Sidecar previews and to not import suspected duplicates. In the Apply During Import panel, I deliberately chose to leave everything set to None, because I did not wish to overwrite or add to any of the existing Develop settings or informational metadata contained in the files I was about to import.
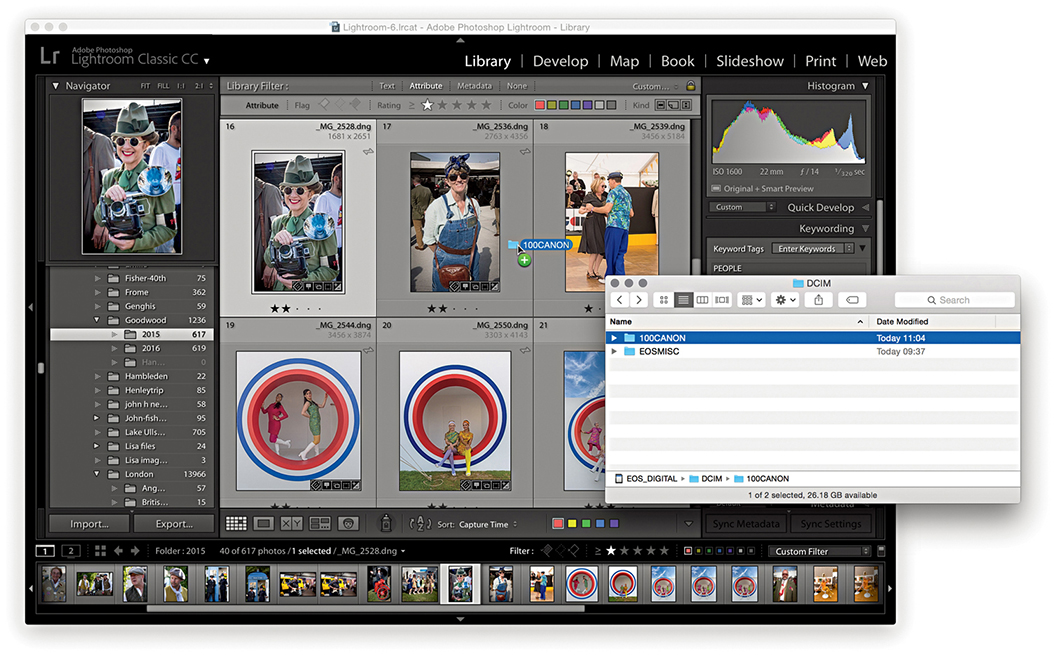
Importing Photos via Dragging
Another way to import photos into Lightroom is to simply drag files from a camera card or a folder of images from the Finder/Explorer or Bridge to the Library module content area. This method triggers opening the Import dialog with the dragged folder selected as the source and allows you to decide how the new images should be imported. Even when the Import dialog is already open, you can use this method to make the dragged folder the source.
In Figure 2.38 below, I located the images I wanted to import and dragged them across to the content area in the Library module. This action established the dragged folder as the source. From here on, the steps I used were exactly the same as for any other import. All I had to do after that was to decide how I wanted them to be imported, whether to import by copy or to add to the catalog.
Importing Photos from Another Application
You can migrate libraries from Apple Aperture or iPhoto to the Lightroom catalog using the Aperture Importer or iPhoto Importer plug-ins. These can be used to migrate files and preserve custom metadata information, but won’t be able to preserve and re-create Develop settings that have been created in Aperture or iPhoto.
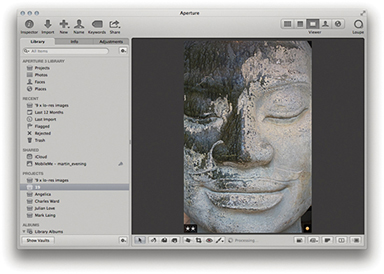
1. I started in the Aperture library with an image selected that had been rated with two stars and an orange label.
2. I quit the Aperture catalog, and in Lightroom I chose File ![]() Plug-in Extras
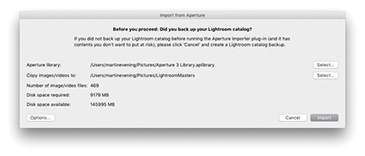
Plug-in Extras ![]() Import from Aperture Library. This opened the Import from Aperture dialog (if importing from iPhoto, you would select Import from iPhoto Library). I clicked the Select button to select the Aperture library referred to in Step 1 and clicked the Select button below that to choose a folder to copy the images and videos to. I then clicked the Import button.
Import from Aperture Library. This opened the Import from Aperture dialog (if importing from iPhoto, you would select Import from iPhoto Library). I clicked the Select button to select the Aperture library referred to in Step 1 and clicked the Select button below that to choose a folder to copy the images and videos to. I then clicked the Import button.
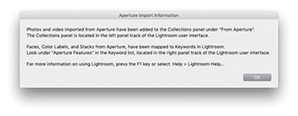
3. Once the import process had completed, the above dialog summarized the import process. If there were any errors, these would have been reported.
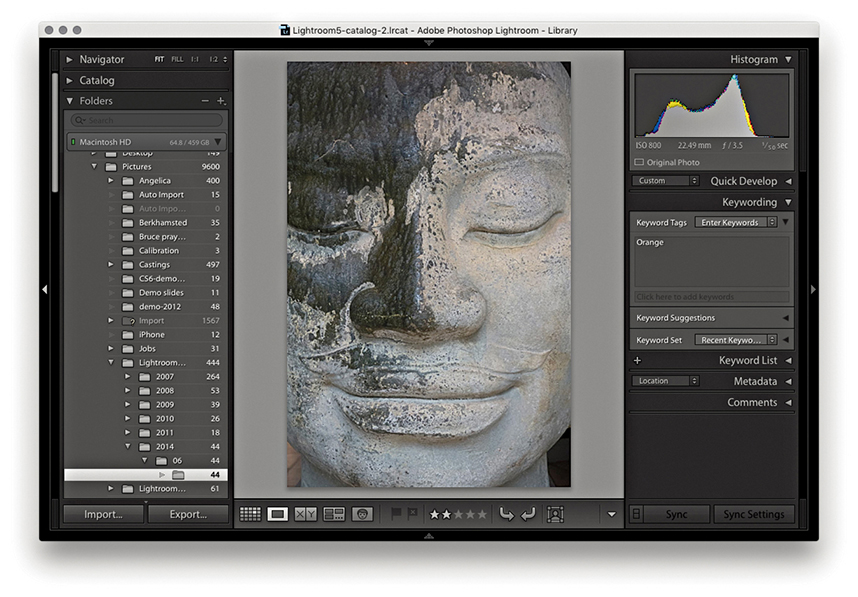
4. In Lightroom, a From Aperture collection was added to the Collections panel and the actual files themselves were copied to the folder location specified in Step 2. As you can see here, the Export/Import process preserved the two-star rating and assigned Orange as a keyword, which is visible in the Keywording panel. This process also preserved Aperture Faces and Stacks as keywords when imported into Lightroom.
Auto Imports
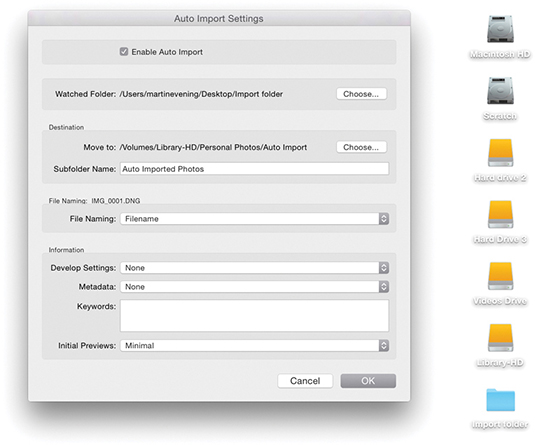
If you go to the File menu and choose Auto Import ![]() Auto Import Settings, Lightroom opens the Auto Import Settings dialog shown in Figure 2.39. In the Watched Folder section, you can choose a folder into which you can drag the photos you wish to auto-import, and in the Destination section, choose where you wish to import the photos to. The remaining sections can be used to determine how the files will be named as they are imported and also whether to apply any specific Develop settings, IPTC metadata, or keywords metadata on import. Lastly, you can select an option for generating the initial previews.
Auto Import Settings, Lightroom opens the Auto Import Settings dialog shown in Figure 2.39. In the Watched Folder section, you can choose a folder into which you can drag the photos you wish to auto-import, and in the Destination section, choose where you wish to import the photos to. The remaining sections can be used to determine how the files will be named as they are imported and also whether to apply any specific Develop settings, IPTC metadata, or keywords metadata on import. Lastly, you can select an option for generating the initial previews.
Tip
The Auto Import dialog can also be used to establish a tethered import workflow for those cases when you are reliant on using third-party software programs to download the photos from the camera. For more information about this, please refer to the PDF “Tethered shooting with the Canon EOS Utility” on the Lightroom book website.
Downloadable Content:

The Auto Import feature is incredibly useful. After you have configured the Auto Setup settings and selected the Enable Auto Import box, you are all set to add files to the catalog by simply dragging them to the designated watched folder. This lets you quickly import files and bypasses the Import Photos dialog completely. After files have been imported, you will see them appear in the Destination folder in Lightroom. You can then, if you like, choose to move them to a new folder location.
Importing Directly from the Camera
It is possible to set up Lightroom to work in a tethered shooting mode, which means photographs shot on the camera can be imported directly into Lightroom (Figure 2.40). For instance, tethered shooting allows clients to see the images appear as previews in the Library grid as you shoot. I also find tethered shooting can be useful on model castings because it enables me to individually update the keywords or captions right after a photo has been shot.

Tethered Shooting Connections
To shoot in tethered mode, you obviously need to be able to connect your camera to the computer. Ideally, you want the fastest connection possible. Most current professional digital SLRs offer a USB 3.0 connection. This should provide a fast enough interface to allow you to import the capture files at around the same speed as you can with a standard-speed camera memory card. The only downside is that you must have your camera connected to the computer via a cable, and this can restrict the amount of freedom you have to move about without pulling the cable out or, worse still, pulling a laptop computer off the table! Another option is to shoot wirelessly. Wireless units are available for some digital SLR cameras; these let you transmit images directly from the camera to a base station that is linked to the computer. Wireless shooting offers you the freedom, up to a certain distance, to shoot in a tethered style, but it is really restricted to the transmission of suitably compressed JPEGs. The current data transmission speeds for some camera systems are a lot slower than those you can expect from a USB 2 or USB 3 connection. Rapid shooting via a wireless connection can certainly work well if you are shooting in JPEG mode, but not if you intend on shooting raw. Of course, this may all change in the future.
Tip
With some Nikon cameras, you can shoot wirelessly via PTP/IP or FTP. It appears so far that PTP/IP is better and should rival USB, because PTP/IP is able to transfer files much faster due to the compression that is built into the transmission.
Tip
To get your camera to tether successfully with the computer, you may need to install the necessary drivers or driver updates for the camera you are using. In most cases, the drivers are already part of the system and you shouldn’t experience any problems.
The main reason for choosing to shoot tethered is to make the import process smoother and faster. But a number of factors can affect the overall tethered shoot import speed. First, you have to consider whether you are going to shoot raw or JPEG and the likely size of the capture files. Then there is the camera interface. Professional digital SLR cameras should boast a faster buffer capacity and data transfer rate compared to budget digital SLRs. The Lightroom tethered capture feature does not appear to create any bottleneck problems and can match or exceed other tethered solutions in terms of download speed, but the actual download speed may still be compromised by the speed of the operating system’s USB drivers and how well the software is able to optimize the interface connection. In my experience, the biggest limitation is the interface connection. It doesn’t matter how fast your computer is or whether you are using fast hard drives—the camera interface connection is nearly always the weakest link.
Downloadable Content:
Lightroom-tethered Shooting
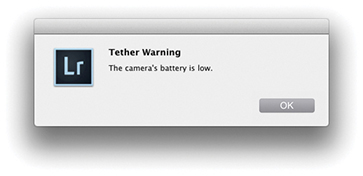
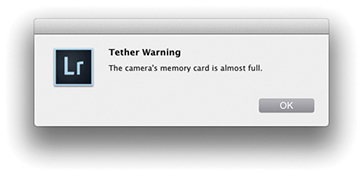
Tethered shooting via Lightroom is available for a select number of Canon and Nikon digital SLR cameras, as well as for the Leica S2 and Leica M (go to tinyurl.com/2fow89q for more help and advice on tethering cameras to Lightroom). There are now two tethered shooting options. There is one for Canon cameras, where the control panel now provides interactive control with the camera and you can manually adjust the camera settings such as the camera shutter, aperture, ISO and white balance settings (see the following step-by-step). Work has been done to also improve the reliability and performance with Canon camera tethered shooting. The other option is for Nikon and other cameras, where the tethered shoot control panel remains unchanged and the tethered connection process is mostly one-way. With either option, Lightroom provides feedback from the camera to warn when the battery is running low or the card is full (Figure 2.41).
Tethered Shooting Alternatives
Most digital SLR and medium-format cameras come with their own software solutions for tethered shooting. You can certainly expect dedicated tethered capture software to allow you to control the camera settings remotely via a computer interface. This can be particularly useful where it would otherwise prove awkward to reach the camera. If this sounds like a more appealing solution, then you might want to explore using such software in conjunction with Lightroom. If you go to the book website, you can download a PDF with instructions on how to import photos via a tethered connection with the Canon EOS Utility program in conjunction with the Canon EOS 1Ds Mark III camera. In this PDF, I show how Lightroom is able to appropriate the tethered shooting component of the camera communication software, and from there, directly take over the image processing and image management via the Auto Import dialog. Although these instructions relate to Canon software, you should be able to easily translate them to working with other cameras and camera software setups.
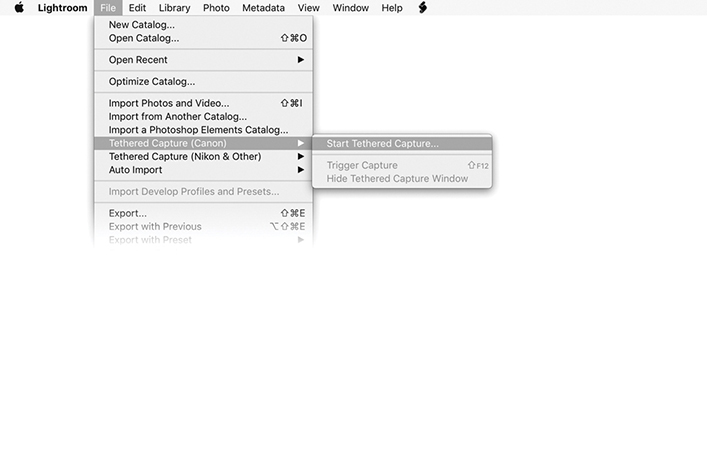
1. To initiate a tethered shoot, I went to the Library module File menu and selected Tethered Capture ![]() Tethered Capture (Canon)
Tethered Capture (Canon) ![]() Start Tethered Capture.
Start Tethered Capture.
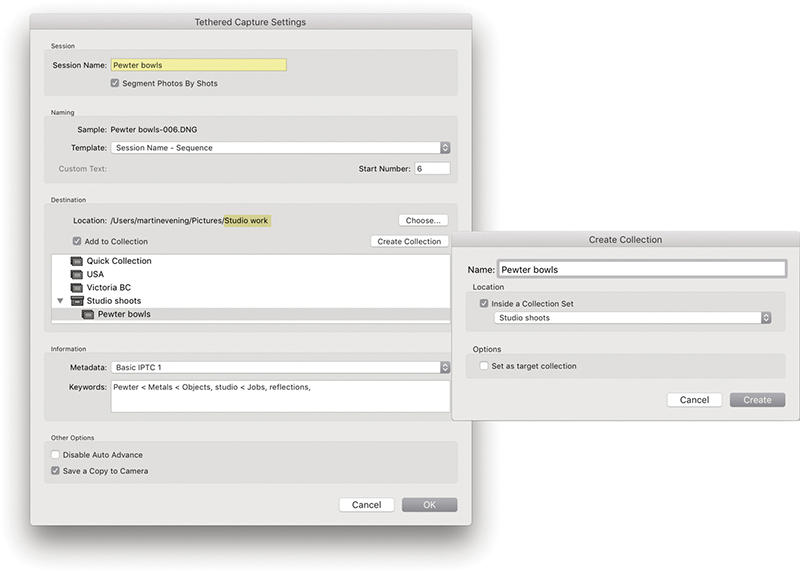
2. This opened the Tethered Capture Settings dialog, where I could configure the tethered import settings. I renamed the Session Name Pewter bowls and selected Segment Photos By Shots. In the Naming section, I chose a suitable file-naming template. In the Destination section, I set the destination folder location to Studio work. You can choose to add photos to a specific collection or create a new collection (as shown here). In the Information section, I selected a metadata preset to add on import, along with relevant keywords for the shoot. I clicked OK to confirm these settings.
Note
Enable Save a Copy to Camera if you want the camera to store a copy of your tethered captures on the camera’s memory card. Now, it can be a good thing to have a backup copy stored on the card. On the other hand, once you exceed the storage limits, you won’t be able to carry on shooting until the card is replaced or cleared.
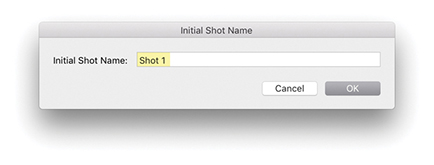
3. Because I had chosen Segment Photos By Shots, the Initial Shot Name dialog appeared, showing Shot 1. I clicked OK to proceed.

4. This opened the Tethered Shoot control panel. When the camera is switched on, the camera name will appear in the top-left section. If more than one camera is connected to the computer, you can click on the pop-up menu to choose which to import from. For supported Canon capture imports, you can use the control panel to adjust the camera settings. Click on the big round shutter button to capture photographs remotely, or use the F12 Trigger shortcut.
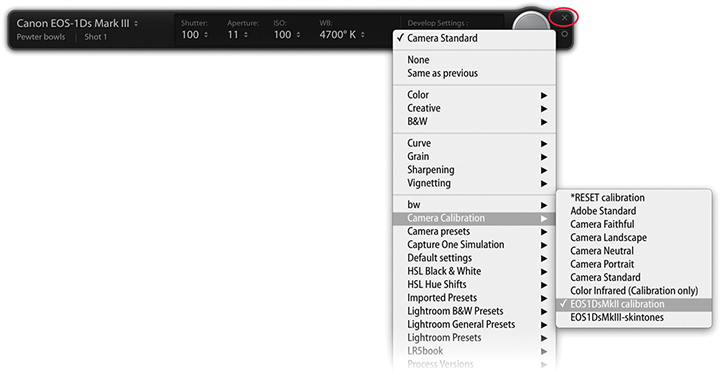
5. Here, I clicked the Develop Settings pop-up menu to select an appropriate Develop setting. As long as the Tethered Shoot control panel remained active, I could shoot pictures with the selected camera and these were automatically imported into Lightroom. You can hide the panel using  (Mac) or
  (PC) or quit by clicking the Close button (circled). To collapse the tether control panel,
  -click the Close button (Figure 2.42).
 -clicking the close button (circled in Step 5).
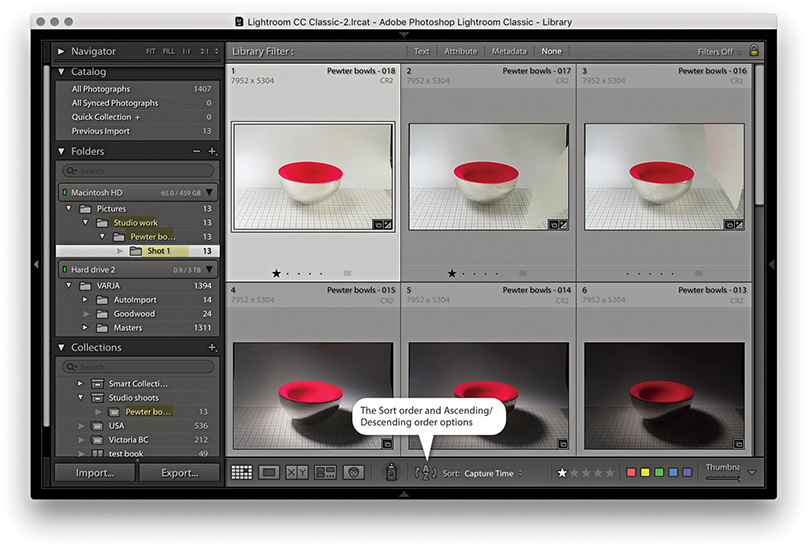
6. As I started shooting, the capture images began to appear in the Lightroom catalog. There is a menu in the Lightroom General preferences that allows you to select a sound to play when a tethered-shoot import process has completed. You will see I adjusted the sort order so the most recently shot images were shown first (see the Tip at right). If the “Disable Auto Advance” option is unchecked in the Tethered Capture Settings dialog (see Step 2), the most recently shot capture image is automatically selected. You will also notice that the photos appeared in the following folder directory: Studio work/Pewter bowls/Shot 1. To understand the hierarchy employed here, you will need to refer back to the sections highlighted in Steps 2 and 3. Studio work was the selected master destination folder for the tethered shoot images. Pewter bowls was the default name used in the Shoot section, and Shot 1 was the name given to this first series of shots. Notice also how the files were added as a collection (see highlighted collection). At this point, I could prepare for a second shoot by opening the Initial Shot Name dialog via the Tethered Shoot control panel (see Step 4) and enter a name for the next set of shots (or use the  [Mac] or
  [PC] shortcut). In the Tethered Capture Settings dialog, Save a Copy to Camera was enabled, which meant copies of the capture files were simultaneously stored on the camera card.
Tip
When you shoot using the tethered mode, it is useful to see new images appear at the top of the content area as they are imported. To enable this feature, choose View ![]() Sort
Sort ![]() Descending. You may want to switch the sort order back to Ascending for normal editing. If the Ascending/Descending toggle action appears to be broken, it may be because you have a Custom sort order selected. Also, make sure the Sort option is set to Import Order or Capture Time.
Descending. You may want to switch the sort order back to Ascending for normal editing. If the Ascending/Descending toggle action appears to be broken, it may be because you have a Custom sort order selected. Also, make sure the Sort option is set to Import Order or Capture Time.