Table of Contents for
TCP/IP Network Administration, 3rd Edition
 TCP/IP Network Administration, 3rd Edition
Published by
O'Reilly Media, Inc., 2002
TCP/IP Network Administration, 3rd Edition
Published by
O'Reilly Media, Inc., 2002
- Cover
- TCP/IP Network Administration, 3rd Edition
- Dedication
- Preface
- 1. Overview of TCP/IP
- 2. Delivering the Data
- 3. Network Services
- 4. Getting Started
- 5. Basic Configuration
- 6. Configuring the Interface
- 7. Configuring Routing
- 8. Configuring DNS
- 9. Local Network Services
- 10. sendmail
- 11. Configuring Apache
- 12. Network Security
- 13. Troubleshooting TCP/IP
- A. PPP Tools
- B. A gated Reference
- C. A named Reference
- D. A dhcpd Reference
- E. A sendmail Reference
- F. Solaris httpd.conf File
- G. RFC Excerpts
- Index
- Index
- Index
- Index
- Index
- Index
- Index
- Index
- Index
- Index
- Index
- Index
- Index
- Index
- Index
- Index
- Index
- Index
- Index
- Index
- Index
- Index
- Index
- Index
- Index
- Index
- Index
- About the Author
- Colophon
- Copyright
Network administration tasks fall into two very different categories: configuration and troubleshooting. Configuration tasks prepare for the expected; they require detailed knowledge of command syntax, but are usually simple and predictable. Once a system is properly configured, there is rarely any reason to change it. The configuration process is repeated each time a new operating system release is installed, but with very few changes.
In contrast, network troubleshooting deals with the unexpected. Troubleshooting frequently requires knowledge that is conceptual rather than detailed. Network problems are usually unique and sometimes difficult to resolve. Troubleshooting is an important part of maintaining a stable, reliable network service.
In this chapter, we discuss the tools you will use to ensure that the network is in good running condition. However, good tools are not enough. No troubleshooting tool is effective if applied haphazardly. Effective troubleshooting requires a methodical approach to the problem, and a basic understanding of how the network works. We’ll start our discussion by looking at ways to approach a network problem.
To approach a problem properly, you need a basic understanding of TCP/IP. The first few chapters of this book discuss the basics of TCP/IP and provide enough background information to troubleshoot most network problems. Knowledge of how TCP/IP routes data through the network, between individual hosts, and between the layers in the protocol stack is important for understanding a network problem. But detailed knowledge of each protocol usually isn’t necessary. When you need these details, look them up in a definitive reference—don’t try to recall them from memory.
Not all TCP/IP problems are alike, and not all problems can be approached in the same manner. But the key to solving any problem is understanding what the problem is. This is not as easy as it may seem. The “surface” problem is sometimes misleading, and the “real” problem is frequently obscured by many layers of software. Once you understand the true nature of the problem, the solution to the problem is often obvious.
First, gather detailed information about exactly what’s happening. When a user reports a problem, talk to her. Find out which application failed. What is the remote host’s name and IP address? What is the user’s hostname and address? What error message was displayed? If possible, verify the problem by having the user run the application while you talk her through it. If possible, duplicate the problem on your own system.
Testing from the user’s system, and other systems, find out:
Does the problem occur in other applications on the user’s host, or is only one application having trouble? If only one application is involved, the application may be misconfigured or disabled on the remote host. Because of security concerns, many systems disable some services.
Does the problem occur with only one remote host, all remote hosts, or only certain “groups” of remote hosts? If only one remote host is involved, the problem could easily be with that host. If all remote hosts are involved, the problem is probably with the user’s system (particularly if no other hosts on your local network are experiencing the same problem). If only hosts on certain subnets or external networks are involved, the problem may be related to routing.
Does the problem occur on other local systems? Make sure you check other systems on the same subnet. If the problem occurs only on the user’s host, concentrate testing on that system. If the problem affects every system on a subnet, concentrate on the router for that subnet.
Once you know the symptoms of the problem, visualize each protocol and device that handles the data. Visualizing the problem will help you avoid oversimplification, and keep you from assuming that you know the cause even before you start testing. Using your TCP/IP knowledge, narrow your attack to the most likely causes of the problem, but keep an open mind.
Below are several useful troubleshooting hints. They are not part of a troubleshooting methodology—just good ideas to keep in mind.
Approach problems methodically. Allow the information gathered from each test to guide your testing. Don’t jump on a hunch into another test scenario without ensuring that you can pick up your original scenario where you left off.
Work carefully through the problem, dividing it into manageable pieces. Test each piece before moving on to the next. For example, when testing a network connection, test each part of the network until you find the problem.
Keep good records of the tests you have completed and their results. Keep a historical record of the problem in case it reappears.
Keep an open mind. Don’t assume too much about the cause of the problem. Some people believe their network is always at fault, while others assume the remote end is always the problem. Some are so sure they know the cause of a problem that they ignore the evidence of the tests. Don’t fall into these traps. Test each possibility and base your actions on the evidence of the tests.
Be aware of security barriers. Security firewalls sometimes block
ping,traceroute, and even ICMP error messages. If problems seem to cluster around a specific remote site, find out if it has a firewall.Pay attention to error messages. Error messages are often vague, but they frequently contain important hints for solving the problem.
Duplicate the reported problem yourself. Don’t rely too heavily on the user’s problem report. The user has probably seen this problem only from the application level. If necessary, obtain the user’s data files to duplicate the problem. Even if you cannot duplicate the problem, log the details of the reported problem for your records.
Most problems are caused by human error. You can prevent some of these errors by providing information and training on network configuration and usage.
Keep your users informed. This reduces the number of duplicated trouble reports and the duplication of effort when several system administrators work on the same problem without knowing others are already working on it. If you’re lucky, someone may have seen the problem before and have a helpful suggestion about how to resolve it.
Don’t speculate about the cause of the problem while talking to the user. Save your speculations for discussions with your networking colleagues. Your speculations may be accepted by the user as gospel, and become rumors. These rumors can cause users to avoid using legitimate network services and may undermine confidence in your network. Users want solutions to their problems; they’re not interested in speculative techno-babble.
Stick to a few simple troubleshooting tools. For most TCP/IP software problems, the tools discussed in this chapter are sufficient. Just learning how to use a new tool is often more time-consuming than solving the problem with an old, familiar tool.
Thoroughly test the problem at your end of the network before locating the owners of the remote system to coordinate testing with them. The greatest difficulty of network troubleshooting is that you do not always control the systems at both ends of the network. In many cases, you may not even know who does control the remote system. The more information you have about your end, the simpler the job will be when you have to contact the remote administrator.
Don’t neglect the obvious. A loose or damaged cable is always a possible problem. Check plugs, connectors, cables, and switches. Small things can cause big problems.
Because most problems have simple causes, developing a clear idea of the problem often provides the solution. Unfortunately, this is not always true, so in this section we begin to discuss the tools that can help you attack the most intractable problems. Many diagnostic tools are available, ranging from commercial systems with specialized hardware and software that may cost thousands of dollars, to free software that is available from the Internet. Many software tools are provided with your Unix system. You should also keep some hardware tools handy.
To maintain the network’s equipment and wiring, you need some simple hand tools. A pair of needle-nose pliers and a few screwdrivers may be sufficient, but you may also need specialized tools. For example, attaching RJ45 connectors to unshielded twisted pair (UTP) cable requires special crimping tools. It is usually easiest to buy a ready-made network maintenance toolkit from your cable vendor.
A full-featured cable tester is also useful. Modern cable testers are small hand-held units with a keypad and LCD display that test both thinnet and UTP cable. Tests are selected from the keyboard and results are displayed on the LCD screen. It is not necessary to interpret the results because the unit does that for you and displays the error condition in a simple text message. For example, a cable test might produce the message “Short at 74 feet.” This tells you that the cable is shorted 74 feet away from the tester. What could be simpler? The proper test tools make it easier to locate, and therefore fix, cable problems.
A laptop computer can be a most useful piece of test
equipment when properly configured. Install TCP/IP software on the
laptop. Take it to the location where the user reports a network
problem. Disconnect the Ethernet cable from the back of the user’s
system and attach it to the laptop. Configure the laptop with an
appropriate address for the user’s subnet and reboot it. Then ping various systems on the network and attach
to one of the user’s servers. If everything works, the fault is probably
in the user’s computer. Users trust this test because it demonstrates
something they do every day. They have more confidence in the laptop
than in an unidentifiable piece of test equipment displaying the message
“No faults found.” If the test fails, the fault is probably in the
network equipment or wiring. That’s the time to bring out the cable
tester.
Another advantage of using a laptop as a piece of test equipment is its inherent versatility. It runs a wide variety of test, diagnostic, and management software. Install Unix on the laptop and run the software discussed in the rest of this chapter from your desktop or your laptop.
This book emphasizes free or “built-in” software diagnostic tools that run on Unix systems. The software tools used in this chapter, and many more, are described in RFC 1470, FYI on a Network Management Tool Catalog: Tools for Monitoring and Debugging TCP/IP Internets and Interconnected Devices. A catchy title, and a useful RFC! The RFC is somewhat dated, but it does point out some very useful tools. The tools listed in that catalog and discussed in this book are:
- ifconfig
Provides information about the basic configuration of the interface. It is useful for detecting bad IP addresses, incorrect subnet masks, and improper broadcast addresses. Chapter 6 covers
ifconfigin detail. This tool is provided with the Unix operating system.- arp
Provides information about Ethernet/IP address translation. It can be used to detect systems on the local network that are configured with the wrong IP address.
arpis covered in this chapter and is used in an example in Chapter 2.arpis delivered as part of Unix.- netstat
Provides a variety of information. It is commonly used to display detailed statistics about each network interface, the network sockets, and the network routing table.
netstatis used repeatedly in this book, most extensively in Chapters Chapter 2, Chapter 6, and Chapter 7.netstatis delivered as part of Unix.- ping
Indicates whether a remote host can be reached.
pingalso displays statistics about packet loss and delivery time.pingis discussed in Chapter 1 and used in Chapter 7.pingalso comes as part of Unix.- nslookup
Provides information about the DNS name service.
nslookupis covered in detail in Chapter 8. It comes as part of the BIND software package.- dig
Also provides information about name service and is similar to
nslookup.- traceroute
Prints information about each routing hop that packets take going from your system to a remote system.
- snoop
Analyzes the individual packets exchanged between hosts on a network.
snoopis a TCP/IP protocol analyzer included with Solaris 8 systems. It examines the contents of packets, including their headers, and is most useful for analyzing protocol problems.tcpdumpis a tool similar tosnoopthat is provided with Linux systems.
This chapter discusses each of these tools, even those covered
earlier in the text. We start with ping, which is used in more troubleshooting
situations than any other diagnostic tool.
The ping command tests whether a remote host can be reached from your
computer. This simple function is extremely useful for testing the
network connection, independent of the application in which the original
problem was detected. ping allows you
to determine whether further testing should be directed toward the
network connection (the lower layers) or the application (the upper
layers). If ping shows that packets
can travel to the remote system and back, the user’s problem is probably
in the upper layers. If packets can’t make the round trip, lower
protocol layers are probably at fault.
Frequently a user reports a network problem by stating that he
can’t telnet (or ftp, or send email, or whatever) to some
remote host. He then immediately qualifies this statement with the
announcement that it worked before. In cases like this, where the
ability to connect to the remote host is in question, ping is a very useful tool.
Using the hostname provided by the user, ping the remote host. If your ping is successful, have the user ping the host. If the user’s ping is also successful, concentrate your
further analysis on the specific application that the user is having
trouble with. Perhaps the user is attempting to telnet to a host that provides only anonymous
ftp. Perhaps the host was down when
the user tried his application. Have the user try it again, while you
watch or listen to every detail of what he is doing. If he is doing
everything right and the application still fails, detailed analysis of
the application with snoop and
coordination with the remote system administrator may be needed.
If your ping is successful and
the user’s ping fails, concentrate
testing on the user’s system configuration, and on those things that are
different about the user’s path to the remote host when compared to your
path to the remote host.
If your ping fails, or the
user’s ping fails, pay close
attention to any error messages. The error messages displayed by
ping are helpful guides for planning
further testing. The details of the messages may vary from
implementation to implementation, but there are only a few basic types
of errors:
- Unknown host
The remote host’s name cannot be resolved by name service into an IP address. The name servers could be at fault (either your local server or the remote system’s server), the name could be incorrect, or something could be wrong with the network between your system and the remote server. If you know the remote host’s IP address, try to
pingthat. If you can reach the host using its IP address, the problem is with name service. Usenslookupordigto test the local and remote servers, and to check the accuracy of the hostname the user gave you.- Network unreachable
The local system does not have a route to the remote system. If the numeric IP address was used on the
pingcommand line, re-enter thepingcommand using the hostname. This eliminates the possibility that the IP address was entered incorrectly, or that you were given the wrong address. If a routing protocol is being used, make sure it is running and check the routing table withnetstat. If a static default route is being used, reinstall it. If everything seems fine on the host, check its default gateway for routing problems.- No answer
The remote system did not respond. Most network utilities have some version of this message. Some
pingimplementations print the message “100% packet loss.”telnetprints the message “Connection timed out” andsendmailreturns the error “cannot connect.” All of these errors mean the same thing. The local system has a route to the remote system, but it receives no response from the remote system to any of the packets it sends.There are many possible causes of this problem. The remote host may be down. Either the local or the remote host may be configured incorrectly. A gateway or circuit between the local host and the remote host may be down. The remote host may have routing problems. Only additional testing can isolate the cause of the problem. Carefully check the local configuration using
netstatandifconfig. Check the route to the remote system withtraceroute. Contact the administrator of the remote system and report the problem.
All of the tools mentioned here will be discussed later in this
chapter. However, before leaving ping, let’s look more closely at the command
and the statistics it displays.
The basic format of the ping
command on a Solaris system is:[141]
pinghost[packetsize] [count]
hostThe hostname or IP address of the remote host being tested. Use the hostname or address provided by the user in the trouble report.
packetsizeDefines the size in bytes of the test packets. This field is required only if the
countfield is going to be used. Use the defaultpacketsizeof 56 bytes.countThe number of packets to be sent in the test. Use the
countfield, and set the value low. Otherwise, thepingcommand may continue to send test packets until you interrupt it, usually by pressing Ctrl-C (^C). Sending excessive numbers of test packets is not a good use of network bandwidth and system resources. Usually five packets are sufficient for a test.
To check that ns.uu.net can be reached from crab, we send five 56-byte packets with the following command:
% ping -s ns.uu.net 56 5
PING ns.uu.net: 56 data bytes
64 bytes from ns.uu.net (137.39.1.3): icmp_seq=0. time=32.8 ms
64 bytes from ns.uu.net (137.39.1.3): icmp_seq=1. time=15.3 ms
64 bytes from ns.uu.net (137.39.1.3): icmp_seq=2. time=13.1 ms
64 bytes from ns.uu.net (137.39.1.3): icmp_seq=3. time=32.4 ms
64 bytes from ns.uu.net (137.39.1.3): icmp_seq=4. time=28.1 ms

----ns.uu.net PING Statistics----
5 packets transmitted, 5 packets received, 0% packet loss
round trip (ms)  min/avg/max = 13.1/24.3/32.8
The -s option is included
because crab is a Solaris workstation, and we want packet-by-packet
statistics. Without the -s option,
Sun’s ping command prints only a
summary line saying “ns.uu.net is alive.” Other ping implementations do not require the
-s option; they display the
statistics by default, as the Linux example below shows:
$ ping -c5 ns.uu.net
PING ns.uu.net (137.39.1.3) from 172.16.12.3 : 56(84) bytes of data.
64 bytes from ns.UU.NET (137.39.1.3): icmp_seq=0 ttl=244 time=98.283 msec
64 bytes from ns.UU.NET (137.39.1.3): icmp_seq=1 ttl=244 time=94.114 msec
64 bytes from ns.UU.NET (137.39.1.3): icmp_seq=2 ttl=244 time=66.565 msec
64 bytes from ns.UU.NET (137.39.1.3): icmp_seq=3 ttl=244 time=24.301 msec
64 bytes from ns.UU.NET (137.39.1.3): icmp_seq=4 ttl=244 time=37.060 msec

--- ns.uu.net ping statistics ---
5 packets transmitted, 5 packets received, 0% packet loss
round trip min/avg/max/mdev = 24.301/64.064/98.283/29.634 ms
Both tests show a good wide area network link to
ns.uu.net with no packet loss and a fast
response. The round trip between almond and
ns.uu.net took an average of only 24.3
milliseconds. A small packet loss, and a round trip time an order of
magnitude higher, would not be abnormal for a connection made across a
wide area network. The statistics displayed by the ping command can indicate low-level network
problems. The key statistics are:
The sequence in which the packets are arriving, as shown by the ICMP sequence number (
icmp_seq) displayed for each packet.How long it takes a packet to make the round trip, displayed in milliseconds after the string
time=.The percentage of packets lost, displayed in a summary line at the end of the
pingoutput.
If the packet loss is high, the response time is very slow, or packets are arriving out of order, there could be a network hardware problem. If you see these conditions when communicating over great distances on a wide area network, there is nothing to worry about. TCP/IP was designed to deal with unreliable networks, and some wide area networks suffer a lot of packet loss. But if these problems are seen on a local area network, they indicate trouble.
On a local network cable segment, the round trip time should be near 0, there should be little or no packet loss, and the packets should arrive in order. If these things are not true, there is a problem with the network hardware. On an Ethernet, the problem could be improper cable termination, a bad cable segment, or a bad piece of “active” hardware, such as a hub, switch, or transceiver. Check the cable with a cable tester as described earlier. Good hubs and switches often have built-in diagnostic software that can be checked. Cheap hubs and transceivers may require the “brute force” method of disconnecting individual pieces of hardware until the problem goes away.
The results of a simple ping
test, even if the ping is
successful, can help you direct further testing toward the most likely
causes of the problem. But other diagnostic tools are needed to
examine the problem more closely and find the underlying cause.
The “no answer” and “cannot connect” errors indicate a problem in
the lower layers of the network protocols. If the preliminary tests
point to this type of problem, concentrate your testing on routing and
on the network interface. Use the ifconfig, netstat, and arp commands to test the Network Access
Layer.
ifconfig checks the network interface configuration. Use this command to
verify the user’s configuration if the user’s system has been recently
configured or if the user’s system cannot reach the remote host while
other systems on the same network can.
When ifconfig is entered with
an interface name and no other arguments, it displays the current
values assigned to that interface. For example, checking interface
dnet0 on a Solaris 8 system gives this report:
% ifconfig dnet0
dnet0: flags=1000843<UP,BROADCAST,RUNNING,MULTICAST,IPv4> mtu 1500 index 2
        inet 172.16.55.105 netmask ffffff00 broadcast 172.16.55.255
The ifconfig command displays
two lines of output. The first line of the display shows the
interface’s name and its characteristics. Check for these
characteristics:
- UP
The interface is enabled for use. If the interface is “down,” have the system’s superuser bring the interface “up” with the
ifconfigcommand (e.g.,ifconfig dnet0 up). If the interface won’t come up, replace the interface cable and try again. If it still fails, have the interface hardware checked.- RUNNING
This interface is operational. If the interface is not “running,” the driver for this interface may not be properly installed. The system administrator should review all of the steps necessary to install this interface, looking for errors or missed steps.
The second line of ifconfig
output shows the IP address, the subnet mask (written in hexadecimal),
and the broadcast address. Check these three fields to make sure the
network interface is properly configured.
Two common interface configuration problems are misconfigured
subnet masks and incorrect IP addresses. A bad subnet mask is
indicated when the host can reach other hosts on its local subnet and
remote hosts on distant networks, but it cannot reach hosts on other
local subnets. ifconfig quickly
reveals if a bad subnet mask is set.
An incorrectly set IP address can be a subtle problem. If the
network part of the address is incorrect, every ping will fail with the “no answer” error.
In this case, using ifconfig will
reveal the incorrect address. However, if the host part of the address
is wrong, the problem can be more difficult to detect. A small system,
such as a PC that only connects out to other systems and never accepts
incoming connections, can run for a long time with the wrong address
without its user noticing the problem. Additionally, the system that
suffers the ill effects may not be the one that is misconfigured. It
is possible for someone to accidentally use your IP address on his
system, and for his mistake to cause your system intermittent
communications problems. An example of this problem is discussed
later. This type of configuration error cannot be discovered by
ifconfig because the error is on a
remote host. The arp command is
used for this type of problem.
The arp command is used to analyze problems with IP-to-Ethernet address
translation. The arp command has
three useful options for troubleshooting:
-aDisplay all ARP entries in the table.
-dhostnameDelete an entry from the ARP table.
-shostname ether-addressAdd a new entry to the table.
With these three options you can view the contents of the ARP table, delete a problem entry, and install a corrected entry. The ability to install a corrected entry is useful in “buying time” while you look for the permanent fix.
Use arp if you suspect that
incorrect entries are getting into the address resolution table. One
clear indication of problems with the ARP table is a report that the
“wrong” host responded to some command, like ftp or telnet. Intermittent problems that affect
only certain hosts can also indicate that the ARP table has been
corrupted. ARP table problems are usually caused by two systems using
the same IP address. The problems appear intermittent because the
entry that appears in the table is the address of the host that
responded quickest to the last ARP request. Sometimes the “correct”
host responds first, and sometimes the “wrong” host responds
first.
If you suspect that two systems are using the same IP address,
display the address resolution table with the arp -a command. Here’s an example from a
Solaris system:[142]
% arp -a
Net to Media Table: IPv4
Device   IP Address               Mask      Flags   Phys Addr
------ -------------------- --------------- ----- ---------------
dnet0  pecan                255.255.255.255       08:00:20:05:21:33
dnet0  horseshoe            255.255.255.255       00:00:0c:e0:80:b1
dnet0  crab                 255.255.255.255  SP   08:00:20:22:fd:51
dnet0  BASE-ADDRESS.MCAST.NET 240.0.0.0      SM   01:00:5e:00:00:00
It is easiest to verify that the IP and Ethernet address pairs are correct if you have a record of each host’s correct Ethernet address. For this reason you should record each host’s Ethernet and IP address when it is added to your network. If you have such a record, you’ll quickly see if anything is wrong with the table.
If you don’t have this type of record, the first three bytes of the Ethernet address can help you to detect a problem. The first three bytes of the address identify the equipment manufacturer. A list of these identifying prefixes is found at http://www.iana.org/assignments/ethernet-numbers.
From the vendor prefixes we see that two of the ARP entries displayed in our example are Sun systems (8:0:20). If horseshoe is also supposed to be a Sun, the 0:0:0c Cisco prefix indicates that a Cisco router has been mistakenly configured with horseshoe’s IP address.
If neither checking a record of correct assignments nor checking
the manufacturer prefix helps you identify the source of the errant
ARP, try using telnet to connect to
the IP address shown in the ARP entry. If the device supports telnet, the login banner might help you
identify the incorrectly configured host.
A user called in asking if the server was down, and reported the following problem. The user’s workstation, called limulus, appeared to “lock up” for minutes at a time when certain commands were used, while other commands worked with no problems. The network commands that involved the NIS name server all caused the lock-up problem, but some unrelated commands also caused the problem. The user reported seeing the error message:
NFS getattr failed for server crab: RPC: Timed out
The server crab was providing
limulus with NIS and NFS services. The commands
that failed on limulus were commands that
required NIS service, or that were stored in the centrally
maintained /usr/local directory exported from
crab. The commands that ran correctly were
installed locally on the user’s workstation. No one else reported a
problem with the server, and we were able to ping limulus from
crab and get good responses.
We had the user check the messages file[143] for recent error messages, and she discovered this:
Mar  6 13:38:23 limulus vmunix: duplicate IP address!!
      sent from ethernet address: 0:0:c0:4:38:1a
This message indicates that the workstation detected another host on the Ethernet responding to its IP address. The “imposter” used the Ethernet address 0:0:c0:4:38:1a in its ARP response. The correct Ethernet address for limulus is 8:0:20:e:12:37.
We checked crab’s ARP table and found
that it had the incorrect ARP entry for
limulus. We deleted the bad
limulus entry with the arp -d command, and installed the correct
entry with the -s option, as
shown below:
# arp -d limulus
limulus (172.16.180.130) deleted
# arp -s limulus 8:0:20:e:12:37
ARP entries received via the ARP protocol are temporary. The values are held in the table for a finite lifetime and are deleted when that lifetime expires. New values are then obtained via the ARP protocol. Therefore, if some remote interfaces change, the local table adjusts and communications continue. Usually this is a good idea, but if someone is using the wrong IP address, that bad address can keep reappearing in the ARP table even if it is deleted. However, manually entered values are permanent; they stay in the table and can only be deleted manually. This allowed us to install a correct entry in the table without worrying about it being overwritten by a bad address.
This quick fix resolved limulus’s immediate problem, but we still needed to find the culprit. We checked the /etc/ethers file to see if we had an entry for Ethernet address 0:0:c0:4:38:1a, but we didn’t. From the first three bytes of this address, 0:0:c0, we knew that the device was a Western Digital card. Since our network has only Unix workstations and PCs, we assumed the Western Digital card was installed in a PC. We also guessed that the problem address was recently installed because the user had never had the problem before. We sent out an urgent announcement to all users asking if anyone had recently installed a new PC, reconfigured a PC, or installed TCP/IP software on a PC. We got one response. When we checked his system, we found out that he had entered the address 172.16.180.130 when he should have entered 172.16.180.138. The address was corrected and the problem did not recur.
Nothing fancy was needed to solve this problem. Once we checked the error messages, we knew what the problem was and how to solve it. Involving the entire network user community allowed us to quickly locate the problem system and to avoid a room-to-room search for the PC. Reluctance to involve users and make them part of the solution is one of the costliest, and most common, mistakes made by network administrators.
If the preliminary tests lead you to suspect that the connection to the
local area network is unreliable, the netstat -i command can provide useful information. The example below
shows the output from the netstat -i command on a Solaris 8 system:[144]
% netstat -i
Name  Mtu  Net/Dest         Address   Ipkts Ierrs Opkts Oerrs Collis Queue
dnet0 1500 wrotethebook.com crab      442697  2   633424  2   50679  0
lo0   1536 loopback         localhost 53040   0   53040   0   0      0
The line for the loopback interface, lo0, can be ignored. Only the line for the real network interface is significant, and only the last five fields on that line provide significant troubleshooting information.
Let’s look at the last field first. There should be no packets queued (Queue) that cannot be transmitted. If the interface is up and running, and the system cannot deliver packets to the network, suspect a bad drop cable or a bad interface. Replace the cable and see if the problem goes away. If it doesn’t, call the vendor for interface hardware repairs.
The input errors (Ierrs) and the output errors (Oerrs) should be
close to 0. Regardless of how much traffic has passed through this
interface, 100 errors in either of these fields is high. High output
errors could indicate a saturated local network or a bad physical
connection between the host and the network. High input errors could
indicate that the network is saturated, the local host is overloaded,
or there is a physical network problem. Tools, such as ping statistics or a cable tester, can help
you determine if it is a physical network problem. Evaluating the
collision rate can help you determine if the local Ethernet is
saturated.
A high value in the collision field (Collis) is normal, but if the percentage of output packets that result in a collision is too high, it indicates that the network is saturated. Collision rates greater than 5% bear watching. If high collision rates are seen consistently, and are seen among a broad sampling of systems on the network, you may need to subdivide the network to reduce traffic load.
Collision rates are a percentage of output packets. Don’t use
the total number of packets sent and received; use the values in the
Opkts and Collis fields when determining the collision rate. For
example, the output in the netstat
example shows 50679 collisions out of 633424 outgoing packets. That’s
a collision rate of 8%. This sample network could be overworked; check
the statistics on other hosts on this network. If the other systems
also show a high collision rate, consider subdividing this
network.
To reduce the collision rate, you must reduce the amount of traffic on the network segment. A simple way to do this is to create multiple segments out of the single segment. Each new segment will have fewer hosts and, therefore, less traffic. We’ll see, however, that it’s not quite this simple.
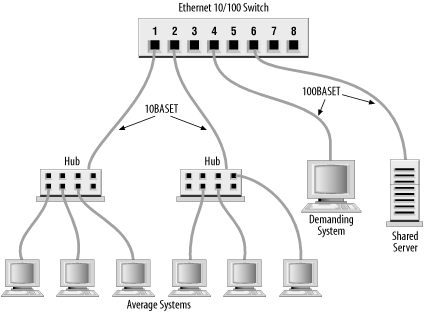
The most effective way to subdivide an Ethernet is to install an Ethernet switch. Each port on the switch is essentially a separate Ethernet. So a 16-port switch gives you 16 Ethernets to work with when balancing the load. On most switches the ports can be used in a variety of ways (see Figure 13-1). Lightly used systems can be attached to a hub that is then attached to one of the switch ports to allow the systems to share a single segment. Servers and demanding systems can be given dedicated ports so that they don’t need to share a segment with anyone. Most switches provide both 10 Mbps Ethernet and Fast Ethernet 100 Mbps ports. These are called asymmetric switches because different ports operate at different speeds. Use the Fast Ethernet ports to connect heavily used servers or segments. Most 10/100 switches have auto-sensing ports. This allows every port to be used at either 100 Mbps or at 10 Mbps, which gives you the maximum configuration flexibility.
Gigabit Ethernet switches can also be used, but they have a unique place in the network topology. 10/100 switches connect servers and local networks. Gigabit switches are primarily used to create a “collapsed backbone” to interconnect other switches. Gigabit switches are used when designing a new corporate backbone network. 10/100 switches are used when subdividing an individual Ethernet segment.
Figure 13-1 shows an 8-port 10/100 Ethernet switch. Ports 1 and 2 are wired to Ethernet hubs. A few systems are connected to each hub. When new systems are added they are distributed evenly among the hubs to prevent any one segment from becoming overloaded. Additional hubs can be added to the available switch ports for future expansion. Port 4 attaches a demanding system with its own private segment. Port 6 operates at 100 Mbps and attaches a heavily used server. A port can be reserved for a future 100 Mbps connection to a second 10/100 Ethernet switch for even more expansion.
Before allocating the ports on your switch, evaluate what services are in demand, and who talks to whom. Then develop a plan that reduces the amount of traffic flowing over any segment. For example, if the demanding system on Port 4 uses lots of bandwidth because it is constantly talking to one of the systems on Port 1, all of the systems on Port 1 will suffer because of this traffic. The computer that the demanding system communicates with should be moved to one of the vacant ports or to the same port (4) as the demanding system. Use your switch to the greatest advantage by balancing the load.
Should you segment an old coaxial cable Ethernet by cutting the cable and joining it back together through a router or a bridge? No. If you have an old network that is finally reaching saturation, it is time to install a new network built on a more robust technology. A shared media network, a network where everyone is on the same cable (in this example, a coaxial cable Ethernet) is an accident waiting to happen. Design a network that a user cannot bring down by merely disconnecting his system, or even by accidentally cutting a wire in his office. Use unshielded twisted pair (UTP) cable, ideally Category 5 cable, to create a 10BaseT Ethernet or 100BaseT Fast Ethernet that wires equipment located in the user’s office to a hub securely stored in a wire closet. The network components in the user’s office should be sufficiently isolated from the network so that damage to those components does not damage the entire network. The new network will solve your collision problem and reduce the amount of hardware troubleshooting you are called upon to do.
Some of the tests discussed in this section can show a network hardware problem. If a hardware problem is indicated, contact the people responsible for the hardware. If the problem appears to be in a leased telephone line, contact the telephone company. If the problem appears to be in a wide area network, contact the management of that network. Don’t sit on a problem expecting it to go away. It could easily get worse.
If the problem is in your local area network, you will have to handle it yourself. Some tools, such as the cable tester, can help. But frequently the only way to approach a hardware problem is by brute force—disconnecting pieces of hardware until you find the one causing the problem. It is most convenient to do this at the switch or hub. If you identify a device causing the problem, repair or replace it. Remember that the problem can be the cable itself, rather than any particular device.
The “network unreachable” error message clearly indicates a routing problem. If the
problem is in the local host’s routing table, it is easy to detect and
resolve. First, use netstat -nr and grep to see whether or not a valid route to
your destination is installed in the routing table.[145]
This example checks for a specific route to network 128.8.0.0:
% netstat -nr | grep '^128\.8\.'
128.8.0.0     26.20.0.16     UG     0    37    dnet0
This same test, run on a system that did not have this route in
its routing table, would return no response at all. For example, a user
reports that the “network is down” because he cannot ftp to
helios.metalab.unc.edu, and a ping test returns the following
results:
% ping -s helios.metalab.unc.edu 56 2
PING helios.metalab.unc.edu: 56 data bytes
sendto: Network is unreachable
ping: wrote helios.metalab.unc.edu 64 chars, ret=-1
sendto: Network is unreachable
ping: wrote helios.metalab.unc.edu 64 chars, ret=-1

----helios.metalab.unc.edu PING Statistics----
2 packets transmitted, 0 packets received, 100% packet loss
Based on the “network unreachable” error message, check the user’s routing table. In our example, we’re looking for a route to helios.metalab.unc.edu. The IP address[146] of helios.metalab.unc.edu is 152.2.210.81. So we check for any route to a destination that begins with 152.2:
% netstat -nr | grep '^152\.2\.'
%
This test shows that there is no specific
route to a destination that begins with 152.2. If a route was found,
grep would display it. Since there’s
no specific route to the destination, remember to look for a default
route. This example shows a successful check for a default route on a
Solaris system:[147]
% netstat -nr | grep def
default       172.16.12.1     UG    0   101277   dnet0
If netstat shows the correct
specific route or a valid default route, the problem is not in the
routing table. In that case, use traceroute, as described in the next section,
to trace the route all the way to its destination.
If the routing table doesn’t contain the expected route, it’s a
local routing problem. There are two ways to approach local routing
problems, depending on whether the system uses static or dynamic
routing. If you’re using static routing, install the missing route using
the route add command. Remember, most systems that use
static routing rely on a default route, so the missing route could be
the default route. Make sure that the startup files add the needed route
to the table whenever the system reboots. See Chapter 7 for details about the route add command.
If you’re using dynamic routing, make sure that the routing
program is running. For example, the command below makes sure that
gated is running:
% ps 'cat /etc/gated.pid'
  PID TT STAT  TIME COMMAND
27711 ?  S   304:59 gated -tep /etc/log/gated.log
If the correct routing daemon is not running, restart it and specify tracing. Tracing allows you to check for problems that might be causing the daemon to terminate abnormally.
If the local routing table is correct, the problem may be occurring some
distance away from the local host. Remote routing problems can cause
the “no answer” error message, as well as the “network unreachable”
error message. But the “network unreachable” message does not always
signify a routing problem. It can mean that the remote network cannot
be reached because something is down between the local host and the
remote destination. traceroute is
the program that can help you locate these problems.
traceroute traces the route
of UDP packets from the local host to a remote host. It prints the
name (if it can be determined) and IP address of each gateway along
the route to the remote host.
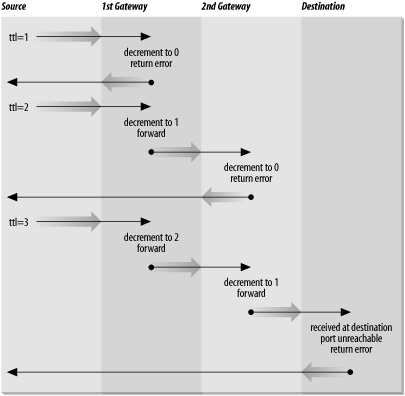
traceroute uses two
techniques, small TTL (time-to-live) values and an invalid port
number, to trace packets to their destination. traceroute sends out UDP packets with small
TTL values to detect the intermediate gateways. The TTL values start
at 1 and increase in increments of 1 for each group of three UDP
packets sent. When a gateway receives a packet, it decrements the TTL.
If the TTL is then 0, the packet is not forwarded and an ICMP “Time
Exceeded” message is returned to the source of the packet. traceroute displays one line of output for
each gateway from which it receives a “Time Exceeded” message. Figure 13-2 presents a sample of
the single line of output that is displayed for a gateway, and shows
the meaning of each field in the line.

When the destination host receives a packet from traceroute, it returns an ICMP “Unreachable Port” message. This happens because traceroute intentionally uses an invalid
port number (33434) to force this error. When traceroute receives the “Unreachable Port”
message, it knows that it has reached the destination host, and it
terminates the trace. So, traceroute is able to develop a list of the
gateways, starting at one hop away and increasing one hop at a time
until the remote host is reached. Figure 13-3 illustrates the flow of
packets tracing to a host three hops away. The following shows a
traceroute to
www.internic.net from a Solaris system hanging
off the Comcast network. traceroute
sends out three packets at each TTL value. If no response is received
to a packet, traceroute prints an
asterisk (*). If a response is
received, traceroute displays the
name and address of the gateway that responded and the packet’s round
trip time in milliseconds.
$ traceroute www.internic.net
traceroute to www.internic.net (207.151.159.3), 30 hops max, 40 byte packets
 1 ani (192.168.0.1)  1.712 ms  1.40 ms  1.34 ms
 2 10.81.130.1 (10.81.130.1)  52.01 ms  34.38 ms  118.97 ms
 3 bb1-fe1-0.mtgmry1.md.home.net (24.11.248.1) 13.30 ms 100.92 ms 31.99 ms
 4 c2-se9-0-10.washdc1.home.net (24.7.73.25) 118.63 ms 94.92 ms 121.10 ms
 5 24.7.71.6 (24.7.71.6) 127.63 ms  26.29 ms  132.07 ms
 6 p4-6-1-0.r00.plalca01.us.bb.verio.net (129.250.2.245) 186.02 ms 164.81 ms 156.44 ms
 7 p16-0-0-0.r06.plalca01.us.bb.verio.net (129.250.2.161) 86.59 ms 130.28 ms 121.09 ms
 8 p16-0-0-0.r04.snjsca03.us.bb.verio.net (129.250.3.162) 84.594 ms 117.42 ms 174.59 ms
 9 p16-3-0-0.r01.snjsca03.us.bb.verio.net (129.250.2.63) 123.87 ms 91.39 ms 119.79 ms
10 p4-2-0-0.r00.lsanca01.us.bb.verio.net (129.250.2.26) 142.38 ms 166.11 ms 95.32 ms
11 ge-0-0-0.a02.lsanca02.us.ra.verio.net (129.250.29.116) 137.59 ms 98.28 ms 256.11 ms
12 uscisi-pl.customer.ni.net (209.189.66.66) 98.64 ms 125.03 ms 231.11 ms
13 207.151.151.2 (207.151.151.2) 192.06 ms 164.52 ms 103.30 ms
14 icann-IWC.interworld.net (206.124.230.170) 113.33 ms 145.72 ms 107.39 ms
15 * host159-3.icann.org (207.151.159.3) 99.67 ms 178.72 ms
This trace shows that 15 intermediate gateways are involved, that packets are making the trip, and that round trip travel time for packets from this host to www.internic.net is about 140 ms.
Variations and bugs in the implementation of ICMP on different
types of gateways, as well as the unpredictable nature of the path a
datagram can take through a network, can cause some odd displays. For
this reason, you shouldn’t examine the output of traceroute too closely. The most important
things in the traceroute output
are:
Did the packet get to its remote destination?
If not, where did it stop?
In the code below we show another trace of the path to www.internic.net. This time the trace does not go all the way through to the InterNIC.
$ traceroute www.internic.net
traceroute to www.internic.net (207.151.159.3), 30 hops max, 40 byte packets
 1 ani (192.168.0.1)  1.712 ms  1.40 ms  1.34 ms
 2 10.81.130.1 (10.81.130.1)  52.01 ms  34.38 ms  118.97 ms
 3 bb1-fe1-0.mtgmry1.md.home.net (24.11.248.1) 13.30 ms 100.92 ms 31.99 ms
 4 c2-se9-0-10.washdc1.home.net (24.7.73.25) 118.63 ms 94.92 ms 121.10 ms
 5 24.7.71.6 (24.7.71.6) 127.63 ms  26.29 ms  132.07 ms
 6 p4-6-1-0.r00.plalca01.us.bb.verio.net (129.250.2.245) 186.02 ms 164.81 ms 156.44 ms
 7 p16-0-0-0.r06.plalca01.us.bb.verio.net (129.250.2.161) 86.59 ms 130.28 ms 121.09 ms
 8 p16-0-0-0.r04.snjsca03.us.bb.verio.net (129.250.3.162) 84.594 ms 117.42 ms 174.59 ms
 9  * * *
10  * * *
    .
    .
    .
29  * * *
30  * * *
When traceroute fails to get
packets through to the remote end system, the trace trails off,
displaying a series of three asterisks at each hop count until the
count reaches 30. If this happens, contact the administrator of the
remote host you’re trying to reach, and the administrator of the last
gateway displayed in the trace. Describe the problem to them; they may
be able to help. In our example, the last gateway that responded to
our packets was
p16-0-0-0.r04.snjsca03.us.bb.verio.net. We would
therefore contact this system administrator and the administrator of
www.internic.net.
To contact a remote administrator, you must know who to contact. whois helps you locate important people. One
of the most important pieces of information in a network is who is in
charge at the other end. When troubleshooting a network problem,
whois is a tool that helps you find
this out.
whois obtains the requested
information from the Internet white pages. The white pages is a
database of information about responsible people that is maintained by
the Internet registrars. When you request an official network number
or domain name, you are asked to provide contact information, which
becomes your personal record in the white pages database. Because of
this, everyone who is responsible for an official network or domain is
supposed to have an entry in the white pages, and that entry can be
retrieved by anyone who needs to contact them.
Many Unix systems provide a whois command to query the white pages. The
general form of this command is:
% whois [-hserver]name
The name field is the information to be searched for in the white pages database. The server field is the name of a system containing the white pages.
In the following example, we search for contact information for
the verio.net domain, which is the domain where
the remote router from the traceroute example is located.
$ whois verio.net
[whois.crsnic.net]

Whois Server Version 1.3

Domain names in the .com, .net, and .org domains can now be registered
with many different competing registrars. Go to http://www.internic.net
for detailed information.

   Domain Name: VERIO.NET
   Registrar: MELBOURNE IT, LTD. D/B/A INTERNET NAMES WORLDWIDE
   Whois Server: whois.inww.com
   Referral URL: http://www.inww.com
   Name Server: NS0.VERIO.NET
   Name Server: NS1.VERIO.NET
   Name Server: NS2.VERIO.NET
   Updated Date: 13-jun-2001


>>> Last update of whois database: Tue, 17 Jul 2001 02:04:28 EDT <<<

The Registry database contains ONLY .COM, .NET, .ORG, .EDU domains and
Registrars.


[whois.inww.com]

Domain Name.......... verio.net
  Creation Date........ 1996-12-07
  Registration Date.... 2000-05-10
  Expiry Date.......... 2001-12-06
  Organisation Name.... Verio, Inc.
  Organisation Address. 8005 South Chester Street
  Organisation Address. Suite 200
  Organisation Address. Englewood
  Organisation Address. CO
  Organisation Address. 80112
  Organisation Address. UNITED STATES

Admin Name........... Hostmaster Verio
  Admin Address........ 8005 South Chester Street
  Admin Address........ Suite 200
  Admin Address........ Englewood
  Admin Address........ 80112
  Admin Address........ CO
  Admin Address........ UNITED STATES
  Admin Email.......... DomainAdmin@verio.net
  Admin Phone.......... 214 290 8620
  Admin Fax............ .

Tech Name............ Hostmaster Verio
  Tech Address......... 8005 South Chester Street
  Tech Address......... Suite 200
  Tech Address......... Englewood
  Tech Address......... CO
  Tech Address......... 80112
  Tech Address......... UNITED STATES
  Tech Email........... hostmaster@verio.net
  Tech Phone........... 214 290 8620
  Tech Fax............. .
  Name Server.......... NS0.VERIO.NET
  Name Server.......... NS1.VERIO.NET
  Name Server.......... NS2.VERIO.NET
The query displays the name, address, and telephone number of
the contacts for the domain, as well as a list of hosts providing
authoritative name service for the domain. This example shows how it
is supposed to work, and for substantial, well-run networks such as
verio.net, it usually does. Unfortunately, many
whois queries return no useful
information because the white pages database is poorly maintained. If
whois provides no information, try
checking DNS name service. The DNS SOA record should contain a mailing
address for a domain contact who may be able to point you to the right
system administrator.
Name server problems are indicated when the “unknown host” error
message is returned by the user’s application. Name server problems can
usually be diagnosed with nslookup or
dig. nslookup is discussed in detail in Chapter 8; dig is an alternative tool with similar
functionality and is discussed in this chapter. Before looking at
dig, let’s take another look at
nslookup and see how it is used to troubleshoot name
service.
The three features of nslookup
covered in Chapter 8 are particularly
important for troubleshooting remote name server problems. These
features are its ability to:
Locate the authoritative servers for the remote domain using the NS query
Obtain all records about the remote host using the ANY query
Browse all entries in the remote zone using
nslookup’slsandviewcommands
When troubleshooting a remote server problem, directly query the authoritative servers returned by the NS query. Don’t rely on information returned by non-authoritative servers. If the problems that have been reported are intermittent, query all of the authoritative servers in turn and compare their answers. Intermittent name server problems are sometimes caused by the remote servers returning different answers to the same query.
The ANY query returns all records about a host, thus giving the
broadest range of troubleshooting information. Simply knowing what
information is (and isn’t) available can solve a lot of problems. For
example, if the query returns an MX record but no A record, it is easy
to understand why the user couldn’t telnet to that host! Many hosts are accessible
to mail that are not accessible by other network services. In this case,
the user is confused and is trying to use the remote host in an
inappropriate manner.
If you are unable to locate any information about the hostname
that the user gave you, perhaps the hostname is incorrect. Given that
the hostname you have is wrong, looking for the correct name is like
trying to find a needle in a haystack. However, nslookup can help. Use nslookup’s ls command to dump the remote zone file, and
redirect the listing to a file. Then use nslookup’s view command to browse through the file,
looking for names similar to the one the user supplied. Many problems
are caused by a mistaken hostname.
All of the nslookup features
and commands mentioned here are used in Chapter 8. However, some examples using
these commands to solve real name server problems will be helpful. The
three examples that follow are based on actual trouble reports.[148]
A user reported that she could resolve a certain hostname from her
workstation, but could not resolve the same hostname from the central
system. However, the central system could resolve other hostnames. We
ran several tests and found that we could resolve the hostname on some
systems and not on others. There seemed to be no predictable pattern
to the failure. So we used nslookup
to check the remote servers:
% nslookup
Default Server:  crab.wrotethebook.com
Address:  172.16.12.1

> set type=NS
> foo.edu.
Server:  crab.wrotethebook.com
Address:  172.16.12.1

foo.edu        nameserver = gerbil.foo.edu
foo.edu        nameserver = red.big.com
foo.edu        nameserver = shrew.foo.edu
gerbil.foo.edu   inet address = 198.97.99.2
red.big.com   inet address = 184.6.16.2
shrew.foo.edu    inet address = 198.97.99.1
> set type=ANY
> server gerbil.foo.edu
Default Server:  gerbil.foo.edu
Address:  198.97.99.2

> hamster.foo.edu
Server:  gerbil.foo.edu
Address:  198.97.99.2

hamster.foo.edu        inet address = 198.97.99.8
> server red.big.com
Default Server:  red.big.com
Address:  184.6.16.2
> hamster.foo.edu
Server:  red.big.com
Address:  184.6.16.2
 *** red.big.com can't find hamster.foo.edu: Non-existent domain
This sample nslookup session
contains several steps. The first step is to locate the authoritative
servers for the hostname in question
(hamster.foo.edu). We set the query type to NS to
get the name server records, and query for the domain
(foo.edu) in which the hostname is found. This
returns three names of authoritative servers:
gerbil.foo.edu, red.big.com,
and shrew.foo.edu.
Next, we set the query type to ANY to look for any records related to the hostname in question. Then we set the server to the first server in the list, gerbil.foo.edu, and query for hamster.foo.edu. This returns an address record. So server gerbil.foo.edu works fine. We repeat the test using red.big.com as the server, and it fails. No records are returned.
The next step is to get SOA records from each server and see if they are the same:
> set type=SOA
> foo.edu.
Server:  red.big.com
Address:  184.6.16.2

foo.edu        origin = gerbil.foo.edu
   mail addr = amanda.gerbil.foo.edu
   serial=10164, refresh=43200, retry=3600, expire=3600000,
   min=2592000
> server gerbil.foo.edu
Default Server:  gerbil.foo.edu
Address:  198.97.99.2

> foo.edu.
Server:  gerbil.foo.edu
Address:  198.97.99.2

foo.edu        origin = gerbil.foo.edu
   mail addr = amanda.gerbil.foo.edu
   serial=10164, refresh=43200, retry=3600, expire=3600000,
   min=2592000
 > exit
If the SOA records have different serial numbers, perhaps the zone file, and therefore the hostname, has not yet been downloaded to the slave server. If the serial numbers are the same and the data is different, as in this case, there is a definite problem. Contact the remote domain administrator and notify her of the problem. The administrator’s mailing address is shown in the “mail addr” field of the SOA record. In our example, we would send mail to amanda@gerbil.foo.edu reporting the problem.
This problem was reported by the administrator of one of our slave name servers. The administrator reported that his server could not resolve a certain hostname in a domain for which his server was a slave server. The master server was, however, able to resolve the name. The administrator dumped his cache (more on dumping the server cache in the next section), and he could see in the dump that his server had the correct entry for the host. But his server still would not resolve that hostname to an IP address!
The problem was replicated on several other slave servers. The master server would resolve the name; the slave servers wouldn’t. All servers had the same SOA serial number, and a dump of the cache on each server showed that they all had the correct address records for the hostname in question. So why wouldn’t they resolve the hostname to an address?
Visualizing the difference between the way master and slave servers load their data made us suspicious of the zone file transfer. Master servers load the data directly from local disk files. Slave servers transfer the data from the master server via a zone file transfer. Perhaps the zone files were getting corrupted. We displayed the zone file on one of the slave servers, and it showed the following data:
% cat /usr/etc/events.wrotethebook.com.hosts
PCpma      IN   A       172.16.64.159
           IN   HINFO   "pc" "n3/800eventsnutscom"
PCrkc      IN   A       172.16.64.155
           IN   HINFO   "pc" "n3/800eventsnutscom"
PCafc      IN   A       172.16.64.189
           IN   HINFO   "pc" "n3/800eventsnutscom"
accu       IN   A       172.16.65.27
cmgds1     IN   A       172.16.130.40
cmg        IN   A       172.16.130.30
PCgns      IN   A       172.16.64.167
           IN   HINFO   "pc" "(3/800eventsnutscom"
gw         IN   A       172.16.65.254
zephyr     IN   A       172.16.64.188
           IN   HINFO   "Sun" "sparcstation"
ejw        IN   A       172.16.65.17
PCecp      IN   A       172.16.64.193
           IN   HINFO   "pc" "n Lsparcstationstcom"
Notice the odd display in the last field of the HINFO statement for each PC.[149]
This data might have been corrupted in the transfer or it might
be bad on the master server. We used nslookup to check that:
               % nslookup
Default Server:  crab.wrotethebook.com
Address:  172.16.12.1

> server 24seven.events.wrotethebook.com
Default Server:  24seven.events.wrotethebook.com
Address:  172.16.6.1

> set query=HINFO
> PCwlg.events.wrotethebook.com
Server:  24seven.events.wrotethebook.com
Address:  172.16.6.1

PCwlg.events.wrotethebook.com     CPU=pc  OS=ov
packet size error (0xf7fff590 != 0xf7fff528)
> exit
In this nslookup example, we
set the server to
24seven.events.wrotethebook.com, which is the
master server for events.wrotethebook.com. Next
we queried for the HINFO record for one of the hosts that appeared to
have a corrupted record. The “packet size error” message clearly
indicates that nslookup was even
having trouble retrieving the HINFO record directly from the master
server. We contacted the administrator of the master server and told
him about the problem, pointing out the records that appeared to be in
error. He discovered that he had forgotten to put an operating system
entry on some of the HINFO records. He corrected this, and it fixed
the problem.
The previous problem was caused by the name server cache being corrupted by bad data. Cache corruption can occur even if your system is not a slave server. All servers cache answers. If those answers are corrupted, entries in the cache may become corrupted. Dumping the cache can help diagnose these types of problems.
For example, a user reported intermittent name server failures.
She had no trouble with any hostnames within the local domain or with
some names outside the local domain, but names in several different
remote domains would not resolve. nslookup tests produced no solid clues, so
the name server cache was dumped and examined for problems. The root
server entries were corrupted, so named was reloaded to clear the cache and
reread the named.ca file. Here’s how it was
done.
The ndc dumpdb command or the SIGINT signal causes named to dump the name server cache to the
file /var/tmp/named_dump.db. The following
example uses the signal:
# kill -INT 'cat /etc/named.pid'The process ID of named can
be obtained from /etc/named.pid, as in the
example above, because named writes
its process ID in that file during startup.[150]
Once named writes its cache
to the file, we can examine the file to see if the names and addresses
servers are correct. The named_dump.db file is
composed of three sections: the zone table section, the Cache &
Data section, and the Hints section.
The first section of the dump file is the zone table, which shows the zones loaded when the server started. The zone table from the master server for zones wrotethebook.com and 16.172.in-addr.arpa would show the following:
; Dumped at Tue Jul 17 16:08:18 2001
;; ++zone table++
; . (type 6, class 0, source Nil)
;       time=0, lastupdate=0, serial=0,
;       refresh=0, retry=0, expire=0, minimum=0
;       ftime=0, xaddrcnt=0, state=0000, pid=0
; . (type 3, class 1, source named.ca)
;       time=0, lastupdate=965723221, serial=0,
;       refresh=0, retry=0, expire=0, minimum=4294967295
;       ftime=965723221, xaddrcnt=0, state=0040, pid=0
; 0.0.127.in-addr.arpa (type 1, class 1, source named.local)
;       time=0, lastupdate=0, serial=1997022700,
;       refresh=0, retry=14400, expire=3600000, minimum=86400
;       ftime=965723221, xaddrcnt=0, state=0041, pid=0
; wrotethebook.com (type 1, class 1, source wrotethebook.com.hosts)
;       time=0, lastupdate=0, serial=2001070501,
;       refresh=0, retry=1800, expire=604800, minimum=900
;       ftime=982967703, xaddrcnt=0, state=0041, pid=0
; 16.172.in-addr.arpa (type 1, class 1, source 172.16.rev)
;       time=0, lastupdate=0, serial=2001071602,
;       refresh=0, retry=1800, expire=604800, minimum=900
;       ftime=982968091, xaddrcnt=0, state=0041, pid=0
;; --zone table--
The section begins by displaying the date and time that the
dump was taken. Labels at the start and end of the section delimit
the zone table. As indicated by the fact that each line begins with
a semicolon, all of these lines are comments meant to provide
information to the system administrator. None of these are real
database entries used by DNS. From the example above, you can tell
that this server has a zone
statement in its named.conf file for the
following domains:
- . (dot)
The root domain that was loaded from a source file called named.ca. This is the hints file described in Chapter 8.
- 0.0.127.in-addr.arpa
The loopback domain that was loaded from the source file named.local.
- wrotethebook.com
The wrotethebook.com domain that was loaded from the wrotethebook.com.hosts source file.
- 16.172.in-addr.arpa
The reverse domain 16.172.in-addr.arpa that was loaded from the 172.16.rev source file.
The values from the SOA record of each zone are also printed. In the sample shown above, every zone except the root (.) has an SOA record.
The zone table section identifies every zone for which the
server has authority. It tells you where the server obtained the
information about the zone, and it tells you what defaults are set
for the zone by the SOA record. If a zone is missing or is loading
from the wrong source, correct the zone statement in the
named.conf file.
The second section of the dump file is by far the longest. This is the section that contains all of the DNS information known to the server. Because of the section’s length, the Cache & Data information shown below is just an excerpt:
; Note: Cr=(auth,answer,addtnl,cache) tag only shown for non-auth RR's
; Note: NT=milliseconds for any A RR which we've used as a nameserver
; --- Cache & Data ---
$ORIGIN .
.    513482    IN    NS    H.ROOT-SERVERS.NET.    ;Cr=auth
    513482    IN    NS    C.ROOT-SERVERS.NET.    ;Cr=auth
    513482    IN    NS    G.ROOT-SERVERS.NET.    ;Cr=auth
    513482    IN    NS    F.ROOT-SERVERS.NET.    ;Cr=auth
    513482    IN    NS    B.ROOT-SERVERS.NET.    ;Cr=auth
    513482    IN    NS    J.ROOT-SERVERS.NET.    ;Cr=auth
    513482    IN    NS    K.ROOT-SERVERS.NET.    ;Cr=auth
    513482    IN    NS    L.ROOT-SERVERS.NET.    ;Cr=auth
    513482    IN    NS    M.ROOT-SERVERS.NET.    ;Cr=auth
    513482    IN    NS    I.ROOT-SERVERS.NET.    ;Cr=auth
    513482    IN    NS    E.ROOT-SERVERS.NET.    ;Cr=auth
    513482    IN    NS    D.ROOT-SERVERS.NET.    ;Cr=auth
    513482    IN    NS    A.ROOT-SERVERS.NET.    ;Cr=auth
... Many Lines Deleted ...

$ORIGIN ROOT-SERVERS.NET.
K    599882    IN    A    193.0.14.129    ;NT=9 Cr=answer
A    599882    IN    A    198.41.0.4    ;NT=10 Cr=answer
L    599882    IN    A    198.32.64.12    ;NT=5 Cr=answer
M    599882    IN    A    202.12.27.33    ;NT=15 Cr=answer
B    599882    IN    A    128.9.0.107    ;NT=5 Cr=answer
C    599882    IN    A    192.33.4.12    ;NT=165 Cr=answer
D    599882    IN    A    128.8.10.90    ;NT=12 Cr=answer
E    599882    IN    A    192.203.230.10    ;NT=6 Cr=answer
F    599882    IN    A    192.5.5.241    ;NT=1021 Cr=answer
G    599882    IN    A    192.112.36.4 ;NT=1023 Cr=answer
H    599882    IN    A    128.63.2.53    ;NT=6 Cr=answer
I    599882    IN    A    192.36.148.17    ;NT=7 Cr=answer
J    599882    IN    A    198.41.0.10    ;NT=6 Cr=answer
... Many Lines Deleted ...

$ORIGIN com.
foobirds 86400 IN RP admin.foobirds.org. hotline.foobirds.org. ;Cl=2
    86400    IN    MX    10 wren.foobirds.org.    ;Cl=2
    86400    IN    MX    20 parrot.foobirds.org.    ;Cl=2
    86400    IN    NS    wren.foobirds.org.    ;Cl=2
    86400    IN    NS    parrot.foobirds.org.    ;Cl=2
    86400    IN    SOA    wren.foobirds.org. admin.wren.foobirds.org. (
             2000020501 21600 1800 604800 900 )    ;Cl=2
$ORIGIN foobirds.org.
ducks    86400    IN    NS    ruddy.ducks.foobirds.org.    ;Cl=2
         86400    IN    NS    wren.foobirds.org.    ;Cl=2
         86400    IN    NS    bear.mammals.org.    ;Cl=2
news     86400    IN    CNAME    parrot.foobirds.org.    ;Cl=2
robin    86400    IN    RP    admin.foobirds.org. hotline.foobirds.org.    ;Cl=2
         86400    IN    MX    5 wren.foobirds.org.    ;Cl=2
         86400    IN    A    172.16.5.2    ;Cl=2
puffin   86400    IN    RP    admin.foobirds.org. hotline.foobirds.org.    ;Cl=2
         86400    IN    MX    5 wren.foobirds.org.    ;Cl=2
         86400    IN    A    172.16.5.17    ;Cl=2
wren     86400    IN    RP    admin.foobirds.org. hotline.foobirds.org.    ;Cl=2
         86400    IN    A    172.16.5.1    ;Cl=2
parrot   86400    IN    RP    logan.parrot.foobirds.org. logan.foobirds.org.    ;Cl=2
         86400    IN    A    172.16.5.3    ;Cl=2
logan    86400    IN    TXT    "Logan Little (301)555-2021"    ;Cl=2
crow     86400    IN    RP    doris.crow.foobirds.org.foobirds.org. crowRP.foobirds.org.    ;Cl=2
         86400    IN    A    172.16.5.5    ;Cl=2
localhost   86400    IN    A    127.0.0.1    ;Cl=2
terns    86400    IN    NS    sooty.terns.foobirds.org.    ;Cl=2
         86400    IN    NS    arctic.terns.foobirds.org.    ;Cl=2
www      86400    IN    CNAME    wren.foobirds.org.    ;Cl=2
hotline  86400    IN    TXT    "Support hotline (301)555-2000"    ;Cl=2
bob      86400    IN    CNAME    robin.foobirds.org.    ;Cl=2
redbreast    86400    IN    CNAME    robin.foobirds.org.    ;Cl=2
hawkRP   86400    IN    TXT    "Clark Smart (301)555-2099"    ;Cl=2
kestrel   86400    IN    RP    clark.foobirds.org.foobirds.org. hawkRP.foobirds.org.    ;Cl=2
         86400    IN    A    172.16.5.20    ;Cl=2
crowRP   86400    IN    TXT    "Doris Nathan (301)555-2078"    ;Cl=2
kestral  86400    IN    CNAME    kestrel.foobirds.org.    ;Cl=2
hawk     86400    IN    RP    clark.foobirds.org.foobirds.org. hawkRP.foobirds.org.    ;Cl=2
         86400    IN    A    172.16.5.4    ;Cl=2
foobirds-net    86400    IN    PTR    0.0.16.172.in-addr.arpa.    ;Cl=2
$ORIGIN terns.foobirds.org.
arctic   86400    IN    A    172.16.30.251    ;Cl=2
sooty    86400    IN    A    172.16.30.250    ;Cl=2
$ORIGIN 172.in-addr.arpa.
16       86400    IN    NS    wren.foobirds.org.    ;Cl=4
         86400    IN    SOA    wren.foobirds.org. admin.wren.foobirds.org. (
        2000021602 21600 1800 604800 900 )    ;Cl=4
$ORIGIN 6.16.172.in-addr.arpa.
1    86400    IN    PTR    arctic.terns.foobirds.org.    ;Cl=4
$ORIGIN 12.16.172.in-addr.arpa.
3    86400    IN    PTR    wren.foobirds.org.    ;Cl=4
$ORIGIN 5.16.172.in-addr.arpa.
20   86400    IN    PTR    kestrel.foobirds.org.    ;Cl=4
4    86400    IN    PTR    hawk.foobirds.org.    ;Cl=4
2    86400    IN    PTR    robin.foobirds.org.    ;Cl=4
17   86400    IN    PTR    puffin.foobirds.org.    ;Cl=4
5    86400    IN    PTR    crow.foobirds.org.    ;Cl=4
3    86400    IN    PTR    parrot.foobirds.org.    ;Cl=4
$ORIGIN 0.127.in-addr.arpa.
0    86400    IN    NS    localhost.    ;Cl=5
     86400    IN    SOA    localhost. root.localhost. (
        1997022700 28800 14400 3600000 86400 )    ;Cl=5
$ORIGIN 0.0.127.in-addr.arpa.
1    86400    IN    PTR    localhost.    ;Cl=5
The example is long even though the dump was taken shortly after the server started, and many lines have been deleted from the listing. The bulk of the data shown is information loaded from the local zone files, but a dump file also contains a good deal of cached information. Large chunks of the cache are the result of information provided in the authority and additional sections of the query responses. At least as much data enters the cache in this manner as enters as a result of specific answers to queries. The large number of NS entries and the A records for those NS entries make this clear.
The Cache & Data section is segmented by $ORIGIN directives. All of the other lines in this section are clearly identifiable DNS resource records. But some additional information is appended to the end of each record as a comment. Three comments that the server commonly adds to a record include the following:
ClIdentifies the number of fields in the current origin. Therefore, when the origin is 0.0.127.in-addr.arpa, the Cl value is 5, and when the origin is wrotethebook.com, the Cl value is 2. The root (.) is assigned a Cl value of 0.
NtThe round trip time for queries to the specified name server. This comment is added only to the address records of name servers. The round trip time helps
namedselect the best server for a given query.CrThe “credibility” tag identifies the authority level of the source of cached information. BIND has three authority levels:
authAn authoritative answer.
answerAn answer from a non-authoritative source.
addtnlA record learned from the authority or additional section of a query response.
The Cr value is used by named when a record is received that
already exists in the name server’s cache. If the record received
has a higher credibility rating than the record in the cache, the
new record replaces the cached record. If the new record has a lower
credibility rating than the record in the cache, the cached record
is retained. Of the Cr values, auth is the most credible and addtnl is the least credible.
The comments at the end of a record are not the only comments that you might see in the Cache & Data section of a dump file. Negative cached information also appears in the dump as a comment. There are no examples of this in our sample dump file, but if there were, you would see a normal resource record that starts with a semicolon. In other words, the negative cached information appears as a resource record that has been commented out of the file. Additionally, the tag NXDOMAIN is written near the end of the record.
Examine the Cache & Data section to discover if the data you entered in your zone file has been loaded as you expect. Also use this section to see if the information you have loaded from a remote server is what you expect. Local data can be corrected locally. Incorrect data from a remote server may require coordination with the administrator of a remote domain.
The last section in the dump file is the Hints section. This section contains the list of root name servers loaded from the hints file. (Defining and using the hints file is discussed in Chapter 8.) This hints file is used only when the name server starts. Once the server starts, one of the root servers is queried for an authoritative list of root servers. It is the authoritative list obtained from the root server that you see in the Cache & Data section following the $ORIGIN . statement.
The Hints section from our sample system is shown below.
Notice that all of the name servers in the Hints section have an Nt
number assigned. named queries
each server to establish a round trip time to select the best root
server to use.
; --- Hints ---
$ORIGIN .
.   3600000    IN    NS    A.ROOT-SERVERS.NET.    ;Cl=0
    3600000    IN    NS    B.ROOT-SERVERS.NET.    ;Cl=0
    3600000    IN    NS    C.ROOT-SERVERS.NET.    ;Cl=0
    3600000    IN    NS    D.ROOT-SERVERS.NET.    ;Cl=0
    3600000    IN    NS    E.ROOT-SERVERS.NET.    ;Cl=0
    3600000    IN    NS    F.ROOT-SERVERS.NET.    ;Cl=0
    3600000    IN    NS    G.ROOT-SERVERS.NET.    ;Cl=0
    3600000    IN    NS    H.ROOT-SERVERS.NET.    ;Cl=0
    3600000    IN    NS    I.ROOT-SERVERS.NET.    ;Cl=0
    3600000    IN    NS    J.ROOT-SERVERS.NET.    ;Cl=0
    3600000    IN    NS    K.ROOT-SERVERS.NET.    ;Cl=0
    3600000    IN    NS    L.ROOT-SERVERS.NET.    ;Cl=0
    3600000    IN    NS    M.ROOT-SERVERS.NET.    ;Cl=0
$ORIGIN ROOT-SERVERS.NET.
K    3600000    IN    A    193.0.14.129    ;NT=2 Cl=0
L    3600000    IN    A    198.32.64.12    ;NT=5 Cl=0
A    3600000    IN    A    198.41.0.4      ;NT=6 Cl=0
M    3600000    IN    A    202.12.27.33    ;NT=10 Cl=0
B    3600000    IN    A    128.9.0.107     ;NT=134 Cl=0
C    3600000    IN    A    192.33.4.12     ;NT=8 Cl=0
D    3600000    IN    A    128.8.10.90     ;NT=24 Cl=0
E    3600000    IN    A    192.203.230.10  ;NT=2 Cl=0
F    3600000    IN    A    192.5.5.241     ;NT=22 Cl=0
G    3600000    IN    A    192.112.36.4    ;NT=2 Cl=0
H    3600000    IN    A    128.63.2.53     ;NT=22 Cl=0
I    3600000    IN    A    192.36.148.17   ;NT=2 Cl=0
J    3600000    IN    A    198.41.0.10     ;Cl=0
The purpose of dumping the DNS cache is to examine what data is stored internally by DNS and how it is stored. Examining the authoritative information that you provide to the server in the zone files will give you insight into how that data is being stored. Examining the other data in the cache shows you how your users use DNS. Learning how DNS is normally used can help identify when usage patterns change.
If you see problems in the dump file, force named to reload its cache with the
ndc reload command (on BIND 9,
use rndc reload), or with the SIGHUP signal as
shown below:
# kill -HUP 'cat /etc/named.pid'This clears the cache and reloads the valid root server entries from your named.ca file.
If you know which system is corrupting your cache, instruct
your system to ignore updates from the culprit by using a server statement in the
/etc/named.conf file with the bogus option set to yes. The server statement lists the IP address of a
name server. Setting bogus to
yes in the server statement tells named that information from that server
cannot be trusted. For example, the previous section described a
problem where 24seven.events.wrotethebook.com
(172.16.16.1) was causing cache corruption with improperly formatted
HINFO records. The following entry in the
named.conf file would reject answers from
24seven.events.wrotethebook.com and thus
prevent the cache corruption:
 server 172.16.16.1 {
    bogus yes;
};
Setting bogus to yes is only a temporary measure, designed
to keep things running while the remote domain administrator has a
chance to diagnose and repair the problem. Once the remote system is
fixed, remove the server
statement
from
named.conf.
An alternative to nslookup for making name service queries is
dig. dig queries are usually entered as
single-line commands, while nslookup is usually run as an interactive
session. But the dig command
performs essentially the same function as nslookup. Which you use is mostly a matter
of personal choice. They both work well.
As an example, we’ll use dig
to ask the root server b.root-servers.net for the
NS records for the mit.edu domain. To do this,
enter the following command:
% dig @b.root-servers.net mit.edu nsIn this example, @b.root-servers.net is the server that is being queried. The server can be identified by name or IP address. If you’re troubleshooting a problem in a remote domain, specify an authoritative server for that domain. In this example we’re asking for the names of servers for a top-level domain (mit.edu), so we ask a root server.
If you don’t specify a server explicitly, dig uses the local name server or the name
server defined in the /etc/resolv.conf file.
(Chapter 8 describes
resolv.conf.) Optionally, you can set the
environment variable LOCALRES to the name of an alternate
resolv.conf file. This alternate file will then
be used in place of /etc/resolv.conf for dig queries. Setting the LOCALRES variable
will affect only dig. Other
programs that use name service will continue to use
/etc/resolv.conf.
The last item on our sample command line is
ns. This is the query type. A query type is a value that requests a specific type of
DNS information. It is similar to the value used in nslookup’s set type
command. Table 13-1 shows
the possible dig query types and
their meanings.
Table 13-1. dig query types
Query type | DNS record requested |
|---|---|
a | Address records |
any | Any type of record |
mx | Mail Exchange records |
ns | Name Server records |
soa | Start of Authority records |
hinfo | Host Info records |
axfr | All records in the zone |
txt | Text records |
Notice that the function of nslookup’s ls command is performed by the dig query type axfr.
dig also has an option that
is useful for locating a hostname when you have only an IP address. If
you have only the IP address of a host, you may want to find out the
hostname because numeric addresses are more prone to typos. Having the
hostname can reduce the user’s problems. The
in-addr.arpa domain converts addresses to
hostnames, and dig provides a
simple way to enter in-addr.arpa domain queries.
Using the -x option, you can query
for a number-to-name conversion without having to manually reverse the
numbers and add “in-addr.arpa.” For example, to query for the hostname
of IP address 18.72.0.3, simply enter:
% dig -x 18.72.0.3

; <<>> DiG 2.2 <<>> -x
;; res options: init recurs defnam dnsrch
;; got answer:
;; ->>HEADER<<- opcode: QUERY, status: NOERROR, id: 4
;; flags: qr aa rd ra; QUERY: 1, ANSWER: 1, AUTHORITY: 3, ADDITIONAL: 3
;; QUERY SECTION:
;;      3.0.72.18.in-addr.arpa, type = ANY, class = IN

;; ANSWER SECTION:
3.0.72.18.in-addr.arpa.  6H IN PTR  BITSY.MIT.EDU.

;; AUTHORITY SECTION:
18.in-addr.arpa.        6H IN NS        W20NS.MIT.EDU.
18.in-addr.arpa.        6H IN NS        BITSY.MIT.EDU.
18.in-addr.arpa.        6H IN NS        STRAWB.MIT.EDU.

;; ADDITIONAL SECTION:
W20NS.MIT.EDU.          6H IN A         18.70.0.160
BITSY.MIT.EDU.          6H IN A         18.72.0.3
STRAWB.MIT.EDU.         6H IN A         18.71.0.151

;; Total query time: 367 msec
;; FROM: wren.foobirds.org to SERVER: default -- 0.0.0.0
;; WHEN: Thu Jul 19 16:00:39 2001
;; MSG SIZE  sent: 40  rcvd: 170
The answer to our query is BITSY.MIT.EDU, but dig displays lots of other output. For the
purposes of this specific query, the only important information is the
answer.[151] However, the additional information displayed by
dig is useful for gaining an
insight into the format of a DNS response packet and for learning
where the various pieces of DNS information come from.
The format of the DNS message is defined in RFC 1035, Domain Names - Implementation and Specification. The RFC defines a standard message format composed of up to five parts:
- Header
Provides administrative information about the message, including information about what is contained in subsequent sections of the message.
- Question
Defines the question being asked by a query. When the question section is returned in a response, it is used to help determine which question the response is answering.
- Answer
The part of a response that contains the answer to the specific question sent in the query.
- Authority
Contains pointers to the authoritative servers for the domain being queried.
- Additional
Contains other resource records that provide additional, important information that supports the answer. This is not the answer to the query, but it helps in interpreting or utilizing the answer.
The core of the output of the dig command is found in the various sections
from the DNS response packet. The header data from the example above
is:
;; ->>HEADER<<- opcode: QUERY, status: NOERROR, id: 4
;; flags: qr aa rd ra; QUERY: 1, ANSWER: 1, AUTHORITY: 3, ADDITIONAL: 3
dig does not display the
header data in the order in which it occurs in the header section, but
it is easy to map the dig display to the header described in RFC 1035.
The various values displayed in the example and their meanings are
listed here:
opcode: QUERYIndicates that this is a standard query.
status: NOERRORIndicates that no error code was found in the RCODE field of the header, which means that the RCODE field contains a 0.
id: 6Indicates that the identifier used for this message was the number 6.
flags: qr aa rd raflagsgroups together all of the one-bit fields from the header. In this case it covers four different fields in the header section and gives us information about three others. This flag group means that QR is set to 1, indicating this is a response. AA is set to 1 because this answer came from an authoritative server. RD is set to 1 to indicate that recursion was requested by the query. RA is set to 1, indicating that recursion is available on the server. TC is not listed, meaning it is set to 0 and that the response was not truncated. AD and CD are also set to 0 because DNSSEC is not in use.QUERY: 1, ANSWER: 1, AUTHORITY: 3, ADDITIONAL: 3These represent the header fields QDCOUNT, ANCOUNT, NSCOUNT, and ARCOUNT, which indicate the number of resource records in the remaining sections of the response. This display says that there is one entry in the question section, one resource record in the answer section, three records in the authority section, and three records in the additional section.
The sample dig command
displays the following query data:
;; QUERY SECTION:
;;      3.0.72.18.in-addr.arpa, type = ANY, class = IN
The three fields of this query are clearly shown. The class
field is IN because this is a query for Internet records. The query is
asking for any record (type = any)
associated with 3.0.72.18.in-addr.arpa. Notice
how dig reversed the address and
created the proper reverse domain name for this query.
Next, the dig command
displays the answer, authority, and additional sections:
;; ANSWER SECTION:
3.0.72.18.in-addr.arpa.  6H IN PTR  BITSY.MIT.EDU.

;; AUTHORITY SECTION:
18.in-addr.arpa.        6H IN NS        W20NS.MIT.EDU.
18.in-addr.arpa.        6H IN NS        BITSY.MIT.EDU.
18.in-addr.arpa.        6H IN NS        STRAWB.MIT.EDU.

;; ADDITIONAL SECTION:
W20NS.MIT.EDU.          6H IN A         18.70.0.160
BITSY.MIT.EDU.          6H IN A         18.72.0.3
STRAWB.MIT.EDU.         6H IN A         18.71.0.151
The answer is just what you would expect: the PTR record for 3.0.72.18.in-addr.arpa. The record tells us that the hostname for the address 18.72.0.3 is bitsy.mit.edu.
The authority section lists the servers that are authoritative for the 18.in-addr.arpa domain. There are three NS records, each providing the name of an authoritative server. From this, we know that w20ns.mit.edu, bitsy.mit.edu, and strawb.mit.edu are authoritative for the reverse domain 18.in-addr.arpa.
The additional section completes the message by providing the address of each of the authoritative servers. The addresses are important because if the local server wants to send future queries directly to these authoritative servers, it needs to know the servers’ addresses. In this case, the addresses are 18.70.0.160, 18.72.0.3, and 18.71.0.151.
In addition to the DNS response, dig provides status information in the first
three lines and the last four lines of the display. The first line
echoes the dig command-line options
(-x in the example). The second
line displays the resolver library settings, and the third line states
whether or not an answer was found for the query. The last four lines
show the query response time, the name and address of the server that
answered the query, when the query was received, and the size of the
query and response packets. All of this can be helpful information
when debugging a DNS problem.
dig is useful because the
format of the DNS message is clearly shown in the dig output. dig is included with Linux, but it is not
found on all Unix systems. Don’t worry if you don’t have it on your
system. nslookup can be used to
attack the same problems as dig.
nslookup and dig both test DNS very effectively.
Problems caused by bad TCP/IP configurations are much more common than problems caused by bad TCP/IP protocol implementations. Most of the problems you encounter will succumb to analysis using the simple tools we have already discussed. But on occasion, you may need to analyze the protocol interaction between two systems. In the worst case, you may need to analyze the packets in the data stream bit by bit. Protocol analyzers help you do this.
snoop is the tool we’ll use. It
is provided with the Solaris operating system.[152] Although we use snoop
in all of our examples, the concepts introduced in this section should
be applicable to the analyzer that you use, since most protocol
analyzers function in basically the same way. Protocol analyzers allow
you to select, or filter, the packets you want to examine, and to
examine those packets byte by byte. We’ll discuss both of these
functions.
Protocol analyzers watch all the packets on the network.
Therefore, you only need one system that runs analyzer software on the
affected part of the network. One Solaris system with snoop can monitor the network traffic and tell
you what the other hosts are (or aren’t) doing. This, of course, assumes
a shared media network. If you use an Ethernet switch, only the traffic
on an individual segment can be seen. Some switches provide a monitor
port. For others you may need to take your monitor to the location of
the problem.
snoop reads all the packets on an Ethernet. It does this by placing the Ethernet
interface into promiscuous mode.[153] Normally, an Ethernet interface only passes packets that
are destined for the local host up to the higher layer protocols. In
promiscuous mode, all packets are accepted and passed to the higher
layer. This allows snoop to view
all packets and to select packets for analysis, based on a filter you
define. Filters can be defined to capture packets from, or to,
specific hosts, protocols, ports, or combinations of all these. As an
example, let’s look at a very simple snoop filter. The following snoop command displays all packets sent
between the hosts crab and
rodent :
               # snoop host crab and host rodent
Using device /dev/le (promiscuous mode)
rodent.wrotethebook.com -> crab.wrotethebook.com ICMP Echo request
crab.wrotethebook.com -> rodent.wrotethebook.com ICMP Echo reply
rodent.wrotethebook.com -> crab.wrotethebook.com RLOGIN C port=1023
crab.wrotethebook.com -> rodent.wrotethebook.com RLOGIN R port=1023
^C
The filter “host crab and host rodent” selects only those
packets that are from rodent to
crab, or from crab to
rodent. The filter is constructed from a set of
primitives, and associated hostnames, protocol names, and port
numbers. The primitives can be modified and combined with the
operators and, or, and not. The filter may be omitted; this causes
snoop to display all packets from
the network.
Table 13-2 shows the
primitives used to build snoop
filters. There are a few additional primitives and some variations
that perform the same functions, but these are the essential
primitives. See the snoop manpage
for additional details.
Table 13-2. Expression primitives
Primitive | Matches packets |
|---|---|
dst host | net | port destination | To destination host, net, or port |
src host | net | port source | From source host, net, or port |
host destination | To or from destination host |
net destination | To or from destination network |
port destination | To or from destination port |
ether address | To or from Ethernet address |
protocol | Of protocol type (icmp, udp, or tcp) |
Using these primitives with the operators and and or, complex filters can be constructed.
However, filters are usually simple. Capturing the traffic between two
hosts is probably the most common filter. You may further limit the
data captured to a specific protocol, but often you’re not sure which
protocol will reveal the problem. Just because the user sees the
problem in ftp or telnet does not mean that is where the
problem actually occurs. Analysis must often start by capturing all
packets, and can only be narrowed after test evidence points to
some specific problem.
The example
in the previous section
shows that snoop displays a
single line of summary information for each packet received. All
lines show the source and destination addresses, and the protocol
being used (ICMP and RLOGIN in the example). The lines that
summarize the ICMP packets identify the packet types (Echo request
and Echo reply in the example). The lines that summarize the
application protocol packets display the source port and the first
20 characters of the packet data.
This summary information is sufficient to gain insight into
how packets flow between two hosts and into potential problems.
However, troubleshooting protocol problems requires more detailed
information about each packet. snoop has options that give you control
over what information is displayed. To display the data contained in
a packet, use the -x option. It
causes the entire contents of the packet to be dumped in hex and
ASCII. In most cases, you don’t need to see the entire packet;
usually, the headers are sufficient to troubleshoot a protocol
problem. The -v option displays
the headers in a well-formatted and very detailed manner. Because of
the large number of lines displayed for each packet, use -v only when you need it.
The following example shows an ICMP Echo Request packet
displayed with the -v option. The
same type of packet was summarized in the first line of the previous
example.
# snoop -v host crab and host minasi
Using device /dev/le (promiscuous mode)
ETHER:  ----- Ether Header -----
ETHER:
ETHER:  Packet 3 arrived at 16:56:57.90
ETHER:  Packet size = 98 bytes
ETHER:  Destination = 8:0:20:22:fd:51, Sun
ETHER:  Source      = 0:0:c0:9a:d0:db, Western Digital
ETHER:  Ethertype = 0800 (IP)
ETHER:
IP:   ----- IP Header -----
IP:
IP:   Version = 4
IP:   Header length = 20 bytes
IP:   Type of service = 0x00
IP:         xxx. .... = 0 (precedence)
IP:         ...0 .... = normal delay
IP:         .... 0... = normal throughput
IP:         .... .0.. = normal reliability
IP:   Total length = 84 bytes
IP:   Identification = 3049
IP:   Flags = 0x0
IP:         .0.. .... = may fragment
IP:         ..0. .... = last fragment
IP:   Fragment offset = 0 bytes
IP:   Time to live = 64 seconds/hops
IP:   Protocol = 1 (ICMP)
IP:   Header checksum = fde0
IP:   Source address = 172.16.55.106, minasi.wrotethebook.com
IP:   Destination address = 172.16.12.1, crab.wrotethebook.com
IP:   No options
IP:
ICMP:  ----- ICMP Header -----
ICMP:
ICMP:  Type = 8 (Echo request)
ICMP:  Code = 0
ICMP:  Checksum = ac54 ICMP:
The detailed formatting done by snoop maps the bytes received from the
network to the header structure. Look at the description of the
various header fields in Chapter 1
and Appendix G for more
information.
This example is an actual case that was solved by protocol analysis. The
problem was reported as an occasional ftp failure with the error message:
netout: Option not supported by protocol 421 Service not available, remote server has closed connection
Only one user reported the problem, and it occurred only when transferring large files from a workstation to the central computer via our backbone network.
We obtained the user’s data file and were able to duplicate the problem from other workstations, but only when we transferred the file to the same central system via the backbone network. Figure 13-4 graphically summarizes the tests we ran to duplicate the problem.
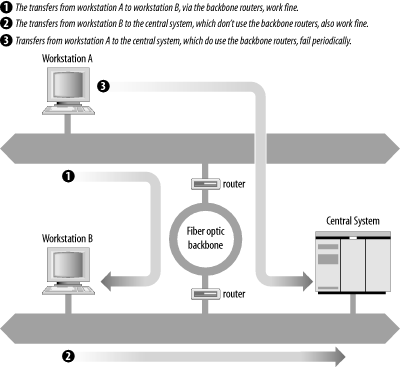
We notified all users of the problem. In response, we received reports that others had also experienced it, but again only when transferring to the central system, and only when transferring via the backbone. They had not reported it because they rarely saw it. But the additional reports gave us some evidence that the problem did not relate to any recent network changes.
Because the problem had been duplicated on other systems, it
probably was not a configuration problem on the user’s system. The
ftp failure could also be avoided if
the backbone routers and the central system did not interact. So we
concentrated our attention on those systems. We checked the routing
tables and ARP tables, and ran ping
tests on the central system and the routers. No problems were
observed.
Based on this preliminary analysis, the ftp failure appeared to be a possible protocol
interaction problem between a certain brand of routers and a central
computer. We made that assessment because the transfer routinely failed
when these two brands of systems were involved, but never failed in any
other circumstance. If the router or the central system were
misconfigured, they should fail when transferring data to other hosts.
If the problem was an intermittent physical problem, it should occur
randomly, regardless of the hosts involved. Instead, this problem
occurred predictably, and only between two specific brands of computers.
Perhaps there was something incompatible in the way these two systems
implemented TCP/IP.
Therefore, we used snoop to
capture the TCP/IP headers during several ftp test runs. Reviewing the dumps showed that
all transfers that failed with the “netout” error message had an ICMP
Parameter Error packet near the end of the session, usually about 50
packets before the final close. No successful transfer had this ICMP
packet. Note that the error did not occur in the
last packet in the data stream, as you might expect. It is common for an
error to be detected, and for the data stream to continue for some time
before the connection is actually shut down. Don’t assume that an error
will always be at the end of a data stream.
Here are the headers from the key packets. First, the IP header of the packet from the backbone router that caused the central system to send the error:
ETHER:  ----- Ether Header -----
ETHER:
ETHER:  Packet 1 arrived at 16:56:36.39
ETHER:  Packet size = 60 bytes
ETHER:  Destination = 8:0:25:30:6:51, CDC
ETHER:  Source      = 0:0:93:e0:a0:bf, Proteon
ETHER:  Ethertype = 0800 (IP)
ETHER:
IP:   ----- IP Header -----
IP:
IP:   Version = 4
IP:   Header length = 20 bytes
IP:   Type of service = 0x00
IP:         xxx. .... = 0 (precedence)
IP:         ...0 .... = normal delay
IP:         .... 0... = normal throughput
IP:         .... .0.. = normal reliability
IP:   Total length = 552 bytes
IP:   Identification = 8a22
IP:   Flags = 0x0
IP:         .0.. .... = may fragment
IP:         ..0. .... = last fragment
IP:   Fragment offset = 0 bytes
IP:   Time to live = 57 seconds/hops
IP:   Protocol = 6 (TCP)
IP:   Header checksum = ffff
IP:   Source address = 172.16.55.106, fs.wrotethebook.com
IP:   Destination address = 172.16.51.252, bnos.wrotethebook.com
IP:   No options IP:
And this is the ICMP Parameter Error packet sent from the central system in response to that packet:
ETHER:  ----- Ether Header -----
ETHER:
ETHER:  Packet 3 arrived at 16:56:57.90
ETHER:  Packet size = 98 bytes
ETHER:  Destination = 0:0:93:e0:a0:bf, Proteon
ETHER:  Source      = 8:0:25:30:6:51, CDC
ETHER:  Ethertype = 0800 (IP)
ETHER:
IP:   ----- IP Header -----
IP:
IP:   Version = 4
IP:   Header length = 20 bytes
IP:   Type of service = 0x00
IP:         xxx. .... = 0 (precedence)
IP:         ...0 .... = normal delay
IP:         .... 0... = normal throughput
IP:         .... .0.. = normal reliability
IP:   Total length = 56 bytes
IP:   Identification = 000c
IP:   Flags = 0x0
IP:         .0.. .... = may fragment
IP:         ..0. .... = last fragment
IP:   Fragment offset = 0 bytes
IP:   Time to live = 59 seconds/hops
IP:   Protocol = 1 (ICMP)
IP:   Header checksum = 8a0b
IP:   Source address = 172.16.51.252, bnos.wrotethebook.com
IP:   Destination address = 172.16.55.106, fs.wrotethebook.com
IP:   No options
IP:
ICMP:  ----- ICMP Header -----
ICMP:
ICMP:  Type = 12 (Parameter problem)
ICMP:  Code = 0
ICMP:  Checksum = 0d9f ICMP:  Pointer = 10
Each packet header is broken out bit by bit and mapped to the appropriate TCP/IP header fields. From this detailed analysis of each packet, we see that the router issued an IP Header Checksum of 0xffff, and that the central system objected to this checksum. We know that the central system objected to the checksum because it returned an ICMP Parameter Error with a Pointer of 10. The Parameter Error indicates that there is something wrong with the data the system has just received, and the Pointer identifies the specific data that the system thinks is in error. The tenth byte of the router’s IP header is the IP Header Checksum. The data field of the ICMP error message returns the header that it believes is in error. When we displayed that data we noticed that when the central system returned the header, the checksum field was “corrected” to 0000. Clearly the central system disagreed with the router’s checksum calculation.
Occasional checksum errors will occur. They can be caused by transmission problems, and are intended to detect these types of problems. Every protocol suite has a mechanism for recovering from checksum errors. So how should they be handled in TCP/IP?
To determine the correct protocol action in this situation, we turned to the authoritative sources—the RFCs. RFC 791, Internet Protocol, provided information about the checksum calculation, but the best source for this particular problem was RFC 1122, Requirements for Internet Hosts—Communication Layers, by R. Braden. This RFC provided two specific references that define the action to be taken. These excerpts are from page 29 of RFC 1122:
In the following, the action specified in certain cases is to “silently discard” a received datagram. This means that the datagram will be discarded without further processing and that the host will not send any ICMP error message (see Section 3.2.2) as a result....
... A host MUST verify the IP header checksum on every received datagram and silently discard every datagram that has a bad checksum.
Therefore, when a system receives a packet with a bad checksum, it is not supposed to do anything with it. The packet should be discarded, and the system should wait for the next packet to arrive. The system should not respond with an error message. A system cannot respond to a bad IP header checksum because it cannot really know where the packet came from. If the header checksum is in doubt, how do you know if the addresses in the header are correct? And if you don’t know for sure where the packet came from, how can you respond to it?
IP relies on the upper-layer protocols to recover from these problems. If TCP is used (as it was in this case), the sending TCP eventually notices that the recipient has never acknowledged the segment, and it sends the segment again. If UDP is used, the sending application is responsible for recovering from the error. In neither case does recovery rely on an error message returned from the recipient.
Therefore, for an incorrect checksum, the central system should have simply discarded the bad packet. The vendor was informed of this problem and, much to their credit, they sent us a fix for the software within two weeks. Not only that, the fix worked perfectly!
Not all problems are resolved so cleanly. But the technique of analysis is the same no matter what the problem.
Every network will have problems. This chapter discusses the tools and techniques that can help you recover from these problems, and the planning and monitoring that can help avoid them. A solution is sometimes obvious if you can just gain enough information about the problem. Unix provides several built-in software tools that can help you gather information about system configuration, addressing, routing, name service, and other vital network components. Gather your tools and learn how to use them before a breakdown occurs.
Troubleshooting is an ongoing process. This book is just the beginning of another ongoing process—learning. As you explore your system and network, you’ll see that there is much more to networking than can ever be covered in one book. This book has been your launching pad—helping you connect your system to the network. Now that your system is up and running, use it as a tool to expand your information horizons.
[141] Check your system’s documentation. ping varies slightly from system to
system. On Linux, the format shown above would be: ping [-c count
] [-s
packetsize ]
host.
[142] The format in which the ARP table is displayed may vary slightly between systems.
[143] Check /etc/syslog.conf for the full path of the messages file. Common locations are /var/adm/messages and /var/log/messages.
[144] The output on a Linux system is formatted differently, but the same statistics are provided.
[145] netstat -nr works on most systems, but Linux
administrators prefer route
-n.
[146] Use nslookup to find the IP
address if you don’t know it. nslookup is discussed later in this
chapter.
[147] On a Linux system, grep for
network 0.0.0.0, which Linux uses instead of the word “default” to
indicate the default route.
[148] The host and server names are fictitious, but the problems were real.
[149] See Appendix C for a detailed description of the HINFO statement.
[150] On our Linux system the process ID is written to /var/run/named.pid.
[151] To see a single-line answer to this query, pipe dig’s output to grep; e.g., dig -x 18.72.0.3 |
grep PTR.
[152] If you use Linux, try tcpdump. It is similar to snoop.
[153] This works only if the interface supports promiscuous mode; not all interfaces do.