Table of Contents for
TCP/IP Network Administration, 3rd Edition
 TCP/IP Network Administration, 3rd Edition
Published by
O'Reilly Media, Inc., 2002
TCP/IP Network Administration, 3rd Edition
Published by
O'Reilly Media, Inc., 2002
- Cover
- TCP/IP Network Administration, 3rd Edition
- Dedication
- Preface
- 1. Overview of TCP/IP
- 2. Delivering the Data
- 3. Network Services
- 4. Getting Started
- 5. Basic Configuration
- 6. Configuring the Interface
- 7. Configuring Routing
- 8. Configuring DNS
- 9. Local Network Services
- 10. sendmail
- 11. Configuring Apache
- 12. Network Security
- 13. Troubleshooting TCP/IP
- A. PPP Tools
- B. A gated Reference
- C. A named Reference
- D. A dhcpd Reference
- E. A sendmail Reference
- F. Solaris httpd.conf File
- G. RFC Excerpts
- Index
- Index
- Index
- Index
- Index
- Index
- Index
- Index
- Index
- Index
- Index
- Index
- Index
- Index
- Index
- Index
- Index
- Index
- Index
- Index
- Index
- Index
- Index
- Index
- Index
- Index
- Index
- About the Author
- Colophon
- Copyright
Now our attention turns to configuring local network servers. As with name service, these servers are not strictly required for the network to operate, but they provide services that are central to the network’s purpose.
There are many network services—many more than can be covered in this chapter. Here we concentrate on servers that provide essential services for local clients. The services covered in this chapter are:
The Network File System (NFS)
The Line Printer Daemon (LPD) and the Line Printer (LP) service
Windows file and print services (Samba)
The Network Information Service (NIS)
Dynamic Host Configuration Protocol (DHCP)
The Post Office Protocol (POP)
Internet Message Access Protocol (IMAP)
All of these software packages are designed to provide service to systems within your organization and are not intended to service outsiders. Essential services that are as important to external users as they are to in-house users, such as email, web service, and name service, are covered in separate chapters.
We begin our discussion of local network services with NFS, which is the server that provides file sharing on Unix networks.
The Network File System (NFS) allows directories and files to be shared across a network. It was originally developed by Sun Microsystems but is now supported by virtually all Unix and many non-Unix operating systems. Through NFS, users and programs can access files located on remote systems as if they were local files. In a perfect NFS environment, the user neither knows nor cares where files are actually stored.
NFS has several benefits:
It reduces local disk storage requirements because a server can store a single copy of a directory that is fully accessible to everyone on the network.
It simplifies central support tasks—files can be updated centrally yet be available throughout the network.
It allows users to use familiar Unix commands to manipulate remote files instead of learning new commands. There is no need to use
ftporrcpto copy a file between hosts on the network;cpworks fine.
There are two sides to NFS: a client side and a server side. The client is the system that uses the remote directories as if they were part of its local filesystem. The server is the system that makes the directories available for use. Attaching a remote directory to the local filesystem (a client function) is called mounting a directory. Offering a directory for remote access (a server function) is called sharing or exporting a directory.[97] Frequently, a system runs both the client and the server NFS software. In this section we’ll look at how to configure a system to export and mount directories using NFS.
If you’re responsible for an NFS server for a large site, you should take care in planning and implementing the NFS environment. This chapter describes how NFS is configured to run on a client and a server, but you may want more details to design an optimal NFS environment. For a comprehensive treatment, see Managing NFS and NIS by Hal Stern (O’Reilly & Associates).
The Network File System is run by several daemons, some performing client functions and some performing server functions. Before we discuss the NFS configuration, let’s look at the function of the daemons that run NFS on a Solaris 8 system:
nfsd [nservers]The NFS daemon,
nfsd, runs on NFS servers. This daemon services the client’s NFS requests. Thenserversoption specifies how many daemons should be started.mountdThe NFS mount daemon,
mountd, processes the clients’ mount requests. NFS servers run the mount daemon.nfslogdThe NFS logging daemon,
nfslogd, logs activity for exported filesystems. NFS servers run the logging daemon.rquotadThe remote quota server,
rquotad, provides information about user quotas on remote filesystems that is then displayed by thequotacommand. The remote quota server is run on both clients and servers.lockdThe lock daemon,
lockd, handles file lock requests. Both clients and servers run the lock daemon. Clients request file locks, and servers grant them.statdThe network status monitor daemon,
statd, is required bylockdto provide monitoring services. In particular, it allows locks to be reset properly after a crash. Both clients and servers runstatd.
On a Solaris 8 system, the daemons necessary to run NFS are
found in the /usr/lib/ nfs directory. Most of these
daemons are started at boot time by two scripts located in the
/etc/init.d directory,
nfs.client and nfs.server . The nfs.client script starts the
statd and lockd programs.[98]
NFS server systems run those two daemons, plus the NFS server
daemon (nfsd), the NFS logging
daemon (nfslogd), and the mount
server daemon (mountd). On Solaris
systems, the nfs.server script starts mountd, nfslogd, and 16 copies of nfsd. Solaris systems do not normally start
rquotad at boot time. Instead,
rquotad is started by inetd, as this grep of the /etc/inetd.conf file shows:
$ grep rquotad /etc/inetd.conf
rquotad/1   tli   rpc/datagram_v  wait root /usr/lib/nfs/rquotad  rquotad
Each system has its own technique for starting these daemons. If some of the daemons aren’t starting, ensure your startup scripts and your inetd.conf file are correct.
The first step in configuring a server is deciding which filesystems will be shared and what restrictions will be placed on them. Only filesystems that provide a benefit to the client should be shared. Before you share a filesystem, think about what purpose it will serve. Some common reasons for sharing filesystems are:
To provide disk space to diskless clients
To prevent unnecessary duplication of the same data on multiple systems
To provide centrally supported programs and data
To share data among users in a group
Once you’ve selected the filesystems you’ll share, you must configure them for sharing using the appropriate commands for your system. The following section emphasizes the way this is done on Solaris systems. It is very different on Linux systems, which are covered later. Check your system’s documentation to find out exactly how it implements NFS file sharing.
On Solaris systems, directories are exported using the
share command.
A simplified syntax for the share command is:
share -F nfs[-ooptions]pathname
where pathname is the path of the
directory the server is offering to share with its clients, and
options are the access controls for that directory. The options
are:
rwThe
rwoption grants read and write access to the shared filesystem. It can be specified in the formrw=accesslistto identify the systems that are granted this access. When used in this way, only the systems identified in the list are given access to the filesystem. If the access list is not provided with therwoption, all hosts are given read/write access to the filesystem.roThis option limits access to read-only. It also can be specified with an access list, e.g.,
ro=accesslist. When the access list is included, only the systems on the list have access and that access is limited to read-only. If the access list is not provided with therooption, all hosts are given read-only access to the filesystem, which is the default if no options are specified.aclokThis option grants full access to all clients, which could open up a security hole. This option is documented on the Solaris system, but it should never be used. It is intended to provide backward compatibility with a version of NFS that no longer exists.
-
anon=uid Defines the UID used for users who do not provide a valid user ID.
-
index=file Tells NFS to use a web-style index file instead of a directory listing for this filesystem.
-
log[=tag] Enable logging. If an optional tag is specified, it must match a tag defined in the /etc/nfs/nfslog.conf file.
-
nosub Do not allow clients to mount subdirectories. The default is
sub, which allows subdirectories to be mounted.-
nosuid Do not allow clients to create setuid or setgid files on this filesystem. The default is
suid, which allows clients to create setuid and setgid files.-
public Use the public file handle for this filesystem.
root=accesslistThis option allows the root users from the systems specified by the access list to have root access to the filesystem.
-
sec=type Defines the type of authentication used for accessing this filesystem.
typeis a colon-separated list of NFS security modes. For access to be successful, the client must support at least one of the security modes identified in thetypelist. The possibletypevalues are:-
sys Use clear-text user IDs and group IDs to control access to the filesystem. This is the same as traditional Unix file permissions, which are granted based on UID and GID, with the exception that the UID and GID are passed over the network and the server must trust the remote source.
-
dh Use Diffie-Hellman public key cryptography for authentication.
-
krb4 Use the Kerberos Version 4 for authentication.
-
none Do not use authentication. When no authentication is used, all users access the filesystem as user nobody.
-
-
window=seconds Defines the maximum lifetime in seconds that the NFS server will permit for a
dhorkrb4authentication. The server rejects any security credentials that have a longer lifetime value.secondsdefaults to 30000.
A few of the options contain an access list. The access list is a colon-separated list that identifies computers by individual hostnames, individual IP addresses, or by the domain, network, or NIS netgroup to which the hosts belong. The syntax of these list elements is:
-
hostname This is any hostname that resolves to an IP address. It can be a fully qualified name or just the hostname as long as the name as written will resolve to an IP address. If the hostname can be found in the local host table, the short name can be used. If the name must be resolved by DNS, the fully qualified hostname, with its domain name attached, should be specified. However, fully qualified names should not be used if your system does not use DNS, i.e., if your system relies exclusively on NIS.
-
address -
netgroup If an NIS netgroup name is used, the option applies to every system within that netgroup. Netgroup names look identical to unqualified hostnames and are easy to confuse with hostnames. Netgroup names should only be used if your system uses NIS.
-
.domain A domain name is used to apply the option to every system within that domain. When a domain name is used, it is preceded by a dot (
.). Thus .wrotethebook.com applies to every system in the wrotethebook.com domain. Domain names should be used only if your server uses DNS.-
@network[/prefix] A network address is used to apply an option to every system within the network. When a network address is used, it must be preceded by an at-sign (
@). An optional network prefix can be used with the address to clearly define the network mask.
The rw and ro options can be combined to grant
different levels of access to different clients. For example:
share -F nfs -o rw=crab:horseshoe ro  /usr/man
share -F nfs -o rw=rodent:crab:horseshoe:jerboas  /export/home/research
The first share command
grants read and write access to crab and
horseshoe, and read-only access to all other
clients. On the other hand, the second share command grants read/write access to
rodent, crab,
horseshoe, and jerboas,
and no access of any kind to any other client.
The share command does not survive a boot. Put the share commands in the
/etc/dfs/dfstab file to make sure that the
filesystems continue to be offered to your clients even if the
system reboots. Here is a sample dfstab file
containing our two share
commands:
% cat /etc/dfs/dfstab
#   place share(1M) commands here for automatic execution
#   on entering init state 3.
#
#   share [-F fstype] [ -o options] [-d "<text>"] <pathname> [resource]
#   .e.g.,
#   share  -F nfs  -o rw=engineering  -d "home dirs"  /export/home2
share -F nfs -o rw=crab:horseshoe ro  /usr/man
share -F nfs -o rw=rodent:crab:horseshoe:jerboas  /export/home/research
The share command, the
dfstab file, and even the terminology “share”
are Solaris-specific. Most Unix systems say that they are
exporting files, instead of
sharing files, when they are offering files to
NFS clients. Furthermore, they do not use the share command or the
dfstab file; instead, they offer filesystems
through the /etc/exports file. Linux is an
example of such a system.
The /etc/exports file is the NFS server configuration file for Linux systems. It controls which files and directories are exported, which hosts can access them, and what kinds of access are allowed. A sample /etc/exports file might contain these entries:
/usr/man        crab(rw) horseshoe(rw)  (ro)
/usr/local      (ro)
/home/research  rodent(rw) crab(rw) horseshoe(rw) jerboas(rw)
This sample file says that:
/usr/man can be mounted by any client, but it can be written to only by crab and horseshoe. Other clients have read-only access.
/usr/local can be mounted by any client, with read-only access.
/home/research can be mounted only by the hosts rodent, crab, horseshoe, and jerboas. These four hosts have read/write access.
The options used in each of the entries in the /etc/exports file determine what kinds of access are allowed. The information derived from the sample file is based on the options specified on each line in the file. The general format of the entries is as follows:
directory[host(option)]...
directory names the directory or
file that is available for export. The
host is the name of the client granted
access to the exported directory, while the
option specifies the type of access being
granted.
In the sample /etc/exports file shown
above, the host value is either the name
of a single client or it is blank. When a single hostname is used,
access is granted to the individual client. If no hostvalue is
specified, the directory is exported to everyone. Like Solaris,
Linux also accepts values for domains, networks, and netgroups,
although the syntax is slightly different. Valid host values are:
Individual hostnames such as crab or crab.wrotethebook.com.
Domain wildcards such as *wrotethebook.com for every host in the wrotethebook.com domain.
IP address/address mask pairs such as 172.16.12.0/255.255.255.0 for every host with an address that begins with 172.16.12.
Net groups such as @group1.
Notice that in Linux, domain names begin with an asterisk (*), instead of the dot used in Solaris.
Also note that the at-sign begins a netgroup name, whereas in
Solaris the at-sign is used at the beginning of a network
address.
The options used in the sample /etc/exports file are:
roRead-only prevents NFS clients from writing to this directory. Attempts by clients to write to a read-only directory fail with the message “Read-only filesystem” or “Permission denied.” If
rois specified without a client hostname, all clients are granted read-only access.rwRead/write permits clients to read and write to this directory. When specified without hostname, all clients are granted read/write access. If a hostname is specified, only the named host is given read/write permission.
Although specific hosts are granted read/write access to some of these directories, the access granted to individual users of those systems is controlled by standard Unix user, group, and world file permissions based on the user’s user ID (UID) and group ID (GID). NFS trusts that a remote host has authenticated its users and assigned them valid UIDs and GIDs. Exporting files grants the client system’s users the same access to the files they would have if they directly logged into the server. This assumes, of course, that both the client and the server have assigned exactly the same UIDs and GIDs to the same users, which is not always the case. If both the client and the server assign the same UID to a given user, for example, if Craig is assigned 501 on both systems, then both systems properly identify Craig and grant him appropriate access to his files. On the other hand, if the client assigns Craig a UID of 501 and the server has assigned that UID to Michael, the server will grant Craig access to Michael’s files as if Craig owned those files. NFS provides several tools to deal with the problems that arise because of mismatched UIDs and GIDs.
One obvious problem is dealing with the root account. It is
very unlikely that you want people with root access to your clients
to also have root access to your server. By default, NFS prevents
this with the root_squash
setting, which maps requests that contain the root
UID and GID to the nobody UID and GID. Thus if
someone is logged into a client as root, they are only granted world
permissions on the server. You can undo this with the no_root_squash setting, but no_root_squash opens a potential security
hole.
Map other UIDs and GIDs to nobody with
the squash_uids , squash_gids, and
all_squash options. all_squash maps every user of a client
system to the user nobody. squash_uids and squash_gids map specific UIDs and GIDs.
For example:
/pub           (ro,all_squash)
/usr/local/pub (squash_uids=0-50,squash_gids=0-50)
The first entry exports the /pub directory with read-only access to every client. It limits every user of those clients to the world permissions granted to nobody, meaning that the only files the users can read are those that have world read permission.
The second entry exports /usr/local/pub
to every client with default read/write permission. The squash_uid and squash_gid options in the example show
that a range of UIDs and GIDs can be specified in some
options.[99] A single UID or GID can be defined with these options,
but it is frequently useful to affect a range of values with a
single command. In the example we prevent users from accessing the
directory with a UID or GID that is 50 or less. These low numbers
are usually assigned to non-user accounts. For example, on our Linux
system, UID 10 is assigned to uucp. Attempting
to write a file as uucp would cause the file to
be written with the owner mapped to nobody.
Thus the user uucp would be able to write to
the /usr/local/pub directory only if that
directory had world write permission.
It is also possible to map every user from a client to a specific user ID or
group ID. The anonuid and
anongid options provide this
capability. These options are most useful when the client has only
one user and does not assign that user a UID or GID, for example, in the case of a Microsoft
Windows PC running NFS. PCs generally have only one user and they
don’t use UIDs or GIDs. To map the user of a PC to a valid user ID
and group ID, enter a line like this in the
/etc/exports file:
/home/alana giant(all_squash,anonuid=1001,anongid=1001)
In this example, the hostname of Alana’s PC is
giant. The entry grants that client read/write
access to the directory /home/alana. The
all_squash option maps every
request from that client to a specific UID, but this time, instead
of nobody, it maps to the UID and the GID
defined by the anonuid and
anongid options. Of course, for
this to work correctly, 1001:1001 should be the UID and GID pair
assigned to alana in the
/etc/passwd file.
A single mapping is sufficient for a PC, but it might not
handle all of the mapping needed for a Unix client. Unix clients
assign their users UIDs and GIDs. Problems occur if those differ
from the UIDs and GIDs assigned to those same users on the NFS
server. Use the map_static option
to point to a file that maps the UIDs and GIDs for a specific
client. For example:
/export/oscon oscon(map_static=/etc/nfs/oscon.map)
This entry says that the /export/oscon
directory is exported to the client oscon with
read/write permission. The map_static option points to a file on the
server named /etc/nfs/oscon.map that maps the
UIDs and GIDs used on oscon to those used on
the server. The oscon.map file might contain
the following entries:
# UID/GID mapping for client oscon
# remote    local    comment
uid 0-50    -    #squash these
gid 0-50    -    #squash these
uid 100-200    1000    #map 100-200 to 1000-1100
gid 100-200    1000    #map 100-200 to 1000-1100
uid 501    2001    #map individual user
gid 501    2001    #map individual user
The first two lines map the UIDs and GIDs from 0 to 50 to the user nobody. The next two lines map all of the client UIDs and GIDs in the range of 100 to 200 to corresponding numbers in the range of 1000 to 1100 on the server. In other words, 105 on the client maps to 1005 on the server. This is the most common type of entry. On most systems, existing UIDs and GIDs have been assigned sequentially. Often, several systems have assigned the UIDs and GIDs sequentially from 101 to different users in a completely uncoordinated manner. This entry maps the users on oscon to UIDs and GIDs starting at 1000. Another file might map the 100 to 200 entries of another client to UIDs and GIDs starting at 2000. A third file might map yet another client to 3000. This type of entry allows the server to coordinate UIDs and GIDs where no coordination exists. The last two lines map an individual user’s UID and GID. This is less commonly required, but it is possible.
After defining the directories in the /etc/exports
file, run the exportfs command to
process the exports file and to build
/var/lib/nfs/xtab. The
xtab file contains information about the
currently exported directories, and it is the file that mountd reads when processing client mount
requests. To process all of the entries in the
/etc/exports file, run exportfs with the -a command-line
option:
# exportfs -aThis command, which exports everything in the
exports file, is normally run during the boot
from a startup script. To force changes in the
/etc/exports file to take effect without
rebooting the system, use the -r
argument:
# exportfs -rThe -r switch synchronizes
the contents of the exports file
and the xtab file. Items that have been added
to the exports file are added to the
xtab file, and items that have been deleted are
removed from xtab.
The exportfs command can
export a directory that is not listed in the
/etc/exports file. For example, to temporarily export /usr/local to
the client fox with read/write permission,
enter this command:
# exportfs fox:/usr/local -o rwAfter the client has completed its work with the temporarily
exported filesystem, the directory is removed from the export list
with the -u option, as
shown:
# exportfs -u fox:/usr/localThe -u option can be
combined with the -a option to
completely shut down all exports without terminating the NFS
daemon:
# exportfs -uaOnce the server exports or shares the appropriate filesystems, the clients can mount and use those filesystems. The next section looks at how an NFS client system is configured.
Some basic information is required before you can decide which NFS directories to mount on your system. You need to know which servers are connected to your network and which directories are available from those servers. A directory cannot be mounted unless it is first exported by a server.
Your network administrator is a good source for this information. The administrator can tell you what systems are providing NFS service, what directories they are exporting, and what these directories contain. If you are the administrator of an NFS server, you should develop this type of information for your users. See Chapter 4 for advice on planning and distributing network information.
On Solaris and Linux systems, you can also obtain information
about the shared directories directly from the servers by using the
showmount command. The NFS servers are usually the same centrally
supported systems that provide other services such as mail and DNS.
Select a likely server and query it with the command showmount -e
hostname. In response to this command, the
server lists the directories that it exports and the conditions
applied to their export.
For example, a showmount -e
query to jerboas produces the following
output:
% showmount -e jerboas
export list for jerboas:
/usr/man           (everyone)
/home/research     rodent,crab,limulus,horseshoe
/usr/local         (everyone)
The export list shows the NFS directories exported by jerboas as well as who is allowed to access those directories. From this list, rodent’s administrator may decide to mount any of the directories offered by jerboas. Our imaginary administrator decides to:
Mount /usr/man from jerboas instead of maintaining the manpages locally.
Mount /home/research to more easily share files with other systems in the research group.
Mount the centrally maintained programs in /usr/local.
These selections represent some of the most common motivations for mounting NFS directories:
Saving disk space
Sharing files with other systems
Maintaining common files centrally
The extent to which you use NFS is a personal choice. Some people prefer the greater personal control you get from keeping files locally, while others prefer the convenience offered by NFS. Your site may have guidelines for how NFS should be used, which directories should be mounted, and which files should be centrally maintained. Check with your network administrator if you’re unsure about how NFS is used at your site.
A client must mount a shared directory before using it. “Mounting” the directory attaches it to the client’s filesystem hierarchy. Only directories offered by the servers can be mounted, but any part of the offered directory, such as a subdirectory or a file, can be mounted.
NFS directories are mounted using the mount command. The general structure of
the mount command is:
mounthostname:remote-directory local-directory
The hostname identifies an NFS
server, and the remote-directory
identifies all or part of a directory offered by that server. The
mount command attaches that
remote directory to the client’s filesystem using the directory name
provided for local-directory. The
client’s local directory, called the mount point, must be created
before mount is executed. Once
the mount is completed, files located in the remote directory can be
accessed through the local directory exactly as if they were local
files.
For example, assume that jerboas.wrotethebook.com is an NFS server and that it shares the files shown in the previous section. Further assume that the administrator of rodent wants to access the /home/research directory. The administrator simply creates a local /home/research directory and mounts the remote /home/research directory offered by jerboas on this newly created mount point:
# mkdir /home/research
# mount jerboas:/home/research /home/research
In this example, the local system knows to mount an NFS
filesystem because the remote directory is preceded by a hostname
and NFS is the default network filesystem for this client. NFS is
the most common default network filesystem. If your client system
does not default to NFS, specify NFS directly on the mount command line. On a Solaris 8 system, the -F switch is used to identify the
filesystem type:
# mount -F nfs jerboas:/home/research /home/researchOn a Linux system the -t
switch is used:
# mount -t nfs jerboas:/home/research /home/researchOnce a remote directory is mounted, it stays attached to the
local filesystem until it is explicitly dismounted or the local
system reboots. To dismount a directory, use the umount command. On the umount command line, specify either the
local or remote name of the directory that is to be dismounted. For
example, the administrator of rodent can
dismount the remote jerboas:/home/research
filesystem from the local /home/research mount
point, with either:
# umount /home/researchor:
# umount jerboas:/home/researchBooting also dismounts NFS directories. Because systems frequently wish to mount the same filesystems every time they boot, Unix provides a system for automatically remounting after a boot.
Unix systems use the information provided in a special table to remount all types of filesystems, including NFS directories, after a system reboot. The table is a critical part of providing users consistent access to software and files, so care should be taken whenever it is modified. Two different files with two different formats are used for this purpose by the different flavors of Unix. Linux and BSD systems use the /etc/fstab file, and Solaris, our System V example, uses the /etc/vfstab file.
The format of the NFS entries in the Solaris vfstab file is:
filesystem-mountpointnfs - yesoptions
The various fields in the entry must appear in the order shown
and be separated by whitespace. The items not in italics (both
dashes and the words nfs and
yes) are keywords that must
appear exactly as shown. filesystem is
the name of the directory offered by the server,
mountpoint is the pathname of the local
mount point, and options are the mount
options discussed below. A sample NFS vfstab
entry is:
jerboas:/home/research - /home/research nfs - yes rw,soft
This entry mounts the NFS filesystem
jerboas:/home/research on the local mount point
/home/research. The filesystem is mounted with
the rw and soft options set. We previously discussed
the commonly used read/write (rw)
and read-only (ro) options, and
there are many more NFS options. The NFS mount options available on Solaris systems are:
remountIf the filesystem is already mounted read-only, remount the filesystem as read/write.
-
soft If the server fails to respond, return an error and don’t retry the request.
-
timeo=n Defines the number of seconds to wait for a timeout before issuing an error.
-
hard If the server fails to respond, retry until it does respond. This is the default.
-
bg Do the retries in background mode, which allows the boot to proceed.
-
fg Do the retries in foreground mode. This option could hang the boot process while the mount is being retried. For this reason,
fgis used primarily for debugging.-
intr Allow a keyboard interrupt to kill a process that is hung waiting for the server to respond. Hard-mounted filesystems can become hung because the client retries forever, even if the server is down. This is a default.
-
nointr Don’t allow keyboard interrupts. In general, this is a bad idea.
-
nosuid Do not allow an executable stored on the mounted filesystem to run
setuid. This improves security but may limit utility.-
acdirmax=n Cache directory attributes for no more than
nseconds. The default is to hold cache values for a maximum of 60 seconds. Repeated requests for filesystem attributes is one of the leading contributors to NFS traffic. Caching this information helps to reduce the traffic.-
acdirmin=n Cache directory attributes for at least
nseconds. The default is 30 seconds.-
acregmax=n Cache file attributes for no more than
nseconds. The default is 60 seconds.-
acregmin=n Cache file attributes for at least
nseconds. The default is 3 seconds.-
actimeo=n Sets a single value for
acdirmax,acdirmin,acregmax, andacregmin.-
grpid Use the group ID of the parent directory when creating new files. If this option is not set, the effective GID of the calling process is used.
-
noac Do not cache information. The default is to use caching, which can be specified with the
acoption.-
port=n Identifies the IP port number used by the server.
-
posix Use POSIX standards for the filesystem. POSIX is a wide-ranging Unix interoperability standard that includes many standards for filesystems, such as the maximum length of filenames and how file locks are set.
-
proto=protocol Specifies the transport protocol that will be used by NFS.
-
public Use the public file handle when connecting to the NFS server.
-
quota Use
quotato enforce user quotas on this filesystem.-
noquota Do not use
quotato enforce user quotas on this filesystem.-
retrans=n Defines the number of times NFS will retransmit when a connectionless transport protocol is used.
-
retry=n Defines the number of times a mount attempt will be retried. The default is to retry 10,000 times.
-
rsize=n Defines the size of the read buffer as
nbytes. The default for NFS version 3 is 32,768 bytes.-
sec=type Specifies the type of security used for NFS transactions. The type values supported on the Solaris 8
mountcommand are the same as those listed for thesharecommand:sys,dh,krb4, ornone.-
wsize=n Sets the size of the write buffer to
nbytes. The default is 32768 bytes for NFS version 3.-
vers=version Specifies the version of NFS that should be used for this mount. By default, the system automatically selects the latest version supported by both the client and the server.
On the Solaris system, the filesystems defined in the
vfstab file are mounted by a mountall command located in a startup file. On Linux systems,
the startup file contains a mount
command with the -a flag set,
which causes Linux to mount all filesystems listed in
fstab.[100]
The format of NFS entries in the /etc/fstab file is:
filesystem mountpointnfsoptions
The fields must appear in the order shown and must be
separated by whitespace. The keyword nfs is required for NFS filesystems.
filesystem is the name of the directory
being mounted. mountpoint is the pathname
of the local mount point. options are any
of the Linux mount options.
Linux uses most of the same NFS mount options as Solaris.
rsize, wsize, timeo, retrans, acregmin, acregmax, acdirmin, acdirmax, actimeo, retry, port, bg, fg,
soft, hard, intr, nointr, ac, noac, and posix are all options that Linux has in
common with Solaris. In addition to these, Linux uses:
-
mountport=n Defines the port to be used by
mountd.-
mounthost=name Identifies the server running
mountd.-
mountprog=n Defines the RPC program number used by
mountdon the remote host.-
mountvers=n Defines the RPC version number used by
mountdon the remote host.-
nfsprog=n Defines the RPC program number used by
nfsdon the remote host.-
nfsvers=n Defines the RPC version number used by
nfsdon the remote host.-
namlen=n Defines the maximum length of the filenames supported by the remote server.
-
nocto Do not retrieve attributes when creating a file. The default is to retrieve the attributes, which can be specified with the
ctooption.-
tcp Specifies that NFS should use TCP as its transport protocol.
-
udp Specifies that NFS should use UDP as its transport protocol.
-
nolock Prevents the system from starting
lockd. The default is to runlockd, which can be requested with thelockoption.
Finally, there are several options that are not specific to
NFS and can be used on the mount
command for any type of filesystem. Table 9-1 lists the common
mount options used
on Linux systems.
Table 9-1. Common mount options
Option | Function |
|---|---|
async | Use asynchronous file I/O, which acknowledges writes as soon as they are received to improve performance. |
auto | Mount when the -a option is used. |
dev | Allow character and block special devices on the filesystem. |
exec | Permit execution of files from the filesystem. |
noauto | Don’t mount with the -a option. |
nodev | Don’t allow character and block special devices on the filesystem. |
noexec | Don’t allow execution of files from the filesystem. |
nosuid | Don’t allow programs stored on the filesystem to run setuid or setgid. |
nouser | Only root can mount the filesystem. |
remount | Remount a mounted filesystem with new options. |
ro | Mount the filesystem read-only. |
rw | Mount the filesystem read/write. |
suid | Allow programs to run setuid or setgid. |
sync | Use synchronous filesystem I/O, which acknowledges writes only after they are written to disk to improve reliability. |
user | Permit ordinary users to mount the filesystem. |
atime | Update inode access time for every access. |
noatime | Do not update inode access time. |
defaults | Set the rw, suid, dev, exec, auto, nouser, and async options. |
A grep of
fstab shows sample NFS entries.[101]
% grep nfs /etc/fstab
jerboas:/usr/spool/mail   /usr/spool/mail   nfs rw     0 0
jerboas:/usr/man          /usr/man          nfs rw     0 0
jerboas:/home/research    /home/research    nfs rw     0 0
The grep shows that there
are three NFS filesystems contained in the
/etc/fstab file. The mount -a command in the boot script
remounts these three directories every time the system boots.
The vfstab and fstab files are the most common methods used for mounting filesystems at boot time. There is another technique that automatically mounts NFS filesystems, but only when they are actually needed. It is called automounter.
An automounter is a feature available on most NFS clients. Two varieties of automounters are in widespread use: autofs and amd. The Automounter Filesystem (autofs) is the automounter implementation that comes with Solaris and Linux, and it is the implementation we cover in this section. Automounter Daemon (amd) is available for many Unix versions and is included with Linux but not with Solaris. To find out more about amd, see Linux NFS and Automounter Administration written by Erez Zadok, the amd maintainer. In this section, automounter and automounter daemon refer to the version of autofs that comes with Solaris 8.
The automounter configuration files are called maps. Three basic map types are used to define the automounter filesystem:
- Master map
The configuration file read by
automount. It lists all of the other maps that are used to define the autofs filesystem.- Direct map
A configuration file that lists the mount points, pathnames, and options of filesystems that are to be mounted by the automounter daemon (
automountd).- Indirect map
A configuration file that contains pathnames and “relative” mount points. The mount points are relative to a directory path declared in the master map. How indirect maps are used will become clear in the examples.
On Solaris systems the automounter daemon (automountd) and the automount command are started by the
/etc/init.d/autofs script. The script is run with the start option to start automounter, i.e.,
autofs start. It is run with the
stop option to shut down
automounter. automount and automountd are two distinct, separate
programs. automountd runs as a
daemon and dynamically mounts filesystems when they are needed.
automount processes the
auto_master file to determine the filesystems
that can be dynamically mounted.
To use automounter, first configure the /etc/auto_master file. Entries in the auto_master file have this format:
mount-point map-name options
The Solaris system comes with a default
auto_master file preconfigured. Customize the file for your
configuration. Comment out the +auto_master entry unless you run NIS+ or
NIS and your servers offer a centrally maintained
auto_master map. Also ignore the /xfn entry, which is for creating a
federated (composite) name service. Add an entry for your direct map.
In the example, this is called auto_direct. Here is
/etc/auto_master after our modifications:
# Master map for automounter
#
#+auto_master
#/xfn           -xfn
/net            -hosts          -nosuid
/home           auto_home
/-              auto_direct
All lines that begin with a sharp sign (#) are comments, including the +auto_master and /xfn lines we commented out. The first real
entry in the file specifies that the shared filesystems offered by
every NFS server listed in the /etc/hosts file
are automatically mounted under the /net
directory. A subdirectory is created for each server under
/net using the server’s hostname. For example,
assume that jerboas is listed in the
hosts file and that it exports the
/usr/local directory. This auto_master entry automatically makes that
remote directory available on the local host as
/net/jerboas/usr/local.
The second entry automatically mounts the home directories
listed in the /etc/auto_home map under the
/home directory. A default
/etc/auto_home file is provided with the Solaris
system. Comment out the +auto_home
entry found in the default file. It is used only if you run NIS+ or
NIS and your servers offer a centrally maintained
auto_home map. Add entries for individual user
home directories or for all home directories from specific servers.
Here is a modified auto_home map:
# Home directory map for automounter
#
#+auto_home
craig           crab:/export/home/craig
*               horseshoe:/export/home/&
The first entry mounts the
/export/home/craig filesystem shared by
crab on the local mount point
/home/craig. The auto_home
map is an indirect map, so the mount point specified in
the map (craig) is relative to the
/home mount point defined in the
auto_master map. The second entry mounts every
home directory found in the /export/home
filesystem offered by horseshoe to a “like-named”
mount point on the local host. For example, assume that
horseshoe has two home directories,
/export/home/daniel and
/export/home/kristin. Automounter makes them both
available on the local host as /home/daniel and
/home/kristin. The asterisk (*) and the ampersand (&) are wildcard characters used
specifically for this purpose in autofs maps.
That’s it for the auto_home map. Refer back to the auto_master map. The third and final entry in the /etc/auto_master file is:
/- auto_direct
We added this entry for our direct map. The special mount point
/- means that the map name refers
to a direct map. Therefore the real mount points are found in the
direct map file. We named our direct map file
/etc/auto_direct. There is no default direct map
file; you must create it from scratch. The file we created is:
# Direct map for automounter
#
/home/research  -rw       jerboas:/home/research
/usr/man        -ro,soft  horseshoe,crab,jerboas:/usr/share/man
The format of entries in a direct map file is:
mount-point options remote filesystem
Our sample file contains two typical entries. The first entry mounts the remote filesystem /home/research offered by the server jerboas on the local mount point /home/research. It is mounted read/write. The second entry mounts the manpages read-only with a “soft” timeout.[102] Note that three servers are specified for the manpages in a comma-separated list. If a server is unavailable or fails to respond within the soft timeout period, the client asks the next server in the list. This is one of the nice features of automounter.
Automounter has four key features: the -hosts map, wildcarding, automounting, and multiple servers. The -hosts map makes every exported filesystem from every server listed in the /etc/hosts file available to the local user. The wildcard characters make it very easy to mount every directory from a remote server to a like-named directory on the local system. Automounting goes hand-in-glove with these two features because only the filesystems that are actually used are mounted. While -hosts and wildcards make a very large number of filesystems available to the local host, automounting limits the filesystems that are actually mounted to those that are needed. The last feature, multiple servers, improves the reliability of NFS by removing the dependence on a single server.
Unix uses NFS to share files; it uses two different tools, the
Line Printer Daemon (lpd) and the Line Printer
(lp) printer service, to provide
printer services for local and remote users. lpd is used on BSD systems and most Linux
systems. lp is used on System V
systems, including Solaris 8. In the following sections we discuss both
tools.
lpd manages the printer spool area and the print queues. lpd is started at boot time from a startup
script. It is generally included in the startup of Linux and BSD
systems by default, so you might not need to add it to your startup
script. For example, it is started by the
/etc/init.d/lpd script on a Red Hat Linux
system.
When lpd starts, it reads the
/etc/printcap file to find out about the
printers available for its use. The printcap
file defines the printers and their characteristics. Configuring
a printcap file is the scariest
part of setting up a Unix print server. (Don’t worry. As we’ll see
later with the Solaris admintool,
most systems provide a GUI tool for configuring printers.) The
printcap file scares system administrators
because the parser that reads the file is very finicky, and the
syntax of the parameters in the file is terse and arcane. Most
parser problems can be avoided by following these rules:
Start each entry with a printer name that begins in the first column. No white-space should precede the first printer name. Multiple printer names can be used if they are separated by pipe characters (|). One entry must have the printer name lp. If you have more than one printer on the server, assign lp to the “default” printer.
Continue printer entries across multiple lines by escaping the newline character at the end of the line with a backslash (\) and beginning the following line with a tab. Take care that no blank space comes after the backslash. The character after the backslash must be the newline character.
Every field, other than the printer name, begins and ends with a colon (:). The character before the backslash on a continued line is a colon and the first character after the tab on the continuation line is a colon.
Begin comments with a sharp sign (#).
The configuration parameters used in a
printcap file describe the characteristics of
the printer. These characteristics are called “capabilities” in the
printcap documentation, but really they are the
printer characteristics that lpd
needs to know in order to communicate with the printer. Parameters
are identified by names that are two characters long and are usually
assigned a value. The syntax of the parameters varies slightly
depending on the type of value they are assigned. Parameters
come in three different flavors:
- Boolean
All printcap Boolean values default to “false.” Specifying a Boolean enables its function. Booleans are specified simply by entering the two-character parameter name in the file. For example,
:rs:enables security for remote users.- Numeric
Some parameters are assigned numeric values. For example,
:br#9600:sets the baud rate for a serial printer.- String
Some parameters use string values. For example,
:rp=laser:defines the name of a remote printer.
A glance at the manpage shows that there are many printcap parameters. Thankfully, you’ll never need to use most of them. Most printer definitions are fairly simple, and most printcap files are small.
Print servers usually have only one or two directly attached printers; any other printers defined in printcap are probably remote printers. Most, if not all, of the printers defined in a client’s printcap are remote printers.
#
# Remote LaserWriter
#
lw:\
    :lf=/var/adm/lpd-errs:\
    :lp=:rm=horseshoe:rp=lw:\
    :sd=/var/spool/lpd-lw:
The lw printer in this sample
printcap file is a remote printer. The lf parameter points to the log file used
to log status and error messages. The remote machine to which the
printer is attached is defined by the :rm=horseshoe: parameter, and the name of
the remote printer on that machine is defined by the :rp=lw: parameter. Multiple printers can
use the same log file. The final parameter, sd, defines the spool directory. Each
printer has its own unique spool directory. Defining the remote
printer in the client’s printcap file is all
that is needed to configure an LPD client.
Writing a printcap from scratch is
unnecessary. At most, you will need to tweak the
printcap configuration for your own special
needs. All modern Unix systems have printer configuration tools that
will build the basic printcap for you. The
Red Hat printconf-gui tool is an example.
Launch the printer configuration tool on a Red Hat 7.2 system
running the Gnome desktop by selecting Printer Configuration from
the System menu. When the printconf-gui window opens, click the New
button to add a printer to the printcap file.
The New button launches a printer configuration wizard. Use the
first page of the wizard to define the printer name and the queue
type. Enter the printer name, for example lw,
in the Queue Name box. Then select the Queue Type. Red Hat 7.2
offers five choices:
- Local Printer
Use this type to define a directly attached printer. When Local Printer is selected, the wizard asks you to select the printer port to which the printer is attached. The default is /dev/lp0.
- Unix Printer
Use this type to define a printer located on a remote server that is accessed via the LPD protocol. When Unix Printer is selected, the wizard asks for the name of the remote server and the name of the printer on the remote server.
- Windows Printer
Use this type to define a remote printer that is accessed via the SMB protocol. When Windows Printer is selected, the wizard asks for the IP address of the remote server, the SMB workgroup, and the name of the remote printer, which it calls a share name. The wizard also allows a username and password to be input in case they are required for access to the printer. Printer sharing through SMB is is covered in detail later in this chapter.
- Novell Printer
Use this type to define a remote printer accessed via the NetWare protocols. When Novell Printer is selected, the wizard asks for the name of the server and the printer on that server. A username and password can also be entered if they are required for printer access. To communicate with a Novell printer you must have the NetWare protocols installed on your system.
- JetDirect Printer
Use this type to define a network-attached printer that uses the JetDirect protocol. Primarily, this protocol is used on HP printers that contain a built-in Ethernet interface and that connect directly to the Ethernet cable without going through a server. When JetDirect is selected, the wizard asks for the IP address of the printer and gives you a chance to enter a port number in case the printer is not configured to use the standard JetDirect port.
Finally, the wizard presents you with a selection of hundreds of printer drivers. Most Unix systems use standard PostScript printers. Linux systems, however, are built on commodity PC hardware. PCs use a hodgepodge of different printers. The wizard lets you select the correct driver for your printer by selecting the printer make and then the printer model. Once you select the drive, the configuration is finished and the new printer is installed.
The Red Hat tool is just an example. Future versions of Red Hat will have a newer tool, and other Unix systems have their own tools. The point is not the details of the tool, but the fact that the printcap file is not usually written by hand. It is created by a configuration tool.
Once the printer is configured, print jobs are sent to the line
printer daemon using the Line Printer Remote
(lpr) program. The lpr program creates a control file and
sends it and the print file to lpd. There are many possible lpr command-line arguments, but in general
the command simply identifies the printer and the file to be
printed, as in:
% lpr -Plj ch09This command sends a file called ch09 to
a printer called lj. The printer can be local
or remote. It doesn’t matter as long as the printer is defined in
the printcap file and therefore known to
lpd.
The client software provides commands to allow the user to check the status of the print job. Table 9-2 lists these commands, their syntax, and their meaning.
Table 9-2. Line printer commands
Command | Function |
|---|---|
lpc start [printer] | Starts a new printer daemon. |
lpc status [printer] | Displays printer and queue status. |
lpq -Pprinter [user] [job] | Lists the jobs in the printer’s queue. |
lprm -Pprinter job | Removes a print job from the queue. |
In this syntax, printer is the name
of the printer as defined in the /etc/printcap
file, user is the username of the owner
of a print job, and job is the job number
associated with the print job while it is waiting in the queue. The
keyword all can be used in place
of a printer name in any lpc
command to refer to all printers.
While lpc is primarily for
the system administrator, the status and start commands can be used by anyone. All
the commands shown in Table
9-2 are available to users.
The lpq command displays a list of jobs queued for a printer. Command-line arguments
permit the user to select which printer queue is displayed and to
limit the display from that queue to a specific user’s jobs or even
to a specific job. Here’s an example of displaying the queue for the
printer lp:
$ lpq -Plp
Printer: lp@crab 'Canon'
 Queue: 4 printable jobs
 Server: pid 1459 active
 Unspooler: pid 1460 active
 Status: waiting for subserver to exit at 14:17:47.120
 Rank   Owner/ID             Class Job Files                 Size Time
active alana@crab+458          A   458 /usr/share/printconf 18043 14:16:53
2      micheal@crab+477        A   477 /usr/share/printconf/t 193 14:17:38
3      james@crab+479          A   479 /usr/share/printconf 18259 14:17:43
4      daniel@crab+481         A   481 /usr/share/printconf 18043 14:17:46
A queued print job can be removed by the owner of the job with
the lprm command. Assume that daniel
wants to remove print job number 481. He enters the following
command:
$ lprm -Plp 481
Printer lp@crab:
  checking perms 'daniel@crab+481'
  dequeued 'daniel@crab+481'
lpd and lpr were among the first commands created
for Unix to exploit the power of TCP/IP networking. Managing
printers is primarily a system administration task. Only those
aspects of lpd related to remote
printing are covered here.
The Line Printer (LP) print service is used by most System V Unix systems. LP offers the same type of service as LPD.
Traditionally on System V Unix systems, the LP configuration
files are located in the /etc/lp directory. These
files perform the same basic function that the
/etc/printcap file does for LPD. However, the
/etc/lp files are not directly edited by the system
administrator. The files are created and modified using the System V
lpadmin and lpsystem commands.
The lpadmin command adds local printers to the
/etc/lp/printers directory, which makes the
printers available to LP. The basic syntax of adding a new printer is
simple. The -p switch defines the
local name of the printer. The -p
switch is used with either the -v
switch that defines the interface for a local printer or the -s switch that defines the server and printer
name for a remote printer. For example, the following command adds a
local printer named lp connected to the parallel
printer port /dev/lp1:
# lpadmin -plp -v /dev/lp1This command adds a printer locally known as laser that is the lj printer on the remote server crab:
# lpadmin -llaser -s crab!ljThe specific characteristics of a printer added by lpadmin are controlled by the
terminfo file. terminfo is a file that is
almost identical to the printcap file. Like
printcap, it has a great many possible
parameters. For more information on terminfo, see
the manpage.
The lpsystem command manages printer access on System V systems. By default, most System V systems
share all local printers. Remote printer access settings are defined
in the /etc/lp/Systems file, which comes preconfigured with the following
entry:
+:x:-:s5:-:n:10:-:-:Allow all connections
As the comment at its end makes clear, this entry grants all remote systems access to the local printers. The first field defines the name of the host being granted access. When a plus sign (+) is used in this field, it means all hosts.
The fields in an /etc/lp/Systems entry are
separated by colons (:). The field containing an x and all of the fields containing a dash
(-) can be ignored. These fields
are unused.
The fourth field identifies the type of operating system used on
the remote client. It contains either s5 for System V computers that use LP to
print jobs, or bsd for BSD systems
that use LPD.
The n in the sixth field
indicates that this “connection” should never be timed out and removed
from the system. A timeout period in minutes could be entered in this
field, but this is not usually done. Keep the connection available as
long as the local server is up. The 10 is a related value. It indicates that if
a connection to a remote system fails, it should be retried after 10
minutes. This is a good value: it is long enough to give the remote
system a chance to restart after a crash. Both n and 10
are the defaults and don’t usually need to be changed.
Don’t directly edit the /etc/lp/Systems
file. Modify it with the lpsystem
command. To remove a system from the Systems
file, use lpsystem with the
-r
hostname command-line argument, where
hostname is the value in the first field of
the entry you wish to delete. For example, to remove the plus sign (+)
entry from the default /etc/lp/Systems file,
type:
# lpsystem -r +To add an entry to the Systems file, use
the lpsystem command without the
-r option. For example, to add a
BSD system named clock, enter:
# lpsystem -t bsd -y "Linux PC in room 820" clockThe command adds the following entry to the Systems file:
clock:x:-:bsd:-:n:10:-:-:Linux PC in room 820
The -t command-line option
defines the operating system type. The -y option defines the comment;
clock is, of course, the hostname. We accepted
the default values for the timeout and the retry intervals. These
could have been modified from the command line using the -T timeout and
the -R
retry options. See the manpage for lpsystem for more information.
The lpadmin and lpsystem commands are found on most System V
systems, including Solaris. Solaris 8, however, does not rely solely
on these commands and the /etc/lp directory to
configure LP. On a Solaris system, printers are configured through the
/etc/printers.conf file. The lpadmin command will add new printers to the
/etc/printers.conf file, but printers are usually
configured through the Printer Manager window of the admintool. Figure 9-1 shows the Printer Manager
window.
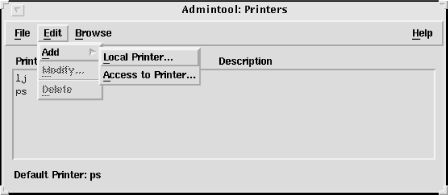
Clients select Add, then Access to Printer from the Edit menu, and enter the name of the remote printer and its server in the window that appears. Servers share printers simply by selecting Add, then LocalPrinter in the same menu and configuring a local printer.
All Unix systems provide some technique for sharing printers. The network administrator’s task is to ensure that the printers are accessible via the network and that they are properly secured.
NFS and lpd are file and
print sharing services for Unix systems, and are both
native TCP/IP applications. Microsoft Windows printer and file sharing
applications are based on NetBIOS (Network Basic Input Output System).
Samba bridges these two worlds, providing file and
print sharing for Unix and Windows systems. Samba is the key to
integrating Unix and Windows because it allows a Unix system to be a
file and print server for Windows clients, or to be a client of a
Windows server.
The protocol used between NetBIOS clients and servers is Server Message Block Protocol (SMB). Originally, NetBIOS was a monolithic protocol that took data all the way from the application to the physical network. Today, NetBIOS runs over TCP/IP, which allows NetBIOS applications to run on Unix systems that use TCP/IP.
Two things are needed to run NetBIOS on a TCP/IP network: a protocol to carry NetBIOS data over TCP/IP and a technique to map NetBIOS addresses to TCP/IP addresses. The protocol that transports NetBIOS is NetBIOS over TCP/IP (NBT), which is defined by RFCs 1001 and 1002. Address mapping is handled by a special NetBIOS name server. Samba provides both of these services.
Samba services are implemented as two daemons. The SMB daemon
(smbd ), the heart of Samba, provides the file and printer
sharing services. The NetBIOS name server daemon (nmbd) provides NetBIOS-to-IP-address name
service. NBT requires some method for mapping NetBIOS computer names,
which are the addresses of a NetBIOS network, to the IP addresses of a
TCP/IP network.
Samba is included in most Linux distributions and is installed
during the initial system installation. On a Red Hat system, the
/etc/rc.d/init.d/smb script runs at boot time, and
starts both smbd and nmbd. Samba is not included in Solaris 8, but
the software is available for download from the Internet. Go to http://www.samba.org to select your
nearest download site.
The Samba server is configured by the smb.conf
file. Look in the startup script to see where smbd expects to find the configuration file.
On a Red Hat system, it is /etc/samba/smb.conf.
On a Caldera system, it is /etc/samba.d/smb.conf.
The default used in most Samba documentation is
/usr/local/samba/lib/smb.conf. Use find or check the startup script so you know
where it is on your system.
The smb.conf file is divided into sections. Except for the global section, which defines configuration parameters for the entire server, the sections are named after shares. A share is a resource offered by the server to the clients. It can be either a filesystem or a shared printer.
The best way to learn about the smb.conf file is to look at one. Minus the printers share, which is covered later, the Red Hat smb.conf file contains these active lines:
[global]
   workgroup = MYGROUP
   server string = Samba Server
   printcap name = /etc/printcap
   load printers = yes
   printing = lprng
   log file = /var/log/samba/%m.log
   max log size = 0
   security = user
   encrypt passwords = yes
   smb passwd file = /etc/samba/smbpasswd
   socket options = TCP_NODELAY SO_RCVBUF=8192 SO_SNDBUF=8192
  dns proxy = no
[homes]
   comment = Home Directories
   browseable = no
   writable = yes
   valid users = %S
   create mode = 0664
   directory mode = 0775
Two sections of the Red Hat configuration file, global and homes, are listed above. The global section defines parameters that affect the entire server:
-
workgroup Defines the hierarchical grouping of hosts, called a workgroup, of which this server is a member. Replace the MYGROUP name in the example with a meaningful workgroup name of 15 characters or less. Make sure you use a meaningful name. Never use the name MYGROUP or WORKGROUP.
-
server string Defines the descriptive comment for this server that is displayed by the
netviewcommand on DOS clients. Change the string in the example to something meaningful for your system.-
printcap name Defines the location of the printcap file. The printcap file is used to identify the printers that are available to share. The default path is /etc/printcap.
-
load printers Specifies whether or not all the printers in the printcap file are to be shared. The default is
yes, use all the printers defined in the printcap file.nomeans don’t read the printcap file at all. Ifnois specified, all shared printers must be defined individually.-
printing Identifies the Unix printing system used by the server. In the example, it is LPR Next Generation (
lprng), which is an implementation of the standard LPR/LPD system described earlier in this chapter.-
log file Defines the location of the log file. The example contains the
%mvariable,[103] which varies according to the client’s NetBIOS name. This creates a different log file for each client with a file extension that is the client’s NetBIOS name. If the NetBIOS name of the client is crab, the log file is named /var/log/samba/log.crab. If the client’s NetBIOS name is rodent, the log file is /var/log/samba/log.rodent.-
max log size Defines the maximum size of a log file in kilobytes. The default is 5 MB, or 5000 KB. (If the maximum size is exceeded,
smbdcloses the log and renames it with the extension .old.) In the sample configuration, this is set to 0, which means that no maximum size is set for log files.-
security Defines the type of security used. There are four possible settings:
-
share Requests share-level security. This is the lowest level of security. The resource is shared with everyone. It is possible to associate a password with a share, but the password is the same for everyone.
-
user Requests user-level security. Every user is required to enter a username and an associated password. By default, this is the username and password defined in /etc/passwd. The default values for passwords can be changed. See the discussion of passwords later in this section.
-
server Defines server-level security. This is similar to user-level security, but an external server is used to authenticate the username and password. The external server must be defined by the password server option.
-
domain Defines domain-level security. In this scheme, the Linux server joins a Windows NT/2000 domain and uses the Windows NT/2000 domain controller as the server that approves usernames and passwords. Use the password server option to point to the Windows NT/2000 Primary Domain Controller (PDC). Log into the PDC and create an account for the Linux system. Finally, add these lines to the global section on the Linux system:
domain master = no
local master = no
preferred master = no
os level = 0
-
-
encrypt passwords Setting this option to
yescauses Samba to encrypt passwords before they are sent across the network. This makes the server more compatible with Windows clients from Windows 98 on, which default to encrypted passwords, and makes it harder for intruders to sniff passwords from the network. By default, Samba uses clear-text Unix passwords.smb passwd fileThis option points to the location of the smbpasswd file, where encrypted Samba passwords are stored. When encrypted passwords are used, the Samba server must maintain two password files: passwd and smbpasswd. Use the mksmbpasswd.sh script to build the initial smbpasswd file from the passwd file.
-
socket options Defines performance tuning parameters. This option is not required, although setting the send and receive buffers to 8 KB may slightly increase performance. In the case of this sample Red Hat configuration, the
TCP_NODELAYsetting, which causes Samba to send multiple packets with each transfer, has no effect because it is the default for versions of Samba 2.0.4 or higher. See Appendix B of Using Samba, by Kelly, Eckstein, and Collier-Brown (O’Reilly) for a good discussion of Samba performance tuning.-
dns proxy Specifies whether or not
nmbdshould forward unresolved NBNS queries to DNS.
In addition to the options described above, several other parameters are commonly used in the global section; they are shown in Table 9-3.
Table 9-3. Other global section parameters
Option | Function |
|---|---|
deadtime | Defines the timeout for inactive connections. |
debug level | Sets the level of messages written to the log. |
keepalive | Uses keepalives to check on the state of the clients. |
lock directory | Defines the path of the directory where wins.dat, status files, and lock files are stored. |
message command | Defines how smbd handles WinPopup messages. |
name resolve order | Defines the order in which services are queried to resolve NetBIOS names. Possible values are: lmhosts, hosts, wins, and bcast. |
netbios aliases | Defines other names the server will answer to. |
netbios name | Defines the server’s NetBIOS name. |
syslog | Maps debug levels to syslog levels. |
syslog only | Uses syslog instead of Samba log files. |
time server | Tells the server to advertise itself as a Windows time server. |
wins support | Enables the WINS name server. |
As the Red Hat sample configuration demonstrates, many servers come preconfigured with reasonable global parameters to begin running a simple server system. In addition to a preconfigured global section, the Red Hat configuration comes with a preconfigured homes section.
The homes section is a special share section. It tells smbd to permit users to access their home
directories through SMB. Unlike other share sections, which we cover
later, this section does not tell smbd the specific path of the directory
being shared. Instead, smbd uses
the home directory from the /etc/passwd file
based on the username of the user requesting the share. The
configuration parameters in the Red Hat homes
section are:
-
comment Provides a description of the share that is displayed in the comment field of the Network Neighborhood window when this share is viewed on a Windows PC.
-
browseable Specifies whether or not all users may browse the contents of this share.
nomeans that only users with the correct user ID are allowed to browse this share.yesmeans all users, regardless of UID, can browse the share. This parameter controls only browsing; actual access to the contents of the share is controlled by standard Linux file permissions.-
writable Specifies whether or not files can be written to this share. If
yes, the share can be written to. Ifno, the share is read-only. This parameter defines the actions permitted by Samba. Actual permission to write to the directory defined by the share is still controlled by standard Linux file permissions.valid usersThis option lists the users who are allowed to use this share. In this example,
%Scontains the name of the user allowed to access this share.create modeThis option defines the file permissions used when a client creates a file within the homes share.
directory modeThis option defines the permissions used when a client creates a directory within the homes share.
To share a directory through Samba, create a share section in smb.conf that describes the directory and the conditions under which it will be shared. To share a new directory named /usr/doc/pcdocs and the /home/research directory used in the NFS examples, add the following two share sections to the sample smb.conf file:
[pcdocs]
     comment = PC Documentation
     path = /usr/doc/pcdocs
     browseable = yes
     writable = no
     public = yes

[research]
     comment = Research Deptment Shared Directory
     path = /home/research
     browseable = no
     writable = yes
     create mode = 0750
     hosts allow = horseshoe,jerboas,crab,rodent
Each share section is labeled with a meaningful name. This
name is displayed as a folder in the Network Neighborhood window on
client PCs. The example contains some commands we have already
covered and a few new commands. The first new command is path, which defines the path of the
directory being offered by this share.
The pcdocs share also contains the
command public, which grants
everyone access, even if they don’t have a valid username or
password. These public users are granted “guest account” access to
the share. On a Linux system, this means they run as user
nobody and group nobody
and are limited to world permissions.
Files may be written to the research share. The create mode command controls the Unix permissions
used when a client writes a file to the share. In the example, the
permission 0750 specifies that files will be created as
read/write/execute for the owner, read/execute for the group, and no
permissions for the world. A related command, directory mode, defines the permission
used when a client creates a directory within a share. For
example:
directory mode = 0744
This sets the permissions for new directories to
read/write/execute for the owner, read/execute for the group, and
read/execute for the world. This is a reasonable setting that allows
cd and ls to work as expected.
The research share section also contains
a hosts allow command, which defines the clients
that are allowed to access this share. Even if a user has the
correct username and password, that user is allowed to access this
share only from the specified hosts. By default, all hosts are
granted access, and specific access is controlled by the username
and password.
In addition to the hosts
allow command, there is a
hosts deny command that defines computers that
are explicitly denied access to the share. Its syntax is similar to
that of the hosts allow
command.
Combining these two new share sections with the section that came with the Red Hat configuration creates a server that provides access to user home directories, to public directories, and to private directories limited to members of a group. This provides the same services as NFS in a manner that is simpler for Microsoft Windows clients to use. Samba can also be used to share printers with Windows clients.
Shared printers are configured through the smb.conf file. The Red Hat system comes with a smb.conf file that is preconfigured for sharing printers. The following lines occur right after the global and homes sections in the Red Hat smb.conf file:
[printers]
   comment = All Printers
   path = /var/spool/samba
   browseable = no
   guest ok = no
   writable = no
   printable = yes
The printcap and load printers lines in the global section
prepare the server to share the printers defined in the
printcap file. This
printers section makes those printers available
to the clients in a manner similar to the way the
homes section makes every home directory
available to the appropriate user. The Red Hat
printers share section contains five
parameters.
Three of the parameters, comment, browseable, and path, were explained previously. Here,
however, path does not define the
path of a shared file. Instead, it defines the path of the spool
directory for the SMB printers.
We introduce two new parameters in this configuration, the
first of which is printable,
which identifies this share as a printer. The default for this
option is no, meaning that by
default, shares are considered to be file shares instead of printer
shares. To create a printer share, set this option to yes. Setting printable = yes permits clients to write
printer files to the spool directory defined by the path option. Use a create mode command to limit the
permissions of the files created by clients in the spool directory.
For example, create mode = 0700.
The other new line, guest
ok, defines whether or not guest
accounts are permitted access to the resource. This is exactly the
same as the public option
discussed earlier, so these two options are used interchangeably.
no means that the user
nobody cannot send a print job to the printer.
A user must have a valid user account to use the printer. This is
designed to prevent guest users from abusing the printer, but it is
also useful to have a valid username for sorting out print jobs if
you use banner pages and accounting on the server.
Generally, a print server offers all of its printers to all of
its clients. However, individual share sections can be created for
each printer in the same way that they are created for file sharing.
If you don’t want to share every printer, remove the printers
section, set the load printers
option to no, and add individual
share sections for just those printers that you want to
share.
An smb.conf file with a share section for a specific printer might contain:
[global]
   workgroup = BOOKS
   server string = Print Server
   load printers = no
   security = user
[homes]
   comment = Home Directories
   browseable = no
   writable = yes
[hp5m]
   comment = PostScript Laser Printer
   path = /var/spool/samba
   browseable = no
   public = no
   create mode = 0700
   printable = yes
   printer = lp
This sample file has no printers section. Instead, a share
section named hp5m is added that shares a
printer named lp. The printer name must be
found in the printcap file for this to work.
The printcap option is allowed to
default to /etc/printcap.
smbd is the component of
Samba that provides file and printer sharing. The other component of
Samba is
nmbd.
The NetBIOS name server daemon (nmbd)
is the part of the basic Samba software distribution that turns a Unix
server into a NetBIOS name server (NBNS). nmbd can handle queries from LanManager
clients, and it can be configured to act as a Windows Internet Name
Server (WINS).
nmbd is configured in the
global section of the smb.conf file. The options that relate to running WINS
are:
-
wins support Set to
yesorno. This option determines whether or notnmbdruns as a WINS server.nois the default, so by default,nmbdprovides browsing controls but does not provide WINS service.-
dns proxy Set to
yesorno. This option tellsnmbdto use DNS to resolve WINS queries that it cannot resolve any other way. This is significant only ifnmbdis running as a WINS server. The default isyes. DNS can help with NetBIOS name resolution only if NetBIOS names and DNS hostnames are the same.-
wins server Set to the IP address of an external WINS server. This option is useful only if you’re not running a WINS server on your Linux system. This option tells Samba the address of the external WINS server to which it should send NetBIOS name queries.
-
wins proxy Set to
yesorno. The default isno. When set toyes,nmbdresolves broadcast NetBIOS name queries by turning them into unicast queries and sending them directly to the WINS server. Ifwins support = yesis set, these queries are handled bynmbditself. If insteadwinsserveris set, these queries are sent to the external server. Thewins proxyoption is needed only if clients don’t know the address of the server or don’t understand the WINS protocol.
The NetBIOS name server is generally started at boot time with the following command:
nmbd -D
When started with the -D
option, nmbd runs continuously as a
daemon listening for NetBIOS name service requests on port 137. The
server answers requests using registration data collected from its
clients and the NetBIOS name-to-address mappings it has learned from
other servers.
The lmhosts file is used to manually map addresses when that is necessary. Most WINS servers do not need an lmhosts file because the servers learn address mappings dynamically from clients and other servers. NetBIOS names are self-registered; clients register their NetBIOS names with the server when they boot. The addresses and names are stored in the WINS database, wins.dat. The lmhosts file is only a small part of the total database.
The lmhosts file is similar to the hosts file described in Chapter 4. Each entry begins with an IP address that is followed by a hostname. However, this time, the hostname is the NetBIOS name. Here is a sample lmhosts file:
$ cat /etc/lmhosts
172.16.12.3       horseshoe
172.16.12.1       crab
172.16.12.2       rodent
172.16.12.4       jerboas
Given this lmhosts file, the NetBIOS name rodent maps to IP address 172.16.12.2. Notice that these NetBIOS names are the same as the TCP/IP hostnames assigned to these clients. Use the same hostnames for both NetBIOS and TCP/IP. Doing otherwise limits configuration choices and creates confusion.
The Network Information Service (NIS)[104] is an administrative database that provides central control and automatic dissemination of important administrative files. NIS converts several standard Unix files into databases that can be queried over the network. The databases are called NIS maps. Some maps are created from files that you’re familiar with from system administration, such as the password file (/etc/passwd) and the groups file (/etc/group). Others are derived from files related to network administration:
- /etc/ethers
Creates the NIS maps ethers.byaddr and ethers.byname. The /etc/ethers file is used by RARP (see Chapter 2).
- /etc/hosts
Creates the maps hosts.byname and hosts.byaddr (see Chapter 3).
- /etc/networks
Creates the maps networks.byname and networks.byaddr (see Chapter 3).
- /etc/protocols
Creates the maps protocols.byname and protocols.byaddr (see Chapter 2).
- /etc/services
Creates a single map called services.byname (see Chapter 2).
- /etc/aliases
Defines electronic mail aliases and creates the maps mail.aliases and mail.byaddr (see Chapter 10).
Check the maps available on your server with the ypcat -x command. This
command produced the same map list on both our Solaris and Linux sample
systems. Your server may display a longer list. Here is the list from a
Linux system:
% ypcat -x
Use "passwd"    for map "passwd.byname"
Use "group"     for map "group.byname"
Use "networks"  for map "networks.byaddr"
Use "hosts"     for map "hosts.byname"
Use "protocols" for map "protocols.bynumber"
Use "services"  for map "services.byname"
Use "aliases"   for map "mail.aliases"
Use "ethers"    for map "ethers.byname"
NIS allows these important administrative files to be maintained
on a central server yet remain completely accessible to every
workstation on the network. All of the maps are stored on a master
server that runs the NIS server process ypserv. The maps are queried remotely by
client systems. Clients run ypbind to
locate the server.
The NIS server and its clients are a NIS domain, a term NIS shares with DNS. The NIS domain is identified by a NIS domain name. The only requirement for the name is that different NIS domains accessible through the same local network must have different names. Although NIS domains and DNS domains are distinct entities, Sun recommends using the DNS domain name as the NIS domain name to simplify administration and reduce confusion.
NIS uses its domain name to create a directory within /var/yp where the NIS maps are stored. For example, the DNS domain of our imaginary network is wrotethebook.com, so we also use this as our NIS domain name. NIS creates a directory named /var/yp/wrotethebook.com and stores the NIS maps in it.
While the NIS protocols and commands were originally defined by Sun Microsystems, the service is now widely implemented. To illustrate this, the majority of examples in this section come from Linux, not from Solaris. The syntax of the commands is very similar from system to system.
The command domainname
checks or sets the NIS domain name. The superuser can
make wrotethebook.com the NIS domain name by
entering:
# domainname wrotethebook.comThe NIS domain name is normally configured at startup by placing
the domainname command in one of the
startup files. On many systems, the NIS domain name that is used as
input to a domainname command is
placed in a second file. For example, on Solaris systems, the value for
the NIS domain name is taken from the
/etc/defaultdomain file. As shown here, defaultdomain
contains only the name of the NIS domain:
% cat /etc/defaultdomain
wrotethebook.com
On Red Hat Linux systems, the NIS domain name is just one of the values in the /etc/sysconfig/networ k file:
$ cat /etc/sysconfig/network
NETWORKING=yes
HOSTNAME=jerboas.wrotethebook.com
NISDOMAIN=wrotethebook.com
Initialize the NIS server and build the initial maps with make. The
/var/yp/Makefile contains the instructions needed
to build the maps. As noted above, it creates a directory using the NIS
domain name. The Makefile reads the files in the
/etc directory and places maps created from them in
the new directory. To initialize a Linux system as a NIS server:
# domainname wrotethebook.com
# cd /var/yp
# make
make[1]: Entering directory '/var/yp/wrotethebook.com'
Updating hosts.byname...
Updating hosts.byaddr...
Updating networks.byaddr...
Updating networks.byname...
Updating protocols.bynumber...
Updating protocols.byname...
Updating rpc.byname...
Updating rpc.bynumber...
Updating services.byname...
Updating passwd.byname...
Updating passwd.byuid...
Updating group.byname...
Updating group.bygid...
Updating netid.byname...
make[1]: Leaving directory '/var/yp/wrotethebook.com'
After initializing the maps, start the NIS server process ypserv and the NIS binder process ypbind:[105]
# ypserv
# ypbind
Our system is now running as both a NIS server and a NIS client. A
quick test with ypwhich shows that we
are bound to the correct server. Use ypcat or ypmatch to test that you can retrieve data
from the server. We use ypcat
in the following example:
# ypwhich
localhost
# ypcat hosts
172.16.55.105            cow cow.wrotethebook.com
172.16.55.106            pig pig.wrotethebook.com
172.16.26.36             island.wrotethebook.com island
127.0.0.1                localhost
The clients need only to define the correct domain name and to run
the binder software ypbind :
# domainname wrotethebook.com
# ypbind
Most NIS clients use ypbind to
locate the server. Using the NIS domain name, ypbind broadcasts a request for a server for
that domain. The first server that responds is the server to which the
client “binds.” The theory is that the server that responds quickest is
the server with the least workload. Generally this works well. However,
it is possible for the client to bind to an inappropriate system, e.g.,
a system that was accidentally configured to run ypserv or one that was maliciously configured
to be a false server. Because of this possibility, some systems allow
you to explicitly configure the server to which the client binds. Linux
provides the /etc/yp.conf file for this purpose.
The syntax of the entries in different versions of this file varies, so
see your system documentation before attempting to use it.
Place the NIS domain name in the appropriate startup file so that
the NIS setup survives the boot. The ypbind and ypserv commands are probably already in a
startup file. On a Red Hat Linux NIS system, ypbind and ypserv have their own scripts in the
/etc/init.d directory. In addition to putting a
value for NISDOMAIN in /etc/sysconfig/network, use
the chkconfig command to make sure
the ypbind and the ypserv scripts run at boot time.
NIS is a possible alternative to DNS, but most systems use both NIS and DNS. Hostnames can be converted to IP addresses by DNS, NIS, and the host file. The order in which the various sources are queried is defined in the nsswitch.conf file.
The Name Service Switch file (nsswitch.conf ) defines the order in which the sources of information are searched. Despite its name, it applies to more than just name service. All of the databases handled by NIS are covered by the nsswitch.conf file, as shown in this example:
hosts:      dns  nis  files
networks:   nis  [NOTFOUND=return]  files
services:   nis  files
protocols:  nis  files
The first entry in the file says that a hostname lookup is first
passed to DNS for resolution; if DNS fails to find a match, the lookup
is then passed to NIS and finally looked up in the
hosts file. The second entry says that network
names are looked up through NIS. The [NOTFOUND=return] string says to use the
networks file only if NIS fails to respond, that
is, if NIS is down. In this case, if NIS answers that it cannot find
the requested network name, terminate the search. The last two entries
search for services port and protocol numbers through NIS and then in
the files in the /etc directory.
Before leaving the topic of NIS, I should say a word about NIS+. It will be a short discussion, because I do not use NIS+ and do not know much about it.
NIS+ replaces NIS on Sun systems. It is not a new version of NIS, but a completely new software product that provides all the functionality of NIS and some new features. The new features are:
Improved security. NIS does not authenticate servers (as noted in the
ypbinddiscussion) or clients. NIS+ provides authentication of users with a secure DES-encrypted authentication scheme. NIS+ also provides various levels of access so that different users have authority to look at different levels of data. NIS can only provide the same access to everyone in the NIS domain.A hierarchical, decentralized architecture. NIS+, like DNS, is a distributed, hierarchical database system. This allows for a very large namespace. It also allows distributed management of the information structure while maintaining consistent access to the data. NIS is a flat structure. All information about a NIS domain comes from a single master server, and NIS domains are not interrelated.
Enhanced data structures. NIS converts ASCII files into simple keyed files that the NIS+ documentation calls “two-column maps.” NIS+ builds multicolumn database tables. Tables can be searched in a variety of ways to retrieve information about an entry. In addition, NIS+ tables can be linked together to provide related information about an entry.
Clearly, NIS+ has some excellent new features and advantages over NIS. So why don’t I use it? Good question! The hierarchical architecture and enhanced data structures are important if you have a very large network and lots of data in your namespace. However, many sites evolved using NIS on local subnets and do not see the need to move the entire enterprise under NIS+. Improved security seems like a real winner, but sites with low security requirements don’t see the need for additional security, and sites with high security requirements may already be behind a firewall that blocks external NIS queries. Additionally, NIS+ is not available for as many operating systems as NIS. And finally, other directory services, such as LDAP, that provide similar services and are more widely available have overtaken NIS+. Taken together, these reasons have slowed the move to NIS+.
To learn more about NIS+ and how to install it on your system, read the NIS+ Transition Guide, the Name Service Configuration Guide, and the Name Service Administration Guide. All of these are available from Sun as part of the Solaris System and Network Administration manual set.
NIS and NIS+ provide a wide range of system configuration information to their clients. However, they cannot provide all the information needed to configure a TCP/IP system. In the next two sections, we look at configuration servers that can do the entire job.
Bootstrap Protocol (BOOTP) was the first comprehensive configuration protocol. It provides all of the information commonly used to configure TCP/IP, from the client’s IP address to what print server the client should use. BOOTP was simple and effective; so effective, in fact, that it became the basis for Dynamic Host Configuration Protocol (DHCP). DHCP operates over the same UDP ports, 67 and 68, as BOOTP. It provides all of the services of BOOTP as well as some important extensions. Dynamic Host Configuration Protocol provides three important features:
- Backward compatibility with Bootstrap Protocol
A DHCP server can support BOOTP clients. Properly configured, a DHCP server can support all of your clients.
- Full configurations
A DHCP server provides a complete set of TCP/IP configuration parameters. (See Appendix D for a full list.) The network administrator can handle the entire configuration for the users.
- Dynamic address assignments
A DHCP server can provide permanent addresses manually, permanent addresses automatically, and temporary addresses dynamically. The network administrator can tailor the type of address to the needs of the network and the client system.
In this section we configure a DHCP server that supports BOOTP clients, performs dynamic address allocation, and provides a wide range of configuration parameters for its clients.
Several implementations of DHCP are available for Unix systems.
Some are commercial packages and some run on a specific version of Unix.
We use the Internet Software Consortium (ISC) Dynamic Host Configuration
Protocol Daemon (dhcpd). It is freely
available over the Internet and runs on a wide variety of Unix systems,
including both our Linux and Solaris sample systems. (See Appendix D for information on downloading
and compiling dhcpd.) If you use
different DHCP server software, it will have different configuration
commands, but it will probably perform the same basic functions.
dhcpd reads its configuration from the
/etc/dhcpd.conf file. The configuration file contains the instructions
that tell the server what subnets and hosts it services and what
configuration information it should provide them.
dhcpd.conf is an ASCII text file that is similar
to a C language source file. The easiest way to learn about the
dhcpd.conf file is to look at a sample:
# Define global values that apply to all systems.

default-lease-time 86400;
max-lease-time 604800;
get-lease-hostnames true;
option subnet-mask 255.255.255.0;
option domain-name "wrotethebook.com";
option domain-name-servers 172.16.12.1, 172.16.3.5;
option lpr-servers 172.16.12.1;
option interface-mtu 1500;

# Identify the subnet served, the options related
# to the subnet, and the range of addresses that
# are available for dynamic allocation.

subnet 172.16.3.0 netmask 255.255.255.0 {
    option routers 172.16.3.25;
    option broadcast-address 172.16.3.255;
    range 172.16.3.50 172.16.3.250;
}

subnet 172.16.12.0 netmask 255.255.255.0 {
    option routers 172.16.12.1;
    option broadcast-address 172.16.12.255;
    range 172.16.12.64 172.16.12.192;
    range 172.16.12.200 172.16.12.250;
}

# Identify each BOOTP client with a host statement

group {
    use-host-decl-names true;
    host 24seven {
        hardware ethernet 00:80:c7:aa:a8:04;
        fixed-address 172.16.3.4;
    }
    host rodent {
        hardware ethernet 08:80:20:01:59:c3;
        fixed-address 172.16.12.2;
    }
    host ring {
        hardware ethernet 00:00:c0:a1:5e:10;
        fixed-address 172.16.3.16;
    }
}
This sample configuration file defines a server that is
connecting to and serving two separate subnets. It assigns IP
addresses dynamically to the DHCP clients on each subnet and supports
a few BOOTP clients. All of the lines that begin with a sharp sign (#)
are comments. The first few real configuration lines in the file
specify a set of parameters and options that apply to all of the
subnets and clients served. The first three lines are parameters,
which provide direction to the server. All three of the sample
parameters define some aspect of how dhcpd should handle dynamic address assignments.
-
default-lease-time Tells the server how many seconds long a default address lease should be. The client can request that the address be leased for a specific period of time. If it does, it is assigned the address for that period of time, given some restrictions. Frequently, clients do not request a specific lifetime for an address lease. When that happens, the default-lease-time is used. In the example, the default lease is set to one day (86400 seconds).
-
max-lease-time Sets the upper limit for how long an address can be leased. Regardless of the length of time requested by the client, this is the longest address lease that
dhcpdwill grant. The life of the lease is specified in seconds. In the example here, it is one week.-
get-lease-hostnames Directs
dhcpdto provide a hostname to each client that is assigned a dynamic address. Further, the hostname is to be obtained from DNS. This parameter is a Boolean. If it is set to false, which is the default, the client receives an address but no hostname. Looking up the hostname for every possible dynamic address adds substantial time to the startup. Set this to false. Set it to true only if the server handles a very small number of dynamic addresses.
The configuration file uses a few more parameters that will be explained as we go. For a complete list of all DHCP parameters, see Appendix D.
The next four lines are options. The options all start with the
keyword option. The keyword is
followed by the name of the option and the value assigned to the
option. Options define configuration values that are used by the
client.
The meanings of the sample options are easy to deduce. The option names are very descriptive. We are providing the clients with the subnet mask, domain name, domain name server addresses, and print server address. These values are similar to those that could have been provided with the old BOOTP service.
DHCP, however, can do more than BOOTP. For sake of illustration,
we also define the maximum transmission unit (MTU). The sample interface-mtu option tells the client that
the MTU is 1500 bytes. In this case, the option is not needed because
1500 bytes is the default for Ethernet. However, it illustrates the
point that DHCP can provide a very complete set of configuration
information.
The subnet statements define the networks that dhcpd serves. The identity of each network
is determined from the address and the address mask, both of which are
required by the subnet statement. dhcpd provides configuration services only
to clients that are attached to one of these networks. There must be a
subnet statement for every subnet to which the server physically
connects, even if some subnets do not contain any clients. dhcpd requires the subnet information to
complete its startup.
The options and parameters defined in a subnet statement apply
only to the subnet and its clients. The meanings of the sample options
are clear. They tell the clients what router and what broadcast
address to use. The range parameter
is more interesting, as it goes to the heart of one of DHCP’s key
features.
The range parameter defines the scope of addresses that are
available for dynamic address allocation. It always occurs in
association with a subnet statement, and the range of addresses must
fall within the address space of the subnet. The scope of the range parameter is defined by the two
addresses it contains. The first address is the lowest address that
can be automatically assigned, and the second is the highest address
that can be assigned. The first range parameter in the example identifies a
contiguous group of addresses from 172.16.12.50 to 172.16.12.250 that
are available for dynamic assignment. Notice that the second subnet
statement has two range parameters.
This creates two separate groups of dynamic addresses. The reason for
this might be that some addresses were already manually assigned
before the DHCP server was installed. Regardless of the reason, the
point is that we can define a noncontiguous dynamic address space with
multiple range statements.
If a range parameter is
defined in a subnet statement, any DHCP client on the subnet that
requests an address is granted one as long as addresses are available.
If a range parameter is not
defined, dynamic addressing is not enabled.
To provide automatic address assignment for BOOTP clients, add the dynamic-bootp argument to the range parameter. For example:
range dynamic-bootp 172.16.8.10 172.16.8.50;
By default, BOOTP clients are assigned permanent addresses. It
is possible to override this default behavior with either the dynamic-bootp-lease-cutoff or the dynamic-bootp-lease-length parameter. However, BOOTP clients do not understand
address leases and do not know that they should renew an address.
Therefore the dynamic-bootp-lease-cutoff and the dynamic-bootp-lease-length parameters are
used only in special circumstances. If you’re interested in these
parameters, see Appendix D.
Each BOOTP client should have an associated host statement that is used to assign the client
configuration parameters and options. It can be used to manually
assign the client a permanent, fixed address. The sample configuration
file ends with three host statements: one for
24seven, one for rodent, and
one for ring. Each host statement contains a
hardware parameter that defines the type of network hardware (ethernet) and the physical network address
(e.g., 08:80:20:01:59:c3) used by
the client. The hardware parameter is required in host statements for
BOOTP clients. The Ethernet address is used by dhcpd to identify the BOOTP client. DHCP
clients can also have associated host statements. For DHCP clients, the
hardware parameter is optional because a DHCP client can be identified
by the dhcp-client-identifier
option. However, it is simpler for a DHCP client connected via
Ethernet to be identified by its Ethernet address.
A wide variety of parameters and options can be defined in the
host statement. For example, adding
to each host statement an option
similar to the following assigns each client a hostname:
option host-name 24seven;
It is often easier, however, to define options and parameters at
a higher level. Global options apply to all systems. Subnet options
apply to every client on the subnet, but the options defined inside a
host statement apply to only a
single host. The host-name option
shown above would need to be repeated with a different hostname in
every host statement. An easier way to define a parameter or option
for a group of hosts is to use a group statement.
A group statement groups together any other statements. The
sole purpose of the group statement
is to apply parameters and options to all members of the group. That is exactly what we do in the
example. The group statement groups
all of the host statements together. The use-host-decl-names parameter in the
group statement applies to every
host in the group. This particular parameter tells dhcpd to assign each client the hostname
that is declared on the host statement associated with that client,
which makes the host-name option
unnecessary for this configuration.
Given the sample dhcpd.conf file shown
earlier, when dhcpd receives a
request packet from a client with the Ethernet address
08:80:20:01:59:c3, it sends that client:
The address 172.16.12.2
The hostname rodent
The default router address 172.16.12.1
The broadcast address 172.16.12.255
The subnet mask 255.255.255.0
The domain name wrotethebook.com
The domain name server addresses 172.16.12.1 and 172.16.3.5
The print server address 172.16.12.1
The MTU for an Ethernet interface
The client receives all global values, all subnet values, and all host values that are appropriate. Clearly, DHCP can provide a complete configuration.
Your DHCP configuration, though larger in the number of systems supported, probably is simpler than the example. Some commands appear in the sample primarily for the purpose of illustration. The biggest difference is that most sites do not serve more than one subnet with a single configuration server. Servers are normally placed on each subnet. This reduces the burden on the server, particularly the burden that can be caused by a network-wide power outage. It eliminates the need to move boot packets through routers. Also, the fact that addresses are assigned at the subnet level makes placing the assigning system at the subnet level as well somehow more logical. DHCP servers are not the only servers that work best when located close to the clients. In the next section we look at how to keep distributed servers updated.
Large networks have multiple servers. As noted earlier, the servers are often distributed around the network with a server on every subnet. This improves network efficiency, but it conflicts with the goal of central configuration control. The more servers you have, the more dispersed the control, and the more likely that a configuration error will occur. Implementing distributed servers requires a technique for maintaining central control and coordinating configuration information among the servers. TCP/IP offers several techniques for doing this.
Any file transfer protocol can be used to move configuration data or any other kind of data from a central system to a group of distributed systems. Either FTP or TFTP will work, but both present difficulties when used in this way. FTP and TFTP are interactive protocols, and require multiple commands to retrieve a file, making them difficult to script. Additionally, FTP requires password authentication before it grants access to a file, and most security experts frown on storing passwords in scripts. For these reasons, we don’t concentrate on using these protocols to distribute the configuration file. Besides, if you know how to use FTP (and you should!), you know how to use it to send a configuration file.
Another possibility is to use NFS to distribute the information. NFS allows files on the server to be used by clients as if they are local files. It is a powerful tool, but it does have limitations when used to distribute configuration information to boot servers. The same power outage that affects the distributed servers can cause the central server to crash. The distributed servers and their clients can be delayed in booting while waiting for the central server to come back online. Sharing a single copy of the configuration file conflicts with the effort to distribute boot services because it puts too much reliance on the central server.
One way to avoid this problem is for the distributed servers to periodically copy the configuration file from the mounted filesystem to a local disk. This is very simple to script, but it creates the possibility that the servers will be “out of sync” at certain times—the distributed servers copy the configuration file on a periodic schedule without knowing if, in the interim, the master file has been updated. Of course, it is possible for all of the remote servers to export filesystems that the central server mounts. The central server can then copy the configuration file directly to the remote filesystems whenever the master file is updated. However, there are easier ways to do this.
The Unix r-commands rcp and rdist provide the most popular methods for
distributing the configuration file.
Remote copy (rcp) is simply a file transfer protocol. It
has two advantages over FTP for this particular application: it is
easy to script and it does not require a password. rcp is easy to script because only a single
line is needed to complete a transfer. An example of transferring the
file dhcpd.conf from the master server to a
remote server named arthropod.wrotethebook.com
is:
# rcp /etc/dhcpd.conf arthropod.wrotethebook.com:/etc/dhcpd.confFor every remote server that the file is sent to, add a line like this one to the procedure that updates the master configuration file.
rcp is only one choice for
distributing the central configuration file. rdist, while a little harder to use, is
often a better choice because it has several features that make it
particularly well suited for this application.
The Remote File Distribution Program
(rdist) is designed to maintain identical copies of files on
multiple hosts. A single rdist
command can distribute several different files to many different
hosts. It does this by following the instructions stored in an
rdist configuration file called a
Distfile.
The function of a Distfile is similar to that of the Makefile used by the make command, and it has a similar syntax
and structure. Now, don’t panic! It’s not that bad. The initial
configuration of an rdist command
is more difficult than the straightforward syntax of an rcp command, but the rdist command provides much more control and
is much easier to maintain in the long run.
A Distfile is composed of
macros and primitives.
Macros can be assigned a single value or a list of values. If a list
of values is used, the list is enclosed in parentheses, e.g.,
macro = (
value value ). Once
assigned a value, the macro is referenced using the syntax ${ macro }, where macro is
the name of the macro. The other components of a
Distfile, the primitives, are explained in Table 9-4.[106]
Table 9-4. rdist primitives
Primitive | Function |
|---|---|
install | Recursively updates files and directories. |
notify address | Sends error/status mail messages to address. |
except file | Omits file from the update. |
except_pat pattern | Omits filenames that match the pattern. |
special "command " | Executes command after each file update. |
The simplest way to understand how the primitives and macros are
combined to make a functioning Distfile is to
look at a sample. The following configuration file distributes the
current version of dhcpd and the
latest dhcpd.conf configuration file to the
remote boot servers horseshoe,
arthropod, and
limulus:
HOSTS = ( horseshoe root@limulus arthropod )
FILES = ( /usr/sbin/dhcpd /etc/dhcpd.conf )

${FILES} -> ${HOSTS}
       install ;
       notify craig@crab.wrotethebook.com
Let’s look at each line of the file:
-
HOSTS = ( horseshoe root@limulus arthropod ) This line defines HOSTS, a macro that contains the hostname of each of the remote servers. Notice the entry for limulus. It tells
rdistto log in as root on limulus to perform the update. On horseshoe and arthropod,rdistwill run under the same username it has on the local host.-
FILES = ( /usr/sbin/dhcpd /etc/dhcpd.conf ) This macro, FILES, defines the two files that will be sent.
${FILES} -> ${HOSTS}The
->symbol has a special meaning tordist. It tellsrdistto copy the files named at the left of the symbol to the hosts named at the right. In this case, FILES is a macro that contains the file names /usr/sbin/dhcpd and /etc/dhcpd.conf, and HOSTS is a macro that contains the hostnames horseshoe, limulus, and arthropod. Therefore this command tellsrdistto copy two files to three different hosts. Any primitives that follow apply to this file-to-host mapping.install ;The
installprimitive explicitly tellsrdistto copy the specified files to the specified hosts if the corresponding file is out of date on the remote host. A file is considered out of date if the creation date or the size is not the same as the master file. The semicolon at the end of this line indicates that another primitive follows.notify craig@crab.wrotethebook.comStatus and error messages are to be mailed to craig@crab.wrotethebook.com.
Additional files and hosts can be easily added to this file. In
the long run, most people find rdist the simplest way to distribute
multiple files to multiple hosts.
One final note: the configuration file does not have to be
called Distfile. Any filename can be specified on
the rdist command line using the
-f option. For example, the
Distfile shown above could be saved under the
name dhcp.dist and invoked with the following
command:
% rdist -f dhcp.distIn this section we configure a system to act as a post office server. A post office server, or mailbox server, is a computer that holds mail for a client computer until the client is ready to download it for the mail reader. This service is essential to support mobile users and small systems that are frequently offline and thus not able to receive mail in real time. We look at two techniques for creating a post office server: Post Office Protocol (POP), which is the original protocol for this purpose, and Internet Message Access Protocol (IMAP), which is a popular alternative. We start with POP.
A Unix host turns into a Post Office Protocol server when it
runs a POP daemon. Check your system’s documentation to see if a POP
daemon is included in the system software. If it isn’t clear from the
documentation, check the inetd.conf or
xinetd.conf file, or try the simple telnet test from Chapter 4. If the server responds to the
telnet test, not only is the daemon
available on your system, it is installed and ready to run.
% telnet localhost 110
Trying 127.0.0.1 ...
Connected to localhost.
Escape character is ' ]'.
+OK POP3 crab Server (Version 1.004) ready
quit
+OK POP3 crab Server (Version 1.001) shutdown
Connection closed by foreign host.
This example is from a system that comes with POP3 ready to run. The Red Hat Linux system includes POP3, although it must be enabled in the /etc/xinetd.d/pop3 file before it can be used. The Solaris system, on the other hand, does not ship with POP2 or POP3. Don’t worry if your system doesn’t include this software. POP3 software is available from several sites on the Internet where it is stored in both the popper17.tar and the pop3d.tar files. I have used them both, and both work fine.
If you don’t have POP3 on your system, download the source code.
Extract it using the Unix tar
command. pop3d.tar creates a directory called
pop3d under the current directory, but
popper17.tar does not. If you decide to use
popper, create a new directory
before extracting it with tar. Edit
the Makefile to configure it for your system and do a make to compile the POP3 daemon. If it
compiles without errors, install the daemon in a system
directory.
On a Solaris system, POP3 is started by the Internet daemon,
inetd. Start POP3 from inetd by placing the following in the
inetd.conf file:
pop3 stream tcp nowait root /usr/sbin/pop3d pop3d
This entry assumes that you are using pop3d, that you placed the executable in the
/usr/sbin directory, and that the port for this
daemon is identified in the /etc/services file by
the name pop3. If these things
aren’t true, adjust the entry accordingly.
Make sure that POP3 is actually defined in /etc/services. If it isn’t, add the following line to that file:
pop3 110/tcp # Post Office Version 3
Once the lines are added to the services
file and the inetd.conf file, send a SIGHUP to
inetd to force it to read the new
configuration, as in this example:
# ps -ef | grep inetd
  root  109  1  0   Jun 09 ?   0:01 /usr/sbin/inetd -s
# kill -HUP 109
Now that POP3 is installed, rerun the test using telnet localhost pop3. If the POP3 daemon answers, you’re in
business. All users who have a valid user account on the system are
now able to download mail via POP3 or read the mail directly on the
server.
Internet Message Access Protocol (IMAP) is an alternative to POP. It provides the same basic service as POP and adds features to support mailbox synchronization, which is the ability to read mail on a client or directly on the server while keeping the mailboxes on both systems completely up to date. On an average POP server, the entire contents of the mailbox are moved to the client and either deleted from the server or retained as if never read. Deletion of individual messages on the client is not reflected on the server because all the messages are treated as a single unit that is either deleted or retained after the initial transfer of data to the client. IMAP provides the ability to manipulate individual messages on either the client or the server and to have those changes reflected in the mailboxes of both systems.
IMAP is not a new protocol; it is about as old as POP3. There have been four distinct versions: IMAP, IMAP2, IMAP3, and the current version, IMAP4, which is defined in RFC 2060. IMAP is popular because of the importance of email as a means of communicating, even when people are out of the office, and the need for a mailbox that can be read and maintained from anywhere.
Solaris 8 does not include IMAP. IMAP binaries for Solaris are available from http://sunfreeware.com. IMAP source code can be obtained via anonymous FTP from ftp://ftp.cac.washington.edu. Download /mail/imap.tar.Z from ftp://ftp.cac.washington.edu as a binary image. Uncompress and untar the file. This creates a directory containing the source code and Makefile needed to build IMAP.[107]
Read the Makefile carefully. It supports many versions of Unix.
If you find yours listed, use the three-character operating system
type listed there. For a Solaris system using the gcc compiler, enter:
# make gsoIf it compiles without error, as it does on our Solaris system,
it produces three daemons: ipop2d,
ipop3d, and imapd. We are familiar with installing POP3.
The new one is imapd. Install it in
/etc/services:
imap 143/tcp # IMAP version 4
Also add it to /etc/inetd:
imap stream tcp nowait root /usr/sbin/imapd imapd
Now basic IMAP service is available to every user with an account on the server.
A nice feature of the University of Washington package is that it provides implementations of POP2 and POP3 as well as IMAP. This is important because many email clients run POP3. The IMAP server can be accessed only by an IMAP client. Installing POP3 along with IMAP gives you the chance to support the full range of clients.
Most Linux systems include IMAP, so compiling the source code is
not a requirement. Simply make sure that the service is listed in the
/etc/services file and available through inetd or xinetd. On Red Hat Linux 7, the
/etc/xinetd.d/imap file is disabled by default
and must be enabled to allow clients access to the service.
POP and IMAP are important components of a mail service. However, there is a great deal more to configuring a complete email system, as we will see in the next chapter.
This chapter covered several important TCP/IP network services.
Network File System (NFS) is the leading TCP/IP file-sharing protocol for Unix systems. It allows server systems to share directories with clients that are then used by the clients as if they were local disk drives. NFS uses trusted hosts and Unix UIDs and GIDs for authentication and authorization.
Unix printer sharing is available on a TCP/IP network through the
use of the Line Printer Daemon (LPD) or the Line Printer (LP) server.
The lpd software is originally from
BSD Unix but is widely available. The lpd program reads the printer definitions from
the printcap file. The LP software is originally
from System V. It uses terminfo for printer
capabilities and the /etc/lp directory to configure
individual printers. Solaris 8 printer sharing is based on the LP
software but it configures printers in a single file,
/etc/printers.conf.
Windows PCs use NetBIOS and Server Message Block (SMB) protocol for file and printer sharing. Unix systems can act as SMB servers by using the Samba software package. Samba provides file and printer sharing in a single package that is configured through the smb.conf file.
Network Information Service (NIS) is a server that distributes several system administration databases. It allows central control and automatic distribution of important system configuration information.
Dynamic Host Configuration Protocol (DHCP) extends BOOTP to provide the full set of configuration parameters defined in the Requirements for Internet Hosts RFC. It also provides for dynamic address allocation, which allows a network to make maximum use of a limited set of addresses.
Large networks use distributed boot servers to avoid overloading a
single server and to avoid sending boot parameters through IP routers.
The configuration files on distributed boot servers are kept
synchronized through file transfer, NFS file sharing, or the Remote File
Distribution Program (rdist).
Post Office Protocol (POP) and Internet Message Access Protocol (IMAP) servers allow email to be stored on the mail server until the user is ready to read it. In the next chapter, we take a closer look at configuring an electronic mail system as we explore sendmail.
[97] Solaris uses the term sharing. Most other systems use the term exporting.
[98] Alternatively, the prefix rpc. may be used on the daemon names. For example, the Slackware Linux system uses the filename rpc.nfsd for the NFS daemon. Check your system’s documentation.
[99] Of the eight options discussed in this section, three,
squash_uid, squash_gid, and map_static, map a range of UIDs and
GIDs. These three options are not available in the kernel-level
NFS (knfsd) used on some
Linux systems. Mapping for knfsd must be done with the other
options.
[100] Red Hat Linux uses a special script, /etc/init.d/netfs, just for mounting all of the different networked filesystems, which include NFS.
[101] grep is used because
the fstab file contains other information
not related to NFS.
[102] See the description of NFS mount options earlier in this chapter.
[103] Samba has about 20 different variables. See the manpage for a full list.
[104] NIS was formerly called the “Yellow Pages,” or yp. Although the name has changed, the abbreviation yp is still used.
[105] If, during the initial build of the NIS maps, make complains that ypserv is not registered, run ypserv before running make.
[106] For more details, see the rdist manpage.
[107] The name of the directory tells you the current release level of the software. At this writing, it is imap-2001.