Table of Contents for
TCP/IP Network Administration, 3rd Edition
 TCP/IP Network Administration, 3rd Edition
Published by
O'Reilly Media, Inc., 2002
TCP/IP Network Administration, 3rd Edition
Published by
O'Reilly Media, Inc., 2002
- Cover
- TCP/IP Network Administration, 3rd Edition
- Dedication
- Preface
- 1. Overview of TCP/IP
- 2. Delivering the Data
- 3. Network Services
- 4. Getting Started
- 5. Basic Configuration
- 6. Configuring the Interface
- 7. Configuring Routing
- 8. Configuring DNS
- 9. Local Network Services
- 10. sendmail
- 11. Configuring Apache
- 12. Network Security
- 13. Troubleshooting TCP/IP
- A. PPP Tools
- B. A gated Reference
- C. A named Reference
- D. A dhcpd Reference
- E. A sendmail Reference
- F. Solaris httpd.conf File
- G. RFC Excerpts
- Index
- Index
- Index
- Index
- Index
- Index
- Index
- Index
- Index
- Index
- Index
- Index
- Index
- Index
- Index
- Index
- Index
- Index
- Index
- Index
- Index
- Index
- Index
- Index
- Index
- Index
- Index
- About the Author
- Colophon
- Copyright
Hosts attached to a network—particularly the worldwide Internet—are exposed to a wider range of security threats than are unconnected hosts. Network security reduces the risks of connecting to a network. But by nature, network access and computer security work at cross-purposes. A network is a data highway designed to increase access to computer systems, while security is designed to control access to those systems. Providing network security is a balancing act between open access and security.
The highway analogy is very appropriate. Like a highway, the network provides equal access for all—welcome visitors as well as unwelcome intruders. At home, you provide security for your possessions by locking your house, not by blocking the streets. Likewise, network security requires adequate security on individual host computers. Simply securing the network with a firewall is not enough.
In very small towns where people know each other, doors are often left unlocked. But in big cities, doors have deadbolts and chains. The Internet has grown from a small town of a few thousand users into a big city of millions of users. Just as the anonymity of a big city turns neighbors into strangers, the growth of the Internet has reduced the level of trust between network neighbors. The ever-increasing need for computer security is an unfortunate side effect. Growth, however, is not all bad. In the same way that a big city offers more choices and more services, the expanded network provides increased services. For most of us, security consciousness is a small price to pay for network access.
Network break-ins have increased as the network has grown and become more impersonal, but it is easy to exaggerate the extent of these security breaches. Overreacting to the threat of break-ins may hinder the way you use the network. Don’t make the cure worse than the disease. The best advice about network security is to use common sense. RFC 1244, now replaced by RFC 2196, stated this principle very well:
Common sense is the most appropriate tool that can be used to establish your security policy. Elaborate security schemes and mechanisms are impressive, and they do have their place, yet there is little point in investing money and time on an elaborate implementation scheme if the simple controls are forgotten.
This chapter emphasizes the simple controls that can be used to increase your network’s security. A reasonable approach to security, based on the level of security required by your system, is the most cost-effective—both in terms of actual expense and in terms of productivity.
One of the most important network security tasks, and probably one of the least enjoyable, is developing a network security policy. Most computer people want a technical solution to every problem. We want to find a program that “fixes” the network security problem. Few of us want to write a paper on network security policies and procedures. However, a well-thought-out security plan will help you decide what needs to be protected, how much you are willing to invest in protecting it, and who will be responsible for carrying out the steps to protect it.
The first step toward developing an effective network security plan is to assess the threat that connection presents to your systems. RFC 2196, Site Security Handbook, identifies three distinct types of security threats usually associated with network connectivity:
- Unauthorized access
A break-in by an unauthorized person.
- Disclosure of information
Any problem that causes the disclosure of valuable or sensitive information to people who should not have access to the information.
- Denial of service (DoS)
Any problem that makes it difficult or impossible for the system to continue to perform productive work.
Assess these threats in relation to the number of users who would be affected, as well as to the sensitivity of the information that might be compromised. For some organizations, break-ins are an embarrassment that can undermine the confidence that others have in the organization. Intruders tend to target government and academic organizations that will be embarrassed by the break-in. But for most organizations, unauthorized access is not a major problem unless it involves one of the other threats: disclosure of information or denial of service.
Assessing the threat of information disclosure depends on the type of information that could be compromised. While no system with highly classified information should ever be directly connected to the Internet, systems with other types of sensitive information might be connected without undue hazard. In most cases, files such as personnel and medical records, corporate plans, and credit reports can be adequately protected by network access controls and standard Unix file security procedures. However, if the risk of liability in case of disclosure is great, the host may choose not to be connected to the Internet.
Denial of service can be a severe problem if it impacts many users or a major mission of your organization. Some systems can be connected to the network with little concern. The benefit of connecting individual workstations and small servers to the Internet generally outweighs the chance of having service interrupted for the individuals and small groups served by these systems. Other systems may be vital to the survival of your organization. The threat of losing the services of a mission-critical system must be evaluated seriously before connecting such a system to the network.
An insidious aspect of DoS appears when your system becomes an unwitting tool of the attackers. Through unauthorized access, intruders can place malicious software on your system in order to use your system as a launching pad for attacks on others. This is most often associated with Microsoft systems, but any type of computer system can be a victim. Preventing your system from becoming a tool of evil is an important reason for protecting it.
In his class on computer security, Brent Chapman classifies information security threats into three categories: threats to the secrecy, to the availability, and to the integrity of data. Secrecy is the need to prevent the disclosure of sensitive information. Availability means that you want information and information processing resources available when they are needed; a denial-of-service attack disrupts availability. The need for the integrity of information is equally obvious, but its link to computer security is more subtle. Once someone has gained unauthorized access to a system, the integrity of the information on that system is in doubt. Some intruders just want to compromise the integrity of data; we are all familiar with cases where web vandals gain access to a web server and change the data on the server in order to embarrass the organization that runs the web site. Thinking about the impact network threats have on your data can make it easier to assess the threat.
Network threats are not, of course, the only threats to computer security, or the only reasons for denial of service. Natural disasters and internal threats (threats from people who have legitimate access to a system) are also serious. Network security has had a lot of publicity, so it’s a fashionable thing to worry about, but more computer time has probably been lost because of fires and power outages than has ever been lost because of network security problems. Similarly, more data has probably been improperly disclosed by authorized users than by unauthorized break-ins. This book naturally emphasizes network security, but network security is only part of a larger security plan that includes physical security and disaster recovery plans.
Many traditional (non-network) security threats are handled, in part, by physical security. Don’t forget to provide an adequate level of physical security for your network equipment and cables. Again, the investment in physical security should be based on your realistic assessment of the threat.
One approach to network security is to distribute the responsibility for and control over different segments of a large network to small groups within the organization. This approach involves a large number of people in security and runs counter to the school of thought that seeks to increase security by centralizing control. However, distributing responsibility and control to small groups can create an environment of small, easily monitored networks composed of a known user community. Using the analogy of small towns and big cities, it is similar to creating a neighborhood watch to reduce risks by giving people connections with their neighbors, mutual responsibility for one another, and control over their own fates.
Additionally, distributing security responsibilities formally recognizes one of the realities of network security—most security actions take place on individual systems. The managers of these systems must know that they are responsible for security and that their contribution to network security is recognized and appreciated. If people are expected to do a job, they must be empowered to do it.
Subnets are a possible tool for distributing network control. A subnet administrator should be appointed when a subnet is created. The administrator is then responsible for the security of the network and for assigning IP addresses to the devices connected to the networks. Assigning IP addresses gives the subnet administrator some control over who connects to the subnet. It also helps to ensure that the administrator knows each system that is connected and who is responsible for that system. When the subnet administrator gives a system an IP address, he also delegates certain security responsibilities to the system’s administrator. Likewise, when the system administrator grants a user an account, the user takes on certain security responsibilities.
The hierarchy of responsibility flows from the network administrator to the subnet administrator to the system administrator and finally to the user. At each point in this hierarchy the individuals are given responsibilities and the power to carry them out. To support this structure, it is important for users to know what they are responsible for and how to carry out that responsibility. The network security policy described in the next section provides this information.
If your site adopts distributed control, you must develop a system for disseminating security information to each group. Mailing lists for each administrative level can be used for alerts and other real-time information. An internal web site can be used to provide policy, background, and archival information as well as links to important security sites.
The network administrator receives security information from outside authorities, filters out irrelevant material, and forwards the relevant material to the subnet administrators. Subnet administrators forward the relevant parts to their system administrators, who in turn forward what they consider important to the individual users. The filtering of information at each level ensures that individuals get the information they need without receiving too much. If too much unnecessary material is distributed, users begin to ignore everything they receive.
At the top of this information structure is the information that the network administrator receives from outside authorities. In order to receive this, the network administrator should join the appropriate mailing lists and newsgroups and browse the appropriate web sites. A few places to start looking for computer security information are the following:
- Your Unix vendor
Many vendors have their own security information mailing lists. Most vendors also have a security page on their web sites. Place a link on your internal web site to the vendor information that you find important and useful.
- The Bugtraq archive
Bugtraq reports on software bugs, some of which are exploited by intruders. Knowing about these bugs and the fixes for them is the single most important thing you can do to improve system security. Bugtraq is widely available on the Web. Two sites I use are http://www.geek-girl.com/bugtraq and http://www.securityfocus.com, which provide access to a wide range of security information.
- Security newsgroups
The comp.security newsgroups—comp.security.unix, comp.security.firewalls, comp.security.announce, and comp.security.misc—contain some useful information. Like most newsgroups, they also contain lots of unimportant and uninteresting material. But they do contain an occasional gem.
- FIRST web site
The Forum of Incident Response and Security Teams (FIRST) is a worldwide organization of computer security response teams. FIRST provides a public web site for computer security information.
- NIST Computer Security Alerts
The National Institute of Standards and Technology’s Computer Security Division maintains a web site with pointers to security-related web pages all over the world. Follow the Alerts link from http://csrc.nist.gov.
- CERT advisories
The Computer Emergency Response Team (CERT) advisories provide information about known security problems and the fixes to these problems. You can retrieve these advisories from the CERT web site at http://www.cert.org.
- SANS Institute
The System Administration, Networking and Security (SANS)Institute offers informative security newsletters that are delivered weekly via email . They also have a useful online reading room. These resources are available from their web site, http://www.sans.org.
- Exploit sites
Most intruders use canned attack scripts that are available from the Web. Sites that provide the scripts often provide discussions of the current security vulnerabilities that might affect your system. http://www.insecure.org is a good site because it provides descriptions of current exploits as well as plenty of other useful information.
Security is largely a “people problem.” People, not computers, are responsible for implementing security procedures, and people are responsible when security is breached. Therefore, network security is ineffective unless people know their responsibilities. It is important to write a security policy that clearly states what is expected and from whom. A network security policy should define:
- The network user’s security responsibilities
The policy may require users to change their passwords at certain intervals, to use passwords that meet certain guidelines, or to perform certain checks to see if their accounts have been accessed by someone else. Whatever is expected from users, it is important that it be clearly defined.
- The system administrator’s security responsibilities
The policy may require that every host use specific security measures, login banner messages, or monitoring and accounting procedures. It might list applications that should not be run on any host attached to the network.
- The proper use of network resources
Define who can use network resources, what things they can do, and what things they should not do. If your organization takes the position that email, files, and histories of computer activity are subject to security monitoring, tell the users very clearly that this is the policy.
- The actions taken when a security problem is detected
What should be done when a security problem is detected? Who should be notified? It is easy to overlook things during a crisis, so you should have a detailed list of the exact steps that a system administrator or user should take when a security breach is detected. This could be as simple as telling the users to “touch nothing, and call the network security officer.” But even these simple actions should be in the written policy so that they are readily available.
Connecting to the Internet brings with it certain security responsibilities. RFC 1281, A Guideline for the Secure Operation of the Internet, provides guidance for users and network administrators on how to use the Internet in a secure and responsible manner. Reading this RFC will provide insight into the information that should be in your security policy.
A great deal of thought is necessary to produce a complete network security policy. The outline shown above describes the contents of a network policy document, but if you are personally responsible for writing a policy, you may want more detailed guidance. I recommend that you read RFC 2196, which is a very good guide for developing a security plan.
Security planning (assessing the threat, assigning security responsibilities, and writing a security policy) is the basic building block of network security, but the plan must be implemented before it can have any effect. In the remainder of this chapter, we’ll turn our attention to implementing basic security procedures.
Good passwords are one of the simplest parts of good network security. Passwords are used to log into systems that use password authentication. Popular mythology says that all network security breaches are caused by sophisticated crackers who discover software security holes. In reality, some of the most famous intruders entered systems simply by guessing or stealing passwords or by exploiting well-known security problems in outdated software. Later in this chapter, we look at guidelines for keeping software up to date and ways to prevent a thief from stealing your password. First, let’s see what we can do to prevent it from being guessed.
These are a few things that make it easy to guess passwords:
Accounts that use the account name as the password. Accounts with this type of trivial password are called joe accounts.
Guest or demonstration accounts that require no password or use a well-publicized password.
System accounts with default passwords.
User who tell their passwords to others.
Guessing these kinds of passwords requires no skill, just lots of spare time! Changing your password frequently is a deterrent to password guessing. However, if you choose good passwords, don’t change them so often that it is hard to remember them. Many security experts recommend that passwords should be changed about every 3 to 6 months.
A more sophisticated form of password guessing is dictionary guessing. Dictionary guessing uses a program that encrypts each word in a dictionary (e.g., /usr/dict/words) and compares each encrypted word to the encrypted password in the /etc/passwd file. Dictionary guessing is not limited to words from a dictionary. Things known about you (your name, initials, telephone number, etc.) are also run through the guessing program. Because of dictionary guessing, you must protect the /etc/passwd file.
Some systems provide a shadow password file to hide the encrypted passwords from potential intruders. If your system has a shadow password facility, use it. Hiding encrypted passwords greatly reduces the risk of password guessing.
Shadow password files have restricted permissions that prevent them from being read by intruders. The encrypted password is stored only in the shadow password file, /etc/shadow, and not in the /etc/passwd file. The passwd file is maintained as a world-readable file because it contains information that various programs use. The shadow file can be read only by root and it does not duplicate the information in the passwd file. It contains only passwords and the information needed to manage them. The format of a shadow file entry on a Solaris system is:
username:password:lastchg:min:max:warn:inactive:expire:flagusername is the login username.
password is the encrypted password or, on
Solaris systems, one of the keyword values NP or *LK*. lastchg is
the date that the password was last changed, written as the number of
days from January 1, 1970 to the date of the change.
min is the minimum number of days that must
elapse before the password can be changed.
max is the maximum number of days the user
can keep the password before it must be changed.
warn is the number of days before the
password expires that the user is warned.
inactive is the number of days the account
can be inactive before it is locked. expire
is the date on which the account will be closed.
flag is unused.
The encrypted password appears only in this file. Every password
field in the /etc/passwd file contains an
x, which tells the system to look
in the shadow file for the real password. Every
password field in the /etc/shadow file contains
either an encrypted password, NP,
or *LK*. If it contains the keyword
NP, it means that there is no
password because this is not a login account. System accounts, such as
daemon or uucp, are not
login accounts, so they have NP in
the password field. *LK* in the
password field means that this account has been locked and is
therefore disabled from any further use. Other systems use different
symbols in the password field to indicate these conditions; some Linux
systems use * and !!. However, all systems have some technique
for differentiating active login accounts from other types of user
IDs.
While the most important purpose of the shadow file is to protect the password, the additional fields in the shadow entry provide other useful security services. One of these is password aging. A password aging mechanism defines a lifetime for each password. When a password reaches the end of its lifetime, the password aging mechanism notifies the user to change the password. If it is not changed within some specified period, the password is removed from the system and the user is blocked from using his account.
The lastchg, max, and warn fields all play a role in password aging. They allow the system to know when the password was changed and how long it should be kept, as well as when the user should be warned about his impending doom. Another nice feature of the shadow file is the min field. This is a more subtle aspect of password aging. It prevents the user from changing her favorite password to a dummy password and then immediately back to the favorite. When the password is changed it must be used for the number of days defined by min before it can be changed again. This reduces one of the common tricks used to avoid really changing passwords.
The inactive and expire fields help eliminate unused accounts. Here, “inactivity” is determined by the number of days the account continues with an expired password. Once the password expires, the user is given some number of days to log in and set a new password. If the user does not log in before the specified number of days has elapsed, the account is locked and the user cannot log in.
The expire field lets you create a user account that has a specified “life.” When the date stored in the expire field is reached, the user account is disabled even if it is still active. The expiration date is stored as the number of days since January 1, 1970.
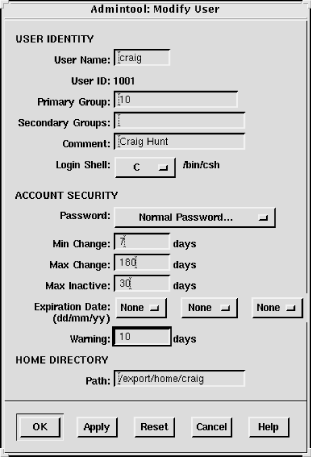
On a Solaris system the /etc/shadow file is
not edited directly. It is modified through the Users window of the
admintool or special options on the
passwd command line. This window is
shown in Figure 12-1. The
username, password, min, max, warn, inactive, and expire fields are
clearly shown.
The passwd command on Solaris systems has -n min, -w warn, and
-x max
options to set the min, max, and warn fields in the
/etc/shadow file. Only the root user can invoke
these options. Here, root sets the maximum life of Tyler’s password to
180 days:
# passwd -x 180 tylerThe Solaris system permits the system administrator to set
default values for all of these options so that they do not have to be
set every time a user is added through the admintool or the passwd command line. The default values are
set in the /etc/default/passwd file.
% cat /etc/default/passwd
#ident  "@(#)passwd.dfl 1.3     92/07/14 SMI"
MAXWEEKS=
MINWEEKS=
PASSLENGTH=6
The default values that can be set in the /etc/default/passwd file are:
-
MAXWEEKS The maximum life of a password defined in weeks, not days. The 180-day period used in the example above would be defined with this parameter as
MAXWEEKS=26.-
MINWEEKS The minimum number of weeks a password must be used before it can be changed.
-
PASSLENGTH The minimum number of characters that a password must contain. This is set to 6 in the sample file. Only the first eight characters are significant on a Solaris system; setting the value above 8 does not change that fact.
-
WARNWEEKS The number of weeks before a password expires that the user is warned.
This section uses Solaris as an example. The shadow password system is provided as part of the Solaris operating system. It is also included with Linux systems. The shadow file described here is exactly the same format as used on Linux systems, and it functions in the same way.
It is very difficult to take the encrypted password and decrypt it back to its original form, but encrypted passwords can be compared against encrypted dictionaries. If bad passwords are used, they can be easily guessed. Take care to protect the /etc/passwd file and choose good passwords.
A good password is an essential part of security. We usually think of the password used for a traditional login; however, passwords, passphrases, and keys are also needed for more advanced authentication systems. For all of these purposes, you want to choose a good password. Choosing a good password boils down to not choosing a password that can be guessed using the techniques described above. Some guidelines for choosing a good password are:
Don’t use your login name.
Don’t use the name of anyone or anything.
Don’t use any English or foreign-language word or abbreviation.
Don’t use any personal information associated with the owner of the account. For example, don’t use your initials, phone number, social security number, job title, organizational unit, etc.
Don’t use keyboard sequences, e.g., qwerty.
Don’t use any of the above spelled backwards, or in caps, or otherwise disguised.
Don’t use an all-numeric password.
Don’t use a sample password, no matter how good, that you’ve gotten from a book that discusses computer security.
Do use a mixture of numbers, special characters, and mixed-case letters.
Do use at least six characters.
Do use a seemingly random selection of letters and numbers.
Common suggestions for constructing seemingly random passwords are:
Use the first letter of each word from a line in a book, song, or poem. For example, “People don’t know you and trust is a joke.”[128] would produce Pd’ky&tiaj.
Use the output from a random password generator. Select a random string that can be pronounced and is easy to remember. For example, the random string “adazac” can be pronounced a-da-zac, and you can remember it by thinking of it as “A-to-Z.” Add uppercase letters to create your own emphasis, e.g., aDAzac.[129]
Use two short words connected by punctuation, e.g., wRen%Rug.
Use numbers and letters to create an imaginary vanity license plate password, e.g., 2hot4U?.
A common theme of these suggestions is that the password should be easy to remember. Avoid passwords that must be written down to be remembered. If unreliable people gain access to your office and find the password you have written down, the security of your system will be compromised.
However, don’t assume that you can’t remember a random password. It may be difficult the first few times you use the password, but any password that is used often enough is easy to remember. If you have an account on a system that you rarely use, you may have trouble remembering a random password. But in that case, the best solution is to get rid of the account. Unused and underutilized accounts are prime targets for intruders. They like to attack unused accounts because there is no user to notice changes to the files or strange Last login: messages. Remove all unused accounts from your systems.
How do you ensure that the guidance for creating new passwords is followed? The most important step is to make sure that every user knows these suggestions and the importance of following them. Cover this topic in your network security plan, and periodically reinforce it through newsletter articles and online system bulletins.
It is also possible to use programs that force users to follow specific password selection guidelines. The web page http://csrc.nist.gov/tools/tools.htm lists several programs that do exactly that.
Sometimes good passwords are not enough. Passwords are transmitted across the network as clear text. Intruders can use protocol-analyzer software to spy on network traffic and steal passwords. If a thief steals your password, it does not matter how good the password was.
The thief can be on any network that handles your TCP/IP packets. If you log in through your local network, you have to worry only about local snoops. But if you log in over the Internet, you must worry about unseen listeners from any number of unknown networks.
Commands that use encrypted passwords are not vulnerable to this
type of attack. Because of this, telnet has been largely supplanted by secure
shell (ssh). However, the secure
shell client may not be available at a remote site. Use one-time
passwords for remote logins when you cannot use secure shell. Because
a one-time password can be used only once, a thief who steals the
password cannot use it.
Naturally, one-time password systems are a hassle. You must
carry with you a list of one-time passwords, or something that can
generate them, any time you want to log in. If you forget the password
list, you cannot log in. However, this may not be as big a problem as
it seems. You usually log in from your office where your primary login
host is probably on your desktop or your local area network. When you
log into your desktop system from its keyboard, the password does not
traverse the network, so you can use a reusable password. And ssh can be used any time you control both
ends of the connection, for example, when logging in with your laptop.
One-time passwords are needed only for the occasions when you log in
from a remote location that does not offer ssh. For this reason, some one-time password
systems are designed to allow reusable passwords when they are
appropriate.
There are several one-time password systems. Some use specialized hardware such as “smart cards.” OPIE is a free software system that requires no special hardware.
One-time Passwords In Everything (OPIE) is free software from the U.S. Naval Research Laboratory (NRL) that modifies a Unix system to use one-time passwords. OPIE is directly derived from Skey, which is a one-time password system created by Bell Communications Research (Bellcore).
Download OPIE from the Internet from http://inner.net/opie. The current
version of OPIE is opie-2.4.tar.gz. It is a
binary file. gunzip the file and
extract it using tar. The directory
this produces contains the source files, Makefiles, and scripts
necessary to compile and install OPIE.
OPIE comes with configure, an
auto-configuration script that detects your system’s configuration and
modifies the Makefile accordingly. It does a good job, but you still
should manually edit the Makefile to make sure it is correct. For
example, my Linux system uses the Washington University FTP daemon
wu.ftpd. OPIE replaces login, su, and ftpd with its own version of these programs.
Using an earlier version of OPIE on my Linux system, configure did not find ftpd, and I did not notice the problem when
I checked the Makefile. make ran
without errors, but make install failed during the install of the
OPIE FTP daemon. The Makefile was easily corrected and the rerun of
make install was successful.
The effects of OPIE are evident as soon as the install
completes. Run su and you’re
prompted with root's response:
instead of Password:. login prompts with Response or Password: instead of just Password:. The response requested by these programs is the
OPIE equivalent of a password. Programs that prompt with Response or Password accept either the OPIE response or
the traditional password from the /etc/passwd
file. This feature permits users to migrate gracefully from
traditional passwords to OPIE. It also allows local console logins
with reusable passwords while permitting remote logins with one-time
passwords. The best of both worlds—convenient local logins without
creating separate local and remote login accounts!
To use OPIE you must first select a secret password that is used
to generate the one-time password list, and then run the program that
generates the list. To select a secret password, run opiepasswd as shown:
$ opiepasswd -c
Updating kristin:
Reminder  -  Only use this method from the console; NEVER from remote.
 If you are using telnet, xterm, or a dial-in, type ^C now or exit with
 no password. Then run opiepasswd without the -c parameter.
Using MD5 to compute responses.
Enter old secret pass phrase: 3J5Wd6PaWP
Enter new secret pass phrase: 9WA11WSfW95/NT
Again new secret pass phrase: 9WA11WSfW95/NT
This example shows the user kristin
updating her secret password. She runs opiepasswd from the computer’s console, as
indicated by the -c command option.
Running opiepasswd from the console
is the most secure. If it is not run from the console, you must have a
copy of the opiekey software with
you to generate the correct responses needed to enter your old and new
secret passwords, because clear text passwords are accepted only from
the console. Kristin is prompted to enter her old password and to
select a new one. OPIE passwords must be at least 10 characters long.
Since the new password is long enough, opiepasswd accepts it and displays the
following two lines:
ID kristin OPIE key is 499 be93564
CITE JAN GORY BELA GET ABED
These lines tell Kristin the information she needs to generate
OPIE login responses and the first response she will need to log into
the system. The one-time password needed for Kristin’s next login
response is the second line of this display: a group of six short,
uppercase character strings. The first line of the display contains
the initial sequence number (499) and the seed (be93564) she needs,
along with her secret password, to generate OPIE login responses. The
software used to generate those responses is opiekey.
opiekey takes the login
sequence number, the user’s seed, and the user’s secret password as
input and outputs the correct one-time password. If you have opiekey software on the system from which
you are initiating the login, you can produce one-time passwords one
at a time. If, however, you will not have access to opiekey when you are away from your login
host, you can use the -n option to
request several passwords. Write the passwords down, put them in your
wallet, and you’re ready to go! [130]
In the following example we request five (-n 5) responses from opiekey:
               $ opiekey -n 5 495 wi01309
Using MD5 algorithm to compute response.
Reminder: Don't use  opiekey  from  telnet  or dial-in sessions.
Enter secret pass phrase: UUaX26CPaU
491: HOST VET FOWL SEEK IOWA YAP
492: JOB ARTS WERE FEAT TILE IBIS
493: TRUE BRED JOEL USER HALT EBEN
494: HOOD WED MOLT PAN FED RUBY
495: SUB YAW BILE GLEE OWE NOR
First opiekey tells us that
it is using the MD5 algorithm to produce the responses, which is the
default for OPIE. For compatibility with older Skey or OPIE
implementations, force opiekey to
use the MD4 algorithm by using the -4 command-line option. opiekey prompts for your secret password.
This is the password you defined with the opiepasswd command. It then prints out the
number of responses requested and lists them in sequence number order.
The login sequence numbers in the example are 495 to 491. When the
sequence number gets down to 10, rerun opiepasswd and select a new secret password.
Selecting a new secret password resets the sequence number to
499.
The OPIE login prompt displays a sequence number, and you must provide the response that goes with that sequence number. For example:
login: tyler
otp-md5 492 wi01309 Response or Password:
JOB ARTS WERE FEAT TILE IBIS
At the login: prompt, Tyler
enters her username. The system then displays a single line that tells
her that one-time passwords are being generated with the MD5 algorithm
(otp-md5), that this is login sequence number 492, and that the seed
used for her one-time passwords is wi01309. She looks up the response
for login number 492 and enters the six short strings. She then marks
that response off her list because it cannot be used again to log into
the system. A response from the list must be used any time she is not
sitting at the console of her system. Reusable passwords can be used
only at the console.
Secure shell is used for remote logins whenever it is available
on the client. Because of this, one-time passwords are needed only in
special cases. Generally, it is sufficient to have one small OPIE
server on your network. Remote users who are forced to use one-time
passwords log into that server and then use a preferred mechanism,
such as ssh, to log into your real
servers.
Some applications use their own security mechanisms. Make
sure that the security for these applications is configured properly.
In particular, check the Unix r
commands, which are a set of Unix networking applications comparable
to ftp and telnet. Care must be taken to ensure that
the r commands don’t compromise
system security. Improperly configured r commands can open access to your computer
facilities to virtually everyone in the world. For this reason, use of
the r commands is
discouraged.
In place of password authentication, the r commands use a security system based on
trusted hosts and users. Trusted users on trusted hosts are allowed to access the local system
without providing a password. Trusted hosts are also called
"equivalent hosts” because the system assumes that users
given access to a trusted host should be given equivalent access to
the local host. The system assumes that user accounts with the same
name on both hosts are “owned” by the same user. For example, a user
logged in as becky on a trusted system is granted
the same access as the user logged in as becky on
the local system.
This authentication system requires databases that define the trusted hosts and the trusted
users. The databases used to configure the r commands are
/etc/hosts.equiv and .rhosts.
The /etc/hosts.equiv file defines the hosts
and users that are granted “trusted” r command access to your system. This file
can also define hosts and users that are explicitly denied trusted
access. Not having trusted access doesn’t mean that the user is denied
access; it just means that he is required to supply a password.
The basic format of entries in the /etc/hosts.equiv file is:
[+ | -][hostname] [+ | -][username]
The hostname is the name of a
“trusted” host, which may optionally be preceded by a plus sign (+).
The plus sign has no real significance, except when used alone. A plus
sign without a hostname following it is a wildcard character that
means “any host.”
If a host is granted equivalence, users logged into that host
are allowed access to like-named user accounts on your system without
providing a password. (This is one reason for administrators to
observe uniform rules in handing out login names.) The optional
username is the name of a user on the
trusted host who is granted access to all user accounts. If
username is specified, that user is not
limited to like-named accounts, but is given access to all user
accounts without being required to provide a password.[131]
The hostname may also be preceded by
a minus sign (-). This explicitly says that the host is
not an equivalent system. Users from that host
must always supply a password when they use an r command to interact with your system. A
username can also be preceded by a minus
sign. This says that, whatever else may be true about that host, the
user is not trusted and must always supply a password.
The following examples show how entries in the hosts.equiv file are interpreted:
rodentAllows password-free access from any user on rodent to a like-named user account on your local system.
-rodentDenies password-free access from any user on rodent to accounts on your system.
rodent -davidDenies password-free access to the user david if he attempts to access your system from rodent.
rodent +beckyAllows the user becky to access any account (except root) on your system, without supplying a password, if she logs in from rodent.
+ beckyAllows the user becky to access any account (except root) on your system without supplying a password, no matter what host she logs in from.
This last entry is an example of something that should never be used in your configuration. Don’t use a standalone plus sign in place of a hostname. It allows access from any host anywhere and can open up a big security hole. For example, if the entry shown above was in your hosts.equiv file, an intruder could create an account named becky on his system and gain access to every account on your system. Check /etc/hosts.equiv, ~/.rhosts, and /etc/hosts.lpd to make sure that none of them contains a + entry. Remember to check the .rhosts file in every user’s home directory.
A simple typographical error could give you a standalone plus sign. For example, consider the entry:
+ rodent beckyThe system administrator probably meant “give becky password-free access to all accounts when she logs in from rodent.” However, with an extraneous space after the + sign, it means “allow users named rodent and becky password-free access from any host in the world.” Don’t use a plus sign in front of a hostname, and always use care when working with the /etc/hosts.equiv file to avoid security problems.
When configuring the /etc/hosts.equiv file,
grant trusted access only to the systems and users you actually trust.
Don’t grant trusted access to every system attached to your local
network. In fact, it is best not to use the r commands at all. If you must use them,
only trust hosts from your local network when you know the person
responsible for that host, when you know that the host is not
available for public use, and when the local network is protected by a
firewall. Don’t grant trusted access by default—have some reason for
conferring trusted status. Never grant trust to remotely located
systems. It is too easy for an intruder to corrupt routing or DNS in
order to fool your system when you grant trust to a remote system.
Also, never begin your hosts.equiv file with a
minus sign as the first character. This confuses some systems, causing
them to improperly grant access. Always err on the side of caution
when creating a hosts.equiv file. Adding trusted
hosts as they are requested is much easier than recovering from a
malicious intruder.
The .rhosts file grants or denies password-free r command access to a specific user’s
account. It is placed in the user’s home directory and contains
entries that define the trusted hosts and users. Entries in the
.rhosts file use the same format as entries in
the hosts.equiv file and function in almost the
same way. The difference is the scope of access granted by entries in
these two files. In the .rhosts file, the entries
grant or deny access to a single user account; the entries in
hosts.equiv control access to an entire
system.
This functional difference can be shown in a simple example. Assume the following entry:
horseshoe anthony
In crab’s hosts.equiv
file, this entry means that the user anthony on
horseshoe can access any account on
crab without entering a password. In an
.rhosts file in the home directory of user
resnick, the exact same entry allows
anthony to rlogin from horseshoe
as resnick without entering a password, but it
does not grant password-free access to any other accounts on
crab.
Individuals use the .rhosts file to
establish equivalence among the different accounts they own. The entry
shown above would probably be made only if
anthony and resnick are the
same person. For example, I have accounts on several different
systems. Sometimes my username is hunt, and
sometimes it is craig. It would be nice if I had
the same account name everywhere, but that is not always possible; the
names craig and hunt are
used by two other people on my local network. I want to be able to
rlogin to my workstation from any
host that I have an account on, but I don’t want mistaken logins from
the other craig and the other
hunt. The .rhosts file gives
me a way to control this problem.
For example, assume my username on crab is craig, but my username on filbert is hunt. Another user on filbert is craig. To allow myself password-free access to my crab account from filbert, and to make sure that the other user doesn’t have password-free access, I put the following .rhosts file in my home directory:
filbert hunt
filbert -craig
Normally the hosts.equiv file is searched
first, followed by the user’s .rhosts file, if it
exists. The first explicit match determines whether or not
password-free access is allowed. Therefore, the
.rhosts file cannot override the
hosts.equiv file. The exception to this is root
user access. When a root user attempts to access a system via the
r commands, the
hosts.equiv file is not checked; only
.rhosts in the root user’s home directory is
consulted. This allows root access to be more tightly controlled. If
the hosts.equiv file were used for root access,
entries that grant trusted access to hosts would give root users on
those hosts root privileges. You can add trusted hosts to
hosts.equiv without granting remote root users
root access to your system.
You should remember that the user can provide access with the
.rhosts file even when the
hosts.equiv file doesn’t exist. The only way to
prevent users from doing this is to periodically check for and remove
the .rhosts files. As long as you have the
r commands on your system, it is
possible for a user to accidentally compromise the security of your
system.
The weak security of the r
commands poses a security threat. You cannot use these commands to
provide secure remote access, even if you use all the techniques given
in the previous section. At best, only trusted local systems on a
secured local network can be given access via the r commands. The reason for this is that the
r commands grant trust based on a
belief that the IP address uniquely identifies the correct computer.
Normally it does. But an intruder can corrupt DNS to provide the wrong
IP address or corrupt routing to deliver to the wrong network, thus
undermining the authentication scheme used by the r commands.
An alternative to the remote shell is the secure shell. Secure shell replaces the standard r commands with secure commands that include
encryption and authentication. Secure shell uses a strong
authentication scheme to ensure that the trusted host really is the
host it claims to be. Secure shell provides a number of public-key
encryption schemes to ensure that every packet in the stream of
packets is from the source it claims to be from. Secure shell is
secure and easy to use.
There are currently two versions of secure shell in widespread use: SSH Secure Shell, which is a commercial product, and OpenSSH, which is an open source product. OpenSSH is included with various versions of Unix and Linux, and both the open source and the commercial secure shell products are available for download from the Internet if your system does not include secure shell. The examples used in this section are based on OpenSSH, but the basic functions of both versions of secure shell are essentially the same.
The basic components of secure shell are:
-
sshd The secure shell daemon handles incoming SSH connections.
sshdshould be started at boot time from one of the boot scripts; don’t start it from inetd.conf.sshdgenerates an encryption key every time it starts. This can cause it to be slow to start, which makes it unsuitable for inetd.conf. A system serving SSH connections must runsshd.sshThe secure shell user command. The
sshcommand replacesrshandrlogin. It is used to securely pass a command to a remote system or to securely log into a remote system. This command creates the outgoing connections that are handled by the remote secure shell daemon. A client system that wants to use an SSH connection must have thesshcommand.-
scp Secure copy (
scp) is the secure shell version ofrcp.-
ssh-keygen Generates the public and private encryption keys used to secure the transmission for the secure shell.
-
sftp A version of FTP that operates over a secure shell connection.
When an ssh client connects to an sshd server, they exchange public keys. The systems compare the keys they receive to the known keys they have stored in the /etc/ssh_known_hosts file and in the .ssh/known_hosts file in the user’s home directory.[132]
If the key is not found or has changed, the user is asked to verify that the new key should be accepted:
> ssh horseshoe
Host key not found from the list of known hosts.
Are you sure you want to continue connecting (yes/no)? yes
Host 'horseshoe' added to the list of known hosts.
craig's password: Watts.Watt.
Last login: Thu Sep 25 15:01:32 1997 from rodent
Linux 2.0.0.
/usr/X11/bin/xauth:  creating new authority file /home/craig/.Xauthority
If the key is found in one of the files or is accepted by the user, the client uses it to encrypt a randomly generated session key. The session key is then sent to the server, and both systems use the key to encrypt the remainder of the SSH session.
The client is authenticated if it is listed in the hosts.equiv file, the
shost.equiv file, the user’s
.rhosts file, or the .shosts
file. This type of authentication is similar to the type used by the
r commands, and the format of the
shost.equiv and the .shosts
files is the same as their r
command equivalents. Notice that in the sample above, the user is
prompted for a password. If the client is not listed in one of the
files, password authentication is used. As you can see, the password
appears in plain text. However, there is no need to worry about
password thieves because SSH encrypts the password before it is sent
across the link.
Users can employ a public-key challenge/response protocol for authentication. First generate your public and private encryption keys:
> ssh-keygen
Initializing random number generator...
Generating p:  ......................................++ (distance 616)
Generating q:  ....................++ (distance 244)
Computing the keys...
Testing the keys...
Key generation complete.
Enter file in which to save the key (/home/craig/.ssh/identity):
Enter passphrase: Pdky&tiaj.
Enter the same passphrase again: Pdky&tiaj.
Your identification has been saved in /home/craig/.ssh/identity.
Your public key is:
1024 35 158564823484025855320901702005057103023948197170850159592181522
craig@horseshoe
Your public key has been saved in /home/craig/.ssh/identity.pub
The ssh-keygen command
creates your keys. Enter a password (or “passphrase”) of at least 10
characters. Use the rules described earlier for picking a good
password to choose a good passphrase that is easy to remember. If you
forget the passphrase, no one will be able to recover it for
you.
Once you have created your keys on the client system, copy the
public key to your account on the server. The public key is stored in
your home directory on the client in
.ssh/identity.pub. Copy it to
.ssh/authorized_keys in your home directory on
the server. Now when you log in using ssh, you are prompted for the
passphrase:
> ssh horseshoe
Enter passphrase for RSA key 'craig@horseshoe': Pdky&tiaj.
Last login: Thu Sep 25 17:11:51 2001
To improve system security, the r commands should be disabled after SSH is installed.
Comment rshd, rlogind, rexcd, and rexd out of the
inetd.conf file to disable inbound connections to
the r commands. To ensure that SSH
is used for outbound connections, replace rlogin and rsh with ssh. To do this, store copies of the
original rlogin and rsh in a safe place, rerun configure with the special options shown
here, and run make install:
# whereis rlogin
/usr/bin/rlogin
# whereis rsh
/usr/bin/rsh
# cp /usr/bin/rlogin /usr/lib/rlogin
# cp /usr/bin/rsh /usr/lib/rsh
# ./configure  -- with-rsh=/usr/bin  -- program-transform-name='s/ s/r/'
# make install
The example assumes that the path to the original rlogin and rsh commands is
/usr/bin. Use whatever is correct for your
system.
After replacing rlogin and
rsh, you can still log into systems
that don’t support SSH. You will, however, be warned that it is not a
secure connection:
> rlogin cow
Secure connection to cow refused; reverting to insecure method.
Using rsh.  WARNING: Connection will not be encrypted.
Last login: Wed Sep 24 22:15:28 from rodent
SSH is an excellent way to have secure communications between systems across the Internet. However, it does require that both systems have SSH installed. When you control both ends of the link, this is not a problem. But there are times when you must log in from a system that is not under your control. For those occasions, one-time passwords, such as those provided by OPIE, are still essential.
Having authentication is an important security measure. However, it isn’t the only thing you can do to improve the security of your computer and your network. Most break-ins occur when bugs in applications are exploited or when applications are misconfigured. In this section we’ll look at some things you can do to improve application security.
Any software that allows an incoming connection from a remote site
has the potential of being exploited by an intruder. Some security
experts recommend you remove every daemon from the
/etc/inetd.conf file that you don’t absolutely
need. (Configuring the inetd.conf file and the
/etc/xinetd.conf file is discussed in Chapter 5, with explicit examples of
removing tftp from service.)
Server systems may require several daemons, but most desktop
systems require very few, if any. Removing the daemons from
inetd.conf prevents only inbound connections. It
does not prevent out-bound connections. A user can still initiate a
telnet to a remote site even after
the telnet daemon is removed from
her system’s inetd.conf. A simple approach used
by some people is to remove everything from
inetd.conf and then add back to the file only
those daemons that you decide you really need.
Vendors frequently release new versions of network software for the express purpose of improving network security. Use the latest version of the network software offered by your vendor. Track the security alerts, CERT advisories, and bulletins to know what programs are particularly important to keep updated.
If you fail to keep the software on your system up to date, you open a big security hole for intruders. Most intruders don’t discover new problems—they exploit well-known problems. Keep track of the known security problems so you can keep your system up to date.
Stay informed about all the latest fixes for your system. The computer security advisories are a good way to do this. Contact your vendor and find out what services they provide for distributing security fixes. Make sure that the vendor knows that security is important to you.
Figure 12-2 shows a software update list at the Red Hat web site. Clicking on any of the updates listed here provides a detailed description of the problem as well as a link to the fix for that problem.
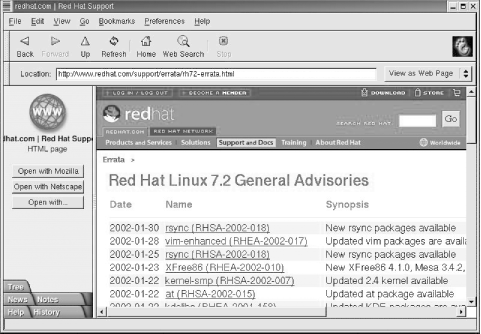
Vendor resources such as the one shown in Figure 12-2 are essential for keeping software up to date. However, you must use these resources for them to be effective. Frequently, administrators complain that vendors do not fix problems, and of course sometimes that is true. But a far more common problem is that system administrators do not install the fixes that are available. Set aside some time every month to apply the latest updates.
Software update services, such as the Red Hat Network, have the potential of lessening the burden of keeping software up to date. With a software update service, the vendor is responsible for periodically updating the system software via the network. Whether or not these services will be a success remains to be seen. They have the potential to improve security and reduce the administrative burden, but many administrators fear the loss of control that comes with giving update privileges to an outside organization.
A key element of effective network security is security monitoring. Good security is an ongoing process, and following the security guidelines discussed above is just the beginning. You must also monitor the systems to detect unauthorized user activity and to locate and close security holes. Over time, a system will change—active accounts become inactive and file permissions are changed. You need to detect and fix these problems as they arise.
Network security is monitored by examining the files and logs of individual
systems on the network. To detect unusual activity on a system, you
must know what activity is normal. What processes are normally
running? Who is usually logged in? Who commonly logs in after hours?
You need to know this, and more, about your system in order to develop
a “feel” for how things should be. Some common Unix commands—ps and who—can help you learn what normal activity
is for your system.
The ps command displays the
status of currently running processes. Run ps regularly to gain a clear picture of what
processes run on the system at different times of the day and who runs
them. The Linux ps -au command and
the Solaris ps -ef command display
the user and the command that initiated each process. This should be
sufficient information to learn who runs what and when they run it. If
you notice something unusual, investigate it. Make sure you understand
how your system is being used.
The who command provides information about who is currently
logged into your system. It displays who is logged in, what device
they are using, when they logged in and, if applicable, what remote
host they logged in from. (The w
command, a variation of who
available on some systems, also displays the currently active process
started by each user.) The who
command helps you learn who is usually logged in as well as what
remote hosts they normally log in from. Investigate any variations
from the norm.
If any of these routine checks gives you reason to suspect a security problem, examine the system for unusual or modified files, for files that you know should be there but aren’t, and for unusual login activity. This close examination of the system can also be made using everyday Unix commands. Not every command or file we discuss will be available on every system. But every system will have some tools that help you keep a close eye on how your system is being used.
Intruders often leave behind files or shell scripts to help them
re-enter the system or gain root access. Use the ls -a | grep '^\'. command to check for
files with names that begin with a dot (.).
Intruders particularly favor names such as .mail,
.xx, ... (dot, dot, dot), ..
(dot, dot, space), or ..^G (dot, dot,
Ctl-G).
If any files with names like these are found, suspect a
break-in. (Remember that one directory named . and one directory named .. are in every directory except the root
directory.) Examine the contents of any suspicious files and follow
your normal incident-reporting procedures.
You should also examine certain key files if you suspect a security problem:
- /etc/inetd.conf and /etc/xinetd.conf
Check the names of the programs started from the /etc/inetd.conf file or the /etc/xinetd.conf file if your system uses
xinetd. In particular, make sure that it does not start any shell programs (e.g., /bin/csh). Also check the programs that are started byinetdor byxinetdto make sure the programs have not been modified. /etc/inetd.conf and /etc/xinetd.conf should not be world-writable.- r command security files
Check /etc/hosts.equiv , /etc/hosts.lpd , and the .rhosts file in each user’s home directory to make sure they have not been improperly modified. In particular, look for any plus sign (+) entries and any entries for hosts outside of your local trusted network. These files should not be world-writable. Better yet, remove the
rcommands from your system and make sure no one reinstalls them.- /etc/passwd
Make sure that the /etc/passwd file has not been modified. Look for new usernames and changes to the UID or GID of any account. /etc/passwd should not be world-writable.
- Files run by
cronorat Check all of the files run by
cronorat, looking for new files or unexplained changes. Sometimes intruders use procedures run bycronoratto readmit themselves to the system, even after they have been kicked off.- Executable files
Check all executable files, binaries, and shell files to make sure they have not been modified by the intruder. Executable files should not be world-writable.
If you find or even suspect a problem, follow your reporting procedure and let people know about the problem. This is particularly important if you are connected to a local area network. A problem on your system could spread to other systems on the network.
The find command is a
powerful tool for detecting potential filesystem
security problems because it can search the entire filesystem for
files based on file permissions. Intruders often leave behind setuid
programs to grant themselves root access. The following command
searches for these files recursively, starting from the root
directory:
# find / -user root -perm -4000 -printThis find command starts
searching at the root (/) for files owned by the user root (-user root) that have the setuid permission bit
set (-perm -4000). All matches
found are displayed at the terminal (-print). If any filenames are displayed by
find, closely examine the
individual files to make sure that these permissions are correct. As
a general rule, shell scripts should not have setuid
permission.
You can use the find
command to check for other problems that might open security holes
for intruders. The other common problems that find checks for are world-writable files
(-perm -2), setgid files (-perm -2000), and unowned files (-nouser -o -nogroup). World-writable and setgid files
should be checked to make sure that these permissions are
appropriate. As a general rule, files with names beginning with a
dot (.) should not be world-writable, and setgid permission, like
setuid, should be avoided for shell scripts.
The process of scanning the filesystem can be automated with the Tripwire program. A commercially supported version of Tripwire is available from http://www.tripwiresecurity.com, and an open source version for Linux is available from http://www.tripwire.org. This package not only scans the filesystem for problems, it computes digital signatures to ensure that if any files are changed, the changes will be detected.
Strange login activity (at odd times of the day or from
unfamiliar locations) can indicate attempts by intruders to gain
access to your system. We have already used the who command to check who is currently
logged into the system. To check who has logged into the system in
the past, use the last
command.
The last command displays the contents of the
wtmp file.[133] It is useful for learning normal login patterns and
detecting abnormal login activity. The wtmp
file keeps a historical record of who logged into the system, when
they logged in, what remote site they logged in from, and when they
logged out.
Figure 12-3 shows a
single line of last command
output. The figure highlights the fields that show the user who
logged in, the device, the remote location from which the login
originated (if applicable), the day, the date, the time logged in,
the time logged out (if applicable), and the elapsed time.

Simply typing last produces
a large amount of output because every login stored in
wtmp is displayed. To limit the output, specify
a username or tty device on the command line. This limits the
display to entries for the specified username or terminal. It is
also useful to use grep to search
last’s output for certain
conditions. For example, the command below checks for logins that
occur on Saturday or Sunday:
% last | grep 'S[au]' | more
craig     console     :0            Sun Dec 15 10:33   still logged in
reboot    system boot               Sat Dec 14 18:12
root      console                   Sat Dec 14 18:14
craig     pts/5       jerboas       Sat Dec 14 17:11 - 17:43  (00:32)
craig     pts/2       172.16.12.24  Sun Dec  8 21:47 - 21:52  (00:05)
       .
       .
--More--
The next example searches for root logins not originating from the console. If you don’t know who made the two logins reported in this example, be suspicious:
% last root | grep -v console
root   pts/5   rodent.wrotethebook.com   Tue Oct 29 13:12 - down  (00:03)
root   ftp     crab.wrotethebook.com     Tue Sep 10 16:37 - 16:38  (00:00)
The last command is a major
source of information about previous login activity. User logins at
odd times or from odd places are suspicious. Remote root logins
should always be discouraged. Use last to check for these problems.
Report any security problems that you detect, or even suspect. Don’t be embarrassed to report a problem because it might turn out to be a false alarm. Don’t keep quiet because you might get “blamed” for the security breach. Your silence will only help the intruder.
Manually monitoring your system is time consuming and prone to errors and omissions. Fortunately, several automated monitoring tools are available. At this writing, the web site http://www.insecure.com lists the monitoring tools that are currently most popular. Tripwire (mentioned earlier) is one of them. Some other currently popular tools are:
- Nessus
Nessus is a network-based security scanner that uses a client/server architecture. Nessus scans target systems for a wide range of known security problems.
- SATAN
Security Auditing Tool for Analyzing Networks is the first network-based security scanner that became widely distributed. Somewhat outdated, it is still popular and can detect a wide range of known security problems. SATAN has spawned some children, SAINT and SARA, that are also popular.
- SAINT
System Administrator’s Integrated Network Tool scans systems for a wide range of known security problems. SAINT is based on SATAN.
- SARA
Security Auditor’s Research Assistant is the third-generation security scanner based on SATAN and SAINT. SARA detects a wide range of known security problems.
- Whisker
Whisker is a security scanner that is particularly effective at detecting certain CGI script problems that threaten web site security.
- ISS
Internet Security Scanner is a commercial security scanner for those who prefer a commercial product.
- Cybercop
Cybercop is another commercial security scanner for those who prefer commercial products.
- Snort
Snort provides a rule-based system for logging packets. Snort attempts to detect intrusions and report them to the administrator in real time.
- PortSentry
PortSentry detects port scans and can, in real time, block the system initiating the scan. Port scans often precede a full-blown security attack.
The biggest problem with security scanners and intrusion detection tools is that they rapidly become outdated. New attacks emerge that the tools are not equipped to detect. For this reason, this book does not spend time describing the details of any specific scanner. These are the currently popular scanners. By the time you read this, new security tools or new versions of these tools may have taken their place. Use this list as a starting point to search the Web for the latest security tools.
Well-informed users and administrators, good password security, and good system monitoring are the foundation of network security. But more is needed. That “more” is some technique for controlling access to the systems connected to the network, or for controlling access to the data the network carries. In the remainder of this chapter, we look at various security techniques that control access.
Access control is a technique for limiting access. Routers and hosts that use access control check the address of a host requesting a service against an access control list. If the list says that the remote host is permitted to use the requested service, the access is granted. If the list says that the remote host is not permitted to access the service, access is denied. Access control does not bypass any normal security checks. It adds a check to validate the source of a service request and retains all of the normal checks to validate the user.
Access control systems are common in terminal servers and routers.
For example, Cisco routers have an access control facility. Access
control software is also available for Unix hosts. Two such packages are
xinetd and the TCP wrapper program.
First we examine TCP wrapper (tcpd),
which gets its name from the fact that you wrap it around a network
service so that the service can be reached only by going through the
wrapper.
The wrapper package performs two basic functions: it logs requests for Internet services, and provides an access control mechanism for Unix systems. Logging requests for specific network services is a useful monitoring function, especially if you are looking for possible intruders. If this were all it did, wrapper would be a useful package. But the real power of wrapper is its ability to control access to network services.
The wrapper software is included with many versions of Linux and
Unix. The wrapper tar file
containing the C source code and Makefile necessary to build the
wrapper daemon tcpd is also
available from several sites on the Internet.
If your Unix system does not include wrapper, download the
source, make tcpd, and then install
it in the same directory as the other network daemons. Edit
/etc/inetd.conf and replace the path to each
network service daemon that you wish to place under access control
with the path to tcpd. The only
field in the /etc/inetd.conf entry affected by
tcpd is the sixth field, which
contains the path to the network daemon.
For example, the entry for the finger daemon in
/etc/inetd.conf on our Solaris 8 system
is:
finger stream tcp6 nowait nobody /usr/sbin/in.fingerd in.fingerd
The value in the sixth field is
/usr/sbin/in.fingerd. To monitor access to the
finger daemon, replace this value
with /usr/sbin/tcpd, as in the following
entry:
finger stream tcp6 nowait nobody /usr/sbin/tcpd in.fingerd
Now when inetd receives a
request for fingerd, it starts
tcpd instead. tcpd then logs the fingerd request, checks the access control
information, and, if permitted, starts the real finger daemon to handle the request. In this
way, tcpd acts as a gatekeeper for
other functions.
Make a similar change for every service you want to place under
access control. Good candidates for access control are ftpd, tftpd, telnetd, and fingerd. Obviously, tcpd cannot directly control access for
daemons that are not started by inetd, such as sendmail and NFS. However, other tools, such
as portmapper, use the tcpd configuration files to enforce their
own access controls. Thus the wrapper configuration can have a
positive impact on the security of daemons that are not started by
inetd.
Using the wrapper on most Linux systems is even easier. There is
no need to download and install the tcpd software. It comes as an integral part
of the Linux release. You don’t even have to edit the
/etc/inetd.conf file because the sixth field of
the entries in that file already points to the tcpd program, as shown below:
finger stream tcp nowait nobody /usr/sbin/tcpd in.fingerd -w
The information tcpd uses to
control access is in two files,
/etc/hosts.allow and /etc/hosts.deny . Each file’s function is obvious from its name.
hosts.allow contains the list of hosts that are
allowed to access the network’s services, and
hosts.deny contains the list of hosts that are
denied access. If the files are not found, tcpd permits every host to have access and
simply logs the access request. Therefore, if you only want to
monitor access, don’t create these two files.
If the files are found, tcpd checks the
hosts.allow file first, followed by the
hosts.deny file. It stops as soon as it finds a
match for the host and the service in question. Therefore, access
granted by hosts.allow cannot be overridden by
hosts.deny.
The format of entries in both files is the same:
service-list:host-list[:shell-command]
The service-list is a list of network
services, separated by commas. These are the services to which
access is being granted (hosts.allow) or denied
(hosts.deny). Each service is identified by the
process name used in the seventh field of the
/etc/inetd.conf entry. This is simply the name
that immediately follows the path to tcpd in inetd.conf.
(See Chapter 5 for a description
of the arguments field in the /etc/inetd.conf
entry.)
Again, let’s use finger as
an example. We changed its inetd.conf entry to
read:
finger stream tcp nowait nobody /usr/etc/tcpd in.fingerd
Given this entry, we would use in.fingerd as the service name in a
hosts.allow or hosts.deny
file.
The host-list is a comma-separated list
of hostnames, domain names, Internet addresses, or network numbers.
The systems listed in the host-list are granted access
(hosts.allow) or denied access
(hosts.deny) to the services specified in the
service-list. A hostname or an Internet address matches an
individual host. For example, rodent is a
hostname and 172.16.12.2 is an Internet address. Both match a
particular host. A domain name matches every host within that
domain; e.g., .wrotethebook.com matches
crab.wrotethebook.com,
rodent.wrotethebook.com,
horseshoe.wrotethebook.com, and any other hosts
in the domain. When specified in a tcpd access control list, domain names
always start with a dot (.). A network number matches every IP
address within that network’s address space. For example, 172.16.
matches 172.16.12.1, 172.16.12.2, 172.16.5.1, and any other address
that begins with 172.16. Network addresses in a tcpd access control list always end with a
dot (.).
A completed hosts.allow entry that grants FTP and Telnet access to all hosts in the wrotethebook.com domain is shown below:
ftpd,telnetd : .wrotethebook.com
Two special keywords can be used in
hosts.allow and hosts.deny
entries. The keyword ALL can be used in the service-list to match all
network services, and in the host-list to match all hostnames and
addresses. The second keyword, LOCAL, can be used only in the host-list. It matches
all local hostnames. tcpd
considers a hostname “local” if it contains no embedded dots.
Therefore, the hostname rodent would match on
LOCAL, but the hostname rodent.wrotethebook.com
would not match. The following entry affects all services and all
local hosts:
ALL : LOCAL
A more complete example of how tcpd is used will help you understand
these entries. First, assume that you wish to allow every host in
your local domain (wrotethebook.com) to have
access to all services on your system, but you want to deny access
to every service to all other hosts. Make an entry in
/etc/hosts.allow to permit access to everything
by everyone in the local domain:
ALL : LOCAL, .wrotethebook.com
The keyword ALL in the services-list indicates that this rule applies to all network services. The colon (:) separates the services-list from the host-list. The keyword LOCAL indicates that all local hostnames without a domain extension are acceptable, and the .wrotethebook.com string indicates that all hostnames that have the wrotethebook.com domain name extensions are also acceptable.
After granting access to just those systems you want to service, explicitly deny access to all other systems using the hosts.deny file. To prevent access by everyone else, make this entry in the /etc/hosts.deny file:
ALL : ALL
Every system that does not match the entry in
/etc/hosts.allow is passed on to
/etc/hosts.deny. Here the entry denies everyone
access, regardless of what service they are asking for. Remember,
even with ALL in the services-list field, only services started by
inetd, and only those services
whose entries in inetd.conf have been edited to
invoke tcpd, are affected. This
does not automatically provide security for any other
service.
The syntax of a standard wrapper access control file can be a little more complicated than the examples above. A hosts.allow file might contain:
imapd, ipopd3 : 172.16.12.
ALL EXCEPT imapd, ipopd3 : ALL
The first entry says that every host whose IP address begins with 172.16.12 is granted access to the IMAP and POP services. The second line says that all services except IMAP and POP are granted to all hosts. These entries would limit mailbox service to a single subnet while providing all other services to anyone who requested them. The EXCEPT keyword is used to except items from an all-encompassing service list. It can also be used in the host-list of an access rule. For example:
ALL: .wrotethebook.com EXCEPT public.wrotethebook.com
If this appeared in a hosts.allow file it would permit every system in the wrotethebook.com domain to have access to all services except for the host public.wrotethebook.com. The assumption is that public.wrotethebook.com is untrusted for some reason—perhaps users outside of the domain are allowed to log into public.
The final syntax variation uses the at-sign (@) to narrow the definition of services or
hosts. Here are two examples:
in.telnetd@172.16.12.2 : 172.16.12.0/255.255.255.0
in.rshd : KNOWN@robin.wrotethebook.com
When the @ appears in the
services side of a rule it indicates that the server has more than
one IP address and that the rule being defined applies only to one
of those addresses. Examples of systems with more than one address
are multi-homed hosts and routers. If your server is also the router
that connects your local network to outside networks, you may want
to provide services on the interface connected to the local network
but not on the interface connected to the outside world. The
@ syntax lets you do that. If the
first line in this example appeared in a
hosts.allow file, it would permit access to the
Telnet daemon through the network interface that has the address
172.16.12.2 by any client with an address that begins with
172.16.12.
The purpose of the @ when
it appears in the host-list of a rule is completely different. In
the host-list, the @ indicates
that a username is required from the client as part of the access
control test. This means that the client must run an identd daemon. The host-list can test for
a specific username, but it is more common to use one of three
possible keywords:
- KNOWN
The result of the test is KNOWN when the remote system returns a username in response to the query.
- UNKNOWN
The result of the test is UNKNOWN when the remote host does not run
identdand thus fails to respond to the query.- ALL
This setting requires the remote host to return a username. It is equivalent to using KNOWN but is less commonly used.
The final field that can be used in these entries is the
optional shell-command field. When a match occurs for an entry that
has an optional shell command, tcpd logs the access, grants or denies
access to the service, and then passes the shell command to the shell for execution.
The shell command allows you to define additional processing that is triggered by a match in the access control list. In all practical examples this feature is used in the hosts.deny file to gather more information about the intruder or to provide immediate notification to the system administrator about a potential security attack. For example:
ALL : ALL : (safe_finger -l @%h | /usr/sbin/mail -s %d - %h root) &
In this example from a hosts.deny file,
all systems that are not explicitly granted access in the
hosts.allow file are denied access to all
services. After logging the attempted access and blocking it,
tcpd sends the safe_finger command to the shell for
execution. All versions of finger, including safe_finger, query the remote host to find
out who is logged into that host. This information is useful when
tracking down an attacker. The result of the safe_finger command is mailed to the root
account. The ampersand (&) at
the end of the line causes the shell commands to run in the
background. This is important. Without it, tcpd would sit and wait for these programs
to complete before returning to its own work.
The safe_finger program is
provided with wrapper. It is specially modified to be less
vulnerable to attack than the standard finger program.
There are some variables, such as %h and %d, used in the example above. These
variables allow you to take values for the incoming connection and
to use them in the shell process. Table 12-1 lists the variables
you can use.
Table 12-1. Variables used with tcpd shell commands
Variable | Value |
|---|---|
%a | The client’s IP address. |
%A | The server’s IP address. |
%c | All available client information, including the username when available. |
%d | The network service daemon process name. |
%h | The client’s hostname. If the hostname is unavailable, the IP address is used. |
%H | The server’s hostname. |
%n | The client’s hostname. If the hostname is unavailable, the keyword UNKNOWN is used. If a DNS lookup of the client’s hostname and IP address do not match, the keyword PARANOID is used. |
%N | The server’s hostname. |
%p | The network service daemon process id (PID). |
%s | All available server information, including the username when available. |
%u | The client username or the keyword UNKNOWN if the username is unavailable. |
%% | The percent character (%). |
Table 12-1 shows
that %h is the remote hostname
and %d is the daemon being
accessed. Refer back to the sample shell command. Assume that the
attempted access to in.rshd came
from the host foo.bar.org. The command passed
to the shell would be:
safe_finger -l @foo.bar.org |
   /usr/sbin/mail -s in.rshd-foo.bar.org root
The standard wrapper access control syntax is a complete configuration language that should cover any reasonable need. Despite this, there is also an extended version of the wrapper access control language.
If wrapper is compiled with PROCESS_OPTIONS enabled in the Makefile, the syntax of the wrapper access control language is changed and extended. With PROCESS_OPTIONS enabled, the command syntax is not limited to three fields. The new syntax is:
                  service-list
                  :
                  host-list
                  :
                  option
                  :
                  option ...
The service-list and the
host-list are defined in exactly the same
way they were in the original wrapper syntax. The options are new,
and so is the fact that multiple options are allowed for each rule.
There are several possible options:
allowGrants the requested service and must appear at the end of a rule.
denyDenies the requested service and must appear at the end of a rule.
spawnshell-commandExecutes the specified shell command as a child process.
twistshell-commandExecutes the shell command instead of the requested service.
keepaliveSends keepalive messages to the remote host. If the host does not respond, the connection is closed.
lingersecondsSpecifies how long to try to deliver data after the server closes the connection.
rfc931 [timeout]Uses the IDENT protocol to look up the user’s name on the remote host.
timeoutdefines how many seconds the server should wait for the remote host to respond.bannerspathSends the contents of a message file to the remote system.
pathis the name of a directory that contains the banner files. The file displayed is the file that has the same name as the network daemon process.nice [number]Sets the
nicevalue for the network service process. The default value is 10.umaskmaskSets a
umaskvalue for files used by the network service process.useruser[.group]Defines the user ID and group ID under which the network service process runs. This overrides what is defined in inetd.conf.
setenvvariablevalueSets an environment variable for the process runtime environment.
A few examples based on the samples shown earlier will illustrate the differences in the new syntax. Using the new syntax, a hosts.allow file might contain:
ALL : LOCAL, .wrotethebook.com : ALLOW
in.ftpd,in.telnetd : eds.oreilly.com : ALLOW
ALL : ALL : DENY
With the new syntax there is no need to have two files. The
options ALLOW and DENY permit everything to be listed in a single
file. The first line grants access to all services to every local
host and every host in the wrotethebook.com
domain. The second line gives the remote host
eds.oreilly.com access through FTP and Telnet.
The third line is the same as having the line ALL :
ALL in the
hosts.deny file; it denies all other hosts
access to all of the services. Using the ALLOW and DENY options, the
command:
ALL: .wrotethebook.com EXCEPT public.wrotethebook.com
can be rewritten as:
ALL: .wrotethebook.com : ALLOW
ALL: public.wrotethebook.com : DENY
The shell command example using the original syntax is almost identical in the new syntax:
in.rshd : ALL: spawn (safe_finger -l @%h | /usr/sbin/mail -s %d - %h root) & : DENY
A more interesting variation on the shell command theme comes
from using the twist option.
Instead of passing a command to the shell for execution, the
twist command executes a program
for the remote user, but not the program the user expects. For
example:
in.ftpd : ALL: twist /bin/echo 421 FTP not allowed from %h : DENY
In this case, when the remote user attempts to start the FTP
daemon, echo is started instead.
The echo program then sends the
message to the remote system and terminates the connection.
The extended wrapper syntax is rarely used because everything
can be done with the traditional syntax. It is useful to understand
the syntax so that you can read it when you encounter it, but it is
unlikely that you will feel the need to use it. An alternative to
wrapper that you will encounter is xinetd. It replaces inetd and adds access controls. The basics
of xinetd are covered in Chapter 5. Here we focus on the access
controls that it provides.
As noted in Chapter 5, most of
the information in the xinetd.conf file parallels
values found in the inetd.conf file. What
xinetd adds are capabilities
similar to those of wrapper. xinetd
reads the /etc/hosts.allow and
/etc/hosts.deny files and implements the access
controls defined in those files. Additionally, xinetd provides its own logging and its own access controls. If your system uses
xinetd, you will probably create
hosts.allow and hosts.deny
files to enhance the security of services, such as portmapper, that read those files, and you
will use the security features of xinetd because those features provide
improved access controls.
xinetd provides two logging
parameters: log_on_success and
log_on_failure. Use these
parameters to customize the standard log entry made when a connection
is successful or when a connection attempt fails. log_on_success and log_on_failure accept the following
options:
- USERID
Logs the user ID of the remote user. USERID can be logged for both successful and failed connection attempts.
- HOST
Logs the address of the remote host. Like USERID, HOST can be used for both success and failure.
- PID
Logs the process ID of the server started to handle the connection. PID applies only to
log_on_success.- DURATION
Logs the length of time that the server handling this connection ran. DURATION applies only to
log_on_success.- EXIT
Logs the exit status of the server when the connection terminates. EXIT applies only to
log_on_success.- ATTEMPT
Logs unsuccessful connection attempts. ATTEMPT applies only to
log_on_failure.- RECORD
Logs the connection information received from the remote server. RECORD applies only to
log_on_failure.
In addition to logging, xinetd provides three parameters for access
control. Use these parameters to configure xinetd to accept connections from certain
hosts, paralleling the hosts.allow file, to
reject connections from certain hosts, paralleling the
hosts.deny file, and to accept connections only
at certain times of the day. The three parameters are:
-
only_from This parameter identifies the hosts that are allowed to connect to the service. Hosts can be defined using:
a numeric address. For example, 172.16.12.5 defines a specific host, and 129.6.0.0 defines all hosts with an address that begins with 129.6. The address 0.0.0.0 matches all addresses.
an address scope. For example, 172.16.12.{3,6,8,23} defines four different hosts: 172.16.12.3, 172.16.12.6, 172.16.12.8, and 172.16.12.23.
a network name. The network name must be defined in the /etc/networks file.
a canonical hostname. The IP address provided by the remote system must reverse-map to this hostname.
a domain name. The hostname returned by the reverse lookup must be in the specified domain. For example, the value
.wrotethebook.comrequires a host in the wrotethebook.com domain. Note that when a domain name is used, it starts with a dot.an IP address with an associated address mask. For example, 172.16.12.128/25 would match every address from 172.16.12.128 to 172.16.12.255.
-
no_access This parameter defines the hosts that are denied access to the service. Hosts are defined using exactly the same methods as those described for the
only_fromattribute.-
access_times This parameter defines the time of day a service is available, in the form
hour:min-hour:min. A 24-hour clock is used. Hours are 0 to 23 and minutes are 0 to 59.
If neither only_from nor
no_access is specified, access is
granted to everyone. If both are specified, the most exact match
applies—for example:
no_access            = 172.16.12.250
only_from            = 172.16.12.0
The only_from command in this
example permits every system on network 172.16.12.0 to have access to
the service. The no_access command
takes away that access for one system. It doesn’t matter whether the
no_access command comes before or
after the only_from command. It
always works the same way because the more exact match takes
precedence.
A sample POP3 entry from xinetd.conf is shown below:
# default: on
# description: The POP3 service allows remote users to access their mail \
#              using an POP3 client such as Netscape Communicator, mutt, \
#              or fetchmail.

service login
{
        socket_type             = stream
        wait                    = no
        user                    = root
        log_on_success          += USERID
        log_on_failure          += USERID
        only_from               = 172.16.12.0
        no_access               = 172.16.12.231
        server                  = /usr/sbin/ipop3d
}
In the sample, the only_from
command permits access from every system on network 172.16.12.0, which
is the local network for this sample system, and blocks access from
all other systems. Additionally, there is one system on subnet
17.16.12.0 (host 172.16.12.231) that is not trusted to have POP
access. The no_access command
denies access to anyone on the system 172.16.12.231.
Remember that wrapper and xinetd can only control access to services.
These tools cannot limit access to data on the system or moving across
the network. For that, you need encryption.
Encryption is a technique for limiting access to the data carried on the network. Encryption encodes the data in a form that can be read only by systems that have the “key” to the encoding scheme. The original text, called the “clear text,” is encrypted using an encryption device (hardware or software) and an encryption key. This produces encoded text, which is called the cipher. To recreate the clear text, the cipher must be decrypted using the same type of encryption device and an appropriate key.
Largely because of spy novels and World War II movies, encryption is one of the first things that people think of when they think of security. However, encryption has not always been applicable to network security. Traditionally, encrypting data for transmission across a network required that the same encryption key, called a shared secret or a private key , be used at both ends of the data exchange. Unless you controlled both ends of the network and could ensure that the same encryption key was available to all participants, it was difficult to use end-to-end data encryption. For this reason, encryption was most commonly used to exchange data where the facilities at both ends of the network were controlled by a single authority, such as military networks, private networks, individual systems, or when the individuals at both ends of the communication could reach personal agreement on the encryption technique and key. Encryption that requires prior agreement to share a secret key is called symmetric encryption .
Public-key encryption is the technology that makes encryption an important security technology for an open global network like the Internet. For example, an e-commerce web server and any customer’s web browser can exchange encrypted data because they both use public-key cryptography. Public-key systems encode the clear text with a key that is widely known and publicly available, but the cipher can only be decoded back to clear text with a secret key. This means that Dan can look up Kristin’s public key in a trusted database and use it to encode a message to her that no one else can read. Even though everyone on the Internet has access to the public key, only Kristin can decrypt the message using her secret key. This encrypted communication takes place without Kristin ever divulging her secret key.
Additionally, messages encrypted using the private key can only be decrypted by the public key. Thus the public key can be used to authenticate the source of a message since only the proper source should have access to the private key. Because public-key cryptography uses different keys for encryption and decryption, it is called asymmetric encryption .
One problem with asymmetric encryption is that it is computationally intensive and slow when compared to symmetric encryption. For this reason it is used for only a small portion of the data exchange. Public-key encryption is used for both encryption and authentication during the initial handshake of an encrypted connection. During the handshake, a shared secret key, protected by public-key encryption, is exchanged by the participants. The subsequent data exchange is encrypted with symmetric encryption using that shared key.
Another problem with public-key encryption in a global network is that it requires a universally recognized, trusted infrastructure to distribute public keys and to ensure that the keys have not been tampered with. The first step when Dan sent a message to Kristin was retrieving her public key. But where did it come from? The key probably came from one of two places: from a private exchange of public keys or from the network with verification from a trusted certificate authority. When the number of participants is limited, public keys can be exchanged through private agreements in the same manner that private keys used to be exchanged. That does not work, however, for global network applications where there is no prior knowledge of the participants. In that case the public key is obtained from the network and certified by a trusted third party called a certificate authority (CA). The CA provides the public key in a message called a certificate that contains the public key, the name of the organization whose key it is, and dates when the key became valid and when it will become invalid. This message is signed with the private key of the CA. Thus when the certificate is verified using the CA’s public key, the recipient knows that the certificate came from the trusted CA. CA public keys are well known and widely distributed. For example, browser vendors provide the public keys of many CAs with every copy of their browser software.
The type of encryption used in the examples in the next section is symmetric encryption. It requires that the same encryption technique and the same secret key is used for both encrypting and decrypting the message. It does not rely on public keys, digital signatures, or a widely accepted infrastructure, but its usefulness is limited.
Before using encryption, decide why you want to encrypt the data, whether the data should be protected with encryption, and whether the data should even be stored on a networked computer system.
A few valid reasons for encrypting data are:
To prevent casual browsers from viewing sensitive data files
To prevent accidental disclosure of sensitive data
To prevent privileged users (e.g., system administrators) from viewing private data files
To complicate matters for intruders who attempt to search through a system’s files
There are several tools available for encrypting data files, many of which are commercial packages. Two open source filesystems that provide automatic file encryption are the Cryptographic File System (CFS) and the Practical Privacy Disk Driver (PPDD).[134] There are even a couple of file encryption tools included with Solaris and Linux.
Solaris includes the old Unix crypt command. crypt is easy to use, but it has limited
value. The encryption provided by crypt is easily broken. At best, crypt protects files from casual browsing,
nothing more.
The age of crypt and the fact
that other, better, more recent symmetric encryption tools are not
included with the operating system show that there is little demand
for symmetric encryption tools. Public-key encryption is simply more
flexible and can be used for a wider range of applications. In fact,
the file encryption tool included with Linux is an asymmetric
encryption tool.
Public-key encryption is the type of encryption that has
the greatest customer demand. The most popular Unix encryption tools,
ssh and SSL, are public-key tools.
Even for tasks such as encrypting files for local storage, public-key
systems are popular because they do not require users to share their
private keys.
Linux systems often include the GNU Privacy Guard (gpg). gpg, like the well-known tool PGP,[135] can be used to encrypt files or mail.
It also provides digital signature services that can be used for
email authentication. In the following example, gpg is used to encrypt and decrypt a file.
We begin by creating our keys with the --gen-key option:
$ gpg  -- gen-key
gpg (GnuPG) 1.0.4; Copyright (C) 2000 Free Software Foundation, Inc.
This program comes with ABSOLUTELY NO WARRANTY.
This is free software, and you are welcome to redistribute it
under certain conditions. See the file COPYING for details.
gpg: Warning: using insecure memory!
gpg: /home/craig/.gnupg/secring.gpg: keyring created
gpg: /home/craig/.gnupg/pubring.gpg: keyring created
Please select what kind of key you want:
   (1) DSA and ElGamal (default)
   (2) DSA (sign only)
   (4) ElGamal (sign and encrypt)
Your selection? 1
DSA keypair will have 1024 bits.
About to generate a new ELG-E keypair.
              minimum keysize is  768 bits
              default keysize is 1024 bits
    highest suggested keysize is 2048 bits
What keysize do you want? (1024) 1024
Requested keysize is 1024 bits
Please specify how long the key should be valid.
         0 = key does not expire
      <n>  = key expires in n days
      <n>w = key expires in n weeks
      <n>m = key expires in n months
      <n>y = key expires in n years
Key is valid for? (0) 0
Key does not expire at all
Is this correct (y/n)? y
A User-ID identifies your key; the software constructs the user id
from Real Name, Comment and Email Address in this form:
    "Heinrich Heine (Der Dichter) <heinrichh@duesseldorf.de>"
Real name: Craig Hunt
Email address: craig.hunt@wrotethebook.com
Comment:
You selected this USER-ID:
    "Craig Hunt <craig.hunt@wrotethebook.com>"
Change (N)ame, (C)omment, (E)mail or (O)kay/(Q)uit? o
You need a Passphrase to protect your secret key.
Type the passphrase: Fateful lightening
Repeat: Fateful lightening
We need to generate a lot of random bytes. It is a good idea to perform
some other action (type on the keyboard, move the mouse, utilize the
disks) during the prime generation; this gives the random number
generator a better chance to gain enough entropy.
+++++.+++++.+++++.++++++++++++++++++++.+++++.+++++++++++++++++++++++++.++++++++++.
++++++++++++++++++++.+++++++++++++++++++++++++++++++++++>.+++++.............................+++++^^^
public and secret key created and signed.
The --gen-key option asks several questions. However, the questions
are simple and the initial key generation needs to be done only once.
First gpg asks what kind of key you
want. What it is really asking is whether you want to use the keys for
digital signatures, for encryption, or for both digital signatures and
encryption. Choose (1), which is
the default. This creates both types of keys so that you’re prepared
for any encryption task. Next it asks how long the key should be; the
longer the key, the more difficult it is to generate and crack. The
default is 1024 bits, which is plenty long for any realistic gpg application. gpg asks for your name, email address, and,
optionally, a comment. It uses this information to identify your keys
in the key databases. Finally, it asks for a passphrase that will be
used to identify you when you access your secret key.
gpg uses two key databases:
one for secret keys and one for public keys. gpg calls these databases “key rings.” The database of secret keys is
secring.gpg and the database of public keys is
pubring.gpg . Both public and private keys are used when we encrypt
and then decrypt a file. The following example shows the encryption
process:
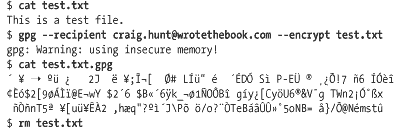
The cat command shows that we have created a simple text file
named test.txt that we wish to encrypt. It is
clear what the --encrypt option on
the gpg command line is doing, but
the purpose of the --recipient
argument is not as clear. The pubring.gpg
database can contain many public keys. The --recipient argument identifies the public
key used to encrypt the file. The word “recipient” is used because
gpg is often used to encrypt mail,
and therefore the public key of the mail recipient is used. For this
same reason, it is common to identify the desired key with the email
address provided when the key was created.
gpg produces a cipher file
that has the same name as the clear-text file with the addition of the
file extension .gpg. A cat of the cipher file shows that it is not
readable. After checking that the cipher file exists, the clear-text
file is deleted. It wouldn’t do us much good to create an encrypted
file if the unencrypted file was still around for everyone to
read!
To read the cipher file, it must be decrypted. In the following
example, the --decrypt option is used with the gpg command to decrypt the
test.txt.gpg file:
$ gpg  -- output test.txt  -- decrypt test.txt.gpg
gpg: Warning: using insecure memory!
You need a passphrase to unlock the secret key for
user: "Craig Hunt <craig.hunt@wrotethebook.com>"
1024-bit ELG-E key, ID D99991BA, created 2001-09-18 (main key ID 9BE3B5AD)
Enter passphrase: Fateful lightening
$ cat test.txt
This is a test file.
The --output option tells
gpg where to write the clear text
after decrypting the cipher file. In the example we write it to
test.txt. A cat of test.txt shows
that the file is readable and that it contains the original
test.
These gpg examples are
reminiscent of the ssh examples
seen earlier in this chapter and the openssl examples in Chapter 11. All of these programs have
tools to generate public and private keys that are then used for a
specific purpose. gpg secures files
and email. ssh secures terminal
connections. openssl secures web
traffic. SSL, however, can be used to secure communications for a wide
variety of
applications.
stunnel is a program that uses SSL to encrypt traffic for daemons
that do not encrypt their own traffic. stunnel brings the benefit of public-key
encryption to a wide variety of network applications. stunnel is included with OpenSSL and is
installed when OpenSSL is installed.[136]
Like all applications that use SSL, stunnel needs a certificate to function
properly. The easiest way to create the stunnel certificate is to change to the
SSL certificate directory and run make, as in the example below:
# cd /usr/share/ssl/certs
# make stunnel.pem
umask 77 ; \
PEM1=`/bin/mktemp /tmp/openssl.XXXXXX` ; \
PEM2=`/bin/mktemp /tmp/openssl.XXXXXX` ; \
/usr/bin/openssl req -newkey rsa:1024 -keyout $PEM1 -nodes -x509 -days 365 -out $PEM2 ; \
cat $PEM1 >  stunnel.pem ; \
echo ""    >> stunnel.pem ; \
cat $PEM2 >> stunnel.pem ; \
rm -f $PEM1 $PEM2
Using configuration from /usr/share/ssl/openssl.cnf
Generating a 1024 bit RSA private key
....++++++
........++++++
writing new private key to '/tmp/openssl.3VVjex'
-----
You are about to be asked to enter information that will be incorporated
into your certificate request. What you are about to enter is what is
called a Distinguished Name or a DN. There are quite a few fields but you
can leave some blank. If you enter '.', the field will be left blank. For
some fields there will be a default value.
-----
Country Name (2 letter code) [AU]:US
State or Province Name (full name) [Some-State]:Maryland
Locality Name (eg, city) []:Gaithersburg
Organization Name (eg, company) [Internet Widgits Ltd]:WroteTheBook.com
Organizational Unit Name (eg, section) []:Books
Common Name (eg, your name or your server's hostname) []:Craig Hunt
Email Address []:craig.hunt@wrotethebook.com
By default the openssl
installation creates the directory
/usr/share/ssl/certs to hold certificates, and
by default stunnel looks for a
certificate in that directory with the filename
stunnel.pem.[137] As with all new openssl certificates, you’re prompted for
the information needed to uniquely identify the certificate.
Once the certificate is created, stunnel is ready for use. POP and IMAP are
excellent examples of services that can be run inside a secure
connection using stunnel. The
primary reason that POP and IMAP are run through stunnel is to ensure that the user’s
password cannot be stolen from a POP or IMAP session and then used
by the thief to log into the server. stunnel encrypts everything: the login and
the download of mail. This also guarantees that the contents of the
mail cannot be surreptitiously read by a snooper during the
download, although from the point of view of the system
administrator, the password is really the piece of information you
want to protect.
For secure POP and IMAP communication to work, both ends of
the connection must be able to tunnel the data through SSL. This is
not always the case. Some clients do not have stunnel; some do not even have SSL. For
this reason, servers usually provide traditional POP and IMAP
connections on the appropriate well-known ports, and SSL-secured POP
and IMAP on other ports. When run over stunnel, POP is called
pops and assigned TCP port 995, and IMAP is
called imaps and assigned TCP port 993.
pops and imaps are not
special protocols. They are simply service names from the
/etc/services file that map to port numbers 995
and 993. The following command added to the system startup runs POP
inside an SSL tunnel on port 995:
stunnel -d 995 -l /usr/sbin/ipop3d -- ipop3d
Alternatively, stunnel can
be run by inetd using an entry in
the inetd.conf file. For example, the following
entry runs POP inside an SSL tunnel on a demand basis:
pops stream tcp nowait root /usr/sbin/stunnel -l /usr/sbin/ipop3d -- ipop3d
Systems that use xinetd can
run stunnel from the
xinetd.conf file. The following xinetd entry runs
imaps:
service imaps
{
        socket_type             = stream
        wait                    = no
        user                    = root
        server                  = /usr/sbin/stunnel
        server_args             = -l /usr/sbin/imapd -- imapd
        log_on_failure          += USERID
}
stunnel has nothing
specific to do with POP or IMAP. It can be used to secure a wide
variety of daemons. When used to secure a daemon that is normally
run by inetd or xinetd, the stunnel command is placed in the
inetd.conf or xinetd.conf
file, as appropriate. When used to secure a daemon that runs from a
startup file, the stunnel command
is placed in that startup file.
Despite the power of tools like stunnel and ssh, encryption is not a substitute for
good computer security. Encryption can protect sensitive or personal
information from snooping, but it should never be the sole means of
protecting critical information. Encryption systems can be broken,
and encrypted data can be deleted or corrupted just like any other
data. So don’t let encryption lull you into a false sense of
security. Some information is so sensitive or critical that it
should not be stored on a networked computer system, even if it is
encrypted. Encryption is only a small part of a complete security
system.
A firewall system is an essential component of network security. The term “firewall” implies protection from danger, and just as the firewall in your car protects the passengers’ compartment from the car’s engine, a firewall computer system protects your network from the outside world. A firewall computer system provides strict access control between your systems and the outside world.
The concept of a firewall is quite simple. A firewall is a choke point through which all traffic between a secured network and an unsecured network must pass. In practice, it is usually a choke point between an enterprise network and the Internet. Creating a single point through which all traffic must pass allows the traffic to be more easily monitored and controlled and allows security expertise to be concentrated on that single point.
Firewalls are implemented in many ways. In fact, there are so many different types of firewalls, the term is almost meaningless. When someone tells you they have a firewall, you really can’t know exactly what they mean. Covering all of the different types of firewall architectures requires an entire book—see Building Internet Firewalls (O’Reilly & Associates). Here we cover the screened subnet architecture (probably the most popular firewall architecture) and the multi-homed host architecture, which is essentially a firewall-in-a-box.
The most common firewall architecture contains at least four hardware components: an exterior router, a secure server (called a bastion host), an exposed network (called a perimeter network), and an interior router. Each hardware component provides part of the complete security scheme. Figure 12-4 illustrates this architecture.
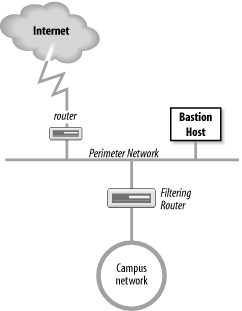
The exterior router is the only connection between the enterprise network and the outside world. This router is configured to do a minimal level of access control. It checks to make sure that no packet coming from the external world has a source address that matches the internal network. If our network number is 172.16, the exterior router discards any packets it receives on its exterior interface that contain the source address 172.16. That source address should be received by the router only on its interior interface. Security people call this type of access control packet filtering .
The interior router does the bulk of the access control work. It
filters packets not only on address but also on protocol and port
numbers to control the services that are accessible to and from the
interior network. It’s up to you which services this router blocks. If
you plan to use a firewall, the services that will be allowed and those
that will be denied should be defined in your security policy document.
Almost every service can be a threat. These threats must be evaluated in
light of your security needs. Services that are intended only for
internal users (NIS, NFS, X-Windows, etc.) are almost always blocked.
Services that allow writing to internal systems (Telnet, FTP, SMTP,
etc.) are usually blocked. Services that provide information about
internal systems (DNS, fingerd, etc.)
are usually blocked. This doesn’t leave much running! That is where the
bastion host and perimeter network come in.
The bastion host is a secure server. It provides an interconnection point between the enterprise network and the outside world for the restricted services. Some of the services that are restricted by the interior gateway may be essential for a useful network. Those essential services are provided through the bastion host in a secure manner. The bastion host provides some services directly, such as DNS, SMTP mail services, and anonymous FTP. Other services are provided as proxy services. When the bastion host acts as a proxy server, internal clients connect to the outside through the bastion host, and external systems respond back to the internal clients through the host. The bastion host can therefore control the traffic flowing into and out of the site to any extent desired.
There can be more than one secure server, and there often is. The perimeter network connects the servers together and connects the exterior router to the interior router. The systems on the perimeter network are much more exposed to security threats than are the systems on the interior network. This is as it must be. After all, the secure servers are needed to provide service to the outside world as well as to the internal network. Isolating the systems that must be exposed on a separate network lessens the chance that a compromise of one of those systems will lead directly to the compromise of an internal system.
The multi-homed host architecture attempts to duplicate all of these firewall functions in a single box. It works by replacing an IP router with a multi-homed host that does not forward packets at the IP layer.[138] The multi-homed host effectively severs the connection between the interior and exterior networks. To provide the interior network with some level of network connectivity, it performs similar functions to the bastion hosts.
Figure 12-5 shows a comparison between an IP router and a multi-homed host firewall. A router handles packets up through the IP layer. The router forwards each packet based on the packet’s destination address, and the route to that destination indicated in the routing table. A host, on the other hand, does not simply forward packets. A multi-homed host can process packets through the Application Layer, which provides it with complete control over how packets are handled.[139]
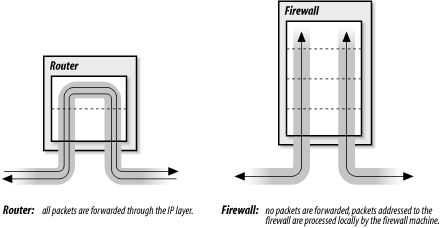
This definition of a firewall—as a device completely distinct from an IP router—is not universally accepted. Some people refer to routers with special security features as firewalls, but this is really just a matter of semantics. In this book, routers with special security features are called “secure routers” or “secure gateways.” Firewalls, while they may include routers, do more than just filter packets.
Ideally, an intruder cannot mount a direct attack on any of the systems behind a firewall. Packets destined for hosts behind the firewall are simply delivered to the firewall. The intruder must instead mount an attack directly against the firewall machine. Because the firewall machine can be the target of break-in attacks, it employs very strict security guidelines. But because there is only one firewall versus many machines on the local network, it is easier to enforce strict security on the firewall.
The disadvantage of a firewall system is obvious. In the same manner that it restricts access from the outside world into the local network, it restricts access from the local network to the outside world. To minimize the inconvenience caused by the firewall, the system must do many more things than a router does. Some firewalls provide:
DNS name service for the outside world
Email forwarding
Proxy services
Only the minimal services truly needed to communicate with
external systems should be provided on a firewall system. Other common
network services (NIS, NFS, X Windows, finger, etc.) should generally not be
provided. Services are limited to decrease the number of holes through
which an intruder can gain access. On firewall systems, security is
more important than service.
The biggest problems for the firewall machine are ftp service and remote terminal service. To
maintain a high level of security, user accounts are discouraged on
the firewall machine; however, user data must pass through the
firewall system for ftp and remote
terminal services. This problem can be handled by creating special
user accounts for ftp and telnet that are shared by all internal
users. But group accounts are generally viewed as security problems. A
better solution is to allow ssh
services through the firewall. This encourages the use of ssh, which in turn provides strong
authentication and encrypted data exchanges.
Because a firewall must be constructed with great care to be effective, and because there are many configuration variables for setting up a firewall machine, vendors offer special firewall software. Some vendors sell special-purpose machines designed specifically for use as firewall systems. There are several low-cost Linux firewall packages. Before setting up your own firewall, investigate the options available from software vendors and your hardware vendor.
The details of setting up a firewall system are beyond the scope of this book. Before you proceed, I recommend you read Building Internet Firewalls and Firewalls and Internet Security. Unless you have skilled Unix system administrators with adequate free time, a do-it-yourself firewall installation is a mistake. Hire a company that specializes in firewall design and installation. If your information is valuable enough to protect with a firewall, it should be valuable enough to protect with a professionally installed firewall.
Of course, not every site can afford a professionally installed
firewall—you might be protecting a small office or even a home
network. If you don’t have money or time, you can buy a low-cost
firewall router, sometimes referred to as a firewall appliance. These boxes are specifically designed for the
small office and home office. They provide basic packet filtering,
proxy services, and network address translation service, and they
often cost only a few hundred dollars. In most cases, you simply buy
the box and plug it in. At the very least, your network deserves this
level of protection. If you have the time and the skill to build a
firewall, you can use a firewall package or the firewall tools built
into your operating systems. A firewall package increases initial
cost, but it is easy to work with. The packet filtering tools built
into the operating system cost nothing but are the most difficult to
configure. The iptables tool
provided with Linux is a good example of the type of firewall tools
provided with some Unix operating systems.
In its simplest incarnation, a firewall is a filtering router that
screens out unwanted traffic. Use the routing capabilities of a
multi-homed Linux host combined with the filtering features of
iptables to create a filtering
router.
The Linux kernel categorizes firewall traffic into three groups and applies different filter rules to each category of traffic. These are:
- INPUT
Incoming traffic bound for a process on the local system is tested against the INPUT filter rules before it is accepted.
- OUTPUT
Outbound traffic that initiated on the local system is tested against the OUTPUT filter rules before it is sent.
- FORWARD
Traffic from one external system bound for another external system is tested against the FORWARDING filter rules.
The INPUT and OUTPUT rules are used when the system acts as a
host. The FORWARD rules are used when the system acts as a router. In
addition to the three standard categories, iptables accepts user-defined
categories.
The Linux kernel maintains a list of rules for each of
these categories. The lists of rules are maintained by the iptables command.[140] Use the options shown in Table 12-2 with the iptables command to create or delete
user-defined chains, to add rules to a chain, to delete rules from a
chain, and to change the order of the rules in the chain.
Table 12-2. iptables command-line options
Option | Function |
|---|---|
-A | Appends rules to the end of a ruleset. |
-D | Deletes rules from a ruleset. |
-E | Renames a ruleset. |
-F | Removes all of the rules from a ruleset. |
-I | Inserts a rule into a specific location in a ruleset. |
-L | Lists all rules in a ruleset. |
-N | Creates a user-defined ruleset with the specified name. |
-P | Sets the default policy for a chain. |
-R | Replaces a rule in a chain. |
-X | Deletes the specified user-defined ruleset. |
-Z | Resets all packet and byte counters to zero. |
Firewall rules are composed of a filter against which the
packets are matched and the action taken when a packet matches the
filter. The action can either be a standard policy or a jump to a
user-defined ruleset for additional processing. The -j target
command-line option identifies the user-defined ruleset or the
standard policy to handle the packet. target is
either the name of a ruleset or a keyword that identifies a standard
policy. The keywords for the standard policies are:
- ACCEPT
Let the packet pass through the firewall.
- DROP
Discard the packet.
- QUEUE
Pass the packet up to user space for processing.
- RETURN
In a user-defined ruleset, this means to return to the ruleset that called this ruleset. In one of the three kernel rulesets, this means to exit the chain and use the default policy for the chain.
The iptables command
constructs filters that match on the protocol used, the source or
destination address, or the network interface used for the packet,
using a variety of command-line parameters. The basic iptables parameters for building filters are:
-pprotocolDefines the protocol to which the rule applies.
protocolcan be any numeric value from the /etc/protocols file or one of the keywords:tcp,udp, oricmp.-saddress[/mask]Defines source address of the packets to which the rule applies.
addresscan be a hostname, network name, or IP address.--sport[port[:port]]Defines the source port of the packets to which the rule applies.
portcan be a name or number from the /etc/services file. A range of ports can be specified using the formatport:port. If no specific port value is specified, all ports are assumed.-daddress[/mask]Defines the destination address of the packets to which the rule applies.
addresscan be a hostname, network name, or IP address.--dport[port[:port]Defines the destination port to which the rule applies. This filters all traffic bound for a specific port. The port is defined using the same rules as those used to define these values for the packet source.
--icmp-typetypeDefines the ICMP type to which the rule applies.
typecan be any valid ICMP message type number or name.-inameDefines the name of the input network interface to which the rule applies. Only packets received on this interface are affected by the rule. Specify a partial interface name by ending it with a
+(e.g.,eth+matches all Ethernet interfaces that begin witheth).-onameDefines the name of the output network interface to which the rule applies. Only packets sent out this interface are affected by the rule. Specify a partial interface name by ending it with a
+(e.g.,eth+matches all Ethernet interfaces that begin witheth).-fIndicates that the rule refers only to second and subsequent fragments of fragmented packets.
Putting this all together creates a firewall that can protect your network.
Assume we have a Linux router attached to a perimeter network with
the address 172.16.12.254 on interface eth0 and to an external
network with the address 192.168.6.5 on interface eth1. Further
assume that the perimeter network contains only a sendmail server
and an Apache server. Here is an example of some iptables commands we might use on the
Linux system to protect the perimeter network:
iptable -F INPUT
iptables -F FORWARD
iptables -A INPUT -i eth1 -j DROP
iptables -A FORWARD -i eth1 -s 172.16.0.0/16 -j DROP
iptables -A FORWARD -o eth1 -d 172.16.0.0/16 -j DROP
iptables -A FORWARD -d 172.16.12.1 25 -j ACCEPT
iptables -A FORWARD -d 172.16.12.6 80 -j ACCEPT
iptables -A FORWARD -j DROP
The first two commands use the -F option to clear the rulesets we plan to
work with. The third line drops any packets from the external
network that are bound for a process running locally on the Linux
router. We do not allow any access to router processes from the
external world.
The next two commands drop packets that are being routed to the external world using an internal address. If packets are received on the external interface with a source address from the internal network, they are dropped. Likewise, if packets are being sent out the external interface with a destination address from the internal network, they are dropped. These rules say that if packets on the external network interface (eth1) misuse addresses from the internal network (172.16), somebody is trying to spoof us and the packets should be discarded.
The next two rules are basically identical. They accept packets if the destination and port are the correct destination and port for a specific server. For example, port 25 is the SMTP port and 172.16.12.1 is the mail server, and port 80 is the HTTP port and 172.16.12.6 is the web server. We accept these inbound connections because they are destined for the correct systems. The last rule rejects all other traffic.
These examples illustrate the power of Linux’s built-in
filtering features and provide enough information to get you
started. Clearly much more can and should be done to build a real
firewall. If you want to know more about iptables, see Building Internet Firewalls and Linux Security, both
mentioned in the reading list below, for many more detailed
examples.
I am not a security expert; I am a network administrator. In my view, good security is good system administration and vice versa. Most of this chapter is just common-sense advice. It is probably sufficient for most circumstances, but certainly not for all.
Make sure you know whether there is an existing security policy that applies to your network or system. If there are policies, regulations, or laws governing your situation, make sure to obey them. Never do anything to undermine the security system established for your site.
No system is completely secure. No matter what you do, you will have problems. Realize this and prepare for it. Prepare a disaster recovery plan and do everything necessary so that when the worst does happen, you can recover from it with the minimum possible disruption.
If you want to read more about security, I recommend the following:
RFC 2196, Site Security Handbook, B. Fraser, September 1997.
RFC 1281, Guidelines for the Secure Operation of the Internet, R. Pethia, S. Crocker, and B. Fraser, November 1991.
Practical Unix and Internet Security, Simson Garfinkel and Gene Spafford, O’Reilly & Associates, 1996.
Linux Security, Ramon Hontanon, Sybex, 2001.
Building Internet Firewalls, Elizabeth Zwicky, Simon Cooper, and Brent Chapman, O’Reilly & Associates, 2000.
Linux Firewalls, Robert Ziegler, New Riders, 2000.
Firewalls and Internet Security, William Cheswick and Steven Bellovin, Addison Wesley, 1994.
Network access and computer security work at cross-purposes. Attaching a computer to a network increases the security risks for that computer. Evaluate your security needs to determine what must be protected and how vigorously it must be protected. Develop a written site security policy that defines your procedures and documents the security duties and responsibilities of employees at all levels.
Network security is essentially good system security. Good user
authentication, effective system monitoring, and well-trained system
administrators provide the best security. Tools are available to help
with these tasks. SSH, OPIE, Tripwire, OpenSSL, iptables, TCP wrappers, encryption, and
firewalls are all tools that can help.
[128] Toad the Wet Sprocket, “Walk on the Ocean.”
[129] A password generator created this password.
[130] Security experts will cringe when they read this suggestion. Writing down passwords is a “no-no.” Frankly, I think the people who steal wallets are more interested in my money and credit cards than in the password to my system. But you should consider this suggestion in light of the level of protection your system needs.
[131] The root account is not included.
[132] The system administrator can initialize the
ssh_known_hosts file by running make-ssh-known-hosts, which gets the key
from every host within a selected domain.
[133] This file is frequently stored in /usr/adm, /var/log, or /etc.
[134] Linux Security by Ramon Hontanon (Sybex) covers the installation, configuration, and use of both CFS and PPDD.
[135] PGP: Pretty Good Privacy by Simson Garfinkel (O’Reilly & Associates) provides a book-length treatment of PGP, an encryption program used for files and electronic mail.
[136] OpenSSL is covered in Chapter 11.
[137] The default certificate path can be changed on the
stunnel command line with the
-p option.
[138] The role of IP routers, also called gateways, in gluing the Internet together is covered extensively in earlier chapters.
[140] iptables came into use
with Linux kernel 2.4. Early kernels used the ipfwadm and the ipchains commands. See Linux Firewalls by Robert Ziegler (New Riders, 2000) for
information on these older commands.