Table of Contents for
TCP/IP Network Administration, 3rd Edition
 TCP/IP Network Administration, 3rd Edition
Published by
O'Reilly Media, Inc., 2002
TCP/IP Network Administration, 3rd Edition
Published by
O'Reilly Media, Inc., 2002
- Cover
- TCP/IP Network Administration, 3rd Edition
- Dedication
- Preface
- 1. Overview of TCP/IP
- 2. Delivering the Data
- 3. Network Services
- 4. Getting Started
- 5. Basic Configuration
- 6. Configuring the Interface
- 7. Configuring Routing
- 8. Configuring DNS
- 9. Local Network Services
- 10. sendmail
- 11. Configuring Apache
- 12. Network Security
- 13. Troubleshooting TCP/IP
- A. PPP Tools
- B. A gated Reference
- C. A named Reference
- D. A dhcpd Reference
- E. A sendmail Reference
- F. Solaris httpd.conf File
- G. RFC Excerpts
- Index
- Index
- Index
- Index
- Index
- Index
- Index
- Index
- Index
- Index
- Index
- Index
- Index
- Index
- Index
- Index
- Index
- Index
- Index
- Index
- Index
- Index
- Index
- Index
- Index
- Index
- Index
- About the Author
- Colophon
- Copyright
Every Unix computer that runs TCP/IP has a technique for incorporating the basic transport and IP datagram services into its operating system. This chapter discusses two techniques for incorporating the basic TCP/IP configuration into a Unix system: recompiling the kernel, and loading dynamically linked kernel modules. We’ll study these techniques and the role they play in linking TCP/IP and Unix. With this information, you should be able to understand how the vendor builds the basic configuration and how to modify it to create your own custom configuration.
The transport and datagram services installed in the operating system are used by the application services described in Chapter 3. There are two different techniques for starting application services: they are either run at boot time or launched on an on-demand basis. This chapter covers both of these techniques and shows you how to configure and control this startup process. But first let’s look at how TCP/IP is incorporated into the Unix operating system.
Kernel configuration is not really a network administration task—rather, it is a basic part of Unix system administration, whether or not the computer is connected to a network. But TCP/IP networking, like other system functions, is integrated into the kernel.
There are two very different approaches to kernel configuration. Some systems are designed to eliminate the need for you to recompile the kernel, while others encourage you to compile your own custom kernel. Linux is an example of the latter philosophy: its documentation encourages you to create your own configuration. Solaris is an example of the former.
The Solaris system comes with a generic kernel that supports all basic system services. When a Solaris system boots, it detects all system hardware and uses dynamically loadable modules to support that hardware. Solaris can rely on this technique because Sun is primarily a hardware vendor. Sun designs its hardware to work with the Solaris kernel, and has a well-defined device driver interface so that third-party hardware vendors can design hardware that clearly identifies itself to the kernel.
Most versions of Unix support dynamically loadable modules, which are kernel modules that can be dynamically linked into the kernel at runtime. These modules provide the system with a great deal of flexibility because the kernel is able to load support for new hardware when the hardware is detected. Dynamically loadable modules are used to add new features to the system without requiring the system administrator to perform a manual reconfiguration.
Solaris depends on dynamically loadable modules. Solaris does have a kernel configuration file, defined in the /etc/system file, but this file is very small, has only limited applicability, and is not directly edited by the system administrator. When a new software package is added to the system, the script that installs that package makes any changes it requires to the /etc/system file. But even that is rare. Most drivers that are delivered with third-party hardware carry their own configuration files.
On a Solaris system, optional device drivers are installed using
the pkgadd command. The
syntax of the command is:
pkgadd -d device packagenamedevice is the device name.
packagename is the name of the driver
software package provided by the vendor.
The device driver installation creates the proper entry in the /dev directory as well as in the /kernel/drv directory. As an example, look at the Ethernet device driver for adapters that use the DEC 21140 chipset. The name of the driver is dnet.[41] There is a device named /dev/dnet defined in the device directory. There is a dynamically loadable module named /kernel/drv/dnet in the kernel driver directory, and there is a configuration file for the driver named /kernel/drv/dnet.conf. dnet is a standard driver, but the installation of an optional driver will create similar files.
After installing a new device driver, create an empty file named /reconfigure. Shut down the system and install the new hardware. Then restart the system. The /reconfigure file is a flag to the system to check for new hardware. When the Solaris system reboots, it will detect the new hardware and load the dynamic module that provides the device driver for that hardware.
The Solaris ifconfig
command, which is covered in extensive detail in Chapter 6, provides the modlist option to let you see the kernel modules that are
associated with a TCP/IP network interface. For example:
# ifconfig dnet0 modlist
0 arp
1 ip
2 dnet
The purpose of each kernel module in this list is clear. arp
provides the ARP protocol for the Ethernet interface. ip provides the
TCP/IP protocols used for this network. Each of these modules has a
configuration file in the /kernel/drv directory. There is an arp.conf
file, an ip.conf file, and a
dnet.conf file. However, these files provide very
limited capacity for controlling the function of the modules. On
Solaris systems, use the ndd
command to control the module.
To see what configuration options are available for a module,
use the ndd command with a
? as an argument. For example, use
the following command to see the variables available for the arp
module:
# ndd /dev/arp ?
?                             (read only)
arp_cache_report              (read only)
arp_debug                     (read and write)
arp_cleanup_interval          (read and write)
arp_publish_interval          (read and write)
arp_publish_count             (read and write)
The arp module offers six values:
?arp_cache_reportA read-only value that displays the permanent values in the ARP cache. The
arpcommand gives a better display of the cache. See the description of thearpcommand in Chapter 2.arp_debugA variable that enables ARP protocol debugging. By default, it is set to 0 and debugging is disabled. Setting it to 1 enables debugging. The ARP protocol is very old and very reliable. ARP debugging is never needed.
arp_cleanup_intervalA variable that defines how long temporary entries are kept in the cache.
arp_publish_intervalA variable that defines how long the system waits between broadcasts of an Ethernet address that it is configured to publish.
arp_publish_countA variable that defines how many ARP broadcasts are sent in response to a query for an address that this system publishes.
The default configuration values set for the arp module have
worked well for every Solaris system I have ever worked with. I have
never had a need to change any of these settings. The second module
displayed by modlist provides a
slightly more interesting example.
Use the ndd /dev/ip ? command
to list the configuration options for the ip module. There are almost
60 of them! Of all of these, there is only one that I have ever needed
to adjust: ip_forwarding.
The ip_forwarding
variable specifies whether the ip module should act as if the system
is a router and forward packets to other hosts. By default, systems
with one network interface are hosts that do not forward packets, and
systems with more than one interface are routers that do forward
packets. Setting ip_forwarding to 0
turns off packet forwarding, even if the system has more than one
network interface. Setting ip_forwarding to 1 turns on packet
forwarding, even if the system has only one network interface.
On occasion you will have a multi-homed host, which is a host connected to more than one network. Despite multiple network connections, the system is a host, not a router. To prevent that system from acting as a router and potentially interfering with the real routing configuration, disable IP forwarding as follows:
# ndd /dev/ip ip_forwarding
1
# ndd -set /dev/ip ip_forwarding 0
# ndd /dev/ip ip_forwarding
0
The first ndd command in this
example queries the ip module for the value set in ip_forwarding. In this example it is set to
1, which enables forwarding. The second ndd command uses the -set option to write the value 0 into the
ip_forwarding variable. The last
command in the example redisplays the variable to show that it has
indeed been changed.
The pkgadd command, the
ifconfig modlist option, and the ndd command are all specific to Solaris.
Other systems use dynamically loadable modules but use a different set
of commands to control them.
Linux also uses loadable modules. Linux derives the same benefit from loadable modules as Solaris does, and like Solaris usually you have very little involvement with loadable modules. Generally the Linux system detects the hardware and determines the correct modules needed during the initial installation without any input from the system administrator. But not always. Sometimes hardware is not detected during the installation, and other times new hardware is added to a running system. To handle these situations, you need to know the Linux commands used to work with loadable modules.
Use the lsmod command to check which modules are installed in a Linux
system. Here’s an example from a Red Hat system:
# lsmod
Module                  Size  Used by
ide-cd                 26848   0  (autoclean)
cdrom                  27232   0  (autoclean) [ide-cd]
autofs                 11264   1  (autoclean)
smc-ultra               6048   1  (autoclean)
8390                    6816   0  (autoclean) [smc-ultra]
ipchains               38976   0  (unused)
nls_iso8859-1           2880   1  (autoclean)
nls_cp437               4384   1  (autoclean)
vfat                    9392   1  (autoclean)
fat                    32672   0  (autoclean) [vfat]
Loadable modules perform a variety of tasks. Some modules are hardware device drivers, such as the smc-ultra module for the SMC Ultra Ethernet card. Other modules provide support for the wide array of filesystems available in Linux, such as the ISO8859 filesystem used on CD-ROMs or the DOS FAT filesystem with long filename support (vfat).
Each entry in the listing produced by the lsmod command begins with the name of the
module followed by the size of the module. As the size field indicates, modules are small. Often modules
depend on other modules to get the task done. The interrelationships
of modules are called module dependencies, which are
shown in the listing. In the sample, the smc-ultra driver depends on
the 8390 module, as indicated by the 8390 entry ending with the string
“[smc-ultra]”. The 8390 entry lists the modules that depend on it
under the heading Used by. The listing shows
other dependencies, including that vfat depends on fat and cdrom
depends on ide-cd.
Most of the lines in the sample include the string
“(autoclean)”. This indicates that the specified module can be removed
from memory automatically if it is unused. autoclean is an option.
You can select different options by manually loading modules with the
insmod command.
Modules can be manually loaded using the insmod command. This command is very straightforward—it’s just
the command and the module name. For example, to load the 3c509 device
driver, enter insmod 3c509. This
does not install the module with the autoclean option. If you want
this driver removed from memory when it is not in use, add the
-k option to the insmod command: insmod -k 3c509.
A critical limitation with the insmod command is that it does not
understand module dependencies. If you used it to load the smc-ultra
module, it would not automatically load the required 8390 module. For
this reason, modprobe is a better command for manually loading modules. As
with the insmod command, the syntax
is simple. To load the smc-ultra module, simply enter modprobe smc-ultra.
modprobe reads the module
dependencies file that is produced by the depmod command. Whenever the kernel or the module libraries
are updated, run depmod to produce
a new file containing the module dependencies. The command depmod -a
searches all of the standard module libraries and creates the
necessary file. After it is run, you can use modprobe to install any modules and have the
other modules it depends on automatically installed.
Use the rmmod command to remove unneeded modules. Again, the syntax
is simple: rmmod appletalk removes
the appletalk driver from your system. There is rarely any need to
remove unneeded modules because, as noted in the discussion of
autoclean, the system automatically removes unused modules.
The smc-ultra module is an Ethernet device driver. It is in fact the device driver used for the network interface on our sample Linux system. Device drivers can be compiled into the kernel, as described later, or they can be dynamically loaded from a module. Most Ethernet device drivers are handled as dynamically loadable modules. The Ethernet driver modules are found in the /lib/modules directory. On a Red Hat 7.2 system, Ethernet device drivers are in the /lib/modules/2.4.7-10/kernel/drivers/net directory, as the following listing shows:
# ls /lib/modules/2.4.7-10/kernel/drivers/net
3c501.o             atp.o       eexpress.o  ni5010.o       smc-ultra.o
3c503.o             bcm         epic100.o   ni52.o         starfire.o
3c505.o             bonding.o   eql.o       ni65.o         strip.o
3c507.o             bsd_comp.o  es3210.o    pcmcia         sundance.o
3c509.o             cipe        eth16i.o    pcnet32.o      sunhme.o
3c515.o             cs89x0.o    ethertap.o  plip.o         tlan.o
3c59x.o             de4x5.o     ewrk3.o     ppp_async.o    tokenring
8139too.o           de600.o     fc          ppp_deflate.o  tulip
82596.o             de620.o     hamachi.o   ppp_generic.o  tun.o
8390.o              defxx.o     hp100.o     ppp_synctty.o  via-rhine.o
ac3200.o            depca.o     hp.o        rcpci.o        wan
acenic.o            dgrs.o      hp-plus.o   sb1000.o       wavelan.o
aironet4500_card.o  dmfe.o      irda        shaper.o       wd.o
aironet4500_core.o  dummy.o     lance.o     sis900.o       winbond-840.o
aironet4500_proc.o  e1000.o     lne390.o    sk98lin        yellowfin.o
appletalk           e100.o      natsemi.o   skfp
arlan.o             e2100.o     ne2k-pci.o  sk_g16.o
arlan-proc.o        eepro100.o  ne3210.o    slip.o
at1700.o            eepro.o     ne.o        smc-ultra32.o
All loadable network device drivers are listed here. Some, such as plip.o, are not for Ethernet devices. Most are easily identifiable as Ethernet drivers, such as the 3COM drivers, the SMC drivers, the NE2000 drivers, and the Ethernet Express drivers.
The Linux system detects the Ethernet hardware during the initial installation, and if Linux
has the correct driver for that hardware, it installs the appropriate
driver. If the Ethernet adapter is not detected during the operating
system installation or if it is added after the system is installed,
use the modprobe command to load
the device driver manually. If the correct driver for the adapter is
not included with your Linux system, you may need to compile the
module yourself.
For a device driver to operate correctly, it must be compiled with the correct libraries for your kernel. Sometimes this means downloading the driver source code and compiling it yourself on your system. Ethernet driver source code is available for many adapters from http://www.scyld.com, which has a great repository of Linux network driver software. The comments in the driver source code includes the correct compiler command to compile the module.
After compiling, copy the object file to the correct
/lib/modules directory. Then use modprobe to load and test the driver.
Alternatively, most device drivers are now available in RPM format,
eliminating the need for compilation.
Linux frequently uses dynamically loadable modules for device drivers. But most other components of TCP/IP are not loaded at runtime; they are compiled into the kernel. Next we look at how Unix kernels are recompiled.
This text uses Linux and FreeBSD as examples of systems that encourage you to compile a custom kernel.[42] This chapter’s examples of kernel configuration statements come from these two Unix systems. While kernel configuration involves all aspects of system configuration, we include only statements that directly affect TCP/IP configuration.
Both of the Unix systems used in the examples come with a kernel configuration file preconfigured for TCP/IP. During the initial installation, you may need to select a preconfigured kernel that includes network support, but you probably won’t need to modify the kernel configuration for networking. The kernel configuration file is normally changed only when you wish to:
Produce a smaller, more efficient kernel by removing unneeded items
Add a new device
Modify a system parameter
While there is rarely any need to modify the kernel network statements, it is useful to understand what these statements do. Looking into the kernel configuration file shows how Unix is tied to the hardware and software of the network.
Warning
The procedures and files used for kernel configuration vary dramatically depending on Unix implementation. These variations make it essential that you refer to your system documentation before trying to configure the kernel on your system. Only your system documentation can provide you with the accurate, detailed instructions required to successfully complete this task.
The source code for the Linux kernel is normally delivered with a Linux distribution. If your system does not have the source code or you want a newer version of the Linux kernel, it can be downloaded from http://www.kernel.org as a compressed tar file. If you already have a directory named /usr/src/linux, rename it before you unpack the tarball:
# cd /usr/src
# tar -zxvf linux-2.1.14.tar.gz
The Linux kernel is a C program compiled and installed by
make. The make command customizes the kernel configuration and
generates the files (including the Makefile) needed to compile and
link the kernel. There are three variations of the command:
make configThis form of the
makecommand is entirely text-based. It takes you through a very long sequence of questions that ask about every aspect of the kernel configuration. Because it asks every question in a sequential manner, this can be the most cumbersome way to reconfigure the kernel, particularly if you wish to change only a few items.make menuconfigThis form of the
makecommand usescursesto present a menu of configuration choices. It provides all of the capabilities of themakeconfigcommand but is much easier to use because it allows you to jump to specific areas of interest. Themakemenuconfigcommand works from any terminal and on any system, even one that does not support X Windows.make xconfigThis form of the
makecommand uses X Windows to provide a “point and click” interface for kernel configuration. It has all the power of the other commands and is very easy to use.
Choose the form of the command you like best. In this example we
use make xconfig.
On Linux systems, the kernel source is found in
/usr/src/linux. To start the configuration
process, change to the source directory and run make xconfig:
# cd /usr/src/linux
# make xconfig
The make xconfig command displays the screen shown in
Figure 5-1.
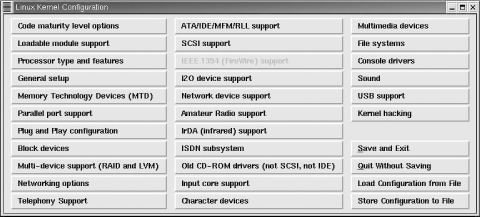
The menu displays more than 30 buttons that represent different configuration categories. Click on a button to view and set the configuration options in that category. Because our focus is on the kernel configuration options that affect TCP/IP, the two menu items we’re interested in are Networking options and Network device support. Figure 5-2 shows the window that appears if the Network device support button is selected.
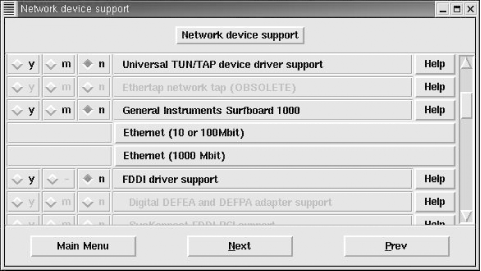
This window lists the network device drivers that can be compiled into or loaded by the kernel and shows the three choices for most configuration options:
- y
- m
Selecting m causes the option to be loaded as a dynamically loadable module by the kernel. Not every option is available as a loadable module. When a configuration question must be answered yes or no, the module selection is not available. Notice the FDDI driver support option. Choosing y for that option enables FDDI driver support and highlights a selection of possible FDDI interface adapters, which are “grayed-out” in Figure 5-2. Frequently, interface support must be selected before an individual adapter can be selected.
- n
Selecting n tells the kernel not to use the configuration option.
Each configuration option also has a Help button. Clicking on the Help button provides additional information about the option and advice about when the option should be set. Even if you think you know what the option is about, you should read the description displayed by the Help button before you change the default setting.
Two items shown in Figure 5-2, Ethernet (10 or 100 Mbit) and Ethernet (1000 Mbit), open separate windows with extensive menu selections because Linux supports a very large number of Ethernet adapters. The Ethernet adapters available through those windows are selected using the same y, m, and n settings described above.
The Network device support window and the Ethernet adapter windows show that it is possible to compile specific adapter support into the kernel, but it is not necessary. As we saw in the previous section on dynamically loadable modules, network interfaces are usually controlled by loadable modules. All Linux systems need a network interface to run TCP/IP, but that interface does not need to be compiled into the kernel.
Selecting Networking options from the main menu in Figure 5-1 opens the Network options window, which contains over 60 menu selections because Linux supports a wide range of network services. Some of these are experimental and some relate to protocols other than IPv4. Here we limit ourselves to those options that directly relate to IPv4. Yet there are still a substantial number of options. They are:
- Packet socket
This service allows applications to communicate directly with the network device. It is required for applications such as
tcpdumpthat do packet capture and packet filtering. If Packet socket is enabled, Packet socket: mmapped IO can be selected to use memory-mapped I/O for the packet socket service. Packet socket service is usually enabled while packet socket memory mapped I/O is usually disabled.- Kernel/User netlink socket
This service provides communication between the kernel and user space programs. If enabled, Routing messages and Netlink device emulation can also be selected. Netlink sockets permit user space programs to interface with IPv4 routing and ARP tables and with kernel firewall code.
- Network packet filtering
This service provides the IP packet filtering services that are required to make the system function as a firewall or a network address translation box. If Network packet filtering is enabled, Network packet filtering debugging can also be selected. Network packet filtering is normally enabled on routers and disabled on hosts, although it can be used to improve server security as described in the
iptablessection of Chapter 12.- TCP/IP networking
This selection installs kernel support for TCP/IP. It provides all basic TCP/IP transport and datagram protocols. Once TCP/IP networking is selected, many other optional TCP/IP services become available, listed below:
- IP: multicasting
This provides IP multicasting support. Multicasting is described in Chapter 2.
- IP: advanced router
This menu selection highlights several options that configure the kernel for advanced routing protocols. Advanced routing does not need to be enabled for basic routing to work, and is not needed for a host or a small interior router. Advanced routing is used only if the Linux system is configured as the primary router or an exterior router between autonomous systems. Chapter 7 describes how
gatedis used to run advanced routing protocols on Unix systems. The kernel configuration advanced routing options are:IP: policy routing enables kernel-level policy-based routing, which is discussed in Chapter 7 in relationship to the BGP routing protocol, and in Chapter 2 in relationship to the Policy Routing Database (PRDB). This option is not needed by
gated, which implements policy-based routing at the user level.IP: equal cost multipath enables kernel support for multiple routes to the same destination. Multipath routing is described in Chapter 7 in relationship to the OSPF routing protocol.
IP use TOS value as routing key enables a type of tag switching (also called label switching) that uses the Type of Service (TOS) field of the IP header to hold the tag. Both OSPF and RIP version 2 can use a tag field. Appendix B touches upon the
gatedsyntax used for tag fields.IP: verbose route monitoring increases the number and length of the routing table update messages.
IP: large routing tables increases the memory reserved for the routing table.
- IP: kernel level autoconfiguration
This service is used on diskless clients. When selected, two additional selections become available, IP: BOOTP support and IP: RARP support, that are used to specify whether the configuration comes from BOOTP or RARP. See Chapter 3 for a description of BOOTP and RARP.
- IP: tunneling
This service encapsulates IPv4 datagrams within an IP tunnel, which makes a host appear to be on a different network than the one to which it is physically connected. This service is occasionally used on laptop machines to facilitate mobility.
- IP: GRE tunnels over IP
This enables the Generic Routing Encapsulation (GRE) protocol that is used to encapsulate IPv4 or IPv6 datagrams in an IPv4 tunnel. Selecting this option makes the IP: broadcast GRE over IP option available, which provides support for multicasting with the tunnel. GRE is the preferred encapsulation protocol when dealing with Cisco routers.
- IP: multicast routing
This selection provides support for multicast routing. It is needed only if your system acts as a multicast router, i.e., runs
mrouted. When selected, you are given the options IP: PIM-SM version 1 support and IP: PIM-SM version 2 support that set the level of the PIM-SM protocol used by your system.- IP: TCP Explicit Congestion Notification support
This enables Explicit Congestion Notification (ECN). ECN messages are sent from a router to a client to alert the client of congestion. This would be enabled only if the Linux system is a router. Because many firewalls are incompatible with ECN, it is recommended that ECN not be enabled.
- IP: TCP syncookie support
This enables support for SYN cookies, which are used to counteract SYN flooding denial-of-service attacks.
- IP: Netfilter Configuration
Selecting this menu item opens a window that allows you to select a range of services for the kernel’s Netfilter firewall. The
iptablesdiscussion in Chapter 12 describes how the Netfilter service is used.
- QoS and/or fair queueing
This specifies options that change the way network packets are handled by the server. Because it is experimental, this option should be set to n for an operational server. The optional packet handlers require special software to administer them.
After completing the network configuration, run make dep;
make clean to build the dependencies and clean up
the odds and ends. When the makes are complete, compile the kernel.
The make bzImage command builds a compressed kernel
and puts it into the /usr/src/linux/i386/boot
directory.[43] When you’re sure that the new kernel is ready to run,
simply copy the new kernel file, bzImage, to the
vmlinuz file your system uses to boot.
Linux’s list of network configuration options is long.[44] Linux is yin to the Solaris yang: Linux permits the system administrator to configure everything while Solaris configures everything for the administrator. BSD kernel configuration lies somewhere between these two extremes.
Like Linux, the BSD Unix kernel is a C program compiled and
installed by make. The config command reads the kernel
configuration file and generates the files (including the Makefile)
needed to compile and link the kernel. On FreeBSD systems, the kernel
configuration file is located in the directory
/usr/src/sys/i386/conf.[45]
A large kernel configuration file named GENERIC is delivered with the FreeBSD system. The GENERIC kernel file configures all of the standard devices for your system—including everything necessary for TCP/IP. In this section, we look at just those items found in the GENERIC file that relate to TCP/IP. No modifications are necessary for the GENERIC kernel to run basic TCP/IP services. The reasons for modifying the BSD kernel are the same as those discussed for the Linux kernel: to make a smaller, more efficient kernel, or to add new features.
There is no standard name for a BSD kernel configuration file. When you create a configuration file, choose any name you wish. By convention, BSD kernel configuration filenames use uppercase letters. To create a new configuration, copy GENERIC to the new file and then edit the newly created file. The following creates a new configuration file called FILBERT:
# cd /usr/src/sys/i386/conf
# cp GENERIC FILBERT
If the kernel has been modified on your system, the system administrator will have created a new configuration file in the /usr/src/sys/i386/conf directory. The kernel configuration file contains many configuration commands that cover all aspects of the system configuration. This text discusses only those parameters that directly affect TCP/IP configuration. See the documentation that comes with the FreeBSD system for information about the other configuration commands.[46]
For a network administrator, it is more important to understand which kernel statements are necessary to configure TCP/IP than to understand the detailed structure of each statement. Three types of statements are used to configure TCP/IP in the BSD kernel: options, pseudo-device, and device statements.
The options statement tells the kernel to compile a software option into the system. The options statement that is most important to TCP/IP is:
options INET # basic networking support--mandatory
Every BSD-based system running TCP/IP has an options INET statement in its kernel
configuration file. The statement produces a -DINET argument for the C compiler, which
in turn causes the IP, ICMP, TCP, UDP, and ARP modules to be
compiled into the kernel. This single statement incorporates the
basic transport and IP datagram services into the system. Never
remove this statement from the configuration file.
options ICMP_BANDLIM #Rate limit bad replies
This option limits the amount of bandwidth that can be consumed by ICMP error messages. Use it to protect your system from denial-of-service attacks that deliberately cause errors to overload your network.
options "TCP_COMPAT_43" # Compatible with BSD 4.3 [KEEP THIS!]
This option prevents connections between BSD 4.3 and FreeBSD systems from hanging by adjusting FreeBSD to ignore mistakes made by 4.3. In addition, setting this parameter prevents some applications from malfunctioning. For these reasons, keep this parameter as is.
The second statement type required by TCP/IP in all BSD configurations is a pseudo-device statement. A pseudo-device is a device driver not directly associated with an actual piece of hardware. The pseudo-device statement creates a header (.h) file that is identified by the pseudo-device name in the kernel directory. For example, the statement shown below creates the file loop.h:
pseudo-device loop # loopback network--mandatory
The loop pseudo-device is necessary to create the loopback device (lo0). This device is associated with the loopback address 127.0.0.1; it is defined as a pseudo-device because it is not really a piece of hardware.
Another pseudo-device that is used on many FreeBSD TCP/IP systems is:
pseudo-device ether # basic Ethernet support
This statement is necessary to support Ethernet. The ether pseudo-device is required for full support of ARP and other Ethernet specific functions. While it is possible that a system that does not have Ethernet may not require this statement, it is usually configured and should remain in your kernel configuration.
Other commonly configured pseudo-devices used by TCP/IP are those that support SLIP and PPP.
pseudo-device sl 2 # Serial Line IP
This statement defines the interface for the Serial Line IP protocol. The number, 2 in the example, defines the number of SLIP pseudo-devices created by the kernel. The two devices created here would be addressed as devices sl0 and sl1.
pseudo-device ppp 2 # Point-to-point protocol
The ppp pseudo-device is the interface for the Point-to-Point Protocol. The number, 2 in the example, defines the number of PPP pseudo-devices created by the kernel. The two devices created here would be addressed as devices ppp0 and ppp1. One other pseudo-device is directly related to PPP.
pseudo-device tun 1 # Tunnel driver(user process ppp)
The tun pseudo-device is a tunnel driver used by user-level PPP software. Tunneling is when a system passes one protocol through another protocol; tun is a FreeBSD feature for doing this over PPP links. The number, 1 in the example, is the number of tunnels that will be supported by this kernel.
One pseudo-device is used for troubleshooting and testing.
pseudo-device bpfilter 4 # Berkeley packet filter
The bpfilter statement adds the support necessary for
capturing packets. Capturing packets is an essential part of
protocol analyzers such as tcpdump; see Chapter 13. When the bpfilter statement
is included in the BSD kernel, the Ethernet interface can be placed
into promiscuous mode.[47] An interface in promiscuous mode passes all packets,
not just those addressed to the local system, up to the software at
the next layer. This feature is useful for a system administrator
troubleshooting a network. But it can also be used by intruders to
steal passwords and compromise security. Use the bpfilter
pseudo-device only if you really need it. The number, 4 in the
example, indicates the maximum number of Ethernet interfaces that
can be monitored by bpfilter.
Real hardware devices are defined using the device statement. Every host connected to a TCP/IP network requires some physical hardware for that attachment. The hardware is declared with a device statement in the kernel configuration file. There are many possible network interfaces for TCP/IP, but the most common are Ethernet interfaces. The device statements for Ethernet interfaces found in the GENERIC kernel are listed below:
device de     # DEC/Intel DC21x4x (``Tulip'')
device fxp    # Intel EtherExpress PRO/100B (82557, 82558)
device tx     # SMC 9432TX (83c170 ``EPIC'')
device vx     # 3Com 3c590, 3c595 (``Vortex'')
device wx     # Intel Gigabit Ethernet Card (``Wiseman'')
device dc     # DEC/Intel 21143 and various workalikes
device rl     # RealTek 8129/8139
device sf     # Adaptec AIC-6915 (``Starfire'')
device sis    # Silicon Integrated Systems SiS 900/SiS 7016
device ste    # Sundance ST201 (D-Link DFE-550TX)
device tl     # Texas Instruments ThunderLAN
device vr     # VIA Rhine, Rhine II
device wb     # Winbond W89C840F
device xl     # 3Com 3c90x (``Boomerang'', ``Cyclone'')
device ed0 at isa? port 0x280 irq 10 iomem 0xd8000
device ex
device ep
device wi      # WaveLAN/IEEE 802.11 wireless NIC
device an      # Aironet 4500/4800 802.11 wireless NICs
device ie0 at isa? port 0x300 irq 10 iomem 0xd0000
device fe0 at isa? port 0x300
device le0 at isa? port 0x300 irq 5 iomem 0xd0000
device lnc0 at isa? port 0x280 irq 10 drq 0
device cs0 at isa? port 0x300
device sn0 at isa? port 0x300 irq 10
The device statement used to configure an Ethernet interface in the FreeBSD kernel comes in two general formats:
device ed0 at isa? port 0x280 net irq 10 iomem 0xd8000
device de0
The format varies depending on whether the device is an ISA device or a PCI device. The ed0 device statement defines the bus type (isa), the I/O base address (port 0x280), the interrupt number (irq 10) and the memory address (iomem 0xd8000). These values should match the values configured on the adapter card. All of these are standard items for configuring PC ISA hardware. On the other hand, the de0 device statement requires very little configuration because it configures a card attached to the PCI bus. The PCI is an intelligent bus that can determine the configuration directly from the hardware.
Ethernet is not the only TCP/IP network interface supported by FreeBSD. It supports several other interfaces. The serial line interfaces necessary for SLIP and PPP are shown below:
device sio0 at isa? port IO_COM1 flags 0x10 irq 4
device sio1 at isa? port IO_COM2 irq 3
device sio2 at isa? disable port IO_COM3 irq 5
device sio3 at isa? disable port IO_COM4 irq 9
The four serial interfaces, sio0 through sio3, correspond to the MS-DOS interfaces COM1 to COM4. These are needed for SLIP and PPP. Chapter 6 covers other aspects of configuring PPP.
The device statement varies according to the interface being configured.
But how do you know which hardware interfaces are installed in your
system? Remember that the GENERIC kernel that
comes with your FreeBSD system is configured for a large number of
devices. A simple way to tell which hardware interfaces are
installed in your system is to look at the messages displayed on the
console at boot time. These messages show all of the devices,
including network devices, that the kernel found during
initialization. Look at the output of the dmesg command. It displays a copy of the
console messages generated during the last boot. Customizing the
kernel for your network device more often than not means removing
unneeded devices from the kernel configuration.
The options, pseudo-device, and device statements found in the kernel configuration file tell the system to include the TCP/IP hardware and software in the kernel. The statements in your configuration may vary somewhat from those shown in the previous examples. But you have the same basic statements in your kernel configuration file. With these basic statements, FreeBSD Unix is ready to run TCP/IP.
You may never change any of the variables discussed in this section. Like everything else in the kernel configuration file, they usually come correctly configured to run TCP/IP. You will, however, frequently be called upon to control the network services your server runs over TCP/IP. We’ll now look at how network services are started and how you control which ones are started.
The kernel configuration brings the basic transport and IP datagram services of TCP/IP into Unix. But there is much more to the TCP/IP suite than just the basic services. How are these other protocols included in the Unix configuration?
Some protocols are explicitly started by including them in the boot files. This technique is used, for example, to start the Routing Information Protocol (RIP) and the Domain Name System (DNS). Network services that either have a long startup procedure or are in constant demand are normally started by a script at boot time, and run as daemon processes the entire time the system is running.
Anything that can be run from a shell prompt can be stored in a file and run as a shell script. Systems use this capability to automate the startup of system services. There are two basic Unix startup models that control how startup files are invoked: the BSD model and the System V model.
The BSD model is the simplest: a limited number of startup scripts are executed in order every time the system boots. At its simplest, there are three basic scripts, /etc/rc, /etc/rc.boot, and /etc/rc.local, executed in that order for system initialization, service initialization, and local customization. On BSD Unix systems, network services are usually started by the /etc/rc.boot file or the /etc/rc.local file.
On systems that use the BSD startup model, place customized network configuration commands in the rc.local script. rc.local executes at the end of the startup process. Any configuration values set in this file override the earlier configuration commands.
The BSD startup model is used on BSD systems and SunOS systems.
Linux and Solaris systems use the System V startup model. The System V startup model employs
a much more complex set of startup files.[48] This model uses whole directories of scripts executed by
the init process, with different
directories being used depending on the runlevel of the system.
To understand System V startup, you need to understand
runlevels, which are used to indicate the state
of the system when the init process
is complete. There is nothing inherent in the system hardware that
recognizes runlevels; they are purely a software construct. init and /etc/inittab -- the file used to configure init—are the only reasons why the runlevels
affect the state of the system. We use Red Hat Linux as an example of
how runlevels are used.
Linux defines several runlevels that run the full gamut of possible system states from not-running (halted) to running multiple processes for multiple users:
Runlevel 0 shuts down all running processes and halts the system.
Runlevel 1 places the system in single-user mode. Single-user mode is used by the system administrator to perform maintenance that cannot be done when users are logged in. This runlevel may also be indicated by the letter S instead of the number 1. Solaris uses S for single-user mode.
Runlevel 2 is a special multiuser mode that does not support file sharing.
Runlevel 3 provides full multiuser support with the full range of services, including NFS file sharing. It is the default mode used on Solaris systems.
Runlevel 4 is unused. You can design your own system state and implement it through runlevel 4.
Runlevel 5 initializes the system as a dedicated X Windows terminal. Linux systems use this to provide an X Windows console login. When Linux systems boot at runlevel 3, they provide a text-based console login. Solaris does not use this runlevel. Entering runlevel 5 on a Solaris system causes a system shutdown.
Runlevel 6 shuts down all running processes and reboots the system.
As these notes make clear, different systems use the same
runlevels in different ways. That is because runlevels are software.
They are boot command arguments that tell init which startup scripts should be run.
The scripts that are run can contain any valid commands. init maps runlevels to startup scripts using
the inittab file.
All of the lines in the inittab file that begin with a sharp sign (#) are comments. A liberal dose of comments is needed because the syntax of inittab configuration lines is terse and arcane. An inittab entry has this general format:
label:runlevel:action:processThe label is a one- to four-character tag that identifies the
entry. Because some systems support only two-character labels, most
configurations limit all labels to two characters. The labels can be
any arbitrary character string; they have no intrinsic
meaning.
The runlevel field indicates the runlevels to which the entry
applies. For example, if the field contains a 3, the process
identified by the entry must be run for the system to initialize
runlevel 3. More than one runlevel can be specified. Entries that
have an empty runlevel field are not involved in initializing
specific runlevels. For example, Linux systems have an
inittab entry to handle the three-finger salute
(Ctrl+Alt+Del); it does not have a value in the runlevel
field.
The action field defines the conditions under which the process
is run. Table 5-1 lists
the action values used on Red Hat, Mandrake, and Caldera Linux
systems.
Table 5-1. Linux inittab action values
Action | Meaning |
|---|---|
Boot | Runs when the system boots. Runlevels are ignored. |
Bootwait | Runs when the system boots, and init waits for the process to complete. Runlevels are ignored. |
Ctrlaltdel | Runs when Ctrl+Alt+Del is pressed, which passes the SIGINT signal to init. Runlevels are ignored. |
Initdefault | Doesn’t execute a process. It sets the default runlevel. |
Kbrequest | Runs when init receives a signal from the keyboard. This requires that a key combination be mapped to KeyBoardSignal. |
Off | Disables the entry so the process is not run. |
Once | Runs one time for every runlevel. |
Ondemand | Runs when the system enters one of the special runlevels A, B, or C. |
Powerfail | Runs when init receives the SIGPWR signal. |
Powerokwait | Runs when init receives the SIGPWR signal and the file /etc/powerstatus contains the word OK. |
Powerwait | Runs when init receives the SIGPWR signal, and init waits for the process to complete. |
Respawn | Restarts the process whenever it terminates. |
sysinit | Runs before any boot or bootwait processes. |
wait | Runs the process upon entering the run mode, and init waits for the process to complete. |
The last field in an inittab entry is
process . It contains the process that init executes. The process appears in the
exact format that it is executed from the command line. Therefore
the process field starts with the name of
the program that is to be executed followed by the arguments that
will be passed to that process. For example, /sbin/shutdown -t3 -r
now, which is the process
executed by some Linux systems when Ctrl+Alt+Del is pressed, is the
same command that could be typed at the shell prompt to reboot the
system. On most inittab entries, the
process field contains the name of a
startup script. Two main types of startup scripts are used: the
system initialization script and the runlevel initialization
scripts. These sample lines from a Red Hat Linux system show
both:
# System initialization.
si::sysinit:/etc/rc.d/rc.sysinit

l0:0:wait:/etc/rc.d/rc 0
l1:1:wait:/etc/rc.d/rc 1
l2:2:wait:/etc/rc.d/rc 2
l3:3:wait:/etc/rc.d/rc 3
l4:4:wait:/etc/rc.d/rc 4
l5:5:wait:/etc/rc.d/rc 5
l6:6:wait:/etc/rc.d/rc 6
These seven lines are the real heart of the
inittab file—they invoke the startup scripts.
The first line tells init to run
the boot script located at /etc/rc.d/rc.sysinit
to initialize the system. This entry has no runlevel value. It is
run every time the system starts. The system initialization script
performs certain essential tasks. For example, the Red Hat
rc.sysinit script:
Initializes the swap space
Runs the filesystem check
Mounts the /proc filesystem
Mounts the root filesystem as read-write after the
fsckcompletesLoads the loadable kernel modules
Other initialization scripts may look different than Red Hat’s, but they perform very similar functions. For example, a Caldera system begins by loading the loadable modules. It then activates the swap space, does the filesystem check, and remounts the root filesystem as read-write. The order is different, but the major functions are the same.
After the system initialization script is run, init runs a script for the specific runlevel. The remaining six
lines in the sample are used to invoke the startup scripts for
individual runlevels. Except for the runlevel involved, each line is
identical.
Let’s use the line with label l3 as an example. This line starts all of
the processes and services needed to provide the full multiuser
support. The runlevel is 3. The action wait directs init to wait until the startup script
terminates before going on to any other entries in the
inittab file that relate to runlevel 3.
init executes the script
/etc/rc.d/rc and passes that script the
command-line argument 3.
The control script, /etc/rc.d/rc,
then runs all the scripts that are appropriate for the runlevel. It
does this by running the scripts that are stored in the directory
/etc/rc
n .d,
where n is the specified runlevel. In our
example, the rc script is passed a 3, so it
runs the scripts found in the directory
/etc/rc.d/rc3.d. A listing of that directory
from a Red Hat system shows that there are lots of scripts:
$ ls /etc/rc.d
init.d  rc0.d  rc2.d  rc4.d  rc6.d     rc.sysinit
rc      rc1.d  rc3.d  rc5.d  rc.local
$ ls /etc/rc.d/rc3.d
K03rhnsd      K35smb       K74ntpd    S05kudzu     S25netfs       S85httpd
K16rarpd      K45arpwatch  K74ypserv  S06reconfig  S26apmd        S90crond
K20nfs        K45named     K74ypxfrd  S08ipchains  S28autofs      S90xfs
K20rstatd     K50snmpd     K75gated   S09isdn      S40atd         S95anacron
K20rusersd    K50tux       K84bgpd    S10network   S55sshd        S99linuxconf
K20rwalld     K55routed    K84ospf6d  S12syslog    S56rawdevices  S99local
K20rwhod      K61ldap      K84ospfd   S13portmap   S56xinetd
K28amd        K65identd    K84ripd    S14nfslock   S60lpd
K34yppasswdd  K73ypbind    K84ripngd  S17keytable  S80sendmail
K35dhcpd      K74nscd      K85zebra   S20random    S85gpm
The scripts that begin with a K are used to kill processes when exiting a specific runlevel. In the listing above, the K scripts would be used when terminating runlevel 3. The scripts that start with an S are used when starting runlevel 3. None of the items in rc3.d, however, is really a startup script. They are logical links to the real scripts, which are located in the /etc/rc.d/init.d directory. For example, S80sendmail is linked to init.d/sendmail. This raises the question of why the scripts are executed from the directory rc3.d instead of directly from init.d where they actually reside. The reasons are simple. The same scripts are needed for several different runlevels. Using logical links, the scripts can be stored in one place and still be accessed by every runlevel from the directory used by that runlevel.
Scripts are executed in alphabetical order. Thus S10network is executed before S80sendmail. This allows the system to control the order in which scripts are executed through simple naming conventions. Different runlevels can execute the scripts in different orders while still allowing the real scripts in init.d to have simple, descriptive names. A listing of the init.d directory shows these descriptive names:
$ ls /etc/rc.d/init.d
amd       functions  kdcrotate  network  rarpd       rwalld    xfs
anacron   gated      keytable   nfs      rawdevices  rwhod     xinetd
apmd      gpm        killall    nfslock  reconfig    sendmail  ypbind
arpwatch  halt       kudzu      nscd     rhnsd       single    yppasswdd
atd       httpd      ldap       ntpd     ripd        smb       ypserv
autofs    identd     linuxconf  ospf6d   ripngd      snmpd     ypxfrd
bgpd      ipchains   lpd        ospfd    routed      sshd      zebra
crond     iptables   named      portmap  rstatd      syslog
dhcpd     isdn       netfs      random   rusersd     tux
It is possible to place a customized configuration command directly in the applicable script in the init.d directory. A better alternative on a Red Hat system is to place any local changes in rc.local.
Like BSD systems, Linux systems provide an rc.local script for local customization. In general, you do not directly edit boot scripts. The exception to this rule is the rc.local script located in the /etc/rc.d directory. It is the one customizable startup file, and it is reserved for your use; you can put anything you want in there. After the system initialization script executes, the runlevel scripts execute in alphabetical order. The last of these is S99local, which is a link to rc.local. Since it is executed last, the values set in the rc.local script override other configuration values.
Solaris also uses the System V startup model, but it makes things a little more difficult than Linux does. First off, it does not provide an rc.local script. If you want to use one, you need to add your own to the runlevel directories. Secondly, Solaris does not use many logical links in the runlevel directories. Therefore, there is no guarantee of a central place to modify scripts that are used for all runlevels. Additionally, each runlevel has a separate controlling script that can introduce differences in the startup process for each runlevel. For example, /sbin/rc2 is the controlling script for runlevel 2 and /sbin/rc3 is the controlling script for runlevel 3. All of these differences make the Solaris startup process more complex to analyze.
On a Solaris 8 system, runlevel 3 is the default runlevel for a multiuser system offering network services. The /sbin/rc3 controlling script runs the scripts in /etc/rc2.d and then those in /etc/rc3.d. Basic network configuration is handled in /etc/rc2.d by the S69inet script and the S72inetsvc script. Several other scripts in both /etc/rc2.d and /etc/rc3.d are involved in launching network services.
For troubleshooting purposes it is important to understand where and how things happen during the system startup. When the network fails to initialize properly, it is good to know where to look. However, when you configure the network you should stick with the standard tools and procedures provided with your system. Directly modifying startup scripts can cause problems during the startup and can lead to lots of confusion for the other people who help you maintain your systems.
Of course, not all network services are started by a boot
script. Most network services are started on demand. The most widely
used tool for starting network services on demand is inetd, the
Internet Daemon.
The internet daemon, inetd
(pronounced “i net d”), is started at boot time from an initialization
file such as /etc/rc2.d/S72inetsvc. When it is
started, inetd reads its
configuration from the /etc/inetd.conf file. This
file contains the names of the services that inetd listens for and starts. You can add or
delete services by making changes to the inetd.conf
file.
An example of a file entry from a Solaris 8 system is:
ftp stream tcp6 nowait root /usr/sbin/in.ftpd in.ftpd
The fields in the inetd.conf entry are, from left to right:
- name
The name of a service, as listed in the /etc/services file. In the sample entry, the value in this field is
ftp.- type
The type of data delivery service used, also called socket type. The commonly used socket types are:
- stream
The stream delivery service provided by TCP, i.e., TCP byte stream.[49]
- dgram
- raw
The sample shows that FTP uses a stream socket.
- protocol
The name of a protocol, as given in the /etc/protocols file. Its value is usually either “tcp” or “udp”. To indicate that a service can run over both IPv4 and IPv6, Solaris uses “tcp6” or “udp6” in this field. The FTP protocol uses TCP as its transport layer protocol, so the sample entry contains
tcp6in this field.- wait-status
The value for this field is either “wait” or “nowait.” Generally, but not always, datagram type servers require “wait,” and stream type servers allow “nowait.” If the status is “wait,”
inetdmust wait for the server to release the socket before it begins to listen for more requests on that socket. If the status is “nowait,”inetdcan immediately begin to listen for more connection requests on the socket. Servers with “nowait” status use sockets other than the connection request socket for processing; i.e., they use dynamically allocated sockets.- uid
The uid is the username under which the server runs. This can be any valid username, but it is normally root. There are several exceptions. For example, in the default Solaris 8 configuration, the
fingerservice and the Sun Font Server (fs) both run as the user nobody for security reasons.- server
This is the full pathname of the server program started by
inetd. Because our example is from a Solaris system, the path is /usr/sbin/in.ftpd. On your system the path may be different. It is more efficient forinetdto provide some small services directly than it is forinetdto start separate servers for these functions. For these small services, the value of the server field is the keyword “internal,” which means that this service is an internalinetdservice.- arguments
These are any command-line arguments that should be passed to the server program when it is invoked. This list always starts with
argv[0](the name of the program being executed). The program’s manpage documents the valid command-line arguments for each program. In the example, onlyin.ftpd, the name of the program, is provided.
There are a few situations in which you need to modify the
inetd.conf file. For example, you may wish to
disable a service. The default configuration provides a full array of
servers. Not all of them are required on every system, and for security
reasons you may want to disable non-essential services on some
computers. To disable a service, place a # at the beginning of its entry (which turns
the line into a comment) and pass a hang-up signal to the inetd server. When inetd receives a hang-up signal, it re-reads
the configuration file, and the new configuration takes effect
immediately.
You may also need to add new services. We’ll see some examples of that in later chapters. Let’s look in detail at an example of restoring a service that has been previously disabled. We’ll begin by looking at some entries and comments from the Solaris /etc/inetd.conf file:
# Tftp service is provided primarily for booting.  Most sites run this
# only on machines acting as "boot servers."
#
#tftp  dgram  udp6 wait   root   /usr/sbin/in.tftpd  in.tftpd -s /tftpboot
#
# Finger, systat and netstat give out user information which may be
# valuable to potential "system crackers."  Many sites choose to disable
# some or all of these services to improve security.
#
finger stream tcp6 nowait nobody /usr/sbin/in.fingerd  in.fingerd
This part of the file shows two TCP/IP services. One of these,
tftp, is commented out. The TFTP
protocol is a special version of FTP that allows file transfers without
username/password verification. Because of this, it is a possible
security hole and is often disabled in the
inetd.conf file. The other is finger, which the comments suggest we might
want to comment out.
As an example of modifying the inetd.conf
file, we’ll reconfigure the system to provide tftp service, which is sometimes necessary for
supporting diskless devices. First, use your favorite editor to remove
the comment (#) from the tftp entry
in inetd.conf. (The example uses sed, everyone’s favorite editor!) Then find
out the process ID for inetd and pass
it the SIGHUP signal. The following steps show how this is done:
# cd /etc
# mv inetd.conf inetd.conf.org
# cat inetd.conf.org | sed s/#tftp/tftp/ > inetd.conf
# ps -acx | grep inetd
  144 ?  I     0:12 inetd
# kill -HUP 144
In some situations, you may also need to modify the pathname of a
server or the arguments passed to a particular server when it is
invoked. For example, look again at the tftp entry. This line contains command-line
arguments that are passed to the tftp
server when it is started. The -s /tftpboot option addresses the most obvious tftp security hole. It prevents tftp users from retrieving files that are not
located in the directory specified after the -s option. If you want to use another
directory for tftp, you must change
the inetd.conf file. The only command-line
arguments passed to servers started by inetd are those defined in the
inetd.conf file.
An alternative to inetd is the
Extended Internet Daemon (xinetd). xinetd is configured in the
/etc/xinetd.conf file, which provides the same information to xinetd as inetd.conf
provides to inetd. But instead of
using positional parameters with meanings determined by location on a
configuration line (as inetd.conf does),
xinetd.conf uses attribute and value pairs. The
attribute name clearly identifies the purpose of each parameter. The
value configures the parameter. For example, the third field in an
inetd.conf entry contains the name of the transport
protocol. In an xinetd.conf file, the name of the
transport protocol is defined using the protocol attribute, e.g., protocol = tcp. Here is an example of an
xinetd.conf tftp
entry:
# default: off
# description: The tftp server uses the trivial file transfer \
#       protocol.  The tftp protocol is often used to boot diskless \
#       workstations, download configuration files to network printers, \
#       and to start the installation process for some operating systems.
service tftp
{
        socket_type             = dgram
        protocol                = udp
        wait                    = yes
        user                    = root
        server                  = /usr/sbin/in.tftpd
        server_args             = -s /tftpboot
        disable                 = yes
}
Lines that start with # are
comments. The actual entry begins with the service command. The attributes enclosed in
the curly braces ({}) define the
characteristics of the specified service.
The service, socket_type, protocol, wait, user, server, and
server_args values all parallel values shown in the tftp example from the Solaris
inetd.conf file. These attributes perform exactly
the same functions for xinetd that
their positional counterparts did for inetd.
One item, disable = yes, needs
a little explanation. disable = yes
prevents xinetd from starting
tftp on demand. disable = yes is equivalent to commenting
tftp out of the
inetd.conf file. To enable tftp, edit this file and change it to disable = no.
Red Hat 7 uses xinetd. However,
you won’t find the network services listed in the
/etc/xinetd.conf file on a Red Hat system. In the
Red Hat configuration, xinetd.conf includes by
reference all of the files defined in the directory
/etc/xinetd.d. The listing shown above is actually
the contents of the /etc/xinetd.d/tftp file from
our sample Red Hat system. Each service has its own configuration
file.
xinetd is used because it has
enhanced security features. Security is one of the most important
reasons for understanding the inetd.conf file or
the xinetd.conf file. How to use the access control
features of xinetd and inetd is covered in Chapter 12.
The basic configuration files, the kernel configuration file, the startup files, and the /etc/inetd.conf or /etc/xinetd.conf file are necessary for installing the TCP/IP software on a Unix system. The kernel comes configured to run TCP/IP on most systems. Some systems, such as Solaris, are designed to eliminate kernel configuration. Others, such as Linux, encourage it as a way to produce a more efficient kernel. In either case, a network administrator needs to be aware of the kernel configuration commands required for TCP/IP so that they are not accidentally removed from the kernel when it is rebuilt.
Network services are either started at boot time from a startup
script or are started on demand using xinetd or inetd. BSD systems have a few startup scripts
that are run in sequence for every boot. System V Unix runs a different
set of startup scripts for each runlevel. Runlevels are used to start
the system in different modes, e.g., single user mode or multi-user
mode. Both Solaris and Linux use the System V startup scheme.
inetd and xinetd start essential network services. Most
Unix systems use inetd, although
some, such as Red Hat Linux, use xinetd. Reconfigure inetd or xinetd to add new services and to improve
security. Security can be improved by removing unneeded services or by
adding access control. Chapter 12
provides additional information on how inetd and xinetd are used to improve system
security.
The kernel configuration defines the network interface. In the next chapter we configure it, calling upon the planning we did in Chapter 4.
[41] dnet is not an optional device. It is a standard part of Solaris and it is the Ethernet device we use in all of our Solaris examples.
[42] The kernel configuration process of other BSD systems, such as SunOS 4.1.3, is similar to the FreeBSD example.
[43] Most Linux systems use a compressed kernel that is automatically decompressed during the system boot.
[44] Not only is this list long, it is bound to change. Always check the system documentation before starting a kernel reconfiguration.
[45] /usr/src/sys is symbolically linked to /sys. We use /usr/src/sys only as an example. Your system may use another directory.
[46] The book The Complete FreeBSD by Greg Lehey (published by Walnut Creek CDROM Books) is a good source for information on recompiling a BSD kernel.
[47] This assumes that the Ethernet hardware is capable of functioning in promiscuous mode. Not all Ethernet boards support this feature.
[48] A good description of the maze of System V initialization files is provided in Essential System Administration by Æleen Frisch (O’Reilly & Associates).
[49] Here the reference is to TCP/IP sockets and TCP streams, not to AT&T streams I/O or BSD socket I/O.