Table of Contents for
Unity in Action, Second Edition
 Unity in Action, Second Edition
Published by
Manning Publications, 2018
Unity in Action, Second Edition
Published by
Manning Publications, 2018
- Cover
- Unity in Action
- Praise for the First Edition
- Titlepage
- Copyright
- foreword
- preface
- acknowledgments
- about this book
- about the author
- about the cover illustration
- Part 1: First steps
- Chapter 1: Getting to know Unity
- Chapter 2: Building a demo that puts you in 3D space
- Chapter 3: Adding enemies and projectiles to the 3D game
- Chapter 4: Developing graphics for your game
- Part 2: Getting comfortable
- Chapter 5: Building a Memory game using Unity’s 2D functionality
- Chapter 6: Creating a basic 2D platformer
- Chapter 7: Putting a GUI onto a game
- Chapter 8: Creating a third-person 3D game: player movement and animation
- Chapter 9: Adding interactive devices and items within the game
- Part 3: Strong finish
- Chapter 10: Connecting your game to the internet
- Chapter 11: Playing audio: sound effects and music
- Chapter 12: Putting the parts together into a complete game
- Chapter 13: Deploying your game to players’ devices
- afterword
- Appendix A: Scene navigation and keyboard shortcuts
- Appendix B: External tools used alongside Unity
- Appendix C: Modeling a bench in Blender
- Appendix D: Online learning resources
- Index
13
Deploying your game to players’ devices
- Building an application package for various platforms
- Assigning build settings, such as the app icon or name
- Interacting with the web page for web games
- Developing plug-ins for apps on mobile platforms
Throughout this book, you’ve learned how to program various games within Unity, but the crucial last step has been missing so far: deploying those games to players. Until a game is playable outside the Unity editor, it’s of little interest to anyone other than the developer. Unity shines at this last step, with the ability to build applications for a huge variety of gaming platforms. This final chapter will go over how to build games for these various platforms.
When I speak of “building” for a platform, I’m referring to generating an application package that will run on that platform. On each platform (Windows, iOS, and so on) the exact form of a built application differs, but once the executable has been generated, that app package can be played without Unity and can be distributed to players. A single Unity project can be deployed to any platform without needing to be redone for each one.
This “build once, deploy anywhere” capability applies to the vast majority of the features in your games, but not to everything. I would estimate that 95% of the code written in Unity (for example, almost everything we’ve done so far in this book) is platform-agnostic and will work just as well across all platforms. But there are a few specific tasks that differ for different platforms, so we’ll go over those platform-specific areas of development.
Unity is capable of building apps for the following platforms:
- Windows PC
- Mac OS X
- Linux
- WebGL
- iOS
- Android
- Windows Phone
- Tizen
- Oculus Rift
- Steam VR/Vive
- Daydream
- HoloLens
In addition, by contacting the platform owners for access, Unity can even build apps for
- XBox One
- PlayStation 4
- PS Vita
- Switch
- 3DS
Whew, that full list is really long! Frankly, that’s almost comically long, and way more than the supported platforms of almost any other game development tool out there. This chapter will focus on the first six platforms listed, because those platforms are of primary interest to the majority of people exploring Unity, but keep in mind how many options are available to you.
To see all these platforms, open the Build Settings window. That’s the window you used in the previous chapter to add scenes to be loaded; to access it, choose File > Build Settings. In chapter 12, you only cared about the list at the top, but now you want to pay attention to the buttons at the bottom (see figure 13.1). You’ll notice a lot of space taken up by the list of platforms; the currently active platform is indicated with the Unity icon. Select platforms in this list and then click the Switch Platform button.
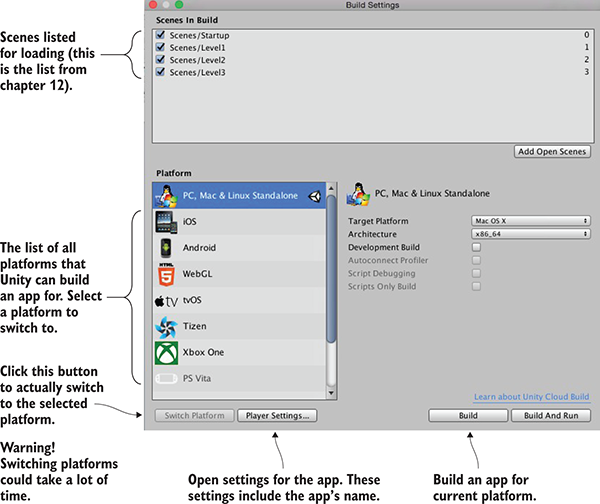
Figure 13.1 The Build Settings window
Also across the bottom of this window are the Player Settings and Build buttons. Click Player Settings to view settings for the app in the Inspector, such as the name and icon for the app. Clicking Build launches the build process.
When you click Build, the first thing that comes up is a file selector so that you can tell Unity where to generate the app package. Once you select a file location, the build process starts. Unity creates an executable app package for the currently active platform. Let’s go over the build process for the most popular platforms: desktop, web, and mobile.
13.1 Start by building for the desktop: Windows, Mac, and Linux
The simplest place to start when first learning to build Unity games is by deploying to desktop computers—Windows PC, Mac OS X, or Linux. Because Unity runs on desktop computers, that means you’ll build an app for the computer you’re already using.
13.1.1 Building the application
First choose File > Build Settings to open the Build Settings window. By default, the current platform will be set to PC, Mac, and Linux, but if that isn’t current, select the correct platform from the list and click Switch Platform.
On the right-hand side of the window, you’ll notice the Target Platform menu. This menu lets you choose between Windows PC, Mac OS X, and Linux. All three are treated as one platform in the list on the left-hand side, but these are very different platforms, so choose the correct one.
Once you’ve chosen your desktop platform, click Build. A file dialog pops up, allowing you to choose where the built application will go. Then the build process starts; this could take a while for a big project, but the build process should be fast for the tiny demos you’ve been making.
The application will appear in the location you chose; double-click it to run it, like any other program. Congrats, that was easy! Building applications is a snap, but the process can be customized in a number of ways; let’s look at how to adjust the build.
13.1.2 Adjusting Player Settings: setting the game’s name and icon
Go back to the Build Settings window, but this time click Player Settings instead of Build. A huge list of settings will appear in the Inspector (see figure 13.2); these settings control a number of aspects of the built application.
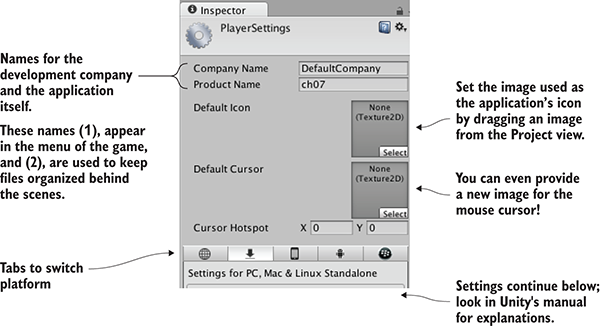
Figure 13.2 Player settings displayed in the Inspector
Because of the large number of settings, you’ll probably want to look them up in Unity’s manual; the relevant doc page is http://docs.unity3d.com/Manual/class-PlayerSettings.html.
The first three settings at the top are easiest to understand: Company Name, Product Name, and Default Icon. Type in values for the first two. Company Name is the name for your development studio, and Product Name is the name of this specific game. Then drag an image from the Project view (import an image into the project if needed) to set that image as the icon; when the app is built, this image will appear as the application’s icon.
Customizing the icon and name of the application is important for giving it a finished appearance. Another useful way of customizing the behavior of built applications is with platform-dependent code.
13.1.3 Platform-dependent compilation
By default, all the code you write will run the same way on all platforms. But Unity provides a number of compiler directives (known as platform defines) that cause different code to run on different platforms. You’ll find the full list of platform defines on this page of the manual: http://docs.unity3d.com/Manual/PlatformDependentCompilation.html.
As that page indicates, there are directives for every platform that Unity supports, allowing you to run separate code on every platform. Usually, the majority of your code doesn’t have to be inside platform directives, but occasionally small bits of the code need to run differently on different platforms. Some code assemblies only exist on one platform, so you need to have platform compiler directives around those commands. The following listing shows how to write such code.
Listing 13.1 PlatformTest script showing how to write platform-dependent code
using UnityEngine;
using System.Collections;

public class PlatformTest : MonoBehaviour {
   void OnGUI() {
#if UNITY_EDITOR
      GUI.Label(new Rect(10, 10, 200, 20), "Running in Editor");
#elif UNITY_STANDALONE
      GUI.Label(new Rect(10, 10, 200, 20), "Running on Desktop");
#else
      GUI.Label(new Rect(10, 10, 200, 20), "Running on other platform");
#endif
   }
}
Create a script called PlatformTest and write the code from this listing in it. Attach that script to an object in the scene (any object will do for testing), and a small message will appear in the top-left of the screen. When you play the game within Unity’s editor, the message will say “Running in the Editor,” but if you build the game and run the built application, the message will say “Running on Desktop.” Different code is being run in each case!
For this test, you used the platform define that treats all desktop platforms as one, but as indicated on that doc page, separate platform defines are available for Windows, Mac, and Linux. In fact, there are platform defines for all the platforms supported by Unity so that you can run different code on each. Let’s move on to the next important platform: the web.
13.2 Building for the web
Although desktop platforms are the most basic targets to build for, another important platform for Unity games is deployment to the web. This refers to games that run within a web browser and can thus be played over the internet.
13.2.1 Unity Player vs. HTML5/WebGL
Previously, Unity had to deploy web builds in a form that played within a custom browser plug-in. This had long been necessary because 3D graphics weren’t built into web browsers. In the last several years, though, a standard has emerged for 3D graphics on the web called WebGL. Technically, WebGL is separate from HTML5, although the two terms are related and are often used interchangeably.
For version 5, Unity added WebGL to the build platforms list, and a few versions later the browser plug-in was dropped, making WebGL the sole avenue for doing web builds. In part, these changes in Unity’s web build were being driven by strategic decisions made within Unity (the company). But these changes were also being driven by pushes from browser makers, who are moving away from custom plug-ins and embracing HTML5/WebGL as the way to do interactive web applications, including games.
13.2.2 Building the game embedded in a web page
Open a different project (again, this is to emphasize how any project will work) and open the Build Settings window. Switch the platform to WebGL and then click the Build button. A file selector will come up; type in the name WebTest for this application, and change to a safe location if necessary (that is, a location not within the Unity project).
The build process will now create a folder containing an index.html web page, as well as subfolders with all the game’s code and other assets. Open this web page and the game should be embedded in the middle of the otherwise blank page.
There’s nothing particularly special about this page; it’s just an example to test your game with. It’s possible to customize the code on that page, or even provide your own web page (discussed later). One of the most important customizations to make is enabling communication between Unity and the browser, so let’s go over that next.
13.2.3 Communicating with JavaScript in the browser
A Unity web game can communicate with the browser (or rather with JavaScript running in the browser), and these messages can go in both directions: from Unity to the browser, and from the browser to Unity. To send messages to the browser, you write JavaScript code into a code library, and then Unity has special commands to use functions in that library.
Meanwhile, for messages from the browser, JavaScript in the browser identifies an object by name and then Unity passes the message to the named object in the scene. Thus, you must have an object in the scene that will receive communications from the browser.
To demonstrate these tasks, create a new script in Unity called WebTestObject. Also create an empty object in the active scene called JSListener (the object in the scene must have that exact name, because that’s the name used by the JavaScript code in Listing 13.4). Attach the new script to that object, and then write in the code from this listing.
Listing 13.2 WebTestObject script for testing communication with the browser
using UnityEngine;
using System.Runtime.InteropServices;

public class WebTestObject : MonoBehaviour {
   private string _message;
   [DllImport("__Internal")]
   private static extern void ShowAlert(string msg);

   void Start() {
      _message = "No message yet";
   }
   void Update() {
      if (Input.GetMouseButtonDown(0)) {
         ShowAlert("Hello out there!");
      }
   }

   void OnGUI() {
      GUI.Label(new Rect(10, 10, 200, 20), _message);
   }
   public void RespondToBrowser(string message) {
      _message = message;
   }
}
The main new bit is the DLLImport command. That imports a function from the JavaScript library to use in C# code. That obviously implies you have a JavaScript library, so write that next. First create the special folder to contain it: create a folder called Plugins, and within that create a folder called WebGL. Now put a file called WebTest that has the extension jslib (so WebTest.jslib) in the WebGL folder; the simplest way is to create a text file outside Unity, rename it, and then drag the file in. Unity will recognize that file as a JavaScript library, so write this code in it.
Listing 13.3 WebTest JavaScript library
var TestLib = {
   ShowAlert: function(msg) {
      window.alert(Pointer_stringify(msg));
   },

}
mergeInto(LibraryManager.library, TestLib);
The jslib file contains both a JavaScript object containing functions and the command to merge the custom object into Unity’s library manager. Note that the function written includes Pointer_stringify() besides standard JavaScript commands; when passing a string from Unity it’s turned into a numeric identifier, so Unity provides that function to look up the string pointed to.
Now build for web again to see the new code in action. The WebTestObject in Unity calls a function in the JavaScript code when you click within the Unity game part of the web page; try clicking a few times and you’ll see an alert box appear in the browser!
All right, you have tested communication from the Unity game to JavaScript in the web page, but the web page can also send a message back to Unity, so let’s do that too. This will involve new code and buttons on the page; fortunately, Unity provides an easy way to customize the web page. Specifically, Unity fills in a web page template when it builds to WebGL, and you can choose a custom template instead of the default one.
The default templates can be found in the Unity installation folder, under Editor\Data\PlaybackEngines\WebGLSupport\BuildTools\WebGLTemplates on Windows. On a Mac they can be found at /PlaybackEngines/WebGLSupport/BuildTools/WebGLTemplates. Open a template page in a text editor and you’ll see that a template is largely standard HTML and JavaScript, plus some special tags that Unity replaces with generated information. Although it’s best for you to leave Unity’s built-in templates alone, they (especially the minimal one) make a good base on which to build your own. You’ll copy the minimal template web page into the custom template you make.
In Unity, create a folder called WebGLTemplates (no space); that’s where custom templates go. Now create a folder within it named WebTest; that folder is for your new template. Put an index.html file in here (you can copy in the web page from the minimal template), open that in a text editor, and write this code in it.
Listing 13.4 WebGL template to enable browser–Unity communication
<!doctype html>
<html lang="en-us">
<head>
<title>Unity WebGL Player | %UNITY_WEB_NAME%</title>
<style>
body { background-color: #333; }
</style>

<script src="%UNITY_WEBGL_LOADER_URL%"></script>
<script>
var gameInstance = UnityLoader.instantiate("gameContainer", "%UNITY_WEBGL_BUILD_URL%");

function SendToUnity() {
   gameInstance.SendMessage("JSListener",
      "RespondToBrowser", "Hello from the browser!");
}
</script>
</head>

<body>
<div id="gameContainer" style="width: %UNITY_WIDTH%px; height: %UNITY_HEIGHT%px; margin: auto"></div>
<br><input type="button" value="Send" onclick="SendToUnity();" />
</body>
</html>
If you copied the minimal template, you’ll see that Listing 13.4 is simply a few lines added there. The two important additions are a function in the header script and an input button added at the bottom; the added style changes the color of the page to make it easier to see the embedded game. The button’s HTML tag links to a JavaScript function, and that function calls SendMessage() on the Unity instance. This method calls a function on a named object within Unity; the first parameter is the name of the object, the second parameter is the name of the method, and the third parameter is a string to pass in while calling the method.
You’ve made your custom template, but you still have to tell Unity to use this template instead of the default. Open the Player Settings again (remember, click Player Settings in the Build Settings window) and find WebGL Template in the web settings (shown in figure 13.3). You’ll see that Default is currently selected, but WebTest (the template folder you created) is also on the list; click that one instead.
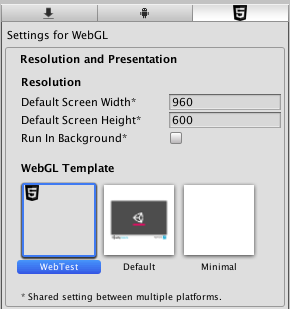
Figure 13.3 WebGL Template setting
With the custom template selected, build to WebGL again. Open the generated web page and this time there’s a button at the bottom of the page. Click the button and you’ll see the changed message displayed in Unity!
That wraps up browser communication for web builds. There’s one more platform (or rather, set of platforms) to discuss building apps for: mobile.
13.3 Building for mobile: iOS and Android
Mobile apps are another important build target for Unity. My gut impression (totally unscientific) is that most commercial games created using Unity are mobile games.
Setting up the build process for mobile apps is more complicated than either desktop or web builds, so this is an optional section—optional as in only read through it without actually following the steps; I’ll still write as if you’re working along, but you’d have to buy a developer license for iOS and install all the developer tools for Android.
All right, with those caveats out of the way, I’ll explain the overall build process for both iOS and Android. Keep in mind that these platforms occasionally change the details of the build process.
13.3.1 Setting up the build tools
Mobile devices are all separate from the computer you’re developing on, and that separateness makes the process of building and deploying to devices slightly more complex. You’ll need to set up a variety of specialized tools before you can click Build.
Setting up iOS build tools
At a high level, the process of deploying a Unity game on iOS requires first building an Xcode project from Unity and then building the Xcode project into an IPA (an iOS application package) using Xcode. Unity can’t build the final IPA directly because all iOS apps have to go through Apple’s build tools. That means you need to install Xcode (Apple’s programming IDE), including the iOS SDK.
Get Xcode from Apple’s website, in the developer section: https://developer.apple.com/xcode/.
Once Xcode is installed, go back to Unity and switch to iOS. You need to adjust the Player settings for the iOS app (remember, open Build Settings and click Player Settings). You should already be on the iOS tab of the Player settings, but click the iPhone icon tab if needed. Scroll down to Other Settings and then look for Identification. Bundle Identifier needs to be adjusted so that Apple will correctly identify the app.
Another important setting that applies to both iOS and Android is Version (this is the version number of the app). Most of the settings beyond that are platform-specific; for example, iOS added an additional build number, separate from the main version number. There’s also a setting for Scripting Backend; Mono was always used in the past, but the newer IL2CPP backend can support platform updates, like 64-bit binaries.
Now click Build in Unity. Select the location for the built files, and that’ll generate an Xcode project in that location.The Xcode project that results can be modified directly if you want (some simple modifications could be part of the postbuild script). Regardless, open the Xcode project; the built folder has many files, but double-click the .xcodeproj file (it has an icon of a blueprint). Xcode will open with this project loaded; Unity already took care of most of the settings needed in the project, but you do need to adjust the provisioning profiles being used.
Make sure Scheme Destination at the top is set to iOS Device and not the simulator (Unity projects only work on device, not simulator, and some necessary build options are grayed out if this is wrong). Xcode will attempt to set up the signing profiles automatically, but if necessary this can be adjusted manually. Select your app in the project list on the left-hand side of Xcode. Several tabs relevant to the selected project will appear; go to Build Settings and scroll down to Code Signing to set the provisioning profiles (see figure 13.4).
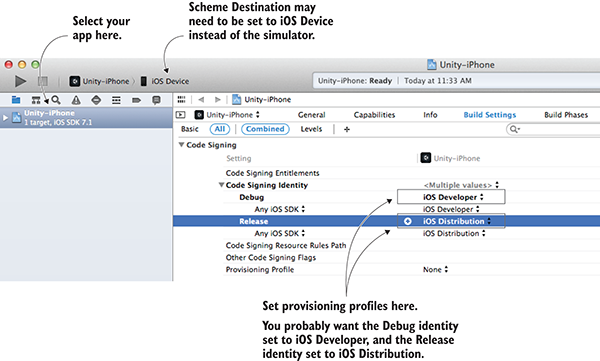
Figure 13.4 Provisioning profile settings in Xcode
Once the provisioning profiles are set, you’re ready to build the app. From the Product menu, choose either Run or Archive. There are a lot of options in the Product menu, including the tantalizingly named Build, but for our purposes the two options that are useful are either Run or Archive. Build generates executable files but doesn’t bundle them for iOS, whereas this is what Run and Archive do:
- Run will test the application on an iPhone connected to the computer with a USB cable.
- Archive will create an application package that can be sent to other registered devices (what Apple refers to as ad hoc distribution).
Archive doesn’t create the app package directly but rather creates a bundle in an intermediate stage between the raw code files and an IPA. The created archive will be listed in Xcode’s Organizer window; in that window, select the generated archive and click Export on the right-hand side. After you click Export, you’ll be asked if you want to distribute the app on the store or ad hoc.
If you choose ad hoc distribution, you’ll end up with an IPA file that can be sent to testers. You could send the file directly for them to install through iTunes, but it’s more convenient to use TestFlight (https://developer.apple.com/testflight/) to handle distributing and installing test builds.
Setting up Android build tools
Unlike iOS apps, Unity can generate the APK (an Android application package) directly. This requires pointing Unity to the Android SDK, which includes the necessary compiler. Download the Android SDK from the Android website, then choose this file location in Unity’s preferences (see figure 13.5). You can download the SDK here: http://developer.android.com/sdk/index.html.
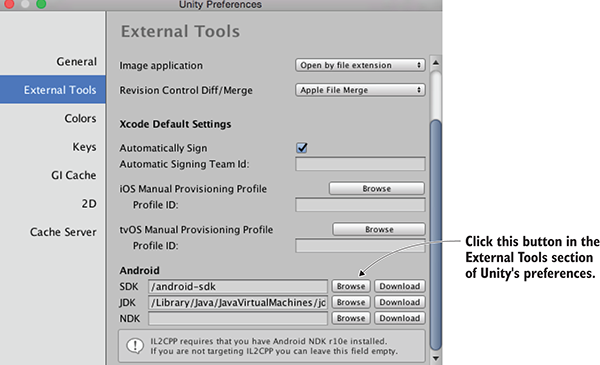
Figure 13.5 Unity preference setting to point to Android SDK
After setting the Android SDK in Unity’s preferences, you need to specify the app’s identifier just as you did for iOS. You’ll find Package Name in Player Settings; set it to com.companyname.productname (as explained in section 13.3.1). Then click Build to start the process. As with all builds, it’ll first ask where to save the file. Then it’ll create an APK file in that location.
Now that you have the app package, you must install it on a device. You can get the APK file onto an Android phone by downloading the file from the web or by transferring the file via a USB cable connected to your computer (an approach referred to as sideloading). The details of how to transfer files onto your phone vary for every device, but once there it can be installed using a file manager app. I don’t know why file managers aren’t built into Android, but you can install one for free from the Play Store. Navigate to your APK file within the file manager and then install the app.
As you can see, the basic build process for Android is a lot simpler than the build process for iOS. Unfortunately, the process of customizing the build and implementing plug-ins is more complicated than with iOS; you’ll learn how in the final section. But before that, let’s talk about texture compression.
13.3.2 Texture compression
Assets can eat up a lot of memory, and this especially includes textures. To reduce their file size, you can compress assets in various ways, with pros and cons to each method. Because of these pros and cons, you may need to adjust how Unity compresses textures.
It’s essential to manage texture compression on mobile devices, but technically, textures are often compressed on other platforms, too. But you don’t have to pay as much attention to compression on other platforms for various reasons, the chief one being that the platform is more technologically mature. On mobile devices, you need to pay closer attention to texture compression because the devices are touchier about this detail.
Unity automatically compresses textures for you; in most development tools you need to compress images yourself, but in Unity you generally import uncompressed images, and then it applies image compression in the import settings for the image (see figure 13.6).
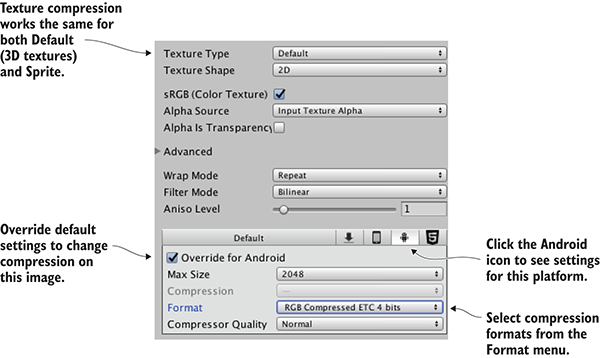
Figure 13.6 Texture compression settings in the Inspector
The compression settings are different on different platforms, so Unity recompresses images when you switch platforms. Initially, the settings are default values, and you may need to adjust them for specific images and specific platforms. In particular, image compression is trickier on Android. This is mostly due to the fragmentation of Android devices: because all iOS devices use pretty much the same video hardware, iOS apps can have texture compression optimized for their graphics chips (the GPU). Android apps don’t enjoy the same uniformity of hardware, so their texture compression has to aim for the lowest common denominator.
To be more specific, all iOS devices use PowerVR GPUs; thus, iOS apps can use the optimized PVR texture compression. Some Android devices also use PowerVR chips, but they just as frequently use Adreno chips from Qualcomm, Mali GPUs from ARM, or other options. As a result, Android apps generally rely on Ericsson Texture Compression (ETC), a compression algorithm supported by all Android devices. Unity defaults to ETC2 (the more advanced second version) for textures on Android.
This default works fairly well most of the time, but if you need to adjust compression on a texture, adjust the settings shown in figure 13.6. Click the Android icon tab to override the default settings for that platform, and then use the Format menu (confusingly, not the Compression menu) to pick specific compressions formats. In particular, you may find that certain key images need to be uncompressed; although their file size will be much larger, the image quality will be better. As long as you compress the majority of textures and only choose uncompressed on a case-by-case basis, the increased file size probably won’t be too bad.
With that discussion out of the way, the final topic for mobile development is developing native plug-ins.
13.3.3 Developing plug-ins
Unity has a huge amount of functionality built-in, but that functionality is mostly limited to features common across all platforms. Taking advantage of platform-specific toolkits (such as Play Game Services on Android) often requires add-on plug-ins for Unity.
The process of communicating with mobile plug-ins is similar to the process of communicating with the browser. On the Unity side of things, there are special commands that call functions within the plug-in. On the plug-in’s side, the plug-in can use SendMessage()to send a message to an object in Unity’s scene. The exact code looks different on different platforms, but the general idea is always the same.
Plug-ins for both platforms are put in the same place within Unity. If needed, create a folder in the Project view called Plugins; then, inside Plugins create a folder each for Android and iOS. Once they’re put into Unity, plug-in files also have settings for what platforms they apply to. Normally, Unity figures this out automatically (iOS plug-ins are set to iOS, Android plug-ins are set to Android, and so on), but if necessary, look for these settings in the Inspector.
iOS plug-ins
The plug-in is really just some native code that gets called by Unity. First, create a script in Unity to handle the native code; call this script TestPlugin (see the next listing).
Listing 13.4 TestPlugin script that calls iOS native code from Unity
using UnityEngine;
using System;
using System.Collections;
using System.Runtime.InteropServices;

public class TestPlugin : MonoBehaviour {
   private static TestPlugin _instance;
   public static void Initialize() {
      if (_instance != null) {
         Debug.Log("TestPlugin instance was found. Already initialized");
         return;
      }
      Debug.Log("TestPlugin instance not found. Initializing...");

      GameObject owner = new GameObject("TestPlugin_instance");
      _instance = owner.AddComponent<TestPlugin>();
      DontDestroyOnLoad(_instance);
   }
   #region iOS
[DllImport("__Internal")]
   private static extern float _TestNumber();

   [DllImport("__Internal")]
   private static extern string _TestString(string test);
   #endregion iOS

   public static float TestNumber() {
      float val = 0f;
      if (Application.platform == RuntimePlatform.IPhonePlayer)
         val = _TestNumber();
      return val;
   }

   public static string TestString(string test) {
      string val = "";
      if (Application.platform == RuntimePlatform.IPhonePlayer)
         val = _TestString(test);
      return val;
   }
}
First, note that the static Initialize() function creates a permanent object in the scene so that you don’t have to do it manually in the editor. You haven’t previously seen code to create an object from scratch because it’s a lot simpler to use a prefab in most cases, but in this case, it’s cleaner to create the object in code (so that you can use the plug-in script without editing the scene).
The main wizardry going on here involves the DLLImport and static extern commands. Those commands tell Unity to link up to functions in the native code you provide, then you can use those referenced functions in this script’s methods (with a check to make sure the code is running on iPhone/iOS).
Next, you’ll use these plug-in functions to test them. Create a new script called MobileTestObject, create an empty object in the scene, and then attach the script to the object.
Listing 13.5 Using the plug-in from MobileTestObject
using UnityEngine;
using System.Collections;

public class MobileTestObject : MonoBehaviour {
   private string _message;

   void Awake() {
      TestPlugin.Initialize();
   }

   // Use this for initialization
   void Start() {
      _message = "START: " + TestPlugin.TestString("ThIs Is A tEsT");
   }

   // Update is called once per frame
   void Update() {

      // Make sure the user touched the screen
      if (Input.touchCount==0){return;}
      Touch touch = Input.GetTouch(0);
      if (touch.phase == TouchPhase.Began) {
         _message = "TOUCH: " + TestPlugin.TestNumber();
      }
   }

   void OnGUI() {
      GUI.Label(new Rect(10, 10, 200, 20), _message);
   }
}
The script in this listing initializes the plug-in object and then calls plug-in methods in response to touch input. Once this is running on the device, you’ll see the test message in the corner change whenever you tap the screen.
The final thing left to do is to write the native code that TestPlugin references. Code on iOS devices is written using Objective C and/or C, so you need both a .h header file and a .mm implementation file. As described earlier, they need to go in the Plugins/iOS/ folder in the Project view. Create TestPlugin.h and TestPlugin.mm there; in the .h file, write this code.
Listing 13.6 TestPlugin.h header for iOS code
#import <Foundation/Foundation.h>

@interface TestObject : NSObject {
NSString* status;
}

@end
Look for an explanation about iOS programming to understand what this header is doing; explaining iOS programming is beyond this book. Write the code from this listing in the .mm file.
Listing 13.7 TestPlugin.mm implementation
#import "TestPlugin.h"

@implementation TestObject
@end

NSString* CreateNSString (const char* string)
{
if (string)
return [NSString stringWithUTF8String: string];
else
return [NSString stringWithUTF8String: ""];
}

char* MakeStringCopy (const char* string)
{
if (string == NULL)
return NULL;

char* res = (char*)malloc(strlen(string) + 1);
strcpy(res, string);
return res;
}

extern "C" {
    const char* _TestString(const char* string) {
        NSString* oldString = CreateNSString(string);
        NSString* newString = [oldString uppercaseString];
        return MakeStringCopy([newString UTF8String]);
    }

    float _TestNumber() {
        return (arc4random() % 100)/100.0f;
    }
}
Again, a detailed explanation of this code is a bit beyond this book. Note that many of the string functions are there to convert between how Unity represents string data and what the native code uses.
With the native code in place, you can build the iOS app and test it on a device. Tap the screen to watch the numbers displayed. Very cool! That’s how to make an iOS plug-in, so let’s look at Android, too.
Android plug-ins
To create an Android plug-in, the Unity side of things is almost exactly the same. You don’t need to change MobileTestObject at all. Make the additions shown here in TestPlugin.
Listing 13.8 Modifying TestPlugin to use the Android plug-in
...
   #region iOS
   [DllImport("__Internal")]
   private static extern float _TestNumber();

   [DllImport("__Internal")]
   private static extern string _TestString(string test);
   #endregion iOS

#if UNITY_ANDROID
   private static Exception _pluginError;
   private static AndroidJavaClass _pluginClass;
   private static AndroidJavaClass GetPluginClass() {
      if (_pluginClass == null && _pluginError == null) {
         AndroidJNI.AttachCurrentThread();
         try {
            _pluginClass = new AndroidJavaClass("com.testcompany.testplugin.TestPlugin");
         } catch (Exception e) {
            _pluginError = e;
         }
      }
      return _pluginClass;
   }

   private static AndroidJavaObject _unityActivity;
   private static AndroidJavaObject GetUnityActivity() {
      if (_unityActivity == null) {
         AndroidJavaClass unityPlayer = new AndroidJavaClass("com.unity3d.player.UnityPlayer");
         _unityActivity = unityPlayer.GetStatic<AndroidJavaObject>("currentActivity");
      }
      return _unityActivity;
   }
#endif

   public static float TestNumber() {
      float val = 0f;
      if (Application.platform == RuntimePlatform.IPhonePlayer)
         val = _TestNumber();
#if UNITY_ANDROID
      if (!Application.isEditor && _pluginError == null)
         val = GetPluginClass().CallStatic<int>("getNumber");
#endif
      return val;
   }

   public static string TestString(string test) {
      string val = "";
      if (Application.platform == RuntimePlatform.IPhonePlayer)
         val = _TestString(test);
#if UNITY_ANDROID
      if (!Application.isEditor && _pluginError == null)
         val = GetPluginClass().CallStatic<string>("getString", test);
#endif
      return val;
   }
}
You’ll notice most of the additions happen inside UNITY_ANDROID platform defines; as explained earlier in the chapter, these compiler directives cause code to apply only to certain platforms and are omitted on other platforms. Whereas the iOS code wasn’t doing anything that would break on other platforms (it won’t do anything, but it won’t cause errors, either), the code for Android plug-ins will only compile when Unity is set to the Android platform.
In particular, note the calls to AndroidJNI. That’s the system within Unity for connecting to native Android. The other possibly confusing word that appears is Activity; in Android apps, an activity is an app process. The Unity game is an activity of the Android app, so the plug-in code needs access to that activity to pass it around when needed.
Finally, you need the native Android code. Whereas iOS code is written in languages like Objective C and C, Android is programmed in Java. But you can’t simply provide the raw Java code for the plug-in; the plug-in must be a JAR packaged from the Java code. Here, again, the details of Android programming are out of scope for an introduction to Unity, but we’ll go over the basics briefly. First off, you should install Android Studio if you didn’t do so as part of downloading the Android SDK.
Figure 13.7 illustrates the steps to set up a plug-in project in Android Studio. First, select Start a New Project. In the configuration window that appears, name it TestPluginProj; for this test it doesn’t matter what the company domain is, but take note of the project location because you’ll need to find it later. Click Next to proceed; for now, Minimum SDK doesn’t matter, but select Add No Activity (since this is a plug-in, not a standalone Android app).
Once you click Finish, there will be a brief wait while the new project is set up. Once the editor view appears, select File > New > New Module to add a library. Choose Java Library in the configuration window, name it test-plugin, click Edit to change the Java package name to com.testcompany.testplugin, and finally, class name TestPlugin. Now open the Project view (it’s a button along the left-hand edge), expand test-plugin, and double-click the TestPlugin class to open it.

Figure 13.7 Setting up Android Studio to build a plug-in
TestPlugin is currently empty, so write the plug-in functions in it. Listing 13.9 shows the Java code for the plug-in.
Listing 13.9 TestPlugin.java that compiles into a JAR
package com.testcompany.testplugin;

public class TestPlugin {
   private static int number = 0;

   public static int getNumber() {
      number++;
      return number;
   }

   public static String getString(String message) {
      return message.toLowerCase();
   }
}
All right, now you can package this code into a JAR. In the top menu, select Build > Build APK; despite the name, this will also build the library, and you can ignore the apk itself. Once the build is complete, go to project on your computer and find test-plugin.jar in /test-plugin/build/libs/. Drag the JAR into Unity’s Android plug-ins folder to import it.
With the JAR file in Plugins/Android, build the game and install on a device, and the message will change whenever you tap the screen. Also, like the iOS plug-in, an Android plug-in could use UnityPlayer.UnitySendMessage()to communicate with the object in the scene (the Java code would need to import Unity’s Android Player library/JAR).
I know I glossed over a lot in developing Android libraries, but that’s because the process is both too complicated and changes frequently. If you become advanced enough to develop plug-ins for your Android games, you’re going to have to look up documentation on Android’s developer website.
Congratulations, you’ve reached the end!
Congratulations, you now know the steps for deploying a Unity game to mobile devices. The basic build process for all platforms is simple (just a single button), but customizing the app on various platforms can get complicated. Now you’re ready to get out there and build your own games!
Summary
- Unity can build executable applications for a huge variety of platforms, including desktop computers, mobile devices, and websites.
- A host of settings can be applied to builds, including details like the icon for the app and the name that appears.
- Web games can interact with the web page they’re embedded in, allowing for all kinds of interesting web apps.
- Unity supports custom plug-ins in order to extend its functionality.