Table of Contents for
Unity in Action, Second Edition
 Unity in Action, Second Edition
Published by
Manning Publications, 2018
Unity in Action, Second Edition
Published by
Manning Publications, 2018
- Cover
- Unity in Action
- Praise for the First Edition
- Titlepage
- Copyright
- foreword
- preface
- acknowledgments
- about this book
- about the author
- about the cover illustration
- Part 1: First steps
- Chapter 1: Getting to know Unity
- Chapter 2: Building a demo that puts you in 3D space
- Chapter 3: Adding enemies and projectiles to the 3D game
- Chapter 4: Developing graphics for your game
- Part 2: Getting comfortable
- Chapter 5: Building a Memory game using Unity’s 2D functionality
- Chapter 6: Creating a basic 2D platformer
- Chapter 7: Putting a GUI onto a game
- Chapter 8: Creating a third-person 3D game: player movement and animation
- Chapter 9: Adding interactive devices and items within the game
- Part 3: Strong finish
- Chapter 10: Connecting your game to the internet
- Chapter 11: Playing audio: sound effects and music
- Chapter 12: Putting the parts together into a complete game
- Chapter 13: Deploying your game to players’ devices
- afterword
- Appendix A: Scene navigation and keyboard shortcuts
- Appendix B: External tools used alongside Unity
- Appendix C: Modeling a bench in Blender
- Appendix D: Online learning resources
- Index
1
Getting to know Unity
- What makes Unity a great choice
- Operating the Unity editor
- Programming in Unity
- Comparing C# and JavaScript
If you’re anything like me, you’ve had developing a video game on your mind for a long time. But it’s a big jump from playing games to making them. Numerous game development tools have appeared over the years, and we’re going to discuss one of the most recent and most powerful of these tools. Unity is a professional-quality game engine used to create video games targeting a variety of platforms. Not only is it a professional development tool used daily by thousands of seasoned game developers, it’s also one of the most accessible modern tools for novice game developers. Until recently, a newcomer to game development would face lots of imposing barriers right from the start, but Unity makes it easy to start learning these skills.
Because you’re reading this book, chances are you’re curious about computer technology and you’ve either developed games with other tools or built other kinds of software, such as desktop applications or websites. Creating a video game isn’t fundamentally different from writing any other kind of software; it’s mostly a difference of degree. For example, a video game is a lot more interactive than most websites, and thus involves very different sorts of code, but the skills and processes involved in creating both are similar. If you’ve already cleared the first hurdle on your path to learning game development, having learned the fundamentals of programming software, then your next step is to pick up some game development tools and translate that programming knowledge into the realm of gaming. Unity is a great choice of game development environment to work with.
To start, go to www.unity3d.com to download the software. This book uses Unity 2017.1, which is the latest version as of this writing. The URL is a leftover from Unity’s original focus on 3D games; support for 3D games remains strong, but Unity works great for 2D games as well, and this book covers both. Indeed, even when demonstrated on a 3D demo, many topics (saving data, playing audio, and so on) apply to both. Meanwhile, although there are also paid versions, the base version is free. Everything in this book works in the free version, and none of it requires the paid versions of Unity, which differ mainly in commercial licensing terms.
1.1 Why is Unity so great?
Let’s take a closer look at that description from the beginning of the chapter: Unity is a professional-quality game engine used to create video games targeting a variety of platforms. That’s a fairly straightforward answer to the straightforward question: “What is Unity?” But, what exactly does that answer mean, and why is Unity so great?
1.1.1 Unity's strengths and advantages
Game engines provide a plethora of features that are useful across many different games. A game implemented using a particular engine will get all those features, while adding custom art assets and gameplay code specific to that game. Unity has physics simulation, normal maps, screen space ambient occlusion (SSAO), dynamic shadows . . . and the list goes on. Many game engines boast such features, but Unity has two main advantages over similar cutting-edge game development tools: an extremely productive visual workflow and a high degree of cross-platform support.
The visual workflow is a fairly unique design, different from most other game development environments. Whereas other game development tools are often a complicated mishmash of disparate parts that must be wrangled, or perhaps a programming library that requires you to set up your own integrated development environment (IDE), build-chain, and whatnot, the development workflow in Unity is anchored by a sophisticated visual editor. The editor is used to lay out the scenes in your game and to tie together art assets and code into interactive objects. The beauty of this editor is that it enables professional-quality games to be built quickly and efficiently, giving developers tools to be incredibly productive, while still using an extensive list of the latest technologies in video gaming.
The editor is especially helpful for doing rapid iteration, honing the game through cycles of prototyping and testing. You can adjust objects in the editor and move things around even while the game is running. Plus, Unity allows you to customize the editor itself by writing scripts that add new features and menus to the interface.
Besides the editor’s significant productivity advantages, the other main strength of Unity’s toolset is a high degree of cross-platform support. Not only is Unity multiplatform in terms of deployment targets (you can deploy to PC, web, mobile, or consoles), but it’s also multiplatform in terms of development tools (you can develop a game on Windows or macOS). This platform-agnostic nature is largely because Unity started as Mac-only software and was later ported to Windows. The first version launched in 2005, but now Unity is past its fifth major version (with lots of minor updates released frequently). Initially, Unity supported only Mac for both development and deployment, but within months Unity had been updated to work on Windows as well. Successive versions gradually added more deployment platforms, such as a cross-platform web player in 2006, iPhone in 2008, Android in 2010, and even game consoles like Xbox and PlayStation. More recently, they’ve added deployment to WebGL, the new framework for 3D graphics in web browsers, and there’s even support for VR platforms like Oculus Rift and Vive. Few game engines support as many deployment targets as Unity, and none make deploying to multiple platforms so simple.
In addition to these main strengths, a third, more subtle, benefit comes from the modular component system used to construct game objects. In a component system, components are mix-and-match packets of functionality, and objects are built up as a collection of components, rather than as a strict hierarchy of classes. A component system is a different (and usually more flexible) approach to doing object-oriented programming (OOP), where game objects are constructed through composition rather than inheritance. Figure 1.1 diagrams an example comparison.
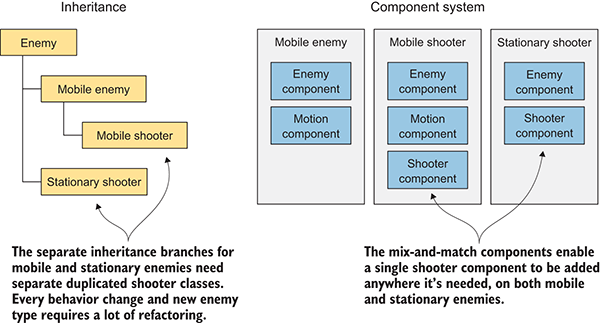
Figure 1.1 Inheritance vs. components
In a component system, objects exist on a flat hierarchy and different objects have different collections of components, rather than an inheritance structure where different objects are on completely different branches of the tree. This arrangement facilitates rapid prototyping, because you can quickly mix and match different components rather than having to refactor the inheritance chain when objects change.
Although you could write code to implement a custom component system if one didn’t exist, Unity already has a robust component system, and this system is even integrated with the visual editor. Rather than only being able to manipulate components in code, you can attach and detach components within the visual editor. Meanwhile, you aren’t limited to only building objects through composition; you still have the option of using inheritance in your code, including all the best-practice design patterns that have emerged based on inheritance.
1.1.2 Downsides to be aware of
Unity has many advantages that make it a great choice for developing games, and I highly recommend it, but I’d be remiss if I didn’t mention its weaknesses. In particular, the combination of the visual editor and sophisticated coding, though very effective with Unity’s component system, is unusual and can create difficulties. In complex scenes, you can lose track of which objects in the scene have specific components attached. Unity does provide a search feature for finding attached scripts, but it could be more robust; sometimes you still encounter situations where you need to manually inspect everything in the scene in order to find script linkages. This doesn’t happen often, but when it does happen, it can be tedious.
Another disadvantage that can be surprising and frustrating for experienced programmers is that Unity doesn’t support linking in external code libraries. Necessary libraries must be manually copied into every project that they’ll be used in, as opposed to referencing one central shared location. The lack of a central location for libraries can make it awkward to share functionality between multiple projects. This disadvantage can be worked around with clever use of version control systems, but Unity doesn’t support external code libraries out of the box.
A third weakness has to do with working with prefabs. Prefabs are a concept specific to Unity and are explained in chapter 3; for now, all you need to know is that prefabs are a flexible approach to visually defining interactive objects. The concept of prefabs is both powerful and unique to Unity (and yes, the concept of prefabs only makes sense in the context of Unity’s component system), but it can be surprisingly awkward to edit prefabs. Considering that prefabs are such a useful and central part of working with Unity, I hope that future versions improve the workflow for editing them.
1.1.3 Example games built with Unity
You’ve heard about the pros and cons of Unity, but you might still need convincing that the development tools in Unity can give first-rate results. Visit the Unity gallery at http://unity3d.com/showcase/gallery to see a constantly updated list of hundreds of games and simulations developed using Unity. This section explores a handful of games, showcasing a number of genres and deployment platforms.
Desktop (Windows, Mac, and Linux)
Because the Unity editor runs on the same platform, deployment to Windows or Mac is often the most straightforward target platform. Here are a couple of examples of desktop games in different genres:
- Guns of Icarus Alliance (figure 1.2), a first-person shooter developed by Muse Games
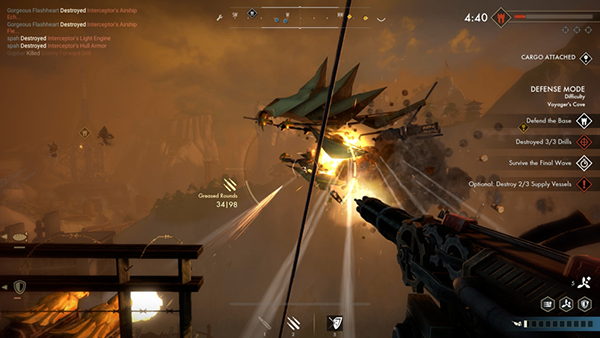
Figure 1.2 Guns of Icarus Alliance
- Gone Home (figure 1.3), an exploration adventure developed by The Fullbright Company
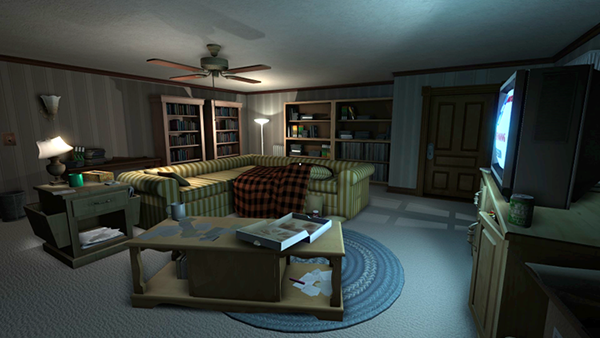
Figure 1.3 Gone Home
Mobile (iOS and Android)
Unity can also deploy games to mobile platforms like iOS (iPhones and iPads) and Android (phones and tablets). Here are three examples of mobile games in different genres:
- Lara Croft GO (figure 1.4), a 3D puzzle game developed by Square Enix
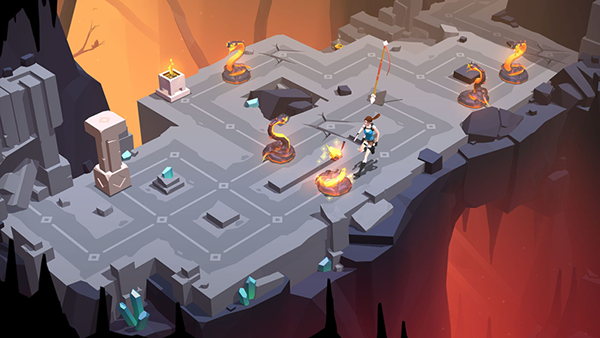
Figure 1.4 Lara Croft GO
- INKS (figure 1.5), a 2D puzzle game developed by State of Play

Figure 1.5 INKS
- Tyrant Unleashed (figure 1.6), a collectible card game developed by Synapse Games
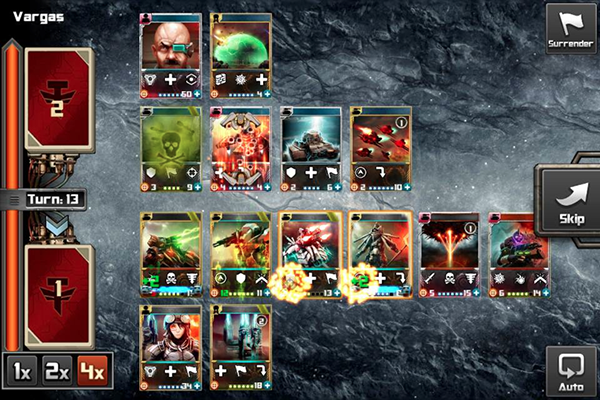
Figure 1.6 Tyrant Unleashed
Console (PlayStation, Xbox, and Switch)
Unity can even deploy to game consoles, although the developer must obtain licensing from Sony, Microsoft, or Nintendo. Because of this requirement and Unity’s easy cross-platform deployment, console games are often available on desktop computers as well. Here are a couple of examples of console games in different genres:
- Yooka-Laylee (figure 1.7), a 3D platformer developed by Playtonic Games
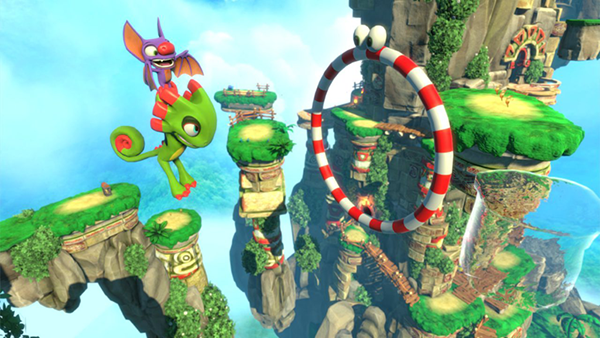
Figure 1.7 Yooka-Laylee
- Shadow Tactics (figure 1.8), a stealth game developed by Mimimi Productions
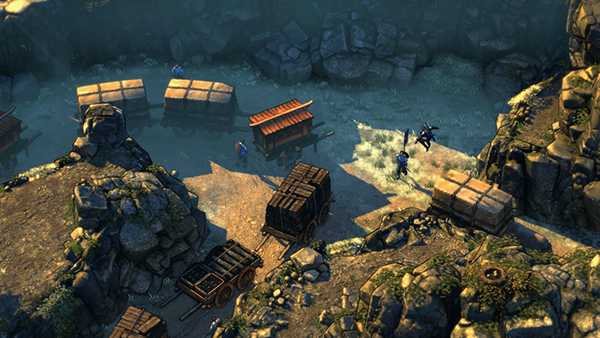
Figure 1.8 Shadow Tactics
As you can see from these examples, Unity’s strengths can definitely translate into commercial-quality games. But even with Unity’s significant advantages over other game development tools, newcomers may misunderstand the involvement of programming in the development process. Unity is often portrayed as a list of features with no programming required, which is a misleading view that won’t teach people what they need to know in order to produce commercial titles. Though it’s true that you can click together a fairly elaborate prototype using pre-existing components even without a programmer being involved (which is itself a pretty big feat), rigorous programming is required to move beyond an interesting prototype to a polished game ready for release.
1.2 How to use Unity
The previous section talked a lot about the productivity benefits of Unity’s visual editor, so let’s go over what the interface looks like and how it operates. If you haven’t done so, download the program from www.unity3d.com/ and install it on your computer (be sure to include Example Project if that’s unchecked in the installer). After you install it, launch Unity to start exploring the interface.
You probably want an example to look at, so open the included example project; a new installation should open the example project automatically, but you can also select File > Open Project to open it manually. The example project is installed in the shared user directory, which is something like C:\Users\Public\Documents\Unity Projects\ on Windows, or Users/Shared/Unity/ on macOS. You may also need to open the example scene, so double-click the Car scene file (highlighted in figure 1.9; scene files have the Unity cube icon), which is found by going to SampleScenes/Scenes/ in the file browser at the bottom of the editor. You should see a screen similar to figure 1.9.
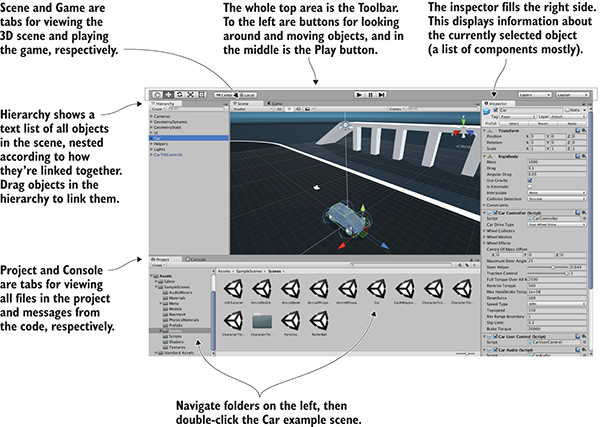
Figure 1.9 Parts of the interface in Unity
The interface in Unity is split into sections: the Scene tab, the Game tab, the Toolbar, the Hierarchy tab, the Inspector, the Project tab, and the Console tab. Each section has a different purpose, but all are crucial to the game building lifecycle.
- You can browse through all the files in the Project tab.
- You can place objects in the 3D scene being viewed using the Scene tab.
- The Toolbar has controls for working with the scene.
- You can drag and drop object relationships in the Hierarchy tab.
- The Inspector lists information about selected objects, including linked code.
- You can test playing in Game view while watching error output in the Console tab.
This is the default layout in Unity; all of the views are in tabs and can be moved around or resized, docking in different places on the screen. Later, you can play around with customizing the layout, but for now, the default layout is the best way to understand what all the views do.
1.2.1 Scene view, Game view, and the Toolbar
The most prominent part of the interface is the Scene view in the middle. This is where you can see what the game world looks like and move objects around. Mesh objects in the scene appear as, well, their mesh (defined in a moment). You can also see a number of other objects in the scene, represented by icons and colored lines: cameras, lights, audio sources, collision regions, and so forth. Note that the view you’re seeing here isn’t the same as the view in the running game—you’re able to look around the scene at will without being constrained to the game’s view.
The Game view isn’t a separate part of the screen but rather another tab located right next to Scene (look for tabs at the top left of views). A couple of places in the interface have multiple tabs like this; if you click a different tab, the view is replaced by the new active tab. When the game is running, what you see in this view is the game. It isn’t necessary to manually switch tabs every time you run the game, because the view automatically switches to Game when the game starts.
Speaking of running the game, that’s as simple as hitting the Play button just above the Scene view. That whole top section of the interface is referred to as the Toolbar, and Play is located right in the middle. Figure 1.10 breaks apart the full editor interface to show only the Toolbar at the top, as well as the Scene/Game tabs right underneath.
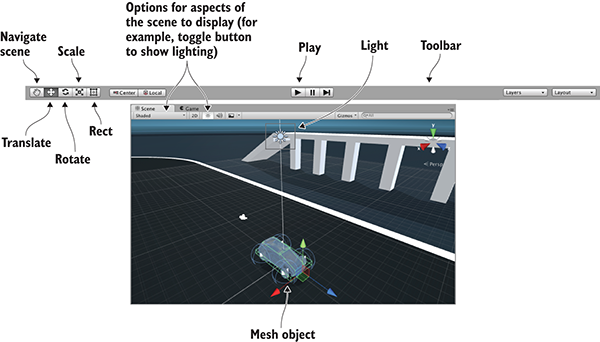
Figure 1.10 Editor screenshot cropped to show Toolbar, Scene, and Game
At the left-hand side of the Toolbar are buttons for scene navigation and transforming objects—how to look around the scene and how to move objects. I suggest you spend time practicing these, because they are two of the most important activities you’ll do in Unity’s visual editor. (They’re so important that they get their own section following this one.) The right-hand side of the Toolbar is where you’ll find drop-down menus for layouts and layers. As mentioned earlier, the layout of Unity’s interface is flexible, so the Layouts menu allows you to switch between layouts. As for the Layers menu, that’s advanced functionality that you can ignore for now (layers will be mentioned in future chapters).
1.2.2 Using the mouse and keyboard
Scene navigation is primarily done using the mouse, along with a few modifier keys used to modify what the mouse is doing. The three main navigation maneuvers are Move, Orbit, and Zoom. The specific mouse movements, because they vary depending on which mouse you’re using, are described in appendix A. The three different movements involve clicking-and-dragging while holding down a combination of Alt (or Option on Mac) and Ctrl. Spend a few minutes moving around in the scene to understand what Move, Orbit, and Zoom do.
Transforming objects is also done through three main maneuvers, and the three scene navigation moves are analogous to the three transforms: Translate, Rotate, and Scale (figure 1.11 demonstrates the transforms on a cube).
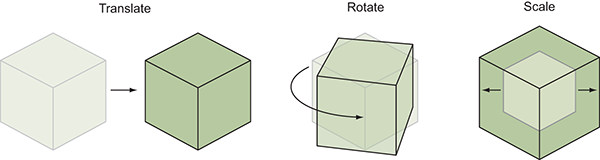
Figure 1.11 Applying the three transforms: Translate, Rotate, and Scale. (The lighter lines are the previous state of the object before it was transformed.)
When you select an object in the scene, you can then move it around (the mathematically accurate technical term is translate), rotate it, or scale how big it is. Relating back to scene navigation maneuvers, Move is when you Translate the camera, Orbit is when you Rotate the camera, and Zoom is when you Scale the camera. Besides the buttons on the Toolbar, you can switch between these functions by pressing W, E, or R on the keyboard. When you activate a transform, you’ll notice that a set of color-coded arrows or circles appears over the object in the scene; this is the Transform gizmo, and you can click-and-drag this gizmo to apply the transformation.
There’s a fourth tool next to the transform buttons. Called the Rect tool, it’s designed for use with 2D graphics. This one tool combines movement, rotation, and scaling. These operations have to be separate tools in 3D but are combined in 2D because there’s one less dimension to worry about. Unity has a host of other keyboard shortcuts for speeding up a variety of tasks. Refer to appendix A to learn about them. And with that, on to the remaining sections of the interface!
1.2.3 The Hierarchy view and the Inspector panel
Looking at either side of the screen, you’ll see the Hierarchy tab on the left and the Inspector tab on the right (see figure 1.12). Hierarchy is a list view with the name of every object in the scene listed, with the names nested together according to their hierarchy linkages in the scene. Basically, it’s a way of selecting objects by name instead of hunting them down and clicking them within Scene. The Hierarchy linkages group objects together, visually grouping them like folders and allowing you to move the entire group as one.
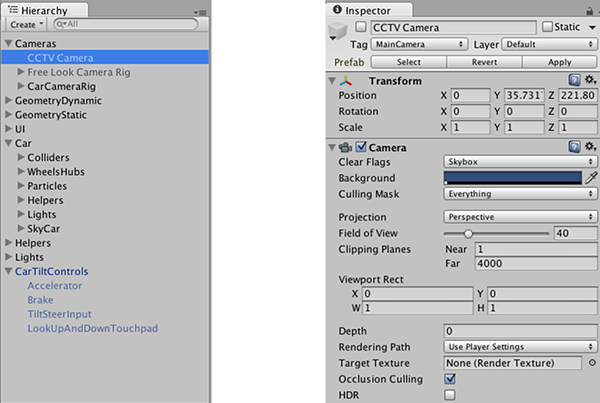
Figure 1.12 Editor screenshot cropped to show the Hierarchy and Inspector tabs
The Inspector shows you information about the currently selected object. Select an object and the Inspector is then filled with information about that object. The information shown is pretty much a list of components, and you can even attach or remove components from objects. All game objects have at least one component, Transform, so you’ll always at least see information about positioning and rotation in the Inspector. Often, objects will have several components listed here, including scripts attached to them.
1.2.4 The Project and Console tabs
At the bottom of the screen, you’ll see Project and Console (see figure 1.13). As with Scene and Game, these aren’t two separate portions of the screen, but rather tabs that you can switch between. Project shows all the assets (art, code, and so on) in the project. Specifically, on the left-hand side of the view is a listing of the directories in the project; when you select a directory, the right side of the view shows the individual files in that directory. The directory listing in Project is similar to the list view in Hierarchy, but Hierarchy shows objects in the scene; Project shows files that may not be contained within any specific scene (including scene files—when you save a scene, it shows up in Project!).
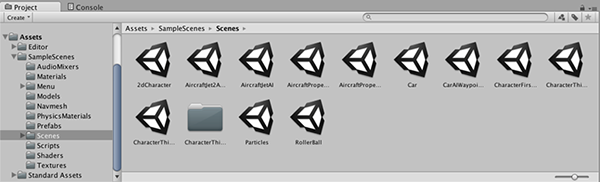
Figure 1.13 Editor screenshot cropped to show the Project and Console tabs
The Console is the place where messages from the code show up. Some of these messages will be debug output that you placed deliberately, but Unity also emits error messages if it encounters problems in the script you wrote.
1.3 Getting up and running with Unity programming
Now let’s look at how the process of programming works in Unity. Although art assets can be laid out in the visual editor, you need to write code to control them and make the game interactive. Unity supports multiple programming languages, in particular JavaScript and C#. Both have their pros and cons, but you’ll be using C# throughout this book.
Let’s walk through an example of writing and running some code. Launch Unity and create a new project; choose New in Unity’s starting window, or File > New Project if Unity was already running. Type a name for the project, leave the default 3D setting (future chapters will mention 2D), and then choose where you want to save it. A Unity project is simply a directory full of various asset and settings files, so save the project anywhere on your computer. Click Create Project and then Unity will briefly disappear while it sets up the project directory.
When Unity reappears, you’ll be looking at a blank project. Next, let’s discuss how programs get executed in Unity.
1.3.1 How code runs in Unity: script components
All code execution in Unity starts from code files linked to an object in the scene. Ultimately, it’s all part of the component system described earlier; game objects are built up as a collection of components, and that collection can include scripts to execute.
As you’ve probably surmised from this description, in Unity, scripts are components—not all scripts, mind you, only scripts that inherit from MonoBehaviour, the base class for script components. MonoBehaviour defines the invisible groundwork for how components attach to game objects, and (as shown in Listing 1.1) inheriting from it provides a couple of automatically run methods that you can implement. Those methods include Start(), called once when the object becomes active (which is generally as soon as the level with that object has loaded), and Update(), which is called every frame. Your code is run when you put it inside these predefined methods.
Listing 1.1 Code template for a basic script component
using UnityEngine;
using System.Collections;
using System.Collections.Generic;
public class HelloWorld : MonoBehaviour {
    void Start() {
        // do something once
    }

    void Update() {
        // do something every frame
    }
}
This is what the file contains when you create a new C# script: the minimal boilerplate code that defines a valid Unity component. Unity has a script template tucked away in the bowels of the application, and when you create a new script it copies that template and renames the class to match the name of the file (which is HelloWorld.cs in my case). There are also empty shells for Start() and Update(), because those are the two most common places to call your custom code from.
To create a script, select C# Script from the Create menu, which you access either under the Assets menu (note that Assets and GameObjects both have listings for Create but they’re different menus) or by right-clicking in the Project view. Type in a name for the new script, such as HelloWorld. As explained later in the chapter (see figure 1.15), you’ll click-and-drag this script file onto an object in the scene. Double-click the script and it’ll automatically be opened in another program for editing, as discussed next.
1.3.2 Using MonoDevelop, the cross-platform IDE
Programming isn’t done within Unity exactly, but rather code exists as separate files that you point Unity to. Script files can be created within Unity, but you still need to use a text editor or IDE to write all the code within those initially empty files. Unity comes bundled with MonoDevelop, an open source, cross-platform IDE for C# (figure 1.14 shows what it looks like). You can visit www.monodevelop.com/ to learn more about this software, but the version to use is the version bundled along with Unity, rather than a version downloaded from its website, because some modifications were made to the base software in order to better integrate it with Unity.
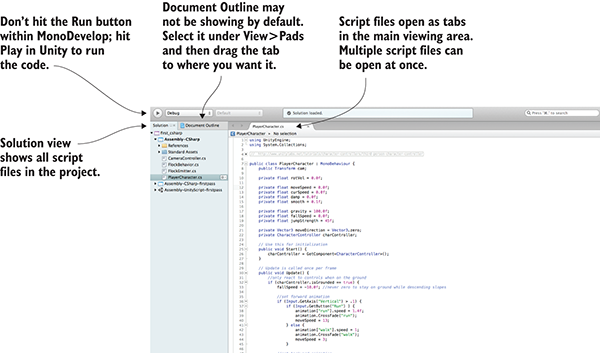
Figure 1.14 Parts of the interface in MonoDevelop
Because C# originated as a Microsoft product, you may be wondering whether you can use Visual Studio to do programming for Unity. The short answer is yes, you can. Support tools are available for using Visual Studio with Unity (particularly so that debugging and breakpoints work properly). To see if this support is already installed, check the Debug menu for the option Attach Unity Debugger. If it isn’t installed, simply run the Visual Studio Installer to modify your install and look for the Unity game development module.
I generally use MonoDevelop, but if you’re already using Visual Studio to do programming, then you could keep using it and not have any problems following along with this book. (Beyond this introductory chapter, I’m not going to talk about the IDE.) Tying your workflow to Windows, though, would run counter to one of the biggest advantages of using Unity. Although C# originated as a Microsoft product, and thus only worked on Windows with the .NET Framework, C# has now become an open language standard and there’s a significant cross-platform framework: Mono. Unity uses Mono for its programming backbone, and using MonoDevelop allows you to keep the entire development workflow cross-platform.
Always keep in mind that, although the code is written in Visual Studio or MonoDevelop, the code isn’t run there. The IDE is pretty much a fancy text editor, and the code is run when you hit Play within Unity.
1.3.3 Printing to the console: Hello World!
All right, you already have an empty script in the project, but you also need an object in the scene to attach the script to. Recall figure 1.1 depicting how a component system works; a script is a component, so it needs to be set as one of the components on an object.
Select GameObject > Create Empty, and a blank GameObject will appear in the Hierarchy list. Now drag the script from the Project view over to the Hierarchy view and drop it on the empty GameObject. As shown in figure 1.15, Unity will highlight valid places to drop the script, and dropping it on the GameObject will attach the script to that object. To verify that the script is attached to the object, select the object and look at the Inspector view. You should see two components listed: the Transform component, which is the basic position/rotation/scale component all objects have and which can’t be removed, and below that, your script.
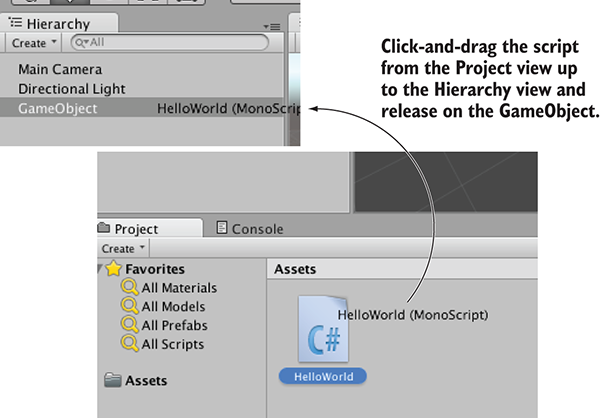
Figure 1.15 How to link a script to a GameObject
When a script is linked to an object, you’ll see something like figure 1.16, with the script showing up as a component in the Inspector. Now the script will execute when you play the scene, although nothing is going to happen yet, because you haven’t written any code. Let’s do that next!
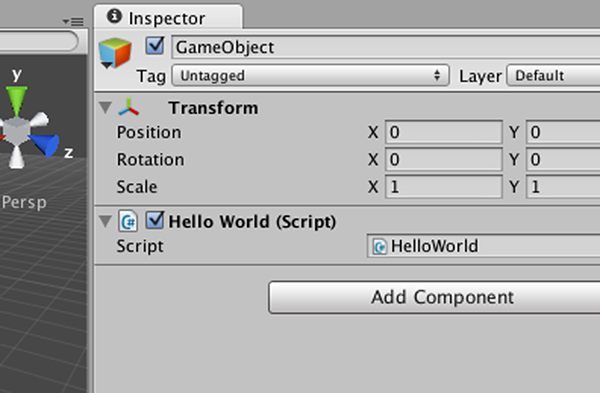
Figure 1.16 Linked script being displayed in the Inspector
Open the script in MonoDevelop to get back to Listing 1.1. The classic place to start when learning a new programming environment is having it print the text “Hello World!”, so add this line inside the Start() method.
Listing 1.2 Adding a console message
...
void Start() {
    Debug.Log("Hello World!");
}
...
What the Debug.Log() command does is print a message to the Console view in Unity. Meanwhile, that line goes in the Start() method because, as was explained earlier, that method is called as soon as the object becomes active. Start() will be called once, as soon as you hit Play in the editor. Once you’ve added the log command to your script (be sure to save the script), hit Play in Unity and switch to the Console view. You’ll see the message “Hello World!” appear. Congratulations, you’ve written your first Unity script! Of course, the code will be more elaborate in later chapters, but this is an important first step.
You could now save the scene; that would create a .unity file with the Unity icon. The scene file is a snapshot of everything currently loaded in the game so that you can reload this scene later. It’s hardly worth saving this scene because it’s so simple (a single empty GameObject), but if you don’t save the scene, then you’ll find it empty again when you come back to the project after quitting Unity.