Table of Contents for
Unity in Action, Second Edition
 Unity in Action, Second Edition
Published by
Manning Publications, 2018
Unity in Action, Second Edition
Published by
Manning Publications, 2018
- Cover
- Unity in Action
- Praise for the First Edition
- Titlepage
- Copyright
- foreword
- preface
- acknowledgments
- about this book
- about the author
- about the cover illustration
- Part 1: First steps
- Chapter 1: Getting to know Unity
- Chapter 2: Building a demo that puts you in 3D space
- Chapter 3: Adding enemies and projectiles to the 3D game
- Chapter 4: Developing graphics for your game
- Part 2: Getting comfortable
- Chapter 5: Building a Memory game using Unity’s 2D functionality
- Chapter 6: Creating a basic 2D platformer
- Chapter 7: Putting a GUI onto a game
- Chapter 8: Creating a third-person 3D game: player movement and animation
- Chapter 9: Adding interactive devices and items within the game
- Part 3: Strong finish
- Chapter 10: Connecting your game to the internet
- Chapter 11: Playing audio: sound effects and music
- Chapter 12: Putting the parts together into a complete game
- Chapter 13: Deploying your game to players’ devices
- afterword
- Appendix A: Scene navigation and keyboard shortcuts
- Appendix B: External tools used alongside Unity
- Appendix C: Modeling a bench in Blender
- Appendix D: Online learning resources
- Index
9
Adding interactive devices and items within the game
This chapter covers
- Programming doors that the player can open
- Enabling physics simulations that scatter a stack of boxes
- Building collectible items that players store in their inventory
- Using code to manage game state, such as inventory data
- Equipping and using inventory items
Implementing functional items is the next topic we’re going to focus on. Previous chapters covered a number of different elements of a complete game: movement, enemies, the UI, and so forth. But our projects have lacked anything to interact with other than enemies, nor have they had much in the way of game state. In this chapter, you’ll learn how to create functional devices like doors. We’ll also discuss collecting items, which involves both interacting with objects in the level and tracking game state. Games often have to track state like the player’s current stats, progress through objectives, and so on. The player’s inventory is an example of this sort of state, so you’ll build a code architecture that can keep track of items collected by the player. By the end of this chapter, you’ll have built a dynamic space that really feels like a game!
We’ll start by exploring devices (such as doors) that are operated with keypresses from the player. After that, you’ll write code to detect when the player collides with objects in the level, enabling interactions like pushing objects around or collecting inventory items. Then you’ll set up a robust MVC (Model-View-Controller) style code architecture to manage data for the collected inventory. Finally, you’ll program interfaces to make use of the inventory for gameplay, such as requiring a key to open a door.
The example project will have these devices and items strewn about the level randomly. A polished game would have a lot of careful design behind the placement of items, but there’s no need to carefully plan out a level that only tests functionality. Even so, though the placement of objects will be haphazard, the chapter opening bullets lay out the order in which we’ll implement things.
As usual, the explanations build up the code step by step, but if you want to see all the finished code in one place, you can download the sample project.
9.1 Creating doors and other devices
Although levels in games mostly consist of static walls and scenery, they also usually incorporate a lot of functional devices as well. I’m talking about objects that the player can interact with and operate—things like lights that turn on or a fan that starts turning. The specific devices can vary a lot and are mostly limited only by your imagination, but almost all of them use the same sort of code to have the player activate the device. You’ll implement a couple of examples in this chapter, and then you should be able to adapt this same code to work with all sorts of other devices.
9.1.1 Doors that open and close on a keypress
The first kind of device you’ll program is a door that opens and closes, and you’re going to start with operating the door by pressing a key. There are lots of different kinds of devices you could have in a game, and lots of different ways of operating those devices. We’re eventually going to look at a couple of variations, but doors are the most common interactive devices found in games, and using items with a keypress is the most straightforward approach to start with.
The scene has a few spots where a gap exists between walls, so place a new object that blocks the gap. I created a new cube object and then set its transform to Position 2.5, 1.5, 17 and Scale 5, 3, .5, creating the door shown in figure 9.1.
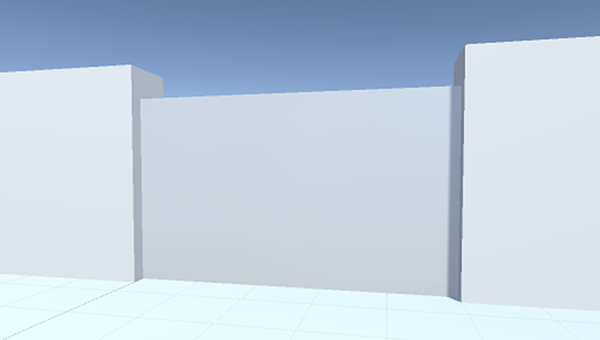
Figure 9.1 Door object fit into a gap in the wall
Create a C# script, call it DoorOpenDevice, and put that script on the door object. This code will cause the object to operate as a door.
Listing 9.1 Script that opens and closes the door on command
using UnityEngine;
using System.Collections;

public class DoorOpenDevice : MonoBehaviour {
   [SerializeField] private Vector3 dPos;
private bool _open; public void Operate() {
if (_open) {
         Vector3 pos = transform.position - dPos;
         transform.position = pos;
      } else {
         Vector3 pos = transform.position + dPos;
         transform.position = pos;
      }
      _open = !_open;
   }
}
The first variable defines the offset that’s applied when the door opens. The door will move this amount when it opens, and then it will subtract this amount when it closes. The second variable is a private Boolean for tracking whether the door is open or closed. In the Operate() method, the object’s transform is set to a new position, adding or subtracting the offset depending on whether the door is already open; then _open is toggled on or off.
As with other serialized variables, dPos appears in the Inspector. But this is a Vector3 value, so instead of one input box there are three, all under the one variable name. Type in the relative position of the door when it opens; I decided to have the door slide down to open, so the offset was 0, -2.9, 0 (because the door object has a height of 3, moving down 2.9 leaves a tiny sliver of the door sticking up out of the floor).
Other code needs to call Operate() to make the door open and close (the single function call handles both cases). You don’t yet have that other script on the player; writing that is the next step.
9.1.2 Checking distance and facing before opening the door
Create a new script and name it DeviceOperator. This listing implements a control key that operates nearby devices.
Listing 9.2 Device control key for the player
using UnityEngine;
using System.Collections;

public class DeviceOperator : MonoBehaviour {
public float radius = 1.5f; void Update() {
if (Input.GetButtonDown("Fire3")) {
      Collider[] hitColliders =
            Physics.OverlapSphere(transform.position, radius);
      foreach (Collider hitCollider in hitColliders) {
        hitCollider.SendMessage("Operate",
            SendMessageOptions.DontRequireReceiver);
      }
    }
  }
}
The majority of the script in this listing should look familiar, but a crucial new method is at the center of this code. First, establish a value for how far away to operate devices from. Then, in the Update() function, look for keyboard input; since the Jump key is already being used by the RelativeMovement script, this time you’ll respond to Fire3 (which is defined in the project’s input settings as the left Shift key).
Now we get to the crucial new method: OverlapSphere(). This method returns an array of all objects that are within a given distance of a given position. By passing in the position of the player and the radius variable, this detects all objects near the player. What you do with this list can vary (perhaps you set off a bomb and want to apply an explosive force), but in this situation you want to attempt to call Operate() on all nearby objects.
That method is called via SendMessage() instead of the typical dot notation, an approach you also saw with UI buttons in previous chapters. As was the case there, the reason to use SendMessage() is because you don’t know the exact type of the target object, and that command works on all GameObjects. But this time you’re going to pass the DontRequireReceiver option to the method. This is because most of the objects returned by OverlapSphere() won’t have an Operate() method; normally, SendMessage() prints an error message if nothing in the object received the message, but in this case the error messages would be distracting because you already know most objects will ignore the message.
Once the code is written, you can attach this script to the player object. Now you can open and close the door by standing near it and pressing the key.
There’s one little detail you can fix. Currently, it doesn’t matter which way the player is facing, as long as the player is close enough. But you could also adjust the script to only operate devices the player is facing, so let’s do that. Recall from chapter 8 that you can calculate the dot product for checking facing. That’s a mathematical operation done on a pair of vectors that returns a range between -1 and 1, with 1 meaning they point in exactly the same direction and -1 when they point in exactly opposite directions. Here is the new code in the DeviceOperator script.
Listing 9.3 Adjusting DeviceOperator to only operate devices that player faces
...
foreach (Collider hitCollider in hitColliders) {
   Vector3 direction = hitCollider.transform.position - transform.position;
   if (Vector3.Dot(transform.forward, direction) > .5f) {
      hitCollider.SendMessage("Operate",
            SendMessageOptions.DontRequireReceiver);
   }
}
...
To use the dot product, you first determine the direction to check against. That would be the direction from the player to the object; make a direction vector by subtracting the position of the player from the position of the object. Then call Vector3.Dot() with both that direction vector and the forward direction of the player. When the dot product is close to 1 (specifically, this code checks whether it is greater than .5), that means the two vectors are close to pointing in the same direction.
With this adjustment made, the door won’t open and close when the player faces away from it, even if the player is close. And this same approach to operating devices can be used with any sort of device. To demonstrate that flexibility, let’s create another example device.
9.1.3 Operating a color-changing monitor
We’ve created a door that opens and closes, but that same device-operating logic can be used with any sort of device. You’re going to create another device that’s operated in the same way; this time, you’ll create a color-changing display on the wall.
Create a new cube and place it so that one side is barely sticking out of the wall. For example, I went with Position 10.9, 1.5, -5. Now create a new script called ColorChangeDevice and attach that script (Listing 9.4) to the wall display. Now run up to the wall monitor and hit the same “operate” key as used with the door; you should see the display change color, as figure 9.2 illustrates.
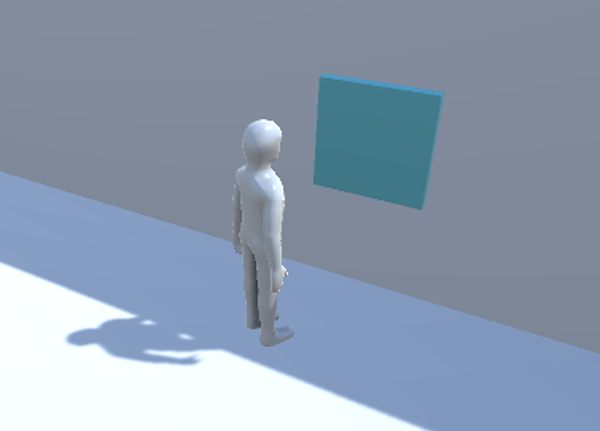
Figure 9.2 Color-changing display embedded in the wall
Listing 9.4 Script for a device that changes color
using UnityEngine;
using System.Collections;

public class ColorChangeDevice : MonoBehaviour {
   public void Operate() {
      Color random = new Color(Random.Range(0f,1f),
            Random.Range(0f,1f), Random.Range(0f,1f));
GetComponent<Renderer>().material.color = random;
   }
}
To start with, declare the same function name as the door script used. Operate is the function name that the device operator script uses, so you need to use that name in order for it to be triggered. Inside this function, the code assigns a random color to the object’s material (remember, color isn’t an attribute of the object itself, but rather the object has a material and that material can have a color).
All right, so we’ve gone over one approach to interacting with devices in the game and have even implemented a couple of different devices to demonstrate. Another way of interacting with items is by bumping into them, so let’s go over that next.
9.2 Interacting with objects by bumping into them
In the previous section, devices were operated by keyboard input from the player, but that’s not the only way players can interact with items in the level. Another straightforward approach is to respond to collisions with the player. Unity handles most of that for you, by having collision detection and physics built into the game engine. Unity will detect collisions for you, but you still need to program the object to respond.
We’ll go over three collision responses that are useful for games:
- Push away and fall over
- Trigger a device in the level
- Disappear on contact (for item pickups)
9.2.1 Colliding with physics-enabled obstacles
To start, you’re going to create a pile of boxes and then cause the pile to collapse when the player runs into it. Although the physics calculations involved are complicated, Unity has all of that built in and will scatter the boxes in a realistic way.
By default, Unity doesn’t use its physics simulation to move objects around. That can be enabled by adding a Rigidbody component to the object. This concept was first discussed in chapter 3, because the enemy’s fireballs also needed a Rigidbody component. As I explained in that chapter, Unity’s physics system will act only on objects that have a Rigidbody component. Look for Rigidbody by clicking Add Component and going to the Physics menu.
Create a new cube object and then add a Rigidbody component to it. Create several such cubes and position them in a neat stack. For example, in the sample download I created five boxes and stacked them into two tiers (see figure 9.3).
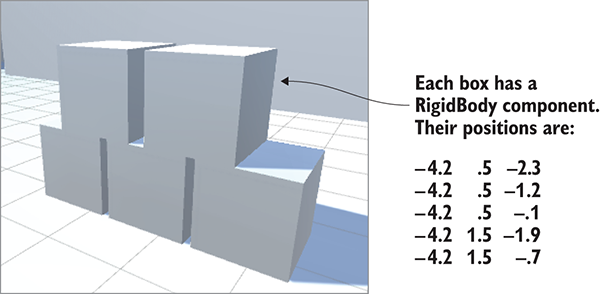
Figure 9.3 Stack of five boxes to collide with
The boxes are now ready to react to physics forces. To have the player apply a force to the boxes, make the small addition shown in the following listing to the RelativeMovement script (this is one of the scripts written in the previous chapter) that’s on the player.
Listing 9.5 Adding physics force to the RelativeMovement script
...
public float pushForce = 3.0f;
...
void OnControllerColliderHit(ControllerColliderHit hit) {
   _contact = hit;
   Rigidbody body = hit.collider.attachedRigidbody;
   if (body != null && !body.isKinematic) {
      body.velocity = hit.moveDirection * pushForce;
   }
}
...
There’s not much to explain about this code: Whenever the player collides with something, check if the collided object has a Rigidbody component. If so, apply a velocity to that Rigidbody.
Play the game and then run into the pile of boxes; you should see them scatter around realistically. And that’s all you had to do to activate physics simulation on a stack of boxes in the scene! Unity has physics simulation built in, so you didn’t have to write much code. That simulation can cause objects to move around in response to collisions, but another possible response is firing trigger events, so let’s use those trigger events to control the door.
9.2.2 Operating the door with a trigger object
Previously the door was operated by a keypress. This time it will open and close in response to the character colliding with another object in the scene. Create yet another door and place it in another wall gap (I duplicated the previous door and moved the new door to -2.5, 1.5, -17). Now create a new cube to use for the trigger object, and select the Is Trigger check box for the collider (this step was illustrated when making the fireball in chapter 3). In addition, set the trigger object to the Ignore Raycast layer; the top-right corner of the Inspector has a Layer menu. Finally, you should turn off shadows from this object (remember, this setting is under Mesh Renderer when you select the object).
Position and scale the trigger object so that it both encompasses the door and surrounds an area around the door; I used Position -2.5, 1.5, -17 (same as the door) and Scale 7.5, 3, 6. Additionally, you may want to assign a semi-transparent material to the object so that you can visually distinguish trigger volumes from solid objects. Create a new material using the Assets menu, and select the new material in the Project view. Looking at the Inspector, the top setting is Rendering Mode (currently set to the default value of Opaque); select Transparent in this menu.
Now click its color swatch to bring up the Color Picker window. Pick green in the main part of the window, and lower the alpha using the bottom slider. Drag this material from Project onto the object; figure 9.4 shows the trigger with this material.
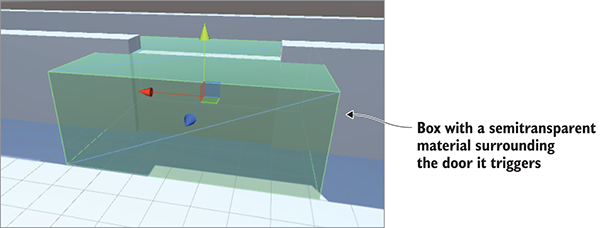
Figure 9.4 Trigger volume surrounding the door it will trigger
Play the game now and you can freely move through the trigger volume; Unity still registers collisions with the object, but those collisions don’t affect the player’s movement anymore. To react to the collisions, you need to write code. Specifically, you want this trigger to control the door. Create a new script called DeviceTrigger.
Listing 9.6 Code for a trigger that controls a device
using UnityEngine;
using System.Collections;

public class DeviceTrigger : MonoBehaviour {
   [SerializeField] private GameObject[] targets;
void OnTriggerEnter(Collider other) {
      foreach (GameObject target in targets) {
         target.SendMessage("Activate");
      }
   }
   void OnTriggerExit(Collider other) {
      foreach (GameObject target in targets) {
         target.SendMessage("Deactivate");
      }
   }
}
This listing defines an array of target objects for the trigger; even though it’ll only be a list of one most of the time, it’s possible to have multiple devices controlled by a single trigger. Loop through the array of targets to send a message to all the targets. This loop happens inside the OnTriggerEnter() and OnTriggerExit() methods. These functions are called once when another object first enters and exits the trigger (as opposed to being called over and over while the object is inside the trigger volume).
Notice that the messages being sent are different than before; now you need to define the Activate() and Deactivate() functions on the door. Add the code in the next listing to the door script.
Listing 9.7 Adding activate and deactivate functions to the DoorOpenDevice script
...
public void Activate() {
   if (!_open) {
      Vector3 pos = transform.position + dPos;
      transform.position = pos;
      _open = true;
   }
}
public void Deactivate() {
   if (_open) {
      Vector3 pos = transform.position - dPos;
      transform.position = pos;
      _open = false;
   }
}
...
The new Activate() and Deactivate() methods are much the same code as the Operate() method from earlier, except now there are separate functions to open and close the door instead of only one function that handles both cases.
With all the necessary code in place you can now use the trigger volume to open and close the door. Put the DeviceTrigger script on the trigger volume and then link the door to the targets property of that script; in the Inspector, first set the size of the array and then drag objects from the Hierarchy view over to slots in the targets array. Because you have only one door that you want to control with this trigger, type 1 in the array’s Size field and then drag that door into the target slot.
With all of this done, play the game and watch what happens to the door when the player walks toward and away from it. It’ll open and close automatically as the player enters and leaves the trigger volume.
That’s another great way to put interactivity into levels! But this trigger volume approach doesn’t only work with devices like doors; you can also use this approach to make collectible items.
9.2.3 Collecting items scattered around the level
Many games include items that can be picked up by the player. These items include equipment, health packs, and power-ups. The basic mechanism of colliding with items to pick them up is simple; most of the complicated stuff happens after items are picked up, but we’ll get to that a bit later.
Create a sphere object and place it hovering at about waist height in an open area of the scene. Make the object small, like Scale .5, .5, .5, but otherwise prepare it like you did with the large trigger volume. Select the Is Trigger setting in the collider, set the object to the Ignore Raycast layer, and then create a new material to give the object a distinct color. Because the object doesn’t cover much there’s no need to make it semi-transparent, so don’t turn down the alpha slider this time. Also, as mentioned in chapter 8, there are settings for removing the shadows cast from this object; whether or not to use the shadows is a judgment call, but for small pickup items like this I prefer to turn them off.
Now that the object in the scene is ready, create a new script to attach to that object. Call the script CollectibleItem.
Listing 9.8 Script that makes an item delete itself on contact with the player
using UnityEngine;
using System.Collections;

public class CollectibleItem : MonoBehaviour {
[SerializeField] private string itemName; void OnTriggerEnter(Collider other) {
Debug.Log("Item collected: " + itemName);
Destroy(this.gameObject);
}
}
This script is extremely short and simple. Give the item a name value so that there can be different items in the scene. OnTriggerEnter()destroys itself. There’s also a debug message being printed to the console; eventually it will be replaced with useful code.
Back in Unity, the variable you added to the code should become visible in the Inspector. Type in a name to identify this item; I went with energy for my first item. Then duplicate the item a few times and change the name of the copies; I also created ore, health, and key (these names must be exact because they’ll be used in code later on). Also create separate materials for each item in order to give them distinct colors: I did light blue energy, dark gray ore, pink health, and yellow key.
Now make prefabs of the items so that you can clone them throughout the level. In chapter 3, I explained that dragging an object from the Hierarchy view down to the Project view will turn that object into a prefab; do that for all four items.
Drag out instances of the prefabs and place the items in open areas of the level; even drag out multiple copies of the same item to test with. Play the game and run into items to collect them. That’s pretty neat, but at the moment nothing happens when you collect an item. You’re going to start keeping track of the items collected; to do that, you need to set up the inventory code structure.
9.3 Managing inventory data and game state
Now that you’ve programmed the features of collecting items, you need background data managers (similar to web coding patterns) for the game’s inventory. The code you’ll write will be similar to the MVC architectures behind many web applications. Their advantage is in decoupling data storage from the objects that are displayed onscreen, allowing for easier experimentation and iterative development. Even when the data and/or displays are complex, changes in one part of the application don’t affect other parts of the application.
That said, such structures vary a lot between different games, because not every game has the same data-management needs.
For example, a role-playing game will have high data-management needs, so you probably want to implement something like an MVC architecture. A puzzle game, though, has little data to manage, so building a complex decoupled structure of data managers would be overkill. Instead, the game state can be tracked in the scene-specific controller objects (indeed, that’s how we handled game state in previous chapters).
In this project, you need to manage the player’s inventory. Let’s set up the code structure needed for that.
9.3.1 Setting up player and inventory managers
The general idea here is to split up all the data management into separate, well-defined modules that each manage their own area of responsibility. You’re going to create separate modules to maintain player state in PlayerManager (things like the player’s health) and maintain the inventory list in InventoryManager. These data managers will behave like the Model in MVC; the Controller is an invisible object in most scenes (it wasn’t needed here, but recall SceneController in previous chapters), and the rest of the scene is analogous to the View.
There will be a higher-level manager-of-managers that keeps track of all the separate modules. Besides keeping a list of all the managers, this higher-level manager will control the lifecycle of the various managers, in particular initializing them at the start. All the other scripts in the game will be able to access these centralized modules by going through the main manager. Specifically, other code can use a number of static properties in the main manager in order to connect with the specific module desired.
In order for the main manager to reference other modules in a consistent way, these modules must all inherit properties from a common base. You’re going to do that with an interface; many programming languages (including C#) allow you to define a sort of blueprint that other classes need to follow. Both PlayerManager and InventoryManager will implement a common interface (called IGameManager in this case) and then the main Managers object can treat both PlayerManager and InventoryManager as type IGameManager. Figure 9.5 illustrates the setup I’m describing.
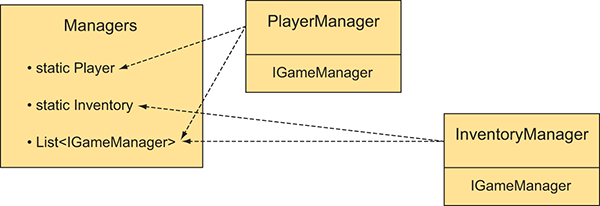
Figure 9.5 Diagram of the various modules and how they’re related
Incidentally, whereas all of the code architecture I’ve been talking about consists of invisible modules that exist in the background, Unity still requires scripts to be linked to objects in the scene in order to run that code. As you’ve done with the scene-specific controllers in previous projects, you’re going to create an empty GameObject to link these data managers to.
9.3.2 Programming the game managers
All right, so that explained all the concepts behind what you’ll do; it’s time to write the code. To start, create a new script called IGameManager.
Listing 9.9 Base interface that the data managers will implement
public interface IGameManager {
ManagerStatus status {get;} void Startup();
}
Hmm, there’s barely any code in this file. Note that it doesn’t even inherit from MonoBehaviour; an interface doesn’t do anything on its own and exists only to impose structure on other classes. This interface declares one property (a variable that has a getter function) and one method; both need to be implemented in any class that implements this interface. The status property tells the rest of the code whether this module has completed its initialization. The purpose of Startup() is to handle the initialization of the manager, so initialization tasks happen there and the function sets the manager’s status.
Notice that the property is of type ManagerStatus; that’s an enum you haven’t written yet, so create the ManagerStatus.cs script.
Listing 9.10 ManagerStatus: possible states for IGameManager status
public enum ManagerStatus {
   Shutdown,
   Initializing,
   Started
}
This is another file with barely any code in it. This time you’re listing the different possible states that managers can be in, thereby enforcing that the status property will always be one of these listed values.
Now that IGameManager is written, you can implement it in other scripts. Listings 9.11 and 9.12 contain code for InventoryManager and PlayerManager .
Listing 9.11 InventoryManager
using UnityEngine;
using System.Collections;
using System.Collections.Generic; public class InventoryManager : MonoBehaviour, IGameManager {
public ManagerStatus status {get; private set;} public void Startup() {
Debug.Log("Inventory manager starting...");
status = ManagerStatus.Started;
}
}
Listing 9.12 PlayerManager
using UnityEngine;
using System.Collections;
using System.Collections.Generic;
public class PlayerManager : MonoBehaviour, IGameManager {
public ManagerStatus status {get; private set;}
public int health {get; private set;}
public int maxHealth {get; private set;}
public void Startup() {
Debug.Log("Player manager starting...");
health = 50;
maxHealth = 100;
status = ManagerStatus.Started;
}
public void ChangeHealth(int value) {
health += value;
if (health > maxHealth) {
health = maxHealth;
} else if (health < 0) {
health = 0;
}
Debug.Log("Health: " + health + "/" + maxHealth);
}
}
For now, InventoryManager is a shell that will be filled in later, whereas PlayerManager has all the functionality needed for this project. These managers both inherit from the MonoBehaviour class and implement the IGameManager interface. That means the managers gain all the functionality of MonoBehaviour while also needing to implement the structure imposed by IGameManager. The structure in IGameManager was one property and one method, so the managers define those two things.
The status property was defined so that the status could be read from anywhere (the getter is public) but only set within this script (the setter is private). The method in the interface is Startup(), so both managers define that function. In both managers, initialization completes right away (InventoryManager doesn’t do anything yet, whereas PlayerManager sets a couple of values), so the status is set to Started. But data modules may have long-running tasks as part of their initialization (such as loading saved data), in which case Startup() will launch those tasks and set the manager’s status to Initializing. Change status to Started after those tasks complete.
Great! We’re finally ready to tie everything together with a main manager-of-managers. Create one more script and call it Managers.
Listing 9.13 The manager-of-managers!
using UnityEngine;
using System.Collections;
using System.Collections.Generic;
[RequireComponent(typeof(PlayerManager))]
[RequireComponent(typeof(InventoryManager))]
public class Managers : MonoBehaviour {
public static PlayerManager Player {get; private set;}
public static InventoryManager Inventory {get; private set;}
private List<IGameManager> _startSequence;
void Awake() {
Player = GetComponent<PlayerManager>();
Inventory = GetComponent<InventoryManager>();
_startSequence = new List<IGameManager>();
_startSequence.Add(Player);
_startSequence.Add(Inventory);
StartCoroutine(StartupManagers());
}
private IEnumerator StartupManagers() {
foreach (IGameManager manager in _startSequence) {
manager.Startup();
}
yield return null;
int numModules = _startSequence.Count;
int numReady = 0;
while (numReady < numModules) {
int lastReady = numReady;
numReady = 0;
foreach (IGameManager manager in _startSequence) {
if (manager.status == ManagerStatus.Started) {
numReady++;
}
}
if (numReady > lastReady)
Debug.Log("Progress: " + numReady + "/" + numModules);
yield return null;
}
Debug.Log("All managers started up");
}
}
The most important parts of this pattern are the static properties at the top. Those enable other scripts to use syntax like Managers.Player or Managers.Inventory to access the various modules. Those properties are initially empty, but they’re filled immediately when the code runs in the Awake() method.
The Awake() method also lists the startup sequence, and then launches the coroutine to start all the managers. Specifically, the function creates a List object and then uses List.Add() to add the managers.
Because all the managers implement IGameManager, this code can list them all as that type and can call the Startup() method defined in each. The startup sequence is run as a coroutine so that it will run asynchronously, with other parts of the game proceeding too (for example, a progress bar animated on a startup screen).
The startup function first loops through the entire list of managers and calls Startup() on each one. Then it enters a loop that keeps checking whether the managers have started up and won’t proceed until they all have. Once all the managers are started, the startup function finally alerts us to this fact before finally completing.
Now all of the code structure has been written. Go back to Unity and create a new empty GameObject; as usual with these sorts of empty code objects, position it at 0, 0, 0 and give the object a descriptive name like Game Managers. Attach the Managers, PlayerManager, and InventoryManager script components to this new object.
When you play the game now, there should be no visible change in the scene, but in the console, you should see a series of messages logging the progress of the startup sequence. Assuming the managers are starting up correctly, it’s time to start programming the inventory manager.
9.3.3 Storing inventory in a collection object: List vs. Dictionary
The list of items collected could also be stored as a List object. This listing adds a List of items to InventoryManager.
Listing 9.14 Adding items to InventoryManager
...
private List<string> _items;
   public void Startup() {
      Debug.Log("Inventory manager starting...");
_items = new List<string>(); status = ManagerStatus.Started;
}
private void DisplayItems() {
string itemDisplay = "Items: ";
foreach (string item in _items) {
itemDisplay += item + " ";
}
Debug.Log(itemDisplay);
}
public void AddItem(string name) {
_items.Add(name);
DisplayItems();
}
...
Two key additions were made to InventoryManager: you added a List object to store items in and you added a public method, AddItem(), that other code can call. This function adds the item to the list and then prints the list to the console. Now let’s make a slight adjustment in the CollectibleItem script to call the new AddItem() method.
Listing 9.15 Using the new InventoryManager in CollectibleItem
...
void OnTriggerEnter(Collider other) {
Managers.Inventory.AddItem(itemName);
Destroy(this.gameObject);
}
...
Now when you run around collecting items, you should see your inventory growing in the console messages. This is pretty cool, but it does expose one limitation of List data structures: as you collect multiples of the same type of item (such as collecting a second Health item), you’ll see both copies listed, instead of aggregating all items of the same type (refer to figure 9.6). Depending on your game, you may want the inventory to track each item separately, but in most games the inventory should aggregate multiple copies of the same item. It’s possible to accomplish this using List, but it’s done more naturally and efficiently using Dictionary instead.

Figure 9.6 Console message with multiples of the same item listed multiple times
Change the code in InventoryManager to use Dictionary instead of List. Replace everything from Listing 9.14 with the code from this listing.
Listing 9.16 Dictionary of items in InventoryManager
...
private Dictionary<string, int> _items; public void Startup() {
Debug.Log("Inventory manager starting...");
_items = new Dictionary<string, int>();
status = ManagerStatus.Started;
}
private void DisplayItems() {
string itemDisplay = "Items: ";
foreach (KeyValuePair<string, int> item in _items) {
itemDisplay += item.Key + "(" + item.Value + ") ";
}
Debug.Log(itemDisplay);
}
public void AddItem(string name) {
if (_items.ContainsKey(name)) {
_items[name] += 1;
} else {
_items[name] = 1;
}
DisplayItems();
}
...
Overall this code looks the same as before, but a few tricky differences exist. If you aren’t already familiar with Dictionary data structures, note that it was declared with two types. Whereas List was declared with only one type (the type of values that’ll be listed), a Dictionary declares both the type of key (that is, what the identifiers will be) and the type of value.
A bit more logic exists in the AddItem() method. Whereas before every item was appended to the List, now you need to check if the Dictionary already contains that item; that’s what the ContainsKey() method is for. If it’s a new entry, then you’ll start the count at 1, but if the entry already exists, then increment the stored value.
Play with the new code and you’ll see the inventory messages have an aggregated count of each item (refer to figure 9.7).

Figure 9.7 Console message with multiples of the same item aggregated
Whew, finally, collected items are managed in the player’s inventory! This probably seems like a lot of code to handle a relatively simple problem, and if this were the entire purpose then, yeah, it would be over-engineered. The point of this elaborate code architecture, though, is to keep all the data in separate flexible modules, a useful pattern once the game gets more complex. For example, now you can write UI displays and the separate parts of the code will be much easier to handle.
9.4 Inventory UI for using and equipping items
The collection of items in your inventory can be used in multiple ways within the game, but all of those uses first rely on some sort of inventory UI so that players can see their collected items. Then, once the inventory is being shown to the player, you can program interactivity into the UI by enabling players to click on their items. Again, you’ll program a couple of specific examples (equipping a key and consuming health packs), and then you should be able to adapt this code to work with other types of items.
9.4.1 Displaying inventory items in the UI
To show the items in a UI display, you first need to add a couple more methods to InventoryManager. Right now, the item list is private and only accessible within the manager; in order to display the list, that information must have public methods for accessing the data. Add two methods shown in the following listing to InventoryManager.
Listing 9.17 Adding data access methods to InventoryManager
...
public List<string> GetItemList() {
List<string> list = new List<string>(_items.Keys);
return list;
}
public int GetItemCount(string name) {
if (_items.ContainsKey(name)) {
return _items[name];
}
return 0;
}
...
The GetItemList() method returns a list of items in the inventory. You might be thinking, “Wait a minute, didn’t we just spend lots of effort to convert the inventory away from a List?” The difference now is that each type of item will appear only once in the list. If the inventory contains two health packs, for example, the word health will still appear only once in the list. That’s because the List was created from the keys in the Dictionary, not from every individual item.
The GetItemCount() method returns a count of how many of a given item are in the inventory. For example, call GetItemCount("health") to ask “How many health packs are in the inventory?” This way, the UI can display a number of each item along with displaying each item.
With these methods added to InventoryManager, you can create the UI display. Let’s display all the items in a horizontal row across the top of the screen. The items will be displayed using icons, so you need to import those images into the project. Unity handles assets in a special way if those assets are in a folder called Resources.
Figure 9.8 shows the four icon images, along with the directory structure showing where to put those images. Create a folder called Resources and then create a folder called Icons inside it.
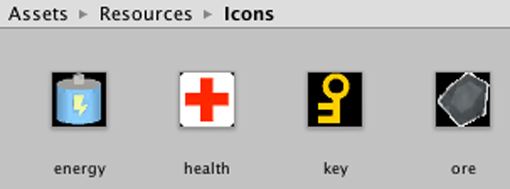
Figure 9.8 Image assets for equipment icons placed inside the Resources folder
The icons are all set up, so create a new empty GameObject named Controller and then assign it a new script called BasicUI.
Listing 9.18 BasicUI displays the inventory
using UnityEngine;
using System.Collections;
using System.Collections.Generic;
public class BasicUI : MonoBehaviour {
void OnGUI() {
int posX = 10;
int posY = 10;
int width = 100;
int height = 30;
int buffer = 10;
List<string> itemList = Managers.Inventory.GetItemList();
if (itemList.Count == 0) {
GUI.Box(new Rect(posX, posY, width, height), "No Items");
}
foreach (string item in itemList) {
int count = Managers.Inventory.GetItemCount(item);
Texture2D image = Resources.Load<Texture2D>("Icons/"+item);
GUI.Box(new Rect(posX, posY, width, height),
new GUIContent("(" + count + ")", image));
posX += width+buffer;
   }
}
}
This listing displays the collected items in a horizontal row (see figure 9.9) along with displaying the number collected. As mentioned in chapter 3, every MonoBehaviour automatically responds to an OnGUI() method. That function runs every frame right after the 3D scene is rendered.
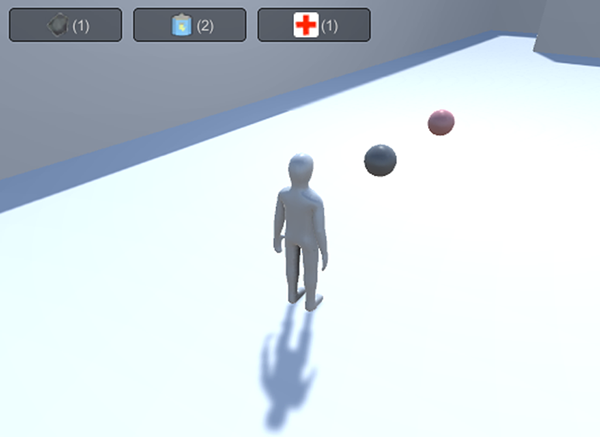
Figure 9.9 UI display of the inventory
Inside OnGUI(), first define a bunch of values for positioning UI elements. These values are incremented when you loop through all the items in order to position UI elements in a row. The specific UI element drawn is GUI.Box; those are non-interactive displays that show text and images inside boxes.
The Resources.Load() method is used to load assets from the Resources folder. This method is a handy way to load assets by name; notice that the name of the item is passed as a parameter. You have to specify a type to load; otherwise, the return value for that method is a generic object.
The UI shows us what items have been collected. Now you can use the items.
9.4.2 Equipping a key to use on locked doors
Let’s go over a couple of examples of using inventory items so that you can extrapolate out to any type of item you want. The first example involves equipping a key required to open the door.
At the moment, the DeviceTrigger script doesn’t pay attention to your items (because that script was written before the inventory code). This listing shows how to adjust that script.
Listing 9.19 Requiring a key in DeviceTrigger
...
public bool requireKey;
void OnTriggerEnter(Collider other) {
if (requireKey && Managers.Inventory.equippedItem != "key") {
return;
}
...
As you can see, all that’s needed is a new public variable in the script and a condition that looks for an equipped key. The requireKey Boolean appears as a check box in the Inspector so that you can require a key from some triggers but not others. The condition at the beginning of OnTriggerEnter() checks for an equipped key in InventoryManager; that requires that you add the code from the next listing to InventoryManager.
Listing 9.20 Equipping code for InventoryManager
...
public string equippedItem {get; private set;}
...
public bool EquipItem(string name) {
if (_items.ContainsKey(name) && equippedItem != name) {
equippedItem = name;
Debug.Log("Equipped " + name);
return true;
}
equippedItem = null;
Debug.Log("Unequipped");
return false;
}
...
At the top, add the equippedItem property that gets checked by other code. Then add the public EquipItem() method to allow other code to change which item is equipped. That method equips an item if it isn’t already equipped, or unequips if that item is already equipped.
Finally, in order for the player to equip an item, add that functionality to the UI. This listing will add a row of buttons for that purpose.
Listing 9.21 Equip functionality added to BasicUI
...
foreach (string item in itemList) {
int count = Managers.Inventory.GetItemCount(item);
GUI.Box(new Rect(posX, posY, width, height), item +
"(" + count + ")");
posX += width+buffer;
}
string equipped = Managers.Inventory.equippedItem;
if (equipped != null) {
posX = Screen.width - (width+buffer);
Texture2D image = Resources.Load("Icons/"+equipped) as Texture2D;
GUI.Box(new Rect(posX, posY, width, height),
new GUIContent("Equipped", image));
}
posX = 10;
posY += height+buffer;
foreach (string item in itemList) {
if (GUI.Button(new Rect(posX, posY, width, height),
"Equip "+item)) {
Managers.Inventory.EquipItem(item);
}
posX += width+buffer;
      }
   }
}
GUI.Box() is used again to display the equipped item. But that element is non-interactive, so the row of Equip buttons is drawn using GUI.Button() instead. That method creates a button that executes the code inside the if statement when clicked.
With all the necessary code in place, select the requireKey option in DeviceTrigger and then play the game. Try running into the trigger volume before equipping a key; nothing happens. Now collect a key and click the button to equip it; running into the trigger volume opens the door.
Just for fun, you could put a key at Position -11, 5, -14 to add a simple gameplay challenge to see if you can figure out how to reach the key. Whether or not you try that, let’s move on to using health packs.
9.4.3 Restoring the player’s health by consuming health packs
Using items to restore the player’s health is another generally useful example. That requires two code changes: a new method in InventoryManager and a new button in the UI (see listings 9.22 and 9.23, respectively).
Listing 9.22 New method in InventoryManager
...
public bool ConsumeItem(string name) {
if (_items.ContainsKey(name)) {
_items[name]--;
if (_items[name] == 0) {
_items.Remove(name);
}
} else {
Debug.Log("cannot consume " + name);
return false;
}
DisplayItems();
return true;
}
...
Listing 9.23 Adding a health item to BasicUI
...
      foreach (string item in itemList) {
         if (GUI.Button(new Rect(posX, posY, width, height),
                  "Equip "+item)) {
Managers.Inventory.EquipItem(item);
}
if (item == "health") {
            if (GUI.Button(new Rect(posX, posY + height+buffer, width,
                        height), "Use Health")) {
               Managers.Inventory.ConsumeItem("health");
               Managers.Player.ChangeHealth(25);
            }
         }
         posX += width+buffer;
      }
   }
}
The new ConsumeItem() method is pretty much the reverse of AddItem(); it checks for an item in the inventory and decrements if the item is found. It has responses to a couple of tricky cases, such as if the item count decrements to 0. The UI code calls this new inventory method, and it calls the ChangeHealth() method that PlayerManager has had from the beginning.
If you collect some health items and then use them, you’ll see health messages appear in the console. And there you go—multiple examples of how to use inventory items!
Summary
- Both keypresses and collision triggers can be used to operate devices.
- Objects with physics enabled can respond to collision forces or trigger volumes.
- Complex game state is managed via special objects that can be accessed globally.
- Collections of objects can be organized in
ListorDictionarydata structures. - Tracking the equip state of items can be used to affect other parts of the game.