Table of Contents for
Unity in Action, Second Edition
 Unity in Action, Second Edition
Published by
Manning Publications, 2018
Unity in Action, Second Edition
Published by
Manning Publications, 2018
- Cover
- Unity in Action
- Praise for the First Edition
- Titlepage
- Copyright
- foreword
- preface
- acknowledgments
- about this book
- about the author
- about the cover illustration
- Part 1: First steps
- Chapter 1: Getting to know Unity
- Chapter 2: Building a demo that puts you in 3D space
- Chapter 3: Adding enemies and projectiles to the 3D game
- Chapter 4: Developing graphics for your game
- Part 2: Getting comfortable
- Chapter 5: Building a Memory game using Unity’s 2D functionality
- Chapter 6: Creating a basic 2D platformer
- Chapter 7: Putting a GUI onto a game
- Chapter 8: Creating a third-person 3D game: player movement and animation
- Chapter 9: Adding interactive devices and items within the game
- Part 3: Strong finish
- Chapter 10: Connecting your game to the internet
- Chapter 11: Playing audio: sound effects and music
- Chapter 12: Putting the parts together into a complete game
- Chapter 13: Deploying your game to players’ devices
- afterword
- Appendix A: Scene navigation and keyboard shortcuts
- Appendix B: External tools used alongside Unity
- Appendix C: Modeling a bench in Blender
- Appendix D: Online learning resources
- Index
6
Creating a basic 2D platformer
- Moving sprites around continuously
- Playing sprite-sheet animation
- 2D physics (collision, gravity)
- Camera control for side-scrolling games
Let’s create a new game and continue learning about Unity’s 2D functionality. Chapter 5 covered the fundamental concepts, so this chapter will build on those to create a more elaborate game. Specifically, you are going to build the core functionality of a 2D platform game. Also called a platformer, it’s a common type of 2D action game, best known for classics like Super Mario Brothers: a character viewed from the side runs and jumps on platforms, and the view scrolls around to follow. Figure 6.1 shows what the end result will be.
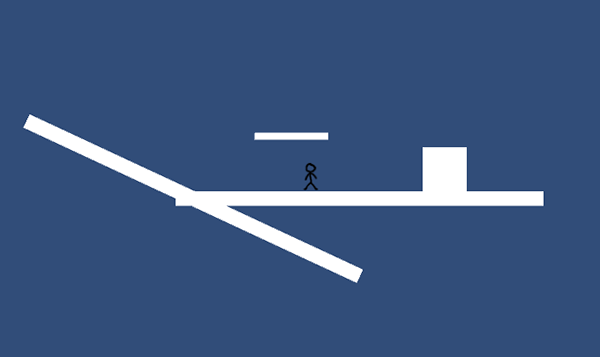
Figure 6.1 The final product of this chapter
This project will teach concepts like moving the player left and right, playing the sprite’s animation, and adding the ability to jump. We’ll also go over several special features common in platform games, like one-way floors and moving platforms. Going from this shell to a full game mostly means repeating those concepts over and over.
To get started, create a new project in 2D mode like in the last chapter: select New on Unity’s opening window or New Project under the File menu, and select 2D in the window that appears. In the new project, create two folders, called Sprites and Scripts, to organize the various assets into. You could adjust the camera like in the last chapter, but for now just reduce Size to 4; this project doesn’t require a perfect camera setup, although you’ll need to adjust the size for a polished game that’s ready for release.
Now save the empty scene (and of course hit Save periodically while you work) to create the Scene asset in this project. Everything’s empty at the moment, so the first step will be bringing in art assets.
6.1 Setting up the graphics
Before you can program the functionality of a 2D platform game, you need to import some images into the project (remember, images in a 2D game are referred to as sprites instead of textures) and then place those sprites into the scene. This game will be the shell of a 2D platform game, with a player-controlled character running around a basic and mostly empty scene, so all you need are a couple of sprites for the platforms and for the player. Let’s go over each separately, because although the images in this example are simple, there are some nonobvious considerations involved.
6.1.1 Placing the walls and floor
Simply put, you need a single blank white image to use here. There is an image called blank.png included in the sample project for this chapter; download the sample and copy blank.png from there. Grab the PNG file from there, drag it into the Sprites folder of your new project, and make sure in the Inspector that Import Settings say it’s a Sprite rather than a Texture (it should be automatic for a 2D project, but it’s worth double-checking).
What you’re doing now is essentially the same as the whiteboxing from chapter 4, but in 2D instead of 3D. Whiteboxing in 2D is done with sprites rather than meshes, but maintains the same activity of blocking out blank floors and walls for the player to move around.
To place the floor object, drag the blank sprite into the scene as shown in figure 6.2 (around position .15 -1.27 0), scale 50, 2, 1, and change its name to Floor. Then drag in another blank sprite, scale 6, 6, 1, place it on the floor off to the right (around 2 -.63 0), and name it Block.
Simple enough; now the floor and block are done. The other object you need is a character for the player.
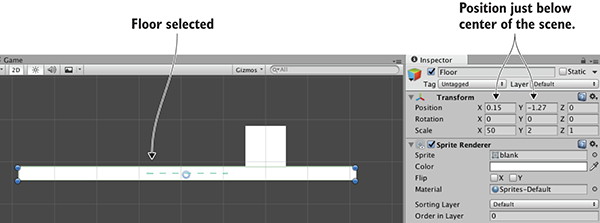
Figure 6.2 Floor platform placement
6.1.2 Importing sprite sheets
The only other art asset you need is the player’s sprite, so also copy stickman.png from the sample project. But unlike the blank image, this time it’s a series of separate sprites assembled into one image. As shown in figure 6.3, the stickman image is the frames of two animations: standing idle and a walk cycle. We’re not going into detail on how to animate, but suffice to say that idle and cycle are both common terms used by game developers. Idle refers to subtle movement while doing nothing, and cycle is an animation that loops continuously.
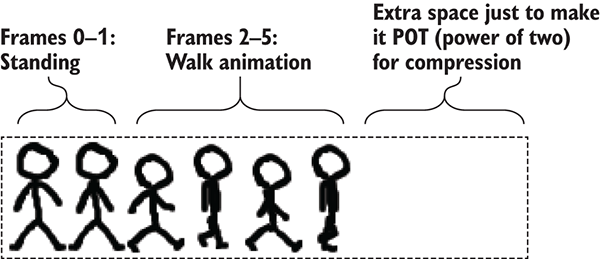
Figure 6.3 Stickman sprite sheet—6 frames in a row
As explained in the previous chapter, an image file may be a bunch of sprite images packed together, rather than just a single sprite. Images like this are called sprite sheets when the multiple sprite images are frames of animation. In Unity, the sprite sheet will still appear in the Project view as a single asset, but if you click the arrow on the asset, it’ll expand and show all the individual sprite images; figure 6.4 shows how that looks.
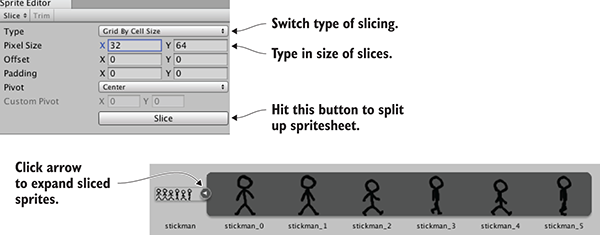
Figure 6.4 Slicing a sprite sheet into separate frames
Drag stickman.png into the Sprites folder to import the image, but this time change a lot of Import Settings in the Inspector. Select the sprite asset, set Sprite Mode to Multiple, then click Sprite Editor to open that window. Click Slice at the top-left of the window, set Type to Grid By Cell Size (shown in figure 6.4), use size 32, 64 (this is the size of each frame in the sprite sheet), and click Slice to see the frames split up. Now close the Sprite Editor window and click Apply to keep the changes.
The sprite asset is now split up, so click the arrow to expand the frames; drag one (probably the first) stickman sprite into the scene, place it standing on the middle of the floor, and name it Player. There, the player object is in the scene!
6.2 Moving the player left and right
Now that the graphics are set up, let’s start programming the player’s movement. First off, the player entity in the scene needs a couple of additional components for us to control. As mentioned briefly in previous chapters, the physics simulation in Unity acts on objects with the special Rigidbody component, and you want physics (collisions and gravity in particular) to act on the character. Meanwhile, the character also needs a Collider component to define its boundaries for collision detection. The difference between these components is subtle but important: the Collider defines the shape for physics to act on, and the Rigidbody tells the physics simulation what objects to act on.
One other subtlety to be aware of is that Unity has a separate physics system for 2D games instead of 3D physics. Thus, in this chapter you’ll be using components from the Physics 2D section instead of the regular Physics section of the list.
Select Player in the scene and then click Add Component in the Inspector; as shown in figure 6.5, choose Physics 2D > Rigidbody 2D in the menu. Now click Add Component again to add Physics 2D > Box Collider 2D. The Rigidbody needs a small amount of fine-tuning, so in the Inspector set Collision Detection as Continuous, Freeze Rotation Z (normally the physics simulation will attempt to rotate objects while moving them, but characters in games don’t behave like normal objects), and Gravity Scale 0 (you’ll reset this later, but for now you don’t want gravity).
The player entity is now ready for the script that controls movement.
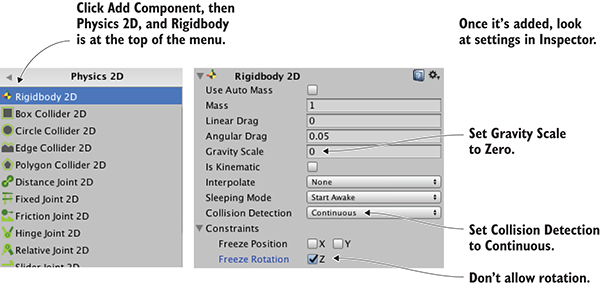
Figure 6.5 Add and adjust Rigidbody 2D component
6.2.1 Writing keyboard controls
To begin, you’ll make the player move left and right; vertical movement is important also in a platformer, but you’ll deal with that later. Create a C# script called PlatformerPlayer in the Scripts folder, then drag that onto the Player object in the scene.
Open the script and write the code from this listing.
Listing 6.1 PlatformerPlayer script to move with arrow keys
using UnityEngine;
using System.Collections;

public class PlatformerPlayer : MonoBehaviour {
  public float speed = 250.0f;

  private Rigidbody2D _body;

  void Start() {
    _body = GetComponent<Rigidbody2D>();
  }

  void Update() {
    float deltaX = Input.GetAxis("Horizontal") * speed * Time.deltaTime;
    Vector2 movement = new Vector2(deltaX, _body.velocity.y);
    _body.velocity = movement;
  }
}
After writing the code, hit Play and you can move the player using the arrow keys. The code is fairly similar to movement code in previous chapters, with the main difference being that it acts on Rigidbody2D instead of a Character Controller. Character Controller is for 3D, so for a 2D game you use a Rigidbody component. Note that the movement is applied to Rigidbody’s velocity, rather than something like position.
This is already most of the way there for horizontal movement! You only need to address collision detection.
6.2.2 Colliding with the walls
As you’ve probably noticed, the player walks through the block right now. There are no colliders on the floor or block, so the player can move through them. To fix this, add Box Collider 2D to Floor and Block: select each object in the scene, click Add Component in the Inspector, and choose Physics 2D > Box Collider 2D.
And that’s all you needed to do! Hit Play now, and the player won’t be able to move through the block. As with moving the player in chapter 2, if you had adjusted the player’s position directly then collision detection wouldn’t work, but Unity’s built-in collision detection can work if you apply the movement to the player’s physics components. In other words, moving Transform.position would have ignored collision detection, so instead you manipulated Rigidbody2D.velocity in the movement script.
Adding colliders to more complex art could be slightly trickier, but frankly not much harder in that case. Even if the art is not exactly a rectangle, you may still want to use Box Colliders and roughly surround the shape of obstacles in the scene. Alternatively, there are a number of other collider shapes to try, including arbitrary custom Polygon shapes. Figure 6.6 illustrates how to work with Polygon colliders for oddly shaped objects.
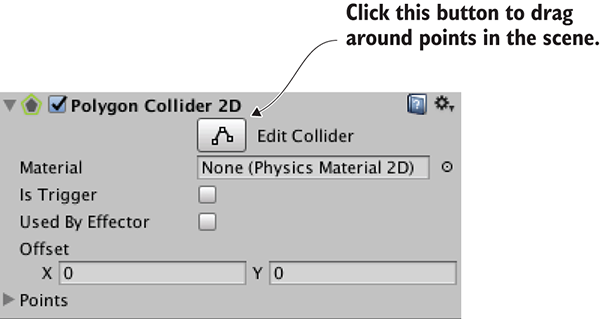
Figure 6.6 Edit the shape of the Polygon collider with the Edit Collider button.
Anyway, collision detection is now working, so the next step is making the player animate along with its movement.
6.3 Playing the sprite’s animation
When stickman.png was imported, it was split into multiple frames for animating. Now let’s play that animation, so that the player isn’t sliding around but appears to be walking.
6.3.1 Explaining the Mecanim animation system
As was mentioned briefly in chapter 4, the animation system in Unity is called Mecanim. It’s designed so that you can visually set up a complex network of animations for a character, and then control those animations with a minimum of code. The system is most useful for 3D characters (thus, we’ll cover it in more detail in future chapters), but is still useful for 2D characters too.
The heart of the animation system is composed of two different kinds of assets: animation clips and animator controllers (notice animation versus animator). Clips are the individual animation loops to play, whereas the controller is the network controlling when to play animations. This network is a state machine diagram, and the states in the diagram are different animations that could be playing. The controller shifts between states in reaction to conditions it is watching, and plays a different animation in each state.
Unity will create both kinds of assets automatically when you drag a 2D animation into the scene. That is, when you drag the frames of an animation into the scene, Unity will automatically create an animation clip and an animator controller using those frames. As depicted in figure 6.7, expand all the frames of the sprite asset, select frames 0-1, drag them into scene, and type the name stickman_idle in the confirmation window.
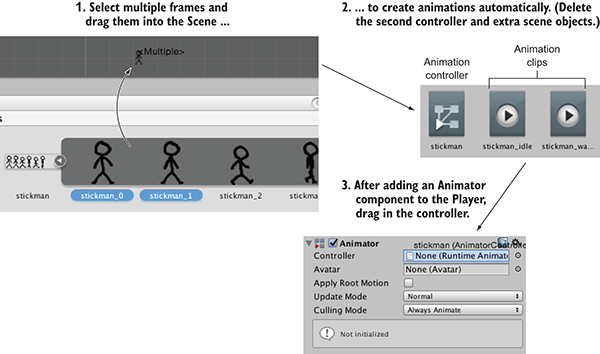
Figure 6.7 Steps to go from sprite sheet frames to Animator on player
In the Asset view, that created a clip named stickman_idle and a controller named stickman_0; rename the controller stickman with no suffix. Great, you created the character’s idle animation! It also created an object called stickman_0 in the scene, but you don’t need that so delete it.
Now repeat the process for the walk animation. Select frames 2-5, drag them into scene, and name the animation stickman_walk. This time, delete both stickman_2 in the scene and the controller in Assets; only one animator controller is needed to control both animation clips, so keep the first one and delete stickman_2, the newly created one.
To apply the controller to your player character, select Player in the scene and add component Miscellaneous > Animator. As shown in figure 6.7, drag the stickman controller into the controller slot in the Inspector. With the Player still selected, open Window > Animator (shown in figure 6.8).
Animations in the Animator window are displayed as blocks, referred to as states, and the controller switches between states when running. This particular controller already has the idle state in it, but you need to add a walking state; drag the stickman_walk animation clip from Assets into the Animator window.
By default, the idle animation will play too fast, so decrease idle speed to .2; select the idle animation state, and in the right-hand panel you’ll see a speed setting. With that change, the animations are all set up for the next step.
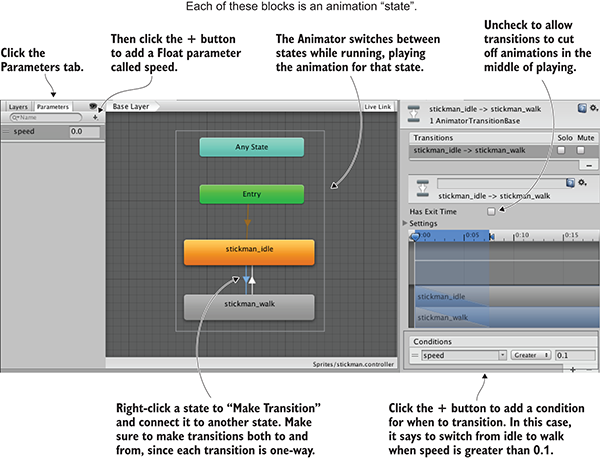
Figure 6.8 Animator window, showing animation states and transitions
6.3.2 Triggering animations from code
Now that you’ve set up animation states in the Animator controller, you can switch between those states to play the different animations. As mentioned in the last section, a state machine switches states in reaction to conditions it is watching. In Unity’s animation controllers, those conditions are referred to as parameters, so let’s add one. Figure 6.8 pointed out the relevant controls: Select the Parameters tab and click the + button for a menu of different parameter types. Add a float parameter called speed.
Next, you need to switch between animation states based on that parameter. Right-click idle and select Make Transition; that’ll start dragging out an arrow from the idle state. Click on walk to connect to that state, and because transitions are unidirectional, also right-click walk to transition back.
Now select the transition from idle (you can click on the arrows themselves), uncheck Has Exit Time, and click the + at the bottom to add a condition (again, shown in figure 6.8). Make the condition speed Greater than .2 so the states will transition in that condition. Now do it again for the walk-to-idle transition: Select the transition from walk, uncheck Has Exit Time, add a condition, make the condition speed Less than .2.
Finally, the movement script can manipulate the animator controller, as shown in this listing.
Listing 6.2 Trigger animations along with moving
...
private Animator _anim;
...
void Start() {
  _body = GetComponent<Rigidbody2D>();
  _anim = GetComponent<Animator>();
}

void Update() {
  ...
  _anim.SetFloat("speed", Mathf.Abs(deltaX));
if (!Mathf.Approximately(deltaX, 0)) {
transform.localScale = new Vector3(Mathf.Sign(deltaX), 1, 1);
  }
}
...
Wow, that was barely any code for controlling the animations! Most of the work is handled by Mecanim, and only a small amount of code is needed to operate it. Play the game and move around to watch the player sprite animate. This game is really coming along, so on to the next step!
6.4 Adding the ability to jump
The player can move back and forth but isn’t yet moving vertically. Vertical movement (both falling off ledges and jumping to higher platforms) is an important part of platform games, so let’s implement that next.
6.4.1 Falling from gravity
Somewhat counter-intuitively, before you can make the player jump, it needs gravity to jump against. As you may recall, earlier you set Gravity Scale to 0 on the player’s Rigidbody. That was so the player wouldn’t fall due to gravity. Well, turn that back to 1 now: select the Player object in the scene, find Rigidbody in the Inspector, and then type 1 in Gravity Scale.
Gravity is now affecting the player, but (assuming you had added a Box Collider to the Floor object) the floor is holding them up. Walk off the sides of the floor to fall into oblivion. By default, gravity affects the player somewhat weakly, so you’ll want to increase the magnitude of its effect. There is a global gravity setting for the physics simulation, and you can adjust that in the Edit menu. Specifically, go to Edit > Project Settings > Physics 2D. As shown in figure 6.9, at the top of the various controls and settings you should see Gravity Y; change that to -40.
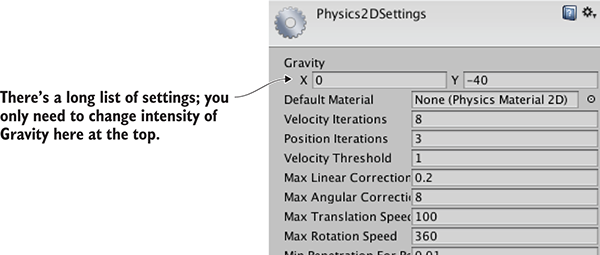
Figure 6.9 Gravity intensity in Physics settings
There’s one subtle issue you may have noticed: The falling player sticks to the side of the floor. To see this problem, walk off the edge of the platform and immediately press the other direction to move back toward the platform. Ugh, not good! Fortunately, Unity makes that easy to fix. Just add Physics 2D > Platform Effector 2D components to Block and Floor. This effector makes objects in the scene behave more like platforms in a platform game. Figure 6.10 points out two settings to adjust: Set Used By Effector on the Collider, and turn off Use One Way on the Effector (we’ll use this latter setting for other platforms, but not now).
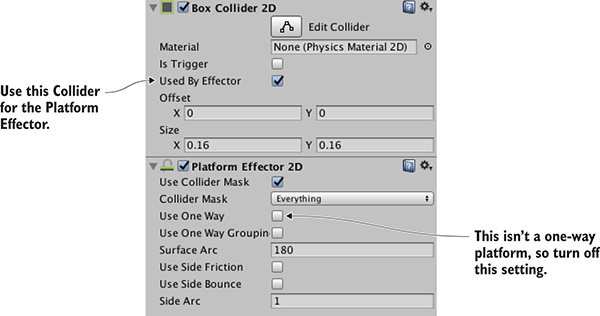
Figure 6.10 Collider and Effector settings in the Inspector
That takes care of the downward part of vertical movement, but you still need to take care of upward.
6.4.2 Applying an upward impulse
The next action you need is jumping. That is an upward jolt applied when the player hits the Jump button. Although your code directly changed the velocity for horizontal movement, you’re going to leave vertical velocity alone so gravity can do its work. Instead, objects can be influenced by other forces besides gravity, so you’ll add an upward force. Add this code to the movement script.
Listing 6.3 Jump when pressing the spacebar
...
public float jumpForce = 12.0f;
...
_body.velocity = movement;
if (Input.GetKeyDown(KeyCode.Space)) {
  _body.AddForce(Vector2.up * jumpForce, ForceMode2D.Impulse);
}
...
The important line is the AddForce() command. The code adds an upward force to the Rigidbody, and does so in impulse mode; an impulse is a sudden jolt, as opposed to a continuously applied force. This code, then, applies a sudden upward jolt when the spacebar is pressed. Meanwhile, gravity continues to affect the jumping player, resulting in a nice arc when the player jumps.
You may have noticed one issue, however, so let’s address that.
6.4.3 Detecting the ground
The jump control has one subtle problem: the player can jump in midair! If the player is already in midair (either because they jumped, or because they are falling), hitting the spacebar applies an upward force, but it shouldn’t. Instead, the jump control should only work when the player is on the ground. You therefore need to detect when the player is on the ground.
Listing 6.4 Check if the player is on the ground
...
private BoxCollider2D _box;
...
_box = GetComponent<BoxCollider2D>();
...
_body.velocity = movement;

Vector3 max = _box.bounds.max;
Vector3 min = _box.bounds.min;
Vector2 corner1 = new Vector2(max.x, min.y - .1f);
Vector2 corner2 = new Vector2(min.x, min.y - .2f);
Collider2D hit = Physics2D.OverlapArea(corner1, corner2);

bool grounded = false;
if (hit != null) {
  grounded = true;
}
if (grounded && Input.GetKeyDown(KeyCode.Space)) {
...
With this code in place, the player can no longer jump in midair. This addition to the script checks for colliders below the player, and takes that into account in the conditional statement for jumping. Specifically, the code first gets the bounds of the player’s collision box, and then looks for overlapping colliders in an area of the same width just below the player. The result of that check is stored in the grounded variable and used in the conditional.
6.5 Additional features for a platform game
At this point, the most crucial aspects of the player’s movement, walking and jumping, are implemented. Let’s round out this platformer demo by adding new functionality to the environment around the player.
6.5.1 Unusual floors: slopes and one-way platforms
Right now, this demo has normal, level floors to stand on. Many interesting kinds of platforms are used in platform games, though, so let’s implement a few other options. The first unusual floor you’ll create is a slope: duplicate the Floor object, set the duplicate’s rotation to 0, 0, -25, move it off to the left-hand side (around -3.47 -1.27 0), and name it Slope.
If you play now, the player already slides up and down correctly when moving, but it slowly slides down due to gravity when idle. To address this, let’s turn off gravity for the player when the player is both (a) standing on the ground, and (b) idle. Fortunately, you already detect the ground, so that can be reused in the new code. Indeed, only a single new line is needed.
Listing 6.5 Turn off gravity when standing on the ground
...
_body.gravityScale = grounded && deltaX == 0 ? 0 : 1;
if (grounded && Input.GetKeyDown(KeyCode.Space)) {
...
With that adjustment to the movement code, your player character correctly navigates slopes. Next, one-way platforms are another sort of unusual floor common in platformers. I’m talking about platforms that you can jump through but still stand on; the player bonks their head against the bottom of normal, fully solid platforms.
Because they’re fairly common in platform games, Unity provides functionality for one-way platforms. If you recall when you added the Platform Effector component earlier, there was a one-way setting that was turned off. Now turn that on! To create a new platform, duplicate the Floor object, scale the duplicate 10, 1, 1, place it above the floor around position -1.68 .11 0, and name the object Platform. Oh, and don’t forget to turn on Use One Way in the Platform Effector component.
The player jumps through the platform from below, but stands on it when coming down from above. There’s one possible issue to fix, shown in figure 6.11. Unity may display the platform sprite on top of the player (to see this more easily, test with Jump Force set to 7), but you probably want the player on top. You could adjust the player’s Z like you did last chapter, but this time you’ll adjust something else to show another option. Sprite renderers have a sorting order that can be used to control which sprites appear on top. Set Order in Layer to 1 in the Player’s Sprite Renderer component.
That takes care of both sloped floors and one-way platforms. There’s one more sort of unusual floor that I’m going to cover, but it is significantly more complex to implement.

Figure 6.11 Platform sprite overlapping the Player sprite
6.5.2 Implementing moving platforms
A third sort of unusual floor common in platform games is the moving platform. Implementing them requires both a new script to control the platform itself and changes in the player’s movement script to handle moving platforms. You’re going to write a script that takes two positions, start and finish, and makes the platform bounce between them. First, create a new C# script called MovingPlatform and write this code in it.
Listing 6.6 MovingPlatform script for floors that move back and forth
using UnityEngine;
using System.Collections;

public class MovingPlatform : MonoBehaviour {
  public Vector3 finishPos = Vector3.zero;
  public float speed = 0.5f;

  private Vector3 _startPos;
  private float _trackPercent = 0;
private int _direction = 1;
  void Start() {
    _startPos = transform.position;
  }

  void Update() {
    _trackPercent += _direction * speed * Time.deltaTime;
    float x = (finishPos.x - _startPos.x) * _trackPercent + _startPos.x;
    float y = (finishPos.y - _startPos.y) * _trackPercent + _startPos.y;
    transform.position = new Vector3(x, y, _startPos.z);

    if ((_direction == 1 && _trackPercent > .9f) ||
    (_direction == -1 && _trackPercent < .1f)) {
      _direction *= -1;
    }
  }
}
Drag this script onto the platform object. Great, the platform moves left and right when you play the scene! Now you need to adjust the player’s movement script in order to attach the player to the moving platform. Here are the changes to make.
Listing 6.7 Handling moving platforms in PlatformerPlayer.cs
...
  _body.AddForce(Vector2.up * jumpForce, ForceMode2D.Impulse);
}

MovingPlatform platform = null;
if (hit != null) {
  platform = hit.GetComponent<MovingPlatform>();
}
if (platform != null) {
  transform.parent = platform.transform;
} else {
  transform.parent = null;
}
_anim.SetFloat("speed", Mathf.Abs(deltaX));
...
Now the player moves with the platform after jumping on it. It mostly comes down to attaching the player as a child of the platform; remember, when you set a parent object, the child object moves with the parent. Listing 6.7 uses GetComponent() to check if the ground detected is a moving platform. If so, it sets that platform as the player’s parent; otherwise, the player is detached from any parent.
There’s a big problem, though: the player inherits the platform’s scale, resulting in weird scaling. That can be fixed by counter-scaling (scaling the player down to counteract the platform’s scale up).
Listing 6.8 Correcting scaling of the player
...
  _anim.SetFloat("speed", Mathf.Abs(deltaX));
  Vector3 pScale = Vector3.one;
  if (platform != null) {
    pScale = platform.transform.localScale;
  }
  if (deltaX != 0) {
    transform.localScale = new Vector3(
    Mathf.Sign(deltaX) / pScale.x, 1/pScale.y, 1);
  }
}
...
The math for counter-scaling is pretty straightforward: set the player to 1 divided by the platform’s scale. When the player’s scale is then multiplied by the platform’s scale, that leaves a scale of 1. The only tricky bit of this code is multiplying by the sign of the movement value; as you may recall from earlier, the player is flipped based on the movement direction.
And that’s moving platforms fully implemented. This platformer demo needs only one final touch ...
6.5.3 Camera control
Moving the camera is the final feature you’ll add to this 2D platformer. Create a script called FollowCam, drag it onto the camera, and then write the following in it.
Listing 6.9 FollowCam script to move with the player
using UnityEngine;
using System.Collections;

public class FollowCam : MonoBehaviour {
  public Transform target;

  void LateUpdate() {
    transform.position = new Vector3(
    target.position.x, target.position.y, transform.position.z);
  }
}
With that code written, drag the Player object to the script’s target slot in the Inspector. Play the scene and the camera moves around, keeping the player at the center of the screen. You can see the code applies the target object’s position to the camera, and you set the player as the target object. Note that the method name is LateUpdate instead of Update; that’s yet another name Unity recognizes. LateUpdate also executes every frame, but it happens after Update every frame.
It’s slightly jarring that the camera moves exactly with the player at all times. The camera in most platformers has all kinds of subtle but complicated behavior, highlighting different parts of the level as the player moves around. In fact, camera control for platform games is a surprisingly deep topic; try searching for “platform game camera” and see all the results. In this case, though, you’re just going to make the camera’s movement smoother and less jarring; this listing makes that adjustment.
Listing 6.10 Smoothing the camera movement
...
public float smoothTime = 0.2f;

private Vector3 _velocity = Vector3.zero;
...
void LateUpdate() {
  Vector3 targetPosition = new Vector3(
  target.position.x, target.position.y, transform.position.z);
  transform.position = Vector3.SmoothDamp(transform.position,
  targetPosition, ref _velocity, smoothTime);
}
...
The main change is calling a function called SmoothDamp; the other changes (like adding time and velocity variables) are all to support that function. That’s a function Unity provides for making values smoothly transition to a new value. In this case, the values are the positions of the camera and target.
The camera moves smoothly with the player now. You implemented the player’s movement, several different kinds of platforms, and now camera control. Looks like this chapter’s project is finished!
Summary
- Sprite sheets are a common way to handle 2D animation.
- Characters in games don’t behave like objects in the real world, so you must adjust their physics accordingly.
- Rigidbody objects can be controlled either by applying forces or by setting their velocity directly.
- Levels in 2D games are often constructed with tilemaps.
- A simple script can make the camera smoothly follow the player.