Table of Contents for
Electron in Action
 Electron in Action
Published by
Manning Publications, 2018
Electron in Action
Published by
Manning Publications, 2018
- Cover
- Electron in Action
- Copyright
- Electron in Action
- Brief Table of Contents
- Table of Contents
- Preface
- Acknowledgments
- About this book
- About the cover illustration
- Part 1. Getting started with Electron
- Chapter 1. Introducing Electron
- Chapter 2. Your first Electron application
- Part 2. Building cross-platform applications with Electron
- Chapter 3. Building a notes application
- Chapter 4. Using native file dialog boxes and facilitating interprocess communication
- Chapter 5. Working with multiple windows
- Chapter 6. Working with files
- Chapter 7. Building application and context menus
- Chapter 8. Further operating system integration and dynamically enabling menu items
- Chapter 9. Introducing the tray module
- Chapter 10. Building applications with the menubar library
- Chapter 11. Using transpilers and frameworks
- Chapter 12. Persisting user data and using native Node.js modules
- Chapter 13. Testing applications with Spectron
- Part 3. Deploying Electron applications
- Chapter 14. Building applications for deployment
- Chapter 15. Releasing and updating applications
- Chapter 16. Distributing your application through the Mac App Store
- Code from the end of chapter 6
- Index
- List of Figures
- List of Tables
- List of Listings
Chapter 16. Distributing your application through the Mac App Store
- Packing your application for the Mac App Store
- Creating certificates and signing your application
- Uploading your application to iTunes Connect
In the previous chapter, we built two of our projects from earlier in the book. This eliminated the need for our users to install Node.js and use the command line to start one of our applications. In this chapter, we discuss strategies for distributing an application built with Electron.
16.1. Submitting your application to the Mac App Store
Distributing your application through the Mac App Store has a few distinct advantages. First, you can easily charge money for your application if you’re interested in going down that road. Second, the Mac App Store handles application updates on your behalf. The disadvantages are that enrolling in Apple’s Developer Program isn’t free and—should you decided to charge for your application—Apple takes a 30% cut of the sale price of your application.
Submitting your application to the Mac App Store takes many steps beyond simply packaging your application—as we did in chapter 14. You must also create security certificates and sign your application to ensure that users are receiving an official version of it. Signing your application is good practice in general, and this chapter is worth reading, even if you do not intend to submit your application to the Mac App Store. The process of signing and uploading your application is primarily performed through native and web-based UIs provided by Apple. As a result, this chapter is highly visual.
Before you can submit an application to the Mac App Store, you must have Xcode installed on your Mac, and you need to sign up for the Apple Developer Program. Xcode, which is available on the Mac App Store, is a large application, so start that download first before enrolling in the developer program. To do this, visit https://developer.apple.com/programs/, and enroll in the program as either an individual or an organization.
16.1.1. Signing the application
Code signing is a technology that allows you to certify that your application is, in fact, created by you and not some imposter. When a user first installs your application, the operating system tracks the certificate you included. Only you can generate this certificate, which means if it changes, the new version of the application could be from a malicious attacker.
We need two certificates: one for the application itself, and one for the installer we upload to the Mac App Store—which we create later in this chapter. To create these certificates, open the Keychain Access application, shown in figure 16.1, located in the /Applications/Utilities directory. This application is included in macOS and should be available even if you haven’t installed Xcode yet.
As you might be able to guess from the name, Keychain Access does more than just generate certificates for signing applications. It is where macOS stores all of your saved passwords and certificates. It also stores all of the passwords for wireless networks that you’ve asked it to remember. If you ever need to look up a password, you can do so using Keychain Access.
With the application open, navigate to the Keychain Access application menu, then select Certificate Assistant, followed by Request a Certification From a Certificate Authority, as shown in figure 16.1. This action triggers a dialog box, shown in figure 16.2, where you can add additional information about the certificate to be generated.
Figure 16.1. Request a certificate using Keychain Access.
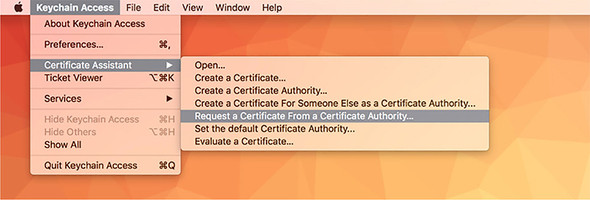
Figure 16.2. Enter information for your application signing certificate request.
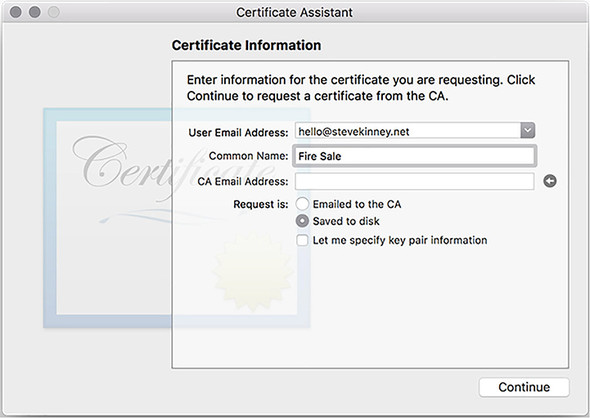
Make sure you select Saved to Disk when creating the certificate. After you click Continue, you are prompted to save a file with the name CertificateSigningRequest.certSigningRequest. Where you choose to save the file is up to you—it doesn’t make a difference as long as you can find it again later.
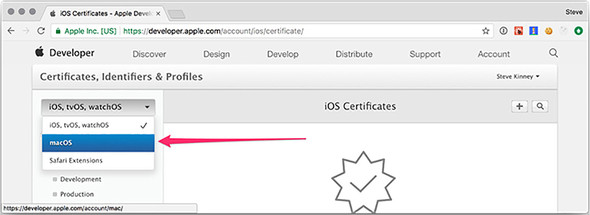
When you have a certificate, you need to let Apple know about it. Visit the Apple Developer Program Member Center (https://developer.apple.com/account), and select Certificates, IDs, and Profiles from the left-hand sidebar. By default, the page for managing iOS certificates opens. Select macOS as the target platform, as shown in figure 16.3.
Figure 16.3. Select macOS as the target platform.
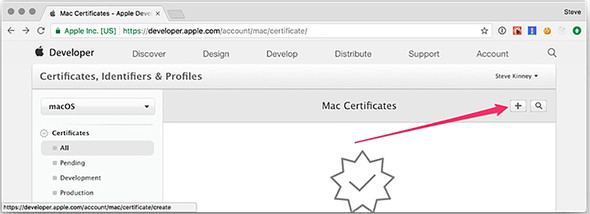
After you switched from iOS to macOS, you see either a list of the certificates that you’ve uploaded in the past or an empty state. Either way, because we’re uploading a new certificate, click the + button in the upper-right corner of the screen, as shown in figure 16.4.
Figure 16.4. Add the certificate request you generated earlier.
The certificate can be used for a variety of purposes. In addition to signing your application, certificates can be used to sign server-generated push messages, which you may have seen on mobile platforms to inform users that something has happened in an application that is not currently open.
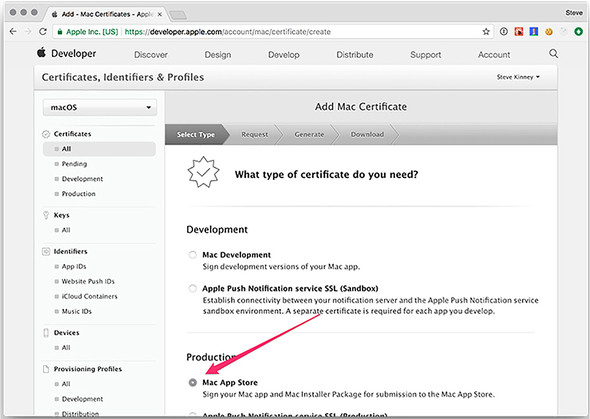
This is outside of the scope of this book and a topic for another day. As you may have guessed, we want to create a production-ready Mac App Store version of Fire Sale and need a Mac App Store certificate to do that. Scroll past the development options along the top, and select Mac App Store, as shown in figure 16.5.
Figure 16.5. Select Mac App Store as the type of certificate that you’re requesting.
Figures 16.6 through 16.8 show that I am creating a Mac App Distribution certificate. In practice however, you need to go through these steps twice—once with Mac App Distribution selected and once with Mac Installer Distribution selected. The process is exactly the same for both, and you receive two certificates at the end. The only difference is which radio button you choose at the very beginning of the process.
Figure 16.6. Generate certificates for the application and installer.
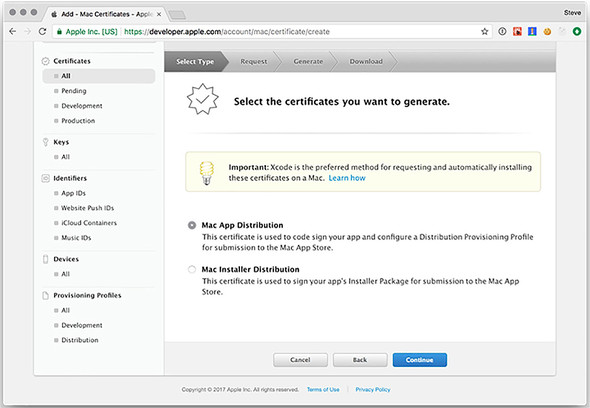
Figure 16.7. Upload the certificate signing request file you created earlier.
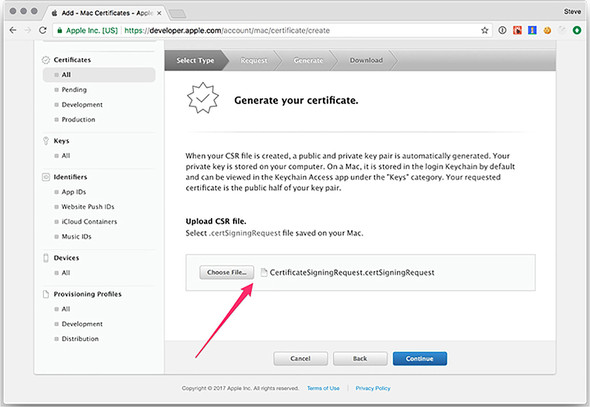
Earlier in the chapter, we created a file with the extension certSigningRequest. We use this file to request certificates from Apple, which are signed by the Apple Worldwide Developer Relations Certification Authority. When you sign an application, you use a key that can be generated only with a private key stored locally on your computer. It’s important that you are careful with this private key. It’s the only way to sign an application that matches the public key, and anyone with access to your private key can sign applications on your behalf.
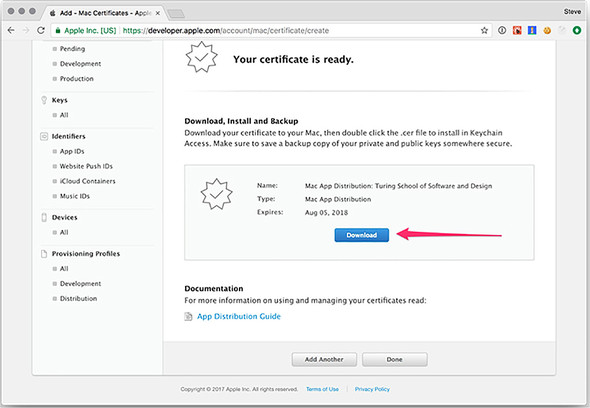
When prompted, upload the certificate-signing request that you generated in Keychain Access. Apple signs the certificate and prompts you to download it, as shown in figure 16.8. After downloading the certificate, you can double-click it to add to Keychain Access automatically.
Figure 16.8. Download your completed certificate.
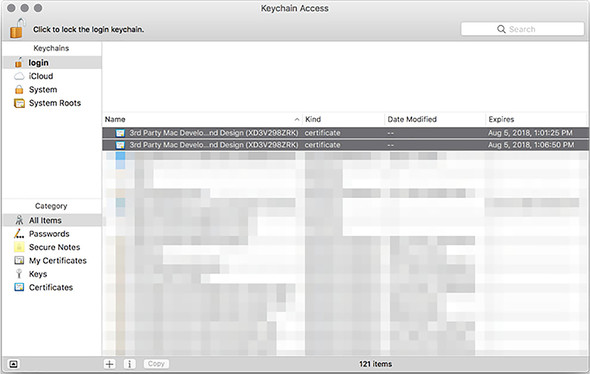
When you complete this process for both Mac App Distribution and Mac Installer Distribution certificates, you should see both certificates inside Keychain Access, as shown in figure 16.9. Congratulations—you’re now ready to sign your application and begin getting it ready for submission to the Mac App Store. In the next section, we begin the process of registering the application with Apple and providing the metadata required to be listed in the App Store.
Figure 16.9. The application and installer certificates listed in Keychain Access.
16.1.2. Registering your application with the Mac App Store
With your certificates in place, you must register the application itself with Apple before you can upload your application binary. Even if you have no intention of distributing an application through the Mac App Store, signing your application and registering it with Apple is a good practice. Unsigned applications trigger those intimidating gatekeeper errors that Apple displays when a user tries to open an unsigned application inside modern versions of macOS. In addition, depending on a user’s settings, they may not be allowed to open unsigned applications at all. Inside the Certificates, Identifiers, and Profiles section, select App ID from the sidebar on the left, as shown in Figure 16.10.
Figure 16.10. Register your App ID.
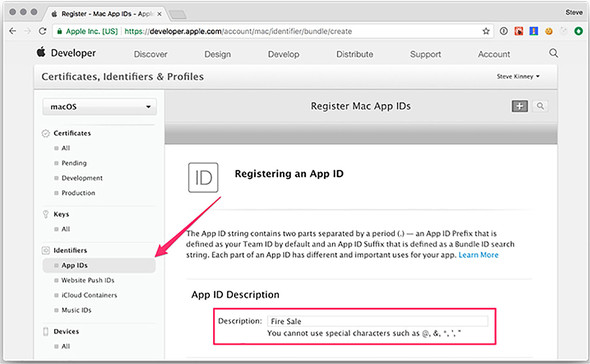
An App ID is a unique identifier for your application. Creating an App ID consists of three steps. The first is to give it an App ID description. This is a colloquial name for the application and is generally what users see as the title of your application when viewing it in the App Store.
The second is a list of services that your application requests access to, such as sending push notifications, displaying maps, or saving or retrieving files from iCloud. Fire Sale does not use any of these, so we’ll stick with the defaults. Third, you create an App ID Suffix, which is the truly unique identifier for your application. It’s a lot like a backward web domain. In this case, I used net.stevekinney.firesale as opposed to firesale.stevekinney.net, which is something you might expect to find on the web.
16.1.3. Adding the application to iTunes Connect
You’re not out of the woods yet. Your next step is to add the application to iTunes Connect (https://itunesconnect.apple.com/), which represents the application’s listing in the Mac App Store. From here, you can add a description of your application, screenshots, and more. A word of caution: I won’t cover every aspect of uploading screenshots and things along those lines, but I will tell you that Apple takes this seriously and will reject your application if you fail to include all of the necessary information—including a link to a valid webpage where users can find support for your application.
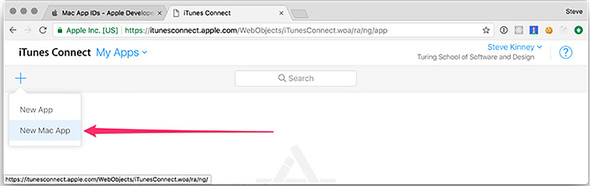
Once inside iTunes Connect, click the My Apps icon in the upper-left corner, shown in figure 16.11. In this section, you see either a list of your existing applications or an empty state if this is your first application. Click the + button in the upper-left side of the window, and select New Mac App, as shown in figure 16.12.
Figure 16.11. Select My Apps in iTunes Connect.
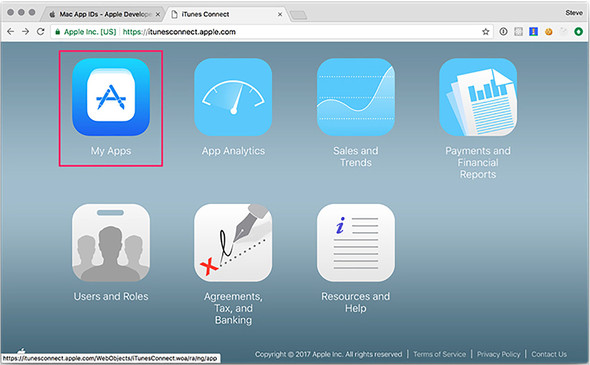
Figure 16.12. Add a new Mac application in iTunes Connect.
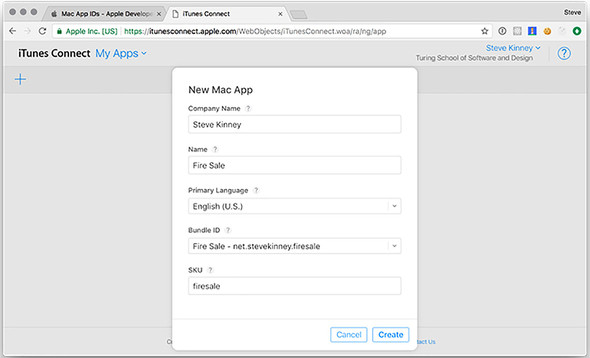
At this stage, as shown in figure 16.13, you are asked for some cursory information about your application: its name, primary language, the App ID description and suffix you created in the previous section, and more. The SKU is optional and is just used to identify application sales for the sake of accounting.
Figure 16.13. Provide details about the application in iTunes Connect.
16.1.4. Packaging your application for the Mac App Store
In chapter 14, we performed all of our configuration inline in the package.json file. To package our application for the Mac App Store, we need to sign it as well as provide some other metadata to aid in operating system integration. macOS applications use property list (.plist) files, which resemble XML, to store important metadata such as the name and what permissions the application is requesting from the operating system.
A simple application might be able to get away with a single property list file. But Electron applications aren’t exactly simple applications. If you recall from chapter 1, each process—both the main and renderer processes—are separated out. This mean that we’ll need to set permissions for our child processes, as well as the main application process. In addition, Electron bundles its own frameworks as well as libraries for media playback. These must be signed as well.
To accomplish this, we set up three property list files: info.plist stores the generic metadata for our application, parent.plist stores the sandbox permissions for the parent process, and child.plist stores the sandbox permissions for the child process. In this example, child processes extend the parent’s permissions. These eventually are installed using a build script. As a result, I’ve decided to place each of these in a folder called ./scripts/mas. My naming conventions are not important. If you’d like to store these files somewhere else, that’s fine. The Electron API Demos application stores the property lists in its assets folder. For the purposes of simplicity and clarity, I’ve chosen to keep all of the files in listings 16.1–16.3 in the same folder as the build script that we’ll create together shortly.
Listing 16.1. Setting up the application: ./scripts/mas/info.plist
<?xml version="1.0" encoding="UTF-8"?>
<!DOCTYPE plist PUBLIC "-//Apple//DTD PLIST 1.0//EN" "http://www.apple.com/DTDs/PropertyList-1.0.dtd">
<plist version="1.0">
  <dict>
    <key>CFBundleURLTypes</key>
    <array>
      <dict>
        <key>CFBundleURLSchemes</key>
        <array>
          <string>firesale</string>
        </array>
        <key>CFBundleURLName</key>
        <string>Fire Sale</string>         1
      </dict>
    </array>
    <key>ElectronTeamID</key>
    <string>XD3V298ZRK</string>            2
  </dict>
</plist>
- 1 This is the same as the productName field in your package.json.
- 2 Your Apple Team ID.
Listing 16.2. Setting parent permissions: ./scripts/mas/parent.plist
<?xml version="1.0" encoding="UTF-8"?>
<!DOCTYPE plist PUBLIC "-//Apple//DTD PLIST 1.0//EN" "http://www.apple.com/DTDs/PropertyList-1.0.dtd">
<plist version="1.0">
  <dict>
    <key>com.apple.security.app-sandbox</key>
    <true/>                                                         1
    <key>com.apple.security.application-groups</key>                2
    <string>XD3V298ZRK.net.stevekinney.firesale</string>            3
    <key>com.apple.security.files.user-selected.read-write</key>    4
    <true/>
  </dict>
</plist>
- 1 Mac App Store applications must use sandboxing.
- 2 Allows access to the sandboxed containers of other applications by your team
- 3 Identifies your team using the Team ID and bundle identifier
- 4 Asks for permission to read and write files using the Open and Save dialog boxes
All applications on the Mac App Store must enable sandboxing, which wraps each application into an isolated container and limits its ability to access the rest of the operating system. Apple does this in the name of security. That said, many applications can’t do their jobs if isolated to a sandbox. Apple understands this and allows applications to clearly state what entitlements they need. We know that Fire Sale uses Open and Save dialog boxes to read and write from the filesystem, so we clearly state that we need that access.
One exception to sandboxing is that applications are allowed to reach into the containers of other applications created by the same developer. We never created tight integrations between Fire Sale and Clipmaster 900 or Jetsetter, but we may down the line. Stating the application group lets macOS know that this application is part of a family—even if it’s a one-person family for now.
Listing 16.3. Extending permissions: ./scripts/mas/child.plist
<?xml version="1.0" encoding="UTF-8"?>
<!DOCTYPE plist PUBLIC "-//Apple//DTD PLIST 1.0//EN" "http://www.apple.com/DTDs/PropertyList-1.0.dtd">
<plist version="1.0">
  <dict>
    <key>com.apple.security.app-sandbox</key>
    <true/>
    <key>com.apple.security.inherit</key>          1
    <true/>
  </dict>
</plist>
- 1 Tells Apple that child processes will inherit the same permissions as the main process
With the three property lists in place, we use electron-packager to build the application. This approach is similar to the technique we used in chapter 14, with some important changes. First, we tell electron-packager that we’re targeting the mas (Mac App Store) platform as opposed to darwin for regular macOS applications. We also script the rather tedious process of code signing all of the processes, frameworks, and libraries used by our application. This script uses the Xcode codesign command-line interface tool. This script is inspired by the approach used by the Electron Core Team to build the Electron API Demos application (https://github.com/electron/electron-api-demos). Make sure you have Xcode installed before running the script in the following listing. You also need to make sure you use the names of the certificates you generated earlier in this chapter.
Listing 16.4. The build script
#!/bin/bash set -ex APP="Fire Sale" electron-packager . \ 1 "$APP" \ --asar \ --overwrite \ --platform=mas \ 2 --app-bundle-id=net.stevekinney.firesale \ --app-version="$npm_package_version" \ --build-version="1.0.0" \ --arch=x64 \ --icon=./icons/Icon.icns \ --out=build \ --extend-info=scripts/mas/info.plist 3 APP_PATH="./build/$APP-mas-x64/$APP.app" 4 RESULT_PATH="./build/$APP.pkg" 5 APP_KEY="3rd Party Mac Developer Application:Turing School of Software and Design (XD3V298ZRK)" 6 INSTALLER_KEY="3rd Party Mac Developer Installer:
- 1 This script runs similar to the build scripts used in package.json in chapter 14.
- 2 One minor change is that we’re setting the platform to mas for the Mac App Store.
- 3 Option takes a property list and merges it with the one included with Electron.
- 4 Location of the application after it has been built by electron-packager.
- 5 Destination for the installer after it has been prepared for the Mac App Store by Xcode.
- 6 Signed certificate for the application itself that we made earlier.
- 7 Signed certificate for the installer.
- 8 Path to Electron’s frameworks and dependencies, which also need to be signed.
- 9 Property list to use for child processes and dependencies.
- 10 Property list to use for main and parent processes.
- 11 Code-sign the parent application with the sandboxing entitlements included in parent.plist.
- 12 Uses Xcode to build the installer package.
16.1.5. Configuring application categories
We can include additional metadata in our property list that falls squarely under the category of “nice to have.” Apple includes an exhaustive list of all of the options in their official documentation (http://mng.bz/2TDO), so I won’t cover all of them here.
Listing 16.5. Adding applications to particular categories: ./scripts/info.plist
<key>NSHumanReadableCopyright</key>
<string>2017 Steve Kinney</string>
<key>LSApplicationCategoryType</key>
<string> public.app-category.developer-tools</string>
<key>LSApplicationSecondaryCategoryType</key>
<string public.app-category.productivity</string>
In the previous listing, we include metadata for the Mac App Store categories in which the application should be listed as well as some generic copyright information. You can find a full list of the available categories in Apple’s official documentation (http://mng.bz/65Eg).
16.1.6. Register the application to open a file type
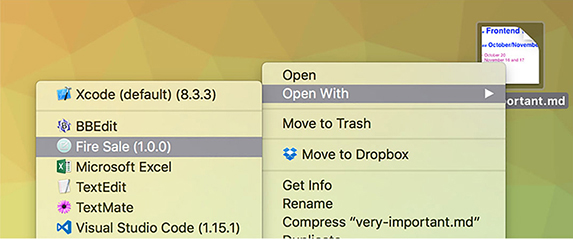
Fire Sale is an application that works with Markdown applications. In development, it was not listed as an application that could handle opening Markdown files. In addition, we could not drag a Markdown file onto the application icon in the dock. This limitation is because although we know that Fire Sale was built to work with Markdown files, macOS was not. To add support for a given file type—in this case, Markdown files—we add this code to ./scripts/mas/info.plist. The result is shown in figure 16.14.
Figure 16.14. Fire Sale is now registered with macOS as an application that can open Markdown files.
Listing 16.6. Setting Fire Sale to be available to open Markdown files: /script/info.plist
<key>CFBundleDocumentTypes</key>
<array>
<dict>
<key>CFBundleTypeExtensions</key>       1
<array>
<string>markdown</string>
<string>mdown</string>
<string>md</string>
</array>
<key>CFBundleTypeRole</key>             2
<string>Editor</string>
<key>LSHandlerRank</key>                3
<string>Alternate</string>
</dict>
</array>
- 1 Contains an array of strings of file extensions that the application should recognize
- 2 Tells macOS about the relationship between this application and the file type
- 3 Defines the priority in which this application should be listed for the respective file type
The CFBundleDocumentTypes contains an array of items that define the types of files that this application should be able to open. Fire Sale works only with Markdown files (and text files, technically), but an application like Atom, which works with a wide variety of file types, has a much longer list, which can be seen in its open source repository (http://mng.bz/zQ4B).
Each item in the CFBundleDocumentTypes dictionary contains a CFBundleType-Extensions array, which lists the file types that the application should support. In addition, the CFBundleTypeRole key defines the application’s relationship to the file type. Fire Sale edits Markdown files, so it makes sense that we’ve listed it as an editor. The available options are Editor, Viewer, Shell, and none.
Many applications can open a file type like Markdown. The LSHandlerRank attribute lets you decide what level of priority the operating system should provide for your application when the user double-clicks a file. Owner should be selected if the application creates a given file type. This is a good choice for a proprietary file type that can be opened only by a particular application. Default should be selected if the application is a good candidate for being the default application. Fire Sale is a great application, but it’s likely that the user would prefer that—in general—the user would like Atom or Visual Studio Code to open upon double-clicking. This is why I chose Alternate.
You can define a number of other keys as well. For example, you could define the CFBundleTypeIconFile if you want all Markdown files to have a special icon that associates them with Fire Sale. A full list of the available options can be found in Apple’s official documentation (http://mng.bz/4DTL).
16.2. Validating and uploading your application
Your application has been packaged and signed. Its entitlements have been defined. It is all ready to be uploaded to the Mac App Store. The next step, of course, is to upload the package to the store itself. You can do this using Xcode.
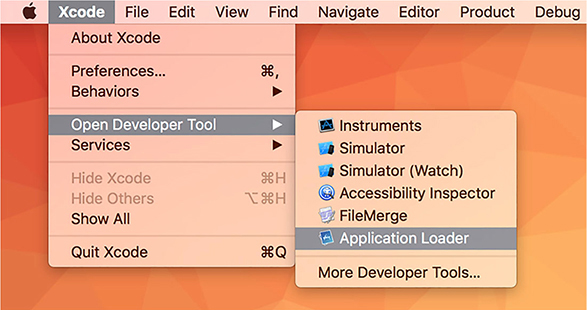
To get started, open Xcode and navigate to the Xcode application menu. Under Open Developer Tool, you find Application Loader, shown in figure 16.15. This is the helper application that uploads your Electron application.
Figure 16.15. Use the Application Loader to upload your Electron application to the Mac App Store.
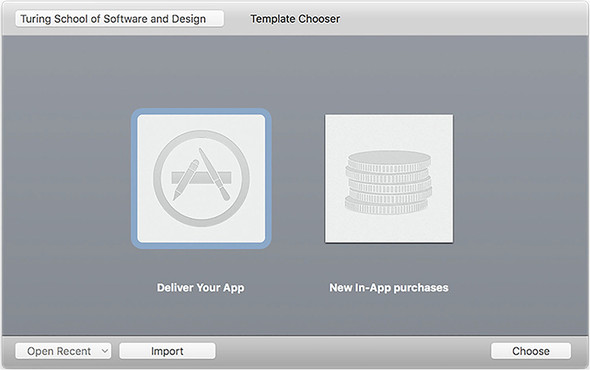
After Application Loader opens, click Deliver Your App. As shown in figure 16.16, you are prompted to select the package that you want to upload—in this case, Fire Sale.pkg, located in ./build.
Figure 16.16. In this case, we’re uploading a full application to the Mac App Store.
After you’ve chosen the package to upload, you can review its metadata, as shown in figure 16.17. If everything looks good, click Next to begin the upload process. It shouldn’t take very long, but this is based—of course—on your connection speed and the size of the application package.
Figure 16.17. Verify that the application’s metadata is correct.

16.3. Finishing touches
Apple wants to ensure the best possible experience for users. As a result, you must provide screenshots, descriptions, a link to a page where users can get help, and more. If you fail to do any of these, Apple will more than likely reject the application and ask you again to provide this information. I’m not going to go in depth in this book about adding screenshots, a home page, and documentation because it is both relatively straightforward as well as likely to change by the time the—possibly digital—ink dries on this page.
Summary
- All Mac App Store applications and their installers must be code signed to verify their authenticity.
- You can create certificate requests using Keychain Access, which is included in macOS.
- After you have a certificate request, you can upload it to Apple’s developer platform to receive signed certificates.
- Applications must be registered with Apple through their developer platform.
- An application’s Bundle ID is its unique identifier and is similar to a web domain but in reverse (e.g., net.stevekinney.firesale).
- Mac App Store applications must be sandboxed. Any entitlements needed must be defined in the property list.
- The entitlements must be defined for all child processes as well as the main application itself.
- Developers can define what types of a file an Electron application should be able to open by adding entries to its property list.
- Applications can be uploaded to iTunes Connect using the Application Loader included with Xcode.
- Apple requires screenshots, descriptions, and help pages on the web to be approved for the Mac App Store.