
![]()
For online information and ordering of this and other Manning books, please visit www.manning.com. The publisher offers discounts on this book when ordered in quantity. For more information, please contact
       Special Sales Department
       Manning Publications Co.
       20 Baldwin Road
       PO Box 761
       Shelter Island, NY 11964
       Email: orders@manning.com
©2019 by Manning Publications Co. All rights reserved.
No part of this publication may be reproduced, stored in a retrieval system, or transmitted, in any form or by means electronic, mechanical, photocopying, or otherwise, without prior written permission of the publisher.
Many of the designations used by manufacturers and sellers to distinguish their products are claimed as trademarks. Where those designations appear in the book, and Manning Publications was aware of a trademark claim, the designations have been printed in initial caps or all caps.
 Recognizing the importance of preserving what has been written, it is Manning’s policy to have the books we publish printed
on acid-free paper, and we exert our best efforts to that end. Recognizing also our responsibility to conserve the resources
of our planet, Manning books are printed on paper that is at least 15 percent recycled and processed without the use of elemental
chlorine.
Recognizing the importance of preserving what has been written, it is Manning’s policy to have the books we publish printed
on acid-free paper, and we exert our best efforts to that end. Recognizing also our responsibility to conserve the resources
of our planet, Manning books are printed on paper that is at least 15 percent recycled and processed without the use of elemental
chlorine.
 |
Manning Publications Co. 20 Baldwin Road PO Box 761 Shelter Island, NY 11964 |
Development editor: Helen Stergius
Technical development editor: Nickie Buckner
Review editor: Aleksandar Dragosavljević
Project editor: Lori Weidert
Copy editor: Pamela Hunt
Proofreader: Elizabeth Martin
Technical proofreader: Doug Warren
Typesetter: Dennis Dalinnik
Cover designer: Marija Tudor
ISBN: 9781617294143
Printed in the United States of America
1 2 3 4 5 6 7 8 9 10 – SP – 23 22 21 20 19 18
This book is dedicated to my wife, Logan, and my sons, Wes and Jack. You are the loves of my life.
1. Getting started with Electron
2. Building cross-platform applications with Electron
Chapter 3. Building a notes application
Chapter 4. Using native file dialog boxes and facilitating interprocess communication
Chapter 5. Working with multiple windows
Chapter 7. Building application and context menus
Chapter 8. Further operating system integration and dynamically enabling menu items
Chapter 9. Introducing the tray module
Chapter 10. Building applications with the menubar library
Chapter 11. Using transpilers and frameworks
Chapter 12. Persisting user data and using native Node.js modules
3. Deploying Electron applications
Chapter 14. Building applications for deployment
Chapter 15. Releasing and updating applications
Chapter 16. Distributing your application through the Mac App Store
1. Getting started with Electron
Chapter 1. Introducing Electron
1.4. Why should I use Electron?
1.4.1. Building on your existing skill set
1.4.2. Access to native operating system APIs
1.4.3. Enhanced privileges and looser restrictions
Chapter 2. Your first Electron application
2.1. Building a bookmark list application
2.2. Working with the main process
2.3. Creating a renderer process
2.3.1. Loading code from the renderer process
2.4.1. Making cross-origin requests in Electron
2.4.3. Storing responses with web storage APIs
2. Building cross-platform applications with Electron
Chapter 3. Building a notes application
3.3. Bootstrapping the application
3.4. Implementing the base functionality
3.5. Debugging an Electron application
3.5.1. Debugging renderer processes
Chapter 4. Using native file dialog boxes and facilitating interprocess communication
4.1. Triggering native file dialog boxes
4.3. Facilitating interprocess communication
4.4. Triggering the Open File function using interprocess communication
4.5. Sending content from the main process to the renderer process
Chapter 5. Working with multiple windows
5.1. Creating and managing multiple windows
5.1.1. Communicating between the main process and multiple windows
5.1.2. Passing a reference to the current window to the main process
6.1. Keeping track of the current file
6.1.1. Updating the window title based on the current file
6.1.2. Determining whether the current file has changed
6.2. Tracking recently opened files
6.3.1. Exporting the rendered HTML output
6.3.3. Saving files from the renderer process
6.4. Opening files using drag and drop
6.4.1. Ignoring dropped files everywhere else
6.5. Watching files for changes
Chapter 7. Building application and context menus
7.1. Replacing and replicating the default menu
7.1.1. macOS and the case of the missing Edit menu
7.1.2. The hidden cost of replacing Electron’s default menu
7.1.3. Implementing the Edit and Window menus
7.1.4. Defining menu item roles and keyboard shortcuts
7.2. Adding application-specific menu functionality
Chapter 8. Further operating system integration and dynamically enabling menu items
8.1. Using the shell module from the UI in the renderer process
8.2. Using the shell module in the application menu
8.3. Accessing the shell module from a context menu
8.3.1. Deciding between putting functionality in a menu or in the browser
8.3.2. Deciding between putting functionality in the application or context menu
8.4. Disabling menu items when appropriate
8.4.1. Dynamically enabling and disabling menu items in the context menu
8.4.2. Dynamically enabling and disabling menu items in the application menu
Chapter 9. Introducing the tray module
9.1. Getting started with Clipmaster
9.2. Creating an application with the tray module
9.2.1. Using the correct icon for macOS and Windows
9.3. Reading from and writing to the clipboard
9.4. Registering global shortcuts
9.4.1. Checking registrations and unregistering global shortcuts
Chapter 10. Building applications with the menubar library
10.1. Starting an application with menubar
10.2. Adding clippings to the UI
10.3. Working with clippings in the application
10.5. Displaying notifications and registering global shortcuts
10.5.1. Registering global shortcuts
10.5.2. Solving for the edge case that occurs if the window has never been shown
Chapter 11. Using transpilers and frameworks
11.1. Introducing electron-compile
11.2. Laying the application’s foundation
11.3. Building the UI in React
11.5. Live reload and hot module reloading
Chapter 12. Persisting user data and using native Node.js modules
12.1. Storing data in an SQLite database
12.1.1. Using the right versions with electron-rebuild
12.1.2. Setting up SQLite and Knex.js
12.1.3. Hooking the database into React
12.1.4. Fetching all of the items from the database
12.1.5. Adding items to the database
12.2.1. Creating a store with IndexedDB
12.2.2. Getting data from IndexedDB
Chapter 13. Testing applications with Spectron
13.2. Getting comfortable with Spectron and WebdriverIO
13.3. Setting up Spectron and the test runner
13.4. Writing asynchronous tests using Spectron
13.4.1. Waiting for the window to load
13.4.2. Testing Electron BrowserWindow APIs
3. Deploying Electron applications
Chapter 14. Building applications for deployment
14.1. Introducing Electron Packager
14.1.1. Setting up Electron Packager
14.1.2. Configuring the output directory
14.1.3. Configuring the application’s name and version
14.3.1. Importing an Electron application into Electron Forge
Chapter 15. Releasing and updating applications
15.1. Collecting crash reports
15.1.1. Setting up the crash reporter
15.2. Signing your applications
15.3. Automatically updating applications
Chapter 16. Distributing your application through the Mac App Store
16.1. Submitting your application to the Mac App Store
16.1.1. Signing the application
16.1.2. Registering your application with the Mac App Store
16.1.3. Adding the application to iTunes Connect
16.1.4. Packaging your application for the Mac App Store
Appendix. Code samples from Fire Sale and Clipmaster 9000
Code from the end of chapter 6
Code from the end of chapter 7
Electron is one of the technologies that I’m most excited about right now. That excitement is something that I hope you catch on to as you read Electron in Action. As I’ll explain ad nauseam throughout this book, Electron allows web developers the ability to create desktop applications with capabilities that are not available in the browser. It allows you to create graphical user interfaces for our command-line tools, opening our creations to a wider audience that may not be familiar with the terminal. Electron enables you to build applications with web technologies that you couldn’t build otherwise.
Electron hits a sweet spot that’s rare in open source. It’s low-level enough that you will quickly wrap your head around the basics, and powerful enough to allow you to build incredibly sophisticated applications. It abstracts over some of the more tedious things you’d need to do to build a desktop application, while not falling into the trap of relying on too much black magic. The platform is supported by an enthusiastic community that has provided libraries that will help you accomplish a wide range of features with ease.
You might have heard of Electron through Atom, Slack, Visual Studio Code, or any of the other big-name applications that use it. But I wrote this book for the hobbyist or indie developer who wants to build something original and new. Electron is popular among larger teams, but it’s also great for the single developer who wants to build an application that only they might use, or for the small team that needs to build tools for internal use.
It’s a tool that, as you become familiar with it, opens up new avenues that wouldn’t otherwise be possible. When you’re becoming comfortable with Electron, it immediately seems cool, but it might be hard to come up with a use case at first. Let it sink in, and you’ll soon catch yourself walking down the street coming up with ideas for applications you can build.
That’s how it happened for me and I’ve taught Electron to enough people to develop a strong suspicion that that’s how it will work for you as well. Electron in Action came to be as I was traveling around the United States and to Colombia, teaching workshops on building cross-platform desktop applications with Electron. Manning invited me to write a book on the topic and I jumped at the opportunity. The book informed the workshops, and delivering the workshops gave me new insights that helped improve the book.
If left to my own devices, I would have kept refining this book in perpetuity. It has helped me clarify my own thinking about building Electron applications and became a working diary as I tackled new challenges and implemented features in my projects. It’s a virtuous cycle that I’ll miss, although, I will be happy to have my nights and weekends back.
One thing that surprised me most about writing a book is how much work it is. Second is how many people are involved in making it happen. First and foremost, I need to thank my wife, Logan, who tolerated my working on this book during nights and weekends that I should have been spending with my family. Her tolerance and support have been crucial in producing this book.
Thank you to Helen Stergius, who put up with deadlines whizzing by as I balanced my family, my day job, and this book—often poorly. Helen kept a positive attitude regardless of how stressed out I was at any given moment. Thank you to Nickie Buckner who ran through the code as I was writing the book, provided encouragement, and fixed my typos along the way. Thanks to Doug Warren who did a final technical pass as the book was nearing completion. Thanks to Brian Sawyer for reaching out and inviting me to write this book in the first place, as well as Marjan Bace who green-lit the project.
Thank you to Marc Grabanski of Frontend Masters for letting me workshop this content in front of a global audience and providing insightful feedback. Thanks to Jeff Casimir for giving me a platform to teach an endless stream of budding software engineers. Thank you to Meeka Gayhart, Louisa Barrett, Jhun de Andreas, Brenna Martenson, and Brittany Storoz for tolerating me as I dropped the ball on various things they were relying on me for, as well as putting up with me in general.
Thank you to the following reviewers, who read this book as it was being developed, and left feedback in the forums: Aiden Mark Humphreys, Alan Bogusiewicz, Alexey Galiulin, Anto Aravinth, Ashwin Raj, Buu Nguyen, Daniel Posey, Frederic Flayol, Harald Kuhn, Hari Khalsa, Iain Shigeoka, Jay Kelkar, Jim McGinn, Jimmy Qiu, Jon Riddle, Matteo Gildone, Mladen Đurić, Philippe Charrière, Raq Khan, and William Wheeler. You helped me improve the content and catch mistakes along the way.
Thank you to Cheng Zhao and all of the people who maintain Electron. Without all of your incredible work, this book would not exist. In addition, your careful attention to detail and user-first mindset made it easy for me explain how to implement features that might otherwise be difficult on another platform. As you read Electron in Action, there will be many times where I just reach for some API that is built-in to Electron to tackle a tricky problem. Thank you to the wonderful community that provides an ecosystem of third-party libraries to help with Electron applications. In the rare case where Electron can’t do something out of the box, there is invariably a library out there that will solve your problem for you. A platform is only as good as the community around it.
Lastly, thank you to Novo Coffee in Denver and their cold brew for giving me a place to write, and the caffeine required to get the words out.
The primary goal of Electron in Action is to get you started building Electron applications quickly. We explore many of the foundational concepts by learning them as we put them to practice in code. This book seeks to not only introduce you to the basics of Electron, but also provide you with inspiration and ideas for applications of your own.
The book is for anyone who wants to build applications that defy the limits put in place in the browser. It’s a book for anyone who wants to scratch their own itch and build desktop applications without having to learn a new programming language or framework. It’s a book for small teams punching above their weight and delivering applications that run on multiple operating systems from one code base. Nearest to my heart, this book is for anyone who wants to take a command-line application and provide a GUI or remove the requirement that a user have Node.js installed on their computer in order to use their application or tool.
I’ll assume that you’re familiar with JavaScript, but will guide you through any parts of the web platform or Node.js that might be unfamiliar to you, since you might only have experience in one of those areas depending on your background.
This book is split into sixteen chapters. It’s true that many chapters continue from where the last one left off, but my hope is that you’ll be able to read the chapters out of order if you’re simply looking to implement a specific feature in your application.
In chapter 1, we’ll cover what Electron is, as well as what it isn’t. We’ll look at some of the things that you can do with Electron that you couldn’t do with either the browser or Node.js alone.
In chapter 2, we start with a very simple Electron application. The goal here is to get our hands dirty and demonstrate that it’s easy to get started with Electron.
Chapter 3 introduces you to one of the main applications in this book: Fire Sale, which is an application that allows users to open Markdown files on their filesystem and edit them.
In chapter 4, we use native system dialogues and alerts that will allow users to select a file from their filesystem for editing in Fire Sale. The application will blur the lines between the DOM and Node’s standard library, coordinating between both to implement this feature.
In chapter 5, we will add multi-window support to your application, which introduces a set of challenges that you’re not used to dealing with in a single browser tab or in Node.js, where there aren’t any windows to speak of.
Chapter 6 brings further integration into the native operating system. We’ll append the documents opened in Fire Sale to the operating system’s list of recently opened files, set up listeners to see if other applications have changed the contents of files you have open, and update the title bar of the window based on whether or not the file has unsaved changes.
Chapter 7 explores techniques for building native applications that are shared across all of the windows in your desktop application and context menus that are available upon right-clicking in the application.
In chapter 8, we look into how to update the application menu based on the state of the application—enabling and disabling menu items as appropriate.
In chapter 9, we switch gears and create a new type of application, one that lives in the menu bar on macOS or the system tray in Windows. This is not a place we’re used to building web applications. In this chapter, you build Clipmaster, which is a small clipboard manager that can read and write to the system clipboard, respond to global hotkeys, and display notifications.
Chapter 10 ups the ante and uses a third-party library to create a version of Clipmaster that has DOM-based UI—just like Fire Sale. Clipmaster 9000, as it’s called, is able to access GitHub’s Gist API and publish clippings with a single keystroke.
Up until chapter 11, we have been using vanilla JavaScript to implement features in our Electron application. In this chapter, I’ll show you how easy it is to use compile-to-JavaScript tools like Babel, TypeScript, and CoffeeScript in your application as well as Sass and Less for styling. In this chapter, you’ll build a packing list application called Jetsetter using React.
In chapter 12, we’ll look at strategies for persisting data beyond just writing to the filesystem. I’ll demonstrate how to set up an SQLite database that you can read from and write to from your client-side code. We’ll then take a second swing at the problem using the browser-based IndexedDB.
Chapter 13 introduces Spectron, which allows you to write Selenium tests for your Electron application. We’ll write a set of tests for the Clipmaster 9000 application we created earlier.
In chapter 14, we’ll look at tools that help us package our Electron applications for distribution to users that aren’t interested in starting the application up using the command line—pretty much everyone who is not a developer and, frankly, many developers as well.
Chapter 15 covers how to sign your application for macOS, create an installer for Windows, and set up a simple server for collecting error logs and crash reports.
In chapter 16, I step through the process of getting your application into the Mac App Store. This isn’t a required step if you prefer to distribute your application on your own, but is certainly useful if you don’t have experience with Apple’s process.
This book contains many examples of source code both in numbered listings and in line with normal text. In both cases, source code is formatted in a fixed-width font like this to separate it from ordinary text. Sometimes code is also in bold to highlight code that has changed from previous steps in the chapter, such as when a new feature adds to an existing line of code.
In many cases, the original source code has been reformatted; we’ve added line breaks and reworked indentation to accommodate
the available page space in the book. In rare cases, even this was not enough, and listings include line-continuation markers
( ). Additionally, comments in the source code have often been removed from the listings when the code is described in the text.
Code annotations accompany many of the listings, highlighting important concepts.
). Additionally, comments in the source code have often been removed from the listings when the code is described in the text.
Code annotations accompany many of the listings, highlighting important concepts.
All of the code for this book is available from the publisher’s website at www.manning.com/books/electron-in-action and also on Github at https://github.com/electron-in-action. In most cases, there is a branch for each chapter. For some of the later chapters where we pick up an application from earlier in the book, I have provided a branch for the starting point at the beginning of the chapter as well as one for where we left the code at the end of the chapter. If the final code for a chapter is short, I have included it at the end of the chapter. Code for chapters with longer examples can be found in the appendix of this book. In May of 2018, GitHub announced a web service and npm package that make it easy to implement auto-updating for open-source Electron applications published using GitHub releases (https://electronjs.org/blog/autoupdating-electron-apps). If your application meets those criteria, you might consider using update-electron-app. Chapter 15 covers how to roll your own solution in the event that you cannot or do not want to use update-electron-app.
One of the scariest parts of writing a book is that a new version of Electron, Node.js, or Chromium—even a minor version—might break one of the examples. This happened more than once as I was writing the book.
I am committed to keeping this code up-to-date and will provide any errata in the README.md on that chapter’s branch. If something does not work as expected in the book itself, be sure to check the repository on GitHub or check the book’s forum.
Purchase of Electron in Action includes free access to a private web forum run by Manning Publications where you can make comments about the book, ask technical questions, and receive help from the author and from other users. To access the forum, go to https://forums.manning.com/forums/electron-in-action. You can also learn more about Manning’s forums and the rules of conduct at https://forums.manning.com/forums/about.
Manning’s commitment to our readers is to provide a venue where a meaningful dialogue between individual readers and between readers and the author can take place. It is not a commitment to any specific amount of participation on the part of the author, whose contribution to the forum remains voluntary (and unpaid). We suggest you try asking the author some challenging questions lest his interest stray! The forum and the archives of previous discussions will be accessible from the publisher’s website as long as the book is in print.
STEVE KINNEY a principal engineer at SendGrid, an international speaker, and an organizer of DinosaurJS—a JavaScript conference in Denver, Colorado, Previously, he was the founding Director of the Front-End Engineering program at the Turing School of Software and Design and a New York City teacher for seven years.
The figure on the cover of Electron in Action is captioned “A Gypsy Woman.” The illustration is taken from a collection of costumes of people, both simple and grand, of the Ottoman Empire, published on January 1, 1802, by William Miller of Old Bond Street, London. The title page is missing from the collection, and we’ve so far been unable to track it down. The book’s table of contents identifies the figures in both English and French, and each illustration also bears the names of two artists who worked on it, both of whom would no doubt be surprised to find their art gracing the front cover of a computer programming book 200 years later.
The collection was purchased by a Manning editor at an antiquarian flea market in the “Garage” on West 26th Street in Manhattan. The seller was an American based in Ankara, Turkey, and the transaction took place just as he was packing up his stand for the day. The Manning editor didn’t have on his person the substantial amount of cash that was required for the purchase, and a credit card and check were both politely turned down. With the seller flying back to Ankara that evening, the situation seemed hopeless. What was the solution? It turned out to be nothing more than an old-fashioned verbal agreement sealed with a handshake. The seller proposed that the money be transferred to him by wire, and the editor walked out with the bank information on a piece of paper and the portfolio of images under his arm. Needless to say, we transferred the funds the next day, and we remain grateful and impressed by this unknown person’s trust in one of us. It recalls something that might have happened a long time ago.
The pictures from the Ottoman collection, like the other illustrations that appear on Manning’s covers, bring to life the richness and variety of dress customs of two centuries ago. They recall the sense of isolation and distance of that period—and of every other historic period except our own hyperkinetic present. Dress codes have changed since then, and the diversity by region, so rich at the time, has faded away. It’s now often hard to tell the inhabitant of one continent from that of another. Perhaps, viewed optimistically, we’ve traded a cultural and visual diversity for a more varied personal life. Or a more varied and interesting intellectual and technical life.
We at Manning celebrate the inventiveness, the initiative, and, yes, the fun of the computer business with book covers based on the rich diversity of regional life as it was two centuries ago, brought back to life by the pictures from this collection.
Have you used Slack recently? Maybe you’ve written some code in Atom or Visual Studio Code or sent a message to a friend using the WhatsApp desktop application. If so, then you’ve used an Electron application. So, what is Electron? The short version is that it’s a platform for building desktop applications that run on macOS, Windows, and Linux using web technologies. Electron combines Node.js with Chromium—the open source foundation of Google Chrome. The long answer is the focus of this book in general and chapter 1 in particular.
If you’re part of a small team tasked with building desktop applications for multiple platforms, Electron is a great way to build your product without the hassle of managing two or three distinct code bases, squashing related bugs on two or three platforms, or implementing the same feature two or three times. If you’re a Node.js developer who wants to get your command-line application in front of a wider audience, Electron makes it easy to build a graphical user interface (GUI) without having to learn an entirely new skill set. If you’re a web developer who has grown accustomed to building your own solutions to problems, Electron makes it easy to access the parts of your computer that exist outside of the browser’s sandbox.
In my experience, learning Electron has both short- and long-term implications. It’s immediately gratifying to see an icon appear in your dock or task bar when you start it up or trigger a native file dialog box from the operating system using JavaScript. But, as you become more and more comfortable with Electron, you’ll find ideas for applications that you couldn’t build with either the browser or Node.js alone. You’ll be able to build a new class of applications that you may not have been able to build otherwise. My hope is that the examples in this book provide inspiration rather than merely guidelines as you embark on your journey as a desktop application developer.
In part 1, we’ll tease out exactly what Electron is and isn’t. We’ll look at some of the big players using it in the wild. I’ll elaborate on what makes it different from browser-based applications in chapter 1. In chapter 2, we’ll build a simple Electron application in a thinly veiled attempt to convince you that building applications with Electron is both easy and fun.
This chapter covers
One of the big things that the web has going for it is ubiquity. It’s an amazing platform for creating collaborative applications that can be accessed from a wide range of devices running different operating systems. That said, entire classes of applications can’t be built in the browser environment. Web applications can’t access the filesystem. They can’t execute code that isn’t written in JavaScript. They can’t hook into many of the operating system APIs that desktop applications can. Most web applications aren’t available when there isn’t a reliable internet connection.
For a long time, building for the desktop has involved adopting a completely different skill set. Many of us don’t have the bandwidth to take on the long learning curve necessary for learning new languages and frameworks. With Electron, you can use your existing skills as a web developer to build applications that have many of the capabilities of a native desktop application.
Electron is a runtime that allows you to create desktop applications with HTML5, CSS, and JavaScript. It’s an open source project started by Cheng Zhao (aka zcbenz), an engineer at GitHub. Previously called Atom Shell, Electron is the foundation for Atom, a cross-platform text editor by GitHub built with web technologies.
You may have heard of—or used—Apache Cordova or Adobe PhoneGap for building web applications—wrapped in native shells—for mobile operating systems such as iOS, Android, and Windows Phone. If so, then it might be helpful to think of Electron as a similar tool for building desktop applications.
Electron allows you to use the web technologies you already know to build applications that you wouldn’t otherwise build. In this book, you’ll learn how to build applications that hook into native operating system APIs on Windows, macOS, and Linux.
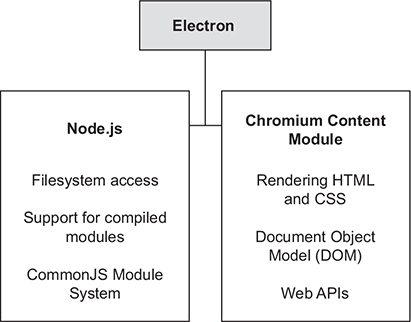
Electron combines the Chromium Content Module and Node.js runtimes. It allows developers to build GUIs with web pages as well as access native operating system capabilities on Windows, macOS, and Linux through an OS-agnostic API.
Chromium and Node are both wildly popular application platforms in their own right, and both have been used independently to create ambitious applications. Electron brings the two platforms together to allow you to use JavaScript to build an entirely new class of application. Anything you can do in the browser, you can do with Electron. Anything you can do with Node, you can do with Electron.
The exciting part is what you can do with the two technologies together. You can build applications that take advantage of both platforms and build applications that wouldn’t otherwise be possible on only one. That’s what this book is all about. Electron is not only a great choice for building web applications that behave like native desktop applications; it’s also a great choice for building a GUI around Node applications that would otherwise be limited to a command-line interface. See figure 1.1.
Let’s say that you want to build an application that allows you to view and edit a folder of images on your computer. Traditional browser applications can’t access the filesystem. They couldn’t access the directory of photographs, load any of the photographs in the directory, or save any of the changes that you made in the application. With Node, you could implement all those features, but you couldn’t provide a GUI, which would make your application difficult to use for the average user. By combining the browser environment with Node, you can use Electron to create an application where you can open and edit photographs as well as provide a UI for doing so. See figure 1.2.
Electron isn’t a complicated framework—it’s a simple runtime. Similar to the way you might use node from the command line, you can run Electron applications using the electron command-line tool. You don’t have to learn many conventions to get started, and you’re free to structure your application however you’d like—although I’ll provide tips and best practices throughout this book.
Chromium is the open source version of Google’s Chrome web browser. It shares much of the same code and features with a few minor differences and different licensing. The Content Module is the core code that allows Chromium to render web pages in independent processes and use GPU acceleration. It includes the Blink rendering engine and the V8 JavaScript engine. The Content Module is what makes a web browser a web browser. It handles fetching and rendering HTML from a web server, loading any referenced CSS and JavaScript, styling the page accordingly, and executing the JavaScript.
The easiest way of thinking about the Content Module is to consider what it doesn’t do. The Content Module doesn’t include support for Chrome extensions. It doesn’t handle syncing your bookmarks and history with Google’s cloud services. It doesn’t handle securely storing your saved passwords or automatically filling them in for you when you visit a page. It doesn’t detect if a page was written in another language and subsequently call on Google’s translation services for assistance. The Content Module includes only the core technologies required to render HTML, CSS, and JavaScript.
For the first 15 years of its existence, JavaScript was traditionally isolated within the web browser. There wasn’t much in the way of support for running JavaScript on the server. Projects existed, but they never got any traction. The Node.js project was initially released in 2009 as an open source, cross-platform runtime for developing server-side applications using JavaScript. It used Google’s open source V8 engine to interpret JavaScript and added APIs for accessing the filesystem, creating servers, and loading code from external modules.
Over the last few years, Node has enjoyed a surge of interest and popularity and is used for a wide range of purposes, from writing web servers to controlling robots to—you guessed it—building desktop applications. Node comes bundled with a package manager called npm, which makes it easy to lean on the more than 250,000 libraries available in its registry.
Electron is used by companies, large and small, to build desktop applications. As discussed earlier, it was originally developed as the foundation for GitHub’s Atom text editor. Atom needed access to the filesystem to fulfill its duties as a text editor. Similarly, other companies have turned to Electron as the foundation of their text-editing applications. Facebook released Nuclide as a package on top of Atom that turns the text editor into a full-fledged integrated development environment (IDE) with first-class support for working with React Native, Hack, and Flow projects. Microsoft also uses Electron for its cross-platform Visual Studio Code editor, which runs on macOS, Windows, and Linux.
You can build more than text editors with Electron. Slack, the popular messaging application, uses Electron for its Windows and Linux versions. Nylas used Electron for its N1 email client, which is designed to look beautiful across all the major platforms. It also supports a JavaScript plugin architecture that allows third-party developers to add features and extend the UI.
Particle, which produces development kits for creating custom hardware, uses Electron for its IDE, which lets users write code and deploy it to hardware devices through a cellular or Wi-Fi network. Using Mapbox Studio, users can import data stored locally and process it on their computers without having to send it over the internet to Mapbox’s servers. The result is a faster and better experience that allows designers to create custom maps easily.
Dat is an open source tool for sharing, syncing, and versioning decentralized data. The grant-funded project consists of a team of three web developers. Despite being a relatively small team, Dat released a desktop application for the project using Electron. In 2015, Wiredcraft—a software consultancy—used Electron to build an offline-friendly Windows application for collecting and correcting voter registration information in Myanmar. The firm needed an application that could store the collected data offline and then publish it when the device was connected to the network. The company chose Electron as an alternative to building it using C++ because it allowed Wiredcraft to take advantage of its existing HTML, CSS, and JavaScript prowess instead of relearning those skills for a different ecosystem.
Brave—a new browser focused on speed and security by Brendan Eich, the creator of JavaScript—is itself built on top of Electron. See figure 1.3. That’s right, you can even use web technologies to build a web browser.

New projects built on top of Electron are being released every day as companies and developers see the value in building products that use the power afforded to desktop applications while still maintaining the web’s intrinsic platform agnosticism. By the end of this book, you’ll take your existing web development skills and apply them to create new applications that wouldn’t have been possible in the traditional browser environment.
Let’s start with what you don’t need to know. This book is for web developers who want to use their existing skill set to create desktop applications that wouldn’t be possible in the traditional browser environment. You don’t need any experience building desktop applications to get value out of this book.
That said, you should be comfortable with writing JavaScript, HTML, and CSS, but by no means do you need to be an expert. I won’t be covering variables or conditionals in this book, but if you’re familiar with general language features of JavaScript, then you probably have the requisite skills to follow along. It’s also helpful if you’re familiar with some of the conventions and patterns from Node.js, such as how the module system works. We’ll explore these concepts as we come across them.
When you’re writing applications for a web browser, you have to be conservative in what technologies you choose to use and cautious in how you write your code. This is because—unlike many server-side situations—you’re writing code that will be executed on someone else’s computer.
Your users could be using the latest version of a modern browser such as Chrome or Firefox, or they could be using an outdated version of Internet Explorer. You have little to no say in where your code is being rendered and executed. You have to be ready for anything.
You typically must write code for the lowest common denominator of features that have the widest support across all versions of all browsers in use today. Even if a better, more efficient, or generally more appealing solution exists to a problem, you might not be able to use that approach. When you decide to reach for a modern browser feature, you usually need to implement a contingency plan of graceful fallbacks, feature detection, and progressive enhancement that adds a nontrivial amount of friction to your development workflow.
When you build your applications with Electron, you’re packaging a particular version of Chromium and Node.js, so you can rely on whatever features are available in those versions. You don’t have to concern yourself with what features other browsers and their versions support. If the build of Chromium included with your application supports the Service Worker API, for example, then you can confidently rely on that API in your application. See figure 1.4.
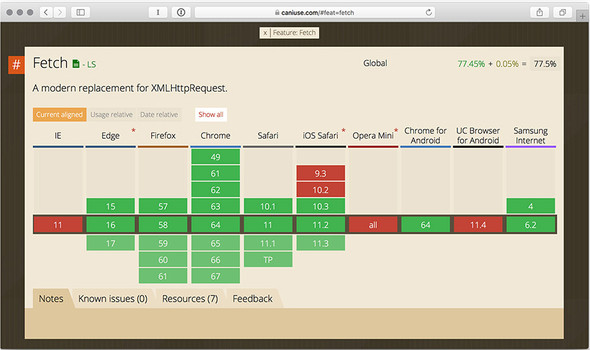
Electron allows you to use cutting-edge web platform features because it includes a relatively recent version of Chromium. Generally speaking, the version of Chromium in Electron is about one to two weeks behind the most recent stable release—and a new stable release comes out every six weeks. Electron typically includes new versions of Node.js about a month after they’re released to ensure it contains the most recent version of V8. Electron already includes a modern build of V8 from Chromium and can afford to wait for minor bug fixes before upgrading to the latest version of Node.
If you’re like me, you probably have much more experience building web applications than desktop applications. You’d love to add the ability to create desktop applications to your set of tools, but you don’t have the bandwidth to learn not only a new programming language but likely a new framework as well.
Learning a new language or framework is an investment that’s not to be taken lightly. As a web developer, you’re used to writing applications that work equally well for all your users—even if that means fighting with idiosyncrasies of a particular browser or screen size. But when you’re contemplating building traditional desktop applications, you’re talking not only about learning one language and framework. You’re also looking at learning at least three different languages and frameworks if you want to target Windows, macOS, and Linux.
Individuals and small teams can use Electron to offer desktop applications in situations where they couldn’t otherwise. For a small team, hiring a developer skilled in building applications for each of those platforms may not be an option. Electron lets you use your existing skill set and deploy your application to all the major platforms. With Electron, you can support multiple operating systems with less effort than you’re normally used to for supporting multiple browsers.
Electron applications are similar to any other desktop application. They live in the filesystem with the rest of your native applications. They sit in the dock in macOS or taskbar in Windows and Linux where all the other native applications hang out. Electron applications can trigger native Open and Save File dialog boxes. These dialog boxes can be configured to allow the operating system to select only files with a particular file extension, whole directories, or multiple files at the same time. You can drag files onto your Electron applications and trigger different actions.
Additionally, Electron applications can set custom application menus like any other application. See figure 1.5. They can create custom context menus that spring into action when the user right-clicks from within the application. You can use Chromium’s notification API to trigger system-level notifications. They can read from the system clipboard and write text, images, and other media to it as well.

Unlike traditional web applications, Electron applications aren’t limited to the browser. You can create applications that live in the menu bar or the system tray. See figure 1.6. You can even register global shortcuts to trigger these applications or any of their abilities with a special keystroke from anywhere in the operating system.
Electron applications have access to system-level information—such as whether the computer is on battery power or plugged into the wall. They can also keep the operating system awake and prevent it from going into power-saving mode, if necessary.
The web is the largest distributed application platform in history. It’s so ubiquitous that web developers take many of the associated headaches for granted. Building web applications involves carefully choreographing the communication between the server-side application and the potentially thousands of instances of the client-side application. Your client-side code runs in the user’s web browser—far removed from the server.
Anything that happens in the client is unique to that browser session unless the changes are sent back to your server. By the same token, if anything changes on your end, you have to wait until the client sends another HTTP request asking for updates; or you can potentially send the updates over WebSockets, if you’ve implemented that capability on both the client and the server.
Desktop applications enjoy a wider range of abilities and fewer restrictions on what they’re allowed to do because the user explicitly went out of their way to download, install, and open the application. When you’re browsing the web, however, you don’t have the same amount of agency. You’re executing code that you didn’t choose to install on your computer. As a result, web applications have many limits on what they’re allowed to do.
When the browser visits a page on the web, it happily downloads all the assets referenced in the HTML code of the document it’s loading, as well as any additional dependencies added by those first assets, and then begins executing the code. Over the years, browser vendors have added restrictions to what the browser can do to prevent malicious code from harming the user or other sites on the internet.
I’m not a bad person, but let’s say—for the sake of argument—that I am. Let’s also say that I run a popular site that sells artisanal, hand-crafted widgets. One day, a competitor pops onto my radar selling equally pretentious widgets at a steep discount. My site is still getting more traffic for now, but this new challenger is affecting my beauty sleep.
Being a bad person, I decide to add JavaScript to my website that fires off an AJAX request every few milliseconds to my competitor’s site with the hope that the thousands of visitors to my site will download this code and effectively flood my sworn enemy’s server and make it unable to handle any legitimate request. It will also degrade the experience my visitors have on my site, but that’s a price I’m willing to pay to bring my competitor’s website to its knees.
Despite the diabolical nature of my plan, it won’t work. Modern browsers restrict client-side code from making requests to a third-party server unless that server explicitly declares a policy that it allows such requests.
Generally speaking, most sites don’t do this. If you want to send a request to a third-party server, then you have to first make a request to your own server, have it contact the third party, and relay the results back to the client. In the previous example, this adds my server as a bottleneck for those thousands of requests, which would make it infeasible for me to launch this kind of attack and trivially easy for my competitor to block my single IP address as opposed to the IPs of the thousands of visitors to my site.
The browser also places strict limits on what client-side code has access to and what it can do. All of this makes for a safer, more secure, and—ultimately—better experience for the user. It’s all incredibly practical and is part of what makes the web such a fantastic and approachable platform for users.
That said, all these useful and important security restrictions severely limit the kinds of applications you can build using web technologies. The user explicitly downloads and installs Electron applications like any other native application. You’re free to access the filesystem like any native desktop application or server-side Node process would. You’re also free to make requests to third-party APIs without going through a Node server because you have access to the same privileges and capabilities as any other Node process. See figure 1.7.

Along with granting access to the filesystem and the ability to fire up a web server, Node.js uses a module system based on the CommonJS modules specification. From its earliest incarnations, Node has supported the ability to break out code into multiple modules and explicitly include ones you require from within a given file.
Packaging any nontrivial amount of JavaScript code for the browser hasn’t always been so easy. For a small amount of code, you can include it in your markup between a matching pair of opening and closing <script> tags. For larger blocks of code, you can use the src attribute to reference an external JavaScript file. You’re welcome to do that as many times as you wish, but you’ll have to pay the performance penalties as the browser fires off an additional request to fetch each external asset.
You’re welcome to use a build tool such as webpack or Browserify if you like, but it’s often not necessary in Electron applications because all of Node’s global properties (for example, require, module, and exports) are available in the browser content. You can use Node’s module system on what you’d traditionally think of as the client side without needing to add a build process to your application.
You can access all of Node’s APIs from the browser context of your Electron application. On top of taking advantage of Node’s module system, you can also use compiled modules with native extensions, access the filesystem, as well as do a bevy of other things that aren’t typically supported in the browser environment.
As anyone who has ever taken a computer on a transcontinental flight can attest, most browser-based web applications aren’t much good without a connection to the internet. Even advanced web applications using any of the popular client-side frameworks like Ember, React, or Angular typically need to connect to a remote server to download their assets.
Electron applications have already been downloaded to the user’s computer. Typically, they load a locally stored HTML file. From there, they can request remote data and assets if a connection is available. Electron even provides APIs that allow you to detect if a connection is available. No special manifests or bleeding-edge technologies are necessary to build an offline application using Electron—it’s the default state unless the application explicitly requests something from the internet. Barring a special circumstance—you’re building a chat client, for example—Electron applications work as well offline as any other application.
Electron applications consist of two types of processes: the main process and zero or more renderer processes. Each process plays a different role in the application. The Electron runtime includes different modules to assist you in building your application. Certain modules, such as the ability to read and write from the system’s clipboard, are available in both types of processes. Others, such as the ability to access an operating system’s APIs, are limited to the main process. See figure 1.8.
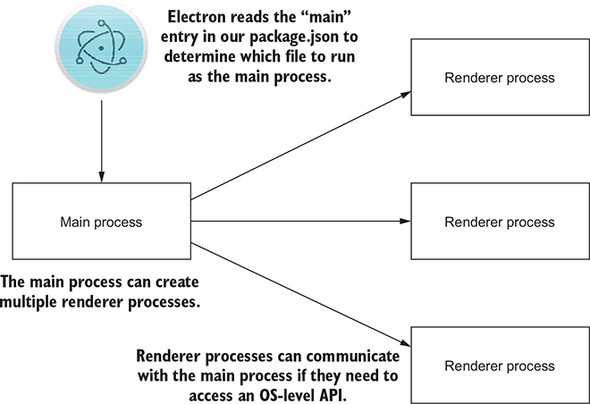
When Electron starts up, it turns to the start entry in your package.json manifest included in your project to determine the entry point of your application. This file can be named anything you’d like, as long as it’s included properly in package.json. Electron runs this file as your main process.
The main process has a few important responsibilities. It can respond to application lifecycle events such as starting up, quitting, preparing to quit, going to the background, coming to the foreground, and more. The main process is also responsible for communicating to native operating system APIs. If you want to display a dialog box to open or save a file, you do it from the main process.
The main process can create and destroy renderer processes using Electron’s BrowserWindow module. Renderer processes can load web pages to display a GUI. Each process takes advantage of Chromium’s multiprocess architecture and runs on its own thread. These pages can then load in additional JavaScript files and execute code in this process. Unlike normal web pages, you have access to all the Node APIs in your renderer processes, allowing you to use native modules and lower-level system interactions.
Renderer processes are isolated from each other and unable to access operating system integration APIs. Electron includes the ability to facilitate communication between processes to allow renderer processes to communicate with the main process in the event that they need to trigger an Open or Save File dialog box or access any other OS-level integration.
Electron is similar to another project called NW.js (previously known as node-webkit). The two have much in common. In fact, zcbenz was a heavy contributor to NW.js before starting work on Electron. That said, they’re different in several important ways, as shown in table 1.1.
|
Electron |
NW.js |
|
|---|---|---|
| Platform | Officially supported Chromium Content Module from recent build | Forked version of Chromium |
| Process model | Separate processes | Shared Node process |
| Crash reporting | Built in | Not included |
| Auto-updater | Built in | Not included |
| Windows support | Windows 7 and later | Windows XP and later |
NW.js uses a forked version of Chromium. Electron uses Chromium and Node.js but doesn’t modify them. This makes it easier for Electron to keep pace with the most recent versions of Chromium and Node. Electron also includes modules for automatically downloading updates and reporting crashes. NW.js doesn’t.
NW.js applications start from an HTML page. Each browser window shares a common Node process. If more than one window is opened, they all share the same Node process. Electron keeps the Node and browser processes separate. In Electron, you start a main process from Node. This main process can open browser windows, each of which is its own process. Electron provides APIs for facilitating communication between the main process and the browser windows, which we call renderer processes throughout this book.
If backward compatibility is a concern, then NW.js might be a better choice because it supports Windows XP and Vista. Electron supports only Windows 7 and later. For multimedia-focused applications, Electron is typically a better choice because Chromium’s FFmpeg library is a statically linked dependency, so Electron supports more codecs out of the box. With NW.js, you need to manually link the FFmpeg library.
This chapter covers
In chapter 1, we discussed what Electron is at a high level. That said, this book is called Electron in Action, right? In this chapter, we learn the ropes of Electron by setting up and building a simple application from the ground up to manage a list of bookmarks. The application will take advantage of features available only in the most modern browsers.
In that high-level discussion from the previous chapter, I mentioned that Electron is a runtime like Node. That’s still true, but I want to revisit that point for a moment. Electron is not a framework—it does not provide any scaffolding or have strong rules about how you structure your application or name your files. Those choices are left up to us, the developers. On the bright side, it also doesn’t enforce any conventions, and we have less conceptual boilerplate information to discuss before getting our hands dirty.
Let’s start by building a simple and somewhat naive Electron application to reinforce everything we’ve covered. Our application accepts URLs. When the user provides a URL, we fetch the title of the page that the URL refers to and save it in our application’s localStorage. Finally, we display all the links in the application. You can find the completed source code for this chapter on GitHub (https://github.com/electron-in-action/bookmarker).
Along the way, we uncover some of the advantages of building an application in Electron, such as the ability to bypass the need for a server and use cutting-edge web APIs that do not have wide support across all the browsers but are implemented in modern versions of Chromium. Figure 2.1 is a wireframe of the application we build in this chapter.
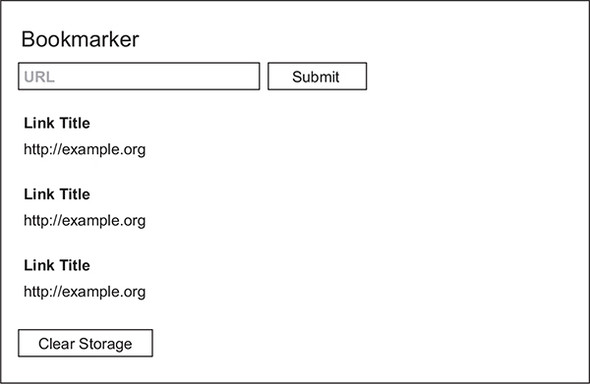
When users add the URL of a website that they would like to save to the list below the input fields, the application sends a request to the website to fetch the markup. After it successfully receives the markup, the application pulls the title of the website and appends both the title and URL to the list of websites, which is stored in the browser’s localStorage. When the application starts, it reads from localStorage and restores the list. We add a button with a command to clear localStorage in case anything goes wrong. Because this simple application is designed to help you get comfortable with Electron, we won’t implement advanced moves, such as removing individual websites from the list.
How you choose to structure your application is up to your team or the individual working on the application. Many developers take slightly different approaches. Looking at some of the more established Electron applications, we can discern common patterns and make decisions on how we’d like to approach our applications in this book.
For our purposes, let’s agree upon a file structure for the remainder of this book. We have an app directory where we store all of our application code. We also have a package.json that will store a list of dependencies, metadata about our application, and scripts and declare where Electron should look for our main process. After we install our dependencies, we end up with a node_modules directory that Electron creates on our behalf, but we won’t include that in the initial setup.
As far as files are concerned, let’s start with two files in our app: main.js and renderer.js. These are purposely simple filenames so we can track the two types of processes. The start of all the applications that we build in this book roughly follows the directory structure shown in figure 2.2. (If you’re running macOS, you can install the tree command using brew install tree.)
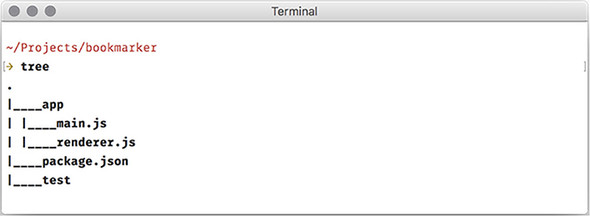
Make a directory called “bookmarker,” and navigate to it. You can create this structure quickly by running the following two commands from the command line. You will generate a package.json file later using npm init.
mkdir app
touch app/main.js app/renderer.js app/style.css app/index.html
Electron doesn’t require this structure, but it is inspired by some of the best practices established by other Electron applications. Atom keeps all of the application code in an app directory and all of its stylesheets and other assets such as images in a static directory. LevelUI has an index.js and a client.js on the top level and keeps all the dependent files in an src directory and stylesheets in a styles directory. Yoda keeps all of its files—including the file that loads the rest of the application—in an src directory. app, src, and lib are common names for the folder that holds the majority of the application’s code, and styles, static, and assets are common names for the directory that holds the static assets used in the application.
The package.json manifest is used in many—if not most—Node projects. This manifest contains important information about the project. It lists metadata such as the name of the author as well as their email address, which license the project is released under, the location of the project’s git repository, and where to file issues. It also defines scripts for common tasks such as running the test suite or—pertinent to our needs—building the application. The package.json file also lists all of the dependencies used to run and develop the application.
In theory, you could potentially have a Node project that does not have a package.json. But Electron relies on this file and its main property to figure out where to start when it loads or builds your application.
npm, the package manager that ships with Node, comes with a helpful tool for generating package.json. From the “bookmarker” directory you created earlier, run npm init. If you leave a prompt blank, npm uses whatever is in the parentheses after the colon as the default answer. Your answers should look something like figure 2.3, with the exception of the author’s name, of course.
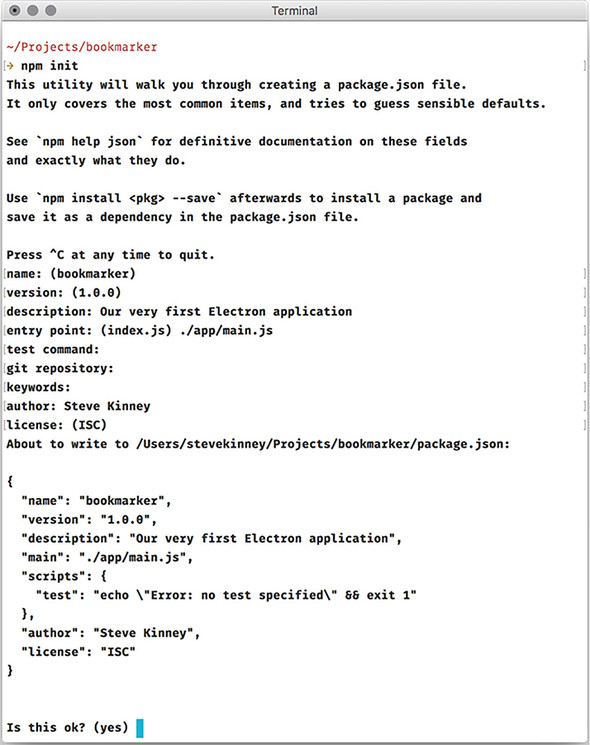
Of note is the main entry in the sample package.json. Here, you can see that I set it to point to ./app/main.js, based on how we set up the application. You can point to any file you want. The main file we’re going to use happens to be called main.js, but it could be named anything (e.g., sandwich.js, index.js, app.js).
We have the basic structure of our application set up, but Electron is nowhere to be found. Building Electron from source takes a while and can be tedious. We rely on prebuilt versions of Electron for each platform (macOS, Windows, and Linux) and both architectures (32- and 64-bit). We install Electron using npm.
npm allows us to install binaries globally or locally to each project. Installing Electron globally seems convenient, but it can cause trouble down the road if we have multiple applications using different versions of Electron. We’re better off specifying and installing a unique version of Electron for each project we work on.
Downloading and installing Electron is easy. Run the following command from inside the project directory where you ran npm init previously:
npm install electron–-save
This command will download and install Electron in your project’s node_modules directory. (It will also create the directory if you don’t already have one.) The --save flag adds it to the list of dependencies in our package.json. This means that if someone downloads the project and runs npm install, they will get electron by default.
As you acclimate yourself to the world of Electron, you may see blog posts, documentation, and even earlier versions of this book that refer to the electron-prebuilt package instead of electron. In the past, the former was the preferred way to install a precompiled version of Electron for your operating system. The latter is the new preferred way. As of early 2017, electron-prebuilt is no longer supported.
npm also lets you define shortcuts for running common scripts in your package.json. When you run a script defined in your package.json, npm automatically adds node_modules to the path. This means that it will use the locally installed version of Electron by default. Let’s add a start script to our package.json.
{
  "name": "bookmarker",
  "version": "1.0.0",
  "description": "Our very first Electron application",
  "main": "./app/main.js",
  "scripts": {
    "start": "electron .",                                     1
    "test": "echo \"Error: no test specified\" && exit 1"
  },
  "author": "Steve Kinney",
  "license": "ISC",
  "dependencies": {
    "electron": "^2.0.4"
  }
}
Now when we run npm start, npm uses our locally installed version of electron to start the Electron application. You’ll notice that not much seems to happen. You should see the following code in your terminal application:
> bookmarker@1.0.0 start /Users/stevekinney/Projects/bookmarker
> electron .
You’ll also see a new application in your dock or task bar—the Electron application we just set up—as shown in figure 2.4. Right now, it’s called simply “Electron,” and it uses Electron’s default application icon. In later chapters, we’ll see how we can customize these properties, but the default is good enough for now. All of our implementation files are completely blank. As a result, there isn’t a lot going on with this application, but it exists and starts up correctly. We count that as a win for the time being. Closing all windows of the application on Windows or selecting Quit from the application menu terminates the process. Alternatively, you can press Control-C in the Windows Command prompt or Terminal to quit the application. Pressing Command-Period terminates a process on macOS.
Now that we have an Electron application, it would be cool if we could actually get it to do something. If you recall from chapter 1, Electron starts with a main process that can create one or more renderer processes. We start by writing code in main.js to get our application off the ground.
To work with Electron, we need to import the electron library. Electron comes with a number of useful modules that we use throughout this book. The first—and arguably, most important—is the app module.
const {app} = require('electron');

app.on('ready', () => {                   1
  console.log('Hello from Electron');
});
app is a module that handles the lifecycle and configuration of our application. We can use it to quit, hide, and show the application as well as get and set the application’s properties. The app module also runs events—including before-quit, window -all-closed, browser-window-blur, and browser-window-focus—when the application enters different states.
We cannot work with our application until it has completely started up and is ready to go. Luckily, app fires a ready event. This means we need to wait patiently and listen for the application to start the ready event before we do anything. In the previous code, we logged into the console, which is something we could easily do without Electron, but this code highlights how to listen for the ready event.
Our main process is a lot like any other Node process. It has access to all of Node’s built-in libraries as well as a special set of modules provided by Electron, which we explore over the course of this book. But, like any other Node process, our main process does not have a DOM (Document Object Model) and cannot render a UI. The main process is responsible for interacting with the operating system, managing state, and coordinating with all the other processes in our application. It is not in charge of rendering HTML and CSS. That’s the job of the renderer processes. One of the primary reasons we signed up for this whole Electron adventure is that we wanted to create a GUI for Node processes.
The main process can create multiple renderer processes using the Browser-Window module. Each BrowserWindow is a separate and unique renderer process that includes a DOM, access to the Chromium web APIs, and the Node built-in module. We can access the BrowserWindow module the same way we got our hands on the app module.
const {app, BrowserWindow} = require('electron');
You may have noticed that the BrowserWindow module starts with a capital letter. According to standard JavaScript convention, this usually means that we call it as a constructor with the new keyword. We can use this constructor to create as many renderer processes as we like or our computer can handle. When the application is ready, we create a BrowserWindow instance. Let’s update our code as follows.
const {app, BrowserWindow} = require('electron');

let mainWindow = null;                      1

app.on('ready', () => {
  console.log('Hello from Electron.');
  mainWindow = new BrowserWindow();         2
});
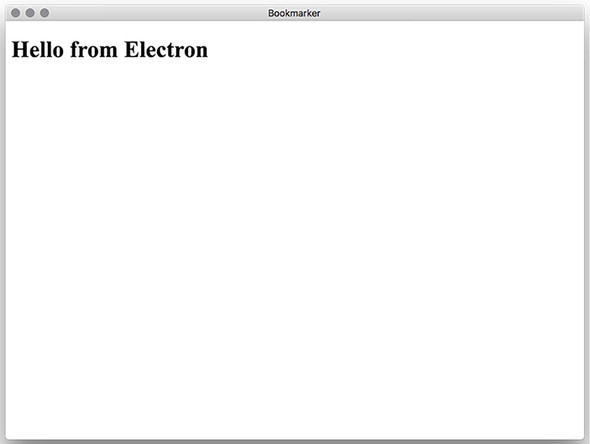
We declared mainWindow outside the ready event listener. JavaScript uses function scope. If we declared mainWindow inside the event listener, mainWindow would be eligible for garbage collection because the function assigned to the ready event has run to completion. If garbage is collected, our window would mysteriously disappear. If we run this code, we see a humble little window displayed in the center of our screen, as shown in figure 2.5.
It’s a window, but it’s not much to look at. The next step is to load an HTML page into that BrowserWindow instance we created. All BrowserWindow instances have a web-Contents property, which has several useful features, such as loading an HTML file into the renderer process’s window, sending messages from the main process to the renderer process, printing the page to either PDF or a printer, and much more. Right now, our biggest concern is loading content into that boring window we just created.
We need an HTML page to load, so create an index.html in the app directory of your project. Let’s add the following content to the HTML page to make it a valid document.
<!DOCTYPE html>
<html>
<head>
<meta charset="UTF-8">
<meta http-equiv="Content-Security-Policy"
          content="
            default-src 'self';
            script-src 'self' 'unsafe-inline';
            connect-src *
          "
>
<meta name="viewport" content="width=device-width,initial-scale=1">
<title>Bookmarker</title>
</head>
<body>

<h1>Hello from Electron</h1>

</body>

</html>
It’s simple, but it gets the job done and gives a good foundation on which to build. We add the following to app/main.js to tell the renderer process to load this HTML document inside of the window we created earlier.
app.on('ready', () => {
  console.log('Hello from Electron.');
  mainWindow = new BrowserWindow();
  mainWindow.webContents.loadFile('index.html');        1
});
We use the file:// protocol and the __dirname variable, which is globally available in Node. __dirname is the full path to the directory where our Node process is being executed. In my case, __dirname expands to /Users/stevekinney/Projects/bookmarker/ app. It’s like typing pwd in macOS and Linux or chdir in Windows.
Now, we can use npm start to start our application and watch it load our new HTML file. If all goes well, you should see something resembling figure 2.6.
From the HTML file loaded by the renderer process, we can load any other files we might need just like we would in a traditional browser-based web application—namely, <script> and <link> tags.
What makes Electron different from what we’re used to in the browser is that we have access to all of Node—even from what we would normally consider “the client.” This means that we can use require or even Node-only objects and variables like __dirname or the process module. At the same time, we have all the browser APIs available as well. The division between what we can do only on the client and what we can do only on the server begins to fade away.
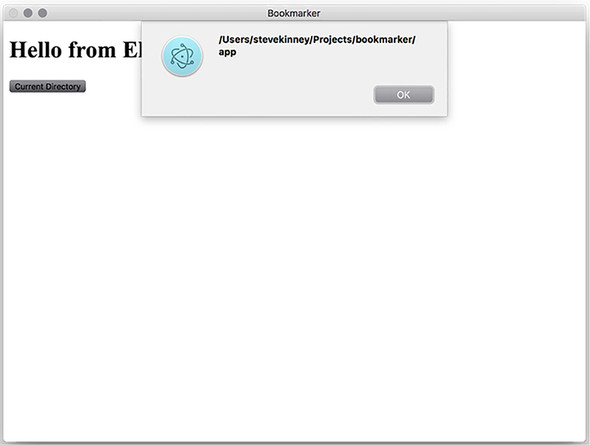
Let’s look at this in action. __dirname is not available in the traditional browser environment, and document or alert are not available in Node. But in Electron we can seamlessly use them together. Let’s add a button to the page.
<!DOCTYPE html>
<html>
<head>
<meta charset="UTF-8">
<meta http-equiv="Content-Security-Policy"
      content="
            default-src 'self';
            script-src 'self' 'unsafe-inline';
            connect-src *
          "
>
<meta name="viewport" content="width=device-width,initial-scale=1">
<title>Bookmarker</title>
</head>
<body>

<h1>Hello from Electron</h1>

<p>                                                     1
<button class="alert">Current Directory</button>
</p>

</body>

</html>
Now that we have our button, let’s add an event listener that alerts us to the current directory from which our application is running.
<script>
  const button = document.querySelector('.alert');

  button.addEventListener('click', () => {
    alert(__dirname);                        1
  });
</script>
alert() is available only in the browser. __dirname is available only in Node. When we click the button, we are treated to Node and Chromium working together in sweet, sweet harmony, as shown in figure 2.7.
Writing code in our HTML file clearly works, but it’s probably not hard to imagine a situation where our code might grow to the point where this method is no longer feasible. We can add script tags with src attributes to reference other files, but this also becomes cumbersome quickly.
This is where web development gets tricky. Although modules were added to the ECMAScript specification, no browsers currently have a working implementation of a module system. On the client, this is the point where we might consider some kind of build tool like Browserify (http://browserify.org) or the module bundler, webpack, and possibly a task runner like Gulp or Grunt.
We can use Node’s module system with no additional configuration. Let’s move all of the code from inside those <script> tags to our—currently empty—app/renderer.js file. Now we can replace the contents inside of the <script> tags with just a reference to renderer.js.
<script>
  require('./renderer');       1
</script>
If we start up our application, you’ll see that its functionality hasn’t changed. Everything still works as it should. That rarely happens in software development. Let’s briefly savor that feeling before moving on.
Few surprises occur when we reference stylesheets in our Electron applications. Later, we talk about using Sass and Less with Electron. Adding a stylesheet in an Electron application isn’t much different than it would be with a traditional web application. That said, a few nuances are worth talking about.
Let’s start by adding a style.css file to our app directory. We add the following content to that style.css.
html {
  box-sizing: border-box;
}

*, *:before, *:after {
  box-sizing: inherit;
}

body, input {
  font: menu;          1
}
That last declaration might look a little unfamiliar. It is unique to Chromium and allows us to use the system font in CSS. This ability is important to make our application fit in with its native siblings. On macOS, it’s the only way to use San Francisco, the system font that ships with El Capitan 10.11 and later.
We should consider one other important distinction when working with CSS inside of our Electron applications. Our applications will run only in the version of Chromium that we ship with the application. We don’t have to worry about cross-browser support or legacy compatibility. As mentioned in chapter 1, Electron ships with a relatively recent version of Chromium. This means we can freely use technologies like flexbox and CSS variables.
We reference our new stylesheet just like we would in the traditional browser environment, then add the following to the <head> section of index.html. I’ll include the HTML tag for linking to a stylesheet—because, in my 20 years as a web developer, I still can never remember how to do it on the first try.
<link rel="stylesheet" href="style.css" type="text/css">
We start by updating our index.html with the markup that we need for the UI.
<h1>Bookmarker</h1>

<div class="error-message"></div>

<section class="add-new-link">
  <form class="new-link-form">
    <input type="url" class="new-link-url" placeholder="URL"size="100"
     required>
    <input type="submit" class="new-link-submit" value="Submit" disabled>
  </form>
</section>

<section class="links"></section>

<section class="controls">
  <button class="clear-storage">Clear Storage</button>
</section>
We have a section for adding a new link, a section for displaying all of our wonderful links, and a button for clearing all links and starting over. The <script> tag in your application should be just as we left it earlier in this chapter, but just in case it isn’t, here is what it should look like at this point:
<script>
  require('./renderer');
</script>
With our markup in place, we can now turn our attention to the functionality. Let’s clear away anything we might have in app/renderer.js and start fresh. Throughout our time together, we’re going to need to work with a few of the elements we added to the markup, so let’s start by querying for those selectors and caching them into variables. Add the following to app/renderer.js.
const linksSection = document.querySelector('.links');
const errorMessage = document.querySelector('.error-message');
const newLinkForm = document.querySelector('.new-link-form');
const newLinkUrl = document.querySelector('.new-link-url');
const newLinkSubmit = document.querySelector('.new-link-submit');
const clearStorageButton = document.querySelector('.clear-storage');
If you look back at listing 2.12, you’ll notice that we set the input element’s type attribute to "url" in the markup. Chromium will mark the field as invalid if the contents do not match a valid URL pattern. We can style valid and invalid states of the element and even check its state using JavaScript. Unfortunately, we don’t have access to the built-in error message popups in Chrome or Firefox. Those popups are not part of the Chromium content module and—as a result—not part of Electron. For now, we disable the start button by default and then check to see if we have a valid URL pattern every time the user types a letter into the URL field.
If the user has provided a valid URL, then we flip the switch on that submit button and allow them to submit the URL. Let’s add this code to app/renderer.js.
newLinkUrl.addEventListener('keyup', () => {
  newLinkSubmit.disabled = !newLinkUrl.validity.valid;        1
});
Now is also a good time to add a small helper function to clear out the contents of the URL field. In a perfect world, we call this whenever we’ve successfully stored the link.
const clearForm= () => {
  newLinkUrl.value = null;        1
};
When the user submits a link, we want the browser to make a request for that URL and then take the response body, parse it, find the title element, get the text from that title element, store the title and URL of the bookmark in localStorage, and then—finally—update the page with the bookmark.
You may or may not feel some of the hairs on the back of your neck begin to stand at attention. You might even be thinking to yourself, “There is no way that this plan will work. You can’t make requests to third-party servers. The browser doesn’t allow this.”
Normally, you’d be right. In a traditional browser-based application, you’re not allowed to have your client-side code make requests to other servers. Typically, your client-side code makes a request to your server which in turn proxies the request to the third-party server. When it hears back, it proxies the response back to the client. We discussed some of the reasoning behind this in chapter 1.
Electron has all the abilities of a Node server along with all the bells and whistles of a browser. This means that we’re free to make cross-origin requests without the need for a server to get in the way.
Another perk of writing this application in Electron is that we’re able to use the up-and-coming Fetch API to make requests to remote servers. The Fetch API spares us the hassle of setting up XMLHttpRequests by hand and gives a nice, promise-based interface for working with our requests. As of this writing, Fetch has limited support among the major browsers. That said, it has full support in the current version of Chromium, which means we can use it.
We add an event listener to the form to spring into action whenever the form has been submitted. We don’t have a server, so we need to be sure to prevent the default action of making a request. We do this by preventing the default action. We also cache the value of the URL input field for future use.
newLinkForm.addEventListener('submit', (event) => {
  event.preventDefault();                             1

  const url = newLinkUrl.value;                       2

  // More code to come...
});
The Fetch API is available as a globally available fetch variable. Fetching a URL returns a promise object, which will be fulfilled when the browser has completed fetching the remote resource. With this promise object, we could handle the response differently depending on if we decided to fetch a webpage, an image, or some other kind of content. In this case, we’re fetching a webpage, so we convert the response to text. We start with the following code inside our event listener.
fetch(url)                                1
  .then(response => response.text());     2
Promises are chainable. We can take the return value of the previous promise and tack on another call to then. Additionally, response.text() itself returns a promise. Our next step will be to take the big block of markup that we received and parse it to traverse it and find the <title> element.
Chromium provides a parser that will do this for us, but we need to instantiate it. At the top of app/renderer.js, we create an instance of DOMParser and store it for later use.
const parser = new DOMParser(); 1
Let’s set up a pair of helper functions that parse the response and find the title for us.
const parseResponse = (text) => {
  return parser.parseFromString(text, 'text/html');      1
}

const findTitle = (nodes) =>{
  return nodes.querySelector('title').innerText;         2
}
We can now add those two steps to our promise chain.
fetch(url)
  .then(response => response.text())
  .then(parseResponse)
  .then(findTitle);
At this point, the code in app/renderer.js looks like this.
const parser = new DOMParser();

const linksSection = document.querySelector('.links');
const errorMessage = document.querySelector('.error-message');
const newLinkForm = document.querySelector('.new-link-form');
const newLinkUrl = document.querySelector('.new-link-url');
const newLinkSubmit = document.querySelector('.new-link-submit');
const clearStorageButton = document.querySelector('.clear-storage');

newLinkUrl.addEventListener('keyup', () => {
  newLinkSubmit.disabled = !newLinkUrl.validity.valid;
});

newLinkForm.addEventListener('submit', (event) => {
  event.preventDefault();

  const url = newLinkUrl.value;

  fetch(url)
    .then(response => response.text())
    .then(parseResponse)
    .then(findTitle)
});

const clearForm = () => {
  newLinkUrl.value = null;
}

const parseResponse = (text) => {
  return parser.parseFromString(text, 'text/html');
}

const findTitle = (nodes) => {
  return nodes.querySelector('title').innerText;
}
localStorage is a simple key/value store that is built into the browser and persists between sessions. You can store simple data types like strings and numbers under an arbitrary key. Let’s set up another helper function that will make a simple object out of the title and URL, convert it into a string using the built-in JSON library, and then store it using the URL as the key.
const storeLink = (title, url) => {
  localStorage.setItem(url, JSON.stringify({ title: title, url: url }));
};
Our new storeLink function needs the title as well as the URL to get its job done, but the previous promise returns only the title. We use an arrow function to wrap our call to storeLink in an anonymous function that has access to the url variable in scope. If that is successful, we clear the form as well.
fetch(url)
    .then(response => response.text())
    .then(parseResponse)
    .then(findTitle)
    .then(title => storeLink(title, url))           1
    .then(clearForm);
Storing the links is not enough. We also want to display them to the user. This means that we need to create the functionality to go through all the links that we stored, turn them into DOM nodes, and then add them to the page.
Let’s start with the ability to get all the links out of localStorage. If you recall, localStorage is a key/value storage. We can use Object.keys to get all the keys out of an object. We have to give ourselves another helper function to get all the links out of localStorage. This isn’t a huge deal because we needed to convert them from strings back into real objects anyway. Let’s define a getLinks function.
const getLinks = () => {
  return Object.keys(localStorage)                                  1
               .map(key => JSON.parse(localStorage.getItem(key)));  2
}
Next, we take these simple objects and convert them into markup so that we can add them to the DOM later. We create a simple convertToElement helper that can take care of this as well. It’s important to mention that our convertToElement function is a bit naive and does not try to sanitize user input. In theory, your application is vulnerable to script-injection attacks. It’s a bit outside of the scope of this chapter, so we do just the bare minimum to render these links onto the page. I’ll leave it as an exercise to the reader to secure this feature.
const convertToElement = (link) => {
  return `
<div class="link">
<h3>${link.title}</h3>
<p>
<a href="${link.url}">${link.url}</a>
</p>
</div>
`;
};
Finally, we create a renderLinks() function that calls getLinks, concatenates them, converts the collection using convertToElement(), and then replaces the linksSection element on the page.
const renderLinks = () => {
  const linkElements = getLinks().map(convertToElement).join('');    1
  linksSection.innerHTML = linkElements;                             2
};
We can now add now add this final step to our promise chain.
fetch(url)
  .then(response => response.text())
  .then(parseResponse)
  .then(findTitle)
  .then(title => storeLink(title, url))
  .then(clearForm)
  .then(renderLinks);
We also render all of the links when the page initially loads simply by calling renderLinks() at the top-level scope.
renderLinks(); 1
One of the advantages of using promises in coordination with breaking out functionality into named helper functions is that it’s very clear what our code is doing as it works through fetching the external webpage, parsing it, storing the result, and re-rendering the list of links.
The final thing we need to complete all of the functionality for our simple application is to wire up the Clear Storage button. We call the clear method on localStorage and then empty the list in linksSection.
clearStorageButton.addEventListener('click', () => {
  localStorage.clear();                                 1
  linksSection.innerHTML = '';                          2
});
With the Clear Storage button in place, it seems we have most of the functionality in place. Our application now looks something like figure 2.8. At this point, our code for our renderer process should look like listing 2.30.
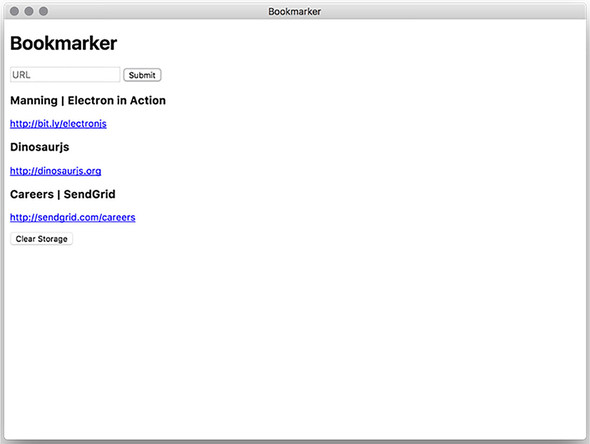
const parser = new DOMParser();

const linksSection = document.querySelector('.links');
const errorMessage = document.querySelector('.error-message');
const newLinkForm = document.querySelector('.new-link-form');
const newLinkUrl = document.querySelector('.new-link-url');
const newLinkSubmit = document.querySelector('.new-link-submit');
const clearStorageButton = document.querySelector('.clear-storage');

newLinkUrl.addEventListener('keyup', () => {
  newLinkSubmit.disabled = !newLinkUrl.validity.valid;
});

newLinkForm.addEventListener('submit', (event) => {
  event.preventDefault();

  const url = newLinkUrl.value;

  fetch(url)
    .then(response => response.text())
    .then(parseResponse)
    .then(findTitle)
    .then(title => storeLink(title, url))
    .then(clearForm)
    .then(renderLinks);
});

clearStorageButton.addEventListener('click', () => {
  localStorage.clear();
  linksSection.innerHTML = '';
});

const clearForm = () => {
  newLinkUrl.value = null;
}

const parseResponse = (text) => {
  return parser.parseFromString(text, 'text/html');
}

const findTitle = (nodes) => {
  return nodes.querySelector('title').innerText;
}

const storeLink = (title, url) => {
  localStorage.setItem(url, JSON.stringify({ title: title, url: url }));
}

const getLinks = () => {
  return Object.keys(localStorage)
               .map(key => JSON.parse(localStorage.getItem(key)));
}

const convertToElement = (link) => {
  return `<div class="link"><h3>${link.title}</h3>
<p><a href="${link.url}">${link.url}</a></p></div>`;
}

const renderLinks = () => {
  const linkElements = getLinks().map(convertToElement).join('');
  linksSection.innerHTML = linkElements;
}

renderLinks();
So far, everything appears to work. Our application fetches the title from the external webpage, stores the link locally, renders the links on the page, and clears them from the page when we ask it to.
But what happens if something goes wrong? What happens if we give it an invalid link? What happens if the request times out? We’ll handle the two most likely cases: when the user provides a URL that passed the validation check on the input field but is not in fact valid, and when the URL is valid but the server returns a 400- or 500-level error.
The first thing we add is the ability to handle any error. Promise chains support a catch method, which is called into action in the event of an uncaught error. We define another helper method in this event.
const handleError = (error, url) => {
  errorMessage.innerHTML = `
There was an issue adding "${url}": ${error.message}
  `.trim();                                                  1
  setTimeout(() => errorMessage.innerText = null, 5000);     2
}
We can add that to the chain. We use another anonymous function to pass along the URL with our error message. This is primarily for providing better error messages. It’s not necessary if you don’t want to include the URL in the error message.
fetch(url)
  .then(response => response.text())
  .then(parseResponse)
  .then(findTitle)
  .then(title => storeLink(title, url))
  .then(clearForm)
  .then(renderLinks)
  .catch(error => handleError(error, url));        1
We also add a step early on to the chain that checks to see if the request was successful. If so, it passes the request along to the next promise in the chain. If it was not successful, then we throw an error, which circumvents the rest of the promises in the chain and skips directly to the handleError() step. There is an edge case here that I didn’t handle: the promise returned from the Fetch API rejects outright if it cannot establish a network connection. I leave that as an exercise to the reader to handle because we have a lot to cover in this book and a limited number of pages to do it in. response.ok will be false if its status code is in the 400- or 500-range.
const validateResponse = (response) => {
  if (response.ok) { return response; }                  1
  throw new Error(`Status code of ${response.status}
     ${response.statusText}`);                           2
}
This code passes the response object along if there is nothing wrong. But if there is something wrong, it throws an error, which is caught by handleError() and dealt with accordingly.
fetch(url)
  .then(validateResponse)
  .then(response => response.text())
  .then(parseResponse)
  .then(findTitle)
  .then(title => storeLink(title, url))
  .then(clearForm)
  .then(renderLinks)
  .catch(error => handleError(error, url));
We’re not out of the woods yet—we also have an issue in the event that everything goes well. What happens if we click one of the links in our application? Perhaps unsurprisingly, it goes to that link. The Chromium part of our Electron application thinks that it is a web browser, and so it does what web browsers do best—it goes to the page.
Except our application is not really a web browser. It lacks important things like a Back button or a location bar. If we click any of the links in our application, we’re pretty much stuck there. Our only option is to kill the application and start all over.
The solution is to open the links in a real browser. But this raises the question, which browser? How can we tell what the user has set as their default browser? We certainly don’t want to take any lucky guesses because we don’t know what browsers the user has installed and no one likes seeing the wrong application start opening just because they clicked a link.
Electron ships with the shell module, which provides some functions related to high-level desktop integration. The shell module can ask the user’s operating system what browser they prefer and pass the URL to that browser to open. Let’s start by pulling in Electron and storing a reference to its shell module at the top of app/renderer.js.
const {shell} = require('electron');
We can use JavaScript to determine which URLs we want to handle in our application and which ones we want to pass along to the default browser. In our simple application, the distinction is easy. We want all of the links to open in the default browser. Links are being added and removed in this application, so we set an event listener on the linksSection element and allow click events to bubble up. If the target element has an href attribute, we prevent the default action and pass the URL to the default browser instead.
linksSection.addEventListener('click', (event) => {
  if (event.target.href) {                           1
    event.preventDefault();                          2
    shell.openExternal(event.target.href);           3
  }
});
With that relatively simple change, our code behaves as expected. Clicking a link will open that page in the user’s default browser. We have a simple—yet fully functional—desktop application.
Our finished code should look something like the following code example. You may have your functions in a different order.
const {shell} = require('electron');

const parser = new DOMParser();

const linksSection = document.querySelector('.links');
const errorMessage = document.querySelector('.error-message');
const newLinkForm = document.querySelector('.new-link-form');
const newLinkUrl = document.querySelector('.new-link-url');
const newLinkSubmit = document.querySelector('.new-link-submit');
const clearStorageButton = document.querySelector('.clear-storage');

newLinkUrl.addEventListener('keyup', () => {
  newLinkSubmit.disabled = !newLinkUrl.validity.valid;
});

newLinkForm.addEventListener('submit', (event) => {
  event.preventDefault();

  const url = newLinkUrl.value;

  fetch(url)
    .then(response => response.text())
    .then(parseResponse)
    .then(findTitle)
    .then(title => storeLink(title, url))
    .then(clearForm)
    .then(renderLinks)
    .catch(error => handleError(error, url));
});

clearStorageButton.addEventListener('click', () => {
  localStorage.clear();
  linksSection.innerHTML = '';
});

linksSection.addEventListener('click', (event) => {
  if (event.target.href) {
    event.preventDefault();
    shell.openExternal(event.target.href);
  }
});

const clearForm = () => {
  newLinkUrl.value = null;
};

const parseResponse = (text) => {
  return parser.parseFromString(text, 'text/html');
};

const findTitle = (nodes) => {
  return nodes.querySelector('title').innerText;
};

const storeLink = (title, url) => {
  localStorage.setItem(url, JSON.stringify({ title: title, url: url }));
};

const getLinks = () => {
  return Object.keys(localStorage)
               .map(key => JSON.parse(localStorage.getItem(key)));
};

const convertToElement = (link) => {
  return `<div class="link"><h3>${link.title}</h3>
<p><a href="${link.url}">${link.url}</a></p></div>`;
};

const renderLinks = () => {
  const linkElements = getLinks().map(convertToElement).join('');
  linksSection.innerHTML = linkElements;
};

const handleError = (error, url) => {
  errorMessage.innerHTML = `
    There was an issue adding "${url}": ${error.message}
  `.trim();
  setTimeout(() => errorMessage.innerText = null, 5000);
};

const validateResponse = (response) => {
  if (response.ok) { return response; }
  throw new Error(`Status code of ${response.status}
     ${response.statusText}`);
}

renderLinks();
In part 1, I talked a bit about what makes Electron interesting and special, but our first run at building an Electron application was deliberately simple and—I’ll admit—a bit uninspired. In part 2—which takes up the lion’s share of this book—we’ll start digging into Electron’s more compelling abilities. In this section, we’ll build three applications: a Markdown text editor with a live preview and direct access to the filesystem, a clippings manager that lives in your operating system’s menu bar or system tray and can read and write to the system clipboard, and a travel packing list built with React that can read and write directly to a native database.
In part 2, I try to walk a fine line by having you build applications that are simple enough that you can understand them in short order while also having just enough complexity that we’ll run into some of the problems waiting for us in larger, more complex applications.
In chapter 3, we’ll lay the foundation for Fire Sale, our Markdown editor, by implementing the UI. We’ll also look into the finer points of debugging an Electron application. In chapter 4, we’ll explore the relationship between the main Node.js process and the one or more browser windows—which are called renderer processes—you can spawn. We’ll read from and write to the filesystem and send data back and forth between processes. In chapter 5, I’ll cover how to manage multiple windows and dig a bit deeper into Electron’s interprocess communication model.
Chapter 6 covers some of the finer points of integrating with the native operating system. We’ll determine whether a file has unsaved changes and update the title bar provided by the operating system accordingly. We’ll append our documents to the operating system’s list of recent documents and listen to see if another application has changed a file currently open in Fire Sale. Chapter 7 explores how to build native application and context menus, which is not normally something web and Node.js developers encounter often. In chapter 8, we’ll put the finishing touches on Fire Sale by implementing additional integrations with the host operating system as well as dynamically updating menus by enabling and disabling menu items as the state of the application changes.
In chapter 9, we’ll set out to build an application in a place where no web developer has gone before: the menu bar in macOS and the system tray in Windows. Clipmaster is a simple application that allows you to read text from the system clipboard and store it in memory. When an item is selected, it’s written back to the clipboard for easy pasting. It’s an application I used thoroughly in writing this book. In chapter 10, we’ll burn the entire application down and start over from scratch, giving it a more robust UI in the process.
Until chapter 11, we use a very limited set of tools for manipulating the DOM. As you read through the chapters leading up to chapter 11, you may be getting grand ideas about how you would integrate your favorite frontend framework. Your patience will be rewarded as we see that implementing tools like Babel, TypeScript, or Sass are easier than you could have imagined. We’ll build a simple list manager called Jetsetter that keeps track of the items you need to pack before your next great adventure. I’ll be using React solely because it has the gentlest learning curve, but I assure you that there are great libraries for Ember, Angular, and Vue as well.
You may have used a tool like webpack or Browserify to pull dependencies from npm into your application. If so, you might have come across a set of modules, which typically use compiled C++ code, that are off limits. Browsers, generally speaking, can work only with JavaScript. But Electron applications are not mere browser applications. In chapter 12, we’ll take Jetsetter and hook it directly to a portable SQLite database. We’ll figure out how to correctly compile your modules for the version of Node.js that ships with Electron. I’ll implement persistent storage in a browser-based IndexedDB database, in an effort to help you determine which approach you might prefer for your own applications.
Chapter 13 covers end-to-end testing using Spectron, which is based on Selenium. In this chapter, I’ll show you how to write tests that spin up your Electron application and take it for a ride. By the end of part 2, you’ll be comfortable with a large subset of everything Electron has to offer, and the creative juices will certainly be flowing.
Our bookmark manager was a fine place to start, but it only scratches the surface of what we can do with Electron. In this chapter, we dig a little bit deeper and lay the foundation for an application with stronger ties to the user’s operating system. Over the course of the next few chapters, we’ll implement features that trigger the operating system’s GUIs, read from and write to the filesystem, and access the clipboard.
We are building a simple note editor that allows us to create new or open existing Markdown files, convert them to HTML, and save the HTML to the filesystem and clipboard. Let’s call the application Fire Sale as an only slightly clever play on price markdowns—because it’s a Markdown editor after all. At the end of the chapter, we’ll discuss the techniques and tools available for debugging our Electron applications when things go awry.
Let’s start by setting goals for our humble, little application. Many of our features might seem a bit banal for a desktop application, and that’s the point. They’re standard fare for a desktop application but completely outside of the realm of abilities for traditional web applications, which cannot access anything outside of their isolated browser tab. Our application will consist of two panes: a left pane where the user can write or edit Markdown and a right pane that displays the user’s Markdown rendered as HTML. Along the top we have a series of buttons, which will allow the user to load a text file from the filesystem as well as write the result to the clipboard or filesystem.
In the first phase of our application, we build a UI based on the wireframe in figure 3.1. We can also add additional UI elements to the wireframe—and subsequently our application—as we go along, but this is a good place to start.
In this chapter, we lay the foundation for our application. We create the project’s structure, install our dependencies, set up our main and renderer processes, build our UI, and implement the Markdown-to-HTML rendering when the user enters text into the left pane.
We build the remainder of the application in phases over the next several chapters. In each chapter, you’ll download the current state of our application. This way you can flip to a chapter that covers the functionality you’re interested in without having to build the entire application from scratch.
In the first phase, our application will be able to
In later chapters, our application tracks recently opened documents using the native operating system APIs. We can drag Markdown files from the Finder or Windows Explorer onto our application and have the application immediately open that Markdown file. Our application will have its own custom application menu as well as custom context menus when we right-click on different areas of our application.
We also take advantage of OS-specific features such as updating the application’s title bar to show the file that is currently open and whether it has been changed since the last time it was saved. We also implement additional features such as updating the content in the application if some other application on the computer changes the file while we have it open.
The file structure, shown in figure 3.2, is unsurprisingly similar to the structure we agreed upon and used for our bookmark manager in the previous chapter. For the sake of simplicity and clarity as we continue to get comfortable with Electron, we keep all of the code for the main process in app/main.js and all of the code for our single renderer process in app/renderer.js. We store the app folder on a UNIX-based operating system so we can generate it quickly, as shown in the following listing. Alternatively, you can check out the master branch for this project on GitHub at https://github.com/electron-in-action/firesale.
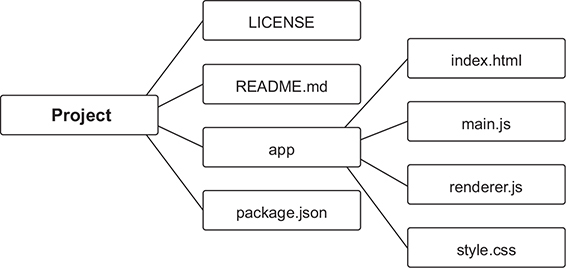
mkdir app && touch app/index.html app/main.js app/renderer.js app/style.css
The parts of the project are
To keep things simple, we start with two dependencies in addition to Electron as our run time. We use a library called marked to handle the heavy lifting of converting Markdown to HTML.
To generate a package.json for this project, run npm init --yes. The --yes flag allows you to skip the prompts from the previous chapter. After you generate the package.json file, run the following command to install the necessary dependencies:
npm install electron marked --save
The main entry in our package.json is configured to load index.js as the main process for our application shown in figure 3.3. We need to adjust this to app/main.js. We also need to fire up a renderer process to present the user with an interface for our application. In app/main.js, let’s add the following code.
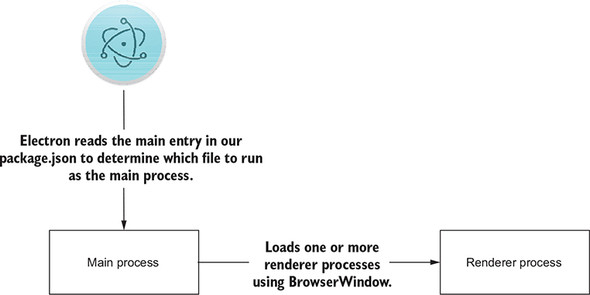
const { app, BrowserWindow } = require('electron');

let mainWindow = null;                     1

app.on('ready', () => {
  mainWindow = new BrowserWindow();        2

  mainWindow.loadFile('index.html');       3

  mainWindow.on('closed', () => {
    mainWindow = null;                     4
  });
});
This is enough to start up our application. That said, there is not a lot going on because our main process currently loads an empty file in the renderer process.
Implementing the requisite amount of HTML and CSS to get a workable version of the wireframe in figure 3.1 is fairly easy in Electron because we need to support only one browser, and that browser supports the latest and greatest features that the web platform offers, as shown in figure 3.4.
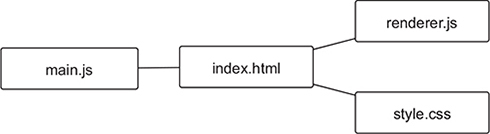
In index.html, we add the markup in listing 3.3 to create the browser window in figure 3.5.
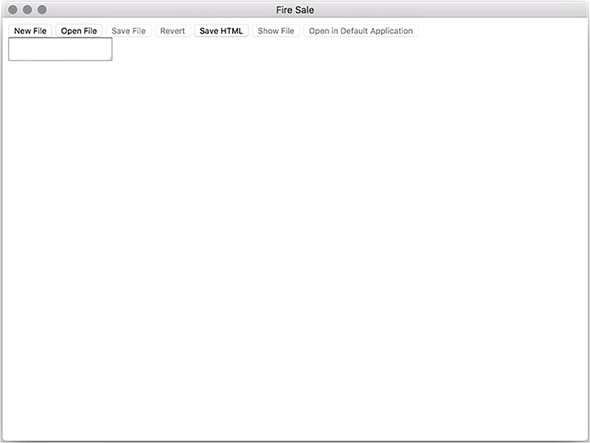
<!DOCTYPE html>
<html>
  <head>
    <meta charset="UTF-8">
    <meta name="viewport" content="width=device-width,initial-scale=1">
    <title>Fire Sale</title>
    <link rel="stylesheet" href="style.css" type="text/css">
  </head>
  <body>

    <section class="controls">                                     1
      <button id="new-file">New File</button>
      <button id="open-file">Open File</button>
      <button id="save-markdown" disabled>Save File</button>
      <button id="revert" disabled>Revert</button>
      <button id="save-html">Save HTML</button>
      <button id="show-file" disabled>Show File</button>
      <button id="open-in-default" disabled>Open in Default
       Application</button>
    </section>

    <section class="content">                                     2
      <label for="markdown" hidden>Markdown Content</label>       3
      <textarea class="raw-markdown" id="markdown"></textarea>
      <div class="rendered-html" id="html"></div>
    </section>

  </body>
  <script>                                                        4
    require('./renderer');
  </script>
</html>
Our application isn’t much to look at just yet. If you’re anything like me, you’ve been a bit skeptical about that two-column interface I introduced in the wireframe. The word easy is rarely used when discussing how to implement columns using HTML and CSS. Luckily, we can confidently use a new layout mode added to CSS3 called Flexbox to quickly define the two-column layout of our application. Flexbox makes it easy to create page layouts that behave predictably across a wide range of screen sizes, as shown in listing 3.4. It’s relatively new to CSS and—until recently—was not supported by Internet Explorer. As we discussed in chapters 1 and 2, our applications are always coupled with a recent version of Chrome, so we can confidently use the Flexbox layout mode without having to worry about cross-browser compatibility.
html {
  box-sizing: border-box;                  1
}

*, *:before, *:after {
  box-sizing: inherit;                     2
}

html, body {
  height: 100%;
  width: 100%;
  overflow: hidden;
}

body {
  margin: 0;
  padding: 0;
  position: absolute;
}

body, input {                               3
  font: menu;
}

textarea, input, div, button {
  outline: none;                            4
  margin: 0;
}

.controls {
  background-color: rgb(217, 241, 238);
  padding: 10px 10px 10px 10px;
}

button {
  font-size: 14px;
  background-color: rgb(181, 220, 216);
  border: none;
  padding: 0.5em 1em;
}

button:hover {
  background-color: rgb(156, 198, 192);
}

button:active {
  background-color: rgb(144, 182, 177);
}

button:disabled {
  background-color: rgb(196, 204, 202);
}

.container {
  display: flex;
  flex-direction: column;
  min-height: 100vh;
  min-width: 100vw;
  position: relative;
}

.content {
  height: 100vh;
  display: flex;                            5
}

.raw-markdown, .rendered-html {
  min-height: 100%;
  max-width: 50%;
  flex-grow: 1;                             6
  padding: 1em;
  overflow: scroll;
  font-size: 16px;
}

.raw-markdown {
  border: 5px solid rgb(238, 252, 250);;
  background-color: rgb(238, 252, 250);
  font-family: monospace;
}
We have two major goals for the stylesheet. First, we want to take advantage of modern CSS features like Flexbox to lay out our UI. Second, we want to take small steps toward making our application look and feel a bit more like a real web application (see figure 3.6).
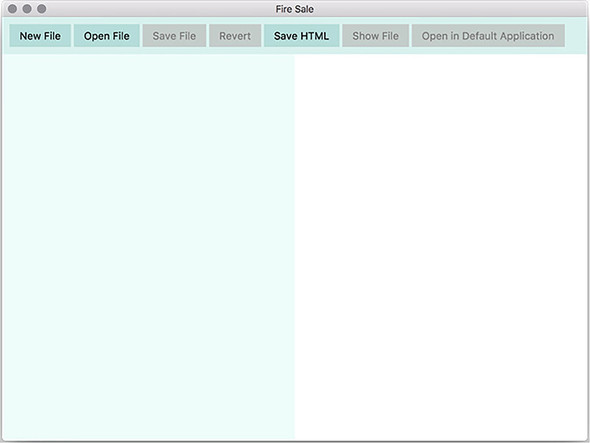
The box-sizing property handles an historical oddity in CSS where adding 50 pixels of padding to an element with a width of 200 pixels would cause it to be 300 pixels wide (adding 50 pixels of padding on each side), with the same being true for borders as well. When box-sizing is set to border-box, our elements respect the height and width that we set them to. Generally speaking, this is a good thing. In this CSS rule, we also have every other element and pseudoelement respect the hard work we did by setting box-sizing to border-box.
We want our applications to fit in with their native colleagues. One important step in that direction is to use the system font that all of the other applications use. That’s easier said than done. For example, despite the fact that macOS uses San Francisco as the default font throughout the operating system, it’s not available as a regular font. We set the font property to menu, which defers to the operating system to use its default font—even if we wouldn’t otherwise have access to it.
The browser puts a border around whatever UI element is currently active. In macOS, this border is a blue glow. You’ve probably never thought much about it, because we’re used to it on the web, but it looks out of place when we’re developing a desktop application. It looks especially bad in our application where one-half of the UI is effectively a large text input. By setting outline to none, we remove the unnatural glow around the active element.
In the .content, .raw-markdown, and .rendered-html rules, we implement a simple Flexbox layout, which will make our application look more like the wireframe we introduced in figure 3.1. The element with the content class will hold our two columns. We set the display property to flex to use the Flexbox technology we discussed earlier. In the next step, we set flex-grow, which specifies the grow factor for a flex item, of course. It’s probably helpful to think of this as the element’s scale in relation to its sibling. In this case, we set both columns to an equal ratio using Flexbox.
If you look closely as your application launches, you’ll notice a brief moment when the window is completely blank before Electron loads index.html and renders the DOM in the window. Users are not used to seeing this in native applications, and we can avoid it by rethinking how we launch the window.
The flash of nothingness when the application first launches makes sense if you consider the code in the main process: it creates a window and then loads content in it. What if we hide the window until the content is loaded? Then, when the UI is ready, we show the window and avoid briefly exposing an empty window.
app.on('ready', () => {
  mainWindow = new BrowserWindow({ show: false });   1

  mainWindow.loadFile('index.html');

  mainWindow.once('ready-to-show', () => {           2
    mainWindow.show();                               3
  });

  mainWindow.on('closed', () => {
    mainWindow = null;
  });
});
We passed an object to the BrowserWindow constructor, setting it as hidden by default. When the BrowserWindow instance fires its ’ready-to-show’ event, we’ll call its show() method, which will bring it out of hiding after the UI is fully ready to go. This approach is even more useful when the application is loading a remote resource over the network, which is likely to take much longer to initialize the page.
Let’s put a stake in the ground by getting some of the basic functionality in place. For starters, we want to update the rendered HTML view in the right pane whenever the Markdown in the left pane changes (see figure 3.7). This is where our one dependency—marked—comes in to play.
Bringing in our dependencies is easy because we can use Node’s require to pull in marked. Let’s add the following in app/renderer.js.
const marked = require('marked');
Now, we have access to Marked using marked. Given our discussion of the application’s functionality along with the diagram in figure 3.7, you’ve probably begun to suspect that we’ll be working with the #markdown text area and the #html element a fair amount as we develop our application. Let’s use a pair of variables to store a reference to each element so that they’re easier to work with, as shown in listing 3.7. While we’re at it, let’s also create variables for each of the buttons along the top of the UI.
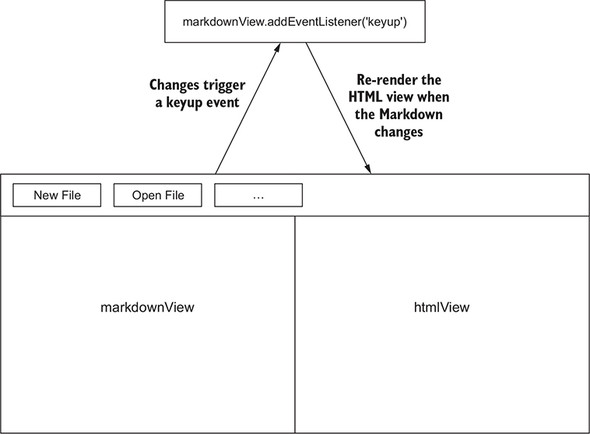
const markdownView = document.querySelector('#markdown');
const htmlView = document.querySelector('#html');
const newFileButton = document.querySelector('#new-file');
const openFileButton = document.querySelector('#open-file');
const saveMarkdownButton = document.querySelector('#save-markdown');
const revertButton = document.querySelector('#revert');
const saveHtmlButton = document.querySelector('#save-html');
const showFileButton = document.querySelector('#show-file');
const openInDefaultButton = document.querySelector('#open-in-default');
We also render Markdown into htmlView fairly frequently, so we want to give ourselves a function to make this easier for us in the future.
const renderMarkdownToHtml = (markdown) => {
  htmlView.innerHTML = marked(markdown, { sanitize: true });
};
marked takes the Markdown content we want to render as the first argument and an object of options as the second argument. We’d like to protect ourselves from accidental script injections, so we pass in an object with the sanitize property set to true.
Finally, we add an event listener to markdownView that on keyup will read its contents (which, in textarea elements, is stored in its value property), run them through marked, and then load them into htmlView. The result is shown in figure 3.8.
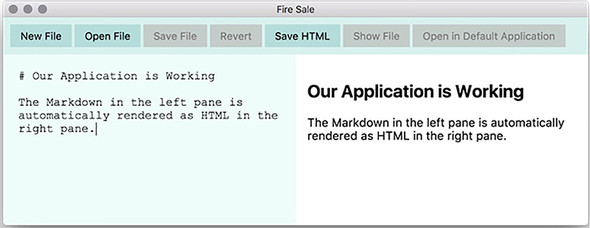
markdownView.addEventListener('keyup', (event) => {
  const currentContent = event.target.value;
  renderMarkdownToHtml(currentContent);
});
The basic functionality is in place and we’re ready to begin working on the features that would only be possible in an Electron application—starting with reading and writing files from and to the filesystem. When all is said and done, the renderer process of our application should look like this.
const marked = require('marked');

const markdownView = document.querySelector('#markdown');
const htmlView = document.querySelector('#html');
const newFileButton = document.querySelector('#new-file');
const openFileButton = document.querySelector('#open-file');
const saveMarkdownButton = document.querySelector('#save-markdown');
const revertButton = document.querySelector('#revert');
const saveHtmlButton = document.querySelector('#save-html');
const showFileButton = document.querySelector('#show-file');
const openInDefaultButton = document.querySelector('#open-in-default');

const renderMarkdownToHtml = (markdown) => {
  htmlView.innerHTML = marked(markdown, { sanitize: true });
};

markdownView.addEventListener('keyup', (event) => {
  const currentContent = event.target.value;
  renderMarkdownToHtml(currentContent);
});
In an ideal world, we’d never make mistakes when writing code. APIs and methods would never change between versions and your author wouldn’t have to hold his breath every time a new version of a dependency used by the applications in this book was released. We don’t live in that world. Thus, we have developer tools at our disposal to aide us in tracking down and—hopefully—eliminating bugs.
Everything has been going pretty smoothly so far, but it probably won’t be long before we’re going to have to debug some tricky situation. Because Electron applications are based on Chrome, it’s no surprise that we have access to the Chrome Developer Tools when building Electron applications (figure 3.9).
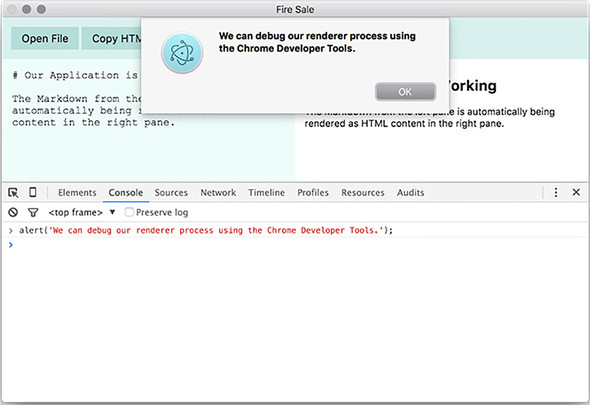
Debugging the renderer process is relatively straightforward. Electron’s default application menu provides a command for opening up the Chrome Developer Tools in our application. In chapter 6, we’ll learn how to create our own custom menu and eliminate this feature in the event that you’d prefer not to expose it your users.
There are also two other ways to access the Developer Tools. At any point, you can press Command-Option-I on macOS or Control-Shift-I on Windows or Linux to open up the tools (figure 3.10). In addition, you can trigger the Developer Tools programmatically. The webContents property on BrowserWindow instances has a method called openDevTools(). This method, as explained in listing 3.11, will open the Developer Tools in the BrowserWindow it’s called on.
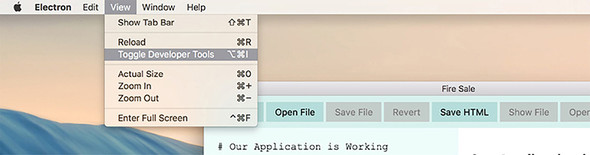
app.on('ready', () => {
  mainWindow = new BrowserWindow();

  mainWindow.loadFile('index.html');

  mainWindow.once('ready-to-show', () => {
    mainWindow.show();
    mainWindow.webContents.openDevTools();        1
  });

  mainWindow.on('closed', () => {
    mainWindow = null;
  });
});
Debugging the main process is not so easy. Node Inspector, a common tool for debugging Node.js applications, is not fully supported by Electron at this time. You can start your Electron application in debug mode using the --debug flag, which will—by default—enable remote debugging on port 5858.
Limited support for using Node Inspector with Electron is available in the official documentation. As this is still in a bit of flux for the time being, you should review the most recent version of the documentation if you are not using Visual Studio Code (http://electron.atom.io/docs/tutorial/debugging-main-process/). That said, I haven’t found this technique particularly stable and wouldn’t recommend it. Your mileage may vary.
Visual Studio Code is a free, open source IDE available for Windows, Linux, and macOS and is—coincidentally—built on top of Electron by Microsoft. Visual Studio Code comes with a rich set of tools for debugging Node applications that make it much easier to debug Electron applications than noted previously. A quick way to set up a build task is to ask Visual Studio Code to build the application without a build task. Press Control-Shift-B on Windows or Command-Shift-B on macOS and you’ll be prompted to create a build task, as shown in figure 3.11.
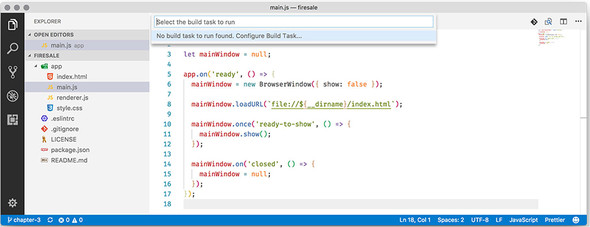
Clicking on the Configure Build Task menu item will prompt you to select whether you want to create a “start” or “test” task. Choosing “start” will generate a task that calls npm start. Choosing “test” will generate npm test. Listing 3.12 is an example of what a “start” task looks like.
{
  // See https://go.microsoft.com/fwlink/?LinkId=733558
  // for the documentation about the tasks.json format
  "version": "2.0.0",
  "tasks": [
    {
      "type": "npm",
      "script": "start",
      "group": {
        "kind": "build",
        "isDefault": true
      }
    }
  ]
}
Now, when you press Control-Shift-B on Windows or Command-Shift-B on macOS, your Electron application will start up. Not only is this important in order to set up debugging within Visual Studio Code, it’s also a convenient way to start up your application in general. The next step is to set up Visual Studio Code to launch the application and connect it to its built-in debugger (figure 3.12).
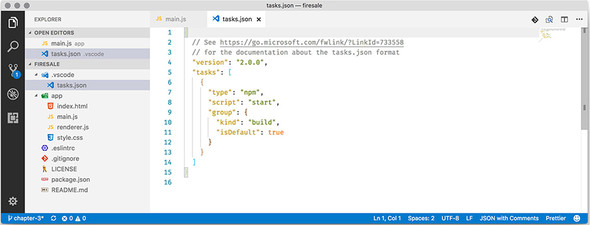
To create a launch task, go the Debug tab in the left pane and click on the small gear in the upper-left corner. Visual Studio Code will ask you what kind of configuration file you’d like to create. Select Node and replace the contents of the file with listing 3.13.
{
  "version": "0.2.0",
  "configurations": [
    {
      "name": "Debug Main Process",
      "type": "node",
      "request": "launch",
      "cwd": "${workspaceRoot}",
      "runtimeExecutable":
        "${workspaceRoot}/node_modules/.bin/electron",
      "windows": {
        "runtimeExecutable":
          "${workspaceRoot}/node_modules/.bin/electron.cmd"
      },
      "args":
        "."
      ]
    }
  ]
}
With this configuration file in place, you can click on the left margin of any line in your main process to set a breakpoint and then press F5 to run the application. Execution will pause at the breakpoint, allowing you to inspect the call stack, determine what variables are in scope, and interact with a live console. Breakpoints aren’t the only way to debug your code. You can also watch for particular expressions or drop into the debugger whenever an uncaught exception is thrown (figure 3.13).
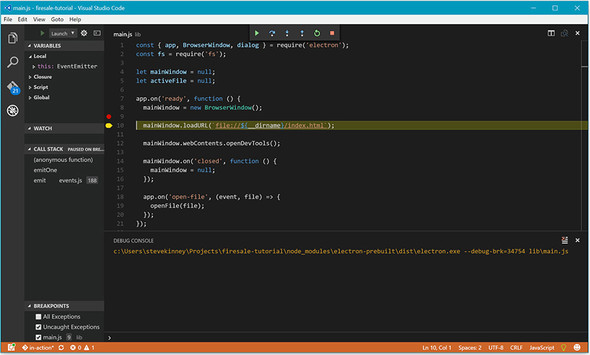
There is a high chance that you’re not using Visual Studio Code. That’s fine. It’s not a prerequisite for this book and you will almost definitely be fine using the text editor or IDE you’re most comfortable with. In addition, Visual Studio Code isn’t the only one with support for debugging the main process. For example, you can find details for configuring WebStorm here: http://mng.bz/Y5T6.
In the previous chapter, we laid the foundation for our first Electron project, a notes application that takes Markdown from the left pane and renders it as HTML in the right pane. We set up our main process and configured it to spawn a renderer. We set up package.json, installed the necessary dependencies, created the main and renderer processes, and laid out the UI. We also explored ways we can make our application feel like a desktop application, but we haven’t added a feature that is far outside the scope of what a traditional web application could do yet.
Right now, the application allows the user to write in the Markdown view. When the user presses a key in the Markdown view, the application automatically renders the Markdown to HTML and displays it in the HTML view.
In this chapter, we’ll add the ability to trigger a native file dialog box and select a text file from anywhere on the filesystem and load it into our application. By the end of the chapter, the Open File button in the renderer process’s browser window will trigger the Open File dialog box from the main process. Before we can do that, it’s important to discuss how to communicate between processes in a bit more depth. We start on the chapter-3 branch, which can be found at http://mng.bz/11Kd. The code at the end of the chapter can be found at http://mng.bz/0C34. Alternatively, you can pull down the master branch and check out either of these two branches.
git clone  https://github.com/electron-in-action/firesale.git chapter-3
git checkout -f chapter3
An easy way to get started is to prompt the user for a file to open when the application first starts and emits its ready event, as shown in figure 4.1. Our application is already listening for the ready event before we create our BrowserWindow instance. Later in this chapter, we learn how to trigger this functionality from the UI. In the next chapter, we learn how to trigger it from the application menu as well.
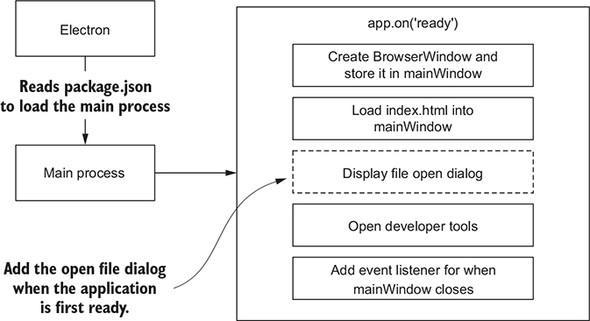
You create native dialogs using Electron’s dialog module. Add the code in listing 4.1 to app/main.js just beneath where the other Electron modules are required.
const { app, BrowserWindow, dialog } = require('electron');
Eventually the application should trigger our file-opening functionality from multiple places. The first step is to create a function to reference later. Start by logging the name of the file selected to the console after it has been selected.
const getFileFromUser = () => {
  const files = dialog.showOpenDialog({     1
    properties: ['openFile']                2
  });

  if (!files) { return; }                   3

  console.log(files);                       4
};
Our getFileFromUser() function is a wrapper over dialog.showOpenDialog() that we can use in multiple places in our application without having to repeat ourselves. It will trigger the showOpenDialog() method on dialog and pass it a JavaScript object with different settings that we can adjust as needed. In JavaScript, an object’s keys are called its properties. The properties of the object passed to dialog.showOpen-Dialog() configure certain characteristics of the dialog box we’re creating. One such setting is the properties of the dialog box itself. The properties property on the configuration object takes an array of different flags we can set on the dialog box. In this case, we’re activating only the openFile flag, which signifies that this dialog box is for selecting a file to open—as opposed to selecting a directory or multiple files. The other flags available are openDirectory and multiselections.
dialog.showOpenDialog() returns the names of the files selected. An array of the paths selected by the user are stored in a variable called files. If the user presses cancel, dialog.showOpenDialog() returns undefined and breaks if we try to call any methods on files while it’s undefined. The return statement guards against that by leaving the function early if files is a false value—and undefined is, in fact, a false value.
getFileFromUser() must be called somewhere in our application to trigger the dialog box. Eventually, it will be called from the UI and the application menu. A convenient place to do this—for now—is when the application starts. Call getFileFrom-User() when the app module fires its ready event, as shown in the following listing. This step will be removed when our UI is configured to trigger getFileFromUser() from the renderer process.
app.on('ready', () => {
  mainWindow = new BrowserWindow({ show: false });

  mainWindow.loadFile('index.html');

  mainWindow.once('ready-to-show', () => {
    mainWindow.show();
    getFileFromUser();                        1
  });

  mainWindow.on('closed', () => {
    mainWindow = null;
  });
});
When our application starts and the window is fully loaded, users immediately will see a File dialog box, which will allow them to select a file (see figure 4.2). We eventually remove this function call from the launch process and assign it to the Open File button in the UI.

In figure 4.3, we can see the results of our selection in the Open File dialog box displayed in our terminal. Notice that dialog.showOpenDialog() returns an array. If multiselections is activated in the dialog’s properties array, the user can select multiple files. Electron always returns an array for consistency.
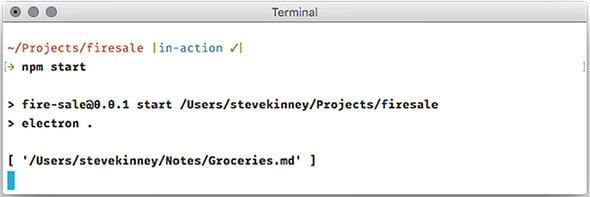
dialog.showOpenDialog() returns an array consisting of the paths of the file or files that the user selected, but it does not read them on our behalf. Depending on what kind of file we’re building, we might want to handle opening the file differently. In this application, the contents of the file are read and immediately displayed in the UI. A different application that handles copying images or uploads them to an external service might take a contrasting approach when the user selects a file. Still another application might add a large movie to a playlist to watch later. In this case, it would be wasteful to immediately start opening the large file.
Node comes with a set of tools for working with files in its standard library. The built-in fs library handles common filesystem operations such as reading and writing files, so you should require it near the top of app/main.js.
const { app, BrowserWindow, dialog } = require('electron');
const fs = require('fs');                                    1

app.on('ready',() => { ... });                               2

const getFileFromUser = () => {
  const files = dialog.showOpenDialog(mainWindow, {
    properties: ['openFile']
  });

  if (!files) { return; }

  const file = files[0];                                     3
  const content = fs.readFileSync(file).toString();          4

  console.log(content);
};
In listing 4.4, the application opens only one file at a time. files[0] selects the first—and only—file path out of the array from dialog.showOpenDialog(). In fs.read-FileSync(file) the file path is passed as an argument to fs.readFileSync(). Node doesn’t know what kind of file was opened, so fs.readFileSync() returns a buffer object. We know, however, that we typically work with plain text in this particular application. We convert it to a string and log the contents of the file to the terminal, as shown in figure 4.4.
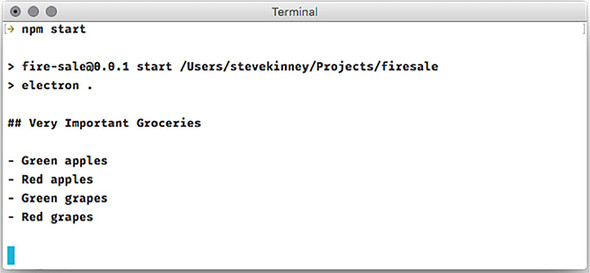
As you can see in figure 4.4, getFileFromUser() successfully logs the contents of a text file to the terminal. But there is a problem. By default, dialog.showOpenDialog() lets us open any file on our computer, with no consideration for what types of files we’re prepared to handle. Figure 4.5 shows the problematic result when we open an image file instead of a text file through the dialog box.
Many desktop applications can limit the file types that the users can open. This is also true for applications built with Electron. Our application isn’t suited for opening music files, so we should probably not let the user select MP3s. Additional options can be added to the configuration object passed to dialog.showOpenDialog() to restrict the dialog box to file extensions that we’ve whitelisted.
const getFileFromUser = () => {
  const files = dialog.showOpenDialog({
    properties: ['openFile'],
    filters: [                                                     1
      { name: 'Text Files', extensions: ['txt'] },
      { name: 'Markdown Files', extensions: ['md', 'markdown'] }
    ]
  });

  if (!files) { return; }

  const file = files[0];
  const content = fs.readFileSync(file).toString();

  console.log(content);
};
In the listing we added a second property to the object passed to dialog.showOpenDialog(). In Windows, the dialog displays the name Markdown Files in the drop-down menu, as seen in figure 4.6. In macOS, there is no drop-down menu, but we cannot select images that do not have one of the extensions, as shown in figure 4.7.
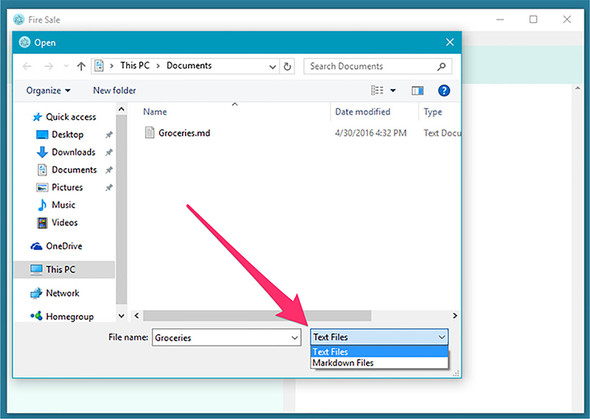
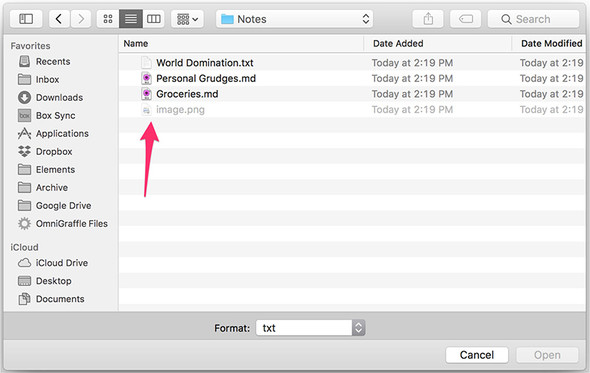
Electron applications are designed to be cross-platform, meaning they work on macOS, Windows, and Linux. Electron provides interfaces to native features and APIs that exist in each of the supporting operating systems but do not exist in the others. We saw this earlier when we provided a name for our file extension filters. This name appears in Windows, but macOS does not have this capability. Electron takes advantage of this feature if it is available, but it still works in the cases where it isn’t.
In macOS, we’re able to display dialog boxes that drop down as sheets from the top of the window instead of being displayed in front of it (listing 4.6). We can create this UI easily in Electron by passing a reference to the BrowserWindow instance—which we’ve stored in mainWindow—as the first argument to dialog.showOpenDialog(), before the configuration object.
const getFileFromUser = () => {
  const files = dialog.showOpenDialog(mainWindow, {      1
    properties: ['openFile'],
    filters: [
      { name: 'Text Files', extensions: ['txt'] },
      { name: 'Markdown Files', extensions: ['md', 'markdown'] }
    ]
  });

  if (!files) { return; }

  const file = files[0];
  const content = fs.readFileSync(file).toString();

  console.log(content);
};
With this simple change, Electron now displays the Open File dialog as a sheet that drops down from the window passed to the method, as shown in figure 4.8.
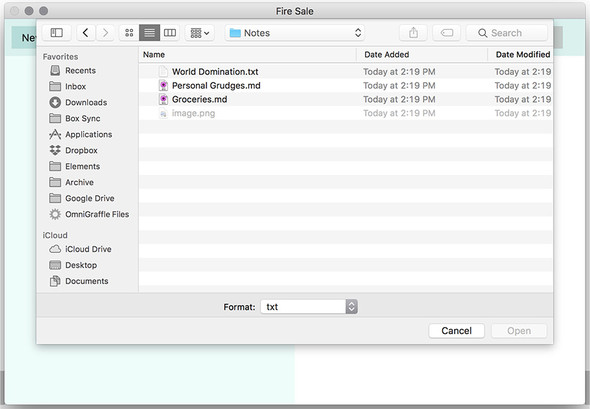
We’ve written all of the code for selecting files and reading files in our main process. But how do we send the contents of the file to the renderer process? How do we trigger the getFileFromUser() function in our main process from our UI?
We have to deal with similar issues when building traditional web applications. It’s not exactly the same because all of the code runs on the client’s computer, but thinking about how we usually build web applications can serve as a helpful metaphor for understanding how to structure our Electron applications. See figure 4.9.
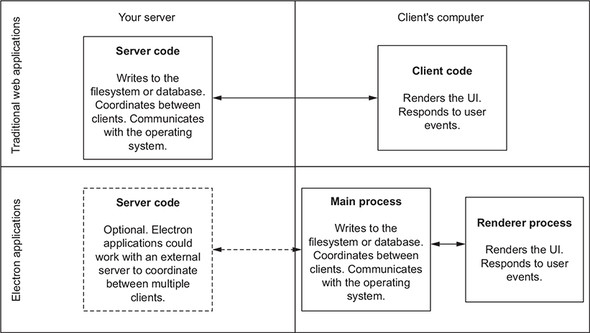
On the web, we typically write code that runs in one of two places: on our servers or client-side code that runs in our users’ browsers. The client-side code is what renders the UI. It listens for and handles user actions and updates the UI to display the current state of the application. There are, however, limits to what we can do with client-side code. As we discussed in chapter 1, we cannot read from or write to the database or filesystem. Server-side code runs on our computer. It has access to the database. It can write to the log files on our system.
In traditional web applications, we typically facilitate communication between the client- and server-side processes using a protocol like HTTP. With HTTP, the client can send a request with information. The server receives this request, handles it appropriately, and sends a response to the client.
In Electron applications, things are a little different. As we’ve discussed in the previous chapters, Electron applications consist of multiple processes: one main process and one or more renderer processes. Everything runs on our computer, but there is a similar separation of roles to the client-server model. We don’t use HTTP to communicate between processes. Instead Electron provides several modules for coordinating communication between the main and renderer processes.
Our main process is in charge of interfacing with the native operating system APIs. It’s in charge of spawning renderer processes, defining application menus, displaying Open and Save dialog boxes, registering global shortcuts, requesting power information from the OS, and more. Electron enforces this by making many of the modules needed to perform these tasks available only in the main process, as shown in figure 4.10.
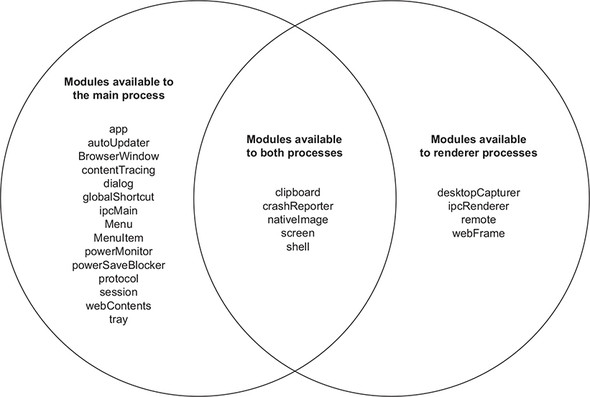
Electron provides only a subset of its modules to each process and doesn’t keep us from accessing Node APIs that are separate from Electron’s modules. We can access a database or the filesystem from the renderer process if we want, but there are compelling reasons to keep this kind of functionality in the main process. We could potentially have many renderer processes, but we will always have only one main process. Reading from and writing to the filesystem from one of our renderer processes could become problematic; we could end up in a situation where one or more processes try to write to the same file at the same time or read from a file while another renderer process is overwriting it.
A given process in JavaScript executes our code on a single thread and can do only one thing at a time. By delegating these tasks to the main process, we can be confident that only one process is performing reading or writing to a given file or database at a time. Other tasks follow the normal JavaScript protocol of patiently waiting in the event queue until the main process is done with its current task.
It makes sense that the main process handles tasks that call native operating system APIs or provides filesystem access, but the UI that likely triggers these operations is called in the renderer process. Even though all of the code is running on the same computer, we still have to coordinate the communication between our processes, just as we would have to coordinate communication between the client and server.
More recently, protocols like WebSockets and WebRTC have emerged that allow for two-way communication between the client and server, and even communication between clients, without needing a central server to facilitate communication. When we’re building desktop applications, we typically won’t be using HTTP or WebSockets, but Electron has several ways to coordinate interprocess communication, which we begin to explore in this chapter and is shown in figure 4.11.
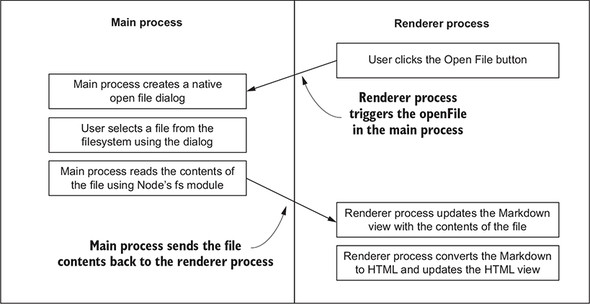
Our UI contains a button with the label Open File. When the user clicks this button, our application should provide a dialog box allowing the user to select a file to open. After the user selects a file, our application should read the contents of the file, display them in the left pane of our application, and render the corresponding HTML in the right pane.
As you might have guessed, this requires us to coordinate between the renderer process, where the button was clicked, and the main process, which is responsible for displaying the dialog and reading the chosen file from the filesystem. After reading the file, the main process needs to send the contents of the file back over to the renderer process (next listing) to be displayed and rendered in the left and right panes, respectively.
const marked = require('marked');

const markdownView = document.querySelector('#markdown');
const htmlView = document.querySelector('#html');
const newFileButton = document.querySelector('#new-file');
const openFileButton = document.querySelector('#open-file');
const saveMarkdownButton = document.querySelector('#save-markdown');
const revertButton = document.querySelector('#revert');
const saveHtmlButton = document.querySelector('#save-html');
const showFileButton = document.querySelector('#show-file');
const openInDefaultButton = document.querySelector('#open-in-default');

const renderMarkdownToHtml = (markdown) => {
  htmlView.innerHTML = marked(markdown, { sanitize: true });
};

markdownView.addEventListener('keyup', (event) => {
  const currentContent = event.target.value;
  renderMarkdownToHtml(currentContent);
});

openFileButton.addEventListener('click', () => {       1
  alert('You clicked the "Open File" button.');
});
Start by adding an event listener to the Open File button in our renderer process. With our event listener in place, it’s time to coordinate with the main process to trigger the Open File dialog box we created earlier.
Electron provides numerous ways to facilitate interprocess communication. The first one is the remote module—a simple way to perform interprocess communication from the renderer process to the main process. The remote module, available only in the renderer process, works as a proxy to the main process by mirroring the modules that are accessible in the main process. The remote module also takes care of communication to and from the main process when we access any of those properties.
Depicted in figure 4.12, the remote module has several properties that overlap with the modules available only to the main process. In our renderer process, we can require the remote module, and it provides access to objects and properties in the main process, as shown in figure 4.13.
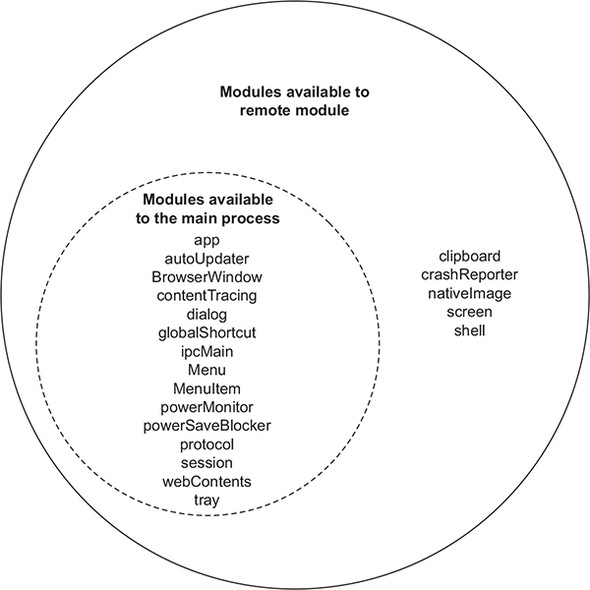
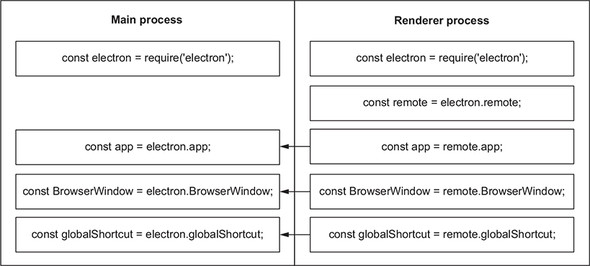
When we call a method or property on the remote object, it sends a synchronous message to the main process, executes in the main process, and sends a message back to the renderer process with the results. The remote module allows us to define functionality in the main process and easily makes it available to our renderer processes.
The application can now trigger an Open File dialog box and read the contents of the file that the user selected in the main process. We’ve also added an event listener to the Open File button in the renderer process. Now it’s just a matter of connecting them using the interprocess communication techniques we explored earlier.
To use functionality from the main process using the remote module, we need to take advantage of Node’s CommonJS module system to expose that functionality to other files in our application. We’ve used require in this book to pull in functionality from Electron, the Node standard library, and third-party libraries, but this is the first time we use it with our own code. Let’s spend a few minutes reviewing how it works.
Node’s module system consists of two primary mechanisms: the ability to require functionality from other sources, and the ability to export functionality to be consumed by other sources. When we require code from other sources, the other source could be a file we’ve written, a third-party module, a module from the Node, or a module provided by Electron. We’ve used Node’s built-in require function at the top of both our main and renderer processes.
When we require a module, what exactly are we importing? In Node, we explicitly declare what functionality should be exported from the module, as shown in listing 4.8. This function is imported in listing 4.9. Every module in Node has a built-in object called exports that starts out as an empty object. Anything we add to the exports object is available when we require it from another file.
exports.addTwo = n => n + 2;
const basicMath = require('./basic-math');

basicMath.addTwo(4); // returns 6
The built-in require function does not work across processes. When we’re working in the renderer process, any functionality we use from the built-in require function to import will be part of the renderer process. When we’re working in the main process, any functionality we require will be part of the main process. But what happens when we are in the renderer process and we want to require functionality from the main process?
Electron’s remote module has its own require method that allows it to require functionality from the main process in our renderer process. Using remote.require returns a proxy object—like the other properties on the remote object. Electron takes care of all of the interprocess communication on our behalf.
To implement the functionality we set out at the beginning of this chapter, the main process must export its getFileFromUser() function so that we can import it into our renderer code. This listing updates a single line in app/main.js.
const getFileFromUser = exports.getFileFromUser  = () => {       1
  const files = dialog.showOpenDialog(mainWindow, {
    properties: ['openFile'],
    filters: [
      { name: 'Text Files', extensions: ['txt'] },
      { name: 'Markdown Files', extensions: ['md', 'markdown'] }
    ]
  });

  if (!files) { return; }

  const file = files[0];
  const content = fs.readFileSync(file).toString();

  console.log(content);
};
The code takes the getFileFromUser() function we created and exports it as a property with the same name on the exports object. The render process needs to bring in Electron’s remote module and then use the remote.require function to get a reference to the getFileFromUser() function from the main process in our renderer process. This is different from the built-in require function shown in listing 4.11 because the imported code is evaluated in terms of the main process, not the renderer process in which it was required. This is accomplished in four steps:
const { remote } = require('electron');
const mainProcess = remote.require('./main.js');
We can now call the getFileFromUser() function we exported from the main process in our renderer process. Let’s replace the functionality in our event listener to trigger the Open File dialog box instead of firing an alert.
openFileButton.addEventListener('click', () => {
  mainProcess.getFileFromUser();
});
If we start our Electron application and click the Open File button, it correctly triggers the Open File dialog box. With that in place, we’re still logging the files only to the console in the main process. To complete our feature, the main process must send the file’s contents back to the renderer process to be displayed in our application.
The remote module facilitates access to functionality from the main process in our renderer processes, but it doesn’t allow for the inverse. To send the contents of the file that the user selected back to the renderer process to be rendered in the UI, we need to learn another technique for communicating between processes.
Each BrowserWindow instance has a property called webContents, which stores an object responsible for the web browser window that we create when we call new Browser-Window(). webContents is similar to app because it emits events based on the lifecycle of the web page in the renderer process.
The following is an incomplete list of some of the events that you can listen for on the webContents object:
webContents also has a number of methods that can trigger different functions in the renderer process from the main process. In the previous chapter, we opened the Chrome Developer Tools in the renderer process from the main process using mainWindow.webContents.openDevTools(). mainWindow.loadURL(’file://${__dirname}/index.html’), an alias for mainWindow.webContents.loadURL(), loaded our HTML file into the renderer process when the application first launched. Figure 4.14 shows more aliases.
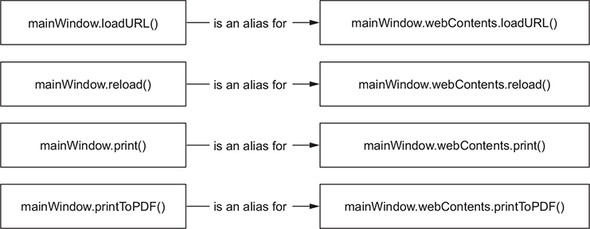
webContents has a method called send() which sends information from the main process to a renderer process. webContents.send() takes a variable number of arguments. The first argument, which is an arbitrary string, is the name of the channel on which to send the message. An event listener in the renderer process listens on the same channel. This flow will become clearer when we see it in action. All of the subsequent arguments after the first are passed along to the renderer process.
Our current implementation reads the file that the user selected and logs it to the terminal. mainWindow.webContents.send() sends the contents of the file to the renderer process instead. The next chapter covers additional ways to open files that do not require a dialog box prompting the user to select a particular file because we do encounter situations where we will want to open a file without triggering the dialog box.
const getFileFromUser = exports.getFileFromUser =  () => {
  const files = dialog.showOpenDialog(mainWindow, {
    properties: ['openFile'],
    filters: [
      { name: 'Text Files', extensions: ['txt'] },
      { name: 'Markdown Files', extensions: ['md', 'markdown'] }
    ]
  });

  if (files) { openFile(files[0]); }                             1
};

const openFile = (file) => {
  const content = fs.readFileSync(file).toString();
  mainWindow.webContents.send('file-opened', file, content);     2
};
The main process is now broadcasting the name of the file and its contents over the file-opened channel. The next step is to set up a listener on the file-opened channel in the renderer process using the ipcRenderer module. Electron comes with two basic modules for sending messages back and forth between processes: ipcRenderer and ipcMain. Each module is available only in the process type with which it shares a name.
ipcRenderer can send messages to the main process. More important to our immediate needs, it can also listen for messages that were sent from the main process using webContents.send(). It requires the ipcRenderer module in the renderer process.
const { remote, ipcRenderer } = require('electron');          1
const mainProcess = remote.require('./main.js');
With that in place, we can now set up a listener. ipcRenderer listens on the file-opened channel, adds the content to the page, and renders the Markdown as HTML.
ipcRenderer.on('file-opened', (event, file, content) => {
  markdownView.value = content;
  renderMarkdownToHtml(content);
});
ipcRenderer.on() takes two arguments: the channel to listen on and a callback function that defines an action to take when the renderer process receives a message on the channel on which you’re setting up the listener. The callback function is provided with a few arguments when it is called. The first is an event object, which is just like a normal event listener in the browser. It contains information about the event for which we set up the listener. The additional arguments are what were provided when using webContents.send() in the main process. In listing 4.13, we sent the name of the file and its contents. Those will be additional arguments passed to our listener.
With these new additions, the user can now click the Open File button, select a file using a native file dialog box, and render the contents in the UI. We’ve successfully implemented the feature that we set out to implement at the beginning of the chapter. The code for our main and renderer processes should look something like the following two listings.
const { app, BrowserWindow, dialog } = require('electron');
const fs = require('fs');

let mainWindow = null;

app.on('ready', () => {
  mainWindow = new BrowserWindow({ show: false });

  mainWindow.loadFile('index.html');

  mainWindow.once('ready-to-show', () => {
    mainWindow.show();
  });

  mainWindow.on('closed', () => {
    mainWindow = null;
  });
});

const getFileFromUser = exports.getFileFromUser = () => {
  const files = dialog.showOpenDialog(mainWindow, {
    properties: ['openFile'],
    filters: [
      { name: 'Text Files', extensions: ['txt'] },
      { name: 'Markdown Files', extensions: ['md', 'markdown'] }
    ]
  });

  if (files) { openFile(files[0]) }
};

const openFile = (file) => {
  const content = fs.readFileSync(file).toString();
  mainWindow.webContents.send('file-opened', file, content);
};
const { remote, ipcRenderer } = require('electron');
const mainProcess = remote.require('./main.js');

const marked = require('marked');

const markdownView = document.querySelector('#markdown');
const htmlView = document.querySelector('#html');
const newFileButton = document.querySelector('#new-file');
const openFileButton = document.querySelector('#open-file');
const saveMarkdownButton = document.querySelector('#save-markdown');
const revertButton = document.querySelector('#revert');
const saveHtmlButton = document.querySelector('#save-html');
const showFileButton = document.querySelector('#show-file');
const openInDefaultButton = document.querySelector('#open-in-default');

const renderMarkdownToHtml = (markdown) => {
  htmlView.innerHTML = marked(markdown, { sanitize: true });
};

markdownView.addEventListener('keyup', (event) => {
  const currentContent = event.target.value;
  renderMarkdownToHtml(currentContent);
});

openFileButton.addEventListener('click', () => {
  mainProcess.getFileFromUser();
});

ipcRenderer.on('file-opened', (event, file, content) => {
  markdownView.value = content;
  renderMarkdownToHtml(content);
});
Right now, when Fire Sale starts up, it creates a single window for the UI. When that window is closed, the application quits. Although this behavior is perfectly acceptable, we typically expect to be able to open multiple, independent windows. In this chapter, we convert Fire Sale from a single-window application to one that supports multiple windows. Along the way, we’ll explore new Electron APIs as well as some of JavaScript’s more recent additions. We also explore solutions to problems that occur when taking a main process that is configured to communicate with one renderer process (see figure 5.1) and refactoring it to manage a variable number of processes (see figure 5.2). The completed code at the end of this chapter can be found at http://mng.bz/V145. We start from the chapter-4 branch, however.

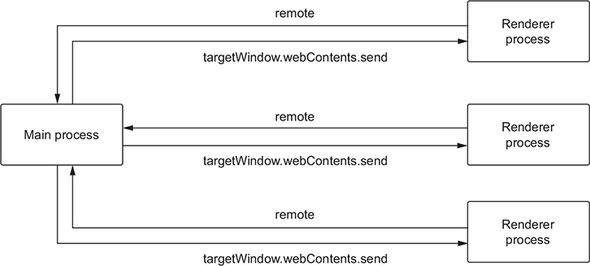
We start by instantiating a Set data structure, which was added to JavaScript in 2015 and tracks all of the user’s windows. Next, we create a function that manages the lifecycle of an individual window. After that’s in place, we modify the functions that we created in chapter 4 for prompting the user to select a file and opening it to target the correct window. In addition, we also take care of some common edge cases and other quirks that arise along the way, such as windows that eclipse each other.
Sets are a new data structure to JavaScript and were added in the ES2015 specification. A set is a collection of unique elements; an array can have duplicate values in it. I chose to use a set rather than an array because it’s easier to remove an element. This listing shows how to create a Set in JavaScript.
const windows = new Set();
With an array, we’d have to either find the index of the window and remove it, or create an array without that window. Neither approach is as simple as calling the delete method on the set and passing it a reference to the window that we want to remove.
With a data structure in place to track all of the application’s windows, the next step is to move the process of creating a BrowserWindow (listing 5.2) out of the application’s “ready” event listener and into its own function.
const createWindow = exports.createWindow = () => {
  let newWindow = new BrowserWindow({ show: false });

  newWindow.loadFile('index.html');

  newWindow.once('ready-to-show', () => {
    newWindow.show();
  });

  newWindow.on('closed', () => {
    windows.delete(newWindow);       1
    newWindow = null;
  });

  windows.add(newWindow);            2
  return newWindow;
};
The createWindow() function creates a BrowserWindow instance and adds it to the set of windows that we created in listing 5.1. Next we repeat the steps for creating a new window from the previous chapters. Closing the window removes it from the set. Finally, we return a reference to the window that was just created. We need this reference in the next chapter.
When the application is ready, call the new createWindow() function, shown in the following listing. The application should start in the same manner as it did before we implemented this change, but it also sets the stage to create additional windows in other contexts.
app.on('ready', () => {
  createWindow();
});
The application starts as before, but if you try to click the Open File button, you’ll notice that it’s broken. This is because we’re still referencing mainWindow in a few places. It’s referenced in dialog.showOpenDialog() to display the dialog box as a sheet in macOS. More importantly, it is referenced in openFile() after the file’s contents have been read from the filesystem and we send it to the window.
Having multiple windows raises the question: to which window do we send the file path and contents? To support multiple windows, these two functions must reference the window where the dialog box should be displayed and the contents sent, as shown in figure 5.3.
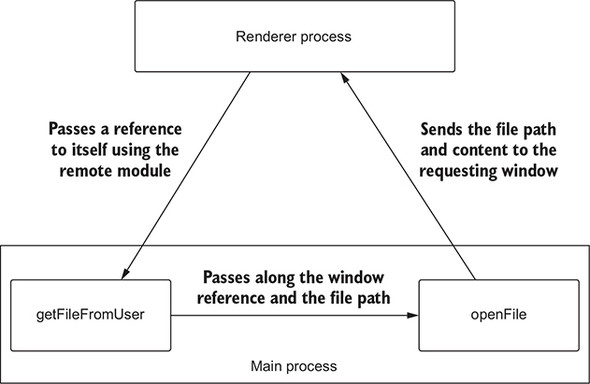
In listing 5.4, let’s refactor the getFileFromUser() function to accept a given window as an argument instead of always assuming that there is a mainWindow instance in scope.
const getFileFromUser  = exports.getFileFromUser = (targetWindow) => {    1
  const files = dialog.showOpenDialog(targetWindow, {                     2
    properties: ['openFile'],
    filters: [
      { name: 'Text Files', extensions: ['txt'] },
      { name: 'Markdown Files', extensions: ['md', 'markdown'] }
    ]
  });

  if (files) { openFile(targetWindow, files[0]); }                        3
};
In the code excerpt, we’ve modified getFileFromUser() to take a reference to a window as an argument. I avoided naming the argument window because it might be confused with the global object in the browser. After the user has selected a file, we pass the targetWindow to openFile() in addition to the file path, shown here.
const openFile = exports.openFile = (targetWindow, file) => {    1
  const content = fs.readFileSync(file).toString();
  targetWindow.webContents.send('file-opened', file, content);   2
};
After the contents of the file have been read from the filesystem, we send the file’s path and content to the window passed in as the first argument. This raises the question, though: How do we get a reference to the window?
getFileFromUser() is called from the renderer process using the remote module to facilitate communication to the main process. As we saw in the previous chapter, the remote module contains references to all the modules that would otherwise be exclusively available to the main process. It turns out that remote also has a few other methods—notably, remote.getCurrentWindow(), which returns a reference to the BrowserWindow instance from which it was called, shown here.
const currentWindow = remote.getCurrentWindow();
Now that we have a reference to the window, the last step necessary to complete the feature is to pass it along to getFileFromUser(). This lets the functions in the main process know which—of our soon to be many—browser windows they’re working with.
openFileButton.addEventListener('click', () => {
  mainProcess.getFileFromUser(currentWindow);
});
When we implemented the Markup for the UI in chapter 3, we included a New File button. We now have the createWindow() function implemented in and exported from the main process. We can quickly wire up that button as well.
newFileButton.addEventListener('click', () => {
  mainProcess.createWindow();
});
We can make a few more enhancements to our implementation of multiple windows in the main process, but we’re finished in the renderer process for this chapter. The current state of the code in app/renderer.js follows.
const { remote, ipcRenderer } = require('electron');
const mainProcess = remote.require('./main.js');
const currentWindow = remote.getCurrentWindow();

const marked = require('marked');

const markdownView = document.querySelector('#markdown');
const htmlView = document.querySelector('#html');
const newFileButton = document.querySelector('#new-file');
const openFileButton = document.querySelector('#open-file');
const saveMarkdownButton = document.querySelector('#save-markdown');
const revertButton = document.querySelector('#revert');
const saveHtmlButton = document.querySelector('#save-html');
const showFileButton = document.querySelector('#show-file');
const openInDefaultButton = document.querySelector('#open-in-default');

const renderMarkdownToHtml = (markdown) => {
  htmlView.innerHTML = marked(markdown, { sanitize: true });
};

markdownView.addEventListener('keyup', (event) => {
  const currentContent = event.target.value;
  renderMarkdownToHtml(currentContent);
});

newFileButton.addEventListener('click', () => {
  mainProcess.createWindow();
});

openFileButton.addEventListener('click', () => {
  mainProcess.getFileFromUser(currentWindow);
});

ipcRenderer.on('file-opened', (event, file, content) => {
  markdownView.value = content;
  renderMarkdownToHtml(content);
});
When clicking the New File button after implementing the event listener in the previous chapter, you might have been confused whether it was working. You may have noticed that the drop shadow around the window got darker, or you may have clicked and dragged the new window and revealed the previous window underneath.
The minor problem that we have right now is that each new window appears in the same default position as the first window and completely eclipses it. It might be more obvious that the new window is created if it is slightly offset from the previous window, as shown in figure 5.4. This listing shows how to offset the window.
const createWindow = exports.createWindow = () => {
  let x, y;

  const currentWindow = BrowserWindow.getFocusedWindow();                  1

  if (currentWindow) {                                                     2
    const [ currentWindowX, currentWindowY ] = currentWindow.getPosition();
    x = currentWindowX + 10;
    y = currentWindowY + 10;
  }

  let newWindow = new BrowserWindow({ x, y, show: false });                3

  newWindow.loadFile('index.html');

  newWindow.once('ready-to-show', () => {
    newWindow.show();
  });

  newWindow.on('closed', () => {
    windows.delete(newWindow);
    newWindow = null;
  });

  windows.add(newWindow);
  return newWindow;
};
In addition to instantiating instances with the new keyword, the BrowserWindow module also has methods of its own. We can use BrowserWindow.getFocusedWindow() to get a reference to the window with which the user is currently working. When the application is first ready and we call createWindow(), there isn’t a focused window and BrowserWindow.getFocusedWindow() returns undefined. If there is a window, we call its getWindow() method, which returns an array with the x- and y-coordinates of the window. We’ll store these values in two variables outside of the conditional block and pass them to the BrowserWindow constructor. If they’re still undefined (for example, there was no focused window), then Electron uses the defaults, just as it did before we implemented this feature. Figure 5.4 shows a second window offset from the first.
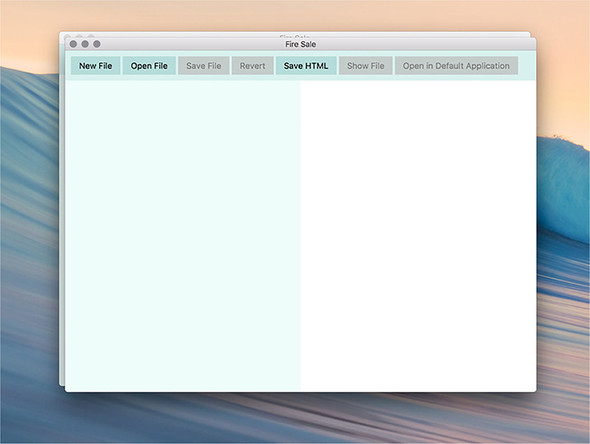
This isn’t the only way to implement this feature. Alternatively, you could track an initial x- and y-position and increment those values on each new window. Or, you could add a slight bit of randomness to the default x- and y-values so that each window is slightly offset. I leave those methods as exercises to the reader.
In macOS, many—but not all—applications remain open, even when all their windows are closed. For example, if you closed all your windows in Chrome, the application remains active in the dock and still appears in the application switcher. Fire Sale doesn’t do that.
In earlier chapters, this might have been acceptable. We had one window and no way of creating additional windows. In this section, we enable the application to remain open only in macOS. By default, Electron quits the application when it fires its window-all-closed event. If we want to prevent this behavior, we must listen for this event and conditionally stop it from closing if we’re running on macOS.
app.on('window-all-closed', () => {
  if (process.platform === 'darwin') {     1
    return false;                          2
  }
  app.quit();                              3
});
The process object is provided by Node and globally available without needing to be required. process.platform returns the name of the platform in which the application is currently executing. As of this writing, process.platform returns one of five strings: darwin, freebsd, linux, sunos, or win32. Darwin is the UNIX operating system that macOS is built on. In listing 5.11, we checked if process.platform is equal to darwin. If it is, then the application is running on macOS and we want to return false to stop the default action from occurring.
Keeping the application alive is half the battle. What happens if the user clicks the application in the dock and no windows are open? In this situation Fire Sale should open a new window and display it to the user as shown here.
app.on('activate', (event, hasVisibleWindows) => {      1
  if (!hasVisibleWindows) { createWindow(); }           2
});
The activate event passes two arguments to the callback function provided. The first is the event object. The second is a Boolean, which returns true if any windows are visible and false if all the windows are closed. In the case of the latter, we call the createWindow() function that we wrote earlier in the chapter.
The activate event fires only on macOS, but there are plenty of reasons why you might choose to have your application remain open on Windows or Linux, particularly if the application is running background processes that you want to continue even if the window is dismissed. Another possibility is that you have an application that can be hidden, or shown with a global shortcut, or from the tray or menu bar. We implement each of these in later chapters.
With these two additional events, we’ve converted Fire Sale from a single-window application to one that supports multiple windows. This listing shows the code for the main process in its current form.
const { app, BrowserWindow, dialog } = require('electron');
const fs = require('fs');

const windows = new Set();

app.on('ready', () => {
  createWindow();
});

app.on('window-all-closed', () => {
  if (process.platform === 'darwin') {
    return false;
  }
});

app.on('activate', (event, hasVisibleWindows) => {
  if (!hasVisibleWindows) { createWindow(); }
});

const createWindow = exports.createWindow = () => {
  let x, y;

  const currentWindow = BrowserWindow.getFocusedWindow();

  if (currentWindow) {
    const [ currentWindowX, currentWindowY ] = currentWindow.getPosition();
    x = currentWindowX + 10;
    y = currentWindowY + 10;
  }

  let newWindow = new BrowserWindow({ x, y, show: false });

  newWindow.loadFile('index.html');

  newWindow.once('ready-to-show', () => {
    newWindow.show();
  });

  newWindow.on('closed', () => {
    windows.delete(newWindow);
    newWindow = null;
  });

  windows.add(newWindow);
  return newWindow;
};

const getFileFromUser  = exports.getFileFromUser = (targetWindow) => {
  const files = dialog.showOpenDialog(targetWindow, {
    properties: ['openFile'],
    filters: [
      { name: 'Text Files', extensions: ['txt'] },
      { name: 'Markdown Files', extensions: ['md', 'markdown'] }
    ]
  });

  if (files) { openFile(targetWindow, files[0]); }
};

const openFile = exports.openFile = (targetWindow, file) => {
  const content = fs.readFileSync(file).toString();
  targetWindow.webContents.send('file-opened', file, content);
};
Over the previous two chapters, we implemented the ability to read a file from the filesystem and display it in a browser window of our application. This exercise demonstrated how interprocess communication works in Electron, as well as Electron’s ability to bridge the gap between a traditional browser-based application and a Node.js application. In the previous chapter, we also added support for multiple browser windows.
In the name of clarity, I kept our initial implementation naively simple. It turns out that users interact with files in a surprising number of different ways—even in a simple note-taking application like Fire Sale. A user might start writing a new note from the empty window spawned when the application initially launches, or they may choose to open an existing file from the filesystem. A user might click the Open File button we implemented earlier, or they might select the file from a list of recently opened documents. The path a user chooses impacts how our application behaves when they wish to save it. If it’s a new file, then we must prompt the user to provide a location to write the new file. If it’s an existing file, then the application should just overwrite the file the user originally selected from the Open File dialog box.
Users have come to expect several features from modern applications. Our application should provide visual indications that a file has been changed since it was originally opened or the last time it was saved. It should integrate with the operating system’s list of recent documents and follow OS-level conventions for how the window’s title bar should look, depending on the state of the file.
In this chapter, we rethink our approach to managing files as we implement the ability to save the Markdown text of our application, export the rendered HTML, and revert changes to unsaved files. We also explore additional ways to open files, such as using the HTML5 File API to implement a drag-and-drop feature to the left pane of the application. Finally, we don’t want our users to end up in a situation where they edit a Markdown file in some other application and accidentally overwrite the changes when they save the file in Fire Sale. Therefore, we listen for external changes to the current file by other applications. Throughout this chapter, we implement all the functionality outlined in figure 6.1.
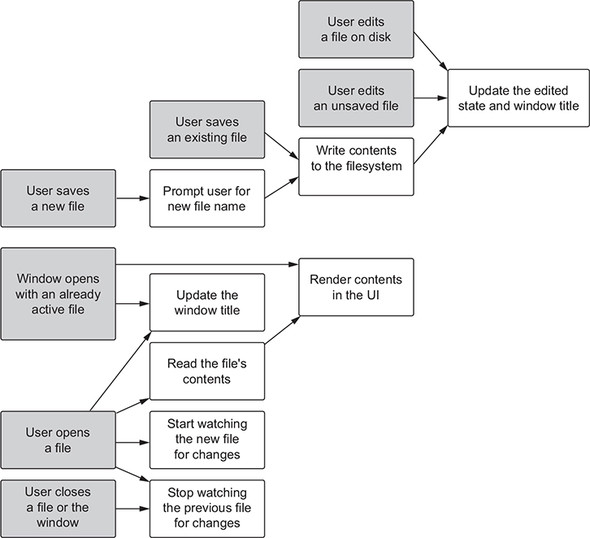
I’ll be starting from the chapter-5 branch of the repository as a starting point. You can also find the completed example in the chapter-6 branch.
As we begin working with different files in our application, it’s helpful to track the file with which we’re currently working. This way, we know which file a user is working on if they ask to save it. Suppose that Mildred has an important stroke of inspiration and wants to record her genius idea into Fire Sale. She opens her list of important thoughts and jots down notes. Right now, Fire Sale doesn’t know if Mildred is editing a new or existing file. The application also doesn’t have a way to track what file Mildred is working on when she selects a file to open.
To solve this problem, we need to implement the ability to keep track of what file Fire Sale is currently working with. In chapter 4, whenever a new file was opened, we sent the contents of the file as well as the path of the file that was just opened from the main process to the renderer process that requested the file. We populated the right and left panes of the application with the content. Our next step is to enable the renderer process to track the path of the file that is currently being displayed to the user. Doing so allows us to save changes without prompting the user for a file location.
We also have a Revert button in the UI. If the user clicks this button, it should roll back any unsaved changes and return the content to its last saved state. A simple way to handle this action is to store a copy of the content whenever a file is opened. If the user clicks Revert, Fire Sale replaces the content in the UI with the cached content from the last time the file was opened.
Let’s start with some sensible defaults for the case where the user opens a new window that isn’t yet tied to a given file. We declare two variables in the top level of the renderer process to track the original content of the current file and its file path.
let filePath = null;
let originalContent = '';
I chose to use an empty string instead of null for originalContent because that’s the value of an empty input or textarea in the browser. Later in the chapter, this setting makes it easier for us to see if a new document has been edited.
Whenever a file has been opened and sent to the renderer process, we need to update these values. We take care of this in the IPC event listener on the file-opened channel we set up in chapter 4.
ipcRenderer.on('file-opened', (event, file, content) => {
  filePath = file;                                         1
  originalContent = content;                               2

  markdownView.value = content;                            3
  renderMarkdownToHtml(content);                           4
});
Mildred can open a file on her computer, edit it, and save the changes, but she currently has no way of knowing what file she is working with. Are these the meeting minutes from this week, or the meeting she missed while on vacation in Greenland? She has multiple windows open and can’t tell which is which. In the previous section, we implemented a feature that allowed each window in Fire Sale to keep a reference to the current file, but we did not add anything to the UI to share that information with the user. The common pattern for desktop applications is to show the name of the file that is currently active in the title bar of the window, as shown in figure 6.2. In this section, we’ll follow best practices and implement this pattern in Fire Sale.
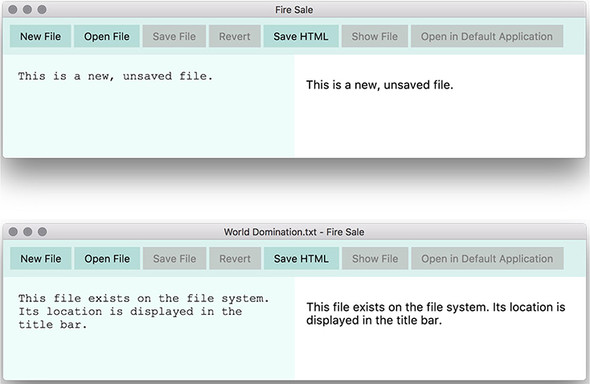
By default, the application’s window displays the title of the HTML page, which is defined in app/index.html. This is a reasonable default, but many native desktop applications display the name or path of the current file. One approach is to update the title of the window whenever the user opens a new file. In addition to displaying the name of the currently open file (as in listing 6.3), we may want to display other information in the window’s title such as whether the current file has been edited since it was saved. We also need to update the window’s title for a few different contexts, such as editing and saving the file.
All BrowserWindow instances have a method called setTitle() that allows us to programmatically manipulate the window’s title. Later in this chapter, we display information about whether the file has been edited since the last time it was saved or since it was opened. We create a method called updateUserInterface() that eventually encapsulates all of this logic as well as some other features down the road like enabling the Save File and Revert buttons if the file contains unsaved changes.
const path = require('path');

const updateUserInterface = () => {
  let title = 'Fire Sale';
  if (filePath) { title = `${path.basename(filePath)} - ${title}`; }   1
  currentWindow.setTitle(title);                                       2
};
We start with the default title. If a file is currently open, we modify the title to include the file path. The path can be long and most of the information, such as the root of the filesystem or where the users’ folders are stored, is not important to our users. We use path.basename() to extract the name of the file itself from the full file path. Finally, we take the reference to the current window that we defined in chapter 5 and set its title. We’ll call this function as the last step whenever a new file is opened.
ipcRenderer.on('file-opened', (event, file, content) => {
  filePath = file;
  originalContent = content;

  markdownView.value = content;
  renderMarkdownToHtml(content);

  updateUserInterface();              1
});
In the midst of taking important notes in Fire Sale, Mildred realizes that she’s 20 minutes late for a meeting. She wants to close Fire Sale before rushing down to the fifth floor, but she is unsure if she has saved her recent changes to the file she was working on. We have lots of good reasons to track whether the user has edited the file since they opened it. We might want to prompt the user if they attempt to close the window and they have unsaved changes. Or, we might want to show only certain UI elements if the file has been modified (see figure 6.3).
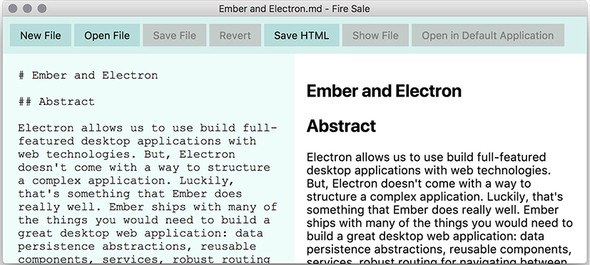
In this section, we add a visual cue in the UI. The Save File button is enabled only if the file has been modified. In addition, we append (Edited) to the title bar (see figure 6.4). To add this feature, we’ll take advantage of the abstraction we began building earlier in this chapter and add functionality to detect if the file has been modified. We have a few approaches we could take.
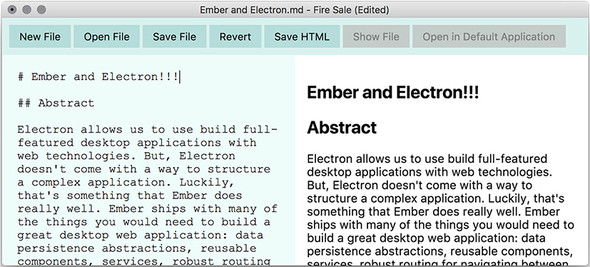
A naive—and flawed—way to check if a file has changed is to listen for either a keyup or change event in our UI. If the user adds a character and then removes it, this approach still considers the file modified, which is not consistent with how other native desktop applications behave.
To determine whether the file has been modified, we need two pieces of information: the original and current contents of the file. We were crafty enough to store the original contents in listing 6.2. If those two pieces of information are identical, then the file has not changed. But if they differ, even slightly, then we know we have a modified file on our hands.
To implement this feature, modify updateUserInterface() to take an argument called isEdited. On keyup, we compare the current value of the textarea with the originalContent and call updateUserInterface() with the result. BrowserWindow instances have a setDocumentEdited() method, which takes a Boolean. This will subtly modify the window on macOS; for Windows and Linux users, we append (Edited) to the window title.
const updateUserInterface = (isEdited) => {                    1
  let title = 'Fire Sale';

  if (filePath) { title = `${path.basename(filePath)} - ${title}`; }
  if (isEdited) { title = `${title} (Edited)`; }

  currentWindow.setTitle(title);
  currentWindow.setDocumentEdited(isEdited);                   2
};
The last step is to have the renderer process call the updateUserInterface() method every time the user lifts their finger from a key while typing.
markdownView.addEventListener('keyup', (event) => {
  const currentContent = event.target.value;
  renderMarkdownToHtml(currentContent);
  updateUserInterface(currentContent !== originalContent);       1
});
With these steps in place, your application can tell if it is in an edited and unsaved state. But we have a problem. The Save File and Revert buttons are still disabled. These buttons should be enabled only if there are unsaved changes. It’s easy to take care of this as we update the window itself.
const updateUserInterface = (isEdited) => {
  let title = 'Fire Sale';

  if (filePath) { title = `${path.basename(filePath)} - ${title}`; }
  if (isEdited) { title = `${title} (Edited)`; }

  currentWindow.setTitle(title);
  currentWindow.setDocumentEdited(isEdited);

  saveMarkdownButton.disabled = !isEdited;         1
  revertButton.disabled = !isEdited;               2
};
We implement the functionality for these buttons later in the chapter.
macOS windows support small representations of the current file in the window’s menu bar. Hold and press Command while clicking the file icon to trigger a drop-down menu showing where the file exists in the filesystem’s hierarchy, as shown in figure 6.5. You can also click and drag the icon—it acts as if you dragged the file from Finder. All BrowserWindow instances have a method called setRepresentedFilename(), which accepts a valid file path as an argument. This method has no effect in Windows. Let’s add this feature to our updateWindowTitle() method. Then we check to see if we have a valid path property and—if so—set it as the represented file for macOS windows.
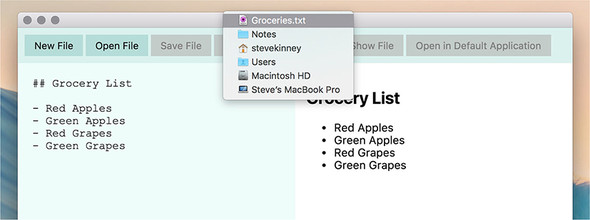
This is unlike updating the title of the window with additional information, like whether the file has been edited. The represented file remains the same until the user opens another file in the same window. We don’t need to update this value on keyup. We have two options: We could set the represented file in the main process before sending the path and content to the renderer process, or we could use the current-Window reference in the renderer process after it has received the file. I’m going to go with the former, but both approaches are acceptable.
const openFile = exports.openFile = (targetWindow, file) => {
  const content = fs.readFileSync(file).toString();
  targetWindow.setRepresentedFilename(file);                         1
  targetWindow.webContents.send('file-opened', file, content);
};
Now that Mildred is back from her meeting, she wants to get back to work. It was a long meeting, and she doesn’t quite remember what notes she’s been working on recently. Our current implementation doesn’t have a way to help her out either. The operating system, however, does this stuff all the time. Whenever the user opens a file, let’s have Electron notify the operating system that it should add the file to the list of recently opened files.
When opening a file in either macOS or Windows, Electron can add the file path to the operating system’s list of recently opened documents. This list is available by right-clicking the Dock icon in macOS (figure 6.6) or the Taskbar icon in Windows (figure 6.7).

The operating system tracks the files opened by each application. It also provides a master list of recently opened files. In Windows, this list is found in the File Explorer. In macOS, you can find the list of Recent Items in the Apple menu (figure 6.8). When a document is selected from the global list of recent documents, it is opened in the default application for that type of document. In this chapter, we primarily concern ourselves with the list of recent documents specific to our application.
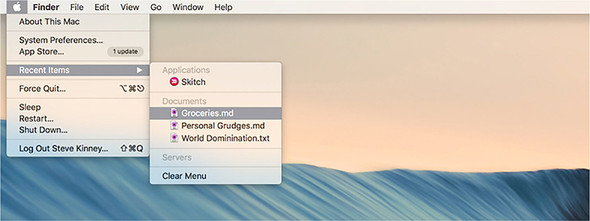
You can add a file path to the recent documents list in Electron using app.add-RecentDocument() and providing the file path as an argument. In the next listing, we add the path of the file we’re opening with openFile() to the list of recent documents.
const openFile = exports.openFile = (targetWindow, file) => {
  const content = fs.readFileSync(file).toString();
  app.addRecentDocument(file);                                  1
  targetWindow.setRepresentedFilename(file);
  targetWindow.webContents.send('file-opened', file, content);
};
If you open a few files in Fire Sale, you see that they’re being appended to the list of recent files. But if you try to select any of the entries in this list, nothing happens. The operating system is asking Fire Sale to open the file, but our application doesn’t know how to yet. We must implement this feature ourselves.
In chapter 4 we added the ability to trigger an Open File dialog from the UI. When a user selects a file using the dialog, the file path is passed to an open file, which reads the contents of the file and sends those contents to the renderer process to be displayed in the left pane, which—finally—triggers the right pane to be updated with the resulting HTML. At the time, we briefly discussed that there were other ways a user might open a file, and that’s why it makes sense to separate the process of triggering the dialog box from the process of opening the file.
Selecting an item from the Recent Documents menu is one instance where the user wants to open a file without being prompted with an Open File dialog box. Whenever a file is opened from outside of the application, Electron’s app module fires an open-file event. In our code, we can listen for the open-file event and handle it accordingly. We should, however, wait until the application is fully up and running, so we’ll set up our listener once the application fires its will-finish-launching event in app/main.js.
app.on('will-finish-launching', () => {
  app.on('open-file', (event, file) => {       1
    const win = createWindow();
    win.once('ready-to-show', () => {
      openFile(win, file);
    });
  });
});
Now when the user selects a file in Fire Sale’s list of recent documents, the application creates a new window and opens the file path in the new window—just as if you’d selected it using the Open File button in the UI that we implemented in chapter 4.
Saving files with Electron is similar to opening files, but with one difference: users might want to save changes to the Markdown file, or they might want to export the HTML that was generated by their application.
If the user is saving a new file for the first time, then the application should ask where the user wants to save the file and what name they want to give it. After that, it should keep track of that name and update the window title as it if had originally opened the file from the filesystem. If the user is saving changes to an existing Markdown file, then the application does not need to prompt to specify a location and filename for the file. Implementing the ability to save files is more than just writing content to the filesystem. We must also update the UI to show where the current file is being saved and if it has been modified since the last time it was saved to the filesystem.
In the Fire Sale case, saving the HTML output is a bit more straightforward since the application doesn’t allow the user to edit the HTML output after it has been saved. Exporting the generated HTML is a lot like saving a file for the first time, but we don’t need to track where it was saved or reflect its new location in the UI. It’s the easiest of the three to implement, so let’s take care of that feature first.
To allow for exporting the generated HTML, we add a saveHtml() function to the main process that asks the user where they’d like to save the HTML file, grabs the content from the HTML view, and then writes the file to the filesystem.
As you might expect, triggering the native dialog box for saving files is similar to triggering one for opening files. The biggest difference is that instead of prompting the user to select a specific file to open, we will ask the user for a filename and location to write to the filesystem. The contents of the file is passed as an argument to the showSaveFileDialog() function.
In the app/main.js, add the function shown in listing 6.11. When this function is run, Electron presents a dialog box asking the user to select a file path where the contents should be written. Once the user selects a file path, we use Node’s built-in fs module to write the contents of the file to the filesystem.
const saveHtml = exports.saveHtml = (targetWindow, content) => {
  const file = dialog.showSaveDialog(targetWindow, {
    title: 'Save HTML',
    defaultPath: app.getPath('documents'),                     1
    filters: [
      { name: 'HTML Files', extensions: ['html', 'htm'] }
    ]
  });

  if (!file) return;                                           2

  fs.writeFileSync(file, content);
};
In the example, dialog.showSaveDialog() takes two arguments. The first is a reference to a BrowserWindow, which is used to display the dialog box as a sheet in macOS only. The second argument is an options object that allows you to pass keys and values to configure the dialog box itself. The object provided to dialog.showSaveDialog() works with the following options:
We’re implementing the ability to save files, but where should we prompt the user to save those files and how does it differ depending on which operating system they’re using? Windows, macOS, and Linux organize their files differently. Ideally, a cross-platform Electron application should default to show the correct directory on each platform. Electron provides app.getPath(), which automatically returns the correct file path based on the user’s platform, saving the developer from having to write error-prone conditional logic. In listing 6.11, we set the default path to app.getPath(’documents’), which will be My Documents on Windows and the Documents folder in the user’s home directory on macOS. Electron provides the following additional paths:
You might want your application to override one of the defaults provided by app.getPath(). You can do this using app.setPath(), which takes two arguments: the name from the previous list and the new path to which you’d like it to resolve. It’s important to note that you can override only paths from the previous list. If you’re going to override one of these paths, you must do it before the application fires its “ready” event.
We didn’t implement a default path in the showOpenFile() function in the previous chapter, but that’s a good candidate for using this approach as well. It would make sense for a music player to default to the directory where users typically store their music, or a photograph management application to default to app.getPath(’pictures’).
Now we enable the Fire Sale application to save the rendered HTML content, shown in figure 6.9. To focus on learning the fundamentals of Electron, we’ll simply take the HTML content of the right pane and pass it to showSaveFileDialog(). A more robust approach would be to add a doctype as well as <html>, <head>, and <body> tags to make it a valid HTML document. Additionally, we could add metadata about the document and a default style sheet, but that is beyond the scope of this book. In the next chapter, we add in the ability to trigger this functionality from the application’s menu as well.
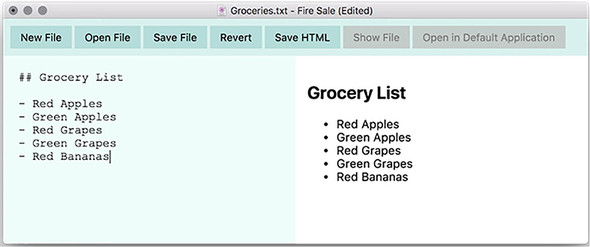
saveHtmlButton.addEventListener('click', () => {
  mainProcess.saveHtml(currentWindow, htmlView.innerHTML);
});
Saving the current file is like saving the HTML output with one small difference: if the file was opened from the filesystem, then the application does not need to prompt the user for a file path. Instead, the application just uses filePath as the location where the file should be written.
const saveMarkdown = exports.saveMarkdown = (targetWindow, file, content) => {
  if (!file) {                                                  1
    file = dialog.showSaveDialog(targetWindow, {
      title: 'Save Markdown',
      defaultPath: app.getPath('documents'),
      filters: [
        { name: 'Markdown Files', extensions: ['md', 'markdown'] }
      ]
    });
  }

  if (!file) return;                                            2

  fs.writeFileSync(file, content);                              3
  openFile(targetWindow, file);
};
This code is flexible enough to handle the case where we’re saving a new file, as well as the case where we’re updating an existing file. If you recall from earlier in the chapter, the filePath property’s value defaults to null until the user opens a file. If the filePath property is false, then Electron prompts the user to select a file path using the native Save File dialog. It then saves the user-selected location to the filePath property.
Conversely, if it already knows where the file is located, then it moves forward and skips directly to writing the content to the filesystem. For the sake of brevity, I called openFile() on the file we just saved. If it’s a new file that we’re saving for the first time, then we would want to add it to the operating system’s list of recent documents and set it as the represented file. Abstracting that out into its own function that we can call without having to read the file from disk again is an exercise that I leave to the reader.
No functionality is complete if there is no way to trigger it. The application needs an event listener on the Save File button that triggers our new functionality.
saveMarkdownButton.addEventListener('click', () => {
  mainProcess.saveMarkdown(currentWindow, filePath, markdownView.value);
});
Given the way we’ve structured our application so far, adding a feature is easy. When the user clicks the Revert button, we replace the value of the Markdown view with the original content of the file that we cached when we last opened or saved it, and then trigger the HTML view to be re-rendered with the cached content as well.
revertButton.addEventListener('click', () => {
  markdownView.value = originalContent;
  renderMarkdownToHtml(originalContent);
});
Later in the chapter, we’ll prompt the user to make sure that they want to blow away all their changes before moving forward.
Electron applications support the HTML5 File API, which allows us to create a feature for our application where users can drag a file onto certain elements in the DOM and drop them. You have seen this API used for uploading photographs in Twitter’s web application or attaching a file to an email in Gmail. In Fire Sale, we take advantage of this API to allow the user to open files by dragging them onto the Markdown view of the UI.
The default action of a web browser when a file is dropped into the browser window is to open the file in the browser itself. We can drag files onto our application and watch in terror as the contents of the file completely replace the UI. This is even more problematic when you consider that we don’t have a Back button to rely on.
The first step to creating a drag-and-drop feature for our application is to disable the default behavior by adding an event listener to the document itself that prevents the default action. Later, we’ll opt back in and customize the behavior for the Markdown pane in our UI.
document.addEventListener('dragstart', event => event.preventDefault());
document.addEventListener('dragover', event => event.preventDefault());
document.addEventListener('dragleave', event => event.preventDefault());
document.addEventListener('drop', event => event.preventDefault());
Though it’s not necessary to implement the feature itself, it’s often helpful to give the user a visual indication that they can drag a file onto an area within your application. We define two additional CSS classes that can be added and removed with JavaScript, depending upon whether the item being dragged is valid.
.raw-markdown.drag-over {                 1
  background-color: rgb(181, 220, 216);
  border-color: rgb(75, 160, 151);
}

.raw-markdown.drag-error {                2
  background-color: rgba(170, 57, 57,1);
  border-color: rgba(255,170,170,1);
}
Before we begin implementing this feature, shown in listing 6.18, it would be nice to have some helper functions. I’m going to create two suspiciously similar functions: getDraggedFile() and getDroppedFile(). One important distinction between the two: When a user is dragging a file, we have access only to its metadata. Only after the user officially drops the file do we have access to the File object. getDraggedFile() will pick the file’s metadata—in the form of a DataTransferItem object—out of the event object, which has a large number of other properties, such as where the mouse was when the event was fired and much more. getDroppedFile() pulls the first element from the files array, which was empty when the user was simply dragging the file.
This process might seem arduous, but it is all in the name of security. You might pass over windows that should not know about the file you’re attempting to drop on your way to your intended application because that file could very well contain sensitive information. But once you’ve let go and dropped the file, then the browser assumes that this action is intentional and allows the application to read the file. fileTypeIsSupported() checks to see if the type of file being dragged is either of the two types supported by Fire Sale and returns a Boolean based on the result.
const getDraggedFile = (event) => event.dataTransfer.items[0];      1
const getDroppedFile = (event) => event.dataTransfer.files[0];      2

const fileTypeIsSupported = (file) => {
  return ['text/plain', 'text/markdown'].includes(file.type);       3
};
When the user drags a file over the browser window, it rapid-fires dragover events until the user either leaves the target area—in which case, a dragleave event—or the user lifts their finger from the mouse or trackpad and drops the file onto the target area, which triggers a drop event.
During the dragover phase, we can give the user a visual clue as to whether the drop is going to be successful, as shown in figure 6.10. If the user is dragging a file type that we’re not prepared to support, we can add the .drag-error class to the element (see figure 6.11). Otherwise, we’ll add the .drag-over class to indicate that the user can drop a file here. When the user removes the file from the target area, we’ll clean up any classes that were added and restore the UI to its default state.
markdownView.addEventListener('dragover', (event) => {
  const file = getDraggedFile(event);

  if (fileTypeIsSupported(file)) {
    markdownView.classList.add('drag-over');              1
  } else {
    markdownView.classList.add('drag-error');             2
  }
});

markdownView.addEventListener('dragleave', () => {        3
  markdownView.classList.remove('drag-over');
  markdownView.classList.remove('drag-error');
});
When the user successfully drops the file onto the left pane, the code in listing 6.20 once again confirms that Fire Sale supports this type of file. If it does, we pass it over to the activeFile object in the main process that we created earlier, to be opened as if we selected it from the dialog box or from the recent documents list.
markdownView.addEventListener('drop', (event) => {
  const file = getDroppedFile(event);

  if (fileTypeIsSupported(file)) {
    mainProcess.openFile(currentWindow, file.path);      1
  } else {
    alert('That file type is not supported');            2
  }

  markdownView.classList.remove('drag-over');
  markdownView.classList.remove('drag-error');
});
With very little new code, we’ve successfully implemented a drag-and-drop feature reminiscent of a native desktop application.
A potentially dangerous edge case exists in our application right now. If we open a Markdown file in some other editor and make changes to it, Fire Sale is blissfully unaware. This means that if we save the file in Fire Sale after making changes in our other editor, it will destructively overwrite those changes.
We have a few ways around this. We could, for example, reread the file when Fire Sale comes back into focus. We could regularly check the file and see if its contents have changed. The way we approach it for now is to take advantage of Node’s fs.watchFile feature, which uses operating system-specific libraries to monitor a file or directory and emit an event if the file changes.
The one caveat of this approach is that we must be careful to stop watching files when we open new ones. Otherwise, we keep adding watchers without letting any go, which is a memory leak. This is further complicated by the fact that we have multiple windows. If a file changes, we must make sure that we send it to the correct window. Our feature will work as follows:
Our first task will be to figure out a way to manage the relationship between a window, the file currently displayed in the window, and/or the watcher for the file. In chapter 5, we used a Set to keep track of all the windows currently open in the application. In this section, we’ll use another recent addition to the JavaScript language—a Map.
Maps are key-value stores, much like regular objects in JavaScript, with an important distinction. Objects can have only strings and numbers as keys. Maps can use any type of object or value as a key. To implement this feature, we instantiate a Map that uses BrowserWindow instances as keys and file watchers as values. When the user closes a window, we find the watcher associated with that window and stop it.
const openFiles = new Map();
As I mentioned earlier, we want to start watching a file path when it’s opened and stop watching when either the window has been closed or the user opens a different file in the window. Let’s set up two functions: startWatchingFile() and stopWatchingFile().
const startWatchingFile = (targetWindow, file) => {
  stopWatchingFile(targetWindow);                                    1

  const watcher = fs.watchFile(file, (event) => {
    if (event === 'change') {                                        2
      const content = fs.readFileSync(file);
      targetWindow.webContents.send('file-opened', file, content);   3
    }
  });

  openFiles.set(targetWindow, watcher);                              4
};

const stopWatchingFile = (targetWindow) => {
  if (openFiles.has(targetWindow)) {                                 5
    openFiles.get(targetWindow).stop();                              6
    openFiles.delete(targetWindow);                                  7
  }
};
In the listing, we start watching a given file path. If the watcher fires a “change” event, we send a message to the window alerting it to the fact that the file has changed. Lastly, add the window and the associated watcher to the openFiles Map, which allows us to find it later when it comes time to close the watcher. As an added precaution, let’s close any existing watcher for that window before creating a new one. Doing so is helpful if the user opens a file window that was already watching a file.
const createWindow = exports.createWindow = () => {
  let x, y;

  const currentWindow = BrowserWindow.getFocusedWindow();

  if (currentWindow) {
    const [ currentWindowX, currentWindowY ] = currentWindow.getPosition();
    x = currentWindowX + 10;
    y = currentWindowY + 10;
  }

  let newWindow = new BrowserWindow({ x, y, show: false });

  newWindow.loadFile('index.html');

  newWindow.once('ready-to-show', () => {
    newWindow.show();
  });

  newWindow.on('close', (event) => {
    if (newWindow.isDocumentEdited()) {
  // ...
    }
  });

  newWindow.on('closed', () => {
    windows.delete(newWindow);
    stopWatchingFile(newWindow);        1
    newWindow = null;
  });

  windows.add(newWindow);
  return newWindow;
};
Right now, the window’s title reflects whether the user has made changes to the current document that haven’t been saved. But what if the user tries to close the window? The changes are gone and unrecoverable. In the previous section, we added the ability to watch the currently active file path. If the file is changed by another application, Fire Sale overwrites the changes without warning. In both cases, this is unacceptable behavior for a desktop application. Users expect to be prompted if they are about to lose their work. In this section, we implement those safeguards.
In chapter 5, we set up a listener for the closed event, which is fired when the window has successfully been closed. Electron also supports a close event, which fires when the user attempts to close the window. If the user has unsaved changes, we can intervene and prompt the user to confirm that they—in fact—want to close the window and lose their changes.
  newWindow.on('close', (event) => {
    if (newWindow.isDocumentEdited()) {                           1
      event.preventDefault();                                     2

      const result = dialog.showMessageBox(newWindow, {           3
        type: 'warning',
        title: 'Quit with Unsaved Changes?',
        message: 'Your changes will be lost if you do not save.',
        buttons: [                                                4
          'Quit Anyway',
          'Cancel',
        ],
        defaultId: 0,                                             5
        cancelId: 1                                               6
         });

      if (result === 0) newWindow.destroy();                      7
    }
  });
In previous chapters, we used dialog.showOpenDialog() and dialog.showSave-Dialog() for prompting the user to select a file. dialog.showMessageBox() is a general-purpose, customizable dialog box. You can provide a list of button labels to the buttons array. dialog.showMessageBox() returns the index of the button that the user selected. If the user selects the first button, dialog.showMessageBox() returns 0. We can use the return value to figure out how to proceed in our application based on the user’s preference. dialog.showMessageBox() also takes additional options that allow us to specify what the default action should be if the user clicks the Return button and what option should be returned if the user dismisses the dialog box.
In the previous example, we listen for the close event. If the window has unedited changes, we prompt the user. Based on the user’s response, we either prevent the window from closing or purposely destroy the window.
We also need to safeguard against two other situations where the user could lose their changes. The first is if the user attempts to open another file in the same window when there are unsaved changes; the second is if another application changes the file. The major difference between these two functions is in the message shown to the user. Either way, if the user decides to move forward, then we load the file and replace the content in the UI. In an effort to avoid repeating ourselves, we’ll move this process into its own function to use it in both places.
const renderFile = (file, content) => {
  filePath = file;
  originalContent = content;

  markdownView.value = content;
  renderMarkdownToHtml(content);

  updateUserInterface(false);
};
With our new renderFile() function in place, we can set up two IPC listeners. When the user opens a new file (listing 6.26), we continue to use the file-opened channel. But if the file has been modified by another application (listing 6.27), we send a message over the file-changed channel instead. Based on from which channel we receive the message, we display a different message to the user.
ipcRenderer.on('file-opened', (event, file, content) => {
  if (currentWindow.isDocumentEdited()) {
    const result = remote.dialog.showMessageBox(currentWindow, {     1
      type: 'warning',
      title: 'Overwrite Current Unsaved Changes?',
      message: 'Opening a new file in this window will overwrite your unsaved
     changes. Open this file anyway?',
      buttons: [
        'Yes',
        'Cancel',
      ],
      defaultId: 0,
      cancelId: 1
    });

    if (result === 1) { return; }                                    2
  }

  renderFile(file, content);                                         3
});
ipcRenderer.on('file-changed', (event, file, content) => {
  const result = remote.dialog.showMessageBox(currentWindow, {        1
    type: 'warning',
    title: 'Overwrite Current Unsaved Changes?',
    message: 'Another application has changed this file. Load changes?',
    buttons: [
      'Yes',
      'Cancel',
    ],
    defaultId: 0,
    cancelId: 1
  });

  renderFile(file, content);
});
The last step is to modify the startWatchingFile() function to send a message over the file-changed channel, instead of the file-opened channel, to trigger the correct message box.
const startWatchingFile = (targetWindow, file) => {
  stopWatchingFile(targetWindow);

  const watcher = fs.watch(file, (event) => {
    if (event === 'change') {
      const content = fs.readFileSync(file).toString();
      targetWindow.webContents.send('file-changed', file, content);     1
    }
  });

  openFiles.set(targetWindow, watcher);
};
And with that, our application now supports drag-and-drop functionality, watches the filesystem for changes, adds files to the operating system’s list of recently opened files, updates the window’s title bar, sets a represented file on macOS, and alerts the user before discarding unsaved changes. The code for the application can be found at https://github.com/electron-in-action/firesale/tree/chapter-6, or the appendix.
In browser-based applications, developers have access only to the visible area of the application’s window. They can’t add controls to the browser’s tool bar or menu bar. The entire UI for the application’s functionality must be inside of the window. Developers also face limitations within the window. They can’t modify the context menus that appear when the user right-clicks their UI. It can be a challenge to find a place for every option and command. Electron, on the other hand, enables developers to add functionality outside of the browser window, such as custom application and context menus that appear when the user right-clicks a component of the UI.
In this chapter, we explore how to create and configure these menus in Fire Sale. We’ll replace the default menu provided by Electron with our own and walk through exposing common operating system functionality in our menus. We assign keyboard shortcuts to menu items to make them easy to trigger from anywhere in the application. With the basic menu functionality implemented, we then add in our own application-specific menu items—notably, the ability to open a Markdown file from the filesystem, display it in the left pane of our UI, and render its contents as HTML in the right pane. Finally, we create a custom context menu containing common text manipulation tasks (cut, copy, and paste, as shown in figure 7.1) whenever the user right-clicks the left pane.

Throughout the previous few chapters, we’ve had a menu in Fire Sale. So why build a custom one now? Developers can overwrite Electron’s default menu, but then they are responsible for building the menu from the ground up. Over the course of this chapter, we restore some of the basic functionality common to most desktop applications. After the foundation has been laid, we extend it with our own custom functionality. From our menu users can save the currently active file as well as export the HTML to its own file. In addition to being able to access this functionality from the application’s menu, users can use keyboard shortcuts to trigger the menu items. In this chapter, we build a menu for Fire Sale that has the structure shown in figure 7.2.
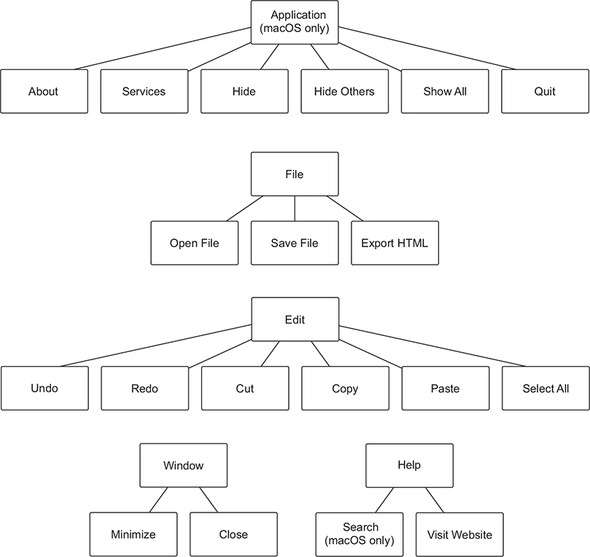
To get started, make a new file called ./app/application-menu.js. This file will grow large by the end of the chapter, so we address that now by breaking it out into its own file. Let’s begin by adding copy and paste back to the application menu.
const { app, BrowserWindow, Menu, shell } = require('electron');    1
const mainProcess = require('./main');

const template = [                                                  2
  {
    label: 'Edit',
    submenu: [
      {
        label: 'Copy',
        accelerator: 'CommandOrControl+C',                          2
        role: 'copy',                                               3
      },
      {
        label: 'Paste',
        accelerator: 'CommandOrControl+V',
        role: 'paste',
      },
    ]
  }
];

module.exports = Menu.buildFromTemplate(template);                  4
Next, set the menu as the application’s menu when app fires the ready event.
const { app, BrowserWindow, dialog, Menu } = require('electron');   1
const applicationMenu = require('./application-menu');              2
const fs = require('fs');

const windows = new Set();
const openFiles = new Map();

app.on('ready', () => {
  Menu.setApplicationMenu(applicationMenu);                         3
  createWindow();
});

// ... Additional methods below ...
Electron includes the Menu and MenuItem modules for building menus. In theory, we could build a menu out of individual MenuItems, but this method can be tedious and error prone. As a convenience, Menu provides the buildFromTemplate() method that accepts an array of regular JavaScript objects. Internally, Electron creates the MenuItems based on the array you provided.
If you start the application in Windows, you should see an Edit menu with two menu items: Copy and Paste. This is to be expected. But if you’re testing the application on macOS, you’ll see something a bit different, as shown in figure 7.3.
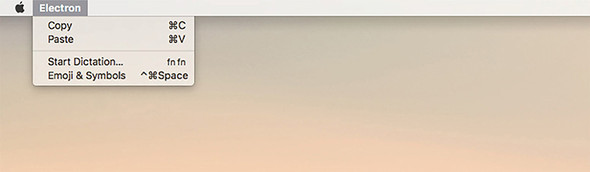
In macOS, the menu is called Electron rather than Edit because the first menu on macOS is always the Application menu. To solve this issue in Electron, we need to shift the Edit menu—and all subsequent menu items in the future—down one spot, as shown in listing 7.3 and figure 7.4, to make room for the Application menu, which we implement later in this chapter.
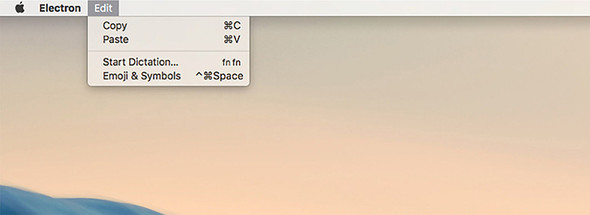
const { app, BrowserWindow, Menu, shell } = require('electron');
const mainProcess = require('./main');

const template = [
  // ... Menu template from the last section. ...
];

if (process.platform === 'darwin') {          1
  const name = 'Fire Sale';                   2
  template.unshift({ label: name });
}

module.exports = Menu.buildFromTemplate(template);
One of the great things about building applications with Electron is that developers can target macOS, Windows, and Linux with one codebase. The caveat is that the developer should consider the idiosyncrasies of each of the supported operating systems when writing the code. Luckily, Node provides the process object, which has several properties, methods, and events that provide introspection into the environment in which the application is running.
process.platform returns the name of the platform in which the application is currently executing. As of this writing, process.platform returns one of five strings: darwin, freebsd, linux, sunos, or win32. Darwin is the UNIX operating system upon which macOS is built. We can adjust our menu at runtime by checking if process.platform is equal to darwin. If it is, then the application is running on macOS and all the menu items should be shifted one place to the right.
For all of the extra work required to get menus in the correct order, you may have noticed in figure 7.4 that we were rewarded with dictation and emoji support without having to implement it just by having an Edit menu.
Electron provides a default menu, but it’s an all or nothing affair. When we replace the menu, we lose all its original functionality. Not only do we lose a few menu items, we also lose their keyboard shortcuts. Try to use the Command-X keyboard shortcut on macOS, or Control-X on Windows and Linux, to cut text from the left pane. What about Command-A or Control-A on macOS or Windows, respectively, to select all the text? How about Command-Z or Control-Z to undo? Nothing happens. If you’re on macOS, try to press Command-Q to quit the application. Again, nothing happens. We also lose the functionality to hide this application and other applications in macOS. On all operating systems, we lose the ability to undo and redo changes, minimize and close the window, and select all text in each field. All that’s left is the ability to copy and paste, shown in figure 7.5—and that’s only because it was added back in our custom menu.
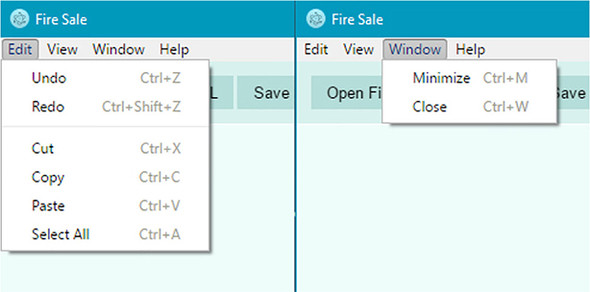
It’s up to the developer to add these features back to the application. If we want to omit any of these features from our application, we can. Your first thought might be that re-implementing this functionality is a bit like reinventing the wheel. Luckily, Electron makes it easy to create menu items that perform common operating system tasks. When a new menu item is created, a number of options can be set on it. So far, we’ve been exposed to the label option and the type option, which we set to separator on the third menu item in each of the previous listings.
To get practice building menus in Electron, let’s start by implementing the Edit and Window menus similar to how they were defined in Electron’s default menu, as shown in figure 7.5.
const template = [
  {
    label: 'Edit',
    submenu: [
      {
        label: 'Undo',
        accelerator: 'CommandOrControl+Z',
        role: 'undo',
      },
      {
        label: 'Redo',
        accelerator: 'Shift+CommandOrControl+Z',
        role: 'redo',
      },
      { type: 'separator' },
      {
        label: 'Cut',
        accelerator: 'CommandOrControl+X',
        role: 'cut',
      },
      {
        label: 'Copy',
        accelerator: 'CommandOrControl+C',
        role: 'copy',
      },
      {
        label: 'Paste',
        accelerator: 'CommandOrControl+V',
        role: 'paste',
      },
      {
        label: 'Select All',
        accelerator: 'CommandOrControl+A',
        role: 'selectall',
      },
    ],
  },
  {
    label: 'Window',
    submenu: [
      {
        label: 'Minimize',
        accelerator: 'CommandOrControl+M',
        role: 'minimize',
      },
      {
        label: 'Close',
        accelerator: 'CommandOrControl+W',
        role: 'close',
      },
    ],
  },
];

if (process.platform === 'darwin') {
  const name = app.getName();
  template.unshift({ label: name });
}

module.exports = Menu.buildFromTemplate(template);
One thing you may have noticed is that all of the menu items added so far have a special role property. This setting is important because functionality like copy and paste is hard to implement by hand. Menu items can have a role, which correlates to a built-in capability provided by the operating system to all applications. On Windows, Linux, and macOS, the role of a menu item can be set to any of the following:
These roles overlap with much of the functionality we lost when we replaced the default menu with our own. Adding menu items with these roles restores the functionality to the menu but not the keyboard shortcuts that many users are accustomed to.
Electron provides an additional property called accelerator for defining a keyboard shortcut to trigger a menu item’s action. When creating menu items, you can set the accelerator property to a string that follows a set of Electron-specific conventions. Listing 7.5 codes a menu item that adds the copy functionality.
const { app, BrowserWindow, Menu, MenuItem, shell } = require('electron');

const copyMenuItem = new MenuItem({
  label: 'Copy',
  accelerator: 'CommandOrControl+C',
  role: 'copy'
});
On Windows and Linux, it’s common to prefix keyboard shortcuts with the Control key. On macOS, it’s common to use the Command key for a similar purpose. In addition to being unconventional, the Command key isn’t available on Linux and Windows. Rather than needing to rely on process.platform along with conditional logic in our menu items, Electron provides the CommandOrControl shorthand. On macOS, this binds the keyboard shortcut to the Command key. On Windows and Linux, Electron uses the Control key instead. As additional shorthand, Electron provides Cmd, Ctrl, and CmdOrCtrl, which are aliased to Command, Control, and CommandOrControl, respectively.
When Electron runs, it compiles the template into a collection of MenuItems and sets the application’s menu accordingly. Keyboard shortcuts for common operations like copying and pasting are restored, and the application behaves as expected in Windows and Linux. In macOS, however, the application is still missing important functionality, not least of which is the ability to quit the application. Standard application menus in macOS have the structure shown in figure 7.6.
When running on macOS, Electron provides an additional set of roles that make it easy to restore the application menu common to most Mac applications. These additional roles are

The default application menu provided by Electron has menu items for showing the application’s About panel, exposing services provided by macOS, hiding the application, hiding all other applications, and quitting the application, as shown in figure 7.7.
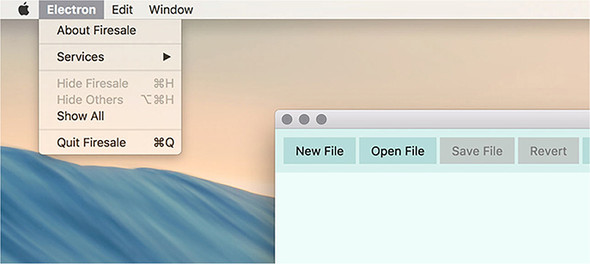
Implementing the application menu is similar to implementing the Edit and Window menus. Command is preferable over CommandOrControl for defining accelerators, because this menu appears only on macOS. In addition, we use template strings to get the application’s name for the About, Hide, and Quit menus because it is customary to include the application’s name in these menu items.
if (process.platform === 'darwin') {
  const name = 'Fire Sale';
  template.unshift({
    label: name,
    submenu: [
      {
        label: `About ${name}`,
        role: 'about',
      },
      { type: 'separator' },
      {
        label: 'Services',
        role: 'services',
        submenu: [],
      },
      { type: 'separator' },
      {
        label: `Hide ${name}`,
        accelerator: 'Command+H',
        role: 'hide',
      },
      {
        label: 'Hide Others',
        accelerator: 'Command+Alt+H',
        role: 'hideothers',
      },
      {
        label: 'Show All',
        role: 'unhide',
      },
      { type: 'separator' },
      {
        label: `Quit ${name}`,
        accelerator: 'Command+Q',
        click() { app.quit(); },         1
      },
    ],
  });
}
Our application now has almost all of the functionality of a native application on macOS, but we still need to address a few subtle differences. On macOS, the Window menu has a few additional menu items—most notably Bring All to Front, which moves all of the windows of the application to the front of the stack. In addition, the macOS-exclusive window role adds the ability to close and minimize the current window from the Window menu, as well as a list of all of the application’s windows, and the ability to bring them all to the front. This role is ignored on platforms that don’t support it.
const template = [
  {
    label: 'Edit',
    submenu: [
      // "Edit" menu shown in Listing 7.4
    ],
  },
  {
    label: 'Window',
    role: 'window',                                                     1
    submenu: [
      // "Window" menu shown in Listing 7.4
    ],
  },
];

if (process.platform === 'darwin') {
  const name = app.getName();
  template.unshift({
    label: name,
    submenu: [
      // #Application menu shown in Listing 7.6
    ],
  });

  const windowMenu = template.find(item => item.label === 'Window');    2
  windowMenu.role = 'window';                                           3
  windowMenu.submenu.push(
    { type: 'separator' },
    {
      label: 'Bring All to Front',
      role: 'front',
    }
  );
}
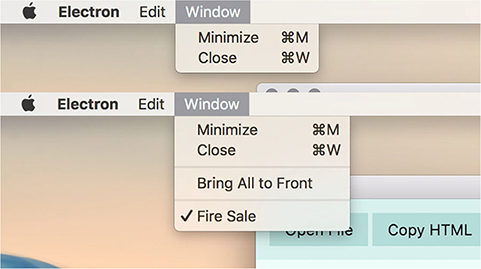
Adding a Help menu is a good practice regardless of platform, but there is an added benefit for doing so on macOS. Even if your application does not have any documentation or support yet, the built-in Help menu allows users to search the application to find menu items, as shown in figure 7.9. This works in most macOS applications and is useful for searching through deeply nested menus quickly. You can access the menu search by pressing Command-Shift-? at any time.
To add a Help menu to your application, such as the structure shown in figure 7.10, add an additional menu with the role of help and a submenu of additional menu items. You must provide an array as the submenu, as shown in listing 7.8, even if it’s empty. For now, we can also add the ability to trigger the developer tools. Depending on the application, you might want to remove this feature before publishing the application. That said, popular applications such as Atom, Nylas Mail, and Visual Studio Code have chosen to leave it in.

const template = [
  // "Edit"  and "Window" menus defined in Listing 7.7
  {
    label: 'Help',
    role: 'help',
    submenu: [
      {
        label: 'Visit Website',
        click() { /* To be implemented */ }
      },
      {
        label: 'Toggle Developer Tools',
        click(item, focusedWindow) {                                      1
          if (focusedWindow) focusedWindow.webContents.toggleDevTools();
        }
      }
    ],
  }
];
The click() method can optionally take up to three arguments: the menu item itself, the currently focused BrowserWindow instance, and an event object. In listing 7.8, we use the second argument—the currently focused window—to determine which window we should tell to toggle the developer tools.
Going through all that work to restore a lot of the functionality, which we originally got for free, is worth it only if we use it as a template to add custom functionality. Users typically expect to be able to open and save files from the File menu. Fire Sale currently lacks this functionality. Right now, we can select and open a Markdown file from the filesystem using the Open File button in the UI. Our next step, shown in figure 7.11, is to modify the File menu with New File, Open File, Save File, and Export HTML menu items along with keyboard shortcuts to trigger each action.
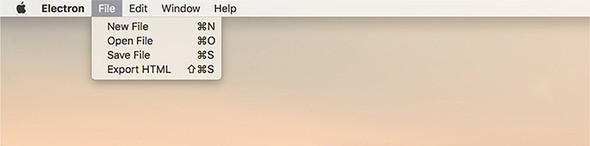
When the user clicks the Open File menu item or presses the keyboard shortcut, the menu item triggers the same openFile() function from the main process that the button in the UI triggers. Clicking New File calls the createWindow() function from the main process. Let’s start by adding a File menu to our template with each of the features shown in figure 7.11 as menu items to its submenu array.
In the case of saving or exporting a file, however, we need the current contents of the Markdown pane or the HTML pane, respectively. We’ll also need the name of the currently open file if there is one because the main process doesn’t have access to this information. Instead, we send a message to the currently focused window that it should gather this information for us and then trigger the same functionality it would if a user clicked on a button in the UI.
const template = [
  {
    label: 'File',
    submenu: [
      {
        label: 'New File',
        accelerator: 'CommandOrControl+N',
        click() {
          mainProcess.createWindow();                        1
        }
      },
      {
        label: 'Open File',
        accelerator: 'CommandOrControl+O',
        click(item, focusedWindow) {
          mainProcess.getFileFromUser(focusedWindow);        2
        },
      },
      {
        label: 'Save File',
        accelerator: 'CommandOrControl+S',
        click(item, focusedWindow) {
          focusedWindow.webContents.send('save-markdown');   3
        },
      },
      {
        label: 'Export HTML',
        accelerator: 'Shift+CommandOrControl+S',
        click(item, focusedWindow) {
          focusedWindow.webContents.send('save-html');       4
        },
      },
    ],
  },
  // "Edit", "Window", and "Help" menus are defined here as well.
];
Sending a message to the focused window is half the battle. We still need to configure the renderer process to listen for these messages and act accordingly. Let’s set up an IPC listener to receive these messages and call our existing save and export functionality whenever a message is received.
ipcRenderer.on('save-markdown', () => {                                  1
  mainProcess.saveMarkdown(currentWindow, filePath, markdownView.value);
});

ipcRenderer.on('save-html', () => {                                      2
  mainProcess.saveHtml(currentWindow, filePath, markdownView.value);
});
In Windows and Linux, the application quits when all the windows are closed. On macOS the application remains running even when all the windows have been closed. A new window is opened when the icon is clicked, but in some cases, the user might select one of the three menu items we just implemented and the focused window is undefined. In chapter 9, we cover how to enable and disable menu items. For now, we take a simpler approach: open a new window if the user selects Open File, and display an error message if there is no content to save or export.
To display the error messages when a user tries to save or export a nonexistent file, we use dialog.showErrorBox(), which is similar to dialog.showMessageBox() but specializes in displaying error messages and doesn’t have as many options for configuration.
const { app, dialog, Menu, MenuItem shell } = require('electron');  1
const mainProcess = require('./main');

const template = [
  {
    label: 'File',
    submenu: [
      {
        label: 'New File',
        accelerator: 'CommandOrControl+N',
        click() {
          mainProcess.createWindow();
        }
      },
      {
        label: 'Open File',
        accelerator: 'CommandOrControl+O',
        click(item, focusedWindow) {
          mainProcess.getFileFromUser(focusedWindow);
        },
      },
      {
        label: 'Save File',
        accelerator: 'CommandOrControl+S',
        click(item, focusedWindow) {
          if (!focusedWindow) {
            return dialog.showErrorBox(                             2
              'Cannot Save or Export',
              'There is currently no active document to save or export.'
            );
          }
          focusedWindow.webContents.send('save-markdown');
        },
      },
      {
        label: 'Export HTML',
        accelerator: 'Shift+CommandOrControl+S',
        click(item, focusedWindow) {
          if (!focusedWindow) {
            return dialog.showErrorBox(                             3
              'Cannot Save or Export',
              'There is currently no active document to save or export.'
            );
          }
          focusedWindow.webContents.send('save-html');
        },
      },
    ],
  },
Things are not nearly as hopeless if the user selects Open File and there is no window available to receive the command. We simply make a new window, wait for it to be shown, and then trigger the File Selection dialog box as if the window had been there all along.
const template = [
  {
    label: 'File',
    submenu: [
      {
        label: 'Open File',
        accelerator: 'CommandOrControl+O',
        click(item, focusedWindow) {
          if (focusedWindow) {
            return mainProcess.getFileFromUser(focusedWindow);       1
          }

          const newWindow = mainProcess.createWindow();              2

          newWindow.on('show', () => {                               3
            mainProcess.getFileFromUser(newWindow);
          });
        },
      }, // "Save File" and "Export HTML" menus are defined here.
    ],
  }, // "Edit", "Window", and "Help" menus are defined here.
];
First, we check if there is a focusedWindow. If there is, we want to trigger the functionality that we implemented earlier and return from the function early. If there isn’t a focused window, we need to create one. Luckily, we created a function in chapter 5 to assist us with this process. When the new window has finished initalizing, we use it as we would use any existing window. Our code is now resilient to this case, and we’re ready to move on.
In the previous section, we defined a menu and set it as the application menu in the main process when the app module fired its “ready” event. Our application can only have one application menu at a time. We can, however, define additional menus in the renderer process, shown in figure 7.12, that spring into action when the user right-clicks (or does a two-finger click on certain computers) a part of the UI.
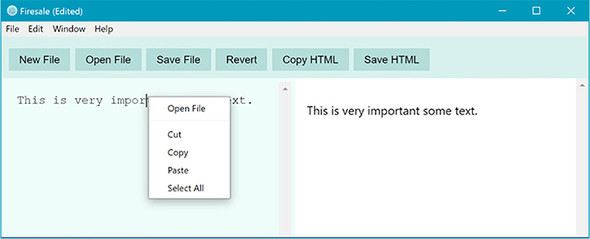
Next, we listen for contextmenu events in the left-hand markdown pane.
markdownView.addEventListener('contextmenu', (event) => {
  event.preventDefault();
  alert('One day, a context menu will go here.');
});
Notice that the alert does not fire unless the user clicks the left pane. If you want a context menu that is triggered from anywhere within the application, listen on the window object instead of on a DOM node. The Menu module is not available from within the renderer process, but it can be accessed from the context of the main process using the remote module as shown in the following listing. Once imported, we can use Menu.buildFromTemplate() to construct a menu as shown in listing 7.15.
const { remote, ipcRenderer } = require('electron');
const { Menu } = remote;                                1
const path = require('path');
const mainProcess = remote.require('./main.js');
const currentWindow = remote.getCurrentWindow();

// Our existing renderer code...

const markdownContextMenu = Menu.buildFromTemplate([
  { label: 'Open File', click() { mainProcess.getFileFromUser(); } },
  { type: 'separator' },
  { label: 'Cut', role: 'cut' },
  { label: 'Copy', role: 'copy' },
  { label: 'Paste', role: 'paste' },
  { label: 'Select All', role: 'selectall' },
]);
To trigger this menu, replace the contextmenu event listener with a function that will call the popup() method on the newly created menu, shown here.
markdownView.addEventListener('contextmenu', (event) => {
  event.preventDefault();
  markdownContextMenu.popup();
});
The popup() method takes four arguments: a BrowserWindow, x, y, and a positioning-Item. All of these arguments are optional, and if they’re omitted, then the context shows up in the current browser window directly under the mouse cursor, which is the behavior we expect in this context. With that code in place, we can now trigger a context menu in our Markdown pane. We add functionality to the context menu as well as additional context menus as we add more features to our application. The complete code for this chapter can be found at https://github.com/electron-in-action/firesale/tree/chapter-7 or in the appendix. Alternatively, you can clone from the GitHub repository at https://github.com/electron-in-action/firesale.git, check out the chapter-7 branch, and run npm install to see it in action.
In addition to creating custom application modules, opening isolated browser window processes, and accessing native file dialogs in Electron, we can use the shell module to interact with the operating system.
How does your application know your system’s default browser for opening websites? If you want to open an image file in its default application, which application should you send it to?
Users of our applications typically set these preferences in the operating system itself. Instead of trying to figure out our user’s settings, we’re better off just asking the operating system for the answer. Electron provides the shell module to make this easy for us.
The shell module is relatively small compared to some of the other modules provided by Electron. It allows us to open a given file path in the operating system’s file browser, send it to its default application, move it to the trash, trigger a system beep, and create shortcut links in Windows. The shell module made a brief appearance in chapter 2, when we used it to make sure that hyperlinks open in the user’s web browser of choice instead of in the application itself, which also happens to be a web browser.
In this chapter, we take a subset of these features—opening a file’s location in the file browser and sending a file to the operating system’s default application—and implement them in multiple places in Fire Sale, as shown in figure 8.1. We add this functionality to Fire Sale’s UI, to the context menu that opens when the user right-clicks the editor pane, and to the application’s menu. Depending on the feature you’re implementing in your application, all or a subset of these might be the right approach for your purposes. As we implement them in each of the three places throughout the chapter, I discuss the advantages and disadvantages of each approach. All the code from this chapter is available on GitHub in the chapter-8 branch (https://github.com/electron-in-action/firesale/tree/chapter-8).
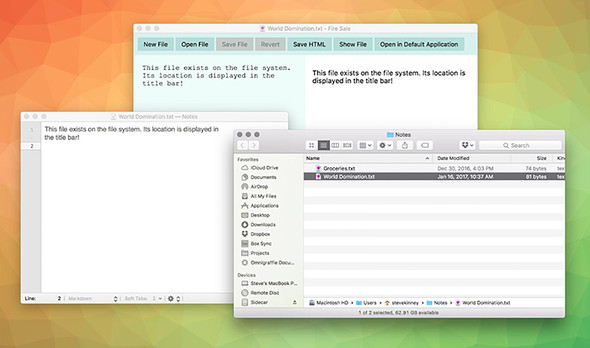
In chapter 7, in learning how to implement custom menus, we added features to Fire Sale like we would in a traditional browser environment: by adding buttons to the DOM. The Electron shell module, which is available in the main process as well as the renderer process, can be triggered from buttons in the UI, from application and context menu items, through keystrokes, and more. But let’s start with what we’re good at: triggering functionality from the UI. The Show File and Open in Default Application buttons, shown in figure 8.2, have been in the UI since chapter 3. Now it’s their turn to shine. When a file is opened or a new file is first saved to the filesystem, the buttons are enabled. When a user clicks the Show File button, the file browser opens so the user can navigate to the directory containing the currently open file. When the Open in Default Application button is selected, the operating system opens the file in the application that typically opens Markdown and text files on the user’s computer.
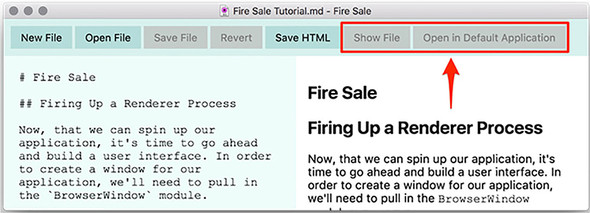
In the previous chapters, the Show File and Open in Default Application buttons have been disabled by default. Like the Save and Revert buttons implemented in a previous chapter, there are situations where the buttons should be enabled. With the Save and Revert buttons, this was whenever the original content of the file—or an empty string in the case of a new, unsaved file—differed from what was currently shown in the left editor pane. Thus, we listened for keyup events in the editor and compared the contents to evaluate if the buttons should be enabled. For Show File and Open in Default Application, we do not care so much whether they have been modified. What we want is a file path to either show or open, respectively.
const renderFile = (file, content) => {
  filePath = file;
  originalContent = content;

  markdownView.value = content;
  renderMarkdownToHtml(content);

  showFileButton.disabled = false;
  openInDefaultButton.disabled = false;          1

  updateUserInterface(false);
};
The Show File and Open in Default Editor buttons should be enabled whenever we are working with a file that is stored in the filesystem, not a new, unsaved file. Whenever the active file is changed, we update the filePath variable. After this variable has been set, enable the buttons.
const showFile = () => {
  if (!filePath) {                                                       1
  return alert('This file has not been saved to the filesystem.');
  }
  shell.showItemInFolder(filePath);                                      2
};

const openInDefaultApplication = () => {
  if (!filePath) {
  return alert('This file has not been saved to the filesystem.');
  }
  shell.openItem(filePath);                                              3
};

showFileButton.addEventListener('click', showFile);                      4
openInDefaultButton.addEventListener('click', openInDefaultApplication);
Enabling the buttons is helpful, but it would be even better if the buttons did something. Whenever a button is clicked, it triggers the appropriate method from the shell module. You might notice that I decided to define the functions in constants instead of just passing anonymous functions to addEventListener. Later in this chapter, we call these functions from Fire Sale’s application menu as well as from a context menu. These names allow me to reference the two functions later.
The first place we might consider adding this functionality is in the application menu, just below the menu items that allow the user to save and export files. In this section, we implement two new menu items, Show File and Open in Default Editor, as shown in figure 8.3, which exposes the file in its containing folder, and opens it in the application set as the default for Markdown files in the operating system, respectively.
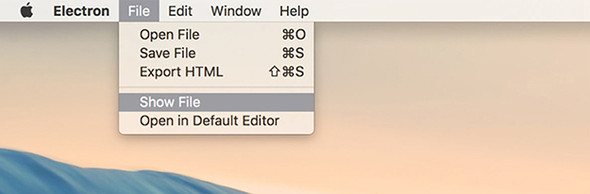
You must add these two new menu items to the application menu template to appear when the application starts. What if no windows are open? In a perfect world, we would disable the menu items unless at least one window was open. But that’s beyond the scope of this chapter, so we’ll do the next best thing and display a useful error message to help the user see the error of their ways.
const { app, BrowserWindow, dialog, Menu, shell } = require('electron');   1
const mainProcess = require('./main');

const template = [
  {
    label: 'File',
    submenu: [
      //Additional submenu items above.
      { type: 'separator' },                                               2
      {
        label: 'Show File',
        accelerator: 'Shift+CommandOrControl+S',
        click(item, focusedWindow) {
          if (!focusedWindow) {                                            3
            return dialog.showErrorBox(
              'Cannot Show File\'s Location',
              'There is currently no active document show.'
            );
          }
          focusedWindow.webContents.send('show-file');                     4
        },
      },
      {
        label: 'Open in Default Editor',
        accelerator: 'Shift+CommandOrControl+S',
        click(item, focusedWindow) {
          if (!focusedWindow) {
            return dialog.showErrorBox(
              'Cannot Open File in Default Editor',
              'There is currently no active document to open.'
            );
          }
          focusedWindow.webContents.send('open-in-default');               5
        },
      },
    ],
  },
  // Edit, Window, and Help menus defined here.
];
In listing 8.3, we add a separator between the menu items we added in the previous chapter and the ones we’re adding in this chapter. This separator is solely for aesthetic reasons and is not required for the menu to work properly. After the separator, we have added two new menu items: Show File and Open in Default Editor. Each window has a reference to the path of the file that is currently rendered in it. So, how do we know what file to show or open? We could devise a complicated system for figuring out which files were opened in which windows, or we could just send a message to the window over interprocess communication (IPC) and let the window figure it out for itself.
To get this working, we listen for IPC messages over the show-file and open-in-default channels. Luckily, we were smart enough earlier to name the functions responsible for handling these requests. This makes setting up the listeners easy.
ipcRenderer.on('show-file', showFile);                            1
ipcRenderer.on('open-in-default', openInDefaultApplication);      2
The Electron shell module also allows developers to move a given file to the macOS Trash or the Windows Recycle Bin without concerning themselves with the finer points of how that works on each platform. It can also allow developers to trigger a system beep. On Windows, developers can create and read shortcut links as well.
You can also add these features to the context menu we originally added to the application in chapter 7. This menu appears when a user right-clicks the left editor pane, shown in figure 8.4. To implement this feature, we need to combine the two approaches from earlier in this chapter: we add menu items to the template, but because we’re in the renderer process already, we can call the functions directly—just as we did with the buttons in the UI—instead of having to send messages via IPC.
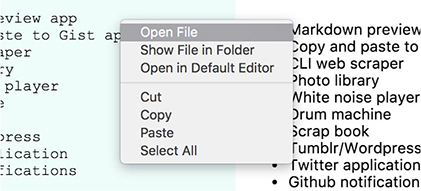
const { remote, ipcRenderer, shell } = require('electron');             1
const { Menu } = remote;
const path = require('path');
const mainProcess = remote.require('./main.js');
const currentWindow = remote.getCurrentWindow();

// Other renderer code from the previous chapters will remain here, but has
     been ommited for brevity...

const markdownContextMenu = Menu.buildFromTemplate([
  { label: 'Open File', click() { mainProcess.getFileFromUser(); } },
  {
    label: 'Show File in Folder',
    click: showFile                                                     2
  },
  {
    label: 'Open in Default Editor',
    click: openInDefaultApplication                                     3
  },
  { type: 'separator' },
  { label: 'Cut', role: 'cut' },
  { label: 'Copy', role: 'copy' },
  { label: 'Paste', role: 'paste' },
  { label: 'Select All', role: 'selectall' },
]);
When is adding buttons to the UI a better choice than adding the same functionality to menu items in an application or context menu? It depends on the role that the feature plays in your application. Contextual menu items are obscure; a user may never think to right-click a given part of your application. If the feature you’re implementing is essential to the application, it is better to put it in the UI. That said, there is only a limited amount of space to work with, and less used, but nice-to-have, functionality is a great fit for contextual menu items.
When would using a context menu be a better approach than including these menu items in the application menu as we did in the previous section? To keep Fire Sale simple, it was designed as a single-window application where the user edits a single file at a time. When a user selects Open File in Default Editor, the application implicitly knows which file because there is only one.
But what if we were building a photo-management application, and we wanted to add a feature where the user could right-click each of the photographs to show it in the Finder or Windows Explorer? This feature would be difficult to add to the application menu, because it would be hard to decipher exactly which photograph the user wanted to see in its containing folder. By using a context menu, we can easily determine which photograph the user right-clicks.
Right now, Fire Sale shows an error message if the user selects a menu item that isn’t available. It’s better than crashing or throwing an indecipherable error message, but it’s not going to win any awards for being a great user experience. What if we disable the context and application menu items that would otherwise throw an error if clicked? This way, it’s clear to the user that this is not a valid action.
It is possible to mutate menus after they have been set, but it’s tricky. Menu items are stored as arrays, and finding a given menu item involves traversing all the top-level menu items and their submenus. Most of the time, it’s easier to either generate a new context menu based on the current state of the window just before displaying it to the user or to regenerate a new application menu when the state of the application has changed.
How we approach solving this problem depends on which menu we’re working with. Context menus within a window are easier because we’re working with only a single window and we’re storing the filePath variable in the global scope. If there is a filePath, then we enable Show File in Folder and Open in Default. If filePath is false, then these menu items are disabled.
The application menu is a little trickier. In addition to Show File and Open in Default Application, we also have Save File and Export HTML, which can remain enabled if the file has not been saved to the filesystem but should be enabled only if there is at least one window open. See figure 8.5.
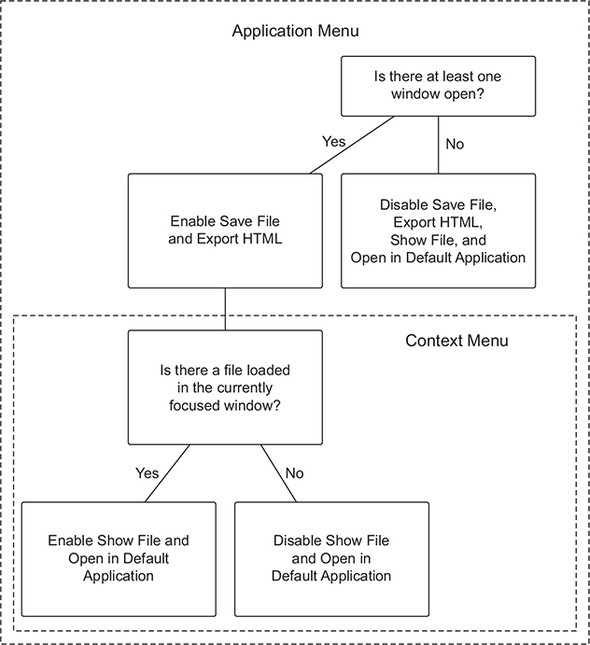
Earlier in this chapter, we created a context menu from a template and then called its popup() method whenever a contextmenu DOM event is fired. To dynamically enable or disable the Show File and Open in Default menu items, as in figure 8.6, let’s create a context menu each time the user right-clicks the Markdown view. We enable these items based on whether there is a filePath. To accomplish this, we move the creation of the menu into a function, which allows us to re-create the menu each time it is called.
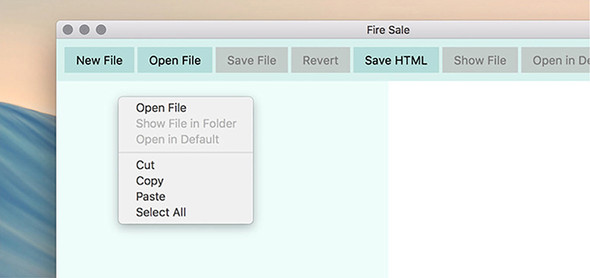
const createContextMenu = () => {                                         1
  return Menu.buildFromTemplate([                                         2
    { label: 'Open File', click() { mainProcess.getFileFromUser(); } },
    {
      label: 'Show File in Folder',
      click: showFile,
      enabled: !!filePath                                                 3
    },
    {
      label: 'Open in Default',
      click: openInDefaultApplication,
      enabled: !!filePath                                                 3
    },
    { type: 'separator' },
    { label: 'Cut', role: 'cut' },
    { label: 'Copy', role: 'copy' },
    { label: 'Paste', role: 'paste' },
    { label: 'Select All', role: 'selectall' },
  ]);
};
In the previous code sample, we created a createContextMenu() function that returns a new menu each time it is called. As it creates the Show File and Open in Default menu items, it checks to see if filePath can be coerced to true using the !! operator. The enabled property expects a Boolean—either true or false. If you’re not familiar with this technique, it’s a trick to take a truthy or falsey value and coerce it into true or false, respectively. The ! operator returns false for any truthy value, and true for any falsey value. Using it a second time flips it back, but this time to a Boolean primitive, as shown in listing 8.7.
null   // Null falsey in JavaScript.
!null  // Returns true.
!!null // Returns false.

'/Users/stevekinney/Notes/Groceries.txt'  // A file path
!/Users/stevekinney/Notes/Groceries.txt'  // Returns false.
!!/Users/stevekinney/Notes/Groceries.txt' // Returns true.
The next step is to modify our event listener to use the function we just created. Each time it generates a new menu, the function checks if filePath is truthy or falsey and enables Show File and Open in Default Application accordingly. The next step is to use this function to generate a new menu on the fly each time the user right-clicks the Markdown view of the application.
markdownView.addEventListener('contextmenu', (event) => {
  event.preventDefault();
  createContextMenu().popup();          1
});
With this change, the user gets a new menu each time they request one. If there is a file to show in the filesystem or open in another application, the respective menu items are enabled. If not, they are disabled. Now it’s time to turn our attention to the—slightly trickier—application menu.
The process of dynamically enabling menu items in the application menu shares some similarities with doing so in the context menu. We use the same approach of generating new menus and replacing the existing application menu but with a few catches: the application menu is shared across all windows. The first window might have a file loaded that we can show or open in another application, but the second one may not. On macOS, we might run into the scenario where there are no windows open. In this case, the Save File and Export HTML menu items should be disabled along with Show File and Open in Default Application, as shown in figure 8.7. Furthermore, our context menu could take advantage of the fact that filePath was in scope. The application menu lives in the main process and doesn’t have access to this variable. See figures 8.8 and 8.9.
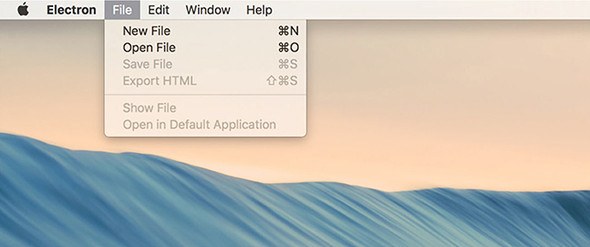
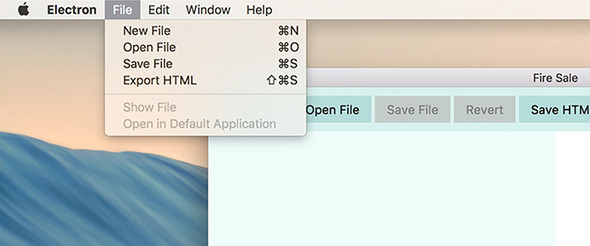
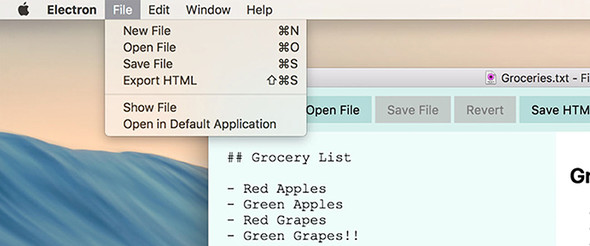
To implement this feature, we take the following approach. First we’ll create a function that returns a new application menu based on the one we implemented in the previous chapter. Each time we create a new menu, we check if there are any windows and if the currently focused window is representing a file on the filesystem. With this in place, we’ll modify the main process to generate a new application menu when
Let’s start by refactoring the template in application-menu.js to a function that will generate a menu and set it as the new application menu.
const { app,
        BrowserWindow,                                                   1
        dialog,
        Menu,
        shell
      } = require('electron');
const mainProcess = require('./main');

const createApplicationMenu = () => {
  const hasOneOrMoreWindows = !!BrowserWindow.getAllWindows().length;    2
  const focusedWindow = BrowserWindow.getFocusedWindow();                3
  const hasFilePath = !!(focusedWindow &&
     focusedWindow.getRepresentedFilename());                            4

  const template = [
    {
      label: 'File',
      submenu: [
        {
          label: 'New File',
          accelerator: 'CommandOrControl+N',
          click() {
            mainProcess.createWindow();
          }
        },
        {
          label: 'Open File',
          accelerator: 'CommandOrControl+O',
          click(item, focusedWindow) {
            // Omitted for brevity...
          },
        },
        {
          label: 'Save File',
          accelerator: 'CommandOrControl+S',
          enabled: hasOneOrMoreWindows,                                  5
          click(item, focusedWindow) {
            // Omitted for brevity...
          },
        },
        {
          label: 'Export HTML',
          accelerator: 'Shift+CommandOrControl+S',
          enabled: hasOneOrMoreWindows,                                  5
          click(item, focusedWindow) {
            // Omitted for brevity...
          },
        },
        { type: 'separator' },
        {
          label: 'Show File',
          enabled: hasFilePath,                                          6
          click(item, focusedWindow) {
            // Omitted for brevity...
          },
        },
        {
          label: 'Open in Default Application',
          enabled: hasFilePath,                                          6
          click(item, focusedWindow) {
            // Omitted for brevity...
          },
        },
      ],
    },
    // Additional Menus...
  ];

  // Additional Functionality...

  return Menu.setApplicationMenu(Menu.buildFromTemplate(template));      7
};

module.exports = createApplicationMenu;
In chapter 7, we built the menu once when the application started and set it as the application menu as soon as it was ready. This approach still works, now that this module exports a function that creates the menu and sets it as the application menu. Along the way, it checks if there are any browser windows, and if there is a focused window, it checks whether that window has a represented file set, shown in listing 8.10. If you recall, we set the represented file in chapter 4 when opening a file. At the time, we did this to get the little file icon in the window’s title bar in macOS. (Calling this method has no discernible visual effect on Windows or Linux.)
const openFile = exports.openFile = (targetWindow, file) => {
  const content = fs.readFileSync(file).toString();
  startWatchingFile(targetWindow, file);
  app.addRecentDocument(file);
  targetWindow.setRepresentedFilename(file);                     1
  targetWindow.webContents.send('file-opened', file, content);
};
With these two pieces of information—the number of open windows and whether the focused window is representing a file path—we can toggle the menu items appropriately. The next step is to trigger this process whenever either of these two might have changed. Triggering events include when the application first launches, when a new window takes focus, when a window is closed (it could be the last window), and when the user opens a file. Whenever one of these events occurs, we re-create the application menu.
const { app, BrowserWindow, dialog, Menu } = require('electron');
const createApplicationMenu = require('./application-menu');          1
const fs = require('fs');

const windows = new Set();
const openFiles = new Map();

app.on('ready', () => {
  createApplicationMenu();                                            2
  createWindow();
});

app.on('window-all-closed', () => {
  // Omitted for brevity...
});

app.on('activate', (event, hasVisibleWindows) => {
  if (!hasVisibleWindows) { createWindow(); }
});

const createWindow = exports.createWindow = () => {
  let x, y;

  const currentWindow = BrowserWindow.getFocusedWindow();

  if (currentWindow) {
    const [ currentWindowX, currentWindowY ] = currentWindow.getPosition();
    x = currentWindowX + 10;
    y = currentWindowY + 10;
  }

  let newWindow = new BrowserWindow({ x, y, show: false });

  newWindow.loadFile('index.html');

  newWindow.once('ready-to-show', () => {
    newWindow.show();
  });

  newWindow.on('focus', createApplicationMenu);                      3

  newWindow.on('close', (event) => {
    // Omitted for brevity...
  });

  newWindow.on('closed', () => {
    windows.delete(newWindow);
    createApplicationMenu();                                         4
    newWindow = null;
  });

  windows.add(newWindow);
  return newWindow;
};

const getFileFromUser  = exports.getFileFromUser = (targetWindow) => {
  // Omitted for brevity...
};

const openFile = exports.openFile = (targetWindow, file) => {
  const content = fs.readFileSync(file).toString();
  startWatchingFile(targetWindow, file);
  app.addRecentDocument(file);
  targetWindow.setRepresentedFilename(file);
  targetWindow.webContents.send('file-opened', file, content);
  createApplicationMenu();                                          5
};


// Additional functions below...
With the ability to create application menus and replace the existing one, implementing this functionality in main.js is just a matter of invoking this function at the right time. With this in place, we’ve accomplished the feature that we set out to implement at the beginning of this section. The full code at the end of this chapter can be found in the appendix book or on GitHub at https://github.com/electron-in-action/firesale.
For most of the first half of the book, we worked on Fire Sale. Although its initial feature set in chapter 3 could have conceivably been matched by a traditional, browser-based web application, we spent the subsequent chapters adding functionality outside the scope of what most browsers allow. In this chapter, we begin well outside the realm of where we expect to find web technologies: the macOS menu bar and Windows system tray. In the beginning, we won’t have a renderer process or the DOM. By the end of this chapter, we explore how to create hidden renderer processes to access features not available to the main process. In the next chapter, we create a BrowserWindow to serve as the UI for our tray application.
With Fire Sale behind us, we’ll embark on building a new application: Clipmaster, shown in figure 9.1. By the end of this chapter, we launch the application. It will have no dock, taskbar icon, or windows of its own. We activate it by pressing a keyboard shortcut that is globally available throughout the operating system. When the shortcut is triggered, Clipmaster reads from and records the contents of the user’s clipboard. If the user selects a previously saved clipboard item from the menu, the app places it back onto the system clipboard for pasting in another application.
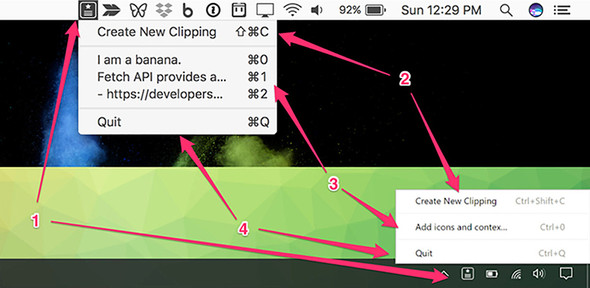
As shown in the figure, we need to implement the following:
If you look closely, you’ll notice that each of these items has a keyboard shortcut as well. In addition to these menu-based accelerators, we register global shortcuts with the operating system that allow the user to activate this menu or create a new clipping from anywhere.
The source code for Clipmaster is available at https://github.com/electron-in-action/clipmaster. I use the master branch as a boilerplate and starting point for the code in this chapter. There is also a branch called “completed-example” that contains the code shown at the end of this chapter. I show the code as we go along, and a completed version will be available at the end.
The folder structure for Clipmaster is roughly the same as we saw in Fire Sale with much of the code in the ./app directory. You might notice that there isn’t a renderer.js or index.html. Those are added by the end of the chapter but aren’t needed in the beginning. You may also notice a few small image files. Our application needs an icon if it’s going to live in the tray or menu bar. macOS expects this icon to be a PNG file, and Electron automatically checks if there is a version of the image with the suffix “@2px” if it is running on a device with a retina screen. Windows accepts a PNG but works best with an ICO file. Unlike the built-in switch between high- and low-resolution versions based on the density of the display, we need to manually check which operating system the application is running on to select the best image.
To get started, clone the master branch, and run either npm install or yarn install to download the dependencies. After everything is installed, we can get started on building Clipmaster.
To get the ball rolling, we can add our application to the system tray or menu bar with just one feature: the ability to click Quit and close the application (see figure 9.2). To accomplish this heroic task, we need help from Electron’s tray module. You can think of the tray module as a peer to BrowserWindow. It’s a constructor that—when instantiated—creates a system tray or menu bar item in much the same way that Browser-Window creates a browser window.

To do this, as you’ll see in listing 9.1, we need to wait until the application is ready, create a tray instance, and provide it with an icon and a menu loaded up with the Quit command. When the application is ready, we create the menu and set it as the context menu of the tray instance. In a fit of ambition, we also set a tooltip that will be shown when the user hovers over our proud new tray icon. See figure 9.3.

const path = require('path');
const {
  app,
  Menu,
  Tray,
  } = require('electron');

let tray = null;                                          1

app.on('ready', () => {
  tray = new Tray(path.join(__dirname, '/Icon.png'));     2

  if (process.platform === 'win32') {
    tray.on('click', tray.popUpContextMenu);              3
  }

  const menu = Menu.buildFromTemplate([                   4
    {
      label: 'Quit',
      click() { app.quit(); }
    }
  ]);

  tray.setToolTip('Clipmaster');                          5
  tray.setContextMenu(menu);                              6
});
As with the windows in Fire Sale, we declared the tray variable in the global scope to prevent it from being thrown out sometime after the event listener on the app’s ready event has run to completion. Inside the event listener, we assign a new tray instance to the variable with a reference to the image we want to use as an icon.
If you recall from chapter 7, Menu.buildFromTemplate() is an abstraction that allows you to create complicated menu structures using objects and arrays. This menu isn’t exactly complicated, but it’s still easier than building a menu by instantiating MenuItem instances one at a time. At this point, the menu has one item with Quit as its label. When it’s clicked—or later activated by a keystroke—it will tell Electron to quit the application. With the menu built, all that is left is to set it as the context menu for tray.
Windows treats the tray instances menu as a context menu. This means the menu shows up only if the icon is right-clicked. In listing 9.1, we also register a click event that triggers the menu if the application is running on Windows.
The application works, but if you fire it up on macOS, you can notice that it also shows up in the dock. Clicking it doesn’t do anything, because the application doesn’t have any browser windows to show. We could add functionality such as the ability to trigger the menu from the menu bar when the dock icon is clicked, but I vote that we hide the dock icon altogether.
app.on('ready', () => {
  if (app.dock) app.dock.hide();     1

  // ...
}
The line of code checks if the app has a dock object, which it does if it’s running on macOS. If so, then Electron tells the dock icon to hide itself. This approach is interesting because it leaves the developer room to hide or show the dock icon at will, depending on what mode their application is in or the user’s preference. In our case, we hide it when the application launches and never show it again.
macOS and Windows prefer different file types for icons. Their UIs each work better with a different color. By default, the menu bar on macOS is white and works better with dark icons whereas Windows 10 has a dark task bar and works better with white icons. Windows prefers ICO files, and macOS uses PNG files. To solve this issue, Node checks the platform it’s running on and gets the appropriate icon based on the platform. Electron does such a good job of providing a consistent cross-platform experience that this is one of the few times in this book that we find ourselves doing something like this.
const getIcon =  () => {                                            1
  if  (process.platform === 'win32')  return 'icon-light@2x.ico';
  return 'icon-dark.png';
};

app.on('ready', () => {
  if (app.dock) app.dock.hide();

  tray = new Tray(path.join(__dirname, getIcon()));                 2
  // ... More code below ...
});
If we’re on Windows, it gives us the filename of the light ICO icon. Otherwise, it gives us the filename of the dark PNG icon. When the application is ready, we use the new getIcon() function instead of the string we had hard-coded originally.
Earlier, I said that the macOS menu bar is white by default. In macOS El Capitan and later, users can turn on dark mode, which inverts the color of the menu bar and dock. In this case, we would want to use a PNG file like we would normally for macOS, but we also want to use the light versions like we would with the transparent black system tray in Windows 10, as shown in listing 9.4 and figure 9.4.

const path = require('path');
const {
  app,
  Menu,
  Tray,
  systemPreferences,
} = require('electron');                                          1

let tray = null;

const getIcon = () => {
  if (process.platform === 'win32') return 'icon-light.ico';
  if (systemPreferences.isDarkMode()) return 'icon-light.png';    2
  return 'icon-dark.png';
};
Electron makes this easy using the systemPreferences module, which conveniently has a method called isDarkMode() that returns a Boolean. I leave it as an exercise to the reader to determine under which conditions it returns true or false.
This application is supposed to store clippings, and we have many ways we could go about doing this. In chapter 11, we look at using an SQLite database to store clippings. But for now, let’s start with the easiest possible solution: storing them in memory. This approach is easy because it allows us to use a built-in JavaScript data structure, but it has the disadvantage of being cleared away whenever the user quits the application.
To ship this feature, we need to create an array to hold our clippings. We also need to create a function that reads from the clipboard and adds the contents to the array, as well as a way for the user to trigger this function. Finally, we want to update the menu with the clippings we stored and allow users to select one to be added back to the clipboard. See figures 9.5 and 9.6.


We update the menu whenever the user saves a new clipping. As we discussed in chapter 7, it’s possible to traverse and mutate the menu after it is created, but it’s often easier and more efficient to completely replace it. To facilitate this, we move the code to create the context menu into its own function that we can call whenever we need to update the menu.
const path = require('path');
const {
  app,
  Menu,
  Tray,
  systemPreferences,
} = require('electron');

const clippings = [];                                              1
let tray = null;

const getIcon = () => {
  if (process.platform === 'win32') return 'icon-light.ico';
  if (systemPreferences.isDarkMode()) return 'icon-light.png';     2
  return 'icon-dark.png';
};

app.on('ready', () => {
  if (app.dock) app.dock.hide();

  tray = new Tray(path.join(__dirname, getIcon()));

  if (process.platform === 'win32') {
    tray.on('click', tray.popUpContextMenu);
  }

  updateMenu();                                                    2

  tray.setToolTip('Clipmaster');
});

const updateMenu = () => {
  const menu = Menu.buildFromTemplate([
    {
      label: 'Create New Clipping',
      click() { null; }                                            3
    },
    { type: 'separator' },
    ...clippings.map((clipping, index) => ({ label: clipping })),  4
    { type: 'separator' },
    {
      label: 'Quit',
      click() { app.quit(); },
    }
  ]);

  tray.setContextMenu(menu);                                       5
};
We start by creating a simple array called clippings with a global scope that stores clippings and is accessed throughout our application. Next, we create a function called updateMenu() to generate a new menu and set it as the context menu for the tray instance. updateMenu() takes the contents of the clippings array, maps it into objects that can be turned into MenuItem instances, and then uses the ECMAScript 2015 spread operator to include them as siblings with Create New Clipping and Quitmenu items.
We added a menu item with the label Create New Clipping (see figure 9.7), but if you look closely, you’ll notice that we haven’t yet added any functionality. To get it working, we need to figure out a way to access the operating system’s native clipboard. Once we can do that, we can update this function to read from the clipboard and push its contents into the array of clippings and then call updateMenu() to re-render it.
At this point, it should come as no surprise that Electron provides a module that makes it easy to access the operating system’s clipboard on Linux, macOS, and Windows. It should come as even less of a surprise that this module is conveniently called clipboard.
The clipboard module is available in the main process as well as in the renderer process, and it has several useful methods for reading images, rich text, HTML, bookmarks, and other formats. For now, let’s keep it simple and stick to working with strings of plain text. Figure 9.7 shows our application with a single clipping.
To get the Create New Clipping menu item to work, we want to create a function that we can call that reads from the clipboard and adds it to the clippings array. In the spirit of simplicity and clarity, we call this function addClipping().

const path = require('path');
const {
  app,
  clipboard,                                        1
  Menu,
  Tray,
  systemPreferences
} = require('electron');

const clippings = [];
let tray = null;

app.on('ready', () => {
  // ...
});

const updateMenu = () => {
  const menu = Menu.buildFromTemplate([
    {
      label: 'Create New Clipping',
      click() { addClipping(); },                   2
      accelerator: 'CommandOrControl+Shift+C'       3
    },
    { type: 'separator' },
    ...clippings.map((clipping, index) => ({ label: clipping })),
    { type: 'separator' },
    {
      label: 'Quit',
      click() { app.quit(); },
      accelerator: 'CommandOrControl+Q'             4
    }
  ]);

  tray.setContextMenu(menu);
};

const addClipping = () => {
  const clipping = clipboard.readText();            5
  clippings.push(clipping);                         6
  updateMenu();                                     7
  return clipping;
};
To do anything with the Electron’s clipboard module, we need to include it like every other module from Electron. With the module included, addClipping() can read text from the clipboard and push it onto the array. With a new clipping in the array, the next logical step is to update the menu and display the new contents to the user as shown in figure 9.7.
With this feature in place, we can read from the clipboard and save the text snippets in our application, but we haven’t yet written the functionality to take one of the saved clippings and write it back to the clipboard. As it stands, our application is a scrapbook of the clippings we’ve saved in the past.
Writing to the clipboard isn’t much different from reading from it. So, let’s up the ante and assign keyboard shortcuts to the menu items associated with the clippings, as shown in figure 9.8 and in listing 9.7. When a user presses the keystroke, the respective clipping is written to the clipboard.

const path = require('path');
const {
  app,
  clipboard,
  Menu,
  Tray,
  systemPreferences
} = require('electron');

const clippings = [];
let tray = null;

app.on('ready', () => {
  // ...
});

const updateMenu = () => {
  const menu = Menu.buildFromTemplate([
    {
      label: 'Create New Clipping',
      click() { addClipping(); },
      accelerator: 'CommandOrControl+Shift+C'
    },
    { type: 'separator' },
    ...clippings.map(createClippingMenuItem),             1
    { type: 'separator' },
    {
      label: 'Quit',
      click() { app.quit(); },
      accelerator: 'CommandOrControl+Q'
    }
  ]);

  tray.setContextMenu(menu);
};

const addClipping = () => {
  // ...
};

const createClippingMenuItem = (clipping, index) => {     2
  return {
    label: clipping,
    click() { clipboard.writeText(clipping); },           3
    accelerator: `CommandOrControl+${index}`              4
  };
};
Mapping the strings into menu items inside of the array with an anonymous function was a short-term solution at best. Now that we’re adding click methods and accelerators to each menu item, it makes sense to break out this process into its own function. createClippingMenuItem() takes the first two arguments passed by Array.prototype.map() to its callback function: the item currently being iterated over and its index. We use this index to determine which accelerator to assign to it.
With this in place, the user can now write a clipping back to the clipboard with a keystroke. That’s great, but what happens if the user copies a big string of text? Eventually the operating system will trim stuff down, as shown in figure 9.9, but we need to step in and do better.

When we iterate over the clippings to create menu items, we check if it is over 20 characters long. If it is, slice off the first 20 characters, add an ellipsis, and use that as the label. Figure 9.10 shows an example of a shortened menu item name and listing 9.8 gives the code for truncating the labels. This truncation has no effect on the clipping itself. If the user selects the clipping, its full text is written back to the clipboard. If the clipping is less than than 20 characters, use it as the label without modification.
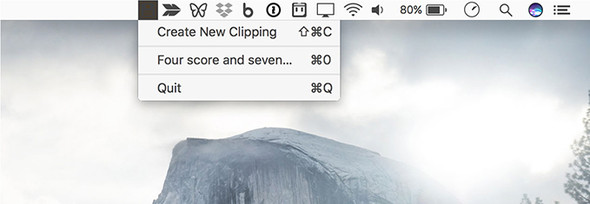
const createClippingMenuItem = (clipping, index) => {
  return {
    label: clipping.length > 20
           ? clipping.slice(0, 20) + '...'
           : clipping,                                1
    click() { clipboard.writeText(clipping); },
    accelerator: `CommandOrControl+${index}`
  };
};
I chose 20 as an arbitrary number. You can choose another number if you prefer. In a larger application, it might make sense to allow the user to express their preference and use that number instead.
What if a user accidentally added a clipping that is already stored in our array? To get around this, we check if the array includes the current clipping. If it does, then return early to short-circuit the function. Another option would be to use a set instead of an array, which is the approach we took with managing unique windows in Fire Sale. This method works for preventing duplicates, but sets do not have a map() method, so we would need to come up with another method for turning the clippings into menu items.
const addClipping = () => {
  const clipping = clipboard.readText();
  if (clippings.includes(clipping)) return;       1
  clippings.push(clipping);
  updateMenu();
  return clipping;
};
Array.prototype.push() adds items to the end of the array, so the first clipping added always is assigned Command-0 or Control-0 as an accelerator. Array.prototype.unshift() adds the new item to the beginning of the array. This means that the most recently saved clipping is accessible with Command-0 or Control-0, the second most recently saved clipping is accessible with Command-1 or Control-1, and so on.
const addClipping = () => {
  const clipping = clipboard.readText();
  if (clippings.includes(clipping)) return;
  clippings.unshift(clipping);                  1
  updateMenu();
  return clipping;
};
If the user falls in love with our application, it could get fairly long. Therefore, it makes sense to limit the number of clippings in the menu. I chose to limit it to 10 items because we’re assigning keyboard shortcuts based on the array indices, and there is no “11” key on most keyboards.
const menu = Menu.buildFromTemplate([
  {
    label: 'Create New Clipping',
    click() { addClipping(); },
    accelerator: 'CommandOrControl+Shift+C'
  },
  { type: 'separator' },
  ...clippings.slice(0, 10).map(createClippingMenuItem),      1
  { type: 'separator' },
  {
    label: 'Quit',
    click() { app.quit(); },
    accelerator: 'CommandOrControl+Q'
  }
]);
These shortcuts have a limitation—they work only when we are actively working with the menu. This means the user would have to mouse over to the menu bar or system tray icon and click it. After that action they can use one of the keyboard shortcuts provided. This is slightly useful, but not as useful as if the shortcuts were globally available.
All the accelerators we’ve used so far have worked only when the application is actively being used. By using the globalShortcut module, Electron also allows us to register global shortcuts with the operating system that can be activated even when the application is in the background. We’ll register two global shortcuts for Clipmaster: one to trigger the menu to appear, and another to save the contents of the clipboard to Clipmaster without needing to trigger the menu at all.
const path = require('path');
const {
  app,
  clipboard,
  globalShortcut,                                                     1
  Menu,
  Tray,
  systemPreferences
} = require('electron');

const clippings = [];
let tray = null;

app.on('ready', () => {
  if (app.dock) app.dock.hide();

  tray = new Tray(path.join(__dirname, '/Icon.png'));

  if (process.platform === 'win32') {
    tray.on('click', tray.popUpContextMenu);
  }

  const activationShortcut = globalShortcut.register(
    'CommandOrControl+Option+C',
    () => { tray.popUpContextMenu(); }                               2
  );

  if (!activationShortcut) {                                         3
    console.error('Global activation shortcut failed to register');
  }

  const newClippingShortcut = globalShortcut.register(
    'CommandOrControl+Shift+Option+C',
    () => { addClipping(); }                                         4
  );

  if (!newClippingShortcut) {                                        5
   console.error('Global new clipping shortcut failed to register');
  }

  updateMenu();

  tray.setToolTip('Clipmaster');
});

const updateMenu = () => {
  // ...
};

const addClipping = () => {
  // ...
};

const createClippingMenuItem = (clipping, index) => {
  // ...
};
The first thing we need to do is require the globalShortcut module from Electron. After we have the module, we can use its register() method, which takes two arguments: an accelerator, and a function to call when it has been activated. If the global shortcut is already taken, Electron returns null instead of throwing an error, which—if uncaught—could take down the entire application. In this case, we log a message to the console informing us that the registration has failed. In a more robust application, you could prompt the user to select a new shortcut or fallback to a second choice.
This functionality behaves slightly differently on macOS and Windows. On macOS the menu appears in the same manner as it would if the user clicked it. On Windows, however, the menu appears beneath the cursor, as shown in figure 9.11, instead of above the system tray icon as you might expect.
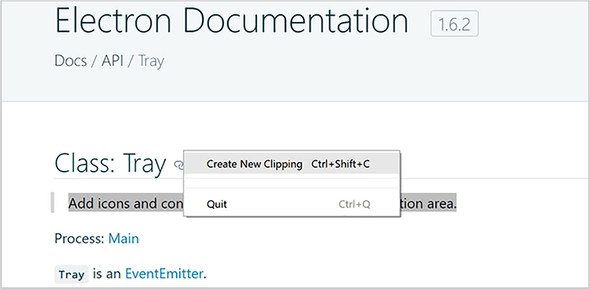
Electron’s globalShortcut module also provides other useful methods for working with shortcuts. globalShortcut.isRegistered() returns a Boolean that is true if the application has already registered the shortcut; otherwise, it returns false. However, it also returns false if another application has registered that shortcut.
In Clipmaster, you’ve chosen to hard-code our global shortcuts, but you may choose to create a UI that allows users to set their own keyboard shortcuts. If a user decides to switch shortcuts for a given command, we want to unregister the old shortcut with globalShortcut.unregister() after we’ve successfully registered the new one. We can also unregister all global shortcuts using the conveniently named globalShortcut.unregisterAll() method.
With our global shortcuts in place, users can save new clippings from anywhere with a touch of a few buttons. But how does the user know when they’ve successfully saved a clipping? Not only does our application not have much of a UI to begin with, it isn’t being shown when they activate it using a global shortcut. One solution would be to show a native system notification, such as that shown in figures 9.12 and 9.13.
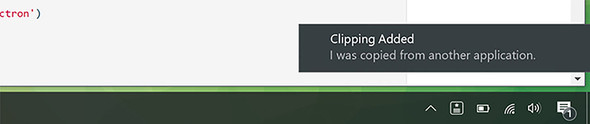

Notifications work out of the box on macOS and Windows 10. They also work with the most common Linux desktop environment. Things get a bit tricky when working with older versions of Windows. This is beyond the scope of this book, but it is covered in the official documentation: http://mng.bz/nJR0.
This is the solution that we’re going with, but it’s not without its complications. Electron applications can create notifications using Chromium’s Notification API. As a web API, Notifications are available only in the renderer process and not in the main process.
To deliver this feature, we need to create a hidden BrowserWindow instance. When the user saves a new clipping using the global shortcut, we send a message via IPC to the renderer process. When the renderer process receives this message, it triggers the notification.
Let’s start by making an invisible process and then send messages to it and let it trigger the notifications. If you recall from Fire Sale, BrowserWindow instances can load HTML, which in turn can load JavaScript like a traditional web page would. The first thing we need is a bare minimum HTML page.
<!DOCTYPE html>
<html lang="en">

<head>
  <meta charset="UTF-8">
  <meta name="viewport" content="width=device-width,initial-scale=1">
  <title>Clipmaster</title>
</head>

<body></body>

<script>
  require('./renderer');      1
</script>

</html>
This page has some basic markup to make it a valid HTML page. The important part is that it contains a script tag that loads renderer.js, which contains the code that listens for messages from the main process and triggers the notification. Next, let’s set up that listener and write the code to display the notification.
const { ipcRenderer } = require('electron');

ipcRenderer.on('show-notification', (event, title, body) => {
  const myNotification = new Notification(title, { body });        1
});
We pull in the ipcRenderer module and begin listening for notifications on the appropriately named show-notification channel. This listener expects three arguments in addition to the event object that is included by default: a title and body for the notification, as well as a function detailing what to do if the user clicks the notification. If no function is provided, onClick is an empty function by default.
With the code for our renderer process in place, we need to run it when the application starts. In Fire Sale, we created BrowserWindow instances that started out hidden and then were displayed when the content has been loaded. In Clipmaster, there isn’t any content to display, so we never show the window itself. Include this code snippet inside the app.on ready block.
const {
   // . . .
   BrowserWindow,
   // . . .
} = requre('electron');

browserWindow = new BrowserWindow({
   show: false
 });

browserWindow.load.URL(`file://{$_dirname}/index.html`);
Even though the window is not shown, we can load the HTML page we created earlier to execute the code and set up our listener. Now when we add a clipping, we send a message to the renderer process to have it show a notification.
constnewClippingShortcut=globalShortcut.register(
  'CommandOrControl+Shift+Option+C',
  () => {
    constclipping=addClipping();       1
    if (clipping) {
      browserWindow.webContents.send(
        'show-notification',
        'Clipping Added',              2
        clipping,
      );
    }
  },
);
When a clipping has been added, a message is sent to the renderer process. Before sending the message, we check if addClipping() returned a value. If you recall, if the list of clippings already contains the new clipping, then the function returns early with a value of undefined. This conditional prevents the message from being sent if no new clipping was saved. I leave it as an exercise to the reader to display a useful notification informing the user that the clipping already exists.
On macOS, our menu bar icon doesn’t behave the same way as its peers. The expected behavior is that the icon’s colors are inverted when the menu is activated. Luckily, Electron makes it easy to implement this feature. See figure 9.14.

The tray module has a method called setPressedImage(). On Windows, this method is ignored. On macOS it allows us to provide the path to a second image file. When the menu bar icon is clicked, Electron swaps out the primary image for this second image. The code in this listing belongs immediately after the statement that sets tray, which also invokes getIcon().
tray.setPressedImage(path.join(__dirname, 'icon-light.png'));
You may be asking, “What about dark mode?” It turns out that the default behavior in macOS is not to invert the icons when they’re pressed in dark mode. As a result, you do not need to implement any additional logic to handle that situation.
The code for Clipmaster, in line with the features in this chapter, has been implemented as follows: Listing 9.18 shows the code for the main process and listing 9.19 shows the code for the renderer process. You can also find this code on the completed-example branch of the repository you cloned at the beginning of this chapter (http://mng.bz/xJ98).
const path = require('path');
const {
  app,
  BrowserWindow,
  clipboard,
  globalShortcut,
  Menu,
  Tray,
  systemPreferences,
} = require('electron');

const clippings = [];
let tray = null;
let browserWindow = null;

const getIcon = () => {
  if (process.platform === 'win32') return 'icon-light@2x.ico';
  if (systemPreferences.isDarkMode()) return 'icon-light.png';
  return 'icon-dark.png';
};

app.on('ready', () => {
  if (app.dock) app.dock.hide();

  tray = new Tray(path.join(__dirname, getIcon()));
  tray.setPressedImage(path.join(__dirname, 'icon-light.png'));

  if (process.platform === 'win32') {
    tray.on('click', tray.popUpContextMenu);
  }

  browserWindow = new BrowserWindow({
    show: false,
  });

  browserWindow.loadURL(`file://${__dirname}/index.html`);

  const activationShortcut = globalShortcut.register(
    'CommandOrControl+Option+C',
    () => {
      tray.popUpContextMenu();
    },
  );

  if (!activationShortcut)
    console.error('Global activation shortcut failed to regiester');

  const newClippingShortcut = globalShortcut.register(
    'CommandOrControl+Shift+Option+C',
    () => {
      const clipping = addClipping();
      if (clipping) {
        browserWindow.webContents.send(
          'show-notification',
          'Clipping Added',
          clipping,
        );
      }
    },
  );

  if (!newClippingShortcut)
    console.error('Global new clipping shortcut failed to regiester');

  updateMenu();

  tray.setToolTip('Clipmaster');
});

const updateMenu = () => {
  const menu = Menu.buildFromTemplate([
    {
      label: 'Create New Clipping',
      click() {
        addClipping();
      },
      accelerator: 'CommandOrControl+Shift+C',
    },
    { type: 'separator' },
    ...clippings.slice(0, 10).map(createClippingMenuItem),
    { type: 'separator' },
    {
      label: 'Quit',
      click() {
        app.quit();
      },
      accelerator: 'CommandOrControl+Q',
    },
  ]);

  tray.setContextMenu(menu);
};

const addClipping = () => {
  const clipping = clipboard.readText();
  if (clippings.includes(clipping)) return;
  clippings.unshift(clipping);
  updateMenu();
  return clipping;
};

const createClippingMenuItem = (clipping, index) => {
  return {
    label: clipping.length > 20 ? clipping.slice(0, 20) + '...' : clipping,
    click() {
      clipboard.writeText(clipping);
    },
    accelerator: `CommandOrControl+${index}`,
  };
};
const { ipcRenderer } = require('electron');

ipcRenderer.on('show-notification', (event, title, body, onClick = () => { })
     => {
  const myNotification = new Notification(title, { body });

  myNotification.onclick = onClick;
});
In the previous chapter, we created an application that lived in the menu bar on macOS or the system tray on Windows. Out of the box, Electron’s tray module allows you to set a menu to display when the user clicks the tray icon. This is the same type of menu used in the application and context menus that we built in Fire Sale. This menu also has the same limitations: it is limited to text, is hard to modify, and provides limited functionality.
Being able to build applications that live in the system tray or menu bar allows us to build entire classes of applications that we couldn’t build in the browser. It’s unfortunate that we have these restrictions, but—luckily—we can work around them. In this chapter, we explore a clever way to get around the limitations of the tray module using a third-party library conveniently called menubar.
menubar is an abstraction built on a set of core Electron modules that we’ve used previously in the book. A high-level explanation is that it creates an empty tray module. When the user clicks the icon, menubar shows a frameless, correctly positioned BrowserWindow instance beneath the icon, which creates the illusion that it’s attached to the icon. menubar also provides a cute cat icon by default.
In this chapter, we’ll rebuild Clipmaster from the ground up into a completely new application. This time it has a much more pleasant UI, shown in figure 10.1, compared to its predecessor. We add the ability to remove a clipping from the list or publish it to the web using an example API so that it can be shared publicly. Finally, we add some interactivity to our notifications and global shortcuts to trigger the application’s functionality using predetermined keystrokes.
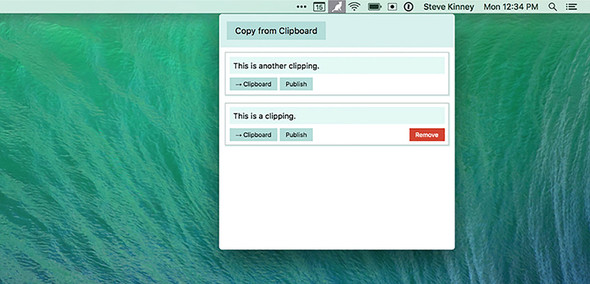
The menubar library provides a function that allows you to create new menu bar applications. It uses the app module to control the lifecycle of the application, an instance from the tray module to create the icon in the operating system’s menu bar or system tray, and a BrowserWindow instance for displaying the UI (as shown in figure 10.2). menubar uses another third-party library called electron-positioner to correctly position the BrowserWindow instance under the icon. It also provides methods for hiding and showing the window programmatically.
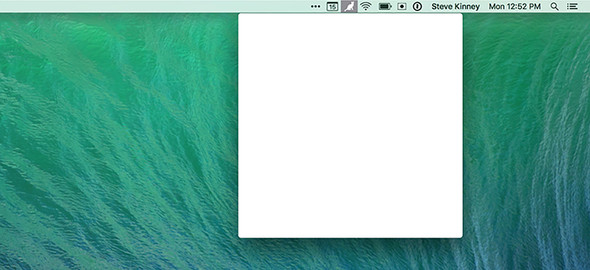
A boilerplate for Clipmaster 9000 is available on Github (https://github.com/electron-in-action/clipmaster-9000). You can start on the master branch and code along or check out the completed-example branch to see the code in its state at the end of the chapter.
const Menubar = require('menubar');

const menubar = Menubar();                 1

menubar.on('ready', () => {                2
  console.log('Application is ready.');
});
In listing 10.1, we don’t require the app module from Electron. menubar does that for us when we call the function and create the instance. You can also see that we’re listening for the ready event on menubar instead of app. menubar’s event is waiting on getting everything else set up, in addition to listening to the app’s ready event.
You can start the simple application using the npm start command. If all goes well, you should see a message in your terminal as well as a small cat in either your menu bar or system tray, depending on which platform the application is running on. If you click the icon, you see an empty browser window. menubar created a BrowserWindow instance on our behalf, but it did not load an HTML document into the window.
To get a UI in that window, we need to do a few things shown in the listing 10.2. First, we need to create an HTML document with some basic markup. Second, we need to define a CSS to style the UI. Third, we need the HTML document to load the code for our UI from renderer.js.
<!DOCTYPE html>
<html>
  <head>
    <meta charset="UTF-8">
    <meta name="viewport" content="width=device-width,initial-scale=1">
    <meta http-equiv="Content-Security-Policy"
          content="
            default-src 'self';
            script-src 'self' 'unsafe-inline';
            connect-src https://cliphub.glitch.com/*
          "
    >
    <!--
      Change the URL in the line above if you fork the back end server.
    -->
    <title>Clipmaster 9000</title>
    <link rel="stylesheet" href="style.css" type="text/css">
  </head>
  <body>
    <div class="container">
      <section class="controls">                                       1
        <button id="copy-from-clipboard">Copy from Clipboard</button>
      </section>

      <section class="content">
        <div id="clippings-list"></div>                                2
      </section>
    </div>
    <script>
      require('./renderer');                                           3
    </script>
  </body>
</html>
I included the stylesheet in the repository, but let’s highlight some of the interesting bits next. I use one or two Electron-specific techniques in the CSS to give the application a more native feel; renderer.js starts out completely empty, but we add to it as the chapter goes on.
// ...Omitted for brevity...

body > div {
  height: 100%;
  overflow: scroll;
  -webkit-overflow-scrolling: touch;         1
}

.container {
  position: absolute;
  top: 0;
  bottom: 0;
  left: 0;
  right: 0;
  overflow: auto;
}

textarea, input, div, button { outline: none; }

// ...Omitted for brevity...

.clipping-text::-webkit-scrollbar {
  display: none;                            2
}

.clipping-controls {
  margin-top: 0.5em;
}

// ...Omitted for brevity...
With these files in place, we now have the foundation for building our application. menubar does not create a window immediately. Instead, it creates a BrowserWindow instance the first time the user clicks the icon and triggers the window. This behavior comes back to bite us later in the chapter when we try to manipulate the DOM before it has been loaded, but let’s follow the happy path for now by listening for an event that is fired after the window has been created and subsequently loading the HTML in the newly created window.
menubar.on('after-create-window', () => {                     1
  menubar.window.loadURL(`file://${__dirname}/index.html`);
});
Your application at this stage should look like figure 10.3. At this point, the button should not work, because we have not written any JavaScript for the frontend.
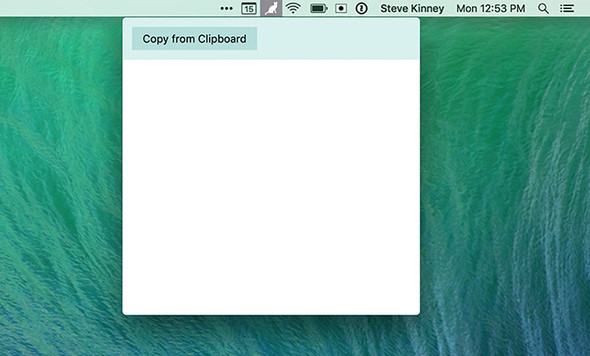
We have a UI for our application, but it doesn’t do anything yet. Just like in chapter 9, we first want to allow the user to add clippings to the application. This is slightly more complicated than it was in the previous chapter because we must generate DOM nodes for the clipping. We need to add this new node to the node in our Markup that contains the list of clippings. Finally, we need to add an event listener to the button to call the two methods we just described. Let’s start by querying and caching two of the selectors that we use frequently as we move through the chapter.
const clippingsList = document.getElementById('clippings-list');
const copyFromClipboardButton = document.getElementById(
  'copy-from-clipboard'
);
Creating the element is straightforward, with one important catch. In listing 10.6, we create an article element and add the .clippings-list-item class to it so that it’s styled appropriately. Next, we set its inner content. We query for the node in charge of displaying the text of the clipping and set its inner text accordingly. Finally, we return our new element so that it can be added to the DOM.
const createClippingElement = (clippingText) => {
const clippingElement = document.createElement('article'); 1
clippingElement.classList.add('clippings-list-item');
clippingElement.innerHTML = ` 2
<div class="clipping-text" disabled="true"></div>
<div class="clipping-controls">
<button class="copy-clipping">→ Clipboard</button>
<button class="publish-clipping">Publish</button>
<button class="remove-clipping">Remove</button>
</div>
`;
clippingElement.querySelector('.clipping-text').innerText = clippingText;3
return clippingElement; 4
};
You might be wondering why I didn’t use interpolation with the template literal when setting the inner HTML of the element. We’re not setting the content of the new element using innerHTML, because it does not escape the input and render it as HTML. If a user had copied HTML to the clipboard, it would render the Markup, which is not what we want. Instead we use innerText to set the content of that node, which escapes any HTML and renders it as the user might expect.
We can now take an arbitrary string of text and return the element needed for the UI. The next step is to get the text to feed this function, take the result, and add it to the page.
const { clipboard } = require('electron');                              1

const addClippingToList = () => {
  const clippingText = clipboard.readText();                            2
  const clippingElement = createClippingElement(clippingText);          3
  clippingsList.prepend(clippingElement);                               4
};

copyFromClipboardButton.addEventListener('click', addClippingToList);   5
Reading from the system’s clipboard is as easy as requiring the clipboard module from Electron and calling its readText() method. With the clipping text, we create the element and then add it to the top of the list of clippings. Last, we add an event listener to the Copy from Clipboard button that triggers this entire process.
Users can now save clippings to Clipmaster 9000, but that is only half the battle. What if they want to write the contents of a clipping back to the clipboard? Technically, because this new version of the application has a UI, they could select the text and copy it again, but we can do better than that. In addition, Clipmaster 9000 will be an improvement over the old version by letting users remove clippings they no longer want to store and publish them on the web to share publicly if they desire.
The most obvious approach to implementing the functionality described in the previous section would be to add an event listener to each button that calls the appropriate function. When creating a new element for each clipping using createClipping-Element(), we could add these event listeners.
The problem here is that if a user removes a clipping, we also need to remove these event listeners. Failing to do so would cause a memory leak, because the event listener and the DOM element would still reference each other. It’s much easier to take advantage of the fact that events bubble up the DOM.
If you click a button, the browser checks that element for any event listeners for a click event. Next it checks that element’s parent. It will continue this process until it gets to the top of the DOM tree. By adding an event listener to the clippingsList, we can catch an event that originated for a particular clipping. Because the list itself will never be removed from the DOM, we don’t need to worry about removing event listeners whenever a clipping is removed from the UI.
All event objects in the DOM come with a target property, which contains a reference to the element that triggered the event. We look at this to figure out which button was clicked on which clipping and then take the appropriate action.
clippingsList.addEventListener('click', (event) => {                   1
  const hasClass = className =>
  event.target.classList.contains(className);                          2

  if (hasClass('remove-clipping')) console.log('Remove clipping');     3
  if (hasClass('copy-clipping')) console.log('Copy clipping');
  if (hasClass('publish-clipping')) console.log('Publish clipping');
});
We check the element for three different classes, so it makes sense to create a small helper method called hasClass() to aid in this process. Based on the class, we need to call different functions. We haven’t written those functions yet, so we’ll simply log to the console for now to confirm that everything works as it should.
To remove a clipping, we navigate up to its grandparent, which is the element for the entire clipping.
const removeClipping = (target) => {
  target.parentNode.parentNode.remove();         1
};
When we have a reference to the element for the clipping, removing it from the page is as simple as calling the element’s remove() method.
clippingsList.addEventListener('click', (event) => {
  const hasClass = className => event.target.classList.contains(className);

  if (hasClass('remove-clipping')) removeClipping(event.target);      1
  if (hasClass('copy-clipping')) console.log('Copy clipping');
  if (hasClass('publish-clipping')) console.log('Publish clipping');
});
Instead of logging to the console whenever the user clicks a clipping’s Remove button, we call removeClipping() and pass it a reference to the button. That works, but we can do a little bit better. Looking ahead, it’s safe to assume that we’ll need to get either a reference to the clipping element or its text. It makes sense to pull these out into their own functions.
const getButtonParent = ({ target }) => {                               1
  return target.parentNode.parentNode;
};

const getClippingText = (clippingListItem) => {                         2
  return clippingListItem.querySelector('.clipping-text').innerText;
};
getButtonParent() can navigate to the parent from any of the three buttons. Although simple, this function is useful in case we ever update the Markup. You don’t want to have to change the code for traversing up the DOM from a button to the clipping element three times. From the parent, we need to get the text of the clipping because we’re effectively using the DOM as our data store. Luckily, traversing down the DOM is easier than traversing up, and getClippingText() can take advantage of the querySelector() method. We can now use this method in our event listener.
clippingsList.addEventListener('click', (event) => {
  const hasClass = className =>
    event.target.classList.contains(className);

  const clippingListItem = getButtonParent(event);                     1

  if (hasClass('remove-clipping')) removeClipping(clippingListItem);   2
  if (hasClass('copy-clipping')) console.log('Copy clipping',
 getClippingText(clippingListItem));
  if (hasClass('publish-clipping')) console.log('Publish clipping',
 getClippingText(clippingListItem));;
});
In the previous listing, we immediately get a reference to the clipping element because we’ll need it in every case. Now that getting the clipping text is easy, let’s update our console logs to include the clipping text as well to verify that we’ve implemented this functionality correctly. removeClipping() can now get a lot simpler as well. It’s arguable that we don’t need a function for this at all, but it’s conceivable that we might want to add more functionality later. As a result, it makes sense to leave it for now.
const removeClipping = (target) => {
  target.remove();                       1
};
Not only did we implement the ability to write to the clipboard in the previous chapter, we’ve already laid a lot of the groundwork in this chapter to make implementing this feature easy. The first thing that we need is a function that handles writing the text of the clipping to the clipboard.
const writeToClipboard = (clippingText) => {         1
  clipboard.writeText(clippingText);
};
We add more to this function later in the chapter, so it makes sense to keep it as a function instead of just adding inline in our event listener. The next step is to replace the console log in the event listener with this new function and pass the function the text of the clipping that was selected by the user.
clippingsList.addEventListener('click', event => {
  const hasClass = className => event.target.classList.contains(className);

  const clippingListItem = getButtonParent(event);

  if (hasClass('remove-clipping')) removeClipping(clippingListItem);
  if (hasClass('copy-clipping'))
    writeToClipboard(getClippingText(clippingListItem));                   1
  if (hasClass('publish-clipping'))
    console.log('Publish Clipping', getClippingText(clippingListItem));
});
We now have the core functionality that any self-respecting application that calls itself Clipmaster 9000 would need to do its job. It’s time to start going for extra credit. Let’s implement the ability to publish clippings to an example API, as shown in figure 10.4. We cannot do this in a browser for the same security reasons we discussed in chapter 2. In addition, we use a Node library that would not normally work in the browser to send our requests to the API.
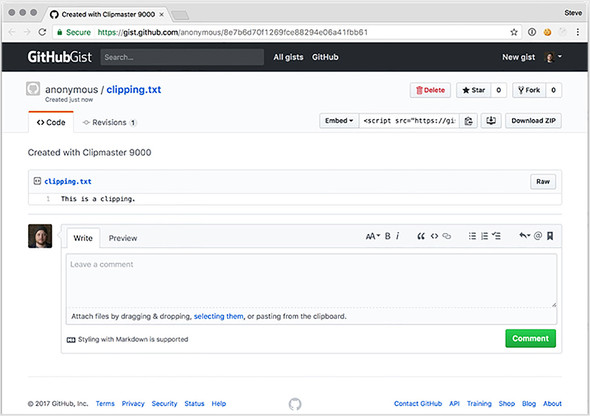
In the name of focus, we’ll take a few shortcuts. This is a deliberatively simple API—it stores the clippings in memory. All of the clippings will be cleared out periodically. The source code for the server can be found at https://glitch.com/~cliphub.
request is another popular, well-named library that makes it easy to perform HTTP requests to remote servers. request allows us to set defaults for every request that it makes. For this application, we send all our requests to the same API endpoint, so it makes sense to set that as a default. We will also create a custom user agent string that will differentiate Clipmaster from an ordinary browser.
In this section, we set up request to make requests to the ClipHub API, format our clippings so that the ClipHub API will accept those requests, and then set up our UI to make the requests.
const request = require('request').defaults({      1
  url: 'https://cliphub.glitch.me/clippings',
  headers: { 'User-Agent': 'Clipmaster 9000' },    2
  json: true,                                      3
});
Now we can format the text of a clipping for the API and send an HTTP request to the API. The next step is to tie these two functions together and show the user whether the request was successful, along with the URL of the clipping on ClipHub if it was successful.
const publishClipping = (clipping) => {
  request.post({ json: { clipping } }), (error, response, body) => {    1
    if (error) { return alert(JSON.parse(error).message); }             2

    const url = body.url;                                               3

    alert(url);                                                         4
    clipboard.writeText(url);                                           5
  });
};
request.post() sends a POST request to a URL. We set the default URL earlier, so there is no need to specify it now. request.post() takes two arguments: the data we want to send and a callback that is invoked when we hear back from the server. request passes three arguments to the callback: an error object in the event the request is not successful, the full HTTP response, and the body of the response. If the request was successful, error is null.
If the request is successful, we get the url property, which contains the URL for our new published clipping. For now, we use an alert to display the URL. We also write it to the clipboard so that the user can paste it into the address bar of their favorite web browser. With the code for this feature in place, the last thing to do is call it when the user clicks the Publish button on a clipping.
clippingsList.addEventListener('click', (event) => {
  const hasClass = className => event.target.classList.contains(className);

     const clippingListItem = getButtonParent(event);

  if (hasClass('remove-clipping')) removeClipping(clippingListItem);
  if (hasClass('copy-clipping'))
     writeToClipboard(getClippingText(clippingListItem));
  if (hasClass('publish-clipping'))
     publishClipping(getClippingText(clippingListItem));     1
});
In this listing, we used a technique similar to writing the clipping’s text to the clipboard. The only difference is that we swap out writeToClipboard() in favor of publish-Clipping().
We let the user know that something has happened in Clipmaster in various ways. We silently write to the clipboard without informing the user as to whether the action ended in success. When publishing we use an alert that locks up the application until the user dismisses it.
Later in this chapter, we implement global shortcuts that allow the user to trigger the application’s functionality without having it open. In this situation, having useful notifications is even more important. Displaying these notifications is simple because we do all the heavy lifting in the renderer process and don’t have to worry about IPC. With that in mind, we look at how to add event handlers to our notifications to add functionality that wasn’t present in the previous chapter.
Let’s start by tackling the alert that pops up whenever the user publishes a clipping. In its place, we display one of two notifications, shown in listing 10.19: that an error occurred with the message received from the server, or that the request was successful with the URL of the newly published clipping on ClipHub. If the request was successful, we add an event handler to the notification that opens ClipHub in their default browser when the user clicks the notification.
const { clipboard, shell } = require('electron');

// Code omitted for clarity...

const publishClipping = (clippingText) => {
  request.post({ json: { clipping } }), (error, response, body) => {
    if (error) {                                                      1
      return new Notification('Error Publishing Your Clipping', {
        body: JSON.parse(error).message
      });
    }

    const url = body.url;
    const notification = new Notification(                            2
      'Your Clipping Has Been Published',
      { body: `Click to open ${url} in your browser.` }
    );

    notification.onclick = () => { shell.openExternal(url); };        3

    clipboard.writeText(url);
  };
};
To open a URL in the user’s default browser, we need to pull in the shell module from Electron. We’ll set the onclick method of the notification to an anonymous function that is triggered when the user clicks the notification.
Asking the user to take their hand off the keyboard and navigate to a small icon in the menu bar or system tray isn’t always optimal. They’re likely typing when they want to create a clipping, and they want the convenience of having a key combination that they can press from anywhere in the operating system to trigger a command inside Clipmaster 9000.
If you remember from the previous chapter, we must register global shortcuts in the main process. In chapter 9, we implemented most of the application’s functionality in the main process, and we could call functions directly. In this chapter, the opposite is true, and we need to set up some IPC. In the following listing, let’s start by registering a shortcut to create a new clipping. We start by having it log to the console for now. In the next step, we implement its functionality.
const { globalShortcut } = require('electron');                           1
const Menubar = require('menubar');

const menubar = Menubar();

menubar.on('ready', function() {
  console.log('Application is ready.');

  const createClipping = globalShortcut.register('CommandOrControl+!', ()
      => {
    console.log('This will eventually trigger creating a new clipping.');
  });                                                                     2

  if (!createClipping) {
    console.error('Registration failed', 'createClipping');
  }                                                                       3
});

menubar.on('after-create-window', () => {
  menubar.window.loadURL(`file://${__dirname}/index.html`);
});
This is similar to what we did in the previous chapter. The important difference is that we’re storing all the clippings in the DOM in the renderer process. As a result, we need to communicate with the renderer process to create the clipping. In Fire Sale, we kept a reference to each window that we created. menubar created a browser window on our behalf and stored it in its window property. Let’s update our global shortcut to send a message to the renderer process whenever the user presses the keystroke to create a new shortcut. We can also register shortcuts for writing clippings back to the clipboard and publishing them to ClipHub.
const createClipping = globalShortcut.register('CommandOrControl+!', () => {
  menubar.window.webContents.send('create-new-clipping');
});

const writeClipping = globalShortcut.register('CmdOrCtrl+Alt+@', () => {
  menubar.window.webContents.send('write-to-clipboard');
});

const publishClipping = globalShortcut.register('CmdOrCtrl+Alt+#', () => {
  menubar.window.webContents.send('publish-clipping');
});

if (!createClipping) {
  console.error('Registration failed', 'createClipping');
}

  if (!writeClipping) {
    console.error('Registration failed', 'writeClipping');
  }

  if (!publishClipping) {
    console.error('Registration failed', 'publishClipping');
  }
Each shortcut is sending a message on a different channel. In this case, we send no additional information to the renderer process because the process reads from the clipboard. The next step is to configure the renderer process to receive the messages sent from the main process. The user may not have the application open when they press the keystroke, so we add notifications where appropriate.
const { clipboard, ipcRenderer, shell } = require('electron');   1

ipcRenderer.on('create-new-clipping', () => {
  addClippingToList();                                           2
  new Notification('Clipping Added', {                           3
    body: `${clipboard.readText()}`
  });
});

ipcRenderer.on('write-to-clipboard', () => {
  const clipping = clippingsList.firstChild;                     4
  writeToClipboard(getClippingText(clipping));                   5
});

ipcRenderer.on('publish-clipping', () => {
  const clipping = clippingsList.firstChild;
  publishClipping(getClippingText(clipping));                    6
});
In chapter 9, we stored all the clippings in an array in the main process. In this chapter, we’re using the DOM as our temporary data store. If the user clicks the button to write to the clipboard or publish the clipping, we know which clipping, based on the button clicked. But how do we find the appropriate clipping when the user activates a global shortcut? In the previous listing, we traverse to the first child of the clippings list and call one of the functions we wrote earlier in the chapter with that element.
You might have noticed a bug when implementing the last feature. If you start your application and immediately press one of your new global shortcuts, you get an error, shown in figure 10.5, that reads “TypeError: Cannot read property ’webContents’ of undefined.” If you look at the previous listing, you’ll notice that we’re attempting to access the webContents property on menubar.window, which is apparently undefined. Click the cat icon to open the window and try the shortcut again. It should work this time.
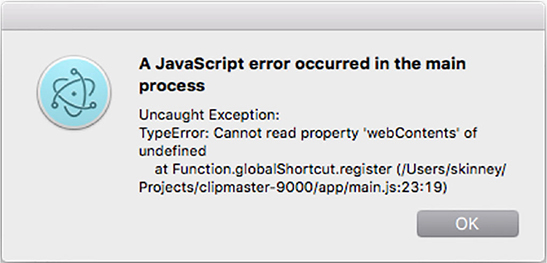
So why does it suddenly work? menubar lazily loads the window the first time it is needed. To prevent this error, we must tell menubar to immediately load the window when it starts up. We also want it to load our HTML page, which—in turn—loads renderer.js, which sets up our IPC listeners.
const menubar = Menubar({
  preloadWindow: true,                         1
  index: `file://${__dirname}/index.html`,     2
});
Previously, we were invoking the Menubar() function with no arguments. In listing 10.23, we modified the function call and passed in a configuration object. We preload the window before the first time the user clicks on the menu bar or tray icon and we load in our HTML page as soon as menubar loads the window.
In Fire Sale, I boasted that one of the great things about building applications in Electron is that we could use application and context menus to provide functionality without needing to find a place for it in the UI. In the previous chapter, we could have created additional submenus if necessary. But what about Clipmaster 9000? It turns out that the tray module allows us to display a secondary menu when the user right-clicks the icon. Let’s create a simple menu that allows users to quit the application. We accomplish this in three steps: create the menu using Menu.buildFromTemplate(), add an event handler for right-clicks on menubar.tray, and pop up the menu when the user right-clicks the icon.
const { globalShortcut,  Menu } = require('electron');    1

const secondaryMenu = Menu.buildFromTemplate([            2
  {
    label: 'Quit',
    click() { menubar.app.quit(); },                      3
    accelerator: 'CommandOrControl+Q'
  },
]);

menubar.on('ready', function () {
  console.log('Application is ready.');

  menubar.tray.on('right-click', () => {                  4
    menubar.tray.popUpContextMenu(secondaryMenu);         5
  });

  // Omitted for brevity...
});
With this small change, we create an entire secondary interface to the application. This would be a great place for user preferences and other advanced options that don’t have a good place in the main UI of the application.
The first phase of Clipmaster 9000 is now complete. You can find the complete code in the appendix or on the completed-example branch of this repository (http://mng.bz/UE9).
In the chapters leading up to this one, we’ve been writing all of our UIs using vanilla JavaScript and CSS. This was intentional—this is a book on Electron, after all. It’s not a book on client-side frameworks. That said, it’s impossible to ignore that modern web developers use a wide variety of languages, frameworks, and tools to build the increasingly complex UIs that users have come to expect from the web.
In this chapter, I’ll show you how to set up Electron to work with an assortment of web languages. With that covered, we build a small application using three languages: React (using JSX and upcoming JavaScript features that are not yet supported by Node or Chromium), Sass, and Jade. It’s not a requirement that you’ve used React or any of the other languages. In fact, if you’re an expert in any of them, you might notice that we kept them deliberately simple and omit things like PropTypes. I chose React, Sass, and Jade because they hit the sweet spot of being popular and relatively approachable for developers unfamiliar with them. Though this book is not on React, Sass, or Jade, it is titled Electron in Action so we we’re going to learn by doing. We use this application in the next chapter when we hook up real, persistent data stores to the application. A branch of this application is ready for you to use if you are already familiar with React or don’t have a strong desire to learn it. That said, do not miss section 11.5 where I cover how to enable live reloading using electron-compile.
In this chapter, we build an application called Jetsetter, shown in figure 11.1. This application solves a problem that I’ve been having. I’ve been traveling a lot recently to speak at JavaScript conferences, and the only thing worse than showing up to the conference venue without the right adapter is showing up at the hotel without enough socks for the week. In the past, I’ve tried to use a to-do list to track everything I needed to pack. But to-do list applications aren’t really built for this purpose, and I find it tedious to check and uncheck all the tasks when I’m packing for the next trip. Hence, Jetsetter was born.
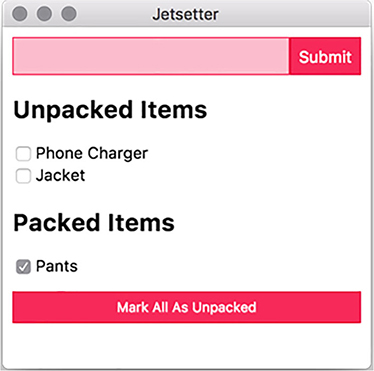
You can find the source code for Jetsetter at https://github.com/electron-in-action/jetsetter. We start with the master branch as the foundation of the application as we go through this chapter, but you can also find a completed version on the branch named completed-example. To get started, clone the repository, and install the dependencies.
We build an application that allows the user to add items and mark them as either packed or unpacked. A button at the bottom of the UI allows the user to mark everything as unpacked again when they’re getting ready for the next trip. The version we are building in this chapter has a fatal flaw: it doesn’t save the list of items anywhere. This means that whenever you close the application, all your new items are lost. Chapter 12 addresses this issue by showing how to persist data in several different ways, from in-browser storage to directly accessing databases from the UI.
Despite all the languages that developers use to build web applications these days, the browser understands only three of them: HTML, CSS, and JavaScript. Some minor exceptions have existed over the years—Google’s Dartium, which was a build of Chromium that ran Dart alongside JavaScript, and Netscape Navigator’s short-lived support of JavaScript Stylesheets come to mind—but, for the most part, this situation has been true for as long as the web has been around.
In addition to compiling from alternative languages into JavaScript, it has become fashionable to compile JavaScript into JavaScript. Tools such as Babel allow developers to use the latest and greatest—and in some cases, upcoming—features of the language and then compile them down into more verbose versions that older browsers support. We’re not concerned with older browsers when building Electron applications because we’re shipping our own modern versions of Chromium and Node, but Babel plugins are available for upcoming language features and alternative syntaxes like JSX or Flow, the former of which we use in this chapter.
Typically, developers write in their language of choice and then use a build tool to compile their code into JavaScript, CSS, or HTML for the browser. This process is commonly called transpilation because we’re compiling one language into another instead of into byte code or assembly. We could certainly do that in this chapter, but it requires running a separate process to compile our code. We’d have to wait for that process to finish before refreshing the Electron application’s browser window to see the changes.
More importantly, the process is not much different for Electron applications than it is for traditional web applications and certainly doesn’t warrant an entire chapter in this book. And so, it is with great pleasure that I get to introduce you to electron-compile.
electron-compile enables Electron to use alternative languages in addition to the ones supported by Chromium and Node, as illustrated in figure 11.2. They are transpiled on the fly and without the need for an additional build process.
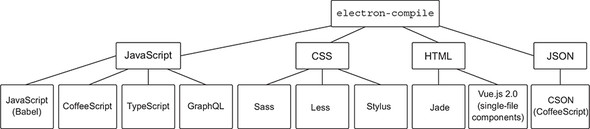
As you can see in figure 11.2, electron-compile supports a healthy number of languages. Getting started with electron-compile is suspiciously easy. In the package.json file of the application, you’ll find the important dependency electron as well as electron-prebuilt-compile, which is a version of Electron that has been configured with electron-compile.
electron-compile determines the language by looking at the file extension. If you load a file with a .coffee extension, it automatically transpiles it using CoffeeScript. The same goes for TypeScript with the .ts extension and so on. All files with a .js extension will be transpiled using Babel. By default, Babel doesn’t do anything, so it has no effect on your JavaScript files unless you intentionally configure it to, which I cover in the next section.
For now, if you run npm start, the application starts as you’d expect, but it now has full support for electron-compile. If your needs are simple, then this is all that you must do. In the next section, we configure electron-compile to support JSX and other upcoming features to JavaScript as well as support source maps in development.
In this chapter, we use JavaScript with a few additional features and support for JSX—an HTML-like syntax that makes it easier to define React components. As such, we need to configure Babel to support these features. When the application starts, electron-compile looks to a file called .compilerc for any additional configuration beyond the default. I’ve included this file for you in the repository you cloned earlier in this chapter, but let’s look at it in this listing.
{
  "env": {
    "development": {                                     1
      "application/javascript": {                        2
        "presets": [                                     3
          [
            "env",                                       4
            {
              "targets": {
                "electron": "1.8"                        5
              }
            }
          ],
          "react"                                        6
        ],
        "plugins": [
          "transform-es2015-classes",
          "transform-es2015-modules-commonjs",           7
          "transform-object-rest-spread"                 8
        ],
        "sourceMaps": "inline"                           9
      },
      "text/jade": {
        "pretty": true                                   10
      }
    },
    "production": {                                      11
      "application/javascript": {
        "presets": [
          [
            "env",
            {
              "targets": {
                "electron": "1.8"
              }
            }
          ],
          "react"
        ],
        "plugins": [
          "transform-es2015-classes",
          "transform-es2015-modules-commonjs",
          "transform-object-rest-spread"
        ],
        "sourceMaps": "none"
      }
    }
  }
}
At first glance, this configuration file can be overwhelming, but there is a beauty to it. First, electron-compile allows us to maintain two separate configuration sets: one for development, and one for production. We chose to omit source maps and not format the HTML generated by Jade for production. Source maps are a convenience for developers.
When we are using transpilation, the code we write is not the code that is being executed by the browser. This inherently makes sense because that’s the whole point of using transpilation, but the catch is that it can be hard to debug code that has been compiled. An error on line 36 of the code in the output may be on line 12 of the code you wrote. Source maps allow Chromium to map the output to the input and show you where that error is in the code you wrote. Generating source maps can take time, so they are generally omitted from production versions of the application.
electron-compile doesn’t configure the transpilation process itself. It simply passes on those options to the tool doing the actual transpilation. Under the development key, we have two additional keys: text/jade and application/javascript. These options are passed to Jade and Babel, respectively. Any options listed under an application/coffeescript are passed to the CoffeeScript compiler.
Within the options being passed to Babel, we see that we’re using both plugins and presets. Presets are just groups of plugins. The react preset includes all the presets related to React, such as the ability to parse and transform JSX. Many other presets are available on npm, but babel-preset-env is a bit of a special beast. It maintains a list of commonly used plugins and the browsers—Electron is included among these—that already have built-in support and do not require a plugin. This allows Babel to intelligently skip transpiling features that are already natively supported by Electron.
In addition to the presets, we include a few other plugins. Node.js does not currently support the ES modules, so I included a plugin that will convert the ES module syntax into the CommonJS module syntax that we’ve been using thus far in this book. We also add support for an upcoming language feature called Object Rest Spread, which is popular with React developers and used to clone objects to avoid mutation.
You may have noticed that I’ve included a plugin for ECMAScript classes, which are already supported in both Node and Chromium, so this plugin is not required. At the time of this writing, a bug with hot module reloading in React requires that this plugin be included. I mention this because if you try to apply the concepts from this chapter in the future, you may also run into this bug (https://github.com/gaearon/react-hot-loader/issues/313). This bug has been open for just over a year and a half, so you may run into it and lose the better part of your afternoon, like I did.
With electron-compile configured, let’s look at the foundation of the application. Instead of an HTML file, we use Jade as the markup language. This file is relatively simple, because React handles most of the heavy lifting for the UI. Replace index.html with index.jade, and add the following content.
doctype html
html(lang='en')
  head
    title Jetsetter
    meta(charset='UTF-8')
    meta(name='viewport', content='width=device-width, initial-scale=1')
    meta(
      http-equiv="Content-Security-Policy",
      content="default-src 'self'; script-src 'self' 'unsafe-inline'"
    )
    link(rel='stylesheet', href='style.scss')
  body
    #application
      .loading Loading...
    script.
      require('./renderer');
Jade was officially renamed Pug a while back due to a trademark dispute, but it is still referred to as Jade by electron-compile, so I do the same for the remainder of this chapter. We also write our stylesheet in Sass, a feature-rich alternative to CSS. Rename style.css to style.scss, and update the content as follows.
$accent-color: rgb(243,46,91);                         1

html {
  box-sizing: border-box;
}

body, input {
  font: caption;
}

input {
  padding: 0.5em;
  border: 1px solid $accent-color;
  background-color: lighten($accent-color, 30);        2
}

button, .button, input[type="submit"] {
  background-color: $accent-color;
  border: 1px solid darken($accent-color, 10);
  color: white;
  padding: 0.5em;
  &:hover {                                            3
    background-color: lighten($accent-color, 10);
  }
  &:active {
    background-color: lighten($accent-color, 5);
  }
  &.full-width {
    width: 100%;
    margin: 1em 0;
  }
}

.NewItem {
  display: flex;
}

.NewItem-input {
  width: 100%;
}
Sass supports a wide range of features—many of which I won’t discuss in this chapter. In the previous example, I used a variable to set the main color of the buttons and input fields and used built-in helper functions such as lighten() and darken() to adjust the color for different parts of the UI.
With the markup and styling in place, we can set up our main and renderer processes. The main process is deliberately simpler than it has been in previous chapters because it’s not the focus.
import { app, BrowserWindow } from 'electron';

let mainWindow;

app.on('ready', () => {
  mainWindow = new BrowserWindow({
    width: 300,
    height: 600,
    minWidth: 300,
    minHeight: 300,
    show: false
  });
  mainWindow.loadFile('index.jade');          1
  mainWindow.once('ready-to-show', () => {
    mainWindow.show();
  });
});
Notice that we can use files with extensions that are not normally supported in the browser. electron-compile transpiles this to an HTML file on the fly, and Chromium is none the wiser. If you look again at listing 11.2, you notice that we requested a stylesheet named style.scss instead of style.css. The .scss extension is used by Sass, and electron-compile transpiles it using Sass before handing the CSS off to Chromium. The last piece of the puzzle is to set up the renderer process.
import React from 'react';                                         1
import { render } from 'react-dom';                                2

const Application = () => {                                        3
  return (
    <div>
      <h1>Hello world!</h1>
      <button className="full-width">
        This button does not do anything.
      </button>
    </div>
  );
};

render(<Application />, document.getElementById('application'));   4
If this is your first time seeing React, you might be surprised to see HTML in your JavaScript. This syntax is known as JSX (JavaScript with XML). It’s a convenient way of describing the markup that a React component should create. Babel transpiles this code into traditional JavaScript to be read by the browser. The actual JavaScript looks like this listing.
const Application = () => {
  return React.createElement(
    "div",
    null,
    React.createElement(
      "h1",
      null,
      "Hello world!"
    ),
    React.createElement(
      "button",
      { className: "full-width" },
      "This button does not do anything."
    )
  );
};
Listing 11.5 is a bit easier on the eyes than listing 11.6—especially as the application begins to grow. We didn’t need to set up a build chain using webpack or Gulp. electron-compile takes care of configuring Babel based on the options we specify in .compilerc. If you fire up the application using npm start, you should see a slightly taller version of figure 11.3.
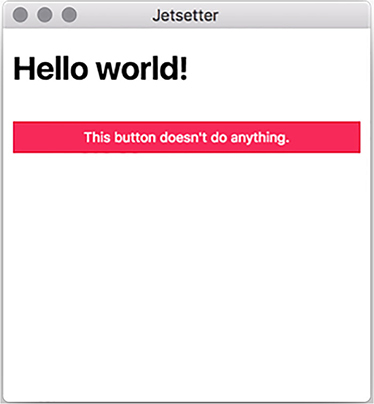
Our Application component is the starting point for Jetsetter’s UI. Jetsetter has four main parts: a form for adding new items, a list of all the items that still need to be packed, a list of all the items that have been packed, and a button for returning all of the items marked as packed to the unpacked list.
The two lists are pretty much the same, so they use the same component, but each list also has a subcomponent for every item on the list. In addition to modifying Application to be a bit more useful, we need to create three more components: Item, Items, and NewItem. The Mark All as Unpacked button can use a standard <button> element. The hierarchy of the components is laid out in figure 11.4.
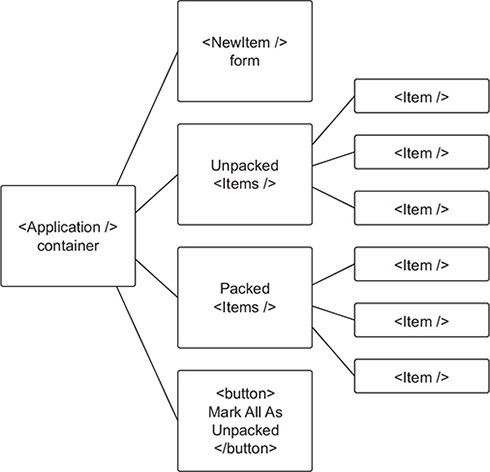
Our pleasant greeting to the world and useless button serve admirably as proof that electron-compile processed our JavaScript, but we need to swap it out with something a bit more functional. We haven’t built our NewItem form, Items list, or individual Item components yet, but we lay the groundwork now for managing the state of our application and getting the bones in place. By the end of this section, our application will look like figure 11.5.
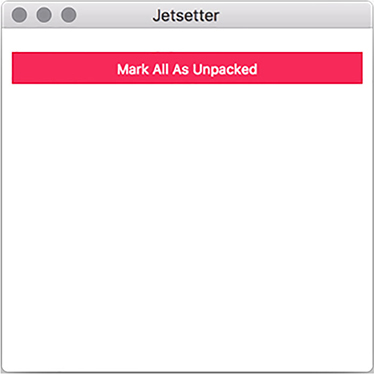
The first version of our Application component was what’s known as a stateless functional component. It was a function and, when called, returned a value. It couldn’t maintain any UI state. In this chapter, the Application component maintains the master list of all the items being tracked in Jetsetter. Like with Clipmaster, we use a simple array in memory to track the list. In chapter 12, we’ll replace this array with a persistent data store so that we don’t lose our list every time we quit the application.
The Application component tracks the items in Jetsetter, adds new items to that list, and marks them as either packed or unpacked. We add these features as we need them. Let’s start by initializing the component with a list of items and adding placeholder methods for adding and marking the items. We also set up a foundation for the UI as shown in figure 11.1. You’ll find a file for the Application component in the ./app/components directory.
import React, { Component } from 'react';                               1

class Application extends Component {                                   2
  constructor(props) {                                                  3
    super(props);
    this.state = {                                                      4
      items: [{ value: 'Pants', id: Date.now(), packed: false }]
    };

    this.addItem = this.addItem.bind(this);                             5
    this.markAsPacked = this.markAsPacked.bind(this);
    this.markAllAsUnpacked = this.markAllAsUnpacked.bind(this);
  }

  addItem(item) {} // To be implemented...

  markAsPacked(item) {} // To be implemented...

  markAllAsUnpacked() {} // To be implemented...

  render() {
    const { items } = this.state;                                       6
    const unpackedItems = items.filter(item => !item.packed);           7
    const packedItems = items.filter(item => item.packed);              8

    return (
      <div className="Application">
        {/* To be implented: <NewItem /> */}
        {/* To be implented: <Items title="Unpacked Items" /> */}
        {/* To be implented: <Items title="Packed Items" /> */}
        <button
          className="full-width" onClick={this.markAllAsUnpacked}       9
        >
          Mark All As Unpacked
        </button>
      </div>
    );
  }
}

export default Application;                                             10
Components that inherit from React’s Component class can have methods and hold onto state. In the previous listing, we initialize the state to have an array of items. For now, we put an important article of clothing in there. In chapter 12, we’ll fetch this item from persistent storage when the application launches. We also follow a common React pattern of binding the methods to the new instance when it’s initialized. This ensures that the methods are bound to the correct this when they are called later. We put in empty placeholders for addItem(), markAsPacked(), and markAllAsUnpacked() for now. We fill these in as we move through the chapter.
When it’s time to render the component to the DOM, we separate the complete list of items into smaller lists of packed and unpacked items. We haven’t built the rest of the components needed to render the UI, so we include placeholders for now. We are, however, able to place the Mark All as Unpacked button at the bottom of the page. The last thing we need to do is replace that placeholder Application component in ./app/renderer.js with the real—if incomplete—thing.
import React from 'react';
import { render } from 'react-dom';
import Application from './components/Application';           1

render(<Application />, document.getElementById('application'));
An application that tracks your packed and unpacked items isn’t much good if it can’t display those items to you. In this section, we implement the two lists, as well as the ability to toggle an item between its packed and unpacked states. This capability requires creating components for individual items and for the lists of items. With the ability to mark items as packed or unpacked in place, we also go the extra mile and connect the Mark All as Unpacked button to the list of items. At the end of this section, the application looks like figure 11.6.
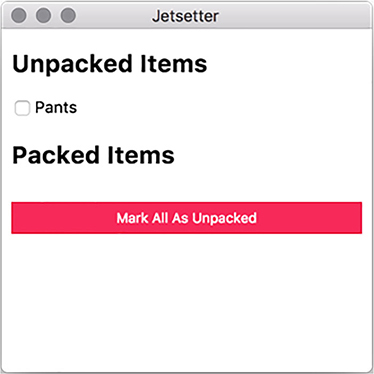
The Application component is doing the hard work of tracking all of the items loaded into Jetsetter. The individual Item just needs to be told what it should display and given a function to be called in the event that a user clicks its check box.
import React from 'react';

const Item = (({ packed, id, value, onCheckOff }) => {                     1
  return (
    <article className="Item">
      <label>
        <input type="checkbox" checked={packed} onChange={onCheckOff} />   2
        {value}
      </label>
    </article>
  );
});

export default Item;
The individual Item component is relatively straightforward. It’s a container with a check box and a label. Surrounding the input in the <label> tag allows the user to click the label in addition to the check box to check or uncheck the box. React triggers the function passed to onChange() whenever the check box is checked or unchecked. This functionality eventually becomes the Application component’s markAsPacked() method.
Having individual items is well and good, but they need a container. In the following listing we create a simple component that accepts a list of items along with what to do if one of them is clicked. It returns a <section> with each item as a child. It also takes a title property to help us differentiate between the packed and unpacked lists.
import React from 'react';
import Item from './Item';

const Items = ({ title, items, onCheckOff }) => {
  return (
    <section className="Items">
      <h2>{ title }</h2>
      {items.map(item => (
        <Item
          key={item.id}                            1
          onCheckOff={() => onCheckOff(item)}      2

          {...item}                                3
        />
      ))}
    </section>
  );
};

export default Items;
The Items component takes the title property for itself and then creates a set of Item components based on the array of items it was provided and passes the onCheckoff() function it was given to each of them with a reference to the specific item. We now have the UI elements we need. It’s time to hook them up to the Application component.
The Items component knows how to work with the individual Item components, so we only need to bring the Items component into the Application component. We do need to implement markAsPacked() and markAllAsUnpacked().
import React, { Component } from 'react';
import Items from './Items';                                                 1

class Application extends Component {
  constructor(props) {
    // Omitted for brevity...
  }

  addItem(item) {} // To be implemented...

  markAsPacked(item) {
    const otherItems = this.state.items.filter(                              2
      other => other.id !== item.id
    );
    const updatedItem = { ...item, packed: !item.packed };                   3
    this.setState({ items: [updatedItem, ...otherItems] });                  4
  }

  markAllAsUnpacked() {
    const items = this.state.items.map(item => ({ ...item, packed: false }));5
    this.setState({ items });                                                6
  }

  render() {
    const { items } = this.state;
    const unpackedItems = items.filter(item => !item.packed);
    const packedItems = items.filter(item => item.packed);

    return (
      <div className="Application">
        <Items                                                               7
          title="Unpacked Items"
          items={unpackedItems}
          onCheckOff={this.markAsPacked}
        />
        <Items                                                               8
          title="Packed Items"
          items={packedItems}
          onCheckOff={this.markAsPacked}
        />
        <button
          className="button full-width"
          onClick={this.markAllAsUnpacked}                                   9
        >
          Mark All As Unpacked
        </button>
      </div>
    );
  }
}

export default Application;
We start by bringing in the Items component that we created in the previous section. We use it twice in the render() method: once for packed items, and once for the unpacked items. We pass each instance its respective list of items along with a title and the markAsPacked() method, which will eventually be passed down to the individual components.
The trickier part lies in the markAsPacked() and markAllAsPacked() methods. Both are modifying and updating the array of items being passed to the two lists. A core tenant of building React actions is that we try not to mutate objects and arrays; instead, we create new ones. It is easier for React’s virtual DOM diffing algorithm to see that it’s working with a totally new object, as opposed to a new version of an existing object that has been subtly changed.
In markAsPacked(), we start with a list of all of the items we’re not working with and put them aside. We then make a copy of the item passed to the method. We keep everything the same but override the packed key with its opposite. If it was true, now it’s false; if it was false, now it’s true. We then update the state of the component with a new array containing our new item mixed in with all the items we put aside earlier.
In markAllAsPacked(), we create an array of items by mapping over the existing items and replacing their packed key with a value of false. The Mark All as Unpacked button should set the item back to unpacked, regardless. With these methods in place, you should be able to mark “Pants” as either packed or unpacked. This application benefits from the fact that we hard-coded an item into the initial state of the application, but it’s high time we gave users the ability to add their own items to Jetsetter.
Our next step is to create the NewItem component and connect it to the application’s state. Unlike Item and Items, NewItem needs to hold on to its own piece of state: the contents of the input field. At the end of this section, the application will look like figure 11.7.
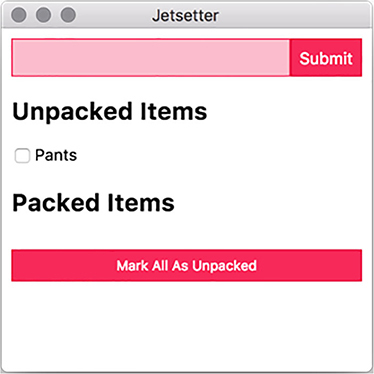
NewItem is another stateful component. It needs to track the value of the input field to correctly name the new item that it creates when the user submits the form. It updates its internal state to reflect the value whenever the user types into the input field. This change itself is represented in the input field, creating a virtuous cycle.
import React, { Component } from 'react';

class NewItem extends Component {
  constructor(props) {
    super(props);
    this.state = {                                                   1
      value: ''
    };

    this.handleChange = this.handleChange.bind(this);                2
    this.handleSubmit = this.handleSubmit.bind(this);                3
  }

  handleChange(event) {
    const { value } = event.target;                                  4
    this.setState({ value });                                        5
  }

  handleSubmit(event) {
    const { onSubmit } = this.props;                                 6
    const { value } = this.state;                                    7

    event.preventDefault();
    onSubmit({ value, packed: false, id: Date.now() });              8
    this.setState({ value: '' });                                    9
  }

  render() {
    const { value } = this.state;

    return (
      <form className="NewItem" onSubmit={this.handleSubmit}>        10
        <input
          className="NewItem-input"
          type="text"
          value={value}                                              11
          onChange={this.handleChange}                               12
        />
        <input className="NewItem-submit button" type="submit" />
      </form>
    );
  }
}

NewItem.defaultProps = {
  onSubmit: () => {}                                                 13
};

export default NewItem;
The user typing in the input field triggers the function passed in as its onChange prop. We’re using the aptly named handleChange() method for this purpose. onChange passes in a representation of the DOM event to handleChange(). event.target is the input field’s DOM node. We ask for its value as we did with the text area in Fire Sale. With this value, we update the state of the component, which also updates the value of the input as shown in the UI.
In React, components do not typically know about their parents. NewItem cannot talk to Application directly. Instead, Application passes in a function as a prop to NewItem. NewItem uses this function when the user submits the form. We haven’t written this function yet, but—when we do—it simply adds the new item to Application’s array of items, which—as of right now—contains only a lonely pair of pants.
When the user submits the form, the function passed in as its onSubmit prop is called. Again, we are good at naming things and opted to name this method handleSubmit(). On form submission, create an item and pass it in to the method passed in as the NewItem’s onSubmit prop. The Application component will pass one of its methods to NewItem as its onSubmit prop. NewItem, in turn, passes it as the onSubmit prop to the form that it creates. Once the form is submitted, we replace the value in state with an empty string—allowing the user to enter another item.
NewItem currently lives in a vacuum. It theoretically works, but it needs to be added to the Application component before we can effectively use it. Our next step is to add it to the UI and pass it a function that adds it to Application’s list of items. We do this here.
import React, { Component } from 'react';
import NewItem from './NewItem';
import Items from './Items';

class Application extends Component {
  constructor(props) {
       // Omitted for brevity...
  }

  addItem(item) {
    this.setState({ items: [item, ...this.state.items] });       1
  }

  markAsPacked(item) {
       // Omitted for brevity...
  }

  markAllAsUnpacked() {
       // Omitted for brevity...
  }

  render() {
    const { items } = this.state;
    const unpackedItems = items.filter(item => !item.packed);
    const packedItems = items.filter(item => item.packed);

    return (
      <div className="Application">
        <NewItem onSubmit={this.addItem} />                      2
        <Items
          title="Unpacked Items"
          items={unpackedItems}
          onCheckOff={this.markAsPacked}
        />
        <Items
          title="Packed Items"
          items={packedItems}
          onCheckOff={this.markAsPacked}
        />
        <button
          className="button full-width"
          onClick={this.markAllAsUnpacked}
        >
          Mark All As Unpacked
        </button>
      </div>
    );
  }
}

export default Application;
With the NewItem component added to the Application component, you should now be able to create additional items, toggle them between the unpacked and packed lists, and move all items to the unpacked list.
Throughout this book, we’ve developed muscle memory by pressing Command-R or Control-R to refresh the renderer process after changes on macOS and Windows/Linux, respectively. It can get a bit tedious, however, to switch back and forth between your text editor and your application every time you make a relatively small change.
electron-compile can trigger a reload whenever the file is changed on disk. This means that when you save the file in your text editor, it instantly reloads the open renderer processes—allowing you to see your changes immediately. electron-compile also supports hot module reloading in React, which takes live reloading one step further by swapping modules that have been updated on the fly without reloading the page itself. In this section, we look at implementing each of these approaches.
Until this point, electron-compile has just worked. We used electron-compile-prebuilt in place of electron in our package.json, did some minimal—and optional—configuration, and we were off to the races. electron-compile can also be required like any other module. The module provides an enableLiveReload() method that does what it says on the tin.
import { app, BrowserWindow } from 'electron';
import { enableLiveReload } from 'electron-compile';     1

enableLiveReload();                                      2

let mainWindow;

app.on('ready', () => {
  // Omitted for brevity...
});
When we call the enableLiveReload() function before the application has started, electron-compile sets up an IPC connection that listens for filesystem changes and sends a message to the renderer process, requesting that it reload whenever it detects a change.
enableLiveReload() is framework-agnostic and works even in simple applications like Fire Sale and Clipmaster 9000. enableLiveReload() also supports hot module reloading with React applications. The first step is to let enableLiveReload() know that we prefer it to use hot module reloading as an alternative to refreshing the entire page.
import { app, BrowserWindow } from 'electron';
import { enableLiveReload } from 'electron-compile';

enableLiveReload({ strategy: 'react-hmr' });         1

let mainWindow;

app.on('ready', () => {
  // Omitted for brevity...
});
With enableLiveReload() configured to use hot module reloading, it no longer refreshes the page when you change a file. But hot module reloading doesn’t work, either. Bummer. We’re effectively back at square one. We have a little more work to do.
If you’re using TypeScript, you can skip this next step. But we haven’t been using TypeScript in this chapter, so it’s on us to let Babel know that we are using hot module reloading. We add it to the list of plugins in .compilerc. We won’t add it as a plugin in production, because we’ll likely not be changing files often on our users’ machines.
{
  "env": {
    "development": {
      "application/javascript": {
        // Omitted for brevity...
        "plugins": [
          "react-hot-loader/babel",           1
          // Additional plugins here...
        ],
        "sourceMaps": "inline"
      },
      "text/jade": {
        "pretty": true
      }
    },
    "production": {
      // Omitted for brevity...
    }
}
We’re not out of the woods yet—there is one other change that we need to make: our application needs to be wrapped in a container component that listens for the changes and passes those changes to our Application component. The good news is that we don’t have to write this component ourselves; we only have to require it from the react-hot-loader module.
import React from 'react';
import { render } from 'react-dom';
import { AppContainer } from 'react-hot-loader';

const renderApplication = () => {                                        1
  const { default: Application } = require('./components/Application');  2
  render(
    <AppContainer>
      <Application />
    </AppContainer>,
    document.getElementById('application')
  );
};

renderApplication();                                                     3

if (module.hot) { module.hot.accept(renderApplication); }                4
We have a few moving pieces. In our original implementation, we pull in the Application component and render it when the renderer process starts. This method is standard practice when building React applications and not specific to the fact that we’re doing all of this inside of Electron. But if we are going to take advantage of hot module reloading, we need to make some adjustments. We need to move the act of rendering the application into a function that we can call repeatedly. We name this function renderApplication() and call it when the renderer process is first evaluated. This function mimics the existing functionality before we implemented the changes described earlier.
When rendering the application, we need a fresh version of the Application component because it may have changed. As of this writing, ECMAScript’s module imports can be used only at the top level, so we have to fall back on the CommonJS require() function to pull in the Application component. We wrap Application in react-hot-loader’s AppContainer component, which lets it know about changes to the filesystem, and mounts it to the same DOM node that we did at the beginning of the chapter.
With all of this in place, hot module reloading should be enabled and you can see the changes to your modules in real time. If the mix of the CommonJS require() and ECMAScript import statements make you feel weird inside, you do have some options. An upcoming change to the specification allows for a second version of import() that can asynchronously fetch modules using a promise-based API. Listing 11.19 shows how to implement this. We used export default in ./components/Application.js, so we need to destructure the default property of the object passed to the promise and name it Application.
const renderApplication = () => {
  import('./components/Application').then(
    ({ default: Application }) => {               1
      render(
        <AppContainer>
          <Application />
        </AppContainer>,
        document.getElementById('application'),
      );
    }
  );
};
Both Node and Chromium support the upcoming async/await syntax that allows for a more traditional, synchronous syntax when using promised-based APIs. You can use this without Babel and electron-compile, because it is natively supported by Node and the browser.
const renderApplication = async () => {
  const { default: Application } = await import('./components/Application');
  render(
    <AppContainer>
      <Application />
    </AppContainer>,
    document.getElementById('application')
  );
};
Both refactors are completely optional and exist mostly to illustrate the fact that Electron supports cutting-edge syntax out of the box and that electron-compile makes it easy to use Babel to add support for future features of the JavaScript language.
In chapter 11, we built a small application to track items we needed to pack between trips. By the end of the chapter, we got the UI working, but the application still had a fatal flaw: it lost all of its data whenever the page refreshed. That’s a bit of a deal killer for an application that is allegedly supposed to help you remember things. Fire Sale was working with files stored on disk, so it wasn’t an issue, but Clipmaster and Clipmaster 9000 had this problem as well. All clippings were lost whenever a user quit the application, or we refreshed the page in development.
In this chapter, we solve this problem once and for all. Data is persisted between page loads and remains available even if the user quits the application and restarts their computer. For good measure, we solve this problem two ways: we create a local SQLite database and a browser-based IndexedDB storage. Along the way, we also cover some interesting implementation details: Where do we store data on a per-user basis? How do we build compiled modules for Electron’s version of Node if it differs from the version installed on our computers? How does working with an SQL database like SQLite differ from a NoSQL database like IndexedDB?
Removing items wasn’t particularly important in chapter 11 when we couldn’t hold on to data, but it certainly is now. By the end of this chapter, we’ll have an application that looks suspiciously similar to what we had at the beginning but with a few major differences: The data is persisted to disk and users can remove items from the list and remove all items that haven’t been packed.
The first approach that we take is storing our data in an SQLite database. This approach is commonly used by traditional native applications, particularly on macOS and iOS. SQLite is a good choice because the database is stored in a file and doesn’t require the user to have MySQL or PostgreSQL installed on their system.
If you’re a recovering database administrator, I’ll give you fair warning: I’m not going to optimize every query, and some techniques might be a little wasteful. I’m optimizing for clarity of the code over performance. We know that—in this case—we’re working with a very small data set.
If you’re coming from a frontend, web development background, you may not have thought to use an SQLite database in your application. You’ve typically sent HTTP requests to a server or used a browser-based solution like IndexedDB, WebSQL, or LocalStorage. The reason that SQLite databases aren’t used frequently in traditional web applications is because they can’t be. We don’t have access to the filesystem from the browser. Also, we can’t use what I’m going to refer to as native modules for the duration of this chapter.
What is a native module? Many libraries—like Lodash or Moment.js—are written purely in JavaScript. Both the browser and Node can execute JavaScript, so these modules can be used in either context. Some libraries—like jQuery—are tightly coupled with the DOM and therefore work only in the browser context. Native modules typically wrap a C or C++ library in JavaScript. The C or C++ component of the library must be compiled for the operating system in which the library will be used. SQLite—and most other database drivers—have libraries written in C or C++. The sqlite3 modules on npm wrap this library in JavaScript bindings so that we can use it from within our Node applications. Not only does the browser not have access to the filesystem, it also can’t run platform-specific C and C++ code. Some projects like Emscripten compile C code to run on the JavaScript virtual machine, but that is far beyond the scope of this book.
As we’ve discussed throughout the book, Electron applications combine a Chromium browser runtime with a Node runtime, so we can use native modules in our applications. We start by setting up an SQLite database, creating a table for our items, and connecting the UI to read from and write to the database—directly from the renderer process.
When we install a native module in Node, it is compiled against the current version of the V8 engine used by Node. Upgrading versions of Node typically results in having to recompile all the native modules used by the application. Electron ships with its own Node runtime, which may or may not be the same version as the Node running on your computer when you run npm install or yarn install. This mismatch can cause problems when you attempt to use native modules with an Electron application.
Lucky for us, the community has been kind enough to provide us with a solution called electron-rebuild, which rebuilds native modules against the version of Node used by Electron as opposed to the version installed on the filesystem. You can install electron-rebuild via npm using npm install electron-rebuild --save-dev. It can then be triggered by using $(npm bin)/electron-rebuild on macOS or .\node _modules\.bin\electron-rebuild.cmd on Windows.
I prefer not to be burdened by having to remember to call it every time I install a dependency. Instead, I recommend using a postinstall hook in your package.json, which will run after every install.
{
  "name": "jetsetter",
  "version": "1.0.0",
  "description": "An application for keeping track of the things you need
 to pack.",
  "main": "app/main.js",
  "scripts": {
    "start": "electron .",
    "test": "echo \"Error: no test specified\" && exit 1",
    "postinstall": "electron-rebuild"                         1
  },
  // Additional configuration omitted for brevity.
}
By default, npm checks for a pre– or postscript before running any script. When you run npm test, it first tries to run pretest, then test, followed by posttest. I’ve found this trick incredibly helpful across a wide variety of projects over the years.
In this chapter, we’re using a helpful library called Knex.js to make working with SQL in Node a bit easier. It acts as our interface between our application code and the underlying SQLite queries. This is set up for you in the chapter-12-beginning branch on the Jetsetter repository. If you want to build off your implementation from chapter 11, you can install these dependencies using npm install sqlite3 knex.
Before we can integrate SQLite into our application, we have to do some initial setup. As I mentioned earlier, SQLite stores data in a file so we need to figure out where we’re going to store this file. We start with a simple but flawed solution for now. Later in the chapter, I’ll revisit the best place to store user data, but for now let’s focus on getting our application working.
import 'sqlite3';                    1
import knex from 'knex';

const database = knex({
  client: 'sqlite3',                 2
  connection: {
    filename: './db.sqlite'          3
  },
  useNullAsDefault: true             4
});

export default database;             5
We need to include the sqlite3 library so it’s loaded into the application when Knex goes looking for it, as well as let Knex know that we’ll be using SQLite as our database for this application.
Calling this property connection is a bit of a misnomer here. If we were connecting to a MySQL server, this name would be fine, but as I mentioned, SQLite uses a file stored on disk, so we put the name of the location where we want to store the file here. I’ve called it db.sqlite for now. We revisit this later.
What’s with that useNullAsDefault option? Knex.js isn’t a library specifically for SQLite. Rather, it works with PostgreSQL, MySQL, MSSQL, and Oracle databases. Many of these support default values for columns in the database. SQLite doesn’t, and Knex displays a warning if we don’t turn on this option, which causes Knex.js to opt for NULL instead of attempting to use a default value.
This isn’t enough to get us all the way there. We created the database, but we still haven’t configured it with a table to store our items. When the application starts, we check if there’s a table for storing items. If there isn’t, then we create the table.
import 'sqlite3';

const database = require('knex')(//...);

database.schema.hasTable('items').then(exists => {         1
  if (!exists) {                                           2
    return database.schema.createTable('items', t => {     3
      t.increments('id').primary();                        4
      t.string('value', 100);                              5
      t.boolean('packed');                                 6
    });
  }
});

export default database;
Knex.js uses a promise-based API. The check for the table returns a promise that is fulfilled with a Boolean based on whether it does in fact exist. All of our queries in the next section are based on promises. The data in Jetsetter is deliberately simple, and our schema reflects that. SQLite creates a unique ID and auto-increments the ID on each new item added to the database. We also store the item’s name as a string in the value column and a Boolean that represents whether the item has been packed.
In a traditional web application, if we want to put something into an SQLite database, we’d likely have to send AJAX requests to a server, which would interact with the database. This means that we’d probably also implement some kind of authentication as well as authorization to make sure that users couldn’t read or edit another user’s data. In an Electron application, we can talk directly to the database from our client code.
At the top level, we pull in the configured database we just created and pass it to the Application component as a prop—React-speak for “property”—which has access to the database inside of its methods.
import React from 'react';
import { render } from 'react-dom';
import { AppContainer } from 'react-hot-loader';
import database from './database';                    1

const renderApplication = async () => {
  const { default: Application } = await import('./components/Application');
  render(
    <AppContainer>
      <Application database={database} />             2
    </AppContainer>,
    document.getElementById('application')
  );
};

renderApplication();

if (module.hot) { module.hot.accept(renderApplication); }
Now comes the fun part. Previously, we stored the state of the application in the Application component. Every time the application is reloaded, that state is replaced. Every time the user quits the application, the state is gone for good. In the next few examples, we replace this behavior with reading from and writing to the database.
This process contains a few pieces. When the Application component starts for the first time, it reads all of the items from the database and loads them into its internal state. It also does this whenever it has reason to believe that the data has changed, which allows us to have one source of truth: the database. Depending on your needs, you may decide you want to approach your data storage strategy differently, but this method works for us in Jetsetter.
When a user creates a new item, we add it to the database. When they check off an item, we update it in the database by flipping the “packed” Boolean to its opposite. When the user selects Mark All as Unpacked, we—unsurprisingly—select all of the items for the database and set their “packed” property to false.
As I mentioned at the beginning of the chapter, we’re adding the ability to remove an item from the database. This capability wasn’t important back when we lost everything on every reload, but it’s necessary now. In addition, we add a button to remove all of the unpacked items from the database.
We continue using this.state to hold a list of the items most recently fetched from the database. But instead of hard-coding a pair of pants into this list, we add a method that fetches all of the items from the database and then updates this list. We also call this method whenever the component starts for the first time.
class Application extends Component {
  constructor(props) {
    super(props);

    this.state = {
      items: []                                            1
    };

    this.fetchItems = this.fetchItems.bind(this);          2
    this.addItem = this.addItem.bind(this);
    this.markAsPacked = this.markAsPacked.bind(this);
    this.markAllAsUnpacked = this.markAllAsUnpacked.bind(this);
  }

  componentDidMount() {
    this.fetchItems();                                     3
  }

  fetchItems() {                                           4
    this.props
      .database('items')
      .select()
      .then(items => this.setState({ items }))             5
      .catch(console.error);
  }

  addItem(item) { ... }
  markAsPacked(item) { ... }
  markAllAsUnpacked() { ... }

  render() { ... }
}

export default Application;
We don’t want to get any errors about trying to map or iterate over an undefined value, so we set the component’s initial state to an empty array. In the previous example, we take the database instance that was passed into the Application component as a property and ask for its items table, which we set up earlier. The .select() method selects all of the rows from that table—which are all of the items in our case—and returns a promise. If everything is successful, we can use .then() to take the results from the .select() method and work with those rows.
We start with the list of items being an empty array. this.fetchItems() queries the database and returns a promise. When this promise resolves, we swap out items being stored in the component’s state with the items we received from the database. React is smart enough to figure out what this means in terms of changing the UI on our behalf. We don’t need to worry about that.
Because this.fetchItems() does its work asynchronously, we need to bind it to the context of the component as we did with this.addItem(), this.markAsPacked(), and this.markAllAsPacked(). Finally, we need to call this.fetchItems() to load the initial state. We do this once the component has started, which immediately updates the state of the component.
The functionality we implemented is impressive. We’re connecting directly to the database from the UI. This isn’t something we’ve been able to do in traditional web applications. But it doesn’t seem to feel that impressive just yet, because there isn’t anything in the database to show. It’s only an empty list at the moment. We could put mock data in there, but let’s cut to the chase and implement the ability to add new items to the database.
If you recall from chapter 11, we passed a function from the Application component to the NewItem component. When a user clicks the Submit button, the NewItem component took the contents of its input field and passed it into the function provided by the Application component, which—in turn—pushed it onto the end of the array of items stored in state.
We’re going to leave much of this functionality in place with one notable exception: instead of pushing the item onto the end of the array stored in the Application component’s state, we insert it into the database and then trigger this.fetchItems() to reload all of the items now in the database. We start by rewriting this.addItem() in the Application component to use the database instead of an in-memory array.
class Application extends Component {
  constructor(props) { ... }
  componentDidMount() { ... }
  fetchItems() { ... }

  addItem(item) {
    this.props
      .database('items')
      .insert(item)                      1
      .then(this.fetchItems);            2
  }

  markAsPacked(item) { ... }
  markAllAsUnpacked() { ... }

  render() { ... }
}

export default Application;
Accessing the items table in the database is the same as it is for fetching all of the items. The main difference is that we use the insert() method to add the new item from the NewItem component to the database. When that has successfully completed, we call this.fetchItems(), which gets the most up-to-date list of items and subsequently updates the state of the UI.
We can add items to the database and see them in the UI, but we have a subtle problem. React is particular about having unique keys for every item. We engaged in a less-than-optimal hack by using the current date as an integer for the unique key. This worked, but I didn’t feel good about it at the time, and I certainly don’t feel good about it now, considering we have a database that tracks and auto-increments unique IDs. Let’s remove our trick for manually creating unique IDs.
class NewItem extends Component {
  constructor(props) { ... }
  handleChange(event) { ... }

  handleSubmit(event) {
    const { onSubmit } = this.props;
    const { value } = this.state;

    event.preventDefault();
    onSubmit({ value, packed: false });       1
    this.setState({ value: '' });
  }

  render() { ... }
}
It might be difficult at first to notice the change, but we just engaged in one of my favorite activities as a software engineer: deleting code. Previously, we passed in three properties: value, packed, and id. By omitting our own ID, SQLite creates one on our behalf, thus eliminating our need to rely on weird tricks involving the time-space continuum.
Most applications that work with data implement the four basic CRUD operations: create, read, update, and delete. We’re able to read all of the items from the database, and we just implemented the ability to create new items. We’re halfway there. Our next step is to be able to update existing items.
The UI of our application provides two ways to update the state of an item in the database: Users can check or uncheck the check box input associated with the item. Users can click the Mark All as Unpacked button to manipulate all of the items in the database. We need two, slightly different approaches for each case.
Let’s start with the case where we want to update a single item in the database. To accomplish this, we need to perform two operations: find the particular item we want to update and then update it.
class Application extends Component {
  constructor(props) { // ... }
  componentDidMount() { // ... }
  fetchItems() { // ... }
  addItem(item) { // ... }

  markAsPacked(item) {
    this.props
      .database('items')
      .where('id', '=', item.id)          1
      .update({
        packed: !item.packed              2
      })
      .then(this.fetchItems)
      .catch(console.error);
  }

  markAllAsUnpacked() { // ... }

  render() { // ... }
}

export default Application;
We find all of the items where the value in the id column matches the ID of the item in the UI that was just clicked. Hint: Only one of these exists. We then use the update() method to update the packed column to the opposite of whatever the item is in the UI. If this action is successful, we get all of the items—including our newly updated item—and refresh the UI. If something goes wrong, we log that error to the console for debugging purposes. A more robust application would either implement a fallback here or—at the very least—display some kind of notification alerting the user to the fact that their change couldn’t be completed successfully.
We can now change the status of one item, but what about all of them? The answer lies somewhere between the implementation of this.fetchItems() and this.markAsPacked(). With this.markAsPacked(), we found the item with an ID that matched the one we’re looking for and then updated it. With this.fetchItems(), we used select() to get all of the items. To implement this.markAllAsPacked(), we get all of the items in the entire set.
class Application extends Component {
  constructor(props) { // ... }
  componentDidMount() { // ... }
  fetchItems() { // ... }
  addItem(item) { // ... }
  markAsPacked(item) { // ... }

  markAllAsUnpacked() {
    this.props
      .database('items')
      .select()                1
      .update({
        packed: false          2
      })
      .then(this.fetchItems)
      .catch(console.error);
  }

  render() { // ... }
}

export default Application;]
As I mentioned before, this implementation roughly combines two of our previous approaches. Selecting all of the items from the database allows you to make changes in bulk using SQL. This case is also true for the .where() method that we used when updating a single item. It just happened to be that when you query based on a unique identifier, you—hopefully—end up with only one record. this.markAllAsPacked() could be changed to use .where() to find all of the items where packed was set to true. I leave this as an exercise to the reader because I’m going to discuss it in the next section.
When our application lost all of its data on every reload, we didn’t have a lot of users clamoring for the ability to remove items. But now we’re in a place where we’ve implemented persistent storage. Maybe you’ve decided that you don’t need to travel with your selfie stick anymore, and you’d like to remove it from the list.
We now implement two features: the ability to remove an individual item, and the ability to remove all items that weren’t packed, which might include our selfie stick, Furby, and ugly sweater. We need UI elements for this as well, but let’s start with the database piece of this.
class Application extends Component {
  constructor(props) {
    super(props);

    // Omitted for brevity...

    this.deleteItem = this.deleteItem.bind(this);                     1
    this.deleteUnpackedItems = this.deleteUnpackedItems.bind(this);   2

  }

  componentDidMount() { ... }
  fetchItems() { ... }
  addItem(item) { ... }
  markAsPacked(item) { ... }
  markAllAsUnpacked() { ... }

  deleteItem(item) {
    this.props
      .database('items')
      .where('id', item.id)                                           3
      .delete()                                                       4
      .then(this.fetchItems)
      .catch(console.error);
  }

  deleteUnpackedItems() {
    this.props
      .database('items')
      .where('packed', false)                                         5
      .delete()
      .then(this.fetchItems)
      .catch(console.error);
  }

  render() { ... }
}

export default Application;
Careful readers can see I used a slightly different syntax here than this.mark-AsPacked(). When you’re trying to match based on equality, you can use this shorthand where you provide the name of the column and the value you’re trying to match. In the previous example, we provided an operator. This method is powerful because we could filter using more sophisticated logic. In this.deleteUnpacked-Items(), we are using the where() method to find all of the items where the packed property is set to false.
This is all well and good, but it’s somewhat difficult to know if they work because we don’t have any UI to trigger these methods. This is suspiciously similar to how we set the check boxes to toggle items between their packed and unpacked states, but that was an entire chapter ago. Let’s review the process.
We pass the this.deleteItem() method to each of the lists. Each list, in turn, passes this method to the items on the list. We add a check box X button to each item. When a user clicks the X button, we pass a reference to the specific item to this.deleteItem() that was passed down from the Application component. These additions give us everything we need to trigger the method we implemented moments ago. We also add a Remove Unpacked Items button beneath the Mark All as Unpacked button. This button is a lot simpler as it doesn’t need to pass that method along.
class Application extends Component {
constructor(props) { ... }
componentDidMount() { ... }
fetchItems() { ... }
addItem(item) { ... }
markAsPacked(item) { ... }
markAllAsUnpacked() { ... }
deleteItem(item) { ... }
deleteUnpackedItems() { ... }
render() {
const { items } = this.state;
const unpackedItems = items.filter(item => !item.packed);
const packedItems = items.filter(item => item.packed);
return (
<div className="Application">
<NewItem onSubmit={this.addItem} />
<Items
title="Unpacked Items"
items={unpackedItems}
onCheckOff={this.markAsPacked}
onDelete={this.deleteItem} 1
/>
<Items
title="Packed Items"
items={packedItems}
onCheckOff={this.markAsPacked}
onDelete={this.deleteItem} 2
/>
<button
className="button full-width"
onClick={this.markAllAsUnpacked}>
Mark All As Unpacked
</button>
<button
className="button full-width secondary"
onClick={this.deleteUnpackedItems}> 3
Remove Unpacked Items
</button>
</div>
);
}
}
export default Application;
The Remove Unpacked Items button should be fully functional at this point. But we still need to keep passing this.deleteItem() along. The next step is to receive it as the onDelete property in the Items component, which powers the Packed Items and Unpacked Items, and then pass it down to each individual item with a reference to the specific item.
const Items = ({ title, items, onCheckOff, onDelete }) => {
return (
<section className="Items">
<h2>{ title }</h2>
{items.map(item => (
<Item
key={item.id}
onCheckOff={() => onCheckOff(item)}
onDelete={() => onDelete(item)}
{...item}
/>
))}
</section>
);
};
export default Items;
There isn’t a lot that’s new here. I included it for the sake of completeness. We’re almost there, and the next step is to add the button to the individual item. This button should have a click event that triggers the this.deleteItem() method that was passed in from the Application component as the onDelete() command.
const Item = (({ packed, id, value, onCheckOff, onDelete }) => { 1
return (
<article className="Item">
<label>
<input type="checkbox" checked={packed} onChange={onCheckOff} />
{value}
</label>
<button className="delete" onClick={onDelete}>?</button> 2
</article>
);
});
With this last piece, the delete functionality is now in place. We have implemented the ability to create, read, update, and delete items from the database. If the user quits Jetsetter, restarts their computer, and then restarts the application, their items will be in the same state as when they left them. Maybe.
For the sake of expediency, I had you place the application in the root of the project directory. But this isn’t normally where user-specific data goes. As it stands, this database is shared by all users on a given computer, which is certainly confusing.
On one hand, operating systems have solved this problem for us. Users have designated places where their particular data should be stored. But, each operating system solves this problem in a slightly different way. Luckily, we aren’t concerned about this because Electron protects us. The Electron app module exposes a method called getPath(), which figures out the operating system–specific path for a common location. We’re going to look for the userData path, but you can see a full list of the paths available at (https://electron.atom.io/docs/api/app/#appgetpathname).
import * as path from 'path';
import { app } from 'electron';
const database = knex({
client: 'sqlite3',
connection: {
filename: path.join(
app.getPath('userData'), 1
'jetsetter-items.sqlite' 2
)
},
useNullAsDefault: true
});
I tend to give files stored outside of the project unique names to avoid the chance of colliding with another project on my machine. Before branding, all Electron applications are called “Electron.” If I give things a unique name, it won’t matter much in the event they happen to end up in the same folder under the hood.
You can store data in an Electron application in many ways. We discussed SQLite earlier, but you could just as easily use a NoSQL database such as LevelDB. You could even just use a JSON file that you write to and read from.
If managing files and recompiling dependencies seems like a bit much for your application, you can opt for browser-based storage. In chapter 2, we used localStorage to track our bookmarks. localStorage is great, but it has some limitations: everything must be stored as a large JSON object of strings. We must parse and resave the object every time we want to read or write to localStorage.
Before we start using IndexedDB, we should cover some terminology. SQL databases contain tables of rows and columns. They’re a lot like incredibly powerful, interconnected spreadsheets. NoSQL databases are typically key-value stores—much like a giant JavaScript object. When working with IndexedDB, you create stores of data, which contain a series of keys. Each key points to an object. IndexedDB differs from SQLite in that keys and values can be any valid JavaScript type—including objects, arrays, maps, and sets.
All interactions with IndexedDB are asynchronous, which makes sense. Natively, however, IndexedDB uses events to handle asynchrony, which can be confusing to read and understand. Luckily, Jake Archibald—a developer advocate at Google—has done the yeoman’s work of wrapping the event-based API with a promise-based API called idb. The abstraction is lightweight and doesn’t hide any of the inner workings of IndexedDB. It’s what I personally recommend, and after you’re comfortable with a promise-based API, it’s easier to wrap your head around than the event-based one. You normally don’t need a library to use IndexedDB, but you do need to import idb if you’d like to use the promise-based API.
In this example, we start by opening the jetsetter database. The name of this database is completely arbitrary. You could name it eggplant-parmigiana, if that is more appealing to you. We also passed the number 1, which represents the version of our database. Version 1 is a good place to start. (There’s no schema like SQLite!)
import idb from 'idb';
const database = idb.open('jetsetter', 1, upgradeDb => { 1
upgradeDb.createObjectStore('items', { 2
keyPath: 'id', 3
autoIncrement: true 4
});
});
Versioning is important in that in web applications, each user stores their IndexedDB locally in their browser. If you change the way your code works, it could corrupt the user’s data if they are using an old version of the database.
Having a version number allows you to bump up that number whenever you make a change to how your database works. In that event, you’d be able to migrate the data to be compatible with the changes you’ve made before any other application code accesses the database. We stick with one version of the database in this chapter because our data is very simple.
Typically, you have one database. This is similar to the fact that most smaller and medium-sized, server-side web applications have just one database that they work with in a given environment (e.g., production). But you may have many stores. Think of stores like tables in an SQL database. In this application, we have only one store for items, but you could have a store for people, locations, or any other model in your application.
We created a store called items, which is a reasonable name for a place where we are going to store all of our items. We also passed two options: we set the keyPath to id and autoIncrement to true. What does this mean? It means that if we pass in an item with an id property, it uses that property as the key. If we don’t, then it adds one to the object and sets it as the key, incrementing the number each time so that the key is unique.
We cheated a bit when we implemented SQLite by using Knex.js to eliminate a lot of the tedium. idb is an abstraction over IndexedDB, but it’s more lightweight than Knex.js. This means we have to do a bit more of the manual labor ourselves. There are libraries like localForage (https://github.com/localForage/localForage) that provide higher-level abstractions over IndexedDB, but let’s stick with idb and create our own abstraction.
Here is the approach we take: in ./app/database.js, we create an object with methods to get all of the items from IndexedDB, create new items, update existing items, and delete items. We then use these methods in the Application component, replacing the calls to SQLite as we go. Let’s start by writing a method to get all of the items from the database.
export default {
getAll() {
return database.then(db => { 1
return db.transaction('items') 2
.objectStore('items') 3
.getAll(); 4
});
},
add(item) { },
update(item) { },
markAllAsUnpacked() { },
delete(item) { },
deleteUnpackedItems() { }
};
I began by exporting an object with all of the methods that we need to match the functionality of SQLite. Most of those methods are empty right now, but we fill them in as we go through the chapter. I did, however, implement the getAll() method.
We start by accessing the database, similar to what we did with Knex.js and SQLite. Next, we start a transaction. Transactions prevent multiple changes to the database from occurring at the same time. If something blows up in a transaction, all of the changes made in the transaction are reverted. This practice protects data from corruption. All interactions with IndexedDB must be wrapped in a transaction. Once inside our transaction, we access the items store and get all of the items from it.
Getting all of the items from IndexedDB isn’t particularly helpful if there aren’t any items in the store to begin with. Let’s implement the ability to add an item to the database. This procedure is similar to reading from the database with a few important distinctions. When reading from the database, the transaction is complete when we finish reading. Modifying the database is a little more complicated. As a result, we need to be more explicit about when a transaction has completed. We also need to let IndexedDB know that we intend to write to the database. After that, it’s a matter of adding the item to the database and then calling the transaction complete.
export default {
getAll() { ... },
add(item) {
return database.then(db => {
const tx = db.transaction('items', 'readwrite'); 1
tx.objectStore('items').add(item); 2
return tx.complete; 3
});
},
update(item) { },
markAllAsUnpacked() { },
delete(item) { },
deleteUnpackedItems() { }
};
When we fetched all of the items, we chained the promises together neatly. If this code looks a bit more complicated, don’t worry—it’s similar. We need to return the transaction promise we created on the first line, so we store it in a variable. Inside of the transaction, we add the item passed as an argument to the items store. If we had other work to do, we could do it here. Finally, we return a promise that resolves when the transaction has been completed.
export default {
getAll() { ... },
add(item) { ... },
update(item) {
return database.then(db => {
const tx = db.transaction('items', 'readwrite');
tx.objectStore('items').put(item);
return tx.complete;
});
},
markAllAsUnpacked() { },
delete(item) { },
deleteUnpackedItems() { }
};
Updating an item in the database is similar to adding a new item to the database except we use the put() method instead of the add() method. Updating all of them, however, is a little more involved. First, we need to get all of the items from the database. Then we change the packed status of each of them to false. Finally, we create a transaction where we update each item in the database.
export default {
getAll() { ... },
add(item) { ... },
update(item) { ... },
markAllAsUnpacked() {
return this.getAll() 1
.then(items => items.map(item => ({ ...item, packed: false }))) 2
.then(items => {
return database.then(db => {
const tx = db.transaction('items', 'readwrite'); 3
for (const item of items) { 4
tx.objectStore('items').put(item); 5
}
return tx.complete; 6
});
});
},
delete(item) { },
deleteUnpackedItems() { }
};
If a single update fails, the entire transaction fails, and all of the items return to their original state. The advantage of using transactions is that it ensures you can’t end up in a state where half of your data has been updated and half remains unchanged. Transactions are an all-or-nothing affair.
Deleting items from the database is virtually the same as updating them. We use the IndexedDB delete() method instead of update(). If you want to be clever, you could probably provide an abstraction over the shared pieces of these implementations, but my job as your author is to be clear rather than clever.
export default {
getAll() { ... },
add(item) { ... },
update(item) { ... },
markAllAsUnpacked() { ... },
delete(item) {
return database.then(db => {
const tx = db.transaction('items', 'readwrite');
tx.objectStore('items').delete(item.id); 1
return tx.complete;
});
},
deleteUnpackedItems() { }
};
When we implemented markAllAsUnpacked(), we mapped over all of the items, regardless of their status. In implementing deleteUnpackedItems(), we need to be more careful. Our job is to delete only those that have their packed property set to false.
export default {
getAll() { ... },
add(item) { ... },
update(item) { ... },
markAllAsUnpacked() { ... },
delete(item) { ... },
deleteUnpackedItems() {
return this.getAll()
.then(items => items.filter(item => !item.packed)) 1
.then(items => {
return database.then(db => {
const tx = db.transaction('items', 'readwrite');
for (const item of items) {
tx.objectStore('items').delete(item.id); 2
}
return tx.complete;
});
});
}
};
Unlike SQLite, IndexedDB doesn’t provide support for querying the database, which makes a certain amount of sense considering it is a NoSQL database. When working with NoSQL databases, you can take some interesting approaches, such as storing your data in multiple places with different indices for quick retrieval, but that is a bit outside the scope of this book.
We’re opting for the simplest approach—and one that is a perfect fit for our data set, which is to simply fetch all of the items from the database and find only the ones that meet our criteria. Again, we do this in a transaction. If deleting any of these items fails, the database returns to the state that it was in before we triggered this method.
With this last method in place, we need to connect all of the new database methods to the UI. By building the database methods in the previous section, we’ve made transitioning from the SQLite implementation to one based on IndexedDB relatively painless. The main difference is that we aren’t querying for items in the database.
fetchItems() {
this.props
.database
.getAll()
.then(items => this.setState({ items }))
.catch(console.error);
}
addItem(item) {
this.props.database.add(item).then(this.fetchItems);
}
deleteItem(item) {
this.props
.database
.delete(item)
.then(this.fetchItems)
.catch(console.error);
}
markAsPacked(item) {
const updatedItem = { ...item, packed: !item.packed };
this.props
.database
.update(updatedItem)
.then(this.fetchItems)
.catch(console.error);
}
markAllAsUnpacked() {
this.props
.database
.markAllAsUnpacked()
.then(this.fetchItems)
.catch(console.error);
}
deleteUnpackedItems() {
this.props
.database
.deleteUnpackedItems()
.then(this.fetchItems)
.catch(console.error);
}
At this point in the book, we’ve built a number of Electron applications. Testing these applications to make sure that they work as expected has been something of a manual process. Make a change, start the application, and click around to ensure that everything works. This is fine for small applications, but this method can become tedious in larger applications. What if a change in the code in one part of the application breaks some functionality elsewhere?
In these situations, it’s helpful to automate the tests. Let the computer do the boring, repetitive work, while you focus on the features that bring value to your customers. That sounds great, but how do we do that? In a traditional web application, you might point something like Selenium WebDriver to your website, make some assertions as to how the site should behave, and then have it click around and confirm that everything works as expected.
That’s great, but we have a few problems: our Electron applications don’t have web addresses per se, but they do support APIs that give us unprecedented access to the underlying operating systems, which are typically not supported by web browsers. At this point, it shouldn’t surprise you that this tricky problem has an easy solution. The Electron team supports a project called Spectron, which allows developers to write integration tests for our Electron applications.
In this chapter, we write integration tests for a special version of Clipmaster 9000 that does not live in the menu bar, as shown in figure 13.1. We test all the core functionality and learn a few tricks along the way. To get started, you need to add Spectron and a test runner to your package.json. I’ve opted to use Mocha in an attempt to stay consistent with the official documentation, but you could use Jest, Karma, Jasmine, or any other test runner that makes you happy. I’ve included this in the example repository (http://mng.bz/UxHY), but if you’re working on your own, you can run npm install --save-dev spectron mocha.
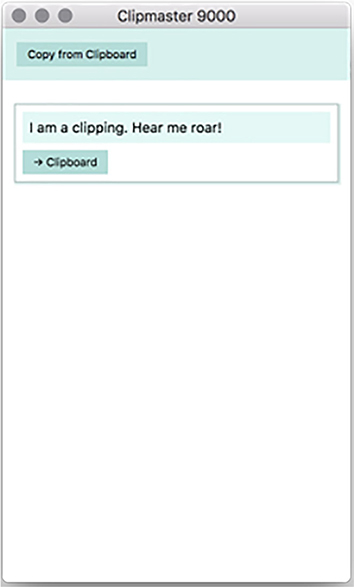
First, it’s important to understand the relationship among Spectron, WebdriverIO, and Selenium WebDriver because we use methods from more than one of them in a given test. Let’s start at the bottom and work our way up. Selenium WebDriver allows developers to write tests that control a web browser so they can test their applications from a user’s perspective—as opposed to unit tests, which exercise a given piece of code in isolation. Selenium WebDriver is a language-agnostic library and is typically wrapped by a library that gives it native API bindings for a given programming language.
Enter WebdriverIO, which wraps Selenium WebDriver with a pleasant JavaScript API and makes it easy to use from within Node.js—or an Electron application, in our case. But as I pointed out in the beginning of this chapter, Electron applications have some major differences from traditional web applications, as well as a lot of additional power and functionality. Spectron wraps WebdriverIO, as shown in figure 13.2, and allows us to access this functionality in an environment custom-tailored for Electron applications.
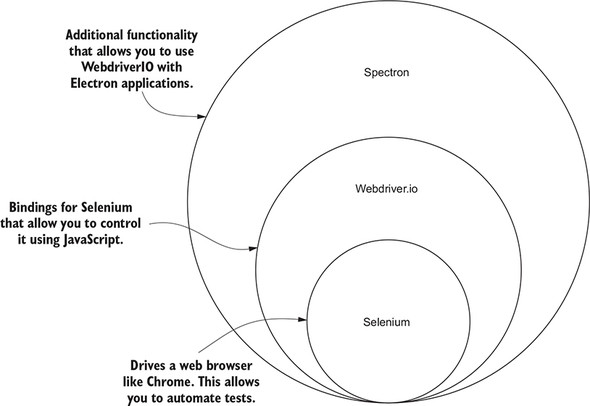
We won’t need to touch Selenium WebDriver in this chapter. WebdriverIO takes care of controlling Selenium WebDriver on our behalf. We douse methods from both Spectron and WebdriverIO. In practice, you don’t really have to think about the line between the two, but some of Spectron’s methods delegate to WebdriverIO. Where this ends up being important is when it comes time to look up the documentation for a given method. I’ll make sure to point out when we’re delegating to WebdriverIO, as opposed to using a method that belongs to Spectron itself.
Spectron makes it easy to start our application and control its UI from our test suite. The primary way to use Spectron is to create an Application instance. This object includes a number of child objects that allow us to access different parts of our application, as shown in figure 13.2
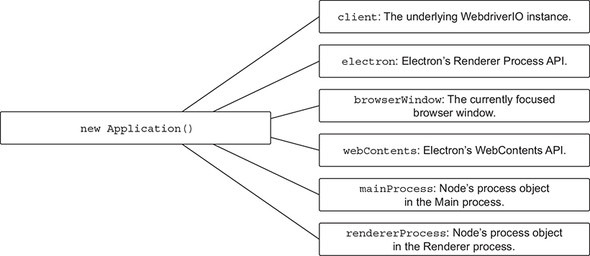
Spectron is broken up into the following parts:
The first two properties of the Application instance provide deep access to the browser’s APIs as well as Electron’s own APIs. With this combination, we have deep, programmatic insight into and control over almost all of the inner workings of our application at any time. This access makes testing Electron applications easy once you get the hang of it. The browserWindow, webContents, mainProcess, and rendererProcess properties provide convenient aliases to the first two properties.
In the previous section, I mentioned that I was fibbing I bit when I said that the client property delegated to WebdriverIO. That statement is technically true—but it isn’t the whole truth. client also has additional, Electron-specific methods, shown in figure 13.4, to make your testing experience even more pleasant.
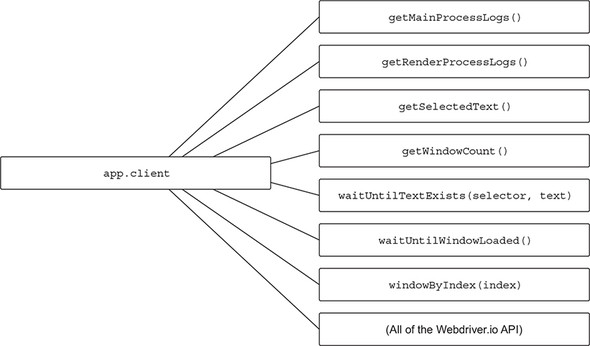
Some of the methods look familiar if you’ve written integration tests in the past. Methods like getSelectedText(), for example, consider that your application might have multiple windows—something that isn’t possible in a traditional web application. Others are unique to testing Electron applications. I introduce you to these methods now as a reference. We use many of them in the sections that follow.
getMainProcessLogs() and getRenderProcessLogs() return a promise that resolves to an array of messages that have been logged to the respective console. As soon as either method is called, it clears the messages from the console. This means that subsequent calls contain only messages that have been logged to the console since the last time the method was called.
getWindowCount() returns a promise that resolves to an integer that—unsurprisingly—represents the number of windows currently open in the application. This value might be useful if you are writing tests for an application like Fire Sale, which has a button allowing users to open another window. app.browserWindow references the currently focused window. app.client.windowByIndex() allows you to focus on an alternate window instead.
waituUntilWindowLoaded() takes a given number of milliseconds as an argument and returns a promise. If the window loads in the allotted time, the promise resolves. Otherwise the promise is rejected. This method allows you to delay execution of your tests until you’ve confirmed that the window has actually loaded.
waitUntilTextExists() takes three arguments: a selector, a string of text, and an optional number of milliseconds to wait before giving up. It returns a promise that resolves when the selector contains the text, Alternatively, it rejects if the 5 seconds or the provided number of milliseconds pass and the text has not appeared. This setting is useful for UI components where the content may come in asynchronously shortly after the window has loaded. Normal tests would fail because they would run immediately, before the asynchronous content has loaded.
Spectron provides the ability to start an Electron application and control it from your tests, but it doesn’t provide a framework for running your tests or verifying that your application works as expected. As mentioned earlier, we use a simplified version of Clipmaster 9000. A starting point for the code can be found here at https://github.com/electron-in-action/clipmaster-9000-spectron.
This is a very good thing because it allows you to use whatever test runner and assertion library you prefer. Just require Spectron in your test runner of choice, configuring it as we’ll see in listing 13.2. In this chapter, I use Mocha along with Node’s built-in assert library, but you can certainly use Chai and an assertion library or Jest, Karma, Jasmine, or any other framework, if you prefer. Spectron is not opinionated on this front. Instead, it allows you to drive your Electron application from the framework of your choice.
I’ve already included Mocha as one of the development dependencies for the example project. As I mentioned earlier, if you’re working on your own application and following along, you can run npm install --save-dev spectron mocha from the command line to install both Spectron and Mocha. This will install the mocha command line tool into your node_modules directory, which can be run by typing ./node_modules/.bin/mocha. This can be tedious. It would be much easier to assign it to be run using npm test. So, let’s add it to our project’s scripts in our package.json. (This should already be set up for you if you’ve cloned the repository from GitHub.)
"scripts": {
"start": "electron .",
"test": "mocha" 1
}
Now whenever we run npm test, Jest runs our test suite by looking for all files with a *.test.js suffix. You can also use this suffix for any unit tests that you want to write—Mocha runs those as well. In a larger application, you might create a folder for all of your tests or include them alongside your implementation files. For the sake of simplicity, I’m going to use a single file called test.js to hold all of the tests for our application.
Let’s begin by examining the boilerplate provided in the repository to start our application before each test and stop the application after the individual test has run. This gives us a fresh instance of the application for each test, which eliminates the need to clean up any of the side effects and leftover state from previous tests.
const assert = require('assert'); 1
const path = require('path'); 2
const Application = require('spectron').Application; 3
const electronPath = require('electron'); 4
const app = new Application({
path: electronPath, 5
args: [path.join(__dirname, '..')], 6
});
describe('Clipmaster 9000', function () {
this.timeout(10000); 7
beforeEach(() => {
return app.start(); 8
});
afterEach(() => {
if (app && app.isRunning()) {
return app.stop(); 9
}
});
});
The first thing we need is the location of the Electron application that we want to test. Theoretically, you could point Spectron to any of the Electron-based applications on your computer and control them programmatically, but I leave that as a devious exercise for the reader. I’m going to be a boring rule follower and get the path to the locally installed version of Electron that we pulled down from npm when we installed our dependencies using npm install.
We want access to a variable holding the instance of our application in each of our tests, so we declare it in the describe() block. Before each test, we create an application instance and assign it to the app variable. The new Application() constructor takes the path of the Electron binary, as well as the location of the directory where we would normally type npm start. This should be the directory that contains the package.json, which references the JavaScript file containing the code for the main process. After the instance has been created, we start the application. We’re now ready to test—despite the fact that we haven’t written a test case just yet. But imagine that we had a test and it has run. We check that there is a value assigned to the app variable and the application is still running. (It may have crashed.) If both of those cases are true, then we stop the application and move onto the next test case, where we go through this process again.
We’ve talked about our testing tools. We’ve set them up. Now let’s sit down and write some tests. Over the course of the chapter, we’ll check that Clipmaster
We’ll start with a simple test: start the application, and confirm that this special version of Clipmaster 9000 creates a single browser window. Spectron and WebdriverIO use an asynchronous, promise-based API for controlling Electron and the web application within. Most methods return promises, which can be chained. As I’ve mentioned repeatedly throughout this book, Electron provides us with a modern version of Node and Chromium. We frequently have the latest and greatest browser and language features at our disposal. This includes the async/await syntax for working with asynchronous APIs in a way that’s as easy to wrap our head around as synchronous code. With this syntax, you don’t have to worry about passing around callbacks or chaining promises.
As shown in listing 13.3, we use the async keyword before the arrow function to denote that we’ll be using the async/await syntax in this function. The await keyword pauses until app.client.getWindowCount() has resolved and then assigns the result to the count variable. After this is done, we expect the count to equal one. Mocha expects asynchronous tests to return a promise when they’re done, so you need to make sure that you prefix your expectation with the return keyword. Your author failed to do that on multiple occasions when writing this chapter before his first cup of coffee. He paid dearly for that oversight with his time and sanity.
it('shows an initial window', async () => {
const count = await app.client.getWindowCount(); 1
return assert.equal(count, 1); 2
});
This test is simple, and a traditional implementation using promises would not look that much different, but more involved tests require longer promise chains that might become tedious to write or confusing to reason about at best.
In many tests, you have to wait for the window to load the HTML, CSS, and JavaScript before you can continue testing the application. Electron loads the HTML quickly, but it’s not instantaneous. We frequently use the app.client.waitUntilWindowLoaded() method described earlier to wait until the application has fully loaded before moving forward. Let’s write a test confirming that the window’s title is the name of the application.
it('has the correct title', async () => {
const title = await app.client.waitUntilWindowLoaded().getTitle(); 1
return assert.equal(title, 'Clipmaster 9000'); 2
});
Many of Spectron’s methods are chainable, with each subsequent method in the chain being called after the promise returned from the previous method has resolved. In the previous example, we wait for the window to finish loading and then get the title of the window and store it in the title variable; after that asynchronous operation is complete, we can verify that the window’s title is what we expect it to be.
Traditionally, integration-testing tools like Selenium and WebdriverIO point a browser to a webpage and interact with it. They typically don’t have much more access to the internals of the browser itself like we do as developers. Electron allows developers to programmatically open the developer tools when the window first loads. That said, it would be bad if we accidentally forgot to remove this code and shipped this to users. Let’s write a test that verifies that developer tools are not opened when the application is loaded.
it('does not have the developer tools open', async () => {
const devToolsAreOpen = await app.client
.waitUntilWindowLoaded() 1
.browserWindow.isDevToolsOpened(); 2
return assert.equal(devToolsAreOpen, false); 3
});
The isDevToolsOpened() method is available on all BrowserWindow instances. When the application has loaded, we get the current browser window and ask it whether it has the developer tools open. We expect this to be false. If it is true, the test will fail.
In addition to testing Electron APIs, we almost definitely want to test the UI of our application like we would a traditional application. Let’s start with a simple example where we search the page for a particular element and verify that it has the copy that we expect.
it('has a button with the text "Copy from Clipboard"', async () => {
const buttonText = await app.client
.getText('#copy-from-clipboard'); 1
return assert.equal(buttonText, 'Copy from Clipboard');
});
The getText() method is provided by WebdriverIO as opposed to Spectron. It accepts a selector as an argument, finds the first node that matches that selector, and returns a promise that resolves to the text content of that node. Finally, we confirm that the text is what we expect it to be.
This works, but what about more complicated traversal? When the application starts, the clippings list is empty—remember this was before we knew how to persist data in our Electron applications. Each time the user clicks that Copy from Clipboard button, a new clipping should be added to the page. How might we go about testing these scenarios? Let’s start with the first case: when the application starts, there should not be any clippings on the page.
it('should not have clippings when it starts up', async () => {
await app.client.waitUntilWindowLoaded(); 1
const clippings = await app.client.$$('.clippings-list-item'); 2
return assert.equal(clippings.length, 0); 3
});
Webdriver exposes $ and $$ methods, which are aliased to document.querySelector and document.querySelectorAll, respectively. We use $$ to select all of the clipping list items on the page, which returns a NodeList object. Ideally, there are no clipping list items on the page and the length of that NodeList is 0.
So far we’ve inspected and verified the state of the application when it starts—an important task but typically only a small portion of the tests we write for a given application. We’ve confirmed that there are no clippings on the page when the application starts. It stands to reason that when the user adds a clipping, it should be added to the UI. We already know how to check for the number of elements matching a given selector on a page. But how do you add a clipping? You click the Copy from Clipboard button. We need to figure out how to program WebdriverIO to click on a particular element on a page.
it('should have one clipping when the "Copy from Clipboard" button has been
pressed', async () => {
await app.client.waitUntilWindowLoaded();
await app.client.click('#copy-from-clipboard'); 1
const clippings = await app.client.$$('.clippings-list-item'); 2
return assert.equal(clippings.length, 1); 3
});
Lucky for us, app.client provides a click() method that does exactly what you might expect: it triggers a click event on a node that matches the selector provided. When we click the Copy from Clipboard button, we expect that a clipping is added to the page. The prior test verifies that there is one clipping on the page after the Copy from Clipboard button has been clicked.
What about the flip side? If you recall, clippings can also be removed from the UI. But there is a catch—the Remove button appears only when the user’s cursor is hovering over the clipping. We can’t simply query for the Remove button, because it’s not on the page yet. Instead, we need to take control of the cursor and move it over the clipping to have the Remove button appear.
it('should successfully remove a clipping', async () => {
await app.client.waitUntilWindowLoaded();
await app.client
.click('#copy-from-clipboard')
.moveToObject('.clippings-list-item') 1
.click('.remove-clipping'); 2
const clippings = await app.client.$$('.clippings-list-item');
return assert.equal(clippings.length, 0); 3
});
After clicking the Copy from Clipboard button, we use the moveToObject() method to move the cursor over the new clipping, which causes the Remove button to appear. We click Remove and then verify that the clipping is no longer on the page.
Seeing a warning is normal, unfortunately. When you run the test in listing 13.9, you see a deprecation warning related to moveTo because of an incompatibility with recent versions of Firefox—an issue that doesn’t concern us. The problem is that although moveTo has been deprecated, there isn’t a replacement at the time of this writing. A number of open issues exist on GitHub about this. A good example can be found at https://github.com/webdriverio/webdriverio/issues/2076. You’re not the only one seeing—and being frustrated by—these warnings.
To suppress these warnings, you can configure WebdriverIO’s options when creating your Spectron application as follows:
const app = new Application({
path: electronPath,
args: [path.join(__dirname, '..')],
webdriverOptions: {
deprecationWarnings: false
}
});
At this point, we have tested that we can add and remove clippings from the page, but we still have a major blind spot: we have no idea whether the clipping is displaying the correct text. If you were able to squint at the application during the previous tests, you might have noticed that the clipping that was added contained whatever was on our clipboard at the time. This will be tricky because our tests should be isolated from the outside world.
What we need to do is use Electron’s clipboard module to write text to the clipboard and then verify that the provided text is, in fact, what is displayed in the UI. Luckily, Spectron gives us access to all of Electron’s APIs. This means we can manipulate what is currently on the clipboard as part of the test and confirm that it is what’s found in the UI when the clipping is added to the page.
it('should have the correct text in a new clipping', async () => {
await app.client.waitUntilWindowLoaded();
await app.electron.clipboard.writeText('Vegan Ham'); 1
await app.client.click('#copy-from-clipboard');
const clippingText = await app.client.getText('.clipping-text'); 2
return assert.equal(clippingText, 'Vegan Ham'); 3
});
The clipboard module is available in both the main and renderer processes, so there is no need to use electron.remote. Before clicking the Copy from Clipboard button, we write text to the clipboard. We then click the button and verify that the clipping’s text is exactly what we wrote to the clipboard.
This covers half of Clipmaster 9000’s functionality. The flip side of the coin is that the user should be able to copy the clipping back to the clipboard when the clipping’s → Clipboard button is clicked. To test this, we need to build on the work we did in the previous test. After clicking the Copy from Clipboard button and adding it to the page, we change the clipboard’s content to something else, then click the → Clipboard button, read from the clipboard, and verify that it is back to the original text that we added to Clipmaster 9000.
it('should write the clipping text to the clipboard', async () => {
await app.client.waitUntilWindowLoaded();
await app.electron.clipboard.writeText('Vegan Ham'); 1
await app.client.click('#copy-from-clipboard'); 2
await app.electron.clipboard.writeText('Something different'); 3
await app.client.click('.copy-clipping'); 4
const clipboardText = await app.electron.clipboard.readText(); 5
return assert.equal(clipboardText, 'Vegan Ham'); 6
});
With this final test in place, we can verify that all of the UI elements work and behave as expected. We were able to use a combination of WebdriverIO and Electron APIs to test the application from multiple angles. The code as it stands at the end of this chapter can be found on the completed-example branch of the repository.
In part 2, we built a number of applications, but each shared a common flaw: our users would need to navigate to the appropriate directory using the command line and have Node.js installed to start the application. This isn’t exactly ideal. As I’m sure you’ve guessed, things don’t have to be this way. That’s not the way I started Slack this morning. Part 3 covers the intricacies of packaging and distributing our wonderful applications.
Chapter 14 directly takes on the problem I illustrated in the previous paragraph by introducing us to two different ways to package our applications for distribution. We’ll create standalone versions of Fire Sale and Jetsetter in the process. In chapter 15, I’ll address a fear that may or may not have crossed your mind: how do we know if our application is working as intended once we release it into the wild? We’ll wire up Fire Sale with Electron’s built-in crash reporter. We’ll also set up a simple server to receive and keep track of crash reports. Full-on crashes are not the only issue our users might come across. We’ll also build our own ability to capture uncaught exceptions and report them to our server as well. This is above and beyond what Electron gives us out of the box, but, ultimately, it is fairly simple to implement.
Chapter 16 discusses how to get your application prepped and ready for the Mac App Store. You, by no means, have to go down this route, but it does solve some of the problems that you might come across if you decide that you’d like to get rich off of your Electron applications.
Throughout this book, we’ve built several applications. We’ve started each of them the same way: open the terminal, navigate to the directory, and launch the application using npm. If you’ve downloaded any of my completed applications, then it’s likely that you went to the project on GitHub, cloned the repository, and installed its dependencies. This is all a bit tedious and—frankly—an unacceptable experience for our users. Our Electron applications should behave like any other desktop application. Users should be able to navigate to a website, download the application, and double-click its icon to launch the application. No terminal. No installing dependencies. No cloning repositories.
In this chapter, we take an application that we built earlier in this book—Fire Sale—and build it as a desktop application using a third-party library called Electron Packager. You can find the repository on GitHub at https://github.com/electron-in-action/firesale. We’ll start by checking out a branch conveniently called chapter-14-beginning. This is roughly where we left off in chapter 8.
We start by setting up Electron Packager. We use command-line flags to customize things like the output directory and set up npm scripts that allow us to build for multiple platforms at once—although I’ll explain why this might be ill-advised. Next, we add a custom icon for Fire Sale. Finally, we discuss Electron’s asar archive format and add it to our build process.
After building Fire Sale with Electron Packager, we build Jetsetter using an alternative called Electron Forge. Where Electron Packager is simple, low-level, and a great way to understand what’s happening without getting too deep into the weeds, Forge contains more bells and whistles. I chose it for Jetsetter because we’re using electron-compile to transform JSX to vanilla JavaScript. Electron Forge is also great for laying the foundation for a new Electron application. In the name of learning and getting our hands dirty, I chose not to use Electron Forge, but you may want to consider it when starting your next Electron application. This chapter covers how to transition an Electron application that wasn’t originally created with Electron Forge.
By the end of this short chapter, we’ll have an executable Electron application that doesn’t need to be started from the command line and can be used by someone who does not have Node installed on their computer. Chapters 15 and 16 go deeper and discuss how to properly package your application for macOS and Windows.
Electron Packager is an abstraction around the numerous steps required to develop an application and package it for distribution. In development, we’ve downloaded a prebuilt version of Electron for our platform (macOS, Windows, or Linux) and processor architecture (32- or 64-bit). We don’t necessarily know what platform and architecture our users are using, and they won’t build it themselves. It’s our responsibility to build a version of the application for each platform and architecture combination we plan to support. Electron Packager is here to help us with that endeavor.
You can install Electron Packager globally using npm install electron-packager -g or yarn global add electron-packager. I prefer to install it locally on the individual project because then each project specifies its own version of Electron Packager. I added it to the devDependencies in the project’s package.json. If you’ve cloned the repository and installed the dependencies, you should be good to go.
We begin by adding a build script to package.json. In this chapter, we start with a deliberately simple configuration and build on top of it as we go along, refining this build script along the way.
{
// ...Omitted...
"scripts": {
"start": "electron .",
"build": "electron-packager .", 1
"test": "echo \"Error: no test specified\" && exit 1"
},
// ...Omitted...
}
With our build script in place, it’s time to start Electron Packager. You can run the build script using npm run build, which runs the local version of electron-packager installed in the node_modules directory. When the build is finished, you should see an additional directory with the name of the application along with the platform and architecture you’re currently using, as shown in figure 14.1. As I write this, I’m using a 64-bit Mac and the directory is called firesale-darwin-x64.
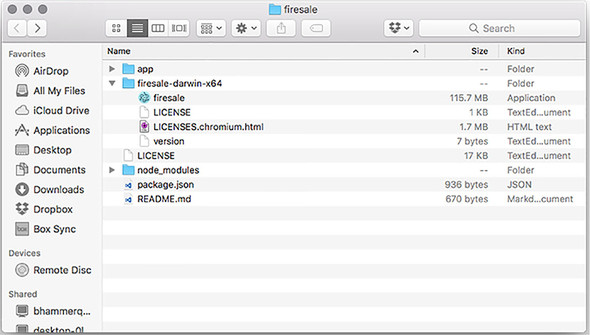
The firesale-darwin-x64 directory contains the desktop application named firesale along with the license and a small text file containing the version. Double-click the application to open it like any other application. If you need to prove it to yourself, feel free to drag the application to another directory and launch it from there.
The output of Electron Packager on Windows is a bit more verbose. On macOS applications are effectively folders that hide much of this complexity from us. In chapter 15, we’ll cover how to make an installer for Windows that hides this complexity from our users.
This was fast and simple, but there is still a lot left to be desired. The filename isn’t capitalized, we’re still using the stock Electron icon, and we’ve built a version for only our current architecture and platform, among other issues.
By default, Electron Packager includes all of the dependencies in your node_modules directory that are listed in your package.json. It does omit dependencies listed under devDependencies in your package.json. This is not an issue that we run into with any of the applications in the book, but it is something you might encounter in your adventures. You can deal with this in two ways: move the dependency from devDependencies to dependencies or pass the --no-prune flag to Electron Packager.
The concerns I just listed are all valid, and we do solve each of them, but we have a more pressing problem to address first. We may not want to check our built applications into version control. Building the applications to the root directory of the project makes that difficult. It adds an increasing amount of visual noise and clutter as we begin building additional platforms and architectures.
If you type ./node_modules/.bin/electron-packager --help from the command line, Electron Packager shows you all the options and flags that it accepts. To specify the directory into which we want Electron Packager to place our applications, we can use the --out flag. Update the build script to electron-packager . --out=build. You can add the build directory to your .gitignore file to keep your compiled applications out of version control. I’ve already done this for you in this project.
Electron Packager uses information in your project’s package.json to set certain parameters during the build process. For example, it reads the version field to determine what version of the application this is. It used the name field to set the name of the application as well. But, this has some limitations. You can’t use spaces or capitalization in the name field in a package.json. Luckily, a package.json is only a text file, and npm ignores any properties it doesn’t understand. This is a good place to store additional information that might be meaningful to Electron Packager. We know that we’d like to change the name of the application, as shown in figure 14.2.
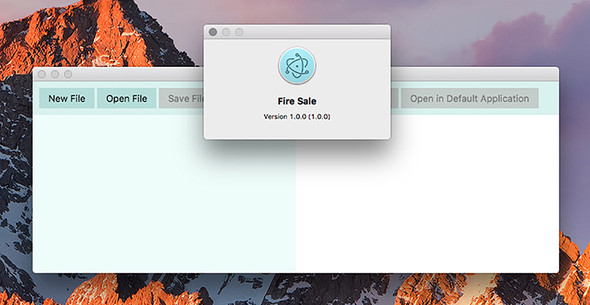
{
"name": "firesale",
"version": "1.0.0",
"description": "Completed code from [Electron in
Action](http://bit.ly/electronjs).",
"productName": "Fire Sale", 1
// ...Additional properties omitted...
}
I like Electron’s logo. It’s done well by us throughout this book. But if every application built on top of Electron used the same logo, it would be hard to tell one application from another. Let’s replace the logo with our own.
As we saw in chapter 9, different operating systems have different preferences regarding the file format of its icons. At this point, we’re building for our own operating system, so we’ll make a choice based on which one we’re using, as shown in figure 14.3. Later in the chapter, we add some nuance to guide Electron Packager in selecting the correct icon for a given platform.

macOS supports .icns files. Windows supports .ico files. Linux supports .png files. For now, pass the appropriate file to the --icon flag based on your current operating system as shown in listing 14.3.
electron-packager . --overwrite --out=build --icon=icons/Icon.icns 1 electron-packager . --overwrite --out=build --icon=icons/Icon.ico 2 electron-packager . --overwrite --out=build --icon=icons/Icon.png 3
Electron Packager supports the --all flag, which creates five builds of the application: 64-bit macOS, 32- and 64-bit Windows, and 32- and 64-bit Linux. Later in this chapter we discuss why this isn’t always possible. Although the --all flag provides a simple way to create builds for each platform, in the previous section we created different icons for each platform. As a result, we want to pass different options to Electron Packager on the platform.
{
// ...Omitted...
"scripts": {
"start": "electron .",
"build": "npm run build-mac && npm run build-win
&& npm run build-linux", 1
"build-mac": "electron-packager . --platform=darwin
--out=build --icons=icons/Icon.icns --overwrite", 2
"build-win": "electron-packager . --platform=win32
--out=build --icons=icons/Icon.ico --overwrite", 3
"build-linux": "electron-packager . --platform=linux
--out=build --icons=icons/Icon.png --overwrite", 4
"test": "echo \"Error: no test specified\" && exit 1"
},
// ...Omitted...
}
If you’re using macOS, you can build Windows binaries if you have Wine installed as well as binaries for Linux. Wine is a utility for running Windows applications on Linux and macOS that can be downloaded from www.winehq.org. On Windows, you cannot create symlinks for macOS and cannot build applications as a result. In chapters 15 and 16, we discuss code signing on macOS, which can be done only on a Mac.
Electron applications are like traditional web applications in that all our code is hidden in plain sight. In a web application a user might right-click and select View Source or open the Developer Tools. In our Electron application, a curious user could open the application bundle and navigate to our source code, as shown in figure 14.4.
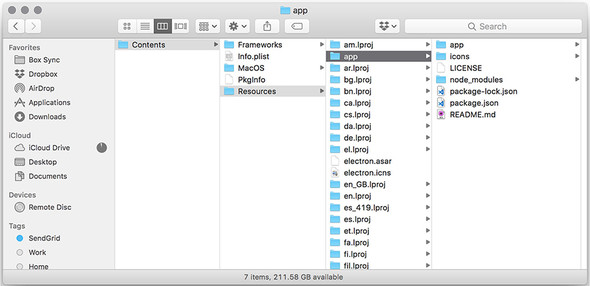
If you’re using Windows, you can see a folder called resources in the same directory as the application. If you’re using macOS, right-click Fire Sale and select Show Package Contents. Next, you see a folder called Contents. Navigate into the Contents directory and then into Resources. Inside this folder are many folders. The one we’re interested in is called app. Open this folder and you find all of Fire Sale’s source code.
Your next impulse might be to run the same experiment on a popular Electron application such as Slack, Atom, or Visual Studio Code. But you won’t find a folder containing the application’s source code. Instead, you’ll see a file with an unfamiliar file extension called app.asar, as shown in figure 14.5.
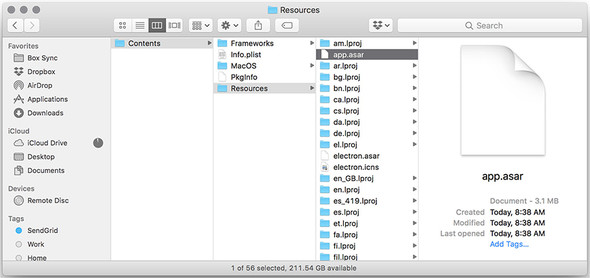
What’s this? Asar is an archive format used by Electron applications. It effectively concatenates the files and prepends a JSON object with the start location of each file along with its length, which allows random access to a specific file in the archive.
Why use asar? Asar speeds up requiring files in Node because they are all colocated in the same file, which is loaded into memory when the application launches. It also helps us avoid a bug in Windows caused by long filenames. The error is fairly self-explanatory: the specified path, filename, or both are too long. The fully qualified filename must be less than 260 characters, and the directory name must be less than 248 characters. While you could practice the discipline of avoiding incredibly long filenames, you don’t have control over dependencies—particularly those written by developers using computers running macOS or Linux. Asar solves this problem by creating a single file called app.asar.
Creating an asar archive with Electron Packager is incredibly easy. Simply add the --asar flag to the command and build the application. The folder disappears and is replaced with the archive.
{
// ...Omitted...
"scripts": {
"start": "electron .",
"build": "npm run build-mac && npm run build-win && npm run build-linux",
"build-mac": "electron-packager . --platform=darwin
--out=build --icons=icons/Icon.icns --asar --overwrite", 1
"build-win": "electron-packager . --platform=win32
--out=build --icons=icons/Icon.ico --asar --overwrite", 2
"build-linux": "electron-packager . --platform=linux
--out=build --icons=icons/Icon.png --asar --overwrite", 3
"test": "echo \"Error: no test specified\" && exit 1"
},
// ...Omitted...
}
Asar is not a way to secure or conceal your source code. The asar module on npm allows anyone to extract the folder structure from the archive. Alternatively, opening the archive in a text editor shows you that asar doesn’t do anything in the way of obfuscation. If you wanted to peek at the source code of an Electron application, globally install the asar binary, navigate to the application’s app.asar, and extract the folder structure.
Electron does not offer a way to hide or encrypt your HTML, CSS, and JavaScript code. If this is a business requirement for you, you might want to consider writing the sensitive parts of your application in a compiled language, like C++ with Node bindings. To the same end, there is nothing stopping you from cracking open your favorite Electron application—Slack, for example—and checking out some of the approaches used in producing for Electron applications.
Electron patches the Node APIs for reading from and writing to the filesystem to support asar automatically. This means you can treat an asar archive as if it were the original folder structure. If you need to use the unpatched version of Node’s built-in fs module, you can use Electron’s built-in original-fs module.
We have successfully set up packaging for Fire Sale. You can find the code for Fire Sale in the chapter-14-ending branch (http://mng.bz/vI4g). This setup works for a simple application like Fire Sale, but what about an application that has code that needs to be transpiled? Yes, you could set up some Gulp tasks or some other kind of build step that takes place before packaging, but at this point in the book, it shouldn’t surprise you that the Electron community has already solved this problem for you. In the next section, we’ll look at using Electron Forge to build and package Jetsetter, which requires a compile step before packaging.
Electron Forge (https://github.com/electron-userland/electron-forge) is an abstraction around electron-compile, electron-rebuild, Electron Packager, and other popular third-party Electron libraries. Electron Forge lays the foundation for a brand-new Electron application using one of several different blueprints. It can also import existing applications. We use Electron Forge with the Jetsetter app from chapters 11 and 12 because it relies on electron-compile and electron-rebuild. Using these with tools like Electron Packager is certainly not impossible, but it’s tedious compared to how easy the process is with Electron Forge, which has built-in support for electron-compile and electron-rebuild.
You’ll start from the chapter-14-beginning branch, which can be found on GitHub (http://mng.bz/MdLb). You can also reference the completed example on the chapter-14-ending branch (http://mng.bz/mzhH).
The trouble with publishing a book is that, sometimes, libraries change. In this section, we’re working at the intersection of a few different libraries: Electron, electron-precompile, Electron Forge, React, and others. The cross-compatibility of all of these libraries fills your author with a sense of existential dread. If you have any trouble with the code printed in this section, I encourage you to visit the repository on GitHub, which should work with the most recent versions of the libraries involved.
Out of the box, Electron Forge also handles many of the concerns around distributing your application that we’ll cover in chapters 15 and 16. It can take care of publishing your application to Amazon S3, GitHub Releases, or your own custom server. As I stated earlier, we’ve opted to do a lot of the work by hand in the name of understanding how Electron works, but I highly recommend considering Electron Forge for your next application. In this section, we cover how to convert an application that was not originally created with Electron Forge in mind to one that is ready and able to take advantage of Electron Forge.
We first need to complete a few steps: install the electron-forge binary, convert Jetsetter to an Electron Forge application, and run the build command. Electron Forge uses Yarn, an alternative to npm, for installing and managing packages. You need to install it if you haven’t already. Visit the official documentation (https://yarnpkg.com/en/docs/install) for up-to-date instructions and to learn how to install it on your operating system.
After you install Yarn on your system, run yarn global add electron-forge. This installs the command-line tool that allows you to create Electron Forge applications, as well as converts existing Electron applications for use with Electron Forge.
When we built Jetsetter in chapter 11, we had not yet discussed Electron Forge. It follows that Jetsetter is not an Electron Forge application. Luckily, it’s easy to convert it to one. From inside the jetsetter directory, run electron-forge import. At this point, you are asked a series of questions about how you’d like the script to proceed. Answer the questions as follows:
The first question is asking your permission to modify your application’s package .json file. This is necessary. Answering no aborts the process. The second question does not apply to us. Jetsetter uses Electron Compile to transpile JavaScript, Sass, and other languages on the fly. If we were instead using a task runner such as Gulp, Grunt, or webpack to transpile our source code into another directory, we would answer yes to this question.
The final three questions are asking if we’d like to use Electron Forge to start our application in development, package the application as we did earlier in this chapter to Fire Sale, and build a distributable—which we’ll cover in the next chapter. Because this is why we’re importing the application to begin with, we’ll answer yes to each of these questions.
As I mentioned earlier, Electron Forge is an abstraction around several helpful libraries in the Electron ecosystem. It exists to make common tasks easier. Building your application is as simple as running yarn run package. This drives Electron Packager through many of the steps we covered earlier in this chapter with Fire Sale.
Electron Forge passes parameters to Electron Packager. It calls the output directory out instead of build. Electron Packager pulls modules from your node_modules directory and installs them into your application. As of this writing, there is an issue where the modules were not moved properly. This issue appears with the current version of npm and may be alleviated by the time you read these words. In the meantime, I found that it was easy to work around this issue by using Yarn instead of npm. Electron Forge adds a few fields to your package.json, so finds the field titled electron-PackagerConfig, and modify it to match this listing.
"electronPackagerConfig": {
"packageManager": "yarn"
}
With this code in place, run yarn run package. Your application should build successfully. See figure 14.6. You may have noticed that Electron Forge adds a few other configuration fields to package.json. As I mentioned earlier, Electron Forge also assists with creating installers and publishing your application to the web. We cover those features in the upcoming chapters.
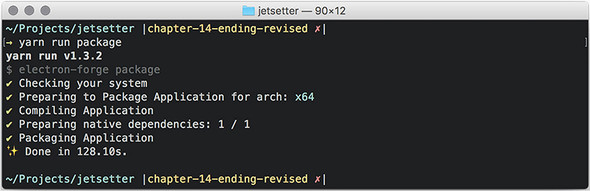
With Electron Forge, everything is set up on your behalf. At this point, you probably fall into one of two categories: you’re either amazed by how much simpler Forge is compared to Packager, or you’re bewildered by all of the black magic. Those reactions are both fair and underscore some of the trade-offs made along the spectrum between convention and configuration. My hope is that by trying both, you’ll have a sense of which you prefer for your own applications.
This chapter covers
You’ve built your application, and you’re ready to distribute it to the world. You’ve prepared your announcement, and your cursor is hovering over the Publish button when—all of a sudden—your mind begins to race with some very important questions: What if it doesn’t work on all platforms as you expected? What if there is a bug you haven’t encountered yet? What if you need to push out a new version of the application to your users?
These concerns are all valid. The good news is that Electron has you covered on each front. In this chapter, we cover how to collect crash reports and—in the event you receive an unexpectedly large number of them—how to push an update to all of the users that currently have the application installed on their system.
Despite how good your skills as a developer are, your application is going to have bugs. Some users report them, but many others suffer in silence. Even among the users who report bugs, it can be difficult to determine how common a given issue is among your user base as a whole. Crash reporting is critical for discovering what types of problems occur and at what frequency your users are experiencing them.
Though it is certainly a relief that Electron includes support for crash reporting, it’s surprising. As we’ve covered throughout this book, Electron is built on top of Chromium, and crash reporting is certainly something that the Chromium team deals with in their project. To stand on the shoulder of giants, however, we need to set up the crash reporter in our Electron application, as well as deploy a simple server to collect these crash reports for later analysis.
In this chapter, we implement crash reporting and auto-updating into Fire Sale, which is the application we began getting ready for deployment in chapter 14. We begin working on the chapter-15-beginning branch, found at https://github.com/electron-in-action/firesale.
We tackle the following:
Under the hood, Electron uses one of two crash-reporting systems: on macOS, the Chrome team’s Crashpad reporting engine; on Windows and Linux, an older engine known as Breakpad. These options impact how we implement crash reporting in Electron. The main difference is that Breakpad crash reporting needs to be set up only in the main process, whereas Crashpad must be started in the main and renderer processes.
Yes, you could copy and paste the code from the main process into each of the renderer processes. (We’re lucky to have only one in Fire Sale.) But that means you’d have to remember to be diligent enough to change it in multiple places in the event you needed to update the configuration. Personally, I’d prefer to spend a few extra moments of effort now for a lifetime of laziness. Let’s set up a single function that we can use in both places.
const { crashReporter } = require('electron');
const host = 'http://localhost:3000/'; 1
const config = {
productName: 'Fire Sale',
companyName: 'Electron in Action',
submitURL: host + 'crashreports',
uploadToServer: true, 2
};
crashReporter.start(config); 3
console.log('[INFO] Crash reporting started.', crashReporter);
module.exports = crashReporter;
We set up a reusable module for starting up the crash reporter, but you can change the value of any of those options. Particularly, we need to change submitURL because it is both unlikely that our users happen to be running a server on that port and ultimately unhelpful to us if they’re collecting crash reports locally and never sending them to us.
The code by itself does not start the crash-reporting engine unless it is pulled into the main and renderer processes. We start by pulling it into the main process.
const { app, BrowserWindow, dialog, Menu } = require('electron');
const createApplicationMenu = require('./application-menu');
const fs = require('fs');
require('./crash-reporter'); 1
const windows = new Set();
const openFiles = new Map();
// The rest of the main process code...
This method is effectively enough to implement the ability to send crash reports on Windows and Linux. We can verify that the code inside the crash reporter has executed by checking the terminal for the message we logged to the console in listing 15.1 when the application starts, as shown in figure 15.1.
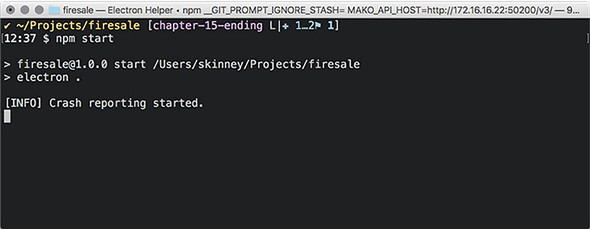
As I mentioned earlier, we need to do one more—arguably simple—step to get crash reporting working on macOS: execute the same code in the renderer process.
const { remote, ipcRenderer, shell } = require('electron');
const { Menu } = remote;
const path = require('path');
const mainProcess = remote.require('./main.js');
const currentWindow = remote.getCurrentWindow();
require('./crash-reporter'); 1
We can verify that the crash reporter has started by opening the Developer Tools in the Fire Sale UI and confirming that the console message has been logged correctly, as seen in figure 15.2.
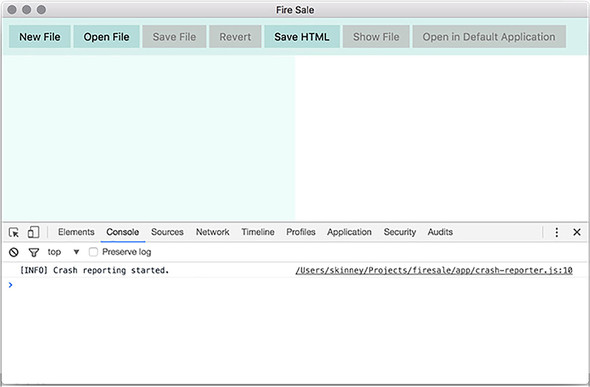
We can send crash reports—but where? We can trigger a crash by typing process.crash() into the Developer Tools in the renderer process. As shown in figures 15.3 and 15.4, doing so results in the following: the page crashing, the Developer Tools locking up, and the main process logging an error.
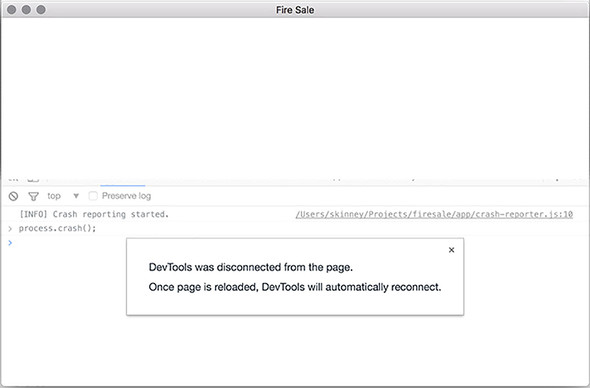
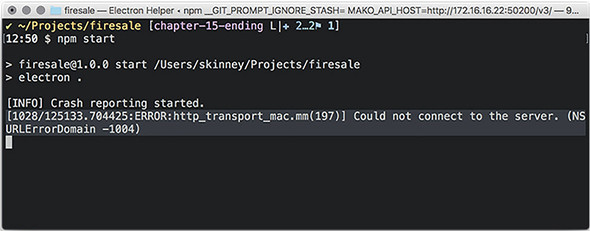
The immediate issue that we need to solve is the error in our terminal. The exact contents of the error varies by operating system, but the gist is that the crash reporter cannot connect to the server. This makes sense, because we haven’t yet set up a server.
Depending on your application, you may already be using an API server. If so, I’d recommend adding an endpoint for receiving POST requests from your application. That said, Fire Sale has not had the need for an API server, and I’m going to work under the assumption that we don’t have one. For those of you that do, I suspect what follows is still helpful because it illustrates what kind of payload you can expect when a crash is reported.
As described in listing 15.4, let’s create a simple server for capturing and recording crash reports. The code can be found on GitHub at http://mng.bz/k6eT.
const express = require('express');
const multer = require('multer');
const bodyParser = require('body-parser');
const uuid = require('uuid');
const writeFile = require('write-file');
const path = require('path');
const http = require('http');
const app = express(); 1
const server = http.createServer(app);
app.use(bodyParser.urlencoded({ extended: false })); 2
const crashesPath = path.join(__dirname, 'crashes');
const upload = multer({ 3
dest: crashesPath,
}).single('upload_file_minidump');
app.post('/crashreports', upload, (request, response) => {
const body = { 4
...request.body,
filename: request.file.filename,
date: new Date(),
};
const filePath = `${request.file.path}.json`;
const report = JSON.stringify(body);
writeFile(filePath, report, error => { 5
if (error) return console.error('Error Saving', report);
console.log('Crash Saved', filePath, report);
});
response.end();
});
server.listen(3000, () => {
console.log('Crash report server running on Port 3000.');
});
If you clone the library from GitHub, install the dependencies, and run npm start. You should have a server ready and able to collect crash reports running on http://localhost:3000, which is exactly where we pointed the Electron crash reporter in listing 15.1.
Each crash report creates two files in the ./crashes directory: a mini-dump from Chromium and a JSON file with additional metadata about the crash. The JSON file contains useful data about the version of your application that crashed and the platform that it was running on.
{
"_companyName": "Electron in Action",
"_productName": "Fire Sale",
"_version": "1.0.0",
"guid": "46cecb8f-f2de-4159-a235-dc8713f8393f",
"platform": "darwin", 1
"process_type": "renderer", 2
"prod": "Electron",
"ver": "2.0.4", 3
"filename": "a51d2ca2e13cad25cea6c2bd15ae4d4d" 4
}
When a crash is reported, the server saves two files to the /crashes directory: a51d2ca2e13cad25cea6c2bd15ae4d4d and a51d2ca2e13cad25cea6c2bd15ae4d4d.json. The former is a dump from Chromium of everything that was happening when the application crashed. This file is in a binary format and cannot be opened in a text editor.
The easiest way to parse this file is to use the minidump library from the Electron team. You can install this globally using npm install -g minidump. After you install it, you have the minidump_stackwalk command-line tool at your disposal and can use minidump_stackwalk <name of mini-dump file> to read the contents of the dump. Alternatively, you can use this tool programmatically on your crash-report server as outlined in the tool’s documentation (www.npmjs.com/package/minidump).
Electron’s built-in crash reporter is good at what it claims to do on the box—reporting crashes. But in my experience, general bugs and minor errors are much more common than outright crashes. It would be great if we could collect these errors as well, to have better insight into where the rough edges of our application are and exactly how to fix them.
Unfortunately, this is not a tool that is already built into Electron. The good news is that this feature is relatively easy to implement given the knowledge we’ve already gained throughout the course of this book.
To implement this feature, we have to listen for any uncaught exceptions. The syntax for this is slightly different between the main and renderer processes, but the implementation is the same, as shown in the following listing. When an uncaught exception occurs, send an HTTP POST request to our crash server, which will then log the error to a JSON file.
const { crashReporter } = require('electron');
const request = require('request');
const manifest = require('../package.json');
const host = 'http://localhost:3000/';
const config = {
productName: 'Fire Sale',
companyName: 'Electron in Action',
submitURL: host + 'crashreports',
uploadToServer: true,
};
crashReporter.start(config);
const sendUncaughtException = error => { 1
const { productName, companyName } = config;
request.post(host + 'uncaughtexceptions', { 2
form: {
_productName: productName,
_companyName: companyName,
_version: manifest.version,
platform: process.platform,
process_type: process.type,
ver: process.versions.electron,
error: { 3
name: error.name,
message: error.message,
stack: error.stack,
},
},
});
};
if (process.type === 'browser') { 4
process.on('uncaughtException', sendUncaughtException); 5
} else {
window.addEventListener('error', sendUncaughtException); 6
}
console.log('[INFO] Crash reporting started.', crashReporter);
module.exports = crashReporter;
Any time an error is fired and it bubbles up to the window object without being handled, a report is sent to our server. But just as last time, our server has not been set up yet to handle this report. We need to add another route to log this error.
const express = require('express');
const multer = require('multer');
const bodyParser = require('body-parser');
const uuid = require('uuid');
const writeFile = require('write-file');
const path = require('path');
const http = require('http');
const app = express();
const server = http.createServer(app);
app.use(bodyParser.urlencoded({ extended: false }));
const crashesPath = path.join(__dirname, 'crashes');
const exceptionsPath = path.join(__dirname, 'uncaughtexceptions'); 1
const upload = multer({
dest: crashesPath,
}).single('upload_file_minidump');
app.post('/crashreports', upload, (request, response) => {
// ...
});
app.post('/uncaughtexceptions', (request, response) => {
const filePath = path.join(exceptionsPath, `${uuid()}.json`); 2
const report = JSON.stringify({
...request.body,
date: new Date() 3
});
writeFile(filePath, report, error => { 4
if (error) return console.error('Error Saving', report);
console.log('Exception Saved', filePath, report);
});
response.end();
});
server.listen(3000, () => {
console.log('Crash report server running on Port 3000.');
});
In chapter 14, we packaged our application so that users don’t need to have Node installed or be familiar with the command line to start it up. In the previous section, we added crash and exception reporting to be confident that we’ll be notified in the event our application does not work as intended. Our next step is to sign our application so that our users can be certain that they’re getting the real thing and not a cheap substitute.
This process differs on macOS and Windows, so let’s walk through each platform separately. Although some of the steps for macOS seem repetitive when we package Fire Sale for the Mac App Store in chapter 16, myriad subtle differences exist.
Before we get into the nitty-gritty of code signing our applications, I’ll take a moment to explain what code signing is. The internet is a wild place. You can think of code signing as a tamper-proof seal around your application. Signing our applications allows users to be confident that it both came from you and that no one modified it or otherwise tampered with it along the way. On top of being a generally good idea, macOS and Windows prefer that users work with signed applications and present a series of warnings if they attempt to open an unsigned application. Depending on their settings, users may not be able to open unsigned applications at all.
You need a few prerequisites in place to sign a macOS application. First, you must be a registered member of the Apple Developer Program (https://developer.apple.com/programs/). Second, you must have Xcode installed. This can be downloaded from the Mac App Store or from Apple’s Developer site (https://developer.apple.com/xcode/download/). In addition to having Xcode installed, you also need to have the Xcode command-line tools installed. To set these up, type xcode-select –install from the command line, and follow all of the subsequent prompts.
To sign your application, you need to create certificates either through iTunes Connect or from within Xcode. We spend an uncomfortable amount of time in iTunes Connect in chapter 16, so we’ll do it in Xcode this time.
We generate two certificates: a “Developer ID Application” and a “Developer ID Installer” certificate. To create these certificates
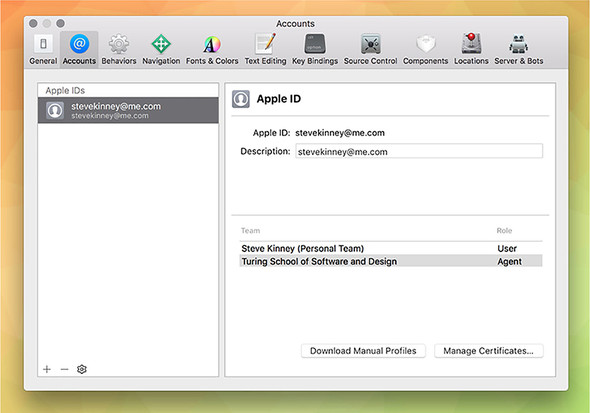
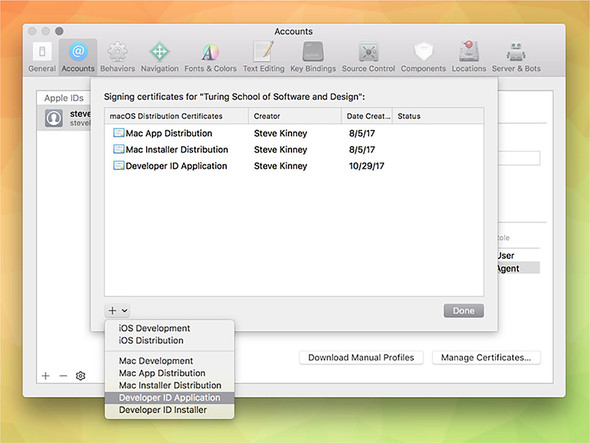
Xcode automatically adds these certificates to your Keychain. Electron Packager looks these up when it comes time to package your application and sign it. First, we need to modify the packaging script in our package.json.
"build-mac": "electron-packager . --platform=darwin
This line is getting a bit long, and we begin to break it out a bit in chapter 16, but for now, we add a few important new arguments to the existing script: --app-bundle-id, --app-version, --build-version, and --osx-sign.
When running npm run build-mac, you are prompted for your password multiple times, as shown in figure 15.8, because Electron Packager accesses your keychain to use the certificates to sign your application.

On Windows, you need a code-signing certificate. Microsoft recommends buying a certificate from a list of certificate authorities listed in their documentation (http://mng.bz/3VEH).
You can still build an installer without a certificate, but you might have difficulty distributing your application to users without one. Microsoft’s SmartScreen filter may block your application from being downloaded, and many antivirus programs might mislabel your application as malware. For the purposes of this chapter, as we go through the process of building an installer, I show you where to plug in your certificate, should you move forward and decide to purchase one.
The Electron team maintains a helpful library for building installers on Windows. You can install this tool using npm install --save-dev electron-winstaller. We create a new folder called scripts and make a file called scripts/windows.js to store the configuration for our Windows installer. Add the content in listing 15.9 to the file we just created.
const { createWindowsInstaller } = require('electron-winstaller'); 1
const path = require('path');
const iconPath = path.resolve(__dirname, '../icons/Icon.ico'); 2
const result = createWindowsInstaller({ 3
title: 'Fire Sale',
authors: 'Steve Kinney',
appDirectory: path.resolve( 4
__dirname,
'../build/Fire Sale-win32-x64'
),
outputDirectory: path.resolve( 5
__dirname,
'../build/Fire Sale-win32-x64-installer'
),
icon: iconPath, 6
setupIcon: iconPath, 7
name: 'FireSale',
setupExe: 'FireSaleSetup.exe',
setupMsi: 'FireSaleSetup.msi',
});
result
.then(() => console.log('Success')) 8
.catch(error => console.error('Failed', error)); 9
If you have your certificates handy, you can add them to the configuration object. certificateFile should point to the path where the certificate is located. This process is similar to how we locate the iconPath. certificatePassword is the password for the certificate. Do not store the password in version control—particularly if your application is or ever will be open source.
If you get really excited and double-click the FireSaleSetup executable, you may notice that things are a little strange. You see a loading GIF followed by the application immediately opening. It didn’t add a shortcut to the desktop, or any other way of getting back to the application.
Uninstalling the application adds its own set of oddities. When you click the button in the Add and Remove Programs settings panel, you see the application open again before it finally uninstalls. We need to address this.
The Windows installer is set up with the Squirrel.Windows framework. When you start the application for the first time, or when it is being uninstalled, has been updated, or finds an available update, Squirrel passes an argument to your application. Luckily, working with Squirrel on Windows can range from incredibly simple to very easy. Let’s start with the incredibly simple way, and then I’ll show you what’s happening under the hood.
The easiest way to get started is to delegate the work to someone else by installing electron-squirrel-startup using npm install electron-squirrel-startup. After you install this package, add the code from this listing to your ./app/main.js.
const { app, BrowserWindow, dialog, Menu } = require('electron');
const createApplicationMenu = require('./application-menu');
const fs = require('fs');
require('./crash-reporter');
if(require('electron-squirrel-startup')) return; 1
// ...
With that simple change, all the oddities we encountered when working with FireSaleSetup.exe are squared away. So, what’s happening in this module? The module is open source and can be found on GitHub (https://github.com/mongodb-js/electron-squirrel-startup), but it’s a small file, and for the sake of completeness I list it here as well.
var path = require('path');
var spawn = require('child_process').spawn;
var debug = require('debug')('electron-squirrel-startup');
var app = require('electron').app;
var run = function(args, done) {
var updateExe = path.resolve( 1
path.dirname(process.execPath), '..', 'Update.exe'
);
debug('Spawning `%s` with args `%s`', updateExe, args);
spawn(updateExe, args, {
detached: true
}).on('close', done);
};
var check = function() {
if (process.platform === 'win32') { 2
var cmd = process.argv[1]; 3
debug('processing squirrel command `%s`', cmd);
var target = path.basename(process.execPath);
if (cmd === '--squirrel-install' || cmd === '--squirrel-updated') { 4
run(['--createShortcut=' + target + ''], app.quit); 5
return true; 6
}
if (cmd === '--squirrel-uninstall') { 7
run(['--removeShortcut=' + target + ''], app.quit); 8
return true;
}
if (cmd === '--squirrel-obsolete') {
app.quit();
return true;
}
}
return false; 9
};
module.exports = check();
If Squirrel did anything, it returns true. Recall in ./app/main.js that we used a conditional and if require(’electron-squirrel-startup’) returned true, we ended the main process early. This allows us to tap into the Squirrel framework when necessary and not start the application when we’re installing or uninstalling it. You can also see that on installation and uninstallation, Squirrel creates and removes the desktop shortcut as needed.
Whether you’ve completed a hot new feature that you want everyone to have or you’re trying to correct a critical bug that you found after implementing the crash and error report, the ability to push out updates to your users is important.
We tend to take this capability for granted as web developers. Whenever we deploy a new application to the web, we can reasonably expect that users are getting the latest and greatest version of it. But that’s not necessarily true when we’re building desktop applications. We can tell users about it, but there is no guarantee that they’re going to take the time to download it.
Browsers used to suffer from this problem. New JavaScript language and web platform features would be released, but you couldn’t use them because users typically did not update their browsers on a regular basis. Today, modern browsers like Chrome and Firefox push out new versions to users every six weeks or so. The update is automatically downloaded, and the next time the user starts the browser, the new one is swapped in without them having to think about the tedious process of upgrading.
It shouldn’t be a surprise at this point to hear that Electron provides a mechanism for us to do this with our applications—with some exceptions. As of this writing, this feature is limited to macOS and Windows. There is currently no support for auto-updating Electron applications on Linux.
Like crash reporting, implementing automatic updates has two sides: your application and a server to host releases of your application. We get into the details momentarily, but let’s talk about how this works at a high level first. After you’ve configured the autoUpdater module, it pings your release server every time the application starts. If the server responds with an HTTP 204 response, then Electron knows that it is running the latest version of the application. If there is a new version, the server returns an HTTP 200 JSON-formatted response with the URL of the new release.
You may have your own server for hosting releases. That’s perfectly fine. If you do not, we create a simple server to get you off the ground and demonstrate auto-updating in action. But this is not meant to be prescriptive. As long as you have a server that responds with the correct HTTP status codes and payload if there is a new release, Electron does not have strong opinions on the implementation details, and we won’t either, for the time being.
To get this working, we check if we’re using a production version of the application. If so, we send a request to the server asking for the most recent version of the application. If a new version exists, ask the user if they are interested in updating. When they agree, tell the autoUpdater module to quit the application and install the new version on our behalf.
const { app, autoUpdater, dialog, BrowserWindow } = require('electron');
const isDevelopment = app.getPath('exe').indexOf('electron') !== -1; 1
const baseUrl = 'https://firesale-releases.glitch.me'; 2
const platform = process.platform; 3
const currentVersion = app.getVersion(); 4
const releaseFeed =
`${baseUrl}/releases/${platform}?currentVersion=${currentVersion}`; 5
if (isDevelopment) {
console.info('[AutoUpdater]', 'In Developement Mode. Skipping...'); 6
} else {
console.info('[AutoUpdater]', `Setting release feed to ${releaseFeed}.`);
autoUpdater.setFeedURL(releaseFeed); 7
}
autoUpdater.addListener('update-available', () => { 8
dialog.showMessageBox({
type: 'question',
buttons: ['Install & Relaunch', 'Not Now'],
defaultId: 0,
message: `${app.getName()} has been updated!`,
detail: 'An update has been downloaded and can be installed now.'
}, response => {
if (response === 0) {
setTimeout(() => {
app.removeAllListeners('window-all-closed'); 9
BrowserWindow.getAllWindows().forEach(win => win.close()); 10
autoUpdater.quitAndInstall(); 11
}, 0);
}
});
});
module.exports = autoUpdater;
On macOS, autoUpdater fails if the application has not been code signed. When we’re developing the application, we use a version that has not been signed. These two facts are in direct opposition. The best course of action is not to fetch an update if we’re in development. This outcome also makes sense, because we’re likely working on the next version of the application, as opposed to the most recently released version.
You can implement this in a few ways. You could, for example, try to set the feed URL and then catch the error if the application hasn’t been code signed. Based purely on aesthestic reasons, this is not something I like to do. Electron does not have an API to let us know whether we’re in development, but when we are in development, we’re using a version of Electron buried inside of our node_modules directory. In my case, it’s located at ./node_modules/electron/dist/Electron.app/Contents/MacOS/Electron. In production it is located in the application bundle itself. I’ve taken advantage of this fun fact to determine whether the application is in development.
If it’s not in development, then we create a URL to look for updates based on the platform on which the application is running. This URL can technically be anything you want. You don’t have to follow my example, if your setup is different than the one we write together next.
We tell the autoUpdater module to send a request to the URL provided and ask if there are any updates. If there are, then the updates-available event runs. We’ve set up a listener for that event. If an update is available, we ask the user if they would like to update to the latest and greatest version of Fire Sale. If they agree, then we take a series of steps to gracefully transition them to the new version.
First, I remove the event listener that we set up in ./app/main.js that prevents the application from quitting if all of the windows are closed on macOS. Next, we iterate through the windows and close them. We do this to prompt the user to save any changes made to the file. Finally, we call autoUpdater.quitAndInstall(), which—unsuprisingly—closes the application and installs the newly downloaded update. Squirrel takes care of all of this on our behalf.
As with the crash reporter, we set up a deliberately simple server for notifying your users of updates. A more robust example might use a database to store the most recent version along with release notes and more. You could store your application bundles on S3, but going through the process of creating a full-featured web server is outside the scope of this book.
As I mentioned earlier, our server must fulfill a simple contract to play nicely with Electron’s autoUpdater module. If the application matches the latest release, the server should return a response with a 204 status code. If an update is available, the servers should return a JSON object that has a url property with the URL to the new application as its value.
I’ve hosted the server (https://firesale-releases.glitch.me/) and its code (https://glitch.com/edit/#!/firesale-releases) on Glitch, where you can remix it for your own purposes. Glitch also hosts the application, so we can use it in Fire Sale to pull down an update. I encourage you to visit the link to the previous code for the most recent version, but I include an annotated version here as well.
const express = require('express');
const fs = require('fs');
const path = require('path');
const app = express();
app.use(express.static('public'));
const latestRelease = '1.2.0'; 1
app.get("/", (request, response) => {
response.sendFile(__dirname + '/views/index.html');
});
app.get('/releases/:platform', (request, response) => { 2
const { platform } = request.params; 3
const { currentVersion } = request.query; 4
if (currentVersion === latestRelease) { 5
response.status(204); 6
return response.end();
}
if (platform === 'darwin') { 7
return response.json({
url: ...
});
}
if (platform === 'win32') { 8
return response.json({
url: ...
});
}
if (platform === 'linux') { 9
return response.json({
url: ...
});
}
response.status(404).end();
});
const listener = app.listen(process.env.PORT, () => {
console.log('Your app is listening on port ' + listener.address().port);
});
I started by storing a reference to the most recent version of Fire Sale in a variable. Next, I set up a dynamic route. If you recall, Fire Sale requests updates based on the platform on which it’s running. Versions running on macOS, Windows, and Linux request updates from /releases/darwin, /releases/win32, and /releases/linux, respectively. We also check if the version number is included as a query parameter.
If the current version and the latest release match, then we respond with a 204 status code to let the application know that it is currently running the most recent version. If they do not match, we assume that an update is available. We then check which platform the user requested and send them the URL for the appropriate flavor of the latest release of Fire Sale, a shown in figure 15.9.
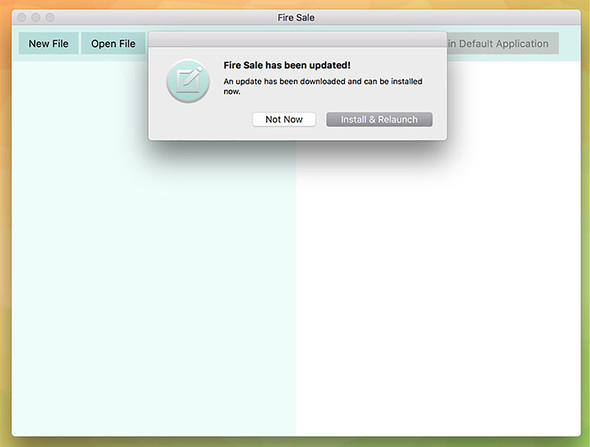
If you’ve used the code I provided for the autoUpdater and pointed it at https://firesale-releases.glitch.me/, then you should be notified about a very important update to Fire Sale.
In the previous chapter, we built two of our projects from earlier in the book. This eliminated the need for our users to install Node.js and use the command line to start one of our applications. In this chapter, we discuss strategies for distributing an application built with Electron.
Distributing your application through the Mac App Store has a few distinct advantages. First, you can easily charge money for your application if you’re interested in going down that road. Second, the Mac App Store handles application updates on your behalf. The disadvantages are that enrolling in Apple’s Developer Program isn’t free and—should you decided to charge for your application—Apple takes a 30% cut of the sale price of your application.
Submitting your application to the Mac App Store takes many steps beyond simply packaging your application—as we did in chapter 14. You must also create security certificates and sign your application to ensure that users are receiving an official version of it. Signing your application is good practice in general, and this chapter is worth reading, even if you do not intend to submit your application to the Mac App Store. The process of signing and uploading your application is primarily performed through native and web-based UIs provided by Apple. As a result, this chapter is highly visual.
Before you can submit an application to the Mac App Store, you must have Xcode installed on your Mac, and you need to sign up for the Apple Developer Program. Xcode, which is available on the Mac App Store, is a large application, so start that download first before enrolling in the developer program. To do this, visit https://developer.apple.com/programs/, and enroll in the program as either an individual or an organization.
Code signing is a technology that allows you to certify that your application is, in fact, created by you and not some imposter. When a user first installs your application, the operating system tracks the certificate you included. Only you can generate this certificate, which means if it changes, the new version of the application could be from a malicious attacker.
We need two certificates: one for the application itself, and one for the installer we upload to the Mac App Store—which we create later in this chapter. To create these certificates, open the Keychain Access application, shown in figure 16.1, located in the /Applications/Utilities directory. This application is included in macOS and should be available even if you haven’t installed Xcode yet.
As you might be able to guess from the name, Keychain Access does more than just generate certificates for signing applications. It is where macOS stores all of your saved passwords and certificates. It also stores all of the passwords for wireless networks that you’ve asked it to remember. If you ever need to look up a password, you can do so using Keychain Access.
With the application open, navigate to the Keychain Access application menu, then select Certificate Assistant, followed by Request a Certification From a Certificate Authority, as shown in figure 16.1. This action triggers a dialog box, shown in figure 16.2, where you can add additional information about the certificate to be generated.
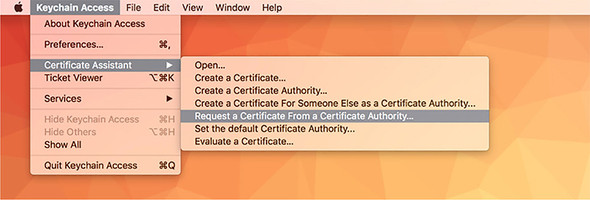
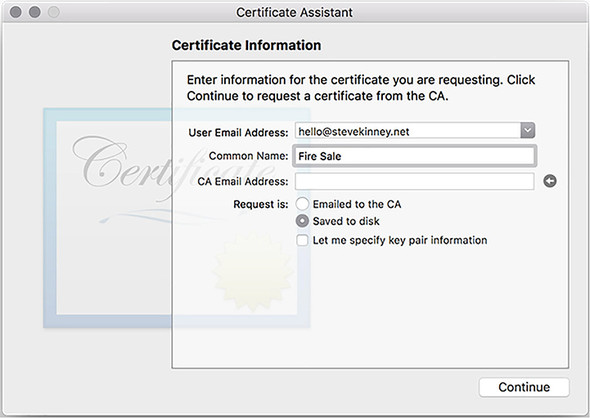
Make sure you select Saved to Disk when creating the certificate. After you click Continue, you are prompted to save a file with the name CertificateSigningRequest.certSigningRequest. Where you choose to save the file is up to you—it doesn’t make a difference as long as you can find it again later.
When you have a certificate, you need to let Apple know about it. Visit the Apple Developer Program Member Center (https://developer.apple.com/account), and select Certificates, IDs, and Profiles from the left-hand sidebar. By default, the page for managing iOS certificates opens. Select macOS as the target platform, as shown in figure 16.3.
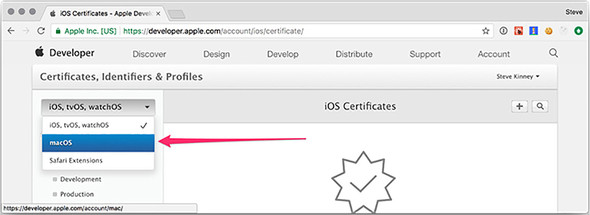
After you switched from iOS to macOS, you see either a list of the certificates that you’ve uploaded in the past or an empty state. Either way, because we’re uploading a new certificate, click the + button in the upper-right corner of the screen, as shown in figure 16.4.
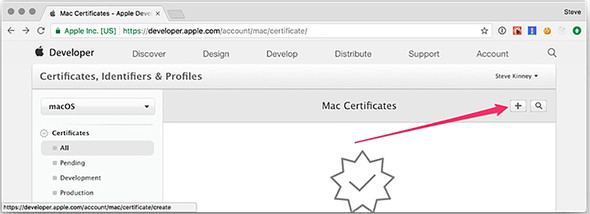
The certificate can be used for a variety of purposes. In addition to signing your application, certificates can be used to sign server-generated push messages, which you may have seen on mobile platforms to inform users that something has happened in an application that is not currently open.
This is outside of the scope of this book and a topic for another day. As you may have guessed, we want to create a production-ready Mac App Store version of Fire Sale and need a Mac App Store certificate to do that. Scroll past the development options along the top, and select Mac App Store, as shown in figure 16.5.
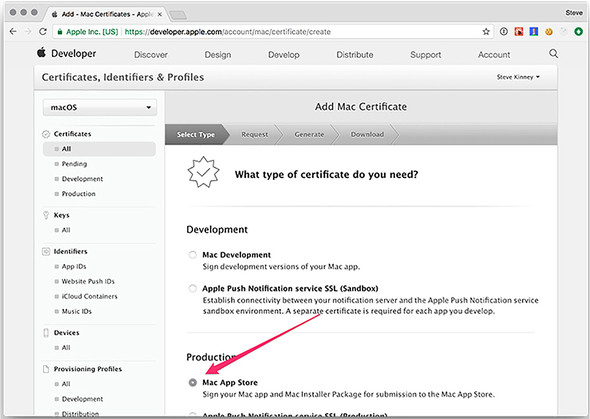
Figures 16.6 through 16.8 show that I am creating a Mac App Distribution certificate. In practice however, you need to go through these steps twice—once with Mac App Distribution selected and once with Mac Installer Distribution selected. The process is exactly the same for both, and you receive two certificates at the end. The only difference is which radio button you choose at the very beginning of the process.
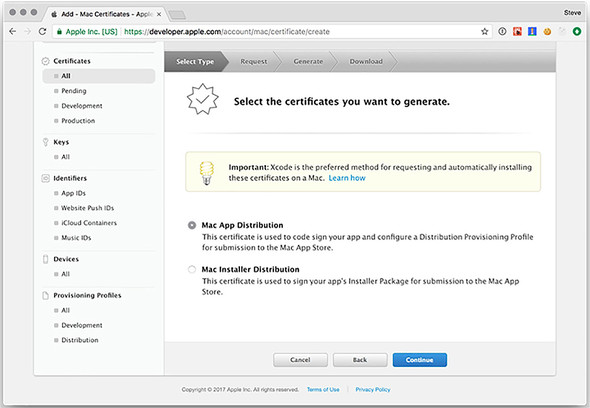
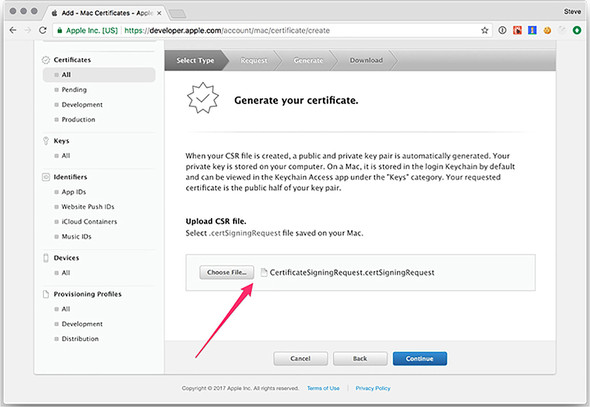
Earlier in the chapter, we created a file with the extension certSigningRequest. We use this file to request certificates from Apple, which are signed by the Apple Worldwide Developer Relations Certification Authority. When you sign an application, you use a key that can be generated only with a private key stored locally on your computer. It’s important that you are careful with this private key. It’s the only way to sign an application that matches the public key, and anyone with access to your private key can sign applications on your behalf.
When prompted, upload the certificate-signing request that you generated in Keychain Access. Apple signs the certificate and prompts you to download it, as shown in figure 16.8. After downloading the certificate, you can double-click it to add to Keychain Access automatically.
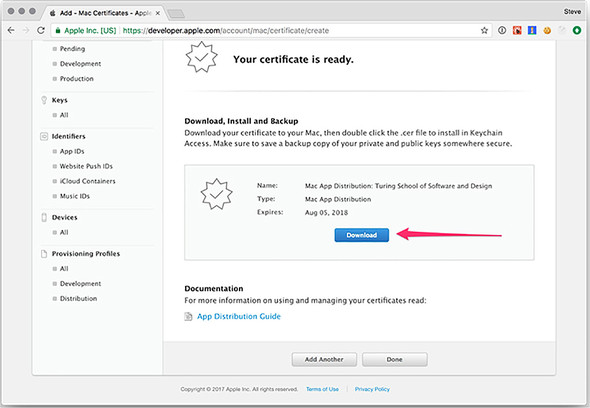
When you complete this process for both Mac App Distribution and Mac Installer Distribution certificates, you should see both certificates inside Keychain Access, as shown in figure 16.9. Congratulations—you’re now ready to sign your application and begin getting it ready for submission to the Mac App Store. In the next section, we begin the process of registering the application with Apple and providing the metadata required to be listed in the App Store.
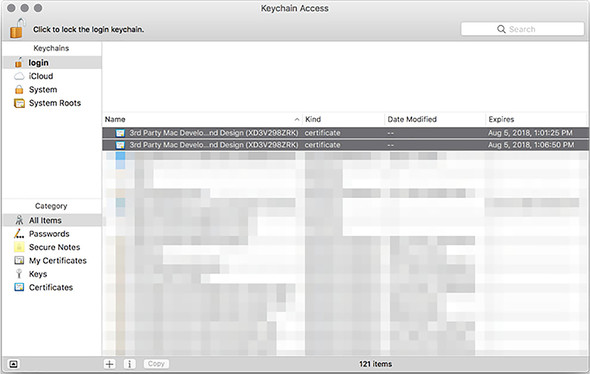
With your certificates in place, you must register the application itself with Apple before you can upload your application binary. Even if you have no intention of distributing an application through the Mac App Store, signing your application and registering it with Apple is a good practice. Unsigned applications trigger those intimidating gatekeeper errors that Apple displays when a user tries to open an unsigned application inside modern versions of macOS. In addition, depending on a user’s settings, they may not be allowed to open unsigned applications at all. Inside the Certificates, Identifiers, and Profiles section, select App ID from the sidebar on the left, as shown in Figure 16.10.
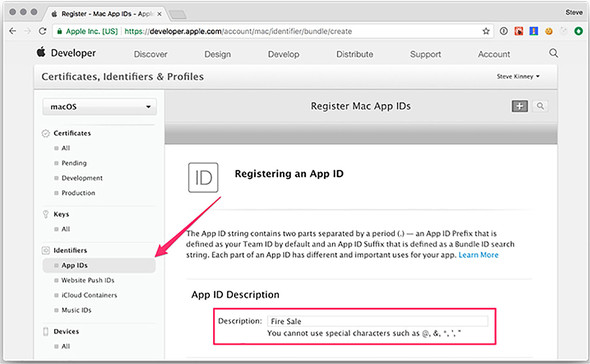
An App ID is a unique identifier for your application. Creating an App ID consists of three steps. The first is to give it an App ID description. This is a colloquial name for the application and is generally what users see as the title of your application when viewing it in the App Store.
The second is a list of services that your application requests access to, such as sending push notifications, displaying maps, or saving or retrieving files from iCloud. Fire Sale does not use any of these, so we’ll stick with the defaults. Third, you create an App ID Suffix, which is the truly unique identifier for your application. It’s a lot like a backward web domain. In this case, I used net.stevekinney.firesale as opposed to firesale.stevekinney.net, which is something you might expect to find on the web.
You’re not out of the woods yet. Your next step is to add the application to iTunes Connect (https://itunesconnect.apple.com/), which represents the application’s listing in the Mac App Store. From here, you can add a description of your application, screenshots, and more. A word of caution: I won’t cover every aspect of uploading screenshots and things along those lines, but I will tell you that Apple takes this seriously and will reject your application if you fail to include all of the necessary information—including a link to a valid webpage where users can find support for your application.
Once inside iTunes Connect, click the My Apps icon in the upper-left corner, shown in figure 16.11. In this section, you see either a list of your existing applications or an empty state if this is your first application. Click the + button in the upper-left side of the window, and select New Mac App, as shown in figure 16.12.
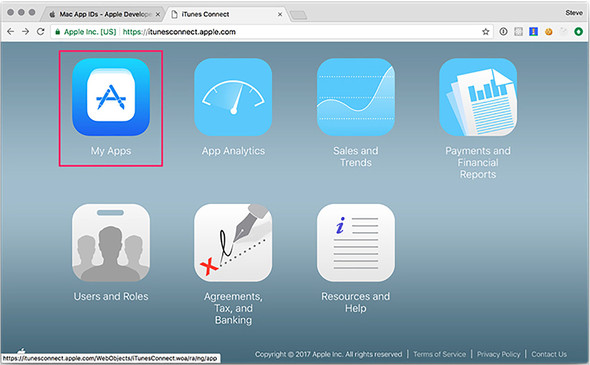
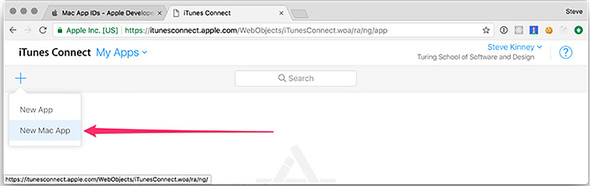
At this stage, as shown in figure 16.13, you are asked for some cursory information about your application: its name, primary language, the App ID description and suffix you created in the previous section, and more. The SKU is optional and is just used to identify application sales for the sake of accounting.
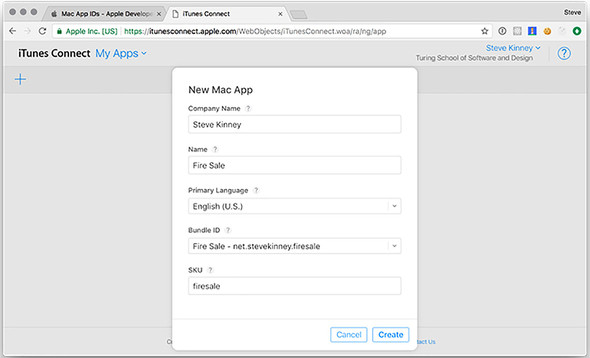
In chapter 14, we performed all of our configuration inline in the package.json file. To package our application for the Mac App Store, we need to sign it as well as provide some other metadata to aid in operating system integration. macOS applications use property list (.plist) files, which resemble XML, to store important metadata such as the name and what permissions the application is requesting from the operating system.
A simple application might be able to get away with a single property list file. But Electron applications aren’t exactly simple applications. If you recall from chapter 1, each process—both the main and renderer processes—are separated out. This mean that we’ll need to set permissions for our child processes, as well as the main application process. In addition, Electron bundles its own frameworks as well as libraries for media playback. These must be signed as well.
To accomplish this, we set up three property list files: info.plist stores the generic metadata for our application, parent.plist stores the sandbox permissions for the parent process, and child.plist stores the sandbox permissions for the child process. In this example, child processes extend the parent’s permissions. These eventually are installed using a build script. As a result, I’ve decided to place each of these in a folder called ./scripts/mas. My naming conventions are not important. If you’d like to store these files somewhere else, that’s fine. The Electron API Demos application stores the property lists in its assets folder. For the purposes of simplicity and clarity, I’ve chosen to keep all of the files in listings 16.1–16.3 in the same folder as the build script that we’ll create together shortly.
<?xml version="1.0" encoding="UTF-8"?>
<!DOCTYPE plist PUBLIC "-//Apple//DTD PLIST 1.0//EN" "http://www.apple.com/DTDs/PropertyList-1.0.dtd">
<plist version="1.0">
<dict>
<key>CFBundleURLTypes</key>
<array>
<dict>
<key>CFBundleURLSchemes</key>
<array>
<string>firesale</string>
</array>
<key>CFBundleURLName</key>
<string>Fire Sale</string> 1
</dict>
</array>
<key>ElectronTeamID</key>
<string>XD3V298ZRK</string> 2
</dict>
</plist>
<?xml version="1.0" encoding="UTF-8"?>
<!DOCTYPE plist PUBLIC "-//Apple//DTD PLIST 1.0//EN" "http://www.apple.com/DTDs/PropertyList-1.0.dtd">
<plist version="1.0">
<dict>
<key>com.apple.security.app-sandbox</key>
<true/> 1
<key>com.apple.security.application-groups</key> 2
<string>XD3V298ZRK.net.stevekinney.firesale</string> 3
<key>com.apple.security.files.user-selected.read-write</key> 4
<true/>
</dict>
</plist>
All applications on the Mac App Store must enable sandboxing, which wraps each application into an isolated container and limits its ability to access the rest of the operating system. Apple does this in the name of security. That said, many applications can’t do their jobs if isolated to a sandbox. Apple understands this and allows applications to clearly state what entitlements they need. We know that Fire Sale uses Open and Save dialog boxes to read and write from the filesystem, so we clearly state that we need that access.
One exception to sandboxing is that applications are allowed to reach into the containers of other applications created by the same developer. We never created tight integrations between Fire Sale and Clipmaster 900 or Jetsetter, but we may down the line. Stating the application group lets macOS know that this application is part of a family—even if it’s a one-person family for now.
<?xml version="1.0" encoding="UTF-8"?>
<!DOCTYPE plist PUBLIC "-//Apple//DTD PLIST 1.0//EN" "http://www.apple.com/DTDs/PropertyList-1.0.dtd">
<plist version="1.0">
<dict>
<key>com.apple.security.app-sandbox</key>
<true/>
<key>com.apple.security.inherit</key> 1
<true/>
</dict>
</plist>
With the three property lists in place, we use electron-packager to build the application. This approach is similar to the technique we used in chapter 14, with some important changes. First, we tell electron-packager that we’re targeting the mas (Mac App Store) platform as opposed to darwin for regular macOS applications. We also script the rather tedious process of code signing all of the processes, frameworks, and libraries used by our application. This script uses the Xcode codesign command-line interface tool. This script is inspired by the approach used by the Electron Core Team to build the Electron API Demos application (https://github.com/electron/electron-api-demos). Make sure you have Xcode installed before running the script in the following listing. You also need to make sure you use the names of the certificates you generated earlier in this chapter.
#!/bin/bash set -ex APP="Fire Sale" electron-packager . \ 1 "$APP" \ --asar \ --overwrite \ --platform=mas \ 2 --app-bundle-id=net.stevekinney.firesale \ --app-version="$npm_package_version" \ --build-version="1.0.0" \ --arch=x64 \ --icon=./icons/Icon.icns \ --out=build \ --extend-info=scripts/mas/info.plist 3 APP_PATH="./build/$APP-mas-x64/$APP.app" 4 RESULT_PATH="./build/$APP.pkg" 5 APP_KEY="3rd Party Mac Developer Application:
We can include additional metadata in our property list that falls squarely under the category of “nice to have.” Apple includes an exhaustive list of all of the options in their official documentation (http://mng.bz/2TDO), so I won’t cover all of them here.
<key>NSHumanReadableCopyright</key> <string>2017 Steve Kinney</string> <key>LSApplicationCategoryType</key> <string> public.app-category.developer-tools</string> <key>LSApplicationSecondaryCategoryType</key> <string public.app-category.productivity</string>
In the previous listing, we include metadata for the Mac App Store categories in which the application should be listed as well as some generic copyright information. You can find a full list of the available categories in Apple’s official documentation (http://mng.bz/65Eg).
Fire Sale is an application that works with Markdown applications. In development, it was not listed as an application that could handle opening Markdown files. In addition, we could not drag a Markdown file onto the application icon in the dock. This limitation is because although we know that Fire Sale was built to work with Markdown files, macOS was not. To add support for a given file type—in this case, Markdown files—we add this code to ./scripts/mas/info.plist. The result is shown in figure 16.14.
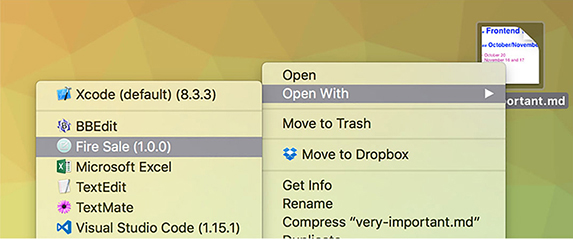
<key>CFBundleDocumentTypes</key> <array> <dict> <key>CFBundleTypeExtensions</key> 1 <array> <string>markdown</string> <string>mdown</string> <string>md</string> </array> <key>CFBundleTypeRole</key> 2 <string>Editor</string> <key>LSHandlerRank</key> 3 <string>Alternate</string> </dict> </array>
The CFBundleDocumentTypes contains an array of items that define the types of files that this application should be able to open. Fire Sale works only with Markdown files (and text files, technically), but an application like Atom, which works with a wide variety of file types, has a much longer list, which can be seen in its open source repository (http://mng.bz/zQ4B).
Each item in the CFBundleDocumentTypes dictionary contains a CFBundleType-Extensions array, which lists the file types that the application should support. In addition, the CFBundleTypeRole key defines the application’s relationship to the file type. Fire Sale edits Markdown files, so it makes sense that we’ve listed it as an editor. The available options are Editor, Viewer, Shell, and none.
Many applications can open a file type like Markdown. The LSHandlerRank attribute lets you decide what level of priority the operating system should provide for your application when the user double-clicks a file. Owner should be selected if the application creates a given file type. This is a good choice for a proprietary file type that can be opened only by a particular application. Default should be selected if the application is a good candidate for being the default application. Fire Sale is a great application, but it’s likely that the user would prefer that—in general—the user would like Atom or Visual Studio Code to open upon double-clicking. This is why I chose Alternate.
You can define a number of other keys as well. For example, you could define the CFBundleTypeIconFile if you want all Markdown files to have a special icon that associates them with Fire Sale. A full list of the available options can be found in Apple’s official documentation (http://mng.bz/4DTL).
Your application has been packaged and signed. Its entitlements have been defined. It is all ready to be uploaded to the Mac App Store. The next step, of course, is to upload the package to the store itself. You can do this using Xcode.
To get started, open Xcode and navigate to the Xcode application menu. Under Open Developer Tool, you find Application Loader, shown in figure 16.15. This is the helper application that uploads your Electron application.
After Application Loader opens, click Deliver Your App. As shown in figure 16.16, you are prompted to select the package that you want to upload—in this case, Fire Sale.pkg, located in ./build.
After you’ve chosen the package to upload, you can review its metadata, as shown in figure 16.17. If everything looks good, click Next to begin the upload process. It shouldn’t take very long, but this is based—of course—on your connection speed and the size of the application package.

Apple wants to ensure the best possible experience for users. As a result, you must provide screenshots, descriptions, a link to a page where users can get help, and more. If you fail to do any of these, Apple will more than likely reject the application and ask you again to provide this information. I’m not going to go in depth in this book about adding screenshots, a home page, and documentation because it is both relatively straightforward as well as likely to change by the time the—possibly digital—ink dries on this page.
Fire Sale is an only slightly clever play on price markdowns—because it’s a Markdown editor after all. Clipmaster 9000 is a simple UI for the Clipmaster application.
const { app, BrowserWindow, dialog } = require('electron');
const fs = require('fs');
const windows = new Set();
const openFiles = new Map();
app.on('ready', () => {
createWindow();
});
app.on('window-all-closed', () => {
if (process.platform === 'darwin') {
return false;
}
});
app.on('activate', (event, hasVisibleWindows) => {
if (!hasVisibleWindows) { createWindow(); }
});
const createWindow = exports.createWindow = () => {
let x, y;
const currentWindow = BrowserWindow.getFocusedWindow();
if (currentWindow) {
const [ currentWindowX, currentWindowY ] = currentWindow.getPosition();
x = currentWindowX + 10;
y = currentWindowY + 10;
}
let newWindow = new BrowserWindow({ x, y, show: false });
newWindow.loadURL(`file://${__dirname}/index.html`);
newWindow.once('ready-to-show', () => {
newWindow.show();
});
newWindow.on('close', (event) => {
if (newWindow.isDocumentEdited()) {
event.preventDefault();
const result = dialog.showMessageBox(newWindow, {
type: 'warning',
title: 'Quit with Unsaved Changes?',
message: 'Your changes will be lost permanently if you do not save.',
buttons: [
'Quit Anyway',
'Cancel',
],
cancelId: 1,
defaultId: 0
});
if (result === 0) newWindow.destroy();
}
});
newWindow.on('closed', () => {
windows.delete(newWindow);
stopWatchingFile(newWindow);
newWindow = null;
});
windows.add(newWindow);
return newWindow;
};
const getFileFromUser = exports.getFileFromUser = (targetWindow) => {
const files = dialog.showOpenDialog(targetWindow, {
properties: ['openFile'],
filters: [
{ name: 'Text Files', extensions: ['txt'] },
{ name: 'Markdown Files', extensions: ['md', 'markdown'] }
]
});
if (files) { openFile(targetWindow, files[0]); }
};
const openFile = exports.openFile = (targetWindow, file) => {
const content = fs.readFileSync(file).toString();
app.addRecentDocument(file);
targetWindow.setRepresentedFilename(file);
targetWindow.webContents.send('file-opened', file, content);
startWatchingFile(targetWindow, file);
};
const saveMarkdown = exports.saveMarkdown = (targetWindow, file, content) =>
{
if (!file) {
file = dialog.showSaveDialog(targetWindow, {
title: 'Save Markdown',
defaultPath: app.getPath('documents'),
filters: [
{ name: 'Markdown Files', extensions: ['md', 'markdown'] }
]
});
}
if (!file) return;
fs.writeFileSync(file, content);
openFile(targetWindow, file);
};
const saveHtml = exports.saveHtml = (targetWindow, content) => {
const file = dialog.showSaveDialog(targetWindow, {
title: 'Save HTML',
defaultPath: app.getPath('documents'),
filters: [
{ name: 'HTML Files', extensions: ['html', 'htm'] }
]
});
if (!file) return;
fs.writeFileSync(file, content);
};
const startWatchingFile = (targetWindow, file) => {
stopWatchingFile(targetWindow);
const watcher = fs.watchFile(file, () => {
const content = fs.readFileSync(file);
targetWindow.webContents.send('file-changed', file, content);
});
openFiles.set(targetWindow, watcher);
};
const stopWatchingFile = (targetWindow) => {
if (openFiles.has(targetWindow)) {
openFiles.get(targetWindow).stop();
openFiles.delete(targetWindow);
}
};
const { remote, ipcRenderer } = require('electron');
const path = require('path');
const mainProcess = remote.require('./main.js');
const currentWindow = remote.getCurrentWindow();
const marked = require('marked');
const markdownView = document.querySelector('#markdown');
const htmlView = document.querySelector('#html');
const newFileButton = document.querySelector('#new-file');
const openFileButton = document.querySelector('#open-file');
const saveMarkdownButton = document.querySelector('#save-markdown');
const revertButton = document.querySelector('#revert');
const saveHtmlButton = document.querySelector('#save-html');
const showFileButton = document.querySelector('#show-file');
const openInDefaultButton = document.querySelector('#open-in-default');
let filePath = null;
let originalContent = '';
const isDifferentContent = (content) => content !== markdownView.value;
const renderMarkdownToHtml = (markdown) => {
htmlView.innerHTML = marked(markdown, { sanitize: true });
};
const renderFile = (file, content) => {
filePath = file;
originalContent = content;
markdownView.value = content;
renderMarkdownToHtml(content);
updateUserInterface(false);
};
const updateUserInterface = (isEdited) => {
let title = 'Fire Sale';
if (filePath) { title = `${path.basename(filePath)} - ${title}`; }
if (isEdited) { title = `${title} (Edited)`; }
currentWindow.setTitle(title);
currentWindow.setDocumentEdited(isEdited);
saveMarkdownButton.disabled = !isEdited;
revertButton.disabled = !isEdited;
};
markdownView.addEventListener('keyup', (event) => {
const currentContent = event.target.value;
renderMarkdownToHtml(currentContent);
updateUserInterface(currentContent !== originalContent);
});
newFileButton.addEventListener('click', () => {
mainProcess.createWindow();
});
openFileButton.addEventListener('click', () => {
mainProcess.getFileFromUser(currentWindow);
});
saveMarkdownButton.addEventListener('click', () => {
mainProcess.saveMarkdown(currentWindow, filePath, markdownView.value);
});
revertButton.addEventListener('click', () => {
markdownView.value = originalContent;
renderMarkdownToHtml(originalContent);
});
saveHtmlButton.addEventListener('click', () => {
mainProcess.saveHtml(currentWindow, htmlView.innerHTML);
});
ipcRenderer.on('file-opened', (event, file, content) => {
if (currentWindow.isDocumentEdited() && isDifferentContent(content)) {
const result = remote.dialog.showMessageBox(currentWindow, {
type: 'warning',
title: 'Overwrite Current Unsaved Changes?',
message: 'Opening a new file in this window will overwrite your unsaved
changes. Open this file anyway?',
buttons: [
'Yes',
'Cancel',
],
defaultId: 0,
cancelId: 1,
});
if (result === 1) { return; }
}
renderFile(file, content);
});
ipcRenderer.on('file-changed', (event, file, content) => {
if (isDifferentContent(content)) return;
const result = remote.dialog.showMessageBox(currentWindow, {
type: 'warning',
title: 'Overwrite Current Unsaved Changes?',
message: 'Another application has changed this file. Load changes?',
buttons: [
'Yes',
'Cancel',
],
defaultId: 0,
cancelId: 1
});
renderFile(file, content);
});
/* Implement Drag and Drop */
document.addEventListener('dragstart', event => event.preventDefault());
document.addEventListener('dragover', event => event.preventDefault());
document.addEventListener('dragleave', event => event.preventDefault());
document.addEventListener('drop', event => event.preventDefault());
const getDraggedFile = (event) => event.dataTransfer.items[0];
const getDroppedFile = (event) => event.dataTransfer.files[0];
const fileTypeIsSupported = (file) => {
return ['text/plain', 'text/markdown'].includes(file.type);
};
markdownView.addEventListener('dragover', (event) => {
const file = getDraggedFile(event);
if (fileTypeIsSupported(file)) {
markdownView.classList.add('drag-over');
} else {
markdownView.classList.add('drag-error');
}
});
markdownView.addEventListener('dragleave', () => {
markdownView.classList.remove('drag-over');
markdownView.classList.remove('drag-error');
});
markdownView.addEventListener('drop', (event) => {
const file = getDroppedFile(event);
if (fileTypeIsSupported(file)) {
mainProcess.openFile(currentWindow, file.path);
} else {
alert('That file type is not supported');
}
markdownView.classList.remove('drag-over');
markdownView.classList.remove('drag-error');
});
const { app, dialog, Menu } = require('electron');
const mainProcess = require('./main');
const template = [
{
label: 'File',
submenu: [
{
label: 'New File',
accelerator: 'CommandOrControl+N',
click() {
mainProcess.createWindow();
}
},
{
label: 'Open File',
accelerator: 'CommandOrControl+O',
click(item, focusedWindow) {
if (focusedWindow) {
return mainProcess.getFileFromUser(focusedWindow);
}
const newWindow = mainProcess.createWindow();
newWindow.on('show', () => {
mainProcess.getFileFromUser(newWindow);
});
},
},
{
label: 'Save File',
accelerator: 'CommandOrControl+S',
click(item, focusedWindow) {
if (!focusedWindow) {
return dialog.showErrorBox(
'Cannot Save or Export',
'There is currently no active document to save or export.'
);
}
mainProcess.saveMarkdown(focusedWindow);
},
},
{
label: 'Export HTML',
accelerator: 'Shift+CommandOrControl+S',
click(item, focusedWindow) {
if (!focusedWindow) {
return dialog.showErrorBox(
'Cannot Save or Export',
'There is currently no active document to save or export.'
);
}
mainProcess.saveHtml(focusedWindow);
},
},
],
},
{
label: 'Edit',
submenu: [
{
label: 'Undo',
accelerator: 'CommandOrControl+Z',
role: 'undo',
},
{
label: 'Redo',
accelerator: 'Shift+CommandOrControl+Z',
role: 'redo',
},
{ type: 'separator' },
{
label: 'Cut',
accelerator: 'CommandOrControl+X',
role: 'cut',
},
{
label: 'Copy',
accelerator: 'CommandOrControl+C',
role: 'copy',
},
{
label: 'Paste',
accelerator: 'CommandOrControl+V',
role: 'paste',
},
{
label: 'Select All',
accelerator: 'CommandOrControl+A',
role: 'selectall',
},
],
},
{
label: 'Window',
submenu: [
{
label: 'Minimize',
accelerator: 'CommandOrControl+M',
role: 'minimize',
},
{
label: 'Close',
accelerator: 'CommandOrControl+W',
role: 'close',
},
],
},
{
label: 'Help',
role: 'help',
submenu: [
{
label: 'Visit Website',
click() { /* To be implemented */ }
},
{
label: 'Toggle Developer Tools',
click(item, focusedWindow) {
if (focusedWindow) focusedWindow.webContents.toggleDevTools();
}
}
],
}
];
if (process.platform === 'darwin') {
const name = 'Fire Sale';
template.unshift({
label: name,
submenu: [
{
label: `About ${name}`,
role: 'about',
},
{ type: 'separator' },
{
label: 'Services',
role: 'services',
submenu: [],
},
{ type: 'separator' },
{
label: `Hide ${name}`,
accelerator: 'Command+H',
role: 'hide',
},
{
label: 'Hide Others',
accelerator: 'Command+Alt+H',
role: 'hideothers',
},
{
label: 'Show All',
role: 'unhide',
},
{ type: 'separator' },
{
label: `Quit ${name}`,
accelerator: 'Command+Q',
click() { app.quit(); },
},
],
});
const windowMenu = template.find(item => item.label === 'Window');
windowMenu.submenu.push(
{ type: 'separator' },
{
label: 'Bring All to Front',
role: 'front',
}
);
}
module.exports = Menu.buildFromTemplate(template);
const { remote, ipcRenderer } = require('electron');
const { Menu } = remote;
const path = require('path');
const mainProcess = remote.require('./main.js');
const currentWindow = remote.getCurrentWindow();
const marked = require('marked');
const markdownView = document.querySelector('#markdown');
const htmlView = document.querySelector('#html');
const newFileButton = document.querySelector('#new-file');
const openFileButton = document.querySelector('#open-file');
const saveMarkdownButton = document.querySelector('#save-markdown');
const revertButton = document.querySelector('#revert');
const saveHtmlButton = document.querySelector('#save-html');
const showFileButton = document.querySelector('#show-file');
const openInDefaultButton = document.querySelector('#open-in-default');
let filePath = null;
let originalContent = '';
const isDifferentContent = (content) => content !== markdownView.value;
const renderMarkdownToHtml = (markdown) => {
htmlView.innerHTML = marked(markdown, { sanitize: true });
};
const renderFile = (file, content) => {
filePath = file;
originalContent = content;
markdownView.value = content;
renderMarkdownToHtml(content);
updateUserInterface(false);
};
const updateUserInterface = (isEdited) => {
let title = 'Fire Sale';
if (filePath) { title = `${path.basename(filePath)} - ${title}`; }
if (isEdited) { title = `${title} (Edited)`; }
currentWindow.setTitle(title);
currentWindow.setDocumentEdited(isEdited);
saveMarkdownButton.disabled = !isEdited;
revertButton.disabled = !isEdited;
};
markdownView.addEventListener('keyup', (event) => {
const currentContent = event.target.value;
renderMarkdownToHtml(currentContent);
updateUserInterface(currentContent !== originalContent);
});
newFileButton.addEventListener('click', () => {
mainProcess.createWindow();
});
openFileButton.addEventListener('click', () => {
mainProcess.getFileFromUser(currentWindow);
});
saveMarkdownButton.addEventListener('click', () => {
mainProcess.saveMarkdown(currentWindow, filePath, markdownView.value);
});
revertButton.addEventListener('click', () => {
markdownView.value = originalContent;
renderMarkdownToHtml(originalContent);
});
saveHtmlButton.addEventListener('click', () => {
mainProcess.saveHtml(currentWindow, htmlView.innerHTML);
});
ipcRenderer.on('file-opened', (event, file, content) => {
if (currentWindow.isDocumentEdited() && isDifferentContent(content)) {
const result = remote.dialog.showMessageBox(currentWindow, {
type: 'warning',
title: 'Overwrite Current Unsaved Changes?',
message: 'Opening a new file in this window will overwrite your unsaved changes. Open this file anyway?',
buttons: [
'Yes',
'Cancel',
],
defaultId: 0,
cancelId: 1,
});
if (result === 1) { return; }
}
renderFile(file, content);
});
ipcRenderer.on('file-changed', (event, file, content) => {
if (isDifferentContent(content)) return;
const result = remote.dialog.showMessageBox(currentWindow, {
type: 'warning',
title: 'Overwrite Current Unsaved Changes?',
message: 'Another application has changed this file. Load changes?',
buttons: [
'Yes',
'Cancel',
],
defaultId: 0,
cancelId: 1
});
renderFile(file, content);
});
/* Implement Drag and Drop */
document.addEventListener('dragstart', event => event.preventDefault());
document.addEventListener('dragover', event => event.preventDefault());
document.addEventListener('dragleave', event => event.preventDefault());
document.addEventListener('drop', event => event.preventDefault());
const getDraggedFile = (event) => event.dataTransfer.items[0];
const getDroppedFile = (event) => event.dataTransfer.files[0];
const fileTypeIsSupported = (file) => {
return ['text/plain', 'text/markdown'].includes(file.type);
};
markdownView.addEventListener('dragover', (event) => {
const file = getDraggedFile(event);
if (fileTypeIsSupported(file)) {
markdownView.classList.add('drag-over');
} else {
markdownView.classList.add('drag-error');
}
});
markdownView.addEventListener('dragleave', () => {
markdownView.classList.remove('drag-over');
markdownView.classList.remove('drag-error');
});
markdownView.addEventListener('drop', (event) => {
const file = getDroppedFile(event);
if (fileTypeIsSupported(file)) {
mainProcess.openFile(currentWindow, file.path);
} else {
alert('That file type is not supported');
}
markdownView.classList.remove('drag-over');
markdownView.classList.remove('drag-error');
});
ipcRenderer.on('save-markdown', () => {
mainProcess.saveMarkdown(currentWindow, filePath, markdownView.value);
});
ipcRenderer.on('save-html', () => {
mainProcess.saveHtml(currentWindow, htmlView.innerHTML);
});
const markdownContextMenu = Menu.buildFromTemplate([
{ label: 'Open File', click() { mainProcess.getFileFromUser(); } },
{ type: 'separator' },
{ label: 'Cut', role: 'cut' },
{ label: 'Copy', role: 'copy' },
{ label: 'Paste', role: 'paste' },
{ label: 'Select All', role: 'selectall' },
]);
markdownView.addEventListener('contextmenu', (event) => {
event.preventDefault();
markdownContextMenu.popup();
});
const { remote, ipcRenderer, shell } = require('electron');
const { Menu } = remote;
const path = require('path');
const mainProcess = remote.require('./main.js');
const currentWindow = remote.getCurrentWindow();
const marked = require('marked');
const markdownView = document.querySelector('#markdown');
const htmlView = document.querySelector('#html');
const newFileButton = document.querySelector('#new-file');
const openFileButton = document.querySelector('#open-file');
const saveMarkdownButton = document.querySelector('#save-markdown');
const revertButton = document.querySelector('#revert');
const saveHtmlButton = document.querySelector('#save-html');
const showFileButton = document.querySelector('#show-file');
const openInDefaultButton = document.querySelector('#open-in-default');
let filePath = null;
let originalContent = '';
const isDifferentContent = (content) => content !== markdownView.value;
const renderMarkdownToHtml = (markdown) => {
htmlView.innerHTML = marked(markdown, { sanitize: true });
};
const renderFile = (file, content) => {
filePath = file;
originalContent = content;
markdownView.value = content;
renderMarkdownToHtml(content);
showFileButton.disabled = false;
openInDefaultButton.disabled = false;
updateUserInterface(false);
};
const updateUserInterface = (isEdited) => {
let title = 'Fire Sale';
if (filePath) { title = `${path.basename(filePath)} - ${title}`; }
if (isEdited) { title = `${title} (Edited)`; }
currentWindow.setTitle(title);
currentWindow.setDocumentEdited(isEdited);
saveMarkdownButton.disabled = !isEdited;
revertButton.disabled = !isEdited;
};
markdownView.addEventListener('keyup', (event) => {
const currentContent = event.target.value;
renderMarkdownToHtml(currentContent);
updateUserInterface(currentContent !== originalContent);
});
newFileButton.addEventListener('click', () => {
mainProcess.createWindow();
});
openFileButton.addEventListener('click', () => {
mainProcess.getFileFromUser(currentWindow);
});
saveMarkdownButton.addEventListener('click', () => {
mainProcess.saveMarkdown(currentWindow, filePath, markdownView.value);
});
revertButton.addEventListener('click', () => {
markdownView.value = originalContent;
renderMarkdownToHtml(originalContent);
});
saveHtmlButton.addEventListener('click', () => {
mainProcess.saveHtml(currentWindow, htmlView.innerHTML);
});
const showFile = () => {
if (!filePath) { return alert('This file has not been saved to the file
system.'); }
shell.showItemInFolder(filePath);
};
const openInDefaultApplication = () => {
if (!filePath) { return alert('This file has not been saved to the file
system.'); }
shell.openItem(filePath);
};
showFileButton.addEventListener('click', showFile);
openInDefaultButton.addEventListener('click', openInDefaultApplication);
ipcRenderer.on('show-file', showFile);
ipcRenderer.on('open-in-default', openInDefaultApplication);
ipcRenderer.on('file-opened', (event, file, content) => {
if (currentWindow.isDocumentEdited() && isDifferentContent(content)) {
const result = remote.dialog.showMessageBox(currentWindow, {
type: 'warning',
title: 'Overwrite Current Unsaved Changes?',
message: 'Opening a new file in this window will overwrite your unsaved
changes. Open this file anyway?',
buttons: [
'Yes',
'Cancel',
],
defaultId: 0,
cancelId: 1,
});
if (result === 1) { return; }
}
renderFile(file, content);
});
ipcRenderer.on('file-changed', (event, file, content) => {
if (isDifferentContent(content)) return;
const result = remote.dialog.showMessageBox(currentWindow, {
type: 'warning',
title: 'Overwrite Current Unsaved Changes?',
message: 'Another application has changed this file. Load changes?',
buttons: [
'Yes',
'Cancel',
],
defaultId: 0,
cancelId: 1
});
renderFile(file, content);
});
/* Implement Drag and Drop */
document.addEventListener('dragstart', event => event.preventDefault());
document.addEventListener('dragover', event => event.preventDefault());
document.addEventListener('dragleave', event => event.preventDefault());
document.addEventListener('drop', event => event.preventDefault());
const getDraggedFile = (event) => event.dataTransfer.items[0];
const getDroppedFile = (event) => event.dataTransfer.files[0];
const fileTypeIsSupported = (file) => {
return ['text/plain', 'text/markdown'].includes(file.type);
};
markdownView.addEventListener('dragover', (event) => {
const file = getDraggedFile(event);
if (fileTypeIsSupported(file)) {
markdownView.classList.add('drag-over');
} else {
markdownView.classList.add('drag-error');
}
});
markdownView.addEventListener('dragleave', () => {
markdownView.classList.remove('drag-over');
markdownView.classList.remove('drag-error');
});
markdownView.addEventListener('drop', (event) => {
const file = getDroppedFile(event);
if (fileTypeIsSupported(file)) {
mainProcess.openFile(currentWindow, file.path);
} else {
alert('That file type is not supported');
}
markdownView.classList.remove('drag-over');
markdownView.classList.remove('drag-error');
});
const createContextMenu = () => {
return Menu.buildFromTemplate([
{ label: 'Open File', click() { mainProcess.getFileFromUser(); } },
{
label: 'Show File in Folder',
click: showFile,
enabled: !!filePath
},
{
label: 'Open in Default',
click: openInDefaultApplication,
enabled: !!filePath
},
{ type: 'separator' },
{ label: 'Cut', role: 'cut' },
{ label: 'Copy', role: 'copy' },
{ label: 'Paste', role: 'paste' },
{ label: 'Select All', role: 'selectall' },
]);
};
markdownView.addEventListener('contextmenu', (event) => {
event.preventDefault();
createContextMenu().popup();
});
ipcRenderer.on('save-markdown', () => {
mainProcess.saveMarkdown(currentWindow, filePath, markdownView.value);
});
ipcRenderer.on('save-html', () => {
mainProcess.saveHtml(currentWindow, filePath, markdownView.value);
});
const { app, BrowserWindow, dialog, Menu, shell } = require('electron');
const mainProcess = require('./main');
const createApplicationMenu = () => {
const hasOneOrMoreWindows = !!BrowserWindow.getAllWindows().length;
const focusedWindow = BrowserWindow.getFocusedWindow();
const hasFilePath = !!(focusedWindow &&
focusedWindow.getRepresentedFilename());
const template = [
{
label: 'File',
submenu: [
{
label: 'New File',
accelerator: 'CommandOrControl+N',
click() {
mainProcess.createWindow();
}
},
{
label: 'Open File',
accelerator: 'CommandOrControl+O',
click(item, focusedWindow) {
if (focusedWindow) {
return mainProcess.getFileFromUser(focusedWindow);
}
const newWindow = mainProcess.createWindow();
newWindow.on('show', () => {
mainProcess.getFileFromUser(newWindow);
});
},
},
{
label: 'Save File',
accelerator: 'CommandOrControl+S',
enabled: hasOneOrMoreWindows,
click(item, focusedWindow) {
if (!focusedWindow) {
return dialog.showErrorBox(
'Cannot Save or Export',
'There is currently no active document to save or export.'
);
}
mainProcess.saveMarkdown(focusedWindow);
},
},
{
label: 'Export HTML',
accelerator: 'Shift+CommandOrControl+S',
enabled: hasOneOrMoreWindows,
click(item, focusedWindow) {
if (!focusedWindow) {
return dialog.showErrorBox(
'Cannot Save or Export',
'There is currently no active document to save or export.'
);
}
mainProcess.saveHtml(focusedWindow);
},
},
{ type: 'separator' },
{
label: 'Show File',
enabled: hasFilePath,
click(item, focusedWindow) {
if (!focusedWindow) {
return dialog.showErrorBox(
'Cannot Show File\'s Location',
'There is currently no active document show.'
);
}
focusedWindow.webContents.send('show-file');
},
},
{
label: 'Open in Default Application',
enabled: hasFilePath,
click(item, focusedWindow) {
if (!focusedWindow) {
return dialog.showErrorBox(
'Cannot Open File in Default Application',
'There is currently no active document to open.'
);
}
focusedWindow.webContents.send('open-in-default');
},
},
],
},
{
label: 'Edit',
submenu: [
{
label: 'Undo',
accelerator: 'CommandOrControl+Z',
role: 'undo',
},
{
label: 'Redo',
accelerator: 'Shift+CommandOrControl+Z',
role: 'redo',
},
{ type: 'separator' },
{
label: 'Cut',
accelerator: 'CommandOrControl+X',
role: 'cut',
},
{
label: 'Copy',
accelerator: 'CommandOrControl+C',
role: 'copy',
},
{
label: 'Paste',
accelerator: 'CommandOrControl+V',
role: 'paste',
},
{
label: 'Select All',
accelerator: 'CommandOrControl+A',
role: 'selectall',
},
],
},
{
label: 'Window',
submenu: [
{
label: 'Minimize',
accelerator: 'CommandOrControl+M',
role: 'minimize',
},
{
label: 'Close',
accelerator: 'CommandOrControl+W',
role: 'close',
},
],
},
{
label: 'Help',
role: 'help',
submenu: [
{
label: 'Visit Website',
click() { /* To be implemented */ }
},
{
label: 'Toggle Developer Tools',
click(item, focusedWindow) {
if (focusedWindow) focusedWindow.webContents.toggleDevTools();
}
}
],
}
];
if (process.platform === 'darwin') {
const name = 'Fire Sale';
template.unshift({
label: name,
submenu: [
{
label: `About ${name}`,
role: 'about',
},
{ type: 'separator' },
{
label: 'Services',
role: 'services',
submenu: [],
},
{ type: 'separator' },
{
label: `Hide ${name}`,
accelerator: 'Command+H',
role: 'hide',
},
{
label: 'Hide Others',
accelerator: 'Command+Alt+H',
role: 'hideothers',
},
{
label: 'Show All',
role: 'unhide',
},
{ type: 'separator' },
{
label: `Quit ${name}`,
accelerator: 'Command+Q',
click() { app.quit(); },
},
],
});
const windowMenu = template.find(item => item.label === 'Window');
windowMenu.submenu.push(
{ type: 'separator' },
{
label: 'Bring All to Front',
role: 'front',
}
);
}
return Menu.setApplicationMenu(Menu.buildFromTemplate(template));
};
module.exports = createApplicationMenu;
const { app, BrowserWindow, dialog, Menu } = require('electron');
const createApplicationMenu = require('./application-menu');
const fs = require('fs');
const windows = new Set();
const openFiles = new Map();
app.on('ready', () => {
createApplicationMenu();
createWindow();
});
app.on('window-all-closed', () => {
if (process.platform === 'darwin') {
return false;
}
});
app.on('activate', (event, hasVisibleWindows) => {
if (!hasVisibleWindows) { createWindow(); }
});
const createWindow = exports.createWindow = () => {
let x, y;
const currentWindow = BrowserWindow.getFocusedWindow();
if (currentWindow) {
const [ currentWindowX, currentWindowY ] = currentWindow.getPosition();
x = currentWindowX + 10;
y = currentWindowY + 10;
}
let newWindow = new BrowserWindow({ x, y, show: false });
newWindow.loadURL(`file://${__dirname}/index.html`);
newWindow.once('ready-to-show', () => {
newWindow.show();
});
newWindow.on('focus', createApplicationMenu);
newWindow.on('close', (event) => {
if (newWindow.isDocumentEdited()) {
event.preventDefault();
const result = dialog.showMessageBox(newWindow, {
type: 'warning',
title: 'Quit with Unsaved Changes?',
message: 'Your changes will be lost permanently if you do not save.',
buttons: [
'Quit Anyway',
'Cancel',
],
cancelId: 1,
defaultId: 0
});
if (result === 0) newWindow.destroy();
}
});
newWindow.on('closed', () => {
windows.delete(newWindow);
createApplicationMenu();
newWindow = null;
});
windows.add(newWindow);
return newWindow;
};
const getFileFromUser = exports.getFileFromUser = (targetWindow) => {
const files = dialog.showOpenDialog(targetWindow, {
properties: ['openFile'],
filters: [
{ name: 'Text Files', extensions: ['txt'] },
{ name: 'Markdown Files', extensions: ['md', 'markdown'] }
]
});
if (files) { openFile(targetWindow, files[0]); }
};
const openFile = exports.openFile = (targetWindow, file) => {
const content = fs.readFileSync(file).toString();
startWatchingFile(targetWindow, file);
app.addRecentDocument(file);
targetWindow.setRepresentedFilename(file);
targetWindow.webContents.send('file-opened', file, content);
createApplicationMenu();
};
const saveMarkdown = exports.saveMarkdown = (targetWindow, file, content) =>
{
if (!file) {
file = dialog.showSaveDialog(targetWindow, {
title: 'Save Markdown',
defaultPath: app.getPath('documents'),
filters: [
{ name: 'Markdown Files', extensions: ['md', 'markdown'] }
]
});
}
if (!file) return;
fs.writeFileSync(file, content);
openFile(targetWindow, file);
};
const saveHtml = exports.saveHtml = (targetWindow, content) => {
const file = dialog.showSaveDialog(targetWindow, {
title: 'Save HTML',
defaultPath: app.getPath('documents'),
filters: [
{ name: 'HTML Files', extensions: ['html', 'htm'] }
]
});
if (!file) return;
fs.writeFileSync(file, content);
};
const startWatchingFile = (targetWindow, file) => {
stopWatchingFile(targetWindow);
const watcher = fs.watchFile(file, () => {
const content = fs.readFileSync(file);
targetWindow.webContents.send('file-changed', file, content);
});
openFiles.set(targetWindow, watcher);
};
const stopWatchingFile = (targetWindow) => {
if (openFiles.has(targetWindow)) {
openFiles.get(targetWindow).stop();
openFiles.delete(targetWindow);
}
};
const Menubar = require('menubar');
const { globalShortcut, Menu } = require('electron');
const menubar = Menubar({
preloadWindow: true,
index: `file://${__dirname}/index.html`,
});
menubar.on('ready', () => {
const secondaryMenu = Menu.buildFromTemplate([
{
label: 'Quit',
click() { menubar.app.quit(); },
accelerator: 'CommandOrControl+Q'
},
]);
menubar.tray.on('right-click', () => {
menubar.tray.popUpContextMenu(secondaryMenu);
});
const createClipping = globalShortcut.register('CommandOrControl+!', () =>
{
menubar.window.webContents.send('create-new-clipping');
});
const writeClipping = globalShortcut.register('CmdOrCtrl+Alt+@', () => {
menubar.window.webContents.send('write-to-clipboard');
});
const publishClipping = globalShortcut.register('CmdOrCtrl+Alt+#', () => {
menubar.window.webContents.send('publish-clipping');
});
if (!createClipping) { console.error('Registration failed',
'createClipping'); }
if (!writeClipping) { console.error('Registration failed',
'writeClipping'); }
if (!publishClipping) { console.error('Registration failed',
'publishClipping'); }
});
const { clipboard, ipcRenderer, shell } = require('electron');
const request = require('request').defaults({
url: 'https://cliphub.glitch.me/clippings',
headers: { 'User-Agent': 'Clipmaster 9000' },
json: true,
});
const clippingsList = document.getElementById('clippings-list');
const copyFromClipboardButton = document.getElementById('copy-from-clipboard');
ipcRenderer.on('create-new-clipping', () => {
addClippingToList();
new Notification('Clipping Added', {
body: `${clipboard.readText()}`
});
});
ipcRenderer.on('write-to-clipboard', () => {
const clipping = clippingsList.firstChild;
writeToClipboard(getClippingText(clipping));
new Notification('Clipping Copied', {
body: `${clipboard.readText()}`
});
});
ipcRenderer.on('publish-clipping', () => {
const clipping = clippingsList.firstChild;
publishClipping(getClippingText(clipping));
});
const createClippingElement = (clippingText) => {
const clippingElement = document.createElement('article');
clippingElement.classList.add('clippings-list-item');
clippingElement.innerHTML = `
<div class="clipping-text" disabled="true"></div>
<div class="clipping-controls">
<button class="copy-clipping">→ Clipboard</button>
<button class="publish-clipping">Publish</button>
<button class="remove-clipping">Remove</button>
</div>
`;
clippingElement.querySelector('.clipping-text').innerText = clippingText;
return clippingElement;
};
const addClippingToList = () => {
const clippingText = clipboard.readText();
const clippingElement = createClippingElement(clippingText);
clippingsList.prepend(clippingElement);
};
copyFromClipboardButton.addEventListener('click', addClippingToList);
clippingsList.addEventListener('click', (event) => {
const hasClass = className => event.target.classList.contains(className);
const clippingListItem = getButtonParent(event);
if (hasClass('remove-clipping')) removeClipping(clippingListItem);
if (hasClass('copy-clipping'))
writeToClipboard(getClippingText(clippingListItem));
if (hasClass('publish-clipping'))
publishClipping(getClippingText(clippingListItem));
});
const removeClipping = (target) => {
target.remove();
};
const writeToClipboard = (clippingText) => {
clipboard.writeText(clippingText);
};
const publishClipping = (clippingText) => {
request.post({ json: { clipping: clippingText } }, (err, response, body) =>
{
if (err) {
return new Notification('Error Publishing Your Clipping', {
body: JSON.parse(err).message
});
}
const gistUrl = body.url;
const notification = new Notification('Your Clipping Has Been Published',
{
body: `Click to open ${gistUrl} in your browser.`
});
notification.onclick = () => { shell.openExternal(gistUrl); };
clipboard.writeText(gistUrl);
});
};
const getButtonParent = ({ target }) => {
return target.parentNode.parentNode;
};
const getClippingText = (clippingListItem) => {
return clippingListItem.querySelector('.clipping-text').innerText;
};
[SYMBOL][A][B][C][D][E][F][G][H][I][J][K][L][M][N][O][P][Q][R][S][T][U][V][W][X][Y]
accelerator property
add( ) method
addClipping( ) function
addEventListener
addItem( ) method
APIs (application programming interfaces)
controlling with Spectron
for native operating systems
app.addRecentDocument( ) method
app.client.getWindowCount( ) method
app.client.waitUntilWindowLoaded( ) method
app.getPath( ) function
Application component
applications
bootstrapping
displaying browser windows
implementing UIs
building for deployment
importing Electron applications into Electron Forge
using asar
with Electron Forge
with Electron Packager
building for multiple operating systems
building with menubar library
adding clippings to UIs
adding secondary menus
displaying notifications
publishing clippings
registering global shortcuts
clippings in
preventing memory leaks using event delegation
removing
writing to clipboard
configuring names in Electron Packager
configuring versions in Electron Packager
creating with tray module
reading from clipboard and storing clippings
supporting dark mode in macOS
using correct icons for macOS and Windows
debugging
main processes
renderer processes
defining
distributing through Mac App Store
finishing touches
uploading applications
validating applications
foundations for
signing
for macOS
for Windows
overview of
starting with menubar
submitting to Mac App Store
adding applications to iTunes Connect
configuring application categories
packaging applications for Mac App Store
registering applications to open file type
registering applications with Mac App Store
testing with Spectron
overview of
setting up
setting up test runners
WebdriverIO
writing asynchronous tests
updating automatically
setting up automatic updates in Electron
setting up servers for automatic updates
updating icons in Electron Packager
applications menus
context menus vs
disabling menu items dynamically
enabling menu items dynamically
foundations for
shell module in
Array.prototype.push( ) function
Array.prototype.unshift( ) function
asar archive format
async keyword
asynchronous tests, writing using Spectron
controlling Electron APIs
testing DOM
testing Electron BrowserWindow APIs
traversing DOM
waiting for windows to load
automatic updates
setting up in Electron
setting up servers for
autoUpdater module, 2nd
autoUpdater.quitAndInstall( ) method
await keyword
babel-preset-env
base functionality
bookmark list applications, building
downloading Electron
installing Electron
package.json
structuring Electron applications
bootstrapping applications
displaying browser windows
implementing UIs
box-sizing property
Brave browser
Breakpad
brew install tree command
Browserify
browsers
displaying windows
vs menus, functionality in
BrowserWindow APIs
BrowserWindow module, 2nd
browserWindow.capturePage( ) method
BrowserWindow.getFocusedWindow( ) function
build command
buildFromTemplate( ) method
<button> element
certificateFile
certificatePassword
certificates
CFBundleDocumentTypes
CFBundleTypeExtensions
CFBundleTypeRole
Chrome Developer Tools
Chromium Content Module
click( ) method, 2nd
clipboard
reading from
handling edge cases
overview of
writing to, 2nd
Clipmaster clipboard manager
clippings
adding to UIs
preventing memory leaks using event delegation
publishing
removing
storing
writing to clipboard
code from renderer processes
codesign command-line interface tool
CommandOrControl shorthand
common paths
CommonJS require systems
Component class
configuring
application categories
application names in Electron Packager
application versions in Electron Packager
output directory in Electron Packager
connection property
content class
context menus
accessing shell module from
application menus vs
building
disabling menu items dynamically in
enabling menu items dynamically in
convertToElement function
crash reports
collecting
setting up crash reporter
setting up servers to receive
Crashpad
createClippingElement( ) function
createClippingMenuItem( ) function
createContextMenu( ) function
createWindow( ) function, 2nd, 3rd, 4th
cross-origin requests
dark mode in macOS
darken( ) function
data
getting from IndexedDB
storing in SQLite databases
adding items to databases
deleting items
fetching all items from databases
hooking databases into React
setting up SQLite and Knex.js
storing databases
updating items in databases
using right versions with electron-rebuild
writing to IndexedDB
databases
adding items to
connecting to UIs
fetching items from
hooking into React
storing
updating items in
debugging
applications
main processes
overview of
with Visual Studio Code
renderer processes
default menus
adding Help menus
defining menu item roles and keyboard shortcuts
Edit menus
implementing
missing
implementing Window menus
replacing
restoring application menus on macOS
default property
delete( ) method, 2nd
dependencies
deployment, building applications for
importing Electron applications into Electron Forge
using asar
with Electron Forge
with Electron Packager
describe( ) method
devDependencies
Developer Program Member Center, Apple
dialog module
dialog sheets in macOS
dialog.showErrorBox( ) function
dialog.showMessageBox( ) function
dialog.showOpenDialog( ) function
dirname variable
disabling menu items
dynamically in application menus
dynamically in context menus
discarding changes to files
DOM (Document Object Model)
testing with Spectron
traversing with Spectron
DOMParser
downloading Electron
drag and drop, opening files with
ignoring dropped files
opening dropped files
providing visual feedback
.drag-error class
.drag-over class
dragover phase
dropped files
ignoring
opening
ECMAScript classes
edge cases
handling
when window has never been shown
Edit menus
implementing
missing
Electron
advantages of
access to native operating system APIs
accessing Node from browser context
building on existing skill sets
enhanced privileges and looser restrictions
offline first
downloading
installing
NW.js vs
overview of
users of
electron command-line tool
Electron Forge
building applications with
importing Electron applications into
overview of
Electron Packager
building for multiple operating systems
configuring application name and version
configuring output directory
setting up
updating application icons
electron-compile, 2nd
electronPackagerConfig
electron-positioner library
electron-prebuilt package
electron-rebuild, 2nd
electron.remote.getCurrentWindow( ) method
enableLiveReload( ) method
enabling menu items dynamically
dynamically in context menus
in application menus
error handling
event delegation
exceptions, uncaught
exporting rendered HTML output
Fetch API
fetch variable
FFmpeg library
file structure
filePath variable, 2nd, 3rd
files
keeping track of current file
determining whether current file has changed
enabling Save and Revert buttons in UI
updating represented file on macOS
updating window titles based on current file
opening with drag and drop
ignoring dropped files
opening dropped files
providing visual feedback
promptings user before discarding changes to
reading using Node
implementing dialog sheets in macOS
scoping Open File dialogs
recently opened, tracking
requiring in renderer processes
reverting
saving
common paths
exporting rendered HTML output
from renderer process
saving current files
sending contents to renderer contents
watching for changes in
fileTypeIsSupported( ) function
firesale-darwin-x64 directory
frameworks
adding new items
building UIs in React
Application component
displaying lists of items
electron-compile, overview of
foundation for applications
hot module reloading
live reload
fs.readFileSync( ) function
functionality
adding application-specific menu functionality
implementing base functionality
in application menus vs context menus
in menus vs browsers
requiring from another process
getAll( ) method
getButtonParent( ) function
getDraggedFile( ) function
getDroppedFile( ) function
getFileFromUser( ) function, 2nd, 3rd, 4th
getIcon( ) function
getLinks function
getMainProcessLogs( ) method
getPath( ) method
getRenderProcessLogs( ) method
getSelectedText( ) method
getText( ) method
getWindow( ) method
getWindowCount( ) method
global shortcuts
registering, 2nd
checking registrations
solving for edge case when window has never been shown
unregistering
globalShortcut module, 2nd
globalShortcut.isRegistered( ) function
globalShortcut.unregister( ) function
globalShortcut.unregisterAll( ) method
handleChange( ) method
handleError( ) function
handleSubmit( ) method
hasClass( ) method
Help menus
hot module reloading
href attribute
#html element
icons
for applications, updating in Electron Packager
for macOS
for menu bars
for Windows OS
IDE (integrated development environment)
import( ) function
importing to Electron Forge
IndexedDB
connecting databases to UIs
creating stores with
getting data from
writing data to
innerHTML
innerText
insert( ) method
installing Electron
integrated development environment (IDE)
interprocess communication, 2nd
CommonJS require systems
overview of
remote modules
requiring functionality from another process
sending content from main processes to renderer processes
IPC (interprocess communication)
ipcRenderer module, 2nd
isDarkMode( ) method
isDevToolsOpened( ) method
items
adding
overview of
to databases
deleting
displaying lists of
fetching from databases
updating in databases
ITunes Connect
keyboard shortcuts
Keychain Access
Knex.js query builder
<label> tag
LevelUI library
lighten( ) function
lists of items, displaying
live reload
localStorage
LSHandlerRank attribute
Mac App Store
distributing applications through
finishing touches
uploading applications
validating applications
submitting applications to
adding applications to iTunes Connect
configuring application categories
packaging applications for Mac App Store
registering applications to open file type
registering applications with Mac App Store
signing applications
macOS (operating system)
implementing dialog sheets in
integrating multiple windows with
restoring application menus on
signing applications for
supporting dark mode in
switching menu bar icons when pressed in
updating represented file on
using correct icons for
main processes
debugging
overview of
with Visual Studio Code
multiple windows and, communication between
overview of, 2nd
passing reference to current window to
sending content to renderer processes from
mainWindow, 2nd
mainWindow.webContents.loadURL( ) method
mainWindow.webContents.openDevTools( ) method
mainWindow.webContents.send( ) method
map( ) method
maps
markAllAsPacked( ) method
markAllAsUnpacked( ) method
markAsPacked( ) method, 2nd
memory leaks
menu bar icons
menubar library, building applications with
adding clippings to UIs
adding secondary menus
clippings in applications
displaying notifications
publishing clippings
registering global shortcuts
starting applications with menubars
Menubar( ) function
Menu.buildFromTemplate( ) function, 2nd, 3rd
menus
adding application-specific menu functionality
disabling menu items
in application menus
in context menus
enabling menu items
in application menus
in context menus
functionality in
context menus vs application menus
vs browsers
secondary menus
shell module in application menus
minidump_stackwalk command-line tool
moveToObject( ) method
multiple windows
communicating between main processes and
creating
improving user experience of creating new windows
integrating with macOS
managing
communicating between main processes and multiple windows
passing reference to current window to main processes
multiselections flag
native file dialog boxes, 2nd
CommonJS require systems
overview of
reading files using Node
implementing dialog sheets in macOS
scoping Open File dialogs
triggering
native module
Node.js runtime
accessing from browser context
native modules
IndexedDB
storing data in SQLite databases
overview of
reading files
implementing dialog sheets in macOS
scoping Open File dialogs
node_modules directory, 2nd
notes applications
bootstrapping
displaying browser windows
implementing UIs
debugging
main processes
renderer processes
defining
file structure of
implementing base functionality
notifications, displaying
overview of
solving for edge case when window has never been shown
npm init command, 2nd
npm start command
NW.js framework
onChange( ) function
onCheckoff( ) function
onClick function
onDelete property
onSubmit prop
Open File dialogs
open file type
Open in Default Application button
openDevTools( ) method
openDirectory flag
open-file event
openFile( ) function, 2nd, 3rd, 4th
original-fs module
output directory
package.json
packaging applications for Mac App Store
parsing responses
path.basename( ) method
persisting user data
IndexedDB
storing data in SQLite databases
popup( ) method, 2nd
privileges
process module
process.crash( ) method
processes, requiring functionality from another
productName set
properties property
publishClipping( ) function
publishing clippings
put( ) method
querySelector( ) method
Quit command
React library
building UIs in
Application component
displaying lists of items
hooking databases into
react preset
reading from clipboard
handling edge cases
overview of
readText( ) method
ready event, 2nd
register( ) method
registering
applications
to open file type
with Mac App Store
global shortcuts
checking registrations
overview of
solving for edge case when window has never been shown
remote modules
remote.getCurrentWindow( ) function
remote.require function
remove( ) method
removeClipping( ) function
render( ) method
renderApplication( ) function
renderer contents
renderer processes
adding styles in
creating
debugging
loading code from
requiring files in
saving files from
sending content from main processes to
shell module from UI in
renderFile( ) function
renderLinks( ) function
replacing default menu
request.post( ) method
requests
cross-origin requests
displaying results
require systems in CommonJS
require( ) function
responses
parsing
storing with web storage APIs
response.text( ) method
restrictions
Revert buttons
reverting files
sandboxing
sanitize property
Save buttons
save flag
saveHtml( ) function
saving files
common paths
exporting rendered HTML output
from renderer process
scoping Open File dialogs
<script> tags
secondary menus
select( ) method
Selenium WebDriver
servers, setting up
for automatic updates
to receive crash reports
setDocumentEdited( ) method
setPressedImage( ) method
setRepresentedFilename( ) method
setTitle( ) function
shell module, 2nd
shell modules
accessing from context menus
functionality in application menus vs context menus
functionality in menus vs browsers
features of
from UI in renderer processes
in application menus
Show File button
showOpenDialog( ) method
showOpenFile( ) function
showSaveFileDialog( ) function
signing applications
for macOS
for Windows
overview of
Spectron framework
controlling APIs with
overview of
setting up
testing applications with
setting up test runners
WebdriverIO
writing asynchronous tests
testing DOM with
testing Electron BrowserWindow APIs
traversing DOM with
waiting for windows to load
SQLite databases
setting up
storing data in
adding items to databases
deleting items
fetching all items from databases
hooking databases into React
setting up SQLite and Knex.js
storing databases
updating items in databases
using right versions with electron-rebuild
sqlite3 modules
squirrel events
Squirrel.Windows framework
src attribute
startWatchingFile( ) function, 2nd
stopWatchingFile( ) function
storeLink function
stores with IndexedDB
storing
data in SQLite databases
adding items to databases
deleting items
fetching all items from databases
hooking databases into React
setting up SQLite and Knex.js
storing databases
updating items in databases
using right versions with electron-rebuild
databases
responses with web storage APIs
styles in renderer processes
systemPreferences module
target property
test runners
testing
applications with Spectron
overview of
setting up
setting up test runners
WebdriverIO
writing asynchronous tests
DOM with Spectron
Electron BrowserWindow APIs
then( ) method
third-party dependencies
this.addItem( ) method
this.deleteItem( ) method
this.deleteUnpackedItems( ) method
this.fetchItems( ) method
this.markAsPacked( ) method
titles of windows, updating
tracking recently opened files
transpilation, 2nd
transpilers
adding new items
building UIs in React
Application component
displaying lists of items
electron-compile
foundation for applications
hot module reloading
live reload
tray module
Clipmaster
completed code for
creating applications with
reading from clipboard and storing clippings
supporting dark mode in macOS
using correct icons for macOS and Windows
displaying notifications
reading from clipboard
registering global shortcuts
switching menu bar icons when pressed in macOS
unregistering global shortcuts
writing to clipboard
handling edge cases
tree command
triggering native file dialog boxes
troubleshooting
UIs (user interfaces)
adding clippings to
building in React
Application component
displaying lists of items
connecting databases to
cross-origin requests
displaying request results
enabling Revert buttons in
enabling Save buttons in
error handling
implementing
parsing responses
shell module from
storing responses with web storage APIs
troubleshooting
uncaught exceptions
unregistering global shortcuts
update( ) method
updateMenu( ) function
updates-available event
updateUserInterface( ) method
updateWindowTitle( ) method
updating
application icons in Electron Packager
applications automatically
setting up automatic updates in Electron
setting up servers for automatic updates
items in databases
represented file on macOS
windows titles based on current file
uploading applications
url property
url variable
useNullAsDefault option
user data, persisting
IndexedDB
storing data in SQLite databases
validating applications
visual feedback
Visual Studio Code IDE
waitUntilTextExists( ) method
waituUntilWindowLoaded( ) method
web storage APIs
webContents property, 2nd, 3rd, 4th
webContents.savePage( ) method
webContents.send( ) method
WebdriverIO, 2nd
WebRTC
WebSockets
where( ) method
will-finish-launching event
Window menus
window-all-closed event
windows
creating new
handling cases of having no focused windows
updating titles based on current file
waiting to load
Windows OS (operating system)
overview of
signing applications for
Worldwide Developer Relations Certification Authority
writeToClipboard( ) function
writing
asynchronous tests using Spectron
controlling Electron APIs
testing DOM
testing Electron BrowserWindow APIs
traversing DOM
waiting for windows to load
to clipboard
handling edge cases
overview of
Chapter 1. Introducing Electron
Figure 1.3. Brave is an entire web browser built on top of Electron.
Figure 1.5. Electron allows you to create custom application menus.
Chapter 2. Your first Electron application
Figure 2.1. A wireframe of the application we build in this chapter
Figure 2.2. The file tree structure for our first Electron application
Figure 2.3. npm init provides a series of prompts and sets up a package.json file
Figure 2.5. An empty BrowserWindow without an HTML document loaded
Figure 2.6. A BrowserWindow with a simple HTML document loaded
Figure 2.7. The BrowserWindow executing JavaScript from the context of the renderer process.
Chapter 3. Building a notes application
Figure 3.2. The structure of our project
Figure 3.5. The unstyled beginnings our first Electron application
Figure 3.6. Our application has been given some basic styling using modern features of CSS.
Chapter 4. Using native file dialog boxes and facilitating interprocess communication
Figure 4.4. The contents of the file are logged to the user’s terminal.
Figure 4.5. If the user selects a nontext file, the function logs the binary data.
Figure 4.6. In Windows, we can switch between different types of files.
Figure 4.14. BrowserWindow instances have methods that are aliases to Electron’s webContents API.
Chapter 5. Working with multiple windows
Figure 5.1. In chapter 4, we set up communication between the main process and one renderer process.
Chapter 6. Working with files
Figure 6.2. The name of file in the filesystem is displayed in the window’s title.
Figure 6.6. Recent files in macOS
Figure 6.7. Recent files in Windows 10
Chapter 7. Building application and context menus
Figure 7.2. The structure of the application menu for Fire Sale
Figure 7.5. The Edit and Window menus as implemented in Electron’s builtin menu
Figure 7.6. The structure of the application menu in macOS applications
Figure 7.9. On macOS, the Help menu allows you to search for items in your menu.
Figure 7.10. The structure of the Help menu that we build in listing 7.8.
Figure 7.11. In this section, we will add a File menu with application-specific functionality.
Chapter 8. Further operating system integration and dynamically enabling menu items
Figure 8.6. Show File in Folder and Open in Default is disabled if there is no file open.
Chapter 9. Introducing the tray module
Figure 9.4. If the macOS menu bar is in dark mode, we’ll use the inverted icon.
Figure 9.5. The application with its two basic commands on macOS
Figure 9.8. The application now has keyboard shortcuts.
Figure 9.12. A notification in Windows 10
Chapter 10. Building applications with the menubar library
Figure 10.1. This is what the application will look like at the end of the chapter.
Figure 10.3. The basic UI for Clipmaster 9000 is in place.
Chapter 11. Using transpilers and frameworks
Figure 11.2. electron-compile supports a wide variety of languages.
Figure 11.3. The foundation of our application using React, Sass, and Jade.
Figure 11.4. Jetsetter is broken into small components as illustrated here.
Figure 11.5. The Application component without items
Figure 11.6. The application now includes lists of packed and unpacked items.
Figure 11.7. The application can now add a new item in addition to “Pants.”
Chapter 13. Testing applications with Spectron
Figure 13.1. A simplified version of Clipmaster 9000 that does not live in the menu bar.
Chapter 14. Building applications for deployment
Figure 14.2. With the productName set, our application has the correct name after it is built.
Figure 14.3. Hey, look! We have a custom icon now!
Figure 14.4. The application’s source code is located within the application itself.
Chapter 15. Releasing and updating applications
Figure 15.1. The console message verifies that the code inside crash-reporter.js has executed.
Figure 15.2. Verify that the crash reporter code has been executed by checking the console.
Figure 15.3. Triggering a crash in the render process requires a reload of the UI.
Figure 15.4. Electron attempts to send the crash report but cannot find the server.
Figure 15.5. Select Preferences from the Application menu.
Figure 15.6. Select your team from the Accounts tab, and click Manage Certificates.
Figure 15.7. Select Developer ID Application and Developer ID Installer from the drop-down menu.
Figure 15.9. Fire Sale automatically notifies users when a new version is available on the server.
Chapter 16. Distributing your application through the Mac App Store
Figure 16.1. Request a certificate using Keychain Access.
Figure 16.2. Enter information for your application signing certificate request.
Figure 16.3. Select macOS as the target platform.
Figure 16.4. Add the certificate request you generated earlier.
Figure 16.5. Select Mac App Store as the type of certificate that you’re requesting.
Figure 16.6. Generate certificates for the application and installer.
Figure 16.7. Upload the certificate signing request file you created earlier.
Figure 16.8. Download your completed certificate.
Figure 16.9. The application and installer certificates listed in Keychain Access.
Figure 16.10. Register your App ID.
Figure 16.11. Select My Apps in iTunes Connect.
Figure 16.12. Add a new Mac application in iTunes Connect.
Figure 16.13. Provide details about the application in iTunes Connect.
Figure 16.14. Fire Sale is now registered with macOS as an application that can open Markdown files.
Figure 16.15. Use the Application Loader to upload your Electron application to the Mac App Store.
Figure 16.16. In this case, we’re uploading a full application to the Mac App Store.
Figure 16.17. Verify that the application’s metadata is correct.
Chapter 1. Introducing Electron
Table 1.1. A comparison of some of the main differences between Electron and NW.js
Chapter 2. Your first Electron application
Listing 2.1. Adding a start script to package.json
Listing 2.2. Adding a basic main process: ./app/main.js
Listing 2.3. Requiring the BrowserWindow module: ./app/main.js
Listing 2.4. Creating a BrowserWindow: ./app/main.js
Listing 2.5. Creating index.html: ./app/index.html
Listing 2.6. Loading an HTML document into the main window: ./app/main.js
Listing 2.7. Adding a button to an HTML document: ./app/index.html
Listing 2.8. Adding script with Node.js global in the browser context: ./app/index.html
Listing 2.9. Loading JavaScript from renderer.js: ./app/index.html
Listing 2.10. Adding basic styles: ./app/style.css
Listing 2.11. Referencing a stylesheet in the HTML document: ./app/index.html
Listing 2.12. Adding the markup for the UI of the application: ./app/index.html
Listing 2.13. Caching DOM element selectors: ./app/renderer.js
Listing 2.14. Adding an event listener to enable the submit button: ./app/renderer.js
Listing 2.15. Adding a helper function to clear out form input: ./app/renderer.js
Listing 2.16. Adding an event listener to the submit button: ./app/renderer.js
Listing 2.17. Using the Fetch API to request a remote resource: ./app/renderer.js
Listing 2.18. Instantiating a DOMParser: ./app/renderer.js
Listing 2.19. Adding functions for parsing response and finding the title: ./app/renderer.js
Listing 2.20. Parsing response and finding the title when fetching a page: ./app/renderer.js
Listing 2.21. Current contents of app/renderer.js
Listing 2.22. Creating a function to persist links in local storage: ./app/renderer.js
Listing 2.23. Storing a link and clearing the form upon fetching remote resource: ./app/renderer.js
Listing 2.24. Creating a function for getting links from local storage: ./app/renderer.js
Listing 2.25. Creating a function for creating DOM nodes from link data: ./app/renderer.js
Listing 2.26. Creating a function to render all links and add them to the DOM: ./app/renderer.js
Listing 2.27. Rendering links after fetching a remote resource: ./app/renderer.js
Listing 2.28. Loading and rendering links: ./app/render.js
Listing 2.29. Wiring the Clear Storage button: ./app/renderer.js
Listing 2.30. Renderering process to fetch, store, and render links: ./app/renderer.js
Listing 2.31. Displaying an error message: ./app/renderer.js
Listing 2.32. Catching errors when fetching, parsing, and rendering links: ./app/renderer.js
Listing 2.33. Validating responses from remote servers: ./app/renderer.js
Listing 2.34. Adding validateResponse() to the chain: ./app/renderer.js
Listing 2.35. Requiring Electron’s shell module: ./app/renderer.js
Listing 2.36. Opening links in the user’s default browser: /app/renderer.js
Chapter 3. Building a notes application
Listing 3.1. Generating the application’s file structure
Listing 3.2. Bootstrapping the main process: ./app/main.js
Listing 3.3. Our application’s markup: ./app/index.html
Listing 3.4. Using Flexbox to create page layouts: ./app/style.css
Listing 3.5. Gracefully showing the window when the DOM’s ready: ./app/main.js
Listing 3.6. Requiring our dependencies: ./app/renderer.js
Listing 3.7. Caching DOM selectors: ./app/renderer.js
Listing 3.8. Converting Markdown to HTML: ./app/renderer.js
Listing 3.9. Re-rendering the HTML when Markdown changes: ./app/renderer.js
Listing 3.10. The renderer process: ./app/renderer.js
Listing 3.11. Opening the Developer Tools from the main process: ./app/main.js
Listing 3.12. Setting up a build task in Visual Studio Code for Windows: tasks.json
Listing 3.13. Setting up a launch task for Visual Studio Code for Windows: launch.json
Chapter 4. Using native file dialog boxes and facilitating interprocess communication
Listing 4.1. Importing the dialog module: ./app/main.js
Listing 4.2. Creating a getFileFromUser() function: ./app/main.js
Listing 4.3. Invoking getFileFromUser() when the application is first ready
Listing 4.4. Importing Node’s fs module: ./app/main.js
Listing 4.5. Whitelisting specific file types: ./app/main.js
Listing 4.6. Creating sheet dialogs in macOS: ./app/main.js
Listing 4.7. Adding an event listener in the renderer process: ./app/renderer.js
Listing 4.8. Exporting a function in Node: basic-math.js
Listing 4.9. Importing a function in Node
Listing 4.10. Exporting ability to open the file dialog from the renderer process: ./app/main.js
Listing 4.11. Requiring functions from the main process in the renderer process: ./app/renderer.js
Listing 4.12. Triggering getFileFromUser() in the main process from the UI: ./app/renderer.js
Listing 4.13. Sending content from the main to a renderer process: ./app/main.js
Listing 4.14. Importing the ipcRenderer module: ./app/renderer.js
Listing 4.15. Listening for messages on the file-opened channel: ./app/renderer.js
Listing 4.16. Open File functionality implemented in the main process: ./app/main.js
Listing 4.17. Open File functionality implemented: ./app/renderer.js
Chapter 5. Working with multiple windows
Listing 5.1. Creating a Set to keep track of new windows: ./app/main.js
Listing 5.2. Implementing a function to create new windows: ./app/main.js
Listing 5.3. Creating a window when the application is ready: ./app/main.js
Listing 5.4. Refactoring getFileFromUser() to work with a specific window: ./app/main.js
Listing 5.5. Refactoring openFile() to work with a specific window: ./app/main.js
Listing 5.6. Getting a reference to the current window in the renderer process: ./app/renderer.js
Listing 5.7. Passing a reference to the current window to the main process: ./app/renderer.js
Listing 5.8. Adding listener to newFileButton: ./app/renderer.js
Listing 5.9. newFileButton implemented in the renderer process: ./app/renderer.js
Listing 5.10. Offsetting new windows based on the currently focused window: ./app/main.js
Listing 5.11. Keeping the application alive when all windows are closed: ./app/main.js
Listing 5.12. Creating a window when application is opened and there are no windows: ./app/main.js
Listing 5.13. Multiple windows implemented in the main process: ./app/main.js
Chapter 6. Working with files
Listing 6.1. Declaring global variables for keeping track of the current file: ./app/renderer.js
Listing 6.2. Updating global variables when a new file is opened: ./app/renderer.js
Listing 6.3. Updating the window title based on the current file: ./app/renderer.js
Listing 6.4. Calling updateUserInterface() when a new file is opened: ./app/renderer.js
Listing 6.5. Updating the UI if the document has unsaved changes: ./app/renderer.js
Listing 6.6. Checking for changes whenever the user types: ./app/renderer.js
Listing 6.7. Enabling the Save and Revert buttons when there are unsaved changes: ./app/renderer.js
Listing 6.8. Setting the represented file in macOS: ./app/main.js
Listing 6.9. Appending to the list of recent documents: ./app/main.js
Listing 6.10. Responding to external requests to open a file: ./app/main.js
Listing 6.11. Saving the generated output: ./app/main.js
Listing 6.12. Triggering the Save File dialog box from the renderer process: ./app/renderer.js
Listing 6.13. Saving the current file: ./app/main.js
Listing 6.14. Adding an event listener to the Save File button: ./app/renderer.js
Listing 6.15. Reverting content in UI to last saved content: ./app/renderer.js
Listing 6.16. Setting up foundation for drag-and-drop events: ./app/renderer.js
Listing 6.17. Adding styles for drag-and-drop functionality: ./app/style.css
Listing 6.18. Helper methods: ./app/renderer.js
Listing 6.19. Adding and removing classes on dragover and dragleave: ./app/renderer.js
Listing 6.20. Drag-and-drop functionality: ./app/renderer.js
Listing 6.21. Setting up a Map to watch files: ./app/main.js
Listing 6.22. Setting up a listener: ./app/main.js
Listing 6.23. Closing the watcher when the browser window closes: ./app/main.js
Listing 6.24. Prompting the user if they try to close a window with unsaved changes: ./app/main.js
Listing 6.25. Refactoring the process of displaying a new file: ./app/renderer.js
Listing 6.27. Prompting the user when a file changes: ./app/renderer.js
Listing 6.28. Sending a message over the file-changed channel: ./app/main.js
Chapter 7. Building application and context menus
Listing 7.1. Creating an Edit menu with copy and paste: ./app/application-menu.js
Listing 7.2. Loading the menu in the main application file: ./app/main.js
Listing 7.3. Prepending to the list of menu items in macOS: ./app/application-menu.js
Listing 7.4. Edit menu template: ./app/application-menu.js
Listing 7.5. Using roles and accelerators: ./app/application-menu.js
Listing 7.6. Application menu for macOS: ./app/application-menu.js
Listing 7.7. Combining the application, Edit, and Window menus: ./app/application-menu.js
Listing 7.8. Creating a Help menu: ./app/application-menu.js
Listing 7.9. Custom menu functionality: ./app/application-menu.js
Listing 7.10. Add IPC listeners to the renderer process: ./app/renderer.js
Listing 7.13. Listening for contextmenu events: ./app/renderer.js
Listing 7.14. Creating a context menu: ./app/renderer.js
Listing 7.15. Triggering the context menu: ./app/renderer.js
Chapter 8. Further operating system integration and dynamically enabling menu items
Listing 8.1. Enabling the buttons when there is a file to show: ./app/renderer.js
Listing 8.2. Adding event listeners to the buttons: ./app/renderer.js
Listing 8.3. Adding additional menu items: ./app/application-menu
Listing 8.5. Adding shell module access to the context menu template: ./app/renderer.js
Listing 8.6. Creating a function to dynamically create context menus: ./app/renderer.js
Listing 8.7. Converting values into Booleans
Listing 8.8. Creating a context menu each time a contextmenu event is fired: ./app/renderer.js
Listing 8.10. Setting the represented file: ./app/main.js
Listing 8.11. Generating a new application menu when state might have changed: ./app/main.js
Chapter 9. Introducing the tray module
Listing 9.1. Creating a tray instance: ./app/main.js
Listing 9.2. Hiding the dock icon on macOS: ./app/main.js
Listing 9.3. Conditionally choosing an icon based on the platform: ./app/main.js
Listing 9.4. Supporting dark mode on macOS: ./app/main.js
Listing 9.5. Storing clippings in memory using an array: ./app/main.js
Listing 9.6. Adding a clipping to the array when the menu item is clicked: ./app/main.js
Listing 9.7. Listing out the clippings as menu items: ./app/main.js
Listing 9.8. Truncating menu item labels: ./main/app.js
Listing 9.9. Preventing duplicate clippings: ./app/main.js
Listing 9.10. Adding clippings to the beginning of the array: ./main.js
Listing 9.11. Displaying only the first 10 clippings: ./app/main.js
Listing 9.12. Registering a global shortcut: ./app/main.js
Listing 9.13. Setting up a simple HTML document: ./app/index.html
Listing 9.14. Listening for messages and displaying notifications: ./app/renderer.js
Listing 9.15. Launching the hidden browser window: ./app/main.js
Listing 9.16. Sending a message to the renderer process: ./app/main.js
Listing 9.17. Setting an alternate icon for when icon is pressed: ./app/main.js
Listing 9.18. Clipmaster’s completed main process: ./app/main.js
Listing 9.19. Clipmaster’s completed renderer process: ./app/renderer.js
Chapter 10. Building applications with the menubar library
Listing 10.1. Getting started with menubar: ./app/main.js
Listing 10.2. The markup for the UI: ./app/index.html
Listing 10.3. Styling for the UI: ./app/style.css
Listing 10.4. Loading the HTML page after a window has been created: ./app/main.js
Listing 10.5. Querying for and caching frequently used selectors: ./app/renderer.js
Listing 10.6. Creating an element for the UI based on the clipping’s text: ./app/renderer.js
Listing 10.7. Reading from clipboard and adding a clipping to list: ./app/renderer.js
Listing 10.8. Setting up an event listener for each clipping’s buttons: ./app/renderer.js
Listing 10.9. Removing a clipping from the DOM: ./app/renderer.js
Listing 10.10. Configuring the event listener to remove clippings: ./app/renderer.js
Listing 10.11. Setting up helper methods for working with clippings: ./app/renderer.js
Listing 10.12. Configuring the event listener to display the clipping’s text: ./app/renderer.js
Listing 10.13. Refactoring the removeClipping() function: ./app/renderer.js
Listing 10.14. Creating a function to write a clipping to the clipboard: ./app/renderer.js
Listing 10.15. Adding writeToClipboard() to the event listener: ./app/renderer.js
Listing 10.16. Requiring and configuring default parameters for request: ./app/renderer.js
Listing 10.17. Creating a function to publish a clipping to ClipHub’s API: ./app/renderer.js
Listing 10.18. Adding publishClipping() to the event listener: ./app/renderer.js
Listing 10.19. Setting up notifications when publishing a clipping: ./app/renderer.js
Listing 10.20. Setting up a simple global shortcut: ./app/main.js
Listing 10.21. Setting up global shortcuts with IPC: ./app/main.js
Listing 10.22. Setting up IPC listeners in the renderer process: ./app/renderer.js
Listing 10.23. Preloading window and contents on start-up: ./app/main.js
Chapter 11. Using transpilers and frameworks
Listing 11.1. Configuring Babel for use with electron-compile: ./.compilerc
Listing 11.2. The renderer process’s HTML file written in Jade: ./app/index.jade
Listing 11.3. Application styles using Sass: ./app/style.scss
Listing 11.4. The main process for Jetsetter: ./app/main.js
Listing 11.5. A simple component using JSX and React: ./app/renderer.js
Listing 11.6. The Application component after transpilation
Listing 11.7. Application component foundation: ./app/components/Application.js
Listing 11.8. Mounting the new Application component onto the DOM: ./app/renderer.js
Listing 11.9. Individual Item component: ./app/components/Item.js
Listing 11.10. Item list component: ./app/components/Items.js
Listing 11.11. Item and Items in the Application component: ./app/components/Application.js
Listing 11.12. Adding a NewItem: ./app/components/NewItem.js
Listing 11.13. NewItem in the Application component: ./app/components/application.js
Listing 11.14. Enabling live reload: ./app/main.js
Listing 11.15. Setting up hot module reloading: ./app/main.js
Listing 11.16. Adding Babel support for hot module reloading: ./.compilerc
Listing 11.17. Using AppContainer to subscribe to updates: ./app/renderer.js
Listing 11.18. Using import() to asynchronously load dependencies: ./app/renderer.js
Listing 11.19. Using async/await to asynchronously load dependencies: ./app/renderer.js
Chapter 12. Persisting user data and using native Node.js modules
Listing 12.1. Adding a postinstall hook: /package.json
Listing 12.2. Setting up an SQLite database: ./app/database.js
Listing 12.3. Creating a table to store items: ./app/database.js
Listing 12.4. Passing the database into the application component: ./app/renderer.js
Listing 12.5. Fetching items from the database: ./app/components/Application.js
Listing 12.6. Implementing the ability to add items to the database: ./app/components/Application.js
Listing 12.7. Letting the database handle incrementing the ID: ./app/components/NewItem.js
Listing 12.8. Marking items as packed: ./app/components/Application.js
Listing 12.9. Marking all items as packed: ./app/components/Application.js
Listing 12.10. Deleting items: ./app/components/Application.js
Listing 12.11. Passing in delete methods: ./app/components/Application.js
Listing 12.12. The Items component: ./app/components/Items.js
Listing 12.13. The Item component: ./app/component/Item.js
Listing 12.14. Storing the database in the appropriate location: ./app/database.js
Listing 12.15. Setting up a store in IndexedDB: ./app/database.js
Listing 12.16. Getting all of the items from IndexedDB: ./app/database.js
Listing 12.17. Adding an item to IndexedDB: ./app/database.js
Listing 12.18. Updating an item in IndexedDB: ./app/database.js
Listing 12.19. Marking all items as packed: ./app/database.js
Listing 12.20. Removing an item from IndexedDB: ./app/database.js
Listing 12.21. Deleting all unpacked items from IndexedDB: ./app/database.js
Listing 12.22. Updating the Application component to use IndexedDB: ./app/components/Application.js
Chapter 13. Testing applications with Spectron
Listing 13.1. Setting up Mocha as a test script: ./package.json
Listing 13.2. Writing up Spectron with the test runner: ./test/spec.js
Listing 13.3. Writing a test to count the number of windows: ./test/spec.js
Listing 13.4. Writing a test to verify the window title: ./test/spec.js
Listing 13.5. Testing that the developer tools are not open: ./test/spec.js
Listing 13.6. Testing the content of the Copy from Clipboard button: ./test/spec.js
Listing 13.7. Testing the initial state of the UI: ./test/spec.js
Listing 13.8. Testing a click interaction: ./test/spec.js
Listing 13.9. Moving the cursor in a test: ./test/spec.js
Listing 13.10. Accessing Electron APIs in a test: ./test/spec.js
Listing 13.11. Testing that the application writes to the clipboard: ./test/spec.js
Chapter 14. Building applications for deployment
Listing 14.1. Adding a build script: ./package.json
Listing 14.2. Customizing the applications name and version: ./package.json
Listing 14.3. Building the application with a custom icon: ./package.json
Listing 14.4. Building for multiple platforms: ./package.json
Listing 14.5. Building for multiple platforms with asar: ./package.json
Listing 14.6. Using Yarn as your package manager: ./package.json
Chapter 15. Releasing and updating applications
Listing 15.1. Creating a file to configure and start up the Crash Reporter: ./app/crash-reporter.js
Listing 15.2. Starting the crash reporter in the main process: ./app/main.js
Listing 15.3. Starting the crash reporter in the renderer process: ./app/renderer.js
Listing 15.4. Creating a simple crash reporting server
Listing 15.5. An example of the JSON metadata from a crash report
Listing 15.6. Updating the crash reporter to report uncaught exceptions: ./app/crash-reporter.js
Listing 15.7. Setting up a server route to receive reports of uncaught exceptions
Listing 15.8. Updated Mac packaging script: ./package.json
Listing 15.9. Windows installer configuration: ./scripts/windows.js
Listing 15.10. Setting up Squirrel events in the main process: ./app/main.js
Listing 15.11. electron-squirrel-startup
Listing 15.12. Implementing Electron’s autoUpdater: ./app/auto-updater.js
Chapter 16. Distributing your application through the Mac App Store
Listing 16.1. Setting up the application: ./scripts/mas/info.plist
Listing 16.2. Setting parent permissions: ./scripts/mas/parent.plist
Listing 16.3. Extending permissions: ./scripts/mas/child.plist
Listing 16.4. The build script
Listing 16.5. Adding applications to particular categories: ./scripts/info.plist
Listing 16.6. Setting Fire Sale to be available to open Markdown files: /script/info.plist
Appendix Appendix. Code samples from Fire Sale and Clipmaster 9000
Listing 1. Fire Sale’s main process: ./app/main.js
Listing 2. Fire Sale’s renderer process: ./app/renderer.js
Listing 3. Fire Sale’s application menu: ./app/application-menu.js
Listing 4. Fire Sale’s renderer process: ./app/renderer.js
Listing 5. Fire Sale’s renderer process: ./app/renderer.js
Listing 6. Fire Sale’s application menu: ./app/application-menu.js
Listing 7. Fire Sale’s main process: ./app/main.js
Listing 8. Clipmaster 9000’s main process: ./app/main.js
Listing 9. Clipmaster 9000’s renderer process: ./app/renderer.js
![]()
For online information and ordering of this and other Manning books, please visit www.manning.com. The publisher offers discounts on this book when ordered in quantity. For more information, please contact
Special Sales Department Manning Publications Co. 20 Baldwin Road PO Box 761 Shelter Island, NY 11964 Email: orders@manning.com
©2019 by Manning Publications Co. All rights reserved.
No part of this publication may be reproduced, stored in a retrieval system, or transmitted, in any form or by means electronic, mechanical, photocopying, or otherwise, without prior written permission of the publisher.
Many of the designations used by manufacturers and sellers to distinguish their products are claimed as trademarks. Where those designations appear in the book, and Manning Publications was aware of a trademark claim, the designations have been printed in initial caps or all caps.
Recognizing the importance of preserving what has been written, it is Manning’s policy to have the books we publish printed
on acid-free paper, and we exert our best efforts to that end. Recognizing also our responsibility to conserve the resources
of our planet, Manning books are printed on paper that is at least 15 percent recycled and processed without the use of elemental
chlorine.
|
Manning Publications Co. 20 Baldwin Road PO Box 761 Shelter Island, NY 11964 |
Development editor: Helen Stergius Technical development editor: Nickie Buckner Review editor: Aleksandar Dragosavljević Project editor: Lori Weidert Copy editor: Pamela Hunt Proofreader: Elizabeth Martin Technical proofreader: Doug Warren Typesetter: Dennis Dalinnik Cover designer: Marija Tudor
ISBN: 9781617294143
Printed in the United States of America
1 2 3 4 5 6 7 8 9 10 – SP – 23 22 21 20 19 18
This book is dedicated to my wife, Logan, and my sons, Wes and Jack. You are the loves of my life.
1. Getting started with Electron
2. Building cross-platform applications with Electron
Chapter 3. Building a notes application
Chapter 4. Using native file dialog boxes and facilitating interprocess communication
Chapter 5. Working with multiple windows
Chapter 7. Building application and context menus
Chapter 8. Further operating system integration and dynamically enabling menu items
Chapter 9. Introducing the tray module
Chapter 10. Building applications with the menubar library
Chapter 11. Using transpilers and frameworks
Chapter 12. Persisting user data and using native Node.js modules
3. Deploying Electron applications
Chapter 14. Building applications for deployment
Chapter 15. Releasing and updating applications
Chapter 16. Distributing your application through the Mac App Store
1. Getting started with Electron
Chapter 1. Introducing Electron
1.4. Why should I use Electron?
1.4.1. Building on your existing skill set
1.4.2. Access to native operating system APIs
1.4.3. Enhanced privileges and looser restrictions
Chapter 2. Your first Electron application
2.1. Building a bookmark list application
2.2. Working with the main process
2.3. Creating a renderer process
2.3.1. Loading code from the renderer process
2.4.1. Making cross-origin requests in Electron
2.4.3. Storing responses with web storage APIs
2. Building cross-platform applications with Electron
Chapter 3. Building a notes application
3.3. Bootstrapping the application
3.4. Implementing the base functionality
3.5. Debugging an Electron application
3.5.1. Debugging renderer processes
Chapter 4. Using native file dialog boxes and facilitating interprocess communication
4.1. Triggering native file dialog boxes
4.3. Facilitating interprocess communication
4.4. Triggering the Open File function using interprocess communication
4.5. Sending content from the main process to the renderer process
Chapter 5. Working with multiple windows
5.1. Creating and managing multiple windows
5.1.1. Communicating between the main process and multiple windows
5.1.2. Passing a reference to the current window to the main process
6.1. Keeping track of the current file
6.1.1. Updating the window title based on the current file
6.1.2. Determining whether the current file has changed
6.2. Tracking recently opened files
6.3.1. Exporting the rendered HTML output
6.3.3. Saving files from the renderer process
6.4. Opening files using drag and drop
6.4.1. Ignoring dropped files everywhere else
6.5. Watching files for changes
Chapter 7. Building application and context menus
7.1. Replacing and replicating the default menu
7.1.1. macOS and the case of the missing Edit menu
7.1.2. The hidden cost of replacing Electron’s default menu
7.1.3. Implementing the Edit and Window menus
7.1.4. Defining menu item roles and keyboard shortcuts
7.2. Adding application-specific menu functionality
Chapter 8. Further operating system integration and dynamically enabling menu items
8.1. Using the shell module from the UI in the renderer process
8.2. Using the shell module in the application menu
8.3. Accessing the shell module from a context menu
8.3.1. Deciding between putting functionality in a menu or in the browser
8.3.2. Deciding between putting functionality in the application or context menu
8.4. Disabling menu items when appropriate
8.4.1. Dynamically enabling and disabling menu items in the context menu
8.4.2. Dynamically enabling and disabling menu items in the application menu
Chapter 9. Introducing the tray module
9.1. Getting started with Clipmaster
9.2. Creating an application with the tray module
9.2.1. Using the correct icon for macOS and Windows
9.3. Reading from and writing to the clipboard
9.4. Registering global shortcuts
9.4.1. Checking registrations and unregistering global shortcuts
Chapter 10. Building applications with the menubar library
10.1. Starting an application with menubar
10.2. Adding clippings to the UI
10.3. Working with clippings in the application
10.5. Displaying notifications and registering global shortcuts
10.5.1. Registering global shortcuts
10.5.2. Solving for the edge case that occurs if the window has never been shown
Chapter 11. Using transpilers and frameworks
11.1. Introducing electron-compile
11.2. Laying the application’s foundation
11.3. Building the UI in React
11.5. Live reload and hot module reloading
Chapter 12. Persisting user data and using native Node.js modules
12.1. Storing data in an SQLite database
12.1.1. Using the right versions with electron-rebuild
12.1.2. Setting up SQLite and Knex.js
12.1.3. Hooking the database into React
12.1.4. Fetching all of the items from the database
12.1.5. Adding items to the database
12.2.1. Creating a store with IndexedDB
12.2.2. Getting data from IndexedDB
Chapter 13. Testing applications with Spectron
13.2. Getting comfortable with Spectron and WebdriverIO
13.3. Setting up Spectron and the test runner
13.4. Writing asynchronous tests using Spectron
13.4.1. Waiting for the window to load
13.4.2. Testing Electron BrowserWindow APIs
3. Deploying Electron applications
Chapter 14. Building applications for deployment
14.1. Introducing Electron Packager
14.1.1. Setting up Electron Packager
14.1.2. Configuring the output directory
14.1.3. Configuring the application’s name and version
14.3.1. Importing an Electron application into Electron Forge
Chapter 15. Releasing and updating applications
15.1. Collecting crash reports
15.1.1. Setting up the crash reporter
15.2. Signing your applications
15.3. Automatically updating applications
Chapter 16. Distributing your application through the Mac App Store
16.1. Submitting your application to the Mac App Store
16.1.1. Signing the application
16.1.2. Registering your application with the Mac App Store
16.1.3. Adding the application to iTunes Connect
16.1.4. Packaging your application for the Mac App Store
Appendix. Code samples from Fire Sale and Clipmaster 9000
Code from the end of chapter 6
Code from the end of chapter 7
Electron is one of the technologies that I’m most excited about right now. That excitement is something that I hope you catch on to as you read Electron in Action. As I’ll explain ad nauseam throughout this book, Electron allows web developers the ability to create desktop applications with capabilities that are not available in the browser. It allows you to create graphical user interfaces for our command-line tools, opening our creations to a wider audience that may not be familiar with the terminal. Electron enables you to build applications with web technologies that you couldn’t build otherwise.
Electron hits a sweet spot that’s rare in open source. It’s low-level enough that you will quickly wrap your head around the basics, and powerful enough to allow you to build incredibly sophisticated applications. It abstracts over some of the more tedious things you’d need to do to build a desktop application, while not falling into the trap of relying on too much black magic. The platform is supported by an enthusiastic community that has provided libraries that will help you accomplish a wide range of features with ease.
You might have heard of Electron through Atom, Slack, Visual Studio Code, or any of the other big-name applications that use it. But I wrote this book for the hobbyist or indie developer who wants to build something original and new. Electron is popular among larger teams, but it’s also great for the single developer who wants to build an application that only they might use, or for the small team that needs to build tools for internal use.
It’s a tool that, as you become familiar with it, opens up new avenues that wouldn’t otherwise be possible. When you’re becoming comfortable with Electron, it immediately seems cool, but it might be hard to come up with a use case at first. Let it sink in, and you’ll soon catch yourself walking down the street coming up with ideas for applications you can build.
That’s how it happened for me and I’ve taught Electron to enough people to develop a strong suspicion that that’s how it will work for you as well. Electron in Action came to be as I was traveling around the United States and to Colombia, teaching workshops on building cross-platform desktop applications with Electron. Manning invited me to write a book on the topic and I jumped at the opportunity. The book informed the workshops, and delivering the workshops gave me new insights that helped improve the book.
If left to my own devices, I would have kept refining this book in perpetuity. It has helped me clarify my own thinking about building Electron applications and became a working diary as I tackled new challenges and implemented features in my projects. It’s a virtuous cycle that I’ll miss, although, I will be happy to have my nights and weekends back.
One thing that surprised me most about writing a book is how much work it is. Second is how many people are involved in making it happen. First and foremost, I need to thank my wife, Logan, who tolerated my working on this book during nights and weekends that I should have been spending with my family. Her tolerance and support have been crucial in producing this book.
Thank you to Helen Stergius, who put up with deadlines whizzing by as I balanced my family, my day job, and this book—often poorly. Helen kept a positive attitude regardless of how stressed out I was at any given moment. Thank you to Nickie Buckner who ran through the code as I was writing the book, provided encouragement, and fixed my typos along the way. Thanks to Doug Warren who did a final technical pass as the book was nearing completion. Thanks to Brian Sawyer for reaching out and inviting me to write this book in the first place, as well as Marjan Bace who green-lit the project.
Thank you to Marc Grabanski of Frontend Masters for letting me workshop this content in front of a global audience and providing insightful feedback. Thanks to Jeff Casimir for giving me a platform to teach an endless stream of budding software engineers. Thank you to Meeka Gayhart, Louisa Barrett, Jhun de Andreas, Brenna Martenson, and Brittany Storoz for tolerating me as I dropped the ball on various things they were relying on me for, as well as putting up with me in general.
Thank you to the following reviewers, who read this book as it was being developed, and left feedback in the forums: Aiden Mark Humphreys, Alan Bogusiewicz, Alexey Galiulin, Anto Aravinth, Ashwin Raj, Buu Nguyen, Daniel Posey, Frederic Flayol, Harald Kuhn, Hari Khalsa, Iain Shigeoka, Jay Kelkar, Jim McGinn, Jimmy Qiu, Jon Riddle, Matteo Gildone, Mladen Đurić, Philippe Charrière, Raq Khan, and William Wheeler. You helped me improve the content and catch mistakes along the way.
Thank you to Cheng Zhao and all of the people who maintain Electron. Without all of your incredible work, this book would not exist. In addition, your careful attention to detail and user-first mindset made it easy for me explain how to implement features that might otherwise be difficult on another platform. As you read Electron in Action, there will be many times where I just reach for some API that is built-in to Electron to tackle a tricky problem. Thank you to the wonderful community that provides an ecosystem of third-party libraries to help with Electron applications. In the rare case where Electron can’t do something out of the box, there is invariably a library out there that will solve your problem for you. A platform is only as good as the community around it.
Lastly, thank you to Novo Coffee in Denver and their cold brew for giving me a place to write, and the caffeine required to get the words out.
The primary goal of Electron in Action is to get you started building Electron applications quickly. We explore many of the foundational concepts by learning them as we put them to practice in code. This book seeks to not only introduce you to the basics of Electron, but also provide you with inspiration and ideas for applications of your own.
The book is for anyone who wants to build applications that defy the limits put in place in the browser. It’s a book for anyone who wants to scratch their own itch and build desktop applications without having to learn a new programming language or framework. It’s a book for small teams punching above their weight and delivering applications that run on multiple operating systems from one code base. Nearest to my heart, this book is for anyone who wants to take a command-line application and provide a GUI or remove the requirement that a user have Node.js installed on their computer in order to use their application or tool.
I’ll assume that you’re familiar with JavaScript, but will guide you through any parts of the web platform or Node.js that might be unfamiliar to you, since you might only have experience in one of those areas depending on your background.
This book is split into sixteen chapters. It’s true that many chapters continue from where the last one left off, but my hope is that you’ll be able to read the chapters out of order if you’re simply looking to implement a specific feature in your application.
In chapter 1, we’ll cover what Electron is, as well as what it isn’t. We’ll look at some of the things that you can do with Electron that you couldn’t do with either the browser or Node.js alone.
In chapter 2, we start with a very simple Electron application. The goal here is to get our hands dirty and demonstrate that it’s easy to get started with Electron.
Chapter 3 introduces you to one of the main applications in this book: Fire Sale, which is an application that allows users to open Markdown files on their filesystem and edit them.
In chapter 4, we use native system dialogues and alerts that will allow users to select a file from their filesystem for editing in Fire Sale. The application will blur the lines between the DOM and Node’s standard library, coordinating between both to implement this feature.
In chapter 5, we will add multi-window support to your application, which introduces a set of challenges that you’re not used to dealing with in a single browser tab or in Node.js, where there aren’t any windows to speak of.
Chapter 6 brings further integration into the native operating system. We’ll append the documents opened in Fire Sale to the operating system’s list of recently opened files, set up listeners to see if other applications have changed the contents of files you have open, and update the title bar of the window based on whether or not the file has unsaved changes.
Chapter 7 explores techniques for building native applications that are shared across all of the windows in your desktop application and context menus that are available upon right-clicking in the application.
In chapter 8, we look into how to update the application menu based on the state of the application—enabling and disabling menu items as appropriate.
In chapter 9, we switch gears and create a new type of application, one that lives in the menu bar on macOS or the system tray in Windows. This is not a place we’re used to building web applications. In this chapter, you build Clipmaster, which is a small clipboard manager that can read and write to the system clipboard, respond to global hotkeys, and display notifications.
Chapter 10 ups the ante and uses a third-party library to create a version of Clipmaster that has DOM-based UI—just like Fire Sale. Clipmaster 9000, as it’s called, is able to access GitHub’s Gist API and publish clippings with a single keystroke.
Up until chapter 11, we have been using vanilla JavaScript to implement features in our Electron application. In this chapter, I’ll show you how easy it is to use compile-to-JavaScript tools like Babel, TypeScript, and CoffeeScript in your application as well as Sass and Less for styling. In this chapter, you’ll build a packing list application called Jetsetter using React.
In chapter 12, we’ll look at strategies for persisting data beyond just writing to the filesystem. I’ll demonstrate how to set up an SQLite database that you can read from and write to from your client-side code. We’ll then take a second swing at the problem using the browser-based IndexedDB.
Chapter 13 introduces Spectron, which allows you to write Selenium tests for your Electron application. We’ll write a set of tests for the Clipmaster 9000 application we created earlier.
In chapter 14, we’ll look at tools that help us package our Electron applications for distribution to users that aren’t interested in starting the application up using the command line—pretty much everyone who is not a developer and, frankly, many developers as well.
Chapter 15 covers how to sign your application for macOS, create an installer for Windows, and set up a simple server for collecting error logs and crash reports.
In chapter 16, I step through the process of getting your application into the Mac App Store. This isn’t a required step if you prefer to distribute your application on your own, but is certainly useful if you don’t have experience with Apple’s process.
This book contains many examples of source code both in numbered listings and in line with normal text. In both cases, source code is formatted in a fixed-width font like this to separate it from ordinary text. Sometimes code is also in bold to highlight code that has changed from previous steps in the chapter, such as when a new feature adds to an existing line of code.
In many cases, the original source code has been reformatted; we’ve added line breaks and reworked indentation to accommodate
the available page space in the book. In rare cases, even this was not enough, and listings include line-continuation markers
(). Additionally, comments in the source code have often been removed from the listings when the code is described in the text.
Code annotations accompany many of the listings, highlighting important concepts.
All of the code for this book is available from the publisher’s website at www.manning.com/books/electron-in-action and also on Github at https://github.com/electron-in-action. In most cases, there is a branch for each chapter. For some of the later chapters where we pick up an application from earlier in the book, I have provided a branch for the starting point at the beginning of the chapter as well as one for where we left the code at the end of the chapter. If the final code for a chapter is short, I have included it at the end of the chapter. Code for chapters with longer examples can be found in the appendix of this book. In May of 2018, GitHub announced a web service and npm package that make it easy to implement auto-updating for open-source Electron applications published using GitHub releases (https://electronjs.org/blog/autoupdating-electron-apps). If your application meets those criteria, you might consider using update-electron-app. Chapter 15 covers how to roll your own solution in the event that you cannot or do not want to use update-electron-app.
One of the scariest parts of writing a book is that a new version of Electron, Node.js, or Chromium—even a minor version—might break one of the examples. This happened more than once as I was writing the book.
I am committed to keeping this code up-to-date and will provide any errata in the README.md on that chapter’s branch. If something does not work as expected in the book itself, be sure to check the repository on GitHub or check the book’s forum.
Purchase of Electron in Action includes free access to a private web forum run by Manning Publications where you can make comments about the book, ask technical questions, and receive help from the author and from other users. To access the forum, go to https://forums.manning.com/forums/electron-in-action. You can also learn more about Manning’s forums and the rules of conduct at https://forums.manning.com/forums/about.
Manning’s commitment to our readers is to provide a venue where a meaningful dialogue between individual readers and between readers and the author can take place. It is not a commitment to any specific amount of participation on the part of the author, whose contribution to the forum remains voluntary (and unpaid). We suggest you try asking the author some challenging questions lest his interest stray! The forum and the archives of previous discussions will be accessible from the publisher’s website as long as the book is in print.
STEVE KINNEY a principal engineer at SendGrid, an international speaker, and an organizer of DinosaurJS—a JavaScript conference in Denver, Colorado, Previously, he was the founding Director of the Front-End Engineering program at the Turing School of Software and Design and a New York City teacher for seven years.
The figure on the cover of Electron in Action is captioned “A Gypsy Woman.” The illustration is taken from a collection of costumes of people, both simple and grand, of the Ottoman Empire, published on January 1, 1802, by William Miller of Old Bond Street, London. The title page is missing from the collection, and we’ve so far been unable to track it down. The book’s table of contents identifies the figures in both English and French, and each illustration also bears the names of two artists who worked on it, both of whom would no doubt be surprised to find their art gracing the front cover of a computer programming book 200 years later.
The collection was purchased by a Manning editor at an antiquarian flea market in the “Garage” on West 26th Street in Manhattan. The seller was an American based in Ankara, Turkey, and the transaction took place just as he was packing up his stand for the day. The Manning editor didn’t have on his person the substantial amount of cash that was required for the purchase, and a credit card and check were both politely turned down. With the seller flying back to Ankara that evening, the situation seemed hopeless. What was the solution? It turned out to be nothing more than an old-fashioned verbal agreement sealed with a handshake. The seller proposed that the money be transferred to him by wire, and the editor walked out with the bank information on a piece of paper and the portfolio of images under his arm. Needless to say, we transferred the funds the next day, and we remain grateful and impressed by this unknown person’s trust in one of us. It recalls something that might have happened a long time ago.
The pictures from the Ottoman collection, like the other illustrations that appear on Manning’s covers, bring to life the richness and variety of dress customs of two centuries ago. They recall the sense of isolation and distance of that period—and of every other historic period except our own hyperkinetic present. Dress codes have changed since then, and the diversity by region, so rich at the time, has faded away. It’s now often hard to tell the inhabitant of one continent from that of another. Perhaps, viewed optimistically, we’ve traded a cultural and visual diversity for a more varied personal life. Or a more varied and interesting intellectual and technical life.
We at Manning celebrate the inventiveness, the initiative, and, yes, the fun of the computer business with book covers based on the rich diversity of regional life as it was two centuries ago, brought back to life by the pictures from this collection.
Have you used Slack recently? Maybe you’ve written some code in Atom or Visual Studio Code or sent a message to a friend using the WhatsApp desktop application. If so, then you’ve used an Electron application. So, what is Electron? The short version is that it’s a platform for building desktop applications that run on macOS, Windows, and Linux using web technologies. Electron combines Node.js with Chromium—the open source foundation of Google Chrome. The long answer is the focus of this book in general and chapter 1 in particular.
If you’re part of a small team tasked with building desktop applications for multiple platforms, Electron is a great way to build your product without the hassle of managing two or three distinct code bases, squashing related bugs on two or three platforms, or implementing the same feature two or three times. If you’re a Node.js developer who wants to get your command-line application in front of a wider audience, Electron makes it easy to build a graphical user interface (GUI) without having to learn an entirely new skill set. If you’re a web developer who has grown accustomed to building your own solutions to problems, Electron makes it easy to access the parts of your computer that exist outside of the browser’s sandbox.
In my experience, learning Electron has both short- and long-term implications. It’s immediately gratifying to see an icon appear in your dock or task bar when you start it up or trigger a native file dialog box from the operating system using JavaScript. But, as you become more and more comfortable with Electron, you’ll find ideas for applications that you couldn’t build with either the browser or Node.js alone. You’ll be able to build a new class of applications that you may not have been able to build otherwise. My hope is that the examples in this book provide inspiration rather than merely guidelines as you embark on your journey as a desktop application developer.
In part 1, we’ll tease out exactly what Electron is and isn’t. We’ll look at some of the big players using it in the wild. I’ll elaborate on what makes it different from browser-based applications in chapter 1. In chapter 2, we’ll build a simple Electron application in a thinly veiled attempt to convince you that building applications with Electron is both easy and fun.
This chapter covers
One of the big things that the web has going for it is ubiquity. It’s an amazing platform for creating collaborative applications that can be accessed from a wide range of devices running different operating systems. That said, entire classes of applications can’t be built in the browser environment. Web applications can’t access the filesystem. They can’t execute code that isn’t written in JavaScript. They can’t hook into many of the operating system APIs that desktop applications can. Most web applications aren’t available when there isn’t a reliable internet connection.
For a long time, building for the desktop has involved adopting a completely different skill set. Many of us don’t have the bandwidth to take on the long learning curve necessary for learning new languages and frameworks. With Electron, you can use your existing skills as a web developer to build applications that have many of the capabilities of a native desktop application.
Electron is a runtime that allows you to create desktop applications with HTML5, CSS, and JavaScript. It’s an open source project started by Cheng Zhao (aka zcbenz), an engineer at GitHub. Previously called Atom Shell, Electron is the foundation for Atom, a cross-platform text editor by GitHub built with web technologies.
You may have heard of—or used—Apache Cordova or Adobe PhoneGap for building web applications—wrapped in native shells—for mobile operating systems such as iOS, Android, and Windows Phone. If so, then it might be helpful to think of Electron as a similar tool for building desktop applications.
Electron allows you to use the web technologies you already know to build applications that you wouldn’t otherwise build. In this book, you’ll learn how to build applications that hook into native operating system APIs on Windows, macOS, and Linux.
Electron combines the Chromium Content Module and Node.js runtimes. It allows developers to build GUIs with web pages as well as access native operating system capabilities on Windows, macOS, and Linux through an OS-agnostic API.
Chromium and Node are both wildly popular application platforms in their own right, and both have been used independently to create ambitious applications. Electron brings the two platforms together to allow you to use JavaScript to build an entirely new class of application. Anything you can do in the browser, you can do with Electron. Anything you can do with Node, you can do with Electron.
The exciting part is what you can do with the two technologies together. You can build applications that take advantage of both platforms and build applications that wouldn’t otherwise be possible on only one. That’s what this book is all about. Electron is not only a great choice for building web applications that behave like native desktop applications; it’s also a great choice for building a GUI around Node applications that would otherwise be limited to a command-line interface. See figure 1.1.
Let’s say that you want to build an application that allows you to view and edit a folder of images on your computer. Traditional browser applications can’t access the filesystem. They couldn’t access the directory of photographs, load any of the photographs in the directory, or save any of the changes that you made in the application. With Node, you could implement all those features, but you couldn’t provide a GUI, which would make your application difficult to use for the average user. By combining the browser environment with Node, you can use Electron to create an application where you can open and edit photographs as well as provide a UI for doing so. See figure 1.2.
Electron isn’t a complicated framework—it’s a simple runtime. Similar to the way you might use node from the command line, you can run Electron applications using the electron command-line tool. You don’t have to learn many conventions to get started, and you’re free to structure your application however you’d like—although I’ll provide tips and best practices throughout this book.
Chromium is the open source version of Google’s Chrome web browser. It shares much of the same code and features with a few minor differences and different licensing. The Content Module is the core code that allows Chromium to render web pages in independent processes and use GPU acceleration. It includes the Blink rendering engine and the V8 JavaScript engine. The Content Module is what makes a web browser a web browser. It handles fetching and rendering HTML from a web server, loading any referenced CSS and JavaScript, styling the page accordingly, and executing the JavaScript.
The easiest way of thinking about the Content Module is to consider what it doesn’t do. The Content Module doesn’t include support for Chrome extensions. It doesn’t handle syncing your bookmarks and history with Google’s cloud services. It doesn’t handle securely storing your saved passwords or automatically filling them in for you when you visit a page. It doesn’t detect if a page was written in another language and subsequently call on Google’s translation services for assistance. The Content Module includes only the core technologies required to render HTML, CSS, and JavaScript.
For the first 15 years of its existence, JavaScript was traditionally isolated within the web browser. There wasn’t much in the way of support for running JavaScript on the server. Projects existed, but they never got any traction. The Node.js project was initially released in 2009 as an open source, cross-platform runtime for developing server-side applications using JavaScript. It used Google’s open source V8 engine to interpret JavaScript and added APIs for accessing the filesystem, creating servers, and loading code from external modules.
Over the last few years, Node has enjoyed a surge of interest and popularity and is used for a wide range of purposes, from writing web servers to controlling robots to—you guessed it—building desktop applications. Node comes bundled with a package manager called npm, which makes it easy to lean on the more than 250,000 libraries available in its registry.
Electron is used by companies, large and small, to build desktop applications. As discussed earlier, it was originally developed as the foundation for GitHub’s Atom text editor. Atom needed access to the filesystem to fulfill its duties as a text editor. Similarly, other companies have turned to Electron as the foundation of their text-editing applications. Facebook released Nuclide as a package on top of Atom that turns the text editor into a full-fledged integrated development environment (IDE) with first-class support for working with React Native, Hack, and Flow projects. Microsoft also uses Electron for its cross-platform Visual Studio Code editor, which runs on macOS, Windows, and Linux.
You can build more than text editors with Electron. Slack, the popular messaging application, uses Electron for its Windows and Linux versions. Nylas used Electron for its N1 email client, which is designed to look beautiful across all the major platforms. It also supports a JavaScript plugin architecture that allows third-party developers to add features and extend the UI.
Particle, which produces development kits for creating custom hardware, uses Electron for its IDE, which lets users write code and deploy it to hardware devices through a cellular or Wi-Fi network. Using Mapbox Studio, users can import data stored locally and process it on their computers without having to send it over the internet to Mapbox’s servers. The result is a faster and better experience that allows designers to create custom maps easily.
Dat is an open source tool for sharing, syncing, and versioning decentralized data. The grant-funded project consists of a team of three web developers. Despite being a relatively small team, Dat released a desktop application for the project using Electron. In 2015, Wiredcraft—a software consultancy—used Electron to build an offline-friendly Windows application for collecting and correcting voter registration information in Myanmar. The firm needed an application that could store the collected data offline and then publish it when the device was connected to the network. The company chose Electron as an alternative to building it using C++ because it allowed Wiredcraft to take advantage of its existing HTML, CSS, and JavaScript prowess instead of relearning those skills for a different ecosystem.
Brave—a new browser focused on speed and security by Brendan Eich, the creator of JavaScript—is itself built on top of Electron. See figure 1.3. That’s right, you can even use web technologies to build a web browser.
New projects built on top of Electron are being released every day as companies and developers see the value in building products that use the power afforded to desktop applications while still maintaining the web’s intrinsic platform agnosticism. By the end of this book, you’ll take your existing web development skills and apply them to create new applications that wouldn’t have been possible in the traditional browser environment.
Let’s start with what you don’t need to know. This book is for web developers who want to use their existing skill set to create desktop applications that wouldn’t be possible in the traditional browser environment. You don’t need any experience building desktop applications to get value out of this book.
That said, you should be comfortable with writing JavaScript, HTML, and CSS, but by no means do you need to be an expert. I won’t be covering variables or conditionals in this book, but if you’re familiar with general language features of JavaScript, then you probably have the requisite skills to follow along. It’s also helpful if you’re familiar with some of the conventions and patterns from Node.js, such as how the module system works. We’ll explore these concepts as we come across them.
When you’re writing applications for a web browser, you have to be conservative in what technologies you choose to use and cautious in how you write your code. This is because—unlike many server-side situations—you’re writing code that will be executed on someone else’s computer.
Your users could be using the latest version of a modern browser such as Chrome or Firefox, or they could be using an outdated version of Internet Explorer. You have little to no say in where your code is being rendered and executed. You have to be ready for anything.
You typically must write code for the lowest common denominator of features that have the widest support across all versions of all browsers in use today. Even if a better, more efficient, or generally more appealing solution exists to a problem, you might not be able to use that approach. When you decide to reach for a modern browser feature, you usually need to implement a contingency plan of graceful fallbacks, feature detection, and progressive enhancement that adds a nontrivial amount of friction to your development workflow.
When you build your applications with Electron, you’re packaging a particular version of Chromium and Node.js, so you can rely on whatever features are available in those versions. You don’t have to concern yourself with what features other browsers and their versions support. If the build of Chromium included with your application supports the Service Worker API, for example, then you can confidently rely on that API in your application. See figure 1.4.
Electron allows you to use cutting-edge web platform features because it includes a relatively recent version of Chromium. Generally speaking, the version of Chromium in Electron is about one to two weeks behind the most recent stable release—and a new stable release comes out every six weeks. Electron typically includes new versions of Node.js about a month after they’re released to ensure it contains the most recent version of V8. Electron already includes a modern build of V8 from Chromium and can afford to wait for minor bug fixes before upgrading to the latest version of Node.
If you’re like me, you probably have much more experience building web applications than desktop applications. You’d love to add the ability to create desktop applications to your set of tools, but you don’t have the bandwidth to learn not only a new programming language but likely a new framework as well.
Learning a new language or framework is an investment that’s not to be taken lightly. As a web developer, you’re used to writing applications that work equally well for all your users—even if that means fighting with idiosyncrasies of a particular browser or screen size. But when you’re contemplating building traditional desktop applications, you’re talking not only about learning one language and framework. You’re also looking at learning at least three different languages and frameworks if you want to target Windows, macOS, and Linux.
Individuals and small teams can use Electron to offer desktop applications in situations where they couldn’t otherwise. For a small team, hiring a developer skilled in building applications for each of those platforms may not be an option. Electron lets you use your existing skill set and deploy your application to all the major platforms. With Electron, you can support multiple operating systems with less effort than you’re normally used to for supporting multiple browsers.
Electron applications are similar to any other desktop application. They live in the filesystem with the rest of your native applications. They sit in the dock in macOS or taskbar in Windows and Linux where all the other native applications hang out. Electron applications can trigger native Open and Save File dialog boxes. These dialog boxes can be configured to allow the operating system to select only files with a particular file extension, whole directories, or multiple files at the same time. You can drag files onto your Electron applications and trigger different actions.
Additionally, Electron applications can set custom application menus like any other application. See figure 1.5. They can create custom context menus that spring into action when the user right-clicks from within the application. You can use Chromium’s notification API to trigger system-level notifications. They can read from the system clipboard and write text, images, and other media to it as well.
Unlike traditional web applications, Electron applications aren’t limited to the browser. You can create applications that live in the menu bar or the system tray. See figure 1.6. You can even register global shortcuts to trigger these applications or any of their abilities with a special keystroke from anywhere in the operating system.
Electron applications have access to system-level information—such as whether the computer is on battery power or plugged into the wall. They can also keep the operating system awake and prevent it from going into power-saving mode, if necessary.
The web is the largest distributed application platform in history. It’s so ubiquitous that web developers take many of the associated headaches for granted. Building web applications involves carefully choreographing the communication between the server-side application and the potentially thousands of instances of the client-side application. Your client-side code runs in the user’s web browser—far removed from the server.
Anything that happens in the client is unique to that browser session unless the changes are sent back to your server. By the same token, if anything changes on your end, you have to wait until the client sends another HTTP request asking for updates; or you can potentially send the updates over WebSockets, if you’ve implemented that capability on both the client and the server.
Desktop applications enjoy a wider range of abilities and fewer restrictions on what they’re allowed to do because the user explicitly went out of their way to download, install, and open the application. When you’re browsing the web, however, you don’t have the same amount of agency. You’re executing code that you didn’t choose to install on your computer. As a result, web applications have many limits on what they’re allowed to do.
When the browser visits a page on the web, it happily downloads all the assets referenced in the HTML code of the document it’s loading, as well as any additional dependencies added by those first assets, and then begins executing the code. Over the years, browser vendors have added restrictions to what the browser can do to prevent malicious code from harming the user or other sites on the internet.
I’m not a bad person, but let’s say—for the sake of argument—that I am. Let’s also say that I run a popular site that sells artisanal, hand-crafted widgets. One day, a competitor pops onto my radar selling equally pretentious widgets at a steep discount. My site is still getting more traffic for now, but this new challenger is affecting my beauty sleep.
Being a bad person, I decide to add JavaScript to my website that fires off an AJAX request every few milliseconds to my competitor’s site with the hope that the thousands of visitors to my site will download this code and effectively flood my sworn enemy’s server and make it unable to handle any legitimate request. It will also degrade the experience my visitors have on my site, but that’s a price I’m willing to pay to bring my competitor’s website to its knees.
Despite the diabolical nature of my plan, it won’t work. Modern browsers restrict client-side code from making requests to a third-party server unless that server explicitly declares a policy that it allows such requests.
Generally speaking, most sites don’t do this. If you want to send a request to a third-party server, then you have to first make a request to your own server, have it contact the third party, and relay the results back to the client. In the previous example, this adds my server as a bottleneck for those thousands of requests, which would make it infeasible for me to launch this kind of attack and trivially easy for my competitor to block my single IP address as opposed to the IPs of the thousands of visitors to my site.
The browser also places strict limits on what client-side code has access to and what it can do. All of this makes for a safer, more secure, and—ultimately—better experience for the user. It’s all incredibly practical and is part of what makes the web such a fantastic and approachable platform for users.
That said, all these useful and important security restrictions severely limit the kinds of applications you can build using web technologies. The user explicitly downloads and installs Electron applications like any other native application. You’re free to access the filesystem like any native desktop application or server-side Node process would. You’re also free to make requests to third-party APIs without going through a Node server because you have access to the same privileges and capabilities as any other Node process. See figure 1.7.
Along with granting access to the filesystem and the ability to fire up a web server, Node.js uses a module system based on the CommonJS modules specification. From its earliest incarnations, Node has supported the ability to break out code into multiple modules and explicitly include ones you require from within a given file.
Packaging any nontrivial amount of JavaScript code for the browser hasn’t always been so easy. For a small amount of code, you can include it in your markup between a matching pair of opening and closing <script> tags. For larger blocks of code, you can use the src attribute to reference an external JavaScript file. You’re welcome to do that as many times as you wish, but you’ll have to pay the performance penalties as the browser fires off an additional request to fetch each external asset.
You’re welcome to use a build tool such as webpack or Browserify if you like, but it’s often not necessary in Electron applications because all of Node’s global properties (for example, require, module, and exports) are available in the browser content. You can use Node’s module system on what you’d traditionally think of as the client side without needing to add a build process to your application.
You can access all of Node’s APIs from the browser context of your Electron application. On top of taking advantage of Node’s module system, you can also use compiled modules with native extensions, access the filesystem, as well as do a bevy of other things that aren’t typically supported in the browser environment.
As anyone who has ever taken a computer on a transcontinental flight can attest, most browser-based web applications aren’t much good without a connection to the internet. Even advanced web applications using any of the popular client-side frameworks like Ember, React, or Angular typically need to connect to a remote server to download their assets.
Electron applications have already been downloaded to the user’s computer. Typically, they load a locally stored HTML file. From there, they can request remote data and assets if a connection is available. Electron even provides APIs that allow you to detect if a connection is available. No special manifests or bleeding-edge technologies are necessary to build an offline application using Electron—it’s the default state unless the application explicitly requests something from the internet. Barring a special circumstance—you’re building a chat client, for example—Electron applications work as well offline as any other application.
Electron applications consist of two types of processes: the main process and zero or more renderer processes. Each process plays a different role in the application. The Electron runtime includes different modules to assist you in building your application. Certain modules, such as the ability to read and write from the system’s clipboard, are available in both types of processes. Others, such as the ability to access an operating system’s APIs, are limited to the main process. See figure 1.8.
When Electron starts up, it turns to the start entry in your package.json manifest included in your project to determine the entry point of your application. This file can be named anything you’d like, as long as it’s included properly in package.json. Electron runs this file as your main process.
The main process has a few important responsibilities. It can respond to application lifecycle events such as starting up, quitting, preparing to quit, going to the background, coming to the foreground, and more. The main process is also responsible for communicating to native operating system APIs. If you want to display a dialog box to open or save a file, you do it from the main process.
The main process can create and destroy renderer processes using Electron’s BrowserWindow module. Renderer processes can load web pages to display a GUI. Each process takes advantage of Chromium’s multiprocess architecture and runs on its own thread. These pages can then load in additional JavaScript files and execute code in this process. Unlike normal web pages, you have access to all the Node APIs in your renderer processes, allowing you to use native modules and lower-level system interactions.
Renderer processes are isolated from each other and unable to access operating system integration APIs. Electron includes the ability to facilitate communication between processes to allow renderer processes to communicate with the main process in the event that they need to trigger an Open or Save File dialog box or access any other OS-level integration.
Electron is similar to another project called NW.js (previously known as node-webkit). The two have much in common. In fact, zcbenz was a heavy contributor to NW.js before starting work on Electron. That said, they’re different in several important ways, as shown in table 1.1.
|
Electron |
NW.js |
|
|---|---|---|
| Platform | Officially supported Chromium Content Module from recent build | Forked version of Chromium |
| Process model | Separate processes | Shared Node process |
| Crash reporting | Built in | Not included |
| Auto-updater | Built in | Not included |
| Windows support | Windows 7 and later | Windows XP and later |
NW.js uses a forked version of Chromium. Electron uses Chromium and Node.js but doesn’t modify them. This makes it easier for Electron to keep pace with the most recent versions of Chromium and Node. Electron also includes modules for automatically downloading updates and reporting crashes. NW.js doesn’t.
NW.js applications start from an HTML page. Each browser window shares a common Node process. If more than one window is opened, they all share the same Node process. Electron keeps the Node and browser processes separate. In Electron, you start a main process from Node. This main process can open browser windows, each of which is its own process. Electron provides APIs for facilitating communication between the main process and the browser windows, which we call renderer processes throughout this book.
If backward compatibility is a concern, then NW.js might be a better choice because it supports Windows XP and Vista. Electron supports only Windows 7 and later. For multimedia-focused applications, Electron is typically a better choice because Chromium’s FFmpeg library is a statically linked dependency, so Electron supports more codecs out of the box. With NW.js, you need to manually link the FFmpeg library.
This chapter covers
In chapter 1, we discussed what Electron is at a high level. That said, this book is called Electron in Action, right? In this chapter, we learn the ropes of Electron by setting up and building a simple application from the ground up to manage a list of bookmarks. The application will take advantage of features available only in the most modern browsers.
In that high-level discussion from the previous chapter, I mentioned that Electron is a runtime like Node. That’s still true, but I want to revisit that point for a moment. Electron is not a framework—it does not provide any scaffolding or have strong rules about how you structure your application or name your files. Those choices are left up to us, the developers. On the bright side, it also doesn’t enforce any conventions, and we have less conceptual boilerplate information to discuss before getting our hands dirty.
Let’s start by building a simple and somewhat naive Electron application to reinforce everything we’ve covered. Our application accepts URLs. When the user provides a URL, we fetch the title of the page that the URL refers to and save it in our application’s localStorage. Finally, we display all the links in the application. You can find the completed source code for this chapter on GitHub (https://github.com/electron-in-action/bookmarker).
Along the way, we uncover some of the advantages of building an application in Electron, such as the ability to bypass the need for a server and use cutting-edge web APIs that do not have wide support across all the browsers but are implemented in modern versions of Chromium. Figure 2.1 is a wireframe of the application we build in this chapter.
When users add the URL of a website that they would like to save to the list below the input fields, the application sends a request to the website to fetch the markup. After it successfully receives the markup, the application pulls the title of the website and appends both the title and URL to the list of websites, which is stored in the browser’s localStorage. When the application starts, it reads from localStorage and restores the list. We add a button with a command to clear localStorage in case anything goes wrong. Because this simple application is designed to help you get comfortable with Electron, we won’t implement advanced moves, such as removing individual websites from the list.
How you choose to structure your application is up to your team or the individual working on the application. Many developers take slightly different approaches. Looking at some of the more established Electron applications, we can discern common patterns and make decisions on how we’d like to approach our applications in this book.
For our purposes, let’s agree upon a file structure for the remainder of this book. We have an app directory where we store all of our application code. We also have a package.json that will store a list of dependencies, metadata about our application, and scripts and declare where Electron should look for our main process. After we install our dependencies, we end up with a node_modules directory that Electron creates on our behalf, but we won’t include that in the initial setup.
As far as files are concerned, let’s start with two files in our app: main.js and renderer.js. These are purposely simple filenames so we can track the two types of processes. The start of all the applications that we build in this book roughly follows the directory structure shown in figure 2.2. (If you’re running macOS, you can install the tree command using brew install tree.)
Make a directory called “bookmarker,” and navigate to it. You can create this structure quickly by running the following two commands from the command line. You will generate a package.json file later using npm init.
mkdir app touch app/main.js app/renderer.js app/style.css app/index.html
Electron doesn’t require this structure, but it is inspired by some of the best practices established by other Electron applications. Atom keeps all of the application code in an app directory and all of its stylesheets and other assets such as images in a static directory. LevelUI has an index.js and a client.js on the top level and keeps all the dependent files in an src directory and stylesheets in a styles directory. Yoda keeps all of its files—including the file that loads the rest of the application—in an src directory. app, src, and lib are common names for the folder that holds the majority of the application’s code, and styles, static, and assets are common names for the directory that holds the static assets used in the application.
The package.json manifest is used in many—if not most—Node projects. This manifest contains important information about the project. It lists metadata such as the name of the author as well as their email address, which license the project is released under, the location of the project’s git repository, and where to file issues. It also defines scripts for common tasks such as running the test suite or—pertinent to our needs—building the application. The package.json file also lists all of the dependencies used to run and develop the application.
In theory, you could potentially have a Node project that does not have a package.json. But Electron relies on this file and its main property to figure out where to start when it loads or builds your application.
npm, the package manager that ships with Node, comes with a helpful tool for generating package.json. From the “bookmarker” directory you created earlier, run npm init. If you leave a prompt blank, npm uses whatever is in the parentheses after the colon as the default answer. Your answers should look something like figure 2.3, with the exception of the author’s name, of course.
Of note is the main entry in the sample package.json. Here, you can see that I set it to point to ./app/main.js, based on how we set up the application. You can point to any file you want. The main file we’re going to use happens to be called main.js, but it could be named anything (e.g., sandwich.js, index.js, app.js).
We have the basic structure of our application set up, but Electron is nowhere to be found. Building Electron from source takes a while and can be tedious. We rely on prebuilt versions of Electron for each platform (macOS, Windows, and Linux) and both architectures (32- and 64-bit). We install Electron using npm.
npm allows us to install binaries globally or locally to each project. Installing Electron globally seems convenient, but it can cause trouble down the road if we have multiple applications using different versions of Electron. We’re better off specifying and installing a unique version of Electron for each project we work on.
Downloading and installing Electron is easy. Run the following command from inside the project directory where you ran npm init previously:
npm install electron–-save
This command will download and install Electron in your project’s node_modules directory. (It will also create the directory if you don’t already have one.) The --save flag adds it to the list of dependencies in our package.json. This means that if someone downloads the project and runs npm install, they will get electron by default.
As you acclimate yourself to the world of Electron, you may see blog posts, documentation, and even earlier versions of this book that refer to the electron-prebuilt package instead of electron. In the past, the former was the preferred way to install a precompiled version of Electron for your operating system. The latter is the new preferred way. As of early 2017, electron-prebuilt is no longer supported.
npm also lets you define shortcuts for running common scripts in your package.json. When you run a script defined in your package.json, npm automatically adds node_modules to the path. This means that it will use the locally installed version of Electron by default. Let’s add a start script to our package.json.
{
"name": "bookmarker",
"version": "1.0.0",
"description": "Our very first Electron application",
"main": "./app/main.js",
"scripts": {
"start": "electron .", 1
"test": "echo \"Error: no test specified\" && exit 1"
},
"author": "Steve Kinney",
"license": "ISC",
"dependencies": {
"electron": "^2.0.4"
}
}
Now when we run npm start, npm uses our locally installed version of electron to start the Electron application. You’ll notice that not much seems to happen. You should see the following code in your terminal application:
> bookmarker@1.0.0 start /Users/stevekinney/Projects/bookmarker > electron .
You’ll also see a new application in your dock or task bar—the Electron application we just set up—as shown in figure 2.4. Right now, it’s called simply “Electron,” and it uses Electron’s default application icon. In later chapters, we’ll see how we can customize these properties, but the default is good enough for now. All of our implementation files are completely blank. As a result, there isn’t a lot going on with this application, but it exists and starts up correctly. We count that as a win for the time being. Closing all windows of the application on Windows or selecting Quit from the application menu terminates the process. Alternatively, you can press Control-C in the Windows Command prompt or Terminal to quit the application. Pressing Command-Period terminates a process on macOS.
Now that we have an Electron application, it would be cool if we could actually get it to do something. If you recall from chapter 1, Electron starts with a main process that can create one or more renderer processes. We start by writing code in main.js to get our application off the ground.
To work with Electron, we need to import the electron library. Electron comes with a number of useful modules that we use throughout this book. The first—and arguably, most important—is the app module.
const {app} = require('electron');
app.on('ready', () => { 1
console.log('Hello from Electron');
});
app is a module that handles the lifecycle and configuration of our application. We can use it to quit, hide, and show the application as well as get and set the application’s properties. The app module also runs events—including before-quit, window -all-closed, browser-window-blur, and browser-window-focus—when the application enters different states.
We cannot work with our application until it has completely started up and is ready to go. Luckily, app fires a ready event. This means we need to wait patiently and listen for the application to start the ready event before we do anything. In the previous code, we logged into the console, which is something we could easily do without Electron, but this code highlights how to listen for the ready event.
Our main process is a lot like any other Node process. It has access to all of Node’s built-in libraries as well as a special set of modules provided by Electron, which we explore over the course of this book. But, like any other Node process, our main process does not have a DOM (Document Object Model) and cannot render a UI. The main process is responsible for interacting with the operating system, managing state, and coordinating with all the other processes in our application. It is not in charge of rendering HTML and CSS. That’s the job of the renderer processes. One of the primary reasons we signed up for this whole Electron adventure is that we wanted to create a GUI for Node processes.
The main process can create multiple renderer processes using the Browser-Window module. Each BrowserWindow is a separate and unique renderer process that includes a DOM, access to the Chromium web APIs, and the Node built-in module. We can access the BrowserWindow module the same way we got our hands on the app module.
const {app, BrowserWindow} = require('electron');
You may have noticed that the BrowserWindow module starts with a capital letter. According to standard JavaScript convention, this usually means that we call it as a constructor with the new keyword. We can use this constructor to create as many renderer processes as we like or our computer can handle. When the application is ready, we create a BrowserWindow instance. Let’s update our code as follows.
const {app, BrowserWindow} = require('electron');
let mainWindow = null; 1
app.on('ready', () => {
console.log('Hello from Electron.');
mainWindow = new BrowserWindow(); 2
});
We declared mainWindow outside the ready event listener. JavaScript uses function scope. If we declared mainWindow inside the event listener, mainWindow would be eligible for garbage collection because the function assigned to the ready event has run to completion. If garbage is collected, our window would mysteriously disappear. If we run this code, we see a humble little window displayed in the center of our screen, as shown in figure 2.5.
It’s a window, but it’s not much to look at. The next step is to load an HTML page into that BrowserWindow instance we created. All BrowserWindow instances have a web-Contents property, which has several useful features, such as loading an HTML file into the renderer process’s window, sending messages from the main process to the renderer process, printing the page to either PDF or a printer, and much more. Right now, our biggest concern is loading content into that boring window we just created.
We need an HTML page to load, so create an index.html in the app directory of your project. Let’s add the following content to the HTML page to make it a valid document.
<!DOCTYPE html>
<html>
<head>
<meta charset="UTF-8">
<meta http-equiv="Content-Security-Policy"
content="
default-src 'self';
script-src 'self' 'unsafe-inline';
connect-src *
"
>
<meta name="viewport" content="width=device-width,initial-scale=1">
<title>Bookmarker</title>
</head>
<body>
<h1>Hello from Electron</h1>
</body>
</html>
It’s simple, but it gets the job done and gives a good foundation on which to build. We add the following to app/main.js to tell the renderer process to load this HTML document inside of the window we created earlier.
app.on('ready', () => {
console.log('Hello from Electron.');
mainWindow = new BrowserWindow();
mainWindow.webContents.loadFile('index.html'); 1
});
We use the file:// protocol and the __dirname variable, which is globally available in Node. __dirname is the full path to the directory where our Node process is being executed. In my case, __dirname expands to /Users/stevekinney/Projects/bookmarker/ app. It’s like typing pwd in macOS and Linux or chdir in Windows.
Now, we can use npm start to start our application and watch it load our new HTML file. If all goes well, you should see something resembling figure 2.6.
From the HTML file loaded by the renderer process, we can load any other files we might need just like we would in a traditional browser-based web application—namely, <script> and <link> tags.
What makes Electron different from what we’re used to in the browser is that we have access to all of Node—even from what we would normally consider “the client.” This means that we can use require or even Node-only objects and variables like __dirname or the process module. At the same time, we have all the browser APIs available as well. The division between what we can do only on the client and what we can do only on the server begins to fade away.
Let’s look at this in action. __dirname is not available in the traditional browser environment, and document or alert are not available in Node. But in Electron we can seamlessly use them together. Let’s add a button to the page.
<!DOCTYPE html>
<html>
<head>
<meta charset="UTF-8">
<meta http-equiv="Content-Security-Policy"
content="
default-src 'self';
script-src 'self' 'unsafe-inline';
connect-src *
"
>
<meta name="viewport" content="width=device-width,initial-scale=1">
<title>Bookmarker</title>
</head>
<body>
<h1>Hello from Electron</h1>
<p> 1
<button class="alert">Current Directory</button>
</p>
</body>
</html>
Now that we have our button, let’s add an event listener that alerts us to the current directory from which our application is running.
<script>
const button = document.querySelector('.alert');
button.addEventListener('click', () => {
alert(__dirname); 1
});
</script>
alert() is available only in the browser. __dirname is available only in Node. When we click the button, we are treated to Node and Chromium working together in sweet, sweet harmony, as shown in figure 2.7.
Writing code in our HTML file clearly works, but it’s probably not hard to imagine a situation where our code might grow to the point where this method is no longer feasible. We can add script tags with src attributes to reference other files, but this also becomes cumbersome quickly.
This is where web development gets tricky. Although modules were added to the ECMAScript specification, no browsers currently have a working implementation of a module system. On the client, this is the point where we might consider some kind of build tool like Browserify (http://browserify.org) or the module bundler, webpack, and possibly a task runner like Gulp or Grunt.
We can use Node’s module system with no additional configuration. Let’s move all of the code from inside those <script> tags to our—currently empty—app/renderer.js file. Now we can replace the contents inside of the <script> tags with just a reference to renderer.js.
<script>
require('./renderer'); 1
</script>
If we start up our application, you’ll see that its functionality hasn’t changed. Everything still works as it should. That rarely happens in software development. Let’s briefly savor that feeling before moving on.
Few surprises occur when we reference stylesheets in our Electron applications. Later, we talk about using Sass and Less with Electron. Adding a stylesheet in an Electron application isn’t much different than it would be with a traditional web application. That said, a few nuances are worth talking about.
Let’s start by adding a style.css file to our app directory. We add the following content to that style.css.
html {
box-sizing: border-box;
}
*, *:before, *:after {
box-sizing: inherit;
}
body, input {
font: menu; 1
}
That last declaration might look a little unfamiliar. It is unique to Chromium and allows us to use the system font in CSS. This ability is important to make our application fit in with its native siblings. On macOS, it’s the only way to use San Francisco, the system font that ships with El Capitan 10.11 and later.
We should consider one other important distinction when working with CSS inside of our Electron applications. Our applications will run only in the version of Chromium that we ship with the application. We don’t have to worry about cross-browser support or legacy compatibility. As mentioned in chapter 1, Electron ships with a relatively recent version of Chromium. This means we can freely use technologies like flexbox and CSS variables.
We reference our new stylesheet just like we would in the traditional browser environment, then add the following to the <head> section of index.html. I’ll include the HTML tag for linking to a stylesheet—because, in my 20 years as a web developer, I still can never remember how to do it on the first try.
<link rel="stylesheet" href="style.css" type="text/css">
We start by updating our index.html with the markup that we need for the UI.
<h1>Bookmarker</h1>
<div class="error-message"></div>
<section class="add-new-link">
<form class="new-link-form">
<input type="url" class="new-link-url" placeholder="URL"size="100"
required>
<input type="submit" class="new-link-submit" value="Submit" disabled>
</form>
</section>
<section class="links"></section>
<section class="controls">
<button class="clear-storage">Clear Storage</button>
</section>
We have a section for adding a new link, a section for displaying all of our wonderful links, and a button for clearing all links and starting over. The <script> tag in your application should be just as we left it earlier in this chapter, but just in case it isn’t, here is what it should look like at this point:
<script>
require('./renderer');
</script>
With our markup in place, we can now turn our attention to the functionality. Let’s clear away anything we might have in app/renderer.js and start fresh. Throughout our time together, we’re going to need to work with a few of the elements we added to the markup, so let’s start by querying for those selectors and caching them into variables. Add the following to app/renderer.js.
const linksSection = document.querySelector('.links');
const errorMessage = document.querySelector('.error-message');
const newLinkForm = document.querySelector('.new-link-form');
const newLinkUrl = document.querySelector('.new-link-url');
const newLinkSubmit = document.querySelector('.new-link-submit');
const clearStorageButton = document.querySelector('.clear-storage');
If you look back at listing 2.12, you’ll notice that we set the input element’s type attribute to "url" in the markup. Chromium will mark the field as invalid if the contents do not match a valid URL pattern. We can style valid and invalid states of the element and even check its state using JavaScript. Unfortunately, we don’t have access to the built-in error message popups in Chrome or Firefox. Those popups are not part of the Chromium content module and—as a result—not part of Electron. For now, we disable the start button by default and then check to see if we have a valid URL pattern every time the user types a letter into the URL field.
If the user has provided a valid URL, then we flip the switch on that submit button and allow them to submit the URL. Let’s add this code to app/renderer.js.
newLinkUrl.addEventListener('keyup', () => {
newLinkSubmit.disabled = !newLinkUrl.validity.valid; 1
});
Now is also a good time to add a small helper function to clear out the contents of the URL field. In a perfect world, we call this whenever we’ve successfully stored the link.
const clearForm= () => {
newLinkUrl.value = null; 1
};
When the user submits a link, we want the browser to make a request for that URL and then take the response body, parse it, find the title element, get the text from that title element, store the title and URL of the bookmark in localStorage, and then—finally—update the page with the bookmark.
You may or may not feel some of the hairs on the back of your neck begin to stand at attention. You might even be thinking to yourself, “There is no way that this plan will work. You can’t make requests to third-party servers. The browser doesn’t allow this.”
Normally, you’d be right. In a traditional browser-based application, you’re not allowed to have your client-side code make requests to other servers. Typically, your client-side code makes a request to your server which in turn proxies the request to the third-party server. When it hears back, it proxies the response back to the client. We discussed some of the reasoning behind this in chapter 1.
Electron has all the abilities of a Node server along with all the bells and whistles of a browser. This means that we’re free to make cross-origin requests without the need for a server to get in the way.
Another perk of writing this application in Electron is that we’re able to use the up-and-coming Fetch API to make requests to remote servers. The Fetch API spares us the hassle of setting up XMLHttpRequests by hand and gives a nice, promise-based interface for working with our requests. As of this writing, Fetch has limited support among the major browsers. That said, it has full support in the current version of Chromium, which means we can use it.
We add an event listener to the form to spring into action whenever the form has been submitted. We don’t have a server, so we need to be sure to prevent the default action of making a request. We do this by preventing the default action. We also cache the value of the URL input field for future use.
newLinkForm.addEventListener('submit', (event) => {
event.preventDefault(); 1
const url = newLinkUrl.value; 2
// More code to come...
});
The Fetch API is available as a globally available fetch variable. Fetching a URL returns a promise object, which will be fulfilled when the browser has completed fetching the remote resource. With this promise object, we could handle the response differently depending on if we decided to fetch a webpage, an image, or some other kind of content. In this case, we’re fetching a webpage, so we convert the response to text. We start with the following code inside our event listener.
fetch(url) 1 .then(response => response.text()); 2
Promises are chainable. We can take the return value of the previous promise and tack on another call to then. Additionally, response.text() itself returns a promise. Our next step will be to take the big block of markup that we received and parse it to traverse it and find the <title> element.
Chromium provides a parser that will do this for us, but we need to instantiate it. At the top of app/renderer.js, we create an instance of DOMParser and store it for later use.
const parser = new DOMParser(); 1
Let’s set up a pair of helper functions that parse the response and find the title for us.
const parseResponse = (text) => {
return parser.parseFromString(text, 'text/html'); 1
}
const findTitle = (nodes) =>{
return nodes.querySelector('title').innerText; 2
}
We can now add those two steps to our promise chain.
fetch(url) .then(response => response.text()) .then(parseResponse) .then(findTitle);
At this point, the code in app/renderer.js looks like this.
const parser = new DOMParser();
const linksSection = document.querySelector('.links');
const errorMessage = document.querySelector('.error-message');
const newLinkForm = document.querySelector('.new-link-form');
const newLinkUrl = document.querySelector('.new-link-url');
const newLinkSubmit = document.querySelector('.new-link-submit');
const clearStorageButton = document.querySelector('.clear-storage');
newLinkUrl.addEventListener('keyup', () => {
newLinkSubmit.disabled = !newLinkUrl.validity.valid;
});
newLinkForm.addEventListener('submit', (event) => {
event.preventDefault();
const url = newLinkUrl.value;
fetch(url)
.then(response => response.text())
.then(parseResponse)
.then(findTitle)
});
const clearForm = () => {
newLinkUrl.value = null;
}
const parseResponse = (text) => {
return parser.parseFromString(text, 'text/html');
}
const findTitle = (nodes) => {
return nodes.querySelector('title').innerText;
}
localStorage is a simple key/value store that is built into the browser and persists between sessions. You can store simple data types like strings and numbers under an arbitrary key. Let’s set up another helper function that will make a simple object out of the title and URL, convert it into a string using the built-in JSON library, and then store it using the URL as the key.
const storeLink = (title, url) => {
localStorage.setItem(url, JSON.stringify({ title: title, url: url }));
};
Our new storeLink function needs the title as well as the URL to get its job done, but the previous promise returns only the title. We use an arrow function to wrap our call to storeLink in an anonymous function that has access to the url variable in scope. If that is successful, we clear the form as well.
fetch(url)
.then(response => response.text())
.then(parseResponse)
.then(findTitle)
.then(title => storeLink(title, url)) 1
.then(clearForm);
Storing the links is not enough. We also want to display them to the user. This means that we need to create the functionality to go through all the links that we stored, turn them into DOM nodes, and then add them to the page.
Let’s start with the ability to get all the links out of localStorage. If you recall, localStorage is a key/value storage. We can use Object.keys to get all the keys out of an object. We have to give ourselves another helper function to get all the links out of localStorage. This isn’t a huge deal because we needed to convert them from strings back into real objects anyway. Let’s define a getLinks function.
const getLinks = () => {
return Object.keys(localStorage) 1
.map(key => JSON.parse(localStorage.getItem(key))); 2
}
Next, we take these simple objects and convert them into markup so that we can add them to the DOM later. We create a simple convertToElement helper that can take care of this as well. It’s important to mention that our convertToElement function is a bit naive and does not try to sanitize user input. In theory, your application is vulnerable to script-injection attacks. It’s a bit outside of the scope of this chapter, so we do just the bare minimum to render these links onto the page. I’ll leave it as an exercise to the reader to secure this feature.
const convertToElement = (link) => {
return `
<div class="link">
<h3>${link.title}</h3>
<p>
<a href="${link.url}">${link.url}</a>
</p>
</div>
`;
};
Finally, we create a renderLinks() function that calls getLinks, concatenates them, converts the collection using convertToElement(), and then replaces the linksSection element on the page.
const renderLinks = () => {
const linkElements = getLinks().map(convertToElement).join(''); 1
linksSection.innerHTML = linkElements; 2
};
We can now add now add this final step to our promise chain.
fetch(url) .then(response => response.text()) .then(parseResponse) .then(findTitle) .then(title => storeLink(title, url)) .then(clearForm) .then(renderLinks);
We also render all of the links when the page initially loads simply by calling renderLinks() at the top-level scope.
renderLinks(); 1
One of the advantages of using promises in coordination with breaking out functionality into named helper functions is that it’s very clear what our code is doing as it works through fetching the external webpage, parsing it, storing the result, and re-rendering the list of links.
The final thing we need to complete all of the functionality for our simple application is to wire up the Clear Storage button. We call the clear method on localStorage and then empty the list in linksSection.
clearStorageButton.addEventListener('click', () => {
localStorage.clear(); 1
linksSection.innerHTML = ''; 2
});
With the Clear Storage button in place, it seems we have most of the functionality in place. Our application now looks something like figure 2.8. At this point, our code for our renderer process should look like listing 2.30.
const parser = new DOMParser();
const linksSection = document.querySelector('.links');
const errorMessage = document.querySelector('.error-message');
const newLinkForm = document.querySelector('.new-link-form');
const newLinkUrl = document.querySelector('.new-link-url');
const newLinkSubmit = document.querySelector('.new-link-submit');
const clearStorageButton = document.querySelector('.clear-storage');
newLinkUrl.addEventListener('keyup', () => {
newLinkSubmit.disabled = !newLinkUrl.validity.valid;
});
newLinkForm.addEventListener('submit', (event) => {
event.preventDefault();
const url = newLinkUrl.value;
fetch(url)
.then(response => response.text())
.then(parseResponse)
.then(findTitle)
.then(title => storeLink(title, url))
.then(clearForm)
.then(renderLinks);
});
clearStorageButton.addEventListener('click', () => {
localStorage.clear();
linksSection.innerHTML = '';
});
const clearForm = () => {
newLinkUrl.value = null;
}
const parseResponse = (text) => {
return parser.parseFromString(text, 'text/html');
}
const findTitle = (nodes) => {
return nodes.querySelector('title').innerText;
}
const storeLink = (title, url) => {
localStorage.setItem(url, JSON.stringify({ title: title, url: url }));
}
const getLinks = () => {
return Object.keys(localStorage)
.map(key => JSON.parse(localStorage.getItem(key)));
}
const convertToElement = (link) => {
return `<div class="link"><h3>${link.title}</h3>
<p><a href="${link.url}">${link.url}</a></p></div>`;
}
const renderLinks = () => {
const linkElements = getLinks().map(convertToElement).join('');
linksSection.innerHTML = linkElements;
}
renderLinks();
So far, everything appears to work. Our application fetches the title from the external webpage, stores the link locally, renders the links on the page, and clears them from the page when we ask it to.
But what happens if something goes wrong? What happens if we give it an invalid link? What happens if the request times out? We’ll handle the two most likely cases: when the user provides a URL that passed the validation check on the input field but is not in fact valid, and when the URL is valid but the server returns a 400- or 500-level error.
The first thing we add is the ability to handle any error. Promise chains support a catch method, which is called into action in the event of an uncaught error. We define another helper method in this event.
const handleError = (error, url) => {
errorMessage.innerHTML = `
There was an issue adding "${url}": ${error.message}
`.trim(); 1
setTimeout(() => errorMessage.innerText = null, 5000); 2
}
We can add that to the chain. We use another anonymous function to pass along the URL with our error message. This is primarily for providing better error messages. It’s not necessary if you don’t want to include the URL in the error message.
fetch(url) .then(response => response.text()) .then(parseResponse) .then(findTitle) .then(title => storeLink(title, url)) .then(clearForm) .then(renderLinks) .catch(error => handleError(error, url)); 1
We also add a step early on to the chain that checks to see if the request was successful. If so, it passes the request along to the next promise in the chain. If it was not successful, then we throw an error, which circumvents the rest of the promises in the chain and skips directly to the handleError() step. There is an edge case here that I didn’t handle: the promise returned from the Fetch API rejects outright if it cannot establish a network connection. I leave that as an exercise to the reader to handle because we have a lot to cover in this book and a limited number of pages to do it in. response.ok will be false if its status code is in the 400- or 500-range.
const validateResponse = (response) => {
if (response.ok) { return response; } 1
throw new Error(`Status code of ${response.status}
${response.statusText}`); 2
}
This code passes the response object along if there is nothing wrong. But if there is something wrong, it throws an error, which is caught by handleError() and dealt with accordingly.
fetch(url) .then(validateResponse) .then(response => response.text()) .then(parseResponse) .then(findTitle) .then(title => storeLink(title, url)) .then(clearForm) .then(renderLinks) .catch(error => handleError(error, url));
We’re not out of the woods yet—we also have an issue in the event that everything goes well. What happens if we click one of the links in our application? Perhaps unsurprisingly, it goes to that link. The Chromium part of our Electron application thinks that it is a web browser, and so it does what web browsers do best—it goes to the page.
Except our application is not really a web browser. It lacks important things like a Back button or a location bar. If we click any of the links in our application, we’re pretty much stuck there. Our only option is to kill the application and start all over.
The solution is to open the links in a real browser. But this raises the question, which browser? How can we tell what the user has set as their default browser? We certainly don’t want to take any lucky guesses because we don’t know what browsers the user has installed and no one likes seeing the wrong application start opening just because they clicked a link.
Electron ships with the shell module, which provides some functions related to high-level desktop integration. The shell module can ask the user’s operating system what browser they prefer and pass the URL to that browser to open. Let’s start by pulling in Electron and storing a reference to its shell module at the top of app/renderer.js.
const {shell} = require('electron');
We can use JavaScript to determine which URLs we want to handle in our application and which ones we want to pass along to the default browser. In our simple application, the distinction is easy. We want all of the links to open in the default browser. Links are being added and removed in this application, so we set an event listener on the linksSection element and allow click events to bubble up. If the target element has an href attribute, we prevent the default action and pass the URL to the default browser instead.
linksSection.addEventListener('click', (event) => {
if (event.target.href) { 1
event.preventDefault(); 2
shell.openExternal(event.target.href); 3
}
});
With that relatively simple change, our code behaves as expected. Clicking a link will open that page in the user’s default browser. We have a simple—yet fully functional—desktop application.
Our finished code should look something like the following code example. You may have your functions in a different order.
const {shell} = require('electron');
const parser = new DOMParser();
const linksSection = document.querySelector('.links');
const errorMessage = document.querySelector('.error-message');
const newLinkForm = document.querySelector('.new-link-form');
const newLinkUrl = document.querySelector('.new-link-url');
const newLinkSubmit = document.querySelector('.new-link-submit');
const clearStorageButton = document.querySelector('.clear-storage');
newLinkUrl.addEventListener('keyup', () => {
newLinkSubmit.disabled = !newLinkUrl.validity.valid;
});
newLinkForm.addEventListener('submit', (event) => {
event.preventDefault();
const url = newLinkUrl.value;
fetch(url)
.then(response => response.text())
.then(parseResponse)
.then(findTitle)
.then(title => storeLink(title, url))
.then(clearForm)
.then(renderLinks)
.catch(error => handleError(error, url));
});
clearStorageButton.addEventListener('click', () => {
localStorage.clear();
linksSection.innerHTML = '';
});
linksSection.addEventListener('click', (event) => {
if (event.target.href) {
event.preventDefault();
shell.openExternal(event.target.href);
}
});
const clearForm = () => {
newLinkUrl.value = null;
};
const parseResponse = (text) => {
return parser.parseFromString(text, 'text/html');
};
const findTitle = (nodes) => {
return nodes.querySelector('title').innerText;
};
const storeLink = (title, url) => {
localStorage.setItem(url, JSON.stringify({ title: title, url: url }));
};
const getLinks = () => {
return Object.keys(localStorage)
.map(key => JSON.parse(localStorage.getItem(key)));
};
const convertToElement = (link) => {
return `<div class="link"><h3>${link.title}</h3>
<p><a href="${link.url}">${link.url}</a></p></div>`;
};
const renderLinks = () => {
const linkElements = getLinks().map(convertToElement).join('');
linksSection.innerHTML = linkElements;
};
const handleError = (error, url) => {
errorMessage.innerHTML = `
There was an issue adding "${url}": ${error.message}
`.trim();
setTimeout(() => errorMessage.innerText = null, 5000);
};
const validateResponse = (response) => {
if (response.ok) { return response; }
throw new Error(`Status code of ${response.status}
${response.statusText}`);
}
renderLinks();
In part 1, I talked a bit about what makes Electron interesting and special, but our first run at building an Electron application was deliberately simple and—I’ll admit—a bit uninspired. In part 2—which takes up the lion’s share of this book—we’ll start digging into Electron’s more compelling abilities. In this section, we’ll build three applications: a Markdown text editor with a live preview and direct access to the filesystem, a clippings manager that lives in your operating system’s menu bar or system tray and can read and write to the system clipboard, and a travel packing list built with React that can read and write directly to a native database.
In part 2, I try to walk a fine line by having you build applications that are simple enough that you can understand them in short order while also having just enough complexity that we’ll run into some of the problems waiting for us in larger, more complex applications.
In chapter 3, we’ll lay the foundation for Fire Sale, our Markdown editor, by implementing the UI. We’ll also look into the finer points of debugging an Electron application. In chapter 4, we’ll explore the relationship between the main Node.js process and the one or more browser windows—which are called renderer processes—you can spawn. We’ll read from and write to the filesystem and send data back and forth between processes. In chapter 5, I’ll cover how to manage multiple windows and dig a bit deeper into Electron’s interprocess communication model.
Chapter 6 covers some of the finer points of integrating with the native operating system. We’ll determine whether a file has unsaved changes and update the title bar provided by the operating system accordingly. We’ll append our documents to the operating system’s list of recent documents and listen to see if another application has changed a file currently open in Fire Sale. Chapter 7 explores how to build native application and context menus, which is not normally something web and Node.js developers encounter often. In chapter 8, we’ll put the finishing touches on Fire Sale by implementing additional integrations with the host operating system as well as dynamically updating menus by enabling and disabling menu items as the state of the application changes.
In chapter 9, we’ll set out to build an application in a place where no web developer has gone before: the menu bar in macOS and the system tray in Windows. Clipmaster is a simple application that allows you to read text from the system clipboard and store it in memory. When an item is selected, it’s written back to the clipboard for easy pasting. It’s an application I used thoroughly in writing this book. In chapter 10, we’ll burn the entire application down and start over from scratch, giving it a more robust UI in the process.
Until chapter 11, we use a very limited set of tools for manipulating the DOM. As you read through the chapters leading up to chapter 11, you may be getting grand ideas about how you would integrate your favorite frontend framework. Your patience will be rewarded as we see that implementing tools like Babel, TypeScript, or Sass are easier than you could have imagined. We’ll build a simple list manager called Jetsetter that keeps track of the items you need to pack before your next great adventure. I’ll be using React solely because it has the gentlest learning curve, but I assure you that there are great libraries for Ember, Angular, and Vue as well.
You may have used a tool like webpack or Browserify to pull dependencies from npm into your application. If so, you might have come across a set of modules, which typically use compiled C++ code, that are off limits. Browsers, generally speaking, can work only with JavaScript. But Electron applications are not mere browser applications. In chapter 12, we’ll take Jetsetter and hook it directly to a portable SQLite database. We’ll figure out how to correctly compile your modules for the version of Node.js that ships with Electron. I’ll implement persistent storage in a browser-based IndexedDB database, in an effort to help you determine which approach you might prefer for your own applications.
Chapter 13 covers end-to-end testing using Spectron, which is based on Selenium. In this chapter, I’ll show you how to write tests that spin up your Electron application and take it for a ride. By the end of part 2, you’ll be comfortable with a large subset of everything Electron has to offer, and the creative juices will certainly be flowing.
Our bookmark manager was a fine place to start, but it only scratches the surface of what we can do with Electron. In this chapter, we dig a little bit deeper and lay the foundation for an application with stronger ties to the user’s operating system. Over the course of the next few chapters, we’ll implement features that trigger the operating system’s GUIs, read from and write to the filesystem, and access the clipboard.
We are building a simple note editor that allows us to create new or open existing Markdown files, convert them to HTML, and save the HTML to the filesystem and clipboard. Let’s call the application Fire Sale as an only slightly clever play on price markdowns—because it’s a Markdown editor after all. At the end of the chapter, we’ll discuss the techniques and tools available for debugging our Electron applications when things go awry.
Let’s start by setting goals for our humble, little application. Many of our features might seem a bit banal for a desktop application, and that’s the point. They’re standard fare for a desktop application but completely outside of the realm of abilities for traditional web applications, which cannot access anything outside of their isolated browser tab. Our application will consist of two panes: a left pane where the user can write or edit Markdown and a right pane that displays the user’s Markdown rendered as HTML. Along the top we have a series of buttons, which will allow the user to load a text file from the filesystem as well as write the result to the clipboard or filesystem.
In the first phase of our application, we build a UI based on the wireframe in figure 3.1. We can also add additional UI elements to the wireframe—and subsequently our application—as we go along, but this is a good place to start.
In this chapter, we lay the foundation for our application. We create the project’s structure, install our dependencies, set up our main and renderer processes, build our UI, and implement the Markdown-to-HTML rendering when the user enters text into the left pane.
We build the remainder of the application in phases over the next several chapters. In each chapter, you’ll download the current state of our application. This way you can flip to a chapter that covers the functionality you’re interested in without having to build the entire application from scratch.
In the first phase, our application will be able to
In later chapters, our application tracks recently opened documents using the native operating system APIs. We can drag Markdown files from the Finder or Windows Explorer onto our application and have the application immediately open that Markdown file. Our application will have its own custom application menu as well as custom context menus when we right-click on different areas of our application.
We also take advantage of OS-specific features such as updating the application’s title bar to show the file that is currently open and whether it has been changed since the last time it was saved. We also implement additional features such as updating the content in the application if some other application on the computer changes the file while we have it open.
The file structure, shown in figure 3.2, is unsurprisingly similar to the structure we agreed upon and used for our bookmark manager in the previous chapter. For the sake of simplicity and clarity as we continue to get comfortable with Electron, we keep all of the code for the main process in app/main.js and all of the code for our single renderer process in app/renderer.js. We store the app folder on a UNIX-based operating system so we can generate it quickly, as shown in the following listing. Alternatively, you can check out the master branch for this project on GitHub at https://github.com/electron-in-action/firesale.
mkdir app && touch app/index.html app/main.js app/renderer.js app/style.css
The parts of the project are
To keep things simple, we start with two dependencies in addition to Electron as our run time. We use a library called marked to handle the heavy lifting of converting Markdown to HTML.
To generate a package.json for this project, run npm init --yes. The --yes flag allows you to skip the prompts from the previous chapter. After you generate the package.json file, run the following command to install the necessary dependencies:
npm install electron marked --save
The main entry in our package.json is configured to load index.js as the main process for our application shown in figure 3.3. We need to adjust this to app/main.js. We also need to fire up a renderer process to present the user with an interface for our application. In app/main.js, let’s add the following code.
const { app, BrowserWindow } = require('electron');
let mainWindow = null; 1
app.on('ready', () => {
mainWindow = new BrowserWindow(); 2
mainWindow.loadFile('index.html'); 3
mainWindow.on('closed', () => {
mainWindow = null; 4
});
});
This is enough to start up our application. That said, there is not a lot going on because our main process currently loads an empty file in the renderer process.
Implementing the requisite amount of HTML and CSS to get a workable version of the wireframe in figure 3.1 is fairly easy in Electron because we need to support only one browser, and that browser supports the latest and greatest features that the web platform offers, as shown in figure 3.4.
In index.html, we add the markup in listing 3.3 to create the browser window in figure 3.5.
<!DOCTYPE html>
<html>
<head>
<meta charset="UTF-8">
<meta name="viewport" content="width=device-width,initial-scale=1">
<title>Fire Sale</title>
<link rel="stylesheet" href="style.css" type="text/css">
</head>
<body>
<section class="controls"> 1
<button id="new-file">New File</button>
<button id="open-file">Open File</button>
<button id="save-markdown" disabled>Save File</button>
<button id="revert" disabled>Revert</button>
<button id="save-html">Save HTML</button>
<button id="show-file" disabled>Show File</button>
<button id="open-in-default" disabled>Open in Default
Application</button>
</section>
<section class="content"> 2
<label for="markdown" hidden>Markdown Content</label> 3
<textarea class="raw-markdown" id="markdown"></textarea>
<div class="rendered-html" id="html"></div>
</section>
</body>
<script> 4
require('./renderer');
</script>
</html>
Our application isn’t much to look at just yet. If you’re anything like me, you’ve been a bit skeptical about that two-column interface I introduced in the wireframe. The word easy is rarely used when discussing how to implement columns using HTML and CSS. Luckily, we can confidently use a new layout mode added to CSS3 called Flexbox to quickly define the two-column layout of our application. Flexbox makes it easy to create page layouts that behave predictably across a wide range of screen sizes, as shown in listing 3.4. It’s relatively new to CSS and—until recently—was not supported by Internet Explorer. As we discussed in chapters 1 and 2, our applications are always coupled with a recent version of Chrome, so we can confidently use the Flexbox layout mode without having to worry about cross-browser compatibility.
html {
box-sizing: border-box; 1
}
*, *:before, *:after {
box-sizing: inherit; 2
}
html, body {
height: 100%;
width: 100%;
overflow: hidden;
}
body {
margin: 0;
padding: 0;
position: absolute;
}
body, input { 3
font: menu;
}
textarea, input, div, button {
outline: none; 4
margin: 0;
}
.controls {
background-color: rgb(217, 241, 238);
padding: 10px 10px 10px 10px;
}
button {
font-size: 14px;
background-color: rgb(181, 220, 216);
border: none;
padding: 0.5em 1em;
}
button:hover {
background-color: rgb(156, 198, 192);
}
button:active {
background-color: rgb(144, 182, 177);
}
button:disabled {
background-color: rgb(196, 204, 202);
}
.container {
display: flex;
flex-direction: column;
min-height: 100vh;
min-width: 100vw;
position: relative;
}
.content {
height: 100vh;
display: flex; 5
}
.raw-markdown, .rendered-html {
min-height: 100%;
max-width: 50%;
flex-grow: 1; 6
padding: 1em;
overflow: scroll;
font-size: 16px;
}
.raw-markdown {
border: 5px solid rgb(238, 252, 250);;
background-color: rgb(238, 252, 250);
font-family: monospace;
}
We have two major goals for the stylesheet. First, we want to take advantage of modern CSS features like Flexbox to lay out our UI. Second, we want to take small steps toward making our application look and feel a bit more like a real web application (see figure 3.6).
The box-sizing property handles an historical oddity in CSS where adding 50 pixels of padding to an element with a width of 200 pixels would cause it to be 300 pixels wide (adding 50 pixels of padding on each side), with the same being true for borders as well. When box-sizing is set to border-box, our elements respect the height and width that we set them to. Generally speaking, this is a good thing. In this CSS rule, we also have every other element and pseudoelement respect the hard work we did by setting box-sizing to border-box.
We want our applications to fit in with their native colleagues. One important step in that direction is to use the system font that all of the other applications use. That’s easier said than done. For example, despite the fact that macOS uses San Francisco as the default font throughout the operating system, it’s not available as a regular font. We set the font property to menu, which defers to the operating system to use its default font—even if we wouldn’t otherwise have access to it.
The browser puts a border around whatever UI element is currently active. In macOS, this border is a blue glow. You’ve probably never thought much about it, because we’re used to it on the web, but it looks out of place when we’re developing a desktop application. It looks especially bad in our application where one-half of the UI is effectively a large text input. By setting outline to none, we remove the unnatural glow around the active element.
In the .content, .raw-markdown, and .rendered-html rules, we implement a simple Flexbox layout, which will make our application look more like the wireframe we introduced in figure 3.1. The element with the content class will hold our two columns. We set the display property to flex to use the Flexbox technology we discussed earlier. In the next step, we set flex-grow, which specifies the grow factor for a flex item, of course. It’s probably helpful to think of this as the element’s scale in relation to its sibling. In this case, we set both columns to an equal ratio using Flexbox.
If you look closely as your application launches, you’ll notice a brief moment when the window is completely blank before Electron loads index.html and renders the DOM in the window. Users are not used to seeing this in native applications, and we can avoid it by rethinking how we launch the window.
The flash of nothingness when the application first launches makes sense if you consider the code in the main process: it creates a window and then loads content in it. What if we hide the window until the content is loaded? Then, when the UI is ready, we show the window and avoid briefly exposing an empty window.
app.on('ready', () => {
mainWindow = new BrowserWindow({ show: false }); 1
mainWindow.loadFile('index.html');
mainWindow.once('ready-to-show', () => { 2
mainWindow.show(); 3
});
mainWindow.on('closed', () => {
mainWindow = null;
});
});
We passed an object to the BrowserWindow constructor, setting it as hidden by default. When the BrowserWindow instance fires its ’ready-to-show’ event, we’ll call its show() method, which will bring it out of hiding after the UI is fully ready to go. This approach is even more useful when the application is loading a remote resource over the network, which is likely to take much longer to initialize the page.
Let’s put a stake in the ground by getting some of the basic functionality in place. For starters, we want to update the rendered HTML view in the right pane whenever the Markdown in the left pane changes (see figure 3.7). This is where our one dependency—marked—comes in to play.
Bringing in our dependencies is easy because we can use Node’s require to pull in marked. Let’s add the following in app/renderer.js.
const marked = require('marked');
Now, we have access to Marked using marked. Given our discussion of the application’s functionality along with the diagram in figure 3.7, you’ve probably begun to suspect that we’ll be working with the #markdown text area and the #html element a fair amount as we develop our application. Let’s use a pair of variables to store a reference to each element so that they’re easier to work with, as shown in listing 3.7. While we’re at it, let’s also create variables for each of the buttons along the top of the UI.
const markdownView = document.querySelector('#markdown');
const htmlView = document.querySelector('#html');
const newFileButton = document.querySelector('#new-file');
const openFileButton = document.querySelector('#open-file');
const saveMarkdownButton = document.querySelector('#save-markdown');
const revertButton = document.querySelector('#revert');
const saveHtmlButton = document.querySelector('#save-html');
const showFileButton = document.querySelector('#show-file');
const openInDefaultButton = document.querySelector('#open-in-default');
We also render Markdown into htmlView fairly frequently, so we want to give ourselves a function to make this easier for us in the future.
const renderMarkdownToHtml = (markdown) => {
htmlView.innerHTML = marked(markdown, { sanitize: true });
};
marked takes the Markdown content we want to render as the first argument and an object of options as the second argument. We’d like to protect ourselves from accidental script injections, so we pass in an object with the sanitize property set to true.
Finally, we add an event listener to markdownView that on keyup will read its contents (which, in textarea elements, is stored in its value property), run them through marked, and then load them into htmlView. The result is shown in figure 3.8.
markdownView.addEventListener('keyup', (event) => {
const currentContent = event.target.value;
renderMarkdownToHtml(currentContent);
});
The basic functionality is in place and we’re ready to begin working on the features that would only be possible in an Electron application—starting with reading and writing files from and to the filesystem. When all is said and done, the renderer process of our application should look like this.
const marked = require('marked');
const markdownView = document.querySelector('#markdown');
const htmlView = document.querySelector('#html');
const newFileButton = document.querySelector('#new-file');
const openFileButton = document.querySelector('#open-file');
const saveMarkdownButton = document.querySelector('#save-markdown');
const revertButton = document.querySelector('#revert');
const saveHtmlButton = document.querySelector('#save-html');
const showFileButton = document.querySelector('#show-file');
const openInDefaultButton = document.querySelector('#open-in-default');
const renderMarkdownToHtml = (markdown) => {
htmlView.innerHTML = marked(markdown, { sanitize: true });
};
markdownView.addEventListener('keyup', (event) => {
const currentContent = event.target.value;
renderMarkdownToHtml(currentContent);
});
In an ideal world, we’d never make mistakes when writing code. APIs and methods would never change between versions and your author wouldn’t have to hold his breath every time a new version of a dependency used by the applications in this book was released. We don’t live in that world. Thus, we have developer tools at our disposal to aide us in tracking down and—hopefully—eliminating bugs.
Everything has been going pretty smoothly so far, but it probably won’t be long before we’re going to have to debug some tricky situation. Because Electron applications are based on Chrome, it’s no surprise that we have access to the Chrome Developer Tools when building Electron applications (figure 3.9).
Debugging the renderer process is relatively straightforward. Electron’s default application menu provides a command for opening up the Chrome Developer Tools in our application. In chapter 6, we’ll learn how to create our own custom menu and eliminate this feature in the event that you’d prefer not to expose it your users.
There are also two other ways to access the Developer Tools. At any point, you can press Command-Option-I on macOS or Control-Shift-I on Windows or Linux to open up the tools (figure 3.10). In addition, you can trigger the Developer Tools programmatically. The webContents property on BrowserWindow instances has a method called openDevTools(). This method, as explained in listing 3.11, will open the Developer Tools in the BrowserWindow it’s called on.
app.on('ready', () => {
mainWindow = new BrowserWindow();
mainWindow.loadFile('index.html');
mainWindow.once('ready-to-show', () => {
mainWindow.show();
mainWindow.webContents.openDevTools(); 1
});
mainWindow.on('closed', () => {
mainWindow = null;
});
});
Debugging the main process is not so easy. Node Inspector, a common tool for debugging Node.js applications, is not fully supported by Electron at this time. You can start your Electron application in debug mode using the --debug flag, which will—by default—enable remote debugging on port 5858.
Limited support for using Node Inspector with Electron is available in the official documentation. As this is still in a bit of flux for the time being, you should review the most recent version of the documentation if you are not using Visual Studio Code (http://electron.atom.io/docs/tutorial/debugging-main-process/). That said, I haven’t found this technique particularly stable and wouldn’t recommend it. Your mileage may vary.
Visual Studio Code is a free, open source IDE available for Windows, Linux, and macOS and is—coincidentally—built on top of Electron by Microsoft. Visual Studio Code comes with a rich set of tools for debugging Node applications that make it much easier to debug Electron applications than noted previously. A quick way to set up a build task is to ask Visual Studio Code to build the application without a build task. Press Control-Shift-B on Windows or Command-Shift-B on macOS and you’ll be prompted to create a build task, as shown in figure 3.11.
Clicking on the Configure Build Task menu item will prompt you to select whether you want to create a “start” or “test” task. Choosing “start” will generate a task that calls npm start. Choosing “test” will generate npm test. Listing 3.12 is an example of what a “start” task looks like.
{
// See https://go.microsoft.com/fwlink/?LinkId=733558
// for the documentation about the tasks.json format
"version": "2.0.0",
"tasks": [
{
"type": "npm",
"script": "start",
"group": {
"kind": "build",
"isDefault": true
}
}
]
}
Now, when you press Control-Shift-B on Windows or Command-Shift-B on macOS, your Electron application will start up. Not only is this important in order to set up debugging within Visual Studio Code, it’s also a convenient way to start up your application in general. The next step is to set up Visual Studio Code to launch the application and connect it to its built-in debugger (figure 3.12).
To create a launch task, go the Debug tab in the left pane and click on the small gear in the upper-left corner. Visual Studio Code will ask you what kind of configuration file you’d like to create. Select Node and replace the contents of the file with listing 3.13.
{
"version": "0.2.0",
"configurations": [
{
"name": "Debug Main Process",
"type": "node",
"request": "launch",
"cwd": "${workspaceRoot}",
"runtimeExecutable":
"${workspaceRoot}/node_modules/.bin/electron",
"windows": {
"runtimeExecutable":
"${workspaceRoot}/node_modules/.bin/electron.cmd"
},
"args":
"."
]
}
]
}
With this configuration file in place, you can click on the left margin of any line in your main process to set a breakpoint and then press F5 to run the application. Execution will pause at the breakpoint, allowing you to inspect the call stack, determine what variables are in scope, and interact with a live console. Breakpoints aren’t the only way to debug your code. You can also watch for particular expressions or drop into the debugger whenever an uncaught exception is thrown (figure 3.13).
There is a high chance that you’re not using Visual Studio Code. That’s fine. It’s not a prerequisite for this book and you will almost definitely be fine using the text editor or IDE you’re most comfortable with. In addition, Visual Studio Code isn’t the only one with support for debugging the main process. For example, you can find details for configuring WebStorm here: http://mng.bz/Y5T6.
In the previous chapter, we laid the foundation for our first Electron project, a notes application that takes Markdown from the left pane and renders it as HTML in the right pane. We set up our main process and configured it to spawn a renderer. We set up package.json, installed the necessary dependencies, created the main and renderer processes, and laid out the UI. We also explored ways we can make our application feel like a desktop application, but we haven’t added a feature that is far outside the scope of what a traditional web application could do yet.
Right now, the application allows the user to write in the Markdown view. When the user presses a key in the Markdown view, the application automatically renders the Markdown to HTML and displays it in the HTML view.
In this chapter, we’ll add the ability to trigger a native file dialog box and select a text file from anywhere on the filesystem and load it into our application. By the end of the chapter, the Open File button in the renderer process’s browser window will trigger the Open File dialog box from the main process. Before we can do that, it’s important to discuss how to communicate between processes in a bit more depth. We start on the chapter-3 branch, which can be found at http://mng.bz/11Kd. The code at the end of the chapter can be found at http://mng.bz/0C34. Alternatively, you can pull down the master branch and check out either of these two branches.
git clone https://github.com/electron-in-action/firesale.git chapter-3 git checkout -f chapter3
An easy way to get started is to prompt the user for a file to open when the application first starts and emits its ready event, as shown in figure 4.1. Our application is already listening for the ready event before we create our BrowserWindow instance. Later in this chapter, we learn how to trigger this functionality from the UI. In the next chapter, we learn how to trigger it from the application menu as well.
You create native dialogs using Electron’s dialog module. Add the code in listing 4.1 to app/main.js just beneath where the other Electron modules are required.
const { app, BrowserWindow, dialog } = require('electron');
Eventually the application should trigger our file-opening functionality from multiple places. The first step is to create a function to reference later. Start by logging the name of the file selected to the console after it has been selected.
const getFileFromUser = () => {
const files = dialog.showOpenDialog({ 1
properties: ['openFile'] 2
});
if (!files) { return; } 3
console.log(files); 4
};
Our getFileFromUser() function is a wrapper over dialog.showOpenDialog() that we can use in multiple places in our application without having to repeat ourselves. It will trigger the showOpenDialog() method on dialog and pass it a JavaScript object with different settings that we can adjust as needed. In JavaScript, an object’s keys are called its properties. The properties of the object passed to dialog.showOpen-Dialog() configure certain characteristics of the dialog box we’re creating. One such setting is the properties of the dialog box itself. The properties property on the configuration object takes an array of different flags we can set on the dialog box. In this case, we’re activating only the openFile flag, which signifies that this dialog box is for selecting a file to open—as opposed to selecting a directory or multiple files. The other flags available are openDirectory and multiselections.
dialog.showOpenDialog() returns the names of the files selected. An array of the paths selected by the user are stored in a variable called files. If the user presses cancel, dialog.showOpenDialog() returns undefined and breaks if we try to call any methods on files while it’s undefined. The return statement guards against that by leaving the function early if files is a false value—and undefined is, in fact, a false value.
getFileFromUser() must be called somewhere in our application to trigger the dialog box. Eventually, it will be called from the UI and the application menu. A convenient place to do this—for now—is when the application starts. Call getFileFrom-User() when the app module fires its ready event, as shown in the following listing. This step will be removed when our UI is configured to trigger getFileFromUser() from the renderer process.
app.on('ready', () => {
mainWindow = new BrowserWindow({ show: false });
mainWindow.loadFile('index.html');
mainWindow.once('ready-to-show', () => {
mainWindow.show();
getFileFromUser(); 1
});
mainWindow.on('closed', () => {
mainWindow = null;
});
});
When our application starts and the window is fully loaded, users immediately will see a File dialog box, which will allow them to select a file (see figure 4.2). We eventually remove this function call from the launch process and assign it to the Open File button in the UI.
In figure 4.3, we can see the results of our selection in the Open File dialog box displayed in our terminal. Notice that dialog.showOpenDialog() returns an array. If multiselections is activated in the dialog’s properties array, the user can select multiple files. Electron always returns an array for consistency.
dialog.showOpenDialog() returns an array consisting of the paths of the file or files that the user selected, but it does not read them on our behalf. Depending on what kind of file we’re building, we might want to handle opening the file differently. In this application, the contents of the file are read and immediately displayed in the UI. A different application that handles copying images or uploads them to an external service might take a contrasting approach when the user selects a file. Still another application might add a large movie to a playlist to watch later. In this case, it would be wasteful to immediately start opening the large file.
Node comes with a set of tools for working with files in its standard library. The built-in fs library handles common filesystem operations such as reading and writing files, so you should require it near the top of app/main.js.
const { app, BrowserWindow, dialog } = require('electron');
const fs = require('fs'); 1
app.on('ready',() => { ... }); 2
const getFileFromUser = () => {
const files = dialog.showOpenDialog(mainWindow, {
properties: ['openFile']
});
if (!files) { return; }
const file = files[0]; 3
const content = fs.readFileSync(file).toString(); 4
console.log(content);
};
In listing 4.4, the application opens only one file at a time. files[0] selects the first—and only—file path out of the array from dialog.showOpenDialog(). In fs.read-FileSync(file) the file path is passed as an argument to fs.readFileSync(). Node doesn’t know what kind of file was opened, so fs.readFileSync() returns a buffer object. We know, however, that we typically work with plain text in this particular application. We convert it to a string and log the contents of the file to the terminal, as shown in figure 4.4.
As you can see in figure 4.4, getFileFromUser() successfully logs the contents of a text file to the terminal. But there is a problem. By default, dialog.showOpenDialog() lets us open any file on our computer, with no consideration for what types of files we’re prepared to handle. Figure 4.5 shows the problematic result when we open an image file instead of a text file through the dialog box.
Many desktop applications can limit the file types that the users can open. This is also true for applications built with Electron. Our application isn’t suited for opening music files, so we should probably not let the user select MP3s. Additional options can be added to the configuration object passed to dialog.showOpenDialog() to restrict the dialog box to file extensions that we’ve whitelisted.
const getFileFromUser = () => {
const files = dialog.showOpenDialog({
properties: ['openFile'],
filters: [ 1
{ name: 'Text Files', extensions: ['txt'] },
{ name: 'Markdown Files', extensions: ['md', 'markdown'] }
]
});
if (!files) { return; }
const file = files[0];
const content = fs.readFileSync(file).toString();
console.log(content);
};
In the listing we added a second property to the object passed to dialog.showOpenDialog(). In Windows, the dialog displays the name Markdown Files in the drop-down menu, as seen in figure 4.6. In macOS, there is no drop-down menu, but we cannot select images that do not have one of the extensions, as shown in figure 4.7.
Electron applications are designed to be cross-platform, meaning they work on macOS, Windows, and Linux. Electron provides interfaces to native features and APIs that exist in each of the supporting operating systems but do not exist in the others. We saw this earlier when we provided a name for our file extension filters. This name appears in Windows, but macOS does not have this capability. Electron takes advantage of this feature if it is available, but it still works in the cases where it isn’t.
In macOS, we’re able to display dialog boxes that drop down as sheets from the top of the window instead of being displayed in front of it (listing 4.6). We can create this UI easily in Electron by passing a reference to the BrowserWindow instance—which we’ve stored in mainWindow—as the first argument to dialog.showOpenDialog(), before the configuration object.
const getFileFromUser = () => {
const files = dialog.showOpenDialog(mainWindow, { 1
properties: ['openFile'],
filters: [
{ name: 'Text Files', extensions: ['txt'] },
{ name: 'Markdown Files', extensions: ['md', 'markdown'] }
]
});
if (!files) { return; }
const file = files[0];
const content = fs.readFileSync(file).toString();
console.log(content);
};
With this simple change, Electron now displays the Open File dialog as a sheet that drops down from the window passed to the method, as shown in figure 4.8.
We’ve written all of the code for selecting files and reading files in our main process. But how do we send the contents of the file to the renderer process? How do we trigger the getFileFromUser() function in our main process from our UI?
We have to deal with similar issues when building traditional web applications. It’s not exactly the same because all of the code runs on the client’s computer, but thinking about how we usually build web applications can serve as a helpful metaphor for understanding how to structure our Electron applications. See figure 4.9.
On the web, we typically write code that runs in one of two places: on our servers or client-side code that runs in our users’ browsers. The client-side code is what renders the UI. It listens for and handles user actions and updates the UI to display the current state of the application. There are, however, limits to what we can do with client-side code. As we discussed in chapter 1, we cannot read from or write to the database or filesystem. Server-side code runs on our computer. It has access to the database. It can write to the log files on our system.
In traditional web applications, we typically facilitate communication between the client- and server-side processes using a protocol like HTTP. With HTTP, the client can send a request with information. The server receives this request, handles it appropriately, and sends a response to the client.
In Electron applications, things are a little different. As we’ve discussed in the previous chapters, Electron applications consist of multiple processes: one main process and one or more renderer processes. Everything runs on our computer, but there is a similar separation of roles to the client-server model. We don’t use HTTP to communicate between processes. Instead Electron provides several modules for coordinating communication between the main and renderer processes.
Our main process is in charge of interfacing with the native operating system APIs. It’s in charge of spawning renderer processes, defining application menus, displaying Open and Save dialog boxes, registering global shortcuts, requesting power information from the OS, and more. Electron enforces this by making many of the modules needed to perform these tasks available only in the main process, as shown in figure 4.10.
Electron provides only a subset of its modules to each process and doesn’t keep us from accessing Node APIs that are separate from Electron’s modules. We can access a database or the filesystem from the renderer process if we want, but there are compelling reasons to keep this kind of functionality in the main process. We could potentially have many renderer processes, but we will always have only one main process. Reading from and writing to the filesystem from one of our renderer processes could become problematic; we could end up in a situation where one or more processes try to write to the same file at the same time or read from a file while another renderer process is overwriting it.
A given process in JavaScript executes our code on a single thread and can do only one thing at a time. By delegating these tasks to the main process, we can be confident that only one process is performing reading or writing to a given file or database at a time. Other tasks follow the normal JavaScript protocol of patiently waiting in the event queue until the main process is done with its current task.
It makes sense that the main process handles tasks that call native operating system APIs or provides filesystem access, but the UI that likely triggers these operations is called in the renderer process. Even though all of the code is running on the same computer, we still have to coordinate the communication between our processes, just as we would have to coordinate communication between the client and server.
More recently, protocols like WebSockets and WebRTC have emerged that allow for two-way communication between the client and server, and even communication between clients, without needing a central server to facilitate communication. When we’re building desktop applications, we typically won’t be using HTTP or WebSockets, but Electron has several ways to coordinate interprocess communication, which we begin to explore in this chapter and is shown in figure 4.11.
Our UI contains a button with the label Open File. When the user clicks this button, our application should provide a dialog box allowing the user to select a file to open. After the user selects a file, our application should read the contents of the file, display them in the left pane of our application, and render the corresponding HTML in the right pane.
As you might have guessed, this requires us to coordinate between the renderer process, where the button was clicked, and the main process, which is responsible for displaying the dialog and reading the chosen file from the filesystem. After reading the file, the main process needs to send the contents of the file back over to the renderer process (next listing) to be displayed and rendered in the left and right panes, respectively.
const marked = require('marked');
const markdownView = document.querySelector('#markdown');
const htmlView = document.querySelector('#html');
const newFileButton = document.querySelector('#new-file');
const openFileButton = document.querySelector('#open-file');
const saveMarkdownButton = document.querySelector('#save-markdown');
const revertButton = document.querySelector('#revert');
const saveHtmlButton = document.querySelector('#save-html');
const showFileButton = document.querySelector('#show-file');
const openInDefaultButton = document.querySelector('#open-in-default');
const renderMarkdownToHtml = (markdown) => {
htmlView.innerHTML = marked(markdown, { sanitize: true });
};
markdownView.addEventListener('keyup', (event) => {
const currentContent = event.target.value;
renderMarkdownToHtml(currentContent);
});
openFileButton.addEventListener('click', () => { 1
alert('You clicked the "Open File" button.');
});
Start by adding an event listener to the Open File button in our renderer process. With our event listener in place, it’s time to coordinate with the main process to trigger the Open File dialog box we created earlier.
Electron provides numerous ways to facilitate interprocess communication. The first one is the remote module—a simple way to perform interprocess communication from the renderer process to the main process. The remote module, available only in the renderer process, works as a proxy to the main process by mirroring the modules that are accessible in the main process. The remote module also takes care of communication to and from the main process when we access any of those properties.
Depicted in figure 4.12, the remote module has several properties that overlap with the modules available only to the main process. In our renderer process, we can require the remote module, and it provides access to objects and properties in the main process, as shown in figure 4.13.
When we call a method or property on the remote object, it sends a synchronous message to the main process, executes in the main process, and sends a message back to the renderer process with the results. The remote module allows us to define functionality in the main process and easily makes it available to our renderer processes.
The application can now trigger an Open File dialog box and read the contents of the file that the user selected in the main process. We’ve also added an event listener to the Open File button in the renderer process. Now it’s just a matter of connecting them using the interprocess communication techniques we explored earlier.
To use functionality from the main process using the remote module, we need to take advantage of Node’s CommonJS module system to expose that functionality to other files in our application. We’ve used require in this book to pull in functionality from Electron, the Node standard library, and third-party libraries, but this is the first time we use it with our own code. Let’s spend a few minutes reviewing how it works.
Node’s module system consists of two primary mechanisms: the ability to require functionality from other sources, and the ability to export functionality to be consumed by other sources. When we require code from other sources, the other source could be a file we’ve written, a third-party module, a module from the Node, or a module provided by Electron. We’ve used Node’s built-in require function at the top of both our main and renderer processes.
When we require a module, what exactly are we importing? In Node, we explicitly declare what functionality should be exported from the module, as shown in listing 4.8. This function is imported in listing 4.9. Every module in Node has a built-in object called exports that starts out as an empty object. Anything we add to the exports object is available when we require it from another file.
exports.addTwo = n => n + 2;
const basicMath = require('./basic-math');
basicMath.addTwo(4); // returns 6
The built-in require function does not work across processes. When we’re working in the renderer process, any functionality we use from the built-in require function to import will be part of the renderer process. When we’re working in the main process, any functionality we require will be part of the main process. But what happens when we are in the renderer process and we want to require functionality from the main process?
Electron’s remote module has its own require method that allows it to require functionality from the main process in our renderer process. Using remote.require returns a proxy object—like the other properties on the remote object. Electron takes care of all of the interprocess communication on our behalf.
To implement the functionality we set out at the beginning of this chapter, the main process must export its getFileFromUser() function so that we can import it into our renderer code. This listing updates a single line in app/main.js.
const getFileFromUser = exports.getFileFromUser = () => { 1
const files = dialog.showOpenDialog(mainWindow, {
properties: ['openFile'],
filters: [
{ name: 'Text Files', extensions: ['txt'] },
{ name: 'Markdown Files', extensions: ['md', 'markdown'] }
]
});
if (!files) { return; }
const file = files[0];
const content = fs.readFileSync(file).toString();
console.log(content);
};
The code takes the getFileFromUser() function we created and exports it as a property with the same name on the exports object. The render process needs to bring in Electron’s remote module and then use the remote.require function to get a reference to the getFileFromUser() function from the main process in our renderer process. This is different from the built-in require function shown in listing 4.11 because the imported code is evaluated in terms of the main process, not the renderer process in which it was required. This is accomplished in four steps:
const { remote } = require('electron');
const mainProcess = remote.require('./main.js');
We can now call the getFileFromUser() function we exported from the main process in our renderer process. Let’s replace the functionality in our event listener to trigger the Open File dialog box instead of firing an alert.
openFileButton.addEventListener('click', () => {
mainProcess.getFileFromUser();
});
If we start our Electron application and click the Open File button, it correctly triggers the Open File dialog box. With that in place, we’re still logging the files only to the console in the main process. To complete our feature, the main process must send the file’s contents back to the renderer process to be displayed in our application.
The remote module facilitates access to functionality from the main process in our renderer processes, but it doesn’t allow for the inverse. To send the contents of the file that the user selected back to the renderer process to be rendered in the UI, we need to learn another technique for communicating between processes.
Each BrowserWindow instance has a property called webContents, which stores an object responsible for the web browser window that we create when we call new Browser-Window(). webContents is similar to app because it emits events based on the lifecycle of the web page in the renderer process.
The following is an incomplete list of some of the events that you can listen for on the webContents object:
webContents also has a number of methods that can trigger different functions in the renderer process from the main process. In the previous chapter, we opened the Chrome Developer Tools in the renderer process from the main process using mainWindow.webContents.openDevTools(). mainWindow.loadURL(’file://${__dirname}/index.html’), an alias for mainWindow.webContents.loadURL(), loaded our HTML file into the renderer process when the application first launched. Figure 4.14 shows more aliases.
webContents has a method called send() which sends information from the main process to a renderer process. webContents.send() takes a variable number of arguments. The first argument, which is an arbitrary string, is the name of the channel on which to send the message. An event listener in the renderer process listens on the same channel. This flow will become clearer when we see it in action. All of the subsequent arguments after the first are passed along to the renderer process.
Our current implementation reads the file that the user selected and logs it to the terminal. mainWindow.webContents.send() sends the contents of the file to the renderer process instead. The next chapter covers additional ways to open files that do not require a dialog box prompting the user to select a particular file because we do encounter situations where we will want to open a file without triggering the dialog box.
const getFileFromUser = exports.getFileFromUser = () => {
const files = dialog.showOpenDialog(mainWindow, {
properties: ['openFile'],
filters: [
{ name: 'Text Files', extensions: ['txt'] },
{ name: 'Markdown Files', extensions: ['md', 'markdown'] }
]
});
if (files) { openFile(files[0]); } 1
};
const openFile = (file) => {
const content = fs.readFileSync(file).toString();
mainWindow.webContents.send('file-opened', file, content); 2
};
The main process is now broadcasting the name of the file and its contents over the file-opened channel. The next step is to set up a listener on the file-opened channel in the renderer process using the ipcRenderer module. Electron comes with two basic modules for sending messages back and forth between processes: ipcRenderer and ipcMain. Each module is available only in the process type with which it shares a name.
ipcRenderer can send messages to the main process. More important to our immediate needs, it can also listen for messages that were sent from the main process using webContents.send(). It requires the ipcRenderer module in the renderer process.
const { remote, ipcRenderer } = require('electron'); 1
const mainProcess = remote.require('./main.js');
With that in place, we can now set up a listener. ipcRenderer listens on the file-opened channel, adds the content to the page, and renders the Markdown as HTML.
ipcRenderer.on('file-opened', (event, file, content) => {
markdownView.value = content;
renderMarkdownToHtml(content);
});
ipcRenderer.on() takes two arguments: the channel to listen on and a callback function that defines an action to take when the renderer process receives a message on the channel on which you’re setting up the listener. The callback function is provided with a few arguments when it is called. The first is an event object, which is just like a normal event listener in the browser. It contains information about the event for which we set up the listener. The additional arguments are what were provided when using webContents.send() in the main process. In listing 4.13, we sent the name of the file and its contents. Those will be additional arguments passed to our listener.
With these new additions, the user can now click the Open File button, select a file using a native file dialog box, and render the contents in the UI. We’ve successfully implemented the feature that we set out to implement at the beginning of the chapter. The code for our main and renderer processes should look something like the following two listings.
const { app, BrowserWindow, dialog } = require('electron');
const fs = require('fs');
let mainWindow = null;
app.on('ready', () => {
mainWindow = new BrowserWindow({ show: false });
mainWindow.loadFile('index.html');
mainWindow.once('ready-to-show', () => {
mainWindow.show();
});
mainWindow.on('closed', () => {
mainWindow = null;
});
});
const getFileFromUser = exports.getFileFromUser = () => {
const files = dialog.showOpenDialog(mainWindow, {
properties: ['openFile'],
filters: [
{ name: 'Text Files', extensions: ['txt'] },
{ name: 'Markdown Files', extensions: ['md', 'markdown'] }
]
});
if (files) { openFile(files[0]) }
};
const openFile = (file) => {
const content = fs.readFileSync(file).toString();
mainWindow.webContents.send('file-opened', file, content);
};
const { remote, ipcRenderer } = require('electron');
const mainProcess = remote.require('./main.js');
const marked = require('marked');
const markdownView = document.querySelector('#markdown');
const htmlView = document.querySelector('#html');
const newFileButton = document.querySelector('#new-file');
const openFileButton = document.querySelector('#open-file');
const saveMarkdownButton = document.querySelector('#save-markdown');
const revertButton = document.querySelector('#revert');
const saveHtmlButton = document.querySelector('#save-html');
const showFileButton = document.querySelector('#show-file');
const openInDefaultButton = document.querySelector('#open-in-default');
const renderMarkdownToHtml = (markdown) => {
htmlView.innerHTML = marked(markdown, { sanitize: true });
};
markdownView.addEventListener('keyup', (event) => {
const currentContent = event.target.value;
renderMarkdownToHtml(currentContent);
});
openFileButton.addEventListener('click', () => {
mainProcess.getFileFromUser();
});
ipcRenderer.on('file-opened', (event, file, content) => {
markdownView.value = content;
renderMarkdownToHtml(content);
});
Right now, when Fire Sale starts up, it creates a single window for the UI. When that window is closed, the application quits. Although this behavior is perfectly acceptable, we typically expect to be able to open multiple, independent windows. In this chapter, we convert Fire Sale from a single-window application to one that supports multiple windows. Along the way, we’ll explore new Electron APIs as well as some of JavaScript’s more recent additions. We also explore solutions to problems that occur when taking a main process that is configured to communicate with one renderer process (see figure 5.1) and refactoring it to manage a variable number of processes (see figure 5.2). The completed code at the end of this chapter can be found at http://mng.bz/V145. We start from the chapter-4 branch, however.
We start by instantiating a Set data structure, which was added to JavaScript in 2015 and tracks all of the user’s windows. Next, we create a function that manages the lifecycle of an individual window. After that’s in place, we modify the functions that we created in chapter 4 for prompting the user to select a file and opening it to target the correct window. In addition, we also take care of some common edge cases and other quirks that arise along the way, such as windows that eclipse each other.
Sets are a new data structure to JavaScript and were added in the ES2015 specification. A set is a collection of unique elements; an array can have duplicate values in it. I chose to use a set rather than an array because it’s easier to remove an element. This listing shows how to create a Set in JavaScript.
const windows = new Set();
With an array, we’d have to either find the index of the window and remove it, or create an array without that window. Neither approach is as simple as calling the delete method on the set and passing it a reference to the window that we want to remove.
With a data structure in place to track all of the application’s windows, the next step is to move the process of creating a BrowserWindow (listing 5.2) out of the application’s “ready” event listener and into its own function.
const createWindow = exports.createWindow = () => {
let newWindow = new BrowserWindow({ show: false });
newWindow.loadFile('index.html');
newWindow.once('ready-to-show', () => {
newWindow.show();
});
newWindow.on('closed', () => {
windows.delete(newWindow); 1
newWindow = null;
});
windows.add(newWindow); 2
return newWindow;
};
The createWindow() function creates a BrowserWindow instance and adds it to the set of windows that we created in listing 5.1. Next we repeat the steps for creating a new window from the previous chapters. Closing the window removes it from the set. Finally, we return a reference to the window that was just created. We need this reference in the next chapter.
When the application is ready, call the new createWindow() function, shown in the following listing. The application should start in the same manner as it did before we implemented this change, but it also sets the stage to create additional windows in other contexts.
app.on('ready', () => {
createWindow();
});
The application starts as before, but if you try to click the Open File button, you’ll notice that it’s broken. This is because we’re still referencing mainWindow in a few places. It’s referenced in dialog.showOpenDialog() to display the dialog box as a sheet in macOS. More importantly, it is referenced in openFile() after the file’s contents have been read from the filesystem and we send it to the window.
Having multiple windows raises the question: to which window do we send the file path and contents? To support multiple windows, these two functions must reference the window where the dialog box should be displayed and the contents sent, as shown in figure 5.3.
In listing 5.4, let’s refactor the getFileFromUser() function to accept a given window as an argument instead of always assuming that there is a mainWindow instance in scope.
const getFileFromUser = exports.getFileFromUser = (targetWindow) => { 1
const files = dialog.showOpenDialog(targetWindow, { 2
properties: ['openFile'],
filters: [
{ name: 'Text Files', extensions: ['txt'] },
{ name: 'Markdown Files', extensions: ['md', 'markdown'] }
]
});
if (files) { openFile(targetWindow, files[0]); } 3
};
In the code excerpt, we’ve modified getFileFromUser() to take a reference to a window as an argument. I avoided naming the argument window because it might be confused with the global object in the browser. After the user has selected a file, we pass the targetWindow to openFile() in addition to the file path, shown here.
const openFile = exports.openFile = (targetWindow, file) => { 1
const content = fs.readFileSync(file).toString();
targetWindow.webContents.send('file-opened', file, content); 2
};
After the contents of the file have been read from the filesystem, we send the file’s path and content to the window passed in as the first argument. This raises the question, though: How do we get a reference to the window?
getFileFromUser() is called from the renderer process using the remote module to facilitate communication to the main process. As we saw in the previous chapter, the remote module contains references to all the modules that would otherwise be exclusively available to the main process. It turns out that remote also has a few other methods—notably, remote.getCurrentWindow(), which returns a reference to the BrowserWindow instance from which it was called, shown here.
const currentWindow = remote.getCurrentWindow();
Now that we have a reference to the window, the last step necessary to complete the feature is to pass it along to getFileFromUser(). This lets the functions in the main process know which—of our soon to be many—browser windows they’re working with.
openFileButton.addEventListener('click', () => {
mainProcess.getFileFromUser(currentWindow);
});
When we implemented the Markup for the UI in chapter 3, we included a New File button. We now have the createWindow() function implemented in and exported from the main process. We can quickly wire up that button as well.
newFileButton.addEventListener('click', () => {
mainProcess.createWindow();
});
We can make a few more enhancements to our implementation of multiple windows in the main process, but we’re finished in the renderer process for this chapter. The current state of the code in app/renderer.js follows.
const { remote, ipcRenderer } = require('electron');
const mainProcess = remote.require('./main.js');
const currentWindow = remote.getCurrentWindow();
const marked = require('marked');
const markdownView = document.querySelector('#markdown');
const htmlView = document.querySelector('#html');
const newFileButton = document.querySelector('#new-file');
const openFileButton = document.querySelector('#open-file');
const saveMarkdownButton = document.querySelector('#save-markdown');
const revertButton = document.querySelector('#revert');
const saveHtmlButton = document.querySelector('#save-html');
const showFileButton = document.querySelector('#show-file');
const openInDefaultButton = document.querySelector('#open-in-default');
const renderMarkdownToHtml = (markdown) => {
htmlView.innerHTML = marked(markdown, { sanitize: true });
};
markdownView.addEventListener('keyup', (event) => {
const currentContent = event.target.value;
renderMarkdownToHtml(currentContent);
});
newFileButton.addEventListener('click', () => {
mainProcess.createWindow();
});
openFileButton.addEventListener('click', () => {
mainProcess.getFileFromUser(currentWindow);
});
ipcRenderer.on('file-opened', (event, file, content) => {
markdownView.value = content;
renderMarkdownToHtml(content);
});
When clicking the New File button after implementing the event listener in the previous chapter, you might have been confused whether it was working. You may have noticed that the drop shadow around the window got darker, or you may have clicked and dragged the new window and revealed the previous window underneath.
The minor problem that we have right now is that each new window appears in the same default position as the first window and completely eclipses it. It might be more obvious that the new window is created if it is slightly offset from the previous window, as shown in figure 5.4. This listing shows how to offset the window.
const createWindow = exports.createWindow = () => {
let x, y;
const currentWindow = BrowserWindow.getFocusedWindow(); 1
if (currentWindow) { 2
const [ currentWindowX, currentWindowY ] = currentWindow.getPosition();
x = currentWindowX + 10;
y = currentWindowY + 10;
}
let newWindow = new BrowserWindow({ x, y, show: false }); 3
newWindow.loadFile('index.html');
newWindow.once('ready-to-show', () => {
newWindow.show();
});
newWindow.on('closed', () => {
windows.delete(newWindow);
newWindow = null;
});
windows.add(newWindow);
return newWindow;
};
In addition to instantiating instances with the new keyword, the BrowserWindow module also has methods of its own. We can use BrowserWindow.getFocusedWindow() to get a reference to the window with which the user is currently working. When the application is first ready and we call createWindow(), there isn’t a focused window and BrowserWindow.getFocusedWindow() returns undefined. If there is a window, we call its getWindow() method, which returns an array with the x- and y-coordinates of the window. We’ll store these values in two variables outside of the conditional block and pass them to the BrowserWindow constructor. If they’re still undefined (for example, there was no focused window), then Electron uses the defaults, just as it did before we implemented this feature. Figure 5.4 shows a second window offset from the first.
This isn’t the only way to implement this feature. Alternatively, you could track an initial x- and y-position and increment those values on each new window. Or, you could add a slight bit of randomness to the default x- and y-values so that each window is slightly offset. I leave those methods as exercises to the reader.
In macOS, many—but not all—applications remain open, even when all their windows are closed. For example, if you closed all your windows in Chrome, the application remains active in the dock and still appears in the application switcher. Fire Sale doesn’t do that.
In earlier chapters, this might have been acceptable. We had one window and no way of creating additional windows. In this section, we enable the application to remain open only in macOS. By default, Electron quits the application when it fires its window-all-closed event. If we want to prevent this behavior, we must listen for this event and conditionally stop it from closing if we’re running on macOS.
app.on('window-all-closed', () => {
if (process.platform === 'darwin') { 1
return false; 2
}
app.quit(); 3
});
The process object is provided by Node and globally available without needing to be required. process.platform returns the name of the platform in which the application is currently executing. As of this writing, process.platform returns one of five strings: darwin, freebsd, linux, sunos, or win32. Darwin is the UNIX operating system that macOS is built on. In listing 5.11, we checked if process.platform is equal to darwin. If it is, then the application is running on macOS and we want to return false to stop the default action from occurring.
Keeping the application alive is half the battle. What happens if the user clicks the application in the dock and no windows are open? In this situation Fire Sale should open a new window and display it to the user as shown here.
app.on('activate', (event, hasVisibleWindows) => { 1
if (!hasVisibleWindows) { createWindow(); } 2
});
The activate event passes two arguments to the callback function provided. The first is the event object. The second is a Boolean, which returns true if any windows are visible and false if all the windows are closed. In the case of the latter, we call the createWindow() function that we wrote earlier in the chapter.
The activate event fires only on macOS, but there are plenty of reasons why you might choose to have your application remain open on Windows or Linux, particularly if the application is running background processes that you want to continue even if the window is dismissed. Another possibility is that you have an application that can be hidden, or shown with a global shortcut, or from the tray or menu bar. We implement each of these in later chapters.
With these two additional events, we’ve converted Fire Sale from a single-window application to one that supports multiple windows. This listing shows the code for the main process in its current form.
const { app, BrowserWindow, dialog } = require('electron');
const fs = require('fs');
const windows = new Set();
app.on('ready', () => {
createWindow();
});
app.on('window-all-closed', () => {
if (process.platform === 'darwin') {
return false;
}
});
app.on('activate', (event, hasVisibleWindows) => {
if (!hasVisibleWindows) { createWindow(); }
});
const createWindow = exports.createWindow = () => {
let x, y;
const currentWindow = BrowserWindow.getFocusedWindow();
if (currentWindow) {
const [ currentWindowX, currentWindowY ] = currentWindow.getPosition();
x = currentWindowX + 10;
y = currentWindowY + 10;
}
let newWindow = new BrowserWindow({ x, y, show: false });
newWindow.loadFile('index.html');
newWindow.once('ready-to-show', () => {
newWindow.show();
});
newWindow.on('closed', () => {
windows.delete(newWindow);
newWindow = null;
});
windows.add(newWindow);
return newWindow;
};
const getFileFromUser = exports.getFileFromUser = (targetWindow) => {
const files = dialog.showOpenDialog(targetWindow, {
properties: ['openFile'],
filters: [
{ name: 'Text Files', extensions: ['txt'] },
{ name: 'Markdown Files', extensions: ['md', 'markdown'] }
]
});
if (files) { openFile(targetWindow, files[0]); }
};
const openFile = exports.openFile = (targetWindow, file) => {
const content = fs.readFileSync(file).toString();
targetWindow.webContents.send('file-opened', file, content);
};
Over the previous two chapters, we implemented the ability to read a file from the filesystem and display it in a browser window of our application. This exercise demonstrated how interprocess communication works in Electron, as well as Electron’s ability to bridge the gap between a traditional browser-based application and a Node.js application. In the previous chapter, we also added support for multiple browser windows.
In the name of clarity, I kept our initial implementation naively simple. It turns out that users interact with files in a surprising number of different ways—even in a simple note-taking application like Fire Sale. A user might start writing a new note from the empty window spawned when the application initially launches, or they may choose to open an existing file from the filesystem. A user might click the Open File button we implemented earlier, or they might select the file from a list of recently opened documents. The path a user chooses impacts how our application behaves when they wish to save it. If it’s a new file, then we must prompt the user to provide a location to write the new file. If it’s an existing file, then the application should just overwrite the file the user originally selected from the Open File dialog box.
Users have come to expect several features from modern applications. Our application should provide visual indications that a file has been changed since it was originally opened or the last time it was saved. It should integrate with the operating system’s list of recent documents and follow OS-level conventions for how the window’s title bar should look, depending on the state of the file.
In this chapter, we rethink our approach to managing files as we implement the ability to save the Markdown text of our application, export the rendered HTML, and revert changes to unsaved files. We also explore additional ways to open files, such as using the HTML5 File API to implement a drag-and-drop feature to the left pane of the application. Finally, we don’t want our users to end up in a situation where they edit a Markdown file in some other application and accidentally overwrite the changes when they save the file in Fire Sale. Therefore, we listen for external changes to the current file by other applications. Throughout this chapter, we implement all the functionality outlined in figure 6.1.
I’ll be starting from the chapter-5 branch of the repository as a starting point. You can also find the completed example in the chapter-6 branch.
As we begin working with different files in our application, it’s helpful to track the file with which we’re currently working. This way, we know which file a user is working on if they ask to save it. Suppose that Mildred has an important stroke of inspiration and wants to record her genius idea into Fire Sale. She opens her list of important thoughts and jots down notes. Right now, Fire Sale doesn’t know if Mildred is editing a new or existing file. The application also doesn’t have a way to track what file Mildred is working on when she selects a file to open.
To solve this problem, we need to implement the ability to keep track of what file Fire Sale is currently working with. In chapter 4, whenever a new file was opened, we sent the contents of the file as well as the path of the file that was just opened from the main process to the renderer process that requested the file. We populated the right and left panes of the application with the content. Our next step is to enable the renderer process to track the path of the file that is currently being displayed to the user. Doing so allows us to save changes without prompting the user for a file location.
We also have a Revert button in the UI. If the user clicks this button, it should roll back any unsaved changes and return the content to its last saved state. A simple way to handle this action is to store a copy of the content whenever a file is opened. If the user clicks Revert, Fire Sale replaces the content in the UI with the cached content from the last time the file was opened.
Let’s start with some sensible defaults for the case where the user opens a new window that isn’t yet tied to a given file. We declare two variables in the top level of the renderer process to track the original content of the current file and its file path.
let filePath = null; let originalContent = '';
I chose to use an empty string instead of null for originalContent because that’s the value of an empty input or textarea in the browser. Later in the chapter, this setting makes it easier for us to see if a new document has been edited.
Whenever a file has been opened and sent to the renderer process, we need to update these values. We take care of this in the IPC event listener on the file-opened channel we set up in chapter 4.
ipcRenderer.on('file-opened', (event, file, content) => {
filePath = file; 1
originalContent = content; 2
markdownView.value = content; 3
renderMarkdownToHtml(content); 4
});
Mildred can open a file on her computer, edit it, and save the changes, but she currently has no way of knowing what file she is working with. Are these the meeting minutes from this week, or the meeting she missed while on vacation in Greenland? She has multiple windows open and can’t tell which is which. In the previous section, we implemented a feature that allowed each window in Fire Sale to keep a reference to the current file, but we did not add anything to the UI to share that information with the user. The common pattern for desktop applications is to show the name of the file that is currently active in the title bar of the window, as shown in figure 6.2. In this section, we’ll follow best practices and implement this pattern in Fire Sale.
By default, the application’s window displays the title of the HTML page, which is defined in app/index.html. This is a reasonable default, but many native desktop applications display the name or path of the current file. One approach is to update the title of the window whenever the user opens a new file. In addition to displaying the name of the currently open file (as in listing 6.3), we may want to display other information in the window’s title such as whether the current file has been edited since it was saved. We also need to update the window’s title for a few different contexts, such as editing and saving the file.
All BrowserWindow instances have a method called setTitle() that allows us to programmatically manipulate the window’s title. Later in this chapter, we display information about whether the file has been edited since the last time it was saved or since it was opened. We create a method called updateUserInterface() that eventually encapsulates all of this logic as well as some other features down the road like enabling the Save File and Revert buttons if the file contains unsaved changes.
const path = require('path');
const updateUserInterface = () => {
let title = 'Fire Sale';
if (filePath) { title = `${path.basename(filePath)} - ${title}`; } 1
currentWindow.setTitle(title); 2
};
We start with the default title. If a file is currently open, we modify the title to include the file path. The path can be long and most of the information, such as the root of the filesystem or where the users’ folders are stored, is not important to our users. We use path.basename() to extract the name of the file itself from the full file path. Finally, we take the reference to the current window that we defined in chapter 5 and set its title. We’ll call this function as the last step whenever a new file is opened.
ipcRenderer.on('file-opened', (event, file, content) => {
filePath = file;
originalContent = content;
markdownView.value = content;
renderMarkdownToHtml(content);
updateUserInterface(); 1
});
In the midst of taking important notes in Fire Sale, Mildred realizes that she’s 20 minutes late for a meeting. She wants to close Fire Sale before rushing down to the fifth floor, but she is unsure if she has saved her recent changes to the file she was working on. We have lots of good reasons to track whether the user has edited the file since they opened it. We might want to prompt the user if they attempt to close the window and they have unsaved changes. Or, we might want to show only certain UI elements if the file has been modified (see figure 6.3).
In this section, we add a visual cue in the UI. The Save File button is enabled only if the file has been modified. In addition, we append (Edited) to the title bar (see figure 6.4). To add this feature, we’ll take advantage of the abstraction we began building earlier in this chapter and add functionality to detect if the file has been modified. We have a few approaches we could take.
A naive—and flawed—way to check if a file has changed is to listen for either a keyup or change event in our UI. If the user adds a character and then removes it, this approach still considers the file modified, which is not consistent with how other native desktop applications behave.
To determine whether the file has been modified, we need two pieces of information: the original and current contents of the file. We were crafty enough to store the original contents in listing 6.2. If those two pieces of information are identical, then the file has not changed. But if they differ, even slightly, then we know we have a modified file on our hands.
To implement this feature, modify updateUserInterface() to take an argument called isEdited. On keyup, we compare the current value of the textarea with the originalContent and call updateUserInterface() with the result. BrowserWindow instances have a setDocumentEdited() method, which takes a Boolean. This will subtly modify the window on macOS; for Windows and Linux users, we append (Edited) to the window title.
const updateUserInterface = (isEdited) => { 1
let title = 'Fire Sale';
if (filePath) { title = `${path.basename(filePath)} - ${title}`; }
if (isEdited) { title = `${title} (Edited)`; }
currentWindow.setTitle(title);
currentWindow.setDocumentEdited(isEdited); 2
};
The last step is to have the renderer process call the updateUserInterface() method every time the user lifts their finger from a key while typing.
markdownView.addEventListener('keyup', (event) => {
const currentContent = event.target.value;
renderMarkdownToHtml(currentContent);
updateUserInterface(currentContent !== originalContent); 1
});
With these steps in place, your application can tell if it is in an edited and unsaved state. But we have a problem. The Save File and Revert buttons are still disabled. These buttons should be enabled only if there are unsaved changes. It’s easy to take care of this as we update the window itself.
const updateUserInterface = (isEdited) => {
let title = 'Fire Sale';
if (filePath) { title = `${path.basename(filePath)} - ${title}`; }
if (isEdited) { title = `${title} (Edited)`; }
currentWindow.setTitle(title);
currentWindow.setDocumentEdited(isEdited);
saveMarkdownButton.disabled = !isEdited; 1
revertButton.disabled = !isEdited; 2
};
We implement the functionality for these buttons later in the chapter.
macOS windows support small representations of the current file in the window’s menu bar. Hold and press Command while clicking the file icon to trigger a drop-down menu showing where the file exists in the filesystem’s hierarchy, as shown in figure 6.5. You can also click and drag the icon—it acts as if you dragged the file from Finder. All BrowserWindow instances have a method called setRepresentedFilename(), which accepts a valid file path as an argument. This method has no effect in Windows. Let’s add this feature to our updateWindowTitle() method. Then we check to see if we have a valid path property and—if so—set it as the represented file for macOS windows.
This is unlike updating the title of the window with additional information, like whether the file has been edited. The represented file remains the same until the user opens another file in the same window. We don’t need to update this value on keyup. We have two options: We could set the represented file in the main process before sending the path and content to the renderer process, or we could use the current-Window reference in the renderer process after it has received the file. I’m going to go with the former, but both approaches are acceptable.
const openFile = exports.openFile = (targetWindow, file) => {
const content = fs.readFileSync(file).toString();
targetWindow.setRepresentedFilename(file); 1
targetWindow.webContents.send('file-opened', file, content);
};
Now that Mildred is back from her meeting, she wants to get back to work. It was a long meeting, and she doesn’t quite remember what notes she’s been working on recently. Our current implementation doesn’t have a way to help her out either. The operating system, however, does this stuff all the time. Whenever the user opens a file, let’s have Electron notify the operating system that it should add the file to the list of recently opened files.
When opening a file in either macOS or Windows, Electron can add the file path to the operating system’s list of recently opened documents. This list is available by right-clicking the Dock icon in macOS (figure 6.6) or the Taskbar icon in Windows (figure 6.7).
The operating system tracks the files opened by each application. It also provides a master list of recently opened files. In Windows, this list is found in the File Explorer. In macOS, you can find the list of Recent Items in the Apple menu (figure 6.8). When a document is selected from the global list of recent documents, it is opened in the default application for that type of document. In this chapter, we primarily concern ourselves with the list of recent documents specific to our application.
You can add a file path to the recent documents list in Electron using app.add-RecentDocument() and providing the file path as an argument. In the next listing, we add the path of the file we’re opening with openFile() to the list of recent documents.
const openFile = exports.openFile = (targetWindow, file) => {
const content = fs.readFileSync(file).toString();
app.addRecentDocument(file); 1
targetWindow.setRepresentedFilename(file);
targetWindow.webContents.send('file-opened', file, content);
};
If you open a few files in Fire Sale, you see that they’re being appended to the list of recent files. But if you try to select any of the entries in this list, nothing happens. The operating system is asking Fire Sale to open the file, but our application doesn’t know how to yet. We must implement this feature ourselves.
In chapter 4 we added the ability to trigger an Open File dialog from the UI. When a user selects a file using the dialog, the file path is passed to an open file, which reads the contents of the file and sends those contents to the renderer process to be displayed in the left pane, which—finally—triggers the right pane to be updated with the resulting HTML. At the time, we briefly discussed that there were other ways a user might open a file, and that’s why it makes sense to separate the process of triggering the dialog box from the process of opening the file.
Selecting an item from the Recent Documents menu is one instance where the user wants to open a file without being prompted with an Open File dialog box. Whenever a file is opened from outside of the application, Electron’s app module fires an open-file event. In our code, we can listen for the open-file event and handle it accordingly. We should, however, wait until the application is fully up and running, so we’ll set up our listener once the application fires its will-finish-launching event in app/main.js.
app.on('will-finish-launching', () => {
app.on('open-file', (event, file) => { 1
const win = createWindow();
win.once('ready-to-show', () => {
openFile(win, file);
});
});
});
Now when the user selects a file in Fire Sale’s list of recent documents, the application creates a new window and opens the file path in the new window—just as if you’d selected it using the Open File button in the UI that we implemented in chapter 4.
Saving files with Electron is similar to opening files, but with one difference: users might want to save changes to the Markdown file, or they might want to export the HTML that was generated by their application.
If the user is saving a new file for the first time, then the application should ask where the user wants to save the file and what name they want to give it. After that, it should keep track of that name and update the window title as it if had originally opened the file from the filesystem. If the user is saving changes to an existing Markdown file, then the application does not need to prompt to specify a location and filename for the file. Implementing the ability to save files is more than just writing content to the filesystem. We must also update the UI to show where the current file is being saved and if it has been modified since the last time it was saved to the filesystem.
In the Fire Sale case, saving the HTML output is a bit more straightforward since the application doesn’t allow the user to edit the HTML output after it has been saved. Exporting the generated HTML is a lot like saving a file for the first time, but we don’t need to track where it was saved or reflect its new location in the UI. It’s the easiest of the three to implement, so let’s take care of that feature first.
To allow for exporting the generated HTML, we add a saveHtml() function to the main process that asks the user where they’d like to save the HTML file, grabs the content from the HTML view, and then writes the file to the filesystem.
As you might expect, triggering the native dialog box for saving files is similar to triggering one for opening files. The biggest difference is that instead of prompting the user to select a specific file to open, we will ask the user for a filename and location to write to the filesystem. The contents of the file is passed as an argument to the showSaveFileDialog() function.
In the app/main.js, add the function shown in listing 6.11. When this function is run, Electron presents a dialog box asking the user to select a file path where the contents should be written. Once the user selects a file path, we use Node’s built-in fs module to write the contents of the file to the filesystem.
const saveHtml = exports.saveHtml = (targetWindow, content) => {
const file = dialog.showSaveDialog(targetWindow, {
title: 'Save HTML',
defaultPath: app.getPath('documents'), 1
filters: [
{ name: 'HTML Files', extensions: ['html', 'htm'] }
]
});
if (!file) return; 2
fs.writeFileSync(file, content);
};
In the example, dialog.showSaveDialog() takes two arguments. The first is a reference to a BrowserWindow, which is used to display the dialog box as a sheet in macOS only. The second argument is an options object that allows you to pass keys and values to configure the dialog box itself. The object provided to dialog.showSaveDialog() works with the following options:
We’re implementing the ability to save files, but where should we prompt the user to save those files and how does it differ depending on which operating system they’re using? Windows, macOS, and Linux organize their files differently. Ideally, a cross-platform Electron application should default to show the correct directory on each platform. Electron provides app.getPath(), which automatically returns the correct file path based on the user’s platform, saving the developer from having to write error-prone conditional logic. In listing 6.11, we set the default path to app.getPath(’documents’), which will be My Documents on Windows and the Documents folder in the user’s home directory on macOS. Electron provides the following additional paths:
You might want your application to override one of the defaults provided by app.getPath(). You can do this using app.setPath(), which takes two arguments: the name from the previous list and the new path to which you’d like it to resolve. It’s important to note that you can override only paths from the previous list. If you’re going to override one of these paths, you must do it before the application fires its “ready” event.
We didn’t implement a default path in the showOpenFile() function in the previous chapter, but that’s a good candidate for using this approach as well. It would make sense for a music player to default to the directory where users typically store their music, or a photograph management application to default to app.getPath(’pictures’).
Now we enable the Fire Sale application to save the rendered HTML content, shown in figure 6.9. To focus on learning the fundamentals of Electron, we’ll simply take the HTML content of the right pane and pass it to showSaveFileDialog(). A more robust approach would be to add a doctype as well as <html>, <head>, and <body> tags to make it a valid HTML document. Additionally, we could add metadata about the document and a default style sheet, but that is beyond the scope of this book. In the next chapter, we add in the ability to trigger this functionality from the application’s menu as well.
saveHtmlButton.addEventListener('click', () => {
mainProcess.saveHtml(currentWindow, htmlView.innerHTML);
});
Saving the current file is like saving the HTML output with one small difference: if the file was opened from the filesystem, then the application does not need to prompt the user for a file path. Instead, the application just uses filePath as the location where the file should be written.
const saveMarkdown = exports.saveMarkdown = (targetWindow, file, content) => {
if (!file) { 1
file = dialog.showSaveDialog(targetWindow, {
title: 'Save Markdown',
defaultPath: app.getPath('documents'),
filters: [
{ name: 'Markdown Files', extensions: ['md', 'markdown'] }
]
});
}
if (!file) return; 2
fs.writeFileSync(file, content); 3
openFile(targetWindow, file);
};
This code is flexible enough to handle the case where we’re saving a new file, as well as the case where we’re updating an existing file. If you recall from earlier in the chapter, the filePath property’s value defaults to null until the user opens a file. If the filePath property is false, then Electron prompts the user to select a file path using the native Save File dialog. It then saves the user-selected location to the filePath property.
Conversely, if it already knows where the file is located, then it moves forward and skips directly to writing the content to the filesystem. For the sake of brevity, I called openFile() on the file we just saved. If it’s a new file that we’re saving for the first time, then we would want to add it to the operating system’s list of recent documents and set it as the represented file. Abstracting that out into its own function that we can call without having to read the file from disk again is an exercise that I leave to the reader.
No functionality is complete if there is no way to trigger it. The application needs an event listener on the Save File button that triggers our new functionality.
saveMarkdownButton.addEventListener('click', () => {
mainProcess.saveMarkdown(currentWindow, filePath, markdownView.value);
});
Given the way we’ve structured our application so far, adding a feature is easy. When the user clicks the Revert button, we replace the value of the Markdown view with the original content of the file that we cached when we last opened or saved it, and then trigger the HTML view to be re-rendered with the cached content as well.
revertButton.addEventListener('click', () => {
markdownView.value = originalContent;
renderMarkdownToHtml(originalContent);
});
Later in the chapter, we’ll prompt the user to make sure that they want to blow away all their changes before moving forward.
Electron applications support the HTML5 File API, which allows us to create a feature for our application where users can drag a file onto certain elements in the DOM and drop them. You have seen this API used for uploading photographs in Twitter’s web application or attaching a file to an email in Gmail. In Fire Sale, we take advantage of this API to allow the user to open files by dragging them onto the Markdown view of the UI.
The default action of a web browser when a file is dropped into the browser window is to open the file in the browser itself. We can drag files onto our application and watch in terror as the contents of the file completely replace the UI. This is even more problematic when you consider that we don’t have a Back button to rely on.
The first step to creating a drag-and-drop feature for our application is to disable the default behavior by adding an event listener to the document itself that prevents the default action. Later, we’ll opt back in and customize the behavior for the Markdown pane in our UI.
document.addEventListener('dragstart', event => event.preventDefault());
document.addEventListener('dragover', event => event.preventDefault());
document.addEventListener('dragleave', event => event.preventDefault());
document.addEventListener('drop', event => event.preventDefault());
Though it’s not necessary to implement the feature itself, it’s often helpful to give the user a visual indication that they can drag a file onto an area within your application. We define two additional CSS classes that can be added and removed with JavaScript, depending upon whether the item being dragged is valid.
.raw-markdown.drag-over { 1
background-color: rgb(181, 220, 216);
border-color: rgb(75, 160, 151);
}
.raw-markdown.drag-error { 2
background-color: rgba(170, 57, 57,1);
border-color: rgba(255,170,170,1);
}
Before we begin implementing this feature, shown in listing 6.18, it would be nice to have some helper functions. I’m going to create two suspiciously similar functions: getDraggedFile() and getDroppedFile(). One important distinction between the two: When a user is dragging a file, we have access only to its metadata. Only after the user officially drops the file do we have access to the File object. getDraggedFile() will pick the file’s metadata—in the form of a DataTransferItem object—out of the event object, which has a large number of other properties, such as where the mouse was when the event was fired and much more. getDroppedFile() pulls the first element from the files array, which was empty when the user was simply dragging the file.
This process might seem arduous, but it is all in the name of security. You might pass over windows that should not know about the file you’re attempting to drop on your way to your intended application because that file could very well contain sensitive information. But once you’ve let go and dropped the file, then the browser assumes that this action is intentional and allows the application to read the file. fileTypeIsSupported() checks to see if the type of file being dragged is either of the two types supported by Fire Sale and returns a Boolean based on the result.
const getDraggedFile = (event) => event.dataTransfer.items[0]; 1
const getDroppedFile = (event) => event.dataTransfer.files[0]; 2
const fileTypeIsSupported = (file) => {
return ['text/plain', 'text/markdown'].includes(file.type); 3
};
When the user drags a file over the browser window, it rapid-fires dragover events until the user either leaves the target area—in which case, a dragleave event—or the user lifts their finger from the mouse or trackpad and drops the file onto the target area, which triggers a drop event.
During the dragover phase, we can give the user a visual clue as to whether the drop is going to be successful, as shown in figure 6.10. If the user is dragging a file type that we’re not prepared to support, we can add the .drag-error class to the element (see figure 6.11). Otherwise, we’ll add the .drag-over class to indicate that the user can drop a file here. When the user removes the file from the target area, we’ll clean up any classes that were added and restore the UI to its default state.
markdownView.addEventListener('dragover', (event) => {
const file = getDraggedFile(event);
if (fileTypeIsSupported(file)) {
markdownView.classList.add('drag-over'); 1
} else {
markdownView.classList.add('drag-error'); 2
}
});
markdownView.addEventListener('dragleave', () => { 3
markdownView.classList.remove('drag-over');
markdownView.classList.remove('drag-error');
});
When the user successfully drops the file onto the left pane, the code in listing 6.20 once again confirms that Fire Sale supports this type of file. If it does, we pass it over to the activeFile object in the main process that we created earlier, to be opened as if we selected it from the dialog box or from the recent documents list.
markdownView.addEventListener('drop', (event) => {
const file = getDroppedFile(event);
if (fileTypeIsSupported(file)) {
mainProcess.openFile(currentWindow, file.path); 1
} else {
alert('That file type is not supported'); 2
}
markdownView.classList.remove('drag-over');
markdownView.classList.remove('drag-error');
});
With very little new code, we’ve successfully implemented a drag-and-drop feature reminiscent of a native desktop application.
A potentially dangerous edge case exists in our application right now. If we open a Markdown file in some other editor and make changes to it, Fire Sale is blissfully unaware. This means that if we save the file in Fire Sale after making changes in our other editor, it will destructively overwrite those changes.
We have a few ways around this. We could, for example, reread the file when Fire Sale comes back into focus. We could regularly check the file and see if its contents have changed. The way we approach it for now is to take advantage of Node’s fs.watchFile feature, which uses operating system-specific libraries to monitor a file or directory and emit an event if the file changes.
The one caveat of this approach is that we must be careful to stop watching files when we open new ones. Otherwise, we keep adding watchers without letting any go, which is a memory leak. This is further complicated by the fact that we have multiple windows. If a file changes, we must make sure that we send it to the correct window. Our feature will work as follows:
Our first task will be to figure out a way to manage the relationship between a window, the file currently displayed in the window, and/or the watcher for the file. In chapter 5, we used a Set to keep track of all the windows currently open in the application. In this section, we’ll use another recent addition to the JavaScript language—a Map.
Maps are key-value stores, much like regular objects in JavaScript, with an important distinction. Objects can have only strings and numbers as keys. Maps can use any type of object or value as a key. To implement this feature, we instantiate a Map that uses BrowserWindow instances as keys and file watchers as values. When the user closes a window, we find the watcher associated with that window and stop it.
const openFiles = new Map();
As I mentioned earlier, we want to start watching a file path when it’s opened and stop watching when either the window has been closed or the user opens a different file in the window. Let’s set up two functions: startWatchingFile() and stopWatchingFile().
const startWatchingFile = (targetWindow, file) => {
stopWatchingFile(targetWindow); 1
const watcher = fs.watchFile(file, (event) => {
if (event === 'change') { 2
const content = fs.readFileSync(file);
targetWindow.webContents.send('file-opened', file, content); 3
}
});
openFiles.set(targetWindow, watcher); 4
};
const stopWatchingFile = (targetWindow) => {
if (openFiles.has(targetWindow)) { 5
openFiles.get(targetWindow).stop(); 6
openFiles.delete(targetWindow); 7
}
};
In the listing, we start watching a given file path. If the watcher fires a “change” event, we send a message to the window alerting it to the fact that the file has changed. Lastly, add the window and the associated watcher to the openFiles Map, which allows us to find it later when it comes time to close the watcher. As an added precaution, let’s close any existing watcher for that window before creating a new one. Doing so is helpful if the user opens a file window that was already watching a file.
const createWindow = exports.createWindow = () => {
let x, y;
const currentWindow = BrowserWindow.getFocusedWindow();
if (currentWindow) {
const [ currentWindowX, currentWindowY ] = currentWindow.getPosition();
x = currentWindowX + 10;
y = currentWindowY + 10;
}
let newWindow = new BrowserWindow({ x, y, show: false });
newWindow.loadFile('index.html');
newWindow.once('ready-to-show', () => {
newWindow.show();
});
newWindow.on('close', (event) => {
if (newWindow.isDocumentEdited()) {
// ...
}
});
newWindow.on('closed', () => {
windows.delete(newWindow);
stopWatchingFile(newWindow); 1
newWindow = null;
});
windows.add(newWindow);
return newWindow;
};
Right now, the window’s title reflects whether the user has made changes to the current document that haven’t been saved. But what if the user tries to close the window? The changes are gone and unrecoverable. In the previous section, we added the ability to watch the currently active file path. If the file is changed by another application, Fire Sale overwrites the changes without warning. In both cases, this is unacceptable behavior for a desktop application. Users expect to be prompted if they are about to lose their work. In this section, we implement those safeguards.
In chapter 5, we set up a listener for the closed event, which is fired when the window has successfully been closed. Electron also supports a close event, which fires when the user attempts to close the window. If the user has unsaved changes, we can intervene and prompt the user to confirm that they—in fact—want to close the window and lose their changes.
newWindow.on('close', (event) => {
if (newWindow.isDocumentEdited()) { 1
event.preventDefault(); 2
const result = dialog.showMessageBox(newWindow, { 3
type: 'warning',
title: 'Quit with Unsaved Changes?',
message: 'Your changes will be lost if you do not save.',
buttons: [ 4
'Quit Anyway',
'Cancel',
],
defaultId: 0, 5
cancelId: 1 6
});
if (result === 0) newWindow.destroy(); 7
}
});
In previous chapters, we used dialog.showOpenDialog() and dialog.showSave-Dialog() for prompting the user to select a file. dialog.showMessageBox() is a general-purpose, customizable dialog box. You can provide a list of button labels to the buttons array. dialog.showMessageBox() returns the index of the button that the user selected. If the user selects the first button, dialog.showMessageBox() returns 0. We can use the return value to figure out how to proceed in our application based on the user’s preference. dialog.showMessageBox() also takes additional options that allow us to specify what the default action should be if the user clicks the Return button and what option should be returned if the user dismisses the dialog box.
In the previous example, we listen for the close event. If the window has unedited changes, we prompt the user. Based on the user’s response, we either prevent the window from closing or purposely destroy the window.
We also need to safeguard against two other situations where the user could lose their changes. The first is if the user attempts to open another file in the same window when there are unsaved changes; the second is if another application changes the file. The major difference between these two functions is in the message shown to the user. Either way, if the user decides to move forward, then we load the file and replace the content in the UI. In an effort to avoid repeating ourselves, we’ll move this process into its own function to use it in both places.
const renderFile = (file, content) => {
filePath = file;
originalContent = content;
markdownView.value = content;
renderMarkdownToHtml(content);
updateUserInterface(false);
};
With our new renderFile() function in place, we can set up two IPC listeners. When the user opens a new file (listing 6.26), we continue to use the file-opened channel. But if the file has been modified by another application (listing 6.27), we send a message over the file-changed channel instead. Based on from which channel we receive the message, we display a different message to the user.
ipcRenderer.on('file-opened', (event, file, content) => {
if (currentWindow.isDocumentEdited()) {
const result = remote.dialog.showMessageBox(currentWindow, { 1
type: 'warning',
title: 'Overwrite Current Unsaved Changes?',
message: 'Opening a new file in this window will overwrite your unsaved
changes. Open this file anyway?',
buttons: [
'Yes',
'Cancel',
],
defaultId: 0,
cancelId: 1
});
if (result === 1) { return; } 2
}
renderFile(file, content); 3
});
ipcRenderer.on('file-changed', (event, file, content) => {
const result = remote.dialog.showMessageBox(currentWindow, { 1
type: 'warning',
title: 'Overwrite Current Unsaved Changes?',
message: 'Another application has changed this file. Load changes?',
buttons: [
'Yes',
'Cancel',
],
defaultId: 0,
cancelId: 1
});
renderFile(file, content);
});
The last step is to modify the startWatchingFile() function to send a message over the file-changed channel, instead of the file-opened channel, to trigger the correct message box.
const startWatchingFile = (targetWindow, file) => {
stopWatchingFile(targetWindow);
const watcher = fs.watch(file, (event) => {
if (event === 'change') {
const content = fs.readFileSync(file).toString();
targetWindow.webContents.send('file-changed', file, content); 1
}
});
openFiles.set(targetWindow, watcher);
};
And with that, our application now supports drag-and-drop functionality, watches the filesystem for changes, adds files to the operating system’s list of recently opened files, updates the window’s title bar, sets a represented file on macOS, and alerts the user before discarding unsaved changes. The code for the application can be found at https://github.com/electron-in-action/firesale/tree/chapter-6, or the appendix.
In browser-based applications, developers have access only to the visible area of the application’s window. They can’t add controls to the browser’s tool bar or menu bar. The entire UI for the application’s functionality must be inside of the window. Developers also face limitations within the window. They can’t modify the context menus that appear when the user right-clicks their UI. It can be a challenge to find a place for every option and command. Electron, on the other hand, enables developers to add functionality outside of the browser window, such as custom application and context menus that appear when the user right-clicks a component of the UI.
In this chapter, we explore how to create and configure these menus in Fire Sale. We’ll replace the default menu provided by Electron with our own and walk through exposing common operating system functionality in our menus. We assign keyboard shortcuts to menu items to make them easy to trigger from anywhere in the application. With the basic menu functionality implemented, we then add in our own application-specific menu items—notably, the ability to open a Markdown file from the filesystem, display it in the left pane of our UI, and render its contents as HTML in the right pane. Finally, we create a custom context menu containing common text manipulation tasks (cut, copy, and paste, as shown in figure 7.1) whenever the user right-clicks the left pane.
Throughout the previous few chapters, we’ve had a menu in Fire Sale. So why build a custom one now? Developers can overwrite Electron’s default menu, but then they are responsible for building the menu from the ground up. Over the course of this chapter, we restore some of the basic functionality common to most desktop applications. After the foundation has been laid, we extend it with our own custom functionality. From our menu users can save the currently active file as well as export the HTML to its own file. In addition to being able to access this functionality from the application’s menu, users can use keyboard shortcuts to trigger the menu items. In this chapter, we build a menu for Fire Sale that has the structure shown in figure 7.2.
To get started, make a new file called ./app/application-menu.js. This file will grow large by the end of the chapter, so we address that now by breaking it out into its own file. Let’s begin by adding copy and paste back to the application menu.
const { app, BrowserWindow, Menu, shell } = require('electron'); 1
const mainProcess = require('./main');
const template = [ 2
{
label: 'Edit',
submenu: [
{
label: 'Copy',
accelerator: 'CommandOrControl+C', 2
role: 'copy', 3
},
{
label: 'Paste',
accelerator: 'CommandOrControl+V',
role: 'paste',
},
]
}
];
module.exports = Menu.buildFromTemplate(template); 4
Next, set the menu as the application’s menu when app fires the ready event.
const { app, BrowserWindow, dialog, Menu } = require('electron'); 1
const applicationMenu = require('./application-menu'); 2
const fs = require('fs');
const windows = new Set();
const openFiles = new Map();
app.on('ready', () => {
Menu.setApplicationMenu(applicationMenu); 3
createWindow();
});
// ... Additional methods below ...
Electron includes the Menu and MenuItem modules for building menus. In theory, we could build a menu out of individual MenuItems, but this method can be tedious and error prone. As a convenience, Menu provides the buildFromTemplate() method that accepts an array of regular JavaScript objects. Internally, Electron creates the MenuItems based on the array you provided.
If you start the application in Windows, you should see an Edit menu with two menu items: Copy and Paste. This is to be expected. But if you’re testing the application on macOS, you’ll see something a bit different, as shown in figure 7.3.
In macOS, the menu is called Electron rather than Edit because the first menu on macOS is always the Application menu. To solve this issue in Electron, we need to shift the Edit menu—and all subsequent menu items in the future—down one spot, as shown in listing 7.3 and figure 7.4, to make room for the Application menu, which we implement later in this chapter.
const { app, BrowserWindow, Menu, shell } = require('electron');
const mainProcess = require('./main');
const template = [
// ... Menu template from the last section. ...
];
if (process.platform === 'darwin') { 1
const name = 'Fire Sale'; 2
template.unshift({ label: name });
}
module.exports = Menu.buildFromTemplate(template);
One of the great things about building applications with Electron is that developers can target macOS, Windows, and Linux with one codebase. The caveat is that the developer should consider the idiosyncrasies of each of the supported operating systems when writing the code. Luckily, Node provides the process object, which has several properties, methods, and events that provide introspection into the environment in which the application is running.
process.platform returns the name of the platform in which the application is currently executing. As of this writing, process.platform returns one of five strings: darwin, freebsd, linux, sunos, or win32. Darwin is the UNIX operating system upon which macOS is built. We can adjust our menu at runtime by checking if process.platform is equal to darwin. If it is, then the application is running on macOS and all the menu items should be shifted one place to the right.
For all of the extra work required to get menus in the correct order, you may have noticed in figure 7.4 that we were rewarded with dictation and emoji support without having to implement it just by having an Edit menu.
Electron provides a default menu, but it’s an all or nothing affair. When we replace the menu, we lose all its original functionality. Not only do we lose a few menu items, we also lose their keyboard shortcuts. Try to use the Command-X keyboard shortcut on macOS, or Control-X on Windows and Linux, to cut text from the left pane. What about Command-A or Control-A on macOS or Windows, respectively, to select all the text? How about Command-Z or Control-Z to undo? Nothing happens. If you’re on macOS, try to press Command-Q to quit the application. Again, nothing happens. We also lose the functionality to hide this application and other applications in macOS. On all operating systems, we lose the ability to undo and redo changes, minimize and close the window, and select all text in each field. All that’s left is the ability to copy and paste, shown in figure 7.5—and that’s only because it was added back in our custom menu.
It’s up to the developer to add these features back to the application. If we want to omit any of these features from our application, we can. Your first thought might be that re-implementing this functionality is a bit like reinventing the wheel. Luckily, Electron makes it easy to create menu items that perform common operating system tasks. When a new menu item is created, a number of options can be set on it. So far, we’ve been exposed to the label option and the type option, which we set to separator on the third menu item in each of the previous listings.
To get practice building menus in Electron, let’s start by implementing the Edit and Window menus similar to how they were defined in Electron’s default menu, as shown in figure 7.5.
const template = [
{
label: 'Edit',
submenu: [
{
label: 'Undo',
accelerator: 'CommandOrControl+Z',
role: 'undo',
},
{
label: 'Redo',
accelerator: 'Shift+CommandOrControl+Z',
role: 'redo',
},
{ type: 'separator' },
{
label: 'Cut',
accelerator: 'CommandOrControl+X',
role: 'cut',
},
{
label: 'Copy',
accelerator: 'CommandOrControl+C',
role: 'copy',
},
{
label: 'Paste',
accelerator: 'CommandOrControl+V',
role: 'paste',
},
{
label: 'Select All',
accelerator: 'CommandOrControl+A',
role: 'selectall',
},
],
},
{
label: 'Window',
submenu: [
{
label: 'Minimize',
accelerator: 'CommandOrControl+M',
role: 'minimize',
},
{
label: 'Close',
accelerator: 'CommandOrControl+W',
role: 'close',
},
],
},
];
if (process.platform === 'darwin') {
const name = app.getName();
template.unshift({ label: name });
}
module.exports = Menu.buildFromTemplate(template);
One thing you may have noticed is that all of the menu items added so far have a special role property. This setting is important because functionality like copy and paste is hard to implement by hand. Menu items can have a role, which correlates to a built-in capability provided by the operating system to all applications. On Windows, Linux, and macOS, the role of a menu item can be set to any of the following:
These roles overlap with much of the functionality we lost when we replaced the default menu with our own. Adding menu items with these roles restores the functionality to the menu but not the keyboard shortcuts that many users are accustomed to.
Electron provides an additional property called accelerator for defining a keyboard shortcut to trigger a menu item’s action. When creating menu items, you can set the accelerator property to a string that follows a set of Electron-specific conventions. Listing 7.5 codes a menu item that adds the copy functionality.
const { app, BrowserWindow, Menu, MenuItem, shell } = require('electron');
const copyMenuItem = new MenuItem({
label: 'Copy',
accelerator: 'CommandOrControl+C',
role: 'copy'
});
On Windows and Linux, it’s common to prefix keyboard shortcuts with the Control key. On macOS, it’s common to use the Command key for a similar purpose. In addition to being unconventional, the Command key isn’t available on Linux and Windows. Rather than needing to rely on process.platform along with conditional logic in our menu items, Electron provides the CommandOrControl shorthand. On macOS, this binds the keyboard shortcut to the Command key. On Windows and Linux, Electron uses the Control key instead. As additional shorthand, Electron provides Cmd, Ctrl, and CmdOrCtrl, which are aliased to Command, Control, and CommandOrControl, respectively.
When Electron runs, it compiles the template into a collection of MenuItems and sets the application’s menu accordingly. Keyboard shortcuts for common operations like copying and pasting are restored, and the application behaves as expected in Windows and Linux. In macOS, however, the application is still missing important functionality, not least of which is the ability to quit the application. Standard application menus in macOS have the structure shown in figure 7.6.
When running on macOS, Electron provides an additional set of roles that make it easy to restore the application menu common to most Mac applications. These additional roles are
The default application menu provided by Electron has menu items for showing the application’s About panel, exposing services provided by macOS, hiding the application, hiding all other applications, and quitting the application, as shown in figure 7.7.
Implementing the application menu is similar to implementing the Edit and Window menus. Command is preferable over CommandOrControl for defining accelerators, because this menu appears only on macOS. In addition, we use template strings to get the application’s name for the About, Hide, and Quit menus because it is customary to include the application’s name in these menu items.
if (process.platform === 'darwin') {
const name = 'Fire Sale';
template.unshift({
label: name,
submenu: [
{
label: `About ${name}`,
role: 'about',
},
{ type: 'separator' },
{
label: 'Services',
role: 'services',
submenu: [],
},
{ type: 'separator' },
{
label: `Hide ${name}`,
accelerator: 'Command+H',
role: 'hide',
},
{
label: 'Hide Others',
accelerator: 'Command+Alt+H',
role: 'hideothers',
},
{
label: 'Show All',
role: 'unhide',
},
{ type: 'separator' },
{
label: `Quit ${name}`,
accelerator: 'Command+Q',
click() { app.quit(); }, 1
},
],
});
}
Our application now has almost all of the functionality of a native application on macOS, but we still need to address a few subtle differences. On macOS, the Window menu has a few additional menu items—most notably Bring All to Front, which moves all of the windows of the application to the front of the stack. In addition, the macOS-exclusive window role adds the ability to close and minimize the current window from the Window menu, as well as a list of all of the application’s windows, and the ability to bring them all to the front. This role is ignored on platforms that don’t support it.
const template = [
{
label: 'Edit',
submenu: [
// "Edit" menu shown in Listing 7.4
],
},
{
label: 'Window',
role: 'window', 1
submenu: [
// "Window" menu shown in Listing 7.4
],
},
];
if (process.platform === 'darwin') {
const name = app.getName();
template.unshift({
label: name,
submenu: [
// #Application menu shown in Listing 7.6
],
});
const windowMenu = template.find(item => item.label === 'Window'); 2
windowMenu.role = 'window'; 3
windowMenu.submenu.push(
{ type: 'separator' },
{
label: 'Bring All to Front',
role: 'front',
}
);
}
Adding a Help menu is a good practice regardless of platform, but there is an added benefit for doing so on macOS. Even if your application does not have any documentation or support yet, the built-in Help menu allows users to search the application to find menu items, as shown in figure 7.9. This works in most macOS applications and is useful for searching through deeply nested menus quickly. You can access the menu search by pressing Command-Shift-? at any time.
To add a Help menu to your application, such as the structure shown in figure 7.10, add an additional menu with the role of help and a submenu of additional menu items. You must provide an array as the submenu, as shown in listing 7.8, even if it’s empty. For now, we can also add the ability to trigger the developer tools. Depending on the application, you might want to remove this feature before publishing the application. That said, popular applications such as Atom, Nylas Mail, and Visual Studio Code have chosen to leave it in.
const template = [ // "Edit" and "Window" menus defined in Listing 7.7 { label: 'Help', role: 'help', submenu: [ { label: 'Visit Website', click() { /* To be implemented */ } }, { label: 'Toggle Developer Tools', click(item, focusedWindow) { 1 if (focusedWindow) focusedWindow.webContents.toggleDevTools(); } } ], } ];
The click() method can optionally take up to three arguments: the menu item itself, the currently focused BrowserWindow instance, and an event object. In listing 7.8, we use the second argument—the currently focused window—to determine which window we should tell to toggle the developer tools.
Going through all that work to restore a lot of the functionality, which we originally got for free, is worth it only if we use it as a template to add custom functionality. Users typically expect to be able to open and save files from the File menu. Fire Sale currently lacks this functionality. Right now, we can select and open a Markdown file from the filesystem using the Open File button in the UI. Our next step, shown in figure 7.11, is to modify the File menu with New File, Open File, Save File, and Export HTML menu items along with keyboard shortcuts to trigger each action.
When the user clicks the Open File menu item or presses the keyboard shortcut, the menu item triggers the same openFile() function from the main process that the button in the UI triggers. Clicking New File calls the createWindow() function from the main process. Let’s start by adding a File menu to our template with each of the features shown in figure 7.11 as menu items to its submenu array.
In the case of saving or exporting a file, however, we need the current contents of the Markdown pane or the HTML pane, respectively. We’ll also need the name of the currently open file if there is one because the main process doesn’t have access to this information. Instead, we send a message to the currently focused window that it should gather this information for us and then trigger the same functionality it would if a user clicked on a button in the UI.
const template = [
{
label: 'File',
submenu: [
{
label: 'New File',
accelerator: 'CommandOrControl+N',
click() {
mainProcess.createWindow(); 1
}
},
{
label: 'Open File',
accelerator: 'CommandOrControl+O',
click(item, focusedWindow) {
mainProcess.getFileFromUser(focusedWindow); 2
},
},
{
label: 'Save File',
accelerator: 'CommandOrControl+S',
click(item, focusedWindow) {
focusedWindow.webContents.send('save-markdown'); 3
},
},
{
label: 'Export HTML',
accelerator: 'Shift+CommandOrControl+S',
click(item, focusedWindow) {
focusedWindow.webContents.send('save-html'); 4
},
},
],
},
// "Edit", "Window", and "Help" menus are defined here as well.
];
Sending a message to the focused window is half the battle. We still need to configure the renderer process to listen for these messages and act accordingly. Let’s set up an IPC listener to receive these messages and call our existing save and export functionality whenever a message is received.
ipcRenderer.on('save-markdown', () => { 1
mainProcess.saveMarkdown(currentWindow, filePath, markdownView.value);
});
ipcRenderer.on('save-html', () => { 2
mainProcess.saveHtml(currentWindow, filePath, markdownView.value);
});
In Windows and Linux, the application quits when all the windows are closed. On macOS the application remains running even when all the windows have been closed. A new window is opened when the icon is clicked, but in some cases, the user might select one of the three menu items we just implemented and the focused window is undefined. In chapter 9, we cover how to enable and disable menu items. For now, we take a simpler approach: open a new window if the user selects Open File, and display an error message if there is no content to save or export.
To display the error messages when a user tries to save or export a nonexistent file, we use dialog.showErrorBox(), which is similar to dialog.showMessageBox() but specializes in displaying error messages and doesn’t have as many options for configuration.
const { app, dialog, Menu, MenuItem shell } = require('electron'); 1
const mainProcess = require('./main');
const template = [
{
label: 'File',
submenu: [
{
label: 'New File',
accelerator: 'CommandOrControl+N',
click() {
mainProcess.createWindow();
}
},
{
label: 'Open File',
accelerator: 'CommandOrControl+O',
click(item, focusedWindow) {
mainProcess.getFileFromUser(focusedWindow);
},
},
{
label: 'Save File',
accelerator: 'CommandOrControl+S',
click(item, focusedWindow) {
if (!focusedWindow) {
return dialog.showErrorBox( 2
'Cannot Save or Export',
'There is currently no active document to save or export.'
);
}
focusedWindow.webContents.send('save-markdown');
},
},
{
label: 'Export HTML',
accelerator: 'Shift+CommandOrControl+S',
click(item, focusedWindow) {
if (!focusedWindow) {
return dialog.showErrorBox( 3
'Cannot Save or Export',
'There is currently no active document to save or export.'
);
}
focusedWindow.webContents.send('save-html');
},
},
],
},
Things are not nearly as hopeless if the user selects Open File and there is no window available to receive the command. We simply make a new window, wait for it to be shown, and then trigger the File Selection dialog box as if the window had been there all along.
const template = [
{
label: 'File',
submenu: [
{
label: 'Open File',
accelerator: 'CommandOrControl+O',
click(item, focusedWindow) {
if (focusedWindow) {
return mainProcess.getFileFromUser(focusedWindow); 1
}
const newWindow = mainProcess.createWindow(); 2
newWindow.on('show', () => { 3
mainProcess.getFileFromUser(newWindow);
});
},
}, // "Save File" and "Export HTML" menus are defined here.
],
}, // "Edit", "Window", and "Help" menus are defined here.
];
First, we check if there is a focusedWindow. If there is, we want to trigger the functionality that we implemented earlier and return from the function early. If there isn’t a focused window, we need to create one. Luckily, we created a function in chapter 5 to assist us with this process. When the new window has finished initalizing, we use it as we would use any existing window. Our code is now resilient to this case, and we’re ready to move on.
In the previous section, we defined a menu and set it as the application menu in the main process when the app module fired its “ready” event. Our application can only have one application menu at a time. We can, however, define additional menus in the renderer process, shown in figure 7.12, that spring into action when the user right-clicks (or does a two-finger click on certain computers) a part of the UI.
Next, we listen for contextmenu events in the left-hand markdown pane.
markdownView.addEventListener('contextmenu', (event) => {
event.preventDefault();
alert('One day, a context menu will go here.');
});
Notice that the alert does not fire unless the user clicks the left pane. If you want a context menu that is triggered from anywhere within the application, listen on the window object instead of on a DOM node. The Menu module is not available from within the renderer process, but it can be accessed from the context of the main process using the remote module as shown in the following listing. Once imported, we can use Menu.buildFromTemplate() to construct a menu as shown in listing 7.15.
const { remote, ipcRenderer } = require('electron');
const { Menu } = remote; 1
const path = require('path');
const mainProcess = remote.require('./main.js');
const currentWindow = remote.getCurrentWindow();
// Our existing renderer code...
const markdownContextMenu = Menu.buildFromTemplate([
{ label: 'Open File', click() { mainProcess.getFileFromUser(); } },
{ type: 'separator' },
{ label: 'Cut', role: 'cut' },
{ label: 'Copy', role: 'copy' },
{ label: 'Paste', role: 'paste' },
{ label: 'Select All', role: 'selectall' },
]);
To trigger this menu, replace the contextmenu event listener with a function that will call the popup() method on the newly created menu, shown here.
markdownView.addEventListener('contextmenu', (event) => {
event.preventDefault();
markdownContextMenu.popup();
});
The popup() method takes four arguments: a BrowserWindow, x, y, and a positioning-Item. All of these arguments are optional, and if they’re omitted, then the context shows up in the current browser window directly under the mouse cursor, which is the behavior we expect in this context. With that code in place, we can now trigger a context menu in our Markdown pane. We add functionality to the context menu as well as additional context menus as we add more features to our application. The complete code for this chapter can be found at https://github.com/electron-in-action/firesale/tree/chapter-7 or in the appendix. Alternatively, you can clone from the GitHub repository at https://github.com/electron-in-action/firesale.git, check out the chapter-7 branch, and run npm install to see it in action.
In addition to creating custom application modules, opening isolated browser window processes, and accessing native file dialogs in Electron, we can use the shell module to interact with the operating system.
How does your application know your system’s default browser for opening websites? If you want to open an image file in its default application, which application should you send it to?
Users of our applications typically set these preferences in the operating system itself. Instead of trying to figure out our user’s settings, we’re better off just asking the operating system for the answer. Electron provides the shell module to make this easy for us.
The shell module is relatively small compared to some of the other modules provided by Electron. It allows us to open a given file path in the operating system’s file browser, send it to its default application, move it to the trash, trigger a system beep, and create shortcut links in Windows. The shell module made a brief appearance in chapter 2, when we used it to make sure that hyperlinks open in the user’s web browser of choice instead of in the application itself, which also happens to be a web browser.
In this chapter, we take a subset of these features—opening a file’s location in the file browser and sending a file to the operating system’s default application—and implement them in multiple places in Fire Sale, as shown in figure 8.1. We add this functionality to Fire Sale’s UI, to the context menu that opens when the user right-clicks the editor pane, and to the application’s menu. Depending on the feature you’re implementing in your application, all or a subset of these might be the right approach for your purposes. As we implement them in each of the three places throughout the chapter, I discuss the advantages and disadvantages of each approach. All the code from this chapter is available on GitHub in the chapter-8 branch (https://github.com/electron-in-action/firesale/tree/chapter-8).
In chapter 7, in learning how to implement custom menus, we added features to Fire Sale like we would in a traditional browser environment: by adding buttons to the DOM. The Electron shell module, which is available in the main process as well as the renderer process, can be triggered from buttons in the UI, from application and context menu items, through keystrokes, and more. But let’s start with what we’re good at: triggering functionality from the UI. The Show File and Open in Default Application buttons, shown in figure 8.2, have been in the UI since chapter 3. Now it’s their turn to shine. When a file is opened or a new file is first saved to the filesystem, the buttons are enabled. When a user clicks the Show File button, the file browser opens so the user can navigate to the directory containing the currently open file. When the Open in Default Application button is selected, the operating system opens the file in the application that typically opens Markdown and text files on the user’s computer.
In the previous chapters, the Show File and Open in Default Application buttons have been disabled by default. Like the Save and Revert buttons implemented in a previous chapter, there are situations where the buttons should be enabled. With the Save and Revert buttons, this was whenever the original content of the file—or an empty string in the case of a new, unsaved file—differed from what was currently shown in the left editor pane. Thus, we listened for keyup events in the editor and compared the contents to evaluate if the buttons should be enabled. For Show File and Open in Default Application, we do not care so much whether they have been modified. What we want is a file path to either show or open, respectively.
const renderFile = (file, content) => {
filePath = file;
originalContent = content;
markdownView.value = content;
renderMarkdownToHtml(content);
showFileButton.disabled = false;
openInDefaultButton.disabled = false; 1
updateUserInterface(false);
};
The Show File and Open in Default Editor buttons should be enabled whenever we are working with a file that is stored in the filesystem, not a new, unsaved file. Whenever the active file is changed, we update the filePath variable. After this variable has been set, enable the buttons.
const showFile = () => {
if (!filePath) { 1
return alert('This file has not been saved to the filesystem.');
}
shell.showItemInFolder(filePath); 2
};
const openInDefaultApplication = () => {
if (!filePath) {
return alert('This file has not been saved to the filesystem.');
}
shell.openItem(filePath); 3
};
showFileButton.addEventListener('click', showFile); 4
openInDefaultButton.addEventListener('click', openInDefaultApplication);
Enabling the buttons is helpful, but it would be even better if the buttons did something. Whenever a button is clicked, it triggers the appropriate method from the shell module. You might notice that I decided to define the functions in constants instead of just passing anonymous functions to addEventListener. Later in this chapter, we call these functions from Fire Sale’s application menu as well as from a context menu. These names allow me to reference the two functions later.
The first place we might consider adding this functionality is in the application menu, just below the menu items that allow the user to save and export files. In this section, we implement two new menu items, Show File and Open in Default Editor, as shown in figure 8.3, which exposes the file in its containing folder, and opens it in the application set as the default for Markdown files in the operating system, respectively.
You must add these two new menu items to the application menu template to appear when the application starts. What if no windows are open? In a perfect world, we would disable the menu items unless at least one window was open. But that’s beyond the scope of this chapter, so we’ll do the next best thing and display a useful error message to help the user see the error of their ways.
const { app, BrowserWindow, dialog, Menu, shell } = require('electron'); 1
const mainProcess = require('./main');
const template = [
{
label: 'File',
submenu: [
//Additional submenu items above.
{ type: 'separator' }, 2
{
label: 'Show File',
accelerator: 'Shift+CommandOrControl+S',
click(item, focusedWindow) {
if (!focusedWindow) { 3
return dialog.showErrorBox(
'Cannot Show File\'s Location',
'There is currently no active document show.'
);
}
focusedWindow.webContents.send('show-file'); 4
},
},
{
label: 'Open in Default Editor',
accelerator: 'Shift+CommandOrControl+S',
click(item, focusedWindow) {
if (!focusedWindow) {
return dialog.showErrorBox(
'Cannot Open File in Default Editor',
'There is currently no active document to open.'
);
}
focusedWindow.webContents.send('open-in-default'); 5
},
},
],
},
// Edit, Window, and Help menus defined here.
];
In listing 8.3, we add a separator between the menu items we added in the previous chapter and the ones we’re adding in this chapter. This separator is solely for aesthetic reasons and is not required for the menu to work properly. After the separator, we have added two new menu items: Show File and Open in Default Editor. Each window has a reference to the path of the file that is currently rendered in it. So, how do we know what file to show or open? We could devise a complicated system for figuring out which files were opened in which windows, or we could just send a message to the window over interprocess communication (IPC) and let the window figure it out for itself.
To get this working, we listen for IPC messages over the show-file and open-in-default channels. Luckily, we were smart enough earlier to name the functions responsible for handling these requests. This makes setting up the listeners easy.
ipcRenderer.on('show-file', showFile); 1
ipcRenderer.on('open-in-default', openInDefaultApplication); 2
The Electron shell module also allows developers to move a given file to the macOS Trash or the Windows Recycle Bin without concerning themselves with the finer points of how that works on each platform. It can also allow developers to trigger a system beep. On Windows, developers can create and read shortcut links as well.
You can also add these features to the context menu we originally added to the application in chapter 7. This menu appears when a user right-clicks the left editor pane, shown in figure 8.4. To implement this feature, we need to combine the two approaches from earlier in this chapter: we add menu items to the template, but because we’re in the renderer process already, we can call the functions directly—just as we did with the buttons in the UI—instead of having to send messages via IPC.
const { remote, ipcRenderer, shell } = require('electron'); 1
const { Menu } = remote;
const path = require('path');
const mainProcess = remote.require('./main.js');
const currentWindow = remote.getCurrentWindow();
// Other renderer code from the previous chapters will remain here, but has
been ommited for brevity...
const markdownContextMenu = Menu.buildFromTemplate([
{ label: 'Open File', click() { mainProcess.getFileFromUser(); } },
{
label: 'Show File in Folder',
click: showFile 2
},
{
label: 'Open in Default Editor',
click: openInDefaultApplication 3
},
{ type: 'separator' },
{ label: 'Cut', role: 'cut' },
{ label: 'Copy', role: 'copy' },
{ label: 'Paste', role: 'paste' },
{ label: 'Select All', role: 'selectall' },
]);
When is adding buttons to the UI a better choice than adding the same functionality to menu items in an application or context menu? It depends on the role that the feature plays in your application. Contextual menu items are obscure; a user may never think to right-click a given part of your application. If the feature you’re implementing is essential to the application, it is better to put it in the UI. That said, there is only a limited amount of space to work with, and less used, but nice-to-have, functionality is a great fit for contextual menu items.
When would using a context menu be a better approach than including these menu items in the application menu as we did in the previous section? To keep Fire Sale simple, it was designed as a single-window application where the user edits a single file at a time. When a user selects Open File in Default Editor, the application implicitly knows which file because there is only one.
But what if we were building a photo-management application, and we wanted to add a feature where the user could right-click each of the photographs to show it in the Finder or Windows Explorer? This feature would be difficult to add to the application menu, because it would be hard to decipher exactly which photograph the user wanted to see in its containing folder. By using a context menu, we can easily determine which photograph the user right-clicks.
Right now, Fire Sale shows an error message if the user selects a menu item that isn’t available. It’s better than crashing or throwing an indecipherable error message, but it’s not going to win any awards for being a great user experience. What if we disable the context and application menu items that would otherwise throw an error if clicked? This way, it’s clear to the user that this is not a valid action.
It is possible to mutate menus after they have been set, but it’s tricky. Menu items are stored as arrays, and finding a given menu item involves traversing all the top-level menu items and their submenus. Most of the time, it’s easier to either generate a new context menu based on the current state of the window just before displaying it to the user or to regenerate a new application menu when the state of the application has changed.
How we approach solving this problem depends on which menu we’re working with. Context menus within a window are easier because we’re working with only a single window and we’re storing the filePath variable in the global scope. If there is a filePath, then we enable Show File in Folder and Open in Default. If filePath is false, then these menu items are disabled.
The application menu is a little trickier. In addition to Show File and Open in Default Application, we also have Save File and Export HTML, which can remain enabled if the file has not been saved to the filesystem but should be enabled only if there is at least one window open. See figure 8.5.
Earlier in this chapter, we created a context menu from a template and then called its popup() method whenever a contextmenu DOM event is fired. To dynamically enable or disable the Show File and Open in Default menu items, as in figure 8.6, let’s create a context menu each time the user right-clicks the Markdown view. We enable these items based on whether there is a filePath. To accomplish this, we move the creation of the menu into a function, which allows us to re-create the menu each time it is called.
const createContextMenu = () => { 1
return Menu.buildFromTemplate([ 2
{ label: 'Open File', click() { mainProcess.getFileFromUser(); } },
{
label: 'Show File in Folder',
click: showFile,
enabled: !!filePath 3
},
{
label: 'Open in Default',
click: openInDefaultApplication,
enabled: !!filePath 3
},
{ type: 'separator' },
{ label: 'Cut', role: 'cut' },
{ label: 'Copy', role: 'copy' },
{ label: 'Paste', role: 'paste' },
{ label: 'Select All', role: 'selectall' },
]);
};
In the previous code sample, we created a createContextMenu() function that returns a new menu each time it is called. As it creates the Show File and Open in Default menu items, it checks to see if filePath can be coerced to true using the !! operator. The enabled property expects a Boolean—either true or false. If you’re not familiar with this technique, it’s a trick to take a truthy or falsey value and coerce it into true or false, respectively. The ! operator returns false for any truthy value, and true for any falsey value. Using it a second time flips it back, but this time to a Boolean primitive, as shown in listing 8.7.
null // Null falsey in JavaScript. !null // Returns true. !!null // Returns false. '/Users/stevekinney/Notes/Groceries.txt' // A file path !/Users/stevekinney/Notes/Groceries.txt' // Returns false. !!/Users/stevekinney/Notes/Groceries.txt' // Returns true.
The next step is to modify our event listener to use the function we just created. Each time it generates a new menu, the function checks if filePath is truthy or falsey and enables Show File and Open in Default Application accordingly. The next step is to use this function to generate a new menu on the fly each time the user right-clicks the Markdown view of the application.
markdownView.addEventListener('contextmenu', (event) => {
event.preventDefault();
createContextMenu().popup(); 1
});
With this change, the user gets a new menu each time they request one. If there is a file to show in the filesystem or open in another application, the respective menu items are enabled. If not, they are disabled. Now it’s time to turn our attention to the—slightly trickier—application menu.
The process of dynamically enabling menu items in the application menu shares some similarities with doing so in the context menu. We use the same approach of generating new menus and replacing the existing application menu but with a few catches: the application menu is shared across all windows. The first window might have a file loaded that we can show or open in another application, but the second one may not. On macOS, we might run into the scenario where there are no windows open. In this case, the Save File and Export HTML menu items should be disabled along with Show File and Open in Default Application, as shown in figure 8.7. Furthermore, our context menu could take advantage of the fact that filePath was in scope. The application menu lives in the main process and doesn’t have access to this variable. See figures 8.8 and 8.9.
To implement this feature, we take the following approach. First we’ll create a function that returns a new application menu based on the one we implemented in the previous chapter. Each time we create a new menu, we check if there are any windows and if the currently focused window is representing a file on the filesystem. With this in place, we’ll modify the main process to generate a new application menu when
Let’s start by refactoring the template in application-menu.js to a function that will generate a menu and set it as the new application menu.
const { app,
BrowserWindow, 1
dialog,
Menu,
shell
} = require('electron');
const mainProcess = require('./main');
const createApplicationMenu = () => {
const hasOneOrMoreWindows = !!BrowserWindow.getAllWindows().length; 2
const focusedWindow = BrowserWindow.getFocusedWindow(); 3
const hasFilePath = !!(focusedWindow &&
focusedWindow.getRepresentedFilename()); 4
const template = [
{
label: 'File',
submenu: [
{
label: 'New File',
accelerator: 'CommandOrControl+N',
click() {
mainProcess.createWindow();
}
},
{
label: 'Open File',
accelerator: 'CommandOrControl+O',
click(item, focusedWindow) {
// Omitted for brevity...
},
},
{
label: 'Save File',
accelerator: 'CommandOrControl+S',
enabled: hasOneOrMoreWindows, 5
click(item, focusedWindow) {
// Omitted for brevity...
},
},
{
label: 'Export HTML',
accelerator: 'Shift+CommandOrControl+S',
enabled: hasOneOrMoreWindows, 5
click(item, focusedWindow) {
// Omitted for brevity...
},
},
{ type: 'separator' },
{
label: 'Show File',
enabled: hasFilePath, 6
click(item, focusedWindow) {
// Omitted for brevity...
},
},
{
label: 'Open in Default Application',
enabled: hasFilePath, 6
click(item, focusedWindow) {
// Omitted for brevity...
},
},
],
},
// Additional Menus...
];
// Additional Functionality...
return Menu.setApplicationMenu(Menu.buildFromTemplate(template)); 7
};
module.exports = createApplicationMenu;
In chapter 7, we built the menu once when the application started and set it as the application menu as soon as it was ready. This approach still works, now that this module exports a function that creates the menu and sets it as the application menu. Along the way, it checks if there are any browser windows, and if there is a focused window, it checks whether that window has a represented file set, shown in listing 8.10. If you recall, we set the represented file in chapter 4 when opening a file. At the time, we did this to get the little file icon in the window’s title bar in macOS. (Calling this method has no discernible visual effect on Windows or Linux.)
const openFile = exports.openFile = (targetWindow, file) => {
const content = fs.readFileSync(file).toString();
startWatchingFile(targetWindow, file);
app.addRecentDocument(file);
targetWindow.setRepresentedFilename(file); 1
targetWindow.webContents.send('file-opened', file, content);
};
With these two pieces of information—the number of open windows and whether the focused window is representing a file path—we can toggle the menu items appropriately. The next step is to trigger this process whenever either of these two might have changed. Triggering events include when the application first launches, when a new window takes focus, when a window is closed (it could be the last window), and when the user opens a file. Whenever one of these events occurs, we re-create the application menu.
const { app, BrowserWindow, dialog, Menu } = require('electron');
const createApplicationMenu = require('./application-menu'); 1
const fs = require('fs');
const windows = new Set();
const openFiles = new Map();
app.on('ready', () => {
createApplicationMenu(); 2
createWindow();
});
app.on('window-all-closed', () => {
// Omitted for brevity...
});
app.on('activate', (event, hasVisibleWindows) => {
if (!hasVisibleWindows) { createWindow(); }
});
const createWindow = exports.createWindow = () => {
let x, y;
const currentWindow = BrowserWindow.getFocusedWindow();
if (currentWindow) {
const [ currentWindowX, currentWindowY ] = currentWindow.getPosition();
x = currentWindowX + 10;
y = currentWindowY + 10;
}
let newWindow = new BrowserWindow({ x, y, show: false });
newWindow.loadFile('index.html');
newWindow.once('ready-to-show', () => {
newWindow.show();
});
newWindow.on('focus', createApplicationMenu); 3
newWindow.on('close', (event) => {
// Omitted for brevity...
});
newWindow.on('closed', () => {
windows.delete(newWindow);
createApplicationMenu(); 4
newWindow = null;
});
windows.add(newWindow);
return newWindow;
};
const getFileFromUser = exports.getFileFromUser = (targetWindow) => {
// Omitted for brevity...
};
const openFile = exports.openFile = (targetWindow, file) => {
const content = fs.readFileSync(file).toString();
startWatchingFile(targetWindow, file);
app.addRecentDocument(file);
targetWindow.setRepresentedFilename(file);
targetWindow.webContents.send('file-opened', file, content);
createApplicationMenu(); 5
};
// Additional functions below...
With the ability to create application menus and replace the existing one, implementing this functionality in main.js is just a matter of invoking this function at the right time. With this in place, we’ve accomplished the feature that we set out to implement at the beginning of this section. The full code at the end of this chapter can be found in the appendix book or on GitHub at https://github.com/electron-in-action/firesale.
For most of the first half of the book, we worked on Fire Sale. Although its initial feature set in chapter 3 could have conceivably been matched by a traditional, browser-based web application, we spent the subsequent chapters adding functionality outside the scope of what most browsers allow. In this chapter, we begin well outside the realm of where we expect to find web technologies: the macOS menu bar and Windows system tray. In the beginning, we won’t have a renderer process or the DOM. By the end of this chapter, we explore how to create hidden renderer processes to access features not available to the main process. In the next chapter, we create a BrowserWindow to serve as the UI for our tray application.
With Fire Sale behind us, we’ll embark on building a new application: Clipmaster, shown in figure 9.1. By the end of this chapter, we launch the application. It will have no dock, taskbar icon, or windows of its own. We activate it by pressing a keyboard shortcut that is globally available throughout the operating system. When the shortcut is triggered, Clipmaster reads from and records the contents of the user’s clipboard. If the user selects a previously saved clipboard item from the menu, the app places it back onto the system clipboard for pasting in another application.
As shown in the figure, we need to implement the following:
If you look closely, you’ll notice that each of these items has a keyboard shortcut as well. In addition to these menu-based accelerators, we register global shortcuts with the operating system that allow the user to activate this menu or create a new clipping from anywhere.
The source code for Clipmaster is available at https://github.com/electron-in-action/clipmaster. I use the master branch as a boilerplate and starting point for the code in this chapter. There is also a branch called “completed-example” that contains the code shown at the end of this chapter. I show the code as we go along, and a completed version will be available at the end.
The folder structure for Clipmaster is roughly the same as we saw in Fire Sale with much of the code in the ./app directory. You might notice that there isn’t a renderer.js or index.html. Those are added by the end of the chapter but aren’t needed in the beginning. You may also notice a few small image files. Our application needs an icon if it’s going to live in the tray or menu bar. macOS expects this icon to be a PNG file, and Electron automatically checks if there is a version of the image with the suffix “@2px” if it is running on a device with a retina screen. Windows accepts a PNG but works best with an ICO file. Unlike the built-in switch between high- and low-resolution versions based on the density of the display, we need to manually check which operating system the application is running on to select the best image.
To get started, clone the master branch, and run either npm install or yarn install to download the dependencies. After everything is installed, we can get started on building Clipmaster.
To get the ball rolling, we can add our application to the system tray or menu bar with just one feature: the ability to click Quit and close the application (see figure 9.2). To accomplish this heroic task, we need help from Electron’s tray module. You can think of the tray module as a peer to BrowserWindow. It’s a constructor that—when instantiated—creates a system tray or menu bar item in much the same way that Browser-Window creates a browser window.
To do this, as you’ll see in listing 9.1, we need to wait until the application is ready, create a tray instance, and provide it with an icon and a menu loaded up with the Quit command. When the application is ready, we create the menu and set it as the context menu of the tray instance. In a fit of ambition, we also set a tooltip that will be shown when the user hovers over our proud new tray icon. See figure 9.3.
const path = require('path');
const {
app,
Menu,
Tray,
} = require('electron');
let tray = null; 1
app.on('ready', () => {
tray = new Tray(path.join(__dirname, '/Icon.png')); 2
if (process.platform === 'win32') {
tray.on('click', tray.popUpContextMenu); 3
}
const menu = Menu.buildFromTemplate([ 4
{
label: 'Quit',
click() { app.quit(); }
}
]);
tray.setToolTip('Clipmaster'); 5
tray.setContextMenu(menu); 6
});
As with the windows in Fire Sale, we declared the tray variable in the global scope to prevent it from being thrown out sometime after the event listener on the app’s ready event has run to completion. Inside the event listener, we assign a new tray instance to the variable with a reference to the image we want to use as an icon.
If you recall from chapter 7, Menu.buildFromTemplate() is an abstraction that allows you to create complicated menu structures using objects and arrays. This menu isn’t exactly complicated, but it’s still easier than building a menu by instantiating MenuItem instances one at a time. At this point, the menu has one item with Quit as its label. When it’s clicked—or later activated by a keystroke—it will tell Electron to quit the application. With the menu built, all that is left is to set it as the context menu for tray.
Windows treats the tray instances menu as a context menu. This means the menu shows up only if the icon is right-clicked. In listing 9.1, we also register a click event that triggers the menu if the application is running on Windows.
The application works, but if you fire it up on macOS, you can notice that it also shows up in the dock. Clicking it doesn’t do anything, because the application doesn’t have any browser windows to show. We could add functionality such as the ability to trigger the menu from the menu bar when the dock icon is clicked, but I vote that we hide the dock icon altogether.
app.on('ready', () => {
if (app.dock) app.dock.hide(); 1
// ...
}
The line of code checks if the app has a dock object, which it does if it’s running on macOS. If so, then Electron tells the dock icon to hide itself. This approach is interesting because it leaves the developer room to hide or show the dock icon at will, depending on what mode their application is in or the user’s preference. In our case, we hide it when the application launches and never show it again.
macOS and Windows prefer different file types for icons. Their UIs each work better with a different color. By default, the menu bar on macOS is white and works better with dark icons whereas Windows 10 has a dark task bar and works better with white icons. Windows prefers ICO files, and macOS uses PNG files. To solve this issue, Node checks the platform it’s running on and gets the appropriate icon based on the platform. Electron does such a good job of providing a consistent cross-platform experience that this is one of the few times in this book that we find ourselves doing something like this.
const getIcon = () => { 1
if (process.platform === 'win32') return 'icon-light@2x.ico';
return 'icon-dark.png';
};
app.on('ready', () => {
if (app.dock) app.dock.hide();
tray = new Tray(path.join(__dirname, getIcon())); 2
// ... More code below ...
});
If we’re on Windows, it gives us the filename of the light ICO icon. Otherwise, it gives us the filename of the dark PNG icon. When the application is ready, we use the new getIcon() function instead of the string we had hard-coded originally.
Earlier, I said that the macOS menu bar is white by default. In macOS El Capitan and later, users can turn on dark mode, which inverts the color of the menu bar and dock. In this case, we would want to use a PNG file like we would normally for macOS, but we also want to use the light versions like we would with the transparent black system tray in Windows 10, as shown in listing 9.4 and figure 9.4.
const path = require('path');
const {
app,
Menu,
Tray,
systemPreferences,
} = require('electron'); 1
let tray = null;
const getIcon = () => {
if (process.platform === 'win32') return 'icon-light.ico';
if (systemPreferences.isDarkMode()) return 'icon-light.png'; 2
return 'icon-dark.png';
};
Electron makes this easy using the systemPreferences module, which conveniently has a method called isDarkMode() that returns a Boolean. I leave it as an exercise to the reader to determine under which conditions it returns true or false.
This application is supposed to store clippings, and we have many ways we could go about doing this. In chapter 11, we look at using an SQLite database to store clippings. But for now, let’s start with the easiest possible solution: storing them in memory. This approach is easy because it allows us to use a built-in JavaScript data structure, but it has the disadvantage of being cleared away whenever the user quits the application.
To ship this feature, we need to create an array to hold our clippings. We also need to create a function that reads from the clipboard and adds the contents to the array, as well as a way for the user to trigger this function. Finally, we want to update the menu with the clippings we stored and allow users to select one to be added back to the clipboard. See figures 9.5 and 9.6.
We update the menu whenever the user saves a new clipping. As we discussed in chapter 7, it’s possible to traverse and mutate the menu after it is created, but it’s often easier and more efficient to completely replace it. To facilitate this, we move the code to create the context menu into its own function that we can call whenever we need to update the menu.
const path = require('path');
const {
app,
Menu,
Tray,
systemPreferences,
} = require('electron');
const clippings = []; 1
let tray = null;
const getIcon = () => {
if (process.platform === 'win32') return 'icon-light.ico';
if (systemPreferences.isDarkMode()) return 'icon-light.png'; 2
return 'icon-dark.png';
};
app.on('ready', () => {
if (app.dock) app.dock.hide();
tray = new Tray(path.join(__dirname, getIcon()));
if (process.platform === 'win32') {
tray.on('click', tray.popUpContextMenu);
}
updateMenu(); 2
tray.setToolTip('Clipmaster');
});
const updateMenu = () => {
const menu = Menu.buildFromTemplate([
{
label: 'Create New Clipping',
click() { null; } 3
},
{ type: 'separator' },
...clippings.map((clipping, index) => ({ label: clipping })), 4
{ type: 'separator' },
{
label: 'Quit',
click() { app.quit(); },
}
]);
tray.setContextMenu(menu); 5
};
We start by creating a simple array called clippings with a global scope that stores clippings and is accessed throughout our application. Next, we create a function called updateMenu() to generate a new menu and set it as the context menu for the tray instance. updateMenu() takes the contents of the clippings array, maps it into objects that can be turned into MenuItem instances, and then uses the ECMAScript 2015 spread operator to include them as siblings with Create New Clipping and Quitmenu items.
We added a menu item with the label Create New Clipping (see figure 9.7), but if you look closely, you’ll notice that we haven’t yet added any functionality. To get it working, we need to figure out a way to access the operating system’s native clipboard. Once we can do that, we can update this function to read from the clipboard and push its contents into the array of clippings and then call updateMenu() to re-render it.
At this point, it should come as no surprise that Electron provides a module that makes it easy to access the operating system’s clipboard on Linux, macOS, and Windows. It should come as even less of a surprise that this module is conveniently called clipboard.
The clipboard module is available in the main process as well as in the renderer process, and it has several useful methods for reading images, rich text, HTML, bookmarks, and other formats. For now, let’s keep it simple and stick to working with strings of plain text. Figure 9.7 shows our application with a single clipping.
To get the Create New Clipping menu item to work, we want to create a function that we can call that reads from the clipboard and adds it to the clippings array. In the spirit of simplicity and clarity, we call this function addClipping().
const path = require('path');
const {
app,
clipboard, 1
Menu,
Tray,
systemPreferences
} = require('electron');
const clippings = [];
let tray = null;
app.on('ready', () => {
// ...
});
const updateMenu = () => {
const menu = Menu.buildFromTemplate([
{
label: 'Create New Clipping',
click() { addClipping(); }, 2
accelerator: 'CommandOrControl+Shift+C' 3
},
{ type: 'separator' },
...clippings.map((clipping, index) => ({ label: clipping })),
{ type: 'separator' },
{
label: 'Quit',
click() { app.quit(); },
accelerator: 'CommandOrControl+Q' 4
}
]);
tray.setContextMenu(menu);
};
const addClipping = () => {
const clipping = clipboard.readText(); 5
clippings.push(clipping); 6
updateMenu(); 7
return clipping;
};
To do anything with the Electron’s clipboard module, we need to include it like every other module from Electron. With the module included, addClipping() can read text from the clipboard and push it onto the array. With a new clipping in the array, the next logical step is to update the menu and display the new contents to the user as shown in figure 9.7.
With this feature in place, we can read from the clipboard and save the text snippets in our application, but we haven’t yet written the functionality to take one of the saved clippings and write it back to the clipboard. As it stands, our application is a scrapbook of the clippings we’ve saved in the past.
Writing to the clipboard isn’t much different from reading from it. So, let’s up the ante and assign keyboard shortcuts to the menu items associated with the clippings, as shown in figure 9.8 and in listing 9.7. When a user presses the keystroke, the respective clipping is written to the clipboard.
const path = require('path');
const {
app,
clipboard,
Menu,
Tray,
systemPreferences
} = require('electron');
const clippings = [];
let tray = null;
app.on('ready', () => {
// ...
});
const updateMenu = () => {
const menu = Menu.buildFromTemplate([
{
label: 'Create New Clipping',
click() { addClipping(); },
accelerator: 'CommandOrControl+Shift+C'
},
{ type: 'separator' },
...clippings.map(createClippingMenuItem), 1
{ type: 'separator' },
{
label: 'Quit',
click() { app.quit(); },
accelerator: 'CommandOrControl+Q'
}
]);
tray.setContextMenu(menu);
};
const addClipping = () => {
// ...
};
const createClippingMenuItem = (clipping, index) => { 2
return {
label: clipping,
click() { clipboard.writeText(clipping); }, 3
accelerator: `CommandOrControl+${index}` 4
};
};
Mapping the strings into menu items inside of the array with an anonymous function was a short-term solution at best. Now that we’re adding click methods and accelerators to each menu item, it makes sense to break out this process into its own function. createClippingMenuItem() takes the first two arguments passed by Array.prototype.map() to its callback function: the item currently being iterated over and its index. We use this index to determine which accelerator to assign to it.
With this in place, the user can now write a clipping back to the clipboard with a keystroke. That’s great, but what happens if the user copies a big string of text? Eventually the operating system will trim stuff down, as shown in figure 9.9, but we need to step in and do better.
When we iterate over the clippings to create menu items, we check if it is over 20 characters long. If it is, slice off the first 20 characters, add an ellipsis, and use that as the label. Figure 9.10 shows an example of a shortened menu item name and listing 9.8 gives the code for truncating the labels. This truncation has no effect on the clipping itself. If the user selects the clipping, its full text is written back to the clipboard. If the clipping is less than than 20 characters, use it as the label without modification.
const createClippingMenuItem = (clipping, index) => {
return {
label: clipping.length > 20
? clipping.slice(0, 20) + '...'
: clipping, 1
click() { clipboard.writeText(clipping); },
accelerator: `CommandOrControl+${index}`
};
};
I chose 20 as an arbitrary number. You can choose another number if you prefer. In a larger application, it might make sense to allow the user to express their preference and use that number instead.
What if a user accidentally added a clipping that is already stored in our array? To get around this, we check if the array includes the current clipping. If it does, then return early to short-circuit the function. Another option would be to use a set instead of an array, which is the approach we took with managing unique windows in Fire Sale. This method works for preventing duplicates, but sets do not have a map() method, so we would need to come up with another method for turning the clippings into menu items.
const addClipping = () => {
const clipping = clipboard.readText();
if (clippings.includes(clipping)) return; 1
clippings.push(clipping);
updateMenu();
return clipping;
};
Array.prototype.push() adds items to the end of the array, so the first clipping added always is assigned Command-0 or Control-0 as an accelerator. Array.prototype.unshift() adds the new item to the beginning of the array. This means that the most recently saved clipping is accessible with Command-0 or Control-0, the second most recently saved clipping is accessible with Command-1 or Control-1, and so on.
const addClipping = () => {
const clipping = clipboard.readText();
if (clippings.includes(clipping)) return;
clippings.unshift(clipping); 1
updateMenu();
return clipping;
};
If the user falls in love with our application, it could get fairly long. Therefore, it makes sense to limit the number of clippings in the menu. I chose to limit it to 10 items because we’re assigning keyboard shortcuts based on the array indices, and there is no “11” key on most keyboards.
const menu = Menu.buildFromTemplate([
{
label: 'Create New Clipping',
click() { addClipping(); },
accelerator: 'CommandOrControl+Shift+C'
},
{ type: 'separator' },
...clippings.slice(0, 10).map(createClippingMenuItem), 1
{ type: 'separator' },
{
label: 'Quit',
click() { app.quit(); },
accelerator: 'CommandOrControl+Q'
}
]);
These shortcuts have a limitation—they work only when we are actively working with the menu. This means the user would have to mouse over to the menu bar or system tray icon and click it. After that action they can use one of the keyboard shortcuts provided. This is slightly useful, but not as useful as if the shortcuts were globally available.
All the accelerators we’ve used so far have worked only when the application is actively being used. By using the globalShortcut module, Electron also allows us to register global shortcuts with the operating system that can be activated even when the application is in the background. We’ll register two global shortcuts for Clipmaster: one to trigger the menu to appear, and another to save the contents of the clipboard to Clipmaster without needing to trigger the menu at all.
const path = require('path');
const {
app,
clipboard,
globalShortcut, 1
Menu,
Tray,
systemPreferences
} = require('electron');
const clippings = [];
let tray = null;
app.on('ready', () => {
if (app.dock) app.dock.hide();
tray = new Tray(path.join(__dirname, '/Icon.png'));
if (process.platform === 'win32') {
tray.on('click', tray.popUpContextMenu);
}
const activationShortcut = globalShortcut.register(
'CommandOrControl+Option+C',
() => { tray.popUpContextMenu(); } 2
);
if (!activationShortcut) { 3
console.error('Global activation shortcut failed to register');
}
const newClippingShortcut = globalShortcut.register(
'CommandOrControl+Shift+Option+C',
() => { addClipping(); } 4
);
if (!newClippingShortcut) { 5
console.error('Global new clipping shortcut failed to register');
}
updateMenu();
tray.setToolTip('Clipmaster');
});
const updateMenu = () => {
// ...
};
const addClipping = () => {
// ...
};
const createClippingMenuItem = (clipping, index) => {
// ...
};
The first thing we need to do is require the globalShortcut module from Electron. After we have the module, we can use its register() method, which takes two arguments: an accelerator, and a function to call when it has been activated. If the global shortcut is already taken, Electron returns null instead of throwing an error, which—if uncaught—could take down the entire application. In this case, we log a message to the console informing us that the registration has failed. In a more robust application, you could prompt the user to select a new shortcut or fallback to a second choice.
This functionality behaves slightly differently on macOS and Windows. On macOS the menu appears in the same manner as it would if the user clicked it. On Windows, however, the menu appears beneath the cursor, as shown in figure 9.11, instead of above the system tray icon as you might expect.
Electron’s globalShortcut module also provides other useful methods for working with shortcuts. globalShortcut.isRegistered() returns a Boolean that is true if the application has already registered the shortcut; otherwise, it returns false. However, it also returns false if another application has registered that shortcut.
In Clipmaster, you’ve chosen to hard-code our global shortcuts, but you may choose to create a UI that allows users to set their own keyboard shortcuts. If a user decides to switch shortcuts for a given command, we want to unregister the old shortcut with globalShortcut.unregister() after we’ve successfully registered the new one. We can also unregister all global shortcuts using the conveniently named globalShortcut.unregisterAll() method.
With our global shortcuts in place, users can save new clippings from anywhere with a touch of a few buttons. But how does the user know when they’ve successfully saved a clipping? Not only does our application not have much of a UI to begin with, it isn’t being shown when they activate it using a global shortcut. One solution would be to show a native system notification, such as that shown in figures 9.12 and 9.13.
Notifications work out of the box on macOS and Windows 10. They also work with the most common Linux desktop environment. Things get a bit tricky when working with older versions of Windows. This is beyond the scope of this book, but it is covered in the official documentation: http://mng.bz/nJR0.
This is the solution that we’re going with, but it’s not without its complications. Electron applications can create notifications using Chromium’s Notification API. As a web API, Notifications are available only in the renderer process and not in the main process.
To deliver this feature, we need to create a hidden BrowserWindow instance. When the user saves a new clipping using the global shortcut, we send a message via IPC to the renderer process. When the renderer process receives this message, it triggers the notification.
Let’s start by making an invisible process and then send messages to it and let it trigger the notifications. If you recall from Fire Sale, BrowserWindow instances can load HTML, which in turn can load JavaScript like a traditional web page would. The first thing we need is a bare minimum HTML page.
<!DOCTYPE html>
<html lang="en">
<head>
<meta charset="UTF-8">
<meta name="viewport" content="width=device-width,initial-scale=1">
<title>Clipmaster</title>
</head>
<body></body>
<script>
require('./renderer'); 1
</script>
</html>
This page has some basic markup to make it a valid HTML page. The important part is that it contains a script tag that loads renderer.js, which contains the code that listens for messages from the main process and triggers the notification. Next, let’s set up that listener and write the code to display the notification.
const { ipcRenderer } = require('electron');
ipcRenderer.on('show-notification', (event, title, body) => {
const myNotification = new Notification(title, { body }); 1
});
We pull in the ipcRenderer module and begin listening for notifications on the appropriately named show-notification channel. This listener expects three arguments in addition to the event object that is included by default: a title and body for the notification, as well as a function detailing what to do if the user clicks the notification. If no function is provided, onClick is an empty function by default.
With the code for our renderer process in place, we need to run it when the application starts. In Fire Sale, we created BrowserWindow instances that started out hidden and then were displayed when the content has been loaded. In Clipmaster, there isn’t any content to display, so we never show the window itself. Include this code snippet inside the app.on ready block.
const {
// . . .
BrowserWindow,
// . . .
} = requre('electron');
browserWindow = new BrowserWindow({
show: false
});
browserWindow.load.URL(`file://{$_dirname}/index.html`);
Even though the window is not shown, we can load the HTML page we created earlier to execute the code and set up our listener. Now when we add a clipping, we send a message to the renderer process to have it show a notification.
constnewClippingShortcut=globalShortcut.register(
'CommandOrControl+Shift+Option+C',
() => {
constclipping=addClipping(); 1
if (clipping) {
browserWindow.webContents.send(
'show-notification',
'Clipping Added', 2
clipping,
);
}
},
);
When a clipping has been added, a message is sent to the renderer process. Before sending the message, we check if addClipping() returned a value. If you recall, if the list of clippings already contains the new clipping, then the function returns early with a value of undefined. This conditional prevents the message from being sent if no new clipping was saved. I leave it as an exercise to the reader to display a useful notification informing the user that the clipping already exists.
On macOS, our menu bar icon doesn’t behave the same way as its peers. The expected behavior is that the icon’s colors are inverted when the menu is activated. Luckily, Electron makes it easy to implement this feature. See figure 9.14.
The tray module has a method called setPressedImage(). On Windows, this method is ignored. On macOS it allows us to provide the path to a second image file. When the menu bar icon is clicked, Electron swaps out the primary image for this second image. The code in this listing belongs immediately after the statement that sets tray, which also invokes getIcon().
tray.setPressedImage(path.join(__dirname, 'icon-light.png'));
You may be asking, “What about dark mode?” It turns out that the default behavior in macOS is not to invert the icons when they’re pressed in dark mode. As a result, you do not need to implement any additional logic to handle that situation.
The code for Clipmaster, in line with the features in this chapter, has been implemented as follows: Listing 9.18 shows the code for the main process and listing 9.19 shows the code for the renderer process. You can also find this code on the completed-example branch of the repository you cloned at the beginning of this chapter (http://mng.bz/xJ98).
const path = require('path');
const {
app,
BrowserWindow,
clipboard,
globalShortcut,
Menu,
Tray,
systemPreferences,
} = require('electron');
const clippings = [];
let tray = null;
let browserWindow = null;
const getIcon = () => {
if (process.platform === 'win32') return 'icon-light@2x.ico';
if (systemPreferences.isDarkMode()) return 'icon-light.png';
return 'icon-dark.png';
};
app.on('ready', () => {
if (app.dock) app.dock.hide();
tray = new Tray(path.join(__dirname, getIcon()));
tray.setPressedImage(path.join(__dirname, 'icon-light.png'));
if (process.platform === 'win32') {
tray.on('click', tray.popUpContextMenu);
}
browserWindow = new BrowserWindow({
show: false,
});
browserWindow.loadURL(`file://${__dirname}/index.html`);
const activationShortcut = globalShortcut.register(
'CommandOrControl+Option+C',
() => {
tray.popUpContextMenu();
},
);
if (!activationShortcut)
console.error('Global activation shortcut failed to regiester');
const newClippingShortcut = globalShortcut.register(
'CommandOrControl+Shift+Option+C',
() => {
const clipping = addClipping();
if (clipping) {
browserWindow.webContents.send(
'show-notification',
'Clipping Added',
clipping,
);
}
},
);
if (!newClippingShortcut)
console.error('Global new clipping shortcut failed to regiester');
updateMenu();
tray.setToolTip('Clipmaster');
});
const updateMenu = () => {
const menu = Menu.buildFromTemplate([
{
label: 'Create New Clipping',
click() {
addClipping();
},
accelerator: 'CommandOrControl+Shift+C',
},
{ type: 'separator' },
...clippings.slice(0, 10).map(createClippingMenuItem),
{ type: 'separator' },
{
label: 'Quit',
click() {
app.quit();
},
accelerator: 'CommandOrControl+Q',
},
]);
tray.setContextMenu(menu);
};
const addClipping = () => {
const clipping = clipboard.readText();
if (clippings.includes(clipping)) return;
clippings.unshift(clipping);
updateMenu();
return clipping;
};
const createClippingMenuItem = (clipping, index) => {
return {
label: clipping.length > 20 ? clipping.slice(0, 20) + '...' : clipping,
click() {
clipboard.writeText(clipping);
},
accelerator: `CommandOrControl+${index}`,
};
};
const { ipcRenderer } = require('electron');
ipcRenderer.on('show-notification', (event, title, body, onClick = () => { })
=> {
const myNotification = new Notification(title, { body });
myNotification.onclick = onClick;
});
In the previous chapter, we created an application that lived in the menu bar on macOS or the system tray on Windows. Out of the box, Electron’s tray module allows you to set a menu to display when the user clicks the tray icon. This is the same type of menu used in the application and context menus that we built in Fire Sale. This menu also has the same limitations: it is limited to text, is hard to modify, and provides limited functionality.
Being able to build applications that live in the system tray or menu bar allows us to build entire classes of applications that we couldn’t build in the browser. It’s unfortunate that we have these restrictions, but—luckily—we can work around them. In this chapter, we explore a clever way to get around the limitations of the tray module using a third-party library conveniently called menubar.
menubar is an abstraction built on a set of core Electron modules that we’ve used previously in the book. A high-level explanation is that it creates an empty tray module. When the user clicks the icon, menubar shows a frameless, correctly positioned BrowserWindow instance beneath the icon, which creates the illusion that it’s attached to the icon. menubar also provides a cute cat icon by default.
In this chapter, we’ll rebuild Clipmaster from the ground up into a completely new application. This time it has a much more pleasant UI, shown in figure 10.1, compared to its predecessor. We add the ability to remove a clipping from the list or publish it to the web using an example API so that it can be shared publicly. Finally, we add some interactivity to our notifications and global shortcuts to trigger the application’s functionality using predetermined keystrokes.
The menubar library provides a function that allows you to create new menu bar applications. It uses the app module to control the lifecycle of the application, an instance from the tray module to create the icon in the operating system’s menu bar or system tray, and a BrowserWindow instance for displaying the UI (as shown in figure 10.2). menubar uses another third-party library called electron-positioner to correctly position the BrowserWindow instance under the icon. It also provides methods for hiding and showing the window programmatically.
A boilerplate for Clipmaster 9000 is available on Github (https://github.com/electron-in-action/clipmaster-9000). You can start on the master branch and code along or check out the completed-example branch to see the code in its state at the end of the chapter.
const Menubar = require('menubar');
const menubar = Menubar(); 1
menubar.on('ready', () => { 2
console.log('Application is ready.');
});
In listing 10.1, we don’t require the app module from Electron. menubar does that for us when we call the function and create the instance. You can also see that we’re listening for the ready event on menubar instead of app. menubar’s event is waiting on getting everything else set up, in addition to listening to the app’s ready event.
You can start the simple application using the npm start command. If all goes well, you should see a message in your terminal as well as a small cat in either your menu bar or system tray, depending on which platform the application is running on. If you click the icon, you see an empty browser window. menubar created a BrowserWindow instance on our behalf, but it did not load an HTML document into the window.
To get a UI in that window, we need to do a few things shown in the listing 10.2. First, we need to create an HTML document with some basic markup. Second, we need to define a CSS to style the UI. Third, we need the HTML document to load the code for our UI from renderer.js.
<!DOCTYPE html>
<html>
<head>
<meta charset="UTF-8">
<meta name="viewport" content="width=device-width,initial-scale=1">
<meta http-equiv="Content-Security-Policy"
content="
default-src 'self';
script-src 'self' 'unsafe-inline';
connect-src https://cliphub.glitch.com/*
"
>
<!--
Change the URL in the line above if you fork the back end server.
-->
<title>Clipmaster 9000</title>
<link rel="stylesheet" href="style.css" type="text/css">
</head>
<body>
<div class="container">
<section class="controls"> 1
<button id="copy-from-clipboard">Copy from Clipboard</button>
</section>
<section class="content">
<div id="clippings-list"></div> 2
</section>
</div>
<script>
require('./renderer'); 3
</script>
</body>
</html>
I included the stylesheet in the repository, but let’s highlight some of the interesting bits next. I use one or two Electron-specific techniques in the CSS to give the application a more native feel; renderer.js starts out completely empty, but we add to it as the chapter goes on.
// ...Omitted for brevity...
body > div {
height: 100%;
overflow: scroll;
-webkit-overflow-scrolling: touch; 1
}
.container {
position: absolute;
top: 0;
bottom: 0;
left: 0;
right: 0;
overflow: auto;
}
textarea, input, div, button { outline: none; }
// ...Omitted for brevity...
.clipping-text::-webkit-scrollbar {
display: none; 2
}
.clipping-controls {
margin-top: 0.5em;
}
// ...Omitted for brevity...
With these files in place, we now have the foundation for building our application. menubar does not create a window immediately. Instead, it creates a BrowserWindow instance the first time the user clicks the icon and triggers the window. This behavior comes back to bite us later in the chapter when we try to manipulate the DOM before it has been loaded, but let’s follow the happy path for now by listening for an event that is fired after the window has been created and subsequently loading the HTML in the newly created window.
menubar.on('after-create-window', () => { 1
menubar.window.loadURL(`file://${__dirname}/index.html`);
});
Your application at this stage should look like figure 10.3. At this point, the button should not work, because we have not written any JavaScript for the frontend.
We have a UI for our application, but it doesn’t do anything yet. Just like in chapter 9, we first want to allow the user to add clippings to the application. This is slightly more complicated than it was in the previous chapter because we must generate DOM nodes for the clipping. We need to add this new node to the node in our Markup that contains the list of clippings. Finally, we need to add an event listener to the button to call the two methods we just described. Let’s start by querying and caching two of the selectors that we use frequently as we move through the chapter.
const clippingsList = document.getElementById('clippings-list');
const copyFromClipboardButton = document.getElementById(
'copy-from-clipboard'
);
Creating the element is straightforward, with one important catch. In listing 10.6, we create an article element and add the .clippings-list-item class to it so that it’s styled appropriately. Next, we set its inner content. We query for the node in charge of displaying the text of the clipping and set its inner text accordingly. Finally, we return our new element so that it can be added to the DOM.
const createClippingElement = (clippingText) => {
const clippingElement = document.createElement('article'); 1
clippingElement.classList.add('clippings-list-item');
clippingElement.innerHTML = ` 2
<div class="clipping-text" disabled="true"></div>
<div class="clipping-controls">
<button class="copy-clipping">→ Clipboard</button>
<button class="publish-clipping">Publish</button>
<button class="remove-clipping">Remove</button>
</div>
`;
clippingElement.querySelector('.clipping-text').innerText = clippingText;3
return clippingElement; 4
};
You might be wondering why I didn’t use interpolation with the template literal when setting the inner HTML of the element. We’re not setting the content of the new element using innerHTML, because it does not escape the input and render it as HTML. If a user had copied HTML to the clipboard, it would render the Markup, which is not what we want. Instead we use innerText to set the content of that node, which escapes any HTML and renders it as the user might expect.
We can now take an arbitrary string of text and return the element needed for the UI. The next step is to get the text to feed this function, take the result, and add it to the page.
const { clipboard } = require('electron'); 1
const addClippingToList = () => {
const clippingText = clipboard.readText(); 2
const clippingElement = createClippingElement(clippingText); 3
clippingsList.prepend(clippingElement); 4
};
copyFromClipboardButton.addEventListener('click', addClippingToList); 5
Reading from the system’s clipboard is as easy as requiring the clipboard module from Electron and calling its readText() method. With the clipping text, we create the element and then add it to the top of the list of clippings. Last, we add an event listener to the Copy from Clipboard button that triggers this entire process.
Users can now save clippings to Clipmaster 9000, but that is only half the battle. What if they want to write the contents of a clipping back to the clipboard? Technically, because this new version of the application has a UI, they could select the text and copy it again, but we can do better than that. In addition, Clipmaster 9000 will be an improvement over the old version by letting users remove clippings they no longer want to store and publish them on the web to share publicly if they desire.
The most obvious approach to implementing the functionality described in the previous section would be to add an event listener to each button that calls the appropriate function. When creating a new element for each clipping using createClipping-Element(), we could add these event listeners.
The problem here is that if a user removes a clipping, we also need to remove these event listeners. Failing to do so would cause a memory leak, because the event listener and the DOM element would still reference each other. It’s much easier to take advantage of the fact that events bubble up the DOM.
If you click a button, the browser checks that element for any event listeners for a click event. Next it checks that element’s parent. It will continue this process until it gets to the top of the DOM tree. By adding an event listener to the clippingsList, we can catch an event that originated for a particular clipping. Because the list itself will never be removed from the DOM, we don’t need to worry about removing event listeners whenever a clipping is removed from the UI.
All event objects in the DOM come with a target property, which contains a reference to the element that triggered the event. We look at this to figure out which button was clicked on which clipping and then take the appropriate action.
clippingsList.addEventListener('click', (event) => { 1
const hasClass = className =>
event.target.classList.contains(className); 2
if (hasClass('remove-clipping')) console.log('Remove clipping'); 3
if (hasClass('copy-clipping')) console.log('Copy clipping');
if (hasClass('publish-clipping')) console.log('Publish clipping');
});
We check the element for three different classes, so it makes sense to create a small helper method called hasClass() to aid in this process. Based on the class, we need to call different functions. We haven’t written those functions yet, so we’ll simply log to the console for now to confirm that everything works as it should.
To remove a clipping, we navigate up to its grandparent, which is the element for the entire clipping.
const removeClipping = (target) => {
target.parentNode.parentNode.remove(); 1
};
When we have a reference to the element for the clipping, removing it from the page is as simple as calling the element’s remove() method.
clippingsList.addEventListener('click', (event) => {
const hasClass = className => event.target.classList.contains(className);
if (hasClass('remove-clipping')) removeClipping(event.target); 1
if (hasClass('copy-clipping')) console.log('Copy clipping');
if (hasClass('publish-clipping')) console.log('Publish clipping');
});
Instead of logging to the console whenever the user clicks a clipping’s Remove button, we call removeClipping() and pass it a reference to the button. That works, but we can do a little bit better. Looking ahead, it’s safe to assume that we’ll need to get either a reference to the clipping element or its text. It makes sense to pull these out into their own functions.
const getButtonParent = ({ target }) => { 1
return target.parentNode.parentNode;
};
const getClippingText = (clippingListItem) => { 2
return clippingListItem.querySelector('.clipping-text').innerText;
};
getButtonParent() can navigate to the parent from any of the three buttons. Although simple, this function is useful in case we ever update the Markup. You don’t want to have to change the code for traversing up the DOM from a button to the clipping element three times. From the parent, we need to get the text of the clipping because we’re effectively using the DOM as our data store. Luckily, traversing down the DOM is easier than traversing up, and getClippingText() can take advantage of the querySelector() method. We can now use this method in our event listener.
clippingsList.addEventListener('click', (event) => {
const hasClass = className =>
event.target.classList.contains(className);
const clippingListItem = getButtonParent(event); 1
if (hasClass('remove-clipping')) removeClipping(clippingListItem); 2
if (hasClass('copy-clipping')) console.log('Copy clipping',
getClippingText(clippingListItem));
if (hasClass('publish-clipping')) console.log('Publish clipping',
getClippingText(clippingListItem));;
});
In the previous listing, we immediately get a reference to the clipping element because we’ll need it in every case. Now that getting the clipping text is easy, let’s update our console logs to include the clipping text as well to verify that we’ve implemented this functionality correctly. removeClipping() can now get a lot simpler as well. It’s arguable that we don’t need a function for this at all, but it’s conceivable that we might want to add more functionality later. As a result, it makes sense to leave it for now.
const removeClipping = (target) => {
target.remove(); 1
};
Not only did we implement the ability to write to the clipboard in the previous chapter, we’ve already laid a lot of the groundwork in this chapter to make implementing this feature easy. The first thing that we need is a function that handles writing the text of the clipping to the clipboard.
const writeToClipboard = (clippingText) => { 1
clipboard.writeText(clippingText);
};
We add more to this function later in the chapter, so it makes sense to keep it as a function instead of just adding inline in our event listener. The next step is to replace the console log in the event listener with this new function and pass the function the text of the clipping that was selected by the user.
clippingsList.addEventListener('click', event => {
const hasClass = className => event.target.classList.contains(className);
const clippingListItem = getButtonParent(event);
if (hasClass('remove-clipping')) removeClipping(clippingListItem);
if (hasClass('copy-clipping'))
writeToClipboard(getClippingText(clippingListItem)); 1
if (hasClass('publish-clipping'))
console.log('Publish Clipping', getClippingText(clippingListItem));
});
We now have the core functionality that any self-respecting application that calls itself Clipmaster 9000 would need to do its job. It’s time to start going for extra credit. Let’s implement the ability to publish clippings to an example API, as shown in figure 10.4. We cannot do this in a browser for the same security reasons we discussed in chapter 2. In addition, we use a Node library that would not normally work in the browser to send our requests to the API.
In the name of focus, we’ll take a few shortcuts. This is a deliberatively simple API—it stores the clippings in memory. All of the clippings will be cleared out periodically. The source code for the server can be found at https://glitch.com/~cliphub.
request is another popular, well-named library that makes it easy to perform HTTP requests to remote servers. request allows us to set defaults for every request that it makes. For this application, we send all our requests to the same API endpoint, so it makes sense to set that as a default. We will also create a custom user agent string that will differentiate Clipmaster from an ordinary browser.
In this section, we set up request to make requests to the ClipHub API, format our clippings so that the ClipHub API will accept those requests, and then set up our UI to make the requests.
const request = require('request').defaults({ 1
url: 'https://cliphub.glitch.me/clippings',
headers: { 'User-Agent': 'Clipmaster 9000' }, 2
json: true, 3
});
Now we can format the text of a clipping for the API and send an HTTP request to the API. The next step is to tie these two functions together and show the user whether the request was successful, along with the URL of the clipping on ClipHub if it was successful.
const publishClipping = (clipping) => {
request.post({ json: { clipping } }), (error, response, body) => { 1
if (error) { return alert(JSON.parse(error).message); } 2
const url = body.url; 3
alert(url); 4
clipboard.writeText(url); 5
});
};
request.post() sends a POST request to a URL. We set the default URL earlier, so there is no need to specify it now. request.post() takes two arguments: the data we want to send and a callback that is invoked when we hear back from the server. request passes three arguments to the callback: an error object in the event the request is not successful, the full HTTP response, and the body of the response. If the request was successful, error is null.
If the request is successful, we get the url property, which contains the URL for our new published clipping. For now, we use an alert to display the URL. We also write it to the clipboard so that the user can paste it into the address bar of their favorite web browser. With the code for this feature in place, the last thing to do is call it when the user clicks the Publish button on a clipping.
clippingsList.addEventListener('click', (event) => {
const hasClass = className => event.target.classList.contains(className);
const clippingListItem = getButtonParent(event);
if (hasClass('remove-clipping')) removeClipping(clippingListItem);
if (hasClass('copy-clipping'))
writeToClipboard(getClippingText(clippingListItem));
if (hasClass('publish-clipping'))
publishClipping(getClippingText(clippingListItem)); 1
});
In this listing, we used a technique similar to writing the clipping’s text to the clipboard. The only difference is that we swap out writeToClipboard() in favor of publish-Clipping().
We let the user know that something has happened in Clipmaster in various ways. We silently write to the clipboard without informing the user as to whether the action ended in success. When publishing we use an alert that locks up the application until the user dismisses it.
Later in this chapter, we implement global shortcuts that allow the user to trigger the application’s functionality without having it open. In this situation, having useful notifications is even more important. Displaying these notifications is simple because we do all the heavy lifting in the renderer process and don’t have to worry about IPC. With that in mind, we look at how to add event handlers to our notifications to add functionality that wasn’t present in the previous chapter.
Let’s start by tackling the alert that pops up whenever the user publishes a clipping. In its place, we display one of two notifications, shown in listing 10.19: that an error occurred with the message received from the server, or that the request was successful with the URL of the newly published clipping on ClipHub. If the request was successful, we add an event handler to the notification that opens ClipHub in their default browser when the user clicks the notification.
const { clipboard, shell } = require('electron');
// Code omitted for clarity...
const publishClipping = (clippingText) => {
request.post({ json: { clipping } }), (error, response, body) => {
if (error) { 1
return new Notification('Error Publishing Your Clipping', {
body: JSON.parse(error).message
});
}
const url = body.url;
const notification = new Notification( 2
'Your Clipping Has Been Published',
{ body: `Click to open ${url} in your browser.` }
);
notification.onclick = () => { shell.openExternal(url); }; 3
clipboard.writeText(url);
};
};
To open a URL in the user’s default browser, we need to pull in the shell module from Electron. We’ll set the onclick method of the notification to an anonymous function that is triggered when the user clicks the notification.
Asking the user to take their hand off the keyboard and navigate to a small icon in the menu bar or system tray isn’t always optimal. They’re likely typing when they want to create a clipping, and they want the convenience of having a key combination that they can press from anywhere in the operating system to trigger a command inside Clipmaster 9000.
If you remember from the previous chapter, we must register global shortcuts in the main process. In chapter 9, we implemented most of the application’s functionality in the main process, and we could call functions directly. In this chapter, the opposite is true, and we need to set up some IPC. In the following listing, let’s start by registering a shortcut to create a new clipping. We start by having it log to the console for now. In the next step, we implement its functionality.
const { globalShortcut } = require('electron'); 1
const Menubar = require('menubar');
const menubar = Menubar();
menubar.on('ready', function() {
console.log('Application is ready.');
const createClipping = globalShortcut.register('CommandOrControl+!', ()
=> {
console.log('This will eventually trigger creating a new clipping.');
}); 2
if (!createClipping) {
console.error('Registration failed', 'createClipping');
} 3
});
menubar.on('after-create-window', () => {
menubar.window.loadURL(`file://${__dirname}/index.html`);
});
This is similar to what we did in the previous chapter. The important difference is that we’re storing all the clippings in the DOM in the renderer process. As a result, we need to communicate with the renderer process to create the clipping. In Fire Sale, we kept a reference to each window that we created. menubar created a browser window on our behalf and stored it in its window property. Let’s update our global shortcut to send a message to the renderer process whenever the user presses the keystroke to create a new shortcut. We can also register shortcuts for writing clippings back to the clipboard and publishing them to ClipHub.
const createClipping = globalShortcut.register('CommandOrControl+!', () => {
menubar.window.webContents.send('create-new-clipping');
});
const writeClipping = globalShortcut.register('CmdOrCtrl+Alt+@', () => {
menubar.window.webContents.send('write-to-clipboard');
});
const publishClipping = globalShortcut.register('CmdOrCtrl+Alt+#', () => {
menubar.window.webContents.send('publish-clipping');
});
if (!createClipping) {
console.error('Registration failed', 'createClipping');
}
if (!writeClipping) {
console.error('Registration failed', 'writeClipping');
}
if (!publishClipping) {
console.error('Registration failed', 'publishClipping');
}
Each shortcut is sending a message on a different channel. In this case, we send no additional information to the renderer process because the process reads from the clipboard. The next step is to configure the renderer process to receive the messages sent from the main process. The user may not have the application open when they press the keystroke, so we add notifications where appropriate.
const { clipboard, ipcRenderer, shell } = require('electron'); 1
ipcRenderer.on('create-new-clipping', () => {
addClippingToList(); 2
new Notification('Clipping Added', { 3
body: `${clipboard.readText()}`
});
});
ipcRenderer.on('write-to-clipboard', () => {
const clipping = clippingsList.firstChild; 4
writeToClipboard(getClippingText(clipping)); 5
});
ipcRenderer.on('publish-clipping', () => {
const clipping = clippingsList.firstChild;
publishClipping(getClippingText(clipping)); 6
});
In chapter 9, we stored all the clippings in an array in the main process. In this chapter, we’re using the DOM as our temporary data store. If the user clicks the button to write to the clipboard or publish the clipping, we know which clipping, based on the button clicked. But how do we find the appropriate clipping when the user activates a global shortcut? In the previous listing, we traverse to the first child of the clippings list and call one of the functions we wrote earlier in the chapter with that element.
You might have noticed a bug when implementing the last feature. If you start your application and immediately press one of your new global shortcuts, you get an error, shown in figure 10.5, that reads “TypeError: Cannot read property ’webContents’ of undefined.” If you look at the previous listing, you’ll notice that we’re attempting to access the webContents property on menubar.window, which is apparently undefined. Click the cat icon to open the window and try the shortcut again. It should work this time.
So why does it suddenly work? menubar lazily loads the window the first time it is needed. To prevent this error, we must tell menubar to immediately load the window when it starts up. We also want it to load our HTML page, which—in turn—loads renderer.js, which sets up our IPC listeners.
const menubar = Menubar({
preloadWindow: true, 1
index: `file://${__dirname}/index.html`, 2
});
Previously, we were invoking the Menubar() function with no arguments. In listing 10.23, we modified the function call and passed in a configuration object. We preload the window before the first time the user clicks on the menu bar or tray icon and we load in our HTML page as soon as menubar loads the window.
In Fire Sale, I boasted that one of the great things about building applications in Electron is that we could use application and context menus to provide functionality without needing to find a place for it in the UI. In the previous chapter, we could have created additional submenus if necessary. But what about Clipmaster 9000? It turns out that the tray module allows us to display a secondary menu when the user right-clicks the icon. Let’s create a simple menu that allows users to quit the application. We accomplish this in three steps: create the menu using Menu.buildFromTemplate(), add an event handler for right-clicks on menubar.tray, and pop up the menu when the user right-clicks the icon.
const { globalShortcut, Menu } = require('electron'); 1
const secondaryMenu = Menu.buildFromTemplate([ 2
{
label: 'Quit',
click() { menubar.app.quit(); }, 3
accelerator: 'CommandOrControl+Q'
},
]);
menubar.on('ready', function () {
console.log('Application is ready.');
menubar.tray.on('right-click', () => { 4
menubar.tray.popUpContextMenu(secondaryMenu); 5
});
// Omitted for brevity...
});
With this small change, we create an entire secondary interface to the application. This would be a great place for user preferences and other advanced options that don’t have a good place in the main UI of the application.
The first phase of Clipmaster 9000 is now complete. You can find the complete code in the appendix or on the completed-example branch of this repository (http://mng.bz/UE9).
In the chapters leading up to this one, we’ve been writing all of our UIs using vanilla JavaScript and CSS. This was intentional—this is a book on Electron, after all. It’s not a book on client-side frameworks. That said, it’s impossible to ignore that modern web developers use a wide variety of languages, frameworks, and tools to build the increasingly complex UIs that users have come to expect from the web.
In this chapter, I’ll show you how to set up Electron to work with an assortment of web languages. With that covered, we build a small application using three languages: React (using JSX and upcoming JavaScript features that are not yet supported by Node or Chromium), Sass, and Jade. It’s not a requirement that you’ve used React or any of the other languages. In fact, if you’re an expert in any of them, you might notice that we kept them deliberately simple and omit things like PropTypes. I chose React, Sass, and Jade because they hit the sweet spot of being popular and relatively approachable for developers unfamiliar with them. Though this book is not on React, Sass, or Jade, it is titled Electron in Action so we we’re going to learn by doing. We use this application in the next chapter when we hook up real, persistent data stores to the application. A branch of this application is ready for you to use if you are already familiar with React or don’t have a strong desire to learn it. That said, do not miss section 11.5 where I cover how to enable live reloading using electron-compile.
In this chapter, we build an application called Jetsetter, shown in figure 11.1. This application solves a problem that I’ve been having. I’ve been traveling a lot recently to speak at JavaScript conferences, and the only thing worse than showing up to the conference venue without the right adapter is showing up at the hotel without enough socks for the week. In the past, I’ve tried to use a to-do list to track everything I needed to pack. But to-do list applications aren’t really built for this purpose, and I find it tedious to check and uncheck all the tasks when I’m packing for the next trip. Hence, Jetsetter was born.
You can find the source code for Jetsetter at https://github.com/electron-in-action/jetsetter. We start with the master branch as the foundation of the application as we go through this chapter, but you can also find a completed version on the branch named completed-example. To get started, clone the repository, and install the dependencies.
We build an application that allows the user to add items and mark them as either packed or unpacked. A button at the bottom of the UI allows the user to mark everything as unpacked again when they’re getting ready for the next trip. The version we are building in this chapter has a fatal flaw: it doesn’t save the list of items anywhere. This means that whenever you close the application, all your new items are lost. Chapter 12 addresses this issue by showing how to persist data in several different ways, from in-browser storage to directly accessing databases from the UI.
Despite all the languages that developers use to build web applications these days, the browser understands only three of them: HTML, CSS, and JavaScript. Some minor exceptions have existed over the years—Google’s Dartium, which was a build of Chromium that ran Dart alongside JavaScript, and Netscape Navigator’s short-lived support of JavaScript Stylesheets come to mind—but, for the most part, this situation has been true for as long as the web has been around.
In addition to compiling from alternative languages into JavaScript, it has become fashionable to compile JavaScript into JavaScript. Tools such as Babel allow developers to use the latest and greatest—and in some cases, upcoming—features of the language and then compile them down into more verbose versions that older browsers support. We’re not concerned with older browsers when building Electron applications because we’re shipping our own modern versions of Chromium and Node, but Babel plugins are available for upcoming language features and alternative syntaxes like JSX or Flow, the former of which we use in this chapter.
Typically, developers write in their language of choice and then use a build tool to compile their code into JavaScript, CSS, or HTML for the browser. This process is commonly called transpilation because we’re compiling one language into another instead of into byte code or assembly. We could certainly do that in this chapter, but it requires running a separate process to compile our code. We’d have to wait for that process to finish before refreshing the Electron application’s browser window to see the changes.
More importantly, the process is not much different for Electron applications than it is for traditional web applications and certainly doesn’t warrant an entire chapter in this book. And so, it is with great pleasure that I get to introduce you to electron-compile.
electron-compile enables Electron to use alternative languages in addition to the ones supported by Chromium and Node, as illustrated in figure 11.2. They are transpiled on the fly and without the need for an additional build process.
As you can see in figure 11.2, electron-compile supports a healthy number of languages. Getting started with electron-compile is suspiciously easy. In the package.json file of the application, you’ll find the important dependency electron as well as electron-prebuilt-compile, which is a version of Electron that has been configured with electron-compile.
electron-compile determines the language by looking at the file extension. If you load a file with a .coffee extension, it automatically transpiles it using CoffeeScript. The same goes for TypeScript with the .ts extension and so on. All files with a .js extension will be transpiled using Babel. By default, Babel doesn’t do anything, so it has no effect on your JavaScript files unless you intentionally configure it to, which I cover in the next section.
For now, if you run npm start, the application starts as you’d expect, but it now has full support for electron-compile. If your needs are simple, then this is all that you must do. In the next section, we configure electron-compile to support JSX and other upcoming features to JavaScript as well as support source maps in development.
In this chapter, we use JavaScript with a few additional features and support for JSX—an HTML-like syntax that makes it easier to define React components. As such, we need to configure Babel to support these features. When the application starts, electron-compile looks to a file called .compilerc for any additional configuration beyond the default. I’ve included this file for you in the repository you cloned earlier in this chapter, but let’s look at it in this listing.
{
"env": {
"development": { 1
"application/javascript": { 2
"presets": [ 3
[
"env", 4
{
"targets": {
"electron": "1.8" 5
}
}
],
"react" 6
],
"plugins": [
"transform-es2015-classes",
"transform-es2015-modules-commonjs", 7
"transform-object-rest-spread" 8
],
"sourceMaps": "inline" 9
},
"text/jade": {
"pretty": true 10
}
},
"production": { 11
"application/javascript": {
"presets": [
[
"env",
{
"targets": {
"electron": "1.8"
}
}
],
"react"
],
"plugins": [
"transform-es2015-classes",
"transform-es2015-modules-commonjs",
"transform-object-rest-spread"
],
"sourceMaps": "none"
}
}
}
}
At first glance, this configuration file can be overwhelming, but there is a beauty to it. First, electron-compile allows us to maintain two separate configuration sets: one for development, and one for production. We chose to omit source maps and not format the HTML generated by Jade for production. Source maps are a convenience for developers.
When we are using transpilation, the code we write is not the code that is being executed by the browser. This inherently makes sense because that’s the whole point of using transpilation, but the catch is that it can be hard to debug code that has been compiled. An error on line 36 of the code in the output may be on line 12 of the code you wrote. Source maps allow Chromium to map the output to the input and show you where that error is in the code you wrote. Generating source maps can take time, so they are generally omitted from production versions of the application.
electron-compile doesn’t configure the transpilation process itself. It simply passes on those options to the tool doing the actual transpilation. Under the development key, we have two additional keys: text/jade and application/javascript. These options are passed to Jade and Babel, respectively. Any options listed under an application/coffeescript are passed to the CoffeeScript compiler.
Within the options being passed to Babel, we see that we’re using both plugins and presets. Presets are just groups of plugins. The react preset includes all the presets related to React, such as the ability to parse and transform JSX. Many other presets are available on npm, but babel-preset-env is a bit of a special beast. It maintains a list of commonly used plugins and the browsers—Electron is included among these—that already have built-in support and do not require a plugin. This allows Babel to intelligently skip transpiling features that are already natively supported by Electron.
In addition to the presets, we include a few other plugins. Node.js does not currently support the ES modules, so I included a plugin that will convert the ES module syntax into the CommonJS module syntax that we’ve been using thus far in this book. We also add support for an upcoming language feature called Object Rest Spread, which is popular with React developers and used to clone objects to avoid mutation.
You may have noticed that I’ve included a plugin for ECMAScript classes, which are already supported in both Node and Chromium, so this plugin is not required. At the time of this writing, a bug with hot module reloading in React requires that this plugin be included. I mention this because if you try to apply the concepts from this chapter in the future, you may also run into this bug (https://github.com/gaearon/react-hot-loader/issues/313). This bug has been open for just over a year and a half, so you may run into it and lose the better part of your afternoon, like I did.
With electron-compile configured, let’s look at the foundation of the application. Instead of an HTML file, we use Jade as the markup language. This file is relatively simple, because React handles most of the heavy lifting for the UI. Replace index.html with index.jade, and add the following content.
doctype html
html(lang='en')
head
title Jetsetter
meta(charset='UTF-8')
meta(name='viewport', content='width=device-width, initial-scale=1')
meta(
http-equiv="Content-Security-Policy",
content="default-src 'self'; script-src 'self' 'unsafe-inline'"
)
link(rel='stylesheet', href='style.scss')
body
#application
.loading Loading...
script.
require('./renderer');
Jade was officially renamed Pug a while back due to a trademark dispute, but it is still referred to as Jade by electron-compile, so I do the same for the remainder of this chapter. We also write our stylesheet in Sass, a feature-rich alternative to CSS. Rename style.css to style.scss, and update the content as follows.
$accent-color: rgb(243,46,91); 1
html {
box-sizing: border-box;
}
body, input {
font: caption;
}
input {
padding: 0.5em;
border: 1px solid $accent-color;
background-color: lighten($accent-color, 30); 2
}
button, .button, input[type="submit"] {
background-color: $accent-color;
border: 1px solid darken($accent-color, 10);
color: white;
padding: 0.5em;
&:hover { 3
background-color: lighten($accent-color, 10);
}
&:active {
background-color: lighten($accent-color, 5);
}
&.full-width {
width: 100%;
margin: 1em 0;
}
}
.NewItem {
display: flex;
}
.NewItem-input {
width: 100%;
}
Sass supports a wide range of features—many of which I won’t discuss in this chapter. In the previous example, I used a variable to set the main color of the buttons and input fields and used built-in helper functions such as lighten() and darken() to adjust the color for different parts of the UI.
With the markup and styling in place, we can set up our main and renderer processes. The main process is deliberately simpler than it has been in previous chapters because it’s not the focus.
import { app, BrowserWindow } from 'electron';
let mainWindow;
app.on('ready', () => {
mainWindow = new BrowserWindow({
width: 300,
height: 600,
minWidth: 300,
minHeight: 300,
show: false
});
mainWindow.loadFile('index.jade'); 1
mainWindow.once('ready-to-show', () => {
mainWindow.show();
});
});
Notice that we can use files with extensions that are not normally supported in the browser. electron-compile transpiles this to an HTML file on the fly, and Chromium is none the wiser. If you look again at listing 11.2, you notice that we requested a stylesheet named style.scss instead of style.css. The .scss extension is used by Sass, and electron-compile transpiles it using Sass before handing the CSS off to Chromium. The last piece of the puzzle is to set up the renderer process.
import React from 'react'; 1
import { render } from 'react-dom'; 2
const Application = () => { 3
return (
<div>
<h1>Hello world!</h1>
<button className="full-width">
This button does not do anything.
</button>
</div>
);
};
render(<Application />, document.getElementById('application')); 4
If this is your first time seeing React, you might be surprised to see HTML in your JavaScript. This syntax is known as JSX (JavaScript with XML). It’s a convenient way of describing the markup that a React component should create. Babel transpiles this code into traditional JavaScript to be read by the browser. The actual JavaScript looks like this listing.
const Application = () => {
return React.createElement(
"div",
null,
React.createElement(
"h1",
null,
"Hello world!"
),
React.createElement(
"button",
{ className: "full-width" },
"This button does not do anything."
)
);
};
Listing 11.5 is a bit easier on the eyes than listing 11.6—especially as the application begins to grow. We didn’t need to set up a build chain using webpack or Gulp. electron-compile takes care of configuring Babel based on the options we specify in .compilerc. If you fire up the application using npm start, you should see a slightly taller version of figure 11.3.
Our Application component is the starting point for Jetsetter’s UI. Jetsetter has four main parts: a form for adding new items, a list of all the items that still need to be packed, a list of all the items that have been packed, and a button for returning all of the items marked as packed to the unpacked list.
The two lists are pretty much the same, so they use the same component, but each list also has a subcomponent for every item on the list. In addition to modifying Application to be a bit more useful, we need to create three more components: Item, Items, and NewItem. The Mark All as Unpacked button can use a standard <button> element. The hierarchy of the components is laid out in figure 11.4.
Our pleasant greeting to the world and useless button serve admirably as proof that electron-compile processed our JavaScript, but we need to swap it out with something a bit more functional. We haven’t built our NewItem form, Items list, or individual Item components yet, but we lay the groundwork now for managing the state of our application and getting the bones in place. By the end of this section, our application will look like figure 11.5.
The first version of our Application component was what’s known as a stateless functional component. It was a function and, when called, returned a value. It couldn’t maintain any UI state. In this chapter, the Application component maintains the master list of all the items being tracked in Jetsetter. Like with Clipmaster, we use a simple array in memory to track the list. In chapter 12, we’ll replace this array with a persistent data store so that we don’t lose our list every time we quit the application.
The Application component tracks the items in Jetsetter, adds new items to that list, and marks them as either packed or unpacked. We add these features as we need them. Let’s start by initializing the component with a list of items and adding placeholder methods for adding and marking the items. We also set up a foundation for the UI as shown in figure 11.1. You’ll find a file for the Application component in the ./app/components directory.
import React, { Component } from 'react'; 1
class Application extends Component { 2
constructor(props) { 3
super(props);
this.state = { 4
items: [{ value: 'Pants', id: Date.now(), packed: false }]
};
this.addItem = this.addItem.bind(this); 5
this.markAsPacked = this.markAsPacked.bind(this);
this.markAllAsUnpacked = this.markAllAsUnpacked.bind(this);
}
addItem(item) {} // To be implemented...
markAsPacked(item) {} // To be implemented...
markAllAsUnpacked() {} // To be implemented...
render() {
const { items } = this.state; 6
const unpackedItems = items.filter(item => !item.packed); 7
const packedItems = items.filter(item => item.packed); 8
return (
<div className="Application">
{/* To be implented: <NewItem /> */}
{/* To be implented: <Items title="Unpacked Items" /> */}
{/* To be implented: <Items title="Packed Items" /> */}
<button
className="full-width" onClick={this.markAllAsUnpacked} 9
>
Mark All As Unpacked
</button>
</div>
);
}
}
export default Application; 10
Components that inherit from React’s Component class can have methods and hold onto state. In the previous listing, we initialize the state to have an array of items. For now, we put an important article of clothing in there. In chapter 12, we’ll fetch this item from persistent storage when the application launches. We also follow a common React pattern of binding the methods to the new instance when it’s initialized. This ensures that the methods are bound to the correct this when they are called later. We put in empty placeholders for addItem(), markAsPacked(), and markAllAsUnpacked() for now. We fill these in as we move through the chapter.
When it’s time to render the component to the DOM, we separate the complete list of items into smaller lists of packed and unpacked items. We haven’t built the rest of the components needed to render the UI, so we include placeholders for now. We are, however, able to place the Mark All as Unpacked button at the bottom of the page. The last thing we need to do is replace that placeholder Application component in ./app/renderer.js with the real—if incomplete—thing.
import React from 'react';
import { render } from 'react-dom';
import Application from './components/Application'; 1
render(<Application />, document.getElementById('application'));
An application that tracks your packed and unpacked items isn’t much good if it can’t display those items to you. In this section, we implement the two lists, as well as the ability to toggle an item between its packed and unpacked states. This capability requires creating components for individual items and for the lists of items. With the ability to mark items as packed or unpacked in place, we also go the extra mile and connect the Mark All as Unpacked button to the list of items. At the end of this section, the application looks like figure 11.6.
The Application component is doing the hard work of tracking all of the items loaded into Jetsetter. The individual Item just needs to be told what it should display and given a function to be called in the event that a user clicks its check box.
import React from 'react';
const Item = (({ packed, id, value, onCheckOff }) => { 1
return (
<article className="Item">
<label>
<input type="checkbox" checked={packed} onChange={onCheckOff} /> 2
{value}
</label>
</article>
);
});
export default Item;
The individual Item component is relatively straightforward. It’s a container with a check box and a label. Surrounding the input in the <label> tag allows the user to click the label in addition to the check box to check or uncheck the box. React triggers the function passed to onChange() whenever the check box is checked or unchecked. This functionality eventually becomes the Application component’s markAsPacked() method.
Having individual items is well and good, but they need a container. In the following listing we create a simple component that accepts a list of items along with what to do if one of them is clicked. It returns a <section> with each item as a child. It also takes a title property to help us differentiate between the packed and unpacked lists.
import React from 'react';
import Item from './Item';
const Items = ({ title, items, onCheckOff }) => {
return (
<section className="Items">
<h2>{ title }</h2>
{items.map(item => (
<Item
key={item.id} 1
onCheckOff={() => onCheckOff(item)} 2
{...item} 3
/>
))}
</section>
);
};
export default Items;
The Items component takes the title property for itself and then creates a set of Item components based on the array of items it was provided and passes the onCheckoff() function it was given to each of them with a reference to the specific item. We now have the UI elements we need. It’s time to hook them up to the Application component.
The Items component knows how to work with the individual Item components, so we only need to bring the Items component into the Application component. We do need to implement markAsPacked() and markAllAsUnpacked().
import React, { Component } from 'react';
import Items from './Items'; 1
class Application extends Component {
constructor(props) {
// Omitted for brevity...
}
addItem(item) {} // To be implemented...
markAsPacked(item) {
const otherItems = this.state.items.filter( 2
other => other.id !== item.id
);
const updatedItem = { ...item, packed: !item.packed }; 3
this.setState({ items: [updatedItem, ...otherItems] }); 4
}
markAllAsUnpacked() {
const items = this.state.items.map(item => ({ ...item, packed: false }));5
this.setState({ items }); 6
}
render() {
const { items } = this.state;
const unpackedItems = items.filter(item => !item.packed);
const packedItems = items.filter(item => item.packed);
return (
<div className="Application">
<Items 7
title="Unpacked Items"
items={unpackedItems}
onCheckOff={this.markAsPacked}
/>
<Items 8
title="Packed Items"
items={packedItems}
onCheckOff={this.markAsPacked}
/>
<button
className="button full-width"
onClick={this.markAllAsUnpacked} 9
>
Mark All As Unpacked
</button>
</div>
);
}
}
export default Application;
We start by bringing in the Items component that we created in the previous section. We use it twice in the render() method: once for packed items, and once for the unpacked items. We pass each instance its respective list of items along with a title and the markAsPacked() method, which will eventually be passed down to the individual components.
The trickier part lies in the markAsPacked() and markAllAsPacked() methods. Both are modifying and updating the array of items being passed to the two lists. A core tenant of building React actions is that we try not to mutate objects and arrays; instead, we create new ones. It is easier for React’s virtual DOM diffing algorithm to see that it’s working with a totally new object, as opposed to a new version of an existing object that has been subtly changed.
In markAsPacked(), we start with a list of all of the items we’re not working with and put them aside. We then make a copy of the item passed to the method. We keep everything the same but override the packed key with its opposite. If it was true, now it’s false; if it was false, now it’s true. We then update the state of the component with a new array containing our new item mixed in with all the items we put aside earlier.
In markAllAsPacked(), we create an array of items by mapping over the existing items and replacing their packed key with a value of false. The Mark All as Unpacked button should set the item back to unpacked, regardless. With these methods in place, you should be able to mark “Pants” as either packed or unpacked. This application benefits from the fact that we hard-coded an item into the initial state of the application, but it’s high time we gave users the ability to add their own items to Jetsetter.
Our next step is to create the NewItem component and connect it to the application’s state. Unlike Item and Items, NewItem needs to hold on to its own piece of state: the contents of the input field. At the end of this section, the application will look like figure 11.7.
NewItem is another stateful component. It needs to track the value of the input field to correctly name the new item that it creates when the user submits the form. It updates its internal state to reflect the value whenever the user types into the input field. This change itself is represented in the input field, creating a virtuous cycle.
import React, { Component } from 'react';
class NewItem extends Component {
constructor(props) {
super(props);
this.state = { 1
value: ''
};
this.handleChange = this.handleChange.bind(this); 2
this.handleSubmit = this.handleSubmit.bind(this); 3
}
handleChange(event) {
const { value } = event.target; 4
this.setState({ value }); 5
}
handleSubmit(event) {
const { onSubmit } = this.props; 6
const { value } = this.state; 7
event.preventDefault();
onSubmit({ value, packed: false, id: Date.now() }); 8
this.setState({ value: '' }); 9
}
render() {
const { value } = this.state;
return (
<form className="NewItem" onSubmit={this.handleSubmit}> 10
<input
className="NewItem-input"
type="text"
value={value} 11
onChange={this.handleChange} 12
/>
<input className="NewItem-submit button" type="submit" />
</form>
);
}
}
NewItem.defaultProps = {
onSubmit: () => {} 13
};
export default NewItem;
The user typing in the input field triggers the function passed in as its onChange prop. We’re using the aptly named handleChange() method for this purpose. onChange passes in a representation of the DOM event to handleChange(). event.target is the input field’s DOM node. We ask for its value as we did with the text area in Fire Sale. With this value, we update the state of the component, which also updates the value of the input as shown in the UI.
In React, components do not typically know about their parents. NewItem cannot talk to Application directly. Instead, Application passes in a function as a prop to NewItem. NewItem uses this function when the user submits the form. We haven’t written this function yet, but—when we do—it simply adds the new item to Application’s array of items, which—as of right now—contains only a lonely pair of pants.
When the user submits the form, the function passed in as its onSubmit prop is called. Again, we are good at naming things and opted to name this method handleSubmit(). On form submission, create an item and pass it in to the method passed in as the NewItem’s onSubmit prop. The Application component will pass one of its methods to NewItem as its onSubmit prop. NewItem, in turn, passes it as the onSubmit prop to the form that it creates. Once the form is submitted, we replace the value in state with an empty string—allowing the user to enter another item.
NewItem currently lives in a vacuum. It theoretically works, but it needs to be added to the Application component before we can effectively use it. Our next step is to add it to the UI and pass it a function that adds it to Application’s list of items. We do this here.
import React, { Component } from 'react';
import NewItem from './NewItem';
import Items from './Items';
class Application extends Component {
constructor(props) {
// Omitted for brevity...
}
addItem(item) {
this.setState({ items: [item, ...this.state.items] }); 1
}
markAsPacked(item) {
// Omitted for brevity...
}
markAllAsUnpacked() {
// Omitted for brevity...
}
render() {
const { items } = this.state;
const unpackedItems = items.filter(item => !item.packed);
const packedItems = items.filter(item => item.packed);
return (
<div className="Application">
<NewItem onSubmit={this.addItem} /> 2
<Items
title="Unpacked Items"
items={unpackedItems}
onCheckOff={this.markAsPacked}
/>
<Items
title="Packed Items"
items={packedItems}
onCheckOff={this.markAsPacked}
/>
<button
className="button full-width"
onClick={this.markAllAsUnpacked}
>
Mark All As Unpacked
</button>
</div>
);
}
}
export default Application;
With the NewItem component added to the Application component, you should now be able to create additional items, toggle them between the unpacked and packed lists, and move all items to the unpacked list.
Throughout this book, we’ve developed muscle memory by pressing Command-R or Control-R to refresh the renderer process after changes on macOS and Windows/Linux, respectively. It can get a bit tedious, however, to switch back and forth between your text editor and your application every time you make a relatively small change.
electron-compile can trigger a reload whenever the file is changed on disk. This means that when you save the file in your text editor, it instantly reloads the open renderer processes—allowing you to see your changes immediately. electron-compile also supports hot module reloading in React, which takes live reloading one step further by swapping modules that have been updated on the fly without reloading the page itself. In this section, we look at implementing each of these approaches.
Until this point, electron-compile has just worked. We used electron-compile-prebuilt in place of electron in our package.json, did some minimal—and optional—configuration, and we were off to the races. electron-compile can also be required like any other module. The module provides an enableLiveReload() method that does what it says on the tin.
import { app, BrowserWindow } from 'electron';
import { enableLiveReload } from 'electron-compile'; 1
enableLiveReload(); 2
let mainWindow;
app.on('ready', () => {
// Omitted for brevity...
});
When we call the enableLiveReload() function before the application has started, electron-compile sets up an IPC connection that listens for filesystem changes and sends a message to the renderer process, requesting that it reload whenever it detects a change.
enableLiveReload() is framework-agnostic and works even in simple applications like Fire Sale and Clipmaster 9000. enableLiveReload() also supports hot module reloading with React applications. The first step is to let enableLiveReload() know that we prefer it to use hot module reloading as an alternative to refreshing the entire page.
import { app, BrowserWindow } from 'electron';
import { enableLiveReload } from 'electron-compile';
enableLiveReload({ strategy: 'react-hmr' }); 1
let mainWindow;
app.on('ready', () => {
// Omitted for brevity...
});
With enableLiveReload() configured to use hot module reloading, it no longer refreshes the page when you change a file. But hot module reloading doesn’t work, either. Bummer. We’re effectively back at square one. We have a little more work to do.
If you’re using TypeScript, you can skip this next step. But we haven’t been using TypeScript in this chapter, so it’s on us to let Babel know that we are using hot module reloading. We add it to the list of plugins in .compilerc. We won’t add it as a plugin in production, because we’ll likely not be changing files often on our users’ machines.
{
"env": {
"development": {
"application/javascript": {
// Omitted for brevity...
"plugins": [
"react-hot-loader/babel", 1
// Additional plugins here...
],
"sourceMaps": "inline"
},
"text/jade": {
"pretty": true
}
},
"production": {
// Omitted for brevity...
}
}
We’re not out of the woods yet—there is one other change that we need to make: our application needs to be wrapped in a container component that listens for the changes and passes those changes to our Application component. The good news is that we don’t have to write this component ourselves; we only have to require it from the react-hot-loader module.
import React from 'react';
import { render } from 'react-dom';
import { AppContainer } from 'react-hot-loader';
const renderApplication = () => { 1
const { default: Application } = require('./components/Application'); 2
render(
<AppContainer>
<Application />
</AppContainer>,
document.getElementById('application')
);
};
renderApplication(); 3
if (module.hot) { module.hot.accept(renderApplication); } 4
We have a few moving pieces. In our original implementation, we pull in the Application component and render it when the renderer process starts. This method is standard practice when building React applications and not specific to the fact that we’re doing all of this inside of Electron. But if we are going to take advantage of hot module reloading, we need to make some adjustments. We need to move the act of rendering the application into a function that we can call repeatedly. We name this function renderApplication() and call it when the renderer process is first evaluated. This function mimics the existing functionality before we implemented the changes described earlier.
When rendering the application, we need a fresh version of the Application component because it may have changed. As of this writing, ECMAScript’s module imports can be used only at the top level, so we have to fall back on the CommonJS require() function to pull in the Application component. We wrap Application in react-hot-loader’s AppContainer component, which lets it know about changes to the filesystem, and mounts it to the same DOM node that we did at the beginning of the chapter.
With all of this in place, hot module reloading should be enabled and you can see the changes to your modules in real time. If the mix of the CommonJS require() and ECMAScript import statements make you feel weird inside, you do have some options. An upcoming change to the specification allows for a second version of import() that can asynchronously fetch modules using a promise-based API. Listing 11.19 shows how to implement this. We used export default in ./components/Application.js, so we need to destructure the default property of the object passed to the promise and name it Application.
const renderApplication = () => {
import('./components/Application').then(
({ default: Application }) => { 1
render(
<AppContainer>
<Application />
</AppContainer>,
document.getElementById('application'),
);
}
);
};
Both Node and Chromium support the upcoming async/await syntax that allows for a more traditional, synchronous syntax when using promised-based APIs. You can use this without Babel and electron-compile, because it is natively supported by Node and the browser.
const renderApplication = async () => {
const { default: Application } = await import('./components/Application');
render(
<AppContainer>
<Application />
</AppContainer>,
document.getElementById('application')
);
};
Both refactors are completely optional and exist mostly to illustrate the fact that Electron supports cutting-edge syntax out of the box and that electron-compile makes it easy to use Babel to add support for future features of the JavaScript language.
In chapter 11, we built a small application to track items we needed to pack between trips. By the end of the chapter, we got the UI working, but the application still had a fatal flaw: it lost all of its data whenever the page refreshed. That’s a bit of a deal killer for an application that is allegedly supposed to help you remember things. Fire Sale was working with files stored on disk, so it wasn’t an issue, but Clipmaster and Clipmaster 9000 had this problem as well. All clippings were lost whenever a user quit the application, or we refreshed the page in development.
In this chapter, we solve this problem once and for all. Data is persisted between page loads and remains available even if the user quits the application and restarts their computer. For good measure, we solve this problem two ways: we create a local SQLite database and a browser-based IndexedDB storage. Along the way, we also cover some interesting implementation details: Where do we store data on a per-user basis? How do we build compiled modules for Electron’s version of Node if it differs from the version installed on our computers? How does working with an SQL database like SQLite differ from a NoSQL database like IndexedDB?
Removing items wasn’t particularly important in chapter 11 when we couldn’t hold on to data, but it certainly is now. By the end of this chapter, we’ll have an application that looks suspiciously similar to what we had at the beginning but with a few major differences: The data is persisted to disk and users can remove items from the list and remove all items that haven’t been packed.
The first approach that we take is storing our data in an SQLite database. This approach is commonly used by traditional native applications, particularly on macOS and iOS. SQLite is a good choice because the database is stored in a file and doesn’t require the user to have MySQL or PostgreSQL installed on their system.
If you’re a recovering database administrator, I’ll give you fair warning: I’m not going to optimize every query, and some techniques might be a little wasteful. I’m optimizing for clarity of the code over performance. We know that—in this case—we’re working with a very small data set.
If you’re coming from a frontend, web development background, you may not have thought to use an SQLite database in your application. You’ve typically sent HTTP requests to a server or used a browser-based solution like IndexedDB, WebSQL, or LocalStorage. The reason that SQLite databases aren’t used frequently in traditional web applications is because they can’t be. We don’t have access to the filesystem from the browser. Also, we can’t use what I’m going to refer to as native modules for the duration of this chapter.
What is a native module? Many libraries—like Lodash or Moment.js—are written purely in JavaScript. Both the browser and Node can execute JavaScript, so these modules can be used in either context. Some libraries—like jQuery—are tightly coupled with the DOM and therefore work only in the browser context. Native modules typically wrap a C or C++ library in JavaScript. The C or C++ component of the library must be compiled for the operating system in which the library will be used. SQLite—and most other database drivers—have libraries written in C or C++. The sqlite3 modules on npm wrap this library in JavaScript bindings so that we can use it from within our Node applications. Not only does the browser not have access to the filesystem, it also can’t run platform-specific C and C++ code. Some projects like Emscripten compile C code to run on the JavaScript virtual machine, but that is far beyond the scope of this book.
As we’ve discussed throughout the book, Electron applications combine a Chromium browser runtime with a Node runtime, so we can use native modules in our applications. We start by setting up an SQLite database, creating a table for our items, and connecting the UI to read from and write to the database—directly from the renderer process.
When we install a native module in Node, it is compiled against the current version of the V8 engine used by Node. Upgrading versions of Node typically results in having to recompile all the native modules used by the application. Electron ships with its own Node runtime, which may or may not be the same version as the Node running on your computer when you run npm install or yarn install. This mismatch can cause problems when you attempt to use native modules with an Electron application.
Lucky for us, the community has been kind enough to provide us with a solution called electron-rebuild, which rebuilds native modules against the version of Node used by Electron as opposed to the version installed on the filesystem. You can install electron-rebuild via npm using npm install electron-rebuild --save-dev. It can then be triggered by using $(npm bin)/electron-rebuild on macOS or .\node _modules\.bin\electron-rebuild.cmd on Windows.
I prefer not to be burdened by having to remember to call it every time I install a dependency. Instead, I recommend using a postinstall hook in your package.json, which will run after every install.
{
"name": "jetsetter",
"version": "1.0.0",
"description": "An application for keeping track of the things you need
to pack.",
"main": "app/main.js",
"scripts": {
"start": "electron .",
"test": "echo \"Error: no test specified\" && exit 1",
"postinstall": "electron-rebuild" 1
},
// Additional configuration omitted for brevity.
}
By default, npm checks for a pre– or postscript before running any script. When you run npm test, it first tries to run pretest, then test, followed by posttest. I’ve found this trick incredibly helpful across a wide variety of projects over the years.
In this chapter, we’re using a helpful library called Knex.js to make working with SQL in Node a bit easier. It acts as our interface between our application code and the underlying SQLite queries. This is set up for you in the chapter-12-beginning branch on the Jetsetter repository. If you want to build off your implementation from chapter 11, you can install these dependencies using npm install sqlite3 knex.
Before we can integrate SQLite into our application, we have to do some initial setup. As I mentioned earlier, SQLite stores data in a file so we need to figure out where we’re going to store this file. We start with a simple but flawed solution for now. Later in the chapter, I’ll revisit the best place to store user data, but for now let’s focus on getting our application working.
import 'sqlite3'; 1
import knex from 'knex';
const database = knex({
client: 'sqlite3', 2
connection: {
filename: './db.sqlite' 3
},
useNullAsDefault: true 4
});
export default database; 5
We need to include the sqlite3 library so it’s loaded into the application when Knex goes looking for it, as well as let Knex know that we’ll be using SQLite as our database for this application.
Calling this property connection is a bit of a misnomer here. If we were connecting to a MySQL server, this name would be fine, but as I mentioned, SQLite uses a file stored on disk, so we put the name of the location where we want to store the file here. I’ve called it db.sqlite for now. We revisit this later.
What’s with that useNullAsDefault option? Knex.js isn’t a library specifically for SQLite. Rather, it works with PostgreSQL, MySQL, MSSQL, and Oracle databases. Many of these support default values for columns in the database. SQLite doesn’t, and Knex displays a warning if we don’t turn on this option, which causes Knex.js to opt for NULL instead of attempting to use a default value.
This isn’t enough to get us all the way there. We created the database, but we still haven’t configured it with a table to store our items. When the application starts, we check if there’s a table for storing items. If there isn’t, then we create the table.
import 'sqlite3';
const database = require('knex')(//...);
database.schema.hasTable('items').then(exists => { 1
if (!exists) { 2
return database.schema.createTable('items', t => { 3
t.increments('id').primary(); 4
t.string('value', 100); 5
t.boolean('packed'); 6
});
}
});
export default database;
Knex.js uses a promise-based API. The check for the table returns a promise that is fulfilled with a Boolean based on whether it does in fact exist. All of our queries in the next section are based on promises. The data in Jetsetter is deliberately simple, and our schema reflects that. SQLite creates a unique ID and auto-increments the ID on each new item added to the database. We also store the item’s name as a string in the value column and a Boolean that represents whether the item has been packed.
In a traditional web application, if we want to put something into an SQLite database, we’d likely have to send AJAX requests to a server, which would interact with the database. This means that we’d probably also implement some kind of authentication as well as authorization to make sure that users couldn’t read or edit another user’s data. In an Electron application, we can talk directly to the database from our client code.
At the top level, we pull in the configured database we just created and pass it to the Application component as a prop—React-speak for “property”—which has access to the database inside of its methods.
import React from 'react';
import { render } from 'react-dom';
import { AppContainer } from 'react-hot-loader';
import database from './database'; 1
const renderApplication = async () => {
const { default: Application } = await import('./components/Application');
render(
<AppContainer>
<Application database={database} /> 2
</AppContainer>,
document.getElementById('application')
);
};
renderApplication();
if (module.hot) { module.hot.accept(renderApplication); }
Now comes the fun part. Previously, we stored the state of the application in the Application component. Every time the application is reloaded, that state is replaced. Every time the user quits the application, the state is gone for good. In the next few examples, we replace this behavior with reading from and writing to the database.
This process contains a few pieces. When the Application component starts for the first time, it reads all of the items from the database and loads them into its internal state. It also does this whenever it has reason to believe that the data has changed, which allows us to have one source of truth: the database. Depending on your needs, you may decide you want to approach your data storage strategy differently, but this method works for us in Jetsetter.
When a user creates a new item, we add it to the database. When they check off an item, we update it in the database by flipping the “packed” Boolean to its opposite. When the user selects Mark All as Unpacked, we—unsurprisingly—select all of the items for the database and set their “packed” property to false.
As I mentioned at the beginning of the chapter, we’re adding the ability to remove an item from the database. This capability wasn’t important back when we lost everything on every reload, but it’s necessary now. In addition, we add a button to remove all of the unpacked items from the database.
We continue using this.state to hold a list of the items most recently fetched from the database. But instead of hard-coding a pair of pants into this list, we add a method that fetches all of the items from the database and then updates this list. We also call this method whenever the component starts for the first time.
class Application extends Component {
constructor(props) {
super(props);
this.state = {
items: [] 1
};
this.fetchItems = this.fetchItems.bind(this); 2
this.addItem = this.addItem.bind(this);
this.markAsPacked = this.markAsPacked.bind(this);
this.markAllAsUnpacked = this.markAllAsUnpacked.bind(this);
}
componentDidMount() {
this.fetchItems(); 3
}
fetchItems() { 4
this.props
.database('items')
.select()
.then(items => this.setState({ items })) 5
.catch(console.error);
}
addItem(item) { ... }
markAsPacked(item) { ... }
markAllAsUnpacked() { ... }
render() { ... }
}
export default Application;
We don’t want to get any errors about trying to map or iterate over an undefined value, so we set the component’s initial state to an empty array. In the previous example, we take the database instance that was passed into the Application component as a property and ask for its items table, which we set up earlier. The .select() method selects all of the rows from that table—which are all of the items in our case—and returns a promise. If everything is successful, we can use .then() to take the results from the .select() method and work with those rows.
We start with the list of items being an empty array. this.fetchItems() queries the database and returns a promise. When this promise resolves, we swap out items being stored in the component’s state with the items we received from the database. React is smart enough to figure out what this means in terms of changing the UI on our behalf. We don’t need to worry about that.
Because this.fetchItems() does its work asynchronously, we need to bind it to the context of the component as we did with this.addItem(), this.markAsPacked(), and this.markAllAsPacked(). Finally, we need to call this.fetchItems() to load the initial state. We do this once the component has started, which immediately updates the state of the component.
The functionality we implemented is impressive. We’re connecting directly to the database from the UI. This isn’t something we’ve been able to do in traditional web applications. But it doesn’t seem to feel that impressive just yet, because there isn’t anything in the database to show. It’s only an empty list at the moment. We could put mock data in there, but let’s cut to the chase and implement the ability to add new items to the database.
If you recall from chapter 11, we passed a function from the Application component to the NewItem component. When a user clicks the Submit button, the NewItem component took the contents of its input field and passed it into the function provided by the Application component, which—in turn—pushed it onto the end of the array of items stored in state.
We’re going to leave much of this functionality in place with one notable exception: instead of pushing the item onto the end of the array stored in the Application component’s state, we insert it into the database and then trigger this.fetchItems() to reload all of the items now in the database. We start by rewriting this.addItem() in the Application component to use the database instead of an in-memory array.
class Application extends Component {
constructor(props) { ... }
componentDidMount() { ... }
fetchItems() { ... }
addItem(item) {
this.props
.database('items')
.insert(item) 1
.then(this.fetchItems); 2
}
markAsPacked(item) { ... }
markAllAsUnpacked() { ... }
render() { ... }
}
export default Application;
Accessing the items table in the database is the same as it is for fetching all of the items. The main difference is that we use the insert() method to add the new item from the NewItem component to the database. When that has successfully completed, we call this.fetchItems(), which gets the most up-to-date list of items and subsequently updates the state of the UI.
We can add items to the database and see them in the UI, but we have a subtle problem. React is particular about having unique keys for every item. We engaged in a less-than-optimal hack by using the current date as an integer for the unique key. This worked, but I didn’t feel good about it at the time, and I certainly don’t feel good about it now, considering we have a database that tracks and auto-increments unique IDs. Let’s remove our trick for manually creating unique IDs.
class NewItem extends Component {
constructor(props) { ... }
handleChange(event) { ... }
handleSubmit(event) {
const { onSubmit } = this.props;
const { value } = this.state;
event.preventDefault();
onSubmit({ value, packed: false }); 1
this.setState({ value: '' });
}
render() { ... }
}
It might be difficult at first to notice the change, but we just engaged in one of my favorite activities as a software engineer: deleting code. Previously, we passed in three properties: value, packed, and id. By omitting our own ID, SQLite creates one on our behalf, thus eliminating our need to rely on weird tricks involving the time-space continuum.
Most applications that work with data implement the four basic CRUD operations: create, read, update, and delete. We’re able to read all of the items from the database, and we just implemented the ability to create new items. We’re halfway there. Our next step is to be able to update existing items.
The UI of our application provides two ways to update the state of an item in the database: Users can check or uncheck the check box input associated with the item. Users can click the Mark All as Unpacked button to manipulate all of the items in the database. We need two, slightly different approaches for each case.
Let’s start with the case where we want to update a single item in the database. To accomplish this, we need to perform two operations: find the particular item we want to update and then update it.
class Application extends Component {
constructor(props) { // ... }
componentDidMount() { // ... }
fetchItems() { // ... }
addItem(item) { // ... }
markAsPacked(item) {
this.props
.database('items')
.where('id', '=', item.id) 1
.update({
packed: !item.packed 2
})
.then(this.fetchItems)
.catch(console.error);
}
markAllAsUnpacked() { // ... }
render() { // ... }
}
export default Application;
We find all of the items where the value in the id column matches the ID of the item in the UI that was just clicked. Hint: Only one of these exists. We then use the update() method to update the packed column to the opposite of whatever the item is in the UI. If this action is successful, we get all of the items—including our newly updated item—and refresh the UI. If something goes wrong, we log that error to the console for debugging purposes. A more robust application would either implement a fallback here or—at the very least—display some kind of notification alerting the user to the fact that their change couldn’t be completed successfully.
We can now change the status of one item, but what about all of them? The answer lies somewhere between the implementation of this.fetchItems() and this.markAsPacked(). With this.markAsPacked(), we found the item with an ID that matched the one we’re looking for and then updated it. With this.fetchItems(), we used select() to get all of the items. To implement this.markAllAsPacked(), we get all of the items in the entire set.
class Application extends Component {
constructor(props) { // ... }
componentDidMount() { // ... }
fetchItems() { // ... }
addItem(item) { // ... }
markAsPacked(item) { // ... }
markAllAsUnpacked() {
this.props
.database('items')
.select() 1
.update({
packed: false 2
})
.then(this.fetchItems)
.catch(console.error);
}
render() { // ... }
}
export default Application;]
As I mentioned before, this implementation roughly combines two of our previous approaches. Selecting all of the items from the database allows you to make changes in bulk using SQL. This case is also true for the .where() method that we used when updating a single item. It just happened to be that when you query based on a unique identifier, you—hopefully—end up with only one record. this.markAllAsPacked() could be changed to use .where() to find all of the items where packed was set to true. I leave this as an exercise to the reader because I’m going to discuss it in the next section.
When our application lost all of its data on every reload, we didn’t have a lot of users clamoring for the ability to remove items. But now we’re in a place where we’ve implemented persistent storage. Maybe you’ve decided that you don’t need to travel with your selfie stick anymore, and you’d like to remove it from the list.
We now implement two features: the ability to remove an individual item, and the ability to remove all items that weren’t packed, which might include our selfie stick, Furby, and ugly sweater. We need UI elements for this as well, but let’s start with the database piece of this.
class Application extends Component {
constructor(props) {
super(props);
// Omitted for brevity...
this.deleteItem = this.deleteItem.bind(this); 1
this.deleteUnpackedItems = this.deleteUnpackedItems.bind(this); 2
}
componentDidMount() { ... }
fetchItems() { ... }
addItem(item) { ... }
markAsPacked(item) { ... }
markAllAsUnpacked() { ... }
deleteItem(item) {
this.props
.database('items')
.where('id', item.id) 3
.delete() 4
.then(this.fetchItems)
.catch(console.error);
}
deleteUnpackedItems() {
this.props
.database('items')
.where('packed', false) 5
.delete()
.then(this.fetchItems)
.catch(console.error);
}
render() { ... }
}
export default Application;
Careful readers can see I used a slightly different syntax here than this.mark-AsPacked(). When you’re trying to match based on equality, you can use this shorthand where you provide the name of the column and the value you’re trying to match. In the previous example, we provided an operator. This method is powerful because we could filter using more sophisticated logic. In this.deleteUnpacked-Items(), we are using the where() method to find all of the items where the packed property is set to false.
This is all well and good, but it’s somewhat difficult to know if they work because we don’t have any UI to trigger these methods. This is suspiciously similar to how we set the check boxes to toggle items between their packed and unpacked states, but that was an entire chapter ago. Let’s review the process.
We pass the this.deleteItem() method to each of the lists. Each list, in turn, passes this method to the items on the list. We add a check box X button to each item. When a user clicks the X button, we pass a reference to the specific item to this.deleteItem() that was passed down from the Application component. These additions give us everything we need to trigger the method we implemented moments ago. We also add a Remove Unpacked Items button beneath the Mark All as Unpacked button. This button is a lot simpler as it doesn’t need to pass that method along.
class Application extends Component {
constructor(props) { ... }
componentDidMount() { ... }
fetchItems() { ... }
addItem(item) { ... }
markAsPacked(item) { ... }
markAllAsUnpacked() { ... }
deleteItem(item) { ... }
deleteUnpackedItems() { ... }
render() {
const { items } = this.state;
const unpackedItems = items.filter(item => !item.packed);
const packedItems = items.filter(item => item.packed);
return (
<div className="Application">
<NewItem onSubmit={this.addItem} />
<Items
title="Unpacked Items"
items={unpackedItems}
onCheckOff={this.markAsPacked}
onDelete={this.deleteItem} 1
/>
<Items
title="Packed Items"
items={packedItems}
onCheckOff={this.markAsPacked}
onDelete={this.deleteItem} 2
/>
<button
className="button full-width"
onClick={this.markAllAsUnpacked}>
Mark All As Unpacked
</button>
<button
className="button full-width secondary"
onClick={this.deleteUnpackedItems}> 3
Remove Unpacked Items
</button>
</div>
);
}
}
export default Application;
The Remove Unpacked Items button should be fully functional at this point. But we still need to keep passing this.deleteItem() along. The next step is to receive it as the onDelete property in the Items component, which powers the Packed Items and Unpacked Items, and then pass it down to each individual item with a reference to the specific item.
const Items = ({ title, items, onCheckOff, onDelete }) => {
return (
<section className="Items">
<h2>{ title }</h2>
{items.map(item => (
<Item
key={item.id}
onCheckOff={() => onCheckOff(item)}
onDelete={() => onDelete(item)}
{...item}
/>
))}
</section>
);
};
export default Items;
There isn’t a lot that’s new here. I included it for the sake of completeness. We’re almost there, and the next step is to add the button to the individual item. This button should have a click event that triggers the this.deleteItem() method that was passed in from the Application component as the onDelete() command.
const Item = (({ packed, id, value, onCheckOff, onDelete }) => { 1
return (
<article className="Item">
<label>
<input type="checkbox" checked={packed} onChange={onCheckOff} />
{value}
</label>
<button className="delete" onClick={onDelete}>?</button> 2
</article>
);
});
With this last piece, the delete functionality is now in place. We have implemented the ability to create, read, update, and delete items from the database. If the user quits Jetsetter, restarts their computer, and then restarts the application, their items will be in the same state as when they left them. Maybe.
For the sake of expediency, I had you place the application in the root of the project directory. But this isn’t normally where user-specific data goes. As it stands, this database is shared by all users on a given computer, which is certainly confusing.
On one hand, operating systems have solved this problem for us. Users have designated places where their particular data should be stored. But, each operating system solves this problem in a slightly different way. Luckily, we aren’t concerned about this because Electron protects us. The Electron app module exposes a method called getPath(), which figures out the operating system–specific path for a common location. We’re going to look for the userData path, but you can see a full list of the paths available at (https://electron.atom.io/docs/api/app/#appgetpathname).
import * as path from 'path';
import { app } from 'electron';
const database = knex({
client: 'sqlite3',
connection: {
filename: path.join(
app.getPath('userData'), 1
'jetsetter-items.sqlite' 2
)
},
useNullAsDefault: true
});
I tend to give files stored outside of the project unique names to avoid the chance of colliding with another project on my machine. Before branding, all Electron applications are called “Electron.” If I give things a unique name, it won’t matter much in the event they happen to end up in the same folder under the hood.
You can store data in an Electron application in many ways. We discussed SQLite earlier, but you could just as easily use a NoSQL database such as LevelDB. You could even just use a JSON file that you write to and read from.
If managing files and recompiling dependencies seems like a bit much for your application, you can opt for browser-based storage. In chapter 2, we used localStorage to track our bookmarks. localStorage is great, but it has some limitations: everything must be stored as a large JSON object of strings. We must parse and resave the object every time we want to read or write to localStorage.
Before we start using IndexedDB, we should cover some terminology. SQL databases contain tables of rows and columns. They’re a lot like incredibly powerful, interconnected spreadsheets. NoSQL databases are typically key-value stores—much like a giant JavaScript object. When working with IndexedDB, you create stores of data, which contain a series of keys. Each key points to an object. IndexedDB differs from SQLite in that keys and values can be any valid JavaScript type—including objects, arrays, maps, and sets.
All interactions with IndexedDB are asynchronous, which makes sense. Natively, however, IndexedDB uses events to handle asynchrony, which can be confusing to read and understand. Luckily, Jake Archibald—a developer advocate at Google—has done the yeoman’s work of wrapping the event-based API with a promise-based API called idb. The abstraction is lightweight and doesn’t hide any of the inner workings of IndexedDB. It’s what I personally recommend, and after you’re comfortable with a promise-based API, it’s easier to wrap your head around than the event-based one. You normally don’t need a library to use IndexedDB, but you do need to import idb if you’d like to use the promise-based API.
In this example, we start by opening the jetsetter database. The name of this database is completely arbitrary. You could name it eggplant-parmigiana, if that is more appealing to you. We also passed the number 1, which represents the version of our database. Version 1 is a good place to start. (There’s no schema like SQLite!)
import idb from 'idb';
const database = idb.open('jetsetter', 1, upgradeDb => { 1
upgradeDb.createObjectStore('items', { 2
keyPath: 'id', 3
autoIncrement: true 4
});
});
Versioning is important in that in web applications, each user stores their IndexedDB locally in their browser. If you change the way your code works, it could corrupt the user’s data if they are using an old version of the database.
Having a version number allows you to bump up that number whenever you make a change to how your database works. In that event, you’d be able to migrate the data to be compatible with the changes you’ve made before any other application code accesses the database. We stick with one version of the database in this chapter because our data is very simple.
Typically, you have one database. This is similar to the fact that most smaller and medium-sized, server-side web applications have just one database that they work with in a given environment (e.g., production). But you may have many stores. Think of stores like tables in an SQL database. In this application, we have only one store for items, but you could have a store for people, locations, or any other model in your application.
We created a store called items, which is a reasonable name for a place where we are going to store all of our items. We also passed two options: we set the keyPath to id and autoIncrement to true. What does this mean? It means that if we pass in an item with an id property, it uses that property as the key. If we don’t, then it adds one to the object and sets it as the key, incrementing the number each time so that the key is unique.
We cheated a bit when we implemented SQLite by using Knex.js to eliminate a lot of the tedium. idb is an abstraction over IndexedDB, but it’s more lightweight than Knex.js. This means we have to do a bit more of the manual labor ourselves. There are libraries like localForage (https://github.com/localForage/localForage) that provide higher-level abstractions over IndexedDB, but let’s stick with idb and create our own abstraction.
Here is the approach we take: in ./app/database.js, we create an object with methods to get all of the items from IndexedDB, create new items, update existing items, and delete items. We then use these methods in the Application component, replacing the calls to SQLite as we go. Let’s start by writing a method to get all of the items from the database.
export default {
getAll() {
return database.then(db => { 1
return db.transaction('items') 2
.objectStore('items') 3
.getAll(); 4
});
},
add(item) { },
update(item) { },
markAllAsUnpacked() { },
delete(item) { },
deleteUnpackedItems() { }
};
I began by exporting an object with all of the methods that we need to match the functionality of SQLite. Most of those methods are empty right now, but we fill them in as we go through the chapter. I did, however, implement the getAll() method.
We start by accessing the database, similar to what we did with Knex.js and SQLite. Next, we start a transaction. Transactions prevent multiple changes to the database from occurring at the same time. If something blows up in a transaction, all of the changes made in the transaction are reverted. This practice protects data from corruption. All interactions with IndexedDB must be wrapped in a transaction. Once inside our transaction, we access the items store and get all of the items from it.
Getting all of the items from IndexedDB isn’t particularly helpful if there aren’t any items in the store to begin with. Let’s implement the ability to add an item to the database. This procedure is similar to reading from the database with a few important distinctions. When reading from the database, the transaction is complete when we finish reading. Modifying the database is a little more complicated. As a result, we need to be more explicit about when a transaction has completed. We also need to let IndexedDB know that we intend to write to the database. After that, it’s a matter of adding the item to the database and then calling the transaction complete.
export default {
getAll() { ... },
add(item) {
return database.then(db => {
const tx = db.transaction('items', 'readwrite'); 1
tx.objectStore('items').add(item); 2
return tx.complete; 3
});
},
update(item) { },
markAllAsUnpacked() { },
delete(item) { },
deleteUnpackedItems() { }
};
When we fetched all of the items, we chained the promises together neatly. If this code looks a bit more complicated, don’t worry—it’s similar. We need to return the transaction promise we created on the first line, so we store it in a variable. Inside of the transaction, we add the item passed as an argument to the items store. If we had other work to do, we could do it here. Finally, we return a promise that resolves when the transaction has been completed.
export default {
getAll() { ... },
add(item) { ... },
update(item) {
return database.then(db => {
const tx = db.transaction('items', 'readwrite');
tx.objectStore('items').put(item);
return tx.complete;
});
},
markAllAsUnpacked() { },
delete(item) { },
deleteUnpackedItems() { }
};
Updating an item in the database is similar to adding a new item to the database except we use the put() method instead of the add() method. Updating all of them, however, is a little more involved. First, we need to get all of the items from the database. Then we change the packed status of each of them to false. Finally, we create a transaction where we update each item in the database.
export default {
getAll() { ... },
add(item) { ... },
update(item) { ... },
markAllAsUnpacked() {
return this.getAll() 1
.then(items => items.map(item => ({ ...item, packed: false }))) 2
.then(items => {
return database.then(db => {
const tx = db.transaction('items', 'readwrite'); 3
for (const item of items) { 4
tx.objectStore('items').put(item); 5
}
return tx.complete; 6
});
});
},
delete(item) { },
deleteUnpackedItems() { }
};
If a single update fails, the entire transaction fails, and all of the items return to their original state. The advantage of using transactions is that it ensures you can’t end up in a state where half of your data has been updated and half remains unchanged. Transactions are an all-or-nothing affair.
Deleting items from the database is virtually the same as updating them. We use the IndexedDB delete() method instead of update(). If you want to be clever, you could probably provide an abstraction over the shared pieces of these implementations, but my job as your author is to be clear rather than clever.
export default {
getAll() { ... },
add(item) { ... },
update(item) { ... },
markAllAsUnpacked() { ... },
delete(item) {
return database.then(db => {
const tx = db.transaction('items', 'readwrite');
tx.objectStore('items').delete(item.id); 1
return tx.complete;
});
},
deleteUnpackedItems() { }
};
When we implemented markAllAsUnpacked(), we mapped over all of the items, regardless of their status. In implementing deleteUnpackedItems(), we need to be more careful. Our job is to delete only those that have their packed property set to false.
export default {
getAll() { ... },
add(item) { ... },
update(item) { ... },
markAllAsUnpacked() { ... },
delete(item) { ... },
deleteUnpackedItems() {
return this.getAll()
.then(items => items.filter(item => !item.packed)) 1
.then(items => {
return database.then(db => {
const tx = db.transaction('items', 'readwrite');
for (const item of items) {
tx.objectStore('items').delete(item.id); 2
}
return tx.complete;
});
});
}
};
Unlike SQLite, IndexedDB doesn’t provide support for querying the database, which makes a certain amount of sense considering it is a NoSQL database. When working with NoSQL databases, you can take some interesting approaches, such as storing your data in multiple places with different indices for quick retrieval, but that is a bit outside the scope of this book.
We’re opting for the simplest approach—and one that is a perfect fit for our data set, which is to simply fetch all of the items from the database and find only the ones that meet our criteria. Again, we do this in a transaction. If deleting any of these items fails, the database returns to the state that it was in before we triggered this method.
With this last method in place, we need to connect all of the new database methods to the UI. By building the database methods in the previous section, we’ve made transitioning from the SQLite implementation to one based on IndexedDB relatively painless. The main difference is that we aren’t querying for items in the database.
fetchItems() {
this.props
.database
.getAll()
.then(items => this.setState({ items }))
.catch(console.error);
}
addItem(item) {
this.props.database.add(item).then(this.fetchItems);
}
deleteItem(item) {
this.props
.database
.delete(item)
.then(this.fetchItems)
.catch(console.error);
}
markAsPacked(item) {
const updatedItem = { ...item, packed: !item.packed };
this.props
.database
.update(updatedItem)
.then(this.fetchItems)
.catch(console.error);
}
markAllAsUnpacked() {
this.props
.database
.markAllAsUnpacked()
.then(this.fetchItems)
.catch(console.error);
}
deleteUnpackedItems() {
this.props
.database
.deleteUnpackedItems()
.then(this.fetchItems)
.catch(console.error);
}
At this point in the book, we’ve built a number of Electron applications. Testing these applications to make sure that they work as expected has been something of a manual process. Make a change, start the application, and click around to ensure that everything works. This is fine for small applications, but this method can become tedious in larger applications. What if a change in the code in one part of the application breaks some functionality elsewhere?
In these situations, it’s helpful to automate the tests. Let the computer do the boring, repetitive work, while you focus on the features that bring value to your customers. That sounds great, but how do we do that? In a traditional web application, you might point something like Selenium WebDriver to your website, make some assertions as to how the site should behave, and then have it click around and confirm that everything works as expected.
That’s great, but we have a few problems: our Electron applications don’t have web addresses per se, but they do support APIs that give us unprecedented access to the underlying operating systems, which are typically not supported by web browsers. At this point, it shouldn’t surprise you that this tricky problem has an easy solution. The Electron team supports a project called Spectron, which allows developers to write integration tests for our Electron applications.
In this chapter, we write integration tests for a special version of Clipmaster 9000 that does not live in the menu bar, as shown in figure 13.1. We test all the core functionality and learn a few tricks along the way. To get started, you need to add Spectron and a test runner to your package.json. I’ve opted to use Mocha in an attempt to stay consistent with the official documentation, but you could use Jest, Karma, Jasmine, or any other test runner that makes you happy. I’ve included this in the example repository (http://mng.bz/UxHY), but if you’re working on your own, you can run npm install --save-dev spectron mocha.
First, it’s important to understand the relationship among Spectron, WebdriverIO, and Selenium WebDriver because we use methods from more than one of them in a given test. Let’s start at the bottom and work our way up. Selenium WebDriver allows developers to write tests that control a web browser so they can test their applications from a user’s perspective—as opposed to unit tests, which exercise a given piece of code in isolation. Selenium WebDriver is a language-agnostic library and is typically wrapped by a library that gives it native API bindings for a given programming language.
Enter WebdriverIO, which wraps Selenium WebDriver with a pleasant JavaScript API and makes it easy to use from within Node.js—or an Electron application, in our case. But as I pointed out in the beginning of this chapter, Electron applications have some major differences from traditional web applications, as well as a lot of additional power and functionality. Spectron wraps WebdriverIO, as shown in figure 13.2, and allows us to access this functionality in an environment custom-tailored for Electron applications.
We won’t need to touch Selenium WebDriver in this chapter. WebdriverIO takes care of controlling Selenium WebDriver on our behalf. We douse methods from both Spectron and WebdriverIO. In practice, you don’t really have to think about the line between the two, but some of Spectron’s methods delegate to WebdriverIO. Where this ends up being important is when it comes time to look up the documentation for a given method. I’ll make sure to point out when we’re delegating to WebdriverIO, as opposed to using a method that belongs to Spectron itself.
Spectron makes it easy to start our application and control its UI from our test suite. The primary way to use Spectron is to create an Application instance. This object includes a number of child objects that allow us to access different parts of our application, as shown in figure 13.2
Spectron is broken up into the following parts:
The first two properties of the Application instance provide deep access to the browser’s APIs as well as Electron’s own APIs. With this combination, we have deep, programmatic insight into and control over almost all of the inner workings of our application at any time. This access makes testing Electron applications easy once you get the hang of it. The browserWindow, webContents, mainProcess, and rendererProcess properties provide convenient aliases to the first two properties.
In the previous section, I mentioned that I was fibbing I bit when I said that the client property delegated to WebdriverIO. That statement is technically true—but it isn’t the whole truth. client also has additional, Electron-specific methods, shown in figure 13.4, to make your testing experience even more pleasant.
Some of the methods look familiar if you’ve written integration tests in the past. Methods like getSelectedText(), for example, consider that your application might have multiple windows—something that isn’t possible in a traditional web application. Others are unique to testing Electron applications. I introduce you to these methods now as a reference. We use many of them in the sections that follow.
getMainProcessLogs() and getRenderProcessLogs() return a promise that resolves to an array of messages that have been logged to the respective console. As soon as either method is called, it clears the messages from the console. This means that subsequent calls contain only messages that have been logged to the console since the last time the method was called.
getWindowCount() returns a promise that resolves to an integer that—unsurprisingly—represents the number of windows currently open in the application. This value might be useful if you are writing tests for an application like Fire Sale, which has a button allowing users to open another window. app.browserWindow references the currently focused window. app.client.windowByIndex() allows you to focus on an alternate window instead.
waituUntilWindowLoaded() takes a given number of milliseconds as an argument and returns a promise. If the window loads in the allotted time, the promise resolves. Otherwise the promise is rejected. This method allows you to delay execution of your tests until you’ve confirmed that the window has actually loaded.
waitUntilTextExists() takes three arguments: a selector, a string of text, and an optional number of milliseconds to wait before giving up. It returns a promise that resolves when the selector contains the text, Alternatively, it rejects if the 5 seconds or the provided number of milliseconds pass and the text has not appeared. This setting is useful for UI components where the content may come in asynchronously shortly after the window has loaded. Normal tests would fail because they would run immediately, before the asynchronous content has loaded.
Spectron provides the ability to start an Electron application and control it from your tests, but it doesn’t provide a framework for running your tests or verifying that your application works as expected. As mentioned earlier, we use a simplified version of Clipmaster 9000. A starting point for the code can be found here at https://github.com/electron-in-action/clipmaster-9000-spectron.
This is a very good thing because it allows you to use whatever test runner and assertion library you prefer. Just require Spectron in your test runner of choice, configuring it as we’ll see in listing 13.2. In this chapter, I use Mocha along with Node’s built-in assert library, but you can certainly use Chai and an assertion library or Jest, Karma, Jasmine, or any other framework, if you prefer. Spectron is not opinionated on this front. Instead, it allows you to drive your Electron application from the framework of your choice.
I’ve already included Mocha as one of the development dependencies for the example project. As I mentioned earlier, if you’re working on your own application and following along, you can run npm install --save-dev spectron mocha from the command line to install both Spectron and Mocha. This will install the mocha command line tool into your node_modules directory, which can be run by typing ./node_modules/.bin/mocha. This can be tedious. It would be much easier to assign it to be run using npm test. So, let’s add it to our project’s scripts in our package.json. (This should already be set up for you if you’ve cloned the repository from GitHub.)
"scripts": {
"start": "electron .",
"test": "mocha" 1
}
Now whenever we run npm test, Jest runs our test suite by looking for all files with a *.test.js suffix. You can also use this suffix for any unit tests that you want to write—Mocha runs those as well. In a larger application, you might create a folder for all of your tests or include them alongside your implementation files. For the sake of simplicity, I’m going to use a single file called test.js to hold all of the tests for our application.
Let’s begin by examining the boilerplate provided in the repository to start our application before each test and stop the application after the individual test has run. This gives us a fresh instance of the application for each test, which eliminates the need to clean up any of the side effects and leftover state from previous tests.
const assert = require('assert'); 1
const path = require('path'); 2
const Application = require('spectron').Application; 3
const electronPath = require('electron'); 4
const app = new Application({
path: electronPath, 5
args: [path.join(__dirname, '..')], 6
});
describe('Clipmaster 9000', function () {
this.timeout(10000); 7
beforeEach(() => {
return app.start(); 8
});
afterEach(() => {
if (app && app.isRunning()) {
return app.stop(); 9
}
});
});
The first thing we need is the location of the Electron application that we want to test. Theoretically, you could point Spectron to any of the Electron-based applications on your computer and control them programmatically, but I leave that as a devious exercise for the reader. I’m going to be a boring rule follower and get the path to the locally installed version of Electron that we pulled down from npm when we installed our dependencies using npm install.
We want access to a variable holding the instance of our application in each of our tests, so we declare it in the describe() block. Before each test, we create an application instance and assign it to the app variable. The new Application() constructor takes the path of the Electron binary, as well as the location of the directory where we would normally type npm start. This should be the directory that contains the package.json, which references the JavaScript file containing the code for the main process. After the instance has been created, we start the application. We’re now ready to test—despite the fact that we haven’t written a test case just yet. But imagine that we had a test and it has run. We check that there is a value assigned to the app variable and the application is still running. (It may have crashed.) If both of those cases are true, then we stop the application and move onto the next test case, where we go through this process again.
We’ve talked about our testing tools. We’ve set them up. Now let’s sit down and write some tests. Over the course of the chapter, we’ll check that Clipmaster
We’ll start with a simple test: start the application, and confirm that this special version of Clipmaster 9000 creates a single browser window. Spectron and WebdriverIO use an asynchronous, promise-based API for controlling Electron and the web application within. Most methods return promises, which can be chained. As I’ve mentioned repeatedly throughout this book, Electron provides us with a modern version of Node and Chromium. We frequently have the latest and greatest browser and language features at our disposal. This includes the async/await syntax for working with asynchronous APIs in a way that’s as easy to wrap our head around as synchronous code. With this syntax, you don’t have to worry about passing around callbacks or chaining promises.
As shown in listing 13.3, we use the async keyword before the arrow function to denote that we’ll be using the async/await syntax in this function. The await keyword pauses until app.client.getWindowCount() has resolved and then assigns the result to the count variable. After this is done, we expect the count to equal one. Mocha expects asynchronous tests to return a promise when they’re done, so you need to make sure that you prefix your expectation with the return keyword. Your author failed to do that on multiple occasions when writing this chapter before his first cup of coffee. He paid dearly for that oversight with his time and sanity.
it('shows an initial window', async () => {
const count = await app.client.getWindowCount(); 1
return assert.equal(count, 1); 2
});
This test is simple, and a traditional implementation using promises would not look that much different, but more involved tests require longer promise chains that might become tedious to write or confusing to reason about at best.
In many tests, you have to wait for the window to load the HTML, CSS, and JavaScript before you can continue testing the application. Electron loads the HTML quickly, but it’s not instantaneous. We frequently use the app.client.waitUntilWindowLoaded() method described earlier to wait until the application has fully loaded before moving forward. Let’s write a test confirming that the window’s title is the name of the application.
it('has the correct title', async () => {
const title = await app.client.waitUntilWindowLoaded().getTitle(); 1
return assert.equal(title, 'Clipmaster 9000'); 2
});
Many of Spectron’s methods are chainable, with each subsequent method in the chain being called after the promise returned from the previous method has resolved. In the previous example, we wait for the window to finish loading and then get the title of the window and store it in the title variable; after that asynchronous operation is complete, we can verify that the window’s title is what we expect it to be.
Traditionally, integration-testing tools like Selenium and WebdriverIO point a browser to a webpage and interact with it. They typically don’t have much more access to the internals of the browser itself like we do as developers. Electron allows developers to programmatically open the developer tools when the window first loads. That said, it would be bad if we accidentally forgot to remove this code and shipped this to users. Let’s write a test that verifies that developer tools are not opened when the application is loaded.
it('does not have the developer tools open', async () => {
const devToolsAreOpen = await app.client
.waitUntilWindowLoaded() 1
.browserWindow.isDevToolsOpened(); 2
return assert.equal(devToolsAreOpen, false); 3
});
The isDevToolsOpened() method is available on all BrowserWindow instances. When the application has loaded, we get the current browser window and ask it whether it has the developer tools open. We expect this to be false. If it is true, the test will fail.
In addition to testing Electron APIs, we almost definitely want to test the UI of our application like we would a traditional application. Let’s start with a simple example where we search the page for a particular element and verify that it has the copy that we expect.
it('has a button with the text "Copy from Clipboard"', async () => {
const buttonText = await app.client
.getText('#copy-from-clipboard'); 1
return assert.equal(buttonText, 'Copy from Clipboard');
});
The getText() method is provided by WebdriverIO as opposed to Spectron. It accepts a selector as an argument, finds the first node that matches that selector, and returns a promise that resolves to the text content of that node. Finally, we confirm that the text is what we expect it to be.
This works, but what about more complicated traversal? When the application starts, the clippings list is empty—remember this was before we knew how to persist data in our Electron applications. Each time the user clicks that Copy from Clipboard button, a new clipping should be added to the page. How might we go about testing these scenarios? Let’s start with the first case: when the application starts, there should not be any clippings on the page.
it('should not have clippings when it starts up', async () => {
await app.client.waitUntilWindowLoaded(); 1
const clippings = await app.client.$$('.clippings-list-item'); 2
return assert.equal(clippings.length, 0); 3
});
Webdriver exposes $ and $$ methods, which are aliased to document.querySelector and document.querySelectorAll, respectively. We use $$ to select all of the clipping list items on the page, which returns a NodeList object. Ideally, there are no clipping list items on the page and the length of that NodeList is 0.
So far we’ve inspected and verified the state of the application when it starts—an important task but typically only a small portion of the tests we write for a given application. We’ve confirmed that there are no clippings on the page when the application starts. It stands to reason that when the user adds a clipping, it should be added to the UI. We already know how to check for the number of elements matching a given selector on a page. But how do you add a clipping? You click the Copy from Clipboard button. We need to figure out how to program WebdriverIO to click on a particular element on a page.
it('should have one clipping when the "Copy from Clipboard" button has been
pressed', async () => {
await app.client.waitUntilWindowLoaded();
await app.client.click('#copy-from-clipboard'); 1
const clippings = await app.client.$$('.clippings-list-item'); 2
return assert.equal(clippings.length, 1); 3
});
Lucky for us, app.client provides a click() method that does exactly what you might expect: it triggers a click event on a node that matches the selector provided. When we click the Copy from Clipboard button, we expect that a clipping is added to the page. The prior test verifies that there is one clipping on the page after the Copy from Clipboard button has been clicked.
What about the flip side? If you recall, clippings can also be removed from the UI. But there is a catch—the Remove button appears only when the user’s cursor is hovering over the clipping. We can’t simply query for the Remove button, because it’s not on the page yet. Instead, we need to take control of the cursor and move it over the clipping to have the Remove button appear.
it('should successfully remove a clipping', async () => {
await app.client.waitUntilWindowLoaded();
await app.client
.click('#copy-from-clipboard')
.moveToObject('.clippings-list-item') 1
.click('.remove-clipping'); 2
const clippings = await app.client.$$('.clippings-list-item');
return assert.equal(clippings.length, 0); 3
});
After clicking the Copy from Clipboard button, we use the moveToObject() method to move the cursor over the new clipping, which causes the Remove button to appear. We click Remove and then verify that the clipping is no longer on the page.
Seeing a warning is normal, unfortunately. When you run the test in listing 13.9, you see a deprecation warning related to moveTo because of an incompatibility with recent versions of Firefox—an issue that doesn’t concern us. The problem is that although moveTo has been deprecated, there isn’t a replacement at the time of this writing. A number of open issues exist on GitHub about this. A good example can be found at https://github.com/webdriverio/webdriverio/issues/2076. You’re not the only one seeing—and being frustrated by—these warnings.
To suppress these warnings, you can configure WebdriverIO’s options when creating your Spectron application as follows:
const app = new Application({
path: electronPath,
args: [path.join(__dirname, '..')],
webdriverOptions: {
deprecationWarnings: false
}
});
At this point, we have tested that we can add and remove clippings from the page, but we still have a major blind spot: we have no idea whether the clipping is displaying the correct text. If you were able to squint at the application during the previous tests, you might have noticed that the clipping that was added contained whatever was on our clipboard at the time. This will be tricky because our tests should be isolated from the outside world.
What we need to do is use Electron’s clipboard module to write text to the clipboard and then verify that the provided text is, in fact, what is displayed in the UI. Luckily, Spectron gives us access to all of Electron’s APIs. This means we can manipulate what is currently on the clipboard as part of the test and confirm that it is what’s found in the UI when the clipping is added to the page.
it('should have the correct text in a new clipping', async () => {
await app.client.waitUntilWindowLoaded();
await app.electron.clipboard.writeText('Vegan Ham'); 1
await app.client.click('#copy-from-clipboard');
const clippingText = await app.client.getText('.clipping-text'); 2
return assert.equal(clippingText, 'Vegan Ham'); 3
});
The clipboard module is available in both the main and renderer processes, so there is no need to use electron.remote. Before clicking the Copy from Clipboard button, we write text to the clipboard. We then click the button and verify that the clipping’s text is exactly what we wrote to the clipboard.
This covers half of Clipmaster 9000’s functionality. The flip side of the coin is that the user should be able to copy the clipping back to the clipboard when the clipping’s → Clipboard button is clicked. To test this, we need to build on the work we did in the previous test. After clicking the Copy from Clipboard button and adding it to the page, we change the clipboard’s content to something else, then click the → Clipboard button, read from the clipboard, and verify that it is back to the original text that we added to Clipmaster 9000.
it('should write the clipping text to the clipboard', async () => {
await app.client.waitUntilWindowLoaded();
await app.electron.clipboard.writeText('Vegan Ham'); 1
await app.client.click('#copy-from-clipboard'); 2
await app.electron.clipboard.writeText('Something different'); 3
await app.client.click('.copy-clipping'); 4
const clipboardText = await app.electron.clipboard.readText(); 5
return assert.equal(clipboardText, 'Vegan Ham'); 6
});
With this final test in place, we can verify that all of the UI elements work and behave as expected. We were able to use a combination of WebdriverIO and Electron APIs to test the application from multiple angles. The code as it stands at the end of this chapter can be found on the completed-example branch of the repository.
In part 2, we built a number of applications, but each shared a common flaw: our users would need to navigate to the appropriate directory using the command line and have Node.js installed to start the application. This isn’t exactly ideal. As I’m sure you’ve guessed, things don’t have to be this way. That’s not the way I started Slack this morning. Part 3 covers the intricacies of packaging and distributing our wonderful applications.
Chapter 14 directly takes on the problem I illustrated in the previous paragraph by introducing us to two different ways to package our applications for distribution. We’ll create standalone versions of Fire Sale and Jetsetter in the process. In chapter 15, I’ll address a fear that may or may not have crossed your mind: how do we know if our application is working as intended once we release it into the wild? We’ll wire up Fire Sale with Electron’s built-in crash reporter. We’ll also set up a simple server to receive and keep track of crash reports. Full-on crashes are not the only issue our users might come across. We’ll also build our own ability to capture uncaught exceptions and report them to our server as well. This is above and beyond what Electron gives us out of the box, but, ultimately, it is fairly simple to implement.
Chapter 16 discusses how to get your application prepped and ready for the Mac App Store. You, by no means, have to go down this route, but it does solve some of the problems that you might come across if you decide that you’d like to get rich off of your Electron applications.
Throughout this book, we’ve built several applications. We’ve started each of them the same way: open the terminal, navigate to the directory, and launch the application using npm. If you’ve downloaded any of my completed applications, then it’s likely that you went to the project on GitHub, cloned the repository, and installed its dependencies. This is all a bit tedious and—frankly—an unacceptable experience for our users. Our Electron applications should behave like any other desktop application. Users should be able to navigate to a website, download the application, and double-click its icon to launch the application. No terminal. No installing dependencies. No cloning repositories.
In this chapter, we take an application that we built earlier in this book—Fire Sale—and build it as a desktop application using a third-party library called Electron Packager. You can find the repository on GitHub at https://github.com/electron-in-action/firesale. We’ll start by checking out a branch conveniently called chapter-14-beginning. This is roughly where we left off in chapter 8.
We start by setting up Electron Packager. We use command-line flags to customize things like the output directory and set up npm scripts that allow us to build for multiple platforms at once—although I’ll explain why this might be ill-advised. Next, we add a custom icon for Fire Sale. Finally, we discuss Electron’s asar archive format and add it to our build process.
After building Fire Sale with Electron Packager, we build Jetsetter using an alternative called Electron Forge. Where Electron Packager is simple, low-level, and a great way to understand what’s happening without getting too deep into the weeds, Forge contains more bells and whistles. I chose it for Jetsetter because we’re using electron-compile to transform JSX to vanilla JavaScript. Electron Forge is also great for laying the foundation for a new Electron application. In the name of learning and getting our hands dirty, I chose not to use Electron Forge, but you may want to consider it when starting your next Electron application. This chapter covers how to transition an Electron application that wasn’t originally created with Electron Forge.
By the end of this short chapter, we’ll have an executable Electron application that doesn’t need to be started from the command line and can be used by someone who does not have Node installed on their computer. Chapters 15 and 16 go deeper and discuss how to properly package your application for macOS and Windows.
Electron Packager is an abstraction around the numerous steps required to develop an application and package it for distribution. In development, we’ve downloaded a prebuilt version of Electron for our platform (macOS, Windows, or Linux) and processor architecture (32- or 64-bit). We don’t necessarily know what platform and architecture our users are using, and they won’t build it themselves. It’s our responsibility to build a version of the application for each platform and architecture combination we plan to support. Electron Packager is here to help us with that endeavor.
You can install Electron Packager globally using npm install electron-packager -g or yarn global add electron-packager. I prefer to install it locally on the individual project because then each project specifies its own version of Electron Packager. I added it to the devDependencies in the project’s package.json. If you’ve cloned the repository and installed the dependencies, you should be good to go.
We begin by adding a build script to package.json. In this chapter, we start with a deliberately simple configuration and build on top of it as we go along, refining this build script along the way.
{
// ...Omitted...
"scripts": {
"start": "electron .",
"build": "electron-packager .", 1
"test": "echo \"Error: no test specified\" && exit 1"
},
// ...Omitted...
}
With our build script in place, it’s time to start Electron Packager. You can run the build script using npm run build, which runs the local version of electron-packager installed in the node_modules directory. When the build is finished, you should see an additional directory with the name of the application along with the platform and architecture you’re currently using, as shown in figure 14.1. As I write this, I’m using a 64-bit Mac and the directory is called firesale-darwin-x64.
The firesale-darwin-x64 directory contains the desktop application named firesale along with the license and a small text file containing the version. Double-click the application to open it like any other application. If you need to prove it to yourself, feel free to drag the application to another directory and launch it from there.
The output of Electron Packager on Windows is a bit more verbose. On macOS applications are effectively folders that hide much of this complexity from us. In chapter 15, we’ll cover how to make an installer for Windows that hides this complexity from our users.
This was fast and simple, but there is still a lot left to be desired. The filename isn’t capitalized, we’re still using the stock Electron icon, and we’ve built a version for only our current architecture and platform, among other issues.
By default, Electron Packager includes all of the dependencies in your node_modules directory that are listed in your package.json. It does omit dependencies listed under devDependencies in your package.json. This is not an issue that we run into with any of the applications in the book, but it is something you might encounter in your adventures. You can deal with this in two ways: move the dependency from devDependencies to dependencies or pass the --no-prune flag to Electron Packager.
The concerns I just listed are all valid, and we do solve each of them, but we have a more pressing problem to address first. We may not want to check our built applications into version control. Building the applications to the root directory of the project makes that difficult. It adds an increasing amount of visual noise and clutter as we begin building additional platforms and architectures.
If you type ./node_modules/.bin/electron-packager --help from the command line, Electron Packager shows you all the options and flags that it accepts. To specify the directory into which we want Electron Packager to place our applications, we can use the --out flag. Update the build script to electron-packager . --out=build. You can add the build directory to your .gitignore file to keep your compiled applications out of version control. I’ve already done this for you in this project.
Electron Packager uses information in your project’s package.json to set certain parameters during the build process. For example, it reads the version field to determine what version of the application this is. It used the name field to set the name of the application as well. But, this has some limitations. You can’t use spaces or capitalization in the name field in a package.json. Luckily, a package.json is only a text file, and npm ignores any properties it doesn’t understand. This is a good place to store additional information that might be meaningful to Electron Packager. We know that we’d like to change the name of the application, as shown in figure 14.2.
{
"name": "firesale",
"version": "1.0.0",
"description": "Completed code from [Electron in
Action](http://bit.ly/electronjs).",
"productName": "Fire Sale", 1
// ...Additional properties omitted...
}
I like Electron’s logo. It’s done well by us throughout this book. But if every application built on top of Electron used the same logo, it would be hard to tell one application from another. Let’s replace the logo with our own.
As we saw in chapter 9, different operating systems have different preferences regarding the file format of its icons. At this point, we’re building for our own operating system, so we’ll make a choice based on which one we’re using, as shown in figure 14.3. Later in the chapter, we add some nuance to guide Electron Packager in selecting the correct icon for a given platform.
macOS supports .icns files. Windows supports .ico files. Linux supports .png files. For now, pass the appropriate file to the --icon flag based on your current operating system as shown in listing 14.3.
electron-packager . --overwrite --out=build --icon=icons/Icon.icns 1 electron-packager . --overwrite --out=build --icon=icons/Icon.ico 2 electron-packager . --overwrite --out=build --icon=icons/Icon.png 3
Electron Packager supports the --all flag, which creates five builds of the application: 64-bit macOS, 32- and 64-bit Windows, and 32- and 64-bit Linux. Later in this chapter we discuss why this isn’t always possible. Although the --all flag provides a simple way to create builds for each platform, in the previous section we created different icons for each platform. As a result, we want to pass different options to Electron Packager on the platform.
{
// ...Omitted...
"scripts": {
"start": "electron .",
"build": "npm run build-mac && npm run build-win
&& npm run build-linux", 1
"build-mac": "electron-packager . --platform=darwin
--out=build --icons=icons/Icon.icns --overwrite", 2
"build-win": "electron-packager . --platform=win32
--out=build --icons=icons/Icon.ico --overwrite", 3
"build-linux": "electron-packager . --platform=linux
--out=build --icons=icons/Icon.png --overwrite", 4
"test": "echo \"Error: no test specified\" && exit 1"
},
// ...Omitted...
}
If you’re using macOS, you can build Windows binaries if you have Wine installed as well as binaries for Linux. Wine is a utility for running Windows applications on Linux and macOS that can be downloaded from www.winehq.org. On Windows, you cannot create symlinks for macOS and cannot build applications as a result. In chapters 15 and 16, we discuss code signing on macOS, which can be done only on a Mac.
Electron applications are like traditional web applications in that all our code is hidden in plain sight. In a web application a user might right-click and select View Source or open the Developer Tools. In our Electron application, a curious user could open the application bundle and navigate to our source code, as shown in figure 14.4.
If you’re using Windows, you can see a folder called resources in the same directory as the application. If you’re using macOS, right-click Fire Sale and select Show Package Contents. Next, you see a folder called Contents. Navigate into the Contents directory and then into Resources. Inside this folder are many folders. The one we’re interested in is called app. Open this folder and you find all of Fire Sale’s source code.
Your next impulse might be to run the same experiment on a popular Electron application such as Slack, Atom, or Visual Studio Code. But you won’t find a folder containing the application’s source code. Instead, you’ll see a file with an unfamiliar file extension called app.asar, as shown in figure 14.5.
What’s this? Asar is an archive format used by Electron applications. It effectively concatenates the files and prepends a JSON object with the start location of each file along with its length, which allows random access to a specific file in the archive.
Why use asar? Asar speeds up requiring files in Node because they are all colocated in the same file, which is loaded into memory when the application launches. It also helps us avoid a bug in Windows caused by long filenames. The error is fairly self-explanatory: the specified path, filename, or both are too long. The fully qualified filename must be less than 260 characters, and the directory name must be less than 248 characters. While you could practice the discipline of avoiding incredibly long filenames, you don’t have control over dependencies—particularly those written by developers using computers running macOS or Linux. Asar solves this problem by creating a single file called app.asar.
Creating an asar archive with Electron Packager is incredibly easy. Simply add the --asar flag to the command and build the application. The folder disappears and is replaced with the archive.
{
// ...Omitted...
"scripts": {
"start": "electron .",
"build": "npm run build-mac && npm run build-win && npm run build-linux",
"build-mac": "electron-packager . --platform=darwin
--out=build --icons=icons/Icon.icns --asar --overwrite", 1
"build-win": "electron-packager . --platform=win32
--out=build --icons=icons/Icon.ico --asar --overwrite", 2
"build-linux": "electron-packager . --platform=linux
--out=build --icons=icons/Icon.png --asar --overwrite", 3
"test": "echo \"Error: no test specified\" && exit 1"
},
// ...Omitted...
}
Asar is not a way to secure or conceal your source code. The asar module on npm allows anyone to extract the folder structure from the archive. Alternatively, opening the archive in a text editor shows you that asar doesn’t do anything in the way of obfuscation. If you wanted to peek at the source code of an Electron application, globally install the asar binary, navigate to the application’s app.asar, and extract the folder structure.
Electron does not offer a way to hide or encrypt your HTML, CSS, and JavaScript code. If this is a business requirement for you, you might want to consider writing the sensitive parts of your application in a compiled language, like C++ with Node bindings. To the same end, there is nothing stopping you from cracking open your favorite Electron application—Slack, for example—and checking out some of the approaches used in producing for Electron applications.
Electron patches the Node APIs for reading from and writing to the filesystem to support asar automatically. This means you can treat an asar archive as if it were the original folder structure. If you need to use the unpatched version of Node’s built-in fs module, you can use Electron’s built-in original-fs module.
We have successfully set up packaging for Fire Sale. You can find the code for Fire Sale in the chapter-14-ending branch (http://mng.bz/vI4g). This setup works for a simple application like Fire Sale, but what about an application that has code that needs to be transpiled? Yes, you could set up some Gulp tasks or some other kind of build step that takes place before packaging, but at this point in the book, it shouldn’t surprise you that the Electron community has already solved this problem for you. In the next section, we’ll look at using Electron Forge to build and package Jetsetter, which requires a compile step before packaging.
Electron Forge (https://github.com/electron-userland/electron-forge) is an abstraction around electron-compile, electron-rebuild, Electron Packager, and other popular third-party Electron libraries. Electron Forge lays the foundation for a brand-new Electron application using one of several different blueprints. It can also import existing applications. We use Electron Forge with the Jetsetter app from chapters 11 and 12 because it relies on electron-compile and electron-rebuild. Using these with tools like Electron Packager is certainly not impossible, but it’s tedious compared to how easy the process is with Electron Forge, which has built-in support for electron-compile and electron-rebuild.
You’ll start from the chapter-14-beginning branch, which can be found on GitHub (http://mng.bz/MdLb). You can also reference the completed example on the chapter-14-ending branch (http://mng.bz/mzhH).
The trouble with publishing a book is that, sometimes, libraries change. In this section, we’re working at the intersection of a few different libraries: Electron, electron-precompile, Electron Forge, React, and others. The cross-compatibility of all of these libraries fills your author with a sense of existential dread. If you have any trouble with the code printed in this section, I encourage you to visit the repository on GitHub, which should work with the most recent versions of the libraries involved.
Out of the box, Electron Forge also handles many of the concerns around distributing your application that we’ll cover in chapters 15 and 16. It can take care of publishing your application to Amazon S3, GitHub Releases, or your own custom server. As I stated earlier, we’ve opted to do a lot of the work by hand in the name of understanding how Electron works, but I highly recommend considering Electron Forge for your next application. In this section, we cover how to convert an application that was not originally created with Electron Forge in mind to one that is ready and able to take advantage of Electron Forge.
We first need to complete a few steps: install the electron-forge binary, convert Jetsetter to an Electron Forge application, and run the build command. Electron Forge uses Yarn, an alternative to npm, for installing and managing packages. You need to install it if you haven’t already. Visit the official documentation (https://yarnpkg.com/en/docs/install) for up-to-date instructions and to learn how to install it on your operating system.
After you install Yarn on your system, run yarn global add electron-forge. This installs the command-line tool that allows you to create Electron Forge applications, as well as converts existing Electron applications for use with Electron Forge.
When we built Jetsetter in chapter 11, we had not yet discussed Electron Forge. It follows that Jetsetter is not an Electron Forge application. Luckily, it’s easy to convert it to one. From inside the jetsetter directory, run electron-forge import. At this point, you are asked a series of questions about how you’d like the script to proceed. Answer the questions as follows:
The first question is asking your permission to modify your application’s package .json file. This is necessary. Answering no aborts the process. The second question does not apply to us. Jetsetter uses Electron Compile to transpile JavaScript, Sass, and other languages on the fly. If we were instead using a task runner such as Gulp, Grunt, or webpack to transpile our source code into another directory, we would answer yes to this question.
The final three questions are asking if we’d like to use Electron Forge to start our application in development, package the application as we did earlier in this chapter to Fire Sale, and build a distributable—which we’ll cover in the next chapter. Because this is why we’re importing the application to begin with, we’ll answer yes to each of these questions.
As I mentioned earlier, Electron Forge is an abstraction around several helpful libraries in the Electron ecosystem. It exists to make common tasks easier. Building your application is as simple as running yarn run package. This drives Electron Packager through many of the steps we covered earlier in this chapter with Fire Sale.
Electron Forge passes parameters to Electron Packager. It calls the output directory out instead of build. Electron Packager pulls modules from your node_modules directory and installs them into your application. As of this writing, there is an issue where the modules were not moved properly. This issue appears with the current version of npm and may be alleviated by the time you read these words. In the meantime, I found that it was easy to work around this issue by using Yarn instead of npm. Electron Forge adds a few fields to your package.json, so finds the field titled electron-PackagerConfig, and modify it to match this listing.
"electronPackagerConfig": {
"packageManager": "yarn"
}
With this code in place, run yarn run package. Your application should build successfully. See figure 14.6. You may have noticed that Electron Forge adds a few other configuration fields to package.json. As I mentioned earlier, Electron Forge also assists with creating installers and publishing your application to the web. We cover those features in the upcoming chapters.
With Electron Forge, everything is set up on your behalf. At this point, you probably fall into one of two categories: you’re either amazed by how much simpler Forge is compared to Packager, or you’re bewildered by all of the black magic. Those reactions are both fair and underscore some of the trade-offs made along the spectrum between convention and configuration. My hope is that by trying both, you’ll have a sense of which you prefer for your own applications.
This chapter covers
You’ve built your application, and you’re ready to distribute it to the world. You’ve prepared your announcement, and your cursor is hovering over the Publish button when—all of a sudden—your mind begins to race with some very important questions: What if it doesn’t work on all platforms as you expected? What if there is a bug you haven’t encountered yet? What if you need to push out a new version of the application to your users?
These concerns are all valid. The good news is that Electron has you covered on each front. In this chapter, we cover how to collect crash reports and—in the event you receive an unexpectedly large number of them—how to push an update to all of the users that currently have the application installed on their system.
Despite how good your skills as a developer are, your application is going to have bugs. Some users report them, but many others suffer in silence. Even among the users who report bugs, it can be difficult to determine how common a given issue is among your user base as a whole. Crash reporting is critical for discovering what types of problems occur and at what frequency your users are experiencing them.
Though it is certainly a relief that Electron includes support for crash reporting, it’s surprising. As we’ve covered throughout this book, Electron is built on top of Chromium, and crash reporting is certainly something that the Chromium team deals with in their project. To stand on the shoulder of giants, however, we need to set up the crash reporter in our Electron application, as well as deploy a simple server to collect these crash reports for later analysis.
In this chapter, we implement crash reporting and auto-updating into Fire Sale, which is the application we began getting ready for deployment in chapter 14. We begin working on the chapter-15-beginning branch, found at https://github.com/electron-in-action/firesale.
We tackle the following:
Under the hood, Electron uses one of two crash-reporting systems: on macOS, the Chrome team’s Crashpad reporting engine; on Windows and Linux, an older engine known as Breakpad. These options impact how we implement crash reporting in Electron. The main difference is that Breakpad crash reporting needs to be set up only in the main process, whereas Crashpad must be started in the main and renderer processes.
Yes, you could copy and paste the code from the main process into each of the renderer processes. (We’re lucky to have only one in Fire Sale.) But that means you’d have to remember to be diligent enough to change it in multiple places in the event you needed to update the configuration. Personally, I’d prefer to spend a few extra moments of effort now for a lifetime of laziness. Let’s set up a single function that we can use in both places.
const { crashReporter } = require('electron');
const host = 'http://localhost:3000/'; 1
const config = {
productName: 'Fire Sale',
companyName: 'Electron in Action',
submitURL: host + 'crashreports',
uploadToServer: true, 2
};
crashReporter.start(config); 3
console.log('[INFO] Crash reporting started.', crashReporter);
module.exports = crashReporter;
We set up a reusable module for starting up the crash reporter, but you can change the value of any of those options. Particularly, we need to change submitURL because it is both unlikely that our users happen to be running a server on that port and ultimately unhelpful to us if they’re collecting crash reports locally and never sending them to us.
The code by itself does not start the crash-reporting engine unless it is pulled into the main and renderer processes. We start by pulling it into the main process.
const { app, BrowserWindow, dialog, Menu } = require('electron');
const createApplicationMenu = require('./application-menu');
const fs = require('fs');
require('./crash-reporter'); 1
const windows = new Set();
const openFiles = new Map();
// The rest of the main process code...
This method is effectively enough to implement the ability to send crash reports on Windows and Linux. We can verify that the code inside the crash reporter has executed by checking the terminal for the message we logged to the console in listing 15.1 when the application starts, as shown in figure 15.1.
As I mentioned earlier, we need to do one more—arguably simple—step to get crash reporting working on macOS: execute the same code in the renderer process.
const { remote, ipcRenderer, shell } = require('electron');
const { Menu } = remote;
const path = require('path');
const mainProcess = remote.require('./main.js');
const currentWindow = remote.getCurrentWindow();
require('./crash-reporter'); 1
We can verify that the crash reporter has started by opening the Developer Tools in the Fire Sale UI and confirming that the console message has been logged correctly, as seen in figure 15.2.
We can send crash reports—but where? We can trigger a crash by typing process.crash() into the Developer Tools in the renderer process. As shown in figures 15.3 and 15.4, doing so results in the following: the page crashing, the Developer Tools locking up, and the main process logging an error.
The immediate issue that we need to solve is the error in our terminal. The exact contents of the error varies by operating system, but the gist is that the crash reporter cannot connect to the server. This makes sense, because we haven’t yet set up a server.
Depending on your application, you may already be using an API server. If so, I’d recommend adding an endpoint for receiving POST requests from your application. That said, Fire Sale has not had the need for an API server, and I’m going to work under the assumption that we don’t have one. For those of you that do, I suspect what follows is still helpful because it illustrates what kind of payload you can expect when a crash is reported.
As described in listing 15.4, let’s create a simple server for capturing and recording crash reports. The code can be found on GitHub at http://mng.bz/k6eT.
const express = require('express');
const multer = require('multer');
const bodyParser = require('body-parser');
const uuid = require('uuid');
const writeFile = require('write-file');
const path = require('path');
const http = require('http');
const app = express(); 1
const server = http.createServer(app);
app.use(bodyParser.urlencoded({ extended: false })); 2
const crashesPath = path.join(__dirname, 'crashes');
const upload = multer({ 3
dest: crashesPath,
}).single('upload_file_minidump');
app.post('/crashreports', upload, (request, response) => {
const body = { 4
...request.body,
filename: request.file.filename,
date: new Date(),
};
const filePath = `${request.file.path}.json`;
const report = JSON.stringify(body);
writeFile(filePath, report, error => { 5
if (error) return console.error('Error Saving', report);
console.log('Crash Saved', filePath, report);
});
response.end();
});
server.listen(3000, () => {
console.log('Crash report server running on Port 3000.');
});
If you clone the library from GitHub, install the dependencies, and run npm start. You should have a server ready and able to collect crash reports running on http://localhost:3000, which is exactly where we pointed the Electron crash reporter in listing 15.1.
Each crash report creates two files in the ./crashes directory: a mini-dump from Chromium and a JSON file with additional metadata about the crash. The JSON file contains useful data about the version of your application that crashed and the platform that it was running on.
{
"_companyName": "Electron in Action",
"_productName": "Fire Sale",
"_version": "1.0.0",
"guid": "46cecb8f-f2de-4159-a235-dc8713f8393f",
"platform": "darwin", 1
"process_type": "renderer", 2
"prod": "Electron",
"ver": "2.0.4", 3
"filename": "a51d2ca2e13cad25cea6c2bd15ae4d4d" 4
}
When a crash is reported, the server saves two files to the /crashes directory: a51d2ca2e13cad25cea6c2bd15ae4d4d and a51d2ca2e13cad25cea6c2bd15ae4d4d.json. The former is a dump from Chromium of everything that was happening when the application crashed. This file is in a binary format and cannot be opened in a text editor.
The easiest way to parse this file is to use the minidump library from the Electron team. You can install this globally using npm install -g minidump. After you install it, you have the minidump_stackwalk command-line tool at your disposal and can use minidump_stackwalk <name of mini-dump file> to read the contents of the dump. Alternatively, you can use this tool programmatically on your crash-report server as outlined in the tool’s documentation (www.npmjs.com/package/minidump).
Electron’s built-in crash reporter is good at what it claims to do on the box—reporting crashes. But in my experience, general bugs and minor errors are much more common than outright crashes. It would be great if we could collect these errors as well, to have better insight into where the rough edges of our application are and exactly how to fix them.
Unfortunately, this is not a tool that is already built into Electron. The good news is that this feature is relatively easy to implement given the knowledge we’ve already gained throughout the course of this book.
To implement this feature, we have to listen for any uncaught exceptions. The syntax for this is slightly different between the main and renderer processes, but the implementation is the same, as shown in the following listing. When an uncaught exception occurs, send an HTTP POST request to our crash server, which will then log the error to a JSON file.
const { crashReporter } = require('electron');
const request = require('request');
const manifest = require('../package.json');
const host = 'http://localhost:3000/';
const config = {
productName: 'Fire Sale',
companyName: 'Electron in Action',
submitURL: host + 'crashreports',
uploadToServer: true,
};
crashReporter.start(config);
const sendUncaughtException = error => { 1
const { productName, companyName } = config;
request.post(host + 'uncaughtexceptions', { 2
form: {
_productName: productName,
_companyName: companyName,
_version: manifest.version,
platform: process.platform,
process_type: process.type,
ver: process.versions.electron,
error: { 3
name: error.name,
message: error.message,
stack: error.stack,
},
},
});
};
if (process.type === 'browser') { 4
process.on('uncaughtException', sendUncaughtException); 5
} else {
window.addEventListener('error', sendUncaughtException); 6
}
console.log('[INFO] Crash reporting started.', crashReporter);
module.exports = crashReporter;
Any time an error is fired and it bubbles up to the window object without being handled, a report is sent to our server. But just as last time, our server has not been set up yet to handle this report. We need to add another route to log this error.
const express = require('express');
const multer = require('multer');
const bodyParser = require('body-parser');
const uuid = require('uuid');
const writeFile = require('write-file');
const path = require('path');
const http = require('http');
const app = express();
const server = http.createServer(app);
app.use(bodyParser.urlencoded({ extended: false }));
const crashesPath = path.join(__dirname, 'crashes');
const exceptionsPath = path.join(__dirname, 'uncaughtexceptions'); 1
const upload = multer({
dest: crashesPath,
}).single('upload_file_minidump');
app.post('/crashreports', upload, (request, response) => {
// ...
});
app.post('/uncaughtexceptions', (request, response) => {
const filePath = path.join(exceptionsPath, `${uuid()}.json`); 2
const report = JSON.stringify({
...request.body,
date: new Date() 3
});
writeFile(filePath, report, error => { 4
if (error) return console.error('Error Saving', report);
console.log('Exception Saved', filePath, report);
});
response.end();
});
server.listen(3000, () => {
console.log('Crash report server running on Port 3000.');
});
In chapter 14, we packaged our application so that users don’t need to have Node installed or be familiar with the command line to start it up. In the previous section, we added crash and exception reporting to be confident that we’ll be notified in the event our application does not work as intended. Our next step is to sign our application so that our users can be certain that they’re getting the real thing and not a cheap substitute.
This process differs on macOS and Windows, so let’s walk through each platform separately. Although some of the steps for macOS seem repetitive when we package Fire Sale for the Mac App Store in chapter 16, myriad subtle differences exist.
Before we get into the nitty-gritty of code signing our applications, I’ll take a moment to explain what code signing is. The internet is a wild place. You can think of code signing as a tamper-proof seal around your application. Signing our applications allows users to be confident that it both came from you and that no one modified it or otherwise tampered with it along the way. On top of being a generally good idea, macOS and Windows prefer that users work with signed applications and present a series of warnings if they attempt to open an unsigned application. Depending on their settings, users may not be able to open unsigned applications at all.
You need a few prerequisites in place to sign a macOS application. First, you must be a registered member of the Apple Developer Program (https://developer.apple.com/programs/). Second, you must have Xcode installed. This can be downloaded from the Mac App Store or from Apple’s Developer site (https://developer.apple.com/xcode/download/). In addition to having Xcode installed, you also need to have the Xcode command-line tools installed. To set these up, type xcode-select –install from the command line, and follow all of the subsequent prompts.
To sign your application, you need to create certificates either through iTunes Connect or from within Xcode. We spend an uncomfortable amount of time in iTunes Connect in chapter 16, so we’ll do it in Xcode this time.
We generate two certificates: a “Developer ID Application” and a “Developer ID Installer” certificate. To create these certificates
Xcode automatically adds these certificates to your Keychain. Electron Packager looks these up when it comes time to package your application and sign it. First, we need to modify the packaging script in our package.json.
"build-mac": "electron-packager . --platform=darwin
This line is getting a bit long, and we begin to break it out a bit in chapter 16, but for now, we add a few important new arguments to the existing script: --app-bundle-id, --app-version, --build-version, and --osx-sign.
When running npm run build-mac, you are prompted for your password multiple times, as shown in figure 15.8, because Electron Packager accesses your keychain to use the certificates to sign your application.
On Windows, you need a code-signing certificate. Microsoft recommends buying a certificate from a list of certificate authorities listed in their documentation (http://mng.bz/3VEH).
You can still build an installer without a certificate, but you might have difficulty distributing your application to users without one. Microsoft’s SmartScreen filter may block your application from being downloaded, and many antivirus programs might mislabel your application as malware. For the purposes of this chapter, as we go through the process of building an installer, I show you where to plug in your certificate, should you move forward and decide to purchase one.
The Electron team maintains a helpful library for building installers on Windows. You can install this tool using npm install --save-dev electron-winstaller. We create a new folder called scripts and make a file called scripts/windows.js to store the configuration for our Windows installer. Add the content in listing 15.9 to the file we just created.
const { createWindowsInstaller } = require('electron-winstaller'); 1
const path = require('path');
const iconPath = path.resolve(__dirname, '../icons/Icon.ico'); 2
const result = createWindowsInstaller({ 3
title: 'Fire Sale',
authors: 'Steve Kinney',
appDirectory: path.resolve( 4
__dirname,
'../build/Fire Sale-win32-x64'
),
outputDirectory: path.resolve( 5
__dirname,
'../build/Fire Sale-win32-x64-installer'
),
icon: iconPath, 6
setupIcon: iconPath, 7
name: 'FireSale',
setupExe: 'FireSaleSetup.exe',
setupMsi: 'FireSaleSetup.msi',
});
result
.then(() => console.log('Success')) 8
.catch(error => console.error('Failed', error)); 9
If you have your certificates handy, you can add them to the configuration object. certificateFile should point to the path where the certificate is located. This process is similar to how we locate the iconPath. certificatePassword is the password for the certificate. Do not store the password in version control—particularly if your application is or ever will be open source.
If you get really excited and double-click the FireSaleSetup executable, you may notice that things are a little strange. You see a loading GIF followed by the application immediately opening. It didn’t add a shortcut to the desktop, or any other way of getting back to the application.
Uninstalling the application adds its own set of oddities. When you click the button in the Add and Remove Programs settings panel, you see the application open again before it finally uninstalls. We need to address this.
The Windows installer is set up with the Squirrel.Windows framework. When you start the application for the first time, or when it is being uninstalled, has been updated, or finds an available update, Squirrel passes an argument to your application. Luckily, working with Squirrel on Windows can range from incredibly simple to very easy. Let’s start with the incredibly simple way, and then I’ll show you what’s happening under the hood.
The easiest way to get started is to delegate the work to someone else by installing electron-squirrel-startup using npm install electron-squirrel-startup. After you install this package, add the code from this listing to your ./app/main.js.
const { app, BrowserWindow, dialog, Menu } = require('electron');
const createApplicationMenu = require('./application-menu');
const fs = require('fs');
require('./crash-reporter');
if(require('electron-squirrel-startup')) return; 1
// ...
With that simple change, all the oddities we encountered when working with FireSaleSetup.exe are squared away. So, what’s happening in this module? The module is open source and can be found on GitHub (https://github.com/mongodb-js/electron-squirrel-startup), but it’s a small file, and for the sake of completeness I list it here as well.
var path = require('path');
var spawn = require('child_process').spawn;
var debug = require('debug')('electron-squirrel-startup');
var app = require('electron').app;
var run = function(args, done) {
var updateExe = path.resolve( 1
path.dirname(process.execPath), '..', 'Update.exe'
);
debug('Spawning `%s` with args `%s`', updateExe, args);
spawn(updateExe, args, {
detached: true
}).on('close', done);
};
var check = function() {
if (process.platform === 'win32') { 2
var cmd = process.argv[1]; 3
debug('processing squirrel command `%s`', cmd);
var target = path.basename(process.execPath);
if (cmd === '--squirrel-install' || cmd === '--squirrel-updated') { 4
run(['--createShortcut=' + target + ''], app.quit); 5
return true; 6
}
if (cmd === '--squirrel-uninstall') { 7
run(['--removeShortcut=' + target + ''], app.quit); 8
return true;
}
if (cmd === '--squirrel-obsolete') {
app.quit();
return true;
}
}
return false; 9
};
module.exports = check();
If Squirrel did anything, it returns true. Recall in ./app/main.js that we used a conditional and if require(’electron-squirrel-startup’) returned true, we ended the main process early. This allows us to tap into the Squirrel framework when necessary and not start the application when we’re installing or uninstalling it. You can also see that on installation and uninstallation, Squirrel creates and removes the desktop shortcut as needed.
Whether you’ve completed a hot new feature that you want everyone to have or you’re trying to correct a critical bug that you found after implementing the crash and error report, the ability to push out updates to your users is important.
We tend to take this capability for granted as web developers. Whenever we deploy a new application to the web, we can reasonably expect that users are getting the latest and greatest version of it. But that’s not necessarily true when we’re building desktop applications. We can tell users about it, but there is no guarantee that they’re going to take the time to download it.
Browsers used to suffer from this problem. New JavaScript language and web platform features would be released, but you couldn’t use them because users typically did not update their browsers on a regular basis. Today, modern browsers like Chrome and Firefox push out new versions to users every six weeks or so. The update is automatically downloaded, and the next time the user starts the browser, the new one is swapped in without them having to think about the tedious process of upgrading.
It shouldn’t be a surprise at this point to hear that Electron provides a mechanism for us to do this with our applications—with some exceptions. As of this writing, this feature is limited to macOS and Windows. There is currently no support for auto-updating Electron applications on Linux.
Like crash reporting, implementing automatic updates has two sides: your application and a server to host releases of your application. We get into the details momentarily, but let’s talk about how this works at a high level first. After you’ve configured the autoUpdater module, it pings your release server every time the application starts. If the server responds with an HTTP 204 response, then Electron knows that it is running the latest version of the application. If there is a new version, the server returns an HTTP 200 JSON-formatted response with the URL of the new release.
You may have your own server for hosting releases. That’s perfectly fine. If you do not, we create a simple server to get you off the ground and demonstrate auto-updating in action. But this is not meant to be prescriptive. As long as you have a server that responds with the correct HTTP status codes and payload if there is a new release, Electron does not have strong opinions on the implementation details, and we won’t either, for the time being.
To get this working, we check if we’re using a production version of the application. If so, we send a request to the server asking for the most recent version of the application. If a new version exists, ask the user if they are interested in updating. When they agree, tell the autoUpdater module to quit the application and install the new version on our behalf.
const { app, autoUpdater, dialog, BrowserWindow } = require('electron');
const isDevelopment = app.getPath('exe').indexOf('electron') !== -1; 1
const baseUrl = 'https://firesale-releases.glitch.me'; 2
const platform = process.platform; 3
const currentVersion = app.getVersion(); 4
const releaseFeed =
`${baseUrl}/releases/${platform}?currentVersion=${currentVersion}`; 5
if (isDevelopment) {
console.info('[AutoUpdater]', 'In Developement Mode. Skipping...'); 6
} else {
console.info('[AutoUpdater]', `Setting release feed to ${releaseFeed}.`);
autoUpdater.setFeedURL(releaseFeed); 7
}
autoUpdater.addListener('update-available', () => { 8
dialog.showMessageBox({
type: 'question',
buttons: ['Install & Relaunch', 'Not Now'],
defaultId: 0,
message: `${app.getName()} has been updated!`,
detail: 'An update has been downloaded and can be installed now.'
}, response => {
if (response === 0) {
setTimeout(() => {
app.removeAllListeners('window-all-closed'); 9
BrowserWindow.getAllWindows().forEach(win => win.close()); 10
autoUpdater.quitAndInstall(); 11
}, 0);
}
});
});
module.exports = autoUpdater;
On macOS, autoUpdater fails if the application has not been code signed. When we’re developing the application, we use a version that has not been signed. These two facts are in direct opposition. The best course of action is not to fetch an update if we’re in development. This outcome also makes sense, because we’re likely working on the next version of the application, as opposed to the most recently released version.
You can implement this in a few ways. You could, for example, try to set the feed URL and then catch the error if the application hasn’t been code signed. Based purely on aesthestic reasons, this is not something I like to do. Electron does not have an API to let us know whether we’re in development, but when we are in development, we’re using a version of Electron buried inside of our node_modules directory. In my case, it’s located at ./node_modules/electron/dist/Electron.app/Contents/MacOS/Electron. In production it is located in the application bundle itself. I’ve taken advantage of this fun fact to determine whether the application is in development.
If it’s not in development, then we create a URL to look for updates based on the platform on which the application is running. This URL can technically be anything you want. You don’t have to follow my example, if your setup is different than the one we write together next.
We tell the autoUpdater module to send a request to the URL provided and ask if there are any updates. If there are, then the updates-available event runs. We’ve set up a listener for that event. If an update is available, we ask the user if they would like to update to the latest and greatest version of Fire Sale. If they agree, then we take a series of steps to gracefully transition them to the new version.
First, I remove the event listener that we set up in ./app/main.js that prevents the application from quitting if all of the windows are closed on macOS. Next, we iterate through the windows and close them. We do this to prompt the user to save any changes made to the file. Finally, we call autoUpdater.quitAndInstall(), which—unsuprisingly—closes the application and installs the newly downloaded update. Squirrel takes care of all of this on our behalf.
As with the crash reporter, we set up a deliberately simple server for notifying your users of updates. A more robust example might use a database to store the most recent version along with release notes and more. You could store your application bundles on S3, but going through the process of creating a full-featured web server is outside the scope of this book.
As I mentioned earlier, our server must fulfill a simple contract to play nicely with Electron’s autoUpdater module. If the application matches the latest release, the server should return a response with a 204 status code. If an update is available, the servers should return a JSON object that has a url property with the URL to the new application as its value.
I’ve hosted the server (https://firesale-releases.glitch.me/) and its code (https://glitch.com/edit/#!/firesale-releases) on Glitch, where you can remix it for your own purposes. Glitch also hosts the application, so we can use it in Fire Sale to pull down an update. I encourage you to visit the link to the previous code for the most recent version, but I include an annotated version here as well.
const express = require('express');
const fs = require('fs');
const path = require('path');
const app = express();
app.use(express.static('public'));
const latestRelease = '1.2.0'; 1
app.get("/", (request, response) => {
response.sendFile(__dirname + '/views/index.html');
});
app.get('/releases/:platform', (request, response) => { 2
const { platform } = request.params; 3
const { currentVersion } = request.query; 4
if (currentVersion === latestRelease) { 5
response.status(204); 6
return response.end();
}
if (platform === 'darwin') { 7
return response.json({
url: ...
});
}
if (platform === 'win32') { 8
return response.json({
url: ...
});
}
if (platform === 'linux') { 9
return response.json({
url: ...
});
}
response.status(404).end();
});
const listener = app.listen(process.env.PORT, () => {
console.log('Your app is listening on port ' + listener.address().port);
});
I started by storing a reference to the most recent version of Fire Sale in a variable. Next, I set up a dynamic route. If you recall, Fire Sale requests updates based on the platform on which it’s running. Versions running on macOS, Windows, and Linux request updates from /releases/darwin, /releases/win32, and /releases/linux, respectively. We also check if the version number is included as a query parameter.
If the current version and the latest release match, then we respond with a 204 status code to let the application know that it is currently running the most recent version. If they do not match, we assume that an update is available. We then check which platform the user requested and send them the URL for the appropriate flavor of the latest release of Fire Sale, a shown in figure 15.9.
If you’ve used the code I provided for the autoUpdater and pointed it at https://firesale-releases.glitch.me/, then you should be notified about a very important update to Fire Sale.
In the previous chapter, we built two of our projects from earlier in the book. This eliminated the need for our users to install Node.js and use the command line to start one of our applications. In this chapter, we discuss strategies for distributing an application built with Electron.
Distributing your application through the Mac App Store has a few distinct advantages. First, you can easily charge money for your application if you’re interested in going down that road. Second, the Mac App Store handles application updates on your behalf. The disadvantages are that enrolling in Apple’s Developer Program isn’t free and—should you decided to charge for your application—Apple takes a 30% cut of the sale price of your application.
Submitting your application to the Mac App Store takes many steps beyond simply packaging your application—as we did in chapter 14. You must also create security certificates and sign your application to ensure that users are receiving an official version of it. Signing your application is good practice in general, and this chapter is worth reading, even if you do not intend to submit your application to the Mac App Store. The process of signing and uploading your application is primarily performed through native and web-based UIs provided by Apple. As a result, this chapter is highly visual.
Before you can submit an application to the Mac App Store, you must have Xcode installed on your Mac, and you need to sign up for the Apple Developer Program. Xcode, which is available on the Mac App Store, is a large application, so start that download first before enrolling in the developer program. To do this, visit https://developer.apple.com/programs/, and enroll in the program as either an individual or an organization.
Code signing is a technology that allows you to certify that your application is, in fact, created by you and not some imposter. When a user first installs your application, the operating system tracks the certificate you included. Only you can generate this certificate, which means if it changes, the new version of the application could be from a malicious attacker.
We need two certificates: one for the application itself, and one for the installer we upload to the Mac App Store—which we create later in this chapter. To create these certificates, open the Keychain Access application, shown in figure 16.1, located in the /Applications/Utilities directory. This application is included in macOS and should be available even if you haven’t installed Xcode yet.
As you might be able to guess from the name, Keychain Access does more than just generate certificates for signing applications. It is where macOS stores all of your saved passwords and certificates. It also stores all of the passwords for wireless networks that you’ve asked it to remember. If you ever need to look up a password, you can do so using Keychain Access.
With the application open, navigate to the Keychain Access application menu, then select Certificate Assistant, followed by Request a Certification From a Certificate Authority, as shown in figure 16.1. This action triggers a dialog box, shown in figure 16.2, where you can add additional information about the certificate to be generated.
Make sure you select Saved to Disk when creating the certificate. After you click Continue, you are prompted to save a file with the name CertificateSigningRequest.certSigningRequest. Where you choose to save the file is up to you—it doesn’t make a difference as long as you can find it again later.
When you have a certificate, you need to let Apple know about it. Visit the Apple Developer Program Member Center (https://developer.apple.com/account), and select Certificates, IDs, and Profiles from the left-hand sidebar. By default, the page for managing iOS certificates opens. Select macOS as the target platform, as shown in figure 16.3.
After you switched from iOS to macOS, you see either a list of the certificates that you’ve uploaded in the past or an empty state. Either way, because we’re uploading a new certificate, click the + button in the upper-right corner of the screen, as shown in figure 16.4.
The certificate can be used for a variety of purposes. In addition to signing your application, certificates can be used to sign server-generated push messages, which you may have seen on mobile platforms to inform users that something has happened in an application that is not currently open.
This is outside of the scope of this book and a topic for another day. As you may have guessed, we want to create a production-ready Mac App Store version of Fire Sale and need a Mac App Store certificate to do that. Scroll past the development options along the top, and select Mac App Store, as shown in figure 16.5.
Figures 16.6 through 16.8 show that I am creating a Mac App Distribution certificate. In practice however, you need to go through these steps twice—once with Mac App Distribution selected and once with Mac Installer Distribution selected. The process is exactly the same for both, and you receive two certificates at the end. The only difference is which radio button you choose at the very beginning of the process.
Earlier in the chapter, we created a file with the extension certSigningRequest. We use this file to request certificates from Apple, which are signed by the Apple Worldwide Developer Relations Certification Authority. When you sign an application, you use a key that can be generated only with a private key stored locally on your computer. It’s important that you are careful with this private key. It’s the only way to sign an application that matches the public key, and anyone with access to your private key can sign applications on your behalf.
When prompted, upload the certificate-signing request that you generated in Keychain Access. Apple signs the certificate and prompts you to download it, as shown in figure 16.8. After downloading the certificate, you can double-click it to add to Keychain Access automatically.
When you complete this process for both Mac App Distribution and Mac Installer Distribution certificates, you should see both certificates inside Keychain Access, as shown in figure 16.9. Congratulations—you’re now ready to sign your application and begin getting it ready for submission to the Mac App Store. In the next section, we begin the process of registering the application with Apple and providing the metadata required to be listed in the App Store.
With your certificates in place, you must register the application itself with Apple before you can upload your application binary. Even if you have no intention of distributing an application through the Mac App Store, signing your application and registering it with Apple is a good practice. Unsigned applications trigger those intimidating gatekeeper errors that Apple displays when a user tries to open an unsigned application inside modern versions of macOS. In addition, depending on a user’s settings, they may not be allowed to open unsigned applications at all. Inside the Certificates, Identifiers, and Profiles section, select App ID from the sidebar on the left, as shown in Figure 16.10.
An App ID is a unique identifier for your application. Creating an App ID consists of three steps. The first is to give it an App ID description. This is a colloquial name for the application and is generally what users see as the title of your application when viewing it in the App Store.
The second is a list of services that your application requests access to, such as sending push notifications, displaying maps, or saving or retrieving files from iCloud. Fire Sale does not use any of these, so we’ll stick with the defaults. Third, you create an App ID Suffix, which is the truly unique identifier for your application. It’s a lot like a backward web domain. In this case, I used net.stevekinney.firesale as opposed to firesale.stevekinney.net, which is something you might expect to find on the web.
You’re not out of the woods yet. Your next step is to add the application to iTunes Connect (https://itunesconnect.apple.com/), which represents the application’s listing in the Mac App Store. From here, you can add a description of your application, screenshots, and more. A word of caution: I won’t cover every aspect of uploading screenshots and things along those lines, but I will tell you that Apple takes this seriously and will reject your application if you fail to include all of the necessary information—including a link to a valid webpage where users can find support for your application.
Once inside iTunes Connect, click the My Apps icon in the upper-left corner, shown in figure 16.11. In this section, you see either a list of your existing applications or an empty state if this is your first application. Click the + button in the upper-left side of the window, and select New Mac App, as shown in figure 16.12.
At this stage, as shown in figure 16.13, you are asked for some cursory information about your application: its name, primary language, the App ID description and suffix you created in the previous section, and more. The SKU is optional and is just used to identify application sales for the sake of accounting.
In chapter 14, we performed all of our configuration inline in the package.json file. To package our application for the Mac App Store, we need to sign it as well as provide some other metadata to aid in operating system integration. macOS applications use property list (.plist) files, which resemble XML, to store important metadata such as the name and what permissions the application is requesting from the operating system.
A simple application might be able to get away with a single property list file. But Electron applications aren’t exactly simple applications. If you recall from chapter 1, each process—both the main and renderer processes—are separated out. This mean that we’ll need to set permissions for our child processes, as well as the main application process. In addition, Electron bundles its own frameworks as well as libraries for media playback. These must be signed as well.
To accomplish this, we set up three property list files: info.plist stores the generic metadata for our application, parent.plist stores the sandbox permissions for the parent process, and child.plist stores the sandbox permissions for the child process. In this example, child processes extend the parent’s permissions. These eventually are installed using a build script. As a result, I’ve decided to place each of these in a folder called ./scripts/mas. My naming conventions are not important. If you’d like to store these files somewhere else, that’s fine. The Electron API Demos application stores the property lists in its assets folder. For the purposes of simplicity and clarity, I’ve chosen to keep all of the files in listings 16.1–16.3 in the same folder as the build script that we’ll create together shortly.
<?xml version="1.0" encoding="UTF-8"?>
<!DOCTYPE plist PUBLIC "-//Apple//DTD PLIST 1.0//EN" "http://www.apple.com/DTDs/PropertyList-1.0.dtd">
<plist version="1.0">
<dict>
<key>CFBundleURLTypes</key>
<array>
<dict>
<key>CFBundleURLSchemes</key>
<array>
<string>firesale</string>
</array>
<key>CFBundleURLName</key>
<string>Fire Sale</string> 1
</dict>
</array>
<key>ElectronTeamID</key>
<string>XD3V298ZRK</string> 2
</dict>
</plist>
<?xml version="1.0" encoding="UTF-8"?>
<!DOCTYPE plist PUBLIC "-//Apple//DTD PLIST 1.0//EN" "http://www.apple.com/DTDs/PropertyList-1.0.dtd">
<plist version="1.0">
<dict>
<key>com.apple.security.app-sandbox</key>
<true/> 1
<key>com.apple.security.application-groups</key> 2
<string>XD3V298ZRK.net.stevekinney.firesale</string> 3
<key>com.apple.security.files.user-selected.read-write</key> 4
<true/>
</dict>
</plist>
All applications on the Mac App Store must enable sandboxing, which wraps each application into an isolated container and limits its ability to access the rest of the operating system. Apple does this in the name of security. That said, many applications can’t do their jobs if isolated to a sandbox. Apple understands this and allows applications to clearly state what entitlements they need. We know that Fire Sale uses Open and Save dialog boxes to read and write from the filesystem, so we clearly state that we need that access.
One exception to sandboxing is that applications are allowed to reach into the containers of other applications created by the same developer. We never created tight integrations between Fire Sale and Clipmaster 900 or Jetsetter, but we may down the line. Stating the application group lets macOS know that this application is part of a family—even if it’s a one-person family for now.
<?xml version="1.0" encoding="UTF-8"?>
<!DOCTYPE plist PUBLIC "-//Apple//DTD PLIST 1.0//EN" "http://www.apple.com/DTDs/PropertyList-1.0.dtd">
<plist version="1.0">
<dict>
<key>com.apple.security.app-sandbox</key>
<true/>
<key>com.apple.security.inherit</key> 1
<true/>
</dict>
</plist>
With the three property lists in place, we use electron-packager to build the application. This approach is similar to the technique we used in chapter 14, with some important changes. First, we tell electron-packager that we’re targeting the mas (Mac App Store) platform as opposed to darwin for regular macOS applications. We also script the rather tedious process of code signing all of the processes, frameworks, and libraries used by our application. This script uses the Xcode codesign command-line interface tool. This script is inspired by the approach used by the Electron Core Team to build the Electron API Demos application (https://github.com/electron/electron-api-demos). Make sure you have Xcode installed before running the script in the following listing. You also need to make sure you use the names of the certificates you generated earlier in this chapter.
#!/bin/bash set -ex APP="Fire Sale" electron-packager . \ 1 "$APP" \ --asar \ --overwrite \ --platform=mas \ 2 --app-bundle-id=net.stevekinney.firesale \ --app-version="$npm_package_version" \ --build-version="1.0.0" \ --arch=x64 \ --icon=./icons/Icon.icns \ --out=build \ --extend-info=scripts/mas/info.plist 3 APP_PATH="./build/$APP-mas-x64/$APP.app" 4 RESULT_PATH="./build/$APP.pkg" 5 APP_KEY="3rd Party Mac Developer Application:
We can include additional metadata in our property list that falls squarely under the category of “nice to have.” Apple includes an exhaustive list of all of the options in their official documentation (http://mng.bz/2TDO), so I won’t cover all of them here.
<key>NSHumanReadableCopyright</key> <string>2017 Steve Kinney</string> <key>LSApplicationCategoryType</key> <string> public.app-category.developer-tools</string> <key>LSApplicationSecondaryCategoryType</key> <string public.app-category.productivity</string>
In the previous listing, we include metadata for the Mac App Store categories in which the application should be listed as well as some generic copyright information. You can find a full list of the available categories in Apple’s official documentation (http://mng.bz/65Eg).
Fire Sale is an application that works with Markdown applications. In development, it was not listed as an application that could handle opening Markdown files. In addition, we could not drag a Markdown file onto the application icon in the dock. This limitation is because although we know that Fire Sale was built to work with Markdown files, macOS was not. To add support for a given file type—in this case, Markdown files—we add this code to ./scripts/mas/info.plist. The result is shown in figure 16.14.
<key>CFBundleDocumentTypes</key> <array> <dict> <key>CFBundleTypeExtensions</key> 1 <array> <string>markdown</string> <string>mdown</string> <string>md</string> </array> <key>CFBundleTypeRole</key> 2 <string>Editor</string> <key>LSHandlerRank</key> 3 <string>Alternate</string> </dict> </array>
The CFBundleDocumentTypes contains an array of items that define the types of files that this application should be able to open. Fire Sale works only with Markdown files (and text files, technically), but an application like Atom, which works with a wide variety of file types, has a much longer list, which can be seen in its open source repository (http://mng.bz/zQ4B).
Each item in the CFBundleDocumentTypes dictionary contains a CFBundleType-Extensions array, which lists the file types that the application should support. In addition, the CFBundleTypeRole key defines the application’s relationship to the file type. Fire Sale edits Markdown files, so it makes sense that we’ve listed it as an editor. The available options are Editor, Viewer, Shell, and none.
Many applications can open a file type like Markdown. The LSHandlerRank attribute lets you decide what level of priority the operating system should provide for your application when the user double-clicks a file. Owner should be selected if the application creates a given file type. This is a good choice for a proprietary file type that can be opened only by a particular application. Default should be selected if the application is a good candidate for being the default application. Fire Sale is a great application, but it’s likely that the user would prefer that—in general—the user would like Atom or Visual Studio Code to open upon double-clicking. This is why I chose Alternate.
You can define a number of other keys as well. For example, you could define the CFBundleTypeIconFile if you want all Markdown files to have a special icon that associates them with Fire Sale. A full list of the available options can be found in Apple’s official documentation (http://mng.bz/4DTL).
Your application has been packaged and signed. Its entitlements have been defined. It is all ready to be uploaded to the Mac App Store. The next step, of course, is to upload the package to the store itself. You can do this using Xcode.
To get started, open Xcode and navigate to the Xcode application menu. Under Open Developer Tool, you find Application Loader, shown in figure 16.15. This is the helper application that uploads your Electron application.
After Application Loader opens, click Deliver Your App. As shown in figure 16.16, you are prompted to select the package that you want to upload—in this case, Fire Sale.pkg, located in ./build.
After you’ve chosen the package to upload, you can review its metadata, as shown in figure 16.17. If everything looks good, click Next to begin the upload process. It shouldn’t take very long, but this is based—of course—on your connection speed and the size of the application package.
Apple wants to ensure the best possible experience for users. As a result, you must provide screenshots, descriptions, a link to a page where users can get help, and more. If you fail to do any of these, Apple will more than likely reject the application and ask you again to provide this information. I’m not going to go in depth in this book about adding screenshots, a home page, and documentation because it is both relatively straightforward as well as likely to change by the time the—possibly digital—ink dries on this page.
Fire Sale is an only slightly clever play on price markdowns—because it’s a Markdown editor after all. Clipmaster 9000 is a simple UI for the Clipmaster application.
const { app, BrowserWindow, dialog } = require('electron');
const fs = require('fs');
const windows = new Set();
const openFiles = new Map();
app.on('ready', () => {
createWindow();
});
app.on('window-all-closed', () => {
if (process.platform === 'darwin') {
return false;
}
});
app.on('activate', (event, hasVisibleWindows) => {
if (!hasVisibleWindows) { createWindow(); }
});
const createWindow = exports.createWindow = () => {
let x, y;
const currentWindow = BrowserWindow.getFocusedWindow();
if (currentWindow) {
const [ currentWindowX, currentWindowY ] = currentWindow.getPosition();
x = currentWindowX + 10;
y = currentWindowY + 10;
}
let newWindow = new BrowserWindow({ x, y, show: false });
newWindow.loadURL(`file://${__dirname}/index.html`);
newWindow.once('ready-to-show', () => {
newWindow.show();
});
newWindow.on('close', (event) => {
if (newWindow.isDocumentEdited()) {
event.preventDefault();
const result = dialog.showMessageBox(newWindow, {
type: 'warning',
title: 'Quit with Unsaved Changes?',
message: 'Your changes will be lost permanently if you do not save.',
buttons: [
'Quit Anyway',
'Cancel',
],
cancelId: 1,
defaultId: 0
});
if (result === 0) newWindow.destroy();
}
});
newWindow.on('closed', () => {
windows.delete(newWindow);
stopWatchingFile(newWindow);
newWindow = null;
});
windows.add(newWindow);
return newWindow;
};
const getFileFromUser = exports.getFileFromUser = (targetWindow) => {
const files = dialog.showOpenDialog(targetWindow, {
properties: ['openFile'],
filters: [
{ name: 'Text Files', extensions: ['txt'] },
{ name: 'Markdown Files', extensions: ['md', 'markdown'] }
]
});
if (files) { openFile(targetWindow, files[0]); }
};
const openFile = exports.openFile = (targetWindow, file) => {
const content = fs.readFileSync(file).toString();
app.addRecentDocument(file);
targetWindow.setRepresentedFilename(file);
targetWindow.webContents.send('file-opened', file, content);
startWatchingFile(targetWindow, file);
};
const saveMarkdown = exports.saveMarkdown = (targetWindow, file, content) =>
{
if (!file) {
file = dialog.showSaveDialog(targetWindow, {
title: 'Save Markdown',
defaultPath: app.getPath('documents'),
filters: [
{ name: 'Markdown Files', extensions: ['md', 'markdown'] }
]
});
}
if (!file) return;
fs.writeFileSync(file, content);
openFile(targetWindow, file);
};
const saveHtml = exports.saveHtml = (targetWindow, content) => {
const file = dialog.showSaveDialog(targetWindow, {
title: 'Save HTML',
defaultPath: app.getPath('documents'),
filters: [
{ name: 'HTML Files', extensions: ['html', 'htm'] }
]
});
if (!file) return;
fs.writeFileSync(file, content);
};
const startWatchingFile = (targetWindow, file) => {
stopWatchingFile(targetWindow);
const watcher = fs.watchFile(file, () => {
const content = fs.readFileSync(file);
targetWindow.webContents.send('file-changed', file, content);
});
openFiles.set(targetWindow, watcher);
};
const stopWatchingFile = (targetWindow) => {
if (openFiles.has(targetWindow)) {
openFiles.get(targetWindow).stop();
openFiles.delete(targetWindow);
}
};
const { remote, ipcRenderer } = require('electron');
const path = require('path');
const mainProcess = remote.require('./main.js');
const currentWindow = remote.getCurrentWindow();
const marked = require('marked');
const markdownView = document.querySelector('#markdown');
const htmlView = document.querySelector('#html');
const newFileButton = document.querySelector('#new-file');
const openFileButton = document.querySelector('#open-file');
const saveMarkdownButton = document.querySelector('#save-markdown');
const revertButton = document.querySelector('#revert');
const saveHtmlButton = document.querySelector('#save-html');
const showFileButton = document.querySelector('#show-file');
const openInDefaultButton = document.querySelector('#open-in-default');
let filePath = null;
let originalContent = '';
const isDifferentContent = (content) => content !== markdownView.value;
const renderMarkdownToHtml = (markdown) => {
htmlView.innerHTML = marked(markdown, { sanitize: true });
};
const renderFile = (file, content) => {
filePath = file;
originalContent = content;
markdownView.value = content;
renderMarkdownToHtml(content);
updateUserInterface(false);
};
const updateUserInterface = (isEdited) => {
let title = 'Fire Sale';
if (filePath) { title = `${path.basename(filePath)} - ${title}`; }
if (isEdited) { title = `${title} (Edited)`; }
currentWindow.setTitle(title);
currentWindow.setDocumentEdited(isEdited);
saveMarkdownButton.disabled = !isEdited;
revertButton.disabled = !isEdited;
};
markdownView.addEventListener('keyup', (event) => {
const currentContent = event.target.value;
renderMarkdownToHtml(currentContent);
updateUserInterface(currentContent !== originalContent);
});
newFileButton.addEventListener('click', () => {
mainProcess.createWindow();
});
openFileButton.addEventListener('click', () => {
mainProcess.getFileFromUser(currentWindow);
});
saveMarkdownButton.addEventListener('click', () => {
mainProcess.saveMarkdown(currentWindow, filePath, markdownView.value);
});
revertButton.addEventListener('click', () => {
markdownView.value = originalContent;
renderMarkdownToHtml(originalContent);
});
saveHtmlButton.addEventListener('click', () => {
mainProcess.saveHtml(currentWindow, htmlView.innerHTML);
});
ipcRenderer.on('file-opened', (event, file, content) => {
if (currentWindow.isDocumentEdited() && isDifferentContent(content)) {
const result = remote.dialog.showMessageBox(currentWindow, {
type: 'warning',
title: 'Overwrite Current Unsaved Changes?',
message: 'Opening a new file in this window will overwrite your unsaved
changes. Open this file anyway?',
buttons: [
'Yes',
'Cancel',
],
defaultId: 0,
cancelId: 1,
});
if (result === 1) { return; }
}
renderFile(file, content);
});
ipcRenderer.on('file-changed', (event, file, content) => {
if (isDifferentContent(content)) return;
const result = remote.dialog.showMessageBox(currentWindow, {
type: 'warning',
title: 'Overwrite Current Unsaved Changes?',
message: 'Another application has changed this file. Load changes?',
buttons: [
'Yes',
'Cancel',
],
defaultId: 0,
cancelId: 1
});
renderFile(file, content);
});
/* Implement Drag and Drop */
document.addEventListener('dragstart', event => event.preventDefault());
document.addEventListener('dragover', event => event.preventDefault());
document.addEventListener('dragleave', event => event.preventDefault());
document.addEventListener('drop', event => event.preventDefault());
const getDraggedFile = (event) => event.dataTransfer.items[0];
const getDroppedFile = (event) => event.dataTransfer.files[0];
const fileTypeIsSupported = (file) => {
return ['text/plain', 'text/markdown'].includes(file.type);
};
markdownView.addEventListener('dragover', (event) => {
const file = getDraggedFile(event);
if (fileTypeIsSupported(file)) {
markdownView.classList.add('drag-over');
} else {
markdownView.classList.add('drag-error');
}
});
markdownView.addEventListener('dragleave', () => {
markdownView.classList.remove('drag-over');
markdownView.classList.remove('drag-error');
});
markdownView.addEventListener('drop', (event) => {
const file = getDroppedFile(event);
if (fileTypeIsSupported(file)) {
mainProcess.openFile(currentWindow, file.path);
} else {
alert('That file type is not supported');
}
markdownView.classList.remove('drag-over');
markdownView.classList.remove('drag-error');
});
const { app, dialog, Menu } = require('electron');
const mainProcess = require('./main');
const template = [
{
label: 'File',
submenu: [
{
label: 'New File',
accelerator: 'CommandOrControl+N',
click() {
mainProcess.createWindow();
}
},
{
label: 'Open File',
accelerator: 'CommandOrControl+O',
click(item, focusedWindow) {
if (focusedWindow) {
return mainProcess.getFileFromUser(focusedWindow);
}
const newWindow = mainProcess.createWindow();
newWindow.on('show', () => {
mainProcess.getFileFromUser(newWindow);
});
},
},
{
label: 'Save File',
accelerator: 'CommandOrControl+S',
click(item, focusedWindow) {
if (!focusedWindow) {
return dialog.showErrorBox(
'Cannot Save or Export',
'There is currently no active document to save or export.'
);
}
mainProcess.saveMarkdown(focusedWindow);
},
},
{
label: 'Export HTML',
accelerator: 'Shift+CommandOrControl+S',
click(item, focusedWindow) {
if (!focusedWindow) {
return dialog.showErrorBox(
'Cannot Save or Export',
'There is currently no active document to save or export.'
);
}
mainProcess.saveHtml(focusedWindow);
},
},
],
},
{
label: 'Edit',
submenu: [
{
label: 'Undo',
accelerator: 'CommandOrControl+Z',
role: 'undo',
},
{
label: 'Redo',
accelerator: 'Shift+CommandOrControl+Z',
role: 'redo',
},
{ type: 'separator' },
{
label: 'Cut',
accelerator: 'CommandOrControl+X',
role: 'cut',
},
{
label: 'Copy',
accelerator: 'CommandOrControl+C',
role: 'copy',
},
{
label: 'Paste',
accelerator: 'CommandOrControl+V',
role: 'paste',
},
{
label: 'Select All',
accelerator: 'CommandOrControl+A',
role: 'selectall',
},
],
},
{
label: 'Window',
submenu: [
{
label: 'Minimize',
accelerator: 'CommandOrControl+M',
role: 'minimize',
},
{
label: 'Close',
accelerator: 'CommandOrControl+W',
role: 'close',
},
],
},
{
label: 'Help',
role: 'help',
submenu: [
{
label: 'Visit Website',
click() { /* To be implemented */ }
},
{
label: 'Toggle Developer Tools',
click(item, focusedWindow) {
if (focusedWindow) focusedWindow.webContents.toggleDevTools();
}
}
],
}
];
if (process.platform === 'darwin') {
const name = 'Fire Sale';
template.unshift({
label: name,
submenu: [
{
label: `About ${name}`,
role: 'about',
},
{ type: 'separator' },
{
label: 'Services',
role: 'services',
submenu: [],
},
{ type: 'separator' },
{
label: `Hide ${name}`,
accelerator: 'Command+H',
role: 'hide',
},
{
label: 'Hide Others',
accelerator: 'Command+Alt+H',
role: 'hideothers',
},
{
label: 'Show All',
role: 'unhide',
},
{ type: 'separator' },
{
label: `Quit ${name}`,
accelerator: 'Command+Q',
click() { app.quit(); },
},
],
});
const windowMenu = template.find(item => item.label === 'Window');
windowMenu.submenu.push(
{ type: 'separator' },
{
label: 'Bring All to Front',
role: 'front',
}
);
}
module.exports = Menu.buildFromTemplate(template);
const { remote, ipcRenderer } = require('electron');
const { Menu } = remote;
const path = require('path');
const mainProcess = remote.require('./main.js');
const currentWindow = remote.getCurrentWindow();
const marked = require('marked');
const markdownView = document.querySelector('#markdown');
const htmlView = document.querySelector('#html');
const newFileButton = document.querySelector('#new-file');
const openFileButton = document.querySelector('#open-file');
const saveMarkdownButton = document.querySelector('#save-markdown');
const revertButton = document.querySelector('#revert');
const saveHtmlButton = document.querySelector('#save-html');
const showFileButton = document.querySelector('#show-file');
const openInDefaultButton = document.querySelector('#open-in-default');
let filePath = null;
let originalContent = '';
const isDifferentContent = (content) => content !== markdownView.value;
const renderMarkdownToHtml = (markdown) => {
htmlView.innerHTML = marked(markdown, { sanitize: true });
};
const renderFile = (file, content) => {
filePath = file;
originalContent = content;
markdownView.value = content;
renderMarkdownToHtml(content);
updateUserInterface(false);
};
const updateUserInterface = (isEdited) => {
let title = 'Fire Sale';
if (filePath) { title = `${path.basename(filePath)} - ${title}`; }
if (isEdited) { title = `${title} (Edited)`; }
currentWindow.setTitle(title);
currentWindow.setDocumentEdited(isEdited);
saveMarkdownButton.disabled = !isEdited;
revertButton.disabled = !isEdited;
};
markdownView.addEventListener('keyup', (event) => {
const currentContent = event.target.value;
renderMarkdownToHtml(currentContent);
updateUserInterface(currentContent !== originalContent);
});
newFileButton.addEventListener('click', () => {
mainProcess.createWindow();
});
openFileButton.addEventListener('click', () => {
mainProcess.getFileFromUser(currentWindow);
});
saveMarkdownButton.addEventListener('click', () => {
mainProcess.saveMarkdown(currentWindow, filePath, markdownView.value);
});
revertButton.addEventListener('click', () => {
markdownView.value = originalContent;
renderMarkdownToHtml(originalContent);
});
saveHtmlButton.addEventListener('click', () => {
mainProcess.saveHtml(currentWindow, htmlView.innerHTML);
});
ipcRenderer.on('file-opened', (event, file, content) => {
if (currentWindow.isDocumentEdited() && isDifferentContent(content)) {
const result = remote.dialog.showMessageBox(currentWindow, {
type: 'warning',
title: 'Overwrite Current Unsaved Changes?',
message: 'Opening a new file in this window will overwrite your unsaved changes. Open this file anyway?',
buttons: [
'Yes',
'Cancel',
],
defaultId: 0,
cancelId: 1,
});
if (result === 1) { return; }
}
renderFile(file, content);
});
ipcRenderer.on('file-changed', (event, file, content) => {
if (isDifferentContent(content)) return;
const result = remote.dialog.showMessageBox(currentWindow, {
type: 'warning',
title: 'Overwrite Current Unsaved Changes?',
message: 'Another application has changed this file. Load changes?',
buttons: [
'Yes',
'Cancel',
],
defaultId: 0,
cancelId: 1
});
renderFile(file, content);
});
/* Implement Drag and Drop */
document.addEventListener('dragstart', event => event.preventDefault());
document.addEventListener('dragover', event => event.preventDefault());
document.addEventListener('dragleave', event => event.preventDefault());
document.addEventListener('drop', event => event.preventDefault());
const getDraggedFile = (event) => event.dataTransfer.items[0];
const getDroppedFile = (event) => event.dataTransfer.files[0];
const fileTypeIsSupported = (file) => {
return ['text/plain', 'text/markdown'].includes(file.type);
};
markdownView.addEventListener('dragover', (event) => {
const file = getDraggedFile(event);
if (fileTypeIsSupported(file)) {
markdownView.classList.add('drag-over');
} else {
markdownView.classList.add('drag-error');
}
});
markdownView.addEventListener('dragleave', () => {
markdownView.classList.remove('drag-over');
markdownView.classList.remove('drag-error');
});
markdownView.addEventListener('drop', (event) => {
const file = getDroppedFile(event);
if (fileTypeIsSupported(file)) {
mainProcess.openFile(currentWindow, file.path);
} else {
alert('That file type is not supported');
}
markdownView.classList.remove('drag-over');
markdownView.classList.remove('drag-error');
});
ipcRenderer.on('save-markdown', () => {
mainProcess.saveMarkdown(currentWindow, filePath, markdownView.value);
});
ipcRenderer.on('save-html', () => {
mainProcess.saveHtml(currentWindow, htmlView.innerHTML);
});
const markdownContextMenu = Menu.buildFromTemplate([
{ label: 'Open File', click() { mainProcess.getFileFromUser(); } },
{ type: 'separator' },
{ label: 'Cut', role: 'cut' },
{ label: 'Copy', role: 'copy' },
{ label: 'Paste', role: 'paste' },
{ label: 'Select All', role: 'selectall' },
]);
markdownView.addEventListener('contextmenu', (event) => {
event.preventDefault();
markdownContextMenu.popup();
});
const { remote, ipcRenderer, shell } = require('electron');
const { Menu } = remote;
const path = require('path');
const mainProcess = remote.require('./main.js');
const currentWindow = remote.getCurrentWindow();
const marked = require('marked');
const markdownView = document.querySelector('#markdown');
const htmlView = document.querySelector('#html');
const newFileButton = document.querySelector('#new-file');
const openFileButton = document.querySelector('#open-file');
const saveMarkdownButton = document.querySelector('#save-markdown');
const revertButton = document.querySelector('#revert');
const saveHtmlButton = document.querySelector('#save-html');
const showFileButton = document.querySelector('#show-file');
const openInDefaultButton = document.querySelector('#open-in-default');
let filePath = null;
let originalContent = '';
const isDifferentContent = (content) => content !== markdownView.value;
const renderMarkdownToHtml = (markdown) => {
htmlView.innerHTML = marked(markdown, { sanitize: true });
};
const renderFile = (file, content) => {
filePath = file;
originalContent = content;
markdownView.value = content;
renderMarkdownToHtml(content);
showFileButton.disabled = false;
openInDefaultButton.disabled = false;
updateUserInterface(false);
};
const updateUserInterface = (isEdited) => {
let title = 'Fire Sale';
if (filePath) { title = `${path.basename(filePath)} - ${title}`; }
if (isEdited) { title = `${title} (Edited)`; }
currentWindow.setTitle(title);
currentWindow.setDocumentEdited(isEdited);
saveMarkdownButton.disabled = !isEdited;
revertButton.disabled = !isEdited;
};
markdownView.addEventListener('keyup', (event) => {
const currentContent = event.target.value;
renderMarkdownToHtml(currentContent);
updateUserInterface(currentContent !== originalContent);
});
newFileButton.addEventListener('click', () => {
mainProcess.createWindow();
});
openFileButton.addEventListener('click', () => {
mainProcess.getFileFromUser(currentWindow);
});
saveMarkdownButton.addEventListener('click', () => {
mainProcess.saveMarkdown(currentWindow, filePath, markdownView.value);
});
revertButton.addEventListener('click', () => {
markdownView.value = originalContent;
renderMarkdownToHtml(originalContent);
});
saveHtmlButton.addEventListener('click', () => {
mainProcess.saveHtml(currentWindow, htmlView.innerHTML);
});
const showFile = () => {
if (!filePath) { return alert('This file has not been saved to the file
system.'); }
shell.showItemInFolder(filePath);
};
const openInDefaultApplication = () => {
if (!filePath) { return alert('This file has not been saved to the file
system.'); }
shell.openItem(filePath);
};
showFileButton.addEventListener('click', showFile);
openInDefaultButton.addEventListener('click', openInDefaultApplication);
ipcRenderer.on('show-file', showFile);
ipcRenderer.on('open-in-default', openInDefaultApplication);
ipcRenderer.on('file-opened', (event, file, content) => {
if (currentWindow.isDocumentEdited() && isDifferentContent(content)) {
const result = remote.dialog.showMessageBox(currentWindow, {
type: 'warning',
title: 'Overwrite Current Unsaved Changes?',
message: 'Opening a new file in this window will overwrite your unsaved
changes. Open this file anyway?',
buttons: [
'Yes',
'Cancel',
],
defaultId: 0,
cancelId: 1,
});
if (result === 1) { return; }
}
renderFile(file, content);
});
ipcRenderer.on('file-changed', (event, file, content) => {
if (isDifferentContent(content)) return;
const result = remote.dialog.showMessageBox(currentWindow, {
type: 'warning',
title: 'Overwrite Current Unsaved Changes?',
message: 'Another application has changed this file. Load changes?',
buttons: [
'Yes',
'Cancel',
],
defaultId: 0,
cancelId: 1
});
renderFile(file, content);
});
/* Implement Drag and Drop */
document.addEventListener('dragstart', event => event.preventDefault());
document.addEventListener('dragover', event => event.preventDefault());
document.addEventListener('dragleave', event => event.preventDefault());
document.addEventListener('drop', event => event.preventDefault());
const getDraggedFile = (event) => event.dataTransfer.items[0];
const getDroppedFile = (event) => event.dataTransfer.files[0];
const fileTypeIsSupported = (file) => {
return ['text/plain', 'text/markdown'].includes(file.type);
};
markdownView.addEventListener('dragover', (event) => {
const file = getDraggedFile(event);
if (fileTypeIsSupported(file)) {
markdownView.classList.add('drag-over');
} else {
markdownView.classList.add('drag-error');
}
});
markdownView.addEventListener('dragleave', () => {
markdownView.classList.remove('drag-over');
markdownView.classList.remove('drag-error');
});
markdownView.addEventListener('drop', (event) => {
const file = getDroppedFile(event);
if (fileTypeIsSupported(file)) {
mainProcess.openFile(currentWindow, file.path);
} else {
alert('That file type is not supported');
}
markdownView.classList.remove('drag-over');
markdownView.classList.remove('drag-error');
});
const createContextMenu = () => {
return Menu.buildFromTemplate([
{ label: 'Open File', click() { mainProcess.getFileFromUser(); } },
{
label: 'Show File in Folder',
click: showFile,
enabled: !!filePath
},
{
label: 'Open in Default',
click: openInDefaultApplication,
enabled: !!filePath
},
{ type: 'separator' },
{ label: 'Cut', role: 'cut' },
{ label: 'Copy', role: 'copy' },
{ label: 'Paste', role: 'paste' },
{ label: 'Select All', role: 'selectall' },
]);
};
markdownView.addEventListener('contextmenu', (event) => {
event.preventDefault();
createContextMenu().popup();
});
ipcRenderer.on('save-markdown', () => {
mainProcess.saveMarkdown(currentWindow, filePath, markdownView.value);
});
ipcRenderer.on('save-html', () => {
mainProcess.saveHtml(currentWindow, filePath, markdownView.value);
});
const { app, BrowserWindow, dialog, Menu, shell } = require('electron');
const mainProcess = require('./main');
const createApplicationMenu = () => {
const hasOneOrMoreWindows = !!BrowserWindow.getAllWindows().length;
const focusedWindow = BrowserWindow.getFocusedWindow();
const hasFilePath = !!(focusedWindow &&
focusedWindow.getRepresentedFilename());
const template = [
{
label: 'File',
submenu: [
{
label: 'New File',
accelerator: 'CommandOrControl+N',
click() {
mainProcess.createWindow();
}
},
{
label: 'Open File',
accelerator: 'CommandOrControl+O',
click(item, focusedWindow) {
if (focusedWindow) {
return mainProcess.getFileFromUser(focusedWindow);
}
const newWindow = mainProcess.createWindow();
newWindow.on('show', () => {
mainProcess.getFileFromUser(newWindow);
});
},
},
{
label: 'Save File',
accelerator: 'CommandOrControl+S',
enabled: hasOneOrMoreWindows,
click(item, focusedWindow) {
if (!focusedWindow) {
return dialog.showErrorBox(
'Cannot Save or Export',
'There is currently no active document to save or export.'
);
}
mainProcess.saveMarkdown(focusedWindow);
},
},
{
label: 'Export HTML',
accelerator: 'Shift+CommandOrControl+S',
enabled: hasOneOrMoreWindows,
click(item, focusedWindow) {
if (!focusedWindow) {
return dialog.showErrorBox(
'Cannot Save or Export',
'There is currently no active document to save or export.'
);
}
mainProcess.saveHtml(focusedWindow);
},
},
{ type: 'separator' },
{
label: 'Show File',
enabled: hasFilePath,
click(item, focusedWindow) {
if (!focusedWindow) {
return dialog.showErrorBox(
'Cannot Show File\'s Location',
'There is currently no active document show.'
);
}
focusedWindow.webContents.send('show-file');
},
},
{
label: 'Open in Default Application',
enabled: hasFilePath,
click(item, focusedWindow) {
if (!focusedWindow) {
return dialog.showErrorBox(
'Cannot Open File in Default Application',
'There is currently no active document to open.'
);
}
focusedWindow.webContents.send('open-in-default');
},
},
],
},
{
label: 'Edit',
submenu: [
{
label: 'Undo',
accelerator: 'CommandOrControl+Z',
role: 'undo',
},
{
label: 'Redo',
accelerator: 'Shift+CommandOrControl+Z',
role: 'redo',
},
{ type: 'separator' },
{
label: 'Cut',
accelerator: 'CommandOrControl+X',
role: 'cut',
},
{
label: 'Copy',
accelerator: 'CommandOrControl+C',
role: 'copy',
},
{
label: 'Paste',
accelerator: 'CommandOrControl+V',
role: 'paste',
},
{
label: 'Select All',
accelerator: 'CommandOrControl+A',
role: 'selectall',
},
],
},
{
label: 'Window',
submenu: [
{
label: 'Minimize',
accelerator: 'CommandOrControl+M',
role: 'minimize',
},
{
label: 'Close',
accelerator: 'CommandOrControl+W',
role: 'close',
},
],
},
{
label: 'Help',
role: 'help',
submenu: [
{
label: 'Visit Website',
click() { /* To be implemented */ }
},
{
label: 'Toggle Developer Tools',
click(item, focusedWindow) {
if (focusedWindow) focusedWindow.webContents.toggleDevTools();
}
}
],
}
];
if (process.platform === 'darwin') {
const name = 'Fire Sale';
template.unshift({
label: name,
submenu: [
{
label: `About ${name}`,
role: 'about',
},
{ type: 'separator' },
{
label: 'Services',
role: 'services',
submenu: [],
},
{ type: 'separator' },
{
label: `Hide ${name}`,
accelerator: 'Command+H',
role: 'hide',
},
{
label: 'Hide Others',
accelerator: 'Command+Alt+H',
role: 'hideothers',
},
{
label: 'Show All',
role: 'unhide',
},
{ type: 'separator' },
{
label: `Quit ${name}`,
accelerator: 'Command+Q',
click() { app.quit(); },
},
],
});
const windowMenu = template.find(item => item.label === 'Window');
windowMenu.submenu.push(
{ type: 'separator' },
{
label: 'Bring All to Front',
role: 'front',
}
);
}
return Menu.setApplicationMenu(Menu.buildFromTemplate(template));
};
module.exports = createApplicationMenu;
const { app, BrowserWindow, dialog, Menu } = require('electron');
const createApplicationMenu = require('./application-menu');
const fs = require('fs');
const windows = new Set();
const openFiles = new Map();
app.on('ready', () => {
createApplicationMenu();
createWindow();
});
app.on('window-all-closed', () => {
if (process.platform === 'darwin') {
return false;
}
});
app.on('activate', (event, hasVisibleWindows) => {
if (!hasVisibleWindows) { createWindow(); }
});
const createWindow = exports.createWindow = () => {
let x, y;
const currentWindow = BrowserWindow.getFocusedWindow();
if (currentWindow) {
const [ currentWindowX, currentWindowY ] = currentWindow.getPosition();
x = currentWindowX + 10;
y = currentWindowY + 10;
}
let newWindow = new BrowserWindow({ x, y, show: false });
newWindow.loadURL(`file://${__dirname}/index.html`);
newWindow.once('ready-to-show', () => {
newWindow.show();
});
newWindow.on('focus', createApplicationMenu);
newWindow.on('close', (event) => {
if (newWindow.isDocumentEdited()) {
event.preventDefault();
const result = dialog.showMessageBox(newWindow, {
type: 'warning',
title: 'Quit with Unsaved Changes?',
message: 'Your changes will be lost permanently if you do not save.',
buttons: [
'Quit Anyway',
'Cancel',
],
cancelId: 1,
defaultId: 0
});
if (result === 0) newWindow.destroy();
}
});
newWindow.on('closed', () => {
windows.delete(newWindow);
createApplicationMenu();
newWindow = null;
});
windows.add(newWindow);
return newWindow;
};
const getFileFromUser = exports.getFileFromUser = (targetWindow) => {
const files = dialog.showOpenDialog(targetWindow, {
properties: ['openFile'],
filters: [
{ name: 'Text Files', extensions: ['txt'] },
{ name: 'Markdown Files', extensions: ['md', 'markdown'] }
]
});
if (files) { openFile(targetWindow, files[0]); }
};
const openFile = exports.openFile = (targetWindow, file) => {
const content = fs.readFileSync(file).toString();
startWatchingFile(targetWindow, file);
app.addRecentDocument(file);
targetWindow.setRepresentedFilename(file);
targetWindow.webContents.send('file-opened', file, content);
createApplicationMenu();
};
const saveMarkdown = exports.saveMarkdown = (targetWindow, file, content) =>
{
if (!file) {
file = dialog.showSaveDialog(targetWindow, {
title: 'Save Markdown',
defaultPath: app.getPath('documents'),
filters: [
{ name: 'Markdown Files', extensions: ['md', 'markdown'] }
]
});
}
if (!file) return;
fs.writeFileSync(file, content);
openFile(targetWindow, file);
};
const saveHtml = exports.saveHtml = (targetWindow, content) => {
const file = dialog.showSaveDialog(targetWindow, {
title: 'Save HTML',
defaultPath: app.getPath('documents'),
filters: [
{ name: 'HTML Files', extensions: ['html', 'htm'] }
]
});
if (!file) return;
fs.writeFileSync(file, content);
};
const startWatchingFile = (targetWindow, file) => {
stopWatchingFile(targetWindow);
const watcher = fs.watchFile(file, () => {
const content = fs.readFileSync(file);
targetWindow.webContents.send('file-changed', file, content);
});
openFiles.set(targetWindow, watcher);
};
const stopWatchingFile = (targetWindow) => {
if (openFiles.has(targetWindow)) {
openFiles.get(targetWindow).stop();
openFiles.delete(targetWindow);
}
};
const Menubar = require('menubar');
const { globalShortcut, Menu } = require('electron');
const menubar = Menubar({
preloadWindow: true,
index: `file://${__dirname}/index.html`,
});
menubar.on('ready', () => {
const secondaryMenu = Menu.buildFromTemplate([
{
label: 'Quit',
click() { menubar.app.quit(); },
accelerator: 'CommandOrControl+Q'
},
]);
menubar.tray.on('right-click', () => {
menubar.tray.popUpContextMenu(secondaryMenu);
});
const createClipping = globalShortcut.register('CommandOrControl+!', () =>
{
menubar.window.webContents.send('create-new-clipping');
});
const writeClipping = globalShortcut.register('CmdOrCtrl+Alt+@', () => {
menubar.window.webContents.send('write-to-clipboard');
});
const publishClipping = globalShortcut.register('CmdOrCtrl+Alt+#', () => {
menubar.window.webContents.send('publish-clipping');
});
if (!createClipping) { console.error('Registration failed',
'createClipping'); }
if (!writeClipping) { console.error('Registration failed',
'writeClipping'); }
if (!publishClipping) { console.error('Registration failed',
'publishClipping'); }
});
const { clipboard, ipcRenderer, shell } = require('electron');
const request = require('request').defaults({
url: 'https://cliphub.glitch.me/clippings',
headers: { 'User-Agent': 'Clipmaster 9000' },
json: true,
});
const clippingsList = document.getElementById('clippings-list');
const copyFromClipboardButton = document.getElementById('copy-from-clipboard');
ipcRenderer.on('create-new-clipping', () => {
addClippingToList();
new Notification('Clipping Added', {
body: `${clipboard.readText()}`
});
});
ipcRenderer.on('write-to-clipboard', () => {
const clipping = clippingsList.firstChild;
writeToClipboard(getClippingText(clipping));
new Notification('Clipping Copied', {
body: `${clipboard.readText()}`
});
});
ipcRenderer.on('publish-clipping', () => {
const clipping = clippingsList.firstChild;
publishClipping(getClippingText(clipping));
});
const createClippingElement = (clippingText) => {
const clippingElement = document.createElement('article');
clippingElement.classList.add('clippings-list-item');
clippingElement.innerHTML = `
<div class="clipping-text" disabled="true"></div>
<div class="clipping-controls">
<button class="copy-clipping">→ Clipboard</button>
<button class="publish-clipping">Publish</button>
<button class="remove-clipping">Remove</button>
</div>
`;
clippingElement.querySelector('.clipping-text').innerText = clippingText;
return clippingElement;
};
const addClippingToList = () => {
const clippingText = clipboard.readText();
const clippingElement = createClippingElement(clippingText);
clippingsList.prepend(clippingElement);
};
copyFromClipboardButton.addEventListener('click', addClippingToList);
clippingsList.addEventListener('click', (event) => {
const hasClass = className => event.target.classList.contains(className);
const clippingListItem = getButtonParent(event);
if (hasClass('remove-clipping')) removeClipping(clippingListItem);
if (hasClass('copy-clipping'))
writeToClipboard(getClippingText(clippingListItem));
if (hasClass('publish-clipping'))
publishClipping(getClippingText(clippingListItem));
});
const removeClipping = (target) => {
target.remove();
};
const writeToClipboard = (clippingText) => {
clipboard.writeText(clippingText);
};
const publishClipping = (clippingText) => {
request.post({ json: { clipping: clippingText } }, (err, response, body) =>
{
if (err) {
return new Notification('Error Publishing Your Clipping', {
body: JSON.parse(err).message
});
}
const gistUrl = body.url;
const notification = new Notification('Your Clipping Has Been Published',
{
body: `Click to open ${gistUrl} in your browser.`
});
notification.onclick = () => { shell.openExternal(gistUrl); };
clipboard.writeText(gistUrl);
});
};
const getButtonParent = ({ target }) => {
return target.parentNode.parentNode;
};
const getClippingText = (clippingListItem) => {
return clippingListItem.querySelector('.clipping-text').innerText;
};
[SYMBOL][A][B][C][D][E][F][G][H][I][J][K][L][M][N][O][P][Q][R][S][T][U][V][W][X][Y]
accelerator property
add( ) method
addClipping( ) function
addEventListener
addItem( ) method
APIs (application programming interfaces)
controlling with Spectron
for native operating systems
app.addRecentDocument( ) method
app.client.getWindowCount( ) method
app.client.waitUntilWindowLoaded( ) method
app.getPath( ) function
Application component
applications
bootstrapping
displaying browser windows
implementing UIs
building for deployment
importing Electron applications into Electron Forge
using asar
with Electron Forge
with Electron Packager
building for multiple operating systems
building with menubar library
adding clippings to UIs
adding secondary menus
displaying notifications
publishing clippings
registering global shortcuts
clippings in
preventing memory leaks using event delegation
removing
writing to clipboard
configuring names in Electron Packager
configuring versions in Electron Packager
creating with tray module
reading from clipboard and storing clippings
supporting dark mode in macOS
using correct icons for macOS and Windows
debugging
main processes
renderer processes
defining
distributing through Mac App Store
finishing touches
uploading applications
validating applications
foundations for
signing
for macOS
for Windows
overview of
starting with menubar
submitting to Mac App Store
adding applications to iTunes Connect
configuring application categories
packaging applications for Mac App Store
registering applications to open file type
registering applications with Mac App Store
testing with Spectron
overview of
setting up
setting up test runners
WebdriverIO
writing asynchronous tests
updating automatically
setting up automatic updates in Electron
setting up servers for automatic updates
updating icons in Electron Packager
applications menus
context menus vs
disabling menu items dynamically
enabling menu items dynamically
foundations for
shell module in
Array.prototype.push( ) function
Array.prototype.unshift( ) function
asar archive format
async keyword
asynchronous tests, writing using Spectron
controlling Electron APIs
testing DOM
testing Electron BrowserWindow APIs
traversing DOM
waiting for windows to load
automatic updates
setting up in Electron
setting up servers for
autoUpdater module, 2nd
autoUpdater.quitAndInstall( ) method
await keyword
babel-preset-env
base functionality
bookmark list applications, building
downloading Electron
installing Electron
package.json
structuring Electron applications
bootstrapping applications
displaying browser windows
implementing UIs
box-sizing property
Brave browser
Breakpad
brew install tree command
Browserify
browsers
displaying windows
vs menus, functionality in
BrowserWindow APIs
BrowserWindow module, 2nd
browserWindow.capturePage( ) method
BrowserWindow.getFocusedWindow( ) function
build command
buildFromTemplate( ) method
<button> element
certificateFile
certificatePassword
certificates
CFBundleDocumentTypes
CFBundleTypeExtensions
CFBundleTypeRole
Chrome Developer Tools
Chromium Content Module
click( ) method, 2nd
clipboard
reading from
handling edge cases
overview of
writing to, 2nd
Clipmaster clipboard manager
clippings
adding to UIs
preventing memory leaks using event delegation
publishing
removing
storing
writing to clipboard
code from renderer processes
codesign command-line interface tool
CommandOrControl shorthand
common paths
CommonJS require systems
Component class
configuring
application categories
application names in Electron Packager
application versions in Electron Packager
output directory in Electron Packager
connection property
content class
context menus
accessing shell module from
application menus vs
building
disabling menu items dynamically in
enabling menu items dynamically in
convertToElement function
crash reports
collecting
setting up crash reporter
setting up servers to receive
Crashpad
createClippingElement( ) function
createClippingMenuItem( ) function
createContextMenu( ) function
createWindow( ) function, 2nd, 3rd, 4th
cross-origin requests
dark mode in macOS
darken( ) function
data
getting from IndexedDB
storing in SQLite databases
adding items to databases
deleting items
fetching all items from databases
hooking databases into React
setting up SQLite and Knex.js
storing databases
updating items in databases
using right versions with electron-rebuild
writing to IndexedDB
databases
adding items to
connecting to UIs
fetching items from
hooking into React
storing
updating items in
debugging
applications
main processes
overview of
with Visual Studio Code
renderer processes
default menus
adding Help menus
defining menu item roles and keyboard shortcuts
Edit menus
implementing
missing
implementing Window menus
replacing
restoring application menus on macOS
default property
delete( ) method, 2nd
dependencies
deployment, building applications for
importing Electron applications into Electron Forge
using asar
with Electron Forge
with Electron Packager
describe( ) method
devDependencies
Developer Program Member Center, Apple
dialog module
dialog sheets in macOS
dialog.showErrorBox( ) function
dialog.showMessageBox( ) function
dialog.showOpenDialog( ) function
dirname variable
disabling menu items
dynamically in application menus
dynamically in context menus
discarding changes to files
DOM (Document Object Model)
testing with Spectron
traversing with Spectron
DOMParser
downloading Electron
drag and drop, opening files with
ignoring dropped files
opening dropped files
providing visual feedback
.drag-error class
.drag-over class
dragover phase
dropped files
ignoring
opening
ECMAScript classes
edge cases
handling
when window has never been shown
Edit menus
implementing
missing
Electron
advantages of
access to native operating system APIs
accessing Node from browser context
building on existing skill sets
enhanced privileges and looser restrictions
offline first
downloading
installing
NW.js vs
overview of
users of
electron command-line tool
Electron Forge
building applications with
importing Electron applications into
overview of
Electron Packager
building for multiple operating systems
configuring application name and version
configuring output directory
setting up
updating application icons
electron-compile, 2nd
electronPackagerConfig
electron-positioner library
electron-prebuilt package
electron-rebuild, 2nd
electron.remote.getCurrentWindow( ) method
enableLiveReload( ) method
enabling menu items dynamically
dynamically in context menus
in application menus
error handling
event delegation
exceptions, uncaught
exporting rendered HTML output
Fetch API
fetch variable
FFmpeg library
file structure
filePath variable, 2nd, 3rd
files
keeping track of current file
determining whether current file has changed
enabling Save and Revert buttons in UI
updating represented file on macOS
updating window titles based on current file
opening with drag and drop
ignoring dropped files
opening dropped files
providing visual feedback
promptings user before discarding changes to
reading using Node
implementing dialog sheets in macOS
scoping Open File dialogs
recently opened, tracking
requiring in renderer processes
reverting
saving
common paths
exporting rendered HTML output
from renderer process
saving current files
sending contents to renderer contents
watching for changes in
fileTypeIsSupported( ) function
firesale-darwin-x64 directory
frameworks
adding new items
building UIs in React
Application component
displaying lists of items
electron-compile, overview of
foundation for applications
hot module reloading
live reload
fs.readFileSync( ) function
functionality
adding application-specific menu functionality
implementing base functionality
in application menus vs context menus
in menus vs browsers
requiring from another process
getAll( ) method
getButtonParent( ) function
getDraggedFile( ) function
getDroppedFile( ) function
getFileFromUser( ) function, 2nd, 3rd, 4th
getIcon( ) function
getLinks function
getMainProcessLogs( ) method
getPath( ) method
getRenderProcessLogs( ) method
getSelectedText( ) method
getText( ) method
getWindow( ) method
getWindowCount( ) method
global shortcuts
registering, 2nd
checking registrations
solving for edge case when window has never been shown
unregistering
globalShortcut module, 2nd
globalShortcut.isRegistered( ) function
globalShortcut.unregister( ) function
globalShortcut.unregisterAll( ) method
handleChange( ) method
handleError( ) function
handleSubmit( ) method
hasClass( ) method
Help menus
hot module reloading
href attribute
#html element
icons
for applications, updating in Electron Packager
for macOS
for menu bars
for Windows OS
IDE (integrated development environment)
import( ) function
importing to Electron Forge
IndexedDB
connecting databases to UIs
creating stores with
getting data from
writing data to
innerHTML
innerText
insert( ) method
installing Electron
integrated development environment (IDE)
interprocess communication, 2nd
CommonJS require systems
overview of
remote modules
requiring functionality from another process
sending content from main processes to renderer processes
IPC (interprocess communication)
ipcRenderer module, 2nd
isDarkMode( ) method
isDevToolsOpened( ) method
items
adding
overview of
to databases
deleting
displaying lists of
fetching from databases
updating in databases
ITunes Connect
keyboard shortcuts
Keychain Access
Knex.js query builder
<label> tag
LevelUI library
lighten( ) function
lists of items, displaying
live reload
localStorage
LSHandlerRank attribute
Mac App Store
distributing applications through
finishing touches
uploading applications
validating applications
submitting applications to
adding applications to iTunes Connect
configuring application categories
packaging applications for Mac App Store
registering applications to open file type
registering applications with Mac App Store
signing applications
macOS (operating system)
implementing dialog sheets in
integrating multiple windows with
restoring application menus on
signing applications for
supporting dark mode in
switching menu bar icons when pressed in
updating represented file on
using correct icons for
main processes
debugging
overview of
with Visual Studio Code
multiple windows and, communication between
overview of, 2nd
passing reference to current window to
sending content to renderer processes from
mainWindow, 2nd
mainWindow.webContents.loadURL( ) method
mainWindow.webContents.openDevTools( ) method
mainWindow.webContents.send( ) method
map( ) method
maps
markAllAsPacked( ) method
markAllAsUnpacked( ) method
markAsPacked( ) method, 2nd
memory leaks
menu bar icons
menubar library, building applications with
adding clippings to UIs
adding secondary menus
clippings in applications
displaying notifications
publishing clippings
registering global shortcuts
starting applications with menubars
Menubar( ) function
Menu.buildFromTemplate( ) function, 2nd, 3rd
menus
adding application-specific menu functionality
disabling menu items
in application menus
in context menus
enabling menu items
in application menus
in context menus
functionality in
context menus vs application menus
vs browsers
secondary menus
shell module in application menus
minidump_stackwalk command-line tool
moveToObject( ) method
multiple windows
communicating between main processes and
creating
improving user experience of creating new windows
integrating with macOS
managing
communicating between main processes and multiple windows
passing reference to current window to main processes
multiselections flag
native file dialog boxes, 2nd
CommonJS require systems
overview of
reading files using Node
implementing dialog sheets in macOS
scoping Open File dialogs
triggering
native module
Node.js runtime
accessing from browser context
native modules
IndexedDB
storing data in SQLite databases
overview of
reading files
implementing dialog sheets in macOS
scoping Open File dialogs
node_modules directory, 2nd
notes applications
bootstrapping
displaying browser windows
implementing UIs
debugging
main processes
renderer processes
defining
file structure of
implementing base functionality
notifications, displaying
overview of
solving for edge case when window has never been shown
npm init command, 2nd
npm start command
NW.js framework
onChange( ) function
onCheckoff( ) function
onClick function
onDelete property
onSubmit prop
Open File dialogs
open file type
Open in Default Application button
openDevTools( ) method
openDirectory flag
open-file event
openFile( ) function, 2nd, 3rd, 4th
original-fs module
output directory
package.json
packaging applications for Mac App Store
parsing responses
path.basename( ) method
persisting user data
IndexedDB
storing data in SQLite databases
popup( ) method, 2nd
privileges
process module
process.crash( ) method
processes, requiring functionality from another
productName set
properties property
publishClipping( ) function
publishing clippings
put( ) method
querySelector( ) method
Quit command
React library
building UIs in
Application component
displaying lists of items
hooking databases into
react preset
reading from clipboard
handling edge cases
overview of
readText( ) method
ready event, 2nd
register( ) method
registering
applications
to open file type
with Mac App Store
global shortcuts
checking registrations
overview of
solving for edge case when window has never been shown
remote modules
remote.getCurrentWindow( ) function
remote.require function
remove( ) method
removeClipping( ) function
render( ) method
renderApplication( ) function
renderer contents
renderer processes
adding styles in
creating
debugging
loading code from
requiring files in
saving files from
sending content from main processes to
shell module from UI in
renderFile( ) function
renderLinks( ) function
replacing default menu
request.post( ) method
requests
cross-origin requests
displaying results
require systems in CommonJS
require( ) function
responses
parsing
storing with web storage APIs
response.text( ) method
restrictions
Revert buttons
reverting files
sandboxing
sanitize property
Save buttons
save flag
saveHtml( ) function
saving files
common paths
exporting rendered HTML output
from renderer process
scoping Open File dialogs
<script> tags
secondary menus
select( ) method
Selenium WebDriver
servers, setting up
for automatic updates
to receive crash reports
setDocumentEdited( ) method
setPressedImage( ) method
setRepresentedFilename( ) method
setTitle( ) function
shell module, 2nd
shell modules
accessing from context menus
functionality in application menus vs context menus
functionality in menus vs browsers
features of
from UI in renderer processes
in application menus
Show File button
showOpenDialog( ) method
showOpenFile( ) function
showSaveFileDialog( ) function
signing applications
for macOS
for Windows
overview of
Spectron framework
controlling APIs with
overview of
setting up
testing applications with
setting up test runners
WebdriverIO
writing asynchronous tests
testing DOM with
testing Electron BrowserWindow APIs
traversing DOM with
waiting for windows to load
SQLite databases
setting up
storing data in
adding items to databases
deleting items
fetching all items from databases
hooking databases into React
setting up SQLite and Knex.js
storing databases
updating items in databases
using right versions with electron-rebuild
sqlite3 modules
squirrel events
Squirrel.Windows framework
src attribute
startWatchingFile( ) function, 2nd
stopWatchingFile( ) function
storeLink function
stores with IndexedDB
storing
data in SQLite databases
adding items to databases
deleting items
fetching all items from databases
hooking databases into React
setting up SQLite and Knex.js
storing databases
updating items in databases
using right versions with electron-rebuild
databases
responses with web storage APIs
styles in renderer processes
systemPreferences module
target property
test runners
testing
applications with Spectron
overview of
setting up
setting up test runners
WebdriverIO
writing asynchronous tests
DOM with Spectron
Electron BrowserWindow APIs
then( ) method
third-party dependencies
this.addItem( ) method
this.deleteItem( ) method
this.deleteUnpackedItems( ) method
this.fetchItems( ) method
this.markAsPacked( ) method
titles of windows, updating
tracking recently opened files
transpilation, 2nd
transpilers
adding new items
building UIs in React
Application component
displaying lists of items
electron-compile
foundation for applications
hot module reloading
live reload
tray module
Clipmaster
completed code for
creating applications with
reading from clipboard and storing clippings
supporting dark mode in macOS
using correct icons for macOS and Windows
displaying notifications
reading from clipboard
registering global shortcuts
switching menu bar icons when pressed in macOS
unregistering global shortcuts
writing to clipboard
handling edge cases
tree command
triggering native file dialog boxes
troubleshooting
UIs (user interfaces)
adding clippings to
building in React
Application component
displaying lists of items
connecting databases to
cross-origin requests
displaying request results
enabling Revert buttons in
enabling Save buttons in
error handling
implementing
parsing responses
shell module from
storing responses with web storage APIs
troubleshooting
uncaught exceptions
unregistering global shortcuts
update( ) method
updateMenu( ) function
updates-available event
updateUserInterface( ) method
updateWindowTitle( ) method
updating
application icons in Electron Packager
applications automatically
setting up automatic updates in Electron
setting up servers for automatic updates
items in databases
represented file on macOS
windows titles based on current file
uploading applications
url property
url variable
useNullAsDefault option
user data, persisting
IndexedDB
storing data in SQLite databases
validating applications
visual feedback
Visual Studio Code IDE
waitUntilTextExists( ) method
waituUntilWindowLoaded( ) method
web storage APIs
webContents property, 2nd, 3rd, 4th
webContents.savePage( ) method
webContents.send( ) method
WebdriverIO, 2nd
WebRTC
WebSockets
where( ) method
will-finish-launching event
Window menus
window-all-closed event
windows
creating new
handling cases of having no focused windows
updating titles based on current file
waiting to load
Windows OS (operating system)
overview of
signing applications for
Worldwide Developer Relations Certification Authority
writeToClipboard( ) function
writing
asynchronous tests using Spectron
controlling Electron APIs
testing DOM
testing Electron BrowserWindow APIs
traversing DOM
waiting for windows to load
to clipboard
handling edge cases
overview of
Chapter 1. Introducing Electron
Figure 1.3. Brave is an entire web browser built on top of Electron.
Figure 1.5. Electron allows you to create custom application menus.
Chapter 2. Your first Electron application
Figure 2.1. A wireframe of the application we build in this chapter
Figure 2.2. The file tree structure for our first Electron application
Figure 2.3. npm init provides a series of prompts and sets up a package.json file
Figure 2.5. An empty BrowserWindow without an HTML document loaded
Figure 2.6. A BrowserWindow with a simple HTML document loaded
Figure 2.7. The BrowserWindow executing JavaScript from the context of the renderer process.
Chapter 3. Building a notes application
Figure 3.2. The structure of our project
Figure 3.5. The unstyled beginnings our first Electron application
Figure 3.6. Our application has been given some basic styling using modern features of CSS.
Chapter 4. Using native file dialog boxes and facilitating interprocess communication
Figure 4.4. The contents of the file are logged to the user’s terminal.
Figure 4.5. If the user selects a nontext file, the function logs the binary data.
Figure 4.6. In Windows, we can switch between different types of files.
Figure 4.14. BrowserWindow instances have methods that are aliases to Electron’s webContents API.
Chapter 5. Working with multiple windows
Figure 5.1. In chapter 4, we set up communication between the main process and one renderer process.
Chapter 6. Working with files
Figure 6.2. The name of file in the filesystem is displayed in the window’s title.
Figure 6.6. Recent files in macOS
Figure 6.7. Recent files in Windows 10
Chapter 7. Building application and context menus
Figure 7.2. The structure of the application menu for Fire Sale
Figure 7.5. The Edit and Window menus as implemented in Electron’s builtin menu
Figure 7.6. The structure of the application menu in macOS applications
Figure 7.9. On macOS, the Help menu allows you to search for items in your menu.
Figure 7.10. The structure of the Help menu that we build in listing 7.8.
Figure 7.11. In this section, we will add a File menu with application-specific functionality.
Chapter 8. Further operating system integration and dynamically enabling menu items
Figure 8.6. Show File in Folder and Open in Default is disabled if there is no file open.
Chapter 9. Introducing the tray module
Figure 9.4. If the macOS menu bar is in dark mode, we’ll use the inverted icon.
Figure 9.5. The application with its two basic commands on macOS
Figure 9.8. The application now has keyboard shortcuts.
Figure 9.12. A notification in Windows 10
Chapter 10. Building applications with the menubar library
Figure 10.1. This is what the application will look like at the end of the chapter.
Figure 10.3. The basic UI for Clipmaster 9000 is in place.
Chapter 11. Using transpilers and frameworks
Figure 11.2. electron-compile supports a wide variety of languages.
Figure 11.3. The foundation of our application using React, Sass, and Jade.
Figure 11.4. Jetsetter is broken into small components as illustrated here.
Figure 11.5. The Application component without items
Figure 11.6. The application now includes lists of packed and unpacked items.
Figure 11.7. The application can now add a new item in addition to “Pants.”
Chapter 13. Testing applications with Spectron
Figure 13.1. A simplified version of Clipmaster 9000 that does not live in the menu bar.
Chapter 14. Building applications for deployment
Figure 14.2. With the productName set, our application has the correct name after it is built.
Figure 14.3. Hey, look! We have a custom icon now!
Figure 14.4. The application’s source code is located within the application itself.
Chapter 15. Releasing and updating applications
Figure 15.1. The console message verifies that the code inside crash-reporter.js has executed.
Figure 15.2. Verify that the crash reporter code has been executed by checking the console.
Figure 15.3. Triggering a crash in the render process requires a reload of the UI.
Figure 15.4. Electron attempts to send the crash report but cannot find the server.
Figure 15.5. Select Preferences from the Application menu.
Figure 15.6. Select your team from the Accounts tab, and click Manage Certificates.
Figure 15.7. Select Developer ID Application and Developer ID Installer from the drop-down menu.
Figure 15.9. Fire Sale automatically notifies users when a new version is available on the server.
Chapter 16. Distributing your application through the Mac App Store
Figure 16.1. Request a certificate using Keychain Access.
Figure 16.2. Enter information for your application signing certificate request.
Figure 16.3. Select macOS as the target platform.
Figure 16.4. Add the certificate request you generated earlier.
Figure 16.5. Select Mac App Store as the type of certificate that you’re requesting.
Figure 16.6. Generate certificates for the application and installer.
Figure 16.7. Upload the certificate signing request file you created earlier.
Figure 16.8. Download your completed certificate.
Figure 16.9. The application and installer certificates listed in Keychain Access.
Figure 16.10. Register your App ID.
Figure 16.11. Select My Apps in iTunes Connect.
Figure 16.12. Add a new Mac application in iTunes Connect.
Figure 16.13. Provide details about the application in iTunes Connect.
Figure 16.14. Fire Sale is now registered with macOS as an application that can open Markdown files.
Figure 16.15. Use the Application Loader to upload your Electron application to the Mac App Store.
Figure 16.16. In this case, we’re uploading a full application to the Mac App Store.
Figure 16.17. Verify that the application’s metadata is correct.
Chapter 1. Introducing Electron
Table 1.1. A comparison of some of the main differences between Electron and NW.js
Chapter 2. Your first Electron application
Listing 2.1. Adding a start script to package.json
Listing 2.2. Adding a basic main process: ./app/main.js
Listing 2.3. Requiring the BrowserWindow module: ./app/main.js
Listing 2.4. Creating a BrowserWindow: ./app/main.js
Listing 2.5. Creating index.html: ./app/index.html
Listing 2.6. Loading an HTML document into the main window: ./app/main.js
Listing 2.7. Adding a button to an HTML document: ./app/index.html
Listing 2.8. Adding script with Node.js global in the browser context: ./app/index.html
Listing 2.9. Loading JavaScript from renderer.js: ./app/index.html
Listing 2.10. Adding basic styles: ./app/style.css
Listing 2.11. Referencing a stylesheet in the HTML document: ./app/index.html
Listing 2.12. Adding the markup for the UI of the application: ./app/index.html
Listing 2.13. Caching DOM element selectors: ./app/renderer.js
Listing 2.14. Adding an event listener to enable the submit button: ./app/renderer.js
Listing 2.15. Adding a helper function to clear out form input: ./app/renderer.js
Listing 2.16. Adding an event listener to the submit button: ./app/renderer.js
Listing 2.17. Using the Fetch API to request a remote resource: ./app/renderer.js
Listing 2.18. Instantiating a DOMParser: ./app/renderer.js
Listing 2.19. Adding functions for parsing response and finding the title: ./app/renderer.js
Listing 2.20. Parsing response and finding the title when fetching a page: ./app/renderer.js
Listing 2.21. Current contents of app/renderer.js
Listing 2.22. Creating a function to persist links in local storage: ./app/renderer.js
Listing 2.23. Storing a link and clearing the form upon fetching remote resource: ./app/renderer.js
Listing 2.24. Creating a function for getting links from local storage: ./app/renderer.js
Listing 2.25. Creating a function for creating DOM nodes from link data: ./app/renderer.js
Listing 2.26. Creating a function to render all links and add them to the DOM: ./app/renderer.js
Listing 2.27. Rendering links after fetching a remote resource: ./app/renderer.js
Listing 2.28. Loading and rendering links: ./app/render.js
Listing 2.29. Wiring the Clear Storage button: ./app/renderer.js
Listing 2.30. Renderering process to fetch, store, and render links: ./app/renderer.js
Listing 2.31. Displaying an error message: ./app/renderer.js
Listing 2.32. Catching errors when fetching, parsing, and rendering links: ./app/renderer.js
Listing 2.33. Validating responses from remote servers: ./app/renderer.js
Listing 2.34. Adding validateResponse() to the chain: ./app/renderer.js
Listing 2.35. Requiring Electron’s shell module: ./app/renderer.js
Listing 2.36. Opening links in the user’s default browser: /app/renderer.js
Chapter 3. Building a notes application
Listing 3.1. Generating the application’s file structure
Listing 3.2. Bootstrapping the main process: ./app/main.js
Listing 3.3. Our application’s markup: ./app/index.html
Listing 3.4. Using Flexbox to create page layouts: ./app/style.css
Listing 3.5. Gracefully showing the window when the DOM’s ready: ./app/main.js
Listing 3.6. Requiring our dependencies: ./app/renderer.js
Listing 3.7. Caching DOM selectors: ./app/renderer.js
Listing 3.8. Converting Markdown to HTML: ./app/renderer.js
Listing 3.9. Re-rendering the HTML when Markdown changes: ./app/renderer.js
Listing 3.10. The renderer process: ./app/renderer.js
Listing 3.11. Opening the Developer Tools from the main process: ./app/main.js
Listing 3.12. Setting up a build task in Visual Studio Code for Windows: tasks.json
Listing 3.13. Setting up a launch task for Visual Studio Code for Windows: launch.json
Chapter 4. Using native file dialog boxes and facilitating interprocess communication
Listing 4.1. Importing the dialog module: ./app/main.js
Listing 4.2. Creating a getFileFromUser() function: ./app/main.js
Listing 4.3. Invoking getFileFromUser() when the application is first ready
Listing 4.4. Importing Node’s fs module: ./app/main.js
Listing 4.5. Whitelisting specific file types: ./app/main.js
Listing 4.6. Creating sheet dialogs in macOS: ./app/main.js
Listing 4.7. Adding an event listener in the renderer process: ./app/renderer.js
Listing 4.8. Exporting a function in Node: basic-math.js
Listing 4.9. Importing a function in Node
Listing 4.10. Exporting ability to open the file dialog from the renderer process: ./app/main.js
Listing 4.11. Requiring functions from the main process in the renderer process: ./app/renderer.js
Listing 4.12. Triggering getFileFromUser() in the main process from the UI: ./app/renderer.js
Listing 4.13. Sending content from the main to a renderer process: ./app/main.js
Listing 4.14. Importing the ipcRenderer module: ./app/renderer.js
Listing 4.15. Listening for messages on the file-opened channel: ./app/renderer.js
Listing 4.16. Open File functionality implemented in the main process: ./app/main.js
Listing 4.17. Open File functionality implemented: ./app/renderer.js
Chapter 5. Working with multiple windows
Listing 5.1. Creating a Set to keep track of new windows: ./app/main.js
Listing 5.2. Implementing a function to create new windows: ./app/main.js
Listing 5.3. Creating a window when the application is ready: ./app/main.js
Listing 5.4. Refactoring getFileFromUser() to work with a specific window: ./app/main.js
Listing 5.5. Refactoring openFile() to work with a specific window: ./app/main.js
Listing 5.6. Getting a reference to the current window in the renderer process: ./app/renderer.js
Listing 5.7. Passing a reference to the current window to the main process: ./app/renderer.js
Listing 5.8. Adding listener to newFileButton: ./app/renderer.js
Listing 5.9. newFileButton implemented in the renderer process: ./app/renderer.js
Listing 5.10. Offsetting new windows based on the currently focused window: ./app/main.js
Listing 5.11. Keeping the application alive when all windows are closed: ./app/main.js
Listing 5.12. Creating a window when application is opened and there are no windows: ./app/main.js
Listing 5.13. Multiple windows implemented in the main process: ./app/main.js
Chapter 6. Working with files
Listing 6.1. Declaring global variables for keeping track of the current file: ./app/renderer.js
Listing 6.2. Updating global variables when a new file is opened: ./app/renderer.js
Listing 6.3. Updating the window title based on the current file: ./app/renderer.js
Listing 6.4. Calling updateUserInterface() when a new file is opened: ./app/renderer.js
Listing 6.5. Updating the UI if the document has unsaved changes: ./app/renderer.js
Listing 6.6. Checking for changes whenever the user types: ./app/renderer.js
Listing 6.7. Enabling the Save and Revert buttons when there are unsaved changes: ./app/renderer.js
Listing 6.8. Setting the represented file in macOS: ./app/main.js
Listing 6.9. Appending to the list of recent documents: ./app/main.js
Listing 6.10. Responding to external requests to open a file: ./app/main.js
Listing 6.11. Saving the generated output: ./app/main.js
Listing 6.12. Triggering the Save File dialog box from the renderer process: ./app/renderer.js
Listing 6.13. Saving the current file: ./app/main.js
Listing 6.14. Adding an event listener to the Save File button: ./app/renderer.js
Listing 6.15. Reverting content in UI to last saved content: ./app/renderer.js
Listing 6.16. Setting up foundation for drag-and-drop events: ./app/renderer.js
Listing 6.17. Adding styles for drag-and-drop functionality: ./app/style.css
Listing 6.18. Helper methods: ./app/renderer.js
Listing 6.19. Adding and removing classes on dragover and dragleave: ./app/renderer.js
Listing 6.20. Drag-and-drop functionality: ./app/renderer.js
Listing 6.21. Setting up a Map to watch files: ./app/main.js
Listing 6.22. Setting up a listener: ./app/main.js
Listing 6.23. Closing the watcher when the browser window closes: ./app/main.js
Listing 6.24. Prompting the user if they try to close a window with unsaved changes: ./app/main.js
Listing 6.25. Refactoring the process of displaying a new file: ./app/renderer.js
Listing 6.27. Prompting the user when a file changes: ./app/renderer.js
Listing 6.28. Sending a message over the file-changed channel: ./app/main.js
Chapter 7. Building application and context menus
Listing 7.1. Creating an Edit menu with copy and paste: ./app/application-menu.js
Listing 7.2. Loading the menu in the main application file: ./app/main.js
Listing 7.3. Prepending to the list of menu items in macOS: ./app/application-menu.js
Listing 7.4. Edit menu template: ./app/application-menu.js
Listing 7.5. Using roles and accelerators: ./app/application-menu.js
Listing 7.6. Application menu for macOS: ./app/application-menu.js
Listing 7.7. Combining the application, Edit, and Window menus: ./app/application-menu.js
Listing 7.8. Creating a Help menu: ./app/application-menu.js
Listing 7.9. Custom menu functionality: ./app/application-menu.js
Listing 7.10. Add IPC listeners to the renderer process: ./app/renderer.js
Listing 7.13. Listening for contextmenu events: ./app/renderer.js
Listing 7.14. Creating a context menu: ./app/renderer.js
Listing 7.15. Triggering the context menu: ./app/renderer.js
Chapter 8. Further operating system integration and dynamically enabling menu items
Listing 8.1. Enabling the buttons when there is a file to show: ./app/renderer.js
Listing 8.2. Adding event listeners to the buttons: ./app/renderer.js
Listing 8.3. Adding additional menu items: ./app/application-menu
Listing 8.5. Adding shell module access to the context menu template: ./app/renderer.js
Listing 8.6. Creating a function to dynamically create context menus: ./app/renderer.js
Listing 8.7. Converting values into Booleans
Listing 8.8. Creating a context menu each time a contextmenu event is fired: ./app/renderer.js
Listing 8.10. Setting the represented file: ./app/main.js
Listing 8.11. Generating a new application menu when state might have changed: ./app/main.js
Chapter 9. Introducing the tray module
Listing 9.1. Creating a tray instance: ./app/main.js
Listing 9.2. Hiding the dock icon on macOS: ./app/main.js
Listing 9.3. Conditionally choosing an icon based on the platform: ./app/main.js
Listing 9.4. Supporting dark mode on macOS: ./app/main.js
Listing 9.5. Storing clippings in memory using an array: ./app/main.js
Listing 9.6. Adding a clipping to the array when the menu item is clicked: ./app/main.js
Listing 9.7. Listing out the clippings as menu items: ./app/main.js
Listing 9.8. Truncating menu item labels: ./main/app.js
Listing 9.9. Preventing duplicate clippings: ./app/main.js
Listing 9.10. Adding clippings to the beginning of the array: ./main.js
Listing 9.11. Displaying only the first 10 clippings: ./app/main.js
Listing 9.12. Registering a global shortcut: ./app/main.js
Listing 9.13. Setting up a simple HTML document: ./app/index.html
Listing 9.14. Listening for messages and displaying notifications: ./app/renderer.js
Listing 9.15. Launching the hidden browser window: ./app/main.js
Listing 9.16. Sending a message to the renderer process: ./app/main.js
Listing 9.17. Setting an alternate icon for when icon is pressed: ./app/main.js
Listing 9.18. Clipmaster’s completed main process: ./app/main.js
Listing 9.19. Clipmaster’s completed renderer process: ./app/renderer.js
Chapter 10. Building applications with the menubar library
Listing 10.1. Getting started with menubar: ./app/main.js
Listing 10.2. The markup for the UI: ./app/index.html
Listing 10.3. Styling for the UI: ./app/style.css
Listing 10.4. Loading the HTML page after a window has been created: ./app/main.js
Listing 10.5. Querying for and caching frequently used selectors: ./app/renderer.js
Listing 10.6. Creating an element for the UI based on the clipping’s text: ./app/renderer.js
Listing 10.7. Reading from clipboard and adding a clipping to list: ./app/renderer.js
Listing 10.8. Setting up an event listener for each clipping’s buttons: ./app/renderer.js
Listing 10.9. Removing a clipping from the DOM: ./app/renderer.js
Listing 10.10. Configuring the event listener to remove clippings: ./app/renderer.js
Listing 10.11. Setting up helper methods for working with clippings: ./app/renderer.js
Listing 10.12. Configuring the event listener to display the clipping’s text: ./app/renderer.js
Listing 10.13. Refactoring the removeClipping() function: ./app/renderer.js
Listing 10.14. Creating a function to write a clipping to the clipboard: ./app/renderer.js
Listing 10.15. Adding writeToClipboard() to the event listener: ./app/renderer.js
Listing 10.16. Requiring and configuring default parameters for request: ./app/renderer.js
Listing 10.17. Creating a function to publish a clipping to ClipHub’s API: ./app/renderer.js
Listing 10.18. Adding publishClipping() to the event listener: ./app/renderer.js
Listing 10.19. Setting up notifications when publishing a clipping: ./app/renderer.js
Listing 10.20. Setting up a simple global shortcut: ./app/main.js
Listing 10.21. Setting up global shortcuts with IPC: ./app/main.js
Listing 10.22. Setting up IPC listeners in the renderer process: ./app/renderer.js
Listing 10.23. Preloading window and contents on start-up: ./app/main.js
Chapter 11. Using transpilers and frameworks
Listing 11.1. Configuring Babel for use with electron-compile: ./.compilerc
Listing 11.2. The renderer process’s HTML file written in Jade: ./app/index.jade
Listing 11.3. Application styles using Sass: ./app/style.scss
Listing 11.4. The main process for Jetsetter: ./app/main.js
Listing 11.5. A simple component using JSX and React: ./app/renderer.js
Listing 11.6. The Application component after transpilation
Listing 11.7. Application component foundation: ./app/components/Application.js
Listing 11.8. Mounting the new Application component onto the DOM: ./app/renderer.js
Listing 11.9. Individual Item component: ./app/components/Item.js
Listing 11.10. Item list component: ./app/components/Items.js
Listing 11.11. Item and Items in the Application component: ./app/components/Application.js
Listing 11.12. Adding a NewItem: ./app/components/NewItem.js
Listing 11.13. NewItem in the Application component: ./app/components/application.js
Listing 11.14. Enabling live reload: ./app/main.js
Listing 11.15. Setting up hot module reloading: ./app/main.js
Listing 11.16. Adding Babel support for hot module reloading: ./.compilerc
Listing 11.17. Using AppContainer to subscribe to updates: ./app/renderer.js
Listing 11.18. Using import() to asynchronously load dependencies: ./app/renderer.js
Listing 11.19. Using async/await to asynchronously load dependencies: ./app/renderer.js
Chapter 12. Persisting user data and using native Node.js modules
Listing 12.1. Adding a postinstall hook: /package.json
Listing 12.2. Setting up an SQLite database: ./app/database.js
Listing 12.3. Creating a table to store items: ./app/database.js
Listing 12.4. Passing the database into the application component: ./app/renderer.js
Listing 12.5. Fetching items from the database: ./app/components/Application.js
Listing 12.6. Implementing the ability to add items to the database: ./app/components/Application.js
Listing 12.7. Letting the database handle incrementing the ID: ./app/components/NewItem.js
Listing 12.8. Marking items as packed: ./app/components/Application.js
Listing 12.9. Marking all items as packed: ./app/components/Application.js
Listing 12.10. Deleting items: ./app/components/Application.js
Listing 12.11. Passing in delete methods: ./app/components/Application.js
Listing 12.12. The Items component: ./app/components/Items.js
Listing 12.13. The Item component: ./app/component/Item.js
Listing 12.14. Storing the database in the appropriate location: ./app/database.js
Listing 12.15. Setting up a store in IndexedDB: ./app/database.js
Listing 12.16. Getting all of the items from IndexedDB: ./app/database.js
Listing 12.17. Adding an item to IndexedDB: ./app/database.js
Listing 12.18. Updating an item in IndexedDB: ./app/database.js
Listing 12.19. Marking all items as packed: ./app/database.js
Listing 12.20. Removing an item from IndexedDB: ./app/database.js
Listing 12.21. Deleting all unpacked items from IndexedDB: ./app/database.js
Listing 12.22. Updating the Application component to use IndexedDB: ./app/components/Application.js
Chapter 13. Testing applications with Spectron
Listing 13.1. Setting up Mocha as a test script: ./package.json
Listing 13.2. Writing up Spectron with the test runner: ./test/spec.js
Listing 13.3. Writing a test to count the number of windows: ./test/spec.js
Listing 13.4. Writing a test to verify the window title: ./test/spec.js
Listing 13.5. Testing that the developer tools are not open: ./test/spec.js
Listing 13.6. Testing the content of the Copy from Clipboard button: ./test/spec.js
Listing 13.7. Testing the initial state of the UI: ./test/spec.js
Listing 13.8. Testing a click interaction: ./test/spec.js
Listing 13.9. Moving the cursor in a test: ./test/spec.js
Listing 13.10. Accessing Electron APIs in a test: ./test/spec.js
Listing 13.11. Testing that the application writes to the clipboard: ./test/spec.js
Chapter 14. Building applications for deployment
Listing 14.1. Adding a build script: ./package.json
Listing 14.2. Customizing the applications name and version: ./package.json
Listing 14.3. Building the application with a custom icon: ./package.json
Listing 14.4. Building for multiple platforms: ./package.json
Listing 14.5. Building for multiple platforms with asar: ./package.json
Listing 14.6. Using Yarn as your package manager: ./package.json
Chapter 15. Releasing and updating applications
Listing 15.1. Creating a file to configure and start up the Crash Reporter: ./app/crash-reporter.js
Listing 15.2. Starting the crash reporter in the main process: ./app/main.js
Listing 15.3. Starting the crash reporter in the renderer process: ./app/renderer.js
Listing 15.4. Creating a simple crash reporting server
Listing 15.5. An example of the JSON metadata from a crash report
Listing 15.6. Updating the crash reporter to report uncaught exceptions: ./app/crash-reporter.js
Listing 15.7. Setting up a server route to receive reports of uncaught exceptions
Listing 15.8. Updated Mac packaging script: ./package.json
Listing 15.9. Windows installer configuration: ./scripts/windows.js
Listing 15.10. Setting up Squirrel events in the main process: ./app/main.js
Listing 15.11. electron-squirrel-startup
Listing 15.12. Implementing Electron’s autoUpdater: ./app/auto-updater.js
Chapter 16. Distributing your application through the Mac App Store
Listing 16.1. Setting up the application: ./scripts/mas/info.plist
Listing 16.2. Setting parent permissions: ./scripts/mas/parent.plist
Listing 16.3. Extending permissions: ./scripts/mas/child.plist
Listing 16.4. The build script
Listing 16.5. Adding applications to particular categories: ./scripts/info.plist
Listing 16.6. Setting Fire Sale to be available to open Markdown files: /script/info.plist
Appendix Appendix. Code samples from Fire Sale and Clipmaster 9000
Listing 1. Fire Sale’s main process: ./app/main.js
Listing 2. Fire Sale’s renderer process: ./app/renderer.js
Listing 3. Fire Sale’s application menu: ./app/application-menu.js
Listing 4. Fire Sale’s renderer process: ./app/renderer.js
Listing 5. Fire Sale’s renderer process: ./app/renderer.js
Listing 6. Fire Sale’s application menu: ./app/application-menu.js
Listing 7. Fire Sale’s main process: ./app/main.js
Listing 8. Clipmaster 9000’s main process: ./app/main.js
Listing 9. Clipmaster 9000’s renderer process: ./app/renderer.js