Table of Contents for
Electron in Action
 Electron in Action
Published by
Manning Publications, 2018
Electron in Action
Published by
Manning Publications, 2018
- Cover
- Electron in Action
- Copyright
- Electron in Action
- Brief Table of Contents
- Table of Contents
- Preface
- Acknowledgments
- About this book
- About the cover illustration
- Part 1. Getting started with Electron
- Chapter 1. Introducing Electron
- Chapter 2. Your first Electron application
- Part 2. Building cross-platform applications with Electron
- Chapter 3. Building a notes application
- Chapter 4. Using native file dialog boxes and facilitating interprocess communication
- Chapter 5. Working with multiple windows
- Chapter 6. Working with files
- Chapter 7. Building application and context menus
- Chapter 8. Further operating system integration and dynamically enabling menu items
- Chapter 9. Introducing the tray module
- Chapter 10. Building applications with the menubar library
- Chapter 11. Using transpilers and frameworks
- Chapter 12. Persisting user data and using native Node.js modules
- Chapter 13. Testing applications with Spectron
- Part 3. Deploying Electron applications
- Chapter 14. Building applications for deployment
- Chapter 15. Releasing and updating applications
- Chapter 16. Distributing your application through the Mac App Store
- Code from the end of chapter 6
- Index
- List of Figures
- List of Tables
- List of Listings
Chapter 7. Building application and context menus
- Creating menus using Electron’s Menu and MenuItem modules
- Building menus from a template
- Defining custom menus for target operating systems
- Assigning common operating system roles to our menu items
- Making menu items with custom, application-specific functionality
- Creating custom context menus for different parts of your UI
In browser-based applications, developers have access only to the visible area of the application’s window. They can’t add controls to the browser’s tool bar or menu bar. The entire UI for the application’s functionality must be inside of the window. Developers also face limitations within the window. They can’t modify the context menus that appear when the user right-clicks their UI. It can be a challenge to find a place for every option and command. Electron, on the other hand, enables developers to add functionality outside of the browser window, such as custom application and context menus that appear when the user right-clicks a component of the UI.
In this chapter, we explore how to create and configure these menus in Fire Sale. We’ll replace the default menu provided by Electron with our own and walk through exposing common operating system functionality in our menus. We assign keyboard shortcuts to menu items to make them easy to trigger from anywhere in the application. With the basic menu functionality implemented, we then add in our own application-specific menu items—notably, the ability to open a Markdown file from the filesystem, display it in the left pane of our UI, and render its contents as HTML in the right pane. Finally, we create a custom context menu containing common text manipulation tasks (cut, copy, and paste, as shown in figure 7.1) whenever the user right-clicks the left pane.
Figure 7.1. In this chapter, we build custom menu items that trigger some of the functionality found in the UI.

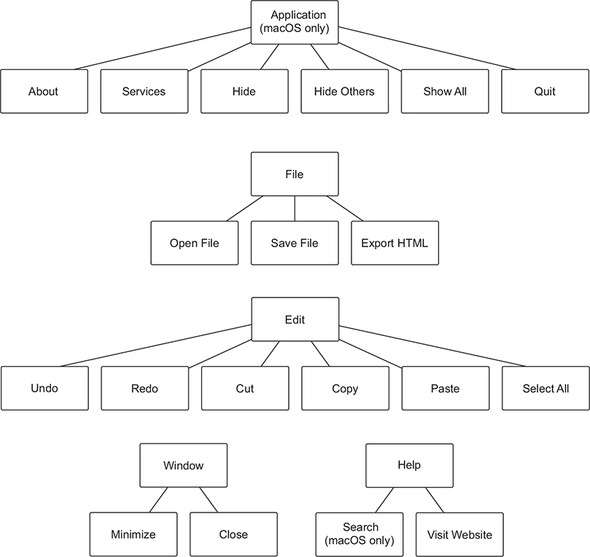
Throughout the previous few chapters, we’ve had a menu in Fire Sale. So why build a custom one now? Developers can overwrite Electron’s default menu, but then they are responsible for building the menu from the ground up. Over the course of this chapter, we restore some of the basic functionality common to most desktop applications. After the foundation has been laid, we extend it with our own custom functionality. From our menu users can save the currently active file as well as export the HTML to its own file. In addition to being able to access this functionality from the application’s menu, users can use keyboard shortcuts to trigger the menu items. In this chapter, we build a menu for Fire Sale that has the structure shown in figure 7.2.
Figure 7.2. The structure of the application menu for Fire Sale
7.1. Replacing and replicating the default menu
To get started, make a new file called ./app/application-menu.js. This file will grow large by the end of the chapter, so we address that now by breaking it out into its own file. Let’s begin by adding copy and paste back to the application menu.
Listing 7.1. Creating an Edit menu with copy and paste: ./app/application-menu.js
const { app, BrowserWindow, Menu, shell } = require('electron');    1
const mainProcess = require('./main');

const template = [                                                  2
  {
    label: 'Edit',
    submenu: [
      {
        label: 'Copy',
        accelerator: 'CommandOrControl+C',                          2
        role: 'copy',                                               3
      },
      {
        label: 'Paste',
        accelerator: 'CommandOrControl+V',
        role: 'paste',
      },
    ]
  }
];

module.exports = Menu.buildFromTemplate(template);                  4
- 1 Requires the modules that we need as we build the application menu throughout this chapter
- 2 Creates a template array that will serve as the blueprint for the menu
- 3 Menu items can be given keyboard shortcuts called accelerators.
- 4 Builds a menu from the template, and exports it so it can be used in the main process.
Next, set the menu as the application’s menu when app fires the ready event.
Listing 7.2. Loading the menu in the main application file: ./app/main.js
const { app, BrowserWindow, dialog, Menu } = require('electron');   1
const applicationMenu = require('./application-menu');              2
const fs = require('fs');

const windows = new Set();
const openFiles = new Map();

app.on('ready', () => {
  Menu.setApplicationMenu(applicationMenu);                         3
  createWindow();
});

// ... Additional methods below ...
- 1 Requires the Menu module from Electron
- 2 Requires the menu built in the previous listing
- 3 Sets it as the application menu upon successful launch
Electron includes the Menu and MenuItem modules for building menus. In theory, we could build a menu out of individual MenuItems, but this method can be tedious and error prone. As a convenience, Menu provides the buildFromTemplate() method that accepts an array of regular JavaScript objects. Internally, Electron creates the MenuItems based on the array you provided.
7.1.1. macOS and the case of the missing Edit menu
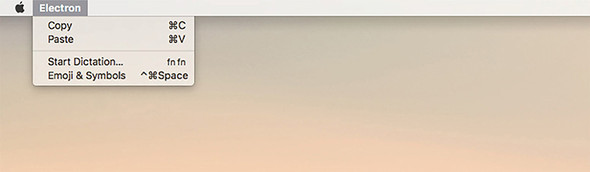
If you start the application in Windows, you should see an Edit menu with two menu items: Copy and Paste. This is to be expected. But if you’re testing the application on macOS, you’ll see something a bit different, as shown in figure 7.3.
Figure 7.3. macOS takes the first menu item and uses it as the Application menu, which is not always the expected or intended behavior.
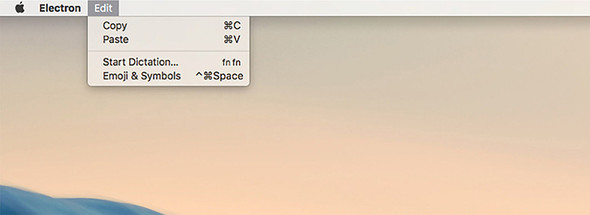
In macOS, the menu is called Electron rather than Edit because the first menu on macOS is always the Application menu. To solve this issue in Electron, we need to shift the Edit menu—and all subsequent menu items in the future—down one spot, as shown in listing 7.3 and figure 7.4, to make room for the Application menu, which we implement later in this chapter.
Figure 7.4. By shifting all of the menus down one position, the Edit menu renders correctly. Soon, we implement an Application menu that behaves like a native macOS application.
Listing 7.3. Prepending to the list of menu items in macOS: ./app/application-menu.js
const { app, BrowserWindow, Menu, shell } = require('electron');
const mainProcess = require('./main');

const template = [
  // ... Menu template from the last section. ...
];

if (process.platform === 'darwin') {          1
  const name = 'Fire Sale';                   2
  template.unshift({ label: name });
}

module.exports = Menu.buildFromTemplate(template);
- 1 Asks Node’s process global what platform the application is running on. macOS reports that it is darwin. If this is the case, moves a new menu item to the beginning of the template array.
- 2 Gets the name of the application. This won’t show up in the menu now but is useful down the road.
One of the great things about building applications with Electron is that developers can target macOS, Windows, and Linux with one codebase. The caveat is that the developer should consider the idiosyncrasies of each of the supported operating systems when writing the code. Luckily, Node provides the process object, which has several properties, methods, and events that provide introspection into the environment in which the application is running.
process.platform returns the name of the platform in which the application is currently executing. As of this writing, process.platform returns one of five strings: darwin, freebsd, linux, sunos, or win32. Darwin is the UNIX operating system upon which macOS is built. We can adjust our menu at runtime by checking if process.platform is equal to darwin. If it is, then the application is running on macOS and all the menu items should be shifted one place to the right.
For all of the extra work required to get menus in the correct order, you may have noticed in figure 7.4 that we were rewarded with dictation and emoji support without having to implement it just by having an Edit menu.
7.1.2. The hidden cost of replacing Electron’s default menu
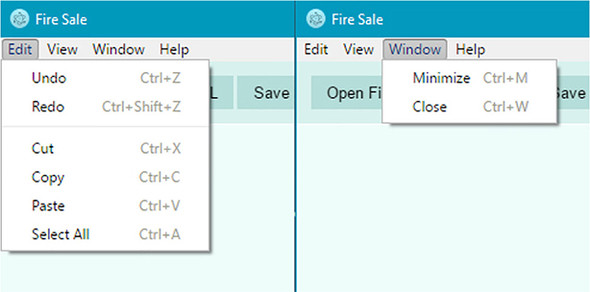
Electron provides a default menu, but it’s an all or nothing affair. When we replace the menu, we lose all its original functionality. Not only do we lose a few menu items, we also lose their keyboard shortcuts. Try to use the Command-X keyboard shortcut on macOS, or Control-X on Windows and Linux, to cut text from the left pane. What about Command-A or Control-A on macOS or Windows, respectively, to select all the text? How about Command-Z or Control-Z to undo? Nothing happens. If you’re on macOS, try to press Command-Q to quit the application. Again, nothing happens. We also lose the functionality to hide this application and other applications in macOS. On all operating systems, we lose the ability to undo and redo changes, minimize and close the window, and select all text in each field. All that’s left is the ability to copy and paste, shown in figure 7.5—and that’s only because it was added back in our custom menu.
Figure 7.5. The Edit and Window menus as implemented in Electron’s builtin menu
It’s up to the developer to add these features back to the application. If we want to omit any of these features from our application, we can. Your first thought might be that re-implementing this functionality is a bit like reinventing the wheel. Luckily, Electron makes it easy to create menu items that perform common operating system tasks. When a new menu item is created, a number of options can be set on it. So far, we’ve been exposed to the label option and the type option, which we set to separator on the third menu item in each of the previous listings.
7.1.3. Implementing the Edit and Window menus
To get practice building menus in Electron, let’s start by implementing the Edit and Window menus similar to how they were defined in Electron’s default menu, as shown in figure 7.5.
Listing 7.4. Edit menu template: ./app/application-menu.js
const template = [
  {
    label: 'Edit',
    submenu: [
      {
        label: 'Undo',
        accelerator: 'CommandOrControl+Z',
        role: 'undo',
      },
      {
        label: 'Redo',
        accelerator: 'Shift+CommandOrControl+Z',
        role: 'redo',
      },
      { type: 'separator' },
      {
        label: 'Cut',
        accelerator: 'CommandOrControl+X',
        role: 'cut',
      },
      {
        label: 'Copy',
        accelerator: 'CommandOrControl+C',
        role: 'copy',
      },
      {
        label: 'Paste',
        accelerator: 'CommandOrControl+V',
        role: 'paste',
      },
      {
        label: 'Select All',
        accelerator: 'CommandOrControl+A',
        role: 'selectall',
      },
    ],
  },
  {
    label: 'Window',
    submenu: [
      {
        label: 'Minimize',
        accelerator: 'CommandOrControl+M',
        role: 'minimize',
      },
      {
        label: 'Close',
        accelerator: 'CommandOrControl+W',
        role: 'close',
      },
    ],
  },
];

if (process.platform === 'darwin') {
  const name = app.getName();
  template.unshift({ label: name });
}

module.exports = Menu.buildFromTemplate(template);
7.1.4. Defining menu item roles and keyboard shortcuts
One thing you may have noticed is that all of the menu items added so far have a special role property. This setting is important because functionality like copy and paste is hard to implement by hand. Menu items can have a role, which correlates to a built-in capability provided by the operating system to all applications. On Windows, Linux, and macOS, the role of a menu item can be set to any of the following:
These roles overlap with much of the functionality we lost when we replaced the default menu with our own. Adding menu items with these roles restores the functionality to the menu but not the keyboard shortcuts that many users are accustomed to.
Electron provides an additional property called accelerator for defining a keyboard shortcut to trigger a menu item’s action. When creating menu items, you can set the accelerator property to a string that follows a set of Electron-specific conventions. Listing 7.5 codes a menu item that adds the copy functionality.
Listing 7.5. Using roles and accelerators: ./app/application-menu.js
const { app, BrowserWindow, Menu, MenuItem, shell } = require('electron');

const copyMenuItem = new MenuItem({
  label: 'Copy',
  accelerator: 'CommandOrControl+C',
  role: 'copy'
});
On Windows and Linux, it’s common to prefix keyboard shortcuts with the Control key. On macOS, it’s common to use the Command key for a similar purpose. In addition to being unconventional, the Command key isn’t available on Linux and Windows. Rather than needing to rely on process.platform along with conditional logic in our menu items, Electron provides the CommandOrControl shorthand. On macOS, this binds the keyboard shortcut to the Command key. On Windows and Linux, Electron uses the Control key instead. As additional shorthand, Electron provides Cmd, Ctrl, and CmdOrCtrl, which are aliased to Command, Control, and CommandOrControl, respectively.
7.1.5. Restoring the application menu on macOS
When Electron runs, it compiles the template into a collection of MenuItems and sets the application’s menu accordingly. Keyboard shortcuts for common operations like copying and pasting are restored, and the application behaves as expected in Windows and Linux. In macOS, however, the application is still missing important functionality, not least of which is the ability to quit the application. Standard application menus in macOS have the structure shown in figure 7.6.
When running on macOS, Electron provides an additional set of roles that make it easy to restore the application menu common to most Mac applications. These additional roles are
- about
- hide
- hideothers
- unhide
- front
- window
- help
- services
Figure 7.6. The structure of the application menu in macOS applications

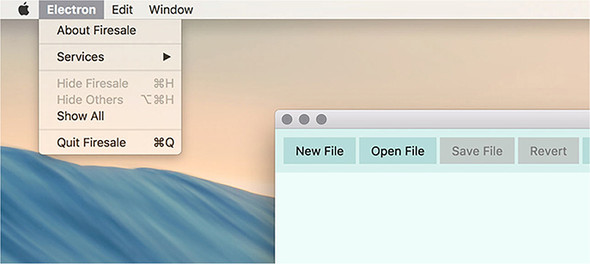
The default application menu provided by Electron has menu items for showing the application’s About panel, exposing services provided by macOS, hiding the application, hiding all other applications, and quitting the application, as shown in figure 7.7.
Figure 7.7. Menu items in the application menu use special roles in Electron that allow you to trigger operating system functionality without reinventing the wheel.
Implementing the application menu is similar to implementing the Edit and Window menus. Command is preferable over CommandOrControl for defining accelerators, because this menu appears only on macOS. In addition, we use template strings to get the application’s name for the About, Hide, and Quit menus because it is customary to include the application’s name in these menu items.
Listing 7.6. Application menu for macOS: ./app/application-menu.js
if (process.platform === 'darwin') {
  const name = 'Fire Sale';
  template.unshift({
    label: name,
    submenu: [
      {
        label: `About ${name}`,
        role: 'about',
      },
      { type: 'separator' },
      {
        label: 'Services',
        role: 'services',
        submenu: [],
      },
      { type: 'separator' },
      {
        label: `Hide ${name}`,
        accelerator: 'Command+H',
        role: 'hide',
      },
      {
        label: 'Hide Others',
        accelerator: 'Command+Alt+H',
        role: 'hideothers',
      },
      {
        label: 'Show All',
        role: 'unhide',
      },
      { type: 'separator' },
      {
        label: `Quit ${name}`,
        accelerator: 'Command+Q',
        click() { app.quit(); },         1
      },
    ],
  });
}
- 1 There is no built-in role for quitting an application. Instead, we add a click method that is called whenever the menu item is clicked or keyboard shortcut activated.
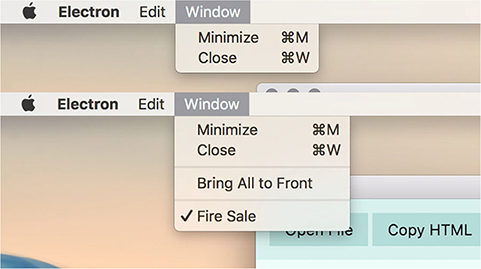
Our application now has almost all of the functionality of a native application on macOS, but we still need to address a few subtle differences. On macOS, the Window menu has a few additional menu items—most notably Bring All to Front, which moves all of the windows of the application to the front of the stack. In addition, the macOS-exclusive window role adds the ability to close and minimize the current window from the Window menu, as well as a list of all of the application’s windows, and the ability to bring them all to the front. This role is ignored on platforms that don’t support it.
Listing 7.7. Combining the application, Edit, and Window menus: ./app/application-menu.js
const template = [
  {
    label: 'Edit',
    submenu: [
      // "Edit" menu shown in Listing 7.4
    ],
  },
  {
    label: 'Window',
    role: 'window',                                                     1
    submenu: [
      // "Window" menu shown in Listing 7.4
    ],
  },
];

if (process.platform === 'darwin') {
  const name = app.getName();
  template.unshift({
    label: name,
    submenu: [
      // #Application menu shown in Listing 7.6
    ],
  });

  const windowMenu = template.find(item => item.label === 'Window');    2
  windowMenu.role = 'window';                                           3
  windowMenu.submenu.push(
    { type: 'separator' },
    {
      label: 'Bring All to Front',
      role: 'front',
    }
  );
}
- 1 The window role on the Window menu causes Electron to add a list of all open windows at the end of the menu when running in macOS.
- 2 The Array.prototype.find() method traverses our menu template and looks for the menu with the label of Window. If the order of the items ever changes, this approach is resilient to change.
- 3 Sets the menu’s role to “window”. This enables the display of a list of currently open windows as shown in figure 7.8.
Figure 7.8. The Window menu in macOS allows you to see all of the windows currently open in the application.
7.1.6. Adding a Help menu
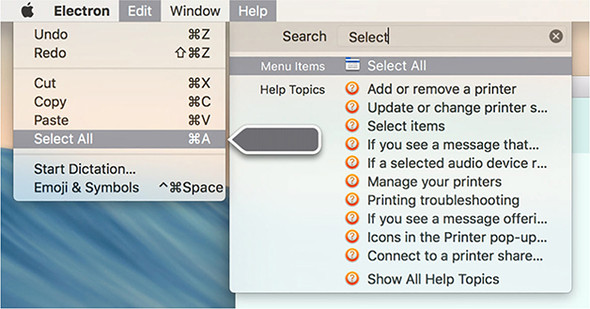
Adding a Help menu is a good practice regardless of platform, but there is an added benefit for doing so on macOS. Even if your application does not have any documentation or support yet, the built-in Help menu allows users to search the application to find menu items, as shown in figure 7.9. This works in most macOS applications and is useful for searching through deeply nested menus quickly. You can access the menu search by pressing Command-Shift-? at any time.
Figure 7.9. On macOS, the Help menu allows you to search for items in your menu.
To add a Help menu to your application, such as the structure shown in figure 7.10, add an additional menu with the role of help and a submenu of additional menu items. You must provide an array as the submenu, as shown in listing 7.8, even if it’s empty. For now, we can also add the ability to trigger the developer tools. Depending on the application, you might want to remove this feature before publishing the application. That said, popular applications such as Atom, Nylas Mail, and Visual Studio Code have chosen to leave it in.
Figure 7.10. The structure of the Help menu that we build in listing 7.8.

Listing 7.8. Creating a Help menu: ./app/application-menu.js
const template = [
  // "Edit"  and "Window" menus defined in Listing 7.7
  {
    label: 'Help',
    role: 'help',
    submenu: [
      {
        label: 'Visit Website',
        click() { /* To be implemented */ }
      },
      {
        label: 'Toggle Developer Tools',
        click(item, focusedWindow) {                                      1
          if (focusedWindow) focusedWindow.webContents.toggleDevTools();
        }
      }
    ],
  }
];
- 1 Click methods can optionally take the menu item itself and the currently focused window as arguments.
The click() method can optionally take up to three arguments: the menu item itself, the currently focused BrowserWindow instance, and an event object. In listing 7.8, we use the second argument—the currently focused window—to determine which window we should tell to toggle the developer tools.
7.2. Adding application-specific menu functionality
Going through all that work to restore a lot of the functionality, which we originally got for free, is worth it only if we use it as a template to add custom functionality. Users typically expect to be able to open and save files from the File menu. Fire Sale currently lacks this functionality. Right now, we can select and open a Markdown file from the filesystem using the Open File button in the UI. Our next step, shown in figure 7.11, is to modify the File menu with New File, Open File, Save File, and Export HTML menu items along with keyboard shortcuts to trigger each action.
Figure 7.11. In this section, we will add a File menu with application-specific functionality.
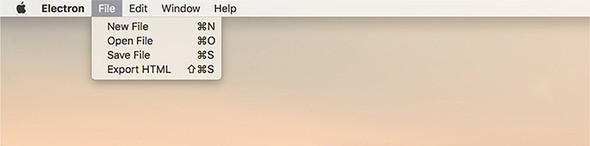
When the user clicks the Open File menu item or presses the keyboard shortcut, the menu item triggers the same openFile() function from the main process that the button in the UI triggers. Clicking New File calls the createWindow() function from the main process. Let’s start by adding a File menu to our template with each of the features shown in figure 7.11 as menu items to its submenu array.
In the case of saving or exporting a file, however, we need the current contents of the Markdown pane or the HTML pane, respectively. We’ll also need the name of the currently open file if there is one because the main process doesn’t have access to this information. Instead, we send a message to the currently focused window that it should gather this information for us and then trigger the same functionality it would if a user clicked on a button in the UI.
Listing 7.9. Custom menu functionality: ./app/application-menu.js
const template = [
  {
    label: 'File',
    submenu: [
      {
        label: 'New File',
        accelerator: 'CommandOrControl+N',
        click() {
          mainProcess.createWindow();                        1
        }
      },
      {
        label: 'Open File',
        accelerator: 'CommandOrControl+O',
        click(item, focusedWindow) {
          mainProcess.getFileFromUser(focusedWindow);        2
        },
      },
      {
        label: 'Save File',
        accelerator: 'CommandOrControl+S',
        click(item, focusedWindow) {
          focusedWindow.webContents.send('save-markdown');   3
        },
      },
      {
        label: 'Export HTML',
        accelerator: 'Shift+CommandOrControl+S',
        click(item, focusedWindow) {
          focusedWindow.webContents.send('save-html');       4
        },
      },
    ],
  },
  // "Edit", "Window", and "Help" menus are defined here as well.
];
- 1 Tells the main process to create a new window when New File is selected
- 2 Prompts the user to select a new file to open in the current window
- 3 Sends a message to the currently focused window to save its Markdown
- 4 Sends a message to the currently focused window to export its HTML
Sending a message to the focused window is half the battle. We still need to configure the renderer process to listen for these messages and act accordingly. Let’s set up an IPC listener to receive these messages and call our existing save and export functionality whenever a message is received.
Listing 7.10. Add IPC listeners to the renderer process: ./app/renderer.js
ipcRenderer.on('save-markdown', () => {                                  1
  mainProcess.saveMarkdown(currentWindow, filePath, markdownView.value);
});

ipcRenderer.on('save-html', () => {                                      2
  mainProcess.saveHtml(currentWindow, filePath, markdownView.value);
});
- 1 When a message is received on the save-markdown channel, sends a message back to the main process with the name of the currently open file—if any—and the text content from the DOM.
- 2 When a message is received on the save-html channel, sends a message back to the main process with the name of the currently open file and the rendered HTML.
7.2.1. Handling the case of having no focused window
In Windows and Linux, the application quits when all the windows are closed. On macOS the application remains running even when all the windows have been closed. A new window is opened when the icon is clicked, but in some cases, the user might select one of the three menu items we just implemented and the focused window is undefined. In chapter 9, we cover how to enable and disable menu items. For now, we take a simpler approach: open a new window if the user selects Open File, and display an error message if there is no content to save or export.
To display the error messages when a user tries to save or export a nonexistent file, we use dialog.showErrorBox(), which is similar to dialog.showMessageBox() but specializes in displaying error messages and doesn’t have as many options for configuration.
Listing 7.11. Displaying an error when trying to save or export a file that doesn’t exist: ./app/application-menu.js
const { app, dialog, Menu, MenuItem shell } = require('electron');  1
const mainProcess = require('./main');

const template = [
  {
    label: 'File',
    submenu: [
      {
        label: 'New File',
        accelerator: 'CommandOrControl+N',
        click() {
          mainProcess.createWindow();
        }
      },
      {
        label: 'Open File',
        accelerator: 'CommandOrControl+O',
        click(item, focusedWindow) {
          mainProcess.getFileFromUser(focusedWindow);
        },
      },
      {
        label: 'Save File',
        accelerator: 'CommandOrControl+S',
        click(item, focusedWindow) {
          if (!focusedWindow) {
            return dialog.showErrorBox(                             2
              'Cannot Save or Export',
              'There is currently no active document to save or export.'
            );
          }
          focusedWindow.webContents.send('save-markdown');
        },
      },
      {
        label: 'Export HTML',
        accelerator: 'Shift+CommandOrControl+S',
        click(item, focusedWindow) {
          if (!focusedWindow) {
            return dialog.showErrorBox(                             3
              'Cannot Save or Export',
              'There is currently no active document to save or export.'
            );
          }
          focusedWindow.webContents.send('save-html');
        },
      },
    ],
  },
- 1 Requires Electron’s dialog module
- 2 Uses dialog.showErrorBox() to display an alert, and returns from the function early
- 3 Provides the same functionality if the user tries to export a nonexistent file
Things are not nearly as hopeless if the user selects Open File and there is no window available to receive the command. We simply make a new window, wait for it to be shown, and then trigger the File Selection dialog box as if the window had been there all along.
Listing 7.12. Creating a window when the user opens a new file if one does not exist: ./app/application-menu.js
const template = [
  {
    label: 'File',
    submenu: [
      {
        label: 'Open File',
        accelerator: 'CommandOrControl+O',
        click(item, focusedWindow) {
          if (focusedWindow) {
            return mainProcess.getFileFromUser(focusedWindow);       1
          }

          const newWindow = mainProcess.createWindow();              2

          newWindow.on('show', () => {                               3
            mainProcess.getFileFromUser(newWindow);
          });
        },
      }, // "Save File" and "Export HTML" menus are defined here.
    ],
  }, // "Edit", "Window", and "Help" menus are defined here.
];
- 1 If focusedWindow is defined, uses the functionality we defined earlier in the chapter.
- 2 If there is no focused-Window, creates one using the createWindow() function we created in the main process in chapter 5.
- 3 When the new window has been shown, prompts the user to select a file as if the window had been there all along.
First, we check if there is a focusedWindow. If there is, we want to trigger the functionality that we implemented earlier and return from the function early. If there isn’t a focused window, we need to create one. Luckily, we created a function in chapter 5 to assist us with this process. When the new window has finished initalizing, we use it as we would use any existing window. Our code is now resilient to this case, and we’re ready to move on.
7.3. Building context menus
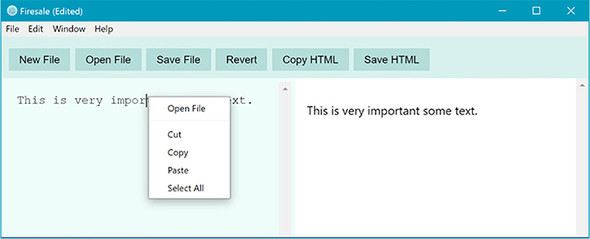
In the previous section, we defined a menu and set it as the application menu in the main process when the app module fired its “ready” event. Our application can only have one application menu at a time. We can, however, define additional menus in the renderer process, shown in figure 7.12, that spring into action when the user right-clicks (or does a two-finger click on certain computers) a part of the UI.
Figure 7.12. Electron allows developers to define custom context menus when the user right-clicks on a specific part of the DOM.
Next, we listen for contextmenu events in the left-hand markdown pane.
Listing 7.13. Listening for contextmenu events: ./app/renderer.js
markdownView.addEventListener('contextmenu', (event) => {
  event.preventDefault();
  alert('One day, a context menu will go here.');
});
Notice that the alert does not fire unless the user clicks the left pane. If you want a context menu that is triggered from anywhere within the application, listen on the window object instead of on a DOM node. The Menu module is not available from within the renderer process, but it can be accessed from the context of the main process using the remote module as shown in the following listing. Once imported, we can use Menu.buildFromTemplate() to construct a menu as shown in listing 7.15.
Listing 7.14. Creating a context menu: ./app/renderer.js
const { remote, ipcRenderer } = require('electron');
const { Menu } = remote;                                1
const path = require('path');
const mainProcess = remote.require('./main.js');
const currentWindow = remote.getCurrentWindow();

// Our existing renderer code...

const markdownContextMenu = Menu.buildFromTemplate([
  { label: 'Open File', click() { mainProcess.getFileFromUser(); } },
  { type: 'separator' },
  { label: 'Cut', role: 'cut' },
  { label: 'Copy', role: 'copy' },
  { label: 'Paste', role: 'paste' },
  { label: 'Select All', role: 'selectall' },
]);
- 1 Requires the Menu module from the context of the main process via the remote module.
To trigger this menu, replace the contextmenu event listener with a function that will call the popup() method on the newly created menu, shown here.
Listing 7.15. Triggering the context menu: ./app/renderer.js
markdownView.addEventListener('contextmenu', (event) => {
  event.preventDefault();
  markdownContextMenu.popup();
});
The popup() method takes four arguments: a BrowserWindow, x, y, and a positioning-Item. All of these arguments are optional, and if they’re omitted, then the context shows up in the current browser window directly under the mouse cursor, which is the behavior we expect in this context. With that code in place, we can now trigger a context menu in our Markdown pane. We add functionality to the context menu as well as additional context menus as we add more features to our application. The complete code for this chapter can be found at https://github.com/electron-in-action/firesale/tree/chapter-7 or in the appendix. Alternatively, you can clone from the GitHub repository at https://github.com/electron-in-action/firesale.git, check out the chapter-7 branch, and run npm install to see it in action.
Summary
- Electron allows developers to build custom application and context menus.
- Electron provides the Menu and the MenuItem modules for building menus.
- Menu.buildFromTemplate() allows developers to build a menu out of an array of JavaScript objects instead of having to use the MenuItem constructor.
- Electron comes with a built-in application menu filled with sensible defaults. Overriding this menu means that we have to replace the built-in functionality.
- process.platform allows developers to detect what operating system their application is running in.
- macOS expects a special application menu as its first menu item.
- Electron provides roles for MenuItems allowing developers to easily implement common, operating system-level functionality.
- MenuItems have a click() method that defines their behavior when clicked by the user.
- MenuItems support an accelerator property that allow developers to define a keyboard shortcut to trigger its action.
- Electron supports a contextmenu event in the renderer process that fires whenever a user right-clicks the DOM.