Table of Contents for
Electron in Action
 Electron in Action
Published by
Manning Publications, 2018
Electron in Action
Published by
Manning Publications, 2018
- Cover
- Electron in Action
- Copyright
- Electron in Action
- Brief Table of Contents
- Table of Contents
- Preface
- Acknowledgments
- About this book
- About the cover illustration
- Part 1. Getting started with Electron
- Chapter 1. Introducing Electron
- Chapter 2. Your first Electron application
- Part 2. Building cross-platform applications with Electron
- Chapter 3. Building a notes application
- Chapter 4. Using native file dialog boxes and facilitating interprocess communication
- Chapter 5. Working with multiple windows
- Chapter 6. Working with files
- Chapter 7. Building application and context menus
- Chapter 8. Further operating system integration and dynamically enabling menu items
- Chapter 9. Introducing the tray module
- Chapter 10. Building applications with the menubar library
- Chapter 11. Using transpilers and frameworks
- Chapter 12. Persisting user data and using native Node.js modules
- Chapter 13. Testing applications with Spectron
- Part 3. Deploying Electron applications
- Chapter 14. Building applications for deployment
- Chapter 15. Releasing and updating applications
- Chapter 16. Distributing your application through the Mac App Store
- Code from the end of chapter 6
- Index
- List of Figures
- List of Tables
- List of Listings
Chapter 8. Further operating system integration and dynamically enabling menu items
- Showing files in the native operating system’s filesystem manager
- Opening a file in the operating system’s default application for that file type
- Modifying application and context menus dynamically
- Opening the URLs in the default browser instead of the application itself
In addition to creating custom application modules, opening isolated browser window processes, and accessing native file dialogs in Electron, we can use the shell module to interact with the operating system.
How does your application know your system’s default browser for opening websites? If you want to open an image file in its default application, which application should you send it to?
Users of our applications typically set these preferences in the operating system itself. Instead of trying to figure out our user’s settings, we’re better off just asking the operating system for the answer. Electron provides the shell module to make this easy for us.
The shell module is relatively small compared to some of the other modules provided by Electron. It allows us to open a given file path in the operating system’s file browser, send it to its default application, move it to the trash, trigger a system beep, and create shortcut links in Windows. The shell module made a brief appearance in chapter 2, when we used it to make sure that hyperlinks open in the user’s web browser of choice instead of in the application itself, which also happens to be a web browser.
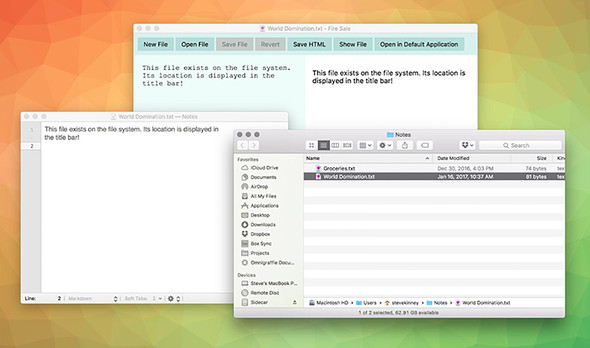
In this chapter, we take a subset of these features—opening a file’s location in the file browser and sending a file to the operating system’s default application—and implement them in multiple places in Fire Sale, as shown in figure 8.1. We add this functionality to Fire Sale’s UI, to the context menu that opens when the user right-clicks the editor pane, and to the application’s menu. Depending on the feature you’re implementing in your application, all or a subset of these might be the right approach for your purposes. As we implement them in each of the three places throughout the chapter, I discuss the advantages and disadvantages of each approach. All the code from this chapter is available on GitHub in the chapter-8 branch (https://github.com/electron-in-action/firesale/tree/chapter-8).
Figure 8.1. Electron allows us to integrate with the operating system to trigger the file browser to navigate to the location of a given file or to open a file path in the default application for that file type.
8.1. Using the shell module from the UI in the renderer process
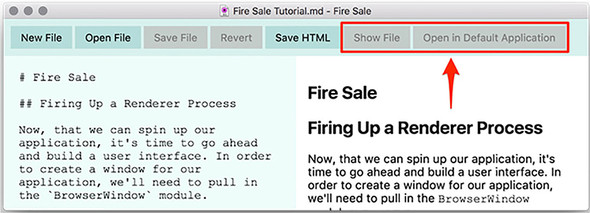
In chapter 7, in learning how to implement custom menus, we added features to Fire Sale like we would in a traditional browser environment: by adding buttons to the DOM. The Electron shell module, which is available in the main process as well as the renderer process, can be triggered from buttons in the UI, from application and context menu items, through keystrokes, and more. But let’s start with what we’re good at: triggering functionality from the UI. The Show File and Open in Default Application buttons, shown in figure 8.2, have been in the UI since chapter 3. Now it’s their turn to shine. When a file is opened or a new file is first saved to the filesystem, the buttons are enabled. When a user clicks the Show File button, the file browser opens so the user can navigate to the directory containing the currently open file. When the Open in Default Application button is selected, the operating system opens the file in the application that typically opens Markdown and text files on the user’s computer.
Figure 8.2. The Show File and the Open in Default Application buttons have been present since chapter 3. In this chapter, we’ll use the Electron shell module to implement their functionality.
In the previous chapters, the Show File and Open in Default Application buttons have been disabled by default. Like the Save and Revert buttons implemented in a previous chapter, there are situations where the buttons should be enabled. With the Save and Revert buttons, this was whenever the original content of the file—or an empty string in the case of a new, unsaved file—differed from what was currently shown in the left editor pane. Thus, we listened for keyup events in the editor and compared the contents to evaluate if the buttons should be enabled. For Show File and Open in Default Application, we do not care so much whether they have been modified. What we want is a file path to either show or open, respectively.
Listing 8.1. Enabling the buttons when there is a file to show: ./app/renderer.js
const renderFile = (file, content) => {
  filePath = file;
  originalContent = content;

  markdownView.value = content;
  renderMarkdownToHtml(content);

  showFileButton.disabled = false;
  openInDefaultButton.disabled = false;          1

  updateUserInterface(false);
};
- 1 When a file path has been sent to the renderer process to be displayed, we activate the Show File and Open in Default buttons.
The Show File and Open in Default Editor buttons should be enabled whenever we are working with a file that is stored in the filesystem, not a new, unsaved file. Whenever the active file is changed, we update the filePath variable. After this variable has been set, enable the buttons.
Listing 8.2. Adding event listeners to the buttons: ./app/renderer.js
const showFile = () => {
  if (!filePath) {                                                       1
  return alert('This file has not been saved to the filesystem.');
  }
  shell.showItemInFolder(filePath);                                      2
};

const openInDefaultApplication = () => {
  if (!filePath) {
  return alert('This file has not been saved to the filesystem.');
  }
  shell.openItem(filePath);                                              3
};

showFileButton.addEventListener('click', showFile);                      4
openInDefaultButton.addEventListener('click', openInDefaultApplication);
- 1 It seems unlikely that a user could click a disabled button, but we guard against them seeing a cryptic error by showing a more helpful one and returning from the function.
- 2 Triggers the operating system’s native file browser to open a new window with the provided file path highlighted.
- 3 Requests that the provided operating system be opened by the default application designated by the user.
- 4 When either button is clicked, we trigger the two functions declared earlier. By omitting the parentheses, we provide a reference to the function to be executed when the button is clicked instead of immediately invoking it.
Enabling the buttons is helpful, but it would be even better if the buttons did something. Whenever a button is clicked, it triggers the appropriate method from the shell module. You might notice that I decided to define the functions in constants instead of just passing anonymous functions to addEventListener. Later in this chapter, we call these functions from Fire Sale’s application menu as well as from a context menu. These names allow me to reference the two functions later.
8.2. Using the shell module in the application menu
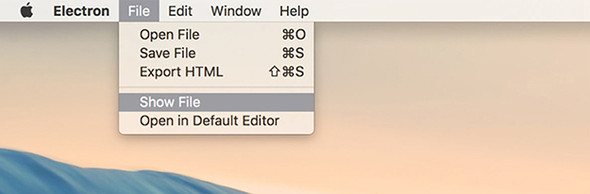
The first place we might consider adding this functionality is in the application menu, just below the menu items that allow the user to save and export files. In this section, we implement two new menu items, Show File and Open in Default Editor, as shown in figure 8.3, which exposes the file in its containing folder, and opens it in the application set as the default for Markdown files in the operating system, respectively.
Figure 8.3. Menu items that work with the Electron shell module to communicate with the native operating system
You must add these two new menu items to the application menu template to appear when the application starts. What if no windows are open? In a perfect world, we would disable the menu items unless at least one window was open. But that’s beyond the scope of this chapter, so we’ll do the next best thing and display a useful error message to help the user see the error of their ways.
Listing 8.3. Adding additional menu items: ./app/application-menu
const { app, BrowserWindow, dialog, Menu, shell } = require('electron');   1
const mainProcess = require('./main');

const template = [
  {
    label: 'File',
    submenu: [
      //Additional submenu items above.
      { type: 'separator' },                                               2
      {
        label: 'Show File',
        accelerator: 'Shift+CommandOrControl+S',
        click(item, focusedWindow) {
          if (!focusedWindow) {                                            3
            return dialog.showErrorBox(
              'Cannot Show File\'s Location',
              'There is currently no active document show.'
            );
          }
          focusedWindow.webContents.send('show-file');                     4
        },
      },
      {
        label: 'Open in Default Editor',
        accelerator: 'Shift+CommandOrControl+S',
        click(item, focusedWindow) {
          if (!focusedWindow) {
            return dialog.showErrorBox(
              'Cannot Open File in Default Editor',
              'There is currently no active document to open.'
            );
          }
          focusedWindow.webContents.send('open-in-default');               5
        },
      },
    ],
  },
  // Edit, Window, and Help menus defined here.
];
- 1 Adds Electron’s shell module to the list of modules being required from the electron library.
- 2 Electron’s menu templates allow us to easily define separators between other—more functional—menu items.
- 3 If there is no focused window, then we display an error to the user and return from the function.
- 4 If the user selects the Show File menu item, we send a message over the show-file channel via IPC to the frontmost window.
- 5 If the user selects the Open in Default Editor menu item, we send a message over the open-in-default channel via IPC to the front-most window.
In listing 8.3, we add a separator between the menu items we added in the previous chapter and the ones we’re adding in this chapter. This separator is solely for aesthetic reasons and is not required for the menu to work properly. After the separator, we have added two new menu items: Show File and Open in Default Editor. Each window has a reference to the path of the file that is currently rendered in it. So, how do we know what file to show or open? We could devise a complicated system for figuring out which files were opened in which windows, or we could just send a message to the window over interprocess communication (IPC) and let the window figure it out for itself.
To get this working, we listen for IPC messages over the show-file and open-in-default channels. Luckily, we were smart enough earlier to name the functions responsible for handling these requests. This makes setting up the listeners easy.
Listing 8.4. Implementing IPC listeners for Show File and Open in Default applications: ./app/renderer.js
ipcRenderer.on('show-file', showFile);                            1
ipcRenderer.on('open-in-default', openInDefaultApplication);      2
- 1 When the ipcRenderer receives a show-file event from the main process, triggers the showFile() function.
- 2 When the ipcRenderer receives a open-in-default event from the main process, triggers the openInDefaultApplication() function.
8.2.1. Additional features of the Electron shell module
The Electron shell module also allows developers to move a given file to the macOS Trash or the Windows Recycle Bin without concerning themselves with the finer points of how that works on each platform. It can also allow developers to trigger a system beep. On Windows, developers can create and read shortcut links as well.
8.3. Accessing the shell module from a context menu
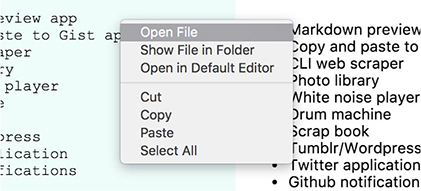
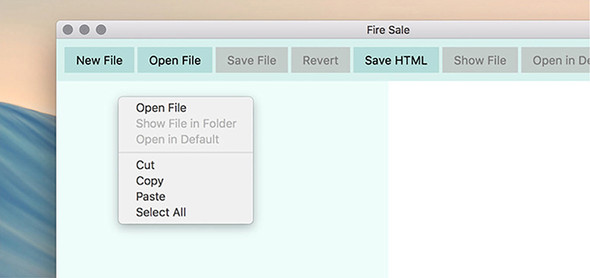
You can also add these features to the context menu we originally added to the application in chapter 7. This menu appears when a user right-clicks the left editor pane, shown in figure 8.4. To implement this feature, we need to combine the two approaches from earlier in this chapter: we add menu items to the template, but because we’re in the renderer process already, we can call the functions directly—just as we did with the buttons in the UI—instead of having to send messages via IPC.
Figure 8.4. Accessing the shell module from context menus. Show File in Folder and Open in Default Editor are disabled when working on a new, unsaved file because unsaved files do not have a valid file path for the shell module’s methods.
Listing 8.5. Adding shell module access to the context menu template: ./app/renderer.js
const { remote, ipcRenderer, shell } = require('electron');             1
const { Menu } = remote;
const path = require('path');
const mainProcess = remote.require('./main.js');
const currentWindow = remote.getCurrentWindow();

// Other renderer code from the previous chapters will remain here, but has
     been ommited for brevity...

const markdownContextMenu = Menu.buildFromTemplate([
  { label: 'Open File', click() { mainProcess.getFileFromUser(); } },
  {
    label: 'Show File in Folder',
    click: showFile                                                     2
  },
  {
    label: 'Open in Default Editor',
    click: openInDefaultApplication                                     3
  },
  { type: 'separator' },
  { label: 'Cut', role: 'cut' },
  { label: 'Copy', role: 'copy' },
  { label: 'Paste', role: 'paste' },
  { label: 'Select All', role: 'selectall' },
]);
- 1 Add the shell module and other modules being required from Electron in the renderer process.
- 2 The syntax is a little different here because we’re just pointing the click method to a reference of the showFile() function. When the user clicks the menu item, it is opened.
- 3 We take a similar approach with the Open in Default Editor button.
8.3.1. Deciding between putting functionality in a menu or in the browser
When is adding buttons to the UI a better choice than adding the same functionality to menu items in an application or context menu? It depends on the role that the feature plays in your application. Contextual menu items are obscure; a user may never think to right-click a given part of your application. If the feature you’re implementing is essential to the application, it is better to put it in the UI. That said, there is only a limited amount of space to work with, and less used, but nice-to-have, functionality is a great fit for contextual menu items.
8.3.2. Deciding between putting functionality in the application or context menu
When would using a context menu be a better approach than including these menu items in the application menu as we did in the previous section? To keep Fire Sale simple, it was designed as a single-window application where the user edits a single file at a time. When a user selects Open File in Default Editor, the application implicitly knows which file because there is only one.
But what if we were building a photo-management application, and we wanted to add a feature where the user could right-click each of the photographs to show it in the Finder or Windows Explorer? This feature would be difficult to add to the application menu, because it would be hard to decipher exactly which photograph the user wanted to see in its containing folder. By using a context menu, we can easily determine which photograph the user right-clicks.
8.4. Disabling menu items when appropriate
Right now, Fire Sale shows an error message if the user selects a menu item that isn’t available. It’s better than crashing or throwing an indecipherable error message, but it’s not going to win any awards for being a great user experience. What if we disable the context and application menu items that would otherwise throw an error if clicked? This way, it’s clear to the user that this is not a valid action.
It is possible to mutate menus after they have been set, but it’s tricky. Menu items are stored as arrays, and finding a given menu item involves traversing all the top-level menu items and their submenus. Most of the time, it’s easier to either generate a new context menu based on the current state of the window just before displaying it to the user or to regenerate a new application menu when the state of the application has changed.
How we approach solving this problem depends on which menu we’re working with. Context menus within a window are easier because we’re working with only a single window and we’re storing the filePath variable in the global scope. If there is a filePath, then we enable Show File in Folder and Open in Default. If filePath is false, then these menu items are disabled.
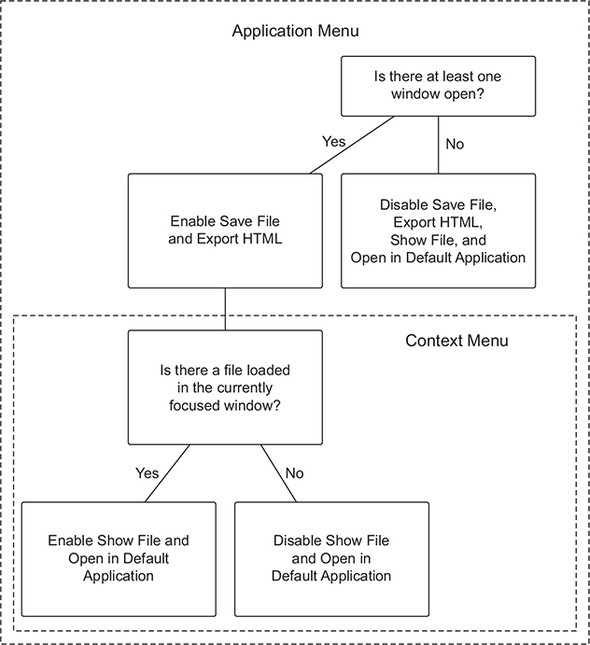
The application menu is a little trickier. In addition to Show File and Open in Default Application, we also have Save File and Export HTML, which can remain enabled if the file has not been saved to the filesystem but should be enabled only if there is at least one window open. See figure 8.5.
Figure 8.5. Certain menu items are either enabled or disabled depending on the state of the application. In this application, we have two menus: application and context. The application menu must track all the open windows, whereas the context menu should deal with only a subset of the same concerns because it can assume that at least one window is open.
8.4.1. Dynamically enabling and disabling menu items in the context menu
Earlier in this chapter, we created a context menu from a template and then called its popup() method whenever a contextmenu DOM event is fired. To dynamically enable or disable the Show File and Open in Default menu items, as in figure 8.6, let’s create a context menu each time the user right-clicks the Markdown view. We enable these items based on whether there is a filePath. To accomplish this, we move the creation of the menu into a function, which allows us to re-create the menu each time it is called.
Figure 8.6. Show File in Folder and Open in Default is disabled if there is no file open.
Listing 8.6. Creating a function to dynamically create context menus: ./app/renderer.js
const createContextMenu = () => {                                         1
  return Menu.buildFromTemplate([                                         2
    { label: 'Open File', click() { mainProcess.getFileFromUser(); } },
    {
      label: 'Show File in Folder',
      click: showFile,
      enabled: !!filePath                                                 3
    },
    {
      label: 'Open in Default',
      click: openInDefaultApplication,
      enabled: !!filePath                                                 3
    },
    { type: 'separator' },
    { label: 'Cut', role: 'cut' },
    { label: 'Copy', role: 'copy' },
    { label: 'Paste', role: 'paste' },
    { label: 'Select All', role: 'selectall' },
  ]);
};
- 1 In chapter 7, we made a single context menu that was shown every time the user right-clicked the Markdown view. In this chapter, we replace that menu with a function that creates a new context menu each time.
- 2 The return value of this function is a Menu object created using Electron’s Menu.buildFromTemplate() function.
- 3 Upon creating the menu, we check to see whether filePath has a value. We coerce filePath into a Boolean to enable or disable the menu accordingly.
In the previous code sample, we created a createContextMenu() function that returns a new menu each time it is called. As it creates the Show File and Open in Default menu items, it checks to see if filePath can be coerced to true using the !! operator. The enabled property expects a Boolean—either true or false. If you’re not familiar with this technique, it’s a trick to take a truthy or falsey value and coerce it into true or false, respectively. The ! operator returns false for any truthy value, and true for any falsey value. Using it a second time flips it back, but this time to a Boolean primitive, as shown in listing 8.7.
Listing 8.7. Converting values into Booleans
null   // Null falsey in JavaScript.
!null  // Returns true.
!!null // Returns false.

'/Users/stevekinney/Notes/Groceries.txt'  // A file path
!/Users/stevekinney/Notes/Groceries.txt'  // Returns false.
!!/Users/stevekinney/Notes/Groceries.txt' // Returns true.
The next step is to modify our event listener to use the function we just created. Each time it generates a new menu, the function checks if filePath is truthy or falsey and enables Show File and Open in Default Application accordingly. The next step is to use this function to generate a new menu on the fly each time the user right-clicks the Markdown view of the application.
Listing 8.8. Creating a context menu each time a contextmenu event is fired: ./app/renderer.js
markdownView.addEventListener('contextmenu', (event) => {
  event.preventDefault();
  createContextMenu().popup();          1
});
- 1 Instead of using a preexisting menu, we call createContextMenu() to create a menu each time and then immediately call its popup() method.
With this change, the user gets a new menu each time they request one. If there is a file to show in the filesystem or open in another application, the respective menu items are enabled. If not, they are disabled. Now it’s time to turn our attention to the—slightly trickier—application menu.
8.4.2. Dynamically enabling and disabling menu items in the application menu
The process of dynamically enabling menu items in the application menu shares some similarities with doing so in the context menu. We use the same approach of generating new menus and replacing the existing application menu but with a few catches: the application menu is shared across all windows. The first window might have a file loaded that we can show or open in another application, but the second one may not. On macOS, we might run into the scenario where there are no windows open. In this case, the Save File and Export HTML menu items should be disabled along with Show File and Open in Default Application, as shown in figure 8.7. Furthermore, our context menu could take advantage of the fact that filePath was in scope. The application menu lives in the main process and doesn’t have access to this variable. See figures 8.8 and 8.9.
Figure 8.7. If there are no windows open, Save File, Export HTML, Show File, and Open in Default Application should be disabled.

Figure 8.8. If there is a focused window, but the user is working on a file that has not yet been saved to the filesystem, then the Save File and Export HTML items should be enabled. The Show File and Open in Default Application menu items should not be, however, because there is no file location to show or open.
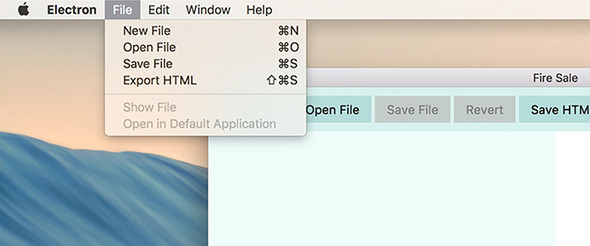
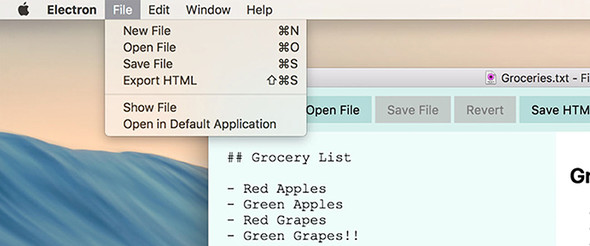
Figure 8.9. If the window is representing a file on the filesystem, all the menu items should be enabled.
To implement this feature, we take the following approach. First we’ll create a function that returns a new application menu based on the one we implemented in the previous chapter. Each time we create a new menu, we check if there are any windows and if the currently focused window is representing a file on the filesystem. With this in place, we’ll modify the main process to generate a new application menu when
- The application fires its “ready” event
- A window is closed.
- A window gains focus (thereby becoming the new focused window).
- A file is opened.
Let’s start by refactoring the template in application-menu.js to a function that will generate a menu and set it as the new application menu.
Listing 8.9. Generating a new application menu based on the application’s menu: ./app/application-menu.js
const { app,
        BrowserWindow,                                                   1
        dialog,
        Menu,
        shell
      } = require('electron');
const mainProcess = require('./main');

const createApplicationMenu = () => {
  const hasOneOrMoreWindows = !!BrowserWindow.getAllWindows().length;    2
  const focusedWindow = BrowserWindow.getFocusedWindow();                3
  const hasFilePath = !!(focusedWindow &&
     focusedWindow.getRepresentedFilename());                            4

  const template = [
    {
      label: 'File',
      submenu: [
        {
          label: 'New File',
          accelerator: 'CommandOrControl+N',
          click() {
            mainProcess.createWindow();
          }
        },
        {
          label: 'Open File',
          accelerator: 'CommandOrControl+O',
          click(item, focusedWindow) {
            // Omitted for brevity...
          },
        },
        {
          label: 'Save File',
          accelerator: 'CommandOrControl+S',
          enabled: hasOneOrMoreWindows,                                  5
          click(item, focusedWindow) {
            // Omitted for brevity...
          },
        },
        {
          label: 'Export HTML',
          accelerator: 'Shift+CommandOrControl+S',
          enabled: hasOneOrMoreWindows,                                  5
          click(item, focusedWindow) {
            // Omitted for brevity...
          },
        },
        { type: 'separator' },
        {
          label: 'Show File',
          enabled: hasFilePath,                                          6
          click(item, focusedWindow) {
            // Omitted for brevity...
          },
        },
        {
          label: 'Open in Default Application',
          enabled: hasFilePath,                                          6
          click(item, focusedWindow) {
            // Omitted for brevity...
          },
        },
      ],
    },
    // Additional Menus...
  ];

  // Additional Functionality...

  return Menu.setApplicationMenu(Menu.buildFromTemplate(template));      7
};

module.exports = createApplicationMenu;
- 1 We imported the BrowserWindow module because it has methods that are useful for reasoning about the windows in our application.
- 2 An easy way to see if any windows are open is to use BrowserWindow.getAllWindows(). If no windows are open, this array will be empty with a length of 0, which is falsey in JavaScript.
- 3 Gets the currently focused window (or null if there is no focused window).
- 4 If there is a focused window, we use its getRepresentedFile() method to get a reference to the current file path. If one exists, we’ll set the hasFilePath Boolean.
- 5 The Save File and Export HTML menu items are set based on the hasOneOr-MoreWindows Boolean.
- 6 The Show File and Open in Default Application menu items are set based on the hasFilePath Boolean.
- 7 Builds the menu from the template, and sets it as the application menu.
In chapter 7, we built the menu once when the application started and set it as the application menu as soon as it was ready. This approach still works, now that this module exports a function that creates the menu and sets it as the application menu. Along the way, it checks if there are any browser windows, and if there is a focused window, it checks whether that window has a represented file set, shown in listing 8.10. If you recall, we set the represented file in chapter 4 when opening a file. At the time, we did this to get the little file icon in the window’s title bar in macOS. (Calling this method has no discernible visual effect on Windows or Linux.)
Listing 8.10. Setting the represented file: ./app/main.js
const openFile = exports.openFile = (targetWindow, file) => {
  const content = fs.readFileSync(file).toString();
  startWatchingFile(targetWindow, file);
  app.addRecentDocument(file);
  targetWindow.setRepresentedFilename(file);                     1
  targetWindow.webContents.send('file-opened', file, content);
};
- 1 We set the represented file path when opening a file.
With these two pieces of information—the number of open windows and whether the focused window is representing a file path—we can toggle the menu items appropriately. The next step is to trigger this process whenever either of these two might have changed. Triggering events include when the application first launches, when a new window takes focus, when a window is closed (it could be the last window), and when the user opens a file. Whenever one of these events occurs, we re-create the application menu.
Listing 8.11. Generating a new application menu when state might have changed: ./app/main.js
const { app, BrowserWindow, dialog, Menu } = require('electron');
const createApplicationMenu = require('./application-menu');          1
const fs = require('fs');

const windows = new Set();
const openFiles = new Map();

app.on('ready', () => {
  createApplicationMenu();                                            2
  createWindow();
});

app.on('window-all-closed', () => {
  // Omitted for brevity...
});

app.on('activate', (event, hasVisibleWindows) => {
  if (!hasVisibleWindows) { createWindow(); }
});

const createWindow = exports.createWindow = () => {
  let x, y;

  const currentWindow = BrowserWindow.getFocusedWindow();

  if (currentWindow) {
    const [ currentWindowX, currentWindowY ] = currentWindow.getPosition();
    x = currentWindowX + 10;
    y = currentWindowY + 10;
  }

  let newWindow = new BrowserWindow({ x, y, show: false });

  newWindow.loadFile('index.html');

  newWindow.once('ready-to-show', () => {
    newWindow.show();
  });

  newWindow.on('focus', createApplicationMenu);                      3

  newWindow.on('close', (event) => {
    // Omitted for brevity...
  });

  newWindow.on('closed', () => {
    windows.delete(newWindow);
    createApplicationMenu();                                         4
    newWindow = null;
  });

  windows.add(newWindow);
  return newWindow;
};

const getFileFromUser  = exports.getFileFromUser = (targetWindow) => {
  // Omitted for brevity...
};

const openFile = exports.openFile = (targetWindow, file) => {
  const content = fs.readFileSync(file).toString();
  startWatchingFile(targetWindow, file);
  app.addRecentDocument(file);
  targetWindow.setRepresentedFilename(file);
  targetWindow.webContents.send('file-opened', file, content);
  createApplicationMenu();                                          5
};


// Additional functions below...
- 1 Updates the require statement to reflect the new function, createApplicationMenu, we’re importing
- 2 Creates an application menu when the application is first launched and is ready
- 3 Creates a new application menu whenever a new window gains focus
- 4 Creates a new application whenever a window is closed
- 5 Creates a new application menu whenever a file has been opened and the represented file has been set
With the ability to create application menus and replace the existing one, implementing this functionality in main.js is just a matter of invoking this function at the right time. With this in place, we’ve accomplished the feature that we set out to implement at the beginning of this section. The full code at the end of this chapter can be found in the appendix book or on GitHub at https://github.com/electron-in-action/firesale.
Summary
- The shell module enables the application to communicate with the operating system to show files in the file browser, open files in their default application, move files to the Trash or Recycling Bin (depending on the operating system), trigger a system beep, and create or read shortcut links in Windows.
- The shell module is available in the main process as well as the renderer processes. Thus, it can be used in the application menus, context menus, or in event listeners on UI elements.