Table of Contents for
Electron in Action
 Electron in Action
Published by
Manning Publications, 2018
Electron in Action
Published by
Manning Publications, 2018
- Cover
- Electron in Action
- Copyright
- Electron in Action
- Brief Table of Contents
- Table of Contents
- Preface
- Acknowledgments
- About this book
- About the cover illustration
- Part 1. Getting started with Electron
- Chapter 1. Introducing Electron
- Chapter 2. Your first Electron application
- Part 2. Building cross-platform applications with Electron
- Chapter 3. Building a notes application
- Chapter 4. Using native file dialog boxes and facilitating interprocess communication
- Chapter 5. Working with multiple windows
- Chapter 6. Working with files
- Chapter 7. Building application and context menus
- Chapter 8. Further operating system integration and dynamically enabling menu items
- Chapter 9. Introducing the tray module
- Chapter 10. Building applications with the menubar library
- Chapter 11. Using transpilers and frameworks
- Chapter 12. Persisting user data and using native Node.js modules
- Chapter 13. Testing applications with Spectron
- Part 3. Deploying Electron applications
- Chapter 14. Building applications for deployment
- Chapter 15. Releasing and updating applications
- Chapter 16. Distributing your application through the Mac App Store
- Code from the end of chapter 6
- Index
- List of Figures
- List of Tables
- List of Listings
Chapter 15. Releasing and updating applications
This chapter covers
- Sending crash reports from Electron
- Sending reports of uncaught exceptions from Electron
- Creating a server to collect crash and exception reports
- Automatically pushing application updates to users
You’ve built your application, and you’re ready to distribute it to the world. You’ve prepared your announcement, and your cursor is hovering over the Publish button when—all of a sudden—your mind begins to race with some very important questions: What if it doesn’t work on all platforms as you expected? What if there is a bug you haven’t encountered yet? What if you need to push out a new version of the application to your users?
These concerns are all valid. The good news is that Electron has you covered on each front. In this chapter, we cover how to collect crash reports and—in the event you receive an unexpectedly large number of them—how to push an update to all of the users that currently have the application installed on their system.
15.1. Collecting crash reports
Despite how good your skills as a developer are, your application is going to have bugs. Some users report them, but many others suffer in silence. Even among the users who report bugs, it can be difficult to determine how common a given issue is among your user base as a whole. Crash reporting is critical for discovering what types of problems occur and at what frequency your users are experiencing them.
Though it is certainly a relief that Electron includes support for crash reporting, it’s surprising. As we’ve covered throughout this book, Electron is built on top of Chromium, and crash reporting is certainly something that the Chromium team deals with in their project. To stand on the shoulder of giants, however, we need to set up the crash reporter in our Electron application, as well as deploy a simple server to collect these crash reports for later analysis.
In this chapter, we implement crash reporting and auto-updating into Fire Sale, which is the application we began getting ready for deployment in chapter 14. We begin working on the chapter-15-beginning branch, found at https://github.com/electron-in-action/firesale.
We tackle the following:
- Configuring Electron’s built-in ability to send a crash report when the application—umm—crashes unexpectedly. The crash reporter is triggered when the application goes down completely.
- Setting up a naively simple server to receive and collect the crash reports sent from versions of our application out in the wild.
- Configuring our application to listen for uncaught exceptions that occur at runtime. This code is our own handiwork and not something provided by Electron out of the box. This functionality is triggered when smaller errors occur that necessarily result in a complete failure of the application itself.
- Updating our server to receive those error reports as well.
15.1.1. Setting up the crash reporter
Under the hood, Electron uses one of two crash-reporting systems: on macOS, the Chrome team’s Crashpad reporting engine; on Windows and Linux, an older engine known as Breakpad. These options impact how we implement crash reporting in Electron. The main difference is that Breakpad crash reporting needs to be set up only in the main process, whereas Crashpad must be started in the main and renderer processes.
Yes, you could copy and paste the code from the main process into each of the renderer processes. (We’re lucky to have only one in Fire Sale.) But that means you’d have to remember to be diligent enough to change it in multiple places in the event you needed to update the configuration. Personally, I’d prefer to spend a few extra moments of effort now for a lifetime of laziness. Let’s set up a single function that we can use in both places.
Listing 15.1. Creating a file to configure and start up the Crash Reporter: ./app/crash-reporter.js
const { crashReporter } = require('electron');

const host = 'http://localhost:3000/';          1

const config = {
  productName: 'Fire Sale',
  companyName: 'Electron in Action',
  submitURL: host + 'crashreports',
  uploadToServer: true,                         2
};

crashReporter.start(config);                    3

console.log('[INFO] Crash reporting started.', crashReporter);

module.exports = crashReporter;
- 1 The URL where the crash reports are sent via an HTTP POST request.
- 2 Indicates that you want the crash results to be sent to the server
- 3 Starts the Crashpad or Breakpad crash reporter using the configuration options passed in
We set up a reusable module for starting up the crash reporter, but you can change the value of any of those options. Particularly, we need to change submitURL because it is both unlikely that our users happen to be running a server on that port and ultimately unhelpful to us if they’re collecting crash reports locally and never sending them to us.
The code by itself does not start the crash-reporting engine unless it is pulled into the main and renderer processes. We start by pulling it into the main process.
Listing 15.2. Starting the crash reporter in the main process: ./app/main.js
const { app, BrowserWindow, dialog, Menu } = require('electron');
const createApplicationMenu = require('./application-menu');
const fs = require('fs');

require('./crash-reporter');          1

const windows = new Set();
const openFiles = new Map();

// The rest of the main process code...
- 1 We require crash-reporter.js, which will start it up.
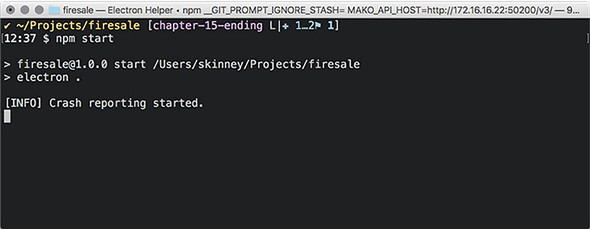
This method is effectively enough to implement the ability to send crash reports on Windows and Linux. We can verify that the code inside the crash reporter has executed by checking the terminal for the message we logged to the console in listing 15.1 when the application starts, as shown in figure 15.1.
Figure 15.1. The console message verifies that the code inside crash-reporter.js has executed.
As I mentioned earlier, we need to do one more—arguably simple—step to get crash reporting working on macOS: execute the same code in the renderer process.
Listing 15.3. Starting the crash reporter in the renderer process: ./app/renderer.js
const { remote, ipcRenderer, shell } = require('electron');
const { Menu } = remote;
const path = require('path');
const mainProcess = remote.require('./main.js');
const currentWindow = remote.getCurrentWindow();

require('./crash-reporter');                  1
- 1 Starts the crash reporter in the renderer process
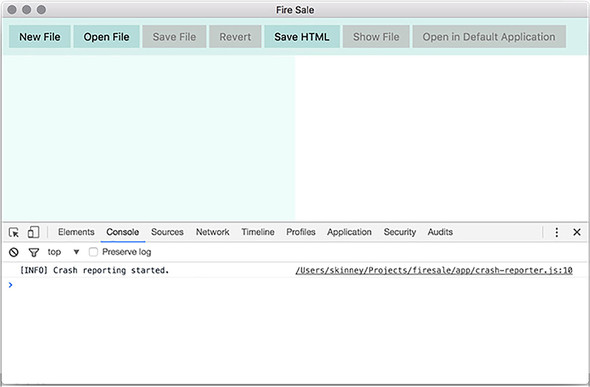
We can verify that the crash reporter has started by opening the Developer Tools in the Fire Sale UI and confirming that the console message has been logged correctly, as seen in figure 15.2.
Figure 15.2. Verify that the crash reporter code has been executed by checking the console.
15.1.2. Setting up a server to receive crash reports
We can send crash reports—but where? We can trigger a crash by typing process.crash() into the Developer Tools in the renderer process. As shown in figures 15.3 and 15.4, doing so results in the following: the page crashing, the Developer Tools locking up, and the main process logging an error.
Figure 15.3. Triggering a crash in the render process requires a reload of the UI.
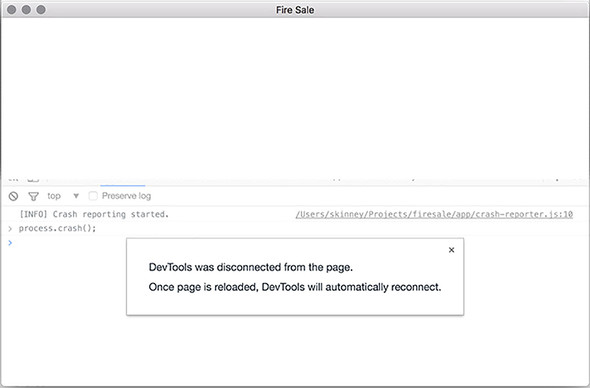
Figure 15.4. Electron attempts to send the crash report but cannot find the server.
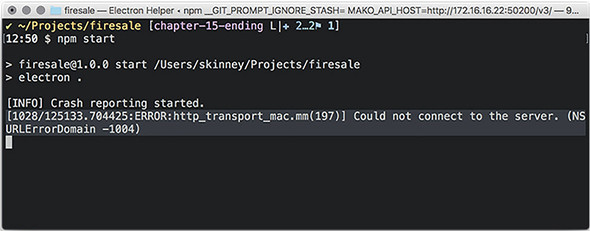
The immediate issue that we need to solve is the error in our terminal. The exact contents of the error varies by operating system, but the gist is that the crash reporter cannot connect to the server. This makes sense, because we haven’t yet set up a server.
Depending on your application, you may already be using an API server. If so, I’d recommend adding an endpoint for receiving POST requests from your application. That said, Fire Sale has not had the need for an API server, and I’m going to work under the assumption that we don’t have one. For those of you that do, I suspect what follows is still helpful because it illustrates what kind of payload you can expect when a crash is reported.
As described in listing 15.4, let’s create a simple server for capturing and recording crash reports. The code can be found on GitHub at http://mng.bz/k6eT.
Listing 15.4. Creating a simple crash reporting server
const express = require('express');
const multer = require('multer');
const bodyParser = require('body-parser');
const uuid = require('uuid');
const writeFile = require('write-file');
const path = require('path');
const http = require('http');

const app = express();                                          1
const server = http.createServer(app);

app.use(bodyParser.urlencoded({ extended: false }));            2

const crashesPath = path.join(__dirname, 'crashes');

const upload = multer({                                         3
  dest: crashesPath,
}).single('upload_file_minidump');

app.post('/crashreports', upload, (request, response) => {
  const body = {                                                4
    ...request.body,
    filename: request.file.filename,
    date: new Date(),
  };
  const filePath = `${request.file.path}.json`;
  const report = JSON.stringify(body);

  writeFile(filePath, report, error => {                        5
    if (error) return console.error('Error Saving', report);
    console.log('Crash Saved', filePath, report);
  });

  response.end();
});

server.listen(3000, () => {
  console.log('Crash report server running on Port 3000.');
});
- 1 Express is a simple web server library for Node.js.
- 2 The bodyParser library is middleware for Express to work with the body of HTTP requests.
- 3 Multer allows us to receive multipart files (such as the crash report mini-dumps generated by Electron).
- 4 Adds the filename of the mini-dump and the current time to the JSON in the request body
- 5 Writes the file to the filesystem
If you clone the library from GitHub, install the dependencies, and run npm start. You should have a server ready and able to collect crash reports running on http://localhost:3000, which is exactly where we pointed the Electron crash reporter in listing 15.1.
Each crash report creates two files in the ./crashes directory: a mini-dump from Chromium and a JSON file with additional metadata about the crash. The JSON file contains useful data about the version of your application that crashed and the platform that it was running on.
Listing 15.5. An example of the JSON metadata from a crash report
{
  "_companyName": "Electron in Action",
  "_productName": "Fire Sale",
  "_version": "1.0.0",
  "guid": "46cecb8f-f2de-4159-a235-dc8713f8393f",
  "platform": "darwin",                              1
  "process_type": "renderer",                        2
  "prod": "Electron",
  "ver": "2.0.4",                                    3
  "filename": "a51d2ca2e13cad25cea6c2bd15ae4d4d"     4
}
- 1 The platform that the crash occurred on.
- 2 The process type that the crash occurred on.
- 3 The version of Electron currently in use.
- 4 The name of the file where the mini-dump is located.
When a crash is reported, the server saves two files to the /crashes directory: a51d2ca2e13cad25cea6c2bd15ae4d4d and a51d2ca2e13cad25cea6c2bd15ae4d4d.json. The former is a dump from Chromium of everything that was happening when the application crashed. This file is in a binary format and cannot be opened in a text editor.
The easiest way to parse this file is to use the minidump library from the Electron team. You can install this globally using npm install -g minidump. After you install it, you have the minidump_stackwalk command-line tool at your disposal and can use minidump_stackwalk <name of mini-dump file> to read the contents of the dump. Alternatively, you can use this tool programmatically on your crash-report server as outlined in the tool’s documentation (www.npmjs.com/package/minidump).
15.1.3. Reporting uncaught exceptions
Electron’s built-in crash reporter is good at what it claims to do on the box—reporting crashes. But in my experience, general bugs and minor errors are much more common than outright crashes. It would be great if we could collect these errors as well, to have better insight into where the rough edges of our application are and exactly how to fix them.
Unfortunately, this is not a tool that is already built into Electron. The good news is that this feature is relatively easy to implement given the knowledge we’ve already gained throughout the course of this book.
To implement this feature, we have to listen for any uncaught exceptions. The syntax for this is slightly different between the main and renderer processes, but the implementation is the same, as shown in the following listing. When an uncaught exception occurs, send an HTTP POST request to our crash server, which will then log the error to a JSON file.
Listing 15.6. Updating the crash reporter to report uncaught exceptions: ./app/crash-reporter.js
const { crashReporter } = require('electron');
const request = require('request');
const manifest = require('../package.json');

const host = 'http://localhost:3000/';

const config = {
  productName: 'Fire Sale',
  companyName: 'Electron in Action',
  submitURL: host + 'crashreports',
  uploadToServer: true,
};

crashReporter.start(config);

const sendUncaughtException = error => {                         1
  const { productName, companyName } = config;
  request.post(host + 'uncaughtexceptions', {                    2
    form: {
      _productName: productName,
      _companyName: companyName,
      _version: manifest.version,
      platform: process.platform,
      process_type: process.type,
      ver: process.versions.electron,
      error: {                                                   3
        name: error.name,
        message: error.message,
           stack: error.stack,
      },
    },
  });
};

if (process.type === 'browser') {                                4
  process.on('uncaughtException', sendUncaughtException);        5
} else {
  window.addEventListener('error', sendUncaughtException);       6
}

console.log('[INFO] Crash reporting started.', crashReporter);

module.exports = crashReporter;
- 1 Sets up a function to report uncaught exceptions
- 2 Sends an HTTP POST request to the crash server we created earlier
- 3 Sends information about the error that was fired
- 4 Checks if we’re running in the main or renderer process
- 5 If the error occurred in the main process, uses Node’s uncaughtException event
- 6 If the error occurred in the renderer process, adds an event listener to the global object
Any time an error is fired and it bubbles up to the window object without being handled, a report is sent to our server. But just as last time, our server has not been set up yet to handle this report. We need to add another route to log this error.
Listing 15.7. Setting up a server route to receive reports of uncaught exceptions
const express = require('express');
const multer = require('multer');
const bodyParser = require('body-parser');
const uuid = require('uuid');
const writeFile = require('write-file');
const path = require('path');
const http = require('http');

const app = express();
const server = http.createServer(app);

app.use(bodyParser.urlencoded({ extended: false }));

const crashesPath = path.join(__dirname, 'crashes');
const exceptionsPath = path.join(__dirname, 'uncaughtexceptions');   1

const upload = multer({
  dest: crashesPath,
}).single('upload_file_minidump');

app.post('/crashreports', upload, (request, response) => {
  // ...
});

app.post('/uncaughtexceptions', (request, response) => {
  const filePath = path.join(exceptionsPath, `${uuid()}.json`);      2
  const report = JSON.stringify({
    ...request.body,
    date: new Date()                                                 3
  });

  writeFile(filePath, report, error => {                             4
    if (error) return console.error('Error Saving', report);
    console.log('Exception Saved', filePath, report);
  });

  response.end();
});

server.listen(3000, () => {
  console.log('Crash report server running on Port 3000.');
});
- 1 Adds a path on the filesystem for storing uncaught exception reports
- 2 Uses the UUID module to create a unique identifier for the crash report
- 3 Adds the date to the crash report
- 4 Writes the report to the filesystem
15.2. Signing your applications
In chapter 14, we packaged our application so that users don’t need to have Node installed or be familiar with the command line to start it up. In the previous section, we added crash and exception reporting to be confident that we’ll be notified in the event our application does not work as intended. Our next step is to sign our application so that our users can be certain that they’re getting the real thing and not a cheap substitute.
This process differs on macOS and Windows, so let’s walk through each platform separately. Although some of the steps for macOS seem repetitive when we package Fire Sale for the Mac App Store in chapter 16, myriad subtle differences exist.
Before we get into the nitty-gritty of code signing our applications, I’ll take a moment to explain what code signing is. The internet is a wild place. You can think of code signing as a tamper-proof seal around your application. Signing our applications allows users to be confident that it both came from you and that no one modified it or otherwise tampered with it along the way. On top of being a generally good idea, macOS and Windows prefer that users work with signed applications and present a series of warnings if they attempt to open an unsigned application. Depending on their settings, users may not be able to open unsigned applications at all.
15.2.1. Signing applications for macOS
You need a few prerequisites in place to sign a macOS application. First, you must be a registered member of the Apple Developer Program (https://developer.apple.com/programs/). Second, you must have Xcode installed. This can be downloaded from the Mac App Store or from Apple’s Developer site (https://developer.apple.com/xcode/download/). In addition to having Xcode installed, you also need to have the Xcode command-line tools installed. To set these up, type xcode-select –install from the command line, and follow all of the subsequent prompts.
Creating Certificates
To sign your application, you need to create certificates either through iTunes Connect or from within Xcode. We spend an uncomfortable amount of time in iTunes Connect in chapter 16, so we’ll do it in Xcode this time.
We generate two certificates: a “Developer ID Application” and a “Developer ID Installer” certificate. To create these certificates
- Open Xcode
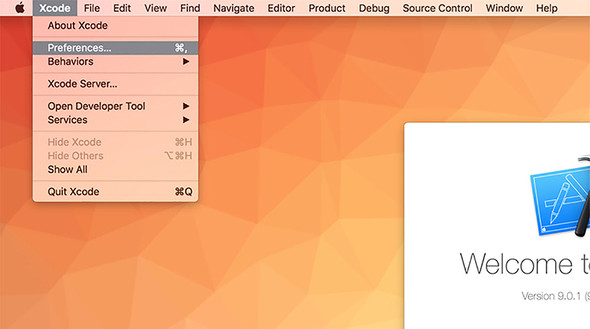
- Select Preferences from the Xcode menu (as shown in figure 15.5)
Figure 15.5. Select Preferences from the Application menu.
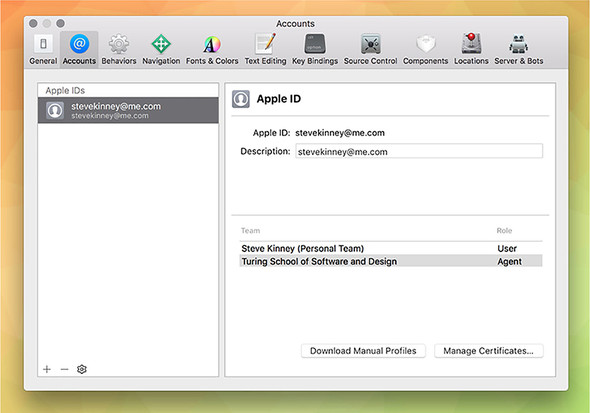
- Select the Accounts tab
- Select your team
- Click the Manage Certificates button (as shown in figure 15.6)
Figure 15.6. Select your team from the Accounts tab, and click Manage Certificates.
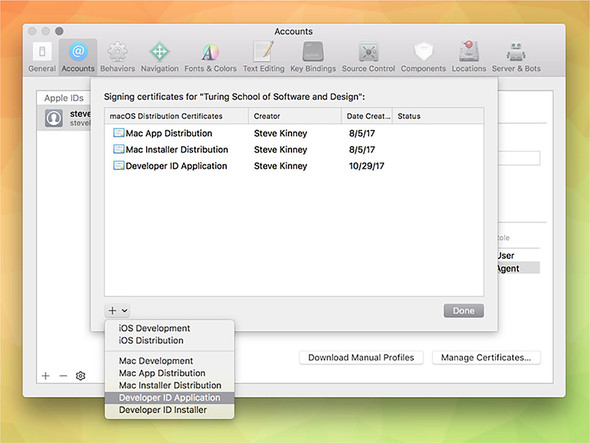
- Click the + button in the lower-left corner
- Choose Developer ID Application from the drop-down menu (shown in figure 15.7)
- Repeat this process with Developer ID Installer
Figure 15.7. Select Developer ID Application and Developer ID Installer from the drop-down menu.
Xcode automatically adds these certificates to your Keychain. Electron Packager looks these up when it comes time to package your application and sign it. First, we need to modify the packaging script in our package.json.
Listing 15.8. Updated Mac packaging script: ./package.json
"build-mac": "electron-packager . --platform=darwin--out=build --icon=./icons/Icon.icns --asar –overwrite
This line is getting a bit long, and we begin to break it out a bit in chapter 16, but for now, we add a few important new arguments to the existing script: --app-bundle-id, --app-version, --build-version, and --osx-sign.
When running npm run build-mac, you are prompted for your password multiple times, as shown in figure 15.8, because Electron Packager accesses your keychain to use the certificates to sign your application.
Figure 15.8. macOS’s codesign utility accesses your keychain to use the certificates you generated to sign the application.

15.2.2. Building an installer and code signing on Windows
On Windows, you need a code-signing certificate. Microsoft recommends buying a certificate from a list of certificate authorities listed in their documentation (http://mng.bz/3VEH).
You can still build an installer without a certificate, but you might have difficulty distributing your application to users without one. Microsoft’s SmartScreen filter may block your application from being downloaded, and many antivirus programs might mislabel your application as malware. For the purposes of this chapter, as we go through the process of building an installer, I show you where to plug in your certificate, should you move forward and decide to purchase one.
The Electron team maintains a helpful library for building installers on Windows. You can install this tool using npm install --save-dev electron-winstaller. We create a new folder called scripts and make a file called scripts/windows.js to store the configuration for our Windows installer. Add the content in listing 15.9 to the file we just created.
Listing 15.9. Windows installer configuration: ./scripts/windows.js
const { createWindowsInstaller } = require('electron-winstaller');    1
const path = require('path');

const iconPath = path.resolve(__dirname, '../icons/Icon.ico');        2

const result = createWindowsInstaller({                               3
  title: 'Fire Sale',
  authors: 'Steve Kinney',
  appDirectory: path.resolve(                                         4
    __dirname,
    '../build/Fire Sale-win32-x64'
  ),
  outputDirectory: path.resolve(                                      5
    __dirname,
    '../build/Fire Sale-win32-x64-installer'
  ),
  icon: iconPath,                                                     6
  setupIcon: iconPath,                                                7
  name: 'FireSale',
  setupExe: 'FireSaleSetup.exe',
  setupMsi: 'FireSaleSetup.msi',
});

result
  .then(() => console.log('Success'))                                 8
  .catch(error => console.error('Failed', error));                    9
- 1 Imports the function to create a Windows installer
- 2 Locates the path to the icons for the application
- 3 Creates an installer. This returns a promise.
- 4 Locates the packaged application that you first built in chapter 14.
- 5 Specifies the directory where you would like the installer to be generated
- 6 Sets the icon for the application itself
- 7 Sets the icon for the installer packager. I’ve opted to use the same icon.
- 8 If the installer was created successfully, the promise resolves.
- 9 If an error occurred and the promise fails, log the error to the console.
If you have your certificates handy, you can add them to the configuration object. certificateFile should point to the path where the certificate is located. This process is similar to how we locate the iconPath. certificatePassword is the password for the certificate. Do not store the password in version control—particularly if your application is or ever will be open source.
Setting Up Squirrel events
If you get really excited and double-click the FireSaleSetup executable, you may notice that things are a little strange. You see a loading GIF followed by the application immediately opening. It didn’t add a shortcut to the desktop, or any other way of getting back to the application.
Uninstalling the application adds its own set of oddities. When you click the button in the Add and Remove Programs settings panel, you see the application open again before it finally uninstalls. We need to address this.
The Windows installer is set up with the Squirrel.Windows framework. When you start the application for the first time, or when it is being uninstalled, has been updated, or finds an available update, Squirrel passes an argument to your application. Luckily, working with Squirrel on Windows can range from incredibly simple to very easy. Let’s start with the incredibly simple way, and then I’ll show you what’s happening under the hood.
The easiest way to get started is to delegate the work to someone else by installing electron-squirrel-startup using npm install electron-squirrel-startup. After you install this package, add the code from this listing to your ./app/main.js.
Listing 15.10. Setting up Squirrel events in the main process: ./app/main.js
const { app, BrowserWindow, dialog, Menu } = require('electron');
const createApplicationMenu = require('./application-menu');
const fs = require('fs');

require('./crash-reporter');

if(require('electron-squirrel-startup')) return;       1

// ...
- 1 If the function in electron-squirrel-startup returns true, exits the main process.
With that simple change, all the oddities we encountered when working with FireSaleSetup.exe are squared away. So, what’s happening in this module? The module is open source and can be found on GitHub (https://github.com/mongodb-js/electron-squirrel-startup), but it’s a small file, and for the sake of completeness I list it here as well.
Listing 15.11. electron-squirrel-startup
var path = require('path');
var spawn = require('child_process').spawn;
var debug = require('debug')('electron-squirrel-startup');
var app = require('electron').app;

var run = function(args, done) {
  var updateExe = path.resolve(                                          1
    path.dirname(process.execPath), '..', 'Update.exe'
  );
  debug('Spawning `%s` with args `%s`', updateExe, args);
  spawn(updateExe, args, {
    detached: true
  }).on('close', done);
};

var check = function() {
  if (process.platform === 'win32') {                                    2
    var cmd = process.argv[1];                                           3
    debug('processing squirrel command `%s`', cmd);
    var target = path.basename(process.execPath);

    if (cmd === '--squirrel-install' || cmd === '--squirrel-updated') {  4
      run(['--createShortcut=' + target + ''], app.quit);                5
      return true;                                                       6
    }
    if (cmd === '--squirrel-uninstall') {                                7
      run(['--removeShortcut=' + target + ''], app.quit);                8
      return true;
    }
    if (cmd === '--squirrel-obsolete') {
      app.quit();
      return true;
    }
  }
  return false;                                                          9
};

module.exports = check();
- 1 Gets the path of the Squirrel updater
- 2 Does any of the following, only if the application is running on Windows
- 3 Gets the first argument passed from the command line
- 4 Checks if the application is being run as an installer or updater
- 5 Creates an application shortcut on the desktop, and quits
- 6 Returns true, which fulfills the conditional in the main process
- 7 Checks if the application is being uninstalled
- 8 Removes the shortcut from the desktop, and quits the application
- 9 If none of the cases are true, returns false.
If Squirrel did anything, it returns true. Recall in ./app/main.js that we used a conditional and if require(’electron-squirrel-startup’) returned true, we ended the main process early. This allows us to tap into the Squirrel framework when necessary and not start the application when we’re installing or uninstalling it. You can also see that on installation and uninstallation, Squirrel creates and removes the desktop shortcut as needed.
15.3. Automatically updating applications
Whether you’ve completed a hot new feature that you want everyone to have or you’re trying to correct a critical bug that you found after implementing the crash and error report, the ability to push out updates to your users is important.
We tend to take this capability for granted as web developers. Whenever we deploy a new application to the web, we can reasonably expect that users are getting the latest and greatest version of it. But that’s not necessarily true when we’re building desktop applications. We can tell users about it, but there is no guarantee that they’re going to take the time to download it.
Browsers used to suffer from this problem. New JavaScript language and web platform features would be released, but you couldn’t use them because users typically did not update their browsers on a regular basis. Today, modern browsers like Chrome and Firefox push out new versions to users every six weeks or so. The update is automatically downloaded, and the next time the user starts the browser, the new one is swapped in without them having to think about the tedious process of upgrading.
It shouldn’t be a surprise at this point to hear that Electron provides a mechanism for us to do this with our applications—with some exceptions. As of this writing, this feature is limited to macOS and Windows. There is currently no support for auto-updating Electron applications on Linux.
15.3.1. Setting up automatic updates in Electron
Like crash reporting, implementing automatic updates has two sides: your application and a server to host releases of your application. We get into the details momentarily, but let’s talk about how this works at a high level first. After you’ve configured the autoUpdater module, it pings your release server every time the application starts. If the server responds with an HTTP 204 response, then Electron knows that it is running the latest version of the application. If there is a new version, the server returns an HTTP 200 JSON-formatted response with the URL of the new release.
You may have your own server for hosting releases. That’s perfectly fine. If you do not, we create a simple server to get you off the ground and demonstrate auto-updating in action. But this is not meant to be prescriptive. As long as you have a server that responds with the correct HTTP status codes and payload if there is a new release, Electron does not have strong opinions on the implementation details, and we won’t either, for the time being.
To get this working, we check if we’re using a production version of the application. If so, we send a request to the server asking for the most recent version of the application. If a new version exists, ask the user if they are interested in updating. When they agree, tell the autoUpdater module to quit the application and install the new version on our behalf.
Listing 15.12. Implementing Electron’s autoUpdater: ./app/auto-updater.js
const { app, autoUpdater, dialog, BrowserWindow } = require('electron');

const isDevelopment = app.getPath('exe').indexOf('electron') !== -1;       1

const baseUrl = 'https://firesale-releases.glitch.me';                     2

const platform = process.platform;                                         3
const currentVersion = app.getVersion();                                   4

const releaseFeed =
     `${baseUrl}/releases/${platform}?currentVersion=${currentVersion}`;   5

if (isDevelopment) {
  console.info('[AutoUpdater]', 'In Developement Mode. Skipping...');      6
} else {
  console.info('[AutoUpdater]', `Setting release feed to ${releaseFeed}.`);
  autoUpdater.setFeedURL(releaseFeed);                                     7
}

autoUpdater.addListener('update-available', () => {                        8
     dialog.showMessageBox({
    type: 'question',
    buttons: ['Install & Relaunch', 'Not Now'],
    defaultId: 0,
    message: `${app.getName()} has been updated!`,
    detail: 'An update has been downloaded and can be installed now.'
  }, response => {
    if (response === 0) {
      setTimeout(() => {
        app.removeAllListeners('window-all-closed');                       9
        BrowserWindow.getAllWindows().forEach(win => win.close());         10
        autoUpdater.quitAndInstall();                                      11
      }, 0);
    }
  });
});

module.exports = autoUpdater;
- 1 Checks if we’re running this Electron application in development
- 2 Stores the base URL of the server where you host releases
- 3 Gets the current OS on which application is running
- 4 Gets the current version of the application
- 5 Creates the path from which to request an update, based on the OS and application version
- 6 If the application is in development mode, does not check for an update . . .
- 7 . . . otherwise, sets the feed of the autoUpdater to the URL you just created.
- 8 If an update is available, performs the action provided
- 9 Removes the event listener for the windows-all-closed event
- 10 Closes all of the windows
- 11 Quits the application, and installs the update
On macOS, autoUpdater fails if the application has not been code signed. When we’re developing the application, we use a version that has not been signed. These two facts are in direct opposition. The best course of action is not to fetch an update if we’re in development. This outcome also makes sense, because we’re likely working on the next version of the application, as opposed to the most recently released version.
You can implement this in a few ways. You could, for example, try to set the feed URL and then catch the error if the application hasn’t been code signed. Based purely on aesthestic reasons, this is not something I like to do. Electron does not have an API to let us know whether we’re in development, but when we are in development, we’re using a version of Electron buried inside of our node_modules directory. In my case, it’s located at ./node_modules/electron/dist/Electron.app/Contents/MacOS/Electron. In production it is located in the application bundle itself. I’ve taken advantage of this fun fact to determine whether the application is in development.
If it’s not in development, then we create a URL to look for updates based on the platform on which the application is running. This URL can technically be anything you want. You don’t have to follow my example, if your setup is different than the one we write together next.
We tell the autoUpdater module to send a request to the URL provided and ask if there are any updates. If there are, then the updates-available event runs. We’ve set up a listener for that event. If an update is available, we ask the user if they would like to update to the latest and greatest version of Fire Sale. If they agree, then we take a series of steps to gracefully transition them to the new version.
First, I remove the event listener that we set up in ./app/main.js that prevents the application from quitting if all of the windows are closed on macOS. Next, we iterate through the windows and close them. We do this to prompt the user to save any changes made to the file. Finally, we call autoUpdater.quitAndInstall(), which—unsuprisingly—closes the application and installs the newly downloaded update. Squirrel takes care of all of this on our behalf.
15.3.2. Setting up a server for automatic updates
As with the crash reporter, we set up a deliberately simple server for notifying your users of updates. A more robust example might use a database to store the most recent version along with release notes and more. You could store your application bundles on S3, but going through the process of creating a full-featured web server is outside the scope of this book.
As I mentioned earlier, our server must fulfill a simple contract to play nicely with Electron’s autoUpdater module. If the application matches the latest release, the server should return a response with a 204 status code. If an update is available, the servers should return a JSON object that has a url property with the URL to the new application as its value.
I’ve hosted the server (https://firesale-releases.glitch.me/) and its code (https://glitch.com/edit/#!/firesale-releases) on Glitch, where you can remix it for your own purposes. Glitch also hosts the application, so we can use it in Fire Sale to pull down an update. I encourage you to visit the link to the previous code for the most recent version, but I include an annotated version here as well.
Listing 15.13. Setting up the release server
const express = require('express');
const fs = require('fs');
const path = require('path');
const app = express();

app.use(express.static('public'));

const latestRelease = '1.2.0';                            1

app.get("/", (request, response) => {
  response.sendFile(__dirname + '/views/index.html');
});

app.get('/releases/:platform', (request, response) => {   2
  const { platform } = request.params;                    3
  const { currentVersion } = request.query;               4

  if (currentVersion === latestRelease) {                 5
    response.status(204);                                 6
    return response.end();
  }

  if (platform === 'darwin') {                            7
    return response.json({
      url: ...
    });
  }

  if (platform === 'win32') {                             8
    return response.json({
      url: ...
    });
  }

  if (platform === 'linux') {                             9
    return response.json({
      url: ...
    });
  }

  response.status(404).end();
});

const listener = app.listen(process.env.PORT, () => {
  console.log('Your app is listening on port ' + listener.address().port);
});
- 1 This is the most recent release of Fire Sale.
- 2 Sets up a route that listens for GET requests on a specific platform with an optional version passed in
- 3 Pulls the OS platform from the URL parameters
- 4 Pulls the current version from a query parameter
- 5 Checks if the current version equals the latest version referenced earlier
- 6 If it matches, returns an HTTP 204 status code
- 7 If the platform is macOS, returns a payload with the URL to the newest bundle for macOS
- 8 If the platform is Windows, returns a payload with the URL to the newest bundle for Windows
- 9 If the platform is Linux, returns a payload with the URL to the newest bundle for Linux
I started by storing a reference to the most recent version of Fire Sale in a variable. Next, I set up a dynamic route. If you recall, Fire Sale requests updates based on the platform on which it’s running. Versions running on macOS, Windows, and Linux request updates from /releases/darwin, /releases/win32, and /releases/linux, respectively. We also check if the version number is included as a query parameter.
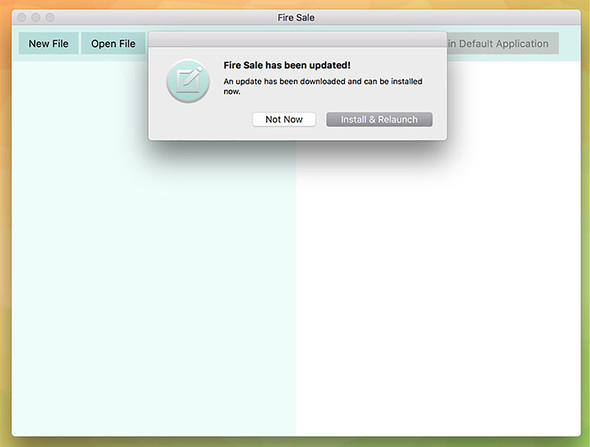
If the current version and the latest release match, then we respond with a 204 status code to let the application know that it is currently running the most recent version. If they do not match, we assume that an update is available. We then check which platform the user requested and send them the URL for the appropriate flavor of the latest release of Fire Sale, a shown in figure 15.9.
Figure 15.9. Fire Sale automatically notifies users when a new version is available on the server.
If you’ve used the code I provided for the autoUpdater and pointed it at https://firesale-releases.glitch.me/, then you should be notified about a very important update to Fire Sale.
Summary
- Electron includes built-in modules for handling crash reports and automatic updates.
- The crash report sends reports in a mini-dump format when the application outright crashes.
- Uncaught exceptions can also be monitored and reported to a server for additional insight.
- Applications should be code signed to verify that they have not been tampered with.
- On macOS, code-signing certificates can be generated from Xcode.
- On Windows, developers can purchase certificates from a certificate authority.
- Windows installers can be easily created using the electron-winstaller and electron-squirrel-startup packages on npm.
- Electron’s autoUpdater module checks for updates on start up.
- autoUpdater uses the open source Squirrel framework under the hood to manage installation and updates.