Table of Contents for
Electron in Action
 Electron in Action
Published by
Manning Publications, 2018
Electron in Action
Published by
Manning Publications, 2018
- Cover
- Electron in Action
- Copyright
- Electron in Action
- Brief Table of Contents
- Table of Contents
- Preface
- Acknowledgments
- About this book
- About the cover illustration
- Part 1. Getting started with Electron
- Chapter 1. Introducing Electron
- Chapter 2. Your first Electron application
- Part 2. Building cross-platform applications with Electron
- Chapter 3. Building a notes application
- Chapter 4. Using native file dialog boxes and facilitating interprocess communication
- Chapter 5. Working with multiple windows
- Chapter 6. Working with files
- Chapter 7. Building application and context menus
- Chapter 8. Further operating system integration and dynamically enabling menu items
- Chapter 9. Introducing the tray module
- Chapter 10. Building applications with the menubar library
- Chapter 11. Using transpilers and frameworks
- Chapter 12. Persisting user data and using native Node.js modules
- Chapter 13. Testing applications with Spectron
- Part 3. Deploying Electron applications
- Chapter 14. Building applications for deployment
- Chapter 15. Releasing and updating applications
- Chapter 16. Distributing your application through the Mac App Store
- Code from the end of chapter 6
- Index
- List of Figures
- List of Tables
- List of Listings
Chapter 9. Introducing the tray module
- Building a simple application that lives in the menu bar on macOS or the system tray in Windows.
- Using Electron’s tray module to create applications that live in the operating system’s menu bar or system tray.
- Reading from and writing to the system clipboard.
- Registering global shortcuts that listen for specific keystrokes even when the application is not in use.
- Triggering native notifications in macOS and Windows 10.
For most of the first half of the book, we worked on Fire Sale. Although its initial feature set in chapter 3 could have conceivably been matched by a traditional, browser-based web application, we spent the subsequent chapters adding functionality outside the scope of what most browsers allow. In this chapter, we begin well outside the realm of where we expect to find web technologies: the macOS menu bar and Windows system tray. In the beginning, we won’t have a renderer process or the DOM. By the end of this chapter, we explore how to create hidden renderer processes to access features not available to the main process. In the next chapter, we create a BrowserWindow to serve as the UI for our tray application.
With Fire Sale behind us, we’ll embark on building a new application: Clipmaster, shown in figure 9.1. By the end of this chapter, we launch the application. It will have no dock, taskbar icon, or windows of its own. We activate it by pressing a keyboard shortcut that is globally available throughout the operating system. When the shortcut is triggered, Clipmaster reads from and records the contents of the user’s clipboard. If the user selects a previously saved clipboard item from the menu, the app places it back onto the system clipboard for pasting in another application.
Figure 9.1. This is what the application looks like when completed. macOS is on the top, and Windows is on the bottom.
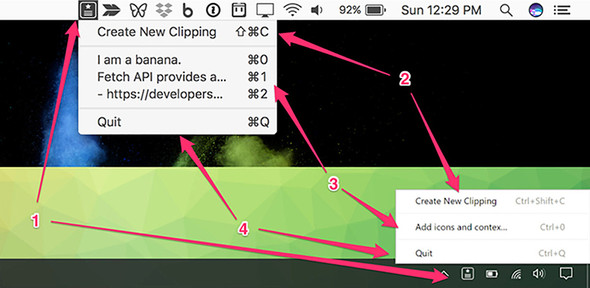
As shown in the figure, we need to implement the following:
- A menu bar or tray icon that is available from anywhere in the respective operating system.
- A menu item that reads from the clipboard and places its contents in a menu item.
- A list of menu items. When the user clicks one of the menu items in this section, Clipmaster writes the string of text back to the clipboard.
- A final menu item for quitting Clipmaster.
If you look closely, you’ll notice that each of these items has a keyboard shortcut as well. In addition to these menu-based accelerators, we register global shortcuts with the operating system that allow the user to activate this menu or create a new clipping from anywhere.
The source code for Clipmaster is available at https://github.com/electron-in-action/clipmaster. I use the master branch as a boilerplate and starting point for the code in this chapter. There is also a branch called “completed-example” that contains the code shown at the end of this chapter. I show the code as we go along, and a completed version will be available at the end.
9.1. Getting started with Clipmaster
The folder structure for Clipmaster is roughly the same as we saw in Fire Sale with much of the code in the ./app directory. You might notice that there isn’t a renderer.js or index.html. Those are added by the end of the chapter but aren’t needed in the beginning. You may also notice a few small image files. Our application needs an icon if it’s going to live in the tray or menu bar. macOS expects this icon to be a PNG file, and Electron automatically checks if there is a version of the image with the suffix “@2px” if it is running on a device with a retina screen. Windows accepts a PNG but works best with an ICO file. Unlike the built-in switch between high- and low-resolution versions based on the density of the display, we need to manually check which operating system the application is running on to select the best image.
To get started, clone the master branch, and run either npm install or yarn install to download the dependencies. After everything is installed, we can get started on building Clipmaster.
9.2. Creating an application with the tray module
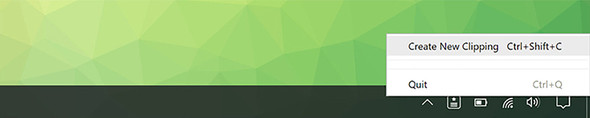
To get the ball rolling, we can add our application to the system tray or menu bar with just one feature: the ability to click Quit and close the application (see figure 9.2). To accomplish this heroic task, we need help from Electron’s tray module. You can think of the tray module as a peer to BrowserWindow. It’s a constructor that—when instantiated—creates a system tray or menu bar item in much the same way that Browser-Window creates a browser window.
Figure 9.2. In the first iteration, Clipmaster is nothing more than a small application that allows the user to immediately quit it. Don’t worry: there is more functionality to come, and you’ll have a fully functional application by the end of the chapter.

To do this, as you’ll see in listing 9.1, we need to wait until the application is ready, create a tray instance, and provide it with an icon and a menu loaded up with the Quit command. When the application is ready, we create the menu and set it as the context menu of the tray instance. In a fit of ambition, we also set a tooltip that will be shown when the user hovers over our proud new tray icon. See figure 9.3.
Figure 9.3. When the user hovers over the icon, they see the tooltip. This can be customized and changed based on the state of the application.

Listing 9.1. Creating a tray instance: ./app/main.js
const path = require('path');
const {
  app,
  Menu,
  Tray,
  } = require('electron');

let tray = null;                                          1

app.on('ready', () => {
  tray = new Tray(path.join(__dirname, '/Icon.png'));     2

  if (process.platform === 'win32') {
    tray.on('click', tray.popUpContextMenu);              3
  }

  const menu = Menu.buildFromTemplate([                   4
    {
      label: 'Quit',
      click() { app.quit(); }
    }
  ]);

  tray.setToolTip('Clipmaster');                          5
  tray.setContextMenu(menu);                              6
});
- 1 Declares a variable in the global scope that eventually stores a reference to the tray instance
- 2 Creates a tray instance by calling the constructor with a path to an image
- 3 On Windows, we register a click event listener to open the menu.
- 4 Builds a menu in the same fashion that we built application and context menus in earlier chapters
- 5 Optionally, defines a tooltip to be shown when the user hovers over the tray icon
- 6 Takes the menu created and sets it as the menu that appears when the user clicks the icon in the menu or system tray in macOS and Windows, respectively.
As with the windows in Fire Sale, we declared the tray variable in the global scope to prevent it from being thrown out sometime after the event listener on the app’s ready event has run to completion. Inside the event listener, we assign a new tray instance to the variable with a reference to the image we want to use as an icon.
If you recall from chapter 7, Menu.buildFromTemplate() is an abstraction that allows you to create complicated menu structures using objects and arrays. This menu isn’t exactly complicated, but it’s still easier than building a menu by instantiating MenuItem instances one at a time. At this point, the menu has one item with Quit as its label. When it’s clicked—or later activated by a keystroke—it will tell Electron to quit the application. With the menu built, all that is left is to set it as the context menu for tray.
Windows treats the tray instances menu as a context menu. This means the menu shows up only if the icon is right-clicked. In listing 9.1, we also register a click event that triggers the menu if the application is running on Windows.
The application works, but if you fire it up on macOS, you can notice that it also shows up in the dock. Clicking it doesn’t do anything, because the application doesn’t have any browser windows to show. We could add functionality such as the ability to trigger the menu from the menu bar when the dock icon is clicked, but I vote that we hide the dock icon altogether.
Listing 9.2. Hiding the dock icon on macOS: ./app/main.js
app.on('ready', () => {
  if (app.dock) app.dock.hide();     1

  // ...
}
- 1 Hides the dock icon if running on macOS.
The line of code checks if the app has a dock object, which it does if it’s running on macOS. If so, then Electron tells the dock icon to hide itself. This approach is interesting because it leaves the developer room to hide or show the dock icon at will, depending on what mode their application is in or the user’s preference. In our case, we hide it when the application launches and never show it again.
9.2.1. Using the correct icon for macOS and Windows
macOS and Windows prefer different file types for icons. Their UIs each work better with a different color. By default, the menu bar on macOS is white and works better with dark icons whereas Windows 10 has a dark task bar and works better with white icons. Windows prefers ICO files, and macOS uses PNG files. To solve this issue, Node checks the platform it’s running on and gets the appropriate icon based on the platform. Electron does such a good job of providing a consistent cross-platform experience that this is one of the few times in this book that we find ourselves doing something like this.
Listing 9.3. Conditionally choosing an icon based on the platform: ./app/main.js
const getIcon =  () => {                                            1
  if  (process.platform === 'win32')  return 'icon-light@2x.ico';
  return 'icon-dark.png';
};

app.on('ready', () => {
  if (app.dock) app.dock.hide();

  tray = new Tray(path.join(__dirname, getIcon()));                 2
  // ... More code below ...
});
- 1 The getIcon() function checks the platform the application is running on and returns the appropriate filename.
- 2 When creating a new tray instance, use getIcon() to get the correct filename.
If we’re on Windows, it gives us the filename of the light ICO icon. Otherwise, it gives us the filename of the dark PNG icon. When the application is ready, we use the new getIcon() function instead of the string we had hard-coded originally.
9.2.2. Supporting dark mode in macOS
Earlier, I said that the macOS menu bar is white by default. In macOS El Capitan and later, users can turn on dark mode, which inverts the color of the menu bar and dock. In this case, we would want to use a PNG file like we would normally for macOS, but we also want to use the light versions like we would with the transparent black system tray in Windows 10, as shown in listing 9.4 and figure 9.4.
Figure 9.4. If the macOS menu bar is in dark mode, we’ll use the inverted icon.

Listing 9.4. Supporting dark mode on macOS: ./app/main.js
const path = require('path');
const {
  app,
  Menu,
  Tray,
  systemPreferences,
} = require('electron');                                          1

let tray = null;

const getIcon = () => {
  if (process.platform === 'win32') return 'icon-light.ico';
  if (systemPreferences.isDarkMode()) return 'icon-light.png';    2
  return 'icon-dark.png';
};
- 1 Imports the systemPreferences module from Electron
- 2 Uses the systemPreferences.isDarkMode() to detect if macOS is in dark mode
Electron makes this easy using the systemPreferences module, which conveniently has a method called isDarkMode() that returns a Boolean. I leave it as an exercise to the reader to determine under which conditions it returns true or false.
9.2.3. Reading from the clipboard and storing clippings
This application is supposed to store clippings, and we have many ways we could go about doing this. In chapter 11, we look at using an SQLite database to store clippings. But for now, let’s start with the easiest possible solution: storing them in memory. This approach is easy because it allows us to use a built-in JavaScript data structure, but it has the disadvantage of being cleared away whenever the user quits the application.
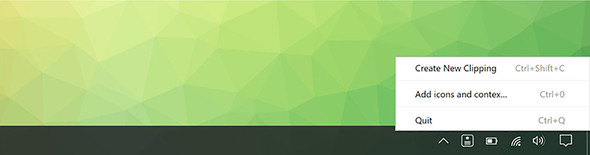
To ship this feature, we need to create an array to hold our clippings. We also need to create a function that reads from the clipboard and adds the contents to the array, as well as a way for the user to trigger this function. Finally, we want to update the menu with the clippings we stored and allow users to select one to be added back to the clipboard. See figures 9.5 and 9.6.
Figure 9.5. The application with its two basic commands on macOS

Figure 9.6. In addition to being able to quit the application, users need a way to add a clipping to the application. Here the application is shown in the Windows tray.
We update the menu whenever the user saves a new clipping. As we discussed in chapter 7, it’s possible to traverse and mutate the menu after it is created, but it’s often easier and more efficient to completely replace it. To facilitate this, we move the code to create the context menu into its own function that we can call whenever we need to update the menu.
Listing 9.5. Storing clippings in memory using an array: ./app/main.js
const path = require('path');
const {
  app,
  Menu,
  Tray,
  systemPreferences,
} = require('electron');

const clippings = [];                                              1
let tray = null;

const getIcon = () => {
  if (process.platform === 'win32') return 'icon-light.ico';
  if (systemPreferences.isDarkMode()) return 'icon-light.png';     2
  return 'icon-dark.png';
};

app.on('ready', () => {
  if (app.dock) app.dock.hide();

  tray = new Tray(path.join(__dirname, getIcon()));

  if (process.platform === 'win32') {
    tray.on('click', tray.popUpContextMenu);
  }

  updateMenu();                                                    2

  tray.setToolTip('Clipmaster');
});

const updateMenu = () => {
  const menu = Menu.buildFromTemplate([
    {
      label: 'Create New Clipping',
      click() { null; }                                            3
    },
    { type: 'separator' },
    ...clippings.map((clipping, index) => ({ label: clipping })),  4
    { type: 'separator' },
    {
      label: 'Quit',
      click() { app.quit(); },
    }
  ]);

  tray.setContextMenu(menu);                                       5
};
- 1 Declares an empty array to store clippings
- 2 Updates the menu immediately when the application starts to build it for the first time
- 3 Eventually, we implement the ability to add clippings to the array.
- 4 Each time updateMenu() is called, we map through the array of clippings and render them as simple menu items.
- 5 tray.setContextMenu() has been moved into updateMenu() to replace the menu whenever the list of clippings has been modified.
We start by creating a simple array called clippings with a global scope that stores clippings and is accessed throughout our application. Next, we create a function called updateMenu() to generate a new menu and set it as the context menu for the tray instance. updateMenu() takes the contents of the clippings array, maps it into objects that can be turned into MenuItem instances, and then uses the ECMAScript 2015 spread operator to include them as siblings with Create New Clipping and Quitmenu items.
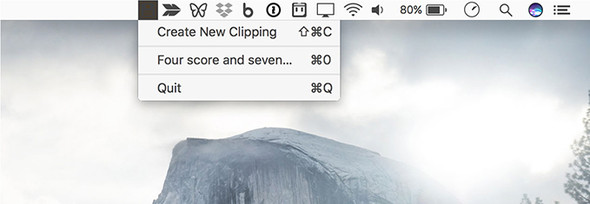
We added a menu item with the label Create New Clipping (see figure 9.7), but if you look closely, you’ll notice that we haven’t yet added any functionality. To get it working, we need to figure out a way to access the operating system’s native clipboard. Once we can do that, we can update this function to read from the clipboard and push its contents into the array of clippings and then call updateMenu() to re-render it.
9.3. Reading from and writing to the clipboard
At this point, it should come as no surprise that Electron provides a module that makes it easy to access the operating system’s clipboard on Linux, macOS, and Windows. It should come as even less of a surprise that this module is conveniently called clipboard.
The clipboard module is available in the main process as well as in the renderer process, and it has several useful methods for reading images, rich text, HTML, bookmarks, and other formats. For now, let’s keep it simple and stick to working with strings of plain text. Figure 9.7 shows our application with a single clipping.
To get the Create New Clipping menu item to work, we want to create a function that we can call that reads from the clipboard and adds it to the clippings array. In the spirit of simplicity and clarity, we call this function addClipping().
Figure 9.7. When clippings are added to the array, the menu is updated with a new menu item with the clipping’s content as the label.

Listing 9.6. Adding a clipping to the array when the menu item is clicked: ./app/main.js
const path = require('path');
const {
  app,
  clipboard,                                        1
  Menu,
  Tray,
  systemPreferences
} = require('electron');

const clippings = [];
let tray = null;

app.on('ready', () => {
  // ...
});

const updateMenu = () => {
  const menu = Menu.buildFromTemplate([
    {
      label: 'Create New Clipping',
      click() { addClipping(); },                   2
      accelerator: 'CommandOrControl+Shift+C'       3
    },
    { type: 'separator' },
    ...clippings.map((clipping, index) => ({ label: clipping })),
    { type: 'separator' },
    {
      label: 'Quit',
      click() { app.quit(); },
      accelerator: 'CommandOrControl+Q'             4
    }
  ]);

  tray.setContextMenu(menu);
};

const addClipping = () => {
  const clipping = clipboard.readText();            5
  clippings.push(clipping);                         6
  updateMenu();                                     7
  return clipping;
};
- 1 Pulls in the clipboard module from Electron
- 2 When a user clicks the Create New Clipping menu item, calls the addClipping() function
- 3 Adds an accelerator for the Create New Clipping menu item. This is available when the menu is active.
- 4 Adds an accelerator for the Quit menu item. This is available when the menu is active.
- 5 Uses Electron’s clipboard module to read text from the system clipboard
- 6 Pushes the text read from the clipboard into the array of clippings
- 7 Regenerates the menu to display the new clipping as a menu item
To do anything with the Electron’s clipboard module, we need to include it like every other module from Electron. With the module included, addClipping() can read text from the clipboard and push it onto the array. With a new clipping in the array, the next logical step is to update the menu and display the new contents to the user as shown in figure 9.7.
9.3.1. Writing to the clipboard
With this feature in place, we can read from the clipboard and save the text snippets in our application, but we haven’t yet written the functionality to take one of the saved clippings and write it back to the clipboard. As it stands, our application is a scrapbook of the clippings we’ve saved in the past.
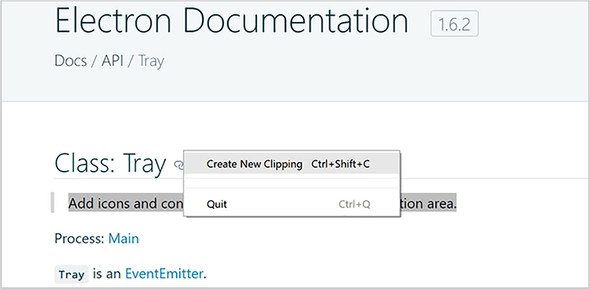
Writing to the clipboard isn’t much different from reading from it. So, let’s up the ante and assign keyboard shortcuts to the menu items associated with the clippings, as shown in figure 9.8 and in listing 9.7. When a user presses the keystroke, the respective clipping is written to the clipboard.
Figure 9.8. The application now has keyboard shortcuts.
Listing 9.7. Listing out the clippings as menu items: ./app/main.js
const path = require('path');
const {
  app,
  clipboard,
  Menu,
  Tray,
  systemPreferences
} = require('electron');

const clippings = [];
let tray = null;

app.on('ready', () => {
  // ...
});

const updateMenu = () => {
  const menu = Menu.buildFromTemplate([
    {
      label: 'Create New Clipping',
      click() { addClipping(); },
      accelerator: 'CommandOrControl+Shift+C'
    },
    { type: 'separator' },
    ...clippings.map(createClippingMenuItem),             1
    { type: 'separator' },
    {
      label: 'Quit',
      click() { app.quit(); },
      accelerator: 'CommandOrControl+Q'
    }
  ]);

  tray.setContextMenu(menu);
};

const addClipping = () => {
  // ...
};

const createClippingMenuItem = (clipping, index) => {     2
  return {
    label: clipping,
    click() { clipboard.writeText(clipping); },           3
    accelerator: `CommandOrControl+${index}`              4
  };
};
- 1 Uses the createClippingMenu() in place of the anonymous function we were using previously when mapping over the array of clippings.
- 2 Creates a function called createClippingMenuItem()
- 3 When a user clicks on a given clipping, writes it to the clipboard. The correct clipping is wrapped inside of a closure.
- 4 Assigns the menu item an accelerator based on its index inside of the clippings array
Mapping the strings into menu items inside of the array with an anonymous function was a short-term solution at best. Now that we’re adding click methods and accelerators to each menu item, it makes sense to break out this process into its own function. createClippingMenuItem() takes the first two arguments passed by Array.prototype.map() to its callback function: the item currently being iterated over and its index. We use this index to determine which accelerator to assign to it.
9.3.2. Handling edge cases
With this in place, the user can now write a clipping back to the clipboard with a keystroke. That’s great, but what happens if the user copies a big string of text? Eventually the operating system will trim stuff down, as shown in figure 9.9, but we need to step in and do better.
Figure 9.9. The operating system will eventually truncate long menu item labels, but even this is a bit unwieldy.

When we iterate over the clippings to create menu items, we check if it is over 20 characters long. If it is, slice off the first 20 characters, add an ellipsis, and use that as the label. Figure 9.10 shows an example of a shortened menu item name and listing 9.8 gives the code for truncating the labels. This truncation has no effect on the clipping itself. If the user selects the clipping, its full text is written back to the clipboard. If the clipping is less than than 20 characters, use it as the label without modification.
Figure 9.10. Clipping menu item labels are now capped at 20 characters. You can adjust this to your liking, or create a setting to allow users to control the length.
Listing 9.8. Truncating menu item labels: ./main/app.js
const createClippingMenuItem = (clipping, index) => {
  return {
    label: clipping.length > 20
           ? clipping.slice(0, 20) + '...'
           : clipping,                                1
    click() { clipboard.writeText(clipping); },
    accelerator: `CommandOrControl+${index}`
  };
};
- 1 If the length of the clipping is longer than 20 characters, slices off the first 20 characters and adds an ellipsis.
I chose 20 as an arbitrary number. You can choose another number if you prefer. In a larger application, it might make sense to allow the user to express their preference and use that number instead.
What if a user accidentally added a clipping that is already stored in our array? To get around this, we check if the array includes the current clipping. If it does, then return early to short-circuit the function. Another option would be to use a set instead of an array, which is the approach we took with managing unique windows in Fire Sale. This method works for preventing duplicates, but sets do not have a map() method, so we would need to come up with another method for turning the clippings into menu items.
Listing 9.9. Preventing duplicate clippings: ./app/main.js
const addClipping = () => {
  const clipping = clipboard.readText();
  if (clippings.includes(clipping)) return;       1
  clippings.push(clipping);
  updateMenu();
  return clipping;
};
- 1 Checks if the clippings array already contains the current clippings. If so, returns early from the function.
Array.prototype.push() adds items to the end of the array, so the first clipping added always is assigned Command-0 or Control-0 as an accelerator. Array.prototype.unshift() adds the new item to the beginning of the array. This means that the most recently saved clipping is accessible with Command-0 or Control-0, the second most recently saved clipping is accessible with Command-1 or Control-1, and so on.
Listing 9.10. Adding clippings to the beginning of the array: ./main.js
const addClipping = () => {
  const clipping = clipboard.readText();
  if (clippings.includes(clipping)) return;
  clippings.unshift(clipping);                  1
  updateMenu();
  return clipping;
};
- 1 Unshift adds an element to the beginning of an array.
If the user falls in love with our application, it could get fairly long. Therefore, it makes sense to limit the number of clippings in the menu. I chose to limit it to 10 items because we’re assigning keyboard shortcuts based on the array indices, and there is no “11” key on most keyboards.
Listing 9.11. Displaying only the first 10 clippings: ./app/main.js
const menu = Menu.buildFromTemplate([
  {
    label: 'Create New Clipping',
    click() { addClipping(); },
    accelerator: 'CommandOrControl+Shift+C'
  },
  { type: 'separator' },
  ...clippings.slice(0, 10).map(createClippingMenuItem),      1
  { type: 'separator' },
  {
    label: 'Quit',
    click() { app.quit(); },
    accelerator: 'CommandOrControl+Q'
  }
]);
These shortcuts have a limitation—they work only when we are actively working with the menu. This means the user would have to mouse over to the menu bar or system tray icon and click it. After that action they can use one of the keyboard shortcuts provided. This is slightly useful, but not as useful as if the shortcuts were globally available.
9.4. Registering global shortcuts
All the accelerators we’ve used so far have worked only when the application is actively being used. By using the globalShortcut module, Electron also allows us to register global shortcuts with the operating system that can be activated even when the application is in the background. We’ll register two global shortcuts for Clipmaster: one to trigger the menu to appear, and another to save the contents of the clipboard to Clipmaster without needing to trigger the menu at all.
Listing 9.12. Registering a global shortcut: ./app/main.js
const path = require('path');
const {
  app,
  clipboard,
  globalShortcut,                                                     1
  Menu,
  Tray,
  systemPreferences
} = require('electron');

const clippings = [];
let tray = null;

app.on('ready', () => {
  if (app.dock) app.dock.hide();

  tray = new Tray(path.join(__dirname, '/Icon.png'));

  if (process.platform === 'win32') {
    tray.on('click', tray.popUpContextMenu);
  }

  const activationShortcut = globalShortcut.register(
    'CommandOrControl+Option+C',
    () => { tray.popUpContextMenu(); }                               2
  );

  if (!activationShortcut) {                                         3
    console.error('Global activation shortcut failed to register');
  }

  const newClippingShortcut = globalShortcut.register(
    'CommandOrControl+Shift+Option+C',
    () => { addClipping(); }                                         4
  );

  if (!newClippingShortcut) {                                        5
   console.error('Global new clipping shortcut failed to register');
  }

  updateMenu();

  tray.setToolTip('Clipmaster');
});

const updateMenu = () => {
  // ...
};

const addClipping = () => {
  // ...
};

const createClippingMenuItem = (clipping, index) => {
  // ...
};
- 1 Requires the globalShortcut module from Electron
- 2 Passes a string defining the accelerator and an anonymous function that should be invoked whenever the accelerator is pressed
- 3 If registration fails, Electron does not throw an error. Instead, it returns undefined. In this line, we check if the activationShortcut is defined.
- 4 We register a second shortcut to add a clipping to the array.
- 5 If either shortcut fails, we log the issue with console.error. In a more robust application, you might show the user that there was an issue or implement a fallback.
The first thing we need to do is require the globalShortcut module from Electron. After we have the module, we can use its register() method, which takes two arguments: an accelerator, and a function to call when it has been activated. If the global shortcut is already taken, Electron returns null instead of throwing an error, which—if uncaught—could take down the entire application. In this case, we log a message to the console informing us that the registration has failed. In a more robust application, you could prompt the user to select a new shortcut or fallback to a second choice.
This functionality behaves slightly differently on macOS and Windows. On macOS the menu appears in the same manner as it would if the user clicked it. On Windows, however, the menu appears beneath the cursor, as shown in figure 9.11, instead of above the system tray icon as you might expect.
Figure 9.11. On Windows, the menu appears beneath the cursor when triggered with the global shortcut.
9.4.1. Checking registrations and unregistering global shortcuts
Electron’s globalShortcut module also provides other useful methods for working with shortcuts. globalShortcut.isRegistered() returns a Boolean that is true if the application has already registered the shortcut; otherwise, it returns false. However, it also returns false if another application has registered that shortcut.
In Clipmaster, you’ve chosen to hard-code our global shortcuts, but you may choose to create a UI that allows users to set their own keyboard shortcuts. If a user decides to switch shortcuts for a given command, we want to unregister the old shortcut with globalShortcut.unregister() after we’ve successfully registered the new one. We can also unregister all global shortcuts using the conveniently named globalShortcut.unregisterAll() method.
9.5. Displaying notifications
With our global shortcuts in place, users can save new clippings from anywhere with a touch of a few buttons. But how does the user know when they’ve successfully saved a clipping? Not only does our application not have much of a UI to begin with, it isn’t being shown when they activate it using a global shortcut. One solution would be to show a native system notification, such as that shown in figures 9.12 and 9.13.
Figure 9.12. A notification in Windows 10
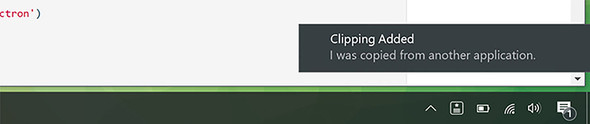
Figure 9.13. A notification in macOS

Notifications work out of the box on macOS and Windows 10. They also work with the most common Linux desktop environment. Things get a bit tricky when working with older versions of Windows. This is beyond the scope of this book, but it is covered in the official documentation: http://mng.bz/nJR0.
This is the solution that we’re going with, but it’s not without its complications. Electron applications can create notifications using Chromium’s Notification API. As a web API, Notifications are available only in the renderer process and not in the main process.
To deliver this feature, we need to create a hidden BrowserWindow instance. When the user saves a new clipping using the global shortcut, we send a message via IPC to the renderer process. When the renderer process receives this message, it triggers the notification.
Let’s start by making an invisible process and then send messages to it and let it trigger the notifications. If you recall from Fire Sale, BrowserWindow instances can load HTML, which in turn can load JavaScript like a traditional web page would. The first thing we need is a bare minimum HTML page.
Listing 9.13. Setting up a simple HTML document: ./app/index.html
<!DOCTYPE html>
<html lang="en">

<head>
  <meta charset="UTF-8">
  <meta name="viewport" content="width=device-width,initial-scale=1">
  <title>Clipmaster</title>
</head>

<body></body>

<script>
  require('./renderer');      1
</script>

</html>
This page has some basic markup to make it a valid HTML page. The important part is that it contains a script tag that loads renderer.js, which contains the code that listens for messages from the main process and triggers the notification. Next, let’s set up that listener and write the code to display the notification.
Listing 9.14. Listening for messages and displaying notifications: ./app/renderer.js
const { ipcRenderer } = require('electron');

ipcRenderer.on('show-notification', (event, title, body) => {
  const myNotification = new Notification(title, { body });        1
});
- 1 Notifications are part of Chromium’s built-in APIs and are not specific to Electron. It takes two arguments: a string for the title, and an object of additional parameters. In this example, we’re providing a body using ES2015’s enhanced object literal syntax. This is equivalent to { body: body }.
We pull in the ipcRenderer module and begin listening for notifications on the appropriately named show-notification channel. This listener expects three arguments in addition to the event object that is included by default: a title and body for the notification, as well as a function detailing what to do if the user clicks the notification. If no function is provided, onClick is an empty function by default.
With the code for our renderer process in place, we need to run it when the application starts. In Fire Sale, we created BrowserWindow instances that started out hidden and then were displayed when the content has been loaded. In Clipmaster, there isn’t any content to display, so we never show the window itself. Include this code snippet inside the app.on ready block.
Listing 9.15. Launching the hidden browser window: ./app/main.js
const {
   // . . .
   BrowserWindow,
   // . . .
} = requre('electron');

browserWindow = new BrowserWindow({
   show: false
 });

browserWindow.load.URL(`file://{$_dirname}/index.html`);
Even though the window is not shown, we can load the HTML page we created earlier to execute the code and set up our listener. Now when we add a clipping, we send a message to the renderer process to have it show a notification.
Listing 9.16. Sending a message to the renderer process: ./app/main.js
constnewClippingShortcut=globalShortcut.register(
  'CommandOrControl+Shift+Option+C',
  () => {
    constclipping=addClipping();       1
    if (clipping) {
      browserWindow.webContents.send(
        'show-notification',
        'Clipping Added',              2
        clipping,
      );
    }
  },
);
- 1 addClipping() returns the string of the clipping that was added to the array.
- 2 If there was a clipping saved, we send a notification to the renderer process, which triggers the notification.
When a clipping has been added, a message is sent to the renderer process. Before sending the message, we check if addClipping() returned a value. If you recall, if the list of clippings already contains the new clipping, then the function returns early with a value of undefined. This conditional prevents the message from being sent if no new clipping was saved. I leave it as an exercise to the reader to display a useful notification informing the user that the clipping already exists.
9.6. Switching menu bar icons when pressed in macOS
On macOS, our menu bar icon doesn’t behave the same way as its peers. The expected behavior is that the icon’s colors are inverted when the menu is activated. Luckily, Electron makes it easy to implement this feature. See figure 9.14.
Figure 9.14. macOS can use an alternate icon when the menu bar application is clicked. In this example, we used an inverted version of the icon to match the rest of the menu bar icons.

The tray module has a method called setPressedImage(). On Windows, this method is ignored. On macOS it allows us to provide the path to a second image file. When the menu bar icon is clicked, Electron swaps out the primary image for this second image. The code in this listing belongs immediately after the statement that sets tray, which also invokes getIcon().
Listing 9.17. Setting an alternate icon for when icon is pressed: ./app/main.js
tray.setPressedImage(path.join(__dirname, 'icon-light.png'));
You may be asking, “What about dark mode?” It turns out that the default behavior in macOS is not to invert the icons when they’re pressed in dark mode. As a result, you do not need to implement any additional logic to handle that situation.
9.7. Completed code
The code for Clipmaster, in line with the features in this chapter, has been implemented as follows: Listing 9.18 shows the code for the main process and listing 9.19 shows the code for the renderer process. You can also find this code on the completed-example branch of the repository you cloned at the beginning of this chapter (http://mng.bz/xJ98).
Listing 9.18. Clipmaster’s completed main process: ./app/main.js
const path = require('path');
const {
  app,
  BrowserWindow,
  clipboard,
  globalShortcut,
  Menu,
  Tray,
  systemPreferences,
} = require('electron');

const clippings = [];
let tray = null;
let browserWindow = null;

const getIcon = () => {
  if (process.platform === 'win32') return 'icon-light@2x.ico';
  if (systemPreferences.isDarkMode()) return 'icon-light.png';
  return 'icon-dark.png';
};

app.on('ready', () => {
  if (app.dock) app.dock.hide();

  tray = new Tray(path.join(__dirname, getIcon()));
  tray.setPressedImage(path.join(__dirname, 'icon-light.png'));

  if (process.platform === 'win32') {
    tray.on('click', tray.popUpContextMenu);
  }

  browserWindow = new BrowserWindow({
    show: false,
  });

  browserWindow.loadURL(`file://${__dirname}/index.html`);

  const activationShortcut = globalShortcut.register(
    'CommandOrControl+Option+C',
    () => {
      tray.popUpContextMenu();
    },
  );

  if (!activationShortcut)
    console.error('Global activation shortcut failed to regiester');

  const newClippingShortcut = globalShortcut.register(
    'CommandOrControl+Shift+Option+C',
    () => {
      const clipping = addClipping();
      if (clipping) {
        browserWindow.webContents.send(
          'show-notification',
          'Clipping Added',
          clipping,
        );
      }
    },
  );

  if (!newClippingShortcut)
    console.error('Global new clipping shortcut failed to regiester');

  updateMenu();

  tray.setToolTip('Clipmaster');
});

const updateMenu = () => {
  const menu = Menu.buildFromTemplate([
    {
      label: 'Create New Clipping',
      click() {
        addClipping();
      },
      accelerator: 'CommandOrControl+Shift+C',
    },
    { type: 'separator' },
    ...clippings.slice(0, 10).map(createClippingMenuItem),
    { type: 'separator' },
    {
      label: 'Quit',
      click() {
        app.quit();
      },
      accelerator: 'CommandOrControl+Q',
    },
  ]);

  tray.setContextMenu(menu);
};

const addClipping = () => {
  const clipping = clipboard.readText();
  if (clippings.includes(clipping)) return;
  clippings.unshift(clipping);
  updateMenu();
  return clipping;
};

const createClippingMenuItem = (clipping, index) => {
  return {
    label: clipping.length > 20 ? clipping.slice(0, 20) + '...' : clipping,
    click() {
      clipboard.writeText(clipping);
    },
    accelerator: `CommandOrControl+${index}`,
  };
};
Listing 9.19. Clipmaster’s completed renderer process: ./app/renderer.js
const { ipcRenderer } = require('electron');

ipcRenderer.on('show-notification', (event, title, body, onClick = () => { })
     => {
  const myNotification = new Notification(title, { body });

  myNotification.onclick = onClick;
});
Summary
- The clipboard module provides several ways to read and write content to and from the clipboard.
- The globalShortcut module allows Electron applications to register listeners for keyboard shortcuts.
- Renderer processes can be used as background threads and don’t always need to be shown.
- Chromium’s Notification API allows us to trigger native notifications on macOS and Windows 10.