Table of Contents for
Electron in Action
 Electron in Action
Published by
Manning Publications, 2018
Electron in Action
Published by
Manning Publications, 2018
- Cover
- Electron in Action
- Copyright
- Electron in Action
- Brief Table of Contents
- Table of Contents
- Preface
- Acknowledgments
- About this book
- About the cover illustration
- Part 1. Getting started with Electron
- Chapter 1. Introducing Electron
- Chapter 2. Your first Electron application
- Part 2. Building cross-platform applications with Electron
- Chapter 3. Building a notes application
- Chapter 4. Using native file dialog boxes and facilitating interprocess communication
- Chapter 5. Working with multiple windows
- Chapter 6. Working with files
- Chapter 7. Building application and context menus
- Chapter 8. Further operating system integration and dynamically enabling menu items
- Chapter 9. Introducing the tray module
- Chapter 10. Building applications with the menubar library
- Chapter 11. Using transpilers and frameworks
- Chapter 12. Persisting user data and using native Node.js modules
- Chapter 13. Testing applications with Spectron
- Part 3. Deploying Electron applications
- Chapter 14. Building applications for deployment
- Chapter 15. Releasing and updating applications
- Chapter 16. Distributing your application through the Mac App Store
- Code from the end of chapter 6
- Index
- List of Figures
- List of Tables
- List of Listings
Chapter 14. Building applications for deployment
- Packaging your application for distribution
- Setting a custom name and icon for your packaged application
- Easily packaging applications containing transpiled code using Electron Forge
- Building source code in Electron archives (asar)
Throughout this book, we’ve built several applications. We’ve started each of them the same way: open the terminal, navigate to the directory, and launch the application using npm. If you’ve downloaded any of my completed applications, then it’s likely that you went to the project on GitHub, cloned the repository, and installed its dependencies. This is all a bit tedious and—frankly—an unacceptable experience for our users. Our Electron applications should behave like any other desktop application. Users should be able to navigate to a website, download the application, and double-click its icon to launch the application. No terminal. No installing dependencies. No cloning repositories.
In this chapter, we take an application that we built earlier in this book—Fire Sale—and build it as a desktop application using a third-party library called Electron Packager. You can find the repository on GitHub at https://github.com/electron-in-action/firesale. We’ll start by checking out a branch conveniently called chapter-14-beginning. This is roughly where we left off in chapter 8.
We start by setting up Electron Packager. We use command-line flags to customize things like the output directory and set up npm scripts that allow us to build for multiple platforms at once—although I’ll explain why this might be ill-advised. Next, we add a custom icon for Fire Sale. Finally, we discuss Electron’s asar archive format and add it to our build process.
After building Fire Sale with Electron Packager, we build Jetsetter using an alternative called Electron Forge. Where Electron Packager is simple, low-level, and a great way to understand what’s happening without getting too deep into the weeds, Forge contains more bells and whistles. I chose it for Jetsetter because we’re using electron-compile to transform JSX to vanilla JavaScript. Electron Forge is also great for laying the foundation for a new Electron application. In the name of learning and getting our hands dirty, I chose not to use Electron Forge, but you may want to consider it when starting your next Electron application. This chapter covers how to transition an Electron application that wasn’t originally created with Electron Forge.
By the end of this short chapter, we’ll have an executable Electron application that doesn’t need to be started from the command line and can be used by someone who does not have Node installed on their computer. Chapters 15 and 16 go deeper and discuss how to properly package your application for macOS and Windows.
14.1. Introducing Electron Packager
Electron Packager is an abstraction around the numerous steps required to develop an application and package it for distribution. In development, we’ve downloaded a prebuilt version of Electron for our platform (macOS, Windows, or Linux) and processor architecture (32- or 64-bit). We don’t necessarily know what platform and architecture our users are using, and they won’t build it themselves. It’s our responsibility to build a version of the application for each platform and architecture combination we plan to support. Electron Packager is here to help us with that endeavor.
14.1.1. Setting up Electron Packager
You can install Electron Packager globally using npm install electron-packager -g or yarn global add electron-packager. I prefer to install it locally on the individual project because then each project specifies its own version of Electron Packager. I added it to the devDependencies in the project’s package.json. If you’ve cloned the repository and installed the dependencies, you should be good to go.
We begin by adding a build script to package.json. In this chapter, we start with a deliberately simple configuration and build on top of it as we go along, refining this build script along the way.
Listing 14.1. Adding a build script: ./package.json
{
  // ...Omitted...
  "scripts": {
    "start": "electron .",
    "build": "electron-packager .",                          1
    "test": "echo \"Error: no test specified\" && exit 1"
  },
  // ...Omitted...
}
With our build script in place, it’s time to start Electron Packager. You can run the build script using npm run build, which runs the local version of electron-packager installed in the node_modules directory. When the build is finished, you should see an additional directory with the name of the application along with the platform and architecture you’re currently using, as shown in figure 14.1. As I write this, I’m using a 64-bit Mac and the directory is called firesale-darwin-x64.
Figure 14.1. By default Electron Packager places builds inside the project’s root. This can be problematic because we typically do not want to commit our built application into source control.
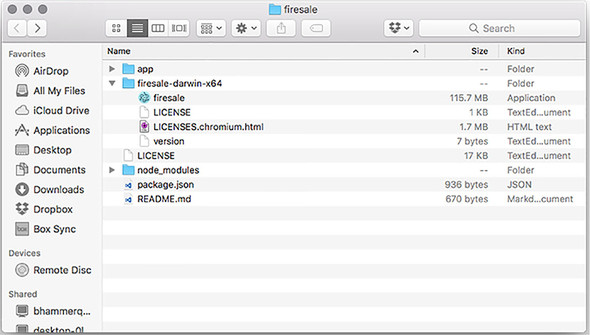
The firesale-darwin-x64 directory contains the desktop application named firesale along with the license and a small text file containing the version. Double-click the application to open it like any other application. If you need to prove it to yourself, feel free to drag the application to another directory and launch it from there.
The output of Electron Packager on Windows is a bit more verbose. On macOS applications are effectively folders that hide much of this complexity from us. In chapter 15, we’ll cover how to make an installer for Windows that hides this complexity from our users.
This was fast and simple, but there is still a lot left to be desired. The filename isn’t capitalized, we’re still using the stock Electron icon, and we’ve built a version for only our current architecture and platform, among other issues.
By default, Electron Packager includes all of the dependencies in your node_modules directory that are listed in your package.json. It does omit dependencies listed under devDependencies in your package.json. This is not an issue that we run into with any of the applications in the book, but it is something you might encounter in your adventures. You can deal with this in two ways: move the dependency from devDependencies to dependencies or pass the --no-prune flag to Electron Packager.
14.1.2. Configuring the output directory
The concerns I just listed are all valid, and we do solve each of them, but we have a more pressing problem to address first. We may not want to check our built applications into version control. Building the applications to the root directory of the project makes that difficult. It adds an increasing amount of visual noise and clutter as we begin building additional platforms and architectures.
If you type ./node_modules/.bin/electron-packager --help from the command line, Electron Packager shows you all the options and flags that it accepts. To specify the directory into which we want Electron Packager to place our applications, we can use the --out flag. Update the build script to electron-packager . --out=build. You can add the build directory to your .gitignore file to keep your compiled applications out of version control. I’ve already done this for you in this project.
14.1.3. Configuring the application’s name and version
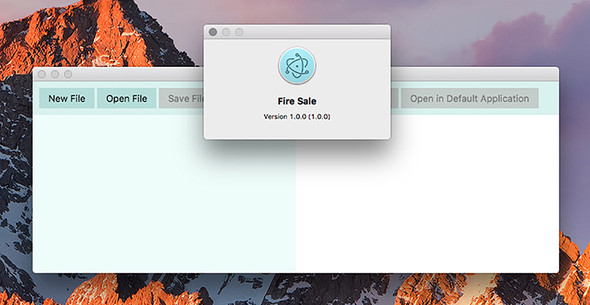
Electron Packager uses information in your project’s package.json to set certain parameters during the build process. For example, it reads the version field to determine what version of the application this is. It used the name field to set the name of the application as well. But, this has some limitations. You can’t use spaces or capitalization in the name field in a package.json. Luckily, a package.json is only a text file, and npm ignores any properties it doesn’t understand. This is a good place to store additional information that might be meaningful to Electron Packager. We know that we’d like to change the name of the application, as shown in figure 14.2.
Figure 14.2. With the productName set, our application has the correct name after it is built.
Listing 14.2. Customizing the applications name and version: ./package.json
{
  "name": "firesale",
  "version": "1.0.0",
  "description": "Completed code from [Electron in
          Action](http://bit.ly/electronjs).",
  "productName": "Fire Sale",                        1
  // ...Additional properties omitted...
}
- 1 Electron Packager uses the productName field, if it is present, as the name of the application instead of the name, which cannot include spaces or capitalization.
14.1.4. Updating the application icon
I like Electron’s logo. It’s done well by us throughout this book. But if every application built on top of Electron used the same logo, it would be hard to tell one application from another. Let’s replace the logo with our own.
As we saw in chapter 9, different operating systems have different preferences regarding the file format of its icons. At this point, we’re building for our own operating system, so we’ll make a choice based on which one we’re using, as shown in figure 14.3. Later in the chapter, we add some nuance to guide Electron Packager in selecting the correct icon for a given platform.
Figure 14.3. Hey, look! We have a custom icon now!

macOS supports .icns files. Windows supports .ico files. Linux supports .png files. For now, pass the appropriate file to the --icon flag based on your current operating system as shown in listing 14.3.
Listing 14.3. Building the application with a custom icon: ./package.json
electron-packager . --overwrite --out=build --icon=icons/Icon.icns    1
electron-packager . --overwrite --out=build --icon=icons/Icon.ico     2
electron-packager . --overwrite --out=build --icon=icons/Icon.png     3
- 1 Uses this option on macOS
- 2 Uses this option on Windows
- 3 Uses this option on Linux
14.1.5. Building for multiple operating systems
Electron Packager supports the --all flag, which creates five builds of the application: 64-bit macOS, 32- and 64-bit Windows, and 32- and 64-bit Linux. Later in this chapter we discuss why this isn’t always possible. Although the --all flag provides a simple way to create builds for each platform, in the previous section we created different icons for each platform. As a result, we want to pass different options to Electron Packager on the platform.
Listing 14.4. Building for multiple platforms: ./package.json
{
     // ...Omitted...
  "scripts": {
    "start": "electron .",
    "build": "npm run build-mac && npm run build-win
 && npm run build-linux",                                   1
    "build-mac": "electron-packager . --platform=darwin
 --out=build --icons=icons/Icon.icns --overwrite",          2
    "build-win": "electron-packager . --platform=win32
 --out=build --icons=icons/Icon.ico --overwrite",           3
    "build-linux": "electron-packager . --platform=linux
 --out=build --icons=icons/Icon.png --overwrite",           4
    "test": "echo \"Error: no test specified\" && exit 1"
  },
     // ...Omitted...
}
&& npm run build-linux", 1
"build-mac": "electron-packager . --platform=darwin
--out=build --icons=icons/Icon.icns --overwrite", 2
"build-win": "electron-packager . --platform=win32
--out=build --icons=icons/Icon.ico --overwrite", 3
"build-linux": "electron-packager . --platform=linux
--out=build --icons=icons/Icon.png --overwrite", 4
"test": "echo \"Error: no test specified\" && exit 1"
},
// ...Omitted...
}
- 1 The build script calls each of the three subsequent build scripts.
- 2 Builds the application for macOS
- 3 Builds the application for Windows
- 4 Builds the application for Linux
If you’re using macOS, you can build Windows binaries if you have Wine installed as well as binaries for Linux. Wine is a utility for running Windows applications on Linux and macOS that can be downloaded from www.winehq.org. On Windows, you cannot create symlinks for macOS and cannot build applications as a result. In chapters 15 and 16, we discuss code signing on macOS, which can be done only on a Mac.
14.2. Using asar
Electron applications are like traditional web applications in that all our code is hidden in plain sight. In a web application a user might right-click and select View Source or open the Developer Tools. In our Electron application, a curious user could open the application bundle and navigate to our source code, as shown in figure 14.4.
Figure 14.4. The application’s source code is located within the application itself.
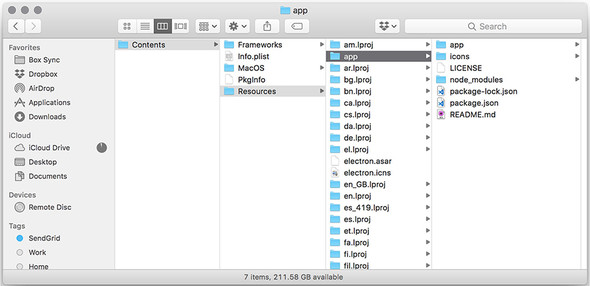
If you’re using Windows, you can see a folder called resources in the same directory as the application. If you’re using macOS, right-click Fire Sale and select Show Package Contents. Next, you see a folder called Contents. Navigate into the Contents directory and then into Resources. Inside this folder are many folders. The one we’re interested in is called app. Open this folder and you find all of Fire Sale’s source code.
Your next impulse might be to run the same experiment on a popular Electron application such as Slack, Atom, or Visual Studio Code. But you won’t find a folder containing the application’s source code. Instead, you’ll see a file with an unfamiliar file extension called app.asar, as shown in figure 14.5.
Figure 14.5. The application wrapped in an asar archive.
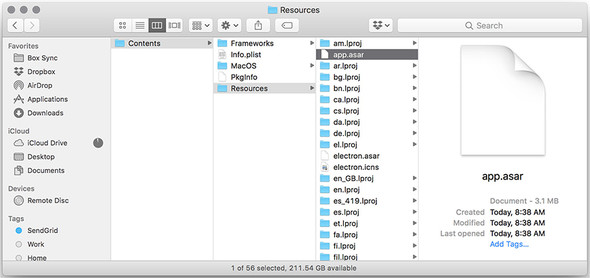
What’s this? Asar is an archive format used by Electron applications. It effectively concatenates the files and prepends a JSON object with the start location of each file along with its length, which allows random access to a specific file in the archive.
Why use asar? Asar speeds up requiring files in Node because they are all colocated in the same file, which is loaded into memory when the application launches. It also helps us avoid a bug in Windows caused by long filenames. The error is fairly self-explanatory: the specified path, filename, or both are too long. The fully qualified filename must be less than 260 characters, and the directory name must be less than 248 characters. While you could practice the discipline of avoiding incredibly long filenames, you don’t have control over dependencies—particularly those written by developers using computers running macOS or Linux. Asar solves this problem by creating a single file called app.asar.
Creating an asar archive with Electron Packager is incredibly easy. Simply add the --asar flag to the command and build the application. The folder disappears and is replaced with the archive.
Listing 14.5. Building for multiple platforms with asar: ./package.json
{
     // ...Omitted...
  "scripts": {
    "start": "electron .",
    "build": "npm run build-mac && npm run build-win && npm run build-linux",
    "build-mac": "electron-packager . --platform=darwin
 --out=build --icons=icons/Icon.icns --asar --overwrite",     1
    "build-win": "electron-packager . --platform=win32
 --out=build --icons=icons/Icon.ico --asar --overwrite",      2
    "build-linux": "electron-packager . --platform=linux
 --out=build --icons=icons/Icon.png --asar --overwrite",      3
    "test": "echo \"Error: no test specified\" && exit 1"
  },
     // ...Omitted...
}
- 1 Adds the --asar flag to the build script for macOS
- 2 Adds the --asar flag to the build script for Windows
- 3 Adds the --asar flag to the build script for Linux
Asar is not a way to secure or conceal your source code. The asar module on npm allows anyone to extract the folder structure from the archive. Alternatively, opening the archive in a text editor shows you that asar doesn’t do anything in the way of obfuscation. If you wanted to peek at the source code of an Electron application, globally install the asar binary, navigate to the application’s app.asar, and extract the folder structure.
Electron does not offer a way to hide or encrypt your HTML, CSS, and JavaScript code. If this is a business requirement for you, you might want to consider writing the sensitive parts of your application in a compiled language, like C++ with Node bindings. To the same end, there is nothing stopping you from cracking open your favorite Electron application—Slack, for example—and checking out some of the approaches used in producing for Electron applications.
Electron patches the Node APIs for reading from and writing to the filesystem to support asar automatically. This means you can treat an asar archive as if it were the original folder structure. If you need to use the unpatched version of Node’s built-in fs module, you can use Electron’s built-in original-fs module.
We have successfully set up packaging for Fire Sale. You can find the code for Fire Sale in the chapter-14-ending branch (http://mng.bz/vI4g). This setup works for a simple application like Fire Sale, but what about an application that has code that needs to be transpiled? Yes, you could set up some Gulp tasks or some other kind of build step that takes place before packaging, but at this point in the book, it shouldn’t surprise you that the Electron community has already solved this problem for you. In the next section, we’ll look at using Electron Forge to build and package Jetsetter, which requires a compile step before packaging.
14.3. Electron Forge
Electron Forge (https://github.com/electron-userland/electron-forge) is an abstraction around electron-compile, electron-rebuild, Electron Packager, and other popular third-party Electron libraries. Electron Forge lays the foundation for a brand-new Electron application using one of several different blueprints. It can also import existing applications. We use Electron Forge with the Jetsetter app from chapters 11 and 12 because it relies on electron-compile and electron-rebuild. Using these with tools like Electron Packager is certainly not impossible, but it’s tedious compared to how easy the process is with Electron Forge, which has built-in support for electron-compile and electron-rebuild.
You’ll start from the chapter-14-beginning branch, which can be found on GitHub (http://mng.bz/MdLb). You can also reference the completed example on the chapter-14-ending branch (http://mng.bz/mzhH).
The trouble with publishing a book is that, sometimes, libraries change. In this section, we’re working at the intersection of a few different libraries: Electron, electron-precompile, Electron Forge, React, and others. The cross-compatibility of all of these libraries fills your author with a sense of existential dread. If you have any trouble with the code printed in this section, I encourage you to visit the repository on GitHub, which should work with the most recent versions of the libraries involved.
Out of the box, Electron Forge also handles many of the concerns around distributing your application that we’ll cover in chapters 15 and 16. It can take care of publishing your application to Amazon S3, GitHub Releases, or your own custom server. As I stated earlier, we’ve opted to do a lot of the work by hand in the name of understanding how Electron works, but I highly recommend considering Electron Forge for your next application. In this section, we cover how to convert an application that was not originally created with Electron Forge in mind to one that is ready and able to take advantage of Electron Forge.
We first need to complete a few steps: install the electron-forge binary, convert Jetsetter to an Electron Forge application, and run the build command. Electron Forge uses Yarn, an alternative to npm, for installing and managing packages. You need to install it if you haven’t already. Visit the official documentation (https://yarnpkg.com/en/docs/install) for up-to-date instructions and to learn how to install it on your operating system.
After you install Yarn on your system, run yarn global add electron-forge. This installs the command-line tool that allows you to create Electron Forge applications, as well as converts existing Electron applications for use with Electron Forge.
14.3.1. Importing an Electron application into Electron Forge
When we built Jetsetter in chapter 11, we had not yet discussed Electron Forge. It follows that Jetsetter is not an Electron Forge application. Luckily, it’s easy to convert it to one. From inside the jetsetter directory, run electron-forge import. At this point, you are asked a series of questions about how you’d like the script to proceed. Answer the questions as follows:
- WARNING: We will now attempt to import "/Users/<username>/Projects/ jetsetter". This will involve modifying some files, are you sure you want to continue? Yes.
- Do you want us to change the "main" attribute of your package.json? If you are currently using Babel and pointing to a "build" directory say yes. No.
- Do you want us to update the "start" script to instead call the electron-forge task "electron-forge start"? Yes.
- Do you want us to update the "package" script to instead call the electron-forge task "electron-forge package"? Yes.
- Do you want us to update the "make" script to instead call the electron-forge task "electron-forge make"? Yes.
The first question is asking your permission to modify your application’s package .json file. This is necessary. Answering no aborts the process. The second question does not apply to us. Jetsetter uses Electron Compile to transpile JavaScript, Sass, and other languages on the fly. If we were instead using a task runner such as Gulp, Grunt, or webpack to transpile our source code into another directory, we would answer yes to this question.
The final three questions are asking if we’d like to use Electron Forge to start our application in development, package the application as we did earlier in this chapter to Fire Sale, and build a distributable—which we’ll cover in the next chapter. Because this is why we’re importing the application to begin with, we’ll answer yes to each of these questions.
14.3.2. Building the application with Electron Forge
As I mentioned earlier, Electron Forge is an abstraction around several helpful libraries in the Electron ecosystem. It exists to make common tasks easier. Building your application is as simple as running yarn run package. This drives Electron Packager through many of the steps we covered earlier in this chapter with Fire Sale.
Electron Forge passes parameters to Electron Packager. It calls the output directory out instead of build. Electron Packager pulls modules from your node_modules directory and installs them into your application. As of this writing, there is an issue where the modules were not moved properly. This issue appears with the current version of npm and may be alleviated by the time you read these words. In the meantime, I found that it was easy to work around this issue by using Yarn instead of npm. Electron Forge adds a few fields to your package.json, so finds the field titled electron-PackagerConfig, and modify it to match this listing.
Listing 14.6. Using Yarn as your package manager: ./package.json
"electronPackagerConfig": {
  "packageManager": "yarn"
}
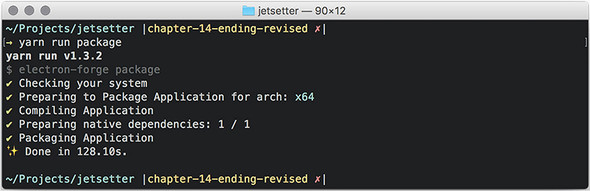
With this code in place, run yarn run package. Your application should build successfully. See figure 14.6. You may have noticed that Electron Forge adds a few other configuration fields to package.json. As I mentioned earlier, Electron Forge also assists with creating installers and publishing your application to the web. We cover those features in the upcoming chapters.
Figure 14.6. Packaging an application with Electron Forge
With Electron Forge, everything is set up on your behalf. At this point, you probably fall into one of two categories: you’re either amazed by how much simpler Forge is compared to Packager, or you’re bewildered by all of the black magic. Those reactions are both fair and underscore some of the trade-offs made along the spectrum between convention and configuration. My hope is that by trying both, you’ll have a sense of which you prefer for your own applications.
Summary
- Electron Packager automates the otherwise manual and error-prone process of packaging an Electron application for distribution.
- The application should be packaged on each of the target platforms to which you wish to distribute.
- Setting the productName key in the package.json instructs Electron Packager to use a custom name that supports spaces and capitalization.
- Electron Packager accepts an --icon flag and allows you to define a custom icon for your application.
- Asar is an archive format used by Electron applications that concatenates files and allows random access to a specific file in the archive.
- Electron Forge can be used as a boilerplate for new Electron projects. It can also be used to facilitate building applications that rely on electron-compile.