Table of Contents for
Angular: Up and Running
 Angular: Up and Running
Published by
O'Reilly Media, Inc., 2018
Angular: Up and Running
Published by
O'Reilly Media, Inc., 2018
- Cover
- nav
- Angular: Up and Running
- Angular: Up and Running
- Introduction
- 1. Introducing Angular
- 2. Hello Angular
- 3. Useful Built-In Angular Directives
- 4. Understanding and Using Angular Components
- 5. Testing Angular Components
- 6. Working with Template-Driven Forms
- 7. Working with Reactive Forms
- 8. Angular Services
- 9. Making HTTP Calls in Angular
- 10. Unit Testing Services
- 11. Routing in Angular
- 12. Productionizing an Angular App
- Index
- About the Author
- Colophon
Chapter 12. Productionizing an Angular App
In all the chapters so far, we have talked about the various bits and pieces that add up to an Angular application. We started at the very basic, and went to the more detailed and complex, from simple components to routing and server calls. But through all this, we focused on functionality and getting different bits to interact and play well together. At this point, you as a developer are ready to tackle 90% of most Angular application needs.
In this chapter, we will focus on what it takes to get that application you have built out into production in a performant manner. We will cover all the things you will have to keep in mind when deploying your Angular applications to production, as well as some other concerns that you may not have thought of. We will cover how to build an Angular app for production, how to reduce the size of the build, how to improve the performance, and even briefly cover other concerns like SEO.
Building for Production
So far, whenever we run our application, we usually ask the Angular CLI to serve our application, by running:
ng serve
This runs the Angular compiler, and builds and serves your Angular application using the internal server that the Angular CLI has. You could use the build command to generate the files to serve it for production as well. The command would simply be:
ng build
This would by default generate all your compiled files in a folder called dist/. You can then simply copy everything from this folder, put it on an HTTP server, and be off and running. But it is not what you should be doing! The build that gets generated by default is a suboptimal, overweight build that would make your production application slow to load and slow to run (comparatively, that is!). Angular allows you to build an optimized version of your application, so let’s see how we might do that.
Production Build
The simplest thing we can do to create a better build for production is to use the prod flag with the ng build command. Simply, you can run:
ng build --prod
This does a few things of note:
- Bundling
-
When we write our code, we like to keep it in nice, disparate files to make it easier to read, manage, and update. But for the end browser, loading 1,000 files is not as efficient as loading, say, 4 or 5 files. Angular CLI bundles all the application and library files into a few bundles to make it faster to load in the browser. Note that bundling happens both with and without the
--prodflag. - Minification
-
Spaces, indentation, and the like are useful for us developers, but the browser and systems running the code don’t care. Minification is the process of removing all unneeded spaces. The
--proddoes this for us, thus saving a few bytes of space in the final build. - Uglification
-
The
--prodflag uglifies the code as well, which is the process of replacing all nice, readable variable and function names with a smaller, two or three character name to save a few bytes. The overall code is much more efficient and smaller to load. - AOT
-
We will talk about Ahead-of-Time (AOT) compilation in a little bit more detail in the following section, but in a nutshell, AOT compilation allows us to further reduce the size of code by dropping unused paths.
- Run Angular in production mode
-
When we run Angular using
ng serve(or build and run it without theprodflag), the Angular library performs some checks each time it renders in the UI. Think of these as training wheels, to ensure that the developer doesn’t end up developing something that invalidates or goes against Angular’s patterns. These checks can add up to a few precious milliseconds during each render, and thus it is recommended that we turn these off in the final production build. The--proddoes this for you. - Dead code elimination
-
There are times when you erroneously leave a module imported, or you haven’t ended up using all of the functionality from a module. The build process removes all unused code and unreferenced modules, thus dropping the bundle size further.
At the end of this, you should have the files you need to deploy in the dist folder, each with an individual hash based on the contents. This would be a pretty optimal build that should be good in a majority of cases.
Ahead-of-Time (AOT) Compilation and Build Optimizer
We briefly mentioned Ahead-of-Time compilation in the previous section. This mode has become enabled by default in any production build since the 1.5 version of the Angular CLI.
Angular applications use what we call Just-in-Time (JIT) compilation, where the application is compiled at runtime in the browser before running. This is also the default when you run the Angular application using ng serve or ng build.
In production mode, Angular uses AOT for compilation, which means that Angular compiles as much of the application as possible upfront. Thus, when the application is served to the browser, it is already precompiled and optimal, thus allowing the browser to quickly render and execute the application.
Furthermore, as part of the compilation process, all HTML templates and CSS are inlined within the application bundle, thus saving asynchronous requests to load them later.
There is also a significant reduction in the size of the built bundle, as the Angular compiler, which constitutes almost half of the Angular library, can be omitted. The compiler’s work, of checking templates, bindings, and the like, can now be done at compile time, thus catching them earlier rather than after deploying the application.
Build Optimizer is a webpack plug-in that was introduced by the Angular team to further optimize the bundle beyond what webpack is capable of. In particular, it focuses on removing some of the decorators and other code that is not relevant for the final build. It only works with AOT, so you shouldn’t end up using it with non-AOT builds. Since Angular CLI 1.5, this has been enabled by default whenever you do a production build in Angular along with AOT.
There is a lot more to the AOT compiler, and the options it provides and how we can modify and play around with it. You can read up on it in more detail in the official Angular docs.
Thus, unless there is a very strong reason (and there usually isn’t), leave the AOT enabled when you generate the final build, which should give you as close to an optimal build with minimal additional work.
Base Href
One additional concern when building and deploying any Single-Page Application is where it is served from. In cases where your application is served from the root domain (say, www.mytestpage.com), the default should work.
In other cases though, where your application is served not from the root domain (say, www.mytestpage.com/app or something similar), then it is important that we update our <base> tag in the index.html.
The HTML base tag is responsible for setting the base path for all relative URLs in our application. These include, but are not limited to, CSS/style files, our JavaScript application and library files, images, and more.
Let’s take the case of serving an application from www.mytestpage.com/app, and see how the base tag would impact this:
-
Let’s assume that we didn’t have a
<base>tag, or the tag was<base href="/">. In this case, when we have the script tag<script src="js/main.js">, then the browser will make a request to www.mytestpage.com/js/main.js. -
Now let’s assume that we had the following base tag:
<base href="/app">. In this case, when we have the script tag<script src="js/main.js">, then the browser will make a request to www.mytestpage.com/app/js/main.js.
As you can clearly see, the second request is the correct one, and ensures that the necessary images and scripts are loaded correctly.
How does this play into our Angular application? When we build our Angular application using the Angular CLI, we can specify or overwrite the base href value. Continuing our example from earlier, we could build our application as follows:
ng build --base-href /app/
This would ensure that the generated index.html has the correct base tag for your deployment.
Deploying an Angular Application
There are a ton more options when building your Angular application for deployment, and you can read up on all the options and their uses at the Angular CLI build wiki.
But for the purpose of deploying a mostly performant Angular application, the options we just reviewed cover the majority of the use cases. At this point, you would have a dist/ folder (unless you have overriden the default) with generated files. Each generated file would also have a hash representing the contents.
At this point, you should be able to take the entire folder, drop it in to your frontend server (be it nginx, Apache, or whatever), and start serving your Angular application. As long as you serve the entire folder, and your base path (as we saw in the preceding section) is set correctly, you should be off to the races. There are a few more concerns that we will cover in the next section, from handling caching, deep-linking, and others, but this would be the base you will build off of.
Other Concerns
In the previous section, we saw the bare minimum it would take to drop a mostly optimal build into our frontend server and have it start serving traffic. In this section, we will go slightly deeper into specific concerns that we need to think about to ensure better performance or proper functionality.
Caching
The first topic we will start with is caching. And in this section, we are particularly talking about frontend code caching, not the API response caching. That is, how and when should we cache our index.html, our JS files and CSS files, and how long should they remain cached.
When we create our production builds, notice that our generated files (other than the index.html) have a hash in the filename (like inline.62ca64ed6c08f96e698b.bundle.js). This hash is generated based on the contents of the file, so if the content of the file changes, the hash in the filename also changes! Also, our generated index.html explicitly refers to these generated files and loads them as scripts or as styles.
This gives us a great mechanism now for caching these files on the browser. Our simple rule of thumb for caching now becomes:
-
We never cache our index.html file on the browser. This would mean setting the
Cache-Controlheader on your server just for the index.html to be set tono-cache,no-store,must-revalidate. Note that this is only for the index.html file, and not for all other files from your frontend server. The index.html file is tiny anyway, and we can quickly revalidate it if needed. -
We always cache all other asset files, like our JavaScript bundles and our CSS files, as long as possible. Again, because the asset filenames themselves will change, we can be guaranteed that our noncached index.html will always load the correct asset files. And those files can remain cached indefinitely. This ensures a great second load performance, where all asset files can be served from the cache.
Now, let’s talk through a few potential user scenarios to make it clear how this caching strategy handles them:
- First load, new user
-
For the very first request from a fresh user, the browser first requests the index.html from the server. The server returns it, after which the browser processes the index.html. Based on the files it then asks for, the browser makes request for the styles and scripts from the server. Since it is the first request, none of the data is cached, and all the required files are served by the server. Finally, the app is up and running after all the files are loaded.
- Second load, repeat user
-
The second time the user comes back to our application, the browser again requests the index.html from the frontend server. This is because the index.html has not been cached according to our
Cache-Controlheaders. The frontend server responds with the latest content for index.html, which has not changed. Now, the browser looks at the script and style files it has to load, which has also not changed. But these files are perpetually cached on the browser. Thus, the browser doesn’t need to make server requests to load them, and instead loads them from the local cache. Our app is now up and running immediately almost as soon as the index.html finishes loading. - First load, new user, website updated
-
In case a new user visits after we have updated our website source code, the flow followed is exactly the same as the first load case for a new user.
- Second load, repeat user, website updated
-
In this case, the user had visited our website in the past, and has a cached version of the styles and scripts on his browser. Now when we visit the website, after we have pushed out a new update, the very first thing that happens will not change. The browser will make a request for index.html from the frontend server. The server will return the new version of the index.html that points to the new script and style tags. Now when the browser tries to load these, it will realize that it doesn’t have a cached version of the script and style tags (because the content-hash in the filename has changed). It will again make a request to the server to load all these files, and thus the flow becomes very similar to the first flow where the user is visiting for the first time.
Thus, we can see that with this kind of caching mechanism, we get the best of both worlds, which is ensuring that we cache as much as possible, without breaking the user experience in case of pushing out updates to our web application.
API/Server Calls and CORS
The second topic worth covering is how to set up your web application so that it can make server calls successfully. The browser, for security reasons, prevents your web application from making asynchronous calls outside of its domain (this includes sub-domains as well). That is, your web application running on www.mytestpage.com cannot make an AJAX call to www.mytestapi.com, or even to api.mytestpage.com.
We get around this during development by using a proxy as part of the Angular CLI (remember ng serve --proxy proxy.config.json?). The proxy ensured that our requests were made to the same frontend server (and domain) serving our static files, and it then was responsible to proxy the calls to the actual API server.
When we deploy our web application in production, you will also need to set up something similar to this. That is, your frontend server will be the one getting the initial API calls, and it then has to proxy those requests forward to the actual API server.
Your frontend server would end up behaving something like shown in Figure 12-1.
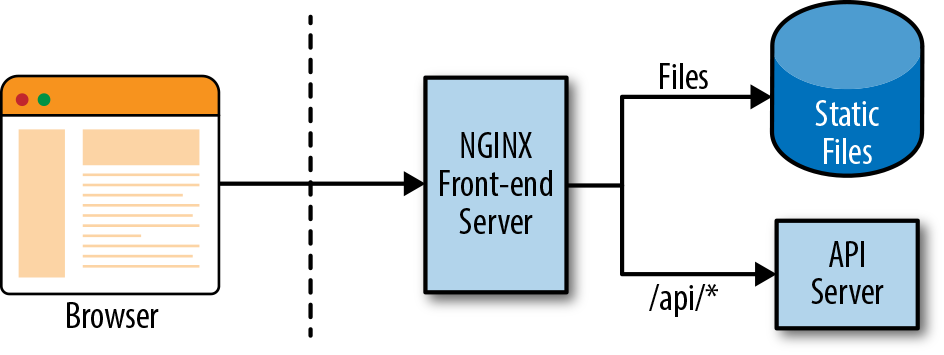
Figure 12-1. Simple end-to-end architecture for a web application
We have used NGINX as an example, but you could easily replace it with Apache or IIS configuration, which does exactly the same. We simply route all requests to our API server (/api/), and all others to our static files, which is our Angular application.
If you really can’t do this (for whatever reason), then there is a second option, which again requires changes on your server. We can enable Cross-Origin Resource Sharing (CORS) on our server, which can allow pages from different origins (read domains or subdomains) to make requests, bypassing the browser security restrictions. It simply requires the API server to respond with an additional header:
Access-Control-Allow-Origin: *
You can also restrict this header to allow only requests from certain origins, instead of all origins like we have done here. Once you do this, then you can allow your web application to directly make requests to the API server. You can learn more about CORS here, and see how to configure it for your particular server here.
Different Environments
Another common requirement when building an application is having different configuration for different environments. For example, you might have different API keys for your client-side tracking libraries, or you might even have different server URLs to configure for test versus production.
In such cases, you can use the concept of environments in Angular. By default, when you create a new Angular application using the Angular CLI, it creates an src/environments folder, with one file per environment. By default, the Angular CLI makes the properties available in the environment.ts file available across your application. But you can override it by running Angular with:
ng serve --env=prod
When you run it like this, it uses the value passed to --env flag, and loads and makes available the corresponding environments file. In this case, it would make the environment.prod.ts file available.
In your application, you can simply import the main environment file like so, and Angular will ensure you get the correct properties based on the flag:
import{environment}from'./environments/environment';
Handling Deep-Linking
The last thing to have a really complete web application is to support deep-linking. We already saw how to enable routing for your Angular application in Chapter 11. Once you deployed your Angular application, you might notice something weird or annoying. When you navigate to the base route of your application, your frontend server serves the index.html, and your application works. Any routes from that point on work as you would expect it to. But if you try to directly link to a route within your application, it might not.
This is due to how we have set up our frontend server to serve the static files necessary for the Angular application. Let’s take a closer look at what is happening here:
-
If you request for the base route, your frontend server translates that to serve the index.html file. This also loads all the relevant scripts and CSS, and bootstraps your Angular application.
-
After this, any link within your application is intercepted by Angular within the browser, and Angular serves the relevant content for that route. So while the route in your browser changes, it is actually not making a request to the server for that new route. It behaves like a Single-Page Application should.
-
Now in the case that we want to directly open a certain route, when we enter that route in the browser, the browser makes that request to our frontend server. Unless you have set up your frontend server configuration correctly, it is not going to find any match for this URL (which is a frontend only route). Thus it fails to serve and most often ends up serving the
404page (or whatever you might have configured).
To work around this, we need to set up our frontend server to serve requests as follows, in order of priority:
-
Recognize all API requests, and proxy that to the actual backend server to serve those requests. Keep API requests under a common path, so that you can proxy all of them consistently and first (for example, always beginning API requests with
/api). -
Match and serve any request that translates to a static file (say, a JS, CSS file, or something like those).
-
Either serve all remaining requests with the index.html file, or match all frontend routes (in addition to the base
/route) with the index.html.
An easy way to do this with an NGINX server would be to use the try_files directive to serve the index.html as a fallback in case a file with the path is not found.
Once you have set up your frontend server as described, then a deep-linked route will end up matching the last category of requests, and the index.html will be served. Once the index.html loads and Angular is bootstrapped, Angular then takes over for all further routing and loading necessary content based on the route in the browser.
Warning
Make sure your base tag is set up correctly so that the web page knows where to load the static files and relative paths from. Otherwise, your Angular application will not work even if you have set up your frontend server correctly.
You can look at the official Angular docs for an updated set of configurations that works for different frontend servers. Configurations for NGINX, Apache, IIS, and more are available there.
Lazy Loading
One more technique for a highly performant app, which we very briefly touched upon in Chapter 11 when we were talking about routing in Angular, is lazy loading. Once we introduced the concept of routing into our Angular applications, you might have realized that not all of the routes are really necessary or need to be loaded.
So one common trick that we use to increase the performance and reduce the initial load time is to try to load the bare minimum up front in the initial request, and defer loading everything else to as and when it’s needed. We accomplish this by leveraging the Angular routing and using what we call child routes.
The technique in a nutshell is as follows:
-
Instead of defining all our routes up front, we break up our application into smaller modules, each with their routes defined in self-contained units.
-
The respective components are now registered at these submodule level only, and not at the main application-level module.
-
We register all these routes as child routes in each individual module.
-
At the application level, we change our routing to instead point certain subpaths at the new module, rather than the individual routes.
Now, when we run our application, Angular will load the bare minimal code up front, and load the remaining modules as and when we navigate to those routes.
Let’s take our application from the previous chapter, and see how to convert it into a lazy-loading application. You can use the code from chapter11/route-guards as the base to convert into the lazy-loading application. Before we get into the nitty gritties, let’s talk through the changes we will make:
-
We will create two new modules, a
UserModuleand aStockModule. TheUserModulewill hold the Login and Register components, and the routes for them. TheStockModulewould hold the routes and components related to showing and creating stocks. Note that for now, we will leave the services registered at the parent level, though you could optimize further and split them into related modules only. -
We will redefine our routes to have a nice parent path for all related and grouped routes. So our login and register routes will move under a
userparent path, and the stock routes will move under astockparent path. This also means that all our redirects and navigation within the app will have to change to refer to the new URLs. -
Finally, we will change the main
AppModuleand the routes to use lazy routing and register only relevant components and services.
Let’s walk through these changes step by step, along with the respective code.
First, we will generate two new modules, along with their corresponding routing module:
ng generate module stock --routing
ng generate module user --routing
This will generate the following four files:
-
src/app/stock/stock.module.ts
-
src/app/stock/stock-routing.module.ts
-
src/app/user/user.module.ts
-
src/app/user/user-routing.module.ts
Now let’s see how we will modify each one to set up our application for lazy loading. First, we’ll start with the user-routing.module.ts file:
import{NgModule}from'@angular/core';import{Routes,RouterModule}from'@angular/router';import{LoginComponent}from'./login/login.component';import{RegisterComponent}from'./register/register.component';constroutes:Routes=[{path:'login',component:LoginComponent},{path:'register',component:RegisterComponent},];@NgModule({imports:[RouterModule.forChild(routes)],exports:[RouterModule]})exportclassUserRoutingModule{}
We simply add our two routes for login and register to the routes array. These have been moved from the app-routes.module.ts file. Also, note one major difference. Previously, whenever we registered our routes, we registered them as RouterModule.forRoot. Now we have started registering them as child routes. This is how Angular differentiates between parent/root routes and child routes.
Our user.module.ts will also change as follows:
import{NgModule}from'@angular/core';import{CommonModule}from'@angular/common';import{LoginComponent}from'./login/login.component';import{RegisterComponent}from'./register/register.component';import{UserRoutingModule}from'./user-routing.module';import{FormsModule}from'@angular/forms';@NgModule({imports:[CommonModule,FormsModule,UserRoutingModule],declarations:[LoginComponent,RegisterComponent,]})exportclassUserModule{}
We end up with a very simple UserModule, which just declares the two components: LoginComponent and the RegisterComponent. Also note that we have imported the FormsModule, because we use ngModel binding in the forms. We don’t define the services here, because we rely on them from the main AppModule instead.
Our changes to the stock-routing.module.ts file are also similar:
import{NgModule}from'@angular/core';import{Routes,RouterModule}from'@angular/router';import{StockListComponent}from'./stock-list/stock-list.component';import{AuthGuardService}from'app/services/auth-guard.service';import{CreateStockComponent}from'./create-stock/create-stock.component';import{CreateStockDeactivateGuardService}from'app/services/create-stock-deactivate-guard.service';import{StockDetailsComponent}from'./stock-details/stock-details.component';import{StockLoadResolverService}from'app/services/stock-load-resolver.service';constroutes:Routes=[{path:'list',component:StockListComponent,canActivate:[AuthGuardService]},{path:'create',component:CreateStockComponent,canActivate:[AuthGuardService],canDeactivate:[CreateStockDeactivateGuardService]},{path:':code',component:StockDetailsComponent,canActivate:[AuthGuardService],resolve:{stock:StockLoadResolverService}},];@NgModule({imports:[RouterModule.forChild(routes)],exports:[RouterModule]})exportclassStockRoutingModule{}
Very similar to the UserRoutingModule, we have simply moved the stock list, create, and details routes to the StockRoutingModule. Do note that we dropped the prefix from the paths and just kept it relative to the current module. Other than prefilling the routes array, everything else is just the autogenerated code.
Our StockModule change is also trivial and straightforward:
import{NgModule}from'@angular/core';import{CommonModule}from'@angular/common';import{StockItemComponent}from'./stock-item/stock-item.component';import{CreateStockComponent}from'./create-stock/create-stock.component';import{StockListComponent}from'./stock-list/stock-list.component';import{StockDetailsComponent}from'./stock-details/stock-details.component';import{StockRoutingModule}from'./stock-routing.module';import{FormsModule}from'@angular/forms';@NgModule({imports:[CommonModule,FormsModule,StockRoutingModule],declarations:[StockDetailsComponent,StockItemComponent,StockListComponent,CreateStockComponent,]})exportclassStockModule{}
We import the FormsModule along with declaring all the stock-related components. Now let’s take a look at the modified AppModule first before we go redefine the routes:
/** No major changes in imports, skipping for brevity **/@NgModule({declarations:[AppComponent,],imports:[BrowserModule,HttpClientModule,AppRoutesModule,],providers:[StockService,UserService,UserStoreService,AuthGuardService,CreateStockDeactivateGuardService,StockLoadResolverService,{provide:HTTP_INTERCEPTORS,useClass:StockAppInterceptor,multi:true,}],bootstrap:[AppComponent]})exportclassAppModule{}
The major change is the declarations array of the NgModule. All the components that we moved into the child modules have been removed from the declarations in the AppModule now. These components will now be loaded if necessary based on the route.
Now we can finally move to the app-routes.module.ts file, which changes as follows:
/** Imports omitted for brevity **/constappRoutes:Routes=[{path:'',redirectTo:'user/login',pathMatch:'full'},{path:'stock',loadChildren:'app/stock/stock.module#StockModule'},{path:'user',loadChildren:'app/user/user.module#UserModule'},{path:'**',redirectTo:'user/register'}];@NgModule({imports:[RouterModule.forRoot(appRoutes),],exports:[RouterModule],})exportclassAppRoutesModule{}
The major change is again only restricted to the appRoutes array. Previously, we defined all our routes in this one file. Now, we use the loadChildren key to tell Angular that these routes are defined as part of a child module. This also means that our login and register routes have changed from /login to /user/login and so on, and similar for the stock routes. Make sure you make a pass through the entire application to fix all the routes changed, in particular the following files:
-
register.component.ts to redirect after registering
-
login.component.ts to redirect after login
-
app.component.html to fix all the navigation links
Now, we can run our application (after making sure you start the Node.js server and proxy to it). When you run it, open up the network inspector of your browser, and see the requests getting made. Create/register a user, and then try logging in. Now if you have the network inspector open, you should see something like Figure 12-2.
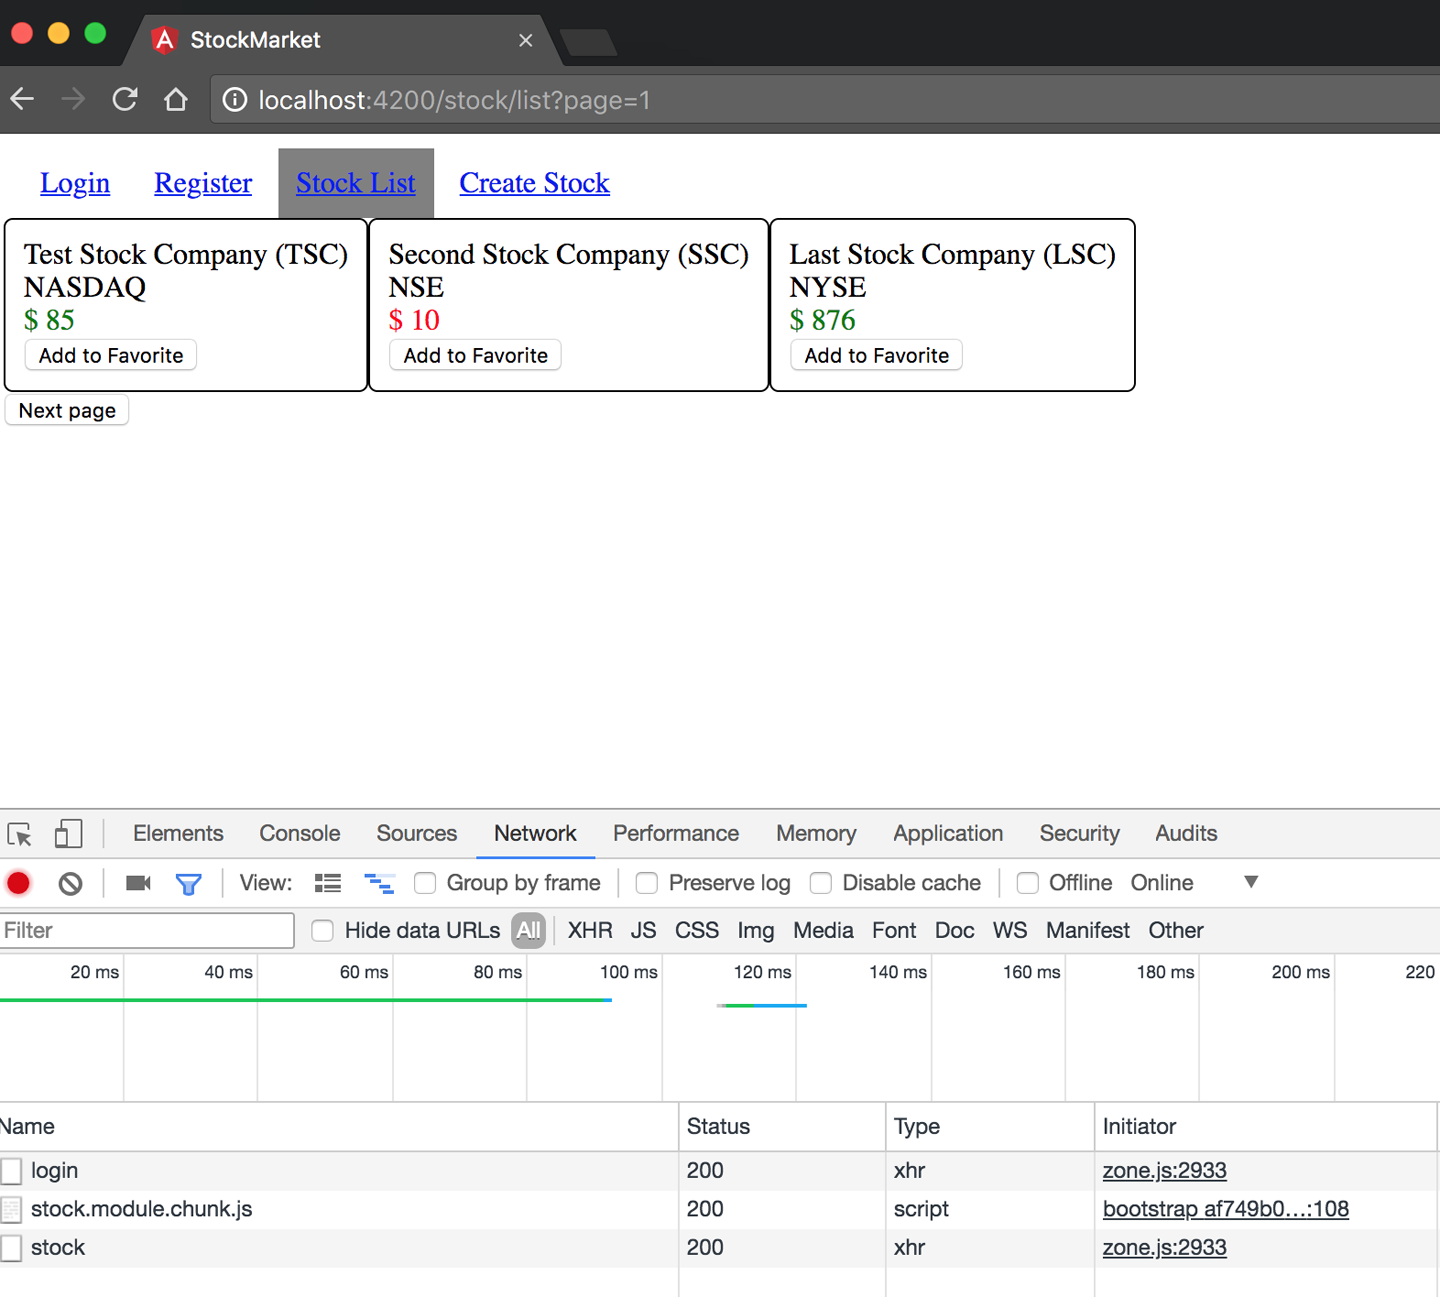
Figure 12-2. Angular lazy loading at work
Notice the additional request to load stock.module.chunk.js when a login happens. This is lazy loading the StockModule chunk once we log in.
You could extend this and configure it to your liking. You might choose to lazy load only the StockModule, and always load the UserModule, or vice versa. It just adds one more item in your toolbox to use to your liking.
The finished example that we created is available in the chapter12/lazy-loading folder in the GitHub repository.
Lazy loading can really impact performance and speed up the initial load for a very large application with lots of routes and code flows. It also makes a lot of sense when there are routes you know most users will not load or open. And as we saw, it is pretty straightforward to implement and add to your application.
Server-Side Rendering and Handling SEO
We will look at one last thing in terms of performance before we wrap up this section. If we consider the life of the first request when we load any Angular (or any Single-Page Application in general) app in our browser, it looks something like this:
-
A request is made with the base path to the server (say www.mytestpage.com).
-
The server serves the index.html file for that path.
-
The browser starts loading the index.html, and then for every static file it needs (CSS, JS, etc.), it will make another request to the server for them.
-
Once all the content has been loaded, Angular will bootstrap, parse the route, and load the necessary components.
-
The components will then make necessary server calls to fetch the data, and then render them.
It is only at this point that the final view is rendered to the user. As you can see, there are multiple hops back-and-forth between the client and the server before this view is rendered. Of course, for future routes and navigation, it is only the component and its calls that happen, so the first few hops are skipped in a Single-Page Application for further routes.
This back-and-forth nature also makes it difficult to handle when it comes to search engine optimization, as most search engine crawlers will not actually render and execute JavaScript when they try to crawl web pages (for various security reasons). Thus, more often than not, deep links and routes in a Single-Page Application also do not get indexed properly. One option to solve this is to use something like Pre-render, which can render the web application in PhantomJS on the server, and serve the fully rendered HTML for search engines to index.
But with Angular, there is another option: rendering the application server-side. We accomplish this using something known as Angular Universal. With this approach, we render the Angular application for serving the initial request on the server itself, and then let Angular bootstrap and take over for the remaining application on the client-side. Thus, we get the best of both worlds, where the initial request does not have the usual back-and-forth, and future requests behave like a Single-Page Application. It also helps in reducing the perceived latency, as the user immediately gets the information he needs while the remaining libraries and framework load.
In this section, we won’t go too much into the details of exactly how Angular accomplishes this, but rather focus on what it takes for us to integrate and get it working. Let’s see how we might take the Angular application we have been working on so far and make it into an Angular Universal application that can seamlessly run on both client and server.
Warning
Angular Universal is in its infancy, so expect to face lots of trouble as you go about integrating it, especially when it comes to working with third-party libraries and components. Even the online guides and tutorials will often be out-of-date, incomplete, or not working as the work is still in progress and prone to sudden changes.
We will again use the codebase from chapter11/routing-guard as the base, and add server-side rendering capability to it. There are fundamentally five new files we will need to add to get Angular Universal working:
-
A bootstrapper for the server app (main.server.ts)
-
TypeScript configuration for our server (tsconfig.server.json)
-
An application module for our server-side app (app.server.module.ts)
-
An express web server to serve our application code (server.ts)
-
Webpack server configuration to define how the build happens (webpack.server.config.js)
In addition, we will be making changes to a few other files as we go along.
Dependencies
To get started, we will rely on a few Angular platform libraries and frameworks. We will need to install the following npm packages:
- @angular/platform-server
-
These provide the Angular server-side components to run and render our application code on the server.
- @nguniversal/module-map-ngfactory-loader
-
In case we use lazy loading for routes, we use the factory loader to lazy load routes in the context of a server-side render.
- @nguniversal/express-engine
-
An express engine to integrate with Angular Universal and render our application.
- ts-loader
-
TypeScript loader to transpile our server-side application into JavaScript and run it using Node.js.
You can install all of these using the following command:
npm install --save @angular/platform-server
                   @nguniversal/module-map-ngfactory-loader
                   ts-loader@3.5.0 @nguniversal/express-engine
This will install and save all of these dependencies to your package.json. Note that we have installed a specific version of the ts-loader, because of a bug with the library and how it interacts with our Angular Universal application.
Making the changes
The first thing we will do is modify the AppModule to have the capability to hook into a rendered server-side Angular application. We accomplish this by replacing the BrowserModule import in src/app/app.module.ts with the following line:
BrowserModule.withServerTransition({appId:'stock-app'}),
The appId is just for reference and a keyword for Angular to use when it renders server-side styles and the like. You can replace it with anything of your choice. We can also get runtime information about the current platform (whether Angular is running on the server or the client) and the appId through Angular as well. We can add the following constructor to the AppModule:
import{NgModule,Inject,PLATFORM_ID,APP_ID}from'@angular/core';import{isPlatformBrowser,APP_BASE_HREF}from'@angular/common';@NgModule({/** Skipped for brevity */providers:[/* Skipping common ones for brevity */{provide:APP_BASE_HREF,useValue:''}]})exportclassAppModule{constructor(@Inject(PLATFORM_ID)privateplatformId:Object,@Inject(APP_ID)privateappId:string){constplatform=isPlatformBrowser(platformId)?'in the browser':'on the server';console.log(`Running${platform}withappId=${appId}`);}}
isPlatformBrowser is a useful check that you can use in other contexts as well, to selectively enable/disable certain flows and features in your application. There might be preloading, caching, and other flows you might want to keep only for the browser, and you can use isPlatformBrowser for this.
The next major change is to the URLs to which we make HTTP calls. In the browser, relative URLs are fine. But in a Universal app, especially on the server side, the HTTP URLs must be absolute for Angular Universal to be able to resolve them correctly. One trick (which we will do here) is to use the APP_BASE_HREF token, which we can inject into our services. In the context of our browser, this will be what we have defined it to be, and in the server, it will have the entire URL. Another way to do it might be to again use isPlatformBrowser to check and change the URL. So in our browser-specific flow, we set the value of APP_BASE_HREF in the main module to be an empty string.
We will use the APP_BASE_HREF trick in the stock.service.ts file as follows:
import{Injectable,Optional,Inject}from'@angular/core';import{APP_BASE_HREF}from'@angular/common';/** Remaining imports skipped for brevity */@Injectable()exportclassStockService{privatebaseUrl:string;constructor(privatehttp:HttpClient,privateuserStore:UserStoreService,@Optional()@Inject(APP_BASE_HREF)origin:string){this.baseUrl=`${origin}/api/stock`;}getStocks():Observable<Stock[]>{returnthis.http.get<Stock[]>(this.baseUrl);}/** Remaining skipped for brevity */}
We would make the same change in the user.service.ts file as well, which we are skipping for brevity. You can always look up the changes in the finished example if you are unsure.
Additions for the server side
Next, we will look at some of the additions we need to do on the server side for the application to actually run. We will first start with a parallel AppServerModule (created as src/app/app.server.module.ts) to the AppModule, which will be used by the server:
import{NgModule}from'@angular/core';import{ServerModule}from'@angular/platform-server';import{ModuleMapLoaderModule}from'@nguniversal/module-map-ngfactory-loader';import{AppModule}from'./app.module';import{AppComponent}from'./app.component';import{APP_BASE_HREF}from'@angular/common';@NgModule({imports:[AppModule,ServerModule,ModuleMapLoaderModule],providers:[// Add universal-only providers here{provide:APP_BASE_HREF,useValue:'http://localhost:4000/'}],bootstrap:[AppComponent],})exportclassAppServerModule{}
Notice that we import the original AppModule into our AppServerModule, and then add the ServerModule from Angular along with the ModuleMapLoaderModule to handle any lazy-loaded routes. We still bootstrap the AppComponent. We would set up any Universal-specific providers in the providers section, which would be for services that are only server-specific. In this case, we ensure that the value of APP_BASE_HREF is provided with an absolute path so that our server can actually make the correct requests.
We would also create a parallel main.server.ts that will be responsible as the entry point for our server-side Angular application, which would be very straightforward. Create it as src/main.server.ts with the following content:
export{AppServerModule}from'./app/app.server.module';
Now we are ready to create our server. For the purpose of this example, we will use a Node.js express server, for which Angular Universal has out-of-the-box integration support. It is not necessary to understand the depths of this server code. Create a server.ts file in the main root folder of the application with the following content:
// These are important and needed before anything elseimport'zone.js/dist/zone-node';import'reflect-metadata';import{enableProdMode}from'@angular/core';import*asexpressfrom'express';import{join}from'path';import*asproxyfrom'http-proxy-middleware';// Faster server renders w/ Prod mode (dev mode never needed)enableProdMode();// Express serverconstapp=express();constPORT=process.env.PORT||4000;constDIST_FOLDER=join(process.cwd(),'dist');// * NOTE :: leave this as require() since this file// is built Dynamically from webpackconst{AppServerModuleNgFactory,LAZY_MODULE_MAP}=require('./dist/server/main.bundle');// Express Engineimport{ngExpressEngine}from'@nguniversal/express-engine';// Import module map for lazy loadingimport{provideModuleMap}from'@nguniversal/module-map-ngfactory-loader';app.engine('html',ngExpressEngine({bootstrap:AppServerModuleNgFactory,providers:[provideModuleMap(LAZY_MODULE_MAP)]}));app.set('view engine','html');app.set('views',join(DIST_FOLDER,'browser'));app.use('/api',proxy({target:'http://localhost:3000',changeOrigin:true}));// Server static files from /browserapp.get('*.*',express.static(join(DIST_FOLDER,'browser')));// All regular routes use the Universal engineapp.get('*',(req,res)=>{res.render(join(DIST_FOLDER,'browser','index.html'),{req});});// Start up the Node serverapp.listen(PORT,()=>{console.log(`Nodeserverlisteningonhttp://localhost:${PORT}`);});
The preceding server is a very simplistic, insecure web server that serves your Angular application, but after rendering it on the server side. Again, add your security and authorization checks before you take it to production.
We make a few assumptions so that the whole process is easier for us. Primarily:
-
The server uses the
ngExpressEngineto convert all client requests into a server-rendered page. We pass it theAppServerModulethat we wrote, which acts as the bridge between the server-side rendered application and our web application. -
We need to figure out what requests are for data, which are for static files, and which are Angular routes.
-
We expect all /api/* routes to be API/data routes, and the work to handle that if left incomplete.
-
We also expect that any request with an extension (say, .js or .css) will be for a static file, and serve that as a static file from a predefined folder.
-
Finally, any request without an extension is then treated as an Angular route, and uses the
ngExpressEngineto render the Angular server-side rendered page.
Configuration
Finally, we get to the configuration that pulls all of these together. The first thing is to write a configuration for TypeScript, which we can add as src/tsconfig.server.json with the following content:
{"extends":"../tsconfig.json","compilerOptions":{"outDir":"../out-tsc/app","baseUrl":"./","module":"commonjs","types":[]},"exclude":["test.ts","**/*.spec.ts"],"angularCompilerOptions":{"entryModule":"app/app.server.module#AppServerModule"}}
We extend the existing tsconfig.json, and point it to our new AppServerModule as the entry module. Also, the module must be set to commonjs for the Angular Universal application to work.
Next, we need the Webpack configuration for our server to compile and work. We add it as webpack.server.config.js at the root folder level, with the following content:
constpath=require('path');constwebpack=require('webpack');module.exports={entry:{server:'./server.ts'},resolve:{extensions:['.js','.ts']},target:'node',// this makes sure we include node_modules and other third-party librariesexternals:[/(node_modules|main\..*\.js)/],output:{path:path.join(__dirname,'dist'),filename:'[name].js'},module:{rules:[{test:/\.ts$/,loader:'ts-loader'}]},plugins:[newwebpack.ContextReplacementPlugin(/(.+)?angular(\\|\/)core(.+)?/,path.join(__dirname,'src'),// location of your src{}// a map of your routes),newwebpack.ContextReplacementPlugin(/(.+)?express(\\|\/)(.+)?/,path.join(__dirname,'src'),{})]};
This is mainly so that our Node.js server.ts compiles into executable JavaScript code, with some fixes for some bugs in the Angular CLI. It also hooks up the ts-loader plug-in we installed so that it can convert our TypeScript into JavaScript correctly.
We also need to make a small change to the Angular CLI configuration JSON file (.angular-cli.json) to make sure it outputs our application code correctly based on the platform. Add the following configuration as another entry into the apps array:
{"platform":"server","root":"src","outDir":"dist/server","assets":[],"index":"index.html","main":"main.server.ts","polyfills":"polyfills.ts","test":"test.ts","tsconfig":"tsconfig.server.json","testTsconfig":"tsconfig.spec.json","prefix":"app","styles":["styles.css"],"scripts":[],"environmentSource":"environments/environment.ts","environments":{"dev":"environments/environment.ts","prod":"environments/environment.prod.ts"}}
While you are at it, also change the existing entry and change the outDir from dist to dist/browser. Your combined apps array in .angular-cli.json should look something like this:
"apps":[{"root":"src","outDir":"dist/browser","assets":["assets","favicon.ico"],"index":"index.html","main":"main.ts","polyfills":"polyfills.ts","test":"test.ts","tsconfig":"tsconfig.app.json","testTsconfig":"tsconfig.spec.json","prefix":"app","styles":["styles.css"],"scripts":[],"environmentSource":"environments/environment.ts","environments":{"dev":"environments/environment.ts","prod":"environments/environment.prod.ts"}},{"platform":"server","root":"src","outDir":"dist/server","assets":[],"index":"index.html","main":"main.server.ts","polyfills":"polyfills.ts","test":"test.ts","tsconfig":"tsconfig.server.json","testTsconfig":"tsconfig.spec.json","prefix":"app","styles":["styles.css"],"scripts":[],"environmentSource":"environments/environment.ts","environments":{"dev":"environments/environment.ts","prod":"environments/environment.prod.ts"}}],
Once we do this, we can now finally add the executable scripts to our package.json. Add the following commands to the scripts section in your package.json:
"build:universal":"npm run build:client-and-server-bundles && npm run webpack:server","serve:universal":"node dist/server.js","webpack:server":"webpack --config webpack.server.config.js --progress --colors"
At this point, we should now be ready to run our Angular Universal application.
Running Angular Universal
Building our Angular Universal application is now as simple as executing:
npm run build:universal
This runs and generates the build for both our server- and browser-side Angular applications. It creates two folders in our dist folder, one each for browser and for server.
Now we can run our Angular application as:
npm run serve:universal
This should now start your application, and allow you to hit the application at http://localhost:4000.
When you open the URL in your browser, open the Network Inspector and look at the requests being made and the responses. In particular, notice the very first request. With a normal Angular application, you would see the barebones index.html being served, which would then load all the relevant source code and trigger Angular.
In this case though, you would see that the very first request itself comes with the route content preloaded, and the template HTML also loaded. It is then that the rest of Angular triggers and starts working in the background. This becomes even more apparent if you throttle the speed to 3G or below, to see the difference in perceived latency in an Angular Universal application versus a normal Angular application.
The finished code for this application is available in the chapter12/server-side-rendering folder in the GitHub repository.
Conclusion
This brings us to the end of our journey of learning Angular, step by step. In this chapter in particular, we covered what it takes to bring the Angular application you have been building so far to production. We covered all the steps from building to deploying, and then went in-depth into various concerns for performance, from caching to prerendering. We also touched upon lazy loading and saw how simple it is to take an Angular application and move it to lazy load certain sections of your application.
That said, we have just begun to scratch the surface of Angular. There are tons of things in Angular itself that we didn’t cover in this book, from creating directives and pipes, to advanced concepts. But what we have done is build a solid base for you to build from, and covered about 80%–90% of the common tasks you will have in building any application. From here, you should be able to build pretty complex things, and leverage the official documentation to see you the rest of the way through.