Table of Contents for
Angular: Up and Running
 Angular: Up and Running
Published by
O'Reilly Media, Inc., 2018
Angular: Up and Running
Published by
O'Reilly Media, Inc., 2018
- Cover
- nav
- Angular: Up and Running
- Angular: Up and Running
- Introduction
- 1. Introducing Angular
- 2. Hello Angular
- 3. Useful Built-In Angular Directives
- 4. Understanding and Using Angular Components
- 5. Testing Angular Components
- 6. Working with Template-Driven Forms
- 7. Working with Reactive Forms
- 8. Angular Services
- 9. Making HTTP Calls in Angular
- 10. Unit Testing Services
- 11. Routing in Angular
- 12. Productionizing an Angular App
- Index
- About the Author
- Colophon
Chapter 3. Useful Built-In Angular Directives
In the previous chapter, we got started with our very first Angular application, and got a feel for using the Angular CLI to begin a new project and create components in it. We got a basic sense of how to use Angular’s data and event binding mechanisms as well.
In this chapter, we will first understand what directives are in Angular and how they are different from components. We will then cover some basic directives that Angular provides out of the box and the use cases where they’re applicable. By the end of the chapter, you should be comfortable using most of the out-of-the-box directives that Angular provides and understand when and where to use them.
Directives and Components
A directive in Angular allows you to attach some custom functionality to elements in your HTML. A component in Angular, like the one we built in the previous chapter, is a direcive that provides both functionality and UI logic. It is fundamentally an element that encapsulates its behavior and rendering logic.
Noncomponent directives, on the other hand, usually work on and modify existing elements. These can be further classified into two types:
- Attribute directives
-
Attribute directives change the look and feel, or the behavior, of an existing element or component that it is applied on.
NgClassandNgStyle, which we will see later in this chapter, are examples of attribute directives. - Structural directives
-
Structural directives change the DOM layout by adding or removing elements from the view.
NgIfandNgForare examples of structural directives that we will see later in this chapter.
Built-In Attribute Directives
We will first explore attribute directives. There are two basic attribute directives that Angular provides out of the box, which are the NgClass and the NgStyle directives. Both of these are alternatives for the class and style bindings, of which we saw the class binding in the previous chapter.
Tip
We generally refer to the directive with the name of its class, which is why we call the directive NgClass or NgIf. But the same directive, when used as an HTML attribute, is usually in camel-case, like ngClass or ngIf. Keep this in mind as we go along.
NgClass
The NgClass directive allows us to apply or remove multiple CSS classes simultaneously from an element in our HTML. Previously, we applied a single class to our element to highlight whether it was a positive or a negative change as follows:
<div[class]="stock.isPositiveChange()?'positive':'negative'">$ {{stock.price}}</div>
In this example, we simply look at a boolean value, and then decide whether to apply the class positive or negative based on that. But what if we had to apply multiple CSS classes? And they were all (or a lot of them) conditional? You would end up having to write code that does string generation based on these multiple conditions, so that you could have one string that represents all the classes that need to be applied.
This is cruft code that is not worth writing or maintaining. So for these kinds of situations, Angular provides the NgClass directive, which can take a JavaScript object as input. For each key in the object that has a truthy value, Angular will add that key (the key itself, not the value of the key!) as a class to the element. Similarly, each key in the object that has a falsy value will be removed as a class from that element.
Truthy and Falsy in JavaScript
JavaScript allows us to use non-boolean values in conditional statements. Thus, instead of just true and false, a whole set of values are equivalent to true and false. In JavaScript, the following values are treated as falsy:
-
undefined -
null -
NaN -
0 -
""(any empty string) -
false(the boolean value)
Any other value is treated as truthy, including, but not limited to:
-
Any nonzero number
-
Any nonempty string
-
Any nonnull object or array
-
true(the boolean value)
Another way to easily remember is that any non-falsy value is truthy. We end up using these concepts quite often in conditionals in our applications.
Let’s take an example to see this in action. Say we want to extend our example from before, where instead of just a positive and a negative class, we want to add another class that dictates whether it is a large or a small change. We want it to be a small change (denoted by the CSS class small-change) if the change percentage is less than 1%; otherwise it would be a large change (denoted by the CSS class large-change).
We will build on the example from the previous chapter, so if you don’t have it, feel free to grab the final code we were working with from the GitHub repository. The codebase is in chapter2/stock-market, which is the base for the code in this chapter.
First, we can add the new classes to the src/app/stock/stock-item/stock-item.component.css file:
.stock-container{border:1pxsolidblack;border-radius:5px;display:inline-block;padding:10px;}.positive{color:green;}.negative{color:red;}.large-change{font-size:1.2em;}.small-change{font-size:0.8em;}
Next, we can change our component class to calculate and keep the JSON object ready with the classes to apply. We modify the src/app/stock/stock-item/stock-item.component.ts file to first calculate the difference between the current and the previous price, and then create an object that holds all the classes we need to apply:
import{Component,OnInit}from'@angular/core';import{Stock}from'../../model/stock';@Component({selector:'app-stock-item',templateUrl:'./stock-item.component.html',styleUrls:['./stock-item.component.css']})exportclassStockItemComponentimplementsOnInit{publicstock:Stock;publicstockClasses;constructor(){}ngOnInit() {this.stock=newStock('Test Stock Company','TSC',85,80);letdiff=(this.stock.price/this.stock.previousPrice)-1;letlargeChange=Math.abs(diff)>0.01;this.stockClasses={"positive":this.stock.isPositiveChange(),"negative":!this.stock.isPositiveChange(),"large-change":largeChange,"small-change":!largeChange};}toggleFavorite(event){console.log('We are toggling the favorite state for this stock',event);this.stock.favorite=!this.stock.favorite;}}
In the component code, we created a stockClasses object with four keys: positive, negative, large-change, and small-change. Based on the current price and previous prices, each of these keys will have a value of true or false.
Now, let’s see how we can use the NgClass directive to use this instead of the class binding we were previously using in the src/app/stock/stock-item/stock-item.component.html file:
<divclass="stock-container"><divclass="name">{{stock.name + ' (' + stock.code + ')'}}</div><divclass="price"[ngClass]="stockClasses">$ {{stock.price}}</div><button(click)="toggleFavorite($event)"[disabled]="stock.favorite">Add to Favorite</button></div>
We primarily replaced the
[class]="stock.isPositiveChange() ? 'positive' : 'negative'"
line with the following:
[ngClass]="stockClasses"
Now if you run this application in your browser (ng serve, in case you have forgotten), you can see the impact of your changes. The price is now shown in green, as well as in slightly larger font, since it has applied both the positive and the large-change classes. You can play around with the values of price and previous price in the component class to see the different combinations reflected.
Another thing to note is that unlike before, where the class binding was overwriting our initial class from the element, the NgClass directive retains the classes on the element.
The finished code for the preceding example is available in the chapter3/ng-class folder in the GitHub repository.
You should consider using the NgClass directive if you have the use case of having to apply various different CSS classes on an element conditionally. It makes it easy to reason and understand how and what classes are applied, and it also makes it easy to unit test the logic of selecting classes separate from the logic of applying classes to the elements.
NgStyle
The NgStyle directive is the lower-level equivalent of the NgClass directive. It operates in a manner similar to the NgClass in that it takes a JSON object and applies it based on the values of the keys. But the NgStyle directive works at a CSS style/properties level. The keys and values it expects are CSS properties and attributes rather than class names.
Considering that our example with NgClass was using simple CSS classes each affecting only one CSS property, let’s see how we can translate the same example using the NgStyle directive instead. First, we need to make a change to the src/app/stock/stock-item/stock-item.component.ts file to create the style object based on the stock properties:
import{Component,OnInit}from'@angular/core';import{Stock}from'../../model/stock';@Component({selector:'app-stock-item',templateUrl:'./stock-item.component.html',styleUrls:['./stock-item.component.css']})exportclassStockItemComponentimplementsOnInit{publicstock:Stock;publicstockStyles;constructor(){}ngOnInit() {this.stock=newStock('Test Stock Company','TSC',85,80);letdiff=(this.stock.price/this.stock.previousPrice)-1;letlargeChange=Math.abs(diff)>0.01;this.stockStyles={"color":this.stock.isPositiveChange()?"green":"red","font-size":largeChange?"1.2em":"0.8em"};}toggleFavorite(event){console.log('We are toggling the favorite state for this stock',event);this.stock.favorite=!this.stock.favorite;}}
Similar to the previous section, we have created a stockStyles object. In the initialization code, we have initialized the stockStyles object with the keys color and font-size. Its values are CSS attributes that are generated based on the stock properties. We can then use this stockStyles object as an input to the NgStyle directive for binding.
We can now change our HTML to use this information by editing the src/app/stock/stock-item/stock-item.component.html file as follows:
<divclass="stock-container"><divclass="name">{{stock.name + ' (' + stock.code + ')'}}</div><divclass="price"[ngStyle]="stockStyles">$ {{stock.price}}</div><button(click)="toggleFavorite($event)"[disabled]="stock.favorite">Add to Favorite</button></div>
We have added a binding for the NgStyle directive:
[ngStyle]="stockStyles"
Angular will look at the keys and values of the stockStyles object and add those particular styles to the HTML element. You can again run the application and try changing the values of the price and previous price to see this in action.
The finished code for the preceding example is available in the chapter3/ng-style folder in the GitHub repository.
It is generally preferable to use the class or NgClass bindings to change the look and feel of your application, but the NgStyle does give you another tool in your toolkit, in case you have the use case of changing the CSS style of elements and cannot (for whatever reasons) use classes to perform the same.
Alternative Class and Style Binding Syntax
We covered using the [class] binding syntax in the previous chapter, as well as the NgClass alternative to dynamically add classes to our elements using Angular. There is a third alternative for both classes and styles, which is to use a singular version of the class and style binding that adds and removes one particular class/style, instead of the all-or-nothing approach of the [class] binding.
We can add or remove individual classes based on evaluating a truthy expression in Angular with the following syntax:
[class.class-name]="expression"
We would replace class-name with the particular CSS class we want to apply/remove on our element, and replace expression in the syntax with a valid JavaScript expression that would either return a truthy or falsy value.
Let’s modify our stock example to apply and remove the positive and negative CSS classes using this syntax instead. We don’t have to make any changes in the component or the CSS, and only make the following changes to the src/app/stock/stock-item/stock-item.component.html file:
<divclass="stock-container"><divclass="name">{{stock.name + ' (' + stock.code + ')'}}</div><divclass="price"[class.positive]="stock.isPositiveChange()"[class.negative]="!stock.isPositiveChange()">$ {{stock.price}}</div><button(click)="toggleFavorite($event)"[disabled]="stock.favorite">Add to Favorite</button></div>
Notice the two new lines:
[class.positive]="stock.isPositiveChange()"
[class.negative]="!stock.isPositiveChange()"
We are telling Angular to apply the CSS class positive if there is a positive change (based on the call to stock.isPositiveChange()), and remove it if this is falsy. Similarly, we are doing the negation of that for negative. This is a nice simple way to deal with CSS classes if you only have to add/remove one or two classes. Note that this also works if the class name has dashes and so on. For example, you could do:
[class.large-change]="someExpressionHere"
and this would apply the class large-change if someExpressionHere evaluated to true. Also note that this keeps the original class from the element intact (the price class), which the basic [class] binding does not. That is yet another advantage of this syntax.
It is, though, preferred to use the NgClass directive any time you have to deal with more than one or two classes, as it makes it more manageable and easier to test.
The style binding is also something similar, and can be done like follows:
[style.background-color]="stock.isPositiveChange() ? 'green' : 'red'"
You can read more about the style binding in the official Angular documentation.
Built-In Structural Directives
Structural directives, as discussed earlier, are responsible for changing the layout of the HTML by adding, removing, or modifying elements from the DOM. Just like other directives that are not components, structural directives are applied on a pre-existing element, and the directive then operates on the content of that element.
Structural directives in Angular follow a very particular syntax, which makes it easy to recognize when a directive is a structural directive versus a normal one. All structural directives in Angular start with an asterisk (*), like:
<div *ngIf="stock.favorite"></div>
Unlike the data- or event-binding syntaxes, there are no square brackets or parentheses. Just a plain *ngIf followed by the expression. Angular understands the expression and translates it into the final HTML. To understand this process a bit more, refer to the following sidebar.
NgIf
We will first take a look at the trusty and often used structural directive NgIf. The NgIf directive allows you to conditionally hide or show elements in your UI. The syntax, as mentioned earlier, starts with an asterisk as it is a structural directive that can conditionally remove or add elements to our rendered HTML.
The NgIf uses one of the simplest microsyntaxes of all the structural directives, as it simply expects the expression provided to it to evaluate to a truthy value. This is the JavaScript concept of truthiness (as explained previously), so the boolean true value, a nonzero number, a nonempty string, and a nonnull object would all be treated as true. This also makes it convenient to have templates that show up if certain objects are present and nonnull.
We will build on the examples from the previous chapter, so if you don’t have it, feel free to grab the final code we were working with from the GitHub repository. The codebase is in chapter2/stock-market, which is the base for the code in this chapter.
Let’s modify the Add to Favorite button such that instead of getting disabled, we hide the button if the stock is already favorited. We don’t need to make any changes to the component or CSS code, but instead just to the src/app/stock/stock-item/stock-item.component.html file as follows:
<divclass="stock-container"><divclass="name">{{stock.name + ' (' + stock.code + ')'}}</div><divclass="price"[class]="stock.isPositiveChange()?'positive':'negative'">$ {{stock.price}}</div><button(click)="toggleFavorite($event)"*ngIf="!stock.favorite">Add to Favorite</button></div>
On the button, we added the conditionality with *ngIf="!stock.favorite". This tells Angular to add the element if the stock is not favorited, and remove it from the DOM if it is currently a favorite stock. Now when you load the page, you will see the button by default. Once you click the Add to Favorite button, the boolean will flip and the stock will now be favorited. Angular will automatically at this point hide the button from the UI.
If you inspect the HTML of the page, you will see that the element is actually removed from the rendered DOM.
The NgIf directive, along with the NgFor, which we will cover in the following sections, are work-horse directives. They do a lot of the heavy lifting and are commonly used in most applications you will develop.
NgFor
While the NgIf directive is used for conditionally showing/hiding elements, the NgFor directive is used for creating multiple elements, usually one for each instance of some or the other object in an array. It is a common practice to have a template, and then create an instance of that template for each instance of our object.
NgFor or NgForOf
In this book, we use NgFor to refer to the *ngFor directive. But technically, the *ngFor directive uses the class called NgForOf under the hood. Thus, you might see people use NgFor and NgForOf interchangeably when referring to the *ngFor directive in Angular.
NgFor uses a special microsyntax that comes with a set of mandatory and optional segments. Let’s modify our example from Chapter 2 to now show a list of stocks, instead of one individual stock.
First, we will modify the src/app/stock/stock-item.component.ts file, just for the sake of demonstration, to have an array of stocks instead of one stock:
import{Component,OnInit}from'@angular/core';import{Stock}from'../../model/stock';@Component({selector:'app-stock-item',templateUrl:'./stock-item.component.html',styleUrls:['./stock-item.component.css']})exportclassStockItemComponentimplementsOnInit{publicstocks:Array<Stock>;constructor(){}ngOnInit() {this.stocks=[newStock('Test Stock Company','TSC',85,80),newStock('Second Stock Company','SSC',10,20),newStock('Last Stock Company','LSC',876,765)];}toggleFavorite(event,index){console.log('We are toggling the favorite state for stock',index,event);this.stocks[index].favorite=!this.stocks[index].favorite;}}
Generally, we want to keep a stock-item for one particular stock only, but we will circumvent that for this particular example. We changed stock to be stocks, an array of stock objects. We then created some dummy stocks in our initialization. Finally, we changed the toggleFavorite to take in an index as a parameter, instead of working with the current stock.
Next, let’s see how we can now modify our HTML in src/app/stock/stock-item.component.html to leverage the power of the NgFor directive:
<divclass="stock-container"*ngFor="let stock of stocks; index as i"><divclass="name">{{stock.name + ' (' + stock.code + ')'}}</div><divclass="price"[class]="stock.isPositiveChange()?'positive':'negative'">$ {{stock.price}}</div><button(click)="toggleFavorite($event,i)"[disabled]="stock.favorite">Add to Favorite</button></div>
We updated our parent container with the NgFor directive. Let’s explore how we have used it in a bit more detail:
*ngFor="let stock of stocks; index as i"
The first part of the microsyntax is basically our for loop. We create a template instance variable named stock, which will be available within the scope of the element created. This can be equated to a standard for-each loop, with the variable stock referring to each individual item in the array. The second part after the semicolon is creating another template instance variable i, which holds the current index value. We will talk about the other properties in just a bit.
With this statement, Angular will repeat the stock-container div element once for each item in the stocks array, thus creating three elements in our final rendered HTML. You should see something like Figure 3-1 on your screen.
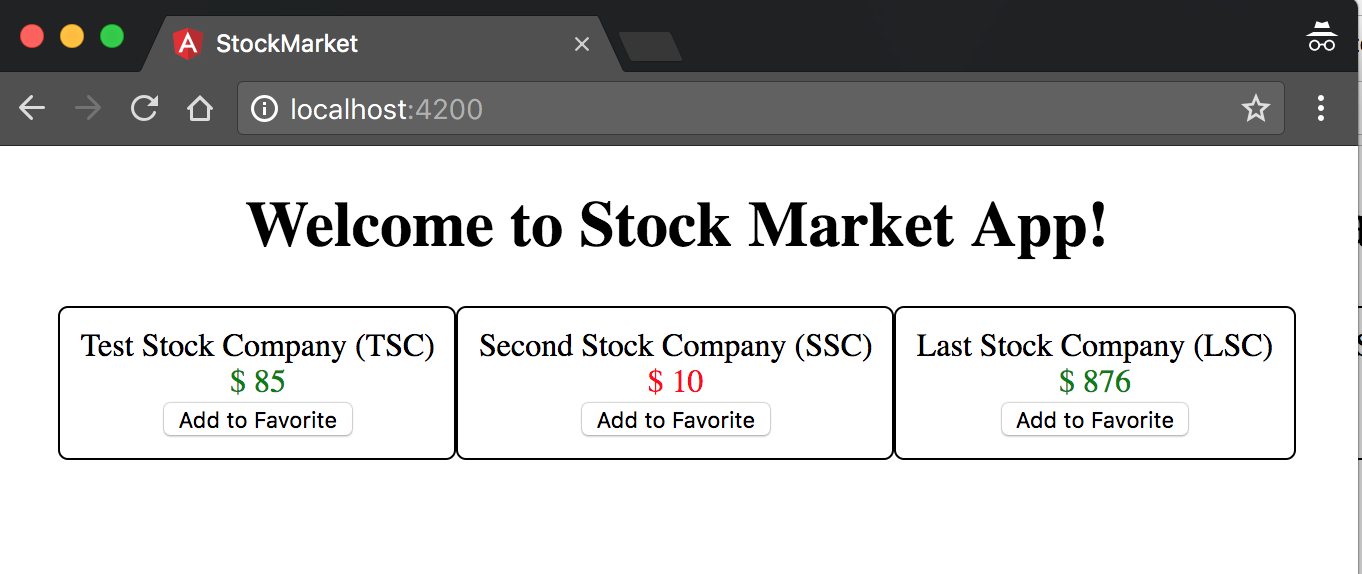
Figure 3-1. Angular app using *ngFor
Angular encapsulates the stock and i variables such that each instance of the template has its own copy of them. Thus, when we refer to stock.name inside the element, Angular correctly picks up the relevant stock and displays its name. When we click the Add to Favorite button, the correct index is passed and only that particular button is disabled.
Similar to index, there are other local values that are available within the context of an NgFor directive that you can assign to a local variable name (like we did with i) and bind them to different values:
index-
This refers to the current element index
even-
This is
truewhen the item has an even index odd-
This is
truewhen the item has an odd index first-
This is
truewhen the item is the first item in the array last-
This is
truewhen the item is the last item in the array
You can then use these variables to bind to CSS classes, or display them in the UI, or run any other calculations you might want to. For instance, you might want to add the CSS class even-item to each even index item, which you can accomplish with a binding like:
[css.even-item]="isEven"
where even is assigned to the isEven variable in the NgFor microsyntax like:
*ngFor="let stock of stocks; even as isEven; index as i"
The last major capability that the NgFor directive provides is a hook into how Angular recognizes elements and avoids re-creating element instances unnecessarily. By default, Angular uses object identity to track additions, removals, and modifications to an array. That is, as long as the object reference does not change, Angular will not create new elements for it, and reuse the old element reference. This is mostly for performance reasons, as element creation/removal are two of the more costly operations in the browser.
There are cases when the element reference might change, but you still want to continue using the same element. For example, when you fetch new data from the server, you don’t want to blow away your list and re-create it unless the data has fundamentally changed. This is where the trackBy capability of the NgFor directive comes into play.
The trackBy option takes a function that has two arguments: an index and the item. If the trackBy function is provided to the NgFor directive, then it will use the return value of the function to decide how to identify individual elements. For example, in our particular case, we might want to use the stock’s code as an identifier, instead of the object reference.
First, we will add the function used to track individual items in src/app/stock/stock-item.component.ts:
import{Component,OnInit}from'@angular/core';import{Stock}from'../../model/stock';@Component({selector:'app-stock-item',templateUrl:'./stock-item.component.html',styleUrls:['./stock-item.component.css']})exportclassStockItemComponentimplementsOnInit{publicstocks:Array<Stock>;constructor(){}ngOnInit() {this.stocks=[newStock('Test Stock Company','TSC',85,80),newStock('Second Stock Company','SSC',10,20),newStock('Last Stock Company','LSC',876,765)];}toggleFavorite(event,index){console.log('We are toggling the favorite state for stock',index,event);this.stocks[index].favorite=!this.stocks[index].favorite;}trackStockByCode(index,stock){returnstock.code;}}
The last function (trackStockByCode) is the one we just added. We are taking both the index and the stock, and returning the stock.code. Angular will use this value to identify each element.
Next, we can change the HTML to pass this function to the NgFor directive by changing the src/app/stock/stock-item/stock-item.component.html file as follows:
<divclass="stock-container"*ngFor="let stock of stocks; index as i; trackBy: trackStockByCode"><divclass="name">{{stock.name + ' (' + stock.code + ')'}}</div><divclass="price"[class]="stock.isPositiveChange()?'positive':'negative'">$ {{stock.price}}</div><button(click)="toggleFavorite($event,i)"[disabled]="stock.favorite">Add to Favorite</button></div>
We just modified the *ngFor to pass in an additional attribute in the microsyntax, which is trackBy: trackStockByCode. This will ensure that Angular calls this function to figure out how to identify individual items, instead of using the object reference.
This ensures that even if we reload all the stocks from the server (thus changing all the object references), Angular will still look at the stock code to decide whether or not to reuse the elements present in the DOM.
NgSwitch
The last built-in directive is actually a set of multiple directives. NgSwitch by itself is not a structural directive, but rather an attribute directive. You would use it with normal data-binding syntax with the square-bracket notation. It is the NgSwitchCase and the NgSwitchDefault directives that are, in fact, structural directives, as they would add or remove elements depending on the case.
Let’s take a hypothetical example to see how this might look in action. Let’s assume that instead of just stocks, we were dealing with all kinds of securities, like stocks, options, derivatives, and mutual funds. And we had built components to render each one of these. Now, given a security we want to render the right kind of component based on its type. This would be a great example of using an NgSwitch, which might look something like follows:
<div[ngSwitch]="security.type"><stock-item*ngSwitchCase="'stock'"[item]="security"></stock-item><option-item*ngSwitchCase="'option'"[item]="security"></option-item><derivative-item*ngSwitchCase="'derivative'"[item]="security"></derivative-item><mutual-fund-item*ngSwitchCase="'mutual-fund'"[item]="security"></mutual-fund-item><unknown-item*ngSwitchDefault[item]="security"></unknown-item></div>
A few interesting things of note in the example:
-
We use normal data binding using square brackets with the
ngSwitchdirective, as we want it to understand and interpret the value underneath the expression. It is not a structural directive, as we mentioned previously. -
Each
*ngSwitchCaseis again taking an expression, and in this case, we are passing string constants like'stock','option', and so on. If the value ofsecurity.typematches any one of these string constants, then that particular element will get rendered, and all other sibling elements will be removed. -
If none of the sibling
*ngSwitchCasestatements matches, then the*ngSwitchDefaultwill get triggered and in the example, theunknown-itemcomponent will get rendered.
The NgSwitch family of directives is great when you have multiple elements/templates, of which one has to be rendered based on conditions.
Multiple Sibling Structural Directives
You might run into a case at some point where you want to run an *ngFor on a template, but only if some condition is met. Your instinctive reaction in that case might be to add both *ngFor and *ngIf on the same element. Angular will not let you.
For example, consider the following code:
<div*ngFor="let stock of stocks"*ngIf="stock.active"><!-- Show stock details here if stock is active --></div>
Here, we want to run the *ngFor, and then decide if the stock is active before we display it. Now consider the following code:
<div*ngFor="let stock of stocks"*ngIf="stocks.length > 2"><!-- Show stock details here if more than 2 stocks present --></div>
Both of these cases look very similar, but the intent and expectation is very different. In the first case, we expect the *ngFor to execute first followed by the *ngIf, and vice versa in the second case.
It is not immediately obvious which one between the two should run first. Rather than creating some innate order that one directive runs before the other, Angular simplifies it by not allowing it on the same element.
When you run into such a case, it is recommended to just use wrapping elements so that you can be explicit about the order in which these structural directives are executed.
Conclusion
In this chapter, we covered what the built-in directives are, and then went over some common directives that you will need and use for your Angular application, such as NgFor, NgIf, and more. We looked at examples of how we could use them for various functionality and saw a little bit of some more complex use cases for NgSwitch as well as advanced usage of NgFor. Of course, Angular does allow you to extend and create your own directives, and you can read up on it in the documentation.
In the next chapter, we will dive deep into Angular components and understand the various options we have for configuring them as well as the lifecycle of an Angular component.
Exercise
For our second exercise, try to change the exercise code from the previous chapter to perform the following:
-
Move from using simple class binding to using either
ngClassor the specific class binding from this chapter to highlight on-sale items. Have a combination of some on sale and some not on sale. -
Instead of disabling the decrease quantity button when the quantity is zero, use
*ngIfto show the button only if it can be clicked. -
Add a drop-down with quantity selection from 1 to 20 (generated via
*ngFor). Don’t worry about the action/update of data on selection of a quantity; we will get to that in one of the following chapters.
All of this can be accomplished using concepts covered in this chapter. You can check out the finished solution in chapter3/exercise/ecommerce.