Table of Contents for
Angular: Up and Running
 Angular: Up and Running
Published by
O'Reilly Media, Inc., 2018
Angular: Up and Running
Published by
O'Reilly Media, Inc., 2018
- Cover
- nav
- Angular: Up and Running
- Angular: Up and Running
- Introduction
- 1. Introducing Angular
- 2. Hello Angular
- 3. Useful Built-In Angular Directives
- 4. Understanding and Using Angular Components
- 5. Testing Angular Components
- 6. Working with Template-Driven Forms
- 7. Working with Reactive Forms
- 8. Angular Services
- 9. Making HTTP Calls in Angular
- 10. Unit Testing Services
- 11. Routing in Angular
- 12. Productionizing an Angular App
- Index
- About the Author
- Colophon
Chapter 11. Routing in Angular
In the previous few chapters, we saw how to extend our application and make reusable services. We also saw how to integrate and deal with HTTP calls in our application using the HttpClient module, and deal with the asynchronous flows using observables and RxJS.
In this chapter, we will deal with another common requirement of web applications, which is to encapsulate various pages and pieces under different routes, and be able to deep-link to them when needed. We will implement Angular’s built-in routing module. In addition, we will also dig into how to secure our application using AuthGuards and other features of the router.
Setting Up Angular Routing
For this chapter, we are going to build against a precoded server, as well as use a codebase that has most of the base components built so that we can focus only on the key aspects. We are going to continue extending our application that we have been working on across the chapters by adding routing capability to it. We are going to try to add four routes: one for the stock list, one to create a stock, one for registering, and one for logging in. Furthermore, we will protect the stock list route and the create stock route so that you can access them only if you are logged in. Finally, we will add protections to ensure that we don’t lose our work by navigating away from a filled-in form.
Server Setup
As mentioned earlier, the server we will be working with is already developed and available in the repository in the chapter11/server folder. Before we start any web development, let’s get our server up and running. Note that this server has more functionality than the previous ones, so please use this one instead of continuing to keep the previous server running.
Checkout and browse to the chapter11/server folder in the GitHub repository. From within the folder, execute the following commands in your terminal:
npm i
node index.js
This installs all the necessary dependencies for our Node.js server, and then starts the server on port 3000. Keep this server running in the background. This will be what our application hits to fetch and save stocks, in addition to logging in and registering users.
Warning
Note that this server is a very simplistic, dummy server with an in-memory data store. Anything you create/save will be reset if you restart the server. This includes any usernames you might register.
Starting Codebase
Similarly, instead of spending time building all the components for the remaining routes, and reviewing concepts we have already covered in previous chapters, we will instead use the precoded base Angular application that has a few more components. If you’re planning to keep coding along, do note the following additions and make sure you add them to your application.
The code is available for you in the chapter11/base-code-base folder. The major additions are:
-
A
LoginComponentandRegisterComponent -
A
UserServicethat makes HTTP calls to login and register a user -
A
UserStoreServicethat stores whether a user is logged in or not, along with the token -
A
StockAppInterceptorthat will be used to send the authentication token if it exists with every request
All of these are also registered in the main AppModule.
Importing the Router Module
With all the set up done, we can now get into how to set up routing in our application. The very first thing is to set up our index.html to ensure that it is able to provide enough context to Angular on how to set up its navigation. We do this by using the base tag within the head element in index.html. If the application is being served from the root (like we are doing so far), then it is enough to add the following to your index.html:
<basehref="/">
This is automatically done by the Angular CLI, so you only need to change it in case you are serving your application from a non-root location. The next thing to do is to import and set up the RouterModule, as routing is an optional module in Angular. Before we can add the RouterModule, we need to define the routes of our application. So we will first look at how to define the routes. We will then come back to seeing how to import and add the RouterModule.
We will define a separate routes module file, app-routes.module.ts, instead of defining it in the same app.module.ts. This is generally good practice, as you want to keep it separate and modular, even if you only have a few routes initially. While we are just defining a separate module for our routes, it would eventually make sense for us to define a separate module and routes for each feature. This would also allow us to lazy load feature modules and certain routes instead of loading all our code up front.
We could choose to manually create our new module and hook it up to the main AppModule, or let the Angular CLI do it for us, by running:
ng generate module app-routes --flat --module=app
This would generate an app-routes.module.ts file in the main app folder. We can drop the basic CommonModule import from it, as we won’t be declaring any components as part of our routing module. Our final app-routing.module.ts might look something like the following:
import{NgModule}from'@angular/core';import{RouterModule,Routes}from'@angular/router';import{CreateStockComponent}from'./stock/create-stock/create-stock.component';import{StockListComponent}from'./stock/stock-list/stock-list.component';import{LoginComponent}from'./user/login/login.component';import{RegisterComponent}from'./user/register/register.component';constappRoutes:Routes=[{path:'login',component:LoginComponent},{path:'register',component:RegisterComponent},{path:'stocks/list',component:StockListComponent},{path:'stocks/create',component:CreateStockComponent},];@NgModule({imports:[RouterModule.forRoot(appRoutes),],exports:[RouterModule],})exportclassAppRoutesModule{}

Declare the array of routes for our application

Import and register the routes for the root application

Export the
RouterModuleso that any module importingAppRoutesModulegets access to router directives
This is the first time we have created another module, separate from the auto-generated one of the Angular CLI. The AppRoutesModule (annotated with @NgModule) simply imports the RouterModule and then exports it so that all modules get access to router directives (which we will use in a bit). While importing the RouterModule, we mark it for the root module by calling the forRoot method on it, with the routes we are defining.
The routes we pass to the forRoot method are nothing but an array of Routes. Each route is simply a configuration that defines the path for the route, as well as the component to be loaded when the route is loaded. We define four routes, one for each of the components.
Next, we just need to hook up this module to our main module, by modifying the app.module.ts file as follows:
/** Other imports not changed, skipping for brevity **/import{AppRoutesModule}from'./app-routes.module';@NgModule({declarations:[/** No change, skipping for brevity **/],imports:[BrowserModule,FormsModule,HttpClientModule,AppRoutesModule,],providers:[/** No change, skipping for brevity **/],bootstrap:[AppComponent]})exportclassAppModule{}
Importing the newly created
AppRoutesModule
There are a lot more components and services, but these were created before we started hooking up the routing. These were part of the base codebase we used to build on top of.
Displaying the Route Contents
The last thing we need to do to get our routing app up and running is to tell Angular where to load the components when a certain route or path is matched. If you consider what we have done so far, we have defined the base for our routing and set up the module and the routes.
The final thing we do is to mark out where Angular is to load the components, and we do that by using the RouterOutlet directive that is made available as part of the RouterModule. We will change the src/app.component.html file as follows:
<div><span><ahref="/login">Login</a></span><span><ahref="/register">Register</a></span><span><ahref="/stocks/list">Stock List</a></span><span><ahref="/stocks/create">Create Stock</a></span></div><router-outlet></router-outlet>
Previously, we used to have the StockListComponent and the CreateStockComponent as part of this HTML file. Instead, now we are telling Angular to load the relevant component based on the URL and path it matches. We have also added a bunch of links to the various pages we added.
We are at a point when we can now run the application, and see the various routes in action. Run it with the following command (making sure you proxy to the node server you have running):
ng serve --proxy proxy.conf.json
You should see something like Figure 11-1 when you browse to http://localhost:4200 in your browser.
Clicking any of the links should open that particular component’s page in your browser.
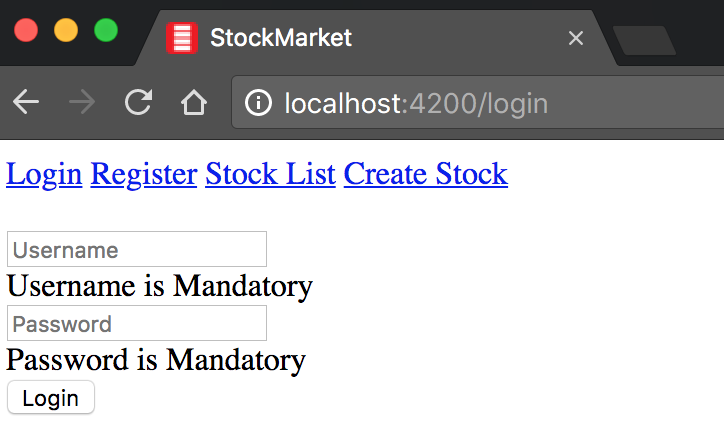
Figure 11-1. Angular application with routing
Navigating Within the Application
If you do click any of the links at the top, and open the network inspector simultaneously, you will see something interesting and unexpected. You will see that the entire page reloads, rather than behaving like how we might expect a Single-Page Application routing to work. What we would want and expect is that when the route changes, only the component is loaded, and its respective XHR calls (if any) are executed. So how do we accomplish this?
Angular provides a directive that allows us to navigate within the application. The modified app.component.html would look as follows:
<divclass="links"><span><arouterLink="/login"routerLinkActive="active">Login</a></span><span><arouterLink="/register"routerLinkActive="active">Register</a></span><span><arouterLink="/stocks/list"routerLinkActive="active">Stock List</a></span><span><arouterLink="/stocks/create"routerLinkActive="active">Create Stock</a></span></div><router-outlet></router-outlet>
We have slightly changed the content, and also added some styling to make it look nicer. From a functionality perspective, the major changes are as follows:
-
We have replaced the
hreflinks with an Angular directiverouterLink. This ensures that all navigation happens within Angular. -
We have also added another Angular directive,
routerLinkActive, which adds the argument passed to it (activein our case) as a CSS class when the current link in the browser matches therouterLinkdirective. It is a simple way of adding a class when the current link is selected.
We also add some CSS to app.component.css as follows:
.links,.linksa{padding:10px;}.linksa.active{background-color:grey;}
We have added a background-color to the currently active link. This class will automatically get added to the link based on the current URL.
Now when you run the application, you should see the screen in Figure 11-2 in your browser.
By default, if you open http://localhost:4200 in your browser, you will see an empty page with only the links at the top. If you click any of the links (say, Login), then the respective components will be loaded.
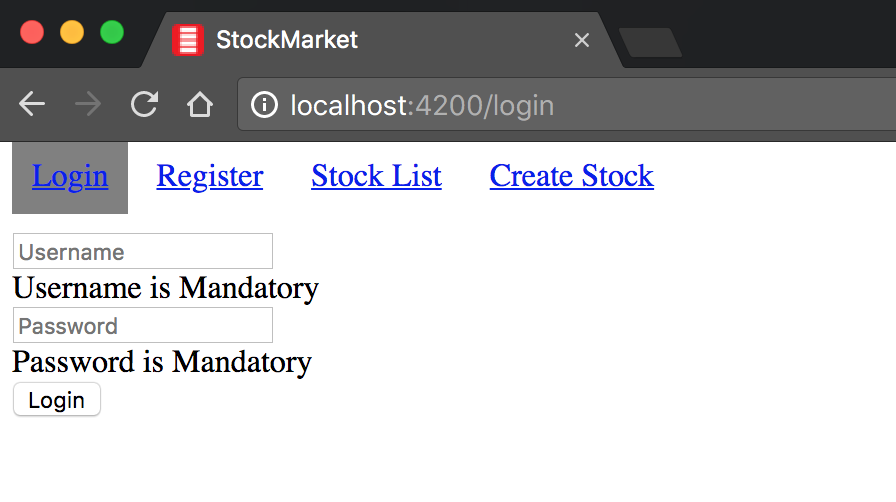
Figure 11-2. Angular application with routing and highlighting
Wildcards and Defaults
The one last thing we will take care of before we wrap up this example is handling the initial load. If we open up http://localhost:4200 in our browser, we are treated with an empty page. Similarly, if we try to navigate to a URL that does not exist, it results in an error (in the developer console) and a redirect to the home page automatically. Let’s see how we might tackle these in our application.
For both of these, we will go back to our AppRoutesModule. We will modify the app-routes.module.ts file as follows:
/** No change in imports, skipping for brevity **/constappRoutes:Routes=[{path:'',redirectTo:'/login',pathMatch:'full'},{path:'login',component:LoginComponent},{path:'register',component:RegisterComponent},{path:'stocks/list',component:StockListComponent},{path:'stocks/create',component:CreateStockComponent},];/** No change in remaining file, skipping for brevity **/exportclassAppRoutesModule{}
Add a default path to redirect to Login page
We have added one more entry to our routes array. Here, we match the empty path and ask Angular to redirect us to the login route. Note that for any path, instead of asking Angular to use a component, we can redirect to another already defined path as well. Also note the pathMatch key, which is set as full. This ensures that only if the remaining path matches the empty string do we redirect to the login route.
pathMatch
The default pathMatch is prefix, which would check if a URL starts with the given path. If we had the first route as the default matching one, and we forgot to add pathMatch: full, then every URL would match and redirect to the login path. Thus, both the ordering of routes as well as the pathMatch value is important.
You can check this out by changing the pathMatch to prefix. When you do this, all the links will end up linking to the Login page.
The final piece we will see is how to handle if the user types in a wrong URL, or we end up having bad links in our application. It is always useful to have a catch-all route that leads to a “Page not found” page or a redirect to some other page. Let’s see how we can have such a capability in our application. Again, we will only modify the app-routes.module.ts file:
/** No change in imports, skipping for brevity **/constappRoutes:Routes=[{path:'',redirectTo:'/login',pathMatch:'full'},{path:'login',component:LoginComponent},{path:'register',component:RegisterComponent},{path:'stocks/list',component:StockListComponent},{path:'stocks/create',component:CreateStockComponent},{path:'**',redirectTo:'/register'}];/** No change in remaining file, skipping for brevity **/exportclassAppRoutesModule{}
Add a catch-all route that redirects to the Register page
Our catch-all route is added by matching the path **. On matching this route, we then have the option of loading a component (like the other routes). Alternatively, we can redirect again, as we have done here, to another route. We redirect to the /register route in case we can’t match the URL.
The end result of both of these changes is that if you just open http://localhost:4200 in your browser, you will be automatically taken to the login route. In case we type in some random URL that doesn’t exist, we will be redirected to the register route.
The entire finished example is available in the chapter11/simple-routing folder in the GitHub repository.
Common Routing Requirements
In this section, we will continue digging into Angular routing capabilities, and see how we might accomplish common tasks that are needed in the course of building a web application. In particular, we will focus on having and using routes with parameters (both required and optional), as well as understand the various ways we might navigate within our application, whether it be through the template or via our component code.
Required Route Params
Let’s first see how we add a route where we might depend on the route to decide what to load. The simplest thing we can do within the context of our example is to build a details page for our stock.
For this section, we will use the previous section code as the base and build on top of it. In case you are not coding along, you can grab the codebase from the chapter11/simple-routing folder in the GitHub repository. Also, make sure you keep the Node server running in the background, and you proxy your requests to it when you serve your Angular application.
For the purpose of keeping our example focused on the routing, a completed (simplistic) StockDetailsComponent is already created in the src/app/stocks folder. It is already registered in the AppModule. All it shows is a repetition of the individual StockItemComponent, but without the favoriting logic. Before we look at it, let’s first see how our routes definition would change to include this new route. We would modify the app-routes.module.ts file as follows:
/** No change in imports, skipping for brevity **/constappRoutes:Routes=[{path:'',redirectTo:'/login',pathMatch:'full'},{path:'login',component:LoginComponent},{path:'register',component:RegisterComponent},{path:'stocks/list',component:StockListComponent},{path:'stocks/create',component:CreateStockComponent},{path:'stock/:code',component:StockDetailsComponent},{path:'**',redirectTo:'/register'}];/** No change in remaining file, skipping for brevity **/exportclassAppRoutesModule{}
A new route to load the details of a stock
There is only one addition to the route, which is a path to StockDetailsComponent. Note the path, which is stock/:code. This includes a variable in the URL, which can change based on which stock needs to be loaded. Our component in this case, the StockDetailsComponent, can then when it is loaded read the code from the route, and then load the corresponding stock from our server. Let’s see how the StockDetailsComponent looks:
import{Component,OnInit}from'@angular/core';import{StockService}from'../../services/stock.service';import{ActivatedRoute}from'@angular/router';import{Stock}from'../../model/stock';@Component({selector:'app-stock-details',templateUrl:'./stock-details.component.html',styleUrls:['./stock-details.component.css']})exportclassStockDetailsComponentimplementsOnInit{publicstock:Stock;constructor(privatestockService:StockService,privateroute:ActivatedRoute){}ngOnInit() {conststockCode=this.route.snapshot.paramMap.get('code');this.stockService.getStock(stockCode).subscribe(stock=>this.stock=stock);}}
Injecting the activated route into the constructor
Using the activated route to read the code from the URL
Most of the component is similar to the remaining components we have seen so far, except for two differences:
-
We inject what we call an
ActivatedRouteinto the constructor. TheActivatedRouteis a context-specific service that holds the information about the currently activated route, and knows how to parse and retrieve information from it. -
We then use the
ActivatedRouteto read the stock code (code) from the URL. Note that we read it from asnapshot. TheparamMapin thesnapshotis a map of all the URL parameters. We will talk about what that implies in just a bit.
Then we use the code to make a service call, and store the return value in a variable. This is then used to display information in the UI, like we have done so far.
The StockService.getStock code is a trivial addition to the src/app/services/stock.service.ts file as follows:
import{Injectable}from'@angular/core';import{HttpClient,HttpHeaders,HttpResponse}from'@angular/common/http';import{Observable}from'rxjs/Observable';import{Stock}from'app/model/stock';import{HttpEvent}from'@angular/common/http/src/response';import{UserStoreService}from'./user-store.service';@Injectable()exportclassStockService{/** Skipped for brevity **/getStock(code:string):Observable<Stock>{returnthis.http.get<Stock>('/api/stock/'+code);}/** Skipped for brevity **/}
The preceding code skips most of the implementation, other than the new addition. Make sure you add it to the existing service. getStock simply makes a GET request with the provided code to the server and returns the relevant stock.
At this point, if we run the application, we would have a route that corresponds the stock details. But if you navigate via URL to it (say http://localhost:4200/stock/TSC), you would see an empty page with just the $ sign. Inspect the Network tab in developer tools, and you will actually see a request to get the stock details, but it is responding with a 403 at this point because the user is not logged in right now. A 403 status response is usually sent when the access is forbidden to a certain resource, usually because the user is not logged in or doesn’t have access to the data. We will see how to deal with it in the section “Route Guards”.
Navigating in Your Application
Now that we have the route for details of a stock, let’s hook up the navigation within the application. These are the few activities we want to enable:
-
Navigate to the login page on successful registration
-
Navigate to the stock list page on successful login
-
Navigate to the stock detail page when we click any stock item in the stock list
Of these, two need to be handled in the TypeScript code, while the other is handled in the template HTML. Let’s see how we can achieve this.
First, we’ll modify the RegisterComponent by changing src/app/user/register/register.component.ts as follows:
import{Component}from'@angular/core';import{UserService}from'../../services/user.service';import{Router}from'@angular/router';@Component({selector:'app-register',templateUrl:'./register.component.html',styleUrls:['./register.component.css']})exportclassRegisterComponent{publicusername:string='';publicpassword:string='';publicmessage:string='';constructor(privateuserService:UserService,privaterouter:Router){}register() {this.userService.register(this.username,this.password).subscribe((resp)=>{console.log('Successfully registered');this.message=resp.msg;this.router.navigate(['login']);},(err)=>{console.error('Error registering',err);this.message=err.error.msg;});}}
We have made some minor changes in the RegisterComponent. Primarly, we have now injected an instance of the Angular Router into our constructor, which gives us the capabilities to navigate within our application. Then, when we make a successful register call, at that point, we use the router.navigate call to navigate to the login page. The navigate method takes an array of commands, which together will resolve to a particular route.
There are more intricacies to the router.navigate method. By default, any array of commands that we pass to it result in an absolute URL that Angular navigates to. So if we use router.navigate(['stocks', 'list']), it would navigate to stocks/list route. But we can also specify the route it is relative to (for example, the current route, which we can obtain by injecting the current ActivatedRoute in the constructor). So if we wanted to navigate to the parent of the current route, we could execute router.navigate(['../'], {relativeTo: this.route}).
We also have the capability to preserve the URL, skip changing the location, and so on. You can read up more on the other capabilities in the official Angular Docs.
We can make a similar change to the LoginComponent as follows:
import{Component}from'@angular/core';import{UserService}from'../../services/user.service';import{Router}from'@angular/router';@Component({selector:'app-login',templateUrl:'./login.component.html',styleUrls:['./login.component.css']})exportclassLoginComponent{publicusername:string='';publicpassword:string='';publicmessage:string='';constructor(privateuserService:UserService,privaterouter:Router){}login() {this.userService.login(this.username,this.password).subscribe((resp)=>{console.log('Successfully logged in');this.message=resp.msg;this.router.navigate(['stocks','list']);},(err)=>{console.error('Error logging in',err);this.message=err.error.msg;});}}
Inject the
Routerinto the componentNavigate to a path using the
Router
Just like the RegisterComponent, we again inject the Router, and then use it on successful login to redirect to the stocks list page. Notice here that we use an array of commands to redirect to the correct stocks list page.
Finally, let’s see how we might ensure that clicking a stock takes us to the details page for that stock. We have already created and hooked up the route for the StockDetailsComponent, which is at stock/:code. Let’s modify src/app/stock/stock-item/stock-item.component.html as follows:
<divclass="stock-container"routerLink="/stock/{{stock.code}}"><divclass="name">{{stock.name + ' (' + stock.code + ')'}}</div><divclass="exchange">{{stock.exchange}}</div><divclass="price"[class.positive]="stock.price>stock.previousPrice" [class.negative]="stock.price<= stock.previousPrice"> $ {{stock.price}}</div><button(click)="onToggleFavorite($event)"*ngIf="!stock.favorite">Add to Favorite</button><button(click)="onToggleFavorite($event)"*ngIf="stock.favorite">Remove from Favorite</button></div>
The only change is on the first line, where we use the routerLink directive on the container div element itself. Note that unlike the links we had in the navigation bar, here we combine the routerLink directive with a binding. Thus, depending on the stock, the value of routerLink will change to have the correct code in it.
Now run the application, and perform the following steps in order:
-
Open http://localhost:4200 in your browser. It should redirect you to the login page.
-
You can try entering a username and password, and it should update the UI with a message that the username and password is incorrect.
-
Click the Register link at the top. It should redirect you to the Register page, and also highlight the Register link at the top (this is using the
routerLinkActivedirective if you remember). -
Enter a username and password, and click Register. It should redirect you to the Login page if successful.
-
Enter the same username and password. It should now redirect you to the stocks list page, with three stocks present.
-
Click any of the stocks. It should open a page with only that stock (no new details though, we were lazy!). Notice that the URL has also changed.
A few things to note and keep in mind:
-
We have not added any local storage capabilities in our application yet. Refreshing the page means you will have to login again!
-
Restarting the node server will mean that you have to register again, as the Node server also keeps all data in memory.
-
If you try to open the stocks list page or the stock details page directly via URL, expect to see a page with empty data, as the authentication token gets reset (between reloads of the page) and you have to go through login again.
Optional Route Params
Before we wrap up this section and example, we will look at one last thing. There are routes where we might want additional params that may or may not be optional. These could be things like the current page number, the page size, or any filtering data that might be passed around, and we want to ensure that they can be bookmarked. First we will cover how to handle those cases, and then quickly look at another way in Angular to read both defined parameters and query parameters.
Let’s assume that we wanted to pass a page number to the StockListComponent so that it can display the corresponding page. Now this parameter would be optional, so we want to pass it as a query parameter.
First, let’s modify the LoginComponent to pass in a page number to the route:
/** Imports and Decorator unchanged, skipping for brevity **/exportclassLoginComponent{/** Code unchanged, skipping for brevity **/login() {this.userService.login(this.username,this.password).subscribe((resp)=>{console.log('Successfully logged in');this.message=resp.msg;this.router.navigate(['stocks','list'],{queryParams:{page:1}});},(err)=>{console.error('Error logging in',err);this.message=err.error.msg;});}}
Passing query params as part of navigation request
We have made a slight change to the router.navigate in the subscribe, in that we pass a queryParams object as part of the second argument to the call. This will translate to query parameters in the route.
Now let’s see how we might read the query params when necessary in our component. We would modify the StockListComponent as follows:
/** Imports unchanged, skipping for brevity **/import{ActivatedRoute}from'@angular/router';@Component({selector:'app-stock-list',templateUrl:'./stock-list.component.html',styleUrls:['./stock-list.component.css']})exportclassStockListComponentimplementsOnInit{publicstocks$:Observable<Stock[]>;constructor(privatestockService:StockService,privateuserStore:UserStoreService,privateroute:ActivatedRoute){}ngOnInit() {console.log('Page No. : ',this.route.snapshot.queryParamMap.get('page'));this.stocks$=this.stockService.getStocks();}}
Inject the current
ActivatedRouteinto the constructorRead the query parameter from the route
snapshot
Very similar to how we read the defined parameters, we can also read the query parameters from the ActivatedRoute snapshot. In this case, when we run the application, when we successfully login, we would see that our route in the browser becomes http://localhost:4200/stocks/list?page=1, and we get the page number printed in the console.
Before we wrap up this topic, there is one additional thing to note or be wary of when working with routes and route parameters (whether mandatory or query parameters). So far, we used the snapshot from the ActivatedRoute to read our parameters in the ngOnInit of our components. This is OK if the component is loaded only once, and we navigate from it to another component and route. But if there is a chance that the same component might need to be loaded with different parameters, then it is recommended that we do not rely on the snapshot.
Instead, we can treat the parameters and query parameters as an observable, just like service calls and HTTP requests. This way, the subscription will get triggered each time the URL changes, allowing us to reload the data rather than relying on the snapshot.
Let’s change our StockListComponent slightly to see it action. First we will add a button to our template to simulate moving to the next page, by modifying the src/app/stock/stock-list/stock-list.component.html file as follows:
<app-stock-item*ngFor="let stock of stocks$ | async"[stock]="stock"></app-stock-item><div><buttontype="button"(click)="nextPage()">Next page</button></div>
We simply added a button, which on click triggers the nextPage() method that we will create. Next, let’s modify the component code to use a subscription to an observable, instead of relying on the snapshot. Our finished src/app/stock/stock-list/stock-list.component.ts would look like this:
/** Imports unchanged, skipping for brevity **/import{ActivatedRoute,Router}from'@angular/router';@Component({selector:'app-stock-list',templateUrl:'./stock-list.component.html',styleUrls:['./stock-list.component.css']})exportclassStockListComponentimplementsOnInit{publicstocks$:Observable<Stock[]>;privatepage=1;constructor(privatestockService:StockService,privateuserStore:UserStoreService,privaterouter:Router,privateroute:ActivatedRoute){}ngOnInit() {console.log('Page No. : ',this.route.snapshot.queryParamMap.get('page'));this.route.queryParams.subscribe((params)=>{console.log('Page : ',params.page);this.stocks$=this.stockService.getStocks();});}nextPage() {this.router.navigate([],{queryParams:{page:++this.page}})}}
Inject router into the constructor
Inject
ActivatedRouteinto the constructorRead page from query params
snapshot
Subscribe to
queryParamsfor any changes
Navigate to the same page while increasing the page number
There are a few changes, so let’s go over them one by one:
-
We added a local variable
page, and initialized it to 1. -
We added a
nextPage()method, which on click navigates (usingrouter.navigate) to the next page. Note that we don’t provide any commands, to keep it at the same page, but just change the query params. -
In the
ngOnInit, we left the oldconsole.logas it is reading from thesnapshot. In addition, we subscribe to thequeryParamsobservable. This subscription will trigger each time thepagechanges, while we remain on the same component.
Now, you can try the following:
-
Login (or register again, in case you restarted the server).
-
Note the developer tools console to see the initial page number in the
snapshotas well as the observable subscription getting triggered. -
Click the “Next page” button a few times, to see the subscription getting triggered.
Whether we subscribe to the queryParams or to params, the code doesn’t change by much. This is a super useful approach in case you have a component where the data will get loaded for various parameters without the component getting reloaded.
The entire completed example (including parameters, navigation, and query parameters including the subscription-based approach) can be found in the chapter11/navigation-and-params folder in the GitHub repository.
Route Guards
The next thing we will cover is the concept of route guards. Route guards in Angular are a way of protecting the loading or unloading of a route based on your own conditions. Route guards give you a lot of flexibility in the kinds of checks you want to add before a route opens or closes. In this section, we will deal with three in particular: a guard to prevent a route from opening, a guard to prevent a route from closing, and a guard that loads necessary data before a route is opened. We will keep the examples very simple, but these could be extended to do whatever is needed in your use case.
For this entire section, we will use the codebase from the previous section as a base to build on. In case you are not coding along, you can find the starter code in the chapter11/navigation-and-params folder in the GitHub repository.
Authenticated-Only Routes
The first thing we will tackle is the issue we saw in the previous section, where if we tried to navigate to the Stock List component without logging in, we would end up seeing an empty page. What we would ideally want in this case is a message or error, and a redirection to the login page so that we can prompt the user to login.
For this, we will rely on the UserStoreService to figure out if the user is currently logged in or not. Using this service, we will then create an authentication guard, which will kick in before we open a protected route. The authentication guard will then decide whether we can continue on to the route, or if we need to redirect to a different route.
To accomplish this, the first thing we will do is create an AuthGuard. To get it kickstarted, you can of course use the Angular CLI (remember, ng g guard guards/auth will do the trick). Replace the content of the generated file (src/app/guards/auth.guard.ts) with the following:
import{Injectable}from'@angular/core';import{CanActivate,Router}from'@angular/router';import{UserStoreService}from'../services/user-store.service';import{Observable}from'rxjs/Observable';@Injectable()exportclassAuthGuardimplementsCanActivate{constructor(privateuserStore:UserStoreService,privaterouter:Router){}canActivate():boolean{console.log('AuthGuard#canActivate called');if(this.userStore.isLoggedIn()){returntrue};console.log('AuthGuard#canActivate not authorized to access page');// Can store current route and redirect back to it// Store it in a service, add it to a query paramthis.router.navigate(['login']);returnfalse;}}
The AuthGuard class is straightforward, and looks and behaves just like an Angular service. The service looks pretty simple, but let’s walk through the changes one by one:
-
We implement an interface called
CanActivatefrom the Angular router module. -
We inject both the
UserStoreServiceand theRouteras part of the constructor. -
We then implement the
canActivatemethod. ThecanActivatemethod can return either abooleanor anObservable<boolean>. If it resolves totrue, then the route will activate. If not, the route will not open. -
In the
canActivate, we check theUserStoreServiceto see if the user is logged in. If he’s not, we redirect the user to the Login page, and returnfalseas well.
In the last step is where we can add our custom logic, if needed. For example, we could preserve the URL we were trying to open. Once the user successfully logs in, we can then redirect to the saved URL rather than the default.
We also can access the newly activated route as well as the router snapshot as arguments to the canActivate method, in case we need to access any route or URL-specific values to make our decision.
Another thing to note is that in our example, we are actually relying on synchronous state to decide whether to proceed or not. But as mentioned, canActivate can also return an observable or a promise, thus allowing you to make server calls to decide whether or not to proceed. Angular will wait for the service to return before making a decision on whether or not the route should activate.
Make sure that you hook up the service in the AppModule before you proceed further. This might be required even if you use the Angular CLI, as we have multiple modules in our application.
Now, let’s hook up our AuthGuard to the routing. We will modify the src/app-routes.module.ts file as follows:
/** Imports unchanged, skipping for brevity **/import{AuthGuard}from'./guards/auth.guard';constappRoutes:Routes=[{path:'',redirectTo:'/login',pathMatch:'full'},{path:'login',component:LoginComponent},{path:'register',component:RegisterComponent},{path:'stocks/list',component:StockListComponent,canActivate:[AuthGuard]},{path:'stocks/create',component:CreateStockComponent,canActivate:[AuthGuard]},{path:'stock/:code',component:StockDetailsComponent,canActivate:[AuthGuard]},{path:'**',redirectTo:'/register'}];/** Code unchanged, skipping for brevity **/exportclassAppRoutesModule{}
Add the
AuthGuardto theStockListComponentAdd the
AuthGuardto theCreateStockComponentAdd the
AuthGuardto theStockDetailsComponent
To the three stock routes, we have added another key to the route definition. We have added a canActivate key, which takes an array of guards. We only have the AuthGuard, so we pass that as the only element of the array. Thus, only the routes we add to the canActivate guard will use the guard, and the others will continue to work as normal.
Before we run this application, ensure that the AuthGuard is hooked up as a provider in the AppModule, which the ng generate guard does not do by default. Your src/app.module.ts file should have the following in it:
/** Other imports unchanged, skipping for brevity **/import{AuthGuard}from'./guards/auth.guard';@NgModule({/** No changes to imports and declarations **/providers:[/** No changes to other services **/AuthGuard,{provide:HTTP_INTERCEPTORS,useClass:StockAppInterceptor,multi:true,}],bootstrap:[AppComponent]})exportclassAppModule{}
Add
AuthGuardto theproviderslist
If you run the application at this point, you should see that trying to navigate directly to the stock list or create stock page will end up redirecting you to the Login page. You can confirm that the guard is working by checking the web development console logs.
Preventing Unload
Similar to how we can prevent loading of a route, we can also prevent deactivation of a route using guards. The canDeactivate guard is most commonly used to prevent the user from losing data by navigating away unintentionally from a form page, or to autosave the data when the user navigates away from a page. Other creative uses for the canDeactivate guard could be logging and analytics.
In this example, we will again keep it very simple to just demonstrate the point, but you can extend it for your purpose. We will simply always prompt the user when navigating away from the CreateStockComponent. But you could make it smarter by looking at the form state, and whether there are any changes before prompting.
Create a CreateStockDeactivateGuard (again, your choice, either create it manually or using the Angular CLI). Don’t forget to register it in the providers array in the AppModule, and then replace the contents of the service with the following:
import{Injectable}from'@angular/core';import{CanDeactivate,ActivatedRouteSnapshot,RouterStateSnapshot}from'@angular/router';import{CreateStockComponent}from'../stock/create-stock/create-stock.component';import{Observable}from'rxjs/Observable';@Injectable()exportclassCreateStockDeactivateGuardimplementsCanDeactivate<CreateStockComponent>{constructor(){}canDeactivate(component:CreateStockComponent,currentRoute:ActivatedRouteSnapshot,currentState:RouterStateSnapshot,nextState?:RouterStateSnapshot):boolean|Observable<boolean>|Promise<boolean>{returnwindow.confirm('Do you want to navigate away from this page?');}}
Implement the
CanDeactivateinterface, specific for ourCreateStockComponentInstance of the
CreateStockComponentpassed to thecanDeactivatemethodThe currently
ActivatedRoutesnapshotpassed to thecanDeactivatemethodThe current router state
snapshotpassed to thecanDeactivatemethodThe next state that is being navigated to from the current state
Our CanDeactivate guard is slightly different from the CanActivate guard, and for a few reasons. The most important reason is that usually, the deactivation is in context of an existing component, and so the state of that component is usually important in deciding whether or not the router can deactivate the component and route.
Here, we implement a CanDeactivate guard that is specific to our CreateStockComponent. The advantage is that we can access state and methods from our component to make the decision (not that we are doing it in our example!). If we had the form state available in the component, this would be a great place to access it and check if the form was dirty or not. You can also refer to the current route and state, as well as what the transition is going to and factor all of these into your decision.
You can return a simple boolean (like we are), or return an observable or a promise that translates to a boolean, and Angular will wait for the asynchronous behavior to finish before making a decision.
Now, let’s hook up this guard to the AppRoutesModule:
/** Imports unchanged, skipping for brevity **/import{CreateStockDeactivateGuard}from'./guards/create-stock-deactivate.guard';constappRoutes:Routes=[{path:'',redirectTo:'/login',pathMatch:'full'},{path:'login',component:LoginComponent},{path:'register',component:RegisterComponent},{path:'stocks/list',component:StockListComponent,canActivate:[AuthGuardService]},{path:'stocks/create',component:CreateStockComponent,canActivate:[AuthGuardService],canDeactivate:[CreateStockDeactivateGuard]},{path:'stock/:code',component:StockDetailsComponent,canActivate:[AuthGuardService]},{path:'**',redirectTo:'/register'}];/** Code unchanged, skipping for brevity **/exportclassAppRoutesModule{}
Add the
CreateStockDeactivateGuardto the create stock route
We have only added another guard (canDeactivate) on the stocks/create route, and hooked up the CreateStockDeactivateGuardService as the only item in the array.
Warning
Make sure you hook up the new guard to the AppModule and register it with the providers array like the other guard. Don’t forget to do this for any new service or guard if it is not automatically added by the Angular CLI.
Once you do this, you can run your application. Log in and navigate to the create stock page, and then try clicking any of the links at the top. At that point, you should see the confirmation asking whether you really want to navigate away. Clicking “No” should leave you on the same page, while clicking “Yes” would allow you to navigate away.
Again, remember that you are free to make the logic as complex as needed. You need to make a call to server to persist the data and then only navigate away? Feel free to change the guard around. The only thing to note is that this will not detect if you change the URL manually yourself. It will only detect navigation within the application context.
A Generic CanDeactivate Guard?
We just saw that the CanDeactivate guard was specific to a component, and we get an instance of that component in the canDeactivate method. Then is it possible for us to create a generic guard?
The answer is yes. One common technique is to create an interface (say, DeactivateableComponent), with a method (say, canDeactivate) that returns a boolean, a Promise<boolean>, or an Observable<boolean>.
We can then create a CanDeactivate<DeactivateableComponent> that relies on the return value of canDeactivate to decide whether to deactivate or not. Each component that needs this guard simply needs to implement this interface, and you can then reuse the guard as needed.
Again, this is only useful for a select handful of cases, primarily if you have multiple components that need to decide whether they can deactivate or not, but all in different ways.
Preloading Data Using Resolve
The last thing we will see in this section is how to preload data before a route is activated. There might be cases where we want to make the service call to fetch its data before the component loads. Similarly, we might want to check if the data exists before even opening up the component. In these cases, it might make sense for us to try to prefetch the data before the component itself. In Angular, we do this using a Resolver.
Let’s take an example to demonstrate how a Resolver works and how you might implement one. Say we wanted to resolve the stock data even before we open up the details of a stock. This would also in some sense allow us to check if the stock with a particular code exists even before opening the stock details component.
To accomplish this, we would use a Resolver. Use the Angular CLI or manually create a StockLoadResolver, with the following content:
import{Injectable}from'@angular/core';import{StockService}from'./stock.service';import{Resolve,ActivatedRouteSnapshot,RouterStateSnapshot}from'@angular/router';import{Stock}from'../model/stock';import{Observable}from'rxjs/Observable';@Injectable()exportclassStockLoadResolverServiceimplementsResolve<Stock>{constructor(privatestockService:StockService){}resolve(route:ActivatedRouteSnapshot,state:RouterStateSnapshot):Stock|Observable<Stock>|Promise<Stock>{conststockCode=route.paramMap.get('code');returnthis.stockService.getStock(stockCode);}}
A Resolver implements the Resolve interface, and is typed. In this case, we are building a Resolver that returns one individual stock. We inject the StockService into the constructor, and then implement the resolve method. Here we have access to the route and state, which allows us to fetch the parameter information from the URL.
In the resolve, we load the stockCode from the URL, and then return an Observable<Stock> by making the service call to getStock for the given stockCode. That is all there is to the Resolver.
Make sure you hook this up to the AppModule and register it with the providers array like the other guards.
Now we can hook this up to the AppRoutesModule as follows:
/** Imports unchanged, skipping for brevity **/import{StockLoadResolverService}from'./resolver/stock-load-resolver.service';constappRoutes:Routes=[{path:'',redirectTo:'/login',pathMatch:'full'},{path:'login',component:LoginComponent},{path:'register',component:RegisterComponent},{path:'stocks/list',component:StockListComponent,canActivate:[AuthGuardService]},{path:'stocks/create',component:CreateStockComponent,canActivate:[AuthGuardService],canDeactivate:[CreateStockDeactivateGuardService]},{path:'stock/:code',component:StockDetailsComponent,canActivate:[AuthGuardService],resolve:{stock:StockLoadResolverService}},{path:'**',redirectTo:'/register'}];/** Code unchanged, skipping for brevity **/exportclassAppRoutesModule{}
Add a resolver to the stock details route
Again, this file has only changed in one line. To the stock/:code route, we have now added a resolve key, which is an object. For each key of the object, we map a Resolver implementation. In this case, we only have the stock that needs to be resolved using the StockLoadResolverService. This is one part of the work that needs to be done, which ensures that the stock with the given code (based on the URL) is prefetched.
Next, let’s see how to modify the StockDetailsComponent to use the prefetched information instead of making the service call itself:
import{Component,OnInit}from'@angular/core';import{StockService}from'../../services/stock.service';import{ActivatedRoute}from'@angular/router';import{Stock}from'../../model/stock';@Component({selector:'app-stock-details',templateUrl:'./stock-details.component.html',styleUrls:['./stock-details.component.css']})exportclassStockDetailsComponentimplementsOnInit{publicstock:Stock;constructor(privateroute:ActivatedRoute){}ngOnInit() {this.route.data.subscribe((data:{stock:Stock})=>{this.stock=data.stock;});}}
The major change in the component is that we have now gotten rid of our dependency on the StockService. Instead, we just use the ActivatedRoute. In the ngOnInit, we subscribe to changes on the data element on the ActivatedRoute. The resolved data would be made available in the data with the key that we used in the route (stock for us). We simply read the key and store the data for use.
You could easily extend the resolve to any data and any number of data items that you want to prefetch. The completed example is available in the chapter11/route-guards folder in the GitHub repository.
Conclusion
In this chapter, we took a deep dive into Angular routing. In particular, we saw how to start setting up the Angular router for any Angular application. We then dealt with handling different kinds of routes, and handling required and optional parameters in routing. We also dealt with handling protected routes, as well as ensuring that we don’t lose data by navigating away from a filled-out form.
In the next chapter, we will bring together all the topics we have covered, and then talk about what it takes to build a performant Angular application, and how to think about deploying it in production.
Exercise
Take the base exercise from chapter11/exercise/starter. Install and run the server in the chapter11/exercise/server folder by running:
npm i
node index.js
from within the folder. This will start a local Node.js server which can work with products (similar to one we had for stocks). It exposes the following APIs:
-
GET on /api/product to get a list of products. It can also take an optional query param
q, which is the product name to search for. -
GET on /api/product/:id to get an individual product with an ID.
-
POST on /api/product with a product information in the body to create a product on the server (in-memory of course; restarting the server would lose all created products).
-
PATCH on /api/product/:id with the product ID in the URL and a field
changeInQuantityin the body would change the quantity in the cart of the product by that amount.
Given this, now try to accomplish the following:
-
Hook up routing in the application. We want a login route, a register route, the product list route, a create product route, and a product details route. The components for the route are already created, as are the extra services you might need.
-
Only the create product route should be protected and accessible after login.
-
In the product list and product details route, the add to cart should only be visible after login.
-
See if you can adapt the login flow to remember that the user has logged in even through page refreshes.
Most of this can be accomplished using concepts covered in this chapter. The only new thing might be trying to remember that you have logged in across page refreshes, for which you need to extend the service using localStorage or something similar. You can check out the finished solution in chapter11/exercise/ecommerce.