Table of Contents for
Angular: Up and Running
 Angular: Up and Running
Published by
O'Reilly Media, Inc., 2018
Angular: Up and Running
Published by
O'Reilly Media, Inc., 2018
- Cover
- nav
- Angular: Up and Running
- Angular: Up and Running
- Introduction
- 1. Introducing Angular
- 2. Hello Angular
- 3. Useful Built-In Angular Directives
- 4. Understanding and Using Angular Components
- 5. Testing Angular Components
- 6. Working with Template-Driven Forms
- 7. Working with Reactive Forms
- 8. Angular Services
- 9. Making HTTP Calls in Angular
- 10. Unit Testing Services
- 11. Routing in Angular
- 12. Productionizing an Angular App
- Index
- About the Author
- Colophon
Chapter 7. Working with Reactive Forms
In the previous chapter, we started working on our first form-based Angular application. To do this, we explored template-driven forms and how we might build and use them within the context of an Angular application. We saw how to perform data binding, work with different form elements, and also perform validity and show relevant error messages.
In this chapter, we will focus on doing the exact same set of things, though this time, we will use a reactive approach. As mentioned in the previous chapter, Angular allows us to build forms using two approaches: template-driven and reactive. Both these approaches are part of the core @angular/forms library, but are part of two different modules, FormsModule and ReactiveFormsModule, respectively.
Reactive Forms
To understand and get into building forms in a reactive manner, it is important to understand what reactive programming is. Reactive programming, to overly simplify it, is the concept of writing a program in a way that it fundamentally deals with and acts on asynchronous data streams. While most programs (especially web apps) do this, reactive programming does this by providing an amazing toolbox of utilities and functions to combine, filter, and merge these various streams and act on them, which is where it gets real fun real fast.
Unlike template-driven forms in Angular, with reactive forms, you define the entire tree of Angular form control objects in your component code, and then bind them to native form control elements in your template. Because the component has access to the form controls as well as the backing data model, it can push data model changes into the form control and vice versa, thus reacting to changes either way.
Understanding the Differences
Now, with two approaches in front of us (even though we haven’t looked at a single line of code of the reactive form approach), the question naturally arises: which one is better? The answer, as you would expect, is that neither is truly “better” than the other. Both have their own advantages and disadvantages.
When we create forms using the template-driven approach, we declare the form controls in the template, and add directives to it (like ngModel). Then Angular is responsible for creating the form controls through the use of directives.
That said, template-driven forms are nice and declarative, and easy to understand. Angular is responsible for the data model sync and pushes data to the model and reads and updates values in the UI via directives like ngModel. This also usually means less code in the component class.
Reactive forms, on the other hand, are synchronous, and you as a developer have absolute control over how and when the data is synced from the UI to the model and vice versa. Because you create the entire form control tree in the component, you have access to it immediately and don’t have to deal with Angular’s asynchronous life-cycle. While we haven’t encountered this ourselves in any of the examples so far, you will run into this if you try to update the form controls from your component class on initialization, as they might not be immediately available. You can read up on this in the official Angular docs. It also fits in better if the rest of your application is following a reactive style of programming.
Using Reactive Forms
Now that we have briefly compared reactive versus template-driven forms and reviewed the pros and cons of each, let’s look at building a reactive form. We will do this step by step, starting with the building block of reactive forms, Form Controls, and work our way upwards to the other various components like Form Groups and Form Builders.
Form Controls
The core of any reactive form is the FormControl, which directly represents an individual form element in the template. Thus, any reactive form is nothing but a set of grouped FormControls. It is at the FormControl level that we also assign initial values and validators (both sync and async). Thus, everything that we did in the template with template-driven forms now happens at a FormControl level in the TypeScript code.
We can use the same codebase from Chapter 6 as our base to build this in case you are not coding along with the book. You can get that from the chapter6/template-driven/simple-ng-model folder in the GitHub repository.
The very first thing we will do is import ReactiveFormsModule into our main app.module.ts file. For this example, we can remove the old FormsModule from it. The src/app/app.module.ts file should look like this:
import{BrowserModule}from'@angular/platform-browser';import{NgModule}from'@angular/core';import{ReactiveFormsModule}from'@angular/forms';import{AppComponent}from'./app.component';import{StockItemComponent}from'./stock/stock-item/stock-item.component';import{CreateStockComponent}from'./stock/create-stock/create-stock.component';@NgModule({declarations:[AppComponent,StockItemComponent,CreateStockComponent],imports:[BrowserModule,ReactiveFormsModule,],providers:[],bootstrap:[AppComponent]})exportclassAppModule{}

Import the
ReactiveFormsModule
Add the
ReactiveFormsModuleto theNgModuleimportssection
Now given this base setup, which enables reactive form features in our application, let’s see how to create a simple form that allows us to take and work with a name. We will first modify the template for our CreateStockComponent by changing the src/app/stock/create-stock/create-stock.component.html file as follows:
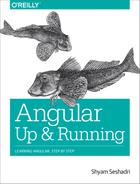
<h2>Create Stock Form</h2><divclass="form-group"><divclass="stock-name"><inputtype="text"placeholder="Stock Name"name="stockName"[formControl]="nameControl"></div><button(click)="onSubmit()">Submit</button></div><p>Form Control value: {{ nameControl.value | json }}</p><p>Form Control status: {{ nameControl.status | json }}</p>
Using a form control binding instead of
ngModelAccessing the current value in the form field
The way we created this form is very different than the template-driven approach outlined in the previous chapter. Instead of using ngModel, we are binding the form element to nameControl. We can then derive the current value of the form control via this field, whether it is the value (via nameControl.value) or its status (via nameControl.status, which is always valid for this simple element). Finally, we have a simple button that triggers the onSubmit() method in the component.
Next, let’s take a look at the src/app/component/stock/create-stock/create-stock.component.ts file to see what changes we have to make to it to support this form:
import{Component,OnInit}from'@angular/core';import{FormControl}from'@angular/forms';@Component({selector:'app-create-stock',templateUrl:'./create-stock.component.html',styleUrls:['./create-stock.component.css']})exportclassCreateStockComponent{publicnameControl=newFormControl();constructor(){}onSubmit() {console.log('Name Control Value',this.nameControl.value);}}
We have removed all references of the Stock model from this. Instead, we import and create an instance of FormControl called nameControl. This is the variable we bound to in the template. Then, on the onSubmit() call, we simply print the current value of the nameControl control. Again, note that unlike traditional non-MVC frameworks, at no point is the control reaching out into the view to get the current value of the element. We rely on the FormControl to provide a representative view of the input element, and keep it up to date.
We have used the default FormControl constructor, but it can also take the initial value along with a list of validators (both sync and async) as arguments. We will see how to add validators in a bit more detail in “Form Groups”.
When we run this application, we should see something like Figure 7-1, with a simple form field below our stock widgets. If you type into it, you should see the form field below it.
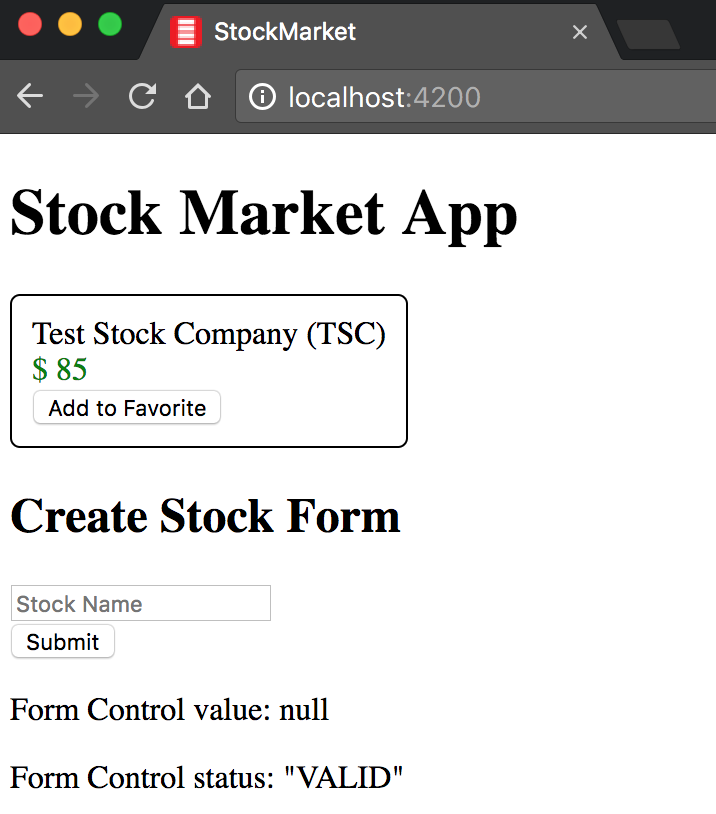
Figure 7-1. Simple Angular reactive form
Summing up, it is helpful to think of FormControl when we need to track the state and value of any individual form element, like an input box or a checkbox. In the next section, we will see how to build a more complete form using FormControl and something called FormGroup.
The finished example is available in the chapter7/form-control folder in the GitHub repository.
Form Groups
Usually, when we build any form, it rarely has just one element. We typically have a set of different fields and elements we want to track under one common form or heading. In these cases, the FormGroup is useful as a way to group relevant form fields under one group. This gives us the convenience of whether we want to track the form controls individually, or as a group. For example, we can get the entire form value, or check whether the form as a whole is valid (as a result of individual elements and their state).
Let’s see how we can extend the example from the previous section to create a comprehensive form for creating a stock using FormControl and FormGroup instances.
First, we will see how to modify the src/app/stock/create-stock/create-stock.component.html template to ask for all the relevant fields of a stock from the user:
<h2>Create Stock Form</h2><divclass="form-group"><form[formGroup]="stockForm"(ngSubmit)="onSubmit()"><divclass="stock-name"><inputtype="text"placeholder="Stock Name"name="stockName"formControlName="name"></div><divclass="stock-code"><inputtype="text"placeholder="Stock Code"formControlName="code"></div><divclass="stock-price"><inputtype="number"placeholder="Stock Price"formControlName="price"></div><buttontype="submit">Submit</button></form></div><p>Form Control value: {{ stockForm.value | json }}</p><p>Form Control status: {{ stockForm.status | json }}</p>
We now bind to a
formGroupinstead of aformControlOnce we use a
formGroup, we useformControlNameinside the group
Change over to printing the form group value instead of the element
The major change from the previous example is that we switched over from binding to formControl to a formGroup. We do this at the form level. Now within it, for each form element, we mention a formControlName. Each of these will bind to an individual element within the formGroup. Finally, we display the current value and status of the form similar to how we did for the FormControl.
Also, for easier readability, we have switched from calling the control nameControl, and instead just call it name, code, and price in the component.
Next, let’s take a look at how we change the src/app/stock/create-stock/create-stock.component.ts component class to get this example to work:
import{Component,OnInit}from'@angular/core';import{FormControl,FormGroup,Validators}from'@angular/forms';@Component({selector:'app-create-stock',templateUrl:'./create-stock.component.html',styleUrls:['./create-stock.component.css']})exportclassCreateStockComponent{publicstockForm:FormGroup=newFormGroup({name:newFormControl(null,Validators.required),code:newFormControl(null,[Validators.required,Validators.minLength(2)]),price:newFormControl(0,[Validators.required,Validators.min(0)])});constructor(){}onSubmit() {console.log('Stock Form Value',this.stockForm.value);}}
In the component, we now instantiate and expose a FormGroup instance, named stockForm. This is what we had bound to at the form level in the template. FormGroup allows us to instantiate multiple named controls within it, and we have done so to instantiate a form control for the name, code, and price. This time, we are also using the constructor of the FormControl to the maximum extent possible, by adding a default value and validators as required.
The first argument to the FormControl constructor is the default value of the form control. Here, we initialize the default values of the two form controls to be null and 0, respectively.
The second argument to the FormControl constructor can either be a single Validator, or an array of Validators. There are a set of built-in validators to ensure that the FormControl is require, or has a minimum value. These validators can either be synchronous (like the ones we have used), or can also be asynchronous (for example, to check whether a username is available in the server). You can check out the built-in validators in the official Angular docs.
When the form is submitted (using ngSubmit event binding), we then print the entire form group value to the console.
When we run this, and type in some values in the form, we should see the form react and print the current value of the form as well as its validity status in the UI. It would look something like Figure 7-2.
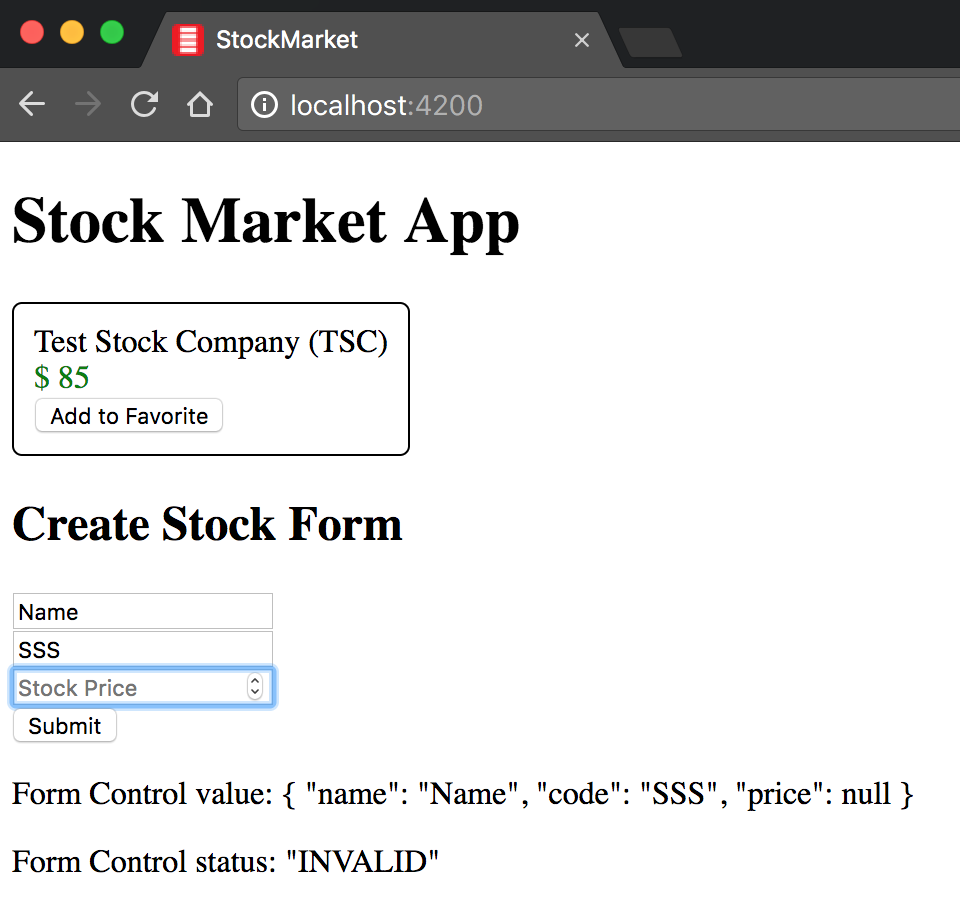
Figure 7-2. Angular reactive form with form control state
The finished example is available in the chapter7/form-groups folder in the GitHub repository.
Form Builders
Now, while the FormGroup gives us the flexibility to build complex, nested forms (and by the way, you can absolutely nest further form groups within a form group!), its syntax is slightly verbose. And that’s why, to replace it, we have a FormBuilder in Angular, which makes it slightly nicer to build these rich forms in a cleaner manner.
The nice thing about the FormBuilder is that we don’t have to change or even touch our template. The FormBuilder fundamentally is syntactic sugar to allow us to quickly create FormGroup and FormControl elements without manually calling new for each one. The reactive form still relies on those elements under the covers for its functioning, and FormBuilder does not do away with them.
Let’s see how we can switch our CreateStockComponent to use FormBuilder. We will change the src/app/stock/create-stock/create-stock.component.ts file as follows:
import{Component,OnInit}from'@angular/core';import{FormControl,FormGroup}from'@angular/forms';import{Validators,FormBuilder}from'@angular/forms';@Component({selector:'app-create-stock',templateUrl:'./create-stock.component.html',styleUrls:['./create-stock.component.css']})exportclassCreateStockComponent{publicstockForm:FormGroup;constructor(privatefb:FormBuilder){this.createForm();}createForm() {this.stockForm=this.fb.group({name:[null,Validators.required],code:[null,[Validators.required,Validators.minLength(2)]],price:[0,[Validators.required,Validators.min(0)]]});}onSubmit() {console.log('Stock Form Value',this.stockForm.value);}}
Import
FormBuilderfrom@angular/formsWe don’t initialize the
FormGroupwhile declaring it anymoreInject an instance of the
FormBuilderinto the constructor
Create a
FormGroupusing the injectedFormBuilderinstance
Initialize the name control with an initial null value and a required validator
The major change from before is how we initialize the stockForm FormGroup instance. Instead of initializing it in line, with the FormBuilder, we first inject an instance of the FormBuilder into our constructor. Then, in the constructor itself, we use the group method on the FormBuilder instance to then create the various form controls.
Even for creating the form controls, we simply use the FormBuilder syntactic sugar. For example, if we just wanted to initialize a text field called name with an empty string as the initial value, we could simply have a key called name, and pass an empty string as the value for it (that is, name: ''). In the preceding code, we actually want to both initialize it with a default value as well as add some validators, so instead of passing it just a value, we pass it an array.
The first value in the array is the default value of the form control (null in the case of name and code, 0 in the case of price). The second value is then either a single validator (like in name), or an array of validators (like in code and price).
Fundamentally, nothing else changes. The result of doing this is we get an application that behaves exactly like the version from the previous section, but we are able to hook it up in a more concise and less verbose manner. For any form with more than a few elements, it almost always makes sense to use the FormBuilder rather than the FormGroup method, as it reduces both the code and makes it a lot more concise and readable.
The finished example is available in the chapter7/form-builder folder in the GitHub repository.
Form Data
So far, we have hand-waved over handling the form data. We have simply used the FormControl or FormGroup and accessed the value from it. In this section, we will go into the data and form model and how reactive forms allow us to deal with it as well as control and form state (like valid, invalid, etc.).
Control State, Validity, and Error Messages
Before we go deep into how the form model is structured, and how that corresponds to our data model in the component, we will first cover the simpler aspects, which is dealing with the control’s state and validity. Dealing with form control state and validity is quite similar to how we handle it with template-driven forms, in that the base control states and validity are the same. What changes is the method of accessing these properties.
Let’s now add error messages to our form that we have been building so far, so that we can show respective error messages along each field. That said, we only want to show these error messages if the user has interacted with a field, and not before. So by default, when the page opens, we don’t want to show any error messages.
We will build on the example from the previous section, so in case you are not coding along, you can copy the codebase from chapter7/form-builder. Before we start going into the code, here’s a quick refresher on the basic Angular control states (repeated from Chapter 6):
| Control state | CSS class if True | CSS class if False |
|---|---|---|
Visited |
|
|
Changed |
|
|
Valid |
|
|
We could use these to highlight and show errors and state of the form, like we did before. But for this section, we will focus on showing only condition error messages, and cleanly handling cases with multiple validators.
Now, let’s see how to edit the template to start showing relevant error messages in the form, while using the reactive form approach. We will edit the src/app/stock/create-stock/create-stock.component.html file as follows:
<h2>Create Stock Form</h2><divclass="form-group"><form[formGroup]="stockForm"(ngSubmit)="onSubmit()"><divclass="stock-name"><inputtype="text"placeholder="Stock Name"name="stockName"formControlName="name"><div*ngIf="stockForm.get('name').invalid &&( stockForm.get('name').dirty || stockForm.get('name').touched )">Name is required</div></div><divclass="stock-code"><inputtype="text"placeholder="Stock Code"formControlName="code"><div*ngIf="stockForm.get('code').invalid && ( stockForm.get('code').dirty || stockForm.get('code').touched )"><div*ngIf="stockForm.get('code').errors.required">Stock Code is required</div><div*ngIf="stockForm.get('code').errors.minlength">Stock Code must be at least 2 characters</div></div></div><divclass="stock-price"><inputtype="number"placeholder="Stock Price"formControlName="price"><div*ngIf="stockForm.get('price').invalid && ( stockForm.get('price').dirty || stockForm.get('price').touched )"><div*ngIf="stockForm.get('price').errors.required">Stock Price is required</div><div*ngIf="stockForm.get('price').errors.min">Stock Price must be positive</div></div></div><buttontype="submit">Submit</button></form></div><p>Form Control value: {{ stockForm.value | json }}</p><p>Form Control status: {{ stockForm.status | json }}</p>
Accessing an individual control element’s validity through the form group
Checking for individual validator status for a form element
While the base form remains the same from the previous example, we have modified it now to show conditional error messages. There are a few noteworthy things happening in this template, so let’s walk through it step by step:
-
For each form element, we have added a
divelement beneath it to show conditional error messages. -
For each element, we first get the individual form element by calling
stockForm.get()with the name of the individual form control that we provided while instantiating theFormGroupin the component class. -
With each
FormControl, we can then check for various properties like whether the form element is touched or not (that is, whether the user has accessed the element), whether the form element has been modified or not (dirty or pristine), and whether it is valid or not. -
For our example, we are relying on these properties to ensure that we display the error message only when the form element is both invalid and the user has interacted with it by either modifying it (
dirtyif modified,pristineotherwise) or at least accessing it (touchedif accessed,untouchedotherwise). -
For form fields with more than one validator (primarily, the stock code and price), we further look at the
errorsproperty on the form control. This field allows us to check what kind of error is causing the form field to be invalid, and thus show the respective error message.
Tip
Instead of repeating stockForm.get('price') every time, you might want to create simple getters in the component class like so:
@Component({selector:'app-create-stock',templateUrl:'./create-stock.component.html',styleUrls:['./create-stock.component.css']})exportclassCreateStockComponent{/* Skipping irrelevant code here */getname() {returnthis.stockForm.get('name');}getprice() {returnthis.stockForm.get('price');}getcode() {returnthis.stockForm.get('code');}}
Now in your HTML, you can simply refer to name.invalid instead of stockForm.get('name').invalid and so on.
In this way, we can interact with the state of the form controls and provide the correct user experience to the users of our web application.
The finished example is available in the chapter7/control-state-validity folder in the GitHub repository.
Form and Data Model
Now we will start digging into accessing and working with the data driving the form, and the interaction between the form and the data model in our component. We simplified this so far in the preceding examples, by simply accessing the value from the FormGroup or the FormControl. This is also what we log in both the template using the json pipe, as well as in the component when we click the Submit button.
Let’s use an example to demonstrate how we work with the form and data model, and how the two interact. First, let’s change our template slightly from the previous example (in case you want the completed code, you can copy it from the chapter7/control-state-validity folder) to provide for a few more actions.
We will edit the template for the CreateStockComponent by changing src/app/stock/create-stock/create-stock.component.html as follows:
<h2>Create Stock Form</h2><divclass="form-group"><form[formGroup]="stockForm"(ngSubmit)="onSubmit()"><!-- Repeated code from before, omitted for brevity --><buttontype="submit">Submit</button><buttontype="button"(click)="resetForm()">Reset</button><buttontype="button"(click)="loadStockFromServer()">Simulate Stock Load from Server</button><buttontype="button"(click)="patchStockForm()">Patch Stock Form</button></form></div><p>Form Control value: {{ stockForm.value | json }}</p><p>Form Control status: {{ stockForm.status | json }}</p>
Most of the template has not changed, but we have added three new buttons at the end of the form. All three of them call out to a method in the component class, which we will see in just a bit. But the three buttons fundamentally perform the following two actions:
-
Reset the form to its original state
-
Simulate loading a stock from the server
And to perform the latter, we show two methods by which we can accomplish that with our reactive form.
Warning
Watch out in case you forget the type on the button element. Depending on the browser, it can take various defaults. For example, Chrome on Mac will assume the type as submit if omitted, causing a form submit even while triggering its event handler.
Now, let’s move to the CreateStockComponent class, which is where most of the activity and changes happen. We will edit the src/app/stock/create-stock/create-stock.component.ts file as follows:
/** NO CHANGE IN IMPORTS **/letcounter=1;/** NO CHANGE IN COMPONENT DECORATOR **/exportclassCreateStockComponent{privatestock:Stock;publicstockForm:FormGroup;constructor(privatefb:FormBuilder){this.createForm();this.stock=newStock('Test '+counter++,'TST',20,10);}createForm() {this.stockForm=this.fb.group({name:[null,Validators.required],code:[null,[Validators.required,Validators.minLength(2)]],price:[0,[Validators.required,Validators.min(0)]]});}loadStockFromServer() {this.stock=newStock('Test '+counter++,'TST',20,10);letstockFormModel=Object.assign({},this.stock);deletestockFormModel.previousPrice;deletestockFormModel.favorite;this.stockForm.setValue(stockFormModel);}patchStockForm() {this.stock=newStock(`Test${counter++}`,'TST',20,10);this.stockForm.patchValue(this.stock);}resetForm() {this.stockForm.reset();}onSubmit() {this.stock=Object.assign({},this.stockForm.value);console.log('Saving stock',this.stock);}}
We have introduced a
stockmodel object, in addition to the form modelInstantiating our stock model with some default value
Setting the entire form model with our
stockdata model valuesPatching the form model with whatever fields are available
Resetting the form to its initial state
While it seems like we have added a lot of code, it is actually not that much. Let’s walk through the component step by step to understand what has changed and what it does:
-
You can ignore the
counter; it is there simply to make sure that something (the name) changes every time we click a button. It is not tied into any of the Angular functionality otherwise. -
We create a
stockmodel object, which is a pure data model object. This is not tied to the Angular form models or anything we have been dealing with so far. It parallels the form model, but has a few extra fields that we don’t ask for in the form. We instantiate this with a default value in the constructor (but it is not used or tied to the template until this point). -
We leave the
createFormmethod untouched. -
We create a new method
loadStockFromServer, to simulate us fetching the stock details from the server. While it is synchronous (unlike a real HTTP server call), it shows us how to take a value and push it to the UI’s form model. -
We use the
setValuemethod on thestockFormFormGroupinstance. This method takes a JSON model object that matches the form model exactly. That means for thesetValueto work in this case, it needs an object with aname,code, andpricekey. It should not have more or fewer keys than this, as it would throw an error in this case. Based on the object, the form’s model object values would get updated and these values would be visible in the form in the UI. This is also the reason why we delete all other keys from the model object before callingsetValue. -
Thus, triggering the
loadStockFromServermethod would end up updating the form with the name, code, and price from the newly createdstockinstance. -
The second method,
patchStockForm, uses another method on thestockFormFormGroupinstance calledpatchValue. This is a more forgiving method that takes the fields it has available, and updates the form with them. It will ignore extra fields even if it has fewer fields. -
Triggering the
patchStockForminstance would also have the same effect as triggering the previous button. What is more interesting (and left as an exercise to the reader) is to delete the code from the stock object and try patching. In the case ofsetValue, it will fail and throw an exception, whilepatchValuewould happily set the other fields (name,price) and leave the code untouched in the form. -
The final method is the
resetForm, which simply resets the form to its initial state.
One final thing to note is that we have changed the onSubmit method slightly as well. While in this case our form model mirrors the data model, it is good practice to not directly assign the form model to our data model, but rather make a copy of it. In this case, since it is a simple object, a simple Object.assign or the spread operator works, but for slightly more complicated models, it might be necessary to do a deep copy.
The finished example is available in the chapter7/form-model folder in the GitHub repository.
FormArrays
For the purpose of demonstrating the last thing related to reactive forms, we are going to extend our stock market example in a slightly tangential manner. Let’s suppose that for each stock, we wanted to capture and highlight the key people related to the company, as well as their titles. A company may have none, one, or many such people associated with it.
This will allow us to see how we can handle forms where we need to capture multiple values as well as handle nested form elements cleanly. We will take the codebase from the previous section and modify it to support the following:
-
Add a new model to represent one or many notable persons under a stock
-
Add a button in the UI to add a new notable person for a stock
-
Add a button to remove an added notable person from the stock
-
Support basic validation on each notable person added
Let’s walk through, step by step, how to accomplish this. In case you are not coding along with the examples, you can copy the codebase from chapter7/form-model and work from there.
We will first update the model to understand this new concept of a person. Ideally, we would do this in a model file of its own, but here, we took a shortcut for readability and making it easier to understand. We added our model to the src/app/model/stock.ts file as follows:
exportclassStock{favorite=false;notablePeople:Person[];constructor(publicname:string,publiccode:string,publicprice:number,publicpreviousPrice:number){this.notablePeople=[];}isPositiveChange():boolean{returnthis.price>=this.previousPrice;}}exportclassPerson{name:string;title:string;}
We added a new class Person with a name and a title, and then added it as a child to the Stock class, with the name notablePeople. In the constructor for Stock class, we initialized it to an empty array.
Now we move over to our CreateStockComponent class. First, let’s walk through the changes to the component class, which is located in src/app/stock/create-stock/create-stock.component.ts:
/** Omitted for brevity, no change in imports */exportclassCreateStockComponent{privatestock:Stock;publicstockForm:FormGroup;constructor(privatefb:FormBuilder){this.createForm();}createForm() {this.stockForm=this.fb.group({name:[null,Validators.required],code:[null,[Validators.required,Validators.minLength(2)]],price:[0,[Validators.required,Validators.min(0)]],notablePeople:this.fb.array([])});}getnotablePeople():FormArray{returnthis.stockForm.get('notablePeople')asFormArray;}addNotablePerson() {this.notablePeople.push(this.fb.group({name:['',Validators.required],title:['',Validators.required]}))}removeNotablePerson(index:number){this.notablePeople.removeAt(index);}resetForm() {this.stockForm.reset();}onSubmit() {this.stock=Object.assign({},this.stockForm.value);console.log('Saving stock',this.stock);}}
Initialize
notablePeopleas aFormArrayinstanceGetter to make it easier to access the underlying
FormArrayfrom the templateAdd a new
FormGroupinstance to theFormArrayRemove a particular
FormGroupinstance from theFormArray
There are a few notable things in the code for the component class. Primarily, we have removed all things related to the model, including loading and patching the stock model object from the class. Instead, we have added:
-
notablePeopleto the mainFormGroup. Note thatnotablePeopleis aFormArrayinstance with an initial value that is empty. In case we have to populate it with existing values, we would pass it to the constructor. -
We have created a simple getter for
notablePeople, which goes deep into thestockFormFormGroupinstance and returns thenotablePeopleFormArrayinstance. This is more for the template to prevent us from writingthis.stockForm.get('notablePeople')each time. -
Since we can have zero to many notable people per stock, we need a method to allow us to add as many notable people as we want. This is what the
addNotablePerson()method does. Note that each instance of notable person in the actual form is represented by aFormGroup. So each time we want to add a new notable person, we add aFormGroupinstance with a requirednameandtitle. -
Similarly, we want to be able to remove any notable person that we have added, which is what the
removeNotablePerson()method does. It takes an index and just removes that particular index from theFormArrayinstance.
Next, we will add some simple CSS that will allow us to separate out each individual person by adding the following to src/app/stock/create-stock/create-stock.component.css:
.notable-people{border:1pxsolidblack;padding:10px;margin:5px;}
Finally, let’s now look at how the template changes to hook all of this up. We will modify src/app/stock/create-stock/create-stock.component.html as follows:
<h2>Create Stock Form</h2><divclass="form-group"><form[formGroup]="stockForm"(ngSubmit)="onSubmit()"><!-- No change until the end of price form element --><!-- Omitted for brevity --><divformArrayName="notablePeople"><div*ngFor="let person of notablePeople.controls; let i = index"[formGroupName]="i"class="notable-people"><div>Person {{i + 1}}</div><div><inputtype="text"placeholder="Person Name"formControlName="name"></div><div><inputtype="text"placeholder="Person Title"formControlName="title"></div><buttontype="button"(click)="removeNotablePerson(i)">Remove Person</button></div></div><buttontype="button"(click)="addNotablePerson()">Add Notable Person</button><buttontype="submit">Submit</button><buttontype="button"(click)="resetForm()">Reset</button></form></div><p>Form Control value: {{ stockForm.value | json }}</p><p>Form Control status: {{ stockForm.status | json }}</p><p>Stock Value: {{stock | json}}</p>
There are a few things to note on how we hooked together the FormArray instance we created in our component to the template for the component:
-
Instead of using
formControlName, we useformGroupNameon the enclosingdivelement. This is the element that will contain zero to many forms, one for each notable person. -
We then have a
divelement that is repeated once for each entry in theFormArrayinstance, which we access throughnotablePeople.controls. ThenotablePeopleaccesses the getter that we created in the component. -
We also expose the current index of the
*ngForvia the variablei. -
We then connect the
FormGroupthat is each element in theFormArrayvia theformGroupNamebinding, binding it to each individual index in the array. -
This allows us to then use
formControlNameindividually for thenameandtitlelike we have done so far. This ensures that thenameandtitleare bound to that particularFormGroupinstance denoted by the index in theFormArray. -
Finally, we have the Remove Person button within each
*ngForinstance, which calls theremoveNotablePerson()method, and a global Add Person button, which calls theaddNotablePerson()method.
When you run this, you should now see a new button, Add Notable Person. Clicking this should show new form elements to enter a person’s details. You can click this multiple times to add more people, and you can click Remove on any individual person to remove them. Your working application should look something like Figure 7-3.
Figure 7-3. Angular form using FormArray
Notice that the form value (printed as JSON) also holds all the person data that you enter. Thus, when the form is submitted, you can capture this data and transform it to the necessary data model before transmitting it.
The finished example is available in the chapter7/form-arrays folder in the GitHub repository.
Conclusion
In this chapter, we explored how to create reactive forms as an alternative to using template-driven forms. We reviewed the building blocks of these forms and saw how to use elements like FormControl, FormGroup, and even FormArray to build complex user experiences. We also briefly touched upon the major differences between template-driven forms and reactive forms, and how reactive forms facilitate and highlight the difference between having a form model (or the presentation model), which is different from our underlying data model.
In the next chapter, we will start exploring Angular services, what they are, and when and how to create them. We will also touch upon Angular’s dependency injection framework and how to deal with asynchronous behavior using observables.
Exercise
Take the finished exercise from Chapter 5 (available in chapter5/exercise/ecommerce). We will repeat the same exercise that we accomplished using template-driven forms, by performing the following:
-
Create a new component that allows us to add new products.
-
Create a form that takes in the product name, price, image URL, and whether it is on sale or not. Create proper
FormGroupto encapsulate this form. UseFormBuilderideally. -
Make all the fields except the On Sale checkbox required. Set the minimum valid price as 1.
-
Add a basic Regex pattern validation for the image URL.
-
Display relevant error messages, but only after the user either modifies a field or after the first submit.
-
Copy over the form and print it to the console after successful submission.
All of this can be accomplished using concepts covered in this chapter. You can check out the finished solution in chapter7/exercise/ecommerce.