Table of Contents for
Angular: Up and Running
 Angular: Up and Running
Published by
O'Reilly Media, Inc., 2018
Angular: Up and Running
Published by
O'Reilly Media, Inc., 2018
- Cover
- nav
- Angular: Up and Running
- Angular: Up and Running
- Introduction
- 1. Introducing Angular
- 2. Hello Angular
- 3. Useful Built-In Angular Directives
- 4. Understanding and Using Angular Components
- 5. Testing Angular Components
- 6. Working with Template-Driven Forms
- 7. Working with Reactive Forms
- 8. Angular Services
- 9. Making HTTP Calls in Angular
- 10. Unit Testing Services
- 11. Routing in Angular
- 12. Productionizing an Angular App
- Index
- About the Author
- Colophon
Chapter 5. Testing Angular Components
In the chapters so far, we focused on writing our Angular application, and dealt with how to use the Angular CLI, how to create components, some common built-in Angular directives, and the like.
In this chapter, we will take a detour to learn how we can write unit tests for the components we have written so far. To do this, we will first get a sense of the unit testing setup for Angular, the various frameworks and libraries we use to accomplish this, and walk step by step through writing unit tests for a component.
Why Unit Test?
But before we go into all that, let’s quickly talk about unit tests and why they are important. Unit tests are called that because they test an individual unit within your application. Given a very large application and its many pieces, it can become very tricky to test each and every flow through the application. This is why we break up the testing to check each individual component, such that we can be assured that when they are hooked up together, they will work correctly under all cases without necessarily testing each and every flow.
This is easily demonstrated with a simple example. Assume we have a very simple application with three different parts. Each part itself might have five different flows through it, giving us a total of 5 * 5 * 5 = 125 flows through the entire application. If we focused only on end-to-end or overall testing, we would have to test 125 flows (or somewhere approaching that number) to get a reasonable assurance on the quality of the application.
Now on the other hand, if we tested each part in isolation, assuming that the other parts were reasonably tested and functional, we would have to write 5 tests for each part, which gives us a total of about 15 tests. Add another 10 to 20 end-to-end tests to make sure the parts are hooked up correctly, and you can have reasonable (not 100% of course) confidence in the overall quality of your application.
That said, unit tests are not just for overall quality. There are a few other good reasons why we write unit tests, some being:
-
It is an assertion that what you have written actually does what it is meant to. Without unit tests, there is no way to prove that your code performs correctly.
-
It guards your code against future breakages, aka regressions. You write your code today with certain assumptions. You or someone else tomorrow may not remember or know them and may unwittingly change something that breaks your underlying assumption. Unit tests are guards that make sure your code remains future-proof.
-
Unit tests are great documentation for your code. Comments have an annoying tendency of becoming obsolete, as people tend to forget to update them. Unit tests, on the other hand, will break if you forget to update your tests as you make changes to your code.
-
Unit tests are a great view on how testable and modular your design is. If tests are hard to read or write, it usually is a signal that there might be design flaws or issues in the underlying code.
That said, people have different associations when they hear the term “unit test.” The prototypical definition of a unit test is a test of a component, with all dependencies completely mocked out. You are testing only the code you have written and nothing else.
Of course, with frameworks like Angular, sometimes unit tests are useful, and other times you actually want a little bit of integration involved. You want to test how your component behaves rather than the class that defines the component. Angular gives you the capability to write both kinds of tests.
Testing and Angular
Before we go deep into how we write tests for Angular components, let’s take a look at the various frameworks and libraries we will use to write and run our Angular tests. Each of these can be used in other non-Angular projects as well, or can be swapped out for something comparable if you have a preference:
- Jasmine
-
Jasmine is a test framework that is oriented toward writing specifications rather than traditional unit tests. It is what is referred to as a behavior-driven development (BDD) framework. It is a standalone framework that can be used to write tests or specifications for any code, not just Angular. The major difference from traditional unit testing frameworks and something like Jasmine is that Jasmine is more oriented to reading like plain English, so instead of writing a test, you write a specification. A specification is a series of commands, and expectations on what should have happened as a result of these commands.
- Karma
-
If Jasmine is the test-writing framework, then Karma is the test-running framework. Karma’s sole task is to take any kind of test, and run it across a suite of real browsers and report the results back. It is highly tuned toward development workflow, as it is heavily oriented toward rapid execution and reporting. It is possible to have Karma run the tests every time you hit save, giving you real-time feedback on whether tests are still passing as you write your code.
- Angular testing utilities
-
Angular provides a suite of various functions and utilities that make testing Angular-specific functionality easier. These are common tasks that you might need to perform in any test, such as initializing modules, components, working with services and routes, and the like. We will touch upon the relevant ones as we work our way through Angular, but in case you want to see all the utility functions upfront, you can check out the documentation.
- Protractor
-
This framework is not relevant with regards to this chapter and unit testing, but for the sake of completeness, we will quickly mention it. Protractor is a framework that is built to write and run end-to-end tests. While the tests we write in this chapter will instantiate various classes and test functionality, it is useful to also test from the perspective of an end user. This would involve opening the browser, clicking, and interacting with the application. Protractor supports this capability of running the real application and simulating actions and verifying behavior, thus completing the circle of testing.
The Test Setup
With that background, let’s write our first unit test. Since we generated our applications so far using the Angular CLI, we have the basic infrastructure already set up for us. In fact, every time we generate a component using the Angular CLI, it also generates a skeleton spec for us to write our test code in.
For the purpose of understanding how the testing infrastructure is set up, we’ll walk through the major files one by one. The entire finished code for this chapter, including all the tests, is available in the GitHub repository in the chapter5/component-spec folder.
Karma Config
The first file of interest is the configuration file for how Karma should find and execute files. The pregenerated karma.conf.js is in the main application folder, and looks like the following:
// Karma configuration file, see link for more information// https://karma-runner.github.io/1.0/config/configuration-file.htmlmodule.exports=function(config){config.set({basePath:'',frameworks:['jasmine','@angular/cli'],plugins:[require('karma-jasmine'),require('karma-chrome-launcher'),require('karma-jasmine-html-reporter'),require('karma-coverage-istanbul-reporter'),require('@angular/cli/plugins/karma')],client:{clearContext:false// leave Jasmine Spec Runner output visible in browser},coverageIstanbulReporter:{reports:['html','lcovonly'],fixWebpackSourcePaths:true},angularCli:{environment:'dev'},reporters:['progress','kjhtml'],port:9876,colors:true,logLevel:config.LOG_INFO,autoWatch:true,browsers:['Chrome'],singleRun:false});};
The Karma configuration is responsible for identifying the various plug-ins needed for Karma to run (which includes an Angular CLI–specific plug-in), the files it needs to watch or execute, and then some Karma-specific configuration including coverage reporting (coverageIstanbulReporter), which port it needs to run on (port), which browsers to run it on (browsers), whether it should rerun every time the file changes (autoWatch), and which level of logs it needs to capture.
test.ts
The test.ts file is the main entry point for our testing, and responsible for loading all our components, the related specifications, and the testing framework and utilities needed to run them:
// This file is required by karma.conf.js and loads recursively all the .spec// and framework filesimport'zone.js/dist/zone-testing';import{getTestBed}from'@angular/core/testing';import{BrowserDynamicTestingModule,platformBrowserDynamicTesting}from'@angular/platform-browser-dynamic/testing';declareconstrequire:any;// First, initialize the Angular testing environment.getTestBed().initTestEnvironment(BrowserDynamicTestingModule,platformBrowserDynamicTesting());// Then we find all the tests.constcontext=require.context('./',true,/\.spec\.ts$/);// And load the modules.context.keys().map(context);
The test.ts file is basically responsible for loading a series of files for the testing framework, and then initializing the Angular testing environment. Then, it looks for specifications (files ending with .spec.ts) recursively in all the folders from the current directory (which is the src folder). It then loads all the relevant modules for them and starts executing Karma.
This file is the reason why we don’t have to manually list all the specification files in karma.conf.js, as it recursively loads them.
Writing Unit Tests
With these two files in place, we can now focus on writing our unit test. To get familiar with Jasmine, we will first start with writing what we call an “isolated unit test.”
An Isolated Unit Test
An isolated unit test in Angular terminology is a vanilla JavaScript unit test. This has nothing to do with Angular, but just instantiates classes and methods and executes them. This is sufficient for a large number of classes, as they will mostly be doing simple data manipulation and execution.
We will start with writing a very simple isolated unit test for the AppComponent using the example we were working on from Chapter 4. The base codebase to start with can be found in the GitHub repository in the chapter4/component-output folder.
The very first thing we will do is create (if it doesn’t already exist) a file right beside app.component.ts in the src/app folder called app.component.spec.ts. If it already exists and you haven’t deleted it yet, you can go ahead and clear the content, as we will write it from scratch so that we are aware of all the intricacies involved in the test.
The first two tests that we will write will focus on AppComponent as a class, and focus on its initialization and how a stock’s favorite state is toggled. In these tests, we will not focus on any Angular-specific functionality and see how to test AppComponent in isolation:
import{AppComponent}from'./app.component';import{Stock}from'app/model/stock';describe('AppComponent',()=>{it('should have stock instantiated on ngInit',()=>{constappComponent=newAppComponent();expect(appComponent.stock).toBeUndefined();appComponent.ngOnInit();expect(appComponent.stock).toEqual(newStock('Test Stock Company','TSC',85,80));});it('should have toggle stock favorite',()=>{constappComponent=newAppComponent();appComponent.ngOnInit();expect(appComponent.stock.favorite).toBeFalsy();appComponent.onToggleFavorite(newStock('Test','TEST',54,55));expect(appComponent.stock.favorite).toBeTruthy();appComponent.onToggleFavorite(newStock('Test','TEST',54,55));expect(appComponent.stock.favorite).toBeFalsy();});});

Importing all relevant dependencies for our tests

Our main
AppComponenttest suite
The first test, each test being an
itblock
Instantiating the
AppComponent
An expectation or assertion on what the behavior should be

Our final expectation on what the stock should be
Our isolated unit tests read just like plain old JavaScript, with Jasmine syntax thrown in. We first import our relevant class and interfaces to be able to use them in the specification. Then we define our first describe block, which is Jasmine’s way of encapsulating a set of tests as one suite. Describe blocks can be nested any number deep, which we will use in the feature to create separate describe blocks for Angular-aware tests versus isolated unit tests.
We then write our first test block, which uses Jasmine’s it to define a specification block. Within this, we define and instantiate our AppComponent instance, and then write an expectation that, by default, the stock instance of the AppComponent is undefined. We then call the ngOnInit method of the AppComponent manually, which creates a stock instance for us. We then write another expectation to make sure this value is created as we expect it to be.
Note that this behavior mirrors how the AppComponent behaves. When an instance of the AppComponent is created, we just have a definition for the stock object, but with no initial value. Thus, our initial expectation for the stock instance in the test is that it should be undefined. Then, we trigger the ngOnInit method, which ends up creating a stock instance with some values. We then assert in our test that the instance that gets created in the AppComponent actually has the values we want.
Tip
Note that in an isolated unit test, Angular lifecycle methods are not called automatically, which is why we manually trigger ngOnInit ourselves in the test. This gives us the flexibility that we might want to test some other function and avoid the ngOnInit, which might make expensive or complex server calls.
Similarly, we write the second test that evaluates the onToggleFavorite method on the AppComponent class. We pass a random value to it, as the value is not used in the class except to log it. We use a different expectation, toBeFalsy and toBeTruthy, instead of the toEquals we used in the previous test. These are all in-built matchers that Jasmine provides for us to use in our specifications. You can see the whole list of matchers that Jasmine provides out of the box in the official documentation.
Running the Tests
Running the actual tests, if you are using the Angular CLI as we are doing in this book, is actually very simple. Simply execute
ng test
from the command line in the root folder to execute the tests. This will:
-
Pick up the configuration from the karma.conf.js Karma configuration file
-
Load all the relevant tests and files as per the test.ts file
-
Capture the default browser (which is Chrome in our case)
-
Execute the tests and report the results in the terminal
-
Keep a watch on files to continue executing on change
You should see Karma capturing Chrome, and spawn up a browser that looks like Figure 5-1.
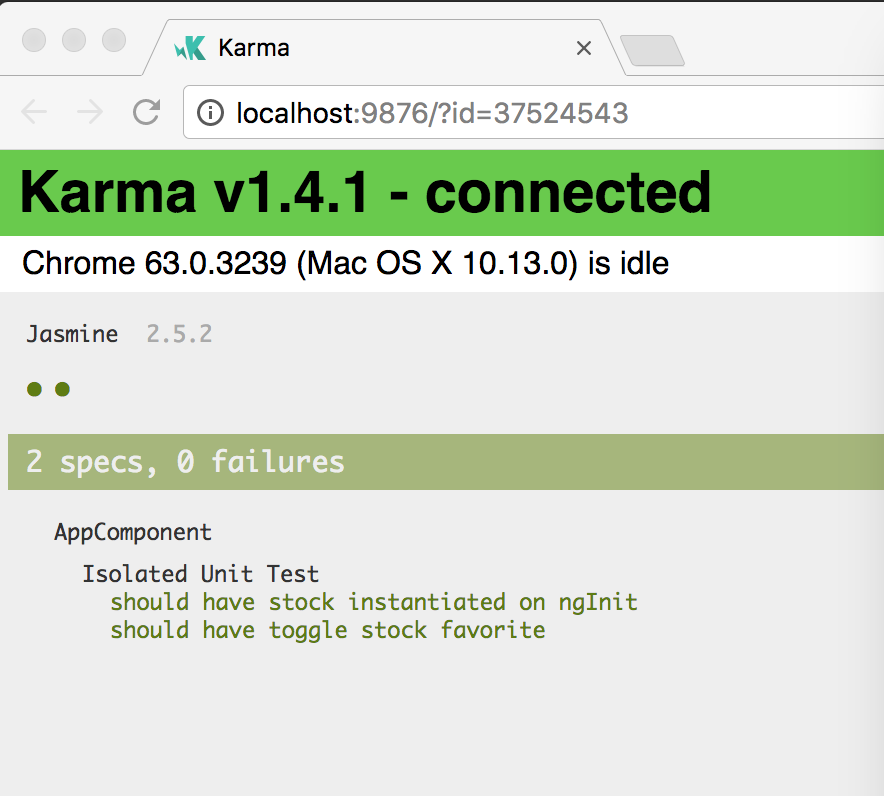
Figure 5-1. Angular tests running via Karma in Chrome
In the terminal, once you run the ng test command, you should see output similar to Figure 5-2.
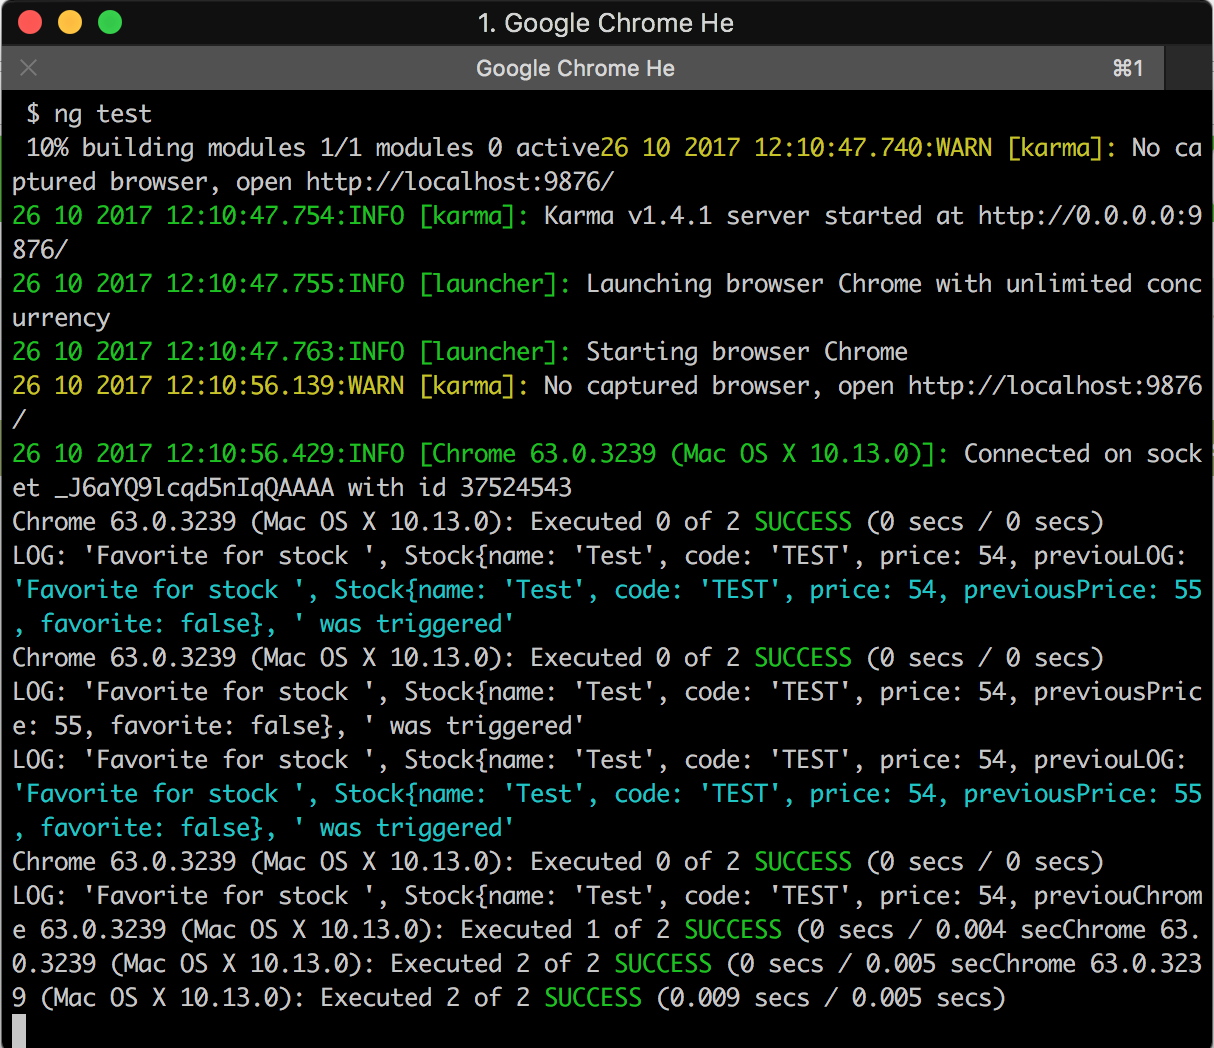
Figure 5-2. Angular test output in the terminal
Once this completes, you should see (in both your Karma captured browser and the terminal) a result of having run two tests with both passing successfully.
Writing an Angular-Aware Unit Test
The next thing we want to learn is how to write a test that is Angular-aware and goes through the Angular lifecycle. In such a test, rather than just instantiating the component class, we want to instantiate a component just the way Angular does, including the HTML for the component.
We will write a test for the StockItemComponent, in which we will make sure that given the right stock input, the template gets rendered with the correct bindings. Furthermore, we want to make sure the input and output bindings are connected and triggered correctly.
Let’s create a stock-item.component.spec.ts file as a sibling to stock-item.component.ts. Again, if this file already exists, replace it with the following contents:
import{TestBed,async}from'@angular/core/testing';import{StockItemComponent}from'./stock-item.component';import{Stock}from'../../model/stock';import{By}from'@angular/platform-browser';describe('Stock Item Component',()=>{letfixture,component;beforeEach(async(()=>{TestBed.configureTestingModule({declarations:[StockItemComponent],}).compileComponents();}));beforeEach(()=>{fixture=TestBed.createComponent(StockItemComponent);component=fixture.componentInstance;component.stock=newStock('Testing Stock','TS',100,200);fixture.detectChanges();});it('should create stock component and render stock data',()=>{constnameEl=fixture.debugElement.query(By.css('.name'));expect(nameEl.nativeElement.textContent).toEqual('Testing Stock (TS)');constpriceEl=fixture.debugElement.query(By.css('.price.negative'));expect(priceEl.nativeElement.textContent).toEqual('$ 100');constaddToFavoriteBtnEl=fixture.debugElement.query(By.css('button'));expect(addToFavoriteBtnEl).toBeDefined();});it('should trigger event emitter on add to favorite',()=>{letselectedStock:Stock;component.toggleFavorite.subscribe((stock:Stock)=>selectedStock=stock);constaddToFavoriteBtnEl=fixture.debugElement.query(By.css('button'));expect(selectedStock).toBeUndefined();addToFavoriteBtnEl.triggerEventHandler('click',null);expect(selectedStock).toEqual(component.stock);});});
Importing Angular testing utilities
An async
beforeEach, to ensure templates are loaded in the componentsUsing the Angular testing utilities to configure a module for testing
Compiling all the declared components for later use
A non-async
beforeEachexecuted only after the previous one finishesCreating an instance of the component fixture under test

Getting the underlying component instance from the test fixture

Manually triggering the Angular change detection to update templates

Getting a particular HTML element from the compiled element

Verifying that the element has the expected value
We have added a lot of code, and highlighted most of the important sections in the code as well. But let’s walk through it step by step so that we are aware of the intricacies of using the Angular testing utilities to write tests for components:
-
@angular/core/testingprovides a set of functionality for testing in Angular. We use theTestBed, which is used to create modules and components while testing, andasync, which is to allow the Jasmine framework to understand Angular’s async behavior (like loading templates for a component, which in our case is from an external template file). Theasyncutility function ensures that we don’t start executing the test until these async tasks are finished. Notice how we call theasyncfunction with a function that does all the tasks which might be asynchronous, and then pass this result to thebeforeEach. -
We use the
TestBedto configure a module for our test. Rather than using an existing module, we create a new module with just our component. This gives us absolute control and can also ensure that we don’t inadvertently depend on something else other than what we have defined. In this case, we declare theStockItemComponent, and then finally compile the component. This does the task of loading the component, loading all its related templates and styles, and then creating a compiled component for us to use later. This happens asynchronously in some cases, which is why we are wrapping it in an async block. -
In the non-async
beforeEach, we create a fixture, which is an instance of the component along with its template and everything related to it. Unlike the previous isolated unit test, where we unit tested just the component class, the fixture is the combination of the template, the component class instance, and Angular’s magic to combine the two. -
From the
fixtureinstance, we can get a handle to the underlying component class instance by using thecomponentInstancevariable on it. We can then manipulate the inputs and outputs directly from the component instance. -
In this test, we are not working with a higher-level component, so we cannot directly test the
InputandOutputbindings. But we can set these values by accessing them directly from the component instance. -
Finally, in the
beforeEach, we triggerfixture.detectChanges(). This is a signal to Angular to trigger its change detection flow, which will look at the values in the component and update the bindings in the corresponding HTML. It is also the trigger to execute thengOnInitfor the component the very first time. Without this, the HTML for the component will not have any values. We trigger this after setting thestockvalue so that these values will be propagated to the HTML. -
In the actual tests, we can get access to individual elements from the generated component by using the
fixture.debugElementand running CSS queries against it. This allows us to check whether the template has the correct bindings and values. Thus, we can avoid writing an end-to-end test for a lot of these basic checks and simply write Angular tests for them. -
In the second test, we can actually see that when we trigger a
clickevent on the button element in the template, the corresponding function in theStockItemComponentclass is triggered, and an event is emitted with the current stock value.
Similarly, we can write a test for most components and test the interaction with the templates and get a good sense for most of the basic functionality and whether it is working as intended.
Testing Component Interactions
The final thing that we’ll need to check is whether the AppComponent and the StockItemComponent interact with each other correctly, and whether the stock value is passed from the AppComponent to the StockItemComponent as input correctly. We can also test these functionalities and more using the Angular testing utilities. Let’s extend our tests for the AppComponent by adding another sub-suite as follows in the app.component.spec.ts file:
import{TestBed,async}from'@angular/core/testing';import{AppComponent}from'./app.component';import{StockItemComponent}from'app/stock/stock-item/stock-item.component';import{Stock}from'app/model/stock';import{By}from'@angular/platform-browser';describe('AppComponent',()=>{describe('Simple, No Angular Unit Test',()=>{/** Move all the previous test code into achild describe block*/});describe('Angular-Aware test',()=>{letfixture,component;beforeEach(async(()=>{TestBed.configureTestingModule({declarations:[AppComponent,StockItemComponent,],}).compileComponents();}));beforeEach(()=>{fixture=TestBed.createComponent(AppComponent);component=fixture.componentInstance;fixture.detectChanges();});it('should load stock with default values',()=>{consttitleEl=fixture.debugElement.query(By.css('h1'));// Trim to avoid HTML whitespacesexpect(titleEl.nativeElement.textContent.trim()).toEqual('Stock Market App');// Check for default stock values in templateconstnameEl=fixture.debugElement.query(By.css('.name'));expect(nameEl.nativeElement.textContent).toEqual('Test Stock Company (TSC)');constpriceEl=fixture.debugElement.query(By.css('.price.positive'));expect(priceEl.nativeElement.textContent).toEqual('$ 85');constaddToFavoriteBtnEl=fixture.debugElement.query(By.css('button'));expect(addToFavoriteBtnEl).toBeDefined();});});});
Most of this test will look very similar to the previous test we wrote for the StockItemComponent, but here are a few notable differences:
-
When we configure our testing module, this time we have to mention both the
AppComponent, which is the component under test, as well as theStockItemComponent. This is because theAppComponentuses theStockItemComponentinternally, and without declaring it, Angular would complain about an unknown element. -
No major changes to either of the
beforeEachother than this. One thing to note (and it’s worth playing around with and trying it out yourself) is that without thefixture.detectChanges()in the secondbeforeEach, none of the bindings would happen. You can test this by commenting it out and making sure the test fails. -
Our test follows a similar pattern like before (in fact, it is pretty much a copy/paste of the previous test for
StockItemComponent). The one thing to note is we are trimming the actual text contents retrieved from the DOM to account for extra whitespaces in the HTML from how we have done our binding. This can be useful sometimes when the HTML is not an exact replica of your bound value.
Let’s quickly add another test that ensures that the end-to-end flow is both ways. We will add a test that makes sure that clicking Add to Favorite updates both the model value as well as hiding the button in the template. The following code is just the test, ignoring the imports and everything else. This is a part of app.component.spec.ts like the previous specification:
it('should toggle stock favorite correctly',()=>{expect(component.stock.favorite).toBeFalsy();letaddToFavoriteBtnEl=fixture.debugElement.query(By.css('button'));expect(addToFavoriteBtnEl).toBeDefined();addToFavoriteBtnEl.triggerEventHandler('click',null);fixture.detectChanges();expect(component.stock.favorite).toBeTruthy();addToFavoriteBtnEl=fixture.debugElement.query(By.css('button'));expect(addToFavoriteBtnEl).toBeNull();});
First, we check the base default value to ensure that the stock is not favorited by default and that the Add to Favorite button is present. Post that, we trigger the click event on the button.
At this point, Angular is supposed to kick in, emit an event from the StockItemComponent to the AppComponent, change the model value, trigger the change detection flow, and update the UI. But in our test, we need to tell Angular to trigger the change detection flow, and hence after we trigger the event, we manually call fixture.detectChanges().
After this, we can write our assertions to ensure that the behavior matches our expectations.
Debugging
Oftentimes, there are cases when your unit test is not working as expected, or is slightly off from what you expect. In these cases, one common approach would be to add tons of console.log statements to try and figure out when and where things are going wrong. Figure 5-3 shows how you can see the test results in the Chrome browser captured by Karma.
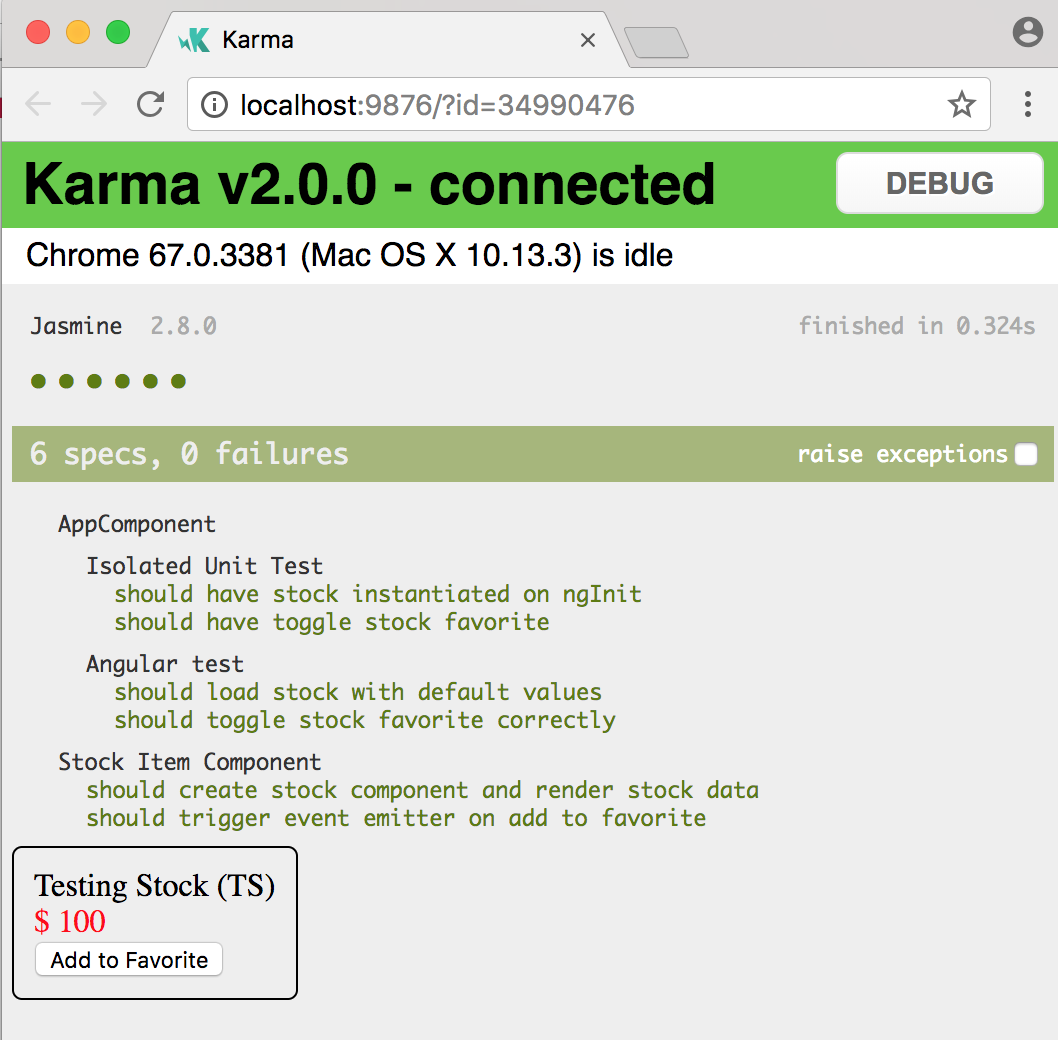
Figure 5-3. Debugging Karma tests using Chrome
Karma allows you to debug your tests and application code the same way you would debug in your normal browser. To debug your tests, simply:
-
Open up the Karma Chrome browser window that Karma spawned on startup. It is the one with the green bar at the top, as shown in Figure 5-3.
-
Click the DEBUG button on the top right of the Karma browser window. This will open up a new tab in debug mode for you to start debugging.
-
Open the Chrome developer tools (Command-Option-I on macOS, Ctrl-Shift-I on Windows) in this tab. Then open up the Sources tab of the developer tools.
-
Select the file you want to debug from the Sources tab. Use Command-P on macOS and Ctrl-P on Windows to start typing the name of the file and select it in case you can’t find it.
-
Add your breakpoints where you need them by clicking the line number on the left of the source code. You can learn more about how to do this by referring to the documentation.
-
Run the tests by refreshing the browser; your test should stop at your breakpoint.
Conclusion
In this chapter, we started digging into the testing sections of Angular. We saw how to use Karma and Jasmine to write simple, isolated unit tests for our component classes, without dealing with anything from Angular. We then saw how to use the Angular testing utilities to be able to test the component logic along with the Angular integration. We saw how to use the TestBed to test both individual components as well as cross-component interactions. Finally, we learned how to both run and debug these tests.
In the next chapter, we will start digging into forms to understand how to capture data from users, and how to validate them and process them in a convenient manner.
Exercise
Take the finished exercise from the previous chapter (available in chapter4/exercise). Do the following:
-
Add isolated unit tests for the
ProductListComponentthat checks theonQuantityChangefunctionality. -
Add three Angular tests for the
ProductItemComponentthat test the initial rendering, theincrementInCart, and thedecrementInCart. -
Add an integrated Angular test for the
ProductListComponentthat checks the integration between theProductListComponentand its childrenProductItemComponent.
All of this can be accomplished using concepts covered in this chapter. You can check out the finished solution in chapter5/exercise/ecommerce.