Table of Contents for
Angular: Up and Running
 Angular: Up and Running
Published by
O'Reilly Media, Inc., 2018
Angular: Up and Running
Published by
O'Reilly Media, Inc., 2018
- Cover
- nav
- Angular: Up and Running
- Angular: Up and Running
- Introduction
- 1. Introducing Angular
- 2. Hello Angular
- 3. Useful Built-In Angular Directives
- 4. Understanding and Using Angular Components
- 5. Testing Angular Components
- 6. Working with Template-Driven Forms
- 7. Working with Reactive Forms
- 8. Angular Services
- 9. Making HTTP Calls in Angular
- 10. Unit Testing Services
- 11. Routing in Angular
- 12. Productionizing an Angular App
- Index
- About the Author
- Colophon
Chapter 9. Making HTTP Calls in Angular
In the previous chapter, we started our groundwork on Angular services. In particular, we took a look at what Angular services are and when to use them. We then dealt with creating Angular services and using them in our application, followed by a very cursory glance at dealing with asynchronous behavior in Angular using observables.
In this chapter, we will build on that base and start using the built-in Angular modules and services to make and parse HTTP calls to a server. We will use that to explore common paradigms, the API options, and how to chain and really use the power of observables in our application.
Introducing HttpClient
In this section, we will start using Angular’s HttpClient to make GET and POST calls to a server. Through this, we will see how to set up our application so that we can make the calls, walk through the process of actually making the calls and dealing with the response, and then go into the API signature and all the various options that we have to tweak it to our needs.
As for the server, we won’t be spending any time building it out, but rather using a prebuilt server for this application. It is a Node.js server, and available in the repository in case you are interested in digging deeper into it, but it is not required to understand this part of the book.
HttpClient Versus Http
If you happened upon some older tutorials and examples, you might encounter a slightly different way of making HTTP calls, by directly importing from @angular/http and then making calls. This was the old way of working with HTTP in Angular, before HttpClient was introduced in Angular version 4.3. In version 5 of Angular, the old http service was deprecated in favor of HttpClient, so just use the method described in this chapter in your applications.
We will continue building on our application, and try to move it over to communicate with a real server instead of our mock data that it was working with so far. In particular, in this section, we will switch over all three service calls (getting a list of stocks, creating a stock, and toggling the favorite on a stock level) to server calls using HTTP GET/POST. By the end of this section, we should not be operating with any mock data on our client side.
Server Setup
As mentioned, the server we will be working with is already developed and available in the repository in the chapter9/server folder. Before we start any web development, let’s get our server up and running.
Checkout and browse to the chapter9/server folder in the GitHub repository. From within the folder, execute the following commands in your terminal :
npm i
node index.js
This installs all the necessary dependencies for our Node.js server, and then starts the server on port 3000. Keep this server running in the background; don’t kill it. This will be what our application hits to fetch and save stocks.
Warning
Note that this is a very simplistic server with an in-memory data store. Anything you create or save will be reset if you restart the server.
Using HttpClientModule
In case you are not coding along, you can get the base code from the chapter8/observables folder in the GitHub repository.
Now let’s get to our web application, and see step by step how to convert our local web application to talk to a server and fetch its data. While doing this, we will also see how easy this switch is, since we are already using observables in our code.
The very first thing we will do is add a dependency on HttpClientModule in our AppModule. Let’s modify the src/app/app.module.ts file as follows:
import{BrowserModule}from'@angular/platform-browser';import{NgModule}from'@angular/core';import{FormsModule}from'@angular/forms';import{HttpClientModule}from'@angular/common/http';import{AppComponent}from'./app.component';import{StockItemComponent}from'./stock/stock-item/stock-item.component';import{CreateStockComponent}from'./stock/create-stock/create-stock.component';import{StockListComponent}from'./stock/stock-list/stock-list.component';import{StockService}from'app/services/stock.service';@NgModule({declarations:[AppComponent,StockItemComponent,CreateStockComponent,StockListComponent],imports:[BrowserModule,FormsModule,HttpClientModule],providers:[StockService,],bootstrap:[AppComponent]})exportclassAppModule{}

Import the
HttpClientModuleinstead ofHttpModule
Add
HttpClientModuleto theimportsarray
Making HTTP GET/POST Calls
Next, we will change the implementation of our StockService to actually make an HTTP service call instead of just returning an observable of mock data. To do this, we get the HttpClient service injected into the constructor (thanks, Angular dependency injection!), and then use it to make our calls. Let’s see how we can modify the src/app/services/stock.service.ts file:
import{Injectable}from'@angular/core';import{HttpClient}from'@angular/common/http';import{Observable}from'rxjs/Observable';import{Stock}from'app/model/stock';@Injectable()exportclassStockService{constructor(privatehttp:HttpClient){}getStocks():Observable<Stock[]>{returnthis.http.get<Stock[]>('/api/stock');}createStock(stock:Stock):Observable<any>{returnthis.http.post('/api/stock',stock);}toggleFavorite(stock:Stock):Observable<Stock>{returnthis.http.patch<Stock>('/api/stock/'+stock.code,{favorite:!stock.favorite});}}
Our server exposes three APIs:
-
GET on /api/stock to get a list of stocks
-
POST on /api/stock with the new stock as a body to create a stock on the server
-
PATCH on /api/stock/:code with the stock code in the URL and the new favorite status in the body of the request, to change the state of favorite for the particular stock.
Our StockService mirrors this API, with each of the three methods making the respective call. The HttpClient APIs directly mirror the HTTP methods, as we can call httpClient.get, httpClient.post, and httpClient.patch directly. Each of them take the URL as the first argument, and a request body as the second (if the method supports it).
One important thing to note is that the HttpClient can give you type-assurance across your code. We leverage this feature in the getStocks() and the toggleFavorite() methods.
One effect of this is that we need to change our stock.ts from a TypeScript class to a TypeScript interface. Why is this? While we don’t need to, Angular does a simple typecast of the response body into the type we have defined. But TypeScript (and ECMAScript underneath it) has no nice and easy way to convert a simple plain-old JavaScript object into a prototypical JavaScript/TypeScript class object. This means that while our response from StockService will have all the properties of the class Stock, it would not have the functions (in particular, isPositiveChange()) available.
We could write a converter, but it is only worth it in very specific cases. It is easier to simply leverage TypeScript for type safety and work with other ways of encapsulation (either at a component level, or maybe as an Angular service).
For these reasons, let’s switch our Stock class to an interface, by editing src/app/model/stock.ts as follows:
exportinterfaceStock{name:string;code:string;price:number;previousPrice:number;exchange:string;favorite:boolean;}
We have simply converted it to an interface, and defined all the properties on it. No more constructor, no more built-in functions. With that groundwork done, let’s now move to changing the components over to using the service correctly. We will first start with StockListComponent, which has minimal changes. All we will do is remove the toggling of favorites functionality away from this component, and let each individual stock component handle it. Let’s see the changes to src/app/stock/stock-list/stock-list.component.ts:
import{Component,OnInit}from'@angular/core';import{StockService}from'app/services/stock.service';import{Stock}from'app/model/stock';import{Observable}from'rxjs/Observable';@Component({selector:'app-stock-list',templateUrl:'./stock-list.component.html',styleUrls:['./stock-list.component.css']})exportclassStockListComponentimplementsOnInit{publicstocks$:Observable<Stock[]>;constructor(privatestockService:StockService){}ngOnInit() {this.stocks$=this.stockService.getStocks();}}
Our StockListComponent becomes simplified with this change. We also have to make a slight tweak to its template, to remove the toggleFavorite event binding. Change src/app/stock/stock-list/stock-list.component.html as follows:
<app-stock-item*ngFor="let stock of stocks$ | async"[stock]="stock"></app-stock-item>
Next, let’s move on to the StockItemComponent. We will move the toggleFavorite logic into the component here, and ask each individual stock to make the respective server call through StockService.toggleFavorite directly, and handle the response. We will remove the EventEmitter while we are at it. The finished src/app/stock/stock-item/stock-item.component.ts file should look like this:
import{Component,OnInit,Input}from'@angular/core';import{Stock}from'../../model/stock';import{StockService}from'app/services/stock.service';@Component({selector:'app-stock-item',templateUrl:'./stock-item.component.html',styleUrls:['./stock-item.component.css']})exportclassStockItemComponent{@Input()publicstock:Stock;constructor(privatestockService:StockService){}onToggleFavorite(event){this.stockService.toggleFavorite(this.stock).subscribe((stock)=>this.stock.favorite=!this.stock.favorite);}}
Only have input, remove the output binding
Inject
StockServiceinto the constructor
Change
onToggleFavoriteto call the service instead
Note that we are taking responsibility for toggling the local state of favorite on the stock on successful toggle favorite call. Without it, it would change the state on the server, but the local browser state would not be changed. We could also have chosen to refresh the entire list of stocks on every toggle favorite, by keeping the EventEmitter and asking the parent StockListComponent to refetch the list of stocks every time. That is a call we can make as we develop our applications, depending on our needs. There will be times when we want the latest and greatest information from the server, and times when handling changes locally is acceptable.
There is also a change in our template for the StockItemComponent, as we no longer have access to the isPositiveChange() function on the stock. We instead directly calculate whether it is positive or not using the underlying properties in our template. Our changed src/app/stock/stock-item/stock-item.component.html should look as follows:
<divclass="stock-container"><divclass="name">{{stock.name + ' (' + stock.code + ')'}}</div><divclass="exchange">{{stock.exchange}}</div><divclass="price"[class.positive]="stock.price>stock.previousPrice"[class.negative]="stock.price<= stock.previousPrice">$ {{stock.price}}</div><button(click)="onToggleFavorite($event)"*ngIf="!stock.favorite">Add to Favorite</button><button(click)="onToggleFavorite($event)"*ngIf="stock.favorite">Remove from Favorite</button></div>
Add
positiveclass binding based on stock priceAdd
negativeclass binding based on stock price
Now, we will move to the last component, the CreateStockComponent. We only have to accommodate the change over from the class to the interface, which means we don’t have a nice constructor for a Stock object. While we are it, we will refactor the class for reuse. But there is no change required with respect to HttpClient, since we abstracted out the logic and used observables from the beginning. The finished src/app/stock/create-stock/create-stock.component.ts file should look like this:
import{Component,OnInit}from'@angular/core';import{Stock}from'app/model/stock';import{StockService}from'app/services/stock.service';@Component({selector:'app-create-stock',templateUrl:'./create-stock.component.html',styleUrls:['./create-stock.component.css']})exportclassCreateStockComponent{publicstock:Stock;publicconfirmed=false;publicmessage=null;publicexchanges=['NYSE','NASDAQ','OTHER'];constructor(privatestockService:StockService){this.initializeStock();}initializeStock() {this.stock={name:'',code:'',price:0,previousPrice:0,exchange:'NASDAQ',favorite:false};}setStockPrice(price){this.stock.price=price;this.stock.previousPrice=price;}createStock(stockForm){if(stockForm.valid){this.stockService.createStock(this.stock).subscribe((result:any)=>{this.message=result.msg;this.initializeStock();},(err)=>{this.message=err.error.msg;});}else{console.error('Stock form is in an invalid state');}}}
Call
initializeStockto create a stock instanceDefine
initializeStockmethod for reuseUse
initializeStockafter stock is successfully created
We just pulled out an initializeStock function, which we call both from the constructor as well as after the stock is successfully created. The only other change we did in this class is how we handled the error. With HttpResponse for errors, the response body is actually available in the error key inside the response, so we grab the msg key from there instead. There are no other changes we need to do in this class. The template also remains as is.
We are now almost ready to run our application, but we have one final change we need to make. The browser, for security reasons, does not allow you to make calls across domains and origins. Thus, even while both our server and the Angular application are running on localhost, they are running on different ports, and thus the browser treats them as different origins. To get around this, the Angular CLI allows us to set up a proxy, so that our requests would be sent to the server, which would then proxy it to our final endpoint.
To do this, we will create a file proxy.conf.json in the main folder of our Angular application, with the following contents:
{"/api":{"target":"http://localhost:3000","secure":false}}
What we have done is simply asked Angular to proxy all requests made to the server with the path starting with /api to our Node.js server running on port 3000 locally. Technically, this filename can be anything, but we are just following a certain pattern. This file supports a lot more configuration, but we will not get into it in this book. You can read up on it in the official Angular CLI docs.
Now we are finally ready to run our application. So far, we have been running the application using ng serve. Now, we need to run it with the following command:
ng serve --proxy-config proxy.conf.json
This will let Angular run our application, but taking our proxy configuration into account. Now, when you browse to our application (http://localhost:4200), you should see the list of stocks coming from the server. Note that if you create a new stock, you will see a message saying it has been added successfully, but you will have to manually refresh the page to see it updated in the UI. Toggling the stock should also work, and this should be persisted even after you refresh the page. The application should look exactly the same as it has been looking so far, as we have not made any UI-specific changes.
The finished code sample for this section is available in the GitHub repository in the chapter9/simple-http folder.
Advanced HTTP
In the previous section, we started with the basics of Angular’s HttpClient and learned how to make simple HTTP GET and POST calls to our server, and deal with its response. In this section, we will dig a little bit deeper into our HTTP API, and other features that are supported by Angular’s HTTP module.
Options—Headers/Params
First, let’s take a closer look at the HTTP API we invoke. So far, we passed it a URL, along with a body for the request if necessary. The HTTP API also allows us to pass an options object as the second (or third in case the API allows for a body like POST and PATCH) argument to the function. Again, let’s modify our existing application to see these options, and add in some common requirements as well. We will use the codebase from the previous section, which can be obtained from the chapter9/simple-http folder in case you are not coding along, as a base.
First, one of the common tasks that any developer has with an HTTP API is to send additional query parameters, or certain HTTP headers along with the request. Let’s see how we can accomplish this using the HttpClient. We will change the src/app/services/stock.service.ts file as follows:
import{Injectable}from'@angular/core';import{HttpClient,HttpHeaders}from'@angular/common/http';import{Observable}from'rxjs/Observable';import{Stock}from'app/model/stock';@Injectable()exportclassStockService{constructor(privatehttp:HttpClient){}getStocks():Observable<Stock[]>{returnthis.http.get<Stock[]>('/api/stock',{headers:newHttpHeaders().set('Authorization','MyAuthorizationHeaderValue').set('X-EXAMPLE-HEADER','TestValue'),params:{q:'test',test:'value'}});}/** Unchanged after this, omitted for brevity */}
Add HTTP headers to the outgoing call
Add query params
qandtestto the outgoing call
In the preceding code, we have made two changes. We have added a second argument to the http.get call, which is an options object. There are certain keys we can pass to it, to configure the outgoing HTTP request. In the code, we have added two options:
- headers
-
We can set the outgoing/request HTTP headers. There are two ways we can set both the headers as well as the parameters. One option, as we have done in the code, is to pass an
HttpHeadersobject, which is a typed class instance, on which we can callsetto set the correct headers. It follows a builder pattern, so you can chain multiple headers as we have done. The second option is to just pass it a plain-old JavaScript object. Of course, for the values, we have hardcoded it here, but you can just as well access it from some variable, or even some other service (in case you need to get authorization headers from, say, anAuthService). - params
-
Just like the headers, HTTP query parameters can also be configured in two ways: using the typed, built-in
HttpParamsclass, or using a plain-old JavaScript object.
Now, when we run this code (making sure that the Node.js server is also running in parallel), open your network inspector to see the outgoing requests. You should see something like Figure 9-1.
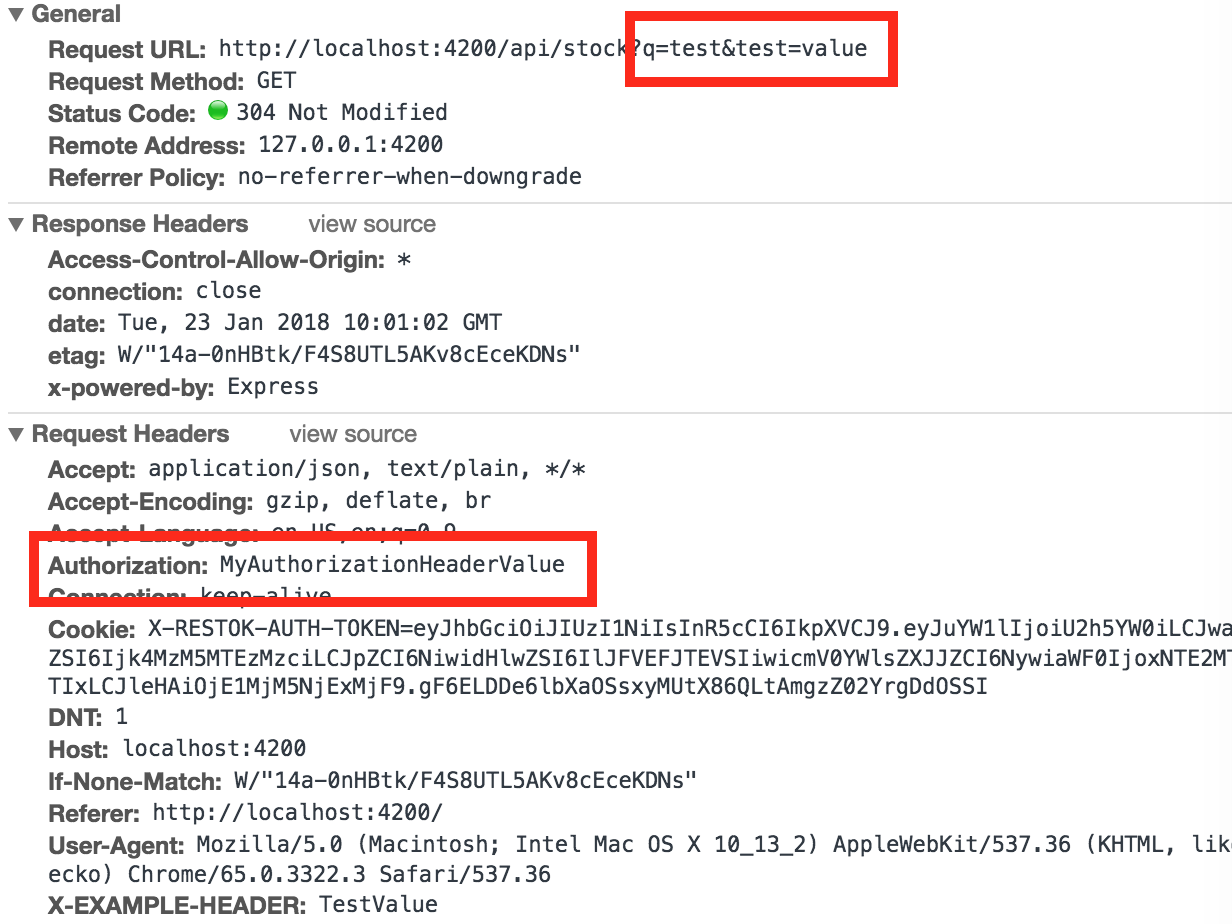
Figure 9-1. Sending query params and headers with an Angular HTTP request
The finished code is available in the chapter9/http-api folder.
Options—Observe/Response Type
We will next move on to two other options on the HTTP request, which give you flexibility in a variety of use cases. The first one we will focus on is the observe property on the options parameter.
The observe parameter takes one of three values:
body-
This is the default value, which ensures that the observable’s
subscribegets called with the body of the response. This body is auto-casted to the return type specified when calling the API. This is what we have been using so far. response-
This changes the response type of the HTTP APIs from returning the entire
HttpResponseinstead of just the body. The response still holds a typed response, so you can still access it underneath, but you also get access to the headers of the response and the status code. Note that instead of a rawHttpResponse, what you really get is anHttpResponse<T>, where T is the type of the body. So in the case ofgetStocks, what you would end up returning is actually an observable ofHttpResponse<Stock[]>. events-
This is similar to
response, but gets triggered on allHttpEvents. This would include the initialization event, as well as the request finished event. These correspond to theXMLHttpRequeststates. This is more useful when we have an API that sends progress events, as we can catch and listen to progress events as well with theobserveparameter set toevents.
The second parameter that we will explore is the responseType property on the options parameter. This can take one of four values:
json-
This is the default, which basically ensures that the response body is parsed and treated as a JSON object. In most cases, you wouldn’t need to change this from the default.
text-
This allows you to treat the response body as a string, without parsing it at all. In this case, the response from your HTTP request would be an
Observable<string>instead of a typed response. blob-
Both this and the next option are more useful when dealing with binary responses that you need to handle in your application.
blobgives you a file-like object containing the raw immutable data, which you can then process as you see fit. arraybuffer-
The last option gives us the underlying raw binary data directly.
Let’s take a look at some of these in action. We will change the StockService temporarily to try the same API with a few of these values set as options. Change the src/app/services/stock.service.ts file as follows:
/** No Change in Imports */@Injectable()exportclassStockService{constructor(privatehttp:HttpClient){}getStocks():Observable<Stock[]>{returnthis.http.get<Stock[]>('/api/stock',{headers:newHttpHeaders().set('Authorization','MyAuthorizationHeaderValue').set('X-EXAMPLE-HEADER','TestValue'),params:{q:'test',test:'value'},observe:'body'});}getStocksAsResponse():Observable<HttpResponse<Stock[]>>{returnthis.http.get<Stock[]>('/api/stock',{observe:'response'});}getStocksAsEvents():Observable<HttpEvent<any>>{returnthis.http.get('/api/stock',{observe:'events'});}getStocksAsString():Observable<string>{returnthis.http.get('/api/stock',{responseType:'text'});}getStocksAsBlob():Observable<Blob>{returnthis.http.get('/api/stock',{responseType:'blob'});}/** Remaining code unchanged, omitted for brevity */}
Observe response body only
Observe entire response
Observe all events

Response to be treated as text

Response to be treated as blob
We have added four new methods to the StockService as follows:
-
getStocksAsResponsemakes the same HTTP call, but sets theobservevalue toresponse. This also changes the response of the function to return anObservable<HttpResponse<Stock[]>>. -
getStocksAsEventsmakes the same HTTP call, but sets theobservevalue toevents. This also changes the response of the function to return anObservable<HttpEvent<any>>. This is because we will get multiple instances ofHttpEventthat are not just the response, but also progress, initialization, etc. Thus the format of the response is not defined. -
getStocksAsStringmakes the same HTTP call, but sets theresponseTypevalue totext. We also change the response type of the function to return anObservable<string>, and the string is the entire body as a string. -
getStocksAsBlobmakes the same HTTP call, but sets theresponseTypevalue toblob. We also change the response type of the function to return anObservable<Blob>to allow the subscriber to work with the blob once we get a response from the server.
Now, let’s hook this up in the component so that we see the effect of calling each of these slightly different APIs. We will modify the StockListComponent to make calls to each of these APIs so that we can see and compare them side by side. Modify the src/app/stock/stock-list/stock-list.component.ts file as follows:
import{Component,OnInit}from'@angular/core';import{StockService}from'app/services/stock.service';import{Stock}from'app/model/stock';import{Observable}from'rxjs/Observable';@Component({selector:'app-stock-list',templateUrl:'./stock-list.component.html',styleUrls:['./stock-list.component.css']})exportclassStockListComponentimplementsOnInit{publicstocks$:Observable<Stock[]>;constructor(privatestockService:StockService){}ngOnInit() {this.stocks$=this.stockService.getStocks();this.stockService.getStocksAsResponse().subscribe((response)=>{console.log('OBSERVE "response" RESPONSE is ',response);});this.stockService.getStocksAsEvents().subscribe((response)=>{console.log('OBSERVE "events" RESPONSE is ',response);});this.stockService.getStocksAsString().subscribe((response)=>{console.log('Response Type "text" RESPONSE is ',response);});this.stockService.getStocksAsBlob().subscribe((response)=>{console.log('Response Type "blob" RESPONSE is ',response);});}}
In the StockListComponent, we leave the original call untouched, and simply add calls to each of the other functions we added in the service below it. For each, we simply subscribe to the response, and then print it (with a respective log so that we can identify them separately). Now, when you run it, make sure you have your browser developer tools open so that you can see the logs it prints. You should see something like Figure 9-2.
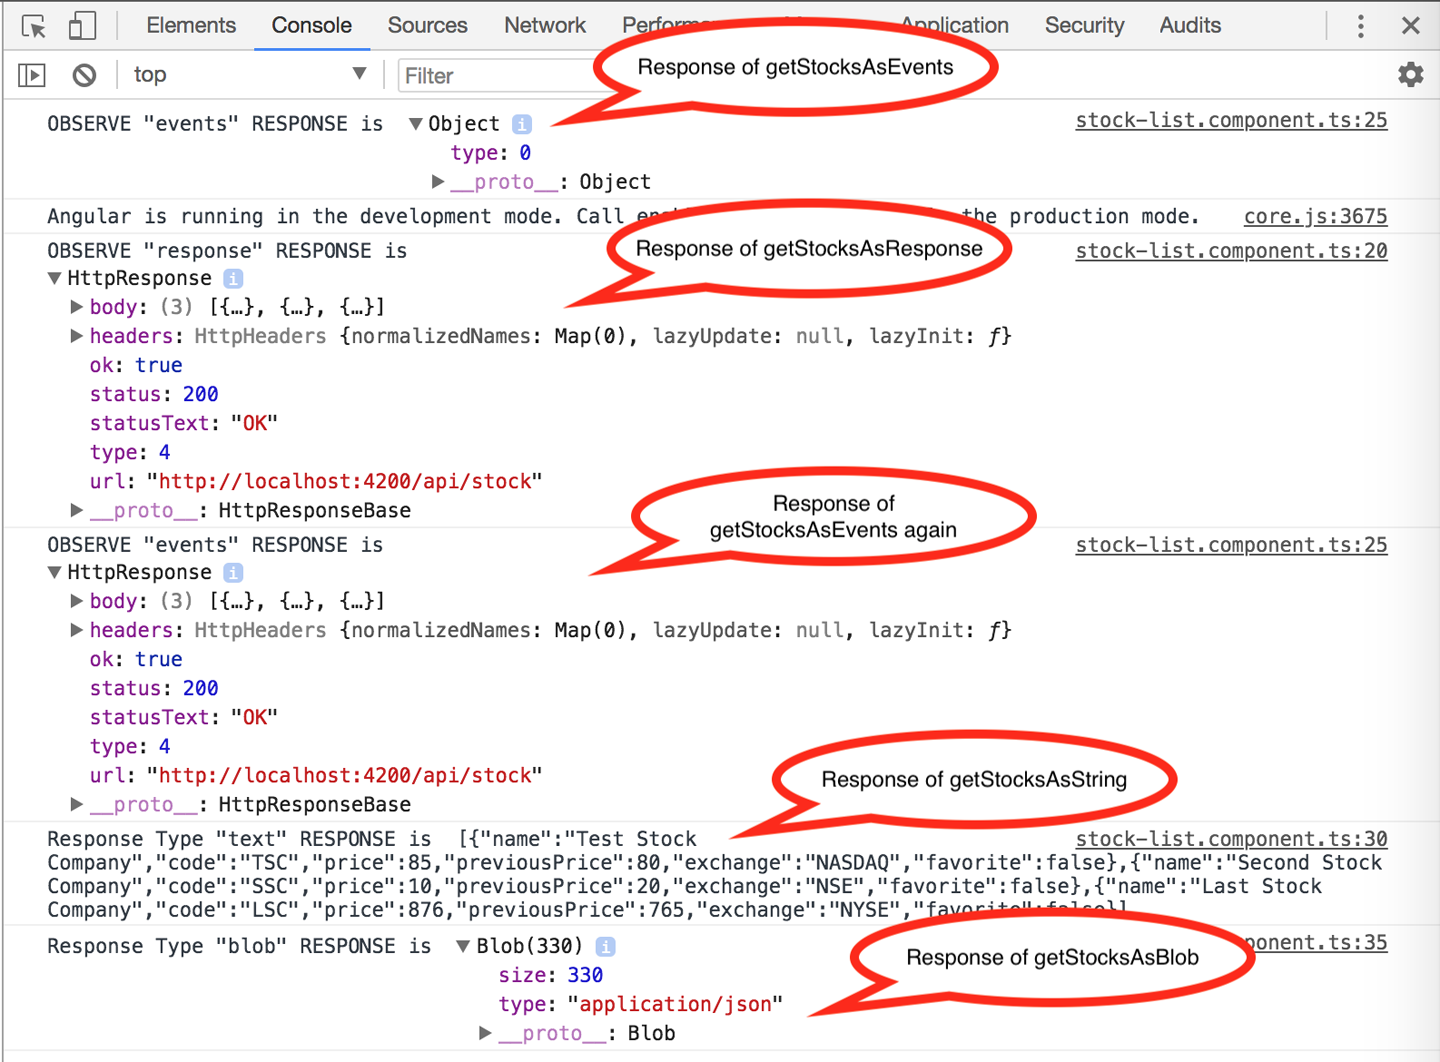
Figure 9-2. Different kind of response types in Angular
There are a few interesting things to note in the example we ran:
-
For the
getStocksAsEvents()call, our subscription is actually called twice, once for the initialization/request being sent and once when the actual information has been loaded with the response. The second event is the one that has the actual data. If our API supported progress, then the subscription would get called for progress events as well. -
The
getStocksAsResponse()call is similar to our initialgetStocks()call, except it gives the body along with other HTTP request fields like status, headers, etc. -
The
getStocksAsString()call is similar to our original call, but instead of getting a typed JSON response, we get our entire JSON response as a string. As mentioned before, this is more useful for working with non-JSON APIs. -
The final
getStocksAsBlob()call returns a blob containing our data that we can then work with. This is more useful for working with binary data and the like, rather than JSON APIs.
For the most part, you wlll only need the default setting of observing the body and using the json response type. These other options exist for that 5% of use cases where the default is not enough, and you need access to something more. The new HttpClient gives you that flexibility to work with your APIs the way you want to, while making it easy for the most common use cases.
The finished code sample for this section is available in the GitHub repository in the chapter9/http-api folder.
Interceptors
One other common use case is to be able to hook into all incoming and outgoing requests to be able to either modify them in flight, or listen in on all responses to accomplish things like logging, handling authentication failures in a common manner, etc.
With the HttpClient API, Angular allows easily defining interceptors, which can conceptually sit between the HttpClient and the server, allowing it to transform all outgoing requests, and listen in and transform if necessary all incoming responses before passing them on. Let’s see how we might create a very simple interceptor in Angular that allows us to:
-
Modify all outgoing requests by adding a header if we have an authorization token.
-
Log all incoming responses before passing them along.
-
In case the request ends up in a failure (a non-
200or non-300response), we will log it differently.
We will fetch the authorization token from another service, which we will create just for the purpose of storing and returning our authorization information. To complete this example, we will build on our codebase from the first section. So if you want, you can obtain the base code from the chapter9/simple-http folder. Note that we are not using the additions we did while we were exploring the HTTP API.
We will first add a very simple service that acts as a holder of authorization-related information. We can add it simply by running this from the terminal:
ng generate service services/auth --module=app
This will create an AuthService for you, and also hook up the provider in the AppModule. We will just make a small change to the generated service to hold a property that we can use in our interceptor. The changed service in src/app/services/auth.service.ts should look like the following:
import{Injectable}from'@angular/core';@Injectable()exportclassAuthService{publicauthToken:string;constructor(){}}
We have added a public property on the class called authToken in the AuthService. Because we generated the service using the Angular CLI, it automatically added the provider in the AppModule. Otherwise, we would have had to do it ourselves. We will add one more HTTP API call in the StockService to an API that always returns a 403. Make the change so that the src/app/services/stock.service.ts file looks like this:
import{Injectable}from'@angular/core';import{HttpClient}from'@angular/common/http';import{Observable}from'rxjs/Observable';import{Stock}from'app/model/stock';@Injectable()exportclassStockService{constructor(privatehttp:HttpClient){}/** No changes to other calls, omitting for brevity */makeFailingCall() {returnthis.http.get('/api/fail');}}
We only added the last method, makeFailingCall(), to the StockService. The remaining code remains untouched. We will then change the StockListComponent to display a few extra buttons, which we will hook up to the StockService and the AuthService that we have just created. First, change the src/app/stock/stock-list/stock-list.component.ts file as follows:
import{Component,OnInit}from'@angular/core';import{StockService}from'app/services/stock.service';import{Stock}from'app/model/stock';import{Observable}from'rxjs/Observable';import{AuthService}from'app/services/auth.service';@Component({selector:'app-stock-list',templateUrl:'./stock-list.component.html',styleUrls:['./stock-list.component.css']})exportclassStockListComponentimplementsOnInit{publicstocks$:Observable<Stock[]>;constructor(privatestockService:StockService,privateauthService:AuthService){}ngOnInit() {this.fetchStocks();}fetchStocks() {this.stocks$=this.stockService.getStocks();}setAuthToken() {this.authService.authToken='TESTING';}resetAuthToken() {this.authService.authToken=null;}makeFailingCall() {this.stockService.makeFailingCall().subscribe((res)=>console.log('Successfully made failing call',res),(err)=>console.error('Error making failing call',err));}}
We made a slight change to the initialization logic, and added a few new methods to the StockListComponent. First, we pulled out the stock$ Observable subscription to a new method called fetchStocks(), and just called it in the ngOnInit. Next, we have added a few more methods, namely setAuthToken(), resetAuthToken(), and makeFailingCall(), all of which are trivial and basically call out to AuthService and StockService, respectively.
Next, we will hook these four new methods to buttons in the template for the StockListComponent. Let’s change src/app/stock/stock-list/stock-list.component.html as follows:
<app-stock-item*ngFor="let stock of stocks$ | async"[stock]="stock"></app-stock-item><div><buttontype="button"(click)="fetchStocks()">Refetch Stocks</button><buttontype="button"(click)="makeFailingCall()">Make Failing Call</button><buttontype="button"(click)="setAuthToken()">Set Auth Token</button><buttontype="button"(click)="resetAuthToken()">Reset Auth Token</button></div>
We have added four new buttons to the template, with each one calling out to one of the new methods we just added.
So far, we have not added anything related to interceptors, but rather just set up our application to demonstrate various things related to the interceptors and how we might be able to use them in our application. Let’s create our interceptor now. Sadly, the Angular CLI does not yet support generating the skeleton of the interceptor, so we will do it manually. Create a file at src/app/services/stock-app.interceptor.ts with the following content:
import{Injectable}from'@angular/core';import{HttpEvent,HttpInterceptor,HttpResponse}from'@angular/common/http';import{HttpHandler,HttpRequest,HttpErrorResponse}from'@angular/common/http'import{Observable}from'rxjs/Observable';@Injectable()exportclassStockAppInterceptorimplementsHttpInterceptor{constructor(){}intercept(req:HttpRequest<any>,next:HttpHandler):Observable<HttpEvent<any>>{console.log('Making a request to ',req.url);returnnext.handle(req);}}
Implement the
HttpInterceptorinterfaceImplement the
interceptAPIContinue the chain by calling
handlewith the request
We have a mostly straightforward StockAppInterceptor class that implements the Angular HttpInterceptor interface. This interface provides one method, intercept, which we implement in the class. The intercept method is called with two arguments, the HttpRequest and an HttpHandler.
A good way to think of HttpInterceptor is that it is a chain. Each interceptor is called with the request, and it is up to the interceptor to decide whether it continues in the chain or not. Within this context, each interceptor can decide to modify the request as well. It can continue the chain by calling the handler provided to the intercept method with a request object. If there is only one interceptor, then the handler would simply call our backend with the request object. If there are more, it would proceed to the next interceptor in the chain.
Let’s hook up this simple interceptor, which at this point simply logs all outgoing requests to the console, to the application. We do so in the AppModule (available in src/app/app.module.ts) as follows:
/** Skipping other standard imports for brevity **/import{HttpClientModule,HTTP_INTERCEPTORS}from'@angular/common/http';import{AuthService}from'./services/auth.service';import{StockAppInterceptor}from'./services/stock-app.interceptor';@NgModule({declarations:[/** Skipping for brevity **/],imports:[/** Skipping for brevity **/],providers:[StockService,AuthService,{provide:HTTP_INTERCEPTORS,useClass:StockAppInterceptor,multi:true,}],bootstrap:[AppComponent]})exportclassAppModule{}
The major focus is on the last element in the providers section, which is how we provide the HttpInterceptor. Here, we are using the basic form of a provider, where we mention what we are providing (using the provide key), how to provide it (using the useClass, which points at our newly created StockAppInterceptor), and the fact that it is an array of interceptors (multi: true takes care of this). We can similarly add another entry for each interceptor we want.
Now we can run this application (using ng serve --proxy-config proxy.conf.json, after making sure our Node.js server is running). When you run this, open the console in your developer tools and you should see a log entry each time a server call is made. You can trigger more server calls by clicking the Refetch Stocks button.
Now, let’s extend to make the interceptor nontrivial. Modify the src/app/services/stock-app.interceptor.ts file as follows:
import{Injectable}from'@angular/core';import{HttpEvent,HttpInterceptor,HttpResponse}from'@angular/common/http';import{HttpHandler,HttpRequest,HttpErrorResponse}from'@angular/common/http'import{Observable}from'rxjs/Observable';import'rxjs/add/operator/do';import{AuthService}from'./auth.service';@Injectable()exportclassStockAppInterceptorimplementsHttpInterceptor{constructor(privateauthService:AuthService){}intercept(req:HttpRequest<any>,next:HttpHandler):Observable<HttpEvent<any>>{if(this.authService.authToken){constauthReq=req.clone({headers:req.headers.set('Authorization',this.authService.authToken)});console.log('Making an authorized request');req=authReq;}returnnext.handle(req).do(event=>this.handleResponse(req,event),error=>this.handleError(req,error));}handleResponse(req:HttpRequest<any>,event){console.log('Handling response for ',req.url,event);if(eventinstanceofHttpResponse){console.log('Request for ',req.url,' Response Status ',event.status,' With body ',event.body);}}handleError(req:HttpRequest<any>,event){console.error('Request for ',req.url,' Response Status ',event.status,' With error ',event.error);}}
Implement the
interceptAPICheck for presence of auth token in the service
Change the request to an authorized request with extra headers
Call the
handleAPI on the request to proceed in the chainHandle any successful response

Handle any error
We have changed a few things of note in the interceptor now:
-
First, we check for the presence of the
authTokenin theAuthService. If it is available, we then modify the request to add anAuthorizationheader with the current value from theAuthService. -
We have added an operator to
Observableusing theimport 'rxjs/add/operator/do';statement. We then use this on thenext.handle. -
The
dooperator on an observable allows us to hook onto the results of an observable in a pass-through manner, but still make changes or have side effects. It is useful for cases like these where we want to see the response and possibly even make changes to it or log it. -
We subscribe to both the success and error events on the observable, and add the appropriate logging in both.
Why Clone the Request?
One very important thing to note is how we handle adding headers (or making any other changes) to the outgoing request.
HttpRequest (and HttpResponse) instances are immutable. This means that once created, its values cannot be changed. We want the HttpRequest and HttpResponse to be immutable because there are various Observable operators, some of which might want to retry the request.
For example, assume a simple flow where before we make the request, we add a counter that counts the number of requests from our client. If the request was retried, then the count might get updated again, even though it is still the original request that was being retried.
If request instances were mutable, then on retrying the request through an interceptor chain, the request might be completely different. For this reason, both HttpRequest and HttpResponse instances are immutable. Thus, any changes we make on them result in a new immutable instance. This allows us to ensure that retrying a request through an interceptor chain would result in exactly the same request being made, and not result in unexpected behavior because of mutability.
We therefore call clone() on the request to get a new instance with modified/updated properties that we pass to the instance. This gives us back a new instance with updated values. We pass this instance to the handler instead of the original request.
Now when you run your application, take the following actions:
-
See the initial request to get the list of stocks in the network inspector. Ensure that there is no
Authorizationheader in the request. -
Click the Set Auth Token button. Now click the Refetch Stocks button. Notice that the
Authorizationheader is now set and sent in the request. Corresponding logs will also be printed. -
Click Reset Auth Token to ensure that header is removed and try Refetch Stocks once again.
-
Click the Make Failing Call button and ensure that the error handler in the interceptor gets called and the logs are correctly printed.
Service Dependencies and Interceptors
Note that we pulled in an AuthService dependency in the interceptor via dependency injection. But there is one exception that you would need to watch out for, which is if the dependency you are pulling in within the interceptor in turn depends on HttpClient. This would compile, but when you run the application in your browser, you will see an error about circular dependency. This is because the HttpClient underneath requires all the interceptors, and when we add a service as a dependency that requires HttpClient, we end up with a circular ask that breaks our application.
How do we fix this? There are a few approaches we can take:
-
Split apart your service if possible into a data service that does not depend on
HttpClientand one that makes server calls usingHttpClient. Then you can pull in the first service as a dependency only, which won’t cause this circular dependency. This is usually the easier and preferred approach. -
Do not inject your
HttpClientdependency in the constructor, but rather lazily inject it later as and when you need it. To do this, you would need theInjectorinjected in the constructor. You can then dothis.injector.get(MyService)to get a handle on your service and use it. Refer to this GitHub issue for more details.
Advanced Observables
In this final section, we will go a little bit more in depth into how we can accomplish some usually complex things using observables. We will also see some common pitfalls that you should be aware of when using observables. From an application perspective, we will try to add the capability to search stocks as you type from the application. This will allow us to see many things in actions. Search is the prototypical example for demonstrating the power of ReactiveX as it really demonstrates how observables can make certain tasks simpler, especially when you treat everything as a stream of events.
Search-as-you-type is generally difficult, for the following reasons:
-
If you trigger an HTTP call every time someone performs a keypress, then you would end up with a lot of calls, most of which will need to be ignored.
-
Users rarely type correctly in one shot, often having to erase and retype. This will also result in unnecessary duplicate calls.
-
You need to worry about how to deal with out-of-order responses. If the result for the previous query returns after the current one, you need to handle it in your application logic.
Thankfully, observables give us powerful operators to handle each of these. Before we get into how to fix these using observables, let’s start by first adding a line to show how many search results we are seeing. This will also demonstrate one thing to watch out for when using observables.
We will again use the code from the first finished example, which is available in chapter9/simple-http. We will build on this for the rest of the section.
First, let’s edit src/app/stock/stock-list.component.html to show the number of stocks we have in addition to the stocks themselves. We might end up with something like:
<h2>We have found {{(stocks$ | async)?.length}} stocks!</h2><app-stock-item*ngFor="let stock of stocks$ | async"[stock]="stock"></app-stock-item>
We have added a div, which shows the length (if present, which is what the ? syntax does—it marks the element as optional, thus preventing failure in case of nulls, etc.). Now if you run the application, you will see the list of stocks as well as “We have found 3 stocks!”
But open up the network inspector and you will notice an interesting thing. There will actually be two different calls going for fetching the list of stocks. Why? Because Angular observables are cold by default. And so every time someone subscribes to it, the observable is triggered. In this case, we have two subscribers, which are the two Async pipes, one for the ngFor and one for the length. Thus, instead of using the same observable, we end up with two different calls being made.
Cold Versus Hot Observables
We just mentioned that Angular observables are cold observables by default. What does this mean for us? Fundamentally, an observable is nothing but a function that connects a producer to a consumer.
A cold observable is responsible for creating the producer as well, while a hot observable ends up sharing the producer.
For us, this just means that if whenever someone subscribes to an observable in Angular, the producer is created for that instance. This is why for each subscribe, we end up with a new producer.
You can read up more on hot and cold observables in this article.
Now how can we solve it? We have a few options:
-
We can tell Angular to share the same observable, thus preventing two calls.
-
We can manually subscribe to the observable in the component, and capture the event response and save it to a class variable. Then the template can access the class variable instead of relying on the
Asyncpipe. -
We can choose not to use observables and instead use the promise to get at the underlying value. Promises do work in Angular, and you can convert any observable into a promise by calling
toPromiseon the observable (after adding the operatortoPromisefirst of course by importing it).
All of these are acceptable options, depending on the use case. While Angular pushes us toward using observables, there is no hard-and-fast rule that you can’t convert it into a promise. And there are cases where it makes sense to deal with a promise instead of an observable.
We won’t go into code snippets for the latter two, though. Let’s see how we can share the same observable, by changing the src/app/stock/stock-list/stock-list.component.ts file as follows:
import{Component,OnInit}from'@angular/core';import{StockService}from'app/services/stock.service';import{Stock}from'app/model/stock';import{Observable}from'rxjs/Observable';import{share}from'rxjs/operators';@Component({selector:'app-stock-list',templateUrl:'./stock-list.component.html',styleUrls:['./stock-list.component.css']})exportclassStockListComponentimplementsOnInit{publicstocks$:Observable<Stock[]>;constructor(privatestockService:StockService){}ngOnInit() {this.stocks$=this.stockService.getStocks().pipe(share());}}
We have simply imported and used the share operator from RxJS. Then, in the ngOnInit, instead of saving the getStocks() observable directly, we pipe our base observable and add the share() operator to our pipe. We save this observable as a member variable. This ensures that regardless of how many subscriptions are present on the observable, there would be only one underlying trigger to the server. Now when you run the application, you should see only one request being made to fetch the list of stocks, and still see both the number of stocks as well as the individual stocks.
Tip
Be careful when you use AsyncPipe in your application, as using multiple async pipes on the same observable without sharing the underlying observable underneath would result in multiple server calls.
Another option is to use the as operator along with the async pipe. This assigns the variable to a template variable for easy access and use. We can do something like:
<li*ngFor="let stock of stocks$ | async as stocks;index as i">{{ stock.name }} ({{ i }} of {{ stocks.length }})</li>
The problem is that the template variable is scoped to the element, and cannot be accessed outside like in our example.
Next, let’s add a simple search field, and see how we might fetch a list of stocks based on the search term from the server. We will take this step by step, by first updating our service to make the modified server call, and then adding a search field in the UI.
First, let’s change our StockService to support searching for stocks with a query string. We will update the src/app/services/stock.service.ts file as follows:
import{Injectable}from'@angular/core';import{HttpClient}from'@angular/common/http';import{Observable}from'rxjs/Observable';import{Stock}from'app/model/stock';@Injectable()exportclassStockService{constructor(privatehttp:HttpClient){}getStocks(query:string):Observable<Stock[]>{returnthis.http.get<Stock[]>(`/api/stock?q=${query}`);}/** Remaining same, omitted for brevity */}
We have changed the definition of the getStocks method to take a query parameter, which is then passed to the /api/stock server call as a query parameter. Note that we could have passed it as an options object as the second argument as well instead of appending it to the URL.
Now we need to change our StockListComponent to make the updated call. While we are doing that, we will also add an input field bound to a model in the component, which will drive our search-as-you-type capability. Let’s modify the template first to add the new form field, by changing src/app/stock/stock-list/stock-list.component.html as follows:
<div><inputname="searchBox"[(ngModel)]="searchString"placeholder="Search Here"(keyup)="search()"></div><h2>We have found {{(stocks$ | async)?.length}} stocks!</h2><app-stock-item*ngFor="let stock of stocks$ | async"[stock]="stock"></app-stock-item>
We have added an input field named searchBox to the template, and bound it using ngModel to a member variable called searchString. In addition, on every keyup event, we are triggering a method called search(). Let’s see how the component in src/app/stock/stock-list/stock-list.component.ts has to evolve:
import{Component,OnInit}from'@angular/core';import{StockService}from'app/services/stock.service';import{Stock}from'app/model/stock';import{Observable}from'rxjs/Observable';import{share}from'rxjs/operators';@Component({selector:'app-stock-list',templateUrl:'./stock-list.component.html',styleUrls:['./stock-list.component.css']})exportclassStockListComponentimplementsOnInit{publicstocks$:Observable<Stock[]>;publicsearchString:string='';constructor(privatestockService:StockService){}ngOnInit() {this.stocks$=this.stockService.getStocks(this.searchString).pipe(share());}search() {this.stocks$=this.stockService.getStocks(this.searchString).pipe(share());}}
We’ve not done much at this point; we’ve simply replicated our logic of fetching the stocks in another method called search(). We have also ensured that we are passing along the query term to our StockService. If you run the application at this point, you will see the new search box. And if you type into the box, it does actually make a request to the server and search. But opening the network inspector in the developer tools tells the underlying story, which is that:
-
For every keystroke, we make a request to the server. This is horrifyingly inefficient.
-
We make requests for duplicate values even if we had already made a request for the previous one.
Thankfully, because we only hold the reference to the latest observable, we don’t have to worry about out-of-order responses, but if we were subscribing to the observable in our component, then we would have to ensure that the response we are working with is the latest and not an older, out-of-date response.
Now let’s see how we can leverage observable operators to solve these problems in a clean, simple manner. We will change the component’s implementation to the following now:
import{Component,OnInit}from'@angular/core';import{StockService}from'app/services/stock.service';import{Stock}from'app/model/stock';import{Observable}from'rxjs/Observable';import{Subject}from'rxjs/Subject';import{debounceTime,switchMap,distinctUntilChanged,startWith,share}from'rxjs/operators';@Component({selector:'app-stock-list',templateUrl:'./stock-list.component.html',styleUrls:['./stock-list.component.css']})exportclassStockListComponentimplementsOnInit{publicstocks$:Observable<Stock[]>;publicsearchString:string='';privatesearchTerms:Subject<string>=newSubject();constructor(privatestockService:StockService){}ngOnInit() {this.stocks$=this.searchTerms.pipe(startWith(this.searchString),debounceTime(500),distinctUntilChanged(),switchMap((query)=>this.stockService.getStocks(query)),share());}search() {this.searchTerms.next(this.searchString);}}
We have given the component a major overhaul, so let’s talk through the various changes and why we have done them:
-
The first major thing we have done is that we have introduced a member variable called
searchTerms, which is aSubject. ASubjectis a special type in RxJS that acts as both an observer as well as an observable. That is, it is capable of both emitting events as well as subscribing to one. We will use thissearchTermssubject to trigger an event whenever the user types in our search box. -
At this point, our
ngOnInitnow starts with theSubjectwe created, rather than theStockService. This means our chain of observable operators will be triggered each time theSubjectgets a new term. TheSubjectis hooked in thesearch()to emit an event each time the user enters a letter. -
Of course, we don’t want to trigger the server call each time the user enters a key, so we introduce the
debounceTime()operator in the chain. To chain, we use thepipeoperator on the observable, and then can add any number of operators separated as arguments to thepipefunction. Here, we instruct the stream to hold until there are no more new events for a period of 500 milliseconds. This ensures that we only send a call once the user stops typing for half a second. -
The next thing we want to do is to avoid unnecessary calls, like if the user enters a search term (say, “test”), then types a few more characters and then erases them to land back at the same word he started with. Instead of adding checks and local variables, we use another observable operator called
distinctUntilChanged(). This ensures that the event is only emitted if the new value is different from the previous value, thus saving a few more network calls. -
So far, we are using a
Subjectthat emitsstringvalues. But our observable that we bind to is one ofStock[]. Converting an observable chain from one type to another is usually the work of themapoperator. But we will use a particular type ofmapoperator called theswitchMap. TheswitchMaphas a nice behavior that in addition to converting from one type of observable to another, it also has the capability to cancel old, in-flight subscriptions. This helps to solve our out-of-order response problem in a nice, clean manner. Note that it does not necessarily cancel the underlying HTTP request, but simply drops the subscription. -
If we leave it at just this, our chain will only start the first moment the user starts typing into the search box, and will result in an empty list of stocks when the page loads. We can solve this by using an operator called
startWith, which sets the initial value with which the observable chain is to be triggered. We start it with an empty string, which ensures that when the page is loaded, we see our original list of stocks.
At this point, with a chain of four RxJS operators, we can now run our application. When you type in the search box, it will wait for you to stop typing for a period before making the request. If you type and erase to land back at the starting value, it will not make the request at all.
There are many more operators available in RxJS than what I can reasonably cover in this book, so I won’t even try. This section is more to give you an idea of what RxJS is really capable of. Whenever you are trying to do any complex work, see if you can tackle it using operators rather than doing it manually. The official RxJS documentation is a great place to start on learning them.
Conclusion
In this chapter, we learned how to make HTTP calls using the HttpClient in Angular. We started with GET and POST calls using the HttpClient, before diving deeper into the API provided in the HttpClient. This included working with headers and query parameters, as well as working with different levels of detail in the response and different response types. We then moved on to handling common use cases of hooking onto every HTTP request and response using interceptors, and saw how to create and hook our own interceptor to the Angular HTTP chain. Finally, we saw how to leverage observables to accomplish some complex tasks in a simple, efficient manner with an example of search-as-you-type.
In the next chapter, we will take a step back and learn how to write unit tests for services, as well as how to unit-test flows where HTTP calls are being made through the HttpClient.
Exercise
Take the finished exercise from Chapter 8 (available in chapter8/exercise/ecommerce). Install and run the server in the chapter9/exercise/server folder by running:
npm i
node index.js
from within the folder. This will start a local Node.js server, which can work with products (similar to one we had for stocks). It exposes the following APIs:
-
GET on /api/product to get a list of products. It can also take an optional query param
q, which is the product name to search for. -
POST on /api/product with product information in the body to create a product on the server (in-memory of course; restarting the server would lose all created products).
-
PATCH on /api/product/:id with the product ID in the URL and a field
changeInQuantityin the body would change the quantity in cart of the product by that amount.
Given this, now try to accomplish the following:
-
Change over the
ProductServiceto make HTTP calls instead of responding with mock data. Support searching for a list of products as well. -
Implement both product listing and search-as-you-type using the power of observables.
-
Handle product creation, as well as change in quantity of an individual product and hook it up end-to-end.
-
See if you can continue using the same observable chain to now reload the entire list of products each time a product is created or the quantity is changed.
Most of this can be accomplished using concepts covered in this chapter. The only tricky thing is how to reload the list of products when it happens in a different component, for which you can leverage template reference variables to access the component and make a call. The other thing you might need to use is the merge operator in the observable so that you can leverage the same observable for loading the list, searching products, and reloading the list. You can check out the finished solution in chapter9/exercise/ecommerce.