Table of Contents for
Web Scraping with Python, 2nd Edition
 Web Scraping with Python, 2nd Edition
Published by
O'Reilly Media, Inc., 2018
Web Scraping with Python, 2nd Edition
Published by
O'Reilly Media, Inc., 2018
- nav
- Cover
- Web Scraping with Python
- Web Scraping with Python
- Preface
- I. Building Scrapers
- 1. Your First Web Scraper
- 2. Advanced HTML Parsing
- 3. Writing Web Crawlers
- 4. Web Crawling Models
- 5. Scrapy
- 6. Storing Data
- II. Advanced Scraping
- 7. Reading Documents
- 8. Cleaning Your Dirty Data
- 9. Reading and Writing Natural Languages
- 10. Crawling Through Forms and Logins
- 11. Scraping JavaScript
- 12. Crawling Through APIs
- 13. Image Processing and Text Recognition
- 14. Avoiding Scraping Traps
- 15. Testing Your Website with Scrapers
- 16. Web Crawling in Parallel
- 17. Scraping Remotely
- 18. The Legalities and Ethics of Web Scraping
- Index
- About the Author
- Colophon
Chapter 13. Image Processing and Text Recognition
From Google’s self-driving cars to vending machines that recognize counterfeit currency, machine vision is a huge field with far-reaching goals and implications. This chapter focuses on one small aspect of the field: text recognition—specifically, how to recognize and use text-based images found online by using a variety of Python libraries.
Using an image in lieu of text is a common technique when you don’t want text to be found and read by bots. This is often seen on contact forms when an email address is partially or completely rendered as an image. Depending on how skillfully it is done, it might not even be noticeable to human viewers, but bots have a difficult time reading these images, and the technique is enough to stop most spammers from acquiring your email address.
CAPTCHAs, of course, take advantage of the fact that users can read security images but most bots can’t. Some CAPTCHAs are more difficult than others, an issue we’ll tackle later in this book.
But CAPTCHAs aren’t the only place on the web where scrapers need image-to-text translation assistance. Even in this day and age, many documents are scanned from hard copies and put on the web, making these documents inaccessible as far as much of the internet is concerned, although they are “hiding in plain sight.” Without image-to-text capabilities, the only way to make these documents accessible is for a human to type them up by hand—and nobody has time for that.
Translating images into text is called optical character recognition, or OCR. A few major libraries can perform OCR, and many other libraries support them or are built on top of them. This system of libraries can get fairly complicated at times, so I recommend you read the next section before attempting any of the exercises in this chapter.
Overview of Libraries
Python is a fantastic language for image processing and reading, image-based machine-learning, and even image creation. Although many libraries can be used for image processing, we will focus on two: Pillow and Tesseract.
These two libraries make for a powerful complementary duo when it comes to processing and doing OCR on images from around the web. Pillow performs the first pass, cleaning and filtering images, and Tesseract attempts to match the shapes found in those images to its library of known text.
This chapter covers their installation and basic usage, along with several examples of this library duo working together. We’ll also cover some advanced Tesseract training, so that you can train Tesseract to OCR additional fonts and languages (or even CAPTCHAs) that you might encounter on the web.
Pillow
Although Pillow might not be the most fully featured image-processing library, it has all the features you are likely to need and then some—unless you plan to rewrite Photoshop in Python, in which case you’re reading the wrong book! Pillow also has the advantage of being one of the better-documented third-party libraries and is extremely easy to use out of the box.
Forked off the Python Imaging Library (PIL) for Python 2.x, Pillow adds support for Python 3.x. Like its predecessor, Pillow allows you to easily import and manipulate images with a variety of filters, masks, and even pixel-specific transformations:
fromPILimportImage,ImageFilterkitten=Image.open('kitten.jpg')blurryKitten=kitten.filter(ImageFilter.GaussianBlur)blurryKitten.save('kitten_blurred.jpg')blurryKitten.show()
In the preceding example, the image kitten.jpg will open in your default image viewer with a blur added to it and will also be saved in its blurrier state as kitten_blurred.jpg in the same directory.
You will use Pillow to perform preprocessing on images to make them more machine readable, but as mentioned before, you can do many other things with the library aside from these simple filter applications. For more information, check out the Pillow documentation.
Tesseract
Tesseract is an OCR library. Sponsored by Google (a company obviously well-known for its OCR and machine-learning technologies), Tesseract is widely regarded to be the best, most accurate, open source OCR system available.
In addition to being accurate, it is also extremely flexible. It can be trained to recognize any number of fonts (as long as those fonts are relatively consistent within themselves, as you will see soon). It also can be expanded to recognize any Unicode character.
This chapter uses both the command-line program Tesseract along with its third-party Python wrapper pytesseract. Both will be explicitly named as one of these two, so know that when you see “Tesseract,” I’m referring to the command-line software, and when you see “pytesseract,” I’m specifically referring to its third-party Python wrapper.
Installing Tesseract
For Windows users, there is a convenient executable installer. As of this writing, the current version is 3.02, although newer versions should be fine as well.
Linux users can install Tesseract with apt-get:
$ sudo apt-get tesseract-ocr
Installing Tesseract on a Mac is slightly more complicated, although it can be done easily with many third-party installers such as Homebrew, which was used in Chapter 6 to install MySQL. For example, you can install Homebrew and use it to install Tesseract in two lines:
$ruby -e"$(curl -fsSL https://raw.githubusercontent.com/Homebrew/\install/master/install)"$brew install tesseract
Tesseract also can be installed from the source, on the project’s download page.
To use some features of Tesseract, such as training the software to recognize new characters later in this section, you also need to set a new environment variable, $TESSDATA_PREFIX, to let it know where data files are stored.
You can do this in most Linux systems and on macOS as follows:
$exportTESSDATA_PREFIX=/usr/local/share/
Note that /usr/local/share/ is the default data location for Tesseract, although you should check to make sure that this is the case for your own installation.
Similarly, on Windows, you can use the following to use the environment variable:
# setx TESSDATA_PREFIX C:\Program Files\Tesseract OCR\
pytesseract
After Tesseract is installed, you’re ready to install the Python wrapper library, pytesseract, which uses your existing Tesseract installation to read image files and output strings and objects that can be used in Python scripts.
Code Samples Require pytesseract 0.1.9
Be aware that some significant changes occurred (with contributions from the author) between versions 0.1.8 and 0.1.9 of pytesseract. This section covers features found only in version 0.1.9 of the library. Please be sure you are installing the correct version when running code samples in this chapter.
As usual, you can install pytesseract via pip, or by downloading from the pytesseract project page and running:
$ python setup.py install
Pytesseract can be used in conjunction with PIL to read text from images:
fromPILimportImageimportpytesseract(pytesseract.image_to_string(Image.open('files/test.png')))
If your Tesseract library is installed in your Python path, you can point pytesseract to the location by including this line:
pytesseract.pytesseract.tesseract_cmd='/path/to/tesseract'
Pytesseract has several useful features in addition to returning the OCR results of an image as in the code sample above. It can estimate box files (pixel locations for the boundaries of each character):
(pytesseract.image_to_boxes(Image.open('files/test.png')))
It can also return a complete output of all data, such as confidence scores, page and line numbers, box data, as well as other information:
(pytesseract.image_to_data(Image.open('files/test.png')))
The default output for these last two files is as space- or tab-delimited string files, but you can also get output as dictionaries or (if decoding in UTF-8 isn’t sufficient) byte strings:
fromPILimportImageimportpytesseractfrompytesseractimportOutput(pytesseract.image_to_data(Image.open('files/test.png'),output_type=Output.DICT))(pytesseract.image_to_string(Image.open('files/test.png'),output_type=Output.BYTES))
This chapter uses a combination of the pytesseract library, as well as command-line Tesseract, and triggering Tesseract from Python via the subprocess library. Although the pytesseract library is useful and convenient, there are some Tesseract functions it cannot do, so it’s good to be familiar with all methods.
NumPy
Although NumPy is not required for straightforward OCR, you will need it if you want to train Tesseract to recognize additional character sets or fonts introduced later in this chapter. You will also be using it for simple math tasks (such as weighted averages) in some of the code samples later.
NumPy is a powerful library used for linear algebra and other large-scale math applications. NumPy works well with Tesseract because of its ability to mathematically represent and manipulate images as large arrays of pixels.
NumPy can be installed using any third-party Python installer such as pip, or by downloading the package and installing with $ python setup.py install.
Even if you don’t plan on running any of the code samples that use it, I highly recommend installing it or adding it to your Python arsenal. It serves to round out Python’s built-in math library and has many useful features, particularly for operations with lists of numbers.
By convention, NumPy is imported as np and can be used as follows:
importnumpyasnpnumbers=[100,102,98,97,103](np.std(numbers))(np.mean(numbers))
This example prints the standard deviation and mean of the set of numbers provided to it.
Processing Well-Formatted Text
With any luck, most of the text that you’ll need to process will be relatively clean and well formatted. Well-formatted text generally meets several requirements, although the line between what is “messy” and what is “well formatted” can be subjective.
In general, well-formatted text:
-
is written in one standard font (excluding handwriting fonts, cursive fonts, or excessively decorative fonts);
-
if copied or photographed, has extremely crisp lines, with no copying artifacts or dark spots;
-
is well aligned, without slanted letters; and
-
does not run off the image, nor is there cut-off text or margins on the edges of the image
Some of these things can be fixed in preprocessing. For instance, images can be converted to grayscale, brightness and contrast can be adjusted, and the image can be cropped and rotated as needed. However, some fundamental limitations might require more-extensive training. See “Reading CAPTCHAs and Training Tesseract”.
Figure 13-1 is an ideal example of well-formatted text.

Figure 13-1. Sample text saved as a .tiff file, to be read by Tesseract
You can run Tesseract from the command line to read this file and write the results to a text file:
$tesseract text.tif textoutput|cat textoutput.txt
The output is a line of information about the Tesseract library to indicate that it is running, followed by the contents of the newly created textoutput.txt:
Tesseract Open Source OCR Engine v3.02.02 with Leptonica
This is some text, written in Arial, that will be read by
Tesseract. Here are some symbols: !@#$%"&‘()
You can see that the results are mostly accurate, although the symbols ^ and * were interpreted as a double quote and single quote, respectively. On the whole, though, this lets you read the text fairly comfortably.
After blurring the image text, creating some JPG compression artifacts, and adding a slight background gradient, the results get much worse (see Figure 13-2).

Figure 13-2. Unfortunately, many of the documents you will encounter on the internet will look more like this than the previous example
Tesseract is not able to deal with this image nearly as well mainly because of the background gradient and produces the following output:
This is some text, written In Arlal, that"
Tesseract. Here are some symbols: _
Notice that the text is cut off as soon as the background gradient makes the text more difficult to distinguish, and that the last character from each line is wrong, as Tesseract tries futilely to make sense of it. In addition, the JPG artifacts and blurring make it difficult for Tesseract to distinguish between a lowercase i and an uppercase I and the number 1.
This is where using a Python script to clean your images first comes in handy. Using the Pillow library, you can create a threshold filter to get rid of the gray in the background, bring out the text, and make the image clearer for Tesseract to read.
In addition, instead of using Tesseract from the command line, you can use the pytesseract library to run the Tesseract commands and read the resulting file for:
fromPILimportImageimportpytesseractdefcleanFile(filePath,newFilePath):image=Image.open(filePath)#Set a threshold value for the image, and saveimage=image.point(lambdax:0ifx<143else255)image.save(newFilePath)returnimageimage=cleanFile('files/textBad.png','files/textCleaned.png')#call tesseract to do OCR on the newly created image(pytesseract.image_to_string(image))
The resulting image, automatically created as textCleaned.png, is shown in Figure 13-3.

Figure 13-3. This image was created by passing the previous “messy” version of the image through a threshold filter
Apart from some barely legible or missing punctuation, the text is readable, at least to us. Tesseract gives it its best shot:
This us some text‘ written In Anal, that will be read by
Tesseract Here are some symbols: !@#$%"&'()
The periods and commas, being extremely small, are the first victims of this image wrangling and nearly disappear, both from our view and Tesseract’s. There’s also the unfortunate misinterpretation of “Arial” as “Anal,” the result of Tesseract interpreting the r and the i as the single character n.
Still, it’s an improvement over the previous version, in which nearly half of the text was cut off.
Tesseract’s greatest weakness seems to be backgrounds with varying brightness. Tesseract’s algorithms attempt to adjust the contrast of the image automatically before reading the text, but you can probably get better results doing this yourself with a tool like the Pillow library.
Images you should definitely fix before submitting to Tesseract are those that are tilted, have large areas of nontext, or have other problems.
Adjusting Images Automatically
In the previous example, the value 143 was chosen experimentally as the “ideal” threshold to adjust all image pixels to black or white, in order for Tesseract to read the image. But what if you have many images, all with slightly different grayscale problems and aren’t reasonably able to go and adjust all of them by hand?
One way to find the best solution (or at least, a pretty good one) is to run Tesseract against a range of images adjusted to different values and algorithmically choose the one with the best result, as measured by some combination of the number of characters and/or strings Tesseract is able to read, and the “confidence” that it reads those characters with.
Which algorithm you use, exactly, may vary slightly from application to application, but this is one example of iterating through image-processing thresholds in order to find the “best” setting:
importpytesseractfrompytesseractimportOutputfromPILimportImageimportnumpyasnpdefcleanFile(filePath,threshold):image=Image.open(filePath)#Set a threshold value for the image, and saveimage=image.point(lambdax:0ifx<thresholdelse255)returnimagedefgetConfidence(image):data=pytesseract.image_to_data(image,output_type=Output.DICT)text=data['text']confidences=[]numChars=[]foriinrange(len(text)):ifdata['conf'][i]>-1:confidences.append(data['conf'][i])numChars.append(len(text[i]))returnnp.average(confidences,weights=numChars),sum(numChars)filePath='files/textBad.png'start=80step=5end=200forthresholdinrange(start,end,step):image=cleanFile(filePath,threshold)scores=getConfidence(image)("threshold: "+str(threshold)+", confidence: "+str(scores[0])+" numChars "+str(scores[1]))
This script has two functions:
cleanFile- Takes in an original “bad” file and a threshold variable to run the PIL threshold tool with. It processes the file and returns the PIL image object.
getConfidence- Takes in the cleaned PIL image object and runs it through Tesseract. It calculates the average confidence of each recognized string (weighted by the number of characters in that string), as well as the number of recognized characters.
By varying the threshold value and getting the confidence and number of recognized characters at each value, you get the output:
threshold: 80, confidence: 61.8333333333 numChars 18
threshold: 85, confidence: 64.9130434783 numChars 23
threshold: 90, confidence: 62.2564102564 numChars 39
threshold: 95, confidence: 64.5135135135 numChars 37
threshold: 100, confidence: 60.7878787879 numChars 66
threshold: 105, confidence: 61.9078947368 numChars 76
threshold: 110, confidence: 64.6329113924 numChars 79
threshold: 115, confidence: 69.7397260274 numChars 73
threshold: 120, confidence: 72.9078947368 numChars 76
threshold: 125, confidence: 73.582278481 numChars 79
threshold: 130, confidence: 75.6708860759 numChars 79
threshold: 135, confidence: 76.8292682927 numChars 82
threshold: 140, confidence: 72.1686746988 numChars 83
threshold: 145, confidence: 75.5662650602 numChars 83
threshold: 150, confidence: 77.5443037975 numChars 79
threshold: 155, confidence: 79.1066666667 numChars 75
threshold: 160, confidence: 78.4666666667 numChars 75
threshold: 165, confidence: 80.1428571429 numChars 70
threshold: 170, confidence: 78.4285714286 numChars 70
threshold: 175, confidence: 76.3731343284 numChars 67
threshold: 180, confidence: 76.7575757576 numChars 66
threshold: 185, confidence: 79.4920634921 numChars 63
threshold: 190, confidence: 76.0793650794 numChars 63
threshold: 195, confidence: 70.6153846154 numChars 65
There is a clear trend among both the average confidence in the result, as well as the number of characters recognized. Both tend to peak around a threshold of 145, which is close to the manually found “ideal” result of 143.
Thresholds of both 140 and 145 give the maximum number of recognized characters (83), but a threshold of 145 gives the highest confidence for those found characters, so you may want to go with that result and return the text that was recognized at that threshold as the “best guess” for what text the image contains.
Of course, simply finding the “most” characters does not necessarily mean that all of those characters are real. At some thresholds, Tesseract could split single characters into multiple ones, or interpret random noise in the image as a text character that doesn’t actually exist. In this case, you may want to rely more heavily on the average confidence of each score.
For example, if you find results that read (in part) as follows:
threshold: 145, confidence: 75.5662650602 numChars 83
threshold: 150, confidence: 97.1234567890 numChars 82
it would probably be a no-brainer to go with the result that gives you over a 20% increase in confidence, with only a one-character loss, and assume that the result with a threshold of 145 was simply incorrect, or perhaps split a character or found something that wasn’t there.
This is the part where some upfront experimentation to perfect your threshold selection algorithm may come in handy. For instance, you may want to select the score for which the product of the confidence and the number of characters is maximized (in this case, 145 still wins with a product of 6272, and in our imaginary example, the threshold 150 would win with a product of 7964) or some other metric.
Note that this type of selection algorithm also works with arbitrary PIL tool values besides just threshold. Also, you can use it to select two or more values by varying the values of each and selecting the best resulting score in a similar way.
Obviously, this type of selection algorithm is computationally intensive. You’re running both PIL and Tesseract many times on every single image, whereas if you know the “ideal” threshold values ahead of time, you have to run them only once.
Keep in mind that, as you start to work with the images that you’re processing, you may start to notice patterns in the “ideal” values that are found. Instead of trying every threshold from 80 to 200, you may realistically need to try only thresholds from 130 to 180.
You may even take another approach and choose thresholds that are, say, 20 apart on the first pass, and then use a greedy algorithm to hone in on the best result by decreasing your step size for thresholds between the “best” solutions found in the previous iteration. This may also work best when you’re dealing with multiple variables.
Scraping Text from Images on Websites
Using Tesseract to read text from an image on your hard drive might not seem all that exciting, but it can be a powerful tool when used with a web scraper. Images can inadvertently obfuscate text on websites (as with the JPG copy of a menu on a local restaurant site), but they can also purposefully hide the text, as I’ll show in the next example.
Although Amazon’s robots.txt file allows scraping of the site’s product pages, book previews typically don’t get picked up by passing bots. That’s because the book previews are loaded via user-triggered Ajax scripts, and the images are carefully hidden under layers of divs. To the average site visitor, they probably look more like Flash presentations than image files. Of course, even if you could get to the images, there’s the not-so-small matter of reading them as text.
The following script accomplishes just this feat: it navigates to the large-print edition1 of Tolstoy’s The Death of Ivan Ilyich, opens the reader, collects image URLs, and then systematically downloads, reads, and prints the text from each one.
Note that this code depends on a live Amazon listing as well as several architectural features of the Amazon website to run correctly. If this listing goes down or is replaced, please fill free to substitute the URL of another book with a Preview feature (I find that large-print, sans-serif fonts work well).
Because this is relatively complex code that draws on multiple concepts from previous chapters, I’ve added comments throughout to make it a little easier to understand what’s going on:
importtimefromurllib.requestimporturlretrievefromPILimportImageimporttesseractfromseleniumimportwebdriverdefgetImageText(imageUrl):urlretrieve(image,'page.jpg')p=subprocess.Popen(['tesseract','page.jpg','page'],stdout=subprocess.PIPE,stderr=subprocess.PIPE)p.wait()f=open('page.txt','r')(f.read())#Create new Selenium driverdriver=webdriver.Chrome(executable_path='<Path to chromedriver>')driver.get('https://www.amazon.com/Death-Ivan-Ilyich'\'-Nikolayevich-Tolstoy/dp/1427027277')time.sleep(2)#Click on the book preview buttondriver.find_element_by_id('imgBlkFront').click()imageList=[]#Wait for the page to loadtime.sleep(5)while'pointer'indriver.find_element_by_id('sitbReaderRightPageTurner').get_attribute('style'):# While the right arrow is available for clicking, turn through pagesdriver.find_element_by_id('sitbReaderRightPageTurner').click()time.sleep(2)# Get any new pages that have loaded (multiple pages can load at once,# but duplicates will not be added to a set)pages=driver.find_elements_by_xpath('//div[@class=\'pageImage\']/div/img')ifnotlen(pages):('No pages found')forpageinpages:image=page.get_attribute('src')('Found image: {}'.format(image))ifimagenotinimageList:imageList.append(image)getImageText(image)driver.quit()
Although this script can, in theory, be run with any type of Selenium webdriver, I’ve found that it currently works most reliably with Chrome.
As you have experienced with the Tesseract reader before, this prints many long passages of the book mostly legibly, as seen in the preview of the first chapter:
Chapter I

During an Interval In the Melvmskl trial In the large
building of the Law Courts the members and public
prosecutor met in [van Egorowch Shebek‘s private
room, where the conversation turned on the celebrated
Krasovski case. Fedor Vasillevich warmly maintained
that it was not subject to their jurisdiction, Ivan
Egorovich maintained the contrary, while Peter
ivanowch, not havmg entered into the discussmn at
the start, took no part in it but looked through the
Gazette which had Just been handed in.

“Gentlemen,” he said, “Ivan Ilych has died!"
However, many of the words have obvious errors, such as “Melvmsl” instead of the name “Melvinski” and “discussmn” instead of “discussion.” Many errors of this type can be fixed by making guesses based on a dictionary word list (perhaps with additions based on relevant proper nouns like “Melvinski”).
Occasionally an error may span an entire word, such as on page 3 of the text:
it is he who is dead and not 1.
In this case the word “I” is replaced by the character “1.” A Markov chain analysis might be useful here, in addition to a word dictionary. If any part of the text contains an extremely uncommon phrase (“and not 1”), it might be assumed that the text was actually the more common phrase (“and not I”).
Of course, it helps that these character substitutions follow predictable patterns: “vi” becomes “w,” and “I” becomes “1.” If these substitutions occur frequently in your text, you might create a list of them that can be used to “try” new words and phrases, selecting the solution that makes the most sense. An approach might be to substitute frequently confused characters, and use a solution that matches a word in a dictionary, or is a recognized (or most common) n-gram.
If you do take this approach, be sure to read Chapter 9 for more information about working with text and natural language processing.
Although the text in this example is a common sans-serif font and Tesseract should be able to recognize it with relative ease, sometimes a little retraining helps improve the accuracy as well. The next section discusses another approach to solving the problem of mangled text with a little upfront time investment.
By providing Tesseract with a large collection of text images with known values, Tesseract can be “taught” to recognize the same font in the future with far greater precision and accuracy, even despite occasional background and positioning problems in the text.
Reading CAPTCHAs and Training Tesseract
Although the word CAPTCHA is familiar to most, far fewer people know what it stands for: Completely Automated Public Turing Test to Tell Computers and Humans Apart. Its unwieldy acronym hints at its rather unwieldy role in obstructing otherwise perfectly usable web interfaces, as both humans and nonhuman robots often struggle to solve CAPTCHA tests.
The Turing test was first described by Alan Turing in his 1950 paper, “Computing Machinery and Intelligence.” In the paper, he described a setup in which a human being could communicate with both humans and artificial intelligence programs through a computer terminal. If the human was unable to distinguish the humans from the AI programs during a casual conversation, the AI programs would be considered to have passed the Turing test, and the artificial intelligence, Turing reasoned, would be genuinely “thinking” for all intents and purposes.
It’s ironic that in the last 60 years we’ve gone from using these tests to test machines to using them to test ourselves, with mixed results. Google recently killed off their notoriously difficult reCAPTCHA due in large part to its tendency to block legitimate website users.2
Most other CAPTCHAs are somewhat easier. Drupal, a popular PHP-based content management system, for example, has a popular CAPTCHA module that can generate CAPTCHA images of varying difficulty. The default image looks like Figure 13-4.
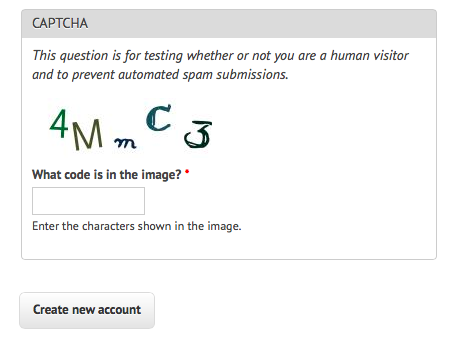
Figure 13-4. An example of the default text CAPTCHA for Drupal’s CAPTCHA project
What makes this CAPTCHA so easy for both humans and machines to read, compared to other CAPTCHAs?
-
Characters do not overlap each other, nor do they cross into each other’s space horizontally. That is, it is possible to draw a neat rectangle around each character without overlapping any other character.
-
There are no background images, lines, or other distracting garbage that could confuse an OCR program.
-
It is not obvious from this image, but there are few variations on the font that the CAPTCHA uses. It alternates between a clean sans-serif font (as seen in the characters “4” and “M”) and a handwriting-style font (as seen in the characters “m,” “C,” and “3”).
-
There is high contrast between the white background and the dark-colored characters.
This CAPTCHA does throw a few curves, though, that make it challenging for OCR programs to read:
-
Both letters and numbers are used, increasing the number of potential characters.
-
The randomized tilt of the letters might confuse OCR software, but remains easy for humans to read.
-
The relatively strange handwriting font presents particular challenges, with extra lines in the “C” and “3” and an unusually small lowercase “m” requiring extra training for computers to get the hang of.
When you run Tesseract over this image using the command
$ tesseract captchaExample.png output
you get this output.txt file:
4N\,,,C<3
It got the 4, C, and 3 right, but it’s clearly not going to be able to fill out a CAPTCHA-protected field any time soon.
Training Tesseract
In order to train Tesseract to recognize writing, whether it’s an obscure and difficult-to-read font or a CAPTCHA, you need to give it multiple examples of each character.
This is the part where you might want to queue up a good podcast or movie because it’s going to be a couple of hours of fairly boring work. The first step is to download multiple examples of your CAPTCHA into a single directory. The number of examples you compile will depend on the complexity of the CAPTCHA; I used 100 sample files (a total of 500 characters, or about 8 examples per symbol, on average) for my CAPTCHA training, and that seemed to work fairly well.
Tip
I recommend naming the image after the CAPTCHA solution it represents (e.g., 4MmC3.jpg). I’ve found that this helps to do quick error-checking across large numbers of files at once; you can view all files as thumbnails and compare the image against its image name easily. This helps greatly in error checking in subsequent steps, as well.
The second step is to tell Tesseract exactly what each character is and where it is in the image. This involves creating box files, one for every CAPTCHA image. A box file looks like this:
4 15 26 33 55 0
M 38 13 67 45 0
m 79 15 101 26 0
C 111 33 136 60 0
3 147 17 176 45 0
The first symbol is the character represented, the next four numbers represent coordinates for a rectangular box outlining the image, and the last number is a “page number” used for training with multipage documents (0 for us).
Obviously, these box files are not fun to create by hand, but a variety of tools can help you out. I like the online tool Tesseract OCR Chopper because it requires no installation or additional libraries, runs on any machine that has a browser, and is relatively easy to use. Upload the image, click the Add button at the bottom if you need additional boxes, adjust the size of the boxes if necessary, and copy and paste your new .box file text into a new file.
Box files must be saved in plain text, with the .box file extension. As with the image files, it’s handy to name the box files by the CAPTCHA solutions they represent (e.g., 4MmC3.box). Again, this makes it easy to double-check the contents of the .box file text against the name of the file, and then again against the image file it is paired with if you sort all the files in your data directory by their filenames.
Again, you’ll need to create about 100 of these files to ensure that you have enough data. Also, Tesseract does occasionally discard files as being unreadable, so you might want some buffer room on top of that. If you find that your OCR results aren’t quite as good as you’d like, or Tesseract is stumbling over certain characters, it’s a good debugging step to create additional training data and try again.
After creating a data folder full of .box files and image files, copy this data into a backup folder before doing any further manipulation on it. Although running training scripts over the data is unlikely to delete anything, it’s better safe than sorry when hours’ worth of work put into .box file creation is involved. Additionally, it’s good to be able to scrap a messy directory full of compiled data and try again.
There are half a dozen steps to performing all the data analysis and creating the training files required for Tesseract. There are tools that do this for you given corresponding source image and .box files, but none at the moment for Tesseract 3.02, unfortunately.
I’ve written a solution in Python that operates over a file containing both image and box files and creates all necessary training files automatically.
The initial settings and steps that this program takes can be seen in the __init__ and runAll methods of the class:
    def __init__(self):
        languageName = 'eng'
        fontName = 'captchaFont'
        directory = '<path to images>'

    def runAll(self):
        self.createFontFile()
        self.cleanImages()
        self.renameFiles()
        self.extractUnicode()
        self.runShapeClustering()
        self.runMfTraining()
        self.runCnTraining()
        self.createTessData()
The only three variables you’ll need to set here are fairly straightforward:
languageName- The three-letter language code that Tesseract uses to understand which language it’s looking at. In most cases, you’ll probably want to use
engfor English. fontName- The name for your chosen font. This can be anything, but must be a single word without spaces.
directory- The directory containing all your image and box files. I recommend you make this an absolute path, but if you use a relative path, it will need to be relative to where you are running the Python code from. If it is absolute, you can run the code from anywhere on your machine.
Let’s take a look at the individual functions used.
createFontFile creates a required file, font_properties, that lets Tesseract know about the new font you are creating:
captchaFont 0 0 0 0 0
This file consists of the name of the font, followed by 1s and 0s indicating whether italic, bold, or other versions of the font should be considered. (Training fonts with these properties is an interesting exercise, but unfortunately outside the scope of this book.)
cleanImages creates higher-contrast versions of all image files found, converts them to grayscale, and performs other operations that make the image files easier to read by OCR programs. If you are dealing with CAPTCHA images with visual garbage that might be easy to filter out in postprocessing, here would be the place to add that additional processing.
renameFiles renames all your .box files and their corresponding image files with the names required by Tesseract (the file numbers here are sequential digits to keep multiple files separate):
-
<languageName>.<fontName>.exp<fileNumber>.box
-
<languageName>.<fontName>.exp<fileNumber>.tiff
extractUnicode looks at all of the created .box files and determines the total set of characters available to be trained. The resulting Unicode file will tell you how many different characters you’ve found, and could be a good way to quickly see if you’re missing anything.
The next three functions, runShapeClustering, runMfTraining, and runCtTraining, create the files shapetable, pfftable, and normproto, respectively. These all provide information about the geometry and shape of each character, as well as provide statistical information that Tesseract uses to calculate the probability that a given character is one type or another.
Finally, Tesseract renames each of the compiled data folders to be prepended by the required language name (e.g., shapetable is renamed to eng.shapetable) and compiles all of those files into the final training data file eng.traineddata.
The only step you have to perform manually is move the created eng.traineddata file to your tessdata root folder by using the following commands on Linux and Mac:
$cp/path/to/data/eng.traineddata$TESSDATA_PREFIX/tessdata
Following these steps, you should have no problem solving CAPTCHAs of the type that Tesseract has now been trained for. Now when you ask Tesseract to read the example image, you get the correct response:
$tesseract captchaExample.png output|cat output.txt 4MmC3
Success! A significant improvement over the previous interpretation of the image as 4N\,,,C<3.
This is just a quick overview of the full power of Tesseract’s font training and recognition capabilities. If you are interested in extensively training Tesseract, perhaps starting your own library of CAPTCHA training files, or sharing new font recognition capabilities with the world, I recommend checking out the documentation.
Retrieving CAPTCHAs and Submitting Solutions
Many popular content management systems are frequently spammed with registrations by bots that are preprogrammed with the well-known location of these user registration pages. On http://pythonscraping.com, for instance, even a CAPTCHA (admittedly, weak) does little to put a damper on the influx of registrations.
So how do these bots do it? We’ve successfully solved CAPTCHAs in images sitting around on our hard drive, but how do we make a fully functioning bot? This section ties together many techniques covered in previous chapters. If you haven’t already, you should at least skim Chapter 10.
Most image-based CAPTCHAs have several properties:
-
They are dynamically generated images, created by a server-side program. They might have image sources that do not look like traditional images, such as
<img src="WebForm.aspx?id=8AP85CQKE9TJ">, but can be downloaded and manipulated like any other image. -
The solution to the image is stored in a server-side database.
-
Many CAPTCHAs time out if you take too long to solve them. This usually isn’t a problem for bots, but queuing CAPTCHA solutions for later use, or other practices that may delay the time between when the CAPTCHA was requested and when the solution is submitted, may not be successful.
The general approach to this is to download the CAPTCHA image file to your hard drive, clean it, use Tesseract to parse the image, and return the solution under the appropriate form parameter.
I’ve created a page at http://pythonscraping.com/humans-only with a CAPTCHA-protected comment form for the purpose of writing a bot to defeat. This bot uses the command line Tesseract library, rather than the pytesseract wrapper (although it could easily use either) and looks like the following:
fromurllib.requestimporturlretrievefromurllib.requestimporturlopenfrombs4importBeautifulSoupimportsubprocessimportrequestsfromPILimportImagefromPILimportImageOpsdefcleanImage(imagePath):image=Image.open(imagePath)image=image.point(lambdax:0ifx<143else255)borderImage=ImageOps.expand(image,border=20,fill='white')borderImage.save(imagePath)html=urlopen('http://www.pythonscraping.com/humans-only')bs=BeautifulSoup(html,'html.parser')#Gather prepopulated form valuesimageLocation=bs.find('img',{'title':'Image CAPTCHA'})['src']formBuildId=bs.find('input',{'name':'form_build_id'})['value']captchaSid=bs.find('input',{'name':'captcha_sid'})['value']captchaToken=bs.find('input',{'name':'captcha_token'})['value']captchaUrl='http://pythonscraping.com'+imageLocationurlretrieve(captchaUrl,'captcha.jpg')cleanImage('captcha.jpg')p=subprocess.Popen(['tesseract','captcha.jpg','captcha'],stdout=subprocess.PIPE,stderr=subprocess.PIPE)p.wait()f=open('captcha.txt','r')#Clean any whitespace characterscaptchaResponse=f.read().replace(' ','').replace('\n','')('Captcha solution attempt: '+captchaResponse)iflen(captchaResponse)==5:params={'captcha_token':captchaToken,'captcha_sid':captchaSid,'form_id':'comment_node_page_form','form_build_id':formBuildId,'captcha_response':captchaResponse,'name':'Ryan Mitchell','subject':'I come to seek the Grail','comment_body[und][0][value]':'...and I am definitely not a bot'}r=requests.post('http://www.pythonscraping.com/comment/reply/10',data=params)responseObj=BeautifulSoup(r.text,'html.parser')ifresponseObj.find('div',{'class':'messages'})isnotNone:(responseObj.find('div',{'class':'messages'}).get_text())else:('There was a problem reading the CAPTCHA correctly!')
Note that this script fails under two conditions: if Tesseract did not extract exactly five characters from the image (because you know that all valid solutions to this CAPTCHA must have five characters), or if it submits the form but the CAPTCHA was solved incorrectly. The first case happens approximately 50% of the time, at which point it does not bother submitting the form and fails with an error message. The second case happens approximately 20% of the time, for a total accuracy rate of about 30% (or about 80% accuracy for each character encountered, over five characters).
Although this may seem low, keep in mind that usually no limit is placed on the number of times users are allowed to make CAPTCHA attempts, and that most of these incorrect attempts can be aborted without needing to actually send the form. When a form is sent, the CAPTCHA is accurate most of the time. If that doesn’t convince you, also keep in mind that simple guessing would give you an accuracy rate of .0000001%. Running a program three or four times rather than guessing 900 million times is quite the time-saver!
1 When it comes to processing text it hasn’t been trained on, Tesseract fares much better with large-format editions of books, especially if the images are small. The next section covers how to train Tesseract on different fonts, which can help it read much smaller font sizes, including previews for non-large-print book editions!
2 See https://gizmodo.com/google-has-finally-killed-the-captcha-1793190374.