Table of Contents for
Learning PHP, MySQL & JavaScript, 5th Edition
 Learning PHP, MySQL & JavaScript, 5th Edition
Published by
O'Reilly Media, Inc., 2018
Learning PHP, MySQL & JavaScript, 5th Edition
Published by
O'Reilly Media, Inc., 2018
- Cover
- nav
- Learning PHP, MySQL & JavaScript
- Learning PHP, MySQL & JavaScript
- Dedication
- Preface
- 1. Introduction to Dynamic Web Content
- 2. Setting Up a Development Server
- 3. Introduction to PHP
- 4. Expressions and Control Flow in PHP
- 5. PHP Functions and Objects
- 6. PHP Arrays
- 7. Practical PHP
- 8. Introduction to MySQL
- 9. Mastering MySQL
- 10. Accessing MySQL Using PHP
- 11. Form Handling
- 12. Cookies, Sessions, and Authentication
- 13. Exploring JavaScript
- 14. Expressions and Control Flow in JavaScript
- 15. JavaScript Functions, Objects, and Arrays
- 16. JavaScript and PHP Validation and Error Handling
- 17. Using Asynchronous Communication
- 18. Introduction to CSS
- 19. Advanced CSS with CSS3
- 20. Accessing CSS from JavaScript
- 21. Introduction to jQuery
- 22. Introduction to jQuery Mobile
- 23. Introduction to HTML5
- 24. The HTML5 Canvas
- 25. HTML5 Audio and Video
- 26. Other HTML5 Features
- 27. Bringing It All Together
- A. Solutions to the Chapter Questions
- B. Online Resources
- C. MySQL’s FULLTEXT Stopwords
- D. MySQL Functions
- E. jQuery Selectors, Objects, and Methods
- Index
- About the Author
- Colophon
Chapter 26. Other HTML5 Features
In this final chapter on HTML5, I explain how to use geolocation and local storage, and demonstrate the use of in-browser dragging and dropping.
Strictly speaking, most of these features (like much of HTML5) aren’t really extensions to HTML, because you access them with JavaScript rather than with HTML markup. They are simply technologies that are being embraced by browser developers, and have been given the handy umbrella name of HTML5.
This means, though, that you need to have fully understood the JavaScript tutorial in this book in order to use them properly. That said, once you get the hang of them, you’ll wonder how you ever did without these powerful new features.
Geolocation and the GPS Service
The Global Positioning System (GPS) service consists of multiple satellites orbiting the Earth whose positions are very precisely known. When a GPS-enabled device tunes into them, the different times at which signals from these various satellites arrive enable the device to quite accurately determine where it is; because the speed of light (and therefore radio waves) is a known constant, the time it takes a signal to get from a satellite to a GPS device indicates the satellite’s distance.
By noting the different times at which signals arrive from different satellites, which are in precisely known orbital locations at any one time, a simple triangulation calculation gives the device its position relative to the satellites within a few meters or less.
Many mobile devices, such as phones and tablets, have GPS chips and can provide this information. But some don’t, others have them turned off, and others may be used indoors where they are shielded from the GPS satellites and therefore cannot receive any signals. In these cases, additional techniques may be used to attempt to determine the device’s location.
Warning
I should also caution you to consider the privacy implications of geolocation, especially if the coordinates are transmitted back to the server as part of an application’s function. Any application that has geolocation functionality should have an explicit privacy policy. Oh, and by the way, technically geolocation is not actually in the HTML5 standard. In fact it’s a standalone feature defined by the W3C/WHATWG, but most people think of it as part of HTML5.
Other Location Methods
If your device has mobile phone hardware but no GPS chip, it may attempt to triangulate its location by checking the timing of signals received from the various communication towers with which it can communicate (and whose positions are very precisely known). If there are a few towers, this can get almost as close to your location as GPS. But where there’s only a single tower, the signal strength can be used to determine a rough radius around the tower, and the circle it creates represents the area in which you are likely to be located. This could place you anywhere within a mile or two of your actual location, down to within a few tens of meters.
Failing that, there may be WiFi access points whose positions are known within range of your device, and since all access points have a unique identifying address called a Media Access Control (MAC) address, a reasonably good approximation of your location can be obtained, perhaps to within a street or two. This is the type of information that Google Street View vehicles have been collecting (some of which it has since been made to discard due to potential breaches of data privacy rights).
And if that fails, the Internet Protocol (IP) address used by your device can be queried and used as a rough indicator of your location. Often, though, this provides only the location of a major switch belonging to your internet provider, which could be dozens or even hundreds of miles away. But at the very least, your IP address can (usually) narrow down the country and sometimes the region you are in.
Note
IP addresses are commonly used by media companies for restricting playback of their content by territory. However, it’s a simple matter to set up proxy servers that use a forwarding IP address (in the territory that is blocking outside access) to fetch and pass content through the blockade directly to a “foreign” browser. Proxy servers are also often employed to disguise a user’s real IP address or bypass censorship restrictions, and can be shared across many users on a WiFi hotspot (for example). Therefore, if you locate someone by IP address, you can’t be completely sure that you have identified the right location, or even country, and should treat this information as only a best guess.
Geolocation and HTML5
In Chapter 23, I briefly introduced HTML5 geolocation. Now it’s time to look at it in depth, starting with the example I gave you before, shown again in Example 26-1.
Example 26-1. Displaying a map of your current location
<!DOCTYPE html>
<html>
  <head>
    <title>Geolocation Example</title>
  </head>
  <body>
    <script>
      if (typeof navigator.geolocation == 'undefined')
         alert("Geolocation not supported.")
      else
        navigator.geolocation.getCurrentPosition(granted, denied)

      function granted(position)
      {
        var lat = position.coords.latitude
        var lon = position.coords.longitude

        alert("Permission Granted. You are at location:\n\n"
          + lat + ", " + lon +
          "\n\nClick 'OK' to load Google Maps with your location")

        window.location.replace("https://www.google.com/maps/@"
          + lat + "," + lon + ",8z")
      }

      function denied(error)
      {
        var message

        switch(error.code)
        {
          case 1: message = 'Permission Denied'; break;
          case 2: message = 'Position Unavailable'; break;
          case 3: message = 'Operation Timed Out'; break;
          case 4: message = 'Unknown Error'; break;
        }

        alert("Geolocation Error: " + message)
      }
    </script>
  </body>
</html>
Let’s walk through this code and see how it works, starting with the <head> section, which displays a title. The <body> of the document is made up entirely of JavaScript, which immediately starts by interrogating the navigator.geolocation property. If the value returned is undefined, then geolocation is not supported by the browser and an error alert window is popped up.
Otherwise, we call the getCurrentPosition method of the property, passing it the names of two functions: granted and denied (remember that by passing only the function names, we pass the actual function code, not the result of calling the function, which would be the case if the function names had parentheses attached):
navigator.geolocation.getCurrentPosition(granted, denied)
These functions appear later in the script and are for handling the two possibilities of permission to provide the user’s location data: granted or denied.
The granted function comes first and is entered only if the data can be accessed. If so, the variables lat and long are given the values returned by the geolocation routines in the browser.
An alert window is then popped up containing details about the user’s current location. When they click OK, the alert is closed and the current web page is replaced by one at Google Maps. It’s passed the latitude and longitude returned from the geolocation call, using a zoom setting of 8. You can set a different zoom level by changing the value 8z to another numeric value followed by a z, at the end of the window.location.replace call.
Displaying the map is achieved with a call to window.location.replace. The result looks like Figure 26-1.
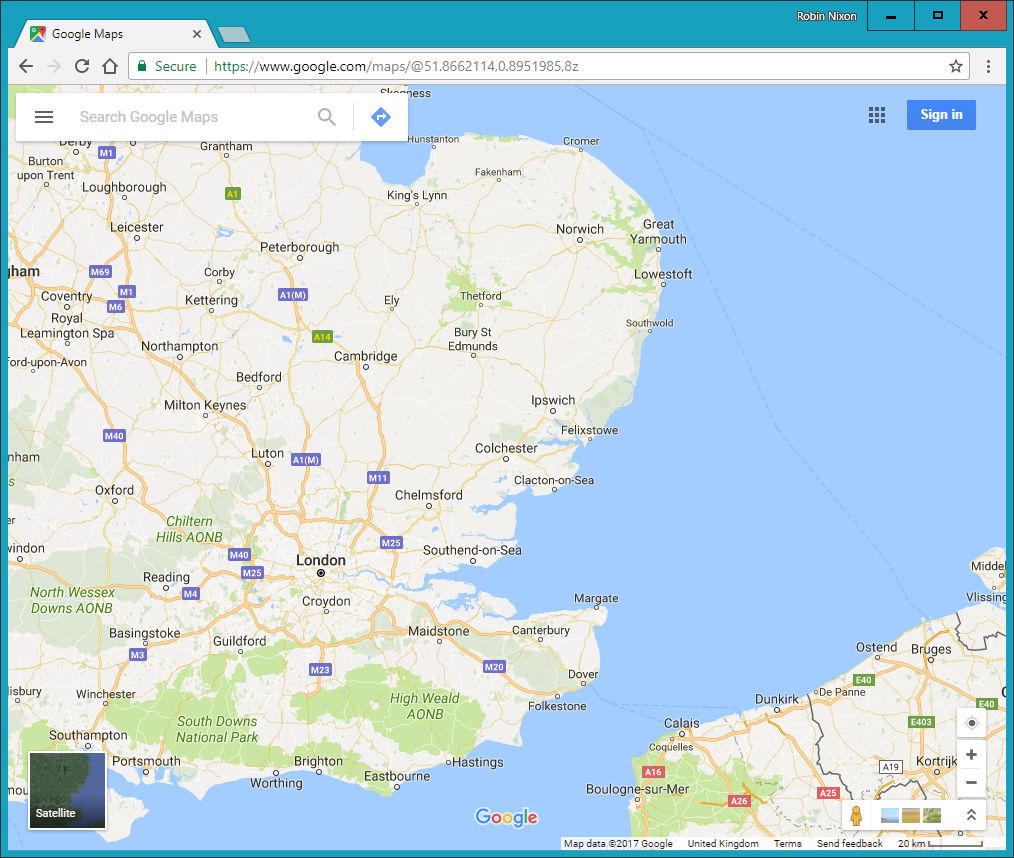
Figure 26-1. An interactive map of the user’s location is displayed
If permission is denied (or there is another issue), an error message is displayed by the denied function, which pops up its own alert window to inform the user of the error:
switch(error.code)
{
  case 1: message = 'Permission Denied'; break;
  case 2: message = 'Position Unavailable'; break;
  case 3: message = 'Operation Timed Out'; break;
  case 4: message = 'Unknown Error'; break;
}

alert("Geolocation Error: " + message)
Note
When a browser requests geolocation data from the host, it will prompt the user for permission. The user can grant or deny permission. Denial results in the Permission Denied state, Position Unavailable results when the user grants permission but the host system cannot determine their location, and Timeout happens when the user grants permission and the host attempts to get their location, but the request times out.
There’s also another error condition in which some platform and browser combinations allow the user to dismiss the permission request dialog without either granting or denying permission. This results in the application “hanging” while waiting for a callback to occur.
In previous editions of this book I used to call the Google Maps API to embed a map directly within the web page, but the service now requires a unique API key which you must apply for yourself, and usage over a certain amount can incur a fee. This is why the example now simply generates a Google Maps link. If you’d like to embed Google Maps in your web pages and web apps, everything you need to know is on the website. Of course, there are also many other mapping options, such as Bing Maps and OpenStreetMap, that have APIs you can access.
Local Storage
Cookies are an essential part of the modern internet, because they enable websites to save on each user’s machine small snippets of information that can be used for tracking purposes. This isn’t as ominous as it sounds, because most of the tracking going on helps web surfers by saving usernames and passwords, keeping them logged into websites and social networks such as Twitter, Facebook, and more.
Cookies can also locally save your preferences for the way you access a website (rather than having those settings stored on the website’s server), or can be used to keep track of a shopping cart as you build up an order on an ecommerce website.
But yes, they can also be used more aggressively to track the websites you frequent and gain a picture of your interests to try to target advertising more effectively. That’s why the European Union now “requires prior informed consent for storage or for access to information stored on a user’s terminal equipment.”
But, as a web developer, think how useful it might be to keep data on users’ devices, especially if you have a small budget for computer servers and disk space. For example, you could create in-browser web apps and services for editing word processing documents, spreadsheets, and graphic images, saving all this data offsite on users’ computers and keeping your server purchasing budget as low as possible.
And from the user’s point of view, think about how much faster a document can be loaded up locally than from across the web, especially on a slow connection. Plus, there’s more security if you know that a website is not storing copies of your documents. Of course, you can never guarantee that a website or web app is totally secure, and should never work on highly sensitive documents using software (or hardware) that can go online. But for minimally private documents such as family photographs, you might feel more comfortable using a web app that saves locally than one that saves files to an external server.
Using Local Storage
The biggest problem with using cookies for local storage is that each cookie can save only a maximum of 4 KB of data. Cookies also have to be passed back and forth on every page reload. And, unless your server uses Transport Layer Security (TLS) encryption—the more secure successor to the Secure Sockets Layer (SSL)—each time a cookie is transmitted, it travels in the clear.
But with HTML5, you have access to a much larger local storage space (typically between 5 MB and 10 MB per domain, depending on the browser) that persists over page loads and between website visits (and even after powering a computer down and back up again). Also, the local storage data is not sent to the server on each page load.
Local storage data is handled through key/value pairs. The key is the name assigned for referencing the data, and the value can hold any type of data, but it is saved as a string. All data is unique to the current domain, and for security reasons any local storage created by websites with different domains is separate from the current local storage, and is not accessible by any domain other than the one that stored the data.
The localStorage Object
You gain access to local storage by means of the localStorage object. To test whether this object is available, query its type to check whether or not it has been defined, like this:
if (typeof localStorage == 'undefined')
{
  // Local storage is not available—tell the user and quit.
  // Or maybe offer to save data on the web server instead?
}
How you handle the lack of local storage being available will depend on what you intend to use it for, so the code you place inside the if statement will be up to you.
Once you’ve ascertained that local storage is available, you can start making use of it with the setItem and getItem methods of the localStorage object, like this:
localStorage.setItem('loc', 'USA')
localStorage.setItem('lan', 'English')
To later retrieve this data, pass the keys to the getItem method, like this:
loc = localStorage.getItem('loc')
lan = localStorage.getItem('lan')
Unlike saving and reading cookies, you can call these methods at any time you like, not simply before any headers have been sent by the web server. The saved values will remain in local storage until erased in the following manner:
localStorage.removeItem('loc')
localStorage.removeItem('lan')
Or, you can totally wipe the local storage for the current domain by calling the clear method, like this:
localStorage.clear()
Example 26-2 combines the preceding examples into a single document that displays the current values of the two keys in a pop-up alert message, which initially will be null. Then the keys and values are saved to local storage, retrieved, and redisplayed, this time having assigned values. Finally, the keys are removed and then an attempt at retrieving these values is again made, but the returned values are once again null. Figure 26-2 shows the second of these three alert messages.
Example 26-2. Getting, setting, and removing local storage data
<!DOCTYPE html>
<html>
  <head>
    <title>Local Storage</title>
  </head>
  <body>
    <script>
      if (typeof localStorage == 'undefined')
      {
        alert("Local storage is not available")
      }
      else
      {
        loc = localStorage.getItem('loc')
        lan = localStorage.getItem('lan')
        alert("The current values of 'loc' and 'lan' are\n\n" +
          loc + " / " + lan + "\n\nClick OK to assign values")

        localStorage.setItem('loc', 'USA')
        localStorage.setItem('lan', 'English')
        loc = localStorage.getItem('loc')
        lan = localStorage.getItem('lan')
        alert("The current values of 'loc' and 'lan' are\n\n" +
          loc + " / " + lan +  "\n\nClick OK to clear values")

        localStorage.removeItem('loc')
        localStorage.removeItem('lan')
        loc = localStorage.getItem('loc')
        lan = localStorage.getItem('lan')
        alert("The current values of 'loc' and 'lan' are\n\n" +
          loc + " / " + lan)
      }
    </script>
  </body>
</html>
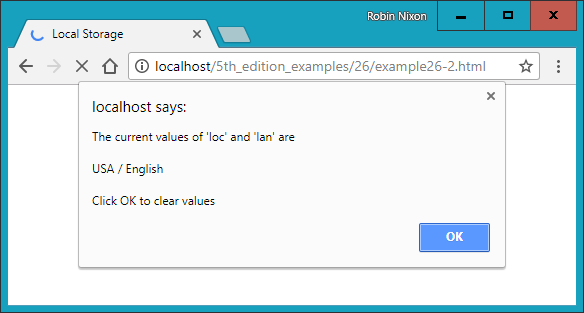
Figure 26-2. Two keys and their values are read from local storage
Web Workers
Web workers run background jobs and are useful for calculations that take a long time and should not be allowed to hold the user back from doing other things. To use a web worker, you can create sections of JavaScript code that will run in the background. This code doesn’t have to set up and monitor interrupts, as jobs have to do in some asynchronous systems. Instead, whenever it has something to report, your background process communicates with the main JavaScript through the use of an event.
This means the JavaScript interpreter gets to decide how to allocate time slices most efficiently, and your code only needs to worry about communicating with the background task whenever there’s information to convey.
Example 26-3 shows how you can set up web workers to perform a repetitive task in the background—in this instance, calculating prime numbers.
Example 26-3. Setting up and communicating with a web worker
<!DOCTYPE html>
<html>
  <head>
    <title>Web Workers</title>
    <script src='OSC.js'></script>
  </head>
  <body>
    Current highest prime number:
    <span id='result'>0</span>

    <script>
      if (!!window.Worker)
      {
        var worker = new Worker('worker.js')

        worker.onmessage = function (event)
        {
          O('result').innerText = event.data;
        }
      }
      else
      {
        alert("Web workers not supported")
      }
    </script>
  </body>
</html>
This example first creates a <span> element with the ID of result in which output from the web worker will be placed. Then, in the <script> section, window.Worker is tested via a !! pair of not operators. This has the effect of returning a Boolean value of true if the Worker method exists, and false otherwise. If it is not true, a message is displayed in the else section, alerting us that web workers are not available.
Otherwise, the program creates a new worker object by calling Worker, passing it the filename worker.js. Then the onmessage event of the new worker object is attached to an anonymous function that places any message passed to it by worker.js into the innerText property of the previously created <span> element.
The web worker itself is saved in the file worker.js, whose contents are shown in Example 26-4.
Example 26-4. The worker.js web worker
var n = 1

search: while (true)
{
  n += 1

  for (var i = 2; i <= Math.sqrt(n); i += 1)
  {
    if (n % i == 0) continue search
  }

  postMessage(n)
}
This file assigns the value 1 to the variable n. It then loops continuously, incrementing n and checking it for primality by a brute-force method of testing all values from 1 to the square root of n to see whether they divide exactly into n, with no remainder. Should a factor be found, the continue command stops the brute-force attack immediately because the number is not prime, and starts processing at the next higher value of n.
But if all possible factors are tested and none result in a zero remainder, n must be prime, so its value is passed to postMessage, which sends a message back to the onmessage event of the object that set up this web worker.
The result looks like the following:
Current highest prime number: 30477191
To stop a web worker from running, issue a call to the terminate method of the worker object, like this:
worker.terminate()
Note
If you wish to stop this particular example from running, you can enter the following into your browser’s address bar:
javascript:worker.terminate()
Also note that due to the way Chrome handles security, you cannot use web workers on a filesystem, only from a web server (or running the files from localhost on a development server such as AMPPS, detailed in Chapter 2).
Web workers do have some security limitations that you should be aware of:
-
Web workers run in their own independent JavaScript context, and have no direct access to anything in any other execution context, including the main JavaScript thread or other web workers.
-
Communication between web worker contexts is done via web messaging (
postMessage). -
Because web workers have no access to the main JavaScript context, they cannot modify the DOM. The only DOM methods available to web workers are
atob,btoa,clearInterval,clearTimeout,dump,setInterval, andsetTimeout. -
Web workers are bound by the same-origin policy, so you can’t load a web worker from a different origin than the original script without going through a cross-site methodology.
Drag and Drop
You can easily support dragging and dropping of objects on a web page by setting up event handlers for the ondragstart, ondragover, and ondrop events, as in Example 26-5.
Example 26-5. Dragging and dropping objects
<!DOCTYPE HTML>
<html>
  <head>
    <title>Drag and Drop</title>
    <script src='OSC.js'></script>
    <style>
      #dest {
        background:lightblue;
        border    :1px solid #444;
        width     :320px;
        height    :100px;
        padding   :10px;
      }
    </style>
  </head>
  <body>
    <div id='dest' ondrop='drop(event)' ondragover='allow(event)'></div><br>
    Drag the image below into the above element<br><br>

    <img id='source1' src='image1.png' draggable='true' ondragstart='drag(event)'>
    <img id='source2' src='image2.png' draggable='true' ondragstart='drag(event)'>
    <img id='source3' src='image3.png' draggable='true' ondragstart='drag(event)'>

    <script>
      function allow(event)
      {
        event.preventDefault()
      }

      function drag(event)
      {
        event.dataTransfer.setData('image/png', event.target.id)
      }

      function drop(event)
      {
        event.preventDefault()
        var data=event.dataTransfer.getData('image/png')
        event.target.appendChild(O(data))
      }
    </script>
  </body>
</html>
After setting up the HTML, providing a title, and loading in the OSC.js file, this document styles the <div> element with the ID of dest, giving it a background color, border, set dimensions, and padding.
Then, the <body> section creates the <div> element and attaches the event handler functions drop and allow to the ondrop and ondragover events of the <div>. After this there’s some text, and then three images with their draggable properties set to true. The drag function is attached to the ondragstart event of each.
In the <script> section, the allow event handler function simply prevents the default action for dragging (which is to disallow it), while the drag event handler function calls the setData method of the dataTransfer object of the event, passing it the MIME type image/png and the target.id of the event (which is the object being dragged). The dataTransfer object holds the data that is being dragged during a drag-and-drop operation.
Finally, the drop event handler function also intercepts its default action so that dropping is allowed, and then it fetches the contents of the object being dragged from the dataTransfer object, passing it the MIME type of the object. Then the dropped data is appended to the target (which is the dest <div>) via its appendChild method.
If you try this example for yourself, you’ll be able to drag and drop the images into the <div> element, where they will stay, as shown in Figure 26-3. The images cannot be dropped elsewhere, only into elements with drop and allow event handlers attached.
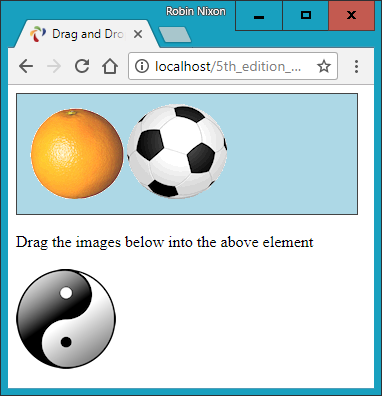
Figure 26-3. Two images have been dragged and dropped
Other events you can attach to include ondragenter (to run when a drag operation enters an element), ondragleave (to run when one leaves an element), and ondragend (to run when a dragging operation ends), which you can use, for example, to modify the cursor during these operations.
Cross-Document Messaging
You’ve already seen messaging in use a little earlier, in the web worker section. I didn’t go into any details, however, as it wasn’t the core topic being discussed, and the message was being posted only to the same document anyway. But for obvious security reasons, cross-document messaging does need to be applied with caution, so you need to fully understand its workings if you plan to use it.
Before HTML5, browser developers disallowed cross-document scripting, but in addition to blocking potential attack sites, this prevented communication between legitimate pages. Document interaction of any kind generally had to occur through Ajax and a third-party web server, which was cumbersome and fiddly to build and maintain.
But web messaging now allows scripts to interact across these boundaries by using some sensible security restraints to prevent malicious hacking attempts. It is achieved through use of the postMessage method, allowing plain-text messages to be sent from one domain to another, always within a single browser.
This requires that JavaScript first obtain the window object of the receiving document, letting messages post to a variety of other windows, frames, or iframes directly related to the sender’s document. The received message event has the following attributes:
data- The incoming message
origin- The origin of the sender document, including the scheme, hostname, and port
source- The source window of the sender document
The code to send messages is just a single instruction, in which you pass the message to be sent and the domain to which it applies, as in Example 26-6.
Example 26-6. Sending web messages to an iframe
<!DOCTYPE HTML>
<html>
  <head>
    <title>Web Messaging (a)</title>
    <script src='OSC.js'></script>
  </head>
  <body>
    <iframe id='frame' src='example26-11.html' width='360' height='75'></iframe>

    <script>
      count = 1

      setInterval(function()
      {
        O('frame').contentWindow.postMessage('Message ' + count++, '*')
      }, 1000)
    </script>
  </body>
</html>
Here the usual use is made of the OSC.js file to pull in the O function, and then an <iframe> element with the ID of frame is created, which loads in Example 26-7. Then, within the <script> section, the variable count is initialized to 1 and a repeating interval is set up to occur every second to post the string 'Message ' (using the postMessage method) along with the current value of count, which is then incremented. The postMessage call is attached to the contentWindow property of the iframe object, not the iframe object itself. This is important because web messaging requires posts to be made to a window, not to an object within a window.
Example 26-7. Receiving messages from another document
<!DOCTYPE HTML>
<html>
  <head>
    <title>Web Messaging (b)</title>
    <style>
      #output {
        font-family:"Courier New";
        white-space:pre;
      }
    </style>
    <script src='OSC.js'></script>
  </head>
  <body>
    <div id='output'>Received messages will display here</div>

    <script>
      window.onmessage = function(event)
      {
        O('output').innerHTML =
          '<b>Origin:</b> ' + event.origin + '<br>' +
          '<b>Source:</b> ' + event.source + '<br>' +
          '<b>Data:</b>   ' + event.data
      }
    </script>
  </body>
</html>
This example sets up a little styling to make the output clearer, and then creates a <div> element with the ID output, in which the contents of received messages will be placed. The <script> section contains a single anonymous function attached to the onmessage event of the window. In this function, the event.origin, event.source, and event.data property values are then displayed, as shown in Figure 26-4.
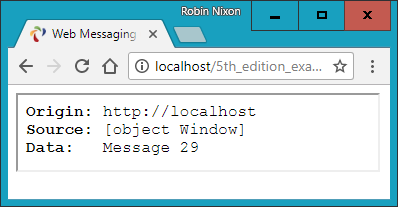
Figure 26-4. The iframe has so far received 29 messages
Web messaging works only across domains, so you cannot test it by loading files in from a filesystem; you must use a web server. As you can see from Figure 26-4, the origin is http://localhost because these examples are running on a local development server. The source is the window object, and the current message value is Message 29.
At the moment, Example 26-6 is not at all secure because the domain value passed to postMessage is the wildcard *:
O('frame').contentWindow.postMessage('Message ' + count++, '*')
To direct messages only to documents originating from a particular domain, you can change this parameter. In the current case, a value of http://localhost would ensure that only documents loaded from the local server will be sent any messages:
O('frame').contentWindow.postMessage('Message ' + count++, 'http://localhost')
Likewise, as it stands, the listener program displays any and all messages it receives. This is also not a very secure state of affairs, because malicious documents also present in the browser can attempt to send messages that unwary listener code in other documents might otherwise access. Therefore, you can restrict the messages your listeners react to by using an if statement, like this:
window.onmessage = function(event)
{
  if (event.origin) == 'http://localhost')
  {
    O('output').innerHTML =
      '<b>Origin:</b> ' + event.origin + '<br>' +
      '<b>Source:</b> ' + event.source + '<br>' +
      '<b>Data:</b>   ' + event.data
  }
}
Warning
If you always use the proper domain for the site you are working with, your web messaging communications will be more secure. However, be aware that since messages are sent in the clear, there may be insecurities in some browsers or browser plug-ins that might make this kind of communication insecure. One way to boost your security, then, is to use an obfuscation or encryption scheme for all your web messages, and also consider introducing two-way communication protocols to verify each message as being authentic.
Normally, you won’t alert the user to the origin or source values, and will simply make use of them for security checking. These examples, however, display those values to help you experiment with web messaging and see what is going on. Instead of using iframes, documents in pop-up windows and other tabs may also talk to each other using this method.
Microdata Is No More
In previous editions of this book I showed you how to use an interesting new HTML5 feature called Microdata, a subset of HTML designed to provide metadata to a document in order to make the different data elements within it have extra meaning to software and search engines such as Google.
However, time passes, and rather than more and more browsers adopting it, both Google and Apple have withdrawn support for this functionality and it has since been dropped from the main HTML5 specification at the W3C.
Therefore, I no longer recommend you mark up any code with Microdata, as it looks pretty much extinct, or very near to it, and even if the Google and Bing web spiders still use any of this information, they probably won’t for much longer.
Other HTML5 Tags
A number of other new HTML5 tags are being adopted by the major browsers, including <article>, <aside>, <details>, <figcaption>, <figure>, <footer>, <header>, <hgroup>, <mark>, <menuitem>, <meter>, <nav>, <output>, <progress>, <rp>, <rt>, <ruby>, <section>, <summary>, <time>, and <wbr>. You can get more information on these and all other HTML5 tags from the W3C’s HTML language reference (check out the elements sporting a NEW icon).
This concludes your introduction to HTML5. You now have a number of powerful new features with which to make even more dynamic and compelling websites. In the final chapter, I’ll show you how you can bring all the different technologies in this book together to create a mini–social networking site.
Questions
-
What method do you call to request geolocation data from a web browser?
-
How can you determine whether a browser supports local storage?
-
What method can you call to erase all local storage data for the current domain?
-
What is the best way for web workers to communicate with a main program?
-
How can you stop a web worker from running?
-
To support drag-and-drop operations, how can you prevent the default action of disallowing dragging and dropping for these events?
-
How can you make cross-document messaging more secure?
See “Chapter 26 Answers” in Appendix A for the answers to these questions.