Table of Contents for
Learning PHP, MySQL & JavaScript, 5th Edition
 Learning PHP, MySQL & JavaScript, 5th Edition
Published by
O'Reilly Media, Inc., 2018
Learning PHP, MySQL & JavaScript, 5th Edition
Published by
O'Reilly Media, Inc., 2018
- Cover
- nav
- Learning PHP, MySQL & JavaScript
- Learning PHP, MySQL & JavaScript
- Dedication
- Preface
- 1. Introduction to Dynamic Web Content
- 2. Setting Up a Development Server
- 3. Introduction to PHP
- 4. Expressions and Control Flow in PHP
- 5. PHP Functions and Objects
- 6. PHP Arrays
- 7. Practical PHP
- 8. Introduction to MySQL
- 9. Mastering MySQL
- 10. Accessing MySQL Using PHP
- 11. Form Handling
- 12. Cookies, Sessions, and Authentication
- 13. Exploring JavaScript
- 14. Expressions and Control Flow in JavaScript
- 15. JavaScript Functions, Objects, and Arrays
- 16. JavaScript and PHP Validation and Error Handling
- 17. Using Asynchronous Communication
- 18. Introduction to CSS
- 19. Advanced CSS with CSS3
- 20. Accessing CSS from JavaScript
- 21. Introduction to jQuery
- 22. Introduction to jQuery Mobile
- 23. Introduction to HTML5
- 24. The HTML5 Canvas
- 25. HTML5 Audio and Video
- 26. Other HTML5 Features
- 27. Bringing It All Together
- A. Solutions to the Chapter Questions
- B. Online Resources
- C. MySQL’s FULLTEXT Stopwords
- D. MySQL Functions
- E. jQuery Selectors, Objects, and Methods
- Index
- About the Author
- Colophon
Chapter 12. Cookies, Sessions, and Authentication
As your web projects grow larger and more complicated, you will find an increasing need to keep track of your users. Even if you aren’t offering logins and passwords, you will still often need to store details about a user’s current session and possibly also recognize them when they return to your site.
Several technologies support this kind of interaction, ranging from simple browser cookies to session handling and HTTP authentication. Between them, they offer the opportunity for you to configure your site to your users’ preferences and ensure a smooth and enjoyable transition through it.
Using Cookies in PHP
A cookie is an item of data that a web server saves to your computer’s hard disk via a web browser. It can contain almost any alphanumeric information (as long as it’s under 4 KB) and can be retrieved from your computer and returned to the server. Common uses include session tracking, maintaining data across multiple visits, holding shopping cart contents, storing login details, and more.
Because of their privacy implications, cookies can be read only from the issuing domain. In other words, if a cookie is issued by, for example, oreilly.com, it can be retrieved only by a web server using that domain. This prevents other websites from gaining access to details for which they are not authorized.
Because of the way the internet works, multiple elements on a web page can be embedded from multiple domains, each of which can issue its own cookies. When this happens, they are referred to as third-party cookies. Most commonly, these are created by advertising companies in order to track users across multiple websites.
Because of this, most browsers allow users to turn cookies off either for the current server’s domain, third-party servers, or both. Fortunately, most people who disable cookies do so only for third-party websites.
Cookies are exchanged during the transfer of headers, before the actual HTML of a web page is sent, and it is impossible to send a cookie once any HTML has been transferred. Therefore, careful planning of cookie usage is important. Figure 12-1 illustrates a typical request and response dialog between a web browser and web server passing cookies.
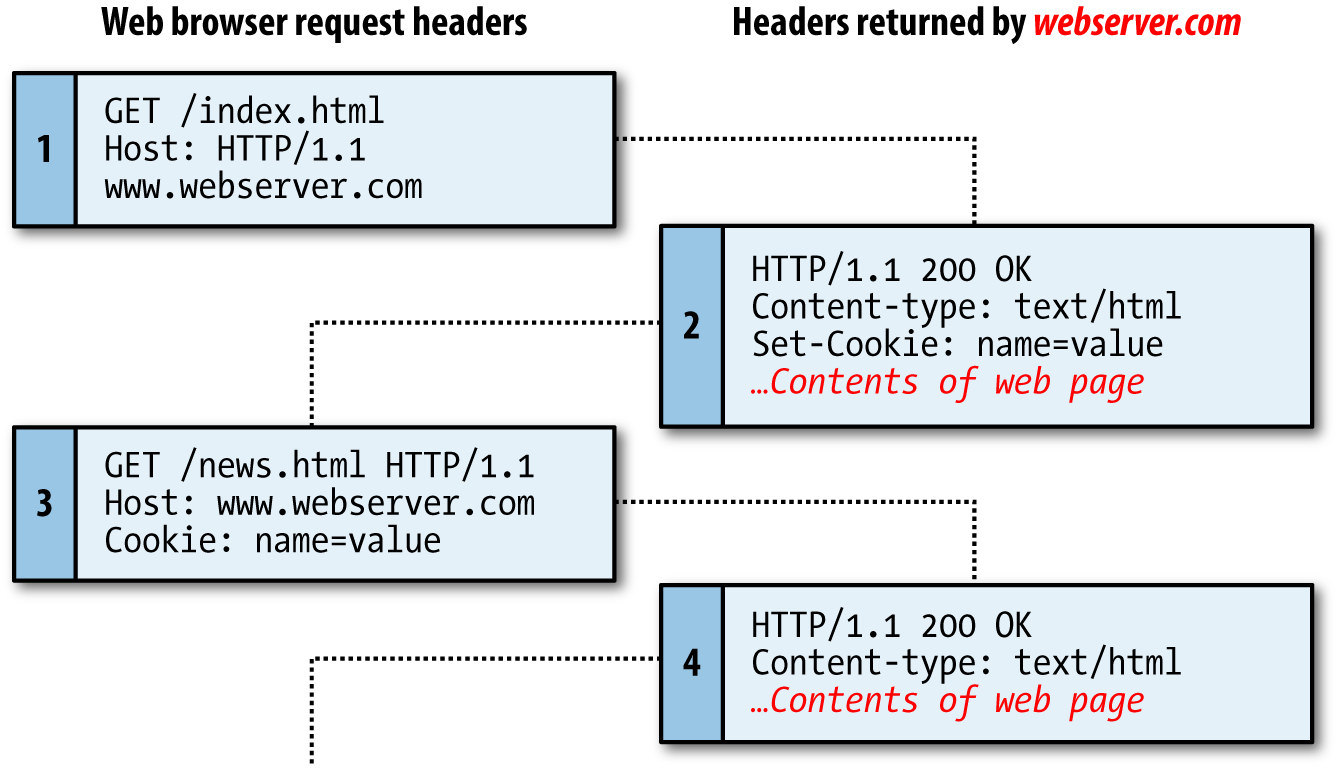
Figure 12-1. A browser/server request/response dialog with cookies
This exchange shows a browser receiving two pages:
-
The browser issues a request to retrieve the main page, index.html, at the website http://www.webserver.com. The first header specifies the file, and the second header specifies the server.
-
When the web server at webserver.com receives this pair of headers, it returns some of its own. The second header defines the type of content to be sent (
text/html), and the third one sends a cookie of the namenameand with the valuevalue. Only then are the contents of the web page transferred. -
Once the browser has received the cookie, it will then return it with every future request made to the issuing server until the cookie expires or is deleted. So, when the browser requests the new page /news.html, it also returns the cookie
namewith the valuevalue. -
Because the cookie has already been set, when the server receives the request to send /news.html, it does not have to resend the cookie, but just returns the requested page.
Note
It is easy to edit cookies directly from within the browser by using built-in developer tools, or extensions. Therefore, because users can change cookie values, you should not put key information such as usernames in a cookie, or you face the possibility of having your website manipulated in ways you are not expecting. Cookies are best used for storing data such as language or currency settings.
Setting a Cookie
Setting a cookie in PHP is a simple matter. As long as no HTML has yet been transferred, you can call the setcookie function, which has the following syntax (see Table 12-1):
setcookie(name, value, expire, path, domain, secure, httponly);
| Parameter | Description | Example |
|---|---|---|
name |
The name of the cookie. This is the name that your server will use to access the cookie on subsequent browser requests. | location |
value |
The value of the cookie, or the cookie’s contents. This can contain up to 4 KB of alphanumeric text. | USA |
expire |
(Optional.) The Unix timestamp of the expiration date. Generally, you will probably use time() plus a number of seconds. If not set, the cookie expires when the browser closes. |
time() + 2592000 |
path |
(Optional.) The path of the cookie on the server. If this is a / (forward slash), the cookie is available over the entire domain, such as www.webserver.com. If it is a subdirectory, the cookie is available only within that subdirectory. The default is the current directory that the cookie is being set in, and this is the setting you will normally use. |
/ |
domain |
(Optional.) The internet domain of the cookie. If this is webserver.com, the cookie is available to all of webserver.com and its subdomains, such as www.webserver.com and images.webserver.com. If it is images.webserver.com, the cookie is available only to images.webserver.com and its subdomains, such as sub.images.webserver.com, but not, say, to www.webserver.com. | webserver.com |
secure |
(Optional.) Whether the cookie must use a secure connection (https://). If this value is TRUE, the cookie can be transferred only across a secure connection. The default is FALSE. |
FALSE |
httponly |
(Optional; implemented since PHP version 5.2.0.) Whether the cookie must use the HTTP protocol. If this value is TRUE, scripting languages such as JavaScript cannot access the cookie. (Not supported in all browsers.) The default is FALSE. |
FALSE |
So, to create a cookie with the name location and the value USA that is accessible across the entire web server on the current domain, and will be removed from the browser’s cache in seven days, use the following:
setcookie('location', 'USA', time() + 60 * 60 * 24 * 7, '/');
Accessing a Cookie
Reading the value of a cookie is as simple as accessing the $_COOKIE system array. For example, if you wish to see whether the current browser has the cookie called location already stored and, if so, to read its value, use the following:
if (isset($_COOKIE['location'])) $location = $_COOKIE['location'];
Note that you can read a cookie back only after it has been sent to a web browser. This means that when you issue a cookie, you cannot read it in again until the browser reloads the page (or another with access to the cookie) from your website and passes the cookie back to the server in the process.
Destroying a Cookie
To delete a cookie, you must issue it again and set a date in the past. It is important for all parameters in your new setcookie call except the timestamp to be identical to the parameters when the cookie was first issued; otherwise, the deletion will fail. Therefore, to delete the cookie created earlier, you would use the following:
setcookie('location', 'USA', time() - 2592000, '/');
As long as the time given is in the past, the cookie should be deleted. However, I have used a time of 2,592,000 seconds (one month) in the past in case the client computer’s date and time are not correctly set. You may also provide an empty string for the cookie value (or a value of FALSE), and PHP will automatically set its time in the past for you.
HTTP Authentication
HTTP authentication uses the web server to manage users and passwords for the application. It’s adequate for simple applications that ask users to log in, although most applications will have specialized needs or more stringent security requirements that call for other techniques.
To use HTTP authentication, PHP sends a header request asking to start an authentication dialog with the browser. The server must have this feature turned on in order for it to work, but because it’s so common, your server is likely to offer the feature.
Note
Although it is usually installed with Apache, the HTTP authentication module may not necessarily be installed on the server you use. So, attempting to run these examples may generate an error telling you that the feature is not enabled, in which case you must either install the module and change the configuration file to load it, or ask your system administrator to do these fixes.
After entering your URL into the browser or visiting the page via a link, the user will see an “Authentication Required” prompt pop up, requesting two fields: User Name and Password (Figure 12-2 shows how this looks in Firefox).
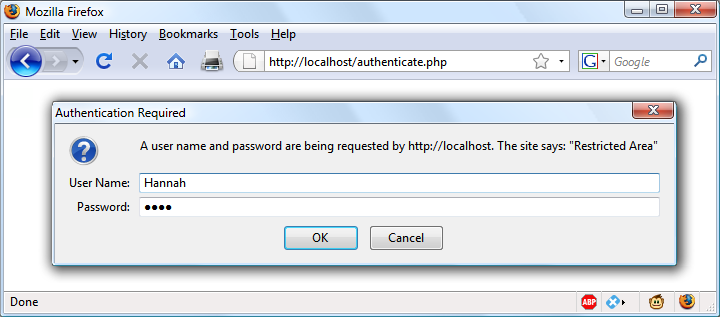
Figure 12-2. An HTTP authentication login prompt
Example 12-1 shows the code to make this happen.
Example 12-1. PHP authentication
<?php
  if (isset($_SERVER['PHP_AUTH_USER']) &&
      isset($_SERVER['PHP_AUTH_PW']))
  {
    echo "Welcome User: " . htmlspecialchars($_SERVER['PHP_AUTH_USER']) .
         " Password: "    . htmlspecialchars($_SERVER['PHP_AUTH_PW']);
  }
  else
  {
    header('WWW-Authenticate: Basic realm="Restricted Area"');
    header('HTTP/1.0 401 Unauthorized');
    die("Please enter your username and password");
  }
?>
The first thing the program does is look for two particular array values: $_SERVER['PHP_AUTH_USER'] and $_SERVER['PHP_AUTH_PW']. If they both exist, they represent the username and password entered by a user into an authentication prompt.
Note
Notice that when being displayed to the screen, the values that have been returned in the $_SERVER array are first processed through the htmlspecialchars function. This is because these values have been entered by the user and therefore cannot be trusted, as a hacker could make a cross-site scripting attempt by adding HTML characters and other symbols to the input. htmlspecialchars translates any such input into harmless HTML entities.
If either value does not exist, the user has not yet been authenticated and you display the prompt in Figure 12-2 by issuing the following header, where Basic realm is the name of the section that is protected and appears as part of the pop-up prompt:
WWW-Authenticate: Basic realm="Restricted Area"
If the user fills out the fields, the PHP program runs again from the top. But if the user clicks the Cancel button, the program proceeds to the following two lines, which send the following header and an error message:
HTTP/1.0 401 Unauthorized
The die statement causes the text “Please enter your username and password” to be displayed (see Figure 12-3).
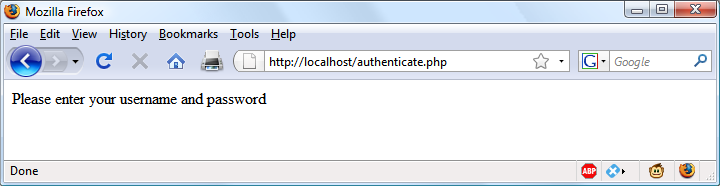
Figure 12-3. The result of clicking the Cancel button
Note
Once a user has been authenticated, you will not be able to get the authentication dialog to pop up again unless the user closes and reopens all browser windows, because the web browser will keep returning the same username and password to PHP. You may need to close and reopen your browser a few times as you work through this section and try different things out. The easiest way to do this is to open up a new private or anonymous window to run these examples, so you won’t need to close the entire browser.
Now let’s check for a valid username and password. The code in Example 12-1 doesn’t require you to change much to add this check, other than modifying the previous welcome message code to test for a correct username and password, and then issuing a welcome message. A failed authentication causes an error message to be sent (see Example 12-2).
Example 12-2. PHP authentication with input checking
<?php
  $username = 'admin';
  $password = 'letmein';

  if (isset($_SERVER['PHP_AUTH_USER']) &&
      isset($_SERVER['PHP_AUTH_PW']))
  {
    if ($_SERVER['PHP_AUTH_USER'] === $username &&
        $_SERVER['PHP_AUTH_PW']   === $password)
          echo "You are now logged in";
    else die("Invalid username/password combination");
  }
  else
  {
    header('WWW-Authenticate: Basic realm="Restricted Area"');
    header('HTTP/1.0 401 Unauthorized');
    die ("Please enter your username and password");
  }
?>
When comparing usernames and passwords the === (identity) operator is used, rather than the == (equals) operator. This is because we are checking whether the two values match exactly. For example, '0e123' == '0e456', and this is not a suitable match for either username or password purposes.
A mechanism is now in place to authenticate users, but only for a single username and password. Also, the password appears in clear text within the PHP file, and if someone managed to hack into your server, they would instantly know it. So, let’s look at a better way to handle usernames and passwords.
Storing Usernames and Passwords
Obviously, MySQL is the natural way to store usernames and passwords. But again, we don’t want to store the passwords as clear text, because our website could be compromised if the database were accessed by a hacker. Instead, we’ll use a neat trick called a one-way function.
This type of function is easy to use and converts a string of text into a seemingly random string. Because of their one-way nature, such functions are impossible to reverse, so their output can be safely stored in a database—and anyone who steals it will be none the wiser as to the passwords used.
In previous editions of this book, I recommended using the MD5 hashing algorithm for your data security. Time marches on, however, and now MD5 is considered easily hackable and therefore unsafe. Indeed, even its previously recommended replacement of SHA-1 can apparently be hacked.
So, now that PHP 5.5 is pretty much the minimum standard everywhere, I have moved on to using its in-built hashing function, which is vastly more secure and handles everything for you in a neat fashion.
Previously, to store a password securely, you would have needed to salt the password, which is a term for adding extra characters to a password that the user did not enter (to further obscure it). You then needed to run the result of that through a one-way function to turn it into a seemingly random set of characters, which used to be hard to crack.
For example, code such as the following (which is now very insecure, because modern graphics processing units have such speed and power):
echo hash('ripemd128', 'saltstringmypassword');
would display this value:
9eb8eb0584f82e5d505489e6928741e7
Remember that this is not a recommended method you should ever use. Treat this as an example of what not to do, as it is very insecure. Instead, please read on.
Using password_hash
From version 5.5 of PHP, there’s a far better way to create salted password hashes: the password_hash function. Supply PASSWORD_DEFAULT as its second (required) argument to ask the function to select the most secure hashing function currently available. password_hash will also choose a random salt for every password. (Don’t be tempted to add any more salting of your own, as this could compromise the algorithm’s security.) So, the following code:
echo password_hash("mypassword", PASSWORD_DEFAULT);
will return a string such as the following, which includes the salt and all information required for the password to be verified:
$2y$10$k0YljbC2dmmCq8WKGf8oteBGiXlM9Zx0ss4PEtb5kz22EoIkXBtbG
Note
If you are letting PHP choose the hashing algorithm for you, you should allow for the returned hash to expand in size over time as better security is implemented. The developers of PHP recommend that you store hashes in a database field that can expand to at least 255 characters (even though 60–72 is the average length right now). Should you wish, you can manually select the BCRYPT algorithm to guarantee a hash string of only 60 characters, by supplying the constant PASSWORD_BCRYPT as the second argument to the function. However, I don’t recommend this unless you have a very good reason.
You can supply options (in the form of an optional third argument) to further tailor how hashes are calculated, such as the cost or amount of processor time to allocate to the hashing (more time means more security, but a slower server). The cost has a default value of 10, which is the minimum you should use with BCRYPT.
However, I don’t want to confuse you with more information than you need to be able to store password hashes securely with the minimum of fuss, so please refer to the documentation if you’d like more details on the available options. You can even choose your own salts (although this is deprecated from PHP 7.0 onward, as it’s not considered that secure—so don’t be tempted).
Using password_verify
To verify that a password matches a hash, use the password_verify function, passing it the password string a user has just entered, and the stored hash value for that user’s password (generally retrieved from your database).
So, assuming your user had previously entered the (very insecure) password of mypassword, and you now have their password’s hash string (from when the user created their password) stored in the variable $hash, you could verify that they match like this:
if (password_verify("mypassword", $hash))
  echo "Valid";
If the correct password for the hash has been supplied, password_verify returns the value TRUE, so this if statement will display the word “Valid.” If it doesn’t match, then FALSE is returned and you can ask the user to try again.
An Example Program
Let’s see how these functions work together when combined with MySQL. First you need to create a new table to store password hashes, so type in the program in Example 12-3 and save it as setupusers.php (or download it from the companion website), and then open it in your browser.
Example 12-3. Creating a users table and adding two accounts
<?php // setupusers.php
  require_once 'login.php';
  $connection = new mysqli($hn, $un, $pw, $db);

  if ($connection->connect_error) die("Fatal Error");

  $query = "CREATE TABLE users (
    forename VARCHAR(32) NOT NULL,
    surname  VARCHAR(32) NOT NULL,
    username VARCHAR(32) NOT NULL UNIQUE,
    password VARCHAR(255) NOT NULL
  )";

  $result = $connection->query($query);
  if (!$result) die("Fatal Error");

  $forename = 'Bill';
  $surname  = 'Smith';
  $username = 'bsmith';
  $password = 'mysecret';
  $hash     = password_hash($password, PASSWORD_DEFAULT);

  add_user($connection, $forename, $surname, $username, $hash);

  $forename = 'Pauline';
  $surname  = 'Jones';
  $username = 'pjones';
  $password = 'acrobat';
  $hash     = password_hash($password, PASSWORD_DEFAULT);

  add_user($connection, $forename, $surname, $username, $hash);

  function add_user($connection, $fn, $sn, $un, $pw)
  {
    $stmt = $connection->prepare('INSERT INTO users VALUES(?,?,?,?)');
    $stmt->bind_param('ssss', $fn, $sn, $un, $pw);
    $stmt->execute();
    $stmt->close();
  }
?>
This program will create the table users within your publications database (or whichever database you set up for the login.php file in Chapter 10). In this table, it will create two users: Bill Smith and Pauline Jones. They have the usernames and passwords of bsmith/mysecret and pjones/acrobat, respectively.
Using the data in this table, we can now modify Example 12-2 to properly authenticate users, and Example 12-4 shows the code needed to do this. Type it in or download it from the companion website, then make sure it is saved as authenticate.php, and call it up in your browser.
Example 12-4. PHP authentication using MySQL
<?php // authenticate.php
require_once 'login.php';
$connection = new mysqli($hn, $un, $pw, $db);
if ($connection->connect_error) die("Fatal Error");
if (isset($_SERVER['PHP_AUTH_USER']) &&
isset($_SERVER['PHP_AUTH_PW']))
{
$un_temp = mysql_entities_fix_string($connection, $_SERVER['PHP_AUTH_USER']);
$pw_temp = mysql_entities_fix_string($connection, $_SERVER['PHP_AUTH_PW']);
$query = "SELECT * FROM users WHERE username='$un_temp'";
$result = $connection->query($query);
if (!$result) die("User not found");
elseif ($result->num_rows)
{
$row = $result->fetch_array(MYSQLI_NUM);
$result->close();
if (password_verify($pw_temp, $row[3])) echo
htmlspecialchars("$row[0] $row[1] :
Hi $row[0], you are now logged in as '$row[2]'");
else die("Invalid username/password combination");
}
else die("Invalid username/password combination");
}
else
{
header('WWW-Authenticate: Basic realm="Restricted Area"');
header('HTTP/1.0 401 Unauthorized');
die ("Please enter your username and password");
}
$connection->close();
function mysql_entities_fix_string($connection, $string)
{
return htmlentities(mysql_fix_string($connection, $string));
}
function mysql_fix_string($connection, $string)
{
if (get_magic_quotes_gpc()) $string = stripslashes($string);
return $connection->real_escape_string($string);
}
?>
Note
Using HTTP authentication will impose approximately an 80 ms penalty when using password_verify with passwords hashed with BCRYPT, with the default cost of 10. This slowdown serves as a barrier for attackers to prevent them from trying to crack the passwords at maximum speed. Therefore, HTTP authentication is not a good solution on very busy sites, where you will probably prefer to use sessions (see the next section).
As you might expect at this point in the book, some of these examples are starting to get quite a bit longer. But don’t be put off. The final 10 lines are simply from Example 10-21 in Chapter 10. They are there to sanitize the user input—very important.
The only lines to really concern yourself with at this point are the ones highlighted in bold. They start with the assigning of two variables, $un_temp and $pw_temp, using the submitted username and password. Next, a query is issued to MySQL to look up the user $un_temp and, if a result is returned, to assign the first row to $row. Because usernames are unique, there will be only one row.
Now all that’s necessary is to check the hash value stored in the database, which happens to be in the fourth column—column 3 when you start from 0. $row[3] contains the previous hash value calculated with password_hash when the user created their password.
If the hash and the password just supplied by the user verify, password_verify will return TRUE and a friendly welcome string will be output, calling the user by their first name (see Figure 12-4). Otherwise, an error message is displayed.
You can try this out for yourself by calling up the program in your browser and entering a username of bsmith and password of mysecret (or pjones and acrobat), the values that were saved in the database by Example 12-3.
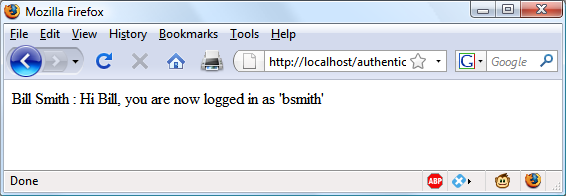
Figure 12-4. Bill Smith has now been authenticated
Note
By sanitizing input immediately after it is encountered, you will block any malicious HTML, JavaScript, or MySQL attacks before they can get any further, and you will not have to sanitize this data again. If a user has characters such as < or & in their password (for example), these will be expanded to < or & by the htmlentities function—but as long as your code allows for strings that may end up larger than the provided input width, and as long as you always run passwords through this sanitization, you’ll be just fine.
Using Sessions
Because your program can’t tell what variables were set in other programs—or even what values the same program set the previous time it ran—you’ll sometimes want to track what your users are doing from one web page to another. You can do this by setting hidden fields in a form, as seen in Chapter 10, and checking the values of the fields after the form is submitted, but PHP provides a much more powerful, more secure, and simpler solution in the form of sessions. These are groups of variables that are stored on the server but relate only to the current user. To ensure that the right variables are applied to the right users, PHP saves a cookie in the users’ web browsers to uniquely identify them.
This cookie has meaning only to the web server and cannot be used to ascertain any information about a user. You might ask about those users who have cookies turned off. Well, in this day and age, anyone with cookies disabled should not expect to have the best browsing experience, and if you find them disabled you should probably inform such a user that they require cookies enabled if they wish to fully benefit from your site, rather than trying to find ways around the use of cookies, which could create security issues.
Starting a Session
Starting a session requires calling the PHP function session_start before any HTML has been output, similarly to how cookies are sent during header exchanges. Then, to begin saving session variables, you just assign them as part of the $_SESSION array, like this:
$_SESSION['variable'] = $value;
They can then be read back just as easily in later program runs, like this:
$variable = $_SESSION['variable'];
Now assume that you have an application that always needs access to the first name and last name of each user, as stored in the table users, which you should have created a little earlier. Let’s further modify authenticate.php from Example 12-4 to set up a session once a user has been authenticated.
Example 12-5 shows the changes needed. The only difference is the content of the if (password_verify($pw_temp, $row[3])) section, which we now start by opening a session and saving these variables into it. Type this program (or modify Example 12-4) and save it as authenticate2.php. But don’t run it in your browser yet, as you will also need to create a second program in a moment.
Example 12-5. Setting a session after successful authentication
<?php // authenticate2.php
  require_once 'login.php';
  $connection = new mysqli($hn, $un, $pw, $db);

  if ($connection->connect_error) die("Fatal Error");

  if (isset($_SERVER['PHP_AUTH_USER']) &&
      isset($_SERVER['PHP_AUTH_PW']))
  {
    $un_temp = mysql_entities_fix_string($connection, $_SERVER['PHP_AUTH_USER']);
    $pw_temp = mysql_entities_fix_string($connection, $_SERVER['PHP_AUTH_PW']);
    $query   = "SELECT * FROM users WHERE username='$un_temp'";
    $result  = $connection->query($query);

    if (!$result) die("User not found");
    elseif ($result->num_rows)
    {
      $row = $result->fetch_array(MYSQLI_NUM);

      $result->close();

      if (password_verify($pw_temp, $row[3]))
      {
        session_start();
        $_SESSION['forename'] = $row[0];
        $_SESSION['surname']  = $row[1];
        echo htmlspecialchars("$row[0] $row[1] : Hi $row[0],
          you are now logged in as '$row[2]'");
        die ("<p><a href='continue.php'>Click here to continue</a></p>");
      }
      else die("Invalid username/password combination");
    }
    else die("Invalid username/password combination");
  }
  else
  {
    header('WWW-Authenticate: Basic realm="Restricted Area"');
    header('HTTP/1.0 401 Unauthorized');
    die ("Please enter your username and password");
  }

  $connection->close();

  function mysql_entities_fix_string($connection, $string)
  {
    return htmlentities(mysql_fix_string($connection, $string));
  }

  function mysql_fix_string($connection, $string)
  {
    if (get_magic_quotes_gpc()) $string = stripslashes($string);
    return $connection->real_escape_string($string);
  }
?>
One other addition to the program is the “Click here to continue” link with a destination URL of continue.php. This will be used to illustrate how the session will transfer to another program or PHP web page. So, create continue.php by typing the program in Example 12-6 and saving it.
Example 12-6. Retrieving session variables
<?php // continue.php
  session_start();

  if (isset($_SESSION['forename']))
  {
    $forename = htmlspecialchars($_SESSION['forename']);
    $surname  = htmlspecialchars($_SESSION['surname']);

    echo "Welcome back $forename.<br>
          Your full name is $forename $surname.<br>";
  }
  else echo "Please <a href=authenticate2.php>click here</a> to log in.";
?>
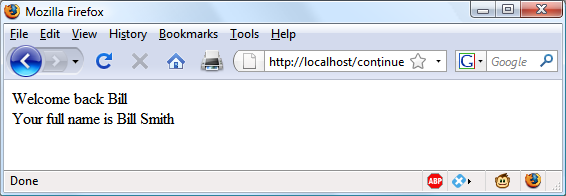
Now you are ready to call up authenticate2.php into your browser. Enter a username of bsmith and password of mysecret (or pjones and acrobat) when prompted, and click the link to load in continue.php. When your browser calls it up, the result should be something like Figure 12-5.
Sessions neatly confine to a single program the extensive code required to authenticate and log in a user. Once a user has been authenticated, and you have created a session, your program code becomes very simple indeed. You need only call up session_start and look in $_SESSION for any variables to which you need access.
In Example 12-6, a quick test of whether $_SESSION['forename'] has a value is enough to let you know that the current user is authenticated, because session variables are stored on the server (unlike cookies, which are stored in the web browser) and can therefore be trusted.
If $_SESSION['forename'] has not been assigned a value, no session is active, so the last line of code in Example 12-6 directs users to the login page at authenticate2.php.
Ending a Session
When the time comes to end a session, usually when a user requests to log out from your site, you can use the session_destroy function, as in Example 12-7. This example provides a useful function for totally destroying a session, logging a user out, and unsetting all session variables.
Example 12-7. A handy function to destroy a session and its data
<?php
  function destroy_session_and_data()
  {
    session_start();
    $_SESSION = array();
    setcookie(session_name(), '', time() - 2592000, '/');
    session_destroy();
  }
?>
To see this in action, you could modify continue.php as in Example 12-8.
Example 12-8. Retrieving session variables and then destroying the session
<?php
  session_start();

  if (isset($_SESSION['username']))
  {
    $forename = $_SESSION['forename'];
    $surname  = $_SESSION['surname'];

    destroy_session_and_data();

    echo htmlspecialchars("Welcome back $forename.<br>
          Your full name is $forename $surname.");

  }
  else echo "Please <a href='authenticate2.php'>click here</a> to log in.";

  function destroy_session_and_data()
  {
    $_SESSION = array();
    setcookie(session_name(), '', time() - 2592000, '/');
    session_destroy();
  }
?>
The first time you navigate from authenticate2.php to continue.php, it will display all the session variables. But, because of the call to destroy_session_and_data, if you then click your browser’s Reload button, the session will have been destroyed and you’ll be prompted to return to the login page.
Setting a Timeout
There are other times when you might wish to close a user’s session yourself, such as when the user has forgotten or neglected to log out, and you want the program to do so for them for their own security. You do this by setting the timeout after which a logout will automatically occur if there has been no activity.
To do this, use the ini_set function as follows. This example sets the timeout to exactly one day:
ini_set('session.gc_maxlifetime', 60 * 60 * 24);
If you wish to know what the current timeout period is, you can display it using the following:
echo ini_get('session.gc_maxlifetime');
Session Security
Although I mentioned that once you had authenticated a user and set up a session, you could safely assume that the session variables were trustworthy, this isn’t exactly the case. The reason is that it’s possible to use packet sniffing (sampling of data) to discover session IDs passing across a network. Additionally, if the session ID is passed in the GET part of a URL, it might appear in external site server logs.
The only truly secure way of preventing these from being discovered is to implement Transport Layer Security (TLS, the more secure successor to the Secure Sockets Layer, or SSL) and run HTTPS instead of HTTP web pages. That’s beyond the scope of this book, although you may like to take a look at the Apache documentation for details on setting up a secure web server.
Preventing session hijacking
When SSL is not a possibility, you can further authenticate users by storing their IP addresses along with their other details by adding a line such as the following when you store their sessions:
$_SESSION['ip'] = $_SERVER['REMOTE_ADDR'];
Then, as an extra check, whenever any page loads and a session is available, perform the following check. It calls the function different_user if the stored IP address doesn’t match the current one:
if ($_SESSION['ip'] != $_SERVER['REMOTE_ADDR']) different_user();
What code you place in your different_user function is up to you. I recommend that you either delete the current session and ask the user to log in again due to a technical error or, if you have their email address, email them a link to confirm their identity, which will enable them to retain all the data in the session.
Of course, you need to be aware that users on the same proxy server, or sharing the same IP address on a home or business network, will have the same IP address. Again, if this is a problem for you, use HTTPS. You can also store a copy of the browser user agent string (a string that developers put in their browsers to identify them by type and version), which might also distinguish users due to the wide variety of browser types, versions, and computer platforms in use (although this is not a perfect solution, and the string will change if the browser auto-updates). Use the following to store the user agent:
$_SESSION['ua'] = $_SERVER['HTTP_USER_AGENT'];
And use this to compare the current user-agent string with the saved one:
if ($_SESSION['ua'] != $_SERVER['HTTP_USER_AGENT']) different_user();
Or, better still, combine the two checks like this and save the combination as a hash hexadecimal string:
$_SESSION['check'] = hash('ripemd128', $_SERVER['REMOTE_ADDR'] .
    $_SERVER['HTTP_USER_AGENT']);
And use this to compare the current and stored strings:
if ($_SESSION['check'] != hash('ripemd128', $_SERVER['REMOTE_ADDR'] .
    $_SERVER['HTTP_USER_AGENT'])) different_user();
Preventing session fixation
Session fixation happens when a malicious third party obtains a valid session ID (which could be server-generated) and makes the user authenticate themselves with that session ID, instead of authenticating with their own. It can happen when an attacker takes advantage of the ability to pass a session ID in the Get part of a URL, like this:
http://yourserver.com/authenticate.php?PHPSESSID=123456789
In this example, the made-up session ID of 123456789 is being passed to the server. Now, consider Example 12-9, which is susceptible to session fixation. To see how, type it and save it as sessiontest.php.
Example 12-9. A session susceptible to session fixation
<?php // sessiontest.php
  session_start();

  if (!isset($_SESSION['count'])) $_SESSION['count'] = 0;
  else ++$_SESSION['count'];

  echo $_SESSION['count'];
?>
Once it’s saved, call it up in your browser using the following URL (prefacing it with the correct pathname, such as http://localhost):
sessiontest.php?PHPSESSID=1234
Press Reload a few times, and you’ll see the counter increase. Now try browsing to:
sessiontest.php?PHPSESSID=5678
Press Reload a few times here, and you should see it count up again from 0. Leave the counter on a different number from the first URL, go back to the first URL, and see how the number changes back. You have created two different sessions of your own choosing here, and you could easily create as many as you needed.
The reason this approach is so dangerous is that a malicious attacker could try to distribute these types of URLs to unsuspecting users, and if any of them followed these links, the attacker would be able to come back and take over any sessions that had not been deleted or expired!
To prevent this, change the session ID using session_regenerate_id as soon as you can. This function keeps all current session variable values, but replaces the session ID with a new one that an attacker cannot know.
To do this, check for a special session variable that you arbitrarily invent. If it doesn’t exist, you know that this is a new session, so you simply change the session ID and set the special session variable to note the change.
Example 12-10 shows how the code to do this might look, using the session variable initiated.
Example 12-10. Session regeneration
<?php
  session_start();

  if (!isset($_SESSION['initiated']))
  {
    session_regenerate_id();
    $_SESSION['initiated'] = 1;
  }

  if (!isset($_SESSION['count'])) $_SESSION['count'] = 0;
  else ++$_SESSION['count'];

  echo $_SESSION['count'];
?>
This way, an attacker can come back to your site using any of the session IDs that they generated, but none of them will call up another user’s session, as they will all have been replaced with regenerated IDs.
Forcing cookie-only sessions
If you are prepared to require your users to enable cookies on your website, you can use the ini_set function, like this:
ini_set('session.use_only_cookies', 1);
With that setting, the ?PHPSESSID= trick will be completely ignored. If you use this security measure, I also recommend that you inform your users that your site requires cookies (but only if the user has cookies disabled), so they know what’s wrong if they don’t get the results they want.
Questions
-
Why must a cookie be transferred at the start of a program?
-
Which PHP function stores a cookie in a web browser?
-
How can you destroy a cookie?
-
Where are the username and password stored in a PHP program when you are using HTTP authentication?
-
Why is the
password_hashfunction a powerful security measure? -
What is meant by salting a string?
-
What is a PHP session?
-
How do you initiate a PHP session?
-
What is session hijacking?
-
What is session fixation?
See “Chapter 12 Answers” in Appendix A for the answers to these .